star navigation - uaf home | university of alaska fairbanks
TRANSCRIPT

Explorations into Angles and Measurements
Star NavigationGRADE LEVEL
6K 1 2 3 4 5 6 7
EDUCATION MATHEMATICS ELEMENTARY
Part of the series Math in a Cultural Context: Lessons Learned from Yup’ik Eskimo Elders
Explorations into A
ngles and Measurem
entsStar N
avigation
S
N
W E
10pm
12pm4am
6am8am
2am
2 hours
MCCMCCThe Supplemental Math Modules curriculum was developed at University of AlaskaFairbanks, and was funded in part by the National Science Foundation.
MCCMCCPart of the series Math in a Cultural Context: Lessons Learned from Yup’ik Eskimo Elders
Barbara L. AdamsMelissa KagleFrederick George
N
EW
S
VVII
VV
VIII
VI
IV
III
VVI
VIV
VII
V
III
VVII
VV
VIII
VI
IV
III
VVI
VIV
VII
V
III
North Star(Polaris)
Little DipperBig Dipper
Cassiopeia
10:00
11:00
12:00
Math in a Cultural Context: Lessons Learned from Yup’ik EskimoElders is the result of a long-term collaboration. These supp-lemental math modules for grades 1-6 bridge the unique knowledgeof Yup’ik elders with school-based mathematics. This serieschallenges students to communicate and think mathematically asthey solve problems. Problems are inquiry-oriented and theproblems are constructed so that the possibilities are constrainedand the students can understand mathematical relationships,properties of geometrical shapes, develop place valueunderstanding, and state conjectures and provide proofs.Curriculum taps into students’ creative, practical, andanalytical thinking. Our classroom-based research stronglysuggests that students engaged in this curriculum candevelop deeper mathematical understandings than studentswho engage with the more procedure-oriented paper andpencil curriculum.
Students learn to group objects, compose and decompose numbers usingthe Yup’ik counting and grouping (base 20 and sub base 5) and Westerncounting in base 10, grouping, and place values. The math module includes astory book, Egg Island, five posters and a coloring book.
Shadows and Angles: Exploring Angles, MeasurementsDirection and Time (Grade 4)Students observe, measure, and analyze shadows to learn aboutangles, time and direction.
Forthcoming in this series for Grade 6:Also in this series for Grade 2
Drying Salmon: Journeys into Proportions, Ratios and Pre-Alg-ebraic ThinkingStudents transform body measurements into mathematicalsymbols, ratios and proportions and begin an investigationof variables and algebraic thinking.Smokehouse: Three Dimensional Geometry of RectangularPrismsThrough buildiing models students learn to “prove”that theyhave constructed a rectangular prism.
Rhombi Patterns: Investigations into Properties, Geometrical Relation-ships, and AreaStudents learn how to cut a rhombus from a folded rectangle, learning theproperties of rhombus and a rectangle and the lines of symmetry of the
Also in this series or Grades 3-5
Going to Egg Island: Adventures in Grouping and Place Values
Salmon Fishing: Investigations into Probability (6th & 7th Grades)The module engages students in exploring a variety of topics withinprobability, using activities that are based on salmon fishing in south-west Alaska. This module uses subsistence and commercial fishingas a contextual background. Students investigate the concepts ofexperimental and theoretical probability, the law of large numbers,sample space, and equally andunequally likely events. The packageincludes the module, two posters, a CD-ROM, and an excel spreadsheet.
Picking Berries and Gathering Data: Analysis, and Represent-ation (Grade 2)Students engage in a series of hands-on activities that help themexplore data and graphic representation. The entire package in-cludes a CD-ROM, one poster, a coloring book, and two storybooks, Big John and LittleHenry and Berry Picking.
rectangle, the cut out rhombus, and the four congruent triangles.They explore part-to-whole and part-to-part relationships, constructa rhombus pattern puzzle, and create a linear pattern of their own.
Forthcoming in this series for Grade 3-5:
Rhombi Patterns: Investigations into Properties, GeometricalRelationships, and AreaStudents learn how to cut a rhombus from a folded rectangle,learning the properties of rhombus and a rectangle and the lines ofsymmetry of the rectangle, the cut out rhombus, and the fourcongruent triangles. They explore part-to-whole and part-to-partrelationships, construct a rhombus pattern puzzle, and create alinear pattern of their own.
Developed at University of Alaska Fairbanks, Fairbanks, Alaska
Grade 6
Barbara L. AdamsMelissa KagleFrederick George
Star Navigation: Explorations into Angles and Measurement
MATH IN A CULTURAL CONTEXT©
Part of the Series
Math in a Cultural Context: Lessons Learned from Yup’ik Eskimo Elders

Library and Archives Canada Cataloguing in Publication
Adams, Barbara L.
Star navigation : explorations into angles and measurement/Barbara L. Adams, Melissa Kagle, Frederick George.
(Math in a cultural context: lessons learned from Yup’ik Eskimo elders)
ISBN-13: 978-1-55059-326-6
ISBN-10: 1-55059-326-9
1. Mathematics—Study and teaching (Elementary) 2. Yupik Eskimos—Alaska. I. Kagle, MelissaII. George, Frederick III. Title. IV. Series.
QA135.6.A324 2006 372.7’044
C2006-904224-1
Star Navigation: Exploration into Angles and Measurement © 2007 University of Alaska Fairbanks
Math in a Cultural Context: Lessons Learned from Yup’ik Eskimo Elders© was developed at the University of Alaska Fairbanks. This material is based upon work supported by the National Science Foundation under grant #9618099, Adapting Yup’ik Elders’ Knowledge: Pre-K-to-6th Math and Instructional Materials Development, and U.S. Department of Education grant #S356A030033, Developing and Implementing Culturally Based Curriculum and Teacher Preparation.
This project was sponsored, in part, by the National Science Foundation. Any opinions, findings, conclusions, or recommendations expressed in this material are those of the author(s) and do not necessarily reflect the views of the National Science Foundation (NSF) or the U.S. Department of Education.
This project was also sponsored, in part, by the University of Alaska Fairbanks Alaska Schools Research Fund and the Bristol Bay Curriculum Project.
© 2019 University of Alaska Fairbanks. Star Navigation: Exploration into Angles and Measurement is licensed under the Creative Commons Attribution-NonCommercial 4.0 International License. This material may be shared and adapted, provided that appropriate credit is given, a link to the license is provided, and any changes made are indicated. Commercial use is prohibited. To view a copy of this license, visit http://creativecommons.org/licenses/by-nc/4.0/.
ISBN: 1-55059-326-9SAN: 113-0234
Printed in Canada.
University of Alaska Fairbanks, 2019

Principal Investigator, Writer, and Series Editor:
Jerry Lipka
Project Mathematician: Barbara L. Adams
Project Manager:Flor Banks
Literacy:Joan Parker Webster
Project Illustrator: Elizabeth (Putt) Clark
Layout and Design: Paula ElmesSue Mitchell
Cover Design: Elizabeth (Putt) Clark
Editing:Katherine Mulcrone
Folklorist:Ben Orr
DVD Creator:Adam Dementieff
Teachers Piloting the Module:Jason BreelandSandra EhlersEmily HerringThad KeenerElizabeth KentWard KruseMelissa LowinskeKathleen MeckelGretchen MurphyMax Nickoli Henry “Chip” NordhoffMichelle OpbroekJanet SpeedBernardo UntalascoJoanne Vanfleteren
Teachers Consulting on the Module:
Gary AdkinsHeather BootheMark BibergJohn Chakuchin Joan JonesCarmen RussoWayne “Woody” Woodgate
iii
Yup’ik Consultants:Lilly AfcanDora Andrew-IhrkeMary BeansWalkie CharlesGrace GamechukEliza OrrSassa PetersonElias PoltyFerdinand SharpAnecia ToyukakMike ToyukakNastasia WahlbergEvelyn Yanez
Yup’ik Elders: Mary ActiveHenry AlakayakMary BavillaWinifred BeansAnnie BlueFrederick GeorgeMary GeorgeTheresa MikeGeorge MosesAnuska NanalookJoshua Phillip
MCCMCCMATH IN A CULTURAL CONTEXT©


�
Table of ContentsAcknowledgements . . . . . . . . . . . . . . . . . . . . . . . . . . . . . . . . . . . . . . . . . . . . . . . . . . . . . . . . . . . . vii
Introduction to the Series . . . . . . . . . . . . . . . . . . . . . . . . . . . . . . . . . . . . . . . . . . . . . . . . . . . . . . . xiii
Introduction to the Module . . . . . . . . . . . . . . . . . . . . . . . . . . . . . . . . . . . . . . . . . . . . . . . . . . . . . . . 1
Section 1: Observing and Recording . . . . . . . . . . . . . . . . . . . . . . . . . . . . . . . . . . . . . . . . . . . . . . 13
Activity 1: Introduction to Navigating and Locating . . . . . . . . . . . . . . . . . . . . . . . . . . . . . . . . . . 15
Activity 2: Observations and Landmarks . . . . . . . . . . . . . . . . . . . . . . . . . . . . . . . . . . . . . . . . . . 25
Activity 3: Gathering Shadow Data . . . . . . . . . . . . . . . . . . . . . . . . . . . . . . . . . . . . . . . . . . . . . . 31
Section 2: Understanding Angles . . . . . . . . . . . . . . . . . . . . . . . . . . . . . . . . . . . . . . . . . . . . . . . . 41
Activity 4: Creating Personal Angle Measurements . . . . . . . . . . . . . . . . . . . . . . . . . . . . . . . . . 43
Activity 5: Angle Explorations . . . . . . . . . . . . . . . . . . . . . . . . . . . . . . . . . . . . . . . . . . . . . . . . . . 53
Activity 6: Transitioning to Standard Angle Measurements . . . . . . . . . . . . . . . . . . . . . . . . . . . . 73
Section 3: Navigating in the Daytime . . . . . . . . . . . . . . . . . . . . . . . . . . . . . . . . . . . . . . . . . . . . . . 77
Activity 7: Sun and Earth Model . . . . . . . . . . . . . . . . . . . . . . . . . . . . . . . . . . . . . . . . . . . . . . . . 79
Activity 8: Finding a Lost Friend . . . . . . . . . . . . . . . . . . . . . . . . . . . . . . . . . . . . . . . . . . . . . . . . . 85
Activity 9: Treasure Hunt . . . . . . . . . . . . . . . . . . . . . . . . . . . . . . . . . . . . . . . . . . . . . . . . . . . . . . 91
Section 4: Navigating at Night . . . . . . . . . . . . . . . . . . . . . . . . . . . . . . . . . . . . . . . . . . . . . . . . . . . 95
Activity 10: The Night Sky . . . . . . . . . . . . . . . . . . . . . . . . . . . . . . . . . . . . . . . . . . . . . . . . . . . . . 97
Activity 11: Star Navigation . . . . . . . . . . . . . . . . . . . . . . . . . . . . . . . . . . . . . . . . . . . . . . . . . . . 109
Activity 12: Traveling to Winter Camp . . . . . . . . . . . . . . . . . . . . . . . . . . . . . . . . . . . . . . . . . . . . 123


�ii
AcknowledgementsFrom Barbara AdamsThis module is dedicated to Frederick (Sual’pi) George of Akiachak, Alaska, who is much more than an author. Without his knowledge, this book would not exist. MCC would like to express our sincere gratitude to him for sharing his tremendous knowledge and his overwhelming patience with the many authors and project staff while passing on this information and teaching his skills. Frederick is a Yup’ik elder who has been refining his navigat-ing skills since he was a young boy. Few Yup’ik navigators in his generation have developed their understanding and methods to the extent that Frederick has. It has taken us years to synthesize the vast amount of information he continuously shares and transform it into a supplemental math curriculum from which students can learn. Frederick, we thank you for all your time, generosity, and wisdom.
Beyond Frederick George, we have many people to thank for assisting us in bringing this module to completion. We would like to thank the other Yup’ik elders who provided their knowledge and skills concerning navigation during many meetings. In particular, thanks to Joshua Phillip and George Moses of Akiachak, Alaska, for their real-life stories concerning traveling, navigating, and understanding the world. A special thank you goes to Henry Alakayak of Manokotak, Alaska, for not only his insight into this topic, but also for becoming our leader in this whole endeavor. Henry has, on more than one occasion, beautifully taught all of us, Yup’ik and non-Yup’ik, old and new, elder and young, how to think and understand in ways that bridge not only the mathematics of the Western world to that of everyday Yup’ik life, but also the cultures themselves. Thank you also to elders, Annie Blue and Mary Bavilla of Togiak, Alaska, for their continued willingness to share stories and for their permis-sion to make them accessible to students of all ages. Thank you to Theresa Mike, expert Yup’ik song and dance composer from St. Marys, Alaska, for her time and willingness to create and share her song and dance, Morning Star, specifically designed to accompany this module. Thanks also to several Yup’ik consultants for their help in translating and understanding Frederick’s ways. First, thank you to Ferdinand Sharp of Manokotak, Alaska, for all the extra time and meetings that helped us truly comprehend Frederick’s way of thinking and understanding the celestial patterns. Thanks also to Mike Toyukak from Manokotak, Alaska; Evelyn Yanez of Togiak, Alaska; Eliza Orr of Tununak and Fairbanks, Alaska; and Anecia Toyukak of Manokotak, Alaska. Thank you also to Sophie Kasayulie of Akiachak, Alaska, for helping contact and coordinate information with Frederick when needed. Thank you also to Mary Beans, Lilly Afcan, and Elias Polty from St. Marys, Alaska, for continuously working with Theresa Mike on the Morning Star song and dance since the summer of 2004, making it another valuable piece of information for students to learn and use in connecting the culture to schooling. And thank you to Adam Dementieff for creating the DVD of the Morning Star story, song, and dance.
We would like to further thank those who have provided their assistance specifically for this module. Thank you to those writers who contributed to previous drafts of Star Navigation: Claudette Bradley-Engelblom, Su-san Addington, Kay Gilliland, and Stephanie Rudig. Thanks to others in the project who have read drafts and provided insight on math, Anthony Rickard; culture, Chase Hensel; pedagogy, Kayt Sunwood; and history, Aishath Shehenaz Adam. Thank you to Jerry Lipka for his vision and continued encouragement and advice on all aspects of this module that have allowed it to become the final product. Thank you to Paula Elmes for her layout work; her professionalism and timeliness have made these final stages enjoyable. Sincere thanks to Kath-erine Mulcrone, editor, whose exceptional skills and mantra of consistency have made this module accessible and understandable.

�iii
A special thanks to the teachers who piloted this curriculum, providing value insight into modifications needed to make it both teacher- and student-friendly. To see Frederick’s knowledge and self-developed ways used in classrooms across Alaska was inspiring to all of us. Thanks specifically to Michelle Opbroek for sharing insights from hours of thoughtful reflection on the activities themselves, the mathematics of the module, constructivist approaches, and how to improve student understanding of angles. Michelle’s willingness to teach the module, provide detailed feedback, encourage other teachers to think more deeply about the mathematics, collaborate on a case study of her students’ learning using the module, and continued reading of drafts until publication have been invaluable. Michelle’s “in the trenches” view has strengthened this module beyond measure and we thank you again for all that you’ve done. We also thank her students in Nenana who worked hard on the activities and provided feedback that is now incorporated into this module. Thanks to the Fairbanks North Star Borough School District, Lower Yukon School District, Yupiit School District, Nenana City Public Schools, Anchorage School District, Kuspuk School District, and Southwest Region Schools for their cooperation in piloting this module.
Lastly, thanks to our families for supporting us during the long hours and extra meetings. We appreciate your love and understanding, without which we could not have accomplished our work.
From Jerry Lipka, Series EditorThe supplemental math series Math in a Cultural Context: Lessons Learned from Yup’ik Eskimo Elders is based on traditional and present-day wisdom and is dedicated to the late Mary George of Akiachak, Alaska, her late father, George Moses of Akiachak, and the late Lillie Gamechuk Pauk of Manokotak, Alaska. Mary contrib-uted to every aspect of this long-term project, from her warm acceptance of people from all walks of life to her unique ideas and ways of putting together traditional Yup’ik knowledge with modern Western knowledge. Mary’s contribution permeates this work. George Moses was always eager and willing to teach and share his knowledge of the land and rivers. He was particularly concerned with the well-being of the next generation and hoped that this project would help connect community knowledge to schooling. Lillie Gamechuk Pauk cheer-fully worked with this project even when she was ill. She always made sure that she first told her story to the group before she attended to other personal concerns. Her dedication, laughter, and spirit of giving formed the foundation for this project.
We would like to extend our gratitude to those who have persevered with this project from the beginning until the present time. Thank you to Evelyn Yanez of Togiak, Alaska; Nancy and Ferdinand Sharp of Manokotak, Alaska; Sassa Peterson of Manokotak, Alaska; and Dora Andrew-Irhke of Aleknagik and Anchorage, Alaska. Their contributions are immeasurable, as is their friendship. Our long-term relationship with elders who em-braced this work wholeheartedly has made this difficult endeavor pleasurable. In particular, we would like to acknowledge Henry Alakayak of Manokotak, Alaska, and Annie Blue of Togiak, Alaska, whose dedication and commitment to cultural continuity has much inspired our project. They have set examples for our own persever-ance in creating ways for students to learn and become flexible thinkers through culturally relevant school cur-ricula. Mary Active and Mary E. Bavilla from Togiak, Alaska, and Anuska Nanalook from Manokotak, Alaska, also contributed unselfishly. They came with stories that enriched us. Also, Sam Ivan of Akiak, Alaska; Joshua Phillip of Akiachak, Alaska; and Anecia and Mike Toyukak of Manokotak, Alaska, provided knowledge about many aspects of traditional life, from Anecia’s gifted storytelling and storyknifing, to how kayaks were made and used and other traditional Yup’ik crafts, to countless stories about how to survive. This valuable information contributed to all the modules in the series.

ix
We would like to thank our dedicated staff, especially Flor Banks, for her highly refined organization skills, determination to get the job done, and motivation to move this project forward from reading and editing manu-scripts to holding the various pieces of this project together; she has been a pleasure to work with, and she has done it all with a smile. To Putt Clark, graphic artist extraordinaire, who kept up with every demand and produced more and better artwork than anyone could have hoped for and who has worked with this project from its incep-tion—thank you. To Barbara Adams, who has done an outstanding job as project mathematician and so much more. Her clear-headed thinking and mathematical insights contributed so much depth to these modules, and we appreciate her perseverance and dedication to seeing this project through. Thanks to Eliza and Ben Orr for all their hard work and for producing the Yup’ik Glossary, an outstanding piece of work that continues to evolve and that accompanies this project. To Sue Mitchell, for her editing and layout work ensuring that these modules are user-friendly and accessible. To Joan Parker Webster for her literacy and pedagogical insights. Particularly, her work has opened up new aspects of this project—connecting indigenous literacy to the modules and con-necting the mathematical and literacy pedagogy. Thank you to Wendy Wood and Kellie Oxie for their continued support behind the scenes which enables products like this to come to fruition. Also, thanks to previous staff members, Jessica Potrikus, Kristy Nicholas, Linda Sheldon, and Alice Atuk for their work on supporting the daily activities that allowed progress on the modules and research.
This has been a long-term and collaborative endeavor, and I hope that we have met the expectations of so many elders who shared their knowledge so freely.
Last but not least, to my loving wife, Janet Schichnes, who supported me in countless ways that allowed me to complete this work, and to my children, Alan and Leah.


xi
Introduction
Math in a Cultural Context:
Lessons Learned from Yup'ik Eskimo Elders


xiii
Introduction to the SeriesMath in a Cultural Context: Lessons Learned from Yup’ik Eskimo Elders (MCC) is a supplemental math cur-riculum based on the traditional wisdom and practices of the Yup’ik Eskimo people of southwest Alaska. The kindergarten to seventh grade math modules that you are about to teach are the result of more than a decade of collaboration between math educators, teachers, Yup’ik Eskimo elders, and researchers to connect cultural knowledge to school mathematics. To understand the rich environment from which this curriculum came, imagine traveling on a snowmachine over the frozen tundra and finding your way based on the position of the stars in the night sky. Or, in summer, paddling a sleek kayak across open waters shrouded in fog, yet knowing which way to travel toward land by the pattern of the waves. Imagine building a kayak or making clothing and accurately sizing them by visualizing or using body measures. These are a small sample of the activities in which modern Yup’ik people engage. The mathematics embedded in these activities formed the basis for this series of supple-mental math modules. Each module is independent and lasts from three to eight weeks.
From 2001 through spring 2006, with the exception of one urban trial, students who used these modules consis-tently outperformed students who used only their regular math textbooks at statistically significant levels on MCC tests. This was true for urban as well as rural students, both Caucasian and Alaska Native. We believe that this supplemental curriculum will motivate your students and strengthen their mathematical understanding because of the engaging content, hands-on approach to problem-solving, and the emphasis on mathematical communica-tion. Further, these modules build on students’ everyday experience and intuitive understandings—particularly in geometry, which is underrepresented in school.
A design principle used in the development of these modules is that the activities allow students to explore math-ematical concepts semiautonomously. Through the use of hands-on materials, students can “physically” prove conjectures; solve problems; and find patterns, properties, shortcuts, or generalizations. The activities incorporate multiple modalities and can challenge students with diverse intellectual needs. Hence, the curriculum is designed for heterogeneous groups with the realization that different students will tap into different cognitive strengths. According to Sternberg and his colleagues (1997, 1998), by engaging students creatively, analytically, and prac-tically, students develop a more robust understanding of math concepts. This approach allows for shifting roles and expertise among students rather than only privileging those students with analytical knowledge.
The modules explore the everyday application of mathematical skills such as grouping, approximating, mea-suring, proportional thinking, informal geometry, and counting in base twenty and then present these skills in terms of formal mathematics. Students move from the concrete and applied to more formal and abstract math. The activities are designed to meet the following goals:
• Students learn to solve mathematical problems that support an in-depth understanding of mathematical concepts.
• Students derive mathematical formulas and rules from concrete and practical applications.• Students become flexible thinkers because they learn that there is more than one method of solving a math-
ematical problem.• Students learn to communicate and think mathematically while they demonstrate their understanding to
peers. • Students learn content across the curriculum, since the lessons comprise Yup’ik Eskimo culture, literacy,
geography, and science.

xi� Star Na�igation: Explorations into Angles and Measurement
Beyond meeting some of the content (mathematics) and process standards of the National Council of Teachers of Mathematics (2000), the curriculum design and its activities respond to the needs of diverse learners. Many activities are designed for group work. One of the strategies for using group work is to provide leadership op-portunities to students who may not typically be placed in those roles. Also, the modules tap into a wide array of intellectual abilities—practical, creative, and analytical. We assessed modules that were tested in rural Alaska, urban Alaska, and suburban California and found that students who were only peripherally involved in math became more active participants through the use of these modules.
Students learn to reason mathematically by constructing models and analyzing practical tasks for their embed-ded mathematics. This enables them to generate and discover mathematical rules and formulas. In this way, we offer students a variety of ways to engage the math material through practical activity, spatial/visual learning, analytical thinking, and creative thinking. They are constantly encouraged to communicate mathematically by presenting their understandings, while other students are encouraged to provide alternate solutions, strategies, and counterarguments. This process also strengthens their deductive reasoning.
Pedagogical Approaches Used in the ModulesThe concept of third space is embedded within each module. Third space relates to a dynamic and creative place among school-based knowledge, everyday knowledge, and knowledge related to other non-mainstream cultural groups. Third space also includes local knowledge such as ways of measuring and counting that are distinct from school-based notions, and brings these elements together in a creative, respectful, and artful manner. Within this creative and evolving space, pedagogical forms can develop creatively from both Western schooling and local ways. In particular, this module pays close attention to expert-apprentice modeling because of its prevalent use among Yup’ik elders and other Alaska Native groups.
DesignThe curriculum design includes strategies that engage students:
• cognitively, so that students use a variety of thinking strategies (analytical, creative, and practical);• socially, so that students with different social, cognitive, and mathematical skills use those strengths to lead
and help solve mathematical problems;• pedagogically, so that students explore mathematical concepts and learn to reason and communicate math-
ematically by demonstrating their understanding of the concepts; and• practically, as students apply or investigate mathematics to solve problems from their daily lives.
The organization of the modules follows five distinct approaches to teaching and learning that converge into one system.
Expert-Apprentice ModelingThe first approach, expert-apprentice modeling, comes from Yup’ik elders and teachers and is supported by re-search in anthropology and education. Many lessons begin with the teacher (the expert) demonstrating a concept to the students (the apprentices). Following the theoretical position of the Russian psychologist Vygotsky (cited in Moll, 1990) and expert Yup’ik teachers (Lipka and Yanez, 1998) and elders, students begin to appropriate the knowledge of the teacher (who functions in the role of expert), as the teacher and the more adept apprentices help other students learn. This establishes a collaborative classroom setting in which student-to-student and student-to-teacher dialogues are part of the classroom fabric.

x�Introduction to the Series
More recently, we have observed experienced teachers use joint productive activity—the teacher works in parallel with students modeling an activity, a concept, or a skill. When effectively implemented, joint productive activity appears to increase student ownership of the task as well as responsibility and motivation. The typical author-ity structure surrounding classrooms changes as students take on more of the responsibility for their learning. Social relations in the classroom become more level. Further, the connections between out-of-school learning and in-school learning are strengthened through pedagogical approaches such as expert-apprentice modeling and joint productive activity when those are the approaches of the community.
Reform-Oriented Approach The second pedagogical approach emphasizes student collaboration in solving “deeper” problems (Ma, 1999). This approach is supported by research in math classrooms and particularly by recent international studies (Stevenson et al., 1990; Stigler and Hiebert, 1998) strongly suggesting that math problems should be more in-depth and challenging and that students should understand the underlying principles, not merely use procedures competently. The modules present complex problems (two-step, open-ended problems) that require students to think more deeply about mathematics.
Multiple IntelligencesFurther, the modules tap into students’ multiple intelligences. While some students may learn best from hands-on, real-world-related problems, others may learn best when abstracting and deducing. This module provides opportunities to guide both modalities. Robert Sternberg’s work (1997, 1998) influenced the development of these modules. He has consistently found that students who are taught so that they use their analytical, creative, and practical intelligences will outperform students who are taught using a single modality, most often analytical. Therefore, we have shaped our activities to engage students in this manner.
Mathematical Argumentation and Deriving Rules The purpose of math communication, argumentation, and conceptual understanding is to foster students’ natural abilities. These modules support a math classroom environment in which students explore the underlying math-ematical rules as they solve problems. Through structured classroom communication, students learn to work collaboratively in a problem-solving environment in which they learn both to appreciate alternative solutions and strategies and to evaluate these strategies and solutions. They will present their mathematical solutions to their peers. Through discrepancies in strategies and solutions, students will communicate with and help each other to understand their reasoning and mathematical decisions. Mathematical discussions are encouraged to strengthen students’ mathematical and logical thinking as they share their findings. This requires classroom norms that support student communication, learning from errors, and viewing errors as opportunities to learn rather than to criticize. The materials in the modules (see Materials section) constrain the possibilities, guide students in a particular direction, and increase their chances of understanding mathematical concepts. Students are given the opportunity to support their conceptual understanding by practicing it in the context of a particular problem.
Familiar and Unfamiliar Contexts Challenge Students’ ThinkingBy working in unfamiliar settings and facing new and challenging problems, students learn to think creatively. They gain confidence in their ability to solve both everyday problems and abstract mathematical questions, and their entire realm of knowledge and experience expands. Further, by making the familiar unfamiliar and by working on novel problems, students are encouraged to connect what they learn from one setting (everyday problems) with mathematics in another setting. For example, most sixth-grade students know about rectangles and how to calculate the area of a rectangle, but if you ask students to go outside and find the four corners of an

x�i Star Na�igation: Explorations into Angles and Measurement
eight-foot-by twelve-foot-rectangle without using rulers or similar instruments, they are faced with a challenging problem. As they work through this everyday application (which is needed to build any rectangular structure) and as they “prove” to their classmates that they do, in fact, have a rectangular base, they expand their knowl-edge of rectangles. In effect they must shift their thinking from considering rectangles as physical entities or as prototypical examples to understanding the salient properties of a rectangle. Similarly, everyday language, conceptions, and intuition may, in fact, be in the way of mathematical understanding and the precise meaning of mathematical terms. By treating familiar knowledge in unfamiliar ways, students explore and confront their own mathematical understandings and begin to understand the world of mathematics. These major principles guide the overall pedagogical approach to the modules.
The Organization of the ModulesThe curriculum includes modules for kindergarten through seventh grade. Modules are divided into sections: activities, explorations, and exercises, with some variation between each module. Supplementary information is included in Cultural Notes, Teacher Notes, and Math Notes. Each module follows a particular cultural storyline, and the mathematics connect directly to it. Some modules are designed around a children’s story, and an illus-trated text is included for the teacher to read to the class.
The module is a teacher’s manual. It begins with a general overview of the activities ahead, an explanation of the math and pedagogy of the module, teaching suggestions, and a historical and cultural overview of the curriculum in general and of each specific module. Each activity includes a brief introductory statement, an estimated dura-tion, goals, materials, any pre-class preparatory instructions for the teacher, and the procedures for the class to carry out the activity. Assessments are placed at various stages, both intermittently and at the end of activities.
Illustrations help to enliven the text. Yup’ik stories and games are interspersed and enrich the mathematics. Transparency masters, worksheet masters, assessments, and suggestions for additional materials are attached at the end of each activity. An overhead projector is necessary. Blackline masters that can be made into overhead transparencies are an important visual enhancement of the activities, stories, and games. Such visual aids also help to further classroom discussion and understanding.
Resources and Materials Required to Teach the Modules MaterialsThe materials and tools limit the range of mathematical possibilities, guiding students’ explorations so that they focus upon the intended purpose of the lesson. For example, in one module, latex sheets are used to explore concepts of topology. Students can manipulate the latex to the degree necessary to discover the mathematics of the various activities and apply the rules of topology.
For materials and learning tools that are more difficult to find or that are directly related to unique aspects of this curriculum, we provide detailed instructions on how to make those tools for the teacher and students. For example, in Going to Egg Island: Adventures in Grouping and Place Values, students use a base twenty abacus. Although the project has produced and makes available a few varieties of wooden abaci, detailed instructions are provided for the teacher and students on how to make a simple, inexpensive, and usable abacus with beads and pipe cleaners.

x�iiIntroduction to the Series
Each module and each activity lists all of the materials and learning tools necessary to carry it out. Some of the tools are expressly mathematical, such as interlocking centimeter cubes, abaci, and compasses. Others are particular to the given context of the problem, such as latex and black and white geometric pattern pieces. Many of the materials are items a teacher will probably have on hand, such as paper, markers, scissors, and rulers. Students learn to apply and manipulate the materials. The value of caring for the materials is underscored by the precepts of subsistence, which is based on processing raw materials and foods with maximum use and minimum waste. Periodically, we use food as part of an activity. In these instances, we encourage minimal waste.
VideosTo convey the knowledge of the elders underlying the entire curriculum more vividly, we have produced a few DVDs to accompany some of the modules. For example, the Going to Egg Island: Adventures in Grouping and Place Values module includes videos of Yup’ik elders demonstrating some traditional Yup’ik games. We also have footage and recordings of the ancient chants that accompanied these games. The videos are available on DVD and are readily accessible for classroom use.
Yup’ik Language Glossary and Math Terms GlossaryTo help teachers and students get a better feel for the Yup’ik language, its sounds, and the Yup’ik words used to describe mathematical concepts in this curriculum, we have developed a Yup’ik glossary on CD-ROM. Each word is recorded in digital form and can be played back in Yup’ik. The context of the word is provided, giving teachers and students a better sense of the Yup’ik concept, not just its Western “equivalent.” Pictures and illustra-tions often accompany the words for additional clarification.
Yup’ik ValuesThere are many important Yup’ik values associated with each module. The elders counsel against waste. They value listening, learning, working hard, being cooperative, and passing knowledge on to others. These values are expressed in the contents of the Yup’ik stories that accompany the modules, in the Cultural Notes, and in various activities. Similarly, Yup’ik people as well as other traditional people continue to produce, build, and make crafts from raw materials. Students who engage in these modules also learn how to make simple math-ematical tools fashioned around such themes as Yup’ik border patterns and building model kayaks, fish racks, and smokehouses. This way, students learn to appreciate and value other cultures.
Cultural NotesMost of the mathematics used in the curriculum comes from our direct association and long-term collaboration with Yup’ik Eskimo elders and teachers. We have included many Cultural Notes to describe and explain more fully the purposes, origins, and variations associated with a particular traditional activity. Each module is based on a cultural activity and follows a Yup’ik cultural storyline along which the activities and lessons unfold.
Math NotesWe want to ensure that teachers who may want to teach these modules, but feel unsure of some of the mathemati-cal concepts, will feel supported by the Math Notes. These provide background material to help teachers better understand the mathematical concepts presented in the activities and exercises of each module. For example, in Building a Fish Rack: Investigations into Proof, Properties, Perimeter, and Area, the Math Notes give a detailed description of a rectangle and describe the geometric proofs one would apply to ascertain whether or not a shape is a rectangle. Building a Smokehouse: The Geometry of Prisms explores rectangular prisms and the geometry of three-dimensional objects; the Math Notes include information on the geometry of rectangular prisms, including

x�iii Star Na�igation: Explorations into Angles and Measurement
proofs, to facilitate the instructional process. In every module, connections are made among the “formal math,” its practical application, and the classroom strategies for teaching the math.
Teacher NotesThe main function of the Teacher Notes is to focus on the key pedagogical aspects of the lesson. For example, they provide suggestions for how to facilitate students’ mathematical understanding through classroom organization strategies, classroom communication, and ways of structuring lessons. Teacher Notes also make suggestions for ways of connecting out-of-school knowledge with schooling.
Literacy Counts!: Developing Language and Literacy in MCCAs MCC has developed over the years, the importance of the role of literacy has also grown. The inclusion of culturally-based stories has proven to contribute to students’ engagement with the math modules as well as pro-vide cultural grounding for the module activities. MCC modules have also made use of literacy-based activities, such as journaling, to further students’ understanding of math concepts and vocabulary. Building on these trends and practices, Literacy Counts!: A Teacher’s Guide to Developing Literacies across the Curriculum (Literacy Counts!: Teacher’s Guide) was developed by our literacy team of Joan Parker Webster, Evelyn Yanez, and Dora Andrew-Ihrke.
There are two strands within the Literacy Counts! approach: (a) Strand 1 is designed to develop literacy in the traditional sense of linguistic modes (speaking, writing, reading, listening, and presenting) as well as other non-linguistic modes, such as two-dimensional drawings or constructing three-dimensional models to communicate mathematically, and practice mathematics; and (b) Strand 2 is designed to develop multiple literacies (linguistic, visual, kinesthetic, dramatic, etc.), through the use of culturally relevant stories and nonfiction literature that accompany MCC modules.
AssessmentAssessment and instruction are interrelated throughout the modules. Assessments are embedded within instruc-tional activities, and teachers are encouraged to carefully observe, listen, and challenge their students’ think-ing. We call this active assessment, which allows teachers to assess how well students have learned to solve the mathematical and cultural problems introduced in the module.
Careful attention has been given to developing assessment techniques and tools that evaluate both the conceptual and procedural knowledge of students. We agree with Ma (1999) that having one type of knowledge without the other or not understanding the link between the two will produce only partial understanding. The goal here is to produce relational understanding in mathematics. Instruction and assessment have been developed and aligned to ensure that both types of knowledge are acquired; this has been accomplished using both traditional and alternative techniques.
The specific details and techniques for assessment (when applicable) are included within activities. The three main tools for collecting and using assessment data follow.

xixIntroduction to the Series
NotebooksIn recent years, the National Council of Teachers of Mathematics (NCTM) has promoted standards that incor-porate math journals as part of math instruction. Journaling has most often occurred as a tool for reflecting on what was learned. In contrast, math notebooks, which are incorporated in Strand one of Literacy Counts!, are used by students to record what they are thinking and learning about math concepts before, during, and after the activities in the modules. Through the use of math notebooks, students build their content knowledge while at the same time developing their literacy skills through reading, writing, drawing, and graphic representations. Math notebooks also play an important role in helping students develop math vocabulary.
ObservationObserving and listening to students lets teachers learn about the strategies that they use to analyze and solve various problems. Listening to informal conversations between students as they work cooperatively on problems provides further insight into their strategies. Through observation, teachers also learn about their students’ at-titudes toward mathematics and their skills in cooperating with others. Observation is an excellent way to link assessment with instruction.
Adaptive InstructionThe goal of the summary assessment in this curriculum is to adapt instruction to the skills and knowledge needed by a group of students. From reviewing journal notes to simply observing, teachers learn which mathematical processes their students are able to effectively use and which ones they need to practice more. Adaptive assess-ment and instruction complete the link between assessment and instruction.
An Introduction to the Land and Its People, Geography, and
ClimateFlying over the largely uninhabited expanse of southwest Alaska on a dark winter morning, one looks down at a white landscape interspersed with trees, winding rivers, rolling hills, and mountains. A handful of lights are sprinkled here, a handful there. Half of Alaska’s 600,000-plus population lives in Anchorage. The other half is dispersed among smaller cities such as Fairbanks and Juneau and among the over 200 rural villages that are scattered across the state. Landing on the village airstrip, which is usually gravel and, in the winter, covered with smooth, hard-packed snow, one is taken to the village by either car or snowmachine. Hardly any villages or regional centers are connected to road systems. The major means of transportation between these communities is by small plane, boat, and snowmachine, depending on the season.
It is common for the school to be centrally located. Village roads are usually unpaved, and people drive cars, four-wheelers, and snowmachines. Houses are typically made from modern materials and have electricity and running water. Over the past twenty years, Alaska villages have undergone major changes, both technologically and culturally. Most now have television, full phone systems, modern water and sewage treatment facilities, an airport, and a small store. Some also have a restaurant, and a few even have a small hotel and taxicab service. Access to medical care and public safety are still sporadic, with the former usually provided by a local health care worker and a community health clinic, or by health care workers from larger cities or regional centers who visit on a regular basis. Serious medical emergencies require air evacuation to either Anchorage or Fairbanks.

xx Star Na�igation: Explorations into Angles and Measurement
The SchoolsYears of work have gone into making education as accessible as possible to rural communities. Almost every village has an elementary school and most have a high school. Some also have a higher education satellite facil-ity, computer access to higher education courses, or options that enable students to earn college credits while in their respective home communities. Vocational education is taught in some of the high schools, and there are also special vocational education facilities in some villages. While English has become the dominant language throughout Alaska, many Yup’ik children in the villages still learn Yup’ik at home.
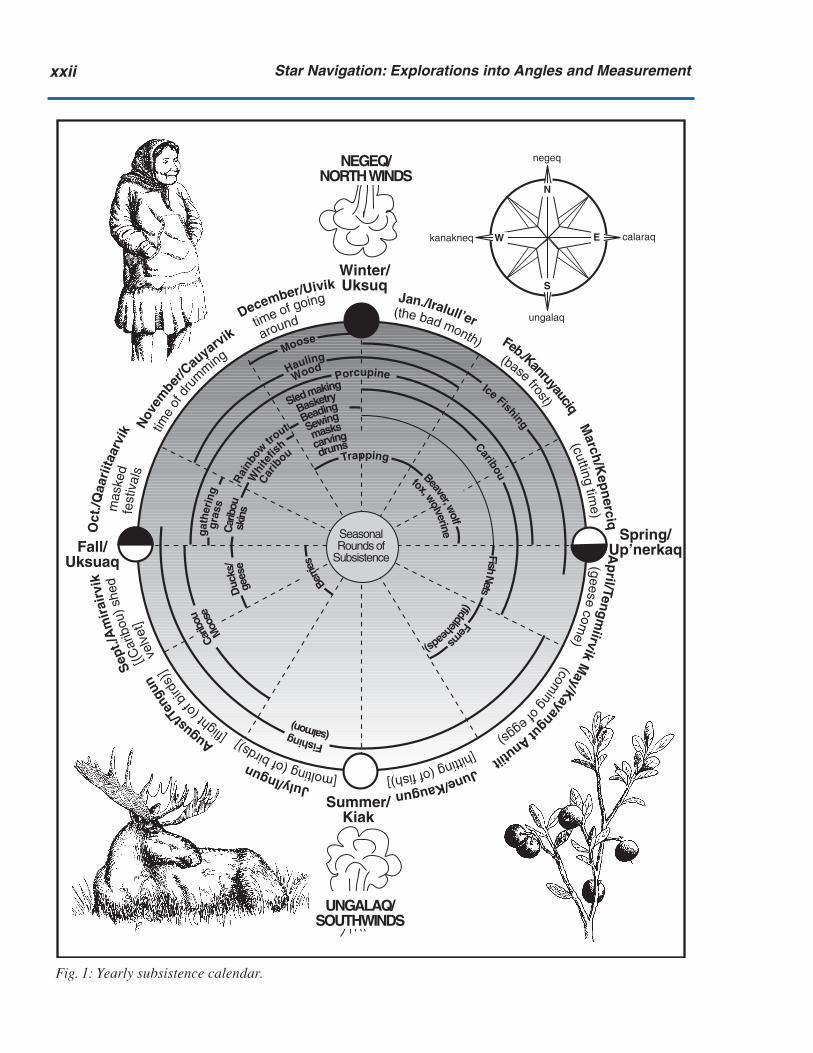
Yup’ik Village Life TodayMost villagers continue to participate in the seasonal rounds of hunting, fishing, and gathering. Although many modern conveniences are located within the village, when one steps outside of its narrow bounds, one is im-mediately aware of one’s vulnerability in this immense and unforgiving land, where one misstep can lead to disaster. Depending upon their location (coastal community, riverine, or interior), villagers hunt and gather the surrounding resources. These include sea mammals, fish, caribou, and many types of berries. The seasonal subsistence calendar illustrates which activities take place during the year (see Figure 1). Knowledgeable elders know how to cross rivers and find their way through ice fields, navigating the seemingly featureless tundra by using directional indicators such as frozen grass and the constellations in the night sky. All of this can mean the difference between life and death. In the summer, when this largely treeless, moss- and grass-covered plain thaws into a large swamp dotted with small lakes, the consequences of ignorance, carelessness, and inexperience can be just as devastating. Underwater hazards in the river, such as submerged logs, can capsize a boat, dumping the occupants into the cold, swift current. Overland travel is much more difficult during the warm months due to the marshy ground and many waterways, and one can easily become disoriented and get lost. The sea is also integral to life in this region and requires its own set of skills and specialized knowledge to be safely navigated.
The Importance of the Land: Hunting and GatheringBasic subsistence skills include knowing how to read the sky to determine the weather and make appropriate travel plans, being able to read the land to find one’s way, knowing how to build an emergency shelter and, in the greater scheme, how to hunt and gather food and properly process and store it. In addition, the byproducts of subsistence activities, such as carved walrus tusks, pelts, and skins are made into clothing or decorative items and a variety of other utilitarian arts and crafts products that provide an important source of cash for many rural residents.
Hunting and gathering are still of great importance in modern Yup’ik society. A young man’s first seal hunt is celebrated; family members who normally live and work in one of the larger cities will often fly home to help when the salmon are running, and whole families still gather to go berry picking. The importance of hunting and gathering in daily life is further reflected in the legislative priorities expressed by rural residents in Alaska. These focus on such things as subsistence hunting regulations, fishing quotas, resource development, and envi-ronmental issues that affect the well-being of game animals and subsistence vegetation.
ConclusionWe developed this curriculum in a Yup’ik context. The traditional subsistence and other skills of the Yup’ik people incorporate spatial, geometric, and proportional reasoning as well as other mathematical reasoning. We have at-tempted to offer you and your students a new way to approach and apply mathematics while also learning about Yup’ik culture. Our goal has been to present math as practical information that is inherent in everything we do. We hope your students will adopt and incorporate some of this knowledge and add it to their learning base.

xxiIntroduction to the Series
We hope you and your students will benefit from the mathematics, culture, geography, and literature embedded in the Math in a Cultural Context: Lessons Learned from Yup’ik Eskimo Elders series. The elders who guided this work emphasized that the next generation of children should be flexible thinkers and leaders. In a small way, we hope that this curriculum guides you and your students along this path.
Tua-ii ingrutuq [This is not the end].
References
Lipka, J. (2003). Going to egg island: Adventures in grouping and place values. Calgary, Alberta: Detselig Enterprises.
Lipka, J., & Yanez, E. (1998). Identifying and understanding cultural differences: Toward culturally based pedagogy. In J. Lipka with G. Mohatt and the Ciulistet, Transforming the culture of schools (pp. 111–137). Mahwah, NJ: Lawrence Erlbaum.
Ma, L. (1999). Knowing and teaching elementary mathematics. Mahwah, NJ: Lawrence Erlbaum.
Moll, L. (1990). Vygotsky and education: Instructional implications and applications of sociohistorical psychology. Cambridge: Cambridge University Press.
National Council of Teachers of Mathematics. (2000). Principles and standards for school mathematics. Reston, VA: National Council of Teachers of Mathematics.
Sternberg, R. (1997). Successful intelligence. New York: Plume.
Sternberg, R. (1998). Principles of teaching for successful intelligence. Educational Psychologist 33, 65–72.
Stevenson, H., Lummis, M., Lee, S.Y., & Stigler, J. (1990). Making the grade in mathematics. Arlington, VA: National Council of Teachers of Mathematics.
Stigler, J., & Hiebert, J. (1998). Teaching is a cultural activity. American Educator 22(4), 4–11.
xxii
calaraqkanakneq
ungalaq
negeq
EW
N
S
Fall/Uksuaq
Spring/Up’nerkaq
Summer/Kiak
UNGALAQ/SOUTHWINDS
Sledmaking
Duc
ks/
Ferns
FishNets
Fishing
Ice Fishing
CaribouBeaver,wolf
Trapping
Berri
es
Winter/Uksuq
SeasonalRounds of
Subsistence
December/Uivik
Nov
embe
r/Cau
yarvik
Oct
./Qaa
riita
arvi
kS
ept./
Am
irai
rvik
August/T
engu
n
July/Ingun June/Kaugun
May/K
ayangutAnutiit
Ap
ril/Tengmiirvik
March/K
epnerciq
Feb./Kanruyauciq
Jan./Iralull’er
Moose
fox,wolverine
(salmon)
Carib
ou
Moo
se
NEGEQ/NORTH WINDS
(the bad month)(base frost)
(cuttingtim
e)(geese
come)
(coming
ofeggs)[hitting(offish)][molting(ofbirds)]
[flight(
ofbi
rds)
]ve
lvet
][(C
arib
ou)s
hed
fest
ival
s
mas
ked
time
ofdr
umming
time of going
around
(fiddleheads)
gees
e
Porcupine
Car
ibou
skin
s
Hauling
Wood
Car
ib
ou
Rai
nbow
trout
Whi
tefis
h
gat
heri
nggr
ass
BeadingBasketry
Sewing
masks
drumscarving
Fig. 1: Yearly subsistence calendar.
Star Na�igation: Explorations into Angles and Measurement

xxiii
Introduction
Star Navigation:
Explorations into Angles and Measurement


�
Introduction to the ModuleStar navigation is an intricate skill developed over many years of observing patterns in the environment, de-termining which patterns can be reliable, and often times practicing in survival situations. Frederick George, a Yup’ik Eskimo elder, is an expert star navigator. He lives in Akiachak, Alaska, located in the southwest portion of the state. Frederick’s knowledge of navigation is the basis for this module. As students learn about navigation from Frederick, they also learn the associated math concepts of angles and measurement through the activities, as well as related stories that connect the math to real experiences through the supplement, The Star Navigation Reader.
Frederick began developing his skills as a young boy, guided by his father and paying attention to elders. In his younger days, he learned how to use the Sun and shadows as both a clock and a compass. He also learned to pay attention to environmental clues, observing the direction of the wind or which sides of trees had more branches. Over the years, Frederick further developed his skills by applying what he learned in the day to understand the night sky. To navigate with stars, he uses the movement of the Earth, the rotation around its axis, and its revolu-tion around the Sun, to understand the apparent change in location of specific stars and constellations. Using these known patterns, he has developed “charts” in his head that relate the location of the stars to specific days of the year and times of night. From these “charts,” he can tell time, season, location, and direction.
Frederick continues to develop his navigating skills and keen observation of his environment. Although obser-vation, keen awareness of the environment, and survival skills are still emphasized and passed-on traditions in the Yup’ik culture, the depth of understanding of the apparent movement of the stars that Frederick has chosen to develop is quite special. In fact, he is well-known in his area as a navigator and is often called upon to help during search and rescue situations. Frederick has countless stories about using the location of the Big Dipper, along with the time and season to track lost travelers, find them, and return them home safely in extreme, bliz-zard conditions.
Navigation Across CulturesMany different cultures around the world and throughout time have developed skills for navigating over land, water, and air. With these skills came observation of the environment, noticing patterns specific to the terrain, location, and time. Since the beginning stages of navigation, key environmental clues included the patterns in the celestial world. People noticed how the Sun’s apparent movement changed over time, from day to day, and from season to season. They noticed how the nighttime stars seemed to move in patterns that could help guide them safely to their destinations. Eventually, they started to develop tools that first made observations of the patterns more accessible and later made use of the dependable patterns (relying on mathematics) to simplify observation. From charts to sundials to astrolabes to compasses and now even to global positioning systems (GPS), all these tools have relied on observations from the progression of the earliest pattern (such as the Sun rising in the east) to the detailed understanding of observations through modern electronic tools (such as the wobbling of the tilt of the Earth on its axis). Frederick’s system of star navigating, shared in this module, adds to the small body of ethnographic literature documenting the knowledge of navigating from indigenous people’s in northern climates (Kenyon, 1990; MacDonald, 1998; Miller, 1997) to those people in the Pacific (Galdwin, 1970).
Various interpretations of the patterns found in the night sky across cultures reveal information relating to the animals and other items important to its people—perhaps those common to a particular area—as well as the worldviews that governed how the people interacted and passed on their belief systems. Our commonly viewed
� Star Na�igation: Explorations into Angles and Measurement
Western Sky Map with constellations such as Orion the hunter, Leo the lion, and Cassiopeia the queen derives from the Greek and Roman cultures’ celestial interpretations. Although the Greco-Roman legends and myths from which these familiar patterns emerged are less familiar to Americans today, their names endure.
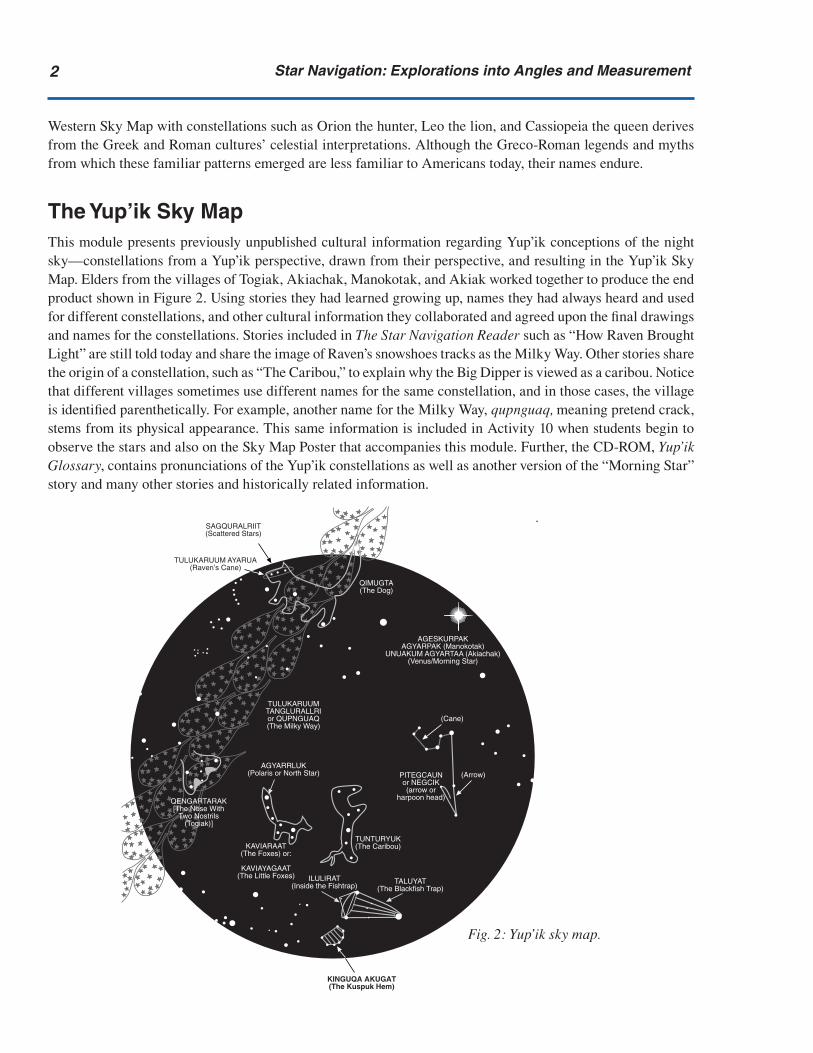
The Yup’ik Sky MapThis module presents previously unpublished cultural information regarding Yup’ik conceptions of the night sky—constellations from a Yup’ik perspective, drawn from their perspective, and resulting in the Yup’ik Sky Map. Elders from the villages of Togiak, Akiachak, Manokotak, and Akiak worked together to produce the end product shown in Figure 2. Using stories they had learned growing up, names they had always heard and used for different constellations, and other cultural information they collaborated and agreed upon the final drawings and names for the constellations. Stories included in The Star Navigation Reader such as “How Raven Brought Light” are still told today and share the image of Raven’s snowshoes tracks as the Milky Way. Other stories share the origin of a constellation, such as “The Caribou,” to explain why the Big Dipper is viewed as a caribou. Notice that different villages sometimes use different names for the same constellation, and in those cases, the village is identified parenthetically. For example, another name for the Milky Way, qupnguaq, meaning pretend crack, stems from its physical appearance. This same information is included in Activity 10 when students begin to observe the stars and also on the Sky Map Poster that accompanies this module. Further, the CD-ROM, Yup’ik Glossary, contains pronunciations of the Yup’ik constellations as well as another version of the “Morning Star” story and many other stories and historically related information.
TUNTURYUK(The Caribou)KAVIARAAT
(The Foxes) or:
KAVIAYAGAAT(The Little Foxes)
AGYARRLUK(Polaris or North Star)
ILULIRAT(Inside the Fishtrap)
KINGUQA AKUGAT(The Kuspuk Hem)
PITEGCAUNor NEGCIK(arrow or
harpoon head)
SAGQURALRIIT(Scattered Stars)
QIMUGTA(The Dog)
TULUKARUUM AYARUA(Raven’s Cane)
QENGARTARAK[The Nose With
Two Nostrils(Togiak)]
TALUYAT(The Blackfish Trap)
TULUKARUUMTANGLURALLRIor QUPNGUAQ(The Milky Way)
(Cane)
(Arrow)
AGESKURPAKAGYARPAK (Manokotak)
UNUAKUM AGYARTAA (Akiachak)(Venus/Morning Star)
.
Fig. 2: Yup’ik sky map.
�Introduction to the Module
The Structure of the ModuleIn this four to six-week module, students will begin to gain a sense of the skills of navigating as they start to observe the patterns of the Sun related to time and location. Through their observations and recordings, they will start to focus on angles. The middle of the module deepens students’ understanding of angles. After inves-tigating properties of angles, students will apply their knowledge to navigating situations, first in the form of a puzzle, and then by creating a treasure hunt for others to use. As daytime navigating creates a simplified problem, most of the module develops foundational thinking in this framework. Once students are more skilled with the activities involved in daytime navigating, they learn Frederick’s methods for nighttime navigating. Using the constellations, they are able to extend their daytime methods, which focus on two-dimensional measures, to the nighttime situation, which uses three-dimensional measures.
The framework of the module is based on using patterns discovered through observations; using conjecture and proof; connecting literacy and science to math; and combining methods of modeling, hands-on activities, and a constructivist approach to deepen students’ understandings of measurement in general and of angles specifi-cally. As the teacher, some activities ask you to work on your own product as the students work. This strategy, called joint activity, allows students needing further guidance to observe and continue learning before working independently and demonstrates teacher engagement with the content. It also provides you with your own data and allows you to possibly anticipate problems students may encounter. Other activities are designed for you to facilitate students’ investigations by asking guiding, rather than leading, questions; posing counterexamples; and modeling how to be inquisitive, make conjectures, and look for proof. Activities tap into students’ analyti-cal, practical, and creative skills. As students work, you will need to determine how much guidance is needed to direct them towards the end goals without short-circuiting the discovery process.
This module uses an integrated approach by including activities in the areas of literacy and science. The literacy component is threefold. Students use their math notebooks to integrate writing and illustrating into math; their story circle roles as a process to gather, refine, and report information; and a variety of representation to under-stand and share their learning. “Morning Star,” as told by Annie Blue, is one of several traditional Yup’ik stories that students will read and connect to the activities in the module during the Literacy Connection times. This should help students appreciate how stories aid in learning and remembering information. Each student’s role in a story circle can also be used to help in their problem-solving, with some minor modifications. As students learn the story circle roles, ask them to apply those same concepts to their group problem-solving work in the math components of the module.
Mathematics of the ModuleThe mathematical goal of this module is to give students a strong conceptual sense of angles, or angle sense. An angle is defined as the amount of rotation between two rays. Students tend to struggle with the concept of an angle and how to measure it because it differs from linear measures. The activities in this module are struc-tured to help students gain a conceptual understanding of this definition and to correct typical misconceptions (described in detail on pages 49–50) students often have about angles. Many of the specific angle properties are further explained in Math Notes throughout the module. Often times, contrasting with linear measurement provides a vehicle for refining ideas about angles. In other situations, relying on angles’ physical use, as Frederick does while navigating, builds on the students’ intuitive sense of angles.
Students will be challenged to learn what an angle is conceptually and then asked to apply this information prac-tically and mathematically. More specifically, students will learn that an angle is a rotation, angles occur within different objects, angles stay the same regardless of the lengths of the rays, angles keep the same measurement

� Star Na�igation: Explorations into Angles and Measurement
in different orientations, and angle measurements are different from linear measurements. Thus, students learn to identify angle properties, partition angles, and measure with standard and nonstandard angle measurements. They also learn to identify the location of an object in three dimensions using two angle measurements. Students continually apply angle sense and angle measuring to navigation, determining time and cardinal directions from contextual environmental clues.
Results from testing this curriculum in fall 2004 (Adams, Adam, & Opbroek, 2005) show that students using this module (treatment group) outperformed students using their typical curriculum (control group) at statisti-cally significant levels on project tests focusing on the concepts of angles and measuring. Specifically, treatment students averaged 66% on the post-test (131 students, standard deviation of 19.5%) and control students aver-aged 54% (70 students, standard deviation of 21.8%) providing an effect size of 0.53 and a significance level of p<0.001 using a t-test. Practically, this difference in averages relates to about 2 ½ more correct questions for the treatment group out of a total of 20 questions. Further, when analyzing gain score from pre- to post-test, treatment students averaged a 17% gain (26.2% standard deviation) and control students actually lost 8% (16.3% standard deviation) providing an effect size of 0.94 and a significance level of p<0.001.
Interestingly, to date, this is the only MCC trial out of 14 conducted (Lipka, Parker Webster, & Yanez, 2005) in which rural treatment students outperformed urban treatment students in both absolute score (1 question more) and gain score (5 questions more). Other research suggests that we may be able to attribute this difference between the treatment groups to the spatially-oriented activities within the module. In Alaska, several lines of local and international research suggest that among Eskimo groups, general spatial abilities appear associated with a preferred cognitive style and comprise a cognitive strength as a skill traditionally emphasized within the culture (Berry, Poortinga, Seagall, & Dasen, 2003). This same ability also emerges as an important factor in educational research on the nature of mathematical thinking (Carroll, 1996).
The Literacy Connection: Using Literacy Counts! in the ModuleLiteracy Counts! is an integrated approach that provides points of entry to math and literacy that are both engag-ing and accessible to students of all levels.
A basic principle guiding the pedagogy underlying Literacy Counts! is the emphasis on moving away from teach-ing by telling and rote memorization of knowledge-level content toward student-centered activities that focus on problem-solving through hands-on inquiry. Literacy Counts! activities are based on a comprehensive approach to developing language and literacy, which includes reading, writing, speaking, listening, and presenting. Literacy Counts! is made up of two interrelated strands: (a) developing literacy practices that are embedded in both pos-ing and solving math problems and problem-solving (reading, writing, speaking, listening, presenting); and (b) developing multiple literacies (oral storytelling, dance, visual arts, film, writing, etc.) through traditional Alaska Native stories and dances, and newly created culturally based stories with embedded math.
There is an emphasis on vocabulary development in both strands. Rather than memorizing definitions of words, the modules in the series combine implicit as well as explicit approaches to vocabulary acquisition. In addition to meaning-making derived from context clues within text, vocabulary is developed by explicit instruction through modeling and joint activity that prepares and supports student-centered inquiry through word study.
This module includes Strand 1 and Strand 2 activities. Strand 2 activities are integrated through the use of the supplemental text for students, The Star Navigation Reader, and an accompanying teacher text, Literacy Counts!: Teacher’s Guide. The Teacher Note, Literacy Connection, is located near each step when The Star Navigation Reader is needed.

�Introduction to the Module
Progression of the ModuleThe first section of the module introduces students to angles through the use of the environment, specifically the Sun and shadows. We use a constructivist approach to develop students’ conceptual and procedural understand-ing of angles. The activities are structured to first introduce the idea of angles by giving students a concrete experience with them. We end this section with the construction of sundials to observe the movement of shad-ows over the course of a day. By focusing on the movement of shadows around the gnomon, or center stick, of their sundial, students gain an intuitive understanding of angles as rotation. This understanding can (later) be referred to as students develop their definitions of an angle. The hands-on activity of building the sundials gives students a foundation for the more conceptual understanding of angles that is developed in the second section. By working with the concrete and moving to the more abstract, students literally build their understanding of angles and deepen it as they go.
The second section of this module is focused on refining students’ angle sense. The section starts with students developing their own angle measures in Activity 4 based on their experience with the angles involved in the sundial from Activity 3. By thinking about how angles are constructed in the development of their own angle measurement, students focus on angles as a measurement of openness independent of linear measurement. They also gain experience partitioning and manipulating angles. Activity 5 provides short explorations focused on developing students’ sense of angles as a measurement of rotation and correcting any misconceptions (such as confusing ray length and angle measurement, or thinking of angles as a measurement of area). Once students have a strong conceptual understanding of angular measurement and standard degree measurements, the use of a protractor and angle classifications are introduced in the final activity of the section. At this point, an assess-ment activity is provided to determine your students’ angle understanding and progress.
In the third section, students are asked to apply and extend their understanding of angles and navigation in novel situations. The first activity involves the construction of a model of the Sun and Earth that explains students’ observations in the sundial activity with a focus on the rotation of the Earth. The last two activities help students apply their angle sense in a way that mimics the knowledge of Yup’ik elders necessary for navigation across the tundra. This will be simulated through the construction of a treasure hunt by students. This activity allows students to apply their angle sense and measurement to daytime navigation.
In the final section of the module, students apply what they have learned about angles in two dimensions, observations, and navigating during the daytime to the night sky. Using Frederick George’s methods of star navigation with the Big Dipper, Cassiopeia, and the Little Dipper, students apply hand measures for angles in three dimensions by using two two-dimensional measurements. They learn the Yup’ik sky map; how to locate important stars or constellations at night; and how to correlate cardinal directions, time of day, season, and the apparent movement of the stars. A culminating activity places students under the tutelage of Frederick as they lead a nighttime winter excursion from Akiachak to Frederick’s winter camp near the Yukon River. Using typi-cal instructions that Frederick uses in his real world teaching, students must synthesize all of their new-found knowledge to ensure correct navigation of the whole group.
We hope you and your students enjoy this approach to learning angles. By focusing on the use of angles, directions, and landmarks, this module deepens students’ mathematical comprehension of angles and measuring, providing the foundation for understanding how people from many different cultures navigate using the stars.
� Star Na�igation: Explorations into Angles and Measurement
Master Vocabulary ListAcute angle— an angle that measures less than 90 degrees. Altitude—height of an object above the Earth’s surface.Angle— two line segments or rays that have a common endpoint.Angle approximation—the term used to describe a nonstandard measurement (horizontal or vertical) using
tools such as hand measures.Arc— a segment of a circle.Arc length— the one-dimensional length measurement of an arc.Area— the measure of a bounded region on a plane.Astronomical units— a unit of length based on the mean distance of the Earth from the Sun.Axis of the Earth— the imaginary straight line on which the planet rotates running from the North Pole to the
South Pole.Cardinal directions— the chief or primary directions of north, south, east, and west.Center— a point equally distant from all points on the circumference of a circle.Circle— the set of all points in a plane the same distance from the center.Conjecture— (n) an inference, theory, or prediction from incomplete or uncertain evidence; (v) to infer, theorize,
or predict from incomplete or uncertain evidence–to guess.Constellation— an arbitrary configuration of stars that suggests an outline of an animal or object.Declination— the angle difference between the direction shown on a compass and true north.Degree(s)— a unit of measurement for angles which is 1/360 of the circumference of a circle.Diameter— a line segment that goes through the center of a circle and whose endpoints are on the circle.Error— the difference between a computed or estimated result and the actual value.Exterior angle— the larger angle of the two angles formed by two rays (completes a circle). Gnomon [no´ man´]— the part of a sundial that casts a shadow indicating the time of day.Horizontal— parallel to the plane of the horizon; not vertical.Interior angle— the smaller angle of the two angles formed by two rays.Iteration— something that is repeated.Landmark— a prominent feature of the landscape used to identify a particular location.Latitude— angular distance, measured in degrees, north or south of the equator.Linear measurement—measurement along a line or in one dimension.Longitude— angular distance, measured in degrees, east or west of the prime meridian running through Green-
wich, England. Measure— to find out or estimate the extent or dimension of an object.Measurement— the extent, quality, or size as determined by measuring.Navigate— to walk or make one’s way through. Navigation— the science of locating one’s position and plotting a course.Observation— the act of noticing.Obtuse angle— an angle that measures more than 90 and less than 180 degrees.Openness of angles— another way of thinking about the rotation of one line segment from another forming an
angle. Orienteering— the act of following a course using a compass and a map.Parallel— two lines that are in the same plane and do not intersect.Partition— to break into smaller sections.Perpendicular—lines that intersect to form a ninety-degree angle or a right angle.Perspective— the appearance of objects as determined by their relative positions and distances.

�Introduction to the Module
Radius— a line segment with one endpoint at the center of a circle and the other endpoint on the circle.Ray— a line segment; two rays form an angle.Readjustment— a change made to get back on course. Reflex angle— an angle that measures more than 180 and less than 360 degrees.Revolution of the Earth—movement of the Earth around the Sun; also the length of time this movement requires
(one revolution is a year).Right angle— an angle measures exactly 90 degrees. Rotation— the movement of an object in a circular motion around a fixed point.Rotation of the Earth— movement of the Earth around its axis; also the length of time this movement requires
(one rotation is a day).Semi-circle— a half circle. Solar noon— the time of day when the Sun is at its highest point.Straight angle— an angle that measures exactly 180 degrees.Tilt of the Earth— the angle of the Earth’s axis away from vertical.Trajectory—the position of an object over time.Tundra— vast, flat, treeless plains of the arctic regions.Vertex— the point of intersection of the two sides of an angle.Vertical— perpendicular to the horizon. Zenith—the point directly overhead in the sky; the highest point any object reaches as it traverses an arc.
Ageskurpak—�the morning star, Venus.Agyarrluk—� North Star.Cakemkut—�the ones downriver toward the sea or exit–back side of the mountain, obscured from view.Ecuilnguar—�clear.Erenret Iquat—�end of day.Kanaqlak—�muskrat.Kankut—�the ones down toward the river or shore–stationary, localized, and visible.Kaviaraat—�foxes, used for the Little Dipper.Kiimaq—�stone.Kinguqa Akugat—�kuspuk hem, Corona Borealis or Northern Crown.Paugkut—�the ones up, back away from the river or shore, or behind–from the perspective of the mouth of river
beyond the horizon.Pitegcaun—�arrow, part of Leo or the Lion.Qaugkut—�the ones inside, inland, or upriver–from the perspective of the mouth of the river toward the observer.Qengartarak—�nose with two nostrils, used for Cassiopeia.Sagquralriit—�scattered stars, used for Orion’s Belt.Taluyat—�blackfish trap, part of the Herdsman or Bootes.Tamakut—�the ones near the listener–from the perspective of the mouth of the river beyond the horizon.Tulukaruum Ayarua—�Raven’s cane, also used for Orion’s Belt.Tulukaruum Tanglurallri—�Raven’s snowshoe tracks, used for the Milky Way.Tunturyuk—�caribou, used for the Big Dipper.Un’a—�the one down toward the river or shore–toward the river and extended.Unegkut—�the one downriver toward the sea or exit–from the perspective of the mouth of the river beyond the
horizon.Unegna—�the one downriver toward the sea or exit–downriver and extended.

� Star Na�igation: Explorations into Angles and Measurement
Master Materials List
Teacher ProvidesAngle rulersBall about 95% the size of the globe or Earth model
to represent VenusBalls or grapefruits for Earth model (optional)Brass fastenersBulb and ring stand or lamp without shade for solar
modelButcher paper (36 x 36 inches sections) or pieces of
equal sized cardboardCardstock or manila foldersClayCoins—several handfuls of different sizesColored pens or markersCopy paper and/or construction paperDirectional compassFlashlightsGarbage bags for placing under cardboard (optional)Globe or Earth modelGlue sticksHole punchMath notebooksNotecardsPencil or stick to use as the gnomonPencilsPiece of cardboard or plywood to place under the
butcher paper (optional)ProtractorsRuler or other straight edgeScissorsSmall common objects such as erasers, water bottles,
glue sticksSmall object for game token (optional)Spaghetti—dried Sticky notesStraight PinsStrawsString—many rollsTokens such as plastic chips or other objects to hideToothpicksTracing paperTransparency pensYardsticks or measuring tape (optional)
Package IncludesLiteracy Counts!: A Teacher’s Guide to Developing
Literacies across the Curriculum The Star Navigation ReaderCD-ROM: Yup’ik GlossaryPoster, Sky MapPoster, Sun and Earth Facts
Blackline Masters for TransparenciesAlaska TundraAngles Inside Circles (optional)Blank ClockCircles and Angles (one per team of three to four
students)Circle CutoutsKnife in the SnowMap of Akiachak Region (Key; optional)Tundra Puzzle Key (optional)Yup’ik Location Words (2)Yup’ik Sky Map—PlainYup’ik Sky Map for April 10Yup’ik Sky Map for December 10Yup’ik Sky Map for February 10Yup’ik Sky Map for January 10Yup’ik Sky Map for March 10Yup’ik Sky Map for November 10
Blackline Masters for WorksheetsAngle GroupsAngle Property ChartBlank ClockCaribou Location For Navigating (one per team)Circle CutoutsDesert LandscapeMap of Akiachak Region (one to three per team)Measurements for Star NavigatingNotes for Traveling (one to three per team) Ocean LandscapePuzzle CardsStar Observations Over One Night (optional)Traveling to Winter Camp (one per team)Treasure Hunt (one per team)Tundra Puzzle InstructionsTundra Puzzle BoardWhat is an Angle (3)

�Introduction to the Module
NCTM Standards and This ModuleThe skills and knowledge emphasized in these activities relate directly to the NCTM (1989, 2000) standards as listed here. Aspects of grades 6-8 math content included in this module focus on problem-solving, reasoning and proof, communication, connections, and representation. Further descriptions and examples of each standard can be found at the NCTM website: http://standards.nctm.org/document/chapter6/index.htm.
Number & OperationsPartially:• Understand numbers, ways of representing num-
bers, relationships among numbers, and number systems
• Understand meanings of operations and how they relate to one another
• Compute fluently and make reasonable estimates
Algebra• Understand patterns, relations, and functions• Use mathematical models to represent and under-
stand quantitative relationships• Analyze change in various contexts
Geometry• Use visualization, spatial reasoning and geometric
modeling to solve problemsPartially:• Analyze characteristics and properties of two-and
three-dimensional geometric shapes and develop mathematical arguments about geometric relation-ships
• Specify locations and describe spatial relationships using coordinate geometry and other representa-tional systems
Measurement• Understand measurable attributes of objects and the
units, systems, and processes of measurement• Apply appropriate techniques, tools, and formulas
to determine measurements
Representation• Create and use representations to organize, record,
and communicate mathematical ideas• Select, apply, and translate among mathematical
representations to solve problems• Use representations to model and interpret physical,
social, and mathematical phenomena
Problem-Solving• Build new mathematical knowledge through prob-
lem-solving• Solve problems that arise in mathematics and in
other contexts• Apply and adapt a variety of appropriate strategies
to solve problems• Monitor and reflect on the process of mathematical
problem-solving
Reasoning & Proof• Recognize reasoning and proof as fundamental
aspects of mathematics• Make and investigate mathematics conjectures• Develop and evaluate mathematical arguments and
proofs• Select and use various types of reasoning and meth-
ods of proof
Communication• Organize and consolidate mathematical thinking
through communications• Communicate mathematical thinking coherently
and clearly to peers, teachers, and others• Analyze and evaluate the mathematical thinking
and strategies of others• Use the language of mathematics to express math-
ematical ideas precisely
Connections• Recognize and use connections among mathemati-
cal ideas• Understand how mathematical ideas interconnect
and build on one another to produce a coherent whole
• Recognize and apply mathematics in contexts out-side of mathematics

�0 Star Na�igation: Explorations into Angles and Measurement
ReferencesAdams, B.L., Adam, A.S., & Opbroek, M. (2005). Reversing the academic trend for rural students: The case
of Michelle Opbroek. Journal of American Indian Education, 44(3), 55-79.
Berry, J. W., Poortinga, Y. H., Seagall, M. H., & Dasen, P. R. (2003). Cross-cultural psychology. Cambridge, England: Cambridge University Press.
Carroll, J. B. (1996). Mathematical abilities: Some results from factor analysis. In R. J. Sternberg & T. Ben-Zeev (Eds.), The nature of mathematical thinking (pp. 3-26). Mahwah, NJ: Lawrence Erlbaum Associates.
Galdwin, T. (1970). East is a big bird: Navigation and logic on Puluwat Atoll. Cambridge, MA: Harvard University Press.
Keiser, J. M. (1997). The development of students’ understanding of angle in a non-directive learning environment. (Doctoral dissertation, University of Indiana, Bloomingon, 1997).
Kenyon, W. (1990). Arctic argonauts. Waterloo, Ontario: Penumbra Press.
Kjellstrom, B. (1976). Be expert with map and compass: The complete “orienteering” Handbook. New York: Charles Scribner’s Sons.
Lipka, J., Parker Webster, J., & Yanez, E. (2005). Factors that affect the performance of Alaska Native students’ mathematical performance. Journal of American Indian Education, 44(3), 1-100.
MacDonald, J. (1998). The arctic sky. Ontario, Canada: Nunavut Research Institute.
Miller, D. S. (1997). Stars of the first people. Boulder, CO: Pruett Publishing.
National Council of Teachers of Mathematics (NCTM). (1989). Curriculum and evaluation standards. Reston, VA: NCTM.
National Council of Teachers of Mathematics (NCTM) (2000). Principles and standards for school mathematics. Reston, VA: NCTM.
Rey, H.A. (1980). The stars: A new way to see them. Boston: Houghton Mifflin Company.
Schifter, D., Bastable, V., & Russell, S. (Eds.). (1999). Developing mathematical ideas: Examining features of shape. Parsippany, NJ: Dale Seymour Publications.

��Introduction to the Module
Internet ResourcesMath Terms
• Mathwords http://www.mathwords.com
• Mathsisfun! http://www.mathsisfun.com/reflex.html http://www.mathsisfun.com/geometry/exterior-angles.html
• Sparknotes http://www.sparknotes.com/math/geometry1/constructions/section1.html
Pattern Blocks and Angles• LessonsPlanPage.com
http://www.lessonplanspage.com/MathAnglesPatternBlocks56.htm
NCTM Standards• NCTM Principles and Standards for School Math
http://standards.nctm.org/document/chapter6/index.htm
Astronomy Facts
Latitude and Longitude
• Wikipedia http://en.wikipedia.org/wiki/Main_Page
• U. S. Geological Survey http://www.usgs.gov
• Alaska Science Forum from the Geophysical Institute, University of Alaska Fairbanks http://www.gi.alaska.edu/ScienceForum/ASF16/1632.html
Sunrise
• National Oceanic and Atmospheric Administration, US Department of Commerce http://www.srrb.noaa.gov/highlights/sunrise/sunrise.html
Earth Facts
• The Nine8 Planets http://www.nineplanets.org/earth.html
• Universe Cycle http://www.msnucleus.org/membership/html/k-6/uc/earth/1/uce1.html
Earth’s Tilt
• MiMi.hu http://en.mimi.hu/astronomy/earth.html
• NationalGeographic.com http://magma.nationalgeographic.com/ngm/0410/resources_who.html

�� Star Na�igation: Explorations into Angles and Measurement
Sun Facts
• The Nine8 Planets http://www.nineplanets.org/sol.html
Venus Facts
• The Nine8 Planets http://www.nineplanets.org/venus.html
Navigating and Time Tools
• History of Sun Dial http://www.colorsofindia.com/sundial/history.html
• Navigational Instruments http://www.celestialnavigation.net/instruments.html
• Wikipedia on Celestial Globes http://en.wikipedia.org/wiki/Celestial_globe
• HowStuffWorks.com on Global Positioning Systems http://electronics.howstuffworks.com/gps1.htm
History of Time Measurements
• Counting in Babylon http://galileoandeinstein.physics.virginia.edu/lectures/babylon.html
• An overview of Babylonian mathematics http://www-history.mcs.st-andrews.ac.uk/HistTopics/Babylonian_mathematics.html
• References for Babylonian numerals http://www-history.mcs.st-andrews.ac.uk/HistTopics/References/Babylonian_numerals.html
Understanding our Modern Time System
• Greenwich Mean Time http://wwp.greenwichmeantime.com/info/noon.htm
Pictures of Sun Trajectories
• Solar Terrestrial Dispatch—Image Gallery http://www.spacew.com/gallery/image002603.html• Alaska Stock—Gallery http://www.alaskastock.com/gallery/editorials/solstice.asp
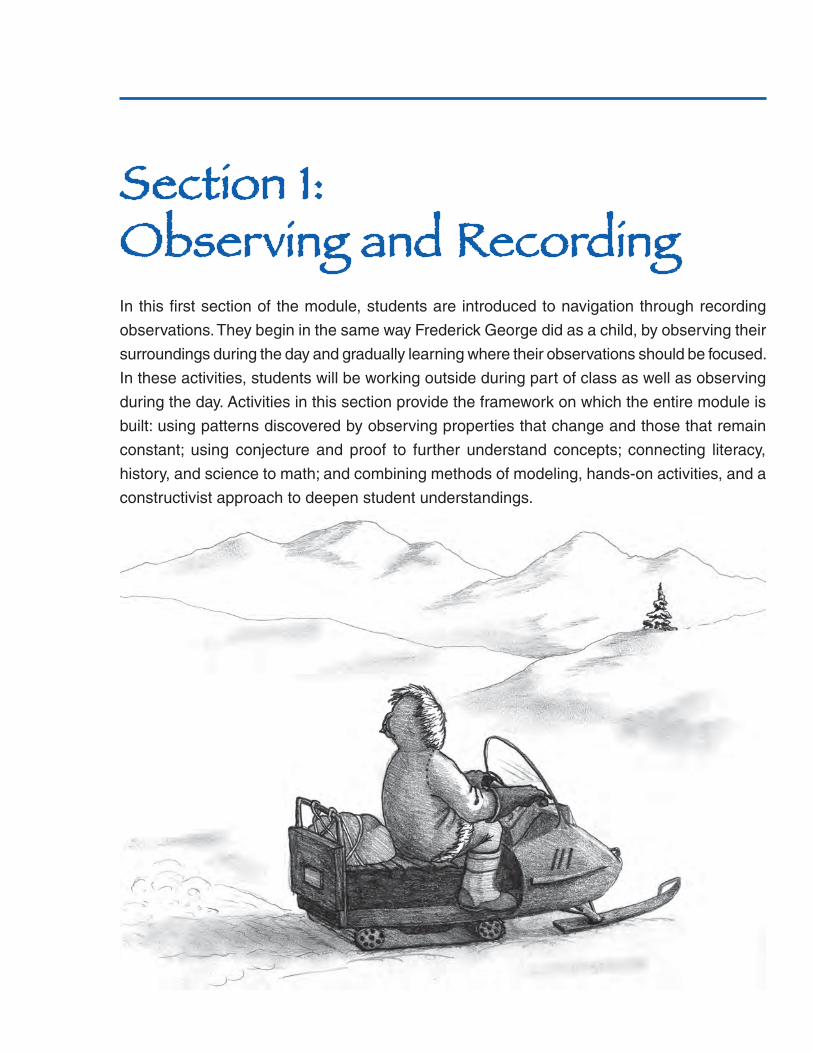
��
Section 1: Observing and RecordingIn this first section of the module, students are introduced to navigation through recording
observations. They begin in the same way Frederick George did as a child, by observing their
surroundings during the day and gradually learning where their observations should be focused.
In these activities, students will be working outside during part of class as well as observing
during the day. Activities in this section provide the framework on which the entire module is
built: using patterns discovered by observing properties that change and those that remain
constant; using conjecture and proof to further understand concepts; connecting literacy,
history, and science to math; and combining methods of modeling, hands-on activities, and a
constructivist approach to deepen student understandings.


��
Activity 1 Introduction to Navigating and LocatingFrederick George, a Yup’ik elder from Akiachak, Alaska, is an expert star navigator who gained the skills he uses today through decades of train-ing and observation. As a young boy, his father asked him to go outside, look around, and report what he had seen. These types of observations mark the beginning of Frederick’s life-long dedication to learning to be a navigator.
In this first activity, your students will be introduced to navigating in differ-ent environments. Students will build on their intuitive understanding from observing in their daily lives. In this and other lessons, these understandings are built upon to bridge intuitive knowledge to mathematical knowledge. Stu-dents will follow Frederick’s example, much like an apprentice, and consider what they need to observe and record in the environment so they can locate their position using landmarks. This first activity sets up the overall inquiry by challenging students to imagine how different people in different locations travel across vast and seemingly undifferentiated spaces.
Throughout the module, we have included various literacy activities. Stu-dents will keep a math notebook to document their observations, math explorations, and reflections as they learn. A more detailed description of math notebooks is included in the introduction to the series. This first activity also includes a secondary literacy component. In the supplemental text for students, The Star Navigation Reader, Yup’ik elder Joshua Phillip’s short statement eloquently expresses the importance of carefully observing your surroundings. Students will focus on developing their understanding of the vocabulary in the piece. Additional literacy work of this kind is con-tinued later in the module through story circles. Please refer to the Literacy Counts!: Teacher’s Guide for a more detailed explanation of how to work with the story circles.
Goals• To become aware of different environments around the globe (ocean,
desert, tundra)• To gain a basic understanding of navigation• To conduct and record observations of Sun, landmarks, and the environ-
ment• To begin developing a math notebook
Fig. 1.1: View of Akiachak, Alaska, on the globe. The darkest color shows the land, blue shows the water, and white shows the perpetually snow-covered areas around the North Pole.
Arc
tic
Circle
North Pole
MagneticNorth Pole
Akiachak
�� Star Na�igation: Explorations into Angles and Measurement
Materials• Transparency, Alaska Tundra• Transparency, Yup’ik Location Words (2), or• CD-ROM: Yup’ik Glossary• Worksheet, Desert Landscape (one for half of the students)• Worksheet, Ocean Landscape (one for the other half of the students)• The Star Navigation Reader, “Joshua Phillip’s Story”• Literacy Counts!: Teacher’s Guide• Math notebooks
PreparationBecome familiar with the Yup’ik Glossary CD-ROM and, in particular, locate the words in the vocabulary list below.
DurationOne to two class periods.
VocabularyLandmark— a prominent feature of the landscape used to identify a par-
ticular location.Navigate— to walk or make one’s way through.Navigation— the science of locating one’s position and plotting a course.Tundra— vast, flat, treeless plains of the arctic regions.Cakemkut—�the ones downriver toward the sea or exit–back side of the
mountain, obscured from view.Kankut—�the ones down toward the river or shore–stationary, localized,
and visible.Paugkut—�the ones up, back away from the river or shore, or behind–from
the perspective of the mouth of river beyond the horizon.Qaugkut—�the ones inside, inland, or upriver–from the perspective of the
mouth of the river toward the observer.Tamakut—�the ones near the listener–from the perspective of the mouth of
the river beyond the horizon.Un’a—�the one down toward the river or shore–toward the river and ex-
tended.Unegkut—�the one downriver toward the sea or exit–from the perspective
of the mouth of the river beyond the horizon.Unegna—� the one downriver toward the sea or exit–downriver and
extended.
��Acti�ity �: Introduction to Na�igating and Locating
Instructions1. As an introduction to the module, explain to your students that they will
be learning how people from all over the world navigate across water, sand, or snow. Explain to your students that once they have a chance to explore environmental clues today, they will learn throughout the module how one Yup’ik elder travels across snow-covered tundra in the day and at night. Distribute the worksheet Desert Landscape to half of your students and the Ocean Landscape worksheet to the other half.
2. Ask students how they would navigate or find their way if they were traveling across the ocean in a ship or across the desert by camel. Have them mark the observational clues in their pictures and write their thoughts about how they would use each of these clues to help them navigate on the back of their worksheet. Have students share their ideas with the class. (See the Teacher Note, left, for examples and ideas.)
3. Share the transparency Alaska Tundra with your students, introducing the term tundra, if needed. Ask your students to picture themselves in the middle of tundra with lots of snow covering everything. Then ask them to think about being out in this snow-covered wilderness and hav-ing to find their way home. Encourage students to observe, find clues from the environment, and think about what they could use to help them find their way home. Have students who are willing share their thoughts with the class. Encourage students to include these words and thoughts in their math notebooks, which are handed out in the next step.
4. Hand out math notebooks for students to use throughout this module. Explain that they will set up a section for vocabulary by writing the following headings in their math notebooks: “Everyday Words,” “Yup’ik Words,” and “Math Words.” In their notebooks have them use either the first or last five pages or so for vocabulary.
5. Give each student a copy of The Star Navigation Reader. Explain to students that as they learn the mathematics of star navigation they will also read related Yup’ik traditional stories and nonfiction accounts.
6. Refer to the Literacy Counts!: Teacher’s Guide to introduce story circle roles. Have students turn to the first story, titled “Joshua Phillip’s Story: True Account of Becoming Aware of His Surroundings.” Explain to students that they will read a short story from Frederick’s elder, Joshua Phillip, about how his father started him on his way to becoming a navigator. Explain that many of the elders, including Frederick, speak of learning about weather and observation similarly to Joshua. Read the short account using the method of your choice.
7. As a conclusion to this activity, explain to students that they will learn a small sample of the vast number of Yup’ik terms used to locate ob-jects. As you share these words and their definitions with your students,
Teacher Note: FactorsStudents should be noticing fac-
tors such as direction of wind, wind
patterns, landmarks, direction of
Sun, current patterns, etc. Some of
these items contain patterns that
navigators can rely on as well as
other patterns that exist only for a
small moment of time. Students
will want to think about what may
change and what may stay the
same in their environments.
Teacher Note: Literacy ConnectionRefer to the Literacy Counts!:
Teacher’s Guide for descriptions
of story circle roles, methods for
introducing the roles, and activities
for students to practice.
�� Star Na�igation: Explorations into Angles and Measurement
encourage them to try to use them throughout the module whenever appropriate. Use the CD-ROM Yup’ik Glossary for the pronunciation and either the CD-ROM or the Yup’ik Location Words transparencies to help share the meanings of the words below. Have students pick three terms to write in the correct column of their vocabulary section in their math notebooks.
Cakemkut—�the ones downriver toward the sea or exit–back side of the mountain, obscured from view.
Kankut—�the ones down toward the river or shore–stationary, local-ized, and visible.
Paugkut—�the ones up, back away from the river or shore, or be-hind–from the perspective of the mouth of the river beyond the horizon.
Qaugkut—�the ones outside, inland, or upriver–from the perspective of the mouth of the river toward the observer.
Tamakut—�the ones near the listener–from the perspective of the mouth of the river beyond the horizon.
Un’a—�the one down toward the river or shore–toward the river and extended.
Unegkut—�the one downriver toward the sea or exit–from the per-spective of the mouth of the river beyond the horizon.
Unegna—�the one downriver toward the sea or exit–downriver and extended.
Teacher Note: Locating the Location WordsYou can find more information on
the Yup’ik locatives by browsing
the CD-ROM Yup’ik Glossary.
After inserting the CD into your
computer and going through the
beginning steps, click on the
“Yup’ik Math Terms” button on the
bottom right of the screen. Next
click on the “Yup’ik Demonstra-
tives” button found on the bottom
left side to reach a screen with text
explaining the Yup’ik conceptual
topography. The next series of in-
teractive screens can be accessed
through the left and right arrow
buttons in the lower left side of
the picture. After clicking the right
arrow (→) two times you will find
the photo and terms used for the
first transparency “Yup’ik Loca-
tion Words (1)”. After moving your
mouse over the different locations
to engage that screen, if you hit the
right arrow (→) seven more times
you will reach the page used for
“Yup’ik Location Words (2)”. Two
more clicks of the right arrow (→)
will take you back to the original
text page.

��Acti�ity �: Introduction to Na�igating and Locating
Cultural Note: Importance of Cardinal DirectionsTraditionally, the cardinal directions were so important to Yup’ik everyday life that they were often built into everyday practices
which may not even seem to be related to traveling and navigation. For example, as women created dance headdresses
they modeled the cardinal directions and used them to know where to place beads. An account of how women incorpo-
rated the directions into their headdresses can be found in The Star Navigation Reader, “Making a Beaded Headdress.”
Another example of the importance of cardinal directions in Yup’ik life is found in how traditional homes were built. The
house was aligned with the Sun so that at noon, the Sun would shine through the front door. The walls had names that
referred to the directions in which they faced. There are also stories that show how basket weavers embedded navigation
into their baskets along with spirituality connections.
An understanding of the cardinal directions was closely connected to understanding the winds. Knowing the direction in
which the winds were blowing also helped inform everyday Yup’ik activities. Frederick explained, for example, that if you are
fishing in the Kuskokwim River and already have your nets out, and the wind is coming from between the north and east
or between the north and west, then you won’t catch many fish. If the wind is from the west, then it’s the worst scenario
for fishing: you won’t catch anything. The best fishing time is when the wind blows from true north or true south.
Frederick uses specific words to help refine the directions between the cardinal directions as well. Keep in mind that many
of these words are specific to his local regional dialect and people from other regions may use similar or quite different
words. The compass rose shown here also uses Frederick’s regional words for north and west which differ from those
used in the yearly subsistence calendar that appears in the Introduction to the Series.
Here are some examples of distinctions between words that can
all mean “halfway between.”
Akunli means halfway between the cardinal directions. This term
can be used for NE, NW, SE, and/or SW.
Kiukeggnaq is a term that refers specifically to halfway between
N and E, but is more towards the north direction.
Negaqvaruarnilluku is a term that refers specifically to halfway
between N and W, but is also closer to north (such as the direc-
tion N-NW) and can literally be translated as “almost touching
the north.”
calaraqkanavaq
ungalaq
negaqviim
EW
N
S
akunli akunli
akunliakunli
Fig. 1.2: Compass rose showing Frederick’s specific words for directions.
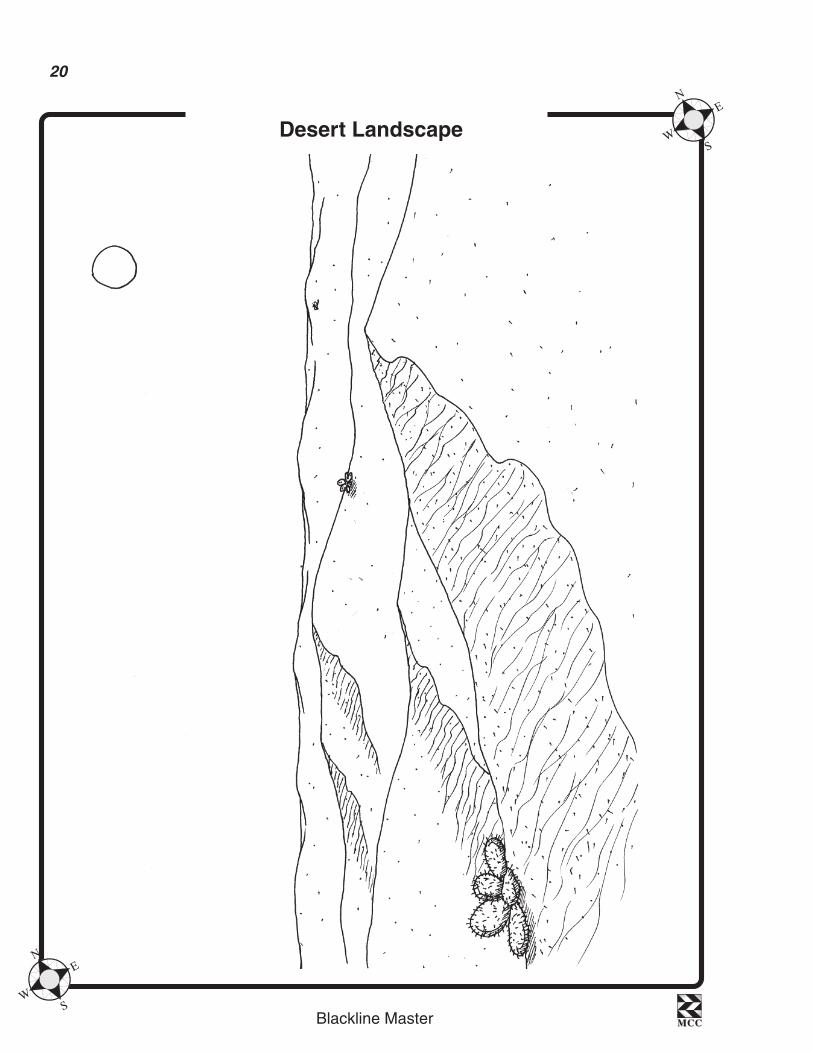
Blackline Master MCCMCC
N
SW
E
N
SW
E
�0
Desert Landscape
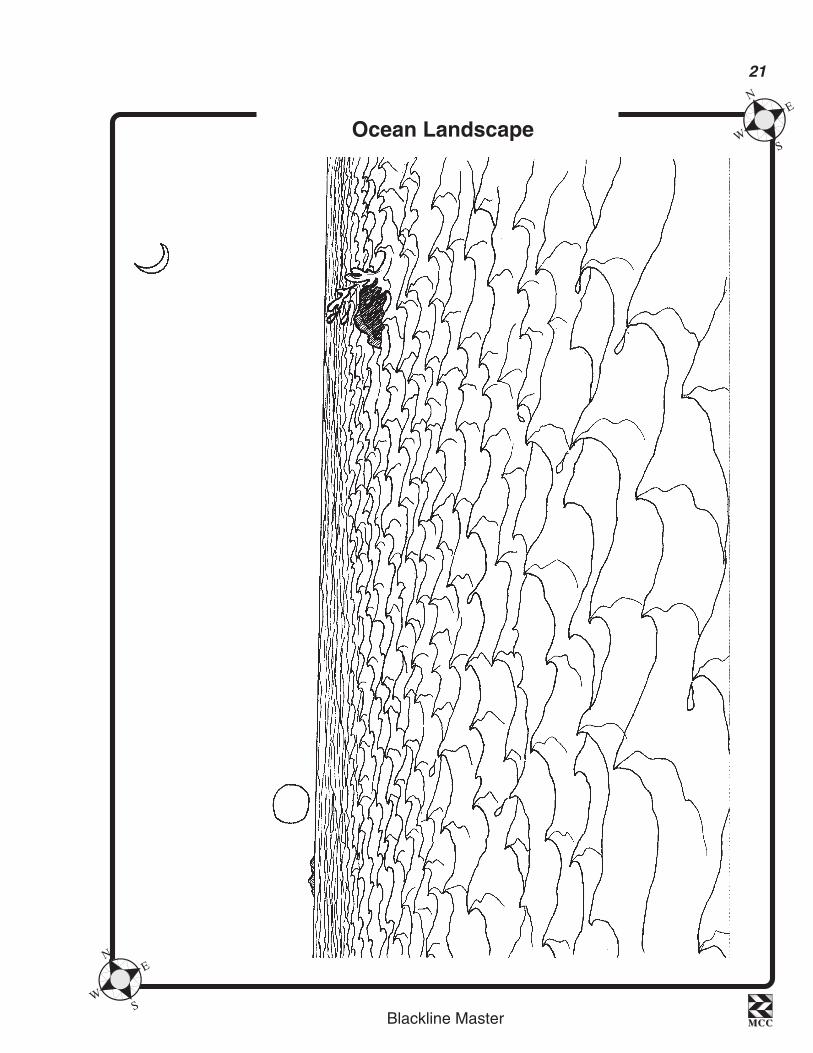
Blackline Master MCCMCC
N
SW
E
N
SW
E
��
Ocean Landscape
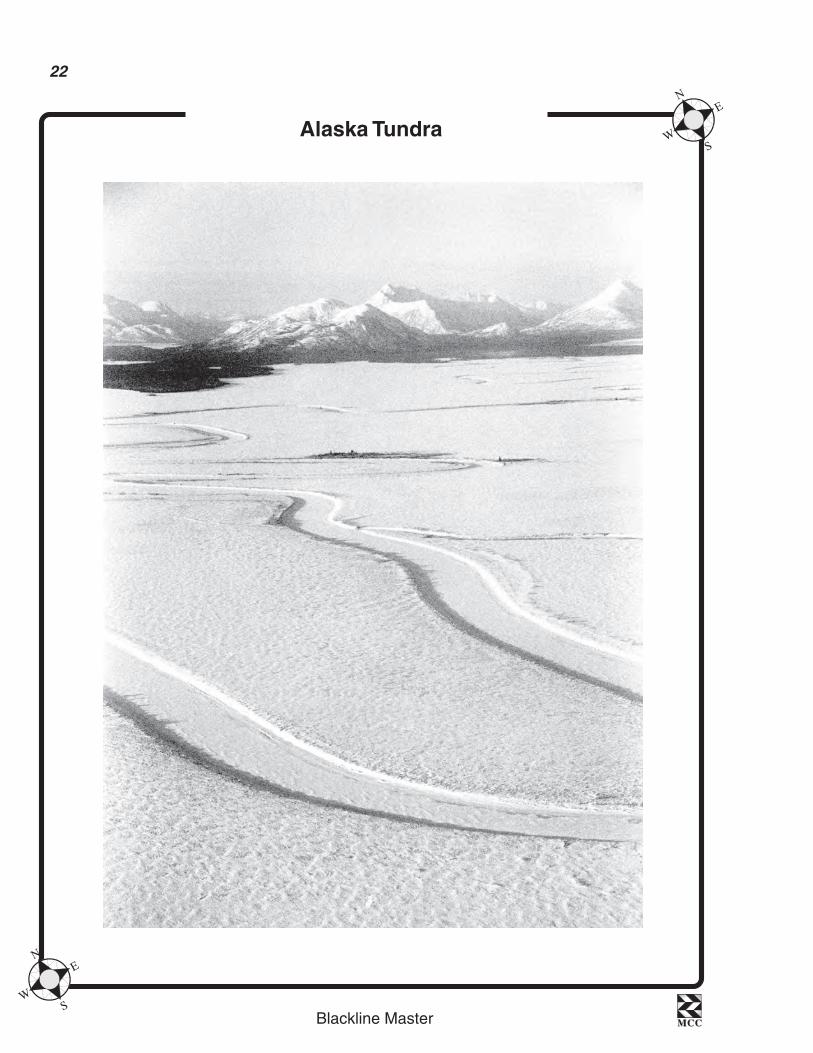
Blackline Master MCCMCC
N
SW
E
N
SW
E
��
Alaska Tundra

Blackline Master MCCMCC
N
SW
E
N
SW
E
��
Yup’ik Location Words (1)

Blackline Master MCCMCC
N
SW
E
N
SW
E
��
Yup’ik Location Words (2)

��
Activity 2 Observations and LandmarksStudents have begun observing clues and patterns in Activity 1, not within their own environments, but rather in a fictitious situation produced by pictures of the desert and ocean. Like Frederick, students will now go outside to observe their own environment. They will look for the clues the environment provides to keen observers and learn how these clues can be used for locating (pinpointing a location) and navigating (moving from location to location).
As students observe, they will be encouraged to map out what they see and include any type of measurements possible. As they learn Frederick’s hand measurements and the methods he uses to locate his own position while traveling, they will begin to focus on angles from the perspective of the observer. Students create a straw angle marker (Fig. 2.1) to aid in locating and understanding the fundamentals of angles such as defining the vertex and aligning objects along the rays. This tool also allows students to investigate the concept of perspective within angle understanding. Later, students will further investigate the angles derived from these observations and from shadow data.
This activity forms the basis of the module and provides the mathematical foundation for many ideas that continue throughout. Students will begin recording information, noting relative locations of where they stand and where objects in the environment are located, as well as estimating and measuring distance between objects and relative positions of objects to one another. Further, students will describe the position of the Sun and how objects are located relative to the Sun, and note the direction of the wind. Students will use instruments to measure angles and will begin to establish an understanding of what an angle is. They will experiment with the perspective of angles, nonstandard angle measurements, and hand measurements.
Please note that Activity 7 includes building and using a Sun and Earth model to better understand some of the patterns found through the observa-tions of shadows begun in Activity 3. You can choose to do Activity 7 at any time you feel it is appropriate and beneficial for your students. Eventu-ally, students will add Venus to their model to connect to the “Morning Star” story. Lastly, the literacy component continues in this activity with students using their math notebooks to record their observations and mea-surements.
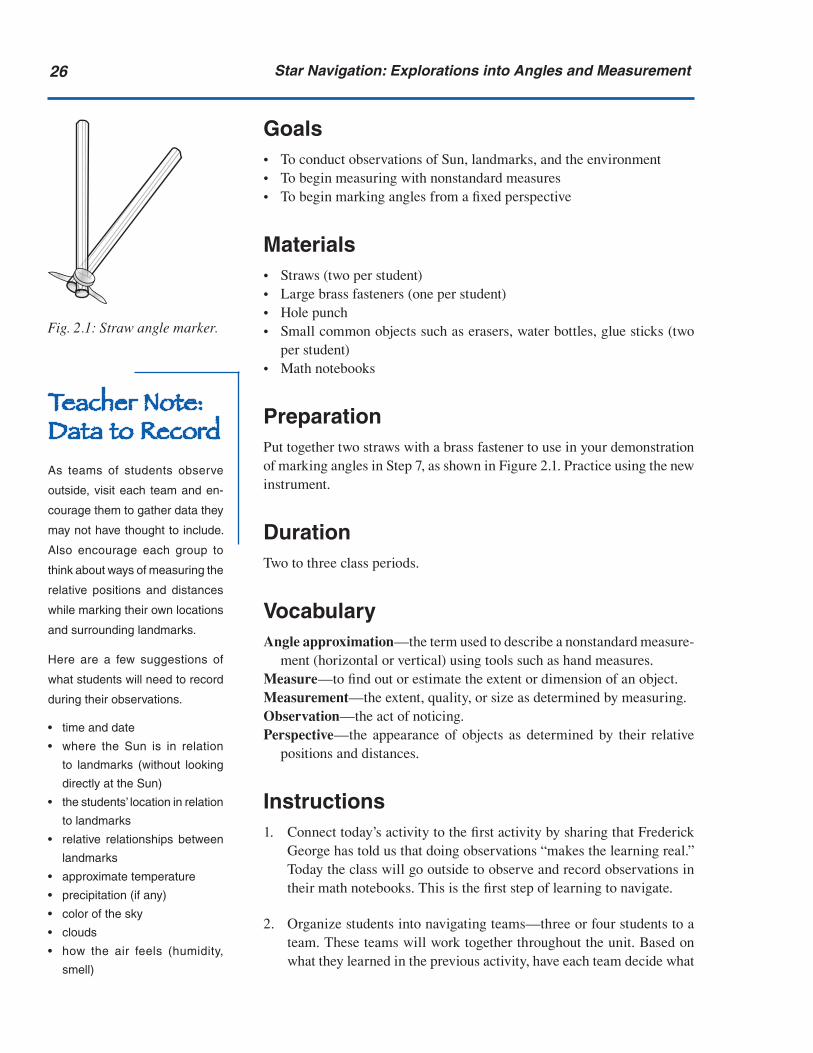
�� Star Na�igation: Explorations into Angles and Measurement
Goals• To conduct observations of Sun, landmarks, and the environment• To begin measuring with nonstandard measures• To begin marking angles from a fixed perspective
Materials• Straws (two per student)• Large brass fasteners (one per student)• Hole punch• Small common objects such as erasers, water bottles, glue sticks (two
per student)• Math notebooks
PreparationPut together two straws with a brass fastener to use in your demonstration of marking angles in Step 7, as shown in Figure 2.1. Practice using the new instrument.
DurationTwo to three class periods.
VocabularyAngle approximation—the term used to describe a nonstandard measure-
ment (horizontal or vertical) using tools such as hand measures.Measure—to find out or estimate the extent or dimension of an object.Measurement— the extent, quality, or size as determined by measuring.Observation— the act of noticing.Perspective— the appearance of objects as determined by their relative
positions and distances.
Instructions1. Connect today’s activity to the first activity by sharing that Frederick
George has told us that doing observations “makes the learning real.” Today the class will go outside to observe and record observations in their math notebooks. This is the first step of learning to navigate.
2. Organize students into navigating teams—three or four students to a team. These teams will work together throughout the unit. Based on what they learned in the previous activity, have each team decide what
Fig. 2.1: Straw angle marker.
Teacher Note: Data to RecordAs teams of students observe
outside, visit each team and en-
courage them to gather data they
may not have thought to include.
Also encourage each group to
think about ways of measuring the
relative positions and distances
while marking their own locations
and surrounding landmarks.
Here are a few suggestions of
what students will need to record
during their observations.
• time and date
• where the Sun is in relation
to landmarks (without looking
directly at the Sun)
• the students’ location in relation
to landmarks
• relative relationships between
landmarks
• approximate temperature
• precipitation (if any)
• color of the sky
• clouds
• how the air feels (humidity,
smell)
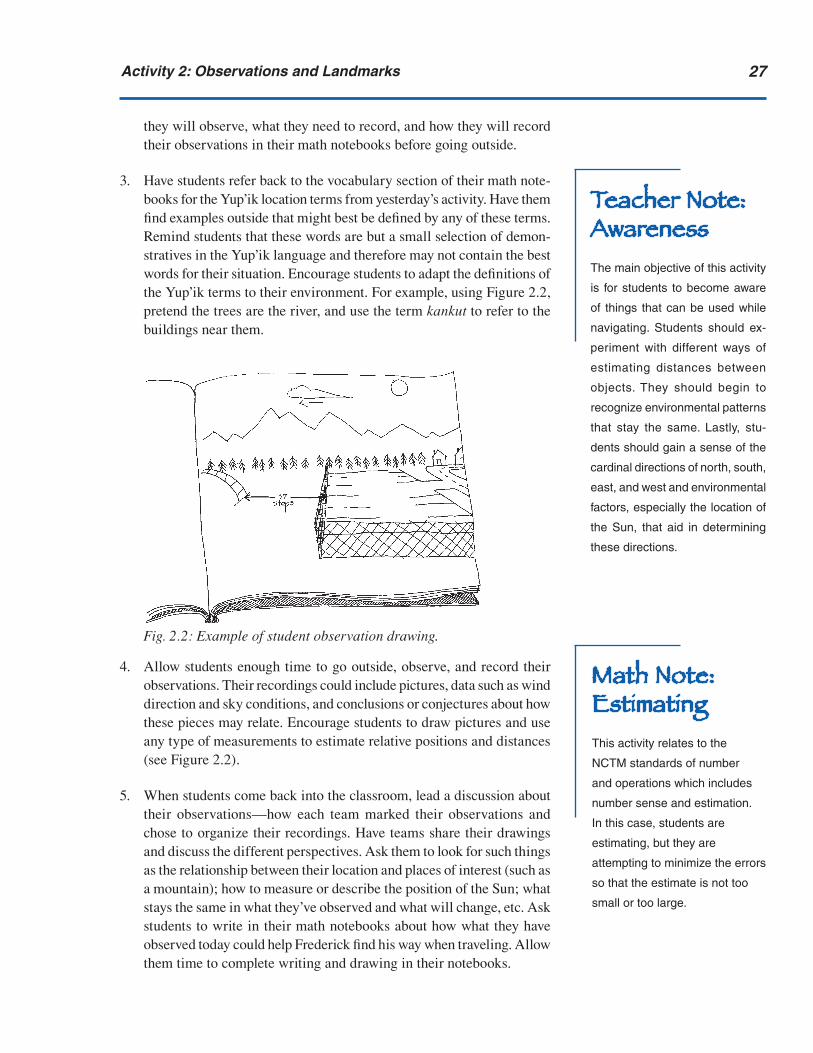
��Acti�ity �: Obser�ations and Landmarks
they will observe, what they need to record, and how they will record their observations in their math notebooks before going outside.
3. Have students refer back to the vocabulary section of their math note-books for the Yup’ik location terms from yesterday’s activity. Have them find examples outside that might best be defined by any of these terms. Remind students that these words are but a small selection of demon-stratives in the Yup’ik language and therefore may not contain the best words for their situation. Encourage students to adapt the definitions of the Yup’ik terms to their environment. For example, using Figure 2.2, pretend the trees are the river, and use the term kankut to refer to the buildings near them.
Fig. 2.2: Example of student observation drawing.
4. Allow students enough time to go outside, observe, and record their observations. Their recordings could include pictures, data such as wind direction and sky conditions, and conclusions or conjectures about how these pieces may relate. Encourage students to draw pictures and use any type of measurements to estimate relative positions and distances (see Figure 2.2).
5. When students come back into the classroom, lead a discussion about their observations—how each team marked their observations and chose to organize their recordings. Have teams share their drawings and discuss the different perspectives. Ask them to look for such things as the relationship between their location and places of interest (such as a mountain); how to measure or describe the position of the Sun; what stays the same in what they’ve observed and what will change, etc. Ask students to write in their math notebooks about how what they have observed today could help Frederick find his way when traveling. Allow them time to complete writing and drawing in their notebooks.
Teacher Note: AwarenessThe main objective of this activity
is for students to become aware
of things that can be used while
navigating. Students should ex-
periment with different ways of
estimating distances between
objects. They should begin to
recognize environmental patterns
that stay the same. Lastly, stu-
dents should gain a sense of the
cardinal directions of north, south,
east, and west and environmental
factors, especially the location of
the Sun, that aid in determining
these directions.
Math Note: EstimatingThis activity relates to the
NCTM standards of number
and operations which includes
number sense and estimation.
In this case, students are
estimating, but they are
attempting to minimize the errors
so that the estimate is not too
small or too large.
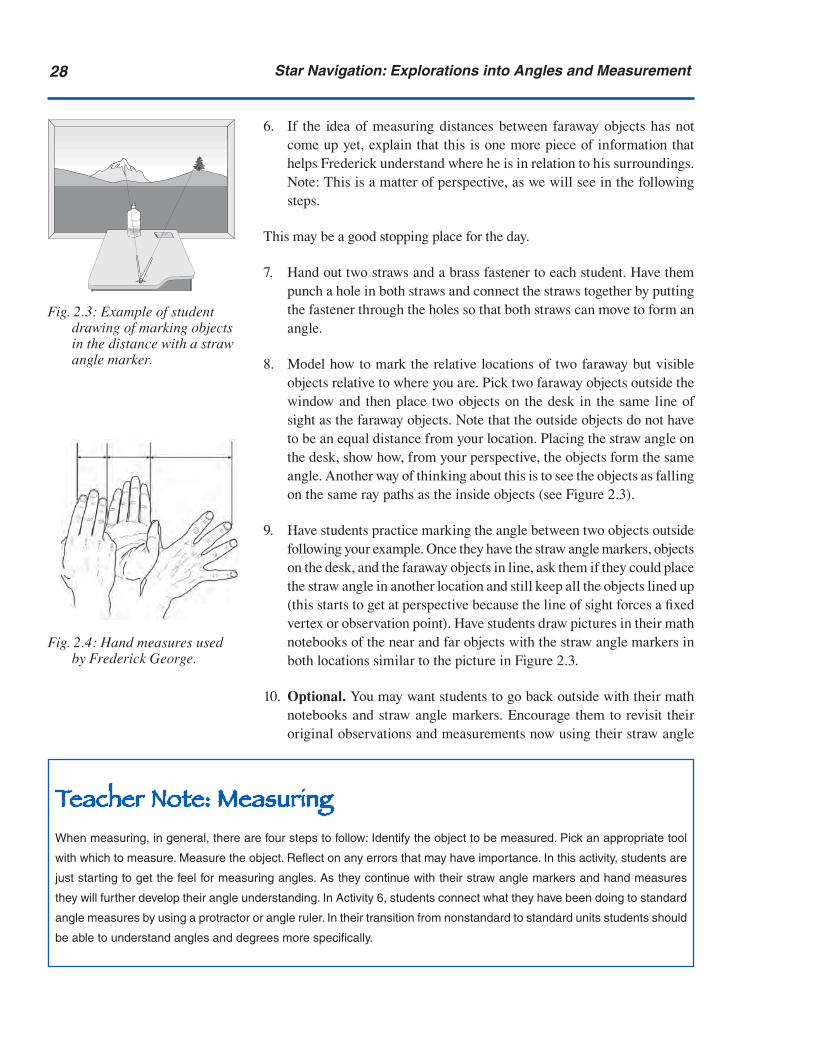
�� Star Na�igation: Explorations into Angles and Measurement
6. If the idea of measuring distances between faraway objects has not come up yet, explain that this is one more piece of information that helps Frederick understand where he is in relation to his surroundings. Note: This is a matter of perspective, as we will see in the following steps.
This may be a good stopping place for the day.
7. Hand out two straws and a brass fastener to each student. Have them punch a hole in both straws and connect the straws together by putting the fastener through the holes so that both straws can move to form an angle.
8. Model how to mark the relative locations of two faraway but visible objects relative to where you are. Pick two faraway objects outside the window and then place two objects on the desk in the same line of sight as the faraway objects. Note that the outside objects do not have to be an equal distance from your location. Placing the straw angle on the desk, show how, from your perspective, the objects form the same angle. Another way of thinking about this is to see the objects as falling on the same ray paths as the inside objects (see Figure 2.3).
9. Have students practice marking the angle between two objects outside following your example. Once they have the straw angle markers, objects on the desk, and the faraway objects in line, ask them if they could place the straw angle in another location and still keep all the objects lined up (this starts to get at perspective because the line of sight forces a fixed vertex or observation point). Have students draw pictures in their math notebooks of the near and far objects with the straw angle markers in both locations similar to the picture in Figure 2.3.
10. Optional. You may want students to go back outside with their math notebooks and straw angle markers. Encourage them to revisit their original observations and measurements now using their straw angle
Fig. 2.3: Example of student drawing of marking objects in the distance with a straw angle marker.
Fig. 2.4: Hand measures used by Frederick George.
Teacher Note: MeasuringWhen measuring, in general, there are four steps to follow: Identify the object to be measured. Pick an appropriate tool
with which to measure. Measure the object. Reflect on any errors that may have importance. In this activity, students are
just starting to get the feel for measuring angles. As they continue with their straw angle markers and hand measures
they will further develop their angle understanding. In Activity 6, students connect what they have been doing to standard
angle measures by using a protractor or angle ruler. In their transition from nonstandard to standard units students should
be able to understand angles and degrees more specifically.

��Acti�ity �: Obser�ations and Landmarks
markers. Be sure they record their new observations and measurements so they are readable.
This may be a good stopping point for the day.
11. Explain that Frederick uses hand measurements (see Figure 2.4), to estimate the distance between the objects and the angle they form in relation to his location. Model the different hand measurements.
12. Model for students how to measure the angle between two objects us-ing Frederick’s hand measurements. While modeling, explain that you need to place your hand against a landmark off in the distance (along one ray) and then reiterate the hand measure, as shown in Figure 2.5, until you reach the other object (on the other ray).
13. Ask students to practice using hand measures to estimate the distance between two objects outside and the two objects on their desks. Ask them to place the measurements in their math notebooks and draw a picture that shows what was measured and how.
Fig. 2.5: Drawing of student measuring distance between objects faraway using hand measures.
14. Conclude the activity by asking students to think about what they have been doing so far and answer the following question in their math note-books with words and drawings: What is an angle? Note that students will continue to refine this definition through future activities.
Math Note: PerspectiveStudents are also investigating the
idea of perspective by defining the
vertex of their angle at their loca-
tion. If students were to move to
another location, such as further
towards or further away from the
faraway objects, it would be a
new perspective and thus a new
angle. If they moved left or right,
they would also create a different
perspective, a new angle, and, in
this case, also new rays. Students
should see that the only way they
can keep the close and faraway
objects lined up is to be at only one
point, the vertex of the angle.
Some students may need to close
an eye to better visualize their hand
measures fitting inside the faraway
objects. Notice that closing one
eye creates a different perspec-
tive than closing the other eye. In
essence, closing an eye creates a
different vertex. Remind students
who opt to close an eye for one set
of distant measurements that they
should close the same eye for any
additional distant measurements.
Otherwise, they will be measuring
a different angle.

�0 Star Na�igation: Explorations into Angles and Measurement
Teacher Note: Understanding Hand MeasuresUsing hand measures for the objects in the distance will provide a different result than if you actually measured the dis-
tance between the objects on the desks. This may create confusion for your students. What we have done in this activity
is measure the angle from one perspective despite the distance objects are on the ray lengths. This will most likely bring
up the issues of what an angle is and how it is measured. Through future activities, students will understand that measur-
ing the arc length at different points on the rays is not the same as measuring the actual angle or the amount of rotation
formed by the rays. At this point, have students think about and refine their understanding of what was measured with
their hand measures.
Cultural Note: Not Getting LostAs students begin to connect observation, measurement, and navigation, they may make the assumption that you stand
outside, take your reading, go in that direction and then if you’ve made an error you will end up getting lost. Frederick
George’s methods allow for slight error because the measurements are approximations. However, he takes measurements
often enough that through rechecking he can make sure he is correct; thus, he can apply course corrections along the
way. These corrections also link back to the observations students started in Activity 1. If they see something and they are
familiar with the place, then they will know better where they are. In this way, students can see that the ideas of observa-
tion and being aware of their surroundings that they learned in Activity 1 are just as important to navigating as knowing
the patterns of the Sun and stars that they will learn in future activities.
Cultural Note: Body MeasuresTraditional Yup’ik culture uses measuring, estimating, and proportional thinking for many tasks ranging from building
structures; to making clothing; to hunting, gathering, and traveling across the land. The hand measures that Frederick
uses are a small sample of the many body measures found in Yup’ik culture. Yup’ik body measures differ from standard
measurements in that each measurement is specific to the person doing the measuring. For example, when building kay-
aks, two or more kayak makers will use the same body measure (see Figure. 2.6), but each person’s measurements differ
according to his or her own body lengths. This ensures that each kayak is tailor-made for each person, and the custom fit
that results creates a balance between the person, the kayak, and the sea. The MCC module, Drying Salmon: Journeys
into Proportional and Prealgebraic Thinking focuses specifically on these topics for grades 5–7.
Figure 2.6: Example of various Yup’ik body measures used when building a kayak.
Yagneq TaluyaneqYagneq
Ikugarnek
Tallinin
Yagneq TaluyaneqYagneq
Ikugarnek
Tallinin

��
Activity 3 Gathering Shadow DataAs Frederick George navigates in his travels, he observes and measures distances between landmarks, just as students practiced in Activity 2. He also observes the position of the Sun and shadows. Through such observa-tions he can tell the approximate time on any given day. He can also find his direction of travel through this method. This activity will give students the tools to make similar observations themselves.
In this activity, students will gather their own shadow measurements as a method of recording the apparent movement of the Sun across the sky. The movement of the shadows should help students conceptualize angles as rotation because they can see the actual movement of the shadows as they rotate on the plane of the cardboard. Students continue collecting and recording data and also begin to find patterns and interpret their data. They will make conjectures and gather the data needed to prove or disprove them. Through this activity students’ intuitive angle understanding will continue to build so that they have the required background knowledge needed to tackle the activities coming in Section 2.
We ask you to model the set-up of the shadow recording device and take the first measurement; then we ask you to continue gathering data on the device you have set up as your students gather their own. This joint activity will allow students needing further guidance to observe and continue learning before working independently. It will also provide you with your own data to help guide students. A sunny day will work best for this activity. If you are dealing with intermittent clouds, have students make predictions about where the shadow should fall.
We also continue the story portion of the literacy component by having students read a short anecdote from Joshua Phillip. Please refer to the Lit-eracy Counts!: Teacher’s Guide to continue developing story circle roles. Note that the roles introduced through the story circle can also be used for group problem-solving in the math component of the module. As students work in navigating teams, encourage them to apply the skills developed in the literacy section to their math problem-solving.
Goals• To record shadow lengths and locations over the course of an entire day• To discern patterns in shadow data• To pose conjectures• To develop proofs of conjectures• To recognize that the shortest shadow occurs at solar noon• To determine the direction of north from solar noon• To determine the four cardinal directions from solar noon

�� Star Na�igation: Explorations into Angles and Measurement
Materials• Poster, Sun and Earth Facts• Transparency, Knife in the Snow• Sheet of butcher paper (36 x 36 inches) or piece of cardboard (one per
team of three to four students)• Pencil or stick to use as the gnomons (one per team)• Dime-sized piece of clay (one per team)• Pencil or pen for recording on the butcher paper (one per student)• Piece of cardboard or plywood to place under the butcher paper (one per
team) (optional)• Flashlights (optional)• Garbage bags for placing under cardboard (one per team) (optional)• Straw angle markers from Activity 2• Ruler or other straight edge (one per team)• Directional compass (one per team)• The Star Navigation Reader, Joshua Phillip’s Anecdote• Literacy Counts!: Teacher’s Guide• Math notebooks
PreparationGather the items you will need to make your own sundial. Be sure you’ve found a location outside that will be suitable for the whole class to gather their shadow data with minimal barriers such as trees or houses. Read the Teacher and Math Notes in the module so you are ready to encourage and facilitate students’ inquiry and exploration in the appropriate direction for the flow of the module.
DurationTwo class periods and intermittently throughout one full school day.
VocabularyAltitude—height of an object above the Earth’s surface.Cardinal directions— the chief or primary directions of north, south, east
and west.Conjecture— (n) an inference, theory, or prediction from incomplete or
uncertain evidence; (v) to infer, theorize, or predict from incomplete or uncertain evidence–to guess.
Declination— the angle difference between the direction shown on a com-pass and true north.
Gnomon— the part of a sundial that casts a shadow indicating the time of day.
Solar noon— the time of day when the Sun is at its highest point.Zenith—the point directly overhead in the sky; the highest point any object
reaches as it traverses an arc.
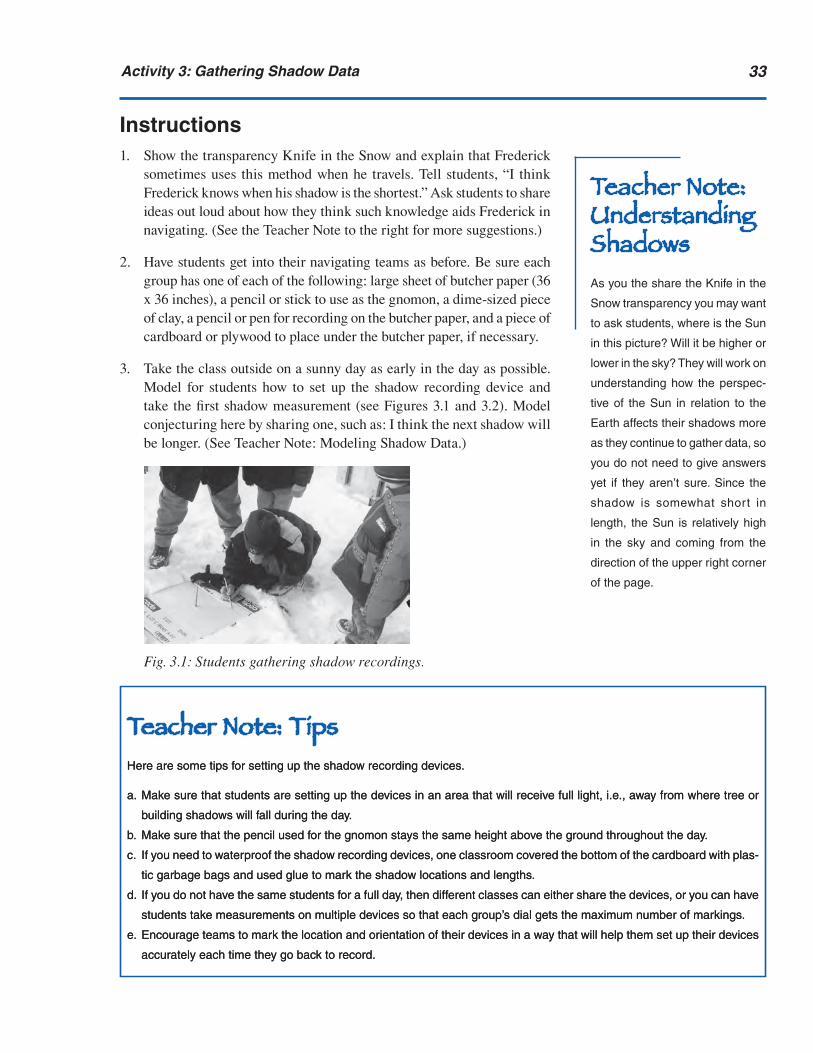
��Acti�ity �: Gathering Shadow Data
Instructions1. Show the transparency Knife in the Snow and explain that Frederick
sometimes uses this method when he travels. Tell students, “I think Frederick knows when his shadow is the shortest.” Ask students to share ideas out loud about how they think such knowledge aids Frederick in navigating. (See the Teacher Note to the right for more suggestions.)
2. Have students get into their navigating teams as before. Be sure each group has one of each of the following: large sheet of butcher paper (36 x 36 inches), a pencil or stick to use as the gnomon, a dime-sized piece of clay, a pencil or pen for recording on the butcher paper, and a piece of cardboard or plywood to place under the butcher paper, if necessary.
3. Take the class outside on a sunny day as early in the day as possible. Model for students how to set up the shadow recording device and take the first shadow measurement (see Figures 3.1 and 3.2). Model conjecturing here by sharing one, such as: I think the next shadow will be longer. (See Teacher Note: Modeling Shadow Data.)
Teacher Note: TipsHere are some tips for setting up the shadow recording devices.
a. Make sure that students are setting up the devices in an area that will receive full light, i.e., away from where tree or
building shadows will fall during the day.
b. Make sure that the pencil used for the gnomon stays the same height above the ground throughout the day.
c. If you need to waterproof the shadow recording devices, one classroom covered the bottom of the cardboard with plas-
tic garbage bags and used glue to mark the shadow locations and lengths.
d. If you do not have the same students for a full day, then different classes can either share the devices, or you can have
students take measurements on multiple devices so that each group’s dial gets the maximum number of markings.
e. Encourage teams to mark the location and orientation of their devices in a way that will help them set up their devices
accurately each time they go back to record.
Fig. 3.1: Students gathering shadow recordings.
Teacher Note: Understanding ShadowsAs you the share the Knife in the
Snow transparency you may want
to ask students, where is the Sun
in this picture? Will it be higher or
lower in the sky? They will work on
understanding how the perspec-
tive of the Sun in relation to the
Earth affects their shadows more
as they continue to gather data, so
you do not need to give answers
yet if they aren’t sure. Since the
shadow is somewhat short in
length, the Sun is relatively high
in the sky and coming from the
direction of the upper right corner
of the page.
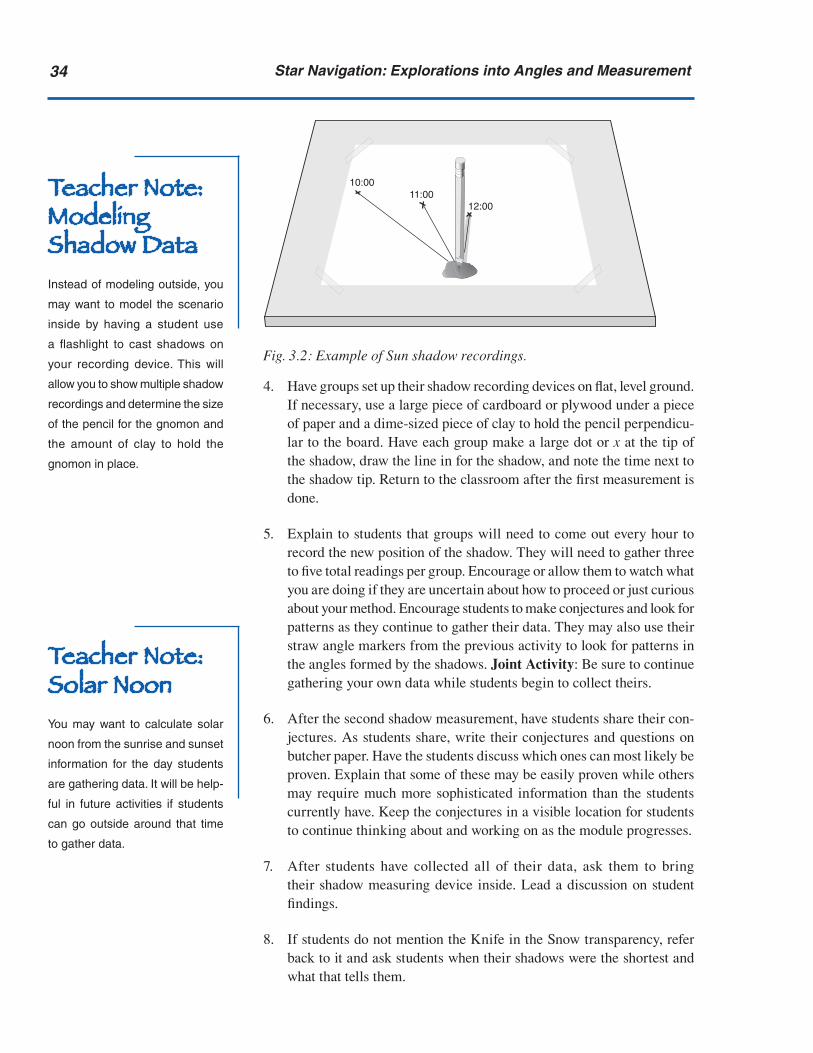
�� Star Na�igation: Explorations into Angles and Measurement
10:0011:00
12:00
Fig. 3.2: Example of Sun shadow recordings.
4. Have groups set up their shadow recording devices on flat, level ground. If necessary, use a large piece of cardboard or plywood under a piece of paper and a dime-sized piece of clay to hold the pencil perpendicu-lar to the board. Have each group make a large dot or x at the tip of the shadow, draw the line in for the shadow, and note the time next to the shadow tip. Return to the classroom after the first measurement is done.
5. Explain to students that groups will need to come out every hour to record the new position of the shadow. They will need to gather three to five total readings per group. Encourage or allow them to watch what you are doing if they are uncertain about how to proceed or just curious about your method. Encourage students to make conjectures and look for patterns as they continue to gather their data. They may also use their straw angle markers from the previous activity to look for patterns in the angles formed by the shadows. Joint Activity: Be sure to continue gathering your own data while students begin to collect theirs.
6. After the second shadow measurement, have students share their con-jectures. As students share, write their conjectures and questions on butcher paper. Have the students discuss which ones can most likely be proven. Explain that some of these may be easily proven while others may require much more sophisticated information than the students currently have. Keep the conjectures in a visible location for students to continue thinking about and working on as the module progresses.
7. After students have collected all of their data, ask them to bring their shadow measuring device inside. Lead a discussion on student findings.
8. If students do not mention the Knife in the Snow transparency, refer back to it and ask students when their shadows were the shortest and what that tells them.
Teacher Note: Modeling Shadow DataInstead of modeling outside, you
may want to model the scenario
inside by having a student use
a flashlight to cast shadows on
your recording device. This will
allow you to show multiple shadow
recordings and determine the size
of the pencil for the gnomon and
the amount of clay to hold the
gnomon in place.
Teacher Note: Solar NoonYou may want to calculate solar
noon from the sunrise and sunset
information for the day students
are gathering data. It will be help-
ful in future activities if students
can go outside around that time
to gather data.

��Acti�ity �: Gathering Shadow Data
Teacher Note: Key DiscoveriesThe key discoveries of this lesson are that:
1. Solar noon is the shortest shadow and the shadow points north while the Sun is directly in the south;
2. The angles between hourly shadows are equal in measure; and
3. The pattern of the shadows provides an angle measure of 15 degrees between hourly shadows on a 24-hour clock.
(This last idea may not come out as quickly as 1 and 2, but it should become more apparent towards the end of the
module.)
Here are some questions and ideas that might help students find these key discoveries. Don’t give these to the students,
but encourage students to make their own conjectures and ask their own questions. Pay attention to their conjectures and
lead them to think of these if they are stuck.
How does “noon” relate to your shadow data?What does the term “noon” mean?Is 12 noon on the clock the actual middle of the day?Is 12 noon on the clock when the Sun is highest in the sky?Where is the Sun in relation to the shadow?Why is the Sun’s location in relation to the shadow important?How do the shadow measures compare to each other?Why do the locations of the shadows change from hour to hour?What do the angles tell you about the Sun and time?How do these shadow patterns help Frederick travel and find his way?What other information can we get from these shadow measurements?Where would the shadow fall if it were on the half-hour?What does the final pattern of the shadows on the paper look like?
Math Note: Conjectures and ProofStudents’ conjecture topics might range from measurement ideas (the length will be shorter), location ideas (the next
shadow will be closer together than the last one), to ideas about the environment, or other topics that may not be easily
proven at this time. One example of a conjecture that can be proven right away is whether they predicted the shadow
would be shorter in the next hour than in the previous one. In that case, to prove or disprove the conjecture, students can
measure the lengths of both shadows and compare their relative sizes.
A more difficult conjecture to verify is if the student conjectured that the shadow moves a certain direction because of the
rotation of the Earth on its axis. To prove or disprove this conjecture, we would need a solar system model or scientific
information about the rate of the Earth’s rotation on its axis to help explain the relationship instead of being able to work
on the conjecture outside for a short while. Students will create a model of the Sun and Earth in Activity 7.
Encourage students to work together. One possibility is to put students whose conjectures could be easily proven or
disproven with students who posed more difficult conjectures so that students get exposure to both types of conjecture.
Explain that as the module progresses they may be able to prove the more difficult conjectures using other methods, but
that these conjectures cannot be verified with the current model.
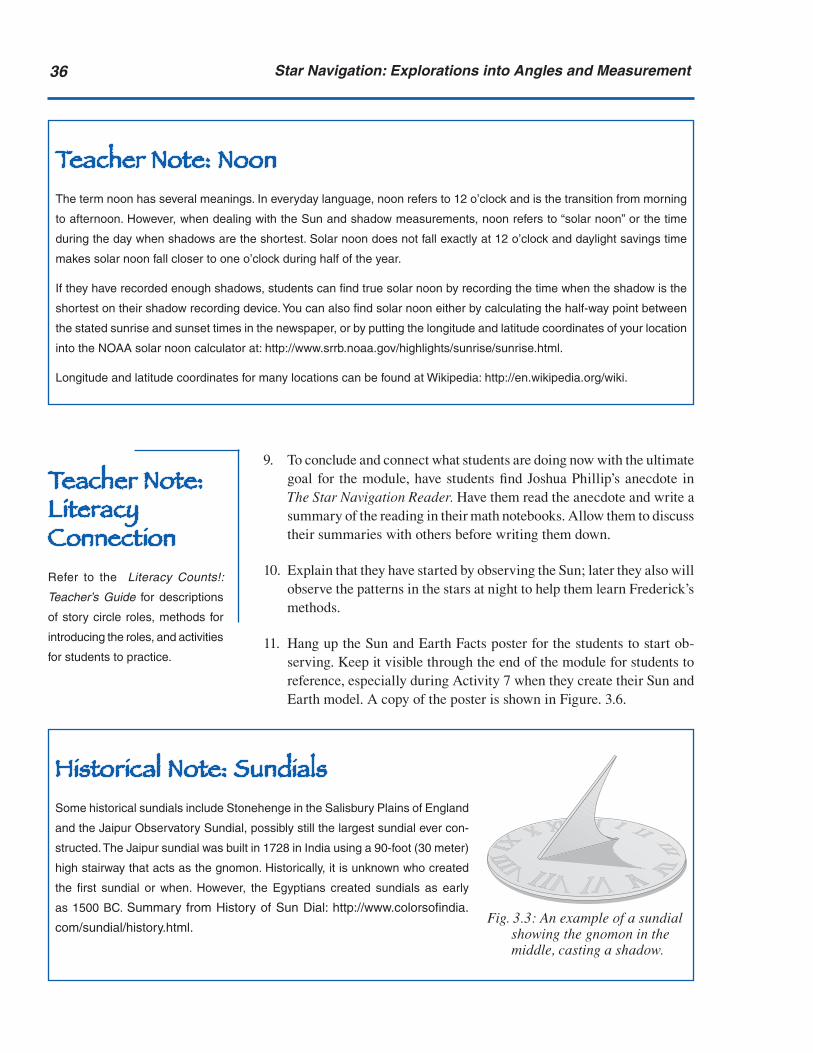
�� Star Na�igation: Explorations into Angles and Measurement
Teacher Note: NoonThe term noon has several meanings. In everyday language, noon refers to 12 o’clock and is the transition from morning
to afternoon. However, when dealing with the Sun and shadow measurements, noon refers to “solar noon” or the time
during the day when shadows are the shortest. Solar noon does not fall exactly at 12 o’clock and daylight savings time
makes solar noon fall closer to one o’clock during half of the year.
If they have recorded enough shadows, students can find true solar noon by recording the time when the shadow is the
shortest on their shadow recording device. You can also find solar noon either by calculating the half-way point between
the stated sunrise and sunset times in the newspaper, or by putting the longitude and latitude coordinates of your location
into the NOAA solar noon calculator at: http://www.srrb.noaa.gov/highlights/sunrise/sunrise.html.
Longitude and latitude coordinates for many locations can be found at Wikipedia: http://en.wikipedia.org/wiki.
9. To conclude and connect what students are doing now with the ultimate goal for the module, have students find Joshua Phillip’s anecdote in The Star Navigation Reader. Have them read the anecdote and write a summary of the reading in their math notebooks. Allow them to discuss their summaries with others before writing them down.
10. Explain that they have started by observing the Sun; later they also will observe the patterns in the stars at night to help them learn Frederick’s methods.
11. Hang up the Sun and Earth Facts poster for the students to start ob-serving. Keep it visible through the end of the module for students to reference, especially during Activity 7 when they create their Sun and Earth model. A copy of the poster is shown in Figure. 3.6.
Historical Note: SundialsSome historical sundials include Stonehenge in the Salisbury Plains of England
and the Jaipur Observatory Sundial, possibly still the largest sundial ever con-
structed. The Jaipur sundial was built in 1728 in India using a 90-foot (30 meter)
high stairway that acts as the gnomon. Historically, it is unknown who created
the first sundial or when. However, the Egyptians created sundials as early
as 1500 BC. Summary from History of Sun Dial: http://www.colorsofindia.
com/sundial/history.html.
Teacher Note: Literacy ConnectionRefer to the Literacy Counts!:
Teacher’s Guide for descriptions
of story circle roles, methods for
introducing the roles, and activities
for students to practice.
Fig. 3.3: An example of a sundial showing the gnomon in the middle, casting a shadow.

��Acti�ity �: Gathering Shadow Data
Teacher Note: Magnetic NorthA compass points toward magnetic north, which, depending on the location, may not be the same as the true north
students found using shadows. The angle difference between the direction shown on a compass and true north is called
declination. In Alaska, depending on the latitude and longitude of a particular location, the declination can be anywhere
between 10 degrees and 30 degrees east (10˚–30˚ E) meaning that the compass needle is pointing that many degrees
too far to the east compared to true north. Since the magnetic pole is constantly wandering, declination measurements
change (Kjellstrom, 1976). For example, in 2003 the following declinations were found for the Alaska locations: Fairbanks,
24˚ E; Anchorage, 21˚ E; Tok, 25˚ E; Ketchikan, 23˚ E; Kodiak, 19˚ E; and Nome, 14˚ E. Be sure to let students know that
if they plan on using a compass while traveling, they should consult updated maps or references such as the following
websites for the most recent declination measures.
More information can be found at the following websites:
U.S. Geological Survey: http://www.usgs.gov
Alaska Science Forum from the Geophysical Institute, UAF: http://www.gi.alaska.edu/ScienceForum/ASF16/1632.html
Exploration: Finding NorthIf students did not recognize that their shortest shadow occurred at solar noon and points in the direction of north, then follow the previous activity with this short exploration.
1. Have students go outside in their navigating teams with one compass per team. Have them take their shadow recordings with them as well and place the recordings where they collected their shadow data if pos-sible.
2. Have students stand so the gnomon is facing in the direction of their shortest shadow. Have them read the direction on the compass.
3. When students return to the classroom, ask them to write what they discovered about directions and shadows and why they think it’s true in their math notebooks.
4. Have students share their discoveries and thoughts.
5. Ask them to face north and then point to the other directions sequen-tially— east, south, and west.
Teacher Note: Shortest Shadow Points North
The Sun is the highest in the sky
when the shadow is the shortest.
The Sun is also at its peak at the
middle of the day. Lastly, the Sun
is in the south—between rising in
the east and setting in the west, at
the middle of the day. Using these
three facts, students can deduce
why the shortest shadow points
to the north during any season
and at any location in the northern
hemisphere.
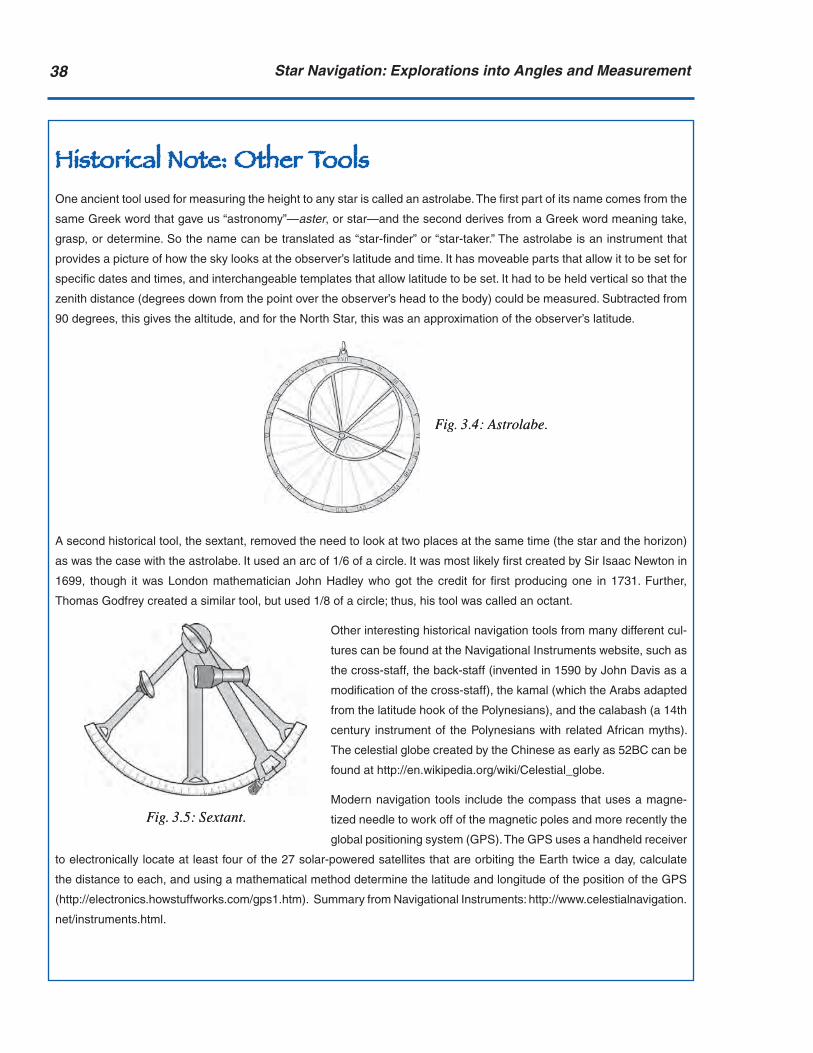
�� Star Na�igation: Explorations into Angles and Measurement
Historical Note: Other ToolsOne ancient tool used for measuring the height to any star is called an astrolabe. The first part of its name comes from the
same Greek word that gave us “astronomy”—aster, or star—and the second derives from a Greek word meaning take,
grasp, or determine. So the name can be translated as “star-finder” or “star-taker.” The astrolabe is an instrument that
provides a picture of how the sky looks at the observer’s latitude and time. It has moveable parts that allow it to be set for
specific dates and times, and interchangeable templates that allow latitude to be set. It had to be held vertical so that the
zenith distance (degrees down from the point over the observer’s head to the body) could be measured. Subtracted from
90 degrees, this gives the altitude, and for the North Star, this was an approximation of the observer’s latitude.
A second historical tool, the sextant, removed the need to look at two places at the same time (the star and the horizon)
as was the case with the astrolabe. It used an arc of 1/6 of a circle. It was most likely first created by Sir Isaac Newton in
1699, though it was London mathematician John Hadley who got the credit for first producing one in 1731. Further,
Thomas Godfrey created a similar tool, but used 1/8 of a circle; thus, his tool was called an octant.
Other interesting historical navigation tools from many different cul-
tures can be found at the Navigational Instruments website, such as
the cross-staff, the back-staff (invented in 1590 by John Davis as a
modification of the cross-staff), the kamal (which the Arabs adapted
from the latitude hook of the Polynesians), and the calabash (a 14th
century instrument of the Polynesians with related African myths).
The celestial globe created by the Chinese as early as 52BC can be
found at http://en.wikipedia.org/wiki/Celestial_globe.
Modern navigation tools include the compass that uses a magne-
tized needle to work off of the magnetic poles and more recently the
global positioning system (GPS). The GPS uses a handheld receiver
to electronically locate at least four of the 27 solar-powered satellites that are orbiting the Earth twice a day, calculate
the distance to each, and using a mathematical method determine the latitude and longitude of the position of the GPS
(http://electronics.howstuffworks.com/gps1.htm). Summary from Navigational Instruments: http://www.celestialnavigation.
net/instruments.html.
Fig. 3.4: Astrolabe.Fig. 3.4: Astrolabe.
Fig. 3.5: Sextant.Fig. 3.5: Sextant.

��Acti�ity �: Gathering Shadow Data
Fig. 3.6: Sun and Earth Facts poster for reference.
Sun
mercuryvenus
Part of the series Math in a Cultural Context: Lessons Learned from Yup’ik Eskimo Elders © 2007 University of Alaska FairbanksMCC
SUMMER in thenorthern hemisphere(Alaska faces the sun
most of the time)
WINTER in thenorthern hemisphere
(Alaska faces away fromthe sun most of the time)
SPRING in thenorthern hemisphere
(Alaska has equalamounts of day and night)
FALL in thenorthern hemisphere
(Alaska has equalamounts of day and night)
Earth makes acomplete revolution
in one year.
earth Earth
Earth makes acomplete rotationin one day.
Third planet from the sunDiameter (at equator): 8,000 milesRotation Period: 23.93 hoursRevolution Period: 365.25 daysDistance from the Sun: 92,960,000 miles
23º
N
W
S
Summer SolsticeJun. 21
Spring/Fall EquinoxMar. 21/Sep. 21
WinterSolsticeDec. 21
E Sunrise
Sunset
Solstice & EquinoxSun Trajectoriesat Latitude 65º
North
Diameter (at equator): 900,000 miles
andandSun EarthSun Earth
N
Fa c t sFa c t s

Blackline Master MCCMCC
N
SW
E
N
SW
E
�0
Knife in the Snow
S
N
WE
��
Section 2: Understanding AnglesIn this section of the module, students will investigate the angles formed by their various shadow
recordings further to gain a deeper understanding of the mathematics of angles. A variety of
explorations are presented to help your students refine their understanding of angle proper-
ties and how measuring angles is fundamentally different from measuring lengths. Students
should also be able to further connect their shadow recordings with cardinal directions and
time to understand how these factors help a navigator travel during the day.


��
Activity 4 Creating Personal Angle MeasurementsAt this point, your students have started to think about and analyze their shadow data. They have been using conjectures, trying to prove or disprove ideas, predicting where future shadows will fall, and connecting what they are doing to how Frederick travels and navigates.
In this activity, students will now create their own ways of measuring angles much like Frederick does with his hand measures. Students will use their shadow recordings as the base for constructing a nonstandard angle mea-surement. Through this constructivist oriented approach students build their angle conception and view angles as a measure of “openness” independent of linear ray measures. This activity starts with an open-ended explora-tion through which students attempt to measure angles without using any standard measuring devices, such as a protractor. Note that students will connect their measures to standard angle measures in Activity 6.
As students progress and refine their own angle measures, they will most likely find that they have an incomplete understanding of what an angle is, misconceptions about angles, and difficulty measuring and partitioning angles. These issues arise due to the nature of angles. The hands-on inves-tigations in this activity will allow students to perceive angles as two rays joined at a vertex and measured as a degree of openness (rotation). Through developing their own personal angle measuring device and partitioning it, students develop a deeper, more accurate understanding of angles which in-cludes partitioning, equal units, starting point, and nonoverlapping units.
Throughout Section 2, Activities 4, 5, and 6, students will focus heavily on the mathematics of angles. The traditional stories “How Raven Brought Light” and “Morning Star,” which can be found in The Star Navigation Reader, are meant to highlight student explorations and prepare them for developing the Sun and Earth model. Both stories connect thematically and culturally to the activities students are working through to understand the mathematics of angles.
Goals• To create a personal angle measuring device and use it• To understand angle measurements as openness or the amount of
rotation• To differentiate between angle measurement and ray length or arc
length

�� Star Na�igation: Explorations into Angles and Measurement
• To partition angles• To compare shadow recordings to a clock
Materials• Transparency, Blank Clock (one per group)• Worksheet, Blank Clock (one per group)• Shadow recordings from Activity 3• Scissors (one pair per student)• String (one to three rolls available for possible use)• Sticky notes (one to three pads available for possible use)• Spaghetti (one package available for possible use)• Coins (several handfuls of different sizes available for possible use)• Copy paper and/or construction paper (one stack available for possible
use)• Note cards (one stack available for possible use)• Straw angle markers from Activity 2• Brass fasteners (handful available for possible use)• Straws (handful available for possible use)• Cardstock or manila folders (one stack available for possible use)• The Star Navigation Reader, “How Raven Brought Light”• Literacy Counts!: Teacher’s Guide• Math notebooks
PreparationRead the Math Note on Important Angle Concepts (pages 49–50) to be aware of issues for your students.
DurationOne class period.
VocabularyAngle— two line segments or rays that have a common endpoint.Iteration— something that has been repeated.Linear measurement—measurement along a line or in one dimension.Openness of angles— another way of thinking about the rotation of one
line segment from another forming an angle.Partition— to break into smaller sections.Ray— a line segment; two rays form an angle.Vertex— the point of intersection of the two sides of an angle.
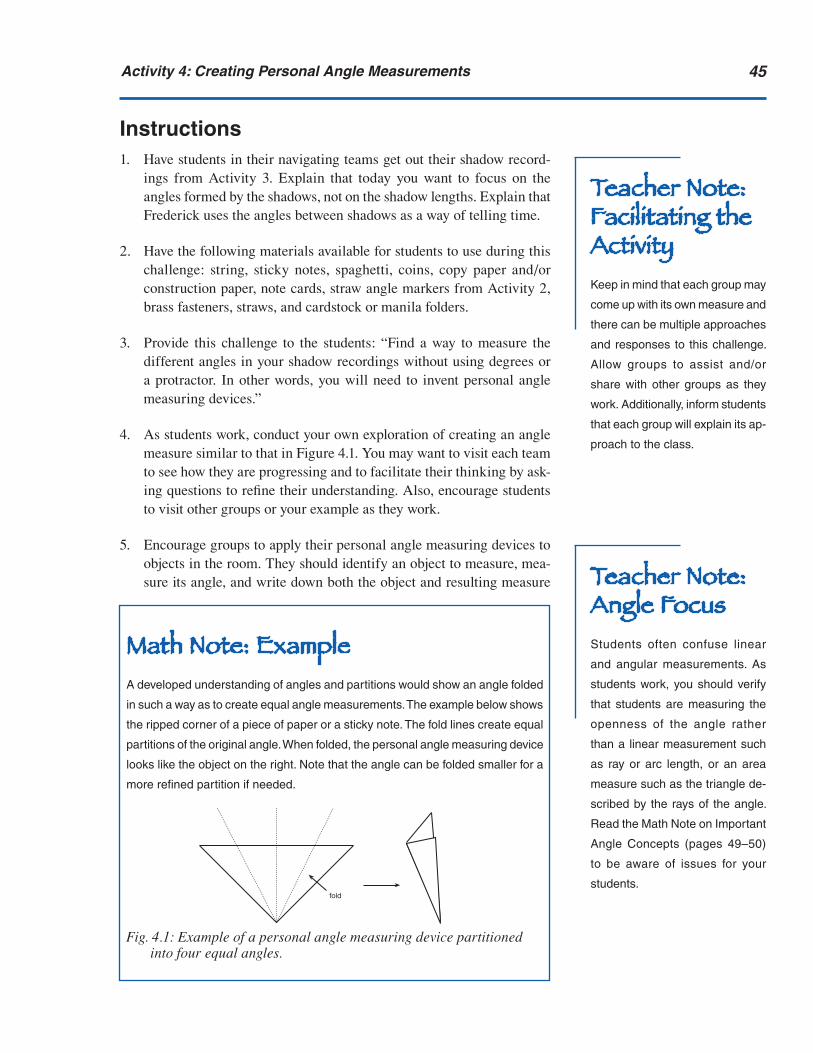
��Acti�ity �: Creating Personal Angle Measurements
Instructions1. Have students in their navigating teams get out their shadow record-
ings from Activity 3. Explain that today you want to focus on the angles formed by the shadows, not on the shadow lengths. Explain that Frederick uses the angles between shadows as a way of telling time.
2. Have the following materials available for students to use during this challenge: string, sticky notes, spaghetti, coins, copy paper and/or construction paper, note cards, straw angle markers from Activity 2, brass fasteners, straws, and cardstock or manila folders.
3. Provide this challenge to the students: “Find a way to measure the different angles in your shadow recordings without using degrees or a protractor. In other words, you will need to invent personal angle measuring devices.”
4. As students work, conduct your own exploration of creating an angle measure similar to that in Figure 4.1. You may want to visit each team to see how they are progressing and to facilitate their thinking by ask-ing questions to refine their understanding. Also, encourage students to visit other groups or your example as they work.
5. Encourage groups to apply their personal angle measuring devices to objects in the room. They should identify an object to measure, mea-sure its angle, and write down both the object and resulting measure
Math Note: ExampleA developed understanding of angles and partitions would show an angle folded
in such a way as to create equal angle measurements. The example below shows
the ripped corner of a piece of paper or a sticky note. The fold lines create equal
partitions of the original angle. When folded, the personal angle measuring device
looks like the object on the right. Note that the angle can be folded smaller for a
more refined partition if needed.
Fig. 4.1: Example of a personal angle measuring device partitioned into four equal angles.
fold
Teacher Note: Facilitating the ActivityKeep in mind that each group may
come up with its own measure and
there can be multiple approaches
and responses to this challenge.
Allow groups to assist and/or
share with other groups as they
work. Additionally, inform students
that each group will explain its ap-
proach to the class.
Teacher Note: Angle FocusStudents often confuse linear
and angular measurements. As
students work, you should verify
that students are measuring the
openness of the angle rather
than a linear measurement such
as ray or arc length, or an area
measure such as the triangle de-
scribed by the rays of the angle.
Read the Math Note on Important
Angle Concepts (pages 49–50)
to be aware of issues for your
students.
�� Star Na�igation: Explorations into Angles and Measurement
in their math notebooks. They may also use their straw angle markers to determine an angle (especially between two faraway objects), and then measure the angle with the group’s new personal angle measuring device.
6. Ask teams if their personal angle measuring devices are accurate enough. Ask them, how can you use what you have, or modify it, to better measure the objects chosen or to measure a half-hour interval or a ten-minute interval.
7. Ask each group to share its personal angle measuring device and the methods they used to make it more accurate with the class. Note for yourself the misconceptions and struggles of each student and/or team.
8. Allow students to further refine their personal angle measuring devices, if they are ready, as they will continue to use these tools throughout the module.
9. Lead a discussion to refine students’ definition of what an angle is from Activity 2. Have students record any new understandings of the defini-tion of an angle in their math notebooks.
10. Hand out The Star Navigation Reader, one to each student, and have them read “How Raven Brought Light.” This traditional story should keep the students connected to what they have just accomplished with the shadow recordings as well as provide a break from the mathemat-ics, if needed. Please refer to the Literacy Counts!: Teacher’s Guide for more details.
Exploration: Shadows and ClocksIn this exploration, students will compare their shadow recordings to a typical clock showing twelve hours. They will find that the hourly mea-sures in the shadows do not align with the hourly measures on the clock. Through the investigation students should see that the shadows stem from a 24-hour clock and so the angles formed between hours are half as big as those on the traditional clock. Students will be able to use this information later when practicing navigating, relating their personal angle measuring devices to the protractor (Activity 6), and when building the Sun and Earth model (Activity 7).
Students will work on this exploration from two perspectives: half of them will be asked to start with the clock and impose the shadows on top while the other half will start with the shadows and impose a clock on them (as seen in Figures 4.2 and 4.3). Working from each perspective will raise dif-
Teacher Note: Literacy ConnectionRefer to the Literacy Counts!:
Teacher’s Guide for descriptions
of story circle roles, methods for
introducing the roles, and activities
for students to practice.
Teacher Note: ExplorationsSeveral explorations are provided
to aid students in their discoveries
at this time, so don’t feel as though
you need to give out answers right
away. The exploration provided
here should help students with the
physical aspects of their shadows
and how they relate to time and
clocks. Activity 5 contains further
explorations to challenge students
mathematically, specifically, to
strengthen their angle sense,
clarify their definitions and per-
ceptions of angles, and partition
their angles. Depending on what
students presented in today’s
activity, choose explorations to
aid in their understanding. Note
that you may want to set up cen-
ters for several of these activities,
work through them sequentially,
or pick and choose one or two for
the whole class to work on at the
same time.

��Acti�ity �: Creating Personal Angle Measurements
Teacher Note: Two ApproachesHaving groups work from different perspectives (from shadow to clock and from clock to shadow) should bring up a dif-
ferent set of questions and issues. These should become resolved as students begin to share their ideas with the class
and are allowed more time to investigate afterwards. For example, when starting with the shadow recording, students may
want to orient their results so that solar noon is pointing towards the twelve on the clock. They will realize that 10:00 on
their shadows does not align with the ten on the clock. When starting with the clock first, students may divide the circle
into angles that provide the correct location of the hours on the clock. When they compare this to their shadow measures
they will see that the angles are not the same. (Note: The starting object in both figures appears
in blue. The imposed object appears in black.)
The end result of all of these investigations is the realization that the sundial is a 24-hour clock and so the angles which
measure 15 degrees are half the size of those on the standard 12-hour clock (30-degree angles).
ferent issues that need to be resolved. The idea of angle as rotation should be further solidified, the understanding of the angle size should become more apparent, and students should begin to see that the purpose of partitioning angles is to be more accurate with their measurements.
1. Remind students that Frederick uses the Sun like a clock. Explain that today’s challenge is to see how the shadow recordings relate to a clock.
2. Have students get out their shadow recordings. You can have students continue to work in their navigating teams or you can switch groups around. Be certain that each group has a shadow recording device with which to work.
3. Pick half of the groups and provide them with the Blank Clock worksheet on a transparency. Distribute the Blank Clock worksheet on paper to the other half of the groups. Allow students to use any of the tools they’ve already developed, such as the straw angle markers or their personal angle measuring devices.
Fig. 4.3: Starting with the clock and imposing the shadow recordings.
Fig. 4.2: Starting with the shadow recording and imposing the clock.
8:00
12:00
12
6
39
12
457
8
1110
10:00
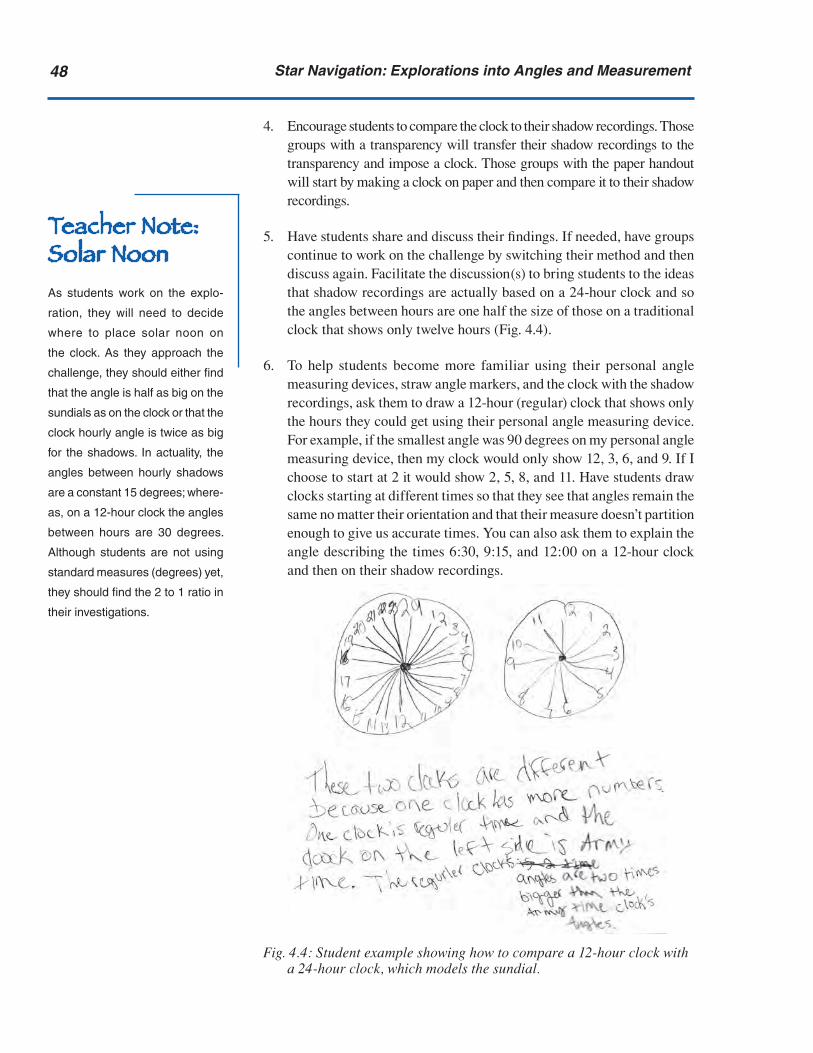
�� Star Na�igation: Explorations into Angles and Measurement
4. Encourage students to compare the clock to their shadow recordings. Those groups with a transparency will transfer their shadow recordings to the transparency and impose a clock. Those groups with the paper handout will start by making a clock on paper and then compare it to their shadow recordings.
5. Have students share and discuss their findings. If needed, have groups continue to work on the challenge by switching their method and then discuss again. Facilitate the discussion(s) to bring students to the ideas that shadow recordings are actually based on a 24-hour clock and so the angles between hours are one half the size of those on a traditional clock that shows only twelve hours (Fig. 4.4).
6. To help students become more familiar using their personal angle measuring devices, straw angle markers, and the clock with the shadow recordings, ask them to draw a 12-hour (regular) clock that shows only the hours they could get using their personal angle measuring device. For example, if the smallest angle was 90 degrees on my personal angle measuring device, then my clock would only show 12, 3, 6, and 9. If I choose to start at 2 it would show 2, 5, 8, and 11. Have students draw clocks starting at different times so that they see that angles remain the same no matter their orientation and that their measure doesn’t partition enough to give us accurate times. You can also ask them to explain the angle describing the times 6:30, 9:15, and 12:00 on a 12-hour clock and then on their shadow recordings.
Fig. 4.4: Student example showing how to compare a 12-hour clock with a 24-hour clock, which models the sundial.
Teacher Note: Solar NoonAs students work on the explo-
ration, they will need to decide
where to place solar noon on
the clock. As they approach the
challenge, they should either find
that the angle is half as big on the
sundials as on the clock or that the
clock hourly angle is twice as big
for the shadows. In actuality, the
angles between hourly shadows
are a constant 15 degrees; where-
as, on a 12-hour clock the angles
between hours are 30 degrees.
Although students are not using
standard measures (degrees) yet,
they should find the 2 to 1 ratio in
their investigations.
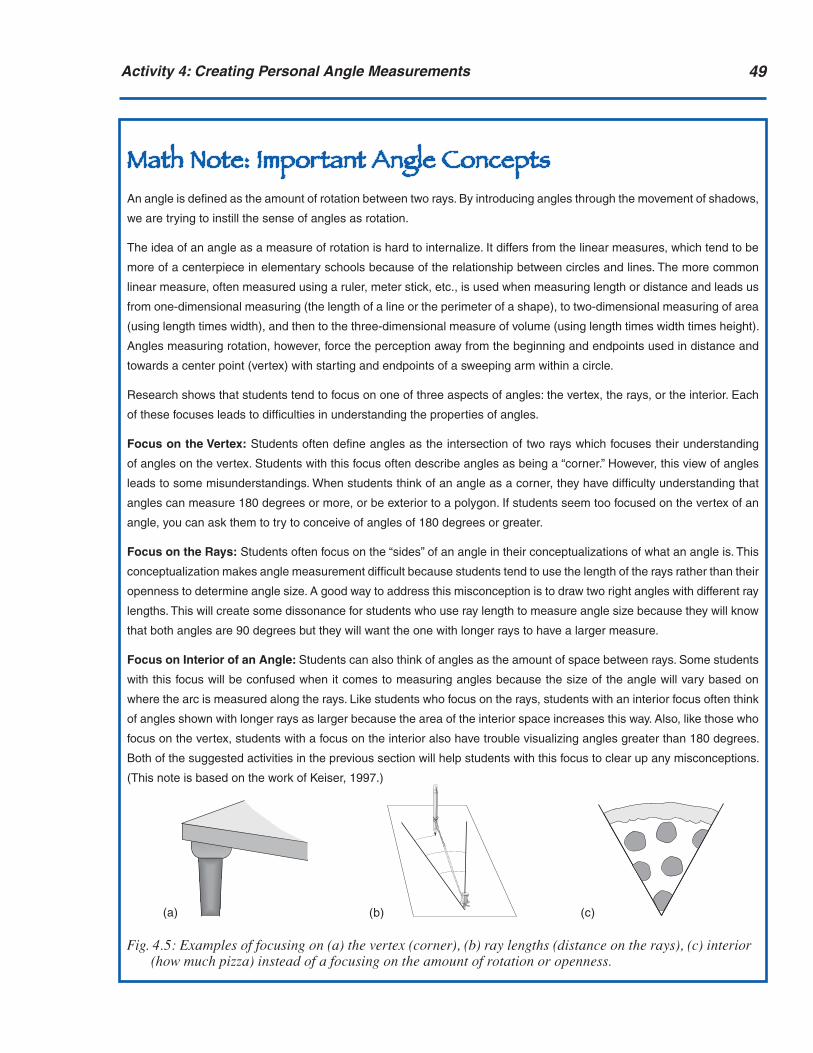
��Acti�ity �: Creating Personal Angle Measurements
Math Note: Important Angle ConceptsAn angle is defined as the amount of rotation between two rays. By introducing angles through the movement of shadows,
we are trying to instill the sense of angles as rotation.
The idea of an angle as a measure of rotation is hard to internalize. It differs from the linear measures, which tend to be
more of a centerpiece in elementary schools because of the relationship between circles and lines. The more common
linear measure, often measured using a ruler, meter stick, etc., is used when measuring length or distance and leads us
from one-dimensional measuring (the length of a line or the perimeter of a shape), to two-dimensional measuring of area
(using length times width), and then to the three-dimensional measure of volume (using length times width times height).
Angles measuring rotation, however, force the perception away from the beginning and endpoints used in distance and
towards a center point (vertex) with starting and endpoints of a sweeping arm within a circle.
Research shows that students tend to focus on one of three aspects of angles: the vertex, the rays, or the interior. Each
of these focuses leads to difficulties in understanding the properties of angles.
Focus on the Vertex: Students often define angles as the intersection of two rays which focuses their understanding
of angles on the vertex. Students with this focus often describe angles as being a “corner.” However, this view of angles
leads to some misunderstandings. When students think of an angle as a corner, they have difficulty understanding that
angles can measure 180 degrees or more, or be exterior to a polygon. If students seem too focused on the vertex of an
angle, you can ask them to try to conceive of angles of 180 degrees or greater.
Focus on the Rays: Students often focus on the “sides” of an angle in their conceptualizations of what an angle is. This
conceptualization makes angle measurement difficult because students tend to use the length of the rays rather than their
openness to determine angle size. A good way to address this misconception is to draw two right angles with different ray
lengths. This will create some dissonance for students who use ray length to measure angle size because they will know
that both angles are 90 degrees but they will want the one with longer rays to have a larger measure.
Focus on Interior of an Angle: Students can also think of angles as the amount of space between rays. Some students
with this focus will be confused when it comes to measuring angles because the size of the angle will vary based on
where the arc is measured along the rays. Like students who focus on the rays, students with an interior focus often think
of angles shown with longer rays as larger because the area of the interior space increases this way. Also, like those who
focus on the vertex, students with a focus on the interior also have trouble visualizing angles greater than 180 degrees.
Both of the suggested activities in the previous section will help students with this focus to clear up any misconceptions.
(This note is based on the work of Keiser, 1997.)
(a) (b) (c)
Fig. 4.5: Examples of focusing on (a) the vertex (corner), (b) ray lengths (distance on the rays), (c) interior (how much pizza) instead of a focusing on the amount of rotation or openness.

�0 Star Na�igation: Explorations into Angles and Measurement
Also, research has found that students better understand angles when they can conceptualize them from three different
views: angle within a shape, angle as rotation, and angle in relation to a circle (see Figure 4.6).
In one view, an angle is the result of two lines, rays, or segments meeting or intersecting in a drawn figure; for
example, the angles that are made by drawing a triangle or a quadrilateral. In another view, we might consider
an angle as a rotation. This is, we might think of a horizontal line segment which pivots counterclockwise. Once
it stops moving, the sweep of the segment, or its turn, describes an angle. In a third view, we could consider an
angle in relation to a circle. For example, consider two segments (radii) drawn from the center of a circle. The
two segments form an angle that can be said to represent some portion of the entire circle (Schifter, Bastable,
& Russell, 1999.
Fig. 4.6: Examples showing an angle (a) within a shape, (b) as a rotation, and (c) within a circle.
Lastly, in common language we often use the term angle referring to a view or perspective: “from my angle, the house
looks small,” or as applied to something with a slope: “the roof has a steep angle.” In these situations, the language does
not describe the angle fully. For example, in Figure 4.7, the angle of the roof does not apply merely to the line drawn for
the roof. The angle is formed between the horizontal line and the roof line as marked.
angle of roof
Fig. 4.7: Using an imaginary vertical line to visualize a right triangle can help determine the angle of the roof.

��Acti�ity �: Creating Personal Angle Measurements
Historical Note: The Rhythm of TimeAs humans we function on a 24-hour cycle of time. This pattern can be found within the universe as well. Are they related?
If so, which came first? Fundamentally, humans are part of the universe and so we are all part of the same system. There-
fore, it makes sense that we function under the same rhythm. However, we do know of other creatures, such as bears
that hibernate through the winter, who seem to function on a different cycle, yet they are also part of the same universe.
In the Yup’ik worldview described in The Star Navigation Reader, animals and humans morphing between their worlds
seemed to exist before light. Thus, as Raven brings the light, it seems the animals and humans actually create the rhythm
of time we now consider part of life.
Despite philosophical debates as to the origin of time, we can all agree that the patterns of time observed in the universe,
created by the movement of the Earth on its axis and around the Sun, are aligned with the patterns of time we follow
as humans. This pattern includes 24-hour days, broken into 12 hours ante meridiem (a.m., meaning before midday or
before noon) and 12 hours post meridiem (p.m., meaning after midday or after noon), as further explained at the website
Greenwich Mean Time (http://wwp.greenwichmeantime.com/info/noon.htm). Further, hours are broken into 60 minutes
each and each minute represents 60 seconds of time.
The Babylonians are attributed with the development of the base 60 system still used for time: 60 seconds in a minute, 60
minutes in an hour. Although it seems this base was used in other measurements during that time period, such as weight,
no one really knows why it was developed. Several theories focus more on the usefulness of the factors of 60 than on
physical properties of the solar system although they agree that the relationship was apparent. Several websites are listed
in the References under the heading, History of Time Measurements, for further exploration.
Interestingly, the circle, another development of nature, also seems to use a base similar to base 60, since there are 360
degrees in a circle (360 is divisible by 60). We can think of a semi-circle as representing a 12-hour clock and a full circle
as representing a 24-hour clock. As students continue their investigations into angles and navigating, they will continue
to connect direction and time to the mathematics of angles and degrees. They will discover that on the sundial, a 24-hour
clock, each hour represents 15 degrees since 360 degrees divided by 24 hours equals 15. Further, they will find the same
15-degree pattern in the apparent movement of the stars found within the Big Dipper and Cassiopeia around the North
Star when they gather nighttime observations in Activity 11. Undoubtedly, all of these concepts are quite interrelated, and
the more students can connect these ideas together, the better their understanding of our position in the universe.

Blackline Master MCCMCC
N
SW
E
N
SW
E
��
Blank Clock

��
Activity 5 Angle ExplorationsThis activity contains a set of explorations to bridge the concrete experi-ence of angles in the shadow recordings to a conceptual understanding of angles. These explorations are aimed at refining the various issues of angle understanding and measurement discussed in Activity 4—angle size is independent of ray length and orientation, angle size is not arc length—as well as basic measuring ideas of units, reiterating units, starting points, and partitioning. The main goal of this activity is to consolidate what students have been learning in Activities 2-4. In that regard, this activity takes a step away from the everyday math with Frederick and steps closer to typical classroom mathematics.
Combining your students’ angle understanding shared by the end of Activity 4 with their responses to the question in Activity 2 (What is an angle?) will help you assess how your students are thinking about angles at this point in the module. Several short explorations are provided here to allow students to continue to refine their thinking about angles and angle measurements. You may want to choose to use only one or two of these explorations or to use them in a different order depending on how far you feel your students have progressed in their angle understanding. Also, a challenge is presented to compare the use of the term “angle” in everyday language to its mathemati-cal usage. Lastly, this activity concludes with a set of Assessment Problems to pull together your students’ results and thinking from the explorations. Once students have a better sense of angles, they can continue following Frederick’s methods for navigating as he locates and determines directions based on angles, time, and cardinal directions.
You may want to refer back to the Math Note in Activity 4 for the specific difficulties related to students’ varying understanding of important angle concepts. Remember that your students should develop the sense of how angles act differently than lengths. They should also see that the lengths of the rays do not play a role in determining the size of the angle and angles are a measure of rotation regardless of their orientation.
Goals• To understand that an angle measurement refers to the amount of rotation
or openness• To recognize ray length does not affect angle measurements• To recognize orientation does not affect angle measurements• To verify angle measurements differ from area or length measurements• To recognize angles within various shapes• To identify angle measurements as acute, right, obtuse, or straight

�� Star Na�igation: Explorations into Angles and Measurement
• To identify angle types as interior and exterior• To relate the common use of the word angle to its mathematical
definition
Materials• Worksheet, Circle Cutouts (one per student)• Transparency, Circle Cutouts (one for demonstration)• Transparency, Angles Inside Circles (optional for discussion)• Worksheet, Angle Property Chart (one per student)• Transparency, Circles and Angles (one per team)• Worksheet, Angle Groups (one per student)• Worksheet, What is an Angle (3) (one set per student)• Personal angle measuring devices from Activity 4• Transparency pens (one set per team)• Shadow recordings from Activity 3• Scissors (one pair per student)• Colored pens or markers (several colors per student)• Math notebooks
DurationOne to two class periods.
VocabularyAcute angle— an angle with measurement less than 90 degrees.Arc— a segment of a circle.Arc length— the one-dimensional length measurement of an arc.Area— the measure of a bounded region on a plane.Center— a point equally distant from all points on the circumference of
a circle.Degree(s)— a unit of measurement for angles which is 1/360 of the circum-
ference of a circle.Exterior angle— the larger angle of the two angles formed by two rays
(completes a circle).Interior angle— the smaller angle of the two angles formed by two rays.Obtuse angle— an angle that measures more than 90 and less than 180
degrees.Radius— a line segment with one endpoint at the center of a circle and the
other endpoint on the circle.Reflex angle— an angle with measurement between 180 and 360 degrees.Right angle— an angle that measures exactly 90 degrees.Rotation—the movement of an object in a circular motion around a fixed
point.Straight angle— an angle that measures exactly 180 degrees.

��Acti�ity �: Angle Explorations
Exploration A:
Comparing Angles and Angle PropertiesThis exploration compares angles of different radii within circles to further investigate angle properties. This exploration will develop the ideas of angle size independent of ray length, equal angles with different orientations, and angle measurements differing from area or length measurements. Further, if you choose, students can also explore angles as rotation and/or properties of angles within various shapes.
PreparationCopy Circle Cutouts onto a transparency to use for modeling. Cut out each circle and color with a transparency pen. If possible, color Circle 2 yellow and Circle 3 blue, keeping Circle 1 uncolored.
Instructions1. Model for students how to compare circles to investigate what stays the
same and what changes (see Figure 5.1). Show the three circles from the cut out transparency—emphasize that two are the same size and the third one is smaller. Show how you can fold Circle 2 in half to form a semi-circle and then half again and then fold it one more time to form a wedge. If the transparency does not fold well, you may need to cut along what would be the fold line.
Fig. 5.1: Folding and overlapping wedges onto a circle to compare properties.
2. Continue modeling by laying the wedge from Circle 2 on top of Circle 1 (making sure the center point of the folded or cut wedge from Circle 2 is on top of the center point of the open Circle 1) and ask students, “What stays the same and what changes?” Encourage students to discuss the
circle 1 unfolded
circle 1 unfolded
circle 2folded
fold
circle 2 unfolded
circle 2folded circle 2 folded
into wedge
circle 1 unfolded
circle 1 unfolded
circle 2folded
fold
circle 2 unfolded
circle 2folded circle 2 folded
into wedge
Math Note: PerspectiveHere is another opportunity for
students to investigate perspec-
tive, first, by recognizing that they
can impose an angle in the center
of a circle and then by recogniz-
ing that rotation does not change
angle measurements. In compari-
son to students’ investigations in
Activity 2, the vertex of the angle
does not change in this case, thus
perspective does not change, and
the angle measurement does not
change.
Teacher Note: Marking AnglesStudents may need a mini-lesson
on how to “mark” angles.

�� Star Na�igation: Explorations into Angles and Measurement
ray length, arcs, centers, and angles made by and within each circle or wedge until you feel comfortable that they can explore on their own.
3. Distribute a pair of scissors and one paper copy of the handout Circle Cutouts to each student.
4. Working in pairs, ask students to fold Circles 2 and 3 and compare these to Circle 1 lying flat. Encourage them to write down in their math notebooks what they see is the same and what is changing as they over-lay the circles. Encourage them to try different folds, to outline folded pieces on their large open circle with different colored pens or pencils, and to try the same method with both the large and small folded circles to compare those results as well.
5. Have pairs of students share their observations of what stays the same and what changes. If needed, make available an additional Circle Cutouts transparency and/or the Angles Inside Circles transparency. Students can overlay these on their work or use when they share their findings.
This may be a good stopping point for the day depending on the properties that changed and that remained the same which students discovered. You can continue having your students use these same tools to investigate (a) how an angle remains the same even after being rotated by following Steps 6 and 7 below, and/or (b) how an angle is the same within the circle and triangle (angle measurements are independent of the shape they are within) by following Steps 8 and 9. Step 10 provides an option for an assessment activity on understanding angle properties.
Angles as Rotation
6. Working in pairs, encourage students to lay the folded section or wedge on top of the large circle in various places by rotating it around the center point. In their math notebooks, ask students to write their observations of what changes and what stays the same as they rotate the same wedge around the center.
7. Have pairs of students share their observations with the class and dis-cuss the property of rotation. Encourage students to relate the idea of rotation back to the angles they gathered and observed using the Sun and shadow recordings. Specifically, what rotation was producing the angle measurements?
Angles within Shapes
8. Have students make triangles out of the folded wedges by cutting off the arcs of the wedges. To make a triangle, have them draw a line from one endpoint of the arc to the opposite edge (making a 90-degree angle)
Teacher Note: Building VocabularyDuring the discussion, introduce
new vocabulary: rotation, vertex,
ray, openness, area, and arc
as students describe what they
observed. If you have already
introduced the story circles role of
word gatherer, this is a good time
to practice the role more. Note that
if students keep drawing on top of
Circle 1 in different colors, then
everything should change except
for one attribute—the angle at the
center.
Students should identify 90-de-
gree angles in the folded circles.
Have them mark down other
angles they might recognize in
their math notebooks and trace
the wedge. This is a good way
to discuss the fact that angle
measurement stays the same no
matter where it is superimposed
on the bigger circle or the size of
the folded circle.
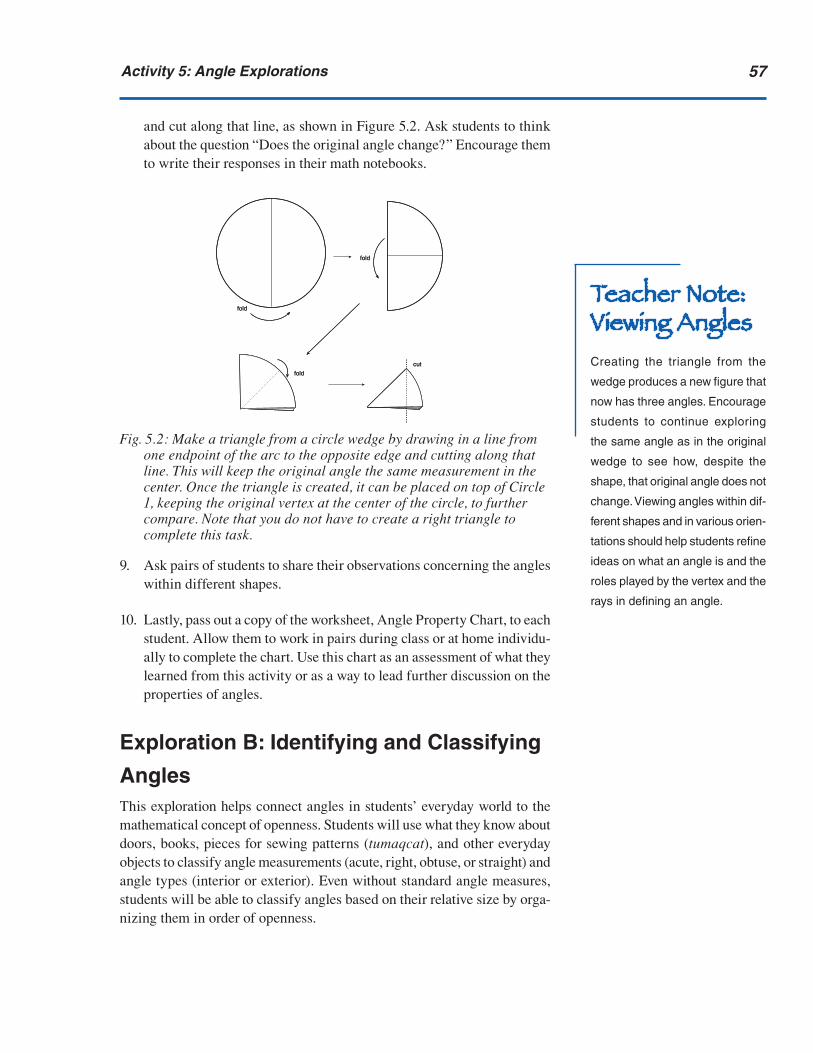
��Acti�ity �: Angle Explorations
and cut along that line, as shown in Figure 5.2. Ask students to think about the question “Does the original angle change?” Encourage them to write their responses in their math notebooks.
Fig. 5.2: Make a triangle from a circle wedge by drawing in a line from one endpoint of the arc to the opposite edge and cutting along that line. This will keep the original angle the same measurement in the center. Once the triangle is created, it can be placed on top of Circle 1, keeping the original vertex at the center of the circle, to further compare. Note that you do not have to create a right triangle to complete this task.
9. Ask pairs of students to share their observations concerning the angles within different shapes.
10. Lastly, pass out a copy of the worksheet, Angle Property Chart, to each student. Allow them to work in pairs during class or at home individu-ally to complete the chart. Use this chart as an assessment of what they learned from this activity or as a way to lead further discussion on the properties of angles.
Exploration B: Identifying and Classifying
AnglesThis exploration helps connect angles in students’ everyday world to the mathematical concept of openness. Students will use what they know about doors, books, pieces for sewing patterns (tumaqcat), and other everyday objects to classify angle measurements (acute, right, obtuse, or straight) and angle types (interior or exterior). Even without standard angle measures, students will be able to classify angles based on their relative size by orga-nizing them in order of openness.
fold
fold
fold
cut
fold
fold
fold
cut
Teacher Note: Viewing AnglesCreating the triangle from the
wedge produces a new figure that
now has three angles. Encourage
students to continue exploring
the same angle as in the original
wedge to see how, despite the
shape, that original angle does not
change. Viewing angles within dif-
ferent shapes and in various orien-
tations should help students refine
ideas on what an angle is and the
roles played by the vertex and the
rays in defining an angle.

�� Star Na�igation: Explorations into Angles and Measurement
Math Note: Interior and Exterior AnglesWhen two rays meet, they actually form two angles. The
interior angle is the smaller part, always less than 180
degrees. The other part of the angle is called the exterior
angle and is always the larger of the two angles or more
than 180 degrees. The term reflex angle refers to the
size of an angle that is more than 180 and less than 360
degrees. Thus, an exterior angle is always a reflex angle.
The term exterior refers to the location, while the term
reflex refers to the size. If the interior angle is 30 degrees,
then the exterior angle is 360 minus 30 or 330 degrees,
which also fits the definition of a reflex angle (Fig. 5.3).
We have chosen not to introduce the term reflex in the
module because it is not used often; however, it can be
introduced during this activity if you feel it’s important for
your students.
Note that there are two other mathematical contexts
that use the term exterior angle differently. The first is
when considering a polygon; then, an exterior angle is
one completing a line. For example, if an angle within
a triangle is 30 degrees, then the exterior angle is 150
degrees (Fig. 5.4). In this situation, these angles are also
considered supplementary angles or angles adding up
to 180 degrees.
The second context is when two parallel lines are cut by a
transversal line (a line that cuts at a diagonal). In this case
eight angles are formed and the exterior angles are those
on the “outside” of each parallel line (Fig. 5.5).
Refer to the following references for more information on
this terminology.
Mathsisfun!: http://www.mathsisfun.com
Sparknotes: http://www.sparknotes.com/math/geometry1/
constructions/section1.html
InteriorAngle
ExteriorAngle
InteriorAngle
ExteriorAngle
ExteriorAngle
ExteriorAngle
InteriorAngle
InteriorAngle
ExteriorAngle
ExteriorAngle
InteriorAngle
InteriorAngle
Fig. 5.3: Definition of interior and exterior angles used in this module.
Fig. 5.4: An alternative definition of interior and exterior angles used more specifically when working only with polygons.
Fig. 5.5: A third definition of interior and exterior angles used when analyzing lines and angles.

��Acti�ity �: Angle Explorations
Instructions 1. Have students use their shadow recordings. Distribute a transparency
copy of Circles and Angles to each team.
2. Have students place the transparency on top of their shadows and draw six angles—one example each of acute, right, obtuse, straight, interior, and exterior angles created by their shadow lengths.
3. Have them label each angle example from their data appropriately on the line provided. Figure 5.6 shows examples for each category.
acute right obtuse
straight interior exterior
Fig. 5.6: Examples of angles for each of the categories.
4. If necessary, ask different teams to share an example and discuss the various drawings for each category.
5. Hand out the Angle Groups worksheet, one to each student.
6. Have students draw in at least three examples of everyday objects in the appropriate box of the Angle Groups worksheet. Note that each angle object can be placed in either a size category (acute, right, obtuse, and straight) or a location category (interior and exterior).
7. Have students write a definition in their math notebooks for each of the vocabulary words that describe openness: acute, right, obtuse, straight, interior, and exterior.
8. Ask students to place the completed worksheets in their math notebooks.
Teacher Note: Connecting to Shadow RecordingsNote that students will have to
place the marking of the gnomon
in the center of each circle to use
that mark as the vertex for each
angle. Also, students should real-
ize that the shadow lengths are
now not important and that they
just need to draw each ray with
length from the center of the circle
to the circle edge.
It’s possible that students may
have the most difficulty finding the
obtuse and straight angles. Direct
their attention to these if needed.
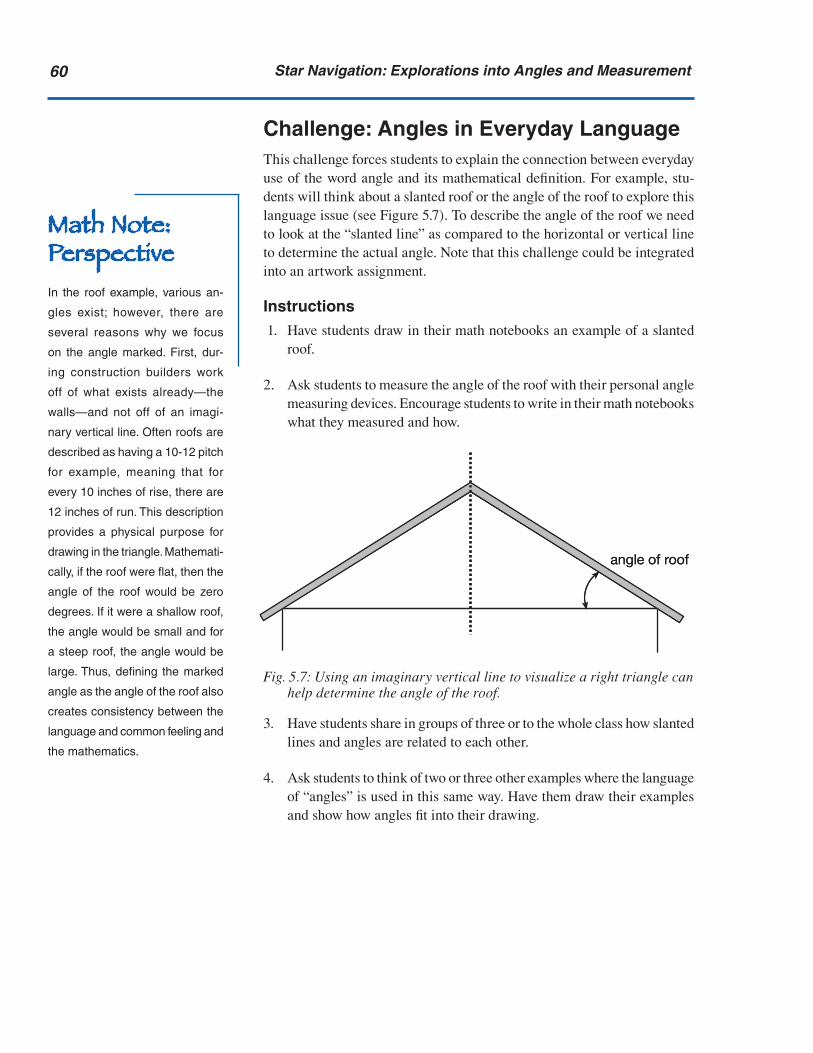
�0 Star Na�igation: Explorations into Angles and Measurement
Challenge: Angles in Everyday LanguageThis challenge forces students to explain the connection between everyday use of the word angle and its mathematical definition. For example, stu-dents will think about a slanted roof or the angle of the roof to explore this language issue (see Figure 5.7). To describe the angle of the roof we need to look at the “slanted line” as compared to the horizontal or vertical line to determine the actual angle. Note that this challenge could be integrated into an artwork assignment.
Instructions 1. Have students draw in their math notebooks an example of a slanted
roof.
2. Ask students to measure the angle of the roof with their personal angle measuring devices. Encourage students to write in their math notebooks what they measured and how.
Fig. 5.7: Using an imaginary vertical line to visualize a right triangle can help determine the angle of the roof.
3. Have students share in groups of three or to the whole class how slanted lines and angles are related to each other.
4. Ask students to think of two or three other examples where the language of “angles” is used in this same way. Have them draw their examples and show how angles fit into their drawing.
angle of roofangle of roof
Math Note: PerspectiveIn the roof example, various an-
gles exist; however, there are
several reasons why we focus
on the angle marked. First, dur-
ing construction builders work
off of what exists already—the
walls—and not off of an imagi-
nary vertical line. Often roofs are
described as having a 10-12 pitch
for example, meaning that for
every 10 inches of rise, there are
12 inches of run. This description
provides a physical purpose for
drawing in the triangle. Mathemati-
cally, if the roof were flat, then the
angle of the roof would be zero
degrees. If it were a shallow roof,
the angle would be small and for
a steep roof, the angle would be
large. Thus, defining the marked
angle as the angle of the roof also
creates consistency between the
language and common feeling and
the mathematics.

��Acti�ity �: Angle Explorations
Assessment: Angle PropertiesThis assessment is provided to gauge the progress of your students’ under-standing of angles since Activity 2 when they first answered the question, “What is an angle?” Students can receive the set of problems as homework, to work on independently in class, to work on in groups during class, or to use as a discussion tool with the whole class. Encourage students to share their thinking by writing or drawing pictures instead of just writing their answers.
Instructions 1. Distribute one copy of the What is an Angle worksheets (3 pages), to
each student.
2. Have students work through the problems independently or in groups during class or as homework. Encourage students to refer back to their previous experiences with the module while working on the problems.
3. Use students’ responses to lead a discussion about the properties of angles and how measuring angles differs from other measurements. Allow students with varied responses to further discuss properties and previous observations until the entire class is convinced appropri-ately.
4. Have students record their latest, refined definition of an angle in their math notebooks, with illustrations.
5. Have each student pick a partner with whom to trade notebooks. Ask them to write a question about their partner’s definition or drawing in their partner’s notebook.
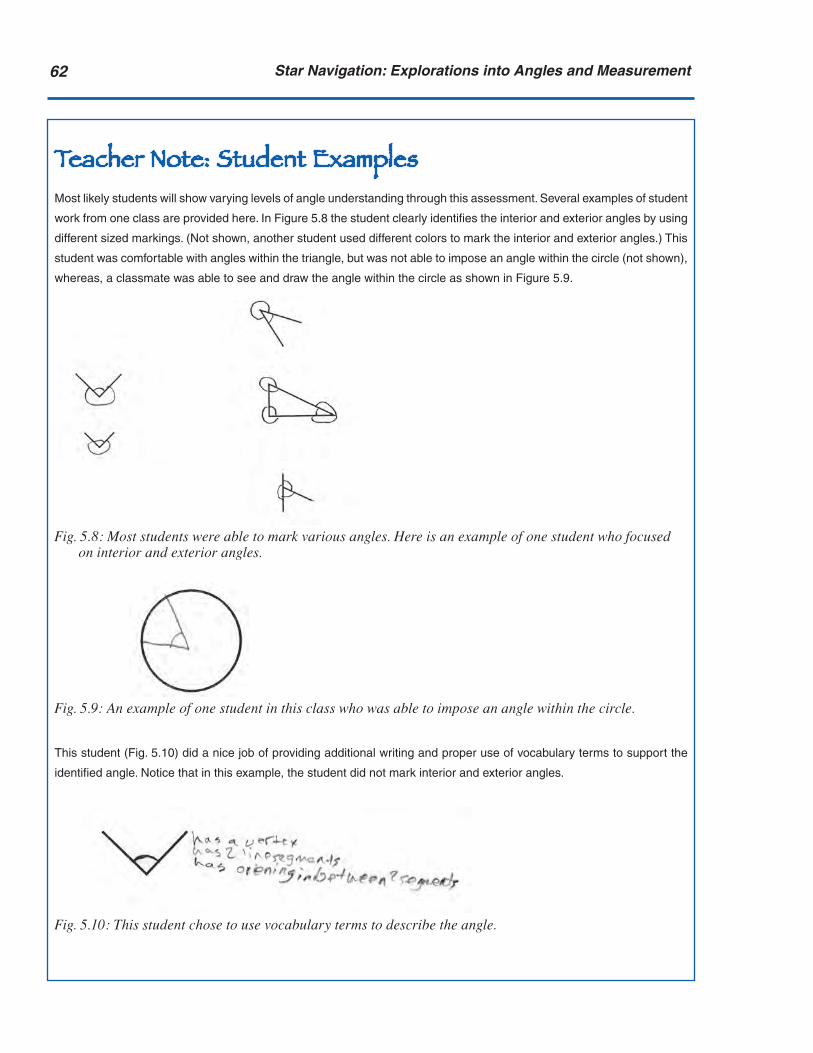
�� Star Na�igation: Explorations into Angles and Measurement
Teacher Note: Student ExamplesMost likely students will show varying levels of angle understanding through this assessment. Several examples of student
work from one class are provided here. In Figure 5.8 the student clearly identifies the interior and exterior angles by using
different sized markings. (Not shown, another student used different colors to mark the interior and exterior angles.) This
student was comfortable with angles within the triangle, but was not able to impose an angle within the circle (not shown),
whereas, a classmate was able to see and draw the angle within the circle as shown in Figure 5.9.
Fig. 5.8: Most students were able to mark various angles. Here is an example of one student who focused on interior and exterior angles.
Fig. 5.9: An example of one student in this class who was able to impose an angle within the circle.
This student (Fig. 5.10) did a nice job of providing additional writing and proper use of vocabulary terms to support the
identified angle. Notice that in this example, the student did not mark interior and exterior angles.
Fig. 5.10: This student chose to use vocabulary terms to describe the angle.
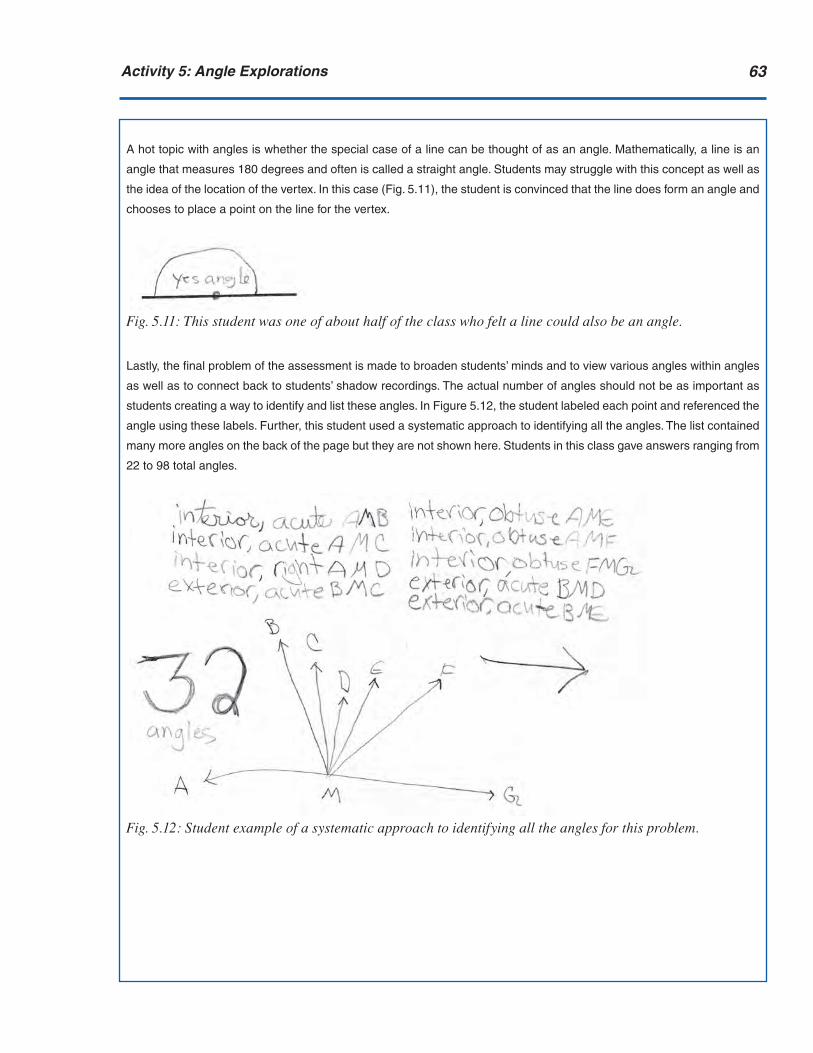
��Acti�ity �: Angle Explorations
A hot topic with angles is whether the special case of a line can be thought of as an angle. Mathematically, a line is an
angle that measures 180 degrees and often is called a straight angle. Students may struggle with this concept as well as
the idea of the location of the vertex. In this case (Fig. 5.11), the student is convinced that the line does form an angle and
chooses to place a point on the line for the vertex.
Fig. 5.11: This student was one of about half of the class who felt a line could also be an angle.
Lastly, the final problem of the assessment is made to broaden students’ minds and to view various angles within angles
as well as to connect back to students’ shadow recordings. The actual number of angles should not be as important as
students creating a way to identify and list these angles. In Figure 5.12, the student labeled each point and referenced the
angle using these labels. Further, this student used a systematic approach to identifying all the angles. The list contained
many more angles on the back of the page but they are not shown here. Students in this class gave answers ranging from
22 to 98 total angles.
Fig. 5.12: Student example of a systematic approach to identifying all the angles for this problem.
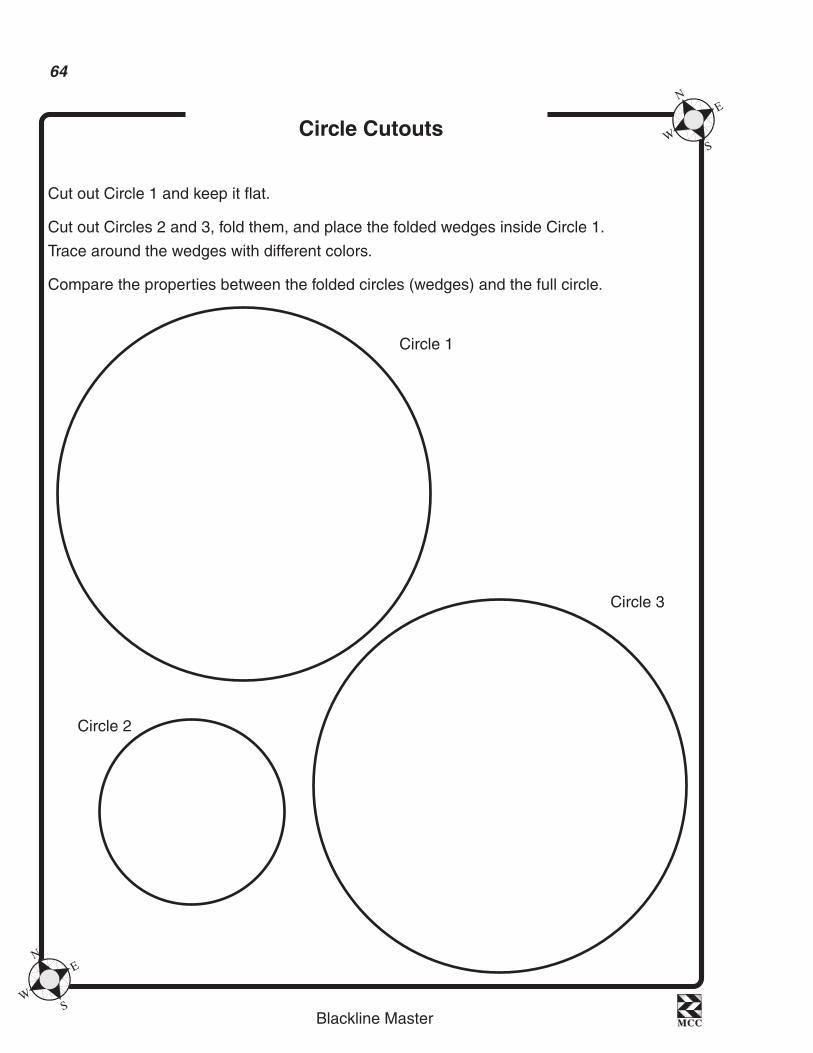
Blackline Master MCCMCC
N
SW
E
N
SW
E
��
Circle Cutouts
Cut out Circle 1 and keep it flat.
Cut out Circles 2 and 3, fold them, and place the folded wedges inside Circle 1.
Trace around the wedges with different colors.
Compare the properties between the folded circles (wedges) and the full circle.
Circle 1
Circle 3
Circle 2
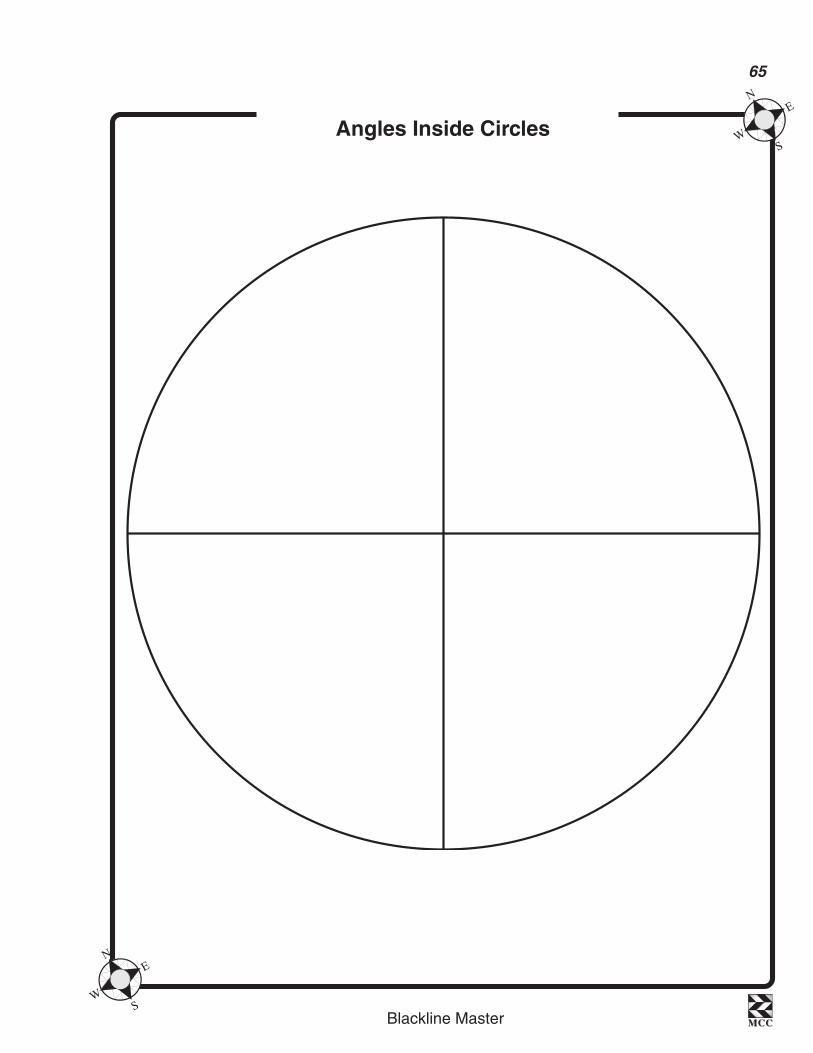
Blackline Master MCCMCC
N
SW
E
N
SW
E
��
Angles Inside Circles

Blackline Master MCCMCC
N
SW
E
N
SW
E
��
Angle Property Chart
Name: _________________________________
Determine whether each angle property is true or false. Draw a picture showing why you
said it was true or false and provide a written proof or explanation.
Angle Property True
or
False
Draw a picture to show what you did Explanation of your
proof
The length of
the line segment
changes the
size of the angle
measurement
Orientation
of the angle
changes the
size of the angle
measurement
Every angle can
have many differ-
ent arc lengths
An angle can
be broken into
smaller angles

Blackline Master MCCMCC
N
SW
E
N
SW
E
��
Circles and Angles
Name: _________________________________
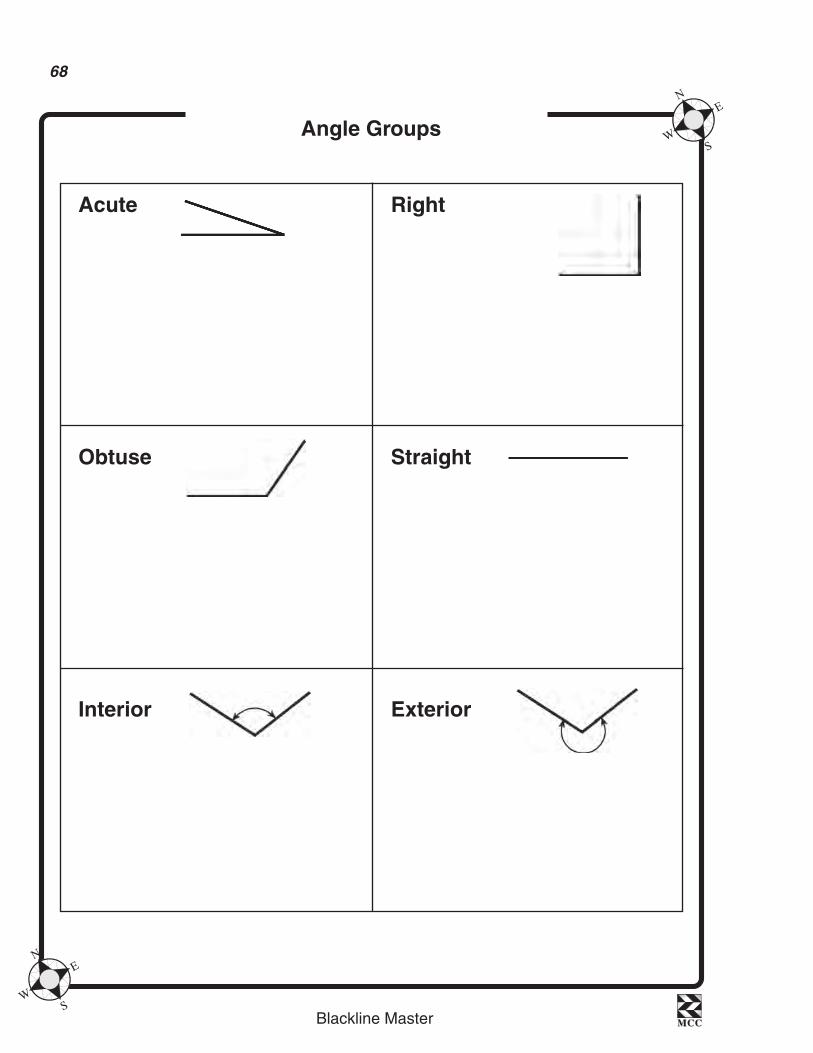
Blackline Master MCCMCC
N
SW
E
N
SW
E
��
Angle Groups
Acute Right
Obtuse Straight
Interior Exterior

Blackline Master MCCMCC
N
SW
E
N
SW
E
��
What is an Angle? (Page 1)
Name:
Problem 1: Mark all the angles on each object below, if an angle exists. Explain your reasoning.

Blackline Master MCCMCC
N
SW
E
N
SW
E
�0
What is an Angle? (Page 2)
Name:
Problem 2: You have a round pizza and you need to cut it into 6 equal pieces. How will you do that? Explain your thinking in words and drawings.
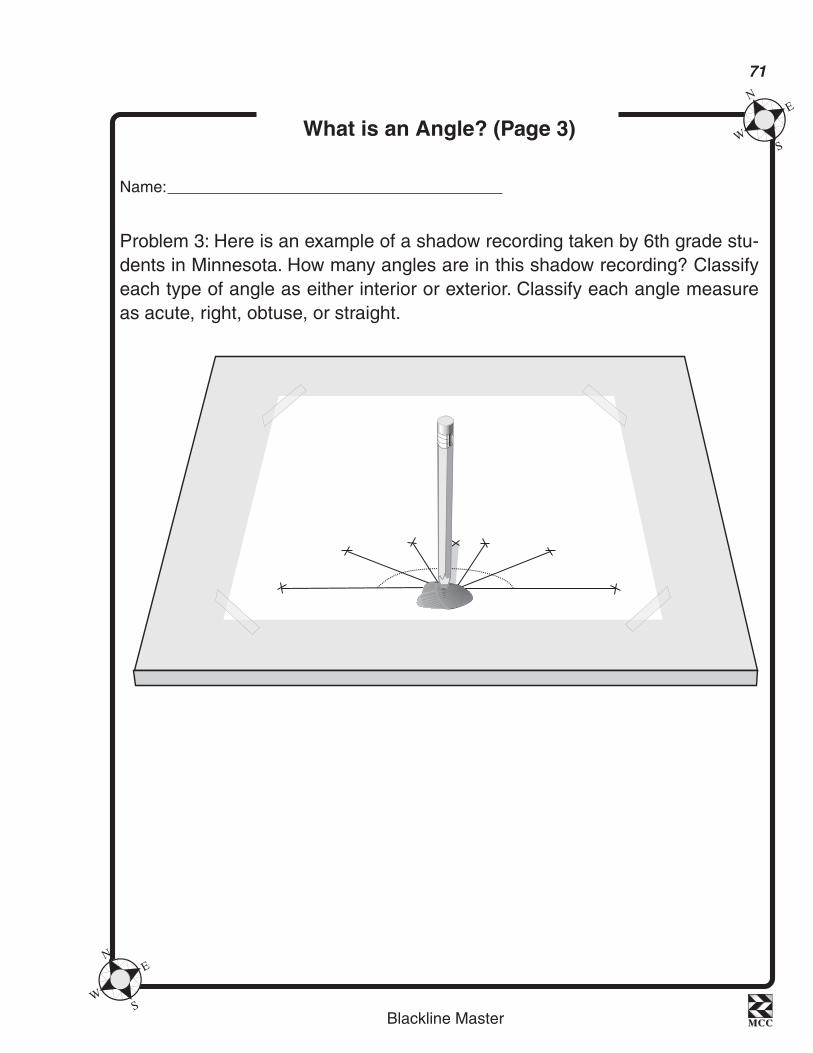
Blackline Master MCCMCC
N
SW
E
N
SW
E
��
What is an Angle? (Page 3)
Name:
Problem 3: Here is an example of a shadow recording taken by 6th grade stu-dents in Minnesota. How many angles are in this shadow recording? Classify each type of angle as either interior or exterior. Classify each angle measure as acute, right, obtuse, or straight.


��
Activity 6 Transitioning to Standard Angle MeasurementsActivity 6 is a key lesson that integrates the Yup’ik culture and stories from previous activities into a bridge connecting students’ personal angle measuring devices with standard angle measures and tools found in typical school math. More specifically, this activity will connect students’ refined understanding of angles with standard measures and tools. Students will work with protractors and/or angle rulers to compare their own personal angle measuring devices to the unit of a degree. As they practice using the tools to measure angles within objects in their surroundings, students will develop a better sense of what a degree is, what an angle is, and where specific measuring tools are useful. This activity can also be used to further practice vocabulary.
Although Frederick does not use a protractor when measuring, he said the protractor explained how he was thinking when he used his hand measures with the stars. Hopefully, students will appreciate the protractor as another available tool as well as better understand its function based on their previ-ous investigations in this module. After students have compared the tools (straw angle marker, personal angle measuring device, angle ruler, and protractor), they will be ready to move on to Section 3 and put some of these tools to work.
Students will continue working with The Star Navigation Reader as they read the first part of a traditional story told by Annie Blue, an elder and expert storyteller from Togiak, Alaska. This story, “Morning Star,” will begin to link students with the Sun and Earth model they will create and use in the next activity. Please refer to the Literacy Counts!: Teacher’s Guide for details on how to use the same debriefing approaches with the stories as students have been using in their navigating teams.
Goals• To relate students’ personal angle measuring devices to degrees using
standard tools• To familiarize students with multiple instruments to measure angles• To understand that angles measure rotation• To determine ease of use, accuracy, and practicality of multiple angle
measuring tools
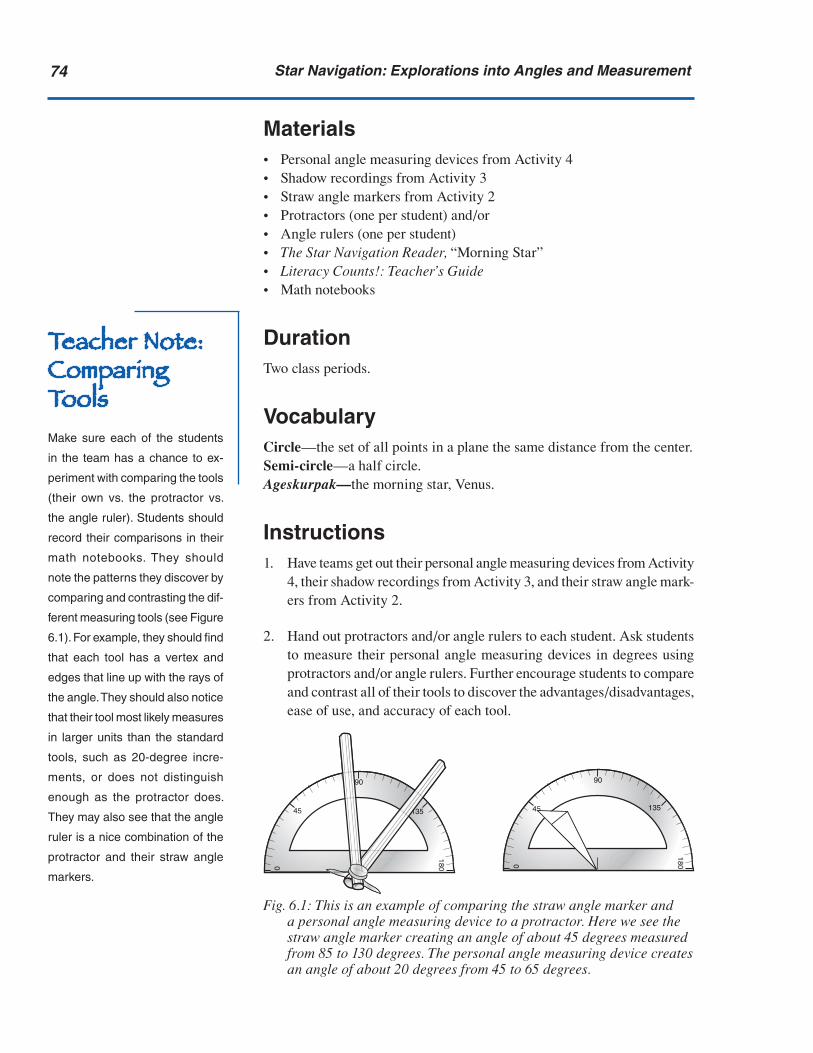
�� Star Na�igation: Explorations into Angles and Measurement
Materials• Personal angle measuring devices from Activity 4• Shadow recordings from Activity 3• Straw angle markers from Activity 2• Protractors (one per student) and/or• Angle rulers (one per student)• The Star Navigation Reader, “Morning Star”• Literacy Counts!: Teacher’s Guide• Math notebooks
DurationTwo class periods.
VocabularyCircle— the set of all points in a plane the same distance from the center.Semi-circle— a half circle.Ageskurpak—�the morning star, Venus.
Instructions1. Have teams get out their personal angle measuring devices from Activity
4, their shadow recordings from Activity 3, and their straw angle mark-ers from Activity 2.
2. Hand out protractors and/or angle rulers to each student. Ask students to measure their personal angle measuring devices in degrees using protractors and/or angle rulers. Further encourage students to compare and contrast all of their tools to discover the advantages/disadvantages, ease of use, and accuracy of each tool.
Fig. 6.1: This is an example of comparing the straw angle marker and a personal angle measuring device to a protractor. Here we see the straw angle marker creating an angle of about 45 degrees measured from 85 to 130 degrees. The personal angle measuring device creates an angle of about 20 degrees from 45 to 65 degrees.
0
180
90
45 135
0
180
90
13545
0
180
90
45 135
0
180
90
13545
Teacher Note: Comparing ToolsMake sure each of the students
in the team has a chance to ex-
periment with comparing the tools
(their own vs. the protractor vs.
the angle ruler). Students should
record their comparisons in their
math notebooks. They should
note the patterns they discover by
comparing and contrasting the dif-
ferent measuring tools (see Figure
6.1). For example, they should find
that each tool has a vertex and
edges that line up with the rays of
the angle. They should also notice
that their tool most likely measures
in larger units than the standard
tools, such as 20-degree incre-
ments, or does not distinguish
enough as the protractor does.
They may also see that the angle
ruler is a nice combination of the
protractor and their straw angle
markers.

��Acti�ity �: Transitioning to Standard Angle Measurements
3. Once students have compared their tools, encourage them to practice measuring objects in the classroom and objects in the distance, using both the standard tools and their personal angle measuring devices. As they record their findings, they should also confirm that the multiple tools produce the same results.
4. Have teams share their findings about how their personal angle measur-ing device compared with the protractor and/or angle rulers. Encourage them to identify and share the smallest unit they can measure with each device (smallest unit on a protractor is one degree). Also have them share angles they measured with each tool and which tools were easiest to use in various circumstances.
5. After students have shared their findings, ask them how they would manage without these tools. Allow them some time to develop methods for remembering angle sizes. This could lead to approximations, hand measures, or creative methods of marking angles within the body, etc.
6. Have students summarize what they have learned about the multiple tools, angle properties, and measuring. Encourage them to describe what was difficult, which tool helped them learn best, how to measure an angle, and any new ideas on the definition of an angle. You may want to do this either in large group discussion or by asking the students to present in their navigating groups to the whole class.
7. Explain to students that as a way to integrate the math explorations of angles back into navigating, students will read the first part of “Morning Star,” a traditional story as told by Annie Blue. Explain that Annie Blue is an elder and expert storyteller from Togiak, Alaska.
8. Hand out The Star Navigation Reader, one to each student.
9. Have students read through “Morning Star,” until the dotted line on page 17, using the method and format of your choice. Please refer to the Literacy Counts!: Teacher’s Guide for more details. Encourage students to take notes in their math notebooks if it helps them.
10. Conclude by paraphrasing the following big picture ideas. Summarize the following activities with your whole class to connect what they have been doing with where they are going. Explain that now that they have a better understanding of angles and how to measure them, they need to go back and understand their shadow data better before trying to navigate during the day. They will use the Sun and Earth model to help with this. Lastly, they will apply what they have learned to night-time navigating as Joshua Phillip suggested by learning the stars that Frederick uses and how to find the patterns to help guide them.
Teacher Note: Pattern Blocks and AnglesAnother activity to help students
gain a better sense of common
standard angles (30, 45, 60, 90,
and 180 degrees) can be done
with patterns blocks. See the fol-
lowing website for instructions:
http://www.lessonplanspage.com/
MathAnglesPatternBlocks56.htm
Teacher Note: Literacy ConnectionRefer to the Literacy Counts!:
Teacher’s Guide for descriptions
of story circle roles, methods for
introducing the roles, and activities
for students to practice.


��
Section 3: Navigating in the DaytimeIn this section of the module, students will integrate what they have been learning through
observations, conjectures, and measures to put their new concepts of angle measurements,
shadow recordings, Sun movements, and cardinal directions to use. They begin by clarifying
some of the outstanding factors of the shadow recordings by using a Sun and Earth model
to prove or disprove any unanswered conjectures from Activity 3. Further, they connect
Venus in the Sun and Earth model to the “Morning Star” story. Then, they focus on solving a
navigating puzzle in a fictitious environment before trying to navigate on their own outside.
The concluding activity for this section asks students to create a treasure hunt for others that
includes cardinal directions, environmental observations, locating and viewing landmarks,
and, of course, measuring angles.


��
Activity 7 Sun and Earth ModelThis activity will help students understand the patterns (length of shadows, angle measurements, perspectives) in their observations of the day and night sky and the Sun shadows. This activity starts by building a model of the Sun and Earth to help students understand some of the phenomena they have observed such as the relationship between time and shadow length. Through this model, students will learn that the Earth revolves around the Sun once a year and that the Earth rotates on its axis once per day. Students can then connect this scientific background to what they have been observ-ing with their shadow recordings and possibly use it to prove or disprove any unanswered conjectures.
Specifically, students should begin to connect the Earth’s rotation on its axis with the day and night schedule and thus their shadow recordings. Focusing on the direction of rotation, counter-clockwise, should explain why their shadows rotate clockwise throughout the day. Once the revolution around the Sun is included in the model, then students should start to see why the shadow lengths change from season to season and are longer in the winter than the summer. Lastly, students should relate the constant rotation of the Earth on its axis to the constant shadow angle measurement of 15 degrees regardless of the length of the shadow.
Next, students read the conclusion of “Morning Star,” in which they learn about Venus, a prominent celestial body. As students investigate the prop-erties of Venus, they learn that different planets have varying attributes and how those differences affect what students have been studying in this module. Through comparisons between Earth and Venus, students should gain a deeper understanding of why many of these environmental patterns exist on Earth and how we can rely on them.
Goals• To model the Sun and Earth properties to understand time (day, night,
seasons)• To use the model to explain shadow patterns of angles and lengths• To use the model to explain observations needed for navigating, such as
relationships between shadow positions and time• To investigate how Venus fits into the Sun and Earth model• To read and comprehend portions of a traditional Yup’ik story about
Venus as another way to relate to time
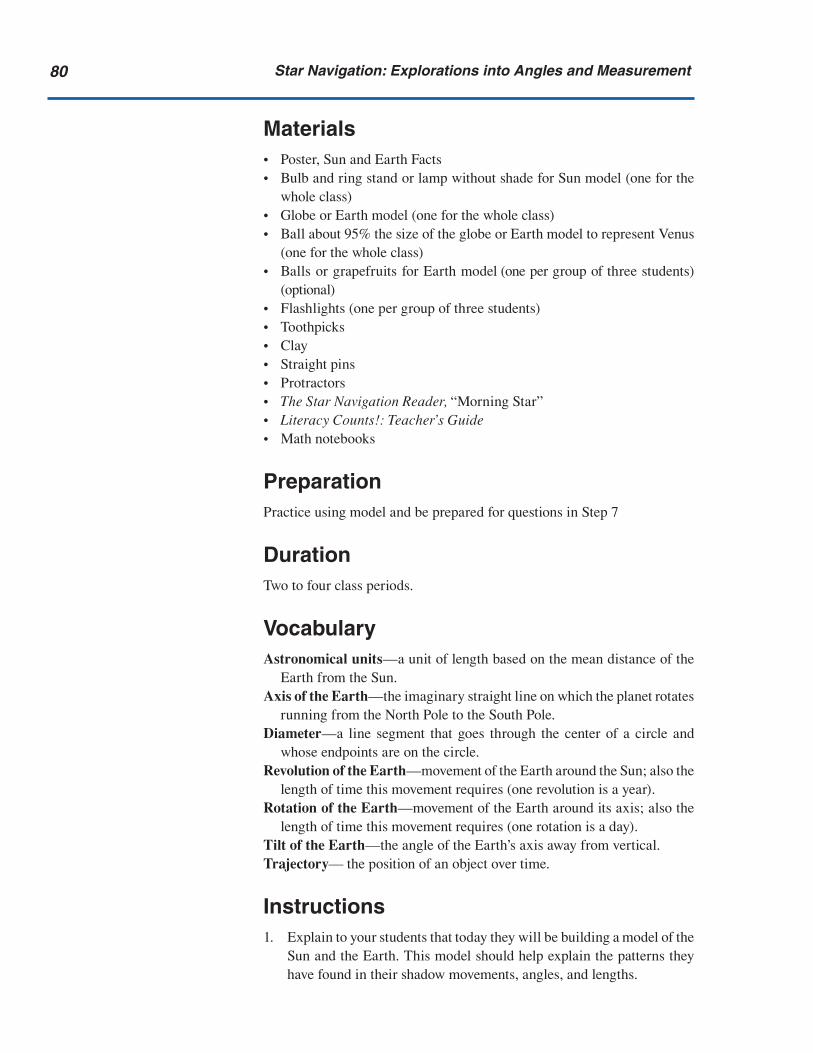
�0 Star Na�igation: Explorations into Angles and Measurement
Materials• Poster, Sun and Earth Facts• Bulb and ring stand or lamp without shade for Sun model (one for the
whole class)• Globe or Earth model (one for the whole class)• Ball about 95% the size of the globe or Earth model to represent Venus
(one for the whole class)• Balls or grapefruits for Earth model (one per group of three students)
(optional)• Flashlights (one per group of three students)• Toothpicks• Clay• Straight pins• Protractors• The Star Navigation Reader, “Morning Star”• Literacy Counts!: Teacher’s Guide• Math notebooks
PreparationPractice using model and be prepared for questions in Step 7
DurationTwo to four class periods.
VocabularyAstronomical units— a unit of length based on the mean distance of the
Earth from the Sun.Axis of the Earth— the imaginary straight line on which the planet rotates
running from the North Pole to the South Pole.Diameter— a line segment that goes through the center of a circle and
whose endpoints are on the circle.Revolution of the Earth— movement of the Earth around the Sun; also the
length of time this movement requires (one revolution is a year).Rotation of the Earth— movement of the Earth around its axis; also the
length of time this movement requires (one rotation is a day).Tilt of the Earth— the angle of the Earth’s axis away from vertical.Trajectory— the position of an object over time.
Instructions1. Explain to your students that today they will be building a model of the
Sun and the Earth. This model should help explain the patterns they have found in their shadow movements, angles, and lengths.
��Acti�ity �: Sun and Earth Model
2. Demonstrate how to set up the model to the whole class using the lamp and globe. You will need to provide the facts necessary for setting up the model either prior to the demonstration or during the demonstra-tion. Refer to the Sun and Earth Facts poster for the information you should share. Specific facts that you need to describe as you model for students include:
• The size of the Sun (not really modeled here, just using a light)• The size of the Earth relative to the size of the Sun• The Earth’s axis is not vertical, it is tilted 23.5 degrees• The North Pole is fixed pointing to the same place always• Looking down from above, the Earth rotates counter-clockwise
on its axis at a constant rate• The Earth’s rotation takes 24 hours and forms a day• Looking down from above, the Earth revolves clockwise around
the Sun at a constant rate• The Earth’s revolution takes 365 days and forms a year
3. Attach a bulb to a ring stand or use a lamp without a shade to simulate the Sun. Show the globe for the Earth model.
4. Ask students how to position the globe so that it shows the Earth’s tilt of 23.5 degrees. Encourage different ideas until everyone is satisfied. Once the globe is tilted correctly, be sure to place it so that the North Pole is consistently pointed at the same object, such as the top of the classroom door, as shown in Figure 7.1.
Fig. 7.1: Example of Sun and Earth model.
Equator
30
60
30
Teacher Note: Earth’s TiltTry to dispel the common miscon-
ception that the Earth is closer
to the Sun during the summer.
It is the tilt of the Earth, usually
about 23.5 degrees, that is much
more important in determining
seasons.
It is becoming well-documented
that as of the writing of this mod-
ule, the tilt of the Earth’s axis is
changing. Frederick has noticed
the change in the patterns of the
Sun and stars from Akiachak over
the last few years and started
recording those changes in 2003
to try to understand them more
specifically. Frederick explains
that his observations show that
the seasons are coming about
one month earlier than normal.
The Sun is more directly above
us in Alaska than we used to see.
Also, the Sun rises more towards
the south than from the southeast
direction as before. Scientists and
researchers are also documenting
these changes, recognized as the
wobble of the Earth’s axis. For
more information, see the follow-
ing informational websites.
MiMi.hu: http://en.mimi.hu/as-
tronomy/earth.html
NationalGeographic.com: http://
magma.nationalgeographic.com/
ngm/0410/resources_who.html

�� Star Na�igation: Explorations into Angles and Measurement
5. Demonstrate yourself or explain to a volunteer how to move the globe around the light source modeling the movement for a year. Then dem-onstrate how to rotate the globe showing the movement for a day. Be sure to explain the seasons and have the globe positioned correctly for winter, spring, summer, and fall as shown in Figure 7.2. Take the time needed so that students are comfortable with the model before breaking into groups.
Fig. 7.2: Diagram showing Earth’s revolution around the Sun and rotation on its axis.
6. Have students break into groups of three students each. Hand out a styrofoam ball, orange, or grapefruit to each group for the Earth model. Also pass out markers and a flashlight to each group. Ask each group to draw a few latitude lines on the ball or fruit (see Figure 7.3), using the globe for guidance to help accurately position their gnomon model close to their true location.
7. Assign one exploration to each group from the following list. Provide additional materials for students to use during these explorations such as toothpicks, modeling clay, straight pins, protractors, or other items that may be helpful.
a. Model why Alaskan days are so long in the summer.b. Model why our Sun shadows move clockwise.c. Model why we have equal angles between shadow hours.d. Model why shadows get smaller at noon.e. Model why solar noon shadows point north.
earth
earth
earth
earth
SUMMER in thenorthern hemisphere
WINTER in thenorthern hemisphere
SPRING in thenorthern hemisphere
FALL in thenorthern hemisphere
Earth makes onecomplete revolutionaround the Sun inone year.
earth
Earth makes onecomplete rotationin one day.
sun

��Acti�ity �: Sun and Earth Model
Teacher Note: Solutions to Modeling in Step 7a. Alaskan days are so long in the summer due to the tilt of the Earth towards the Sun during that season and the fact that
Alaska is at high latitudes (or is so close to the North Pole). Students should be able to recognize this using the Sun
and Earth model if they focus on the summer position.
b. Since the Earth rotates counter-clockwise and the Sun rises in the east, the shadows appear to move clockwise. Students
can place a toothpick or other object on their model to see that this same phenomenon that they observed in Activity 3
with their shadow recordings can be seen in the Sun and Earth model.
c. Students will have to rely on the fact that the Earth rotates at a constant speed therefore providing equal angle
measurements between hourly shadows.
d. Since the Sun appears higher in the sky at midday compared to morning or night, the angle of the rays is greater and so
the shadow is smaller. This can be seen on the model by using the toothpick inserted into the Earth model and rotating
it near the light source.
e. The solar noon shadow points north because the angle of the Sun’s rays to the gnomon (such as the toothpick on the
Earth model) is greatest when the Sun is directly in the south, forcing the shadow to the north.
Fig. 7.3: Example of using an orange as the Earth model. Set the angle ruler to 23 degrees. Line up the toothpick in the top of the orange, representing the axis, to find an approximate position for the tilt of the Earth. Use another toothpick for the gnomon; it is inserted further into the orange so the lengths of the shadows can be seen easily. Both a flashlight or a lamp work fine to cast a shadow on the surface of the orange.

�� Star Na�igation: Explorations into Angles and Measurement
8. Allow time for each group to share their model and explain their rea-soning. Encourage students to ask questions and come to a consensus before moving on to the next group’s presentation.
9. If time permits and they are interested, allow students to use their group models to explore how to answer other questions and conjectures they may still have.
10. Hand out The Star Navigation Reader to each student. Have them turn to “Morning Star” and begin reading the story from where they left off, reading to the end. Refer to the Literacy Counts!: Teacher’s Guide for ways of facilitating reading the final portion of the story in your classroom.
11. Explain to the whole class that the Morning Star is really a planet named Venus. Tell students some facts about Venus, which are quite differ-ent than what they’ve learned about Earth. These facts can be used as counter-examples to the Earth example or to help in adding Venus to the Sun and Earth model in Step 12.
• Venus is known as the morning and evening star as that is when it is visible in the sky.
• The diameter of Venus is 95% of the Earth’s diameter.• Venus is .72 AU (astronomical units) from the Sun compared to
the Earth’s 1 AU (so Venus’ orbit is closer to the Sun than Earth’s orbit is).
• Venus’ rotation on its axis takes 243 Earth days, so one Venus day lasts 243 Earth days.
• Venus rotates in a clockwise direction.• It takes Venus 224.7 Earth days to complete one revolution around
the Sun.
12. Optional. Using the whole class model of the Earth and Sun, ask stu-dents to make some guesses about how Venus could be added to the model. Have volunteers use a ball smaller than the globe to demonstrate the movement of Venus showing why we see it in the morning sky.
13. In their math notebooks, have students give a descriptive proof of any conjectures they made in previous activities using what they learned from the model or any new proofs of conjectures made during this activity.
Teacher Note: Literacy ConnectionRefer to the Literacy Counts!:
Teacher’s Guide for descriptions
of story circle roles, methods for
introducing the roles, and activities
for students to practice.

��
Activity 8 Finding a Lost FriendStudents are now ready to connect what they have learned in Activities 1 through 7 as a stepping stone to connecting to Frederick’s real life skills of navigating during the day. In this activity, students begin to synthesize their understanding of cardinal directions, patterns in the shadow lengths and angles, hand measurements to approximate angles at a distance, observa-tions, and the Sun and Earth relationships to time while solving a challenge that simulates traveling across the tundra in search of a lost friend. Students will work in their navigating teams to solve this puzzle prior to creating their own treasure hunts in the next activity.
Goals• To calculate the scale for a map using linear measurements• To apply knowledge of navigating skills, such as Sun, shadow, and direc-
tion information to solve a puzzle• To apply connections between shadow data and cardinal directions• To connect angle partitions of shadows with the passage of time, specifi-
cally 15 degrees between hourly shadows• To apply correct usage of math vocabulary to solve a puzzle
Materials• Transparency, Tundra Puzzle Key (optional)• Worksheet, Puzzle Cards (one per team)• Worksheet, Tundra Puzzle Instructions (one per team)• Worksheet, Tundra Puzzle Board (one per team)• Colored pens (several per team)• Scissors (one pair per team)• Protractors (one per team)• Small objects for game tokens (one per team) (optional)• Math notebooks
PreparationMake one copy of the Tundra Puzzle, the Tundra Puzzle Board, and the Puzzle Cards for each team. You may want to cut out the puzzle cards to save class time. Note that the Tundra Puzzle Key is provided for you at the end of the activity. You may copy this onto a transparency or worksheet if you prefer.
Try to solve the puzzle yourself and note any difficulties. Prepare a demon-stration for how you might facilitate students’ solutions if needed.
Teacher Note: Frederick Finds the LostA person went caribou hunting
near the Kilbuck Mountains east
of Akiachak, Alaska, and got lost.
When the Search and Rescue
team was contacted, they pre-
pared to go find the hunter. It was
really foggy when Frederick and
the others from the Search and
Rescue team headed out around
9:00 at night. The team was head-
ing south but didn’t know it. When
the driver stopped, Frederick
realized they were traveling in the
wrong direction. He told the driver
that they were lost. When they
asked how he knew, he told them
to look at the sky. Frederick was
able to see the Big Dipper through
the fog faintly. He pointed them
back to the Kilbuck Mountains,
found the lost hunter, and then
navigated them safely home.
This true story illustrates how
Frederick’s knowledge of naviga-
tion makes the difference between
life and death.

�� Star Na�igation: Explorations into Angles and Measurement
DurationOne class period.
VocabularyParallel— two lines that are in the same plane and do not intersect.Perpendicular— lines that intersect to form a ninety-degree angle or a
right angle.Ecuilnguar—�clear.Kanaqlak—�muskrat.Kiimaq—�stone.
Instructions1. Introduce today’s activity by reading the story about Frederick finding
a lost hunter. The story is in the Teacher Note on page 85.
2. Explain to the class that they will work in their navigating teams today trying to solve a puzzle that simulates finding a lost friend. Encourage them to recall information about cardinal directions, how shadow lengths and angles relate to time on the clock, and their experiences observing and measuring with hand measures, straw angle markers, personal angle measuring devices, and protractors.
3. Have students sit with their navigating teams. Give each group the Tundra Puzzle Instructions, Tundra Puzzle Board, and Puzzle Cards. Students will need to cut out the cards, if you haven’t done this already, and place them upside down in order beside the board.
4. Have each navigating team work through the puzzle by following the Tundra Puzzle Instructions worksheet.
5. As they finish, teams should show you their routes and the location of their lost friend. Check to make sure that both the stopping point and the route followed match the one given on the Tundra Puzzle Key. If it doesn’t, teams should resolve the difficulties they ran into and start the puzzle again by marking the route in a different color.
6. Have groups share with the class the difficulties they encountered and what math they needed to use to resolve them. Once groups have shared and everyone is comfortable with following the directions, let students know that in the next activity they will have the opportunity to create directions for another group by designing a treasure hunt.
Teacher Note: Solving the Tundra PuzzleIn working through the solution
to the puzzle, each card pro-
vides a piece of information that
may be needed in the following
steps. Card 1 takes the traveler
to Kanaqlak Hill in order to set up
Card 2, which determines north is
to the right of the page as shown
on the compass rose of the key.
Card 3 should create a 30-de-
gree angle from the line pointing
towards Kiimaq Mountain moving
to the east or in a clockwise direc-
tion. Card 4 gives the shadow clue
which means to turn 30 degrees
off of north to the east. Card 5 uses
the direction of east to determine
the next path for the traveler. Card
6 provides the stopping point
where the travelers find their lost
friend at the pond.

Blackline Master MCCMCC
N
SW
E
N
SW
E
��
Tundra Puzzle Instructions
Imagine a friend is lost on the tundra. You have a two-way radio so you can communicate with her. She will describe where she is and how she got there. Her descriptions are given on the stack of cards. By the end of the stack you should have located your friend. You can use a protractor, angle ruler, or other angle measuring devices; rulers; and hand measures to solve this puzzle.
Your friend has the straw angle marker she made in math class. Each of the units on her straw angle marker is the same angle as one hour on the Sun shadow recordings.
The Tundra Puzzle Board shows the landscape your friend is walking through. Known mountains and other landmarks are named; unknown ones are left unnamed. The place where your friend started her walk is marked on the board. Directions are not marked on the map and north may not be toward the top of the board.
1 inch on the board = 1 mile on the ground
Puzzle Instructions
1. Stack the six game cards beside the board in order with Card 1 at the top and Card 6 at the bottom.
2. Take turns reading the clues on the cards out loud. The person to the left of the person who has read the card marks the route on the map, starting at the star that marks where your friend started her walk. As a group, discuss all the information you learn from each card and add clues to your map.
3. Put an X at the final spot as described on Card 6.4. When you are done, show your route to your teacher so you can find
out whether you found your friend or not. If you’re not in the right spot, start again with Card 1 and draw the new route on the board with a different colored pen.

Lost Lake
Ecu
ilngu
ar R
iver
Creek
Creek
Kanaqlak Hill
BirdLake
ShadowPond
KiimaqMountain
LakeCaribou
START
MirrorLake
Tundra Puzzle Board
Blackline MasterMCCMCC

Lost Lake
Ecu
ilngu
ar R
iver
Creek
Creek
Kanaqlak Hill
BirdLake
ShadowPond
KiimaqMountain
LakeCaribou
START
MirrorLake
N
E
1
3
4
5
6
30º
2
30º
2
Unknown mountainsto the east
6
Tundra Puzzle Key
Blackline MasterMCCMCC
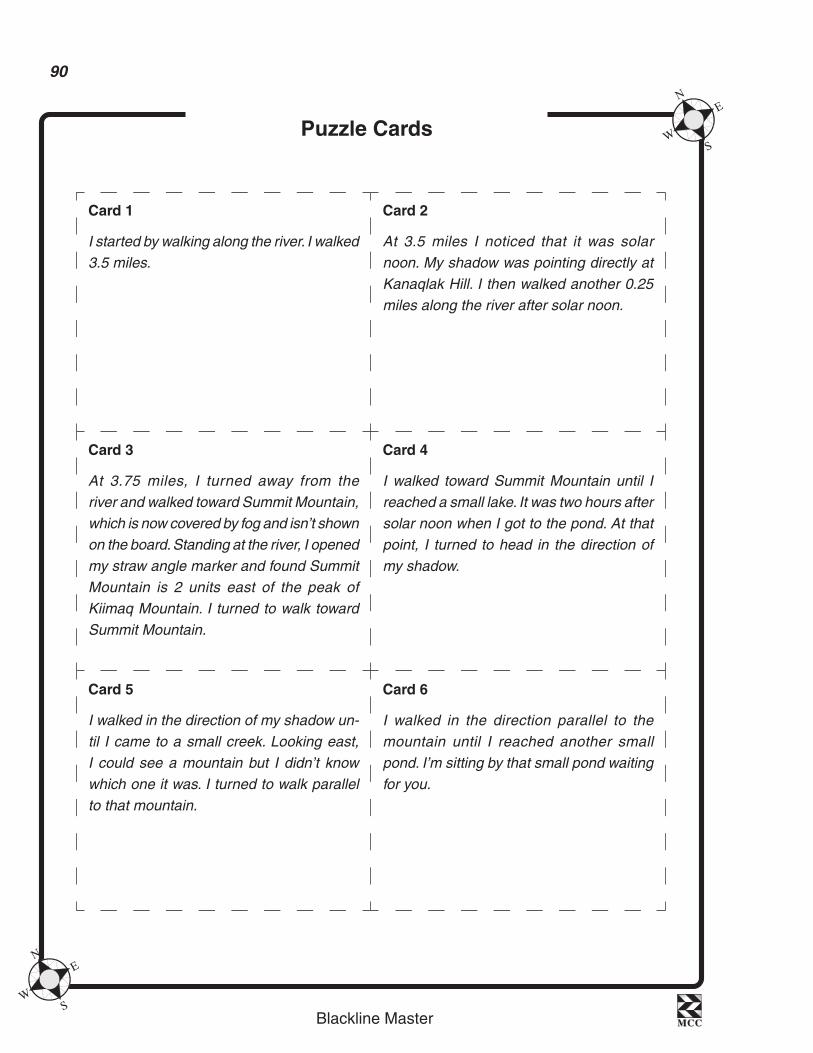
Blackline Master MCCMCC
N
SW
E
N
SW
E
�0
Puzzle Cards
Card 1
I started by walking along the river. I walked
3.5 miles.
Card 2
At 3.5 miles I noticed that it was solar
noon. My shadow was pointing directly at
Kanaqlak Hill. I then walked another 0.25
miles along the river after solar noon.
Card 3
At 3.75 miles, I turned away from the
river and walked toward Summit Mountain,
which is now covered by fog and isn’t shown
on the board. Standing at the river, I opened
my straw angle marker and found Summit
Mountain is 2 units east of the peak of
Kiimaq Mountain. I turned to walk toward
Summit Mountain.
Card 4
I walked toward Summit Mountain until I
reached a small lake. It was two hours after
solar noon when I got to the pond. At that
point, I turned to head in the direction of
my shadow.
Card 5
I walked in the direction of my shadow un-
til I came to a small creek. Looking east,
I could see a mountain but I didn’t know
which one it was. I turned to walk parallel
to that mountain.
Card 6
I walked in the direction parallel to the
mountain until I reached another small
pond. I’m sitting by that small pond waiting
for you.

��
Activity 9 Treasure HuntFrederick George talks about using games as a way to learn, enjoying them, but knowing the lessons have serious consequences when applied to real life situations. In this activity, students will continue working in their navi-gating teams and make a game similar to the one they played in Activity 8. However, in this round, students will create a treasure hunt where they write directions similar to those found on the cards in the puzzle of Activity 8 as a set of directions for another group to find their buried treasure. This game should be a fun way for students to synthesize, refine, and assess their knowledge gained about shadows, cardinal directions, angles, and navigat-ing before moving into using the stars at night.
Goals• To apply navigation and angle skills to a novel situation• To draw a route following navigation instructions
Materials• Worksheet, Treasure Hunt (one per team)• Tokens, such as plastic chips or other objects to hide (one per team)• Personal angle measuring devices from Activity 4• Protractors (one per team) and/or• Angle rulers (one per student)• Rulers (one per team)• Yardsticks or measuring tape (one per team) (optional)• Math notebooks
PreparationFind a good area outside to do this activity. You might want to pick a starting spot for each of the navigating teams in advance so they will have ample space to work.
DurationTwo class periods.

�� Star Na�igation: Explorations into Angles and Measurement
Instructions1. Explain to students that they will play another game and this time they
are writing the instructions. Remind them that Frederick feels games are a good way to learn, but they will need to reflect on what they did at the end to understand the skills they practiced.
2. Have students get into their navigating teams. Give each navigating team a token (like a plastic chip, something you won’t mind losing) that they will bury in the snow somewhere near the school.
3. Hand out a copy of the Treasure Hunt worksheet to each team. Explain that the challenge for each team is to provide directions to another team that will allow them to find the buried token. The directions should have at least six steps from a chosen starting place. The directions should include the types of instructions that were used in the puzzle in Activity 8. Students must use each of the following concepts at least once in their instructions:
a. An angle measurement using a protractor or angle rulerb. An angle measurement using their own angle measurement de-
vice (instructions and the device must be provided to the other team)
c. A cardinal directiond. An angle that relates to solar noon (as in Card 4 of the tundra
puzzle)e. A linear measurement
4. Allow teams plenty of time to be creative and yet adhere to the rules. Check the directions each team submits to make sure that they are both understandable and incorporate the required concepts.
5. The next day, give a set of directions to each of the teams. Have students try to find the token the other team has buried for them. The teams should draw a map of their route as they follow the directions they were given.
6. After students have had time to search for their buried treasure, come together to show the different routes. If a team found the buried treasure, they can demonstrate what they did to the whole class; if not, the team that designed the hunt should show how to follow their instructions.
7. Debrief the activity by asking students to reflect on successes and dif-ficulties in creating and solving the treasure hunt. Encourage teams to discuss the math they used in locating their buried treasures among themselves and then present to the whole class.
Teacher Note: Burying TokensCaution students not to bury their
token until the directions have
been written.
Teacher Note: Maps to ScaleIf you feel your students are ready,
you may want to add some activi-
ties to help students learn how to
create their maps to scale. This
idea can be used again in Activity
11 when students draw their star
observations. Lastly, the final activ-
ity does use a scaled map in which
students must determine the scale
through the given information.
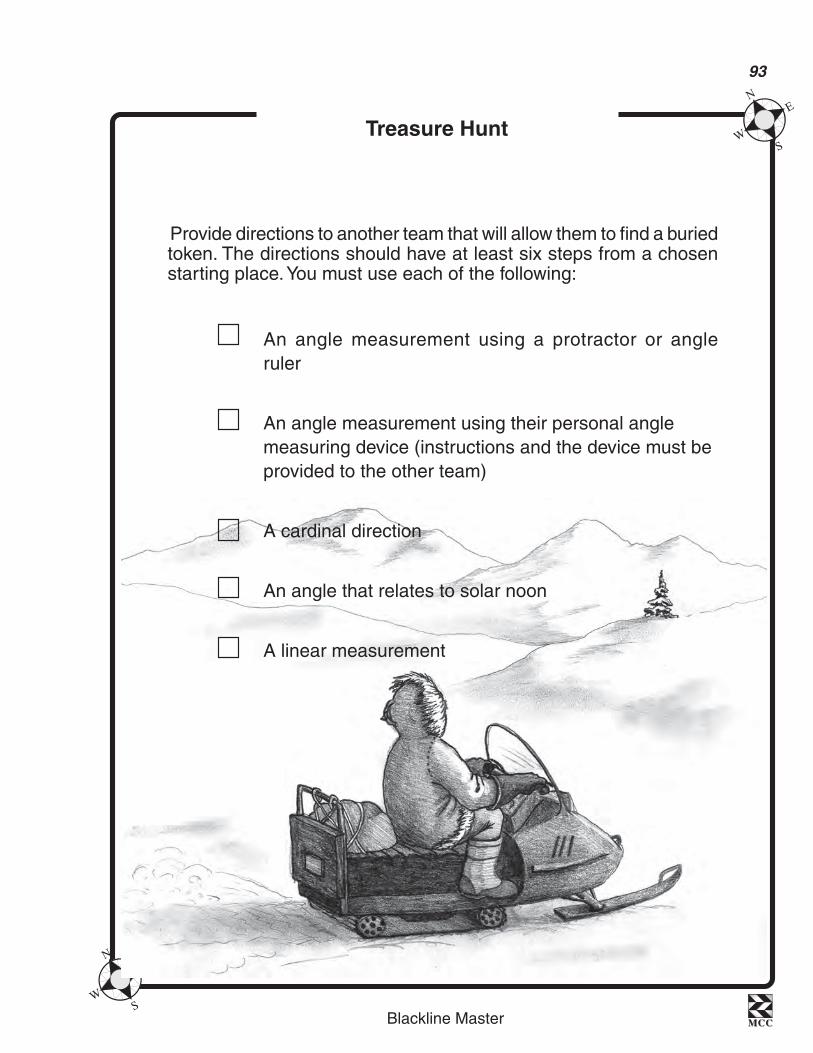
Blackline Master MCCMCC
N
SW
E
N
SW
E
��
Provide directions to another team that will allow them to find a buried token. The directions should have at least six steps from a chosen starting place. You must use each of the following:
An angle measurement using a protractor or angle ruler
An angle measurement using their personal angle measuring device (instructions and the device must be provided to the other team)
A cardinal direction
An angle that relates to solar noon
A linear measurement
Treasure Hunt


��
Section 4: Navigating at NightIn this final section of the module, students will apply what they have learned about angles in two
dimensions, observations, and navigating during the daytime to the night sky. Using Frederick’s
methods of star navigation with the Big Dipper, Cassiopeia, and the Little Dipper, students
will apply hand measures for angles in three dimensions by using two two-dimensional mea-
surements: one horizontally and
another vertically. They will learn
the Yup’ik sky map; how to locate
important stars or constellations
at night; and how to correlate
cardinal directions, time of day,
time of season, and the appar-
ent movement of the stars. Thus,
this final section begins to move
students beyond observation and
measuring and into generalizing
patterns using information from
other sources, such as the Sun
and Earth model.


��
Activity 10 The Night SkyStudents have developed an important knowledge base for star navigation in the first nine activities of the module. They have learned about observation, measuring angles, perspective, cardinal directions, and how all these factors are intertwined in Frederick’s method of navigating during the day.
In this activity, students will learn about the Yup’ik sky map and the con-stellations that Frederick uses during nighttime travel. They will learn the constellations in both English and Yup’ik. Further, they will apply their angle measures vertically and learn which measurements Frederick uses for his star navigation. By combining these new vertical measurements with their previous horizontal measurements, students will locate objects in three dimensions using two angular measurements. Students will be encouraged to observe at home and record their observations several nights in a row in order to recreate what Frederick has discovered and learned through observation over time.
The literacy connection continues by reading more traditional stories and nonfiction accounts related to constellations. Traditionally, stories were told to help people remember the patterns of the apparent movement of the stars and to describe their origins and historical use. Students will read one of these traditional stories included in The Star Navigation Reader, “The Caribou,” and connect it to what they learn in this activity.
Goals• To observe at night to gain a different perspective on students’
surroundings• To learn the names and features of constellations in both English and
Yup’ik• To apply nonstandard (hand measures, personal angle measuring
tools) measurements to a novel situation• To convert nonstandard angle measurements to standard angle
measurements• To locate an object in three dimensions, using two different angle
measures
Materials• Poster, Sky Map• Transparency, Yup’ik Sky Map—Plain• Worksheet, Measurements for Star Navigating (one per student)
�� Star Na�igation: Explorations into Angles and Measurement
• CD-ROM, Yup’ik Glossary, with constellations pronounced• Straw angle markers from Activity 2• Protractors (one per student) and/or• Angle rulers (one per student)• Sticky note or index cards (one per student)• Tracing paper (12 pages or half pages per student)• The Star Navigation Reader, “The Caribou”• Literacy Counts!: Teacher’s Guide• Math notebooks
DurationThree to four class periods.
VocabularyAngle approximation—the term used to describe a nonstandard measure-
ment (horizontal or vertical) using tools such as hand measures.Constellation—an arbitrary configuration of stars that suggests an outline
of an animal or object.Horizontal—parallel to the plane of the horizon; not vertical.Vertical—perpendicular to the horizon.Agyarrluk—North Star.Kaviaraat—foxes, used for the Little Dipper.Qengartarak—nose with two nostrils, used for Cassiopeia.Tunturyuk—caribou, used for the Big Dipper.
Instructions1. Ask students to give a summary of what they have been doing so far in
the Star Navigation module. Encourage them to bring up the concepts of observation, locating, finding landmarks, applying hand measures, understanding angles, and connecting all of these ideas to cardinal directions and time.
2. Hang up the Sky Map poster that compares the Yup’ik constellations to the Western sky map (also shown in Figures 10.2 and 10.3). Explain to students that the next step is to apply what they have been doing in the day to the stars at night. Ask students if they recognize any objects on the poster. (They may recognize the Big Dipper and perhaps a few other constellations, but it’s fine if they do not.)
3. Show students how they can look at a grouping of stars and see a shape, called a constellation, using the Big Dipper. If students have prior knowledge of these constellations, you may want to ask volunteers to share names and point out the ones they know.
Teacher Note: ConstellationsStudents should understand that
constellations are agreed upon
and socially accepted percep-
tions which, when combined, form
a sky map. The Western set of
constellations stems mostly from
the Greek perceptions. The Yup’ik
perceptions shared here were
accepted by the elders working
with the project. Often, names are
presented from different regions
and when they are specific to an
area, it is referenced parentheti-
cally (such as Togiak, Akiachak,
Manokotak or, more regionally, as
Bristol Bay or Kuskokwim). Other
cultures have their own percep-
tions of the sky and use different
names for the constellations.

��Acti�ity �0: The Night Sky
4. Explain that they will learn which set of stars is helpful to Frederick, how the patterns of their apparent movement relate to time and seasons (similar to what we learned with the Sun and shadows), and how to use Frederick’s hand measures to link all of these ideas together. Leave the Sky Map Poster hanging for the remainder of the module.
5. Place the transparency, Yup’ik Sky Map—Plain, on the overhead and explain to students that this is called a sky map. Explain that it is one example of a guide that helps people recognize patterns in the stars and remember their locations, connections, and names. Explain that this example has the names of the constellations in Yup’ik although there are English names and shapes used for these same constellations as well.
6. On the Yup’ik Sky Map—Plain, point out the constellation the Big Dipper (Tunturyuk) and show how to connect the stars by drawing the lines to look like a caribou head, legs, etc. as seen on the Yup’ik Sky Map or in Figure 10.1. Use the constellations shared earlier by the students to compare to the Yup’ik versions. Explain that in Yup’ik the name for the Big Dipper means “caribou.”
Fig. 10.1: Frederick’s view of the Caribou (Big Dipper) showing the two stars that form the snout and the star in the foot that he calls the corner. This drawing was provided by another Yup’ik elder and accepted by the many elders working together at a meeting in Anchorage held at The Imaginarium.
7. If these constellations have not already been mentioned, then on the Yup’ik Sky Map point out the following constellations and share the Yup’ik meanings of their names: Little Dipper (Kaviaraat, meaning foxes), Cassiopeia (Qengartarak, meaning nose with two nostrils), and Orion’s belt (Sagquralriit, meaning scattered stars or Tulukaruum Ayarua, meaning Raven’s Cane). Explain that these are the constella-tions that Frederick uses when navigating in the dark, snowy winters of Alaska. You may want to point out some of the other constellations if you or your students are familiar with them.
snout
corner

�00 Star Na�igation: Explorations into Angles and Measurement
YYup’ik Skup’ik Sky May Mapp
TUNTURYUK(The Caribou)KAVIARAAT
(The Foxes) or:
KAVIAYAGAAT(The Little Foxes)
AGYARRLUK(Polaris or North Star)
ILULIRAT(Inside the Fishtrap)
KINGUQA AKUGAT(The Kuspuk Hem)
PITEGCAUNor NEGCIK(arrow or
harpoon head)
SAGQURALRIIT(Scattered Stars)
QIMUGTA(The Dog)
TULUKARUUM AYARUA(Raven’s Cane)
QENGARTARAK[The Nose With
Two Nostrils(Togiak)]
TALUYAT(The Blackfish Trap)
TULUKARUUMTANGLURALLRIor QUPNGUAQ(The Milky Way)
(Cane)
(Arrow)
AGESKURPAKAGYARPAK (Manokotak)
UNUAKUM AGYARTAA (Akiachak)(Venus/Morning Star)
Fig. 10.2: Yup’ik Sky Map agreed upon by the elders from Togiak, Akiachak, Akiak, and Manokotak. Those constellations with specific local names are referenced by their respective villages.
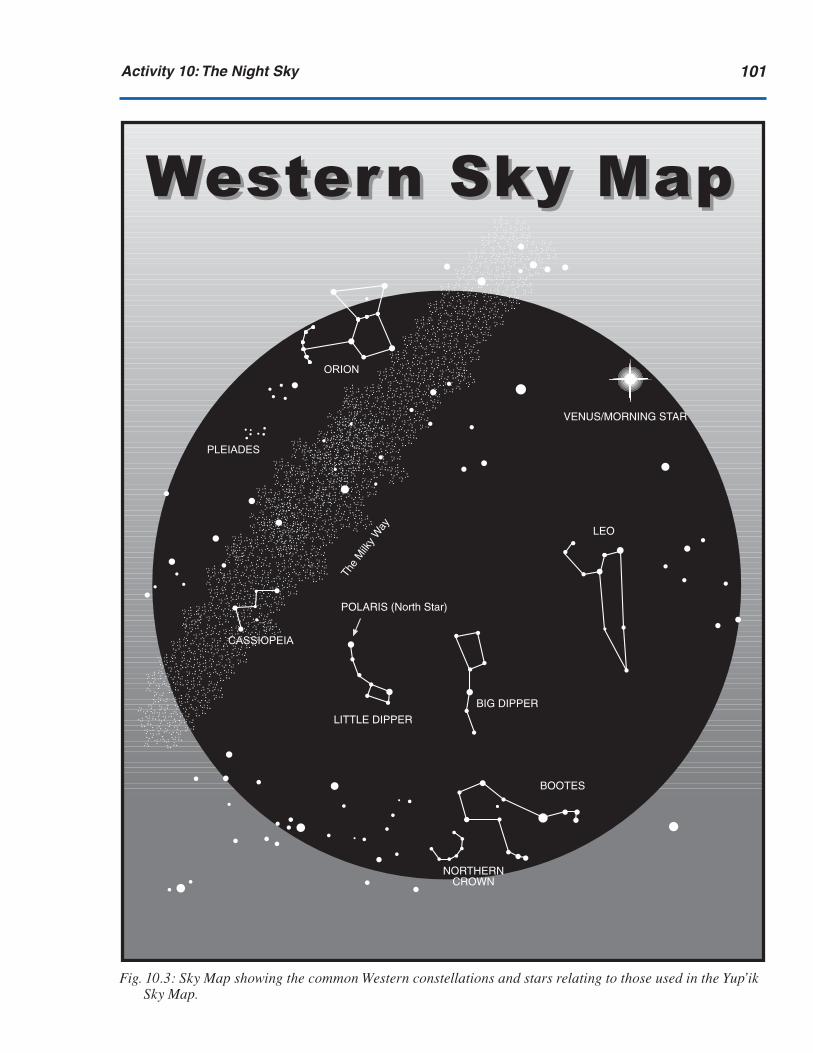
�0�Acti�ity �0: The Night Sky
WWesterester n Skn Sky May Mapp
BIG DIPPER
LITTLE DIPPER
POLARIS (North Star)
BOOTES
LEO
ORION
PLEIADES
CASSIOPEIA
VENUS/MORNING STAR
NORTHERNCROWN
The
Milk
y W
ay
Fig. 10.3: Sky Map showing the common Western constellations and stars relating to those used in the Yup’ik Sky Map.
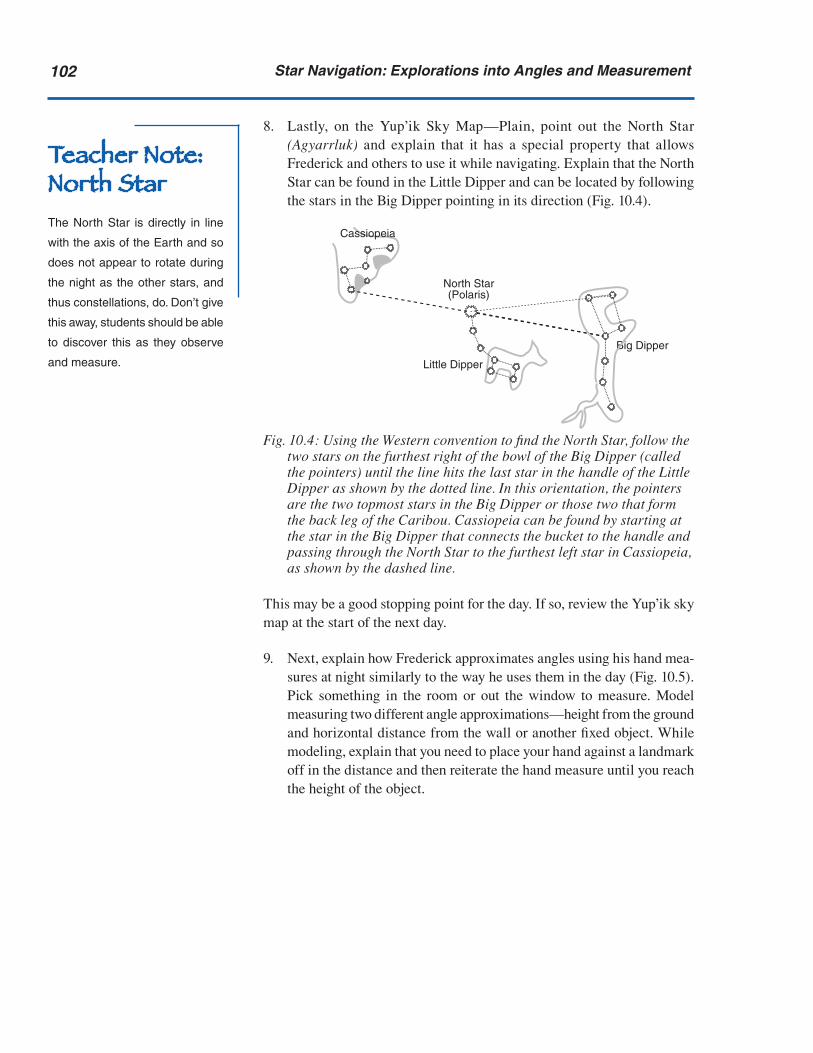
�0� Star Na�igation: Explorations into Angles and Measurement
8. Lastly, on the Yup’ik Sky Map—Plain, point out the North Star (Agyarrluk) and explain that it has a special property that allows Frederick and others to use it while navigating. Explain that the North Star can be found in the Little Dipper and can be located by following the stars in the Big Dipper pointing in its direction (Fig. 10.4).
Fig. 10.4: Using the Western convention to find the North Star, follow the two stars on the furthest right of the bowl of the Big Dipper (called the pointers) until the line hits the last star in the handle of the Little Dipper as shown by the dotted line. In this orientation, the pointers are the two topmost stars in the Big Dipper or those two that form the back leg of the Caribou. Cassiopeia can be found by starting at the star in the Big Dipper that connects the bucket to the handle and passing through the North Star to the furthest left star in Cassiopeia, as shown by the dashed line.
This may be a good stopping point for the day. If so, review the Yup’ik sky map at the start of the next day.
9. Next, explain how Frederick approximates angles using his hand mea-sures at night similarly to the way he uses them in the day (Fig. 10.5). Pick something in the room or out the window to measure. Model measuring two different angle approximations—height from the ground and horizontal distance from the wall or another fixed object. While modeling, explain that you need to place your hand against a landmark off in the distance and then reiterate the hand measure until you reach the height of the object.
North Star(Polaris)
Little Dipper
Big Dipper
Cassiopeia
Teacher Note: North StarThe North Star is directly in line
with the axis of the Earth and so
does not appear to rotate during
the night as the other stars, and
thus constellations, do. Don’t give
this away, students should be able
to discover this as they observe
and measure.
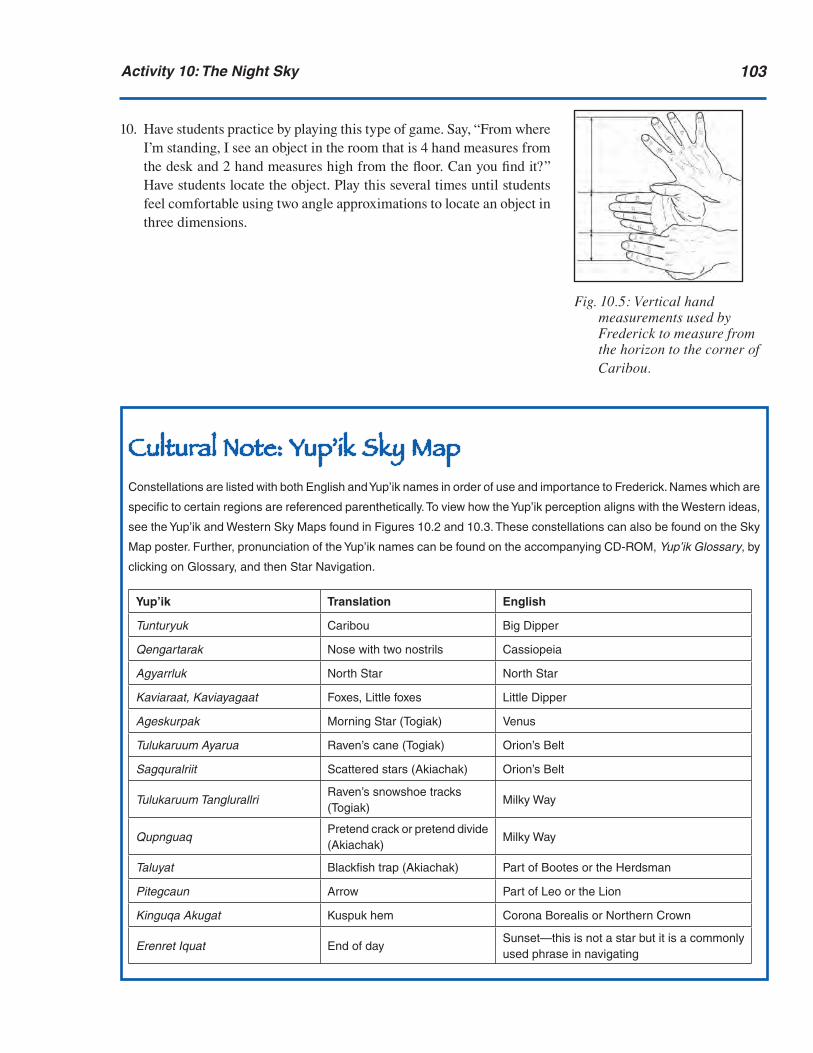
�0�Acti�ity �0: The Night Sky
Cultural Note: Yup’ik Sky MapConstellations are listed with both English and Yup’ik names in order of use and importance to Frederick. Names which are
specific to certain regions are referenced parenthetically. To view how the Yup’ik perception aligns with the Western ideas,
see the Yup’ik and Western Sky Maps found in Figures 10.2 and 10.3. These constellations can also be found on the Sky
Map poster. Further, pronunciation of the Yup’ik names can be found on the accompanying CD-ROM, Yup’ik Glossary, by
clicking on Glossary, and then Star Navigation.
Yup’ik Translation English
Tunturyuk Caribou Big Dipper
Qengartarak Nose with two nostrils Cassiopeia
Agyarrluk North Star North Star
Kaviaraat, Kaviayagaat Foxes, Little foxes Little Dipper
Ageskurpak Morning Star (Togiak) Venus
Tulukaruum Ayarua Raven’s cane (Togiak) Orion’s Belt
Sagquralriit Scattered stars (Akiachak) Orion’s Belt
Tulukaruum TanglurallriRaven’s snowshoe tracks (Togiak)
Milky Way
QupnguaqPretend crack or pretend divide (Akiachak)
Milky Way
Taluyat Blackfish trap (Akiachak) Part of Bootes or the Herdsman
Pitegcaun Arrow Part of Leo or the Lion
Kinguqa Akugat Kuspuk hem Corona Borealis or Northern Crown
Erenret Iquat End of daySunset—this is not a star but it is a commonly used phrase in navigating
10. Have students practice by playing this type of game. Say, “From where I’m standing, I see an object in the room that is 4 hand measures from the desk and 2 hand measures high from the floor. Can you find it?” Have students locate the object. Play this several times until students feel comfortable using two angle approximations to locate an object in three dimensions.
Fig. 10.5: Vertical hand measurements used by Frederick to measure from the horizon to the corner of Caribou.

�0� Star Na�igation: Explorations into Angles and Measurement
11. In pairs, have students practice using vertical hand measurements by measuring the angle approximation of the height of different objects in the room and/or objects at a distance out the window. Have them use hand measures, their straw angle markers, and a protractor and/or angle ruler to get used to using them in a different orientation. Remind them to use the floor inside or the horizon outside as the 0 degree line.
12. Explain to students that they will be making drawings of the stars soon and will need a tool to help make their drawings accurate. Pass out small sticky notes or index cards to each student. Have them create a miniature hand ruler tool by drawing a hand on a small sticky note or index card (Fig. 10.6). They should cut the fingers apart so they can measure a full hand or only one, two, or three fingers. Note that the hand ruler does not have to be to scale.
13. Have students draw a picture of the hand measurements and the angle measurements used, practice with their miniature hand ruler tool, and use a table to record the various measurements in their math notebooks, such as the one shown in Figure 10.7. Have students share findings and their process until they feel comfortable with the various forms of measuring. Note that students may use whatever method and tools they wish to convert their nonstandard angle measures into standard angle measures, such as using their straw angle markers to mark the angle and then measuring the angle with a protractor.
Fig. 10.7: Example of table with vertical hand measurements.
14. Homework. Before students make their star observations outside of their homes, they need to decide where they will stand to observe and choose an object as a reference point. Ask students to draw and describe their chosen locations and reference points and bring their drawing to class the next day. Encourage students to pick an object that does not move and to physically mark the location where they will stand over the next few nights to gather star observations.
This may be a good stopping point for the day.
15. Have students share with the whole class the reference point and loca-tion they will use for their star observations. Have a brief discussion concerning any issues that students may encounter.
Distance Date TimeHand
MeasurementAngle
Measurement
Horizon to
the Corner
in Caribou
Fig. 10.6: Miniature hand ruler.
Teacher Note: Star ObservationsAsk students to observe and
record at least two nights in a
row, although the more nights,
the better. They should be able to
see the change in the night sky
by overlaying the pieces of trac-
ing paper, keeping each North
Star aligned on top of the others
across the pages. Once students
have the several pieces of trac-
ing paper organized, they should
start to recognize patterns much
like those discovered with their
shadow measurements. This idea
is further investigated in Activ-
ity 11. Joint Activity: You should
also gather your own observations
to share with the class. Modify
times for collection if needed.

�0�Acti�ity �0: The Night Sky
16. Pass out three sheets of tracing paper to each student. Ask students to trace their reference point on each sheet to use this evening for star observations.
17. Explain that Frederick uses a variety of measurements at night to under-stand his location, direction, and the time. Explain further that to get them started, everyone will observe the stars at three consecutive hours each night for the next two to four nights (see specifics in Step 18 for homework). Inform students that they will be sharing and discussing their nighttime observations each day.
18. Homework. Hand out the Measurements for Star Navigating worksheet to each student. Explain specifically that each student should observe the stars and environment at night. Ask them to use their reference point and, using a different sheet of tracing paper, draw the North Star, Big Dipper, and Cassiopeia at 6 p.m., 7 p.m., and 8 p.m. (also mark the Little Dipper if possible) with a pencil each hour. Encourage them to use their miniature hand ruler tool to make their drawings accurate. Further encourage them to determine an angle approximation for the height of each star using tools and methods of their choice. Have them record the measurements on the chart, Measurements for Star Navigation.
This may be a good stopping place for the day.
19. Have a brief discussion about the observations from the night before, without giving away any of the patterns yet. Check in with students during this time to make sure they understand how to use the reference points on their tracing paper as well as their miniature hand ruler tool. Encourage students to place the pieces of tracing paper on top of each other to notice what changes and what stays the same.
20. Pass out three more pieces of tracing paper to each student. Ask students to again trace their reference point on the paper to prepare for their second night of star observations.
21. Explain that there are resources other than consistent observation used for remembering the stars and constellations and one of them is stories. Explain that the class will read a traditional Yup’ik story as told by expert storyteller Annie Amatunak.
22. Hand out The Star Navigation Reader, one to each student, and have them turn to “The Caribou.” Have the students read the story using whatever method you choose.
Teacher Note: Literacy ConnectionRefer to the Literacy Counts!:
Teacher’s Guide for descriptions
of story circle roles, methods for
introducing the roles, and activities
for students to practice.

�0� Star Na�igation: Explorations into Angles and Measurement
Teacher Note: Star Observations and MeasurementsYou will want to gather observations and
measurements during the same time as your
students in order to address any difficulties
or challenges in the homework assignment.
The primary goal of this homework is to begin
observing patterns and discovering measure-
ments that remain the same (for example, from
the horizon to the North Star) and those that do
not (for example, from the horizon to the end of
the Big Dipper’s handle). Angle measurements
between the horizon and the stars do not follow
a linear pattern since two types of rotation are
in play, the Earth’s rotation on its axis and the
Earth’s revolution around the Sun. A drawing
of actual measurements is provided here as
an example of how you might want to conduct
your measurements.
23. Homework. Continue to have students observe the stars and environ-ment at night. Refer to Step 18 for details. Students should take observa-tions three to four nights in a row if possible. Note: the worksheet has enough room for three nights of three consecutive measurements.
Fig. 10.8: Example of actual measurements taken from Nenana, Alaska on November 15, 2005, at 8 p.m. The reference point is a woodshed.
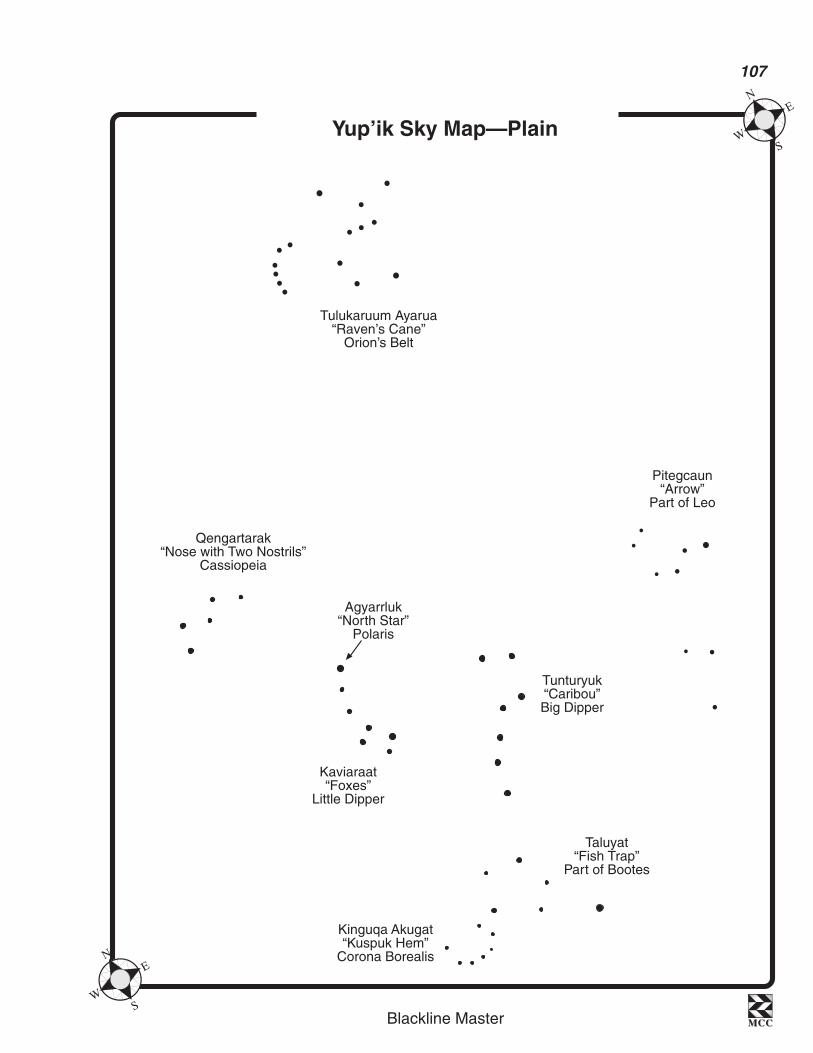
Blackline Master MCCMCC
N
SW
E
N
SW
E
�0�
Yup’ik Sky Map—Plain
Tulukaruum Ayarua“Raven’s Cane”
Orion’s Belt
Qengartarak“Nose with Two Nostrils”
Cassiopeia
Kaviaraat“Foxes”
Little Dipper
Agyarrluk“North Star”
Polaris
Tunturyuk“Caribou”Big Dipper
Taluyat“Fish Trap”
Part of Bootes
Pitegcaun“Arrow”
Part of Leo
Kinguqa Akugat“Kuspuk Hem”
Corona Borealis

Blackline Master MCCMCC
N
SW
E
N
SW
E
�0�
Measurements for Star Navigating
Distance Date TimeHand
MeasurementAngle
Measurement
Horizon to
the Corner
in Caribou
Horizon toNorth Star
Horizon tothe End ofCaribou’sSnout

�0�
Activity 11 Star NavigationStudents should now have had the chance to observe constellations over two to four consecutive nights for three different hours each night. Based on these observations, students will begin to notice the patterns in the ap-parent movement of the constellations used by Frederick. They should also notice the special property of the North Star and associate many of these observations with those they recorded during the day. Specifically, they should see that the North Star stays at the same distance from the horizon in the sky from day to day and hour to hour and the other constellations appear to rotate around it in a counter-clockwise direction.
In this activity, students will share their patterns and discoveries of the stars and constellations. Although they may have very few observations at this time, many of the main patterns will already be obvious. Other patterns, such as those that change with the season and throughout the night, will be less obvious. These patterns have been shared with us by Frederick through his life-long observations and a summary of them will be presented through transparencies. Further, the hand measures may or may not provide patterns depending on what students measure. They may notice that the vertical angle patterns are not the same as the horizontal angle patterns from earlier in the module because hand measures do not change linearly. This is due to rotations in two directions—the rotation on Earth’s axis and the revolution around the Sun. This was not the case with the Sun and shadow observa-tions since the shadows were projected onto the Earth’s surface and thus were only two-dimensional.
Since the patterns in shadows arise from the same physical properties as the patterns in the apparent movement of the stars, students will connect the new information to what they have done earlier in the module. By applying their understanding of the solar system to their observations during both day and night, they will be able to use Frederick’s navigation knowledge in their own environments.
Goals• To analyze patterns in the apparent movement of constellations• To apply locating in three dimensions by using two angle
measurements• To learn that the stars are fixed• To connect how the stars seem to move to the Sun and Earth model
��0 Star Na�igation: Explorations into Angles and Measurement
Materials• Poster—Sky Map (optional)• Transparency, Yup’ik Sky Map—Plain (from Activity 10)• Transparency series: Yup’ik Sky Maps for November 10, December 10,
January 10, February 10, March 10, and April 10• Worksheet, Star Observations Over One Night (one per student)
(optional)• Students’ drawings from homework on tracing paper• Students’ worksheets, Measurements for Star Navigating (from Activity
10)• Glue sticks or tape (one per student)• Sun and Earth model from Activity 7 (whole class model)• Straw angle markers from Activity 2• Protractors (one per student) and/or• Angle rulers (one per student)• Tracing paper (several pages or half pages per student for homework)• The Star Navigation Reader, “Alaska Flag Story”• Literacy Counts!: Teacher’s Guide• Math notebooks
DurationTwo to three class periods.
VocabularyLatitude— angular distance, measured in degrees, north or south of the
equator.Longitude— angular distance, measured in degrees, east or west of the
prime meridian running through Greenwich, England.
Instructions1. Connect back to the previous activity by showing the transparency of the
Yup’ik Sky Map—Plain or using the Sky Map poster. Ask students to review the names and the Yup’ik meanings for the three constellations that Frederick uses.
2. Ask for volunteers to share their homework, the drawings of the stars, on tracing paper. They should have two to four nights with three draw-ings (6 p.m., 7 p.m., and 8 p.m.) each. Ask them to share the landmarks, the constellations, time of night, and the hand measurements and tool measurements they found for their drawings and recorded on the work-sheet, Measurements for Star Navigating.
Teacher Note: Star FactsSome of the ideas that should
emerge include:
• The North Star always seems
to be in the same position.
• The height to the North Star is
fixed and provides the latitude
for that location.
• The shape of the Big Dipper is
always the same.
• The Big Dipper has two stars
that always point to the North
Star.
• Cassiopeia is on the other side
of the North Star from the Big
Dipper.
• The measurement changes
from the horizon to stars other
than the North Star do not seem
to follow a linear pattern.
• Students observed the stars
from different locations and
so they should have different
landmarks to reference.

���Acti�ity ��: Star Na�igation
3. Allow students time to analyze their drawings in groups to look for patterns. Encourage them to compare and contrast different hours on the same day and the same hour on different days. Have each group agree on one set of drawings to share with the class. Ask each group to hang up this set of drawings in a central location so all groups can view and discuss.
4. Ask for groups to share the patterns they found. During this time, be sure to ask key questions, some of which are listed below, to help stu-dents relate their star patterns to their shadow patterns, Sun and Earth model, and to navigating ideas.
• Why does the North Star seem special compared to the other stars? [Height from the horizon does not change. It does not seem to move during the night.]
• What patterns are you noticing that remain the same over time? [The Big Dipper and Cassiopeia rotate around the North Star.]
• Where did you expect to see patterns but did not? [The measure-ments from the horizon to the various stars except the North Star do not change in a consistent way.]
• Are the stars moving? [No, it is the rotation of the Earth on its axis and the revolution of the Earth around the Sun that make the stars appear to move, just like the Sun appears to move.]
• How do you think the Big Dipper and North Star will look at the same time and day but near the equator? Where in the sky will they be? [They will look the same relative to each other, but they will be lower in the sky since the height from the horizon to the North Star determines the latitude. Alaska is at an extreme latitude. In fact, near the equator, stargazers will look very close to the horizon.]
5. Once students have completed their discussion, have them glue or tape their tracing paper drawings into their math notebooks, overlay-ing them, keeping the North Star fixed to show movement over time. (Note: This may be done a couple of days later if more discussion time is needed.)
This may be a good stopping point for the day. If you choose to stop, then be sure to review students’ observations before moving on to Frederick’s observations that follow.
6. Explain that Frederick has been observing the stars for many years at all times of the night and throughout the long winter months from his home in Akiachak, Alaska. He has learned the patterns of the stars for each hour, each day, and each month during the winter for his location. Show the following transparencies in order so students can get a sense of what Frederick has learned about how these constellations seem to
Fig. 11.1: To read a sky map, hold the paper over your head and point N on the paper in the correct direction of north.
Teacher Note: Latitude and LongitudeDepending on your students’
progress, you may want to take
time to look at a globe and dis-
cuss latitude and longitude. If you
are able to do this you should
encourage students to recognize
that their tool measurement to the
North Star defines the latitude for
that location.

��� Star Na�igation: Explorations into Angles and Measurement
move throughout the night for a specific date and throughout the months: Yup’ik Sky Maps for November 10, December 10, January 10, February 10, March 10, and April 10.
7. As you share the transparencies, point out various patterns, such as that the Big Dipper is in about the same position at 10 p.m. on November 10 as it is at 8 p.m. on December 10.
8. To aid students in making some connections between patterns found during the day and night, hand out one copy of the worksheet, Star Observations Over One Night, to each student and ask them to work in pairs. (Depending on how accurate students’ drawings were on their tracing paper, they may be able to do this with their own observations. If so, have each group of students use the agreed upon drawings that they shared with the class previously for this step.) Ask students to conjecture the angle measure between the Big Dipper at 8 p.m. and 9 p.m. first. Then, ask them to draw a line between the pointing stars in the Big Dipper and the North Star for each hour. Ask them to determine the angle between hours. Students should be able to see the 15-degree rotation similar to what we found with the shadows between hours.
9. Ask for volunteers to share their observations from the worksheet. Ask them to connect this back to other observations discussed during this module. Encourage the discussion so students connect this to what they found with shadows and to the idea that the Earth rotates at a constant speed, taking 24 hours for a day, so the 15-degree rotation makes sense again.
This may be a good stopping place.
10. Explain to students that to better understand why Frederick’s system works, we need to go back to the Sun and Earth model. If needed, ex-plain to students that the stars are fixed, that they do not actually move, just like the Sun (in fact, the Sun is a star). Given that information, ask students to explain why we see the patterns in the apparent movement of the constellations. (Note: It is the Earth’s rotation around its axis and revolution around the Sun that create the apparent movement of the stars throughout the night and throughout the seasons.)
11. As a whole class, add to the Sun and Earth model from Activity 7 the constellations discussed (Big Dipper, Little Dipper, Cassiopeia, and the North Star). Use the overhead projector and the transparency Yup’ik Sky Map—Plain from Activity 10 to map the stars onto the ceiling of the classroom with the Sun and Earth model on a table in the center of the room in the appropriate configuration for the location of the stars. Note that the axis, and thus North Pole, must always point to the North Star.
Teacher Note: Sky MapsSky maps are usually drawn with
the north direction on the bottom
of the page. The best way to view
the page and relate the directions
to the real world is to hold the page
above your head as shown in Fig-
ure 11.1. When you do this, orient
the N in the direction of north and
the location of the stars will fall
into place.
Teacher Note: Modeling StarsHere are some alternate methods
for modeling the stars. You can
place dots on the ceiling with
paper or Styrofoam balls using
some type of sticky material or
straight pins. You can also take a
large piece of butcher paper, draw
the constellations on it, and hang
it on the ceiling.

���Acti�ity ��: Star Na�igation
12. As you rotate the Earth on its axis (with no revolution) have students try to view the apparent movement of the stars based on their location for one night. (This movement should help show how the Big Dipper rotates around the North Star throughout the night and how the North Star does not move.) Ask students to discuss how their observations and Frederick’s observations can be explained by this model.
13. As you model the Earth’s revolution around the Sun (with no rotation), have students try to view the apparent movement of the stars based on their location for each month. (This movement should help explain why the Big Dipper is in a different location at 8 p.m. for each month.) Ask students to discuss how their observations and Frederick’s observations can be explained by this model.
14. Hand out The Star Navigation Reader, one to each student, and have them turn to the final story of the reader, “Alaska Flag Story.” Have students read the story using the method of your choice.
15. Homework: Have students continue to observe and draw the sky at the same time as the previous nights. Have more sheets or half sheets of tracing paper available. Encourage them to look for relationships between the measurements that Frederick uses. Ask students to begin creating their own systems. Explain that the module will be ending after the next and final activity but that they can continue observing on their own since they now know what is needed and how to get the required information.
Teacher Note: Perspective and MeasurementIf needed, ask students to go back to measuring objects in the room using two
different angle measurements, like in Activity 10. Ask them to move closer and
further away along the same line of vision and measure again. They should come
up with different measurements based on their perspective. Ask them to connect
these results to this model showing the stars in different locations based on the
month and thus the location in the Earth’s revolution around the Sun. Teacher Note: Literacy ConnectionRefer to the Literacy Counts!:
Teacher’s Guide for descriptions
of story circle roles, methods for
introducing the roles, and activities
for students to practice.
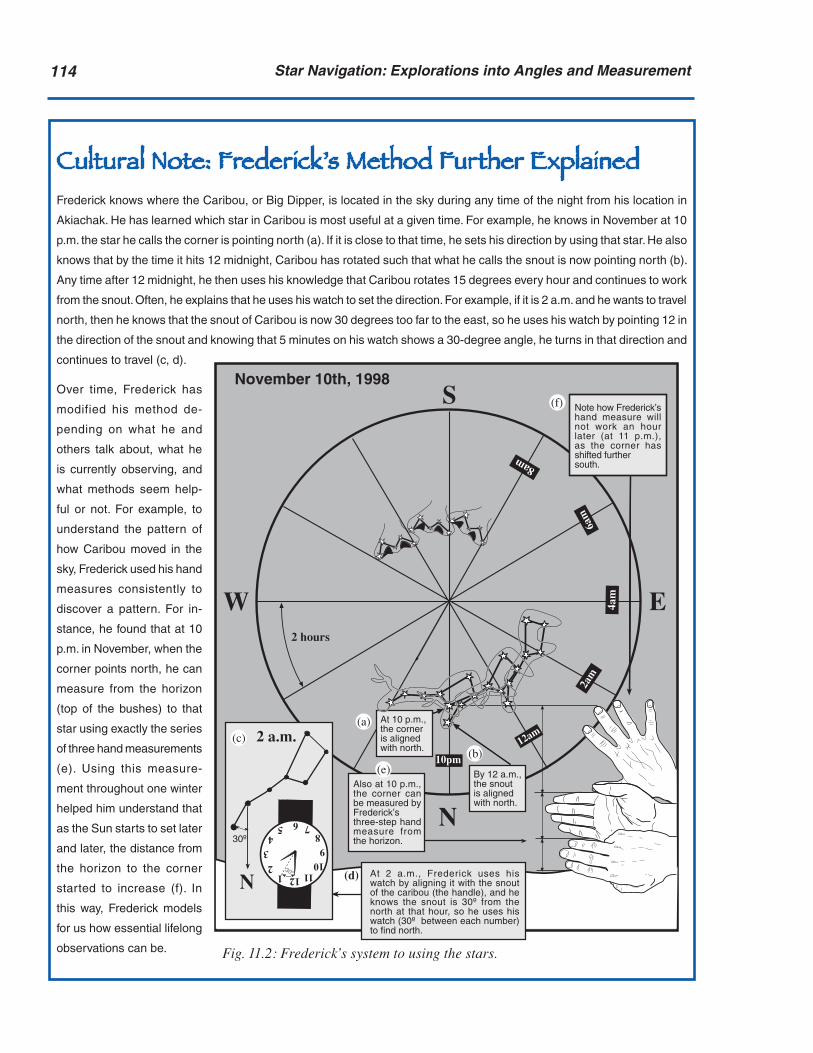
��� Star Na�igation: Explorations into Angles and Measurement
Cultural Note: Frederick’s Method Further ExplainedFrederick knows where the Caribou, or Big Dipper, is located in the sky during any time of the night from his location in
Akiachak. He has learned which star in Caribou is most useful at a given time. For example, he knows in November at 10
p.m. the star he calls the corner is pointing north (a). If it is close to that time, he sets his direction by using that star. He also
knows that by the time it hits 12 midnight, Caribou has rotated such that what he calls the snout is now pointing north (b).
Any time after 12 midnight, he then uses his knowledge that Caribou rotates 15 degrees every hour and continues to work
from the snout. Often, he explains that he uses his watch to set the direction. For example, if it is 2 a.m. and he wants to travel
north, then he knows that the snout of Caribou is now 30 degrees too far to the east, so he uses his watch by pointing 12 in
the direction of the snout and knowing that 5 minutes on his watch shows a 30-degree angle, he turns in that direction and
continues to travel (c, d).
Over time, Frederick has
modified his method de-
pending on what he and
others talk about, what he
is currently observing, and
what methods seem help-
ful or not. For example, to
understand the pattern of
how Caribou moved in the
sky, Frederick used his hand
measures consistently to
discover a pattern. For in-
stance, he found that at 10
p.m. in November, when the
corner points north, he can
measure from the horizon
(top of the bushes) to that
star using exactly the series
of three hand measurements
(e). Using this measure-
ment throughout one winter
helped him understand that
as the Sun starts to set later
and later, the distance from
the horizon to the corner
started to increase (f). In
this way, Frederick models
for us how essential lifelong
observations can be. Fig. 11.2: Frederick’s system to using the stars.
November 10th, 1998S
N
W E
10pm
12am
4am
6am
8am2a
m
2 hours
At 10 p.m.,the corneris alignedwith north.
By 12 a.m.,the snoutis alignedwith north.
Also at 10 p.m.,the corner canbe measured byFrederick’sthree-step handmeasure fromthe horizon.
At 2 a.m., Frederick uses hiswatch by aligning it with the snoutof the caribou (the handle), and heknows the snout is 30º from thenorth at that hour, so he uses hiswatch (30º between each number)to find north.
Note how Frederick’shand measure willnot work an hourlater (at 11 p.m.),as the corner hasshifted furthersouth.
(a)
(b)
(d)
(e)
(f)
30º
2 a.m.
12
6
3 9
12
45 7
8
1110
30º
(c)
N

Blackline Master MCCMCC
N
SW
E
N
SW
E
���
Yup’ik Sky Map for November 10
S
N
W E
10pm
12am4a
m
6am
8am
2am
2 hours
November 10th, 1998
Tundra

Blackline Master MCCMCC
N
SW
E
N
SW
E
���
Yup’ik Sky Map for December 10
S
N
W E
10pm
12am
4am
6am8am
2am
2 hours
December 10th, 1998
Tundra

Blackline Master MCCMCC
N
SW
E
N
SW
E
���
Yup’ik Sky Map for January 10
S
N
W E
10pm
12am
4am
6am
8am
2am
2 hours
January 10th, 1998
Tundra

Blackline Master MCCMCC
N
SW
E
N
SW
E
���
Yup’ik Sky Map for February 10
S
N
W E10pm
12am
4am
6am
8am
2am
2 hours
February 10th, 1998
Tundra

Blackline Master MCCMCC
N
SW
E
N
SW
E
���
Yup’ik Sky Map for March 10
S
N
W E
10pm
12am4am
6am8am
2am
2 hours
March 10th, 1998
Tundra
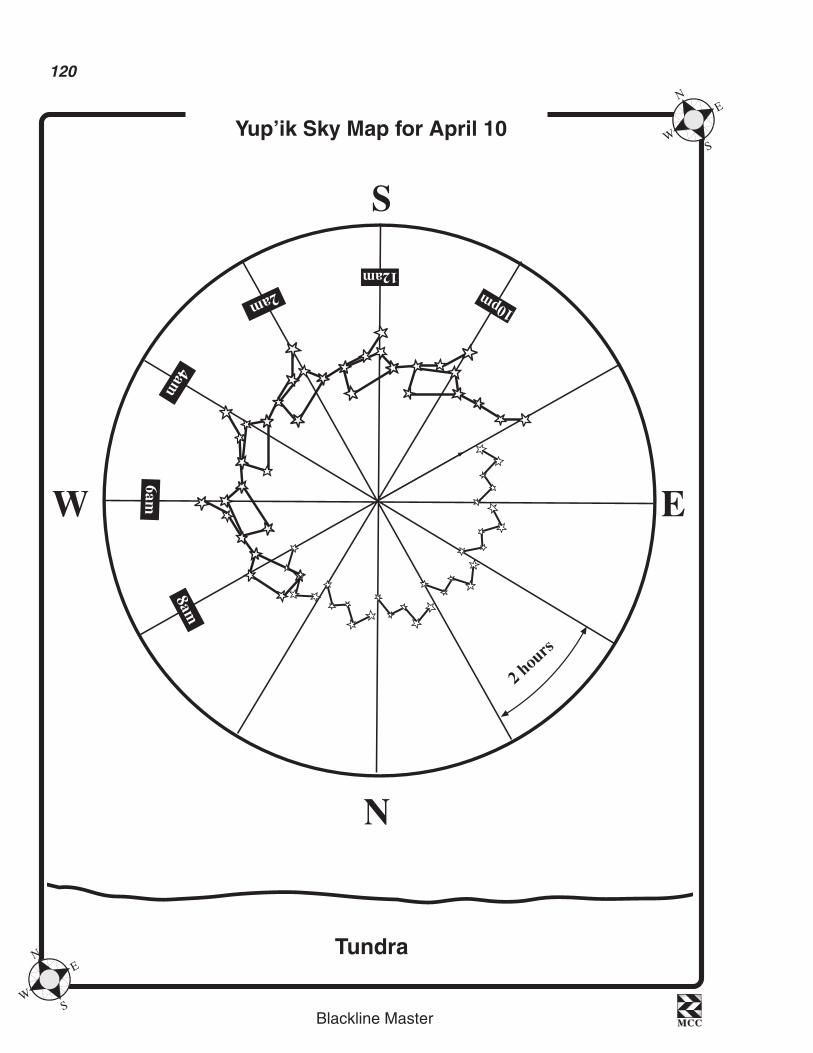
Blackline Master MCCMCC
N
SW
E
N
SW
E
��0
Yup’ik Sky Map for April 10
S
N
W E
10pm
12am
4am
6am
8am
2am
2 hou
rs
April 10th, 1998
Tundra

Blackline Master MCCMCC
N
SW
E
N
SW
E
���
Star Observations Over One Night
xx
x x
x
x
xx
x
x xx
Nenana11/14/05
= 8 pm= 9 pm


���
Activity 12 Traveling to Winter CampStudents should now have a good sense of how their environment, during both day and night, can help them begin to locate and navigate based on Frederick’s ways. Throughout the module, students have developed the skills to determine cardinal directions by either the Sun, the North Star, or the Big Dipper; to apply hand measurements between landmarks, stars, or other helpful objects in two directions, vertically and horizontally; and to relate all of that information to the time of day and season. Further, they have worked with a model that hopefully provides insight into why these natural phenomena work in the manner that they do and that helps dispel common myths that the Sun or stars move.
As the culminating activity of the module, students will synthesize what they have learned throughout the module as they become young apprentices of Frederick. To this day, Frederick continues to teach young people, and anyone else showing an interest in how to navigate by the stars, through a real-life, hands-on approach. He takes teams of travelers out on the tundra, permitting others to lead the way, perhaps even allowing them to take the teams off course through misdirection, in order to teach them the skills and the importance of navigating and being aware of their surroundings in such a dangerous place. He teaches them to use his self-developed understand-ing of the stars to navigate at night, as they travel by snowmobile (usually called snowgo or snowmachine in Alaska) from their home in Akiachak to his winter camp along the Yukon River.
For our final activity and practice we will become travelers with Frederick, using the map of the Akiachak region extending to his winter camp on the Yukon River; the sky maps from the previous activity; and the knowledge of angles, hand measurements, and cardinal directions gathered to lead all the teams to the winter camp. Much like how Frederick teaches, all teams will work independently on interpreting the sky and determining direction, but they must agree before moving on so as not to get too lost.
We hope this culminating activity is enjoyable for you and your students and at the same time helps to integrate and solidify the knowledge students have learned. We also hope this module has helped students to appreciate Frederick and his knowledge as well as that shared by all the elders.
Goals• To synthesize knowledge of angles, measuring, and navigating at night
by applying it to a novel situation
��� Star Na�igation: Explorations into Angles and Measurement
Materials• Transparency, Map of Akiachak Region Key (optional)• Transparency, Map of Akiachak Region (optional)• Transparency series from Activity 11: Yup’ik Sky Maps for November
10, December 10, January 10, February 10, March 10, and April 10• Worksheet, Traveling to Winter Camp (one per team)• Worksheet, Map of Akiachak Region (one to three per team)• Worksheet, Caribou Location for Navigating (one per team)• Markers, colored pencils, or crayons• Protractors (one per student) and/or• Angle rulers (one per team)• Ruler (one per team)• Straw angle markers from Activity 2• Math notebooks
PreparationYou may want to copy the Map of Akiachak Region onto a transparency for students to share their routes with the class or copy the Map of Akiachak Region Key onto a transparency to share with the class when and if you feel it is most appropriate.
DurationTwo to three class periods.
VocabularyError—the difference between a computed or estimated result and the
actual value.Readjustment—a change made to get back on course.Orienteering—the act of following a course using a compass and a map.
Instructions1. Explain that, as a concluding activity, students will work in their teams
as apprentices under Frederick. They are going to take a snowmachine trip and Frederick believes they know enough now to guide the whole group. Encourage students to think about and use all the knowledge and tools they have gained concerning angles, navigating, shadows, and stars while working through this simulation.

���Acti�ity ��: Concluding Na�igation Acti�ity
2. Have students get into their navigating teams. Have a member from each team gather the following materials: a Map of Akiachak Region; colored markers, colored pencils, or crayons; a copy of Caribou Location for Navigating; a ruler; a protractor or angle ruler; and an instruction card called Traveling to Winter Camp.
3. As students are gathering materials, hang up the transparency series from Activity 11 of Sky Maps for each month in a common area so all students can access them when needed. You may want to hang up the transparencies on a bulletin board with a light colored background, on a light colored wall, or make copies to hand out to each team.
4. Read the setup paragraph (or have students read it themselves) at the top of Traveling to Winter Camp. Explain to the class that at every starting and stopping point along the route, each navigating team will deter-mine the location and orientation of Caribou, as well as the direction they need to travel. Each team will be asked to present its results on a rotating basis so that all teams “take the lead” along the trip. Further, within each navigating team, students should take turns leading their own group throughout the simulation. Note that all navigating teams must agree on their results before the class as a whole moves on in its travels. As the teacher, you will act as Frederick George and determine when correction is needed. So, even if all groups agree on a direction that is inaccurate, it is up to you to decide if you want the teams to follow it and then correct later, or if you will encourage them at that moment to reevaluate their decision. Note that both methods may be beneficial and will depend on your students, the nature of the error, and the amount of time you may have set aside for this activity.
5. Work through the simulation as a whole class step by step, with each navigating team working independently on each step, then asking teams to share their ideas step by step, allowing all teams to agree on the re-sults for each step, and then proceed to the next step on the instructions, Traveling to Winter Camp.
6. Once the class has completed the simulation, encourage students to debrief the challenges of the activity within their teams first and then with the whole class. Explain to the class that next they will investigate the results of some real world mistakes made while traveling. Students should feel comfortable with the simulation before moving on to the Mistake Scenarios. You may want to make a transparency of Map of Akiachak Region for ease in sharing with the whole class or you may share the key with students if and when you feel it is necessary.
Teacher Note: Orienting CaribouWhen students are orienting the
Caribou in the sky, encourage
them to refer to the sky maps on
the wall or their notes. Further, be
sure that groups explain to each
other how to hold the Caribou
Location for Navigating correctly.
Remember that all groups must
agree on the correct orientation
before moving on in their travels
with Frederick.

��� Star Na�igation: Explorations into Angles and Measurement
DO NOT
D ISTRIBUTE
Teacher Note: Working through the SimulationAs students work in their navigating team, they will have to solve different pieces of the puzzle to continue through the
simulation of traveling with Frederick to his winter camp. Just as Frederick consistently checks the position and location of
Caribou (the Big Dipper) to assure he is traveling in the correct direction, each team will do so at the beginning, intermediate
stops, and endpoint of the trip. To do this, students will use the Caribou Location for Navigating worksheet and simply hold
it above their heads in the correct orientation and position themselves within the classroom appropriately (in this case, 22
degrees NW). The specific pieces of information that students should determine from each step are listed below.
1. Preparing for the trip.
Each team should mark on their maps a straight line from Akiachak to Winter Camp. They should also mark a line pointing
directly north from Akiachak parallel to the north line given on the map. These two lines should form an angle of 22–25
degrees NW depending on where students place their vertex. Students need to measure this using a protractor or angle
ruler so they have the correct direction in their minds as they travel. Note that north is marked on the map and is not exactly
aligned with the paper. If students draw a line from Akiachak to the North arrow (instead of parallel to that north line) they will
create an incorrect angle measuring closer to 30 degrees. The class can’t move on until all groups are in agreement.
2. Meeting at the start of the trip.
Each team should position their copy of Caribou Location for Navigating in the correct orientation and location of the sky
by simply holding it above their heads in the appropriate fashion. They should also determine the direction of travel, in
other words, they should be able to point themselves in the direction of 22 degrees northwest with respect to the real
cardinal directions for the classroom. Have the leader from each navigating team check with the other teams to make
sure everyone has found the correct direction. Remember, the class should not move on to the next step until all teams
are in agreement.
3. Traveling across the frozen lakes.
Teams should determine the scale of the map from this information, given speed and time. Since they traveled 2 inches in
1 hour at 40 miles per hour, they traveled a total of 40 miles, and the scale is 1 inch to every 20 miles. They should hold
up their copy of Caribou Location for Navigating in the correct orientation and location of the sky with respect to the real
cardinal directions for the classroom. They should also determine which direction is appropriate for traveling, in other words,
they should be able to point themselves in the direction of 22 degrees northwest. (Note that finding 22 degrees NW may
be simple here, but if they had actually traveled that 40 miles their orientation may be off and needing correction.) Have
the leader from each team (for this step) visit with the other teams to assure they all agree on the Caribou location and
orientation and the direction of travel. Further, teams should agree on the location on the map, at the edge of the lakes and
tundra before entering the wooded area. Remember: the class should not move on until all teams are in agreement.
4. Arriving at Winter Camp.
Teams should use the scale they calculated from Step 2 to determine that they traveled 20 miles through the woods before
reaching Winter Camp. Since they traveled 20 miles at the speed of 20 miles per hour, this last part of the trip took another
hour, it is now midnight. Each team should hold up their copy of Caribou Location for Navigating in the correct orientation and
location of the sky as before. Lastly, teams should also determine which direction is appropriate for traveling home, in other
words, they should be able to point themselves in the direction of approximately 22–25 degrees SE or 158–155 degrees
towards the east from north. Note that the direction of travel to camp and home from camp should total 180 degrees.

���Acti�ity ��: Concluding Na�igation Acti�ity
7. To challenge your students, provide them with one or more of these “Mistake Scenarios” in your own words and encourage them to work out the solutions in their teams and then to share with the whole class.
Mistake 1: Traveled too long before stopping. Suppose you didn’t listen to Frederick and when you hit the Johnson
River, you just kept traveling. You traveled pass the Johnson River for 2 hours at 20 miles per hour. Where would you end up on the map? What did you do wrong? What should you have done? How would you know you are not in the right place? How far from camp are you?
Mistake 2: Traveled in a snow storm Suppose you were stuck in a snow storm and ended up turned around
180 degrees while traveling. Suppose the wind stopped and the sky cleared for a moment, how would you know that you were traveling in the opposite direction?
Mistake 3: Traveled off by 5 degrees Suppose you decided to travel 30 degrees NW instead of 22 degrees
NW. Where would you end up after traveling at the speeds given (one hour at 40 miles per hour and then another hour at 20 miles per hour)? How far from camp would you be?
Teacher Note: Mistake ScenariosMistake 1: If you kept traveling at 20 miles per hour through the woods for an ad-
ditional 1 hour you would go right past Frederick’s winter camp and hit the Yukon
River. Students should have recognized from their initial viewing of the map that
they will not go over the river. Further, they may even be able to see the lights
from the village of Marshall to give them an indication that they are in the wrong
place. At the point where you run into the Yukon River, you would be about 20
miles too far past winter camp.
Mistake 2: In this situation, similar to that of the story told by Frederick in Activity
8, you should stop and look for the Caribou and the North Star. When doing so,
you would see that the direction you were facing (assuming NW) was really SE
since you would be forced to turn around where you stood to find the constella-
tions that are helpful.
Mistake 3: Marking on the map a line that is 30 degrees NW from Akiachak, you
would travel over roughly the same amount of frozen lakes. However, when you
stopped in the woods you would be about a ½ inch too far left as the crow flies,
translating to about 10 miles off.
Cultural Note: Checking for ErrorsAs Frederick travels, he uses many
pieces of information to check that
he is continuing in the correct
direction. Often if something feels
or looks unfamiliar then he will
stop and assess where he thinks
he is and see if the various pieces
of information all match. He may
look at the snow drifts, check out
the location of the Caribou in the
sky, and correlate that information
with the map in his head. Histori-
cally, people talk about using error
checking approaches in whiteout
conditions when knowledge of the
surrounding areas is of utmost
importance. The idea is that if you
are aiming for a point and miss it,
then you may not know which side
of the point you are on. However,
if you are aiming for a point that
you know has a slough on the right
side of it, then you’ll know if you hit
the slough you want to go further
to the left. This idea, along with
Frederick’s methods of checking,
synthesizes many of the skills the
students have been dealing with
in this module.

128 Star Navigation: Explorations into Angles and Measurement
8. DebrieftheMistakeScenarios.YoumaywanttomakeatransparencyofMapofAkiachakRegionforeaseinsharingwiththewholeclass.Youmaysharethekeywithstudentsifandwhenyoufeelitisneces-sary.
9. Toconcludethemodule,askstudentstocompleteanyofthefollowingjournalentriesintheirmathnotebooks.Youcanpickfromthelistbeloworpresentyourown.
• Howhasthemodulemadeyoubetterabletotravelinyourenvironmentduringthenight?
• Howhasthemodulemadeyoubetterabletotravelinyourenvironmentduringtheday?
• Howhasthemodulemadeyouabetterobserver?• Howdohandmeasuresdifferfromanglemeasures?• Howwouldyoudescribewhatanangleistoasecondgrader?• Whatisyourfinaldefinitionofanangle?• Howdidyoulikelearningmaththroughtheseactivities?• Howdidyoulikeconnectingmathandstories?• Howdidyoulikedoingmathinteams?• WhatdoyouappreciateaboutFrederickandtheinformation
hesharedinthismodule?
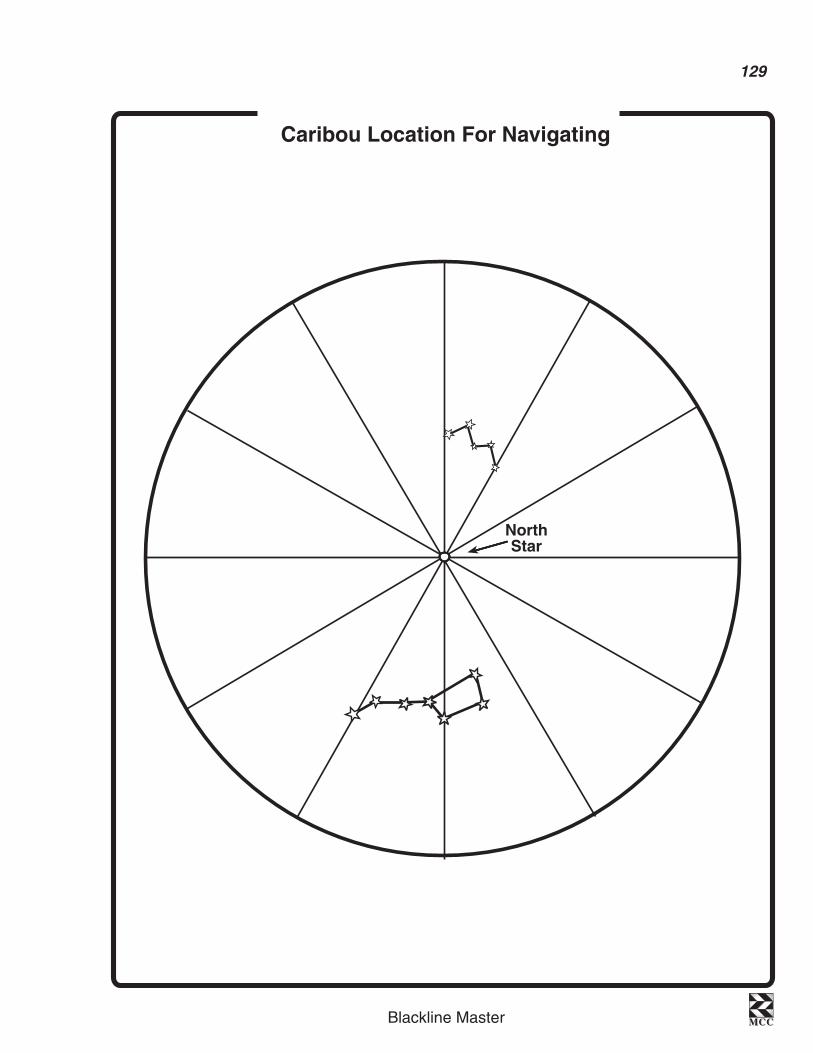
Blackline Master MCCMCC
���
Caribou Location For Navigating
Caribou Location for Navigating
NorthStar

Frederick’sWinter Camp
Blackline Master MCCMCC
��0
Map of Akiachak Region

Blackline Master MCCMCC
N
SW
E
N
SW
E
���
Traveling to Winter Camp
Frederick has invited you to come on a snowmachine trip to his winter camp along with other interested people of all ages. You will travel in teams of 3 to 4 people each and there will be several teams. Frederick believes that each of you has learned enough now to be-come apprentice navigators and he will ask you to lead the whole group at different times throughout the journey.
1. Preparing for the trip.
As you pack up your supplies and check over your snowmachine, Frederick encourages each of you to study the map and locate where his winter camp is in relation to Akiachak. In what direction will you travel from Akiachak if you were to take a straight line to his winter camp, marked with a star near the Yukon River and the village of Marshall? Be sure to mark this on your map, which you will carry with you, in pencil.
2. Meeting at the start of the trip.
Frederick asked everyone to meet on the north side of town at a well-known common spot at 10:00 on the night of November 10th. At this time he asks each of you to notice where Caribou is in the sky and how it is oriented. Which way is the correct direction to travel to get to Winter Camp?
3. Traveling across the frozen lakes.
Frederick explains that each team will need to keep its eyes on each other as we travel across the frozen lakes. We will all stop at the Johnson River to meet up and make sure everyone has made it safely. Knowing that some teams will go faster than others, an average approxi-mate speed for the conditions will be 40 miles per hour on Frederick’s machine. By 11:00 all teams should have arrived at the Johnson River. Frederick encourages each team to assess if they are going in the right direction by observing Caribou’s location and orientation. Where is Caribou in the sky and how is it oriented? Which way is the correct direction to travel to get to Winter Camp? Where are we on the map? What is the scale of the map?
4. Arriving at Winter Camp.
Frederick explains that the terrain is rougher on the other side of the small Johnson River. To get to his Winter Camp we need to go through changing terrain as well, over the frozen lakes, across a small bit of tundra and into the woods. Most likely we will probably have to keep our speeds down around 20 miles per hour. Once each team has determined our direction of travel, he allows us to go on our way. Once we reach Winter Camp we need to observe our new surroundings so it can help while we are here and when we leave to travel back home. Where is Caribou in the sky and how is it oriented? How far did we travel across the tundra? What direction do we need to go when we prepare to go home?

Blackline Master MCCMCC
���
2"1"
22˚
Scale: 1" = 20 miles
Frederick’sWinter Camp
Map of Akiachak Region Key