standing seam trim details seam trim details a brief guide to the various trims used for standing...
TRANSCRIPT

Standing Seam Trim Details
A brief guide to the various trims used for standing seam metal roofing, as well as how they are installed.
This guide is does not cover some aspects of installation. See our installation guide for more info. Butyl Sealant tape or Tube Sealant should be used under all Z-Channel.

Ridge Trim Details for Standing Seam
Ridge Option 1
(Closed Ridge)
Panel goes down first, then the z-channel, and finally the
Ridge Cap.
Color Explanations:
Panel Ridge Cap Z-Channel
Pancake Head Screw Pop Rivet
Butyl Tape or Tube Sealant
Subtract 2” from panel
lengths.

Ridge Option 2
(Vented Ridge)
Panel goes down first, then the z-channel, then the
perforated vent drip (allows for venting) and finally the
Ridge Cap.
Color Explanations:
Panel 13” Ridge Cap Perforated Vent Drip
Z-Channel Pancake Head Screw
Pop Rivet Butyl Tape or Tube Sealant
Subtract 2” from panel
lengths.

Ridge Option 3
(Vented Ridge)
Panel goes down first, then the anchor clip, then the profile
vent material, and finally the Ridge Cap.
Color Explanations:
Panel Ridge Cap Profile Vent Material
Vent Anchor Clip Pancake Head Screw
Pop Rivet Butyl Tape or Tube Sealant
Front
View
Subtract 2” from panel
lengths.

Eave Trim Details for Standing Seam
Eave Option 1
(Hem around Eave)
Cleat is installed, then extended eave is hooked over cleat,
and finally the Panel ribs are cut off, and the flat part is
hemmed around the extended eave trim.
Color Explanations:
Panel Extended Eave Cleat
Pancake Head Screw Tube Sealant
Add 1½” to measurements
for overhang, plus 1” to
fold around eave, for a
total of 2½” extra.

Eave Option 2
(Screw Down Eave)
Extended eave is screwed down, and finally the Panel ribs are cut
off, and the flat part is hemmed around the extended eave trim.
Color Explanations:
Panel Extended Eave Colored Screw
Pancake Head Screw Tube Sealant
Add 1½” to measurements
for overhang, plus 1” to
fold around eave, for a
total of 2½” extra.

Eave Option 3
(Screw Down Panel
And Eave)
Extended eave is screwed down, panels are put down, and then a
colored screw is installed at the eave.
Color Explanations:
Panel Extended Eave Colored Screw
Pancake Head Screw Tube Sealant
Add 1½” to measurements
for overhang.

Gable Trim Details for Standing Seam
Gable Option 1
(Using Cleat)
Panel goes down first, then the z-channel, and then the
cleat, and finally the gable trim. (Also known as rake trim)
Color Explanations:
Panel Gable Trim Cleat
Z-Channel Pancake Head Screw Pop Rivet
Butyl Tape or Tube Sealant

Gable Option 2
(No Cleat)
Panel goes down first, and then the z-channel, and finally
the gable trim. (Also known as rake trim)
Color Explanations:
Panel Gable Trim Z-Channel
Colored Screw Pancake Head Screw Pop Rivet
Butyl Tape or Tube Sealant

Gable Option 3
(Using Small Gable)
Panel goes down first, then the gable trim. You could
also use a z-channel with this custom gable.
Color Explanations:
Panel Custom Gable Trim Colored Screw
Pop Rivet

Gable Option 4
(Screw Down
Step Gable)
Panel goes down first, then the gable trim.
Color Explanations:
Panel Screw Down Step Gable Trim
Colored Screw Butyl Tape or Tube Sealant

Valley Details for Standing Seam
Valley Option 1
(Using Offset Cleat)
Valley goes down first, then the Offset Cleat, and finally the
Panel ribs are cut off, and the flat part is hemmed around the
Offset Cleat.
Color Explanations:
Panel Valley Tube Sealant
Offset Cleat Pancake Head Screw
Subtract 3-4”
from
measurements
for room to flow
between the
panel and the
valley “V”
diverter, but
add 1” to fold
around offset
cleat.

Valley Option 2
(Screw Down Valley)
Valley goes down first, then the panels.
Color Explanations:
Panel Valley Tube Sealant
Colored Screw Pancake Head Screw
Subtract 3-4”
from
measurements
for room to flow
between the
panel and the
valley “V”
diverter.
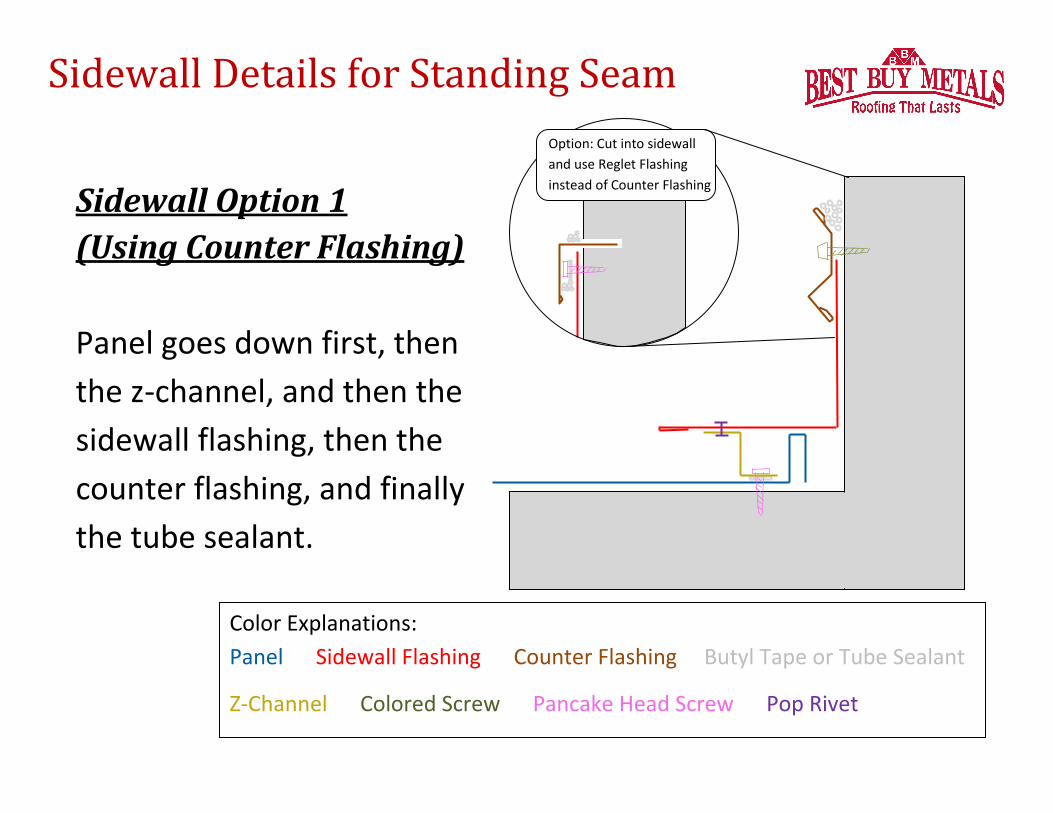
Sidewall Details for Standing Seam
Sidewall Option 1
(Using Counter Flashing)
Panel goes down first, then
the z-channel, and then the
sidewall flashing, then the
counter flashing, and finally
the tube sealant.
Color Explanations:
Panel Sidewall Flashing Counter Flashing Butyl Tape or Tube Sealant
Z-Channel Colored Screw Pancake Head Screw Pop Rivet
Option: Cut into sidewall
and use Reglet Flashing
instead of Counter Flashing

Sidewall Option 2
(Under Siding Material)
Panel goes down first,
then the z-channel, and
then the sidewall flashing,
and finally the siding
materials (by others).
Color Explanations:
Panel Sidewall Flashing Siding Material (by others)
Z-Channel Pancake Head Screw Pop Rivet Butyl Tape or Tube Sealant

Sidewall Option 3
(Screw Down
Step Sidewall)
Panel goes down first,
then the step sidewall
flashing, and finally the
siding materials (by
others).
Color Explanations:
Panel Step Sidewall Flashing Siding Material (by others)
Pancake Head Screw Colored Screw Butyl Tape or Tube Sealant

Endwall Details for Standing Seam
Endwall Option 1
(Using Counter Flashing)
Panel goes down first, then
the z-channel, and then the
endwall flashing, then the
counter flashing, and finally
the tube sealant.
Color Explanations:
Panel Endwall Flashing Counter Flashing Butyl Tape or Tube Sealant
Z-Channel Colored Screw Pancake Head Screw Pop Rivet
Option: Cut into endwall and
use Reglet Flashing instead
of Counter Flashing

Endwall Option 2
(Using Siding Material)
Panel goes down first,
then the z-channel, and
then the endwall flashing,
and finally the siding
material (by others).
Color Explanations:
Panel Endwall Flashing Siding Material (by others)
Z-Channel Pancake Head Screw Pop Rivet Butyl Tape or Tube Sealant

Transition Details for Standing Seam
Transition Option 1
(Hemmed)
Lower panel goes
down first, then the
z-channel, and then
the transition
flashing, then the
offset cleat, finally
the upper panel ribs
are cut off, and the
flat part is hemmed
around the offset
cleat.
Color Explanations:
Panel Transition Flashing Offset Cleat Z-Channel
Pancake Head Screw Pop Rivet Butyl Tape or Tube Sealant
As you can see here, the upper panels must be 2-
6” shorter than the actual measurement, because
you lose some room for the lower panels and the
transition flashing. (The less difference between
pitches, the shorter the panels will be). Be sure to
add 1” to fold around offset cleat.

Transition Option 2
(Exposed Screw)
Lower panel goes
down first, then the
z-channel, and then
the transition
flashing, then the
offset cleat, finally
the upper panels are
put down, then a
colored screw is
installed at the
transition.
Color Explanations:
Panel Transition Flashing Z-Channel Pop Rivet
Pancake Head Screw Colored Screw
Butyl Tape or Tube Sealant
As you can see here, the upper panels must be 2-
6” shorter than the actual measurement, because
you lose some room for the lower panels and the
transition flashing. (The less difference between
pitches, the shorter the panels will be).