standards procedure (skill) table of contents - s.c. | dhec · standards procedure (skill) table of...
TRANSCRIPT

Standards Procedure (Skill)
Table of Contents
Procedures 2009
Procedure1. 12 Lead ECG2. Airway BIAD Combitube3. Airway BIAD King4. Airway BIAD LMA5. Airway CPAP6. Airway Cricothyrotomy Surgical7. Airway Endotracheal Tube Introducer8. Airway Foreign Body Obstruction9. Airway Intubation Confirmation CO2 Detector10. Airway Intubation Confirmation Esophageal Bulb11. Airway Intubation Drug Assisted12. Airway Intubation Nasal13. Airway Intubation Oral Tracheal14. Airway Nebulizer Inhalation Therapy15. Airway Respirator Operation16. Airway Suctioning Advanced17. Airway Suctioning Basic18. Airway Tracheostomy Tube Change19. Airway Ventilator Operation20. Arterial Access Line Maintenance21. Assessment Adult22. Assessment Pain23. Assessment Pediatric24. Blood Glucose Analysis25. Capnography26. Cardiac External Pacing27. Cardiopulmonary Resuscitation28. Cardioversion29. Chest Decompression30. Childbirth31. CNS Catheter Epidural Maintenance32. CNS Catheter Intraventricular Catheter Maintenance33. Decontamination34. Defibrillation Automated35. Defibrillation Manual36. Gastric Tube Insertion37. Injections SQ IM38. Orthostatic BP39. Pulse Oximetry40. Reperfusion Checklist41. Restraints Physical42. Spinal Immobilization43. Splinting44. Stroke Screen LA Prehospital45. Temperature Measurement46. Venous Access Blood Draw47. Venous Access Central Line Maintenance48. Venous Access Existing Catheters49. Venous Access External Jugular Access50. Venous Access Extremity51. Venous Access Intraosseous52. Venous Access Swan Ganz Maintenance53. Wound Care – General54. Wound Care – Hemostatic Agent55. Wound Care – Taserᆴ Probe Removal56. Wound Care – Tourniquet
Standards Procedure (Skill)
12 Lead ECG
Procedure 1 2009
Clinical Indications:
Suspected cardiac patientSuspected tricyclic overdoseElectrical injuriesSyncope
Procedure:1. Assess patient and monitor cardiac status.2. Administer oxygen as patient condition warrants.3. If patient is unstable, definitive treatment is the priority. If patient is stable or stabilized after
treatment, perform a 12 Lead ECG.4. Prepare ECG monitor and connect patient cable with electrodes.5. Enter the required patient information (patient name, etc.) into the 12 lead ECG device.6. Expose chest and prep as necessary. Modesty of the patient should be respected.7. Apply chest leads and extremity leads using the following landmarks:
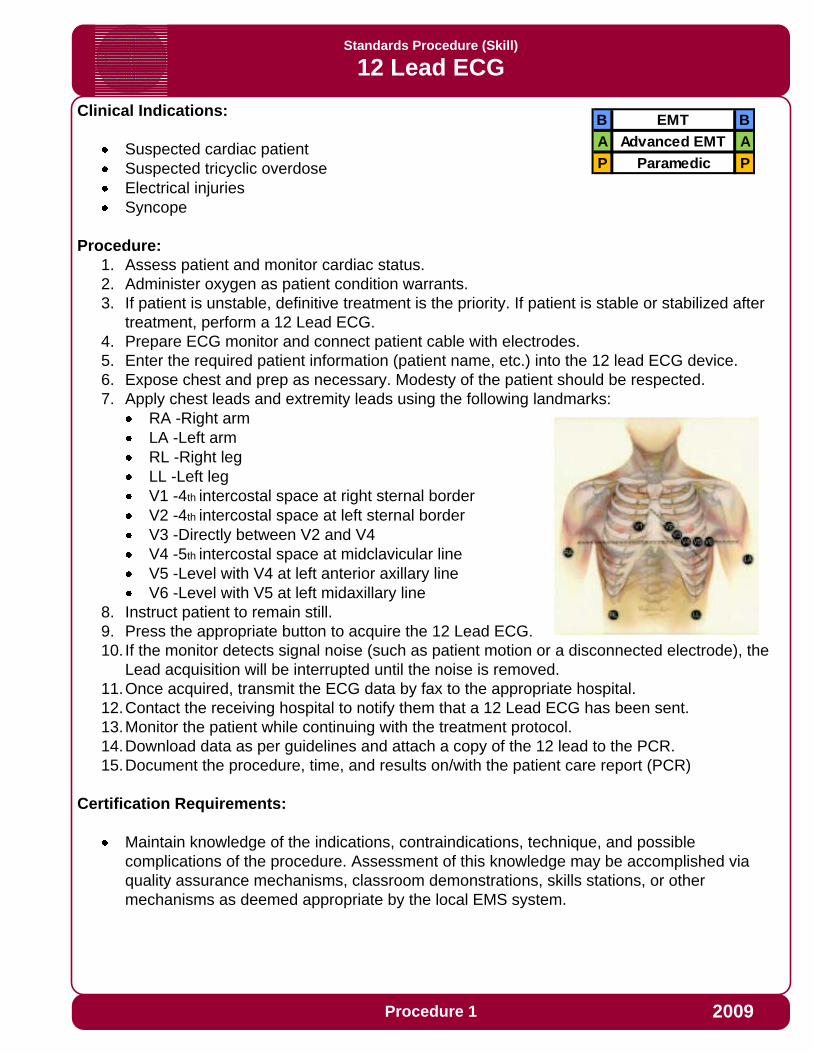
RA -Right armLA -Left armRL -Right legLL -Left legV1 -4th intercostal space at right sternal borderV2 -4th intercostal space at left sternal borderV3 -Directly between V2 and V4V4 -5th intercostal space at midclavicular lineV5 -Level with V4 at left anterior axillary lineV6 -Level with V5 at left midaxillary line
8. Instruct patient to remain still.9. Press the appropriate button to acquire the 12 Lead ECG.10. If the monitor detects signal noise (such as patient motion or a disconnected electrode), the
Lead acquisition will be interrupted until the noise is removed.11.Once acquired, transmit the ECG data by fax to the appropriate hospital.12.Contact the receiving hospital to notify them that a 12 Lead ECG has been sent.13.Monitor the patient while continuing with the treatment protocol.14.Download data as per guidelines and attach a copy of the 12 lead to the PCR.15.Document the procedure, time, and results on/with the patient care report (PCR)
Certification Requirements:
Maintain knowledge of the indications, contraindications, technique, and possible complications of the procedure. Assessment of this knowledge may be accomplished via quality assurance mechanisms, classroom demonstrations, skills stations, or other mechanisms as deemed appropriate by the local EMS system.
B EMT B
A Advanced EMT A
P Paramedic P

Standards Procedure (Skill)
Airway: BIAD-Combitube
Procedure 2 2009
Clinical Indications for Blind Insertion Airway Device (BIAD) Use:
Inability to adequately ventilate a patient with a Bag Valve Mask or longer EMS transport distances require a more advanced airway.Appropriate intubation is impossible due to patient access or difficult airway anatomy.Inability to secure an endotracheal tube in a patient who does not have a gag reflex where at least one failed intubation attempt has occurred.Patient must be ≥ 5 feet and ≥ 16 years of age and must be unconscious.
Procedure:1. Preoxygenate and hyperventilate the patient.2. Lubricate the tube.3. Grasp the patient’s tongue and jaw with your gloved hand and pull forward.4. Gently insert the tube until the teeth are between the printed rings.5. Inflate line 1 (blue pilot balloon) leading to the pharyngeal cuff with 100 cc of air.6. Inflate line 2 (white pilot balloon) leading to the distal cuff with 15 cc of air.7. Ventilate the patient through the longer blue tube.
Auscultate for breath sounds and sounds over the epigastrium.Look for the chest to rise and fall.
8. If breath sounds are positive and epigastric sounds are negative, continue ventilation through the blue tube. The tube is in the esophagus.
In the esophageal mode, stomach contents can be aspirated through the #2, white tube relieving gastric distention.
9. If breath sounds are negative and epigastric sounds are positive, attempt ventilation through the shorter, #2 white tube and reassess for lung and epigastric sounds. If breath sounds are present and the chest rises, you have intubated the trachea and continue ventilation through the shorter tube.
10.The device is secured by the large pharyngeal balloon.11.Confirm tube placement using end-tidal CO2 detector or esophageal bulb device.12. It is strongly recommended that the airway (if equipment is available) be monitored
continuously through Capnography and Pulse Oximetry.13. It is strongly recommended that an Airway Evaluation Form be completed with any
BIAD use.Endotracheal intubation with a Combitube in Place (Only if ventilation unsuccessful):A. The tube must be in the esophageal mode.B. Prepare all equipment needed for endotracheal intubation.C. Decompress the stomach by aspirating contents through the shorter, white tube.D. Hyperventilate the patient.E. Deflate the balloons on the Combitube and remove. Suction equipment must be ready.F. Rapidly proceed with endotracheal intubation.
Certification Requirements:Maintain knowledge of the indications, contraindications, technique, and possible complications of the procedure. Assessment of this knowledge may be accomplished via quality assurance mechanisms, classroom demonstrations, skills stations, or other mechanisms as deemed appropriate by the local EMS System. Assessment should include direct observation at least once per certification cycle.
B EMT B
A Advanced EMT A
P Paramedic P

Standards Procedure (Skill)
Airway: BIAD King
Procedure 3 2009
Clinical Indications for Blind Insertion Airway Device (BIAD) Use:
Inability to adequately ventilate a patient with a Bag Valve Mask or longer EMS transport distances require a more advanced airway.Appropriate intubation is impossible due to patient access or difficult airway anatomy.Inability to secure an endotracheal tube in a patient who does not have a gag reflex where at least one failed intubation attempt has occurred.Patient must be unconscious.
Procedure:1. Preoxygenate and hyperventilate the patient.2. Select the appropriate tube size for the patient.3. Lubricate the tube.4. Grasp the patient’s tongue and jaw with your gloved hand and pull forward.5. Gently insert the tube rotated laterally 45-90 degrees so that the blue orientation line is
touching the corner of the mouth. Once the tip is at the base of the tongue, rotate the tube back to midline. Insert the airway until the base of the connector is in line with the teeth and gums.
6. Inflate the pilot balloon with 45-90 ml of air depending on the size of the device used.7. Ventilate the patient while gently withdrawing the airway until the patient is easily
ventilated.8. Auscultate for breath sounds and sounds over the epigastrium and look for the chest to rise
and fall.9. The large pharyngeal balloon secures the device.10.Confirm tube placement using end-tidal CO2 detector.11. It is strongly recommended that the airway (if equipment is available) be monitored
continuously through Capnography and Pulse Oximetry.12. It is strongly recommended that an Airway Evaluation Form be completed with any
BIAD use.
Certification Requirements:Maintain knowledge of the indications, contraindications, technique, and possible complications of the procedure. Assessment of this knowledge may be accomplished via quality assurance mechanisms, classroom demonstrations, skills stations, or other mechanisms as deemed appropriate by the local EMS System. Assessment should include direct observation at least once per certification cycle.
B EMT B
A Advanced EMT A
P Paramedic P
Standards Procedure (Skill)
Airway: BIAD-Laryngeal Mask Airway (LMA)
Procedure 4 2009
Clinical Indications for Blind Insertion Airway Device (BIAD) Use:
Inability to adequately ventilate a patient with a Bag Valve Mask or longer EMS transport distances require a more advanced airway.Inability to secure an endotracheal tube in a patient who does not have a gag reflex where at least one failed intubation attempt has occurred.Appropriate intubation is impossible due to patient access or difficult airway anatomy.This airway does not prevent aspiration of stomach contents.
Clinical Contraindications:
Deforming Facial TraumaPulmonary FibrosisMorbid Obesity
Procedure:
1. Check the tube for proper inflation and deflation.2. Lubricate with a water-soluble jelly.3. Pre-Oxygenate the patient with 100% Oxygen4. Insert the LMA into the hypopharynx until resistance is met.5. Inflate the cuff until a seal is obtained.6. Connect the LMA to an ambu bag and assess for breath sounds and air entry.7. Confirm tube placement using end-tidal CO2 detector or esophageal bulb device.8. Monitor oxygen saturation with pulse oximetry and heart rhythm with ECG9. It is strongly recommended that the airway (if equipment is available) be monitored
continuously through Capnography and Pulse Oximetry.10.Re-verify LMA placement after every move and upon arrival in the ED11.Document the procedure, time, and result (success) on/with the patient care report (PCR)12. It is strongly recommended that an Airway Evaluation Form be completed with any
BIAD use.
Certification Requirements:
Maintain knowledge of the indications, contraindications, technique, and possible complications of the procedure. Assessment of this knowledge may be accomplished via quality assurance mechanisms, classroom demonstrations, skills stations, or other mechanisms as deemed appropriate by the local EMS System. Assessment should include direct observation once per certification cycle.
B EMT B
A Advanced EMT A
P Paramedic P
Standards Procedure (Skill)
Airway: CPAP
Procedure 5 2009
Clinical Indications for Continuous Positive Airway Pressure (CPAP) Use:
CPAP is indicated in all patients whom inadequate ventilation is suspected that is not associated with Asthma. This could be as a result of pulmonary edema, pneumonia, COPD, etc.
Procedure:
1. Ensure adequate oxygen supply to ventilation device.2. Explain the procedure to the patient.3. Consider placement of a nasopharyngeal airway.4. Place the delivery mask over the mouth and nose. Oxygen should be flowing through the
device at this point.5. Secure the mask with provided straps starting with the lower straps until minimal air leak
occurs.6. If the Positive End Expiratory Pressure (PEEP) is adjustable on the CPAP device adjust the
PEEP beginning at 0 cmH20 of pressure and slowly titrate to achieve a positive pressure as follows:o 5 – 10 cmH20 for Pulmonary Edema, Near Drowning, possible aspiration or pneumoniao 3 – 5 cm H20 for COPD
7. Evaluate the response of the patient assessing breath sounds, oxygen saturation, and general appearance.
8. Titrate oxygen levels to the patient’s response. Many patients respond to lower FIO2 (30-50%).
9. Encourage the patient to allow forced ventilation to occur. Observe closely for signs of complications. The patient must be breathing for optimal use of the CPAP device.
10.Document time and response on patient care report (PCR).
Certification Requirements:
Maintain knowledge of the indications, contraindications, technique, and possible complications of the procedure. Assessment of this knowledge may be accomplished via quality assurance mechanisms, classroom demonstrations, skills stations, or other mechanisms as deemed appropriate by the local EMS System.
B EMT B
A Advanced EMT A
P Paramedic P

Standards Procedure (Skill)
Airway: Cricothyrotomy-Surgical
Procedure 6 2009
Clinical Indications:
Failed Airway ProtocolManagement of an airway when standard airway procedures cannot be performed or have failed in a patient > 12 years old.
Procedure:
1. Have suction and supplies available and ready.2. Locate the cricothyroid membrane utilizing anatomical landmarks.3. Prep the area with an antiseptic swab (Betadine).4. Attach a 5-cc syringe to an 18G - 1 & 1/2-inch needle.5. Insert the needle (with syringe attached) perpendicularly through the cricothyroid membrane with
the needle directed posteriorly.6. During needle insertion, gentle aspiration should be applied to the syringe. Rapid aspiration of air
into the syringe indicates successful entry into the trachea. Do not advance the needle any further. Attach forceps and remove syringe.
7. With the needle remaining in place, make a 1-inch vertical incision through the skin and subcutaneous tissue above and below the needle using a scalpel. Using blunt dissection technique, expose the cricothyroid membrane. This is a bloody procedure. The needle should act as a guide to the cricothyroid membrane.
8. With the needle still in place, make a horizontal stabbing incision approx. 1/2 inch through the membrane on each side of the needle. Remove the needle.
9. Using (skin hook, tracheal hook, or gloved finger) to maintain surgical opening, insert the cuffed tube into the trachea. (Cric tube from the kit or a #6 endotracheal tube is usually sufficient).
10. Inflate the cuff with 5-10cc of air and ventilate the patient while manually stabilizing the tube.11.All of the standard assessment techniques for insuring tube placement should be performed
(auscultation, chest rise & fall, end-tidal CO2 detector, etc.) Esophageal bulb devices are not accurate with this procedure.
12.Secure the tube.13. If Available apply end tidal carbon dioxide monitor (Capnography) and record readings on scene,
en route to the hospital, and at the hospital.14.Document ETT size, time, result (success), and placement location by the centimeter marks.
Document all devices used to confirm initial tube placement and after each movement of the patient.
15.Consider placing an NG or OG tube to clear stomach contents after the airway is secured.16. It is strongly recommended that the airway (if equipment is available) be monitored
continuously through Capnography and Pulse Oximetry.17. It is strongly recommended that an Airway Evaluation Form be completed with all
Intubations
Certification Requirements:
Maintain knowledge of the indications, contraindications, technique, and possible complications of the procedure. Assessment of this knowledge may be accomplished via quality assurance mechanisms, classroom demonstrations, skills stations, or other mechanisms as deemed appropriate by the local EMS System.
P Paramedic P

Standards Procedure (Skill)
Airway: Endotracheal Tube Introducer (Bougie)
Procedure 7 2009
Clinical Indications:
Patients meet clinical indications for oral intubationInitial intubation attempt(s) unsuccessfulPredicted difficult intubation
Contraindications:
Three attempts at orotracheal intubation (utilize failed airway protocol)Age less than eight (8) or ETT size less than 6.5 mm
Procedure:
1. Prepare, position and oxygenate the patient with 100% oxygen;2. Select proper ET tube without stylet, test cuff and prepare suction;3. Lubricate the distal end and cuff of the endotracheal tube (ETT) and the distal 1/2 of the
Endotracheal Tube Introducer (Bougie) (note: Failure to lubricate the Bougie and the ETT may result in being unable to pass the ETT);
4. Using laryngoscopic techniques, visualize the vocal cords if possible using Sellick’s/BURP as needed;
5. Introduce the Bougie with curved tip anteriorly and visualize the tip passing the vocal cords or above the arytenoids if the cords cannot be visualized;
6. Once inserted, gently advance the Bougie until you meet resistance or “hold-up” (if you do not meet resistance you have a probable esophageal intubation and insertion should be reattempted or the failed airway protocol implemented as indicated);
7. Withdraw the Bougie ONLY to a depth sufficient to allow loading of the ETT while maintaining proximal control of the Bougie;
8. Gently advance the Bougie and loaded ET tube until you have hold-up again, thereby assuring tracheal placement and minimizing the risk of accidental displacement of the Bougie;
9. While maintaining a firm grasp on the proximal Bougie, introduce the ET tube over the Bougie passing the tube to its appropriate depth;
10. If you are unable to advance the ETT into the trachea and the Bougie and ETT are adequately lubricated, withdraw the ETT slightly and rotate the ETT 90 degrees COUNTER clockwise to turn the bevel of the ETT posteriorly. If this technique fails to facilitate passing of the ETT you may attempt direct laryngoscopy while advancing the ETT(this will require an assistant to maintain the position of the Bougie and, if so desired, advance the ETT);
11.Once the ETT is correctly placed, hold the ET tube securely and remove the Bougie;12.Confirm tracheal placement according to the intubation protocol, inflate the cuff with 3 to 10 cc of air,
auscultate for equal breath sounds and reposition accordingly;13.When final position is determined secure the ET tube, reassess breath sounds, apply end tidal CO2
monitor, and record and monitor readings to assure continued tracheal intubation.
Certification Requirements:
Maintain knowledge of the indications, contraindications, technique, and possible complications of the procedure. Assessment of this knowledge may be accomplished via quality assurance mechanisms, classroom demonstrations, skills stations, or other mechanisms as deemed appropriate by the local EMS System. Assessment should include direct observation at least once per certification cycle.
P Paramedic P

Standards Procedure (Skill)
Airway: Foreign Body Obstruction
Procedure 8 2009
Clinical Indications:
Sudden onset of respiratory distress often with coughing, wheezing, gagging, or stridor due to a foreign-body obstruction of the upper airway.
Procedure:
1. Assess the degree of foreign body obstructionDo not interfere with a mild obstruction allowing the patient to clear their airway by coughing.In severe foreign-body obstructions, the patient may not be able to make a sound. The victim my clutch his/her neck in the universal choking sign.
2. For an infant, deliver 5 back blows (slaps) followed by 5 chest thrusts repeatedly until the object is expelled or the victim becomes unresponsive.
3. For a child, perform a subdiaphragmatic abdominal thrust (Heimlich Maneuver) until the object is expelled or the victim becomes unresponsive.
4. For adults, a combination of maneuvers may be required.First, subdiaphragmatic abdominal thrusts (Heimlich Maneuver) should be used in rapid sequence until the obstruction is relieved.If abdominal thrusts are ineffective, chest thrusts should be used. Chest thrusts should be used primarily in morbidly obese patients and in the patients who are in the late stages of pregnancy
5. If the victim becomes unresponsive, begin CPR immediately but look in the mouth before administering any ventilations. If a foreign-body is visible, remove it.
6. Do not perform blind finger sweeps in the mouth and posterior pharynx. This may push the object farther into the airway.
7. In unresponsive patients, EMT-Intermediate and EMT-Paramedic level professionals should visualize the posterior pharynx with a laryngoscope to potentially identify and remove the foreign-body using Magil forceps.
8. Document the methods used and result of these procedures in the patient care report (PCR).
Certification Requirements:
Maintain knowledge of the indications, contraindications, technique, and possible complications of the procedure. Assessment of this knowledge may be accomplished via quality assurance mechanisms, classroom demonstrations, skills stations, or other mechanisms as deemed appropriate by the local EMS System.
F First Responder F
B EMT B
A Advanced EMT A
P Paramedic P

Standards Procedure (Skill)
Airway Intubation Confirmation – End-Tidal CO2 Detector
Procedure 9 2009
Clinical Indications:
The End-Tidal CO2 detector shall be used with any Endotracheal Tube or Blind Insertion Airway Device use.
It is strongly recommended that continuous Capnography be used in place of or in additionto the use of an End-Tidal CO2 detector.
Procedure:
1. Attach End-Tidal CO2 detector to the Blind Insertion Airway Device or the Endotracheal Tube.2. Note color change. A color change or CO2 detection will be documented on each respiratory
failure or cardiac arrest patient.3. The CO2 detector shall remain in place with the airway and monitored throughout the
prehospital care and transport unless/until continuous Capnography is used. Any loss of CO2
detection or color change is to be documented and monitored as procedures are done to verify or correct the airway problem.
4. Tube placement should be verified frequently and always with each patient move or loss of color change in the End-Tidal CO2 detector.
5. Document the procedure and the results on/with the Patient Care Report (PCR) as well as on the Airway Evaluation Form.
Certification Requirements:
Maintain knowledge of the indications, contraindications, technique, and possible complications of the procedure. Assessment of this knowledge may be accomplished via quality assurance mechanisms, classroom demonstrations, skills stations, or other mechanisms as deemed appropriate by the local EMS System.
B EMT B
A Advanced EMT A
P Paramedic P
Standards Procedure (Skill)
Airway: Intubation Confirmation-Esophageal Bulb
Procedure 10 2009
Clinical Indications:
To assist in determining and documenting the correct placement of an Endotracheal or Nasotracheal tube.
It is strongly recommended that continuous Capnography be used in place of or in addition to the use of an Esophageal Bulb device.
Procedure:
1. Complete intubation as per Airway-Intubation Oral or Airway-Intubation Nasal procedures.2. Place the bulb device over the proximal end of the ETT or NTT. Squeeze the bulb to remove
air prior to securing the bulb on the tube.3. Once secured on the tube, release the bulb.4. If the bulb expands evenly and easily, this indicates probable tracheal intubation.
Assessment of the patient’s breath sounds bilaterally should also be performed.5. If the bulb does not expand easily, this indicates possible esophageal intubation and the
need to reassess the airway.6. Document time and result in the patient care report (PCR).
Certification Requirements:
Maintain knowledge of the indications, contraindications, technique, and possible complications of the procedure. Assessment of this knowledge may be accomplished via quality assurance mechanisms, classroom demonstrations, skills stations, or other mechanisms as deemed appropriate by the local EMS System.
B EMT B
A Advanced EMT A
P Paramedic P

Standards Procedure (Skill)
Airway: Intubation Drug Assisted
Procedure 11 2009
Clinical Indications:
Need for advanced airway control in a patient who has a gag reflex or trismus (jaw clinching).
Clinical Contraindications:
Significant burns between 24 hours old and 2 weeks old.
Known neuromuscular disease such as myasthenia gravis, amyotrophic lateral sclerosis, muscular dystrophy, Guillain-Barre syndrome.Chronic renal failure and on hemodialysis
Age less than 12 years
Patient or family history of malignant hyperthermia
A minimum of 2 EMT-Paramedics on scene able to participate in patient care
Procedure:
1. Pre-oxygenate patient with 100% oxygen via NRB mask or BVM
2. Monitor oxygen saturation with pulse oximetry and heart rhythm with ECG
3. Ensure functioning IV access
4. Evaluate for difficult airway (LEMON)-see appendix
5. Perform focused neurological exam
6. Prepare equipment (intubation kit, BVM, suction, RSI medications, BIAD, Cricothyrotomy kit, waveform capnography)
7. Administer Etomidate
8. Stroke/head trauma suspected? If yes, Lidocaine 1mg/kg
9. In-line c-spine stabilization by second caregiver (in setting of trauma)
10.Apply cricoid pressure (by third caregiver)
11.Administer Succinylcholine and await fasciculation and jaw relaxation
12. Intubate trachea
13.Verify ET placement through auscultation, Capnography, and Pulse Oximetry
14.May repeat Succinylcholine if inadequate relaxation after 2 minutes
15.Release cricoid pressure and secure tube
16.Continuous Capnography and Pulse Oximetry is required for Drug Assisted Intubation. The pre-intubation levels, minimal levels during intubation, and post-intubation levels must be recorded in the PCR.
17.Re-verify tube placement after every move and upon arrival in the ED
18.Document ETT size, time, result (success), and placement location by the centimeter marks either at the patient’s teeth or lips on/with the patient care report (PCR). Document all devices/methods used to confirm initial tube placement initially and with patient movement.
19.Consider placing a gastric tube to clear stomach contents after the airway is secured.
20.Completion of the Airway Evaluation Form is required including a signature from the receiving physician at the Emergency Department confirming proper tube placement.
Certification Requirements:
100% QA/QI
Maintain knowledge of the indications, contraindications, technique, and possible complications of the procedure. Assessment of this knowledge may be accomplished via quality assurance mechanisms, classroom demonstrations, skills stations, or other mechanisms as deemed appropriate by the local EMS System. Assessment should include direct observation at least once per certification cycle.
P Paramedic P

Standards Procedure (Skill)
Airway: Intubation Nasotracheal
Procedure 12 2009
Clinical Indications:
A spontaneously breathing patient in need of intubation (inadequate respiratory effort, evidence of hypoxia or carbon dioxide retention, or need for airway protection). Rigidity or clenched teeth prohibiting other airway procedures. Patient must be 12 years of age or older.
Procedure:
1. Premedicate the patient with nasal spray.2. Select the largest and least obstructed nostril and insert a lubricated nasal airway to help
dilate the nasal passage.3. Preoxygenate the patient. Lubricate the tube. The use of a BAAM device is recommended.4. Remove the nasal airway and gently insert the tube keeping the bevel of the tube toward the
septum.5. Continue to pass the tube listening for air movement and looking for “to-and-fro” vapor
condensation in the tube. As the tube approaches the larynx, the air movement gets louder.6. Gently and evenly advance the tube through the glottic opening on the inspiration. This
facilitates passage of the tube and reduces the incidence of trauma to the vocal cords.7. Upon entering the trachea, the tube may cause the patient to cough, buck, strain, or gag. Do
not remove the tube! This is normal, but be prepared to control the cervical spine and the patient, and be alert for vomiting.
8. Auscultate for bilaterally equal breath sounds and absence of sounds of the epigastrium. Observe for symmetrical chest expansion. The 15mm adapter usually rests close to the nostril with proper positioning.
9. Inflate the cuff with 5-10 cc of air.10.Confirm tube placement using an end-tidal CO2 monitoring or esophageal bulb device.11.Secure the tube.12.Reassess airway and breath sounds after transfer to the stretcher and during transport.
These tubes are easily dislodged and require close monitoring and frequent reassessment.13.Document the procedure, time, and result (success) on/with the patient care report (PCR).14. It is strongly recommended that the airway (if equipment is available) be monitored
continuously through Capnography and Pulse Oximetry.15. It is strongly recommended that an Airway Evaluation Form be completed with all
intubations
Certification Requirements:
Maintain knowledge of the indications, contraindications, technique, and possible complications of the procedure. Assessment of this knowledge may be accomplished via quality assurance mechanisms, classroom demonstrations, skills stations, or other mechanisms as deemed appropriate by the local EMS System.
P Paramedic P

Standards Procedure (Skill)
Airway: Intubation Oral Tracheal
Procedure 13 2009
Clinical Indications:
Inability to adequately ventilate a patient with a Bag Valve Mask or longer EMS transport distances require a more advanced airway.An unconscious patient without a gag reflex who is apneic or is demonstrating inadequate respiratory effort.A component of Drug Assisted Intubation
Procedure:
1. Prepare, position and oxygenate the patient with 100% Oxygen.2. Select proper ET tube (and stylette, if used), have suction ready.3. Using laryngoscope, visualize vocal cords. (Use Sellick maneuver/BURP to assist you).4. Limit each intubation attempt to 30 seconds with BVM between attempts.5. Visualize tube passing through vocal cords.6. Confirm and document tube placement using an end-tidal CO2 monitoring or
esophageal bulb device.7. Inflate the cuff with 3-to10 cc of air; secure the tube to the patient’s face.8. Auscultate for bilaterally equal breath sounds and absence of sounds over the epigastrium. If
you are unsure of placement, remove tube and ventilate patient with bag valve mask.9. Consider using a Blind Insertion Airway Device if intubation efforts are unsuccessful.10.Apply end tidal carbon dioxide monitor (Capnography) and record readings on scene, en
route to the hospital, and at the hospital.11.Document ETT size, time, result (success), and placement location by the centimeter marks
either at the patient’s teeth or lips on/with the patient care report (PCR). Document all devices used to confirm initial tube placement. Also document positive or negative breath sounds before and after each movement of the patient.
12.Consider placing an NG or OG tube to clear stomach contents after the airway is secured with an ET tube.
13. It is strongly recommended that the airway (if equipment is available) be monitored continuously through Capnography and Pulse Oximetry.
14. It is strongly recommended that an Airway Evaluation Form be completed with all intubations
Certification Requirements:
Maintain knowledge of the indications, contraindications, technique, and possible complications of the procedure. Assessment of this knowledge may be accomplished via quality assurance mechanisms, classroom demonstrations, skills stations, or other mechanisms as deemed appropriate by the local EMS System. Assessment should include direct observation at least once per certification cycle.
P Paramedic P
Standards Procedure (Skill)
Airway – Nebulizer Inhalation Therapy
Procedure 14 2009
Clinical Indications:
Patients experiencing bronchospasm.
Procedure:
1. Gather the necessary equipment.2. Assemble the nebulizer kit.3. Instill the premixed drug (such as Albuterol or other approved drug) into the reservoir well of
the nebulizer.4. Connect the nebulizer device to oxygen at 4 - 6 liters per minute or adequate flow to produce
a steady, visible mist.5. Instruct the patient to inhale normally through the mouthpiece of the nebulizer. The patient
needs to have a good lip seal around the mouthpiece.6. The treatment should last until the solution is depleted. Tapping the reservoir well near the
end of the treatment will assist in utilizing all of the solution.7. Monitor the patient for medication effects. This should include the patient’s assessment of
his/her response to the treatment and reassessment of vital signs, ECG, and breath sounds.8. Assess and document peak flows before and after nebulizer treatments.9. Document the treatment, dose, and route on/with the patient care report (PCR).
Certification Requirements:
Maintain knowledge of the indications, contraindications, technique, and possible complications of the procedure. Assessment of this knowledge may be accomplished via quality assurance mechanisms, classroom demonstrations, skills stations, or other mechanisms as deemed appropriate by the local EMS System.EMT-B and EMT-A may only assist patient in setup and administration.
B EMT B
A Advanced EMT A
P Paramedic P
Standards Procedure (Skill)
Procedure 15 2009
Clinical Indications:
Transport of an intubated patient
Procedure:
1. Confirm the placement of tube as per airway protocol.2. Ensure adequate oxygen delivery to the respirator device.3. Preoxygenate the patient as much as possible with bag-valve mask.4. Remove BVM and attach tube to respiration device.5. Per instructions of device, set initial respiration values. For example, set an
inspiratory:expiratory ratio of 1:4 (for every 1 second of inspiration, allow 4 seconds and expiration) with a rate of 12 to 20.
6. Assess breath sounds. Allow for adequate expiratory time. Adjust respirator setting as clinically indicated.
7. It is strongly recommended that the airway be monitored continuously through Capnography (if equipment is available) and Pulse Oximetry. The ventilatory rate should adjusted to maintain a pulse oximetry of >90 (or as high as possible) while maintaining a pCO2 of 30-35.
8. If any worsening of patient condition, decrease in oxygen saturation, or any question regarding the function of the respirator, remove the respirator and resume bag-valve mask ventilations.
9. Document time, complications, and patient response on the patient care report (PCR).
Certification Requirements:
Maintain knowledge of the indications, contraindications, technique, and possible complications of the procedure. Assessment of this knowledge may be accomplished via quality assurance mechanisms, classroom demonstrations, skills stations, or other mechanisms as deemed appropriate by the local EMS System.
B EMT B
A Advanced EMT A
P Paramedic P

Standards Procedure (Skill)
Procedure 16 2009
Clinical Indications:
Obstruction of the airway (secondary to secretions, blood, or any other substance) in a patient currently being assisted by an airway adjunct such as a naso-tracheal tube, endotracheal tube, Combitube, tracheostomy tube, or a cricothyrotomy tube.
Procedure:
1. Ensure suction device is in proper working order.2. Preoxygenate the patient as is possible.3. Attach suction catheter to suction device, keeping sterile plastic covering over catheter.4. Using the suprasternal notch and the end of the airway into the catheter will be placed as
guides, measure the depth desired for the catheter (judgment must be used regarding the depth of suctioning with cricothyrotomy and tracheostomy tubes).
5. If applicable, remove ventilation devices from the airway.6. With the thumb port of the catheter uncovered, insert the catheter through the airway device.7. Once the desired depth (measured in #4 above) has been reached, occlude the thumb port
and remove the suction catheter slowly.8. A small amount of Normal Saline (10 ml) may be used if needed to loosen secretions for
suctioning.9. Reattach ventilation device (e.g., bag-valve mask) and ventilate the patient10.Document time and result in the patient care report (PCR).
Certification Requirements:
Maintain knowledge of the indications, contraindications, technique, and possible complications of the procedure. Assessment of this knowledge may be accomplished via quality assurance mechanisms, classroom demonstrations, skills stations, or other mechanisms as deemed appropriate by the local EMS System.
B EMT B
A Advanced EMT A
P Paramedic P
Standards Procedure (Skill)
Procedure 17 2009
Clinical Indications:
Obstruction of the airway (secondary to secretions, blood, or any other substance) in a patient who cannot maintain or keep the airway clear.
Procedure:
1. Ensure suction device is in proper working order with suction tip in place.2. Preoxygenate the patient as is possible.3. Explain the procedure to the patient if they are coherent.4. Examine the oropharynx and remove any potential foreign bodies or material which
mayocclude the airway if dislodged by the suction device.5. If applicable, remove ventilation devices from the airway.6. Use the suction device for no more than 30 seconds to remove any secretions, blood, or
other substance.7. The alert patient may assist with this procedure.8. Reattach ventilation device (e.g., bag-valve mask) and ventilate or assist the patient9. Record the time and result of the suctioning in the patient care report (PCR).
Certification Requirements:
Maintain knowledge of the indications, contraindications, technique, and possible complications of the procedure. Assessment of this knowledge may be accomplished via quality assurance mechanisms, classroom demonstrations, skills stations, or other mechanisms as deemed appropriate by the local EMS System.
B EMT B
A Advanced EMT A
P Paramedic P

Standards Procedure (Skill)
Procedure 18 2009
Clinical Indications:
Presence of Tracheostomy site.Urgent or emergent indication to change the tube, such as obstruction that will not clear with suction, dislodgement, or inability to oxygenate/ventilate the patient without other obvious explanation.
Procedure:
1. Have all airway equipment prepared for standard airway management, including equipment of orotracheal intubation and failed airway.
2. Have airway device (endotracheal tube or tracheostomy tube) of the same size as the tracheostomy tube currently in place as well as 0.5 size smaller available (e.g., if the patient has a #6.0 Shiley, then have a 6.0 and a 5.5 tube).
3. Lubricate the replacement tube(s) and check the cuff.4. Remove the tracheostomy tube from mechanical ventilation devices and use a bag-valve
apparatus to pre-oxygenate the patient as much as possible.5. Once all equipment is in place, remove devices securing the tracheostomy tube, including
sutures and/or supporting bandages.6. If applicable, deflate the cuff on the tube. If unable to aspirate air with a syringe, cut the
balloon off to allow the cuff to lose pressure.7. Remove the tracheostomy tube.8. Insert the replacement tube. Confirm placement via standard measures except for
esophageal detection (which is ineffective for surgical airways).9. If there is any difficultly placing the tube, re-attempt procedure with the smaller tube.10. If difficulty is still encountered, use standard airway procedures such as oral bag-valve mask
or endotracheal intubation (as per protocol). More difficulty with tube changing can be anticipated for tracheostomy sites that are immature – i.e., less than two weeks old. Great caution should be exercised in attempts to change immature tracheotomy sites.
11.Document procedure, confirmation, patient response, and any complications in the PCR
Certification Requirements:
Maintain knowledge of the indications, contraindications, technique, and possible complications of the procedure. Assessment of this knowledge may be accomplished via quality assurance mechanisms, classroom demonstrations, skills stations, or other mechanisms as deemed appropriate by the local EMS System. Assessment for this skill should include direct observation at least once per certification cycle.
P Paramedic P
Standards Procedure (Skill)
Procedure 19 2009
Clinical Indications:
Management of the ventilation of a patient during a prolonged or interfacility transport of an intubated patient.
Procedure:
1. Transporting personnel should review the operation of the ventilator with the treating personnel (physician, nurse, or respiratory therapy) in the referring facility prior to transport if possible.
2. All ventilator settings, including respiratory rate, FiO2, mode of ventilation, and tidal volumes should be recorded prior to initiating transport. Additionally, the recent trends in oxygen saturation experienced by the patient should be noted.
3. Prior to transport, specific orders regarding any anticipated changes to ventilator settings as well as causes for significant alarm should be reviewed with the referring medical personnel as well as medical control.
4. Once in the transporting unit, confirm adequate oxygen delivery to the ventilator.5. Frequently assess breath sounds to assess for possible tube dislodgment during transfer.6. Frequently assess the patient’s respiratory status, noting any decreases in oxygen saturation
or changes in tidal volumes, peak pressures, etc.7. Note any changes in ventilator settings or patient condition in the PCR.8. Consider placing an NG or OG tube to clear stomach contents.9. It is strongly recommended that the airway (if equipment is available) be monitored
continuously through Capnography and Pulse Oximetry.10. If any significant change in patient condition, including vital signs or oxygen saturation or
there is a concern regarding ventilator performance/alarms, remove the ventilator from the endotracheal tube and use a bag-valve mask with 100% O2. Contact medical control immediately.
Certification Requirements:
Maintain knowledge of the indications, contraindications, technique, and possible complications of the procedure. Assessment of this knowledge may be accomplished via quality assurance mechanisms, classroom demonstrations, skills stations, or other mechanisms as deemed appropriate by the local EMS System.
P Paramedic P

Standards Procedure (Skill)
Procedure 20 2009
Clinical Indications:
Transport of a patient with an existing arterial line.
Procedure:
1. Make certain arterial line is secured prior to transport, including intersection of arterial catheter and IV/Monitoring lines.
2. Use available equipment for monitoring of arterial pressures via arterial line.3. Do not use the arterial line for administration of any fluids or medications.4. If there is any question regarding dislodgement of the arterial line and bleeding results,
remove the line and apply direct pressure over the site for at least five minutes before checking to ensure hemostasis.
Certification Requirements:
Maintain knowledge of the indications, contraindications, technique, and possible complications of the procedure. Assessment of this knowledge may be accomplished via quality assurance mechanisms, classroom demonstrations, skills stations, or other mechanisms as deemed appropriate by the local EMS System.
P Paramedic P

Standards Procedure (Skill)
Procedure 21 2009
Clinical Indications:
Any patient requesting a medical evaluation that is too large to be measured with a Broselow-Luten Resuscitation Tape.
Procedure:
1. Scene size-up, including universal precautions, scene safety, environmental hazards assessment, need for additional resources, by-stander safety, and patient/caregiver interaction
2. Assess need for additional resources.3. Initial assessment includes a general impression as well as the status of a patient’s airway,
breathing, and circulation.4. Assess mental status (e.g., AVPU) and disability (e.g., GCS).5. Control major hemorrhage and assess overall priority of patient.6. Perform a focused history and physical based on patient’s chief complaint.7. Assess need for critical interventions.8. Complete critical interventions and perform a complete secondary exam to include a baseline
set of vital signs as directed by protocol.9. Maintain an on-going assessment throughout transport; to include patient response/possible
complications of interventions, need for additional interventions, and assessment of evolving patient complaints/conditions.
10.Document all findings and information associated with the assessment, performed procedures, and any administration of medications on the PCR.
Certification Requirements:
Maintain knowledge of the indications, contraindications, technique, and possible complications of the procedure. Assessment of this knowledge may be accomplished via quality assurance mechanisms, classroom demonstrations, skills stations, or other mechanisms as deemed appropriate by the local EMS System.
F First Responder F
B EMT B
A Advanced EMT A
P Paramedic P
Standards Procedure (Skill)
Pain Assessment and Documentation
Procedure 22 2009
Clinical Indications:Any patient with pain.
Definitions:Pain is an unpleasant sensory and emotional experience associated with actual or potential tissue damage.Pain is subjective (whatever the patient says it is).
Procedure:1. Initial and ongoing assessment of pain intensity and character is accomplished through the
patient’s self report.2. Pain should be assessed and documented in the PCR during initial assessment, before
starting pain control treatment, and with each set of vitals.3. Pain should be assessed using the appropriate approved scale.4. Three pain scales are available: the 0 – 10, the Wong - Baker "faces", and the FLACC.
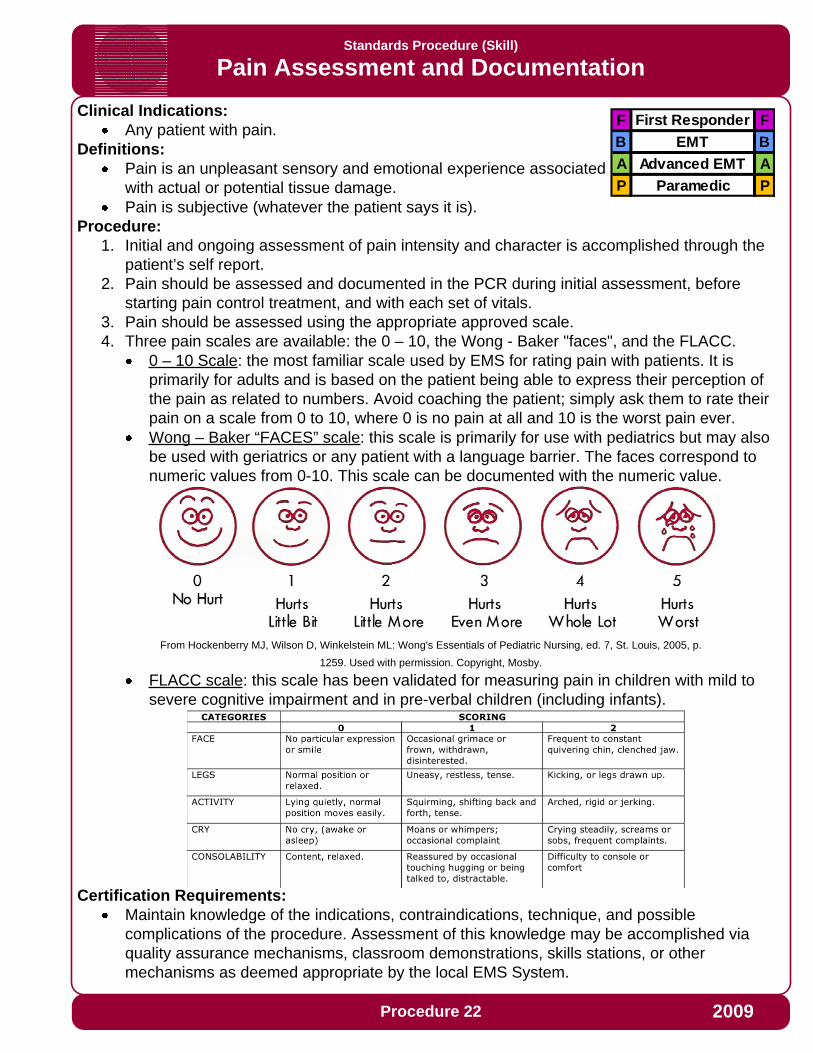
0 – 10 Scale: the most familiar scale used by EMS for rating pain with patients. It is primarily for adults and is based on the patient being able to express their perception of the pain as related to numbers. Avoid coaching the patient; simply ask them to rate their pain on a scale from 0 to 10, where 0 is no pain at all and 10 is the worst pain ever.Wong – Baker “FACES” scale: this scale is primarily for use with pediatrics but may also be used with geriatrics or any patient with a language barrier. The faces correspond to numeric values from 0-10. This scale can be documented with the numeric value.
From Hockenberry MJ, Wilson D, Winkelstein ML: Wong's Essentials of Pediatric Nursing, ed. 7, St. Louis, 2005, p.
1259. Used with permission. Copyright, Mosby.
FLACC scale: this scale has been validated for measuring pain in children with mild to severe cognitive impairment and in pre-verbal children (including infants).
Certification Requirements:Maintain knowledge of the indications, contraindications, technique, and possible complications of the procedure. Assessment of this knowledge may be accomplished via quality assurance mechanisms, classroom demonstrations, skills stations, or other mechanisms as deemed appropriate by the local EMS System.
F First Responder F
B EMT B
A Advanced EMT A
P Paramedic P
Standards Procedure (Skill)
Procedure 23 2009
Clinical Indications:
Any child that can be measured with the Broselow-Luten Resuscitation Tape.
Procedure:
1. Scene size-up, including universal precautions, scene safety, environmental hazards assessment, need for additional resources, by-stander safety, and patient/caregiver interaction
2. Assess patient using the pediatric triangle of ABCs:Airway and appearance: speech/cry, muscle tone, inter-activeness, look/gaze, movement of extremitiesWork of breathing: absent or abnormal airway sounds, use of accessory muscles, nasal flaring, body positioningCirculation to skin: pallor, mottling, cyanosis
3. Establish spinal immobilization if suspicion of spinal injury4. Establish responsiveness appropriate for age (AVPU, GCS, etc.)5. Color code using Broselow-Luten tape6. Assess disability (pulse, motor function, sensory function, papillary reaction)7. Perform a focused history and physical exam. Recall that pediatric patients easily experience
hypothermia and thus should not be left uncovered any longer than necessary to perform an exam.
8. Record vital signs (BP > 3 years of age, cap refill < 3 years of age)9. Include Immunizations, Allergies, Medications, Past Medical History, last meal, and events
leading up to injury or illness where appropriate.10.Treat chief complaint as per protocol
Certification Requirements:
Maintain knowledge of the indications, contraindications, technique, and possible complications of the procedure. Assessment of this knowledge may be accomplished via quality assurance mechanisms, classroom demonstrations, skills stations, or other mechanisms as deemed appropriate by the local EMS System.
F First Responder F
B EMT B
A Advanced EMT A
P Paramedic P

Standards Procedure (Skill)
Procedure 24 2009
Clinical Indications:
Patients with suspected hypoglycemia (diabetic emergencies, change in mental status, bizarre behavior, etc.)
Procedure:
1. Gather and prepare equipment.2. Blood samples for performing glucose analysis can be obtained through a finger-stick or
when possible simultaneously with intravenous access.3. Place correct amount of blood on reagent strip or site on glucometer per the manufacturer's
instructions.4. Time the analysis as instructed by the manufacturer.5. Document the glucometer reading and treat the patient as indicated by the analysis and
protocol.6. Repeat glucose analysis as indicated for reassessment after treatment and as per protocol.7. Perform Quality Assurance on glucometers at least once every 7 days, if any clinically
suspicious readings are noted, and/or as recommended by the manufacturer and document in the log.
Certification Requirements:
Maintain knowledge of the indications, contraindications, technique, and possible complications of the procedure. Assessment of this knowledge may be accomplished via quality assurance mechanisms, classroom demonstrations, skills stations, or other mechanisms as deemed appropriate by the local EMS System.
F First Responder F
B EMT B
A Advanced EMT A
P Paramedic P
Standards Procedure (Skill)
Procedure 25 2009
Clinical Indications:
Capnography shall be used when available with the use of all invasive airway procedures including endotracheal, nasotracheal, cricothyrotomy, or Blind Insertion Airway Devices (BIAD).Capnography should also be used when possible with CPAP.
Procedure:
1. Attach capnography sensor to the BIAD, endotracheal tube, or oxygen delivery device.2. Note CO2 level and waveform changes. These will be documented on each respiratory
failure, cardiac arrest, or respiratory distress patient.3. The capnometer shall remain in place with the airway and be monitored throughout the
prehospital care and transport.4. Any loss of CO2 detection or waveform indicates an airway problem and should be
documented.5. The capnogram should be monitored as procedures are performed to verify or correct the
airway problem.6. Document the procedure and results on/with the Patient Care Report (PCR) and the Airway
Evaluation Form.
Certification Requirements:
Maintain knowledge of the indications, contraindications, technique, and possible complications of the procedure. Assessment of this knowledge may be accomplished via quality assurance mechanisms, classroom demonstrations, skills stations, or other mechanisms as deemed appropriate by the local EMS System.
B EMT B
A Advanced EMT A
P Paramedic P

Standards Procedure (Skill)
Procedure 26 2009
Clinical Indications:
Patients with symptomatic bradycardia (less than 60 per minute) with signs and symptoms of inadequate cerebral or cardiac perfusion such as:
Chest PainHypotensionPulmonary EdemaAltered Mental Status, Confusion, etc.Ventricular Ectopy
Asystole, pacing must be done early to be effective.PEA, where the underlying rhythm is bradycardic and reversible causes have been treated.
Procedure:
1. Attach standard four-lead monitor.2. Apply defibrillation/pacing pads to chest and back:
One pad to left mid chest next to sternumOne pad to mid left posterior chest next to spine.
3. Rotate selector switch to pacing option.4. Adjust heart rate to 70 BPM for an adult and 100 BPM for a child.5. Note pacer spikes on EKG screen.6. Slowly increase output until capture of electrical rhythm on the monitor.7. If unable to capture while at maximum current output, stop pacing immediately.8. If capture observed on monitor, check for corresponding pulse and assess vital signs.9. Consider the use of sedation or analgesia if patient is uncomfortable.10.Document the dysrhythmia and the response to external pacing with ECG strips in the PCR.
Certification Requirements:
Maintain knowledge of the indications, contraindications, technique, and possible complications of the procedure. Assessment of this knowledge may be accomplished via quality assurance mechanisms, classroom demonstrations, skills stations, or other mechanisms as deemed appropriate by the local EMS System. Assessment should include direct observation at least once per certification cycle.
P Paramedic P

Standards Procedure (Skill)
Cardiopulmonary Resuscitation (CPR)
Procedure 28 2009
Clinical Indications:
Basic life support for the patient in cardiac arrest
Procedure:
1. Assess the patient’s level of responsiveness (shake and shout)2. If no response, open the patient’s airway with the head-tilt, chin-lift and look, listen, and feel
for respiratory effort. If the patient may have sustained C-spine trauma, use the modified jaw thrust while maintaining immobilization of the C-spine. For infants, positioning the head in the sniffing position is the most effective method for opening the airway
3. If patient is an adult, go to step 4. If no respiratory effort in a pediatric patient, give two ventilations. If air moves successfully, go to step 4. If air movement fails, proceed to the Airway Obstruction Procedure.
4. Check for pulse (carotid for adults and older children, brachial for infants) for at least 10 seconds. If no pulse, begin chest compressions based on chart below:
5. Go to Cardiac Arrest Procedure. Begin ventilations in the adult as directed in the Cardiac Arrest Procedure
6. Provide no more than 12 breaths per minute with the BVM. Use EtCO2 to guide your ventilations as directed in the Cardiac Arrest Protocol.
7. Chest compressions should be provided in an uninterrupted manner. Only brief interruptions are allowed for rhythm analysis, defibrillation, and performance of procedures
8. Document the time and procedure in the Patient Care Report (PCR).
Certification Requirements:
Maintain knowledge of the indications, contraindications, technique, and possible complications of the procedure. Assessment of this knowledge may be accomplished via quality assurance mechanisms, classroom demonstrations, skills stations, or other mechanisms as deemed appropriate by the local EMS System.
F First Responder F
B EMT B
A Advanced EMT A
P Paramedic P
Age Location Depth Rate
Infant
Over sternum, between nipples (inter-
mammary line), 2-3 fingers
0.5 to 1 inch (1/3 the anterior-posterior chest dimension)
At least 100/minute
Child
Over sternum, just cephalad from xyphoid process, heel of one
hand
1 to 1.5 inches (1/3 the anterior-posterior chest dimension)
80 to 100/minute (3 compressions every 2
seconds)
Adult
Over sternum, just cephalad from xyphoid
process, hands with interlocked fingers
1.5 to 2 inches (1/3 the anterior-posterior chest dimension)
80 to 100/minute (3 compressions every 2
seconds)

Standards Procedure (Skill)
Procedure 28 2009
Clinical Indications:
Unstable patient with a tachydysrhythmia (rapid atrial fibrillation, supraventricular tachycardia, ventricular tachycardia)Patient is not pulseless (the pulseless patient requires unsynchronized cardioversion, i.e., defibrillation)
Procedure:
1. Ensure the patient is attached properly to a monitor/defibrillator capable of synchronized cardioversion.
2. Have all equipment prepared for unsynchronized cardioversion/defibrillation if the patient fails synchronized cardioversion and the condition worsens.
3. Consider the use of pain or sedating medications.4. Set energy selection to the appropriate setting.5. Set monitor/defibrillator to synchronized cardioversion mode.6. Make certain all personnel are clear of patient.7. Press and hold the shock button to cardiovert. Stay clear of the patient until you are certain
the energy has been delivered. NOTE: It may take the monitor/defibrillator several cardiac cycles to “synchronize”, so there may a delay between activating the cardioversion and the actual delivery of energy.
8. Note patient response and perform immediate unsynchronized cardioversion/defibrillation if the patient’s rhythm has deteriorated into pulseless ventricular tachycardia/ventricular fibrillation, following the procedure for Defibrillation-Manual.
9. If the patient’s condition is unchanged, repeat steps 2 to 8 above, using escalating energy settings.
10.Repeat until maximum setting or until efforts succeed. Consider discussion with medical control if cardioversion is unsucessful after 2 attempts.
11.Note procedure, response, and time in the patient care report (PCR).
Certification Requirements:
Maintain knowledge of the indications, contraindications, technique, and possible complications of the procedure. Assessment of this knowledge may be accomplished via quality assurance mechanisms, classroom demonstrations, skills stations, or other mechanisms as deemed appropriate by the local EMS System. Assessment should include direct observation at least once per certification cycle., or other mechanisms as deemed appropriate by the local EMS System.
P Paramedic P

Standards Procedure (Skill)
Procedure 30 2009
Clinical Indications:
Patients with hypotension (SBP <90), clinical signs of shock, and at least one of the following signs:
Jugular vein distention.Tracheal deviation away from the side of the injury (often a late sign).Absent or decreased breath sounds on the affected side.Hyper-resonance to percussion on the affected side.Increased resistance when ventilating a patient.
Patients in traumatic arrest with chest or abdominal trauma for whom resuscitation is indicated. These patients may require bilateral chest decompression even in the absence of the signs above.
Procedure:
1. Don personal protective equipment (gloves, eye protection, etc.).2. Administer high flow oxygen.3. Identify and prep the site:
Locate the second intercostals space in the mid-clavicular line on the same side as the pneumothorax.If unable to place anteriorly, lateral placement may be used at the fourth ICS mid-axillary line.Prepare the site with providone-iodine ointment or solution.
4. Insert the catheter (14 gauge for adults) into the skin over the third rib and direct it just over the top of the rib (superior border) into the interspace.
5. Advance the catheter through the parietal pleura until a “pop” is felt and air or blood exits under pressure through the catheter, then advance catheter only to chest wall.
6. Remove the needle, leaving the plastic catheter in place.7. Secure the catheter hub to the chest wall with dressings and tape.8. Consider placing a finger cut from an exam glove over the catheter hub. Cut a small hole in
the end of the finger to make a flutter valve. Secure the glove finger with tape or a rubber band. (Note – don’t waste much time preparing the flutter valve; if necessary control the air flow through the catheter hub with your gloved thumb.)
Certification Requirements:
Maintain knowledge of the indications, contraindications, technique, and possible complications of the procedure. Assessment of this knowledge may be accomplished via quality assurance mechanisms, classroom demonstrations, skills stations, or other mechanisms as deemed appropriate by the local EMS System. Assessment should include direct observation at least once per certification cycle.
P Paramedic P
Standards Procedure (Skill)
Procedure 30 2009
Clinical Indications:
Imminent delivery with crowning
Procedure:
1. Delivery should be controlled so as to allow a slow controlled delivery of the infant. This will prevent injury to the mother and infant.
2. Support the infant’s head as needed.3. Check for the umbilical cord surrounding the neck. If it is present, slip it over the head. If
unable to free the cord from the neck, double clamp the cord and cut between the clamps.4. Suction the airway with a bulb syringe.5. Grasping the head with hands over the ears, gently pull down to allow delivery of the anterior
shoulder.6. Gently pull up on the head to allow delivery of the posterior shoulder.7. Slowly deliver the remainder of the infant.8. Clamp the cord 2 inches from the abdomen with 2 clamps and cut the cord between the
clamps.9. Record APGAR scores at 1 and 5 minutes.10.Follow the Newly Born Protocol for further treatment.11.The placenta will deliver spontaneously, usually within 5 minutes of the infant. Do not force
the placenta to deliver.12.Massaging the uterus may facilitate delivery of the placenta and decrease bleeding by
facilitating uterine contractions.13.Continue rapid transport to the hospital.
Certification Requirements:
Maintain knowledge of the indications, contraindications, technique, and possible complications of the procedure. Assessment of this knowledge may be accomplished via quality assurance mechanisms, classroom demonstrations, skills stations, or other mechanisms as deemed appropriate by the local EMS System.
B EMT B
A Advanced EMT A
P Paramedic P
Standards Procedure (Skill)
CNS Catheter: Epidural Catheter Maintenance
Procedure 31 2009
Clinical Indications:
Presence of an epidural catheter in a patient requiring transport
Procedure:
1. Prior to transport, ensure catheter is secure and that transport personnel are familiar with medication(s) being delivered and devices used to control medication administration.
2. No adjustments in catheter position are to be attempted.3. No adjustments in medication dosage or administration are to be attempted without direct
approval from on-line medical control.4. Report any complications immediately to on-line medical control.5. Document the time and dose of any medication administration or rate adjustment in the
patientcare report (PCR).
Certification Requirements:
Maintain knowledge of the indications, contraindications, technique, and possible complications of the procedure. Assessment of this knowledge may be accomplished via quality assurance mechanisms, classroom demonstrations, skills stations, or other mechanisms as deemed appropriate by the local EMS System.
P Paramedic P
Standards Procedure (Skill)
CNS Catheter: Ventricular Catheter Maintenance
Procedure 32 2009
Clinical Indications:
Transport of a patient with an intra-ventricular catheter in place
Procedure:
1. Prior to transport, ensure the catheter is secure.2. Prior to transport, determine from the referring hospital/physician the desired patient position
(e.g., supine, head of bed elevated 30 degrees, etc.).3. Prior to transport, determine the height at which the drain is to be maintained, given the
patient position desired from #2 above (if applicable).4. Do not manipulate or move the drain.5. If the patient or height of the drain is altered, immediately correct based on the pre-
determined configuration in step 2 and 3 above.6. Report any problems immediately to on-line medical control.7. Document the time and any adjustments or problems in the patient care report (PCR).
Certification Requirements:
Maintain knowledge of the indications, contraindications, technique, and possible complications of the procedure. Assessment of this knowledge may be accomplished via quality assurance mechanisms, classroom demonstrations, skills stations, or other mechanisms as deemed appropriate by the local EMS System.
P Paramedic P

Standards Procedure (Skill)
Decontamination
Procedure 33 2009
Clinical Indications:
Any patient who may have been exposed to significant hazardous materials, including chemical, biological, or radiological weapons.
Procedure:
1. In coordination with HazMAT and other Emergency Management personnel, establish hot, warm and cold zones of operation.
2. Ensure that personnel assigned to operate within each zone have proper personal protective equipment.
3. In coordination with other public safety personnel, assure each patient from the hot zone undergoes appropriate initial decontamination. This is specific to each incident; such decontamination may include:
Removal of patients from Hot ZoneSimple removal of clothingIrrigation of eyesPassage through high-volume water bath (e.g., between two fire apparatus) for patients contaminated with liquids or certain solids. Patients exposed to gases, vapors, and powders often will not require this step as it may unnecessarily delay treatment and/or increase dermal absorption of the agent(s).
4. Initial triage of patients should occur after step #3. Immediate life threats should be addressed prior to technical decontamination.
5. Assist patients with technical decontamination (unless contraindicated based on 3 above). This may include removal of all clothing and gentle cleansing with soap and water. All body areas should be thoroughly cleansed, although overly harsh scrubbing which could break the skin should be avoided.
6. Place triage identification on each patient. Match triage information with each patient’s personal belongings which were removed during technical decontamination. Preserve these personnel affects for law enforcement.
7. Monitor all patients for environmental illness.8. Transport patients per local protocol.
Certification Requirements:
Maintain knowledge of the indications, contraindications, technique, and possible complications of the procedure. Assessment of this knowledge may be accomplished via quality assurance mechanisms, classroom demonstrations, skills stations, or other mechanisms as deemed appropriate by the local EMS System.
F First Responder F
B EMT B
A Advanced EMT A
P Paramedic P

Standards Procedure (Skill)
Procedure 34 2009
Clinical Indications:
Patients in cardiac arrest (pulseless, non-breathing).Age < 8 years, use Pediatric Pads if available.
Contraindication:
Pediatric patients who are so small that the pads cannot be placed without touching one another.
Procedure:
1. If multiple rescuers available, one rescuer should provide uninterrupted chest compressions while the AED is being prepared for use.
2. Apply defibrillator pads per manufacturer recommendations. Use alternate placement when implanted devices (pacemakers, AICDs) occupy preferred pad positions.
3. Remove any medication patches on the chest and wipe off any residue.4. If necessary, connect defibrillator leads: white to the anterior chest pad and the red to the
posterior pad.5. Activate AED for analysis of rhythm.6. Stop CPR and clear the patient for rhythm analysis. Keep interruption in CPR as brief as
possible.7. Defibrillate if appropriate by depressing the “shock” button. Assertively state “CLEAR” and
visualize that no one, including yourself, is in contact with the patient prior to defibrillation. The sequence of defibrillation charges is preprogrammed for monophasic defibrillators. Biphasic defibrillators will determine the correct joules accordingly.
8. Begin CPR (chest compressions and ventilations) immediately after the delivery of the defibrillation.
9. After 2 minutes of CPR, analyze rhythm and defibrillate if indicated. Repeat this step every 2 minutes.
10. If “no shock advised” appears, perform CPR for two minutes and then reanalyze.11.Transport and continue treatment as indicated.12.Keep interruption of CPR compressions as brief as possible. Adequate CPR is a key to
successful resuscitation.13. If pulse returns please use the Post Resuscitation Protocol
Certification Requirements:
Maintain knowledge of the indications, contraindications, technique, and possible complications of the procedure. Assessment of this knowledge may be accomplished via quality assurance mechanisms, classroom demonstrations, skills stations, or other mechanisms as deemed appropriate by the local EMS System. Assessment should include direct observation at least once per certification cycle.
F First Responder F
B EMT B
A Advanced EMT A
P Paramedic P
Standards Procedure (Skill)
Procedure 35 2009
Clinical Indications:
Cardiac arrest with ventricular fibrillation or pulseless ventricular tachycardia
Procedure:
1. Ensure that Chest Compressions are adequate and interrupted only when absolutely necessary.
2. Clinically confirm the diagnosis of cardiac arrest and identify the need for defibrillation.3. After application of an appropriate conductive agent if needed, apply defibrillation hands free
pads (recommended to allow more continuous CPR) or paddles to the patient’s chest in the proper position
Paddles: right of sternum at 2nd ICS and anterior axillary line at 5th ICSPads: anterior-posterior position
4. Set the appropriate energy level5. Charge the defibrillator to the selected energy level. Continue chest compressions while
the defibrillator is charging.6. If using paddles, assure proper contact by applying 25 pounds of pressure on each paddle.7. Hold Compressions, assertively state, “CLEAR” and visualize that no one, including
yourself, is in contact with the patient.8. Deliver the countershock by depressing the discharge button(s) when using paddles, or
depress the shock button for hands free operation.9. Immediately resume chest compressions and ventilations for 2 minutes. After 2 minutes of
CPR, analyze rhythm and check for pulse only if appropriate for rhythm.10.Repeat the procedure every two minutes as indicated by patient response and ECG rhythm.11.Keep interruption of CPR compressions as brief as possible. Adequate CPR is a key to
successful resuscitation.
Certification Requirements:
Maintain knowledge of the indications, contraindications, technique, and possible complications of the procedure. Assessment of this knowledge may be accomplished via quality assurance mechanisms, classroom demonstrations, skills stations, or other mechanisms as deemed appropriate by the local EMS System. Assessment should include direct observation at least once per certification cycle.
P Paramedic P

Standards Procedure (Skill)
Procedure 36 2009
Clinical Indications:
Gastric decompression in intubated patients or for administration of activated charcoal in patients with altered mental status.
Procedure:
1. Estimate insertion length by superimposing the tube over the body from the nose to the stomach.
2. Flex the neck if not contraindicated to facilitate esophageal passage.3. Liberally lubricate the distal end of the tube and pass through the patient’s nostril along the
floor of the nasal passage. Do not orient the tip upward into the turbinates. This increases the difficulty of the insertion and may cause bleeding.
4. In the setting of an unconscious, intubated patient or a patient with facial trauma, oral insertion of the tube may be considered or preferred.
5. Continue to advance the tube gently until the appropriate distance is reached.6. Confirm placement by injecting 20cc of air and auscultate for the swish or bubbling of the air
over the stomach. Additionally, aspirate gastric contents to confirm proper placement.7. Secure the tube.8. Decompress the stomach of air and food either by connecting the tube to suction or manually
aspirating with the large catheter tip syringe.9. Document the procedure, time, and result (success) on/with the patient care report (PCR).
Certification Requirements:
Maintain knowledge of the indications, contraindications, technique, and possible complications of the procedure. Assessment of this knowledge may be accomplished via quality assurance mechanisms, classroom demonstrations, skills stations, or other mechanisms as deemed appropriate by the local EMS System.
P Paramedic P

Standards Procedure (Skill)
Injections: Subcutaneous and Intramuscular
Procedure 37 2009
Clinical Indications:
When medication administration is necessary and the medication must be given via the SQ (not auto-injector) or IM route or as an alternative route in selected medications.
Procedure:
1. Receive and confirm medication order or perform according to standing orders.2. Prepare equipment and medication expelling air from the syringe.3. Explain the procedure to the patient and reconfirm patient allergies.4. The most common site for subcutaneous injection is the arm.
Injection volume should not exceed 1 cc.5. The possible injection sites for intramuscular injections include the arm, buttock and thigh.
Injection volume should not exceed 1 cc for the armInjection volume should not exceed 2 cc in the thigh or buttock.
6. The thigh should be used for injections in pediatric patients and injection volume should not exceed 1 cc.
7. Expose the selected area and cleanse the injection site with alcohol.8. Insert the needle into the skin with a smooth, steady motion
SQ: 45-degree angle IM: 90-degree angleskin pinched skin flattened
9. Aspirate for blood10. Inject the medication.11.Withdraw the needle quickly and dispose of properly without recapping.12.Apply pressure to the site.13.Monitor the patient for the desired therapeutic effects as well as any possible side effects.14.Document the medication, dose, route, and time on/with the patient care report (PCR).
Certification Requirements:
Maintain knowledge of the indications, contraindications, technique, and possible complications of the procedure. Assessment of this knowledge may be accomplished via quality assurance mechanisms, classroom demonstrations, skills stations, or other mechanisms as deemed appropriate by the local EMS System.
P Paramedic P
Standards Procedure (Skill)
Orthostatic Blood Pressure Measurement
Procedure 38 2009
Clinical Indications:
Patient situations with suspected blood, fluid loss, or dehydration with no indication for spinal immobilization.Patients ≥ 8 years of age, or patients larger than the Broselow-Luten tape
Procedure:
1. Gather and prepare standard sphygmomanometer and stethoscope.2. With the patient supine, obtain pulse and blood pressure.3. Have the patient sit upright.4. After 30 seconds, obtain blood pressure and pulse.5. If the systolic blood pressure falls more than 30 mmHg or the pulse rises more than 20 bpm,
the patient is considered to be orthostatic.6. If a patient experiences dizziness upon sitting or is obviously dehydrated based on history or
physical exam, formal orthostatic examination should be omitted and fluid resuscitation initiated.
Certification Requirements:
Maintain knowledge of the indications, contraindications, technique, and possible complications of the procedure. Assessment of this knowledge may be accomplished via quality assurance mechanisms, classroom demonstrations, skills stations, or other mechanisms as deemed appropriate by the local EMS System.
F First Responder F
B EMT B
A Advanced EMT A
P Paramedic P

Standards Procedure (Skill)
Procedure 39 2009
Clinical Indications:
Patients with suspected hypoxemia.
Procedure:
1. Apply probe to patient’s finger or any other digit as recommended by the device manufacturer.
2. Allow machine to register saturation level.3. Record time and initial saturation percent on room air if possible on/with the patient care
report (PCR).4. Verify pulse rate on machine with actual pulse of the patient.5. Monitor critical patients continuously until arrival at the hospital. If recording a one-time
reading, monitor patients for a few minutes as oxygen saturation can vary.6. Document percent of oxygen saturation every time vital signs are recorded and in response
to therapy to correct hypoxemia.7. In general, normal saturation is 97-99%. Below 94%, suspect a respiratory compromise.8. Use the pulse oximetry as an added tool for patient evaluation. Treat the patient, not the data
provided by the device.9. The pulse oximeter reading should never be used to withhold oxygen from a patient in
respiratory distress or when it is the standard of care to apply oxygen despite good pulse oximetry readings, such as chest pain.
10.Factors which may reduce the reliability of the pulse oximetry reading include:Poor peripheral circulation (blood volume, hypotension, hypothermia)Excessive pulse oximeter sensor motionFingernail polish (may be removed with acetone pad)Carbon monoxide bound to hemoglobinIrregular heart rhythms (atrial fibrillation, SVT, etc.)JaundicePlacement of BP cuff on same extremity as pulse ox probe.
Certification Requirements:
Maintain knowledge of the indications, contraindications, technique, and possible complications of the procedure. Assessment of this knowledge may be accomplished via quality assurance mechanisms, classroom demonstrations, skills stations, or other mechanisms as deemed appropriate by the local EMS System.
F First Responder F
B EMT B
A Advanced EMT A
P Paramedic P

Standards Procedure (Skill)
Procedure 40 2009
Clinical Indications:
Rapid evaluation of a patient with suspected acute stroke and/or acute myocardial infarction (STEMI) to:
Determine eligibility and potential benefit from fibrinolysis..Rapid identification of patients who are not eligible for fibrinolysis and will require interventional therapy.
Procedure:
1. Follow the appropriate protocol for the patient’s complaint to assess and identify an acute condition which could potentially benefit from fibrinolysis. If a positive finding is noted on one of the following assessments, proceed to step 2.
Perform a 12-lead ECG to identify an acute ST elevation myocardial infarction (STEMI).Perform the Pre-hospital Stroke Screen to identify an acute stroke
2. Complete the Reperfusion Check Sheet to identify any potential contraindications to fibrinolysis. (See Appendix)
Systolic Blood Pressure greater than 180 mm HgDiastolic Blood Pressure greater than 110 mm HgRight vs. Left Arm Systolic Blood Pressure difference of greater than 15 mm HgHistory of structural Central Nervous System disease (tumors, masses, hemorrhage, etc.)Significant closed head or facial trauma within the previous 3 monthsRecent (within 6 weeks) major trauma, surgery (including laser eye surgery), gastrointestinal bleeding, or severe genital-urinary bleedingBleeding or clotting problem or on blood thinnersCPR performed greater than 10 minutesCurrently PregnantSerious Systemic Disease such as advanced/terminal cancer or severe liver or kidney failure.
3. Identify if the patient is currently in heart failure or cardiogenic shock. For these patients, a percutaneous coronary intervention is more effective.
Presence of pulmonary edema (rales greater than halfway up lung fields)Systemic hypoperfusion (cool and clammy)
4. If any contraindication is noted using the check list and an acute Stroke is suspected by exam or a STEMI is confirmed by ECG, activate the EMS Stroke Plan or EMS STEMI Plan for fibrinolytic ineligable patients. This may require the EMS Agency, an Air Medical Service, or a Specialty Care Transport Service to transport directly to an specialty center capable of interventional care within the therapeutic window of time.
5. Record all findings in the Patient Care Report (PCR).
Certification Requirements:Maintain knowledge of the indications, contraindications, technique, and possible complications of the procedure. Assessment of this knowledge may be accomplished via quality assurance mechanisms, classroom demonstrations, skills stations, or other mechanisms as deemed appropriate by the local EMS System.
F First Responder F
B EMT B
A Advanced EMT A
P Paramedic P

Standards Procedure (Skill)
Procedure 41 2009
Clinical Indications:
Any patient who may harm himself, herself, or others may be gently restrained to prevent injury to the patient or crew. This restraint must be in a humane manner and used only as a last resort. Other means to prevent injury to the patient or crew must be attempted first. These efforts could include reality orientation, distraction techniques, or other less restrictive therapeutic means. Physical or chemical restraint should be a last resort technique.
Procedure:
1. Ensure personnel and bystander safety 2. Attempt less restrictive means of managing the patient.3. Request law enforcement assistance and Contact Medical Control.4. Ensure that there are sufficient personnel available to physically restrain the patient safely.5. Restrain the patient in a lateral or supine position. No devices such as backboards, splints, or
other devices will be on top of the patient. The patient will never be restrained in the prone position.
6. The patient must be under constant observation by the EMS crew at all times. This includes direct visualization of the patient as well as cardiac and pulse oximetry monitoring.
7. The extremities that are restrained will have a circulation check at least every 15 minutes. The first of these checks should occur as soon after placement of the restraints as possible. This MUST be documented on the PCR.
8. Documentation on/with the patient care report (PCR) should include the reason for the use of restraints, the type of restraints used, and the time restraints were placed. Use of the Restraint Checklist is highly recommended.
9. If the above actions are unsuccessful, or if the patient is resisting the restraints, consider administering medications per protocol. (Chemical restraint may be considered earlier.)
10. If a patient is restrained by law enforcement personnel with handcuffs or other devices EMS personnel can not remove, a law enforcement officer must accompany the patient to the hospital in the transporting EMS vehicle.
Certification Requirements:
Maintain knowledge of the indications, contraindications, technique, and possible complications of the procedure. Assessment of this knowledge may be accomplished via quality assurance mechanisms, classroom demonstrations, skills stations, or other mechanisms as deemed appropriate by the local EMS System.
B EMT B
A Advanced EMT A
P Paramedic P

Standards Procedure (Skill)
Procedure 42 2009
Clinical Indications:
Need for spinal immobilization as determined by protocol
Procedure:
1. Gather a backboard, straps, C-collar appropriate for patient’s size, tape, and head rolls or similar device to secure the head.
2. Explain the procedure to the patient3. Place the patient in an appropriately sized C-collar while maintaining in-line stabilization of
the C-spine. This stabilization, to be provided by a second rescuer, should not involve traction or tension but rather simply maintaining the head in a neutral, midline position while the first rescuer applies the collar.
4. Once the collar is secure, the second rescuer should maintain their position to ensure stabilization (the collar is helpful but will not do the job by itself.)
5. Place the patient on a long spine board with the log-roll technique if the patient is supine or prone. For the patient in a vehicle or otherwise unable to be placed prone or supine, place them on a backboard by the safest method available that allows maintenance of in-line spinal stability.
6. Stabilize the patient with straps and head rolls/tape or other similar device. Once the head is secured to the backboard, the second rescuer may release manual in-line stabilization.
7. NOTE: Some patients, due to size or age, will not be able to be immobilized through in-line stabilization with standard backboards and C-collars. Never force a patient into a non-neutral position to immobilize them. Such situations may require a second rescuer to maintain manual stabilization throughout the transport to the hospital.
8. Document the time of the procedure in the patient care report (PCR).
Certification Requirements:
Maintain knowledge of the indications, contraindications, technique, and possible complications of the procedure. Assessment of this knowledge may be accomplished via quality assurance mechanisms, classroom demonstrations, skills stations, or other mechanisms as deemed appropriate by the local EMS System.
F First Responder F
B EMT B
A Advanced EMT A
P Paramedic P
Standards Procedure (Skill)
Procedure 43 2009
Clinical Indications:
Immobilization of an extremity for transport, either due to suspected fracture, sprain, or injury.Immobilization of an extremity for transport to secure medicallynecessary devices such as intravenous catheters
Procedure:
1. Assess and document pulses, sensation, and motor function prior to placement of the splint. If no pulses are present and a fracture is suspected, consider reduction of the fracture prior to placement of the splint.
2. Remove all clothing from the extremity.3. Select a site to secure the splint both proximal and distal to the area of suspected injury, or
the area where the medical device will be placed.4. Do not secure the splint directly over the injury or device.5. Place the splint and secure with Velcro, straps, or bandage material (e.g., kling, kerlex, cloth
bandage, etc.) depending on the splint manufacturer and design.6. Document pulses, sensation, and motor function after placement of the splint. If there has
been a deterioration in any of these 3 parameters, remove the splint and reassess7. If a femur fracture is suspected and there is no evidence of pelvic fracture or instability, the
following procedure may be followed for placement of a femoral traction splint:Assess neurovascular function as in #1 above.Place the ankle device over the ankle.Place the proximal end of the traction splint on the posterior side of the affected extremity, being careful to avoid placing too much pressure on genitalia or open wounds. Make certain the splint extends proximal to the suspected fracture. If the splint will not extend in such a manner, reassess possible involvement of the pelvisExtend the distal end of the splint at least 6 inches beyond the foot.Attach the ankle device to the traction crank.Twist until moderate resistance is met.Reassess alignment, pulses, sensation, and motor function. If there has been deterioration in any of these 3 parameters, release traction and reassess.
8. Document the time, type of splint, and the pre and post assessment of pulse, sensation, and motor function in the patient care report (PCR).
Certification Requirements:
Maintain knowledge of the indications, contraindications, technique, and possible complications of the procedure. Assessment of this knowledge may be accomplished via quality assurance mechanisms, classroom demonstrations, skills stations, or other mechanisms as deemed appropriate by the local EMS System.
F First Responder F
B EMT B
A Advanced EMT A
P Paramedic P
Standards Procedure (Skill)
Procedure 44 2009
Clinical Indications:
Suspected Stroke Patient
Procedure:
1. Assess and treat suspected stroke patients as per protocol.2. The Los Angeles Prehospital Stroke Screen (LAPSS) form should be completed for all
suspected stroke patients (see appendix). There are six screening criteria items on the LAPSS form.
3. Screen the patient for the following criteria:Age over 45 yearsHistory of a seizure disorderNew onset of symptoms in last 24 hoursPatient ambulatory prior to eventBlood glucose between 60-400
4. The final criterion consists of performing a patient exam looking for facial droop, unilateral grip weakness/absence, or unilateral arm weakness. One of these exam components must be positive to answer “yes” on the screening form.
5. If all of the LAPSS screening criteria are met (“yes” to all criteria), follow the EMS System Stroke Plan and alert the receiving hospital of a possible stroke patient as early as possible.
6. All sections of the LAPSS form must be completed.7. The completed LAPSS form should be attached or documented in the PCR.
Certification Requirements:
Maintain knowledge of the indications, contraindications, technique, and possible complications of the procedure. Assessment of this knowledge may be accomplished via quality assurance mechanisms, classroom demonstrations, skills stations, or other mechanisms as deemed appropriate by the local EMS System.
MIAMI or SC PRE-HOSPITAL STROKE SCREEN HERE – IN PLACE OF LA STROKE SCREEN
F First Responder F
B EMT B
A Advanced EMT A
P Paramedic P

Standards Procedure (Skill)
Procedure 45 2009
Clinical Indications:
Monitoring body temperature in a patient with suspected infection, hypothermia, hyperthermia, or to assist in evaluating resuscitation efforts.
Procedure:
1. If clinically appropriate, allow the patient to reach equilibrium with the surrounding environment.
2. For adult patients that are conscious, cooperative, and in no respiratory distress, an oral temperature is preferred (steps 3 to 5 below). For infants or adults that do not meet the criteria above, a rectal temperature is preferred (steps 6 to 8 below).
3. To obtain an oral temperature, ensure the patient has no significant oral trauma and place the thermometer under the patient’s tongue with appropriate sterile covering.
4. Have the patient seal their mouth closed around thermometer.5. If using an electric thermometer, leave the device in place until there is indication an accurate
temperature has been recorded (per the “beep” or other indicator specific to the device). If using a traditional thermometer, leave it in place until there is no change in the reading for at least 30 seconds (usually 2 to 3 minutes). Proceed to step 9.
6. Prior to obtaining a rectal temperature, assess whether the patient has suffered any rectal trauma by history and/or brief examination as appropriate for patient’s complaint.
7. To obtain a rectal temperature, cover the thermometer with an appropriate sterile cover, apply lubricant, and insert into rectum no more than 1 to 2 cm beyond the external anal sphincter.
8. Follow guidelines in step 5 above to obtain temperature.9. Record time, temperature, method (oral, rectal), and scale (C˚ or F˚) in Patient Care Report
(PCR).
Certification Requirements:
Maintain knowledge of the indications, contraindications, technique, and possible complications of the procedure. Assessment of this knowledge may be accomplished via quality assurance mechanisms, classroom demonstrations, skills stations, or other mechanisms as deemed appropriate by the local EMS System.
F First Responder F
B EMT B
A Advanced EMT A
P Paramedic P
Standards Procedure (Skill)
Procedure 46 2009
Clinical Indications:
Collection of a patient’s blood for laboratory analysis
Procedure:
1. Utilize universal precautions as per OSHA.2. Select vein and prep as usual.3. Select appropriate blood-drawing devices.4. Draw appropriate tubes of blood for lab testing.5. Assure that the blood samples are labeled with the correct information (a minimum of the
patients name, along with the date and time the sample was collected).6. Deliver the blood tubes to the appropriate individual at the hospital.
Certification Requirements:
Maintain knowledge of the indications, contraindications, technique, and possible complications of the procedure. Assessment of this knowledge may be accomplished via quality assurance mechanisms, classroom demonstrations, skills stations, or other mechanisms as deemed appropriate by the local EMS System.
A Advanced EMT A
P Paramedic P

Standards Procedure (Skill)
Venous Access: Central Line Maintenance
Procedure 47 2009
Clinical Indications:
Transport of a patient with a central venous pressure line already in place
Procedure:
1. Prior to transportation, ensure the line is secure.2. Medications and IV fluids may be administered through a central venous pressure line. Such
infusions must be held while the central venous pressure is transduced to obtain a central venous pressure, but may be restarted afterwards.
3. Do not manipulate the central venous catheter.4. If the central venous catheter becomes dysfunctional, does not allow drug administration, or
becomes dislodged, contact medical control.5. Document the time of any pressure measurements, the pressure obtained, and any
medication administration in the patient care report (PCR).
Certification Requirements:
Maintain knowledge of the indications, contraindications, technique, and possible complications of the procedure. Assessment of this knowledge may be accomplished via quality assurance mechanisms, classroom demonstrations, skills stations, or other mechanisms as deemed appropriate by the local EMS System.
P Paramedic P

Standards Procedure (Skill)
Venous Access: Existing Catheters
Procedure 48 2009
Clinical Indications:
Inability to obtain adequate peripheral access.Access of an existing venous catheter for medication or fluid administration.Central venous access in a patient in cardiac arrest.
Procedure:
1. Clean the port of the catheter with alcohol wipe.2. Using sterile technique, withdraw 5-10 ml of blood and discard syringe in sharps container.3. Using 5cc of normal saline, access the port with sterile technique and gently attempt to flush
the saline.4. If there is no resistance, no evidence of infiltration (e.g., no subcutaneous collection of fluid),
and no pain experienced by the patient, then proceed to step 5. If there is resistance, evidence of infiltration, pain experienced by the patient, or any concern that the catheter may be clotted or dislodged, do not use the catheter.
5. Begin administration of medications or IV fluids slowly and observe for any signs of infiltration. If difficulties are encountered, stop the infusion and reassess.
6. Record procedure, any complications, and fluids/medications administered in the Patient Care Report (PCR).
Certification Requirements:
Maintain knowledge of the indications, contraindications, technique, and possible complications of the procedure. Assessment of this knowledge may be accomplished via quality assurance mechanisms, classroom demonstrations, skills stations, or other mechanisms as deemed appropriate by the local EMS System.
P Paramedic P
Standards Procedure (Skill)
Venous Access: External Jugular Access
Procedure 49 2009
Clinical Indications:
External jugular vein cannulation is indicated in a critically ill patient ≥ 8 years of age who requires intravenous access for fluid or medication administration and in whom an extremity vein is not obtainable.External jugular cannulation can be attempted initially in life threatening events where no obvious peripheral site is noted.
Procedure:
1. Place the patient in a supine head down position. This helps distend the vein and prevents air embolism.
2. Turn the patient’s head toward the opposite side if no risk of cervical injury exists.3. Prep the site as per peripheral IV site.4. Align the catheter with the vein and aim toward the same side shoulder.5. “Tourniqueting” the vein lightly with one finger above the clavicle, puncture the vein midway
between the angle of the jaw and the clavicle and cannulate the vein in the usual method.6. Attach the IV and secure the catheter avoiding circumferential dressing or taping.7. Document the procedure, time, and result (success) on/with the patient care report (PCR).
Certification Requirements:
Maintain knowledge of the indications, contraindications, technique, and possible complications of the procedure. Assessment of this knowledge may be accomplished via quality assurance mechanisms, classroom demonstrations, skills stations, or other mechanisms as deemed appropriate by the local EMS System.
A Advanced EMT A
P Paramedic P

Standards Procedure (Skill)
Procedure 50 2009
Clinical Indications:
Any patient where intravenous access is indicated (significant trauma or mechanism, emergent or potentially emergent medical condition).
Procedure:
1. Saline locks may be used as an alternative to an IV tubing and IV fluid in every protocol at the discretion of the ALS professional.
2. Use intraosseous access where threat to life exists as provided for in the Venous Access-Intraosseous procedure.
3. Use the largest catheter bore necessary based upon the patient’s condition and size of veins.4. Fluid and setup choice is preferably:
Lactated Ringers with a macro drip (10 gtt/cc) for trauma or hypovolemia.Normal Saline with a macro drip (10 gtt/cc) for medical conditions, andNormal Saline with a micro drip (60 gtt/cc) for medication infusions.
5. Inspect the IV solution for expiration date, cloudiness, discoloration, leaks, or the presence of particles.
6. Connect IV tubing to the solution in a sterile manner. Fill the drip chamber half full and then flush the tubing bleeding all air bubbles from the line.
7. Place a tourniquet around the patient’s extremity to restrict venous flow only.8. Select a vein and an appropriate gauge catheter for the vein and the patient’s condition.9. Prep the skin with an antiseptic solution.10. Insert the needle with the bevel up into the skin in a steady, deliberate motion until the bloody
flashback is visualized in the catheter.11.Advance the catheter into the vein. Never reinsert the needle through the catheter. Dispose of
the needle into the proper container without recapping.12.Draw blood samples when appropriate.13.Remove the tourniquet and connect the IV tubing or saline lock.14.Open the IV to assure free flow of the fluid and then adjust the flow rate as per protocol or as
clinically indicated.Rates are preferably:
Adult: KVO: 60 cc/hr (1 gtt/ 6 sec for a macro drip set)Pediatric: KVO: 30 cc/hr (1 gtt/ 12 sec for a macro drip set)
If shock is present:Adult: 500 cc fluid boluses repeated as long as lungs are dry and BP < 90. Consider a second IV line.Pediatric: 20 cc/kg blouses repeated PRN for poor perfusion.
15.Cover the site with a sterile dressing and secure the IV and tubing.16.Label the IV with date and time, catheter gauge, and name/ID of the person starting the IV.17.Document the procedure, time and result (success) on/with the patient care report (PCR).
Certification Requirements:Maintain knowledge of the indications, contraindications, technique, and possible complications of the procedure. Assessment of this knowledge may be accomplished via quality assurance mechanisms, classroom demonstrations, skills stations, or other mechanisms as deemed appropriate by the local EMS System.
A Advanced EMT A
P Paramedic P

Standards Procedure (Skill)
Venous Access: Intraosseous
Procedure 51 2009
Clinical Indications:Patients where rapid, regular IV access is unavailable with any of the following:Cardiac arrest.Multisystem trauma with severe hypovolemia.Severe dehydration with vascular collapse and/or loss of consciousness.Respiratory failure / Respiratory arrest.
Contraindications:Fracture proximal to proposed intraosseous site.History of Osteogenesis ImperfectaCurrent or prior infection at proposed intraosseous site.Previous intraosseous insertion or joint replacement at the selected site.
Procedure:1. Don personal protective equipment (gloves, eye protection, etc.).2. Identify anteromedial aspect of the proximal tibia (bony prominence below the knee cap). The
insertion location will be 1-2 cm (2 finger widths) below this. If this site is not suitable, and patient >12 years of age, identify the anteriormedial aspect of the distal tibia (2 cm proximal to the medial malleolus).
3. Prep the site recommended by the device manufacturer with providone-iodine ointment or solution.
4. For manual pediatric devices, hold the intraosseous needle at a 60 to 90 degree angle, aimed away from the nearby joint and epiphyseal plate, twist the needle handle with a rotating grinding motion applying controlled downward force until a “pop” or “give” is felt indicating loss of resistance. Do not advance the needle any further.
5. For the EZ-IO intraosseous device, hold the intraosseous needle at a 60 to 90 degree angle, aimed away from the nearby joint and epiphyseal plate, power the driver until a “pop” or “give” is felt indicating loss of resistance. Do not advance the needle any further.
6. For the Bone Injection Gun (BIG), find and mark the manufacturers recommended site. Position the device and pull out the safety latch. Trigger the BIG at 90˚ to the surface and remove the injection device.
7. Remove the stylette and place in an approved sharps container.8. Attach a syringe filled with at least 5 cc NS; aspirate bone marrow for manual devices only, to
verify placement; then inject at least 5 cc of NS to clear the lumen of the needle.9. Attach the IV line and adjust flow rate. A pressure bag may assist with achieving desired
flows.10.Stabilize and secure the needle with dressings and tape.11.You may administer 10 to 20 mg (1 to 2 cc) of 2% Lidocaine in adult patients who experience
infusion-related pain. This may be repeated prn to a maximum of 60 mg (6 cc).12.Following the administration of any IO medications, flush the IO line with 10 cc of IV fluid.13.Document the procedure, time, and result (success) on/with the patient care report (PCR).
Certification Requirements:Maintain knowledge of the indications, contraindications, technique, and possible complications of the procedure. Assessment of this knowledge may be accomplished via quality assurance mechanisms, classroom demonstrations, skills stations, or other mechanisms as deemed appropriate by the local EMS System. Assessment should include direct observation at least once per certification cycle.
A Advanced EMT A
P Paramedic P

Standards Procedure (Skill)
Venous Access: Swan-Ganz Catheter Maintenance
Procedure 52 2009
Clinical Indications:
Transport of a patient with a Swan-Ganz catheter that is in place prior to transport.
Procedure:
1. Make certain catheter is secure prior to transport.2. Under the supervision of the nurse or physician caring for the patient, make certain the
transport personnel are aware of the depth at which the catheter is secured.3. UNDER NO CIRCUMSTANCES SHOULD TRANSPORT PERSONNEL ADVANCE THE
SWAN-GANZ CATHETER.4. The sterile plastic sheath that surrounds the catheter should not be manipulated.5. The ports of the catheter may be used to continue administration of medications or IV fluids
that were initiated prior to transport. These should be used as any other IV port with attention to sterile technique.
6. If applicable, measurements from the catheter may be obtained during transport and used to guide care as per local protocols and medical control orders.
7. If at anytime during the transport difficulties with the function of the Swan-Ganz catheter is noted, contact medical control.
8. Document the time and any adjustments or problems associated with the catheter in the patient care report (PCR).
Certification Requirements:
Maintain knowledge of the indications, contraindications, technique, and possible complications of the procedure. Assessment of this knowledge may be accomplished via quality assurance mechanisms, classroom demonstrations, skills stations, or other mechanisms as deemed appropriate by the local EMS System.
P Paramedic P
Standards Procedure (Skill)
Procedure 53 2009
Clinical Indications:
Protection and care for open wounds prior to and during transport.
Procedure:
1. Use personal protective equipment, including gloves, gown, and mask as indicated.2. If active bleeding, elevate the affected area if possible and hold direct pressure. Do not rely
on “compression” bandage to control bleeding. Direct pressure is much more effective.3. Once bleeding is controlled, irrigate contaminated wounds with saline as appropriate (this
may have to be avoided if bleeding was difficult to control). Consider analgesia per protocol prior to irrigation.
4. Cover wounds with sterile gauze/dressings. Check distal pulses, sensation, and motor function to ensure the bandage is not too tight.
5. Monitor wounds and/or dressings throughout transport for bleeding.6. Document the wound and assessment and care in the patient care report (PCR).
Certification Requirements:
Maintain knowledge of the indications, contraindications, technique, and possible complications of the procedure. Assessment of this knowledge may be accomplished via quality assurance mechanisms, classroom demonstrations, skills stations, or other mechanisms as deemed appropriate by the local EMS System.
F First Responder F
B EMT B
A Advanced EMT A
P Paramedic P

Standards Procedure (Skill)
Procedure 54 2009
Clinical Indications:
Serious hemorrhage that can not be controlled by other means.
Contraindications:
Wounds involving open thoracic or abdominal cavities.
Procedure:
1. Apply approved non-heat-generating hemostatic agent per manufacturer’s instructions.2. Supplement with direct pressure and standard hemorrhage control techniques.3. Apply dressing.
Certification Requirements:
Maintain knowledge of the indications, contraindications, technique, and possible complications of the procedure. Assessment of this knowledge may be accomplished via quality assurance mechanisms, classroom demonstrations, skills stations, or other mechanisms as deemed appropriate by the local EMS System.
F First Responder F
B EMT B
A Advanced EMT A
P Paramedic P
Standards Procedure (Skill)
Procedure 55 2009
Clinical Indications:
Patient with uncomplicated conducted electrical weapon (Taser®) probes embedded subcutaneously in non-sensitiveareas of skin.Taser probes are barbed metal projectiles that may embed themselves up to 13 mm into the skin.
Contraindications:
Patients with conducted electrical weapon (Taser®) probe penetration in vulnerable areas of body as mentioned below should be transported for further evaluation and probe removalProbes embedded in skin above level of clavicles, female breasts, or genitaliaSuspicion that probe might be embedded in bone, blood vessel, or other sensitive structure.
Procedure:
Ensure wires are disconnected from weapon.Stabilize skin around probe using non-dominant hand.Grasp probe by metal body using dominant hand.Remove probe in single quick motion.Wipe wound with antiseptic wipe and apply dressing.
Certification Requirements:
Maintain knowledge of the indications, contraindications, technique, and possible complications of the procedure. Assessment of this knowledge may be accomplished via quality assurance mechanisms, classroom demonstrations, skills stations, or other mechanisms as deemed appropriate by the local EMS System.
F First Responder F
B EMT B
A Advanced EMT A
P Paramedic P

Standards Procedure (Skill)
Procedure 56 2009
Clinical Indications:
Life threatening extremity hemorrhage that can not be controlled by other means.Serious or life threatening extremity hemorrhage and tactical considerations prevent the use of standard hemorrhage control techniques.
Contraindications:
Non-extremity hemorrhageProximal extremity location where tourniquet application is not practical
Procedure:
1. Place tourniquet proximal to wound2. Tighten per manufacturer instructions until hemorrhage stops and/or distal pulses in affected
extremity disappear.3. Secure tourniquet per manufacturer instructions4. Note time of tourniquet application and communicate this to receiving care providers5. Dress wounds per standard wound care protocol6. If delayed or prolonged transport and tourniquet application time > 45 minutes: consider
reattempting standard hemorrhage control techniques and removing tourniquet
Certification Requirements:
Maintain knowledge of the indications, contraindications, technique, and possible complications of the procedure. Assessment of this knowledge may be accomplished via quality assurance mechanisms, classroom demonstrations, skills stations, or other mechanisms as deemed appropriate by the local EMS System.
F First Responder F
B EMT B
A Advanced EMT A
P Paramedic P