stainless steel cabinetry
TRANSCRIPT
2017 Product Binder
Brown Jordan Outdoor Kitchens | 203.626.5625 | brownjordanoutdoorkitchens.com BROWN JORDAN is a registered trademark of Brown Jordan International, Inc. and is used under license to CT Acquisitions, LLC.
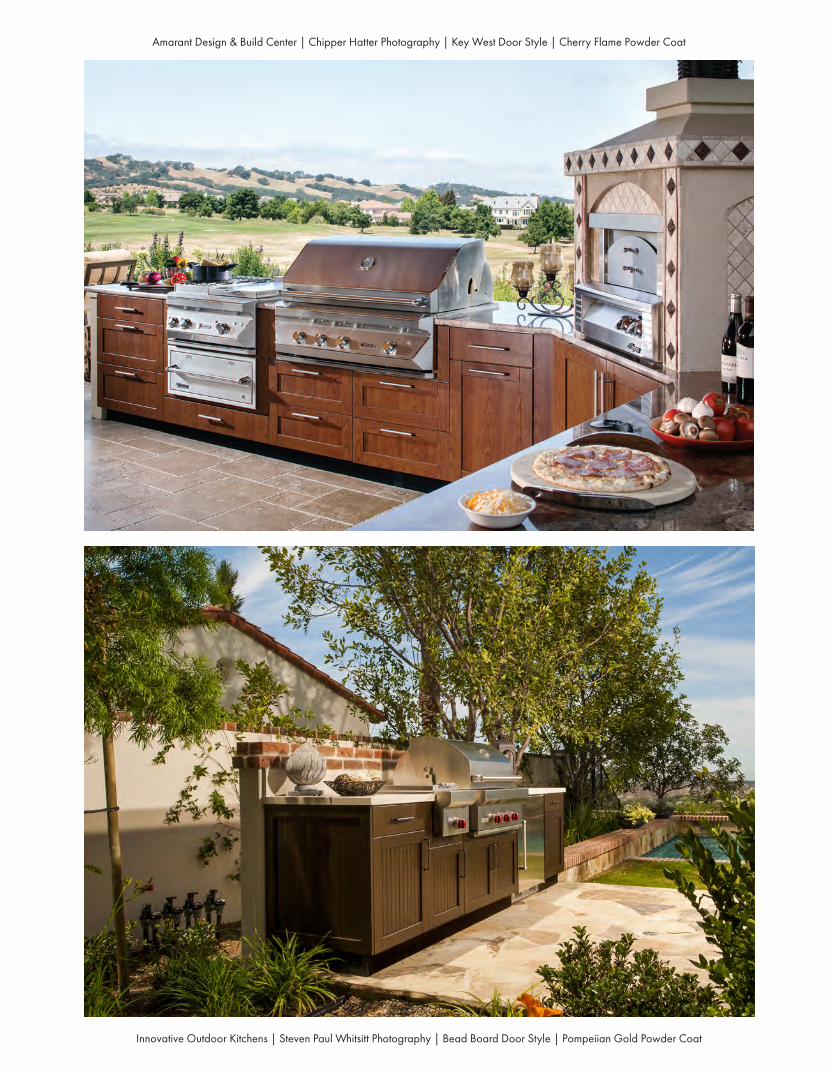
Amarant Design & Build Center | Chipper Hatter Photography | Key West Door Style | Cherry Flame Powder Coat
Innovative Outdoor Kitchens | Steven Paul Whitsitt Photography | Bead Board Door Style | Pompeiian Gold Powder Coat
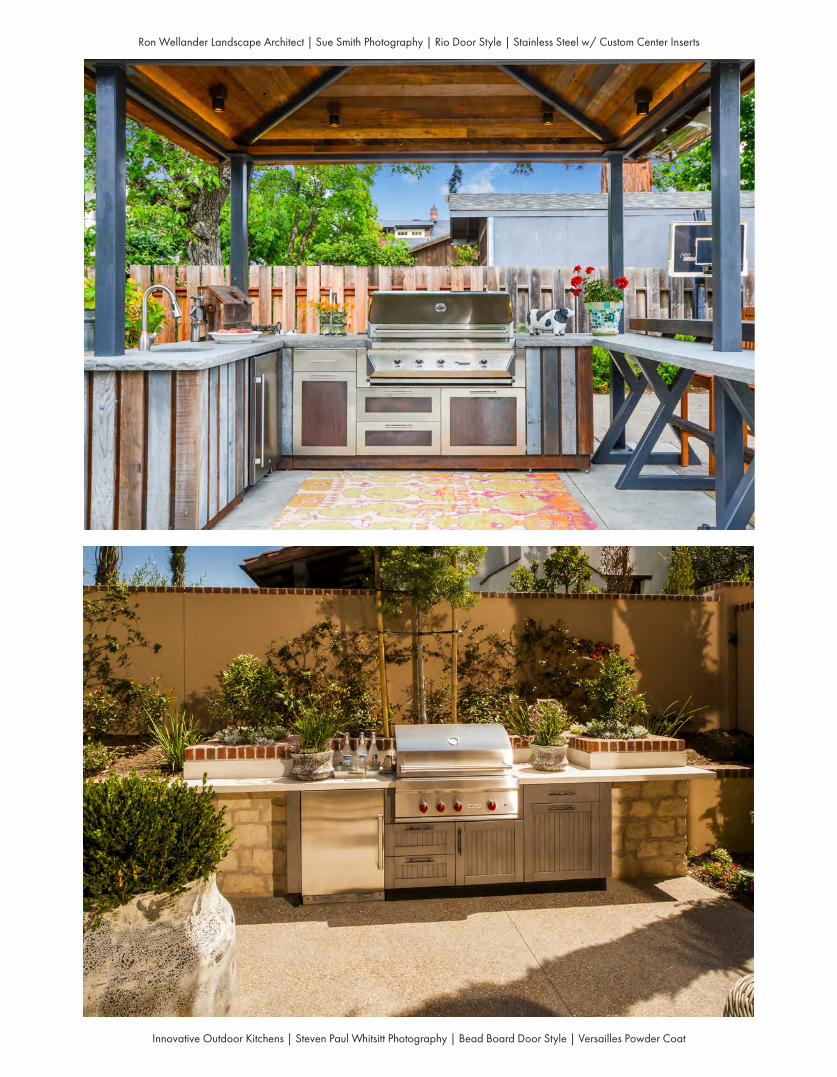
Ron Wellander Landscape Architect | Sue Smith Photography | Rio Door Style | Stainless Steel w/ Custom Center Inserts
Innovative Outdoor Kitchens | Steven Paul Whitsitt Photography | Bead Board Door Style | Versailles Powder Coat
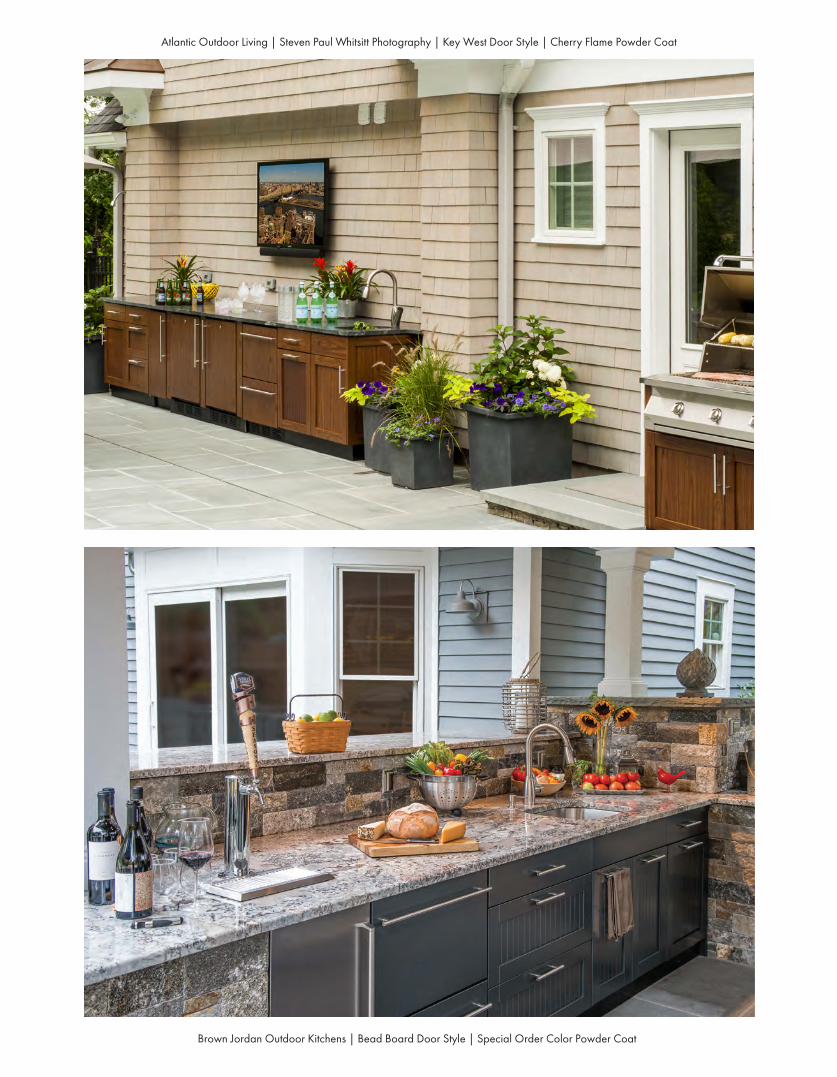
Atlantic Outdoor Living | Steven Paul Whitsitt Photography | Key West Door Style | Cherry Flame Powder Coat
Brown Jordan Outdoor Kitchens | Bead Board Door Style | Special Order Color Powder Coat
STAINLESS STEEL CABINETRYSPECIFICATIONS
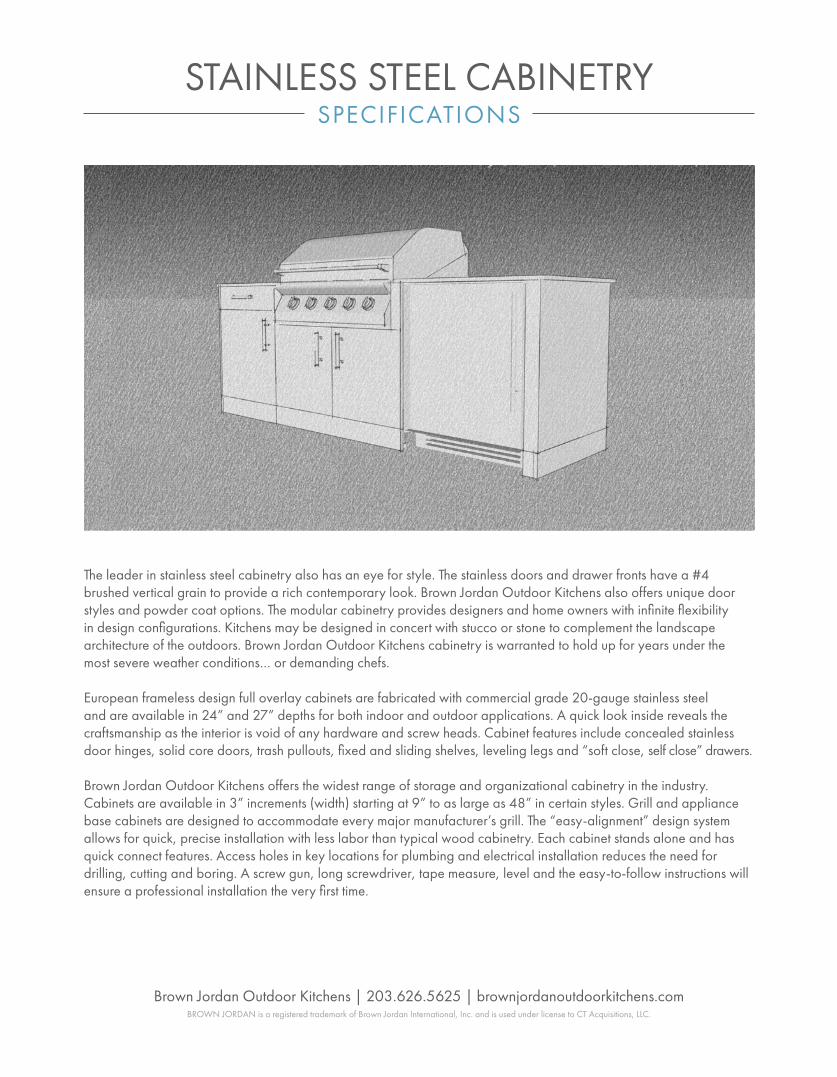
The leader in stainless steel cabinetry also has an eye for style. The stainless doors and drawer fronts have a #4 brushed vertical grain to provide a rich contemporary look. Brown Jordan Outdoor Kitchens also offers unique door styles and powder coat options. The modular cabinetry provides designers and home owners with infinite flexibility in design configurations. Kitchens may be designed in concert with stucco or stone to complement the landscape architecture of the outdoors. Brown Jordan Outdoor Kitchens cabinetry is warranted to hold up for years under the most severe weather conditions… or demanding chefs.
European frameless design full overlay cabinets are fabricated with commercial grade 20-gauge stainless steel and are available in 24” and 27” depths for both indoor and outdoor applications. A quick look inside reveals the craftsmanship as the interior is void of any hardware and screw heads. Cabinet features include concealed stainless door hinges, solid core doors, trash pullouts, fixed and sliding shelves, leveling legs and “soft close, self close” drawers.
Brown Jordan Outdoor Kitchens offers the widest range of storage and organizational cabinetry in the industry. Cabinets are available in 3” increments (width) starting at 9” to as large as 48” in certain styles. Grill and appliance base cabinets are designed to accommodate every major manufacturer’s grill. The “easy-alignment” design system allows for quick, precise installation with less labor than typical wood cabinetry. Each cabinet stands alone and has quick connect features. Access holes in key locations for plumbing and electrical installation reduces the need for drilling, cutting and boring. A screw gun, long screwdriver, tape measure, level and the easy-to-follow instructions will ensure a professional installation the very first time.
Brown Jordan Outdoor Kitchens | 203.626.5625 | brownjordanoutdoorkitchens.com BROWN JORDAN is a registered trademark of Brown Jordan International, Inc. and is used under license to CT Acquisitions, LLC.
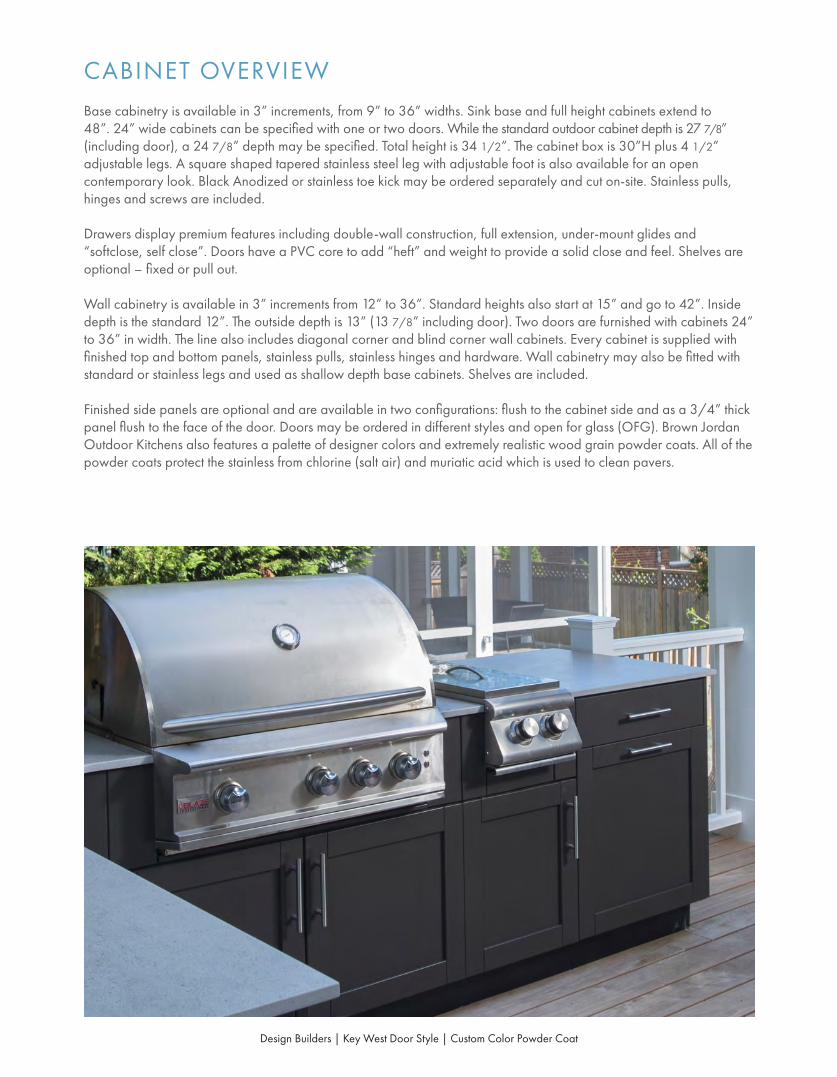
CABINET OVERVIEWBase cabinetry is available in 3” increments, from 9” to 36” widths. Sink base and full height cabinets extend to 48”. 24” wide cabinets can be specified with one or two doors. While the standard outdoor cabinet depth is 27 7/8” (including door), a 24 7/8” depth may be specified. Total height is 34 1/2”. The cabinet box is 30”H plus 4 1/2” adjustable legs. A square shaped tapered stainless steel leg with adjustable foot is also available for an open contemporary look. Black Anodized or stainless toe kick may be ordered separately and cut on-site. Stainless pulls, hinges and screws are included.
Drawers display premium features including double-wall construction, full extension, under-mount glides and “softclose, self close”. Doors have a PVC core to add “heft” and weight to provide a solid close and feel. Shelves are optional – fixed or pull out.
Wall cabinetry is available in 3” increments from 12” to 36”. Standard heights also start at 15” and go to 42”. Inside depth is the standard 12”. The outside depth is 13” (13 7/8” including door). Two doors are furnished with cabinets 24” to 36” in width. The line also includes diagonal corner and blind corner wall cabinets. Every cabinet is supplied with finished top and bottom panels, stainless pulls, stainless hinges and hardware. Wall cabinetry may also be fitted with standard or stainless legs and used as shallow depth base cabinets. Shelves are included.
Finished side panels are optional and are available in two configurations: flush to the cabinet side and as a 3/4” thickpanel flush to the face of the door. Doors may be ordered in different styles and open for glass (OFG). Brown Jordan Outdoor Kitchens also features a palette of designer colors and extremely realistic wood grain powder coats. All of the powder coats protect the stainless from chlorine (salt air) and muriatic acid which is used to clean pavers.
Design Builders | Key West Door Style | Custom Color Powder Coat
BASE
CAB
INET
S
3
®BASE STORAGE CABINETS
ITEM #OBD0911OBD1211OBD1511OBD1811OBD2111OBD2411OBD2412 (2D)OBD2712 (2D)OBD3012 (2D)OBD3312 (2D)OBD3612 (2D)OBD3912 (2D)
ITEM #OBM0930OBM1230OBM1530OBM1830OBM2130OBM2430OBM2730OBM3030OBM3330OBM3630
ITEM #OBF0901OBF1201OBF1501OBF1801OBF2101OBF2401OBF2402 (2D)OBF2702 (2D)OBF3002 (2D)OBF3302 (2D)OBF3602 (2D)OBF3902 (2D)OBF4202 (2D)OBF4502 (2D)OBF4802 (2D)
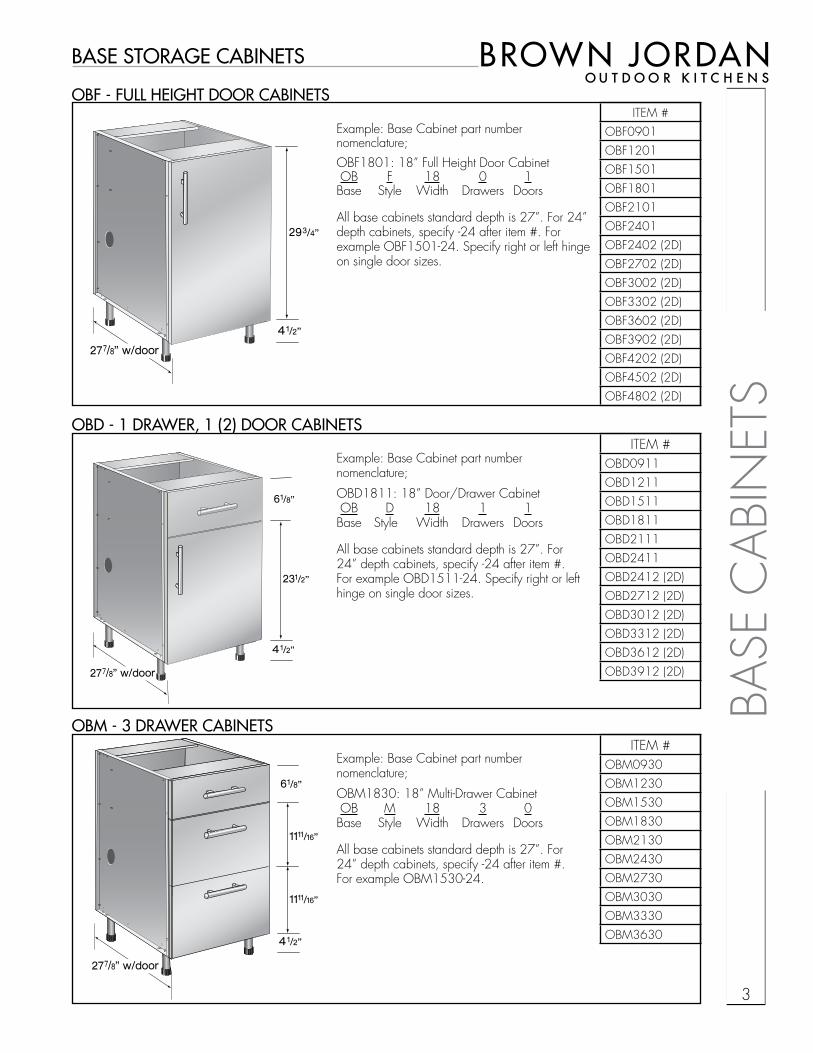
OBD - 1 DRAWER, 1 (2) DOOR CABINETS
OBM - 3 DRAWER CABINETS
Example: Base Cabinet part number nomenclature;OBF1801: 18” Full Height Door Cabinet OB F 18 0 1Base Style Width Drawers Doors
All base cabinets standard depth is 27”. For 24” depth cabinets, specify -24 after item #. For example OBF1501-24. Specify right or left hinge on single door sizes.
Example: Base Cabinet part number nomenclature;OBD1811: 18” Door/Drawer Cabinet OB D 18 1 1Base Style Width Drawers Doors
All base cabinets standard depth is 27”. For 24” depth cabinets, specify -24 after item #. For example OBD1511-24. Specify right or left hinge on single door sizes.
Example: Base Cabinet part number nomenclature;OBM1830: 18” Multi-Drawer Cabinet OB M 18 3 0Base Style Width Drawers Doors
All base cabinets standard depth is 27”. For 24” depth cabinets, specify -24 after item #. For example OBM1530-24.
277/8” w/door
293/4”
41/2”
277/8” w/door
231/2”
41/2”
61/8”
277/8” w/door
1111/16”
1111/16”
41/2”
61/8”
OBF - FULL HEIGHT DOOR CABINETS
BASE
CAB
INET
S
4
®
OBS - SINk BASE CABINETSITEM #
OBS1501OBS1801OBS2101OBS2401OBS2402 (2D)OBS2702 (2D)OBS3002 (2D)OBS3302 (2D)OBS3602 (2D)OBS3902 (2D)OBS4202 (2D)OBS4502 (2D)OBS4802 (2D)
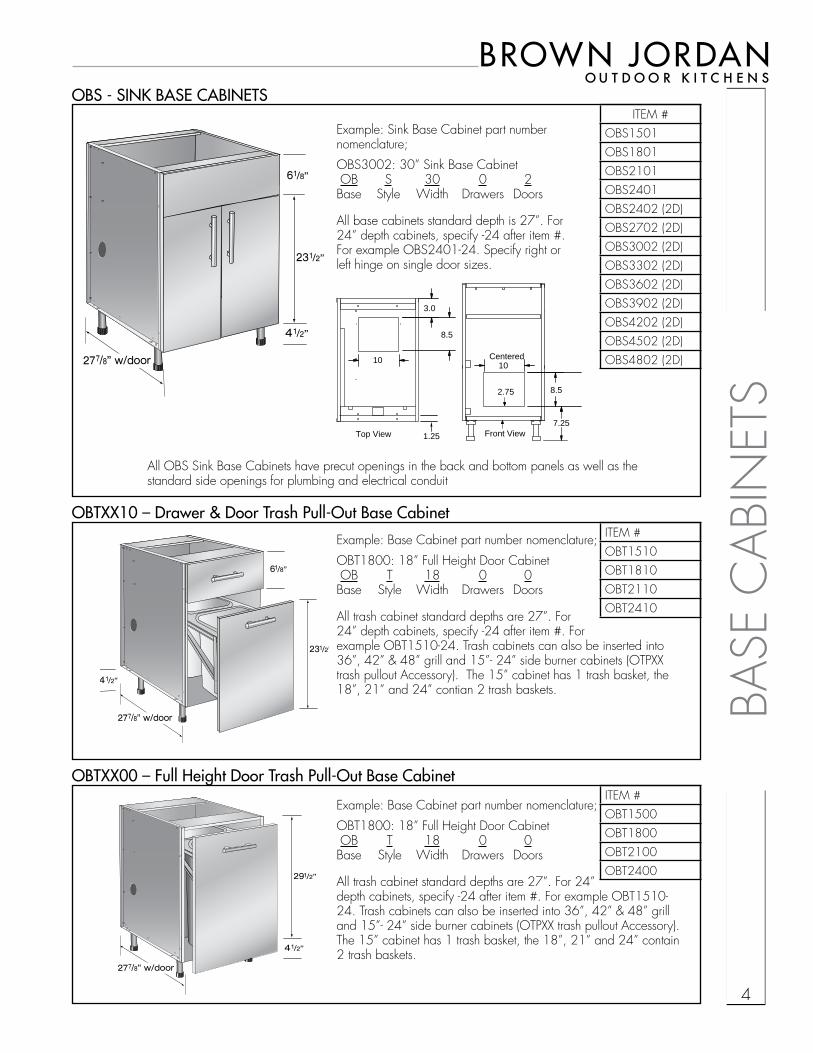
Example: Sink Base Cabinet part number nomenclature;OBS3002: 30” Sink Base Cabinet OB S 30 0 2Base Style Width Drawers Doors
All base cabinets standard depth is 27”. For 24” depth cabinets, specify -24 after item #. For example OBS2401-24. Specify right or left hinge on single door sizes.
277/8” w/door
231/2”
41/2”
61/8”
All OBS Sink Base Cabinets have precut openings in the back and bottom panels as well as the standard side openings for plumbing and electrical conduit
Top View
3.0
8.5
1.25
10 Centered
Front View7.25
8.5
10
2.75
ITEM #OBT1500OBT1800OBT2100OBT2400
OBTXX00 – Full Height Door Trash Pull-Out Base Cabinet
Example: Base Cabinet part number nomenclature;OBT1800: 18” Full Height Door Cabinet OB T 18 0 0Base Style Width Drawers Doors
All trash cabinet standard depths are 27”. For 24” depth cabinets, specify -24 after item #. For example OBT1510-24. Trash cabinets can also be inserted into 36”, 42” & 48” grill and 15”- 24” side burner cabinets (OTPXX trash pullout Accessory). The 15” cabinet has 1 trash basket, the 18”, 21” and 24” contain 2 trash baskets.
277/8” w/door
291/2”
41/2”
ITEM #OBT1510OBT1810OBT2110OBT2410
OBTXX10 – Drawer & Door Trash Pull-Out Base Cabinet
Example: Base Cabinet part number nomenclature;OBT1800: 18” Full Height Door Cabinet OB T 18 0 0Base Style Width Drawers Doors
All trash cabinet standard depths are 27”. For 24” depth cabinets, specify -24 after item #. For example OBT1510-24. Trash cabinets can also be inserted into 36”, 42” & 48” grill and 15”- 24” side burner cabinets (OTPXX trash pullout Accessory). The 15” cabinet has 1 trash basket, the 18”, 21” and 24” contian 2 trash baskets.
277/8” w/door
231/2”
41/2”
61/8”
Top View
3.0
8.5
1.25
10 Centered
Front View7.25
8.5
10
2.75
BASE
CAB
INET
S
5
®
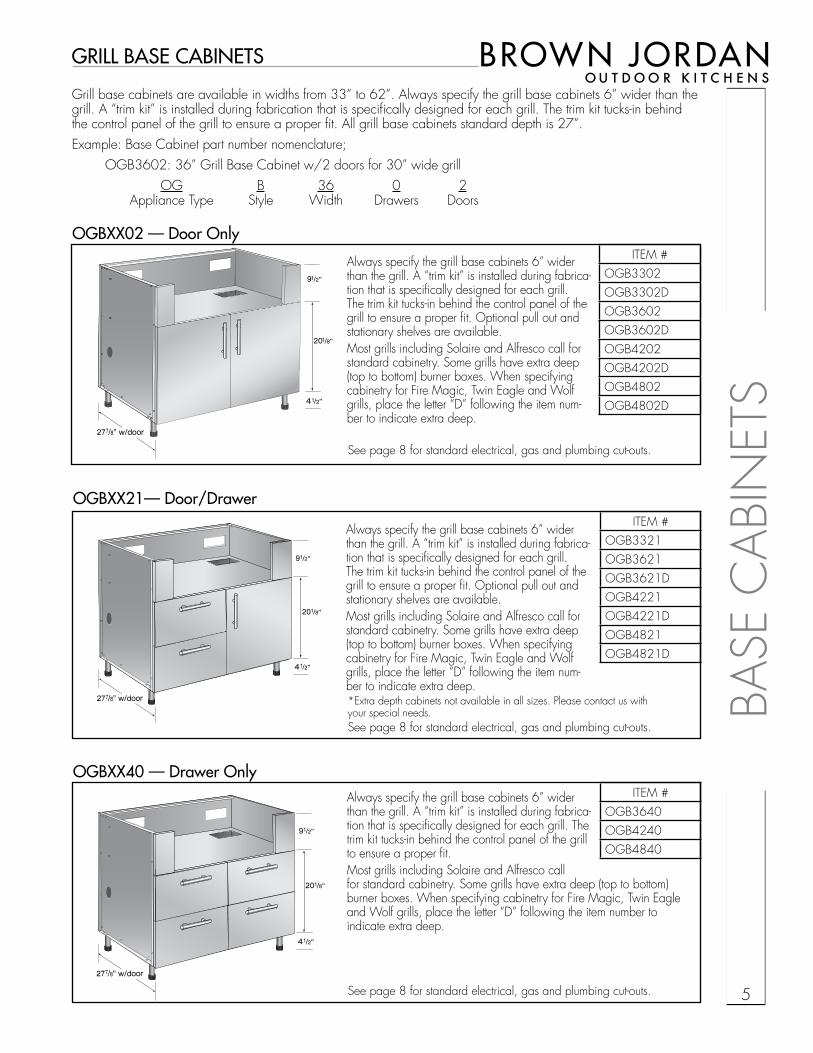
ITEM #OGB3302OGB3302DOGB3602OGB3602DOGB4202OGB4202DOGB4802OGB4802D
Always specify the grill base cabinets 6” wider than the grill. A “trim kit” is installed during fabrica-tion that is specifically designed for each grill. The trim kit tucks-in behind the control panel of the grill to ensure a proper fit. Optional pull out and stationary shelves are available.Most grills including Solaire and Alfresco call for standard cabinetry. Some grills have extra deep (top to bottom) burner boxes. When specifying cabinetry for Fire Magic, Twin Eagle and Wolf grills, place the letter “D” following the item num-ber to indicate extra deep.
Grill base cabinets are available in widths from 33” to 62”. Always specify the grill base cabinets 6” wider than the grill. A “trim kit” is installed during fabrication that is specifically designed for each grill. The trim kit tucks-in behind the control panel of the grill to ensure a proper fit. All grill base cabinets standard depth is 27”. Example: Base Cabinet part number nomenclature; OGB3602: 36” Grill Base Cabinet w/2 doors for 30” wide grill OG B 36 0 2 Appliance Type Style Width Drawers Doors
GRILL BASE CABINETS
277/8” w/door
201/8”
41/2”
91/2”
OGBXX02 — Door Only
ITEM #OGB3321OGB3621OGB3621DOGB4221OGB4221DOGB4821OGB4821D
OGBXX21— Door/Drawer
10”
10”
277/8” w/door
201/8”
41/2”
91/2”
See page 8 for standard electrical, gas and plumbing cut-outs.
Always specify the grill base cabinets 6” wider than the grill. A “trim kit” is installed during fabrica-tion that is specifically designed for each grill. The trim kit tucks-in behind the control panel of the grill to ensure a proper fit. Optional pull out and stationary shelves are available.Most grills including Solaire and Alfresco call for standard cabinetry. Some grills have extra deep (top to bottom) burner boxes. When specifying cabinetry for Fire Magic, Twin Eagle and Wolf grills, place the letter “D” following the item num-ber to indicate extra deep.
Always specify the grill base cabinets 6” wider than the grill. A “trim kit” is installed during fabrica-tion that is specifically designed for each grill. The trim kit tucks-in behind the control panel of the grill to ensure a proper fit. Most grills including Solaire and Alfresco call for standard cabinetry. Some grills have extra deep (top to bottom) burner boxes. When specifying cabinetry for Fire Magic, Twin Eagle and Wolf grills, place the letter “D” following the item number to indicate extra deep.
ITEM #OGB3640OGB4240OGB4840
OGBXX40 — Drawer Only
10”
10”
277/8” w/door
201/8”
41/2”
91/2”
See page 8 for standard electrical, gas and plumbing cut-outs.
*Extra depth cabinets not available in all sizes. Please contact us with your special needs.See page 8 for standard electrical, gas and plumbing cut-outs.
BASE
CAB
INET
S
6
®GRILL BASE CABINETS
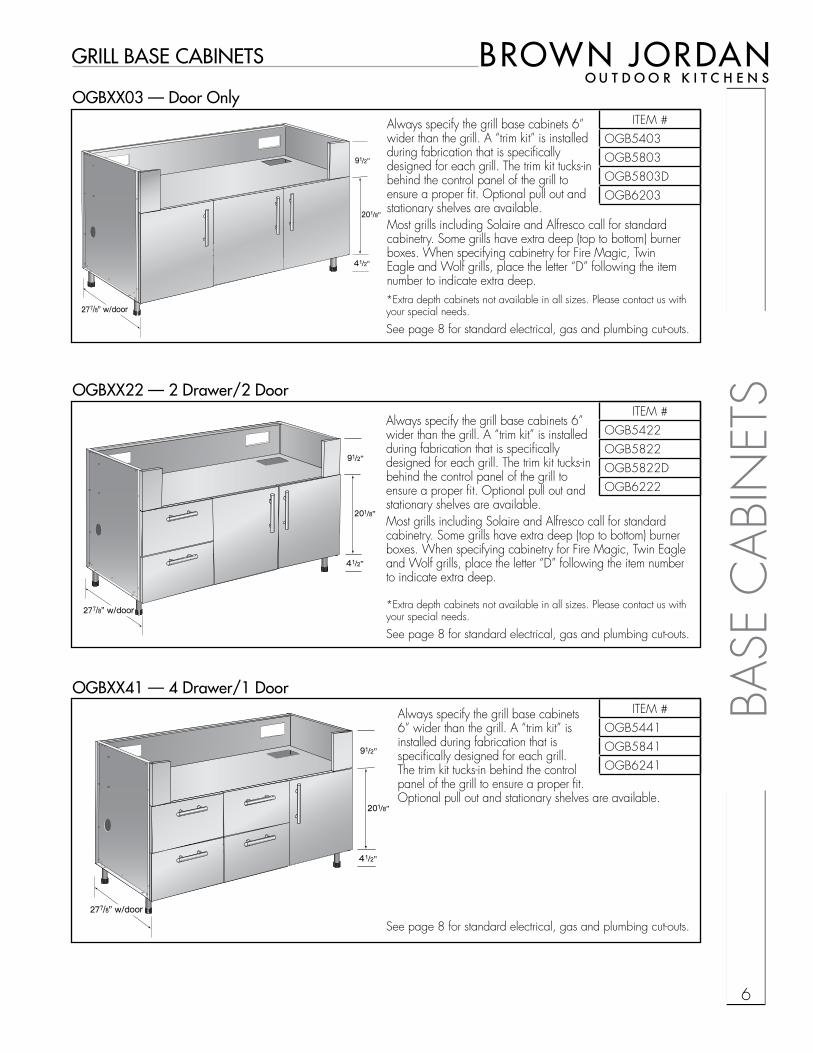
ITEM #OGB5422OGB5822OGB5822DOGB6222
OGBXX22 — 2 Drawer/2 Door
277/8” w/door
201/8”
41/2”
91/2”
Always specify the grill base cabinets 6” wider than the grill. A “trim kit” is installed during fabrication that is specifically designed for each grill. The trim kit tucks-in behind the control panel of the grill to ensure a proper fit. Optional pull out and stationary shelves are available.Most grills including Solaire and Alfresco call for standard cabinetry. Some grills have extra deep (top to bottom) burner boxes. When specifying cabinetry for Fire Magic, Twin Eagle and Wolf grills, place the letter “D” following the item number to indicate extra deep.
ITEM #OGB5441OGB5841OGB6241
OGBXX41 — 4 Drawer/1 Door
277/8” w/door
201/8”
41/2”
91/2”
Always specify the grill base cabinets 6” wider than the grill. A “trim kit” is installed during fabrication that is specifically designed for each grill. The trim kit tucks-in behind the control panel of the grill to ensure a proper fit. Optional pull out and stationary shelves are available.
See page 8 for standard electrical, gas and plumbing cut-outs.
277/8” w/door
201/8”
41/2”
91/2”
ITEM #OGB5403OGB5803OGB5803DOGB6203
OGBXX03 — Door OnlyAlways specify the grill base cabinets 6” wider than the grill. A “trim kit” is installed during fabrication that is specifically designed for each grill. The trim kit tucks-in behind the control panel of the grill to ensure a proper fit. Optional pull out and stationary shelves are available.Most grills including Solaire and Alfresco call for standard cabinetry. Some grills have extra deep (top to bottom) burner boxes. When specifying cabinetry for Fire Magic, Twin Eagle and Wolf grills, place the letter “D” following the item number to indicate extra deep.*Extra depth cabinets not available in all sizes. Please contact us with your special needs.
See page 8 for standard electrical, gas and plumbing cut-outs.
*Extra depth cabinets not available in all sizes. Please contact us with your special needs.
See page 8 for standard electrical, gas and plumbing cut-outs.
BASE
CAB
INET
S
7
®
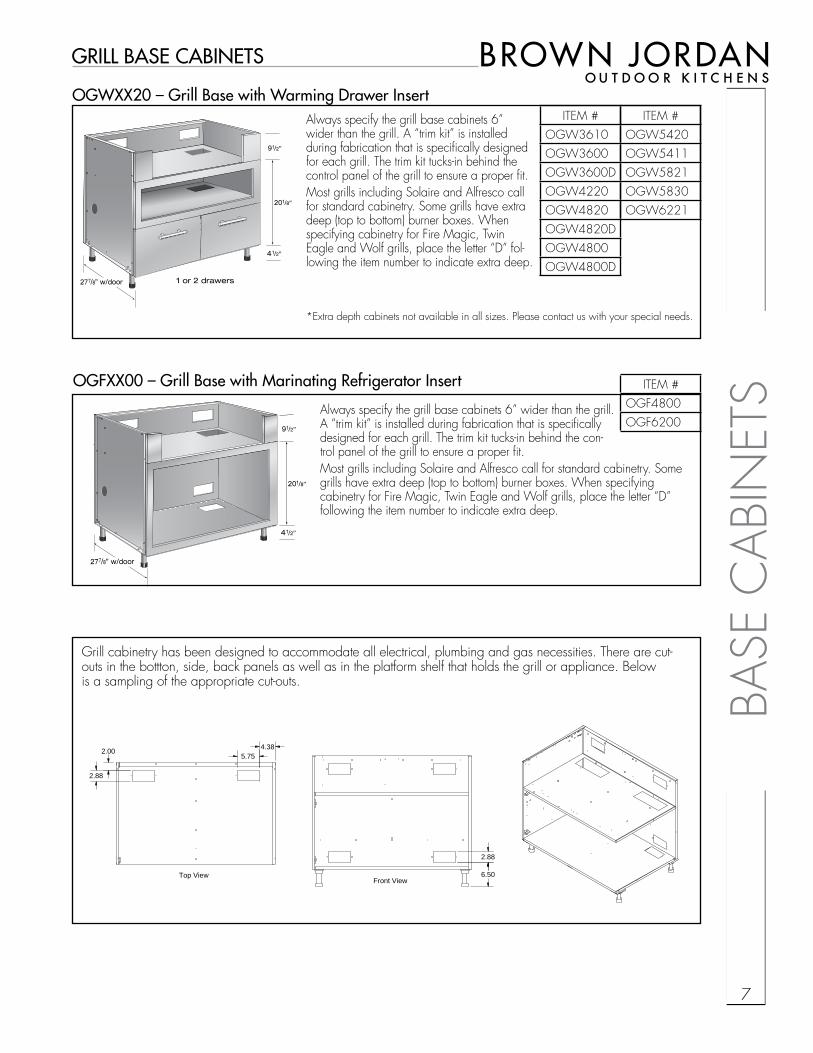
ITEM #OGW3610OGW3600OGW3600DOGW4220OGW4820OGW4820DOGW4800OGW4800D
OGWXX20 – Grill Base with Warming Drawer Insert
1 or 2 drawers277/8” w/door
201/8”
41/2”
91/2”
ITEM #OGF4800OGF6200
OGFXX00 – Grill Base with Marinating Refrigerator Insert
277/8” w/door
201/8”
41/2”
91/2”
ITEM #OGW5420OGW5411OGW5821OGW5830OGW6221
GRILL BASE CABINETS
Always specify the grill base cabinets 6” wider than the grill. A “trim kit” is installed during fabrication that is specifically designed for each grill. The trim kit tucks-in behind the control panel of the grill to ensure a proper fit. Most grills including Solaire and Alfresco call for standard cabinetry. Some grills have extra deep (top to bottom) burner boxes. When specifying cabinetry for Fire Magic, Twin Eagle and Wolf grills, place the letter “D” fol-lowing the item number to indicate extra deep.
Always specify the grill base cabinets 6” wider than the grill. A “trim kit” is installed during fabrication that is specifically designed for each grill. The trim kit tucks-in behind the con-trol panel of the grill to ensure a proper fit. Most grills including Solaire and Alfresco call for standard cabinetry. Some grills have extra deep (top to bottom) burner boxes. When specifying cabinetry for Fire Magic, Twin Eagle and Wolf grills, place the letter “D” following the item number to indicate extra deep.
*Extra depth cabinets not available in all sizes. Please contact us with your special needs.
Top View
4.385.75
2.00
2.88
Front View6.50
2.88
Grill cabinetry has been designed to accommodate all electrical, plumbing and gas necessities. There are cut-outs in the bottton, side, back panels as well as in the platform shelf that holds the grill or appliance. Below is a sampling of the appropriate cut-outs.
BASE
CAB
INET
S
8
®
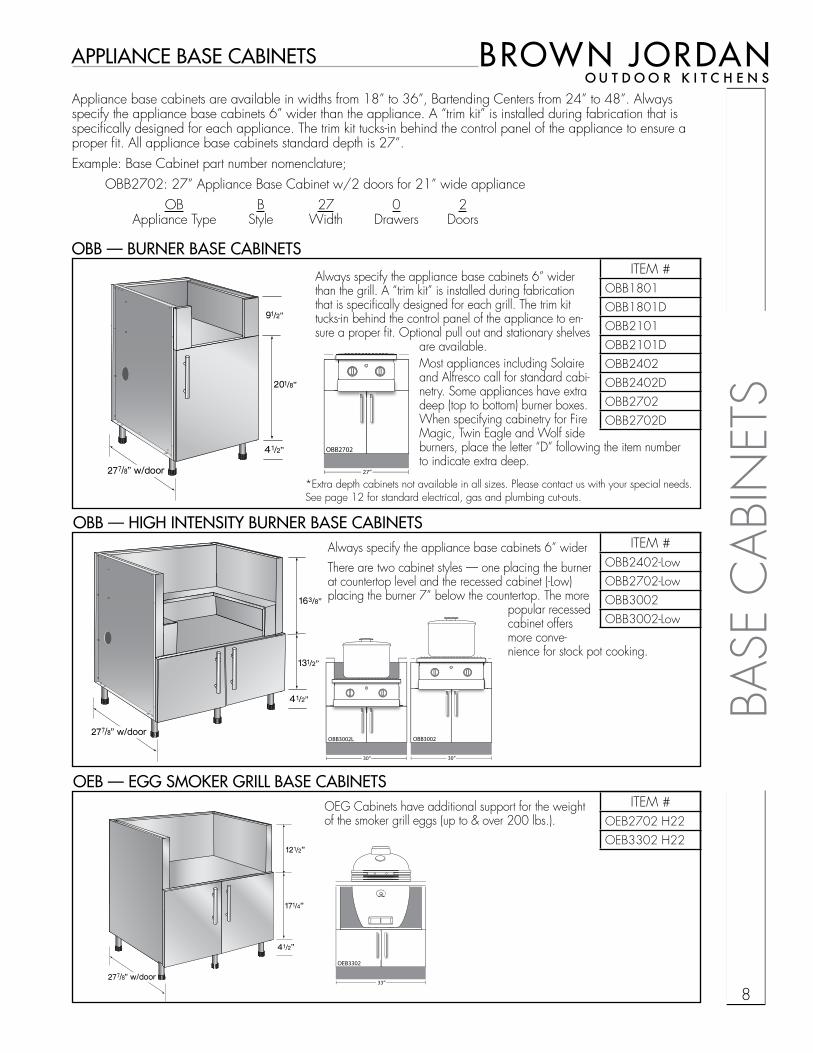
ITEM #OBB1801OBB1801DOBB2101OBB2101DOBB2402OBB2402DOBB2702OBB2702D
APPLIANCE BASE CABINETS
Always specify the appliance base cabinets 6” wider than the grill. A “trim kit” is installed during fabrication that is specifically designed for each grill. The trim kit tucks-in behind the control panel of the appliance to en-sure a proper fit. Optional pull out and stationary shelves
are available.Most appliances including Solaire and Alfresco call for standard cabi-netry. Some appliances have extra deep (top to bottom) burner boxes. When specifying cabinetry for Fire Magic, Twin Eagle and Wolf side burners, place the letter “D” following the item number to indicate extra deep.
277/8” w/door
201/8”
41/2”
91/2”
OBB — BURNER BASE CABINETS
27”
OBB2702
Always specify the appliance base cabinets 6” widerThere are two cabinet styles — one placing the burner at countertop level and the recessed cabinet (-Low) placing the burner 7” below the countertop. The more
popular recessed cabinet offers more conve-nience for stock pot cooking.
277/8” w/door
131/2”
41/2”
163/8”
OBB — HIGH INTENSITY BURNER BASE CABINETS
30”
OBB3002L
33”
OEB3302
ITEM #OEB2702 H22OEB3302 H22
OEG Cabinets have additional support for the weight of the smoker grill eggs (up to & over 200 lbs.).
277/8” w/door
171/4”
41/2”
121/2”
OEB — EGG SMOkER GRILL BASE CABINETS
30”
OBB3002
ITEM #OBB2402-LowOBB2702-LowOBB3002OBB3002-Low
*Extra depth cabinets not available in all sizes. Please contact us with your special needs.See page 12 for standard electrical, gas and plumbing cut-outs.
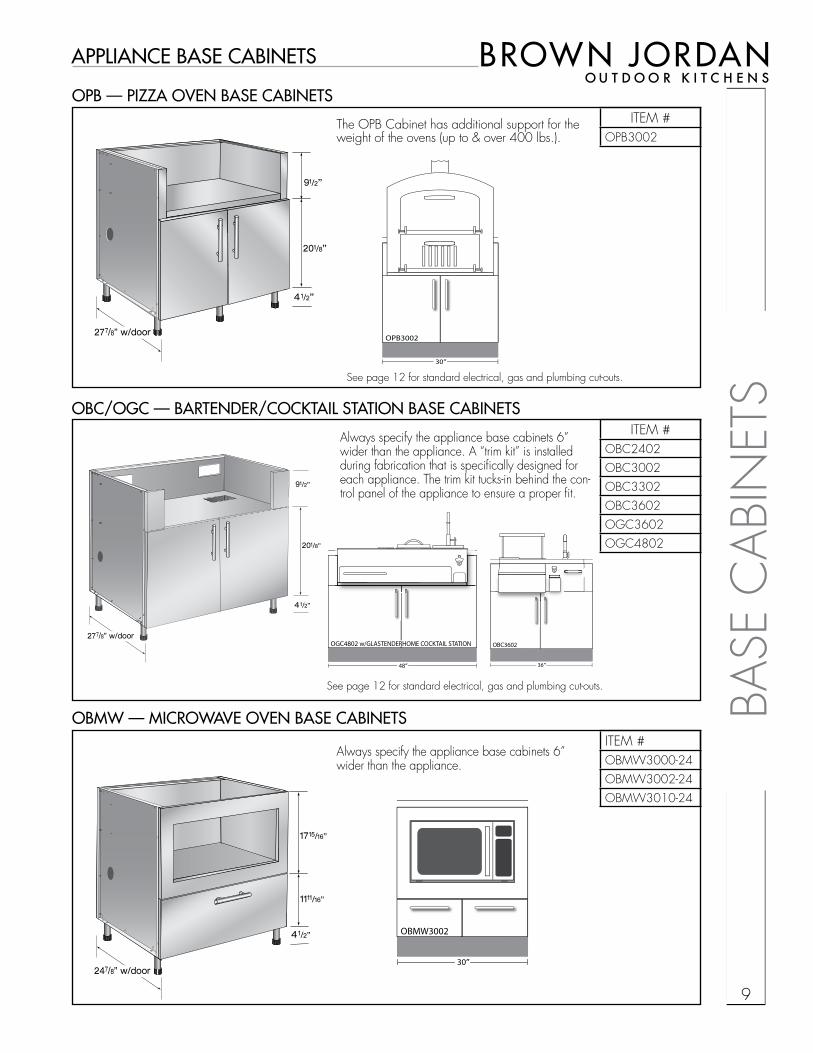
Appliance base cabinets are available in widths from 18” to 36”, Bartending Centers from 24” to 48”. Always specify the appliance base cabinets 6” wider than the appliance. A “trim kit” is installed during fabrication that is specifically designed for each appliance. The trim kit tucks-in behind the control panel of the appliance to ensure a proper fit. All appliance base cabinets standard depth is 27”. Example: Base Cabinet part number nomenclature; OBB2702: 27” Appliance Base Cabinet w/2 doors for 21” wide appliance OB B 27 0 2 Appliance Type Style Width Drawers Doors
BASE
CAB
INET
S
9
®
Always specify the appliance base cabinets 6” wider than the appliance. A “trim kit” is installed during fabrication that is specifically designed for each appliance. The trim kit tucks-in behind the con-trol panel of the appliance to ensure a proper fit.
ITEM #OPB3002
APPLIANCE BASE CABINETS
The OPB Cabinet has additional support for the weight of the ovens (up to & over 400 lbs.).
ITEM #OBC2402OBC3002OBC3302OBC3602OGC3602OGC4802
OPB — PIzzA OVEN BASE CABINETS
OBC/OGC — BARTENDER/COCkTAIL STATION BASE CABINETS
30”
OPB3002
36”
OBC3602
48”
OGC4802 w/GLASTENDERHOME COCKTAIL STATION277/8” w/door
201/8”
41/2”
91/2”
277/8” w/door
201/8”
41/2”
91/2”
Always specify the appliance base cabinets 6” wider than the appliance.
ITEM #OBMW3000-24OBMW3002-24OBMW3010-24
OBMW — MICROWAVE OVEN BASE CABINETS
30”
OBMW3002
247/8” w/door
1111/16”
41/2”
1715/16”
See page 12 for standard electrical, gas and plumbing cut-outs.
See page 12 for standard electrical, gas and plumbing cut-outs.
BASE
CAB
INET
S
10
®APPLIANCE BASE CABINETS
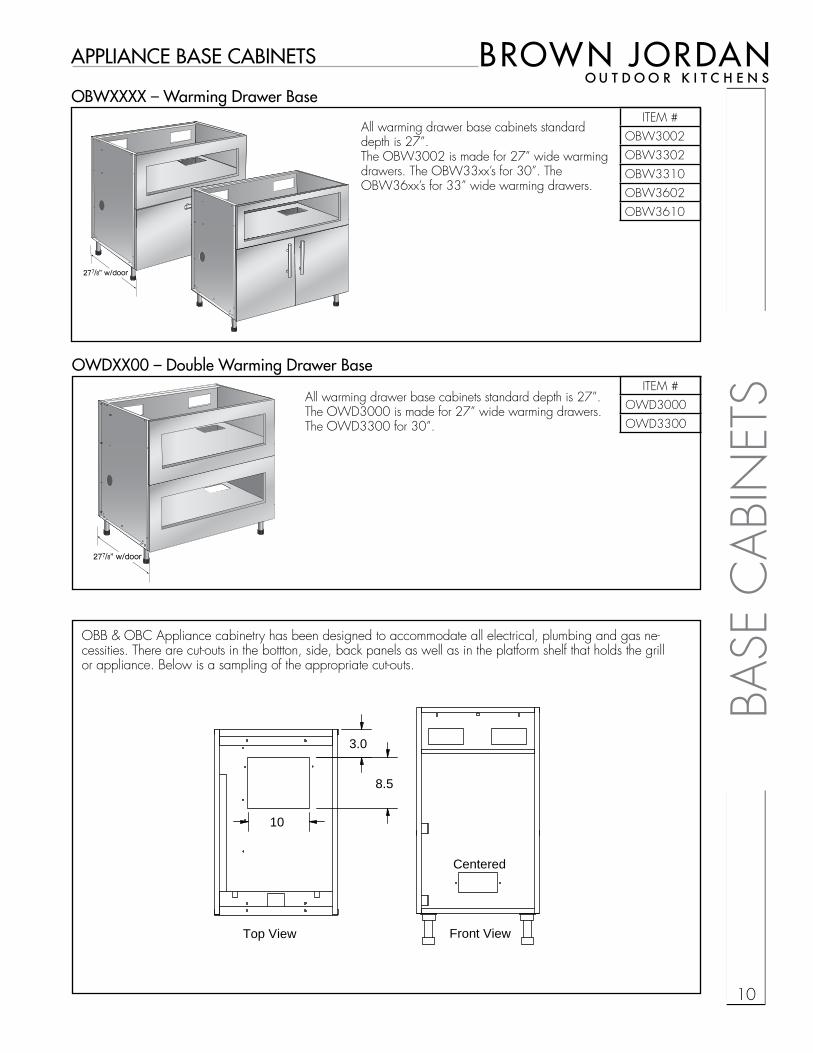
ITEM #OWD3000OWD3300
All warming drawer base cabinets standard depth is 27”.The OWD3000 is made for 27” wide warming drawers. The OWD3300 for 30”.
All warming drawer base cabinets standard depth is 27”.The OBW3002 is made for 27” wide warming drawers. The OBW33xx’s for 30”. The OBW36xx’s for 33” wide warming drawers.
OWDXX00 – Double Warming Drawer Base
OBWXXXX – Warming Drawer Base
277/8” w/door
277/8” w/door
ITEM #OBW3002OBW3302OBW3310OBW3602OBW3610
Top View
Centered
Front View
3.0
8.5
10
OBB & OBC Appliance cabinetry has been designed to accommodate all electrical, plumbing and gas ne-cessities. There are cut-outs in the bottton, side, back panels as well as in the platform shelf that holds the grill or appliance. Below is a sampling of the appropriate cut-outs.
BASE
CAB
INET
S
11
®
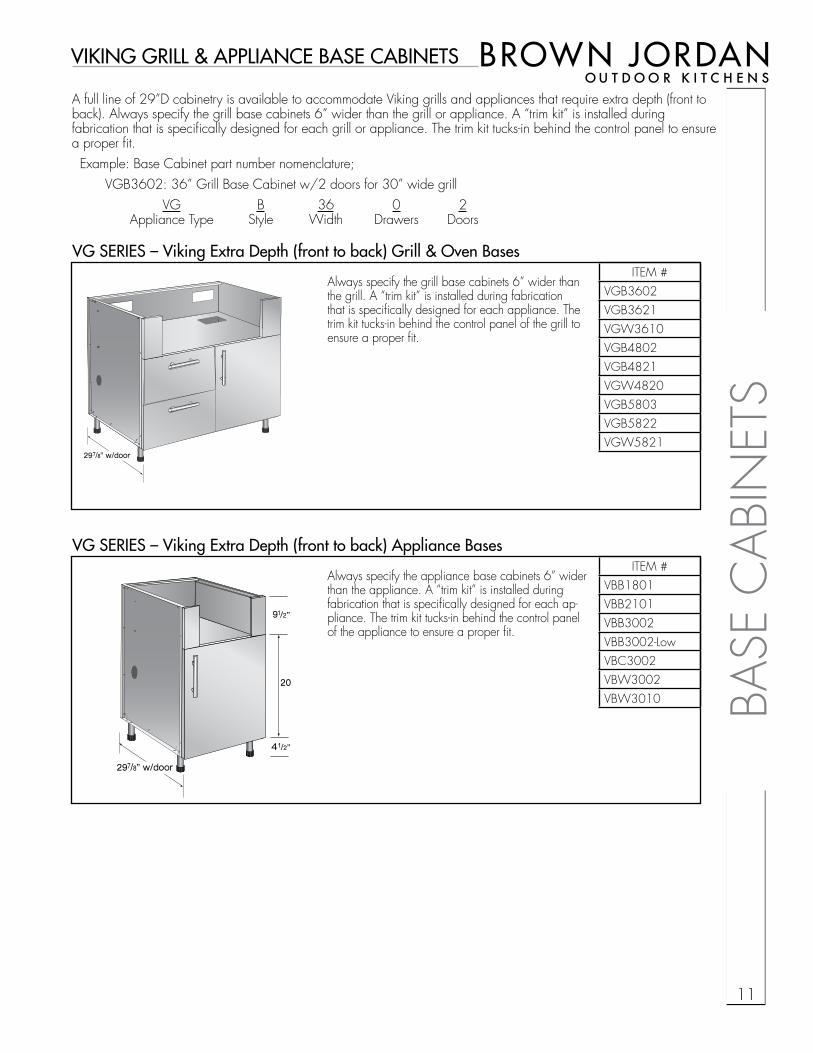
ITEM #VGB3602VGB3621VGW3610VGB4802VGB4821VGW4820VGB5803VGB5822VGW5821
ITEM #VBB1801VBB2101VBB3002VBB3002-LowVBC3002VBW3002VBW3010
Always specify the grill base cabinets 6” wider than the grill. A “trim kit” is installed during fabrication that is specifically designed for each appliance. The trim kit tucks-in behind the control panel of the grill to ensure a proper fit.
Always specify the appliance base cabinets 6” wider than the appliance. A “trim kit” is installed during fabrication that is specifically designed for each ap-pliance. The trim kit tucks-in behind the control panel of the appliance to ensure a proper fit.
VG SERIES – Viking Extra Depth (front to back) Grill & Oven Bases
VG SERIES – Viking Extra Depth (front to back) Appliance Bases
10”
10”
297/8” w/door
201/8”
41/2”
91/2”
297/8” w/door
201/8”
41/2”
91/2”
VIkING GRILL & APPLIANCE BASE CABINETS A full line of 29”D cabinetry is available to accommodate Viking grills and appliances that require extra depth (front to back). Always specify the grill base cabinets 6” wider than the grill or appliance. A “trim kit” is installed during fabrication that is specifically designed for each grill or appliance. The trim kit tucks-in behind the control panel to ensure a proper fit. Example: Base Cabinet part number nomenclature; VGB3602: 36” Grill Base Cabinet w/2 doors for 30” wide grill VG B 36 0 2 Appliance Type Style Width Drawers Doors
BASE
CAB
INET
S
12
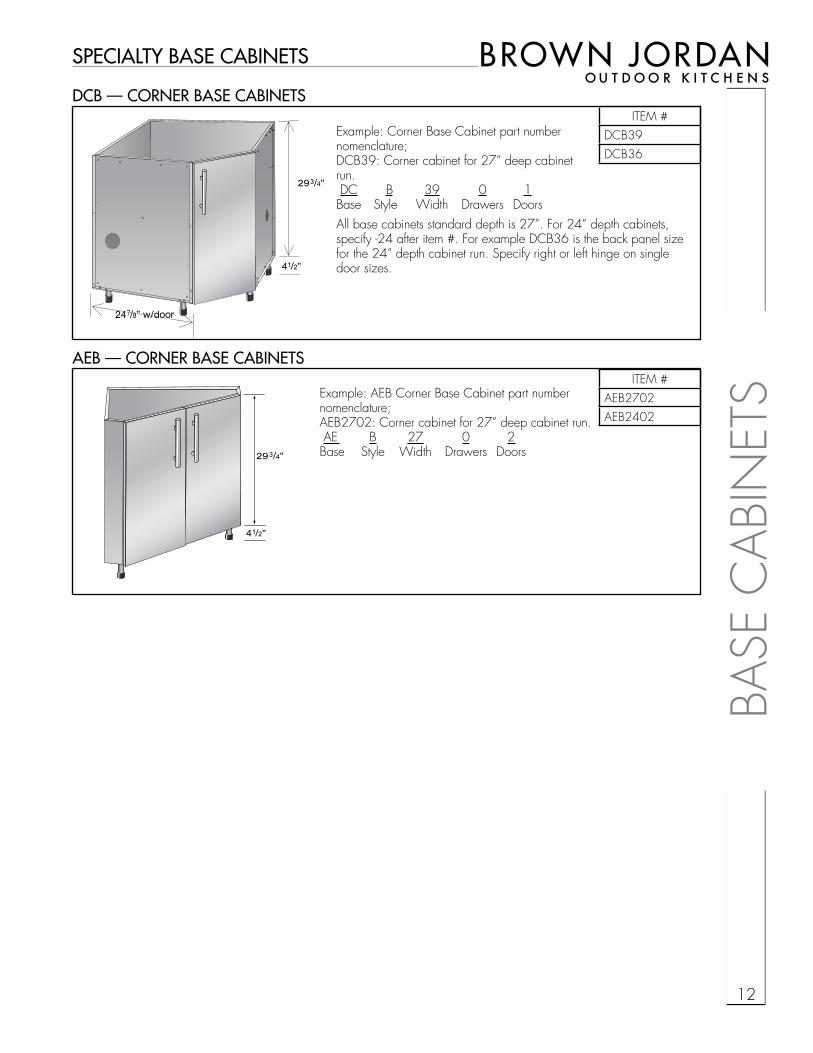
®SPECIALTY BASE CABINETS
ITEM #DCB39DCB36
All base cabinets standard depth is 27”. For 24” depth cabinets, specify -24 after item #. For example DCB36 is the back panel size for the 24” depth cabinet run. Specify right or left hinge on single door sizes.
Example: AEB Corner Base Cabinet part number nomenclature;AEB2702: Corner cabinet for 27” deep cabinet run. AE B 27 0 2Base Style Width Drawers Doors
277/8” w/door247/8” w/door
293/4”
41/2”
DCB — CORNER BASE CABINETS
293/4”
41/2”
Example: Corner Base Cabinet part number nomenclature;DCB39: Corner cabinet for 27” deep cabinet run. DC B 39 0 1Base Style Width Drawers Doors
ITEM #AEB2702AEB2402
AEB — CORNER BASE CABINETS
BASE
CAB
INET
S
13
®
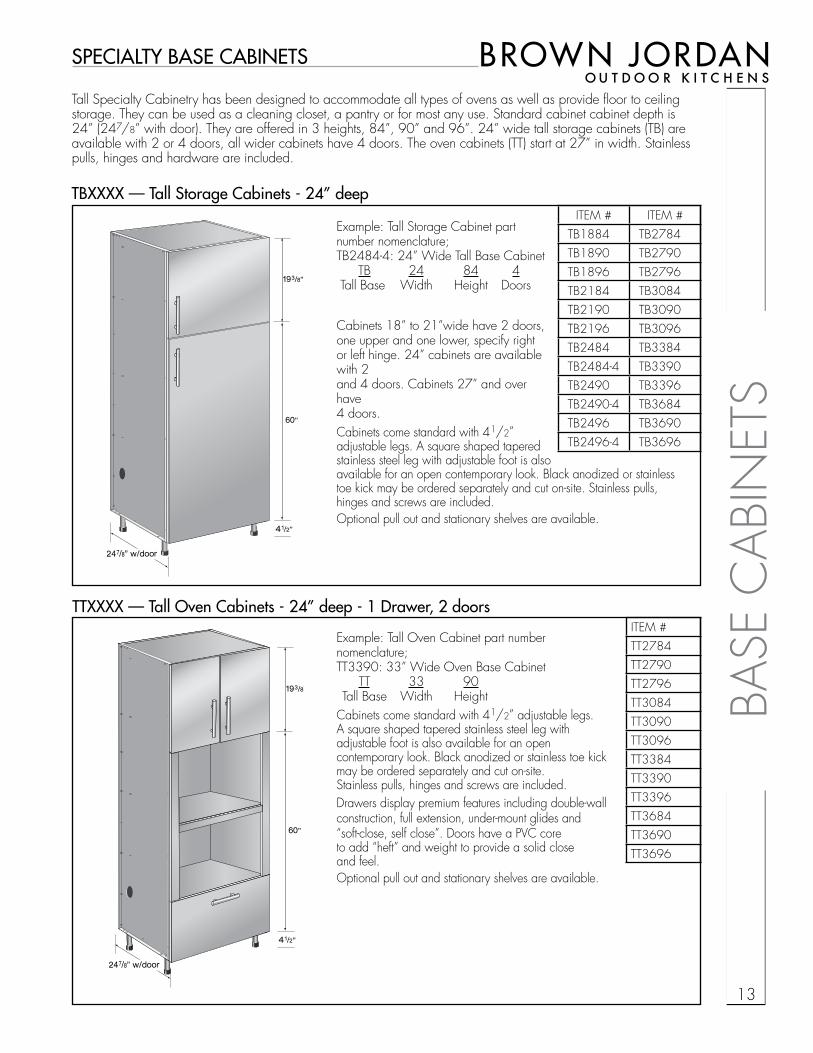
TBXXXX — Tall Storage Cabinets - 24” deep
247/8” w/door
60”
41/2”
193/8”
ITEM #TT2784TT2790TT2796TT3084TT3090TT3096TT3384TT3390TT3396TT3684TT3690TT3696
TTXXXX — Tall Oven Cabinets - 24” deep - 1 Drawer, 2 doors
247/8” w/door
60”
41/2”
193/8”
SPECIALTY BASE CABINETS
Tall Specialty Cabinetry has been designed to accommodate all types of ovens as well as provide floor to ceiling storage. They can be used as a cleaning closet, a pantry or for most any use. Standard cabinet cabinet depth is 24” (247/8” with door). They are offered in 3 heights, 84”, 90” and 96”. 24” wide tall storage cabinets (TB) are available with 2 or 4 doors, all wider cabinets have 4 doors. The oven cabinets (TT) start at 27” in width. Stainless pulls, hinges and hardware are included.
Cabinets 18” to 21”wide have 2 doors, one upper and one lower, specify right or left hinge. 24” cabinets are available with 2 and 4 doors. Cabinets 27” and over have 4 doors.Cabinets come standard with 41/2” adjustable legs. A square shaped tapered stainless steel leg with adjustable foot is also available for an open contemporary look. Black anodized or stainless toe kick may be ordered separately and cut on-site. Stainless pulls, hinges and screws are included.Optional pull out and stationary shelves are available.
Example: Tall Storage Cabinet part number nomenclature;TB2484-4: 24” Wide Tall Base Cabinet TB 24 84 4 Tall Base Width Height Doors
ITEM # ITEM #TB1884 TB2784TB1890 TB2790TB1896 TB2796TB2184 TB3084TB2190 TB3090TB2196 TB3096TB2484 TB3384TB2484-4 TB3390TB2490 TB3396TB2490-4 TB3684TB2496 TB3690TB2496-4 TB3696
Example: Tall Oven Cabinet part number nomenclature;TT3390: 33” Wide Oven Base Cabinet TT 33 90 Tall Base Width HeightCabinets come standard with 41/2” adjustable legs. A square shaped tapered stainless steel leg with adjustable foot is also available for an open contemporary look. Black anodized or stainless toe kick may be ordered separately and cut on-site. Stainless pulls, hinges and screws are included.Drawers display premium features including double-wall construction, full extension, under-mount glides and “soft-close, self close”. Doors have a PVC core to add “heft” and weight to provide a solid close and feel. Optional pull out and stationary shelves are available.
ACC
ESSO
RIES
14
®
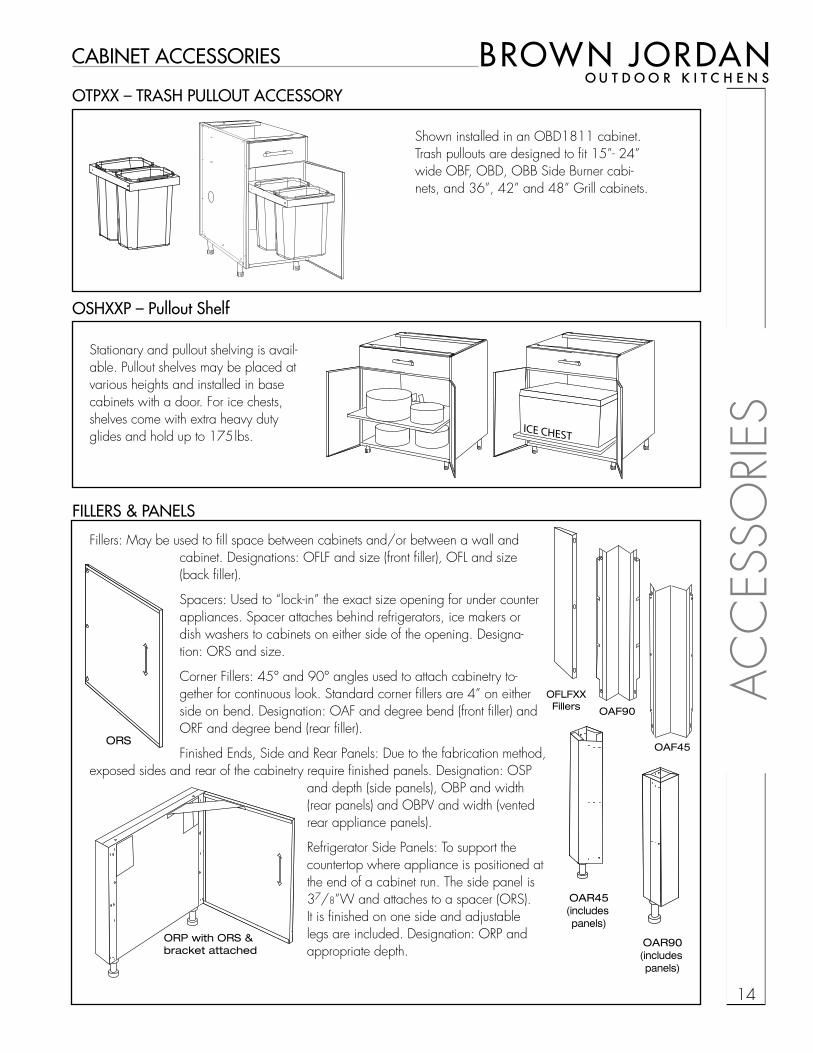
OTPXX – TRASH PULLOUT ACCESSORY
OSHXXP – Pullout Shelf
CABINET ACCESSORIES
Shown installed in an OBD1811 cabinet. Trash pullouts are designed to fit 15”- 24” wide OBF, OBD, OBB Side Burner cabi-nets, and 36”, 42” and 48” Grill cabinets.
Stationary and pullout shelving is avail-able. Pullout shelves may be placed at various heights and installed in base cabinets with a door. For ice chests, shelves come with extra heavy duty glides and hold up to 175lbs.
ICE CHEST
Fillers: May be used to fill space between cabinets and/or between a wall and cabinet. Designations: OFLF and size (front filler), OFL and size (back filler).
Spacers: Used to “lock-in” the exact size opening for under counter appliances. Spacer attaches behind refrigerators, ice makers or dish washers to cabinets on either side of the opening. Designa-tion: ORS and size.
Corner Fillers: 45° and 90° angles used to attach cabinetry to-gether for continuous look. Standard corner fillers are 4” on either side on bend. Designation: OAF and degree bend (front filler) and ORF and degree bend (rear filler).
Finished Ends, Side and Rear Panels: Due to the fabrication method, exposed sides and rear of the cabinetry require finished panels. Designation: OSP
and depth (side panels), OBP and width (rear panels) and OBPV and width (vented rear appliance panels).
Refrigerator Side Panels: To support the countertop where appliance is positioned at the end of a cabinet run. The side panel is 37/8”W and attaches to a spacer (ORS). It is finished on one side and adjustable legs are included. Designation: ORP and appropriate depth.
OAF45 OAF90
OAR90(includes panels)
OAR45(includes panels)
ORP with ORS & bracket attached
OFLFXXFillersOAF45 OAF90
OAR90(includes panels)
OAR45(includes panels)
ORS
FILLERS & PANELS
ACC
ESSO
RIES
15
®CABINET ACCESSORIES (continued)
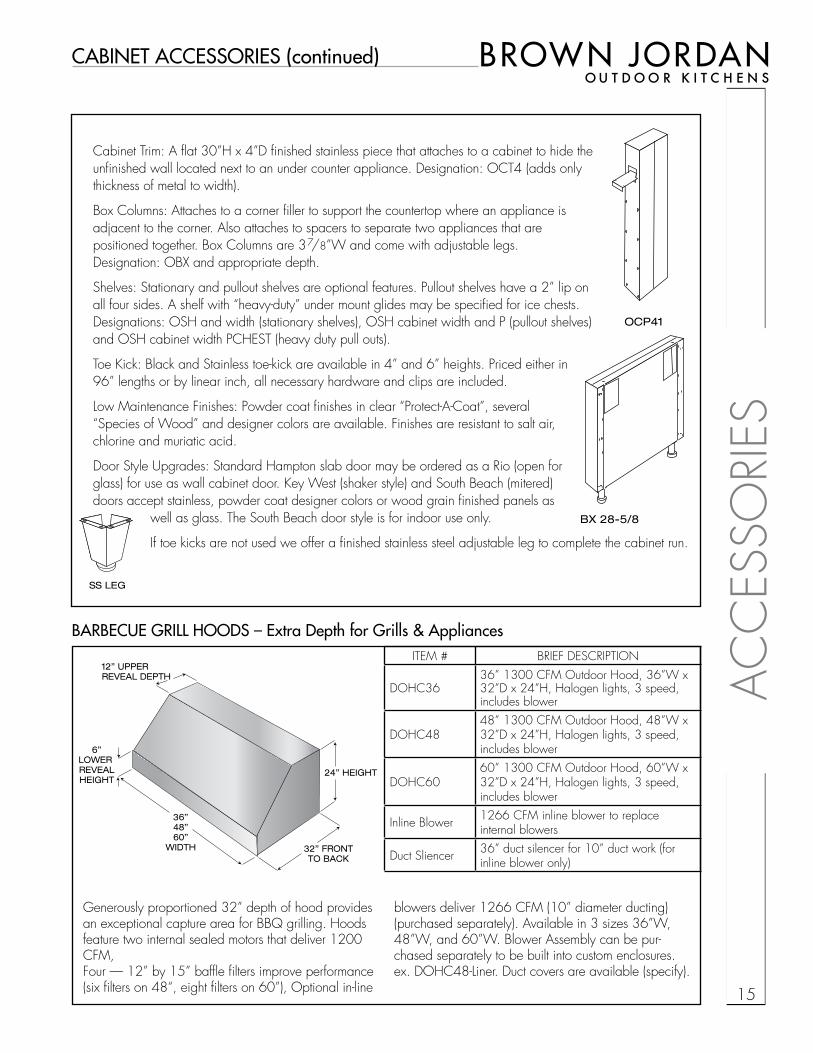
ITEM # BRIEF DESCRIPTION
DOHC3636” 1300 CFM Outdoor Hood, 36”W x 32”D x 24”H, Halogen lights, 3 speed, includes blower
DOHC4848” 1300 CFM Outdoor Hood, 48”W x 32”D x 24”H, Halogen lights, 3 speed, includes blower
DOHC6060” 1300 CFM Outdoor Hood, 60”W x 32”D x 24”H , Halogen lights, 3 speed, includes blower
Inline Blower 1266 CFM inline blower to replace internal blowers
Duct Sliencer 36” duct silencer for 10” duct work (for inline blower only)
Generously proportioned 32” depth of hood provides an exceptional capture area for BBQ grilling. Hoods feature two internal sealed motors that deliver 1200 CFM, Four — 12” by 15” baffle filters improve performance (six filters on 48“, eight filters on 60”), Optional in-line
BARBECUE GRILL HOODS – Extra Depth for Grills & Appliances
12” UPPER REVEAL DEPTH
32” FRONTTO BACK
6”LOWER REVEALHEIGHT
36”48”60”
WIDTH
24” HEIGHT
blowers deliver 1266 CFM (10” diameter ducting) (purchased separately). Available in 3 sizes 36”W, 48”W, and 60”W. Blower Assembly can be pur-chased separately to be built into custom enclosures. ex. DOHC48-Liner. Duct covers are available (specify).
Cabinet Trim: A flat 30”H x 4”D finished stainless piece that attaches to a cabinet to hide the unfinished wall located next to an under counter appliance. Designation: OCT4 (adds only thickness of metal to width).
Box Columns: Attaches to a corner filler to support the countertop where an appliance is adjacent to the corner. Also attaches to spacers to separate two appliances that are positioned together. Box Columns are 37/8”W and come with adjustable legs. Designation: OBX and appropriate depth.
Shelves: Stationary and pullout shelves are optional features. Pullout shelves have a 2” lip on all four sides. A shelf with “heavy-duty” under mount glides may be specified for ice chests. Designations: OSH and width (stationary shelves), OSH cabinet width and P (pullout shelves) and OSH cabinet width PCHEST (heavy duty pull outs).
Toe Kick: Black and Stainless toe-kick are available in 4” and 6” heights. Priced either in 96” lengths or by linear inch, all necessary hardware and clips are included.
Low Maintenance Finishes: Powder coat finishes in clear “Protect-A-Coat”, several “Species of Wood” and designer colors are available. Finishes are resistant to salt air, chlorine and muriatic acid.
Door Style Upgrades: Standard Hampton slab door may be ordered as a Rio (open for glass) for use as wall cabinet door. Key West (shaker style) and South Beach (mitered) doors accept stainless, powder coat designer colors or wood grain finished panels as
well as glass. The South Beach door style is for indoor use only.
If toe kicks are not used we offer a finished stainless steel adjustable leg to complete the cabinet run.
OBX 28-5/8
OCP41
SS LEG
®
WAL
L CAB
INET
S
16
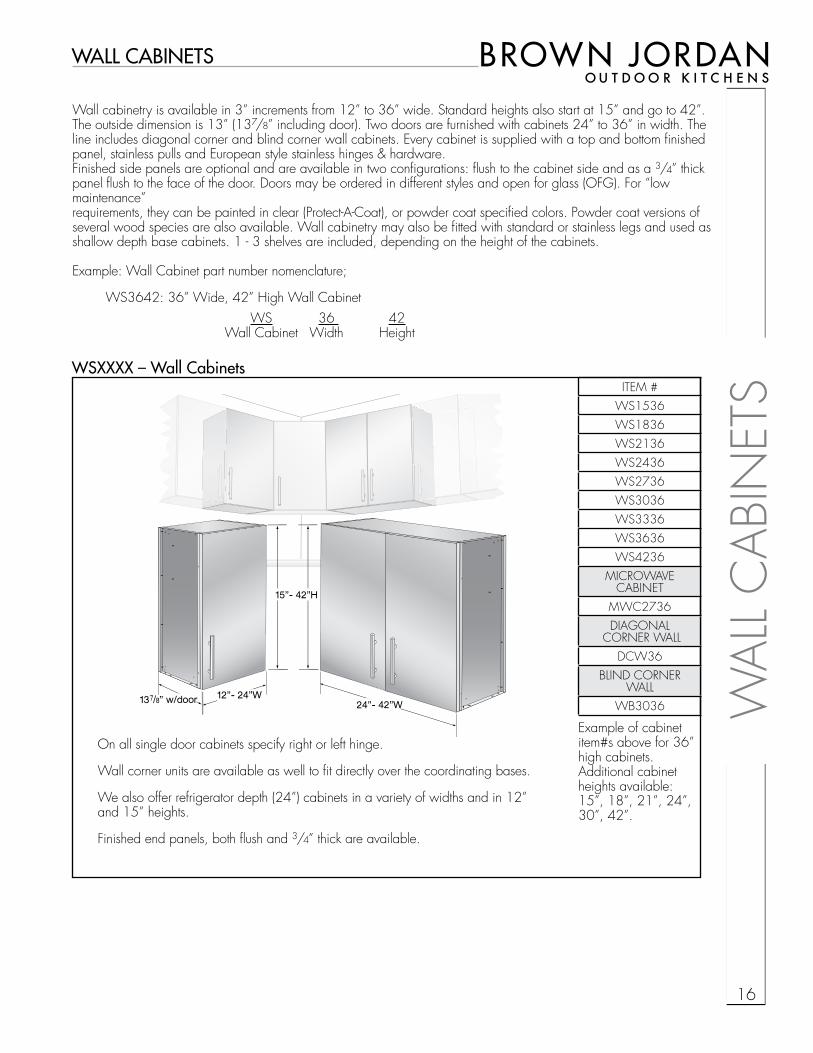
ITEM #WS1536WS1836WS2136WS2436WS2736WS3036WS3336WS3636WS4236
MICROWAVE CABINET
MWC2736DIAGONAL
CORNER WALLDCW36
BLIND CORNER WALL
WB3036
Wall cabinetry is available in 3” increments from 12” to 36” wide. Standard heights also start at 15” and go to 42”. The outside dimension is 13” (137/8” including door). Two doors are furnished with cabinets 24” to 36” in width. The line includes diagonal corner and blind corner wall cabinets. Every cabinet is supplied with a top and bottom finished panel, stainless pulls and European style stainless hinges & hardware.Finished side panels are optional and are available in two configurations: flush to the cabinet side and as a 3/4” thick panel flush to the face of the door. Doors may be ordered in different styles and open for glass (OFG). For “low maintenance” requirements, they can be painted in clear (Protect-A-Coat), or powder coat specified colors. Powder coat versions of several wood species are also available. Wall cabinetry may also be fitted with standard or stainless legs and used as shallow depth base cabinets. 1 - 3 shelves are included, depending on the height of the cabinets.
Example: Wall Cabinet part number nomenclature;
WS3642: 36” Wide, 42” High Wall Cabinet WS 36 42 Wall Cabinet Width Height
WALL CABINETS
WSXXXX – Wall Cabinets
On all single door cabinets specify right or left hinge.
Wall corner units are available as well to fit directly over the coordinating bases.
We also offer refrigerator depth (24”) cabinets in a variety of widths and in 12” and 15” heights.
Finished end panels, both flush and 3/4” thick are available.
137/8” w/door 12”- 24”W
15”- 42”H
24”- 42”W
Example of cabinet item#s above for 36” high cabinets.Additional cabinet heights available: 15”, 18”, 21”, 24”, 30”, 42”.

®
ISLA
ND
CAB
INET
S
17
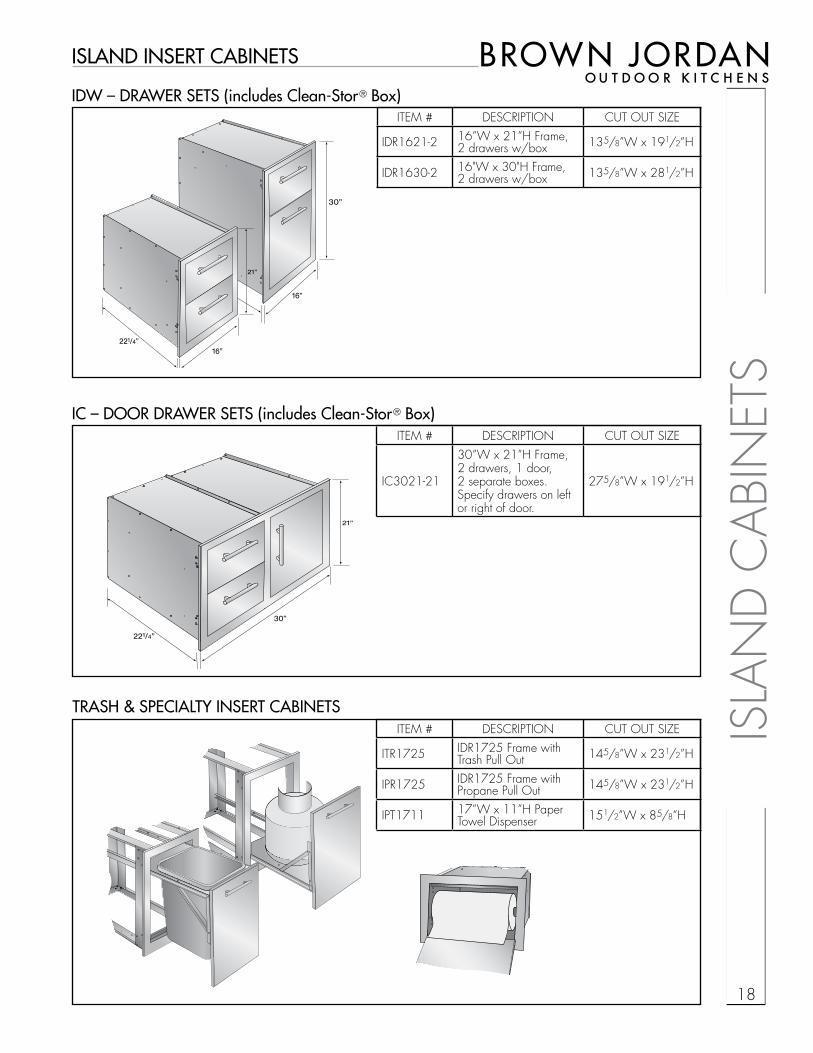
ISLAND INSERT CABINETS
ITEM # DESCRIPTION CUT OUT SIZE
IDR1725-1 17”W x 25”H Frame, One Flush Access Door 145/8”W x 231/2”H
IDR1621-1 16”W x 21”H Frame, One Flush Access Door 135/8”W x 191/2”H
IDR2121-1 21”W x 21”H Frame, One Flush Access Door 185/8”W x 191/2”H
IDR2721-2 27”W x 21”H Frame, Two Flush Access Doors 245/8”W x 191/2”H
IDR3021-2 30”W x 21”H Frame, Two Flush Access Doors 275/8”W x 191/2”H
IDR3025-2 30”W x 25”H Frame, Two Flush Access Doors 275/8”W x 231/2”H
IDR3621-2 36”W x 21”H Frame, Two Flush Access Doors 335/8”W x 191/2”H
IDR4221-2 42”W x 21”H Frame, Two Flush Access Doors 395/8”W x 191/2”H
277/8” w/door
21”
36”
Designers and builders of masonry island kitchens are now offered a complete line of door, drawer/door, drawer combinations and pullout cabinetry to construct a totally functional kitchen. The line features the optional Clean-Stor® box that attaches to door fronts to create useful storage and organization. The Clean-Stor® box eliminates the infamous “masonry black hole” that lurks behind access doors. The steel construction is superior to presently used insert materials that are subject to warping, rotting and mildew. The Clean-Stor® box comes with a shelf and provides clean dry storage.Doors exhibit the same stainless quality, “heft & weight” and solid close as the modular cabinetry line allowing additional design flexibility by using both lines to create the ideal kitchen while retaining a consistent “look”.The insert line includes: • One and Two Drawer Units • Door and Drawer Combination Units • One and Two Door (and frame) Units • Paper Towel Dispenser • Trash and Propane PulloutsAccess Door Inserts may be purchased with just the frame and doors or combined with the “Clean-Stor®” box as a complete unit.
IDR -ACCESS DOORS
Galvanized Storage Box to install behind frame (order at the same time as Access Doors), all Clean-Stor® boxes are 221/4” Deep
277/8” w/door
21”
36”
221/4”
CLEAN-STOR® BOX WITH SHELFITEM # DESCRIPTION
IDR1725-B Clean-Stor® storage box for IDR1725IDR1621-B Clean-Stor® storage box for IDR1621IDR2121-B Clean-Stor® storage box for IDR2121IDR2721-B Clean-Stor® storage box for IDR2721IDR3021-B Clean-Stor® storage box for IDR3021IDR3025-B Clean-Stor® storage box for IDR3025IDR3621-B Clean-Stor® storage box for IDR3621IDR4221-B Clean-Stor® storage box for IDR4221
®
277/8” w/door
30”
16”221/4”
ITEM # DESCRIPTION CUT OUT SIZE
IDR1621-2 16”W x 21”H Frame, 2 drawers w/box 135/8”W x 191/2”H
IDR1630-2 16"W x 30"H Frame, 2 drawers w/box 135/8”W x 281/2”H
21”
16”221/4”
IDW – DRAWER SETS (includes Clean-Stor® Box)
21”
30”
221/4”
IC – DOOR DRAWER SETS (includes Clean-Stor® Box)
TRASH & SPECIALTY INSERT CABINETS ISLA
ND
CAB
INET
S
18
ITEM # DESCRIPTION CUT OUT SIZE
IC3021-21
30”W x 21”H Frame, 2 drawers, 1 door, 2 separate boxes. Specify drawers on left or right of door.
275/8”W x 191/2”H
ITEM # DESCRIPTION CUT OUT SIZE
ITR1725 IDR1725 Frame with Trash Pull Out 145/8”W x 231/2”H
IPR1725 IDR1725 Frame with Propane Pull Out 145/8”W x 231/2”H
IPT1711 17”W x 11”H Paper Towel Dispenser 151/2”W x 85/8”H
277/8” w/door
277/8” w/door
277/8” w/door
ISLAND INSERT CABINETS
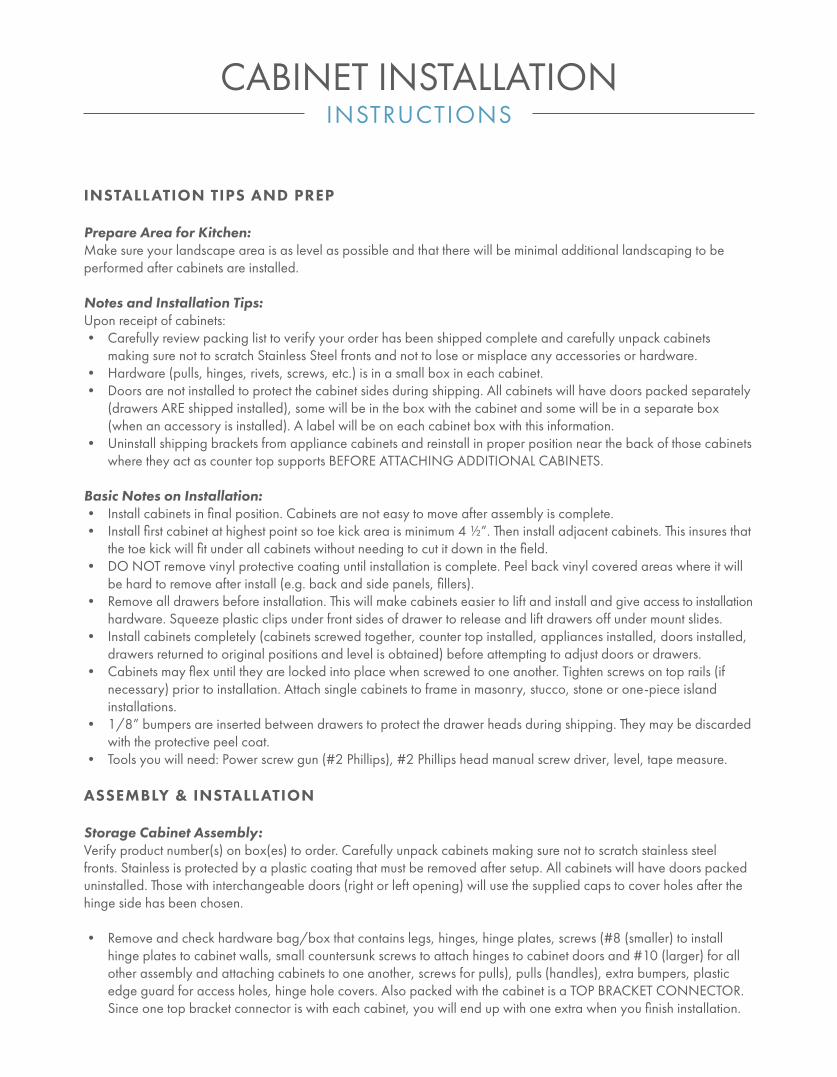
CABINET INSTALLATIONINSTRUCTIONS
INSTALLATION TIPS AND PREP
Prepare Area for Kitchen:Make sure your landscape area is as level as possible and that there will be minimal additional landscaping to be performed after cabinets are installed.
Notes and Installation Tips:Upon receipt of cabinets: • Carefully review packing list to verify your order has been shipped complete and carefully unpack cabinets
making sure not to scratch Stainless Steel fronts and not to lose or misplace any accessories or hardware.• Hardware (pulls, hinges, rivets, screws, etc.) is in a small box in each cabinet.• Doors are not installed to protect the cabinet sides during shipping. All cabinets will have doors packed separately
(drawers ARE shipped installed), some will be in the box with the cabinet and some will be in a separate box (when an accessory is installed). A label will be on each cabinet box with this information.
• Uninstall shipping brackets from appliance cabinets and reinstall in proper position near the back of those cabinets where they act as counter top supports BEFORE ATTACHING ADDITIONAL CABINETS.
Basic Notes on Installation:• Install cabinets in final position. Cabinets are not easy to move after assembly is complete.• Install first cabinet at highest point so toe kick area is minimum 4 ½”. Then install adjacent cabinets. This insures that
the toe kick will fit under all cabinets without needing to cut it down in the field.• DO NOT remove vinyl protective coating until installation is complete. Peel back vinyl covered areas where it will
be hard to remove after install (e.g. back and side panels, fillers).• Remove all drawers before installation. This will make cabinets easier to lift and install and give access to installation
hardware. Squeeze plastic clips under front sides of drawer to release and lift drawers off under mount slides.• Install cabinets completely (cabinets screwed together, counter top installed, appliances installed, doors installed,
drawers returned to original positions and level is obtained) before attempting to adjust doors or drawers.• Cabinets may flex until they are locked into place when screwed to one another. Tighten screws on top rails (if
necessary) prior to installation. Attach single cabinets to frame in masonry, stucco, stone or one-piece island installations.
• 1/8” bumpers are inserted between drawers to protect the drawer heads during shipping. They may be discarded with the protective peel coat.
• Tools you will need: Power screw gun (#2 Phillips), #2 Phillips head manual screw driver, level, tape measure.
ASSEMBLY & INSTALLATION
Storage Cabinet Assembly:Verify product number(s) on box(es) to order. Carefully unpack cabinets making sure not to scratch stainless steel fronts. Stainless is protected by a plastic coating that must be removed after setup. All cabinets will have doors packed uninstalled. Those with interchangeable doors (right or left opening) will use the supplied caps to cover holes after the hinge side has been chosen.
• Remove and check hardware bag/box that contains legs, hinges, hinge plates, screws (#8 (smaller) to install hinge plates to cabinet walls, small countersunk screws to attach hinges to cabinet doors and #10 (larger) for all other assembly and attaching cabinets to one another, screws for pulls), pulls (handles), extra bumpers, plastic edge guard for access holes, hinge hole covers. Also packed with the cabinet is a TOP BRACKET CONNECTOR. Since one top bracket connector is with each cabinet, you will end up with one extra when you finish installation.
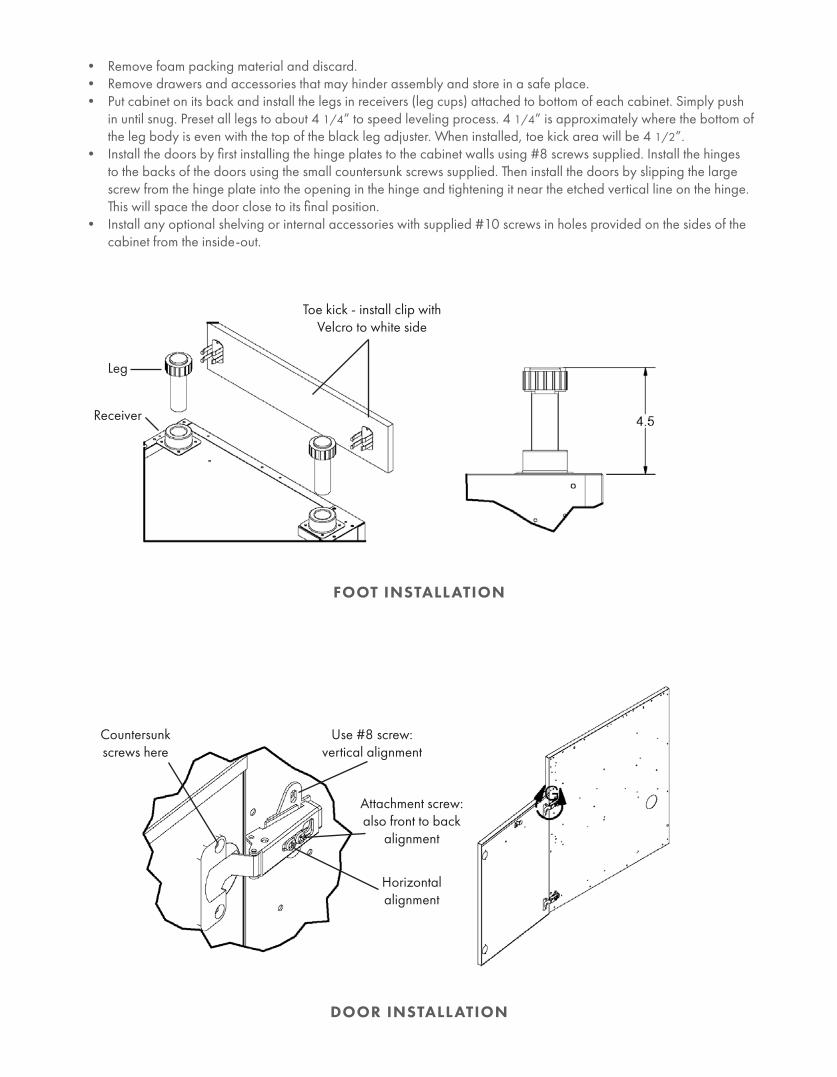
• Remove foam packing material and discard.• Remove drawers and accessories that may hinder assembly and store in a safe place.• Put cabinet on its back and install the legs in receivers (leg cups) attached to bottom of each cabinet. Simply push
in until snug. Preset all legs to about 4 1/4” to speed leveling process. 4 1/4” is approximately where the bottom of the leg body is even with the top of the black leg adjuster. When installed, toe kick area will be 4 1/2”.
• Install the doors by first installing the hinge plates to the cabinet walls using #8 screws supplied. Install the hinges to the backs of the doors using the small countersunk screws supplied. Then install the doors by slipping the large screw from the hinge plate into the opening in the hinge and tightening it near the etched vertical line on the hinge. This will space the door close to its final position.
• Install any optional shelving or internal accessories with supplied #10 screws in holes provided on the sides of the cabinet from the inside-out.
Toe kick - install clip with Velcro to white side
Leg
Receiver
Use #8 screw: vertical alignment
Attachment screw: also front to back
alignment
Horizontal alignment
Countersunk screws here
FOOT INSTALLATION
DOOR INSTALLATION
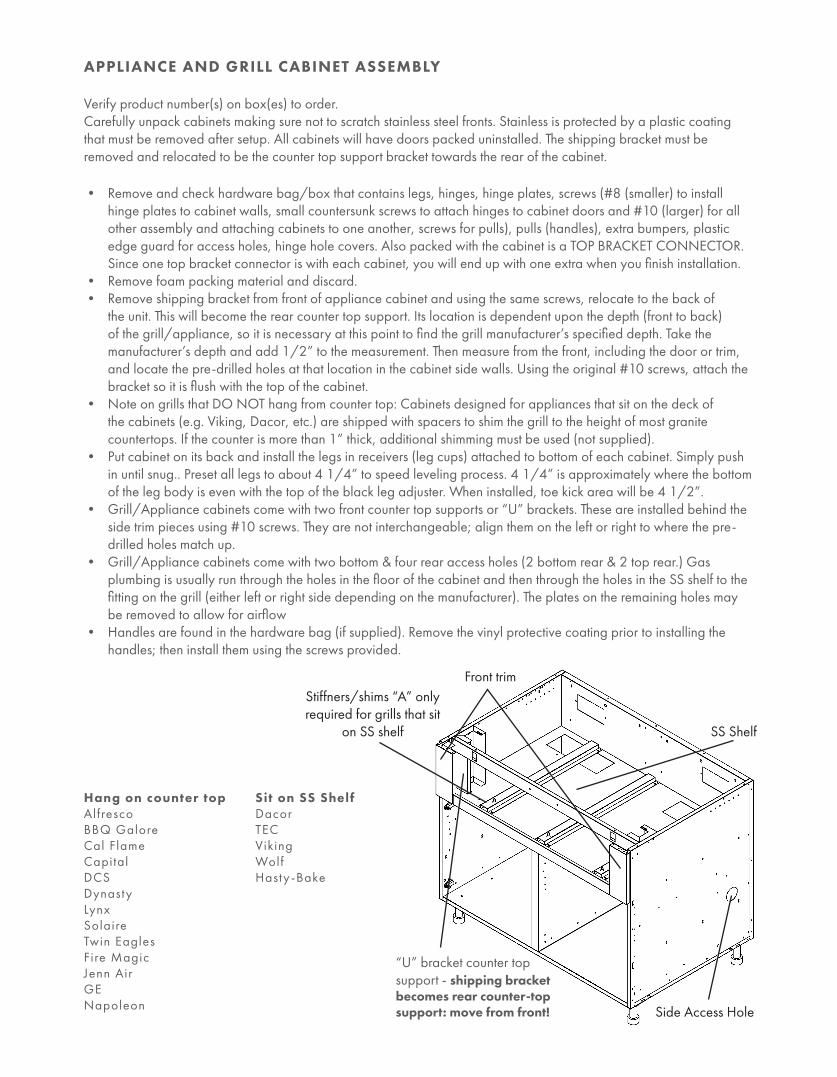
APPLIANCE AND GRILL CABINET ASSEMBLY
Verify product number(s) on box(es) to order.Carefully unpack cabinets making sure not to scratch stainless steel fronts. Stainless is protected by a plastic coating that must be removed after setup. All cabinets will have doors packed uninstalled. The shipping bracket must be removed and relocated to be the counter top support bracket towards the rear of the cabinet.
• Remove and check hardware bag/box that contains legs, hinges, hinge plates, screws (#8 (smaller) to install hinge plates to cabinet walls, small countersunk screws to attach hinges to cabinet doors and #10 (larger) for all other assembly and attaching cabinets to one another, screws for pulls), pulls (handles), extra bumpers, plastic edge guard for access holes, hinge hole covers. Also packed with the cabinet is a TOP BRACKET CONNECTOR. Since one top bracket connector is with each cabinet, you will end up with one extra when you finish installation.
• Remove foam packing material and discard.• Remove shipping bracket from front of appliance cabinet and using the same screws, relocate to the back of
the unit. This will become the rear counter top support. Its location is dependent upon the depth (front to back) of the grill/appliance, so it is necessary at this point to find the grill manufacturer’s specified depth. Take the manufacturer’s depth and add 1/2” to the measurement. Then measure from the front, including the door or trim, and locate the pre-drilled holes at that location in the cabinet side walls. Using the original #10 screws, attach the bracket so it is flush with the top of the cabinet.
• Note on grills that DO NOT hang from counter top: Cabinets designed for appliances that sit on the deck of the cabinets (e.g. Viking, Dacor, etc.) are shipped with spacers to shim the grill to the height of most granite countertops. If the counter is more than 1” thick, additional shimming must be used (not supplied).
• Put cabinet on its back and install the legs in receivers (leg cups) attached to bottom of each cabinet. Simply push in until snug.. Preset all legs to about 4 1/4” to speed leveling process. 4 1/4” is approximately where the bottom of the leg body is even with the top of the black leg adjuster. When installed, toe kick area will be 4 1/2”.
• Grill/Appliance cabinets come with two front counter top supports or “U” brackets. These are installed behind the side trim pieces using #10 screws. They are not interchangeable; align them on the left or right to where the pre-drilled holes match up.
• Grill/Appliance cabinets come with two bottom & four rear access holes (2 bottom rear & 2 top rear.) Gas plumbing is usually run through the holes in the floor of the cabinet and then through the holes in the SS shelf to the fitting on the grill (either left or right side depending on the manufacturer). The plates on the remaining holes may be removed to allow for airflow
• Handles are found in the hardware bag (if supplied). Remove the vinyl protective coating prior to installing the handles; then install them using the screws provided.
Side Access Hole
SS Shelf
Stiffners/shims “A” only required for grills that sit
on SS shelf
Front trim
“U” bracket counter top support - shipping bracket becomes rear counter-top support: move from front!
Hang on counter topAlfrescoBBQ GaloreCal FlameCapitalDCSDynastyLynxSolaireTwin EaglesFire MagicJenn AirGENapoleon
Sit on SS ShelfDacorTECVikingWolfHasty -Bake

CABINET INSTALLATION/JOINING CABINETS
• Place cabinet(s) in approximate final position. Use the cabinet that would be on the highest ground to set the height first and allow at least 4 1/2” of toe kick height. This will insure that the toe kick will fit.
Tip: If kitchen space is fairly level, place grill cabinet first since it is the most difficult to move around.
• Partially install #10 screws in Easy-Alignment holes (2nd from bottom on front and rear flange) on right side of cabinet. These will slip into the “dog bone” alignment holes on the left side of the adjacent cabinet.
• Using the adjustable legs, level cabinet in all directions, remembering to keep the 4 1/2” leg height for the toe kick.• Begin installing cabinets adjacent to the first level cabinet: If working to the left, tip and lift adjacent cabinet so the
Easy-Alignment screws slip into the “dog bone” alignment slots on the left side of the first cabinet flange. If working to the right, tip and lift so the dog bone slot slips over the partially installed screw. Make all cabinets close to level and use legs to align the cabinets. Tighten front alignment screw from inside access hole on left side when cabinets are aligned with each other. Then install top bracket connector with supplied screws.
Tip: If cabinets are installed in an island format where the back is accessible, you may tighten rear alignment screw at back flange. If installed against a wall or the back is otherwise inaccessible, rear tightening is not necessary.
• Continue installation in the same fashion for all cabinets. Make sure all legs are touching the ground and supporting the cabinet’s weight.
• Install the doors by first installing the hinge plates to the cabinet walls using #8 screws supplied. Install the hinges to the backs of the doors using the small countersunk screws supplied. Then install the doors by slipping the large screw from the hinge plate into the opening in the hinge and tightening it near the etched vertical line on the hinge. This will space the door close to its final position. TIP: Use a straight edge across both hinges to align them before screwing them in.
• Cabinet doors must only be adjusted when cabinets are level in final position! There are two adjustment screws on the hinge receiver and the hinge plate mounting screws allow for up and down movement. Trying to adjust doors too soon is a waste of time.
1. The front screw is used to center the door in the opening. Turning the front screws in or out will center the door over the cabinet opening.
2. The back screw is used to align the front of the door with the cabinet frame and secure the door to the cabinet. Slightly loosen the screw and slide door in or out. Re-tighten the screw to secure the door.
3. Loosen the hinge plate mounting screws and slide the hinge plates up or down for further adjustment. Re-tighten the screws.
top bracket
#10 screw: 1 front 1 rear
dog bone
flange
• Install 2 screws in right flange of left cabinet (2nd hole up), Do Not tighten; screw half way in
• Tip & lift either cabinet over screw heads through “Dog Bone” hole
• LEVEL CABINETS TOGETHER• Tighten 2 screws from Step 1 through
access holes (Inside Cabinet)• Place top bracket over sides of adjacent
cabinets; slide bracket front to rear until 4 holes align and install 4 #10 screws
• Cabinets should now be firmly attached
JOINING CABINETS
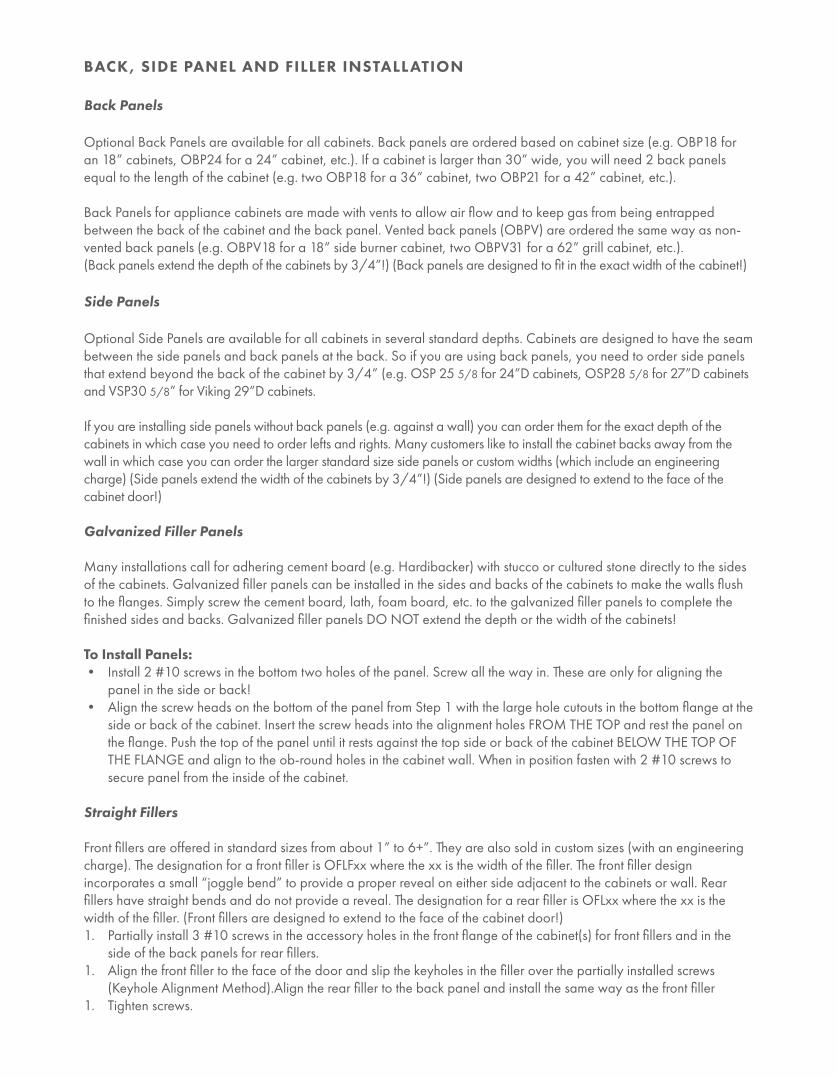
BACK, SIDE PANEL AND FILLER INSTALLATION
Back Panels
Optional Back Panels are available for all cabinets. Back panels are ordered based on cabinet size (e.g. OBP18 for an 18” cabinets, OBP24 for a 24” cabinet, etc.). If a cabinet is larger than 30” wide, you will need 2 back panels equal to the length of the cabinet (e.g. two OBP18 for a 36” cabinet, two OBP21 for a 42” cabinet, etc.).
Back Panels for appliance cabinets are made with vents to allow air flow and to keep gas from being entrapped between the back of the cabinet and the back panel. Vented back panels (OBPV) are ordered the same way as non-vented back panels (e.g. OBPV18 for a 18” side burner cabinet, two OBPV31 for a 62” grill cabinet, etc.).(Back panels extend the depth of the cabinets by 3/4”!) (Back panels are designed to fit in the exact width of the cabinet!)
Side Panels
Optional Side Panels are available for all cabinets in several standard depths. Cabinets are designed to have the seam between the side panels and back panels at the back. So if you are using back panels, you need to order side panels that extend beyond the back of the cabinet by 3/4” (e.g. OSP 25 5/8 for 24”D cabinets, OSP28 5/8 for 27”D cabinets and VSP30 5/8” for Viking 29”D cabinets.
If you are installing side panels without back panels (e.g. against a wall) you can order them for the exact depth of the cabinets in which case you need to order lefts and rights. Many customers like to install the cabinet backs away from the wall in which case you can order the larger standard size side panels or custom widths (which include an engineering charge) (Side panels extend the width of the cabinets by 3/4”!) (Side panels are designed to extend to the face of the cabinet door!)
Galvanized Filler Panels
Many installations call for adhering cement board (e.g. Hardibacker) with stucco or cultured stone directly to the sides of the cabinets. Galvanized filler panels can be installed in the sides and backs of the cabinets to make the walls flush to the flanges. Simply screw the cement board, lath, foam board, etc. to the galvanized filler panels to complete the finished sides and backs. Galvanized filler panels DO NOT extend the depth or the width of the cabinets!
To Install Panels:• Install 2 #10 screws in the bottom two holes of the panel. Screw all the way in. These are only for aligning the
panel in the side or back!• Align the screw heads on the bottom of the panel from Step 1 with the large hole cutouts in the bottom flange at the
side or back of the cabinet. Insert the screw heads into the alignment holes FROM THE TOP and rest the panel on the flange. Push the top of the panel until it rests against the top side or back of the cabinet BELOW THE TOP OF THE FLANGE and align to the ob-round holes in the cabinet wall. When in position fasten with 2 #10 screws to secure panel from the inside of the cabinet.
Straight Fillers
Front fillers are offered in standard sizes from about 1” to 6+”. They are also sold in custom sizes (with an engineering charge). The designation for a front filler is OFLFxx where the xx is the width of the filler. The front filler design incorporates a small “joggle bend” to provide a proper reveal on either side adjacent to the cabinets or wall. Rear fillers have straight bends and do not provide a reveal. The designation for a rear filler is OFLxx where the xx is the width of the filler. (Front fillers are designed to extend to the face of the cabinet door!)1. Partially install 3 #10 screws in the accessory holes in the front flange of the cabinet(s) for front fillers and in the
side of the back panels for rear fillers.1. Align the front filler to the face of the door and slip the keyholes in the filler over the partially installed screws
(Keyhole Alignment Method).Align the rear filler to the back panel and install the same way as the front filler1. Tighten screws.

Angle Fillers
Angle fillers are offered standard in 90 degree (OAF90 for front, OAR90 for rear) and 45 degree (OAF45, OAR45) with 4” on either side of the angle. Custom sizes are available (with an engineering charge).The front angle fillers are installed the same as straight fillers using the Keyhole Alignment Method. The rear angle fillers (OARxx) include an angled post with adjustable leg and 2 panels to fill a corner void where counter top support is required. For rear angle fillers:
1. Partially install 3 #10 screws in the holes on each side of the angled post.1. Partially install 3 #10 screws in the accessory holes on the rear flange of the cabinet(s) or, if using back panels, in
the 3 holes in the side of the back panels installed on the adjacent cabinets. 1. Install the panels using the Keyhole Alignment Method described earlier.
Refrigerator Accessory Panels
Depending on the layout, you may require Brown Jordan Outdoor Kitchens accessories to complete the installation of refrigerators in the outdoor kitchen.
1. If you are building a freestanding island with Brown Jordan Outdoor Kitchens back panels, you will needRefrigerator Spacers of the appropriate size to match the refrigerator’s width (ORS15, ORS24, ORS27). These are screwed to the back panels on the adjacent cabinets using the Keyhole Alignment Method. The spacer acts as the back panel behind the refrigerator.
1. If you are installing two refrigeration appliances (e.g. refrigerator and ice maker or freezer or beer dispenser) nextto each other in a freestanding island installation, most designers prefer to install a support member between theappliances on which to rest the counter top, and to provide a better visual appearance. A Box Column (OBX--37/8” wide and has two leveling legs) of the appropriate depth to match the cabinets is designed for this purpose.It is installed between the two refrigerator spacers at the back using the Keyhole Alignment Method and creates 2spaces for the appliances.
1. If you are installing refrigerators against a wall or in a surround or enclosure made of stone, stucco brick, etc.many installers are choosing to install the Refrigerator Spacers (ORS) to “define” the refrigerator space moreprecisely than just installing adjacent cabinets and leaving a “hole”. The same is true with Box Columns (OBX)where 2 refrigeration devices are installed next to each other in a surround.
1. If the refrigerator will be at the end of a cabinet run and you plan to use a stainless side panel and/or backpanels, then in addition to the refrigerator spacer, you will need a Refrigerator End Panel (ORP--3 7/8” wide andhas two leveling legs) of the appropriate depth. The difference between the ORP and the OBX is that the ORP iscompletely finished on one side with access holes on the other side and the OBX is finished on the front and backwith access holes on both sides. The Keyhole Alignment Method is used to screw the ORP to the refrigerator spacer(ORS) and the spacer to the adjacent cabinet. (See Sample Layouts Drawing)
1. If the refrigerator will be on one side of a corner and an OAF (front angle filler) will be used, an OBX will need tobe incorporated into the design along with a special version of the OAF, the OAF Front Only. In this instance theOAF Front Only will mount in front of the OBX by aligning the screw holes at the front of the OBX with the holes inthe OAF but at the back of the OAF. Everything else installs as described earlier. (See Sample Layouts Drawing)
1. A 4” trim piece (OCT4) is available to finish the inside of a refrigerator space 4” in from the front. These are usedso when the refrigerator is opened the normally unfinished side of a cabinet is not seen. They are installed usingblack plastic push rivets that require no tools. Simply line up the holes in the OCT4 to the accessory holes in thefront flange of the cabinet and push the rivets in.
REINSTALLING DRAWERS
1. Reinstall drawers by pulling out the slides and putting the drawer on top of the slides. At the same time, hold one ofthe slides at the back and push the drawer so it locks into place. Repeat with the other side. Test drawer by openingand closing. Install bumpers at 4 corners at the back of the drawer face, if necessary.
1. Adjust drawer face by loosening and retightening as necessary the 2 or 4 screws on plate at inside face of drawer.
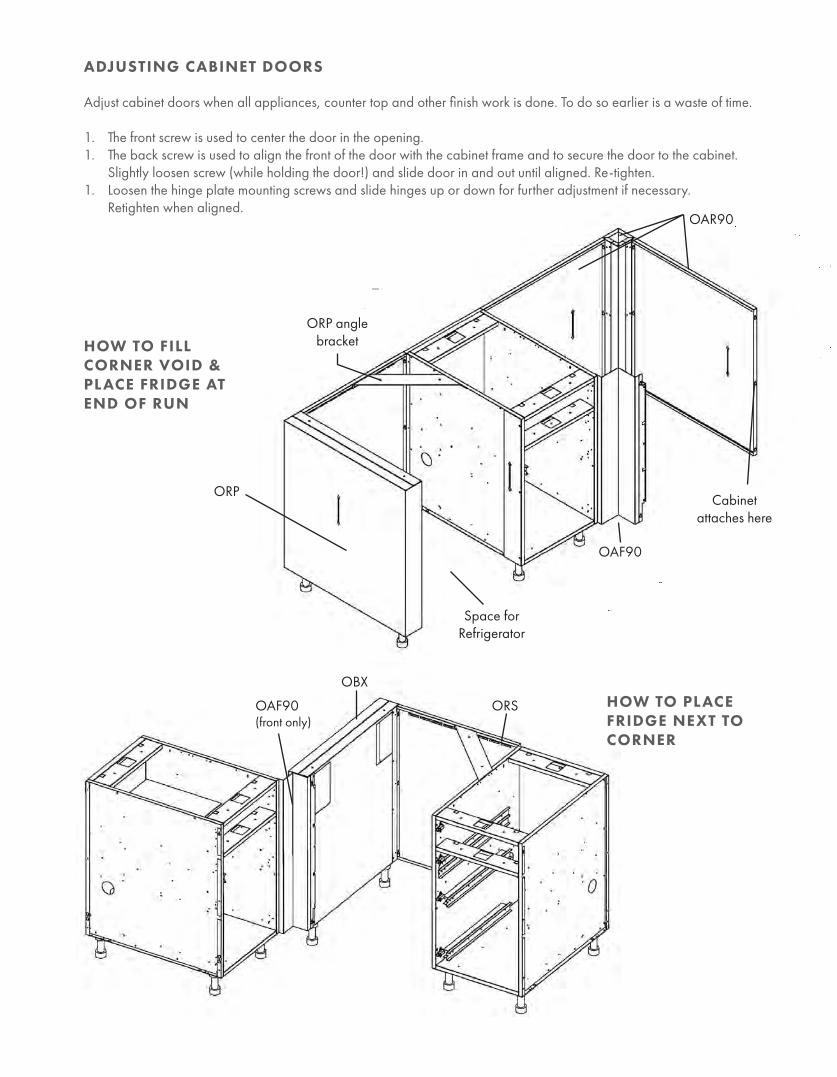
ADJUSTING CABINET DOORS
Adjust cabinet doors when all appliances, counter top and other finish work is done. To do so earlier is a waste of time.
1. The front screw is used to center the door in the opening.1. The back screw is used to align the front of the door with the cabinet frame and to secure the door to the cabinet.
Slightly loosen screw (while holding the door!) and slide door in and out until aligned. Re-tighten.1. Loosen the hinge plate mounting screws and slide hinges up or down for further adjustment if necessary.
Retighten when aligned.
HOW TO FILL CORNER VOID & PLACE FRIDGE AT END OF RUN
ORP
ORP angle bracket
Space for Refrigerator
ORS
OBX
OAF90(front only)
Cabinet attaches here
OAF90
OAR90
HOW TO PLACE FRIDGE NEXT TO CORNER
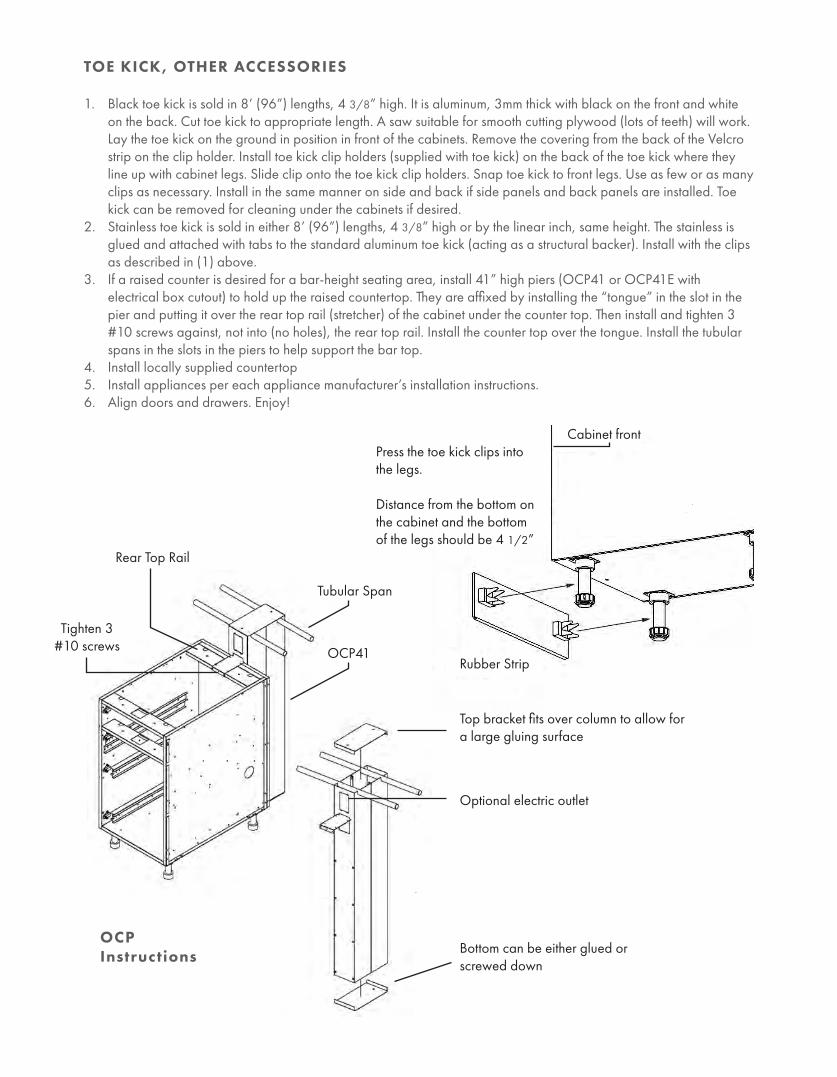
TOE KICK, OTHER ACCESSORIES
1. Black toe kick is sold in 8’ (96”) lengths, 4 3/8” high. It is aluminum, 3mm thick with black on the front and white on the back. Cut toe kick to appropriate length. A saw suitable for smooth cutting plywood (lots of teeth) will work. Lay the toe kick on the ground in position in front of the cabinets. Remove the covering from the back of the Velcro strip on the clip holder. Install toe kick clip holders (supplied with toe kick) on the back of the toe kick where they line up with cabinet legs. Slide clip onto the toe kick clip holders. Snap toe kick to front legs. Use as few or as many clips as necessary. Install in the same manner on side and back if side panels and back panels are installed. Toe kick can be removed for cleaning under the cabinets if desired.
2. Stainless toe kick is sold in either 8’ (96”) lengths, 4 3/8” high or by the linear inch, same height. The stainless is glued and attached with tabs to the standard aluminum toe kick (acting as a structural backer). Install with the clips as described in (1) above.
3. If a raised counter is desired for a bar-height seating area, install 41” high piers (OCP41 or OCP41E with electrical box cutout) to hold up the raised countertop. They are affixed by installing the “tongue” in the slot in the pier and putting it over the rear top rail (stretcher) of the cabinet under the counter top. Then install and tighten 3 #10 screws against, not into (no holes), the rear top rail. Install the counter top over the tongue. Install the tubular spans in the slots in the piers to help support the bar top.
4. Install locally supplied countertop5. Install appliances per each appliance manufacturer’s installation instructions.6. Align doors and drawers. Enjoy!
Press the toe kick clips into the legs.
Distance from the bottom on the cabinet and the bottom of the legs should be 4 1/2”
Cabinet front
Rubber Strip
Tubular Span
OCP41
Rear Top Rail
Tighten 3#10 screws
Top bracket fits over column to allow for a large gluing surface
Optional electric outlet
Bottom can be either glued or screwed down
OCPInstructions
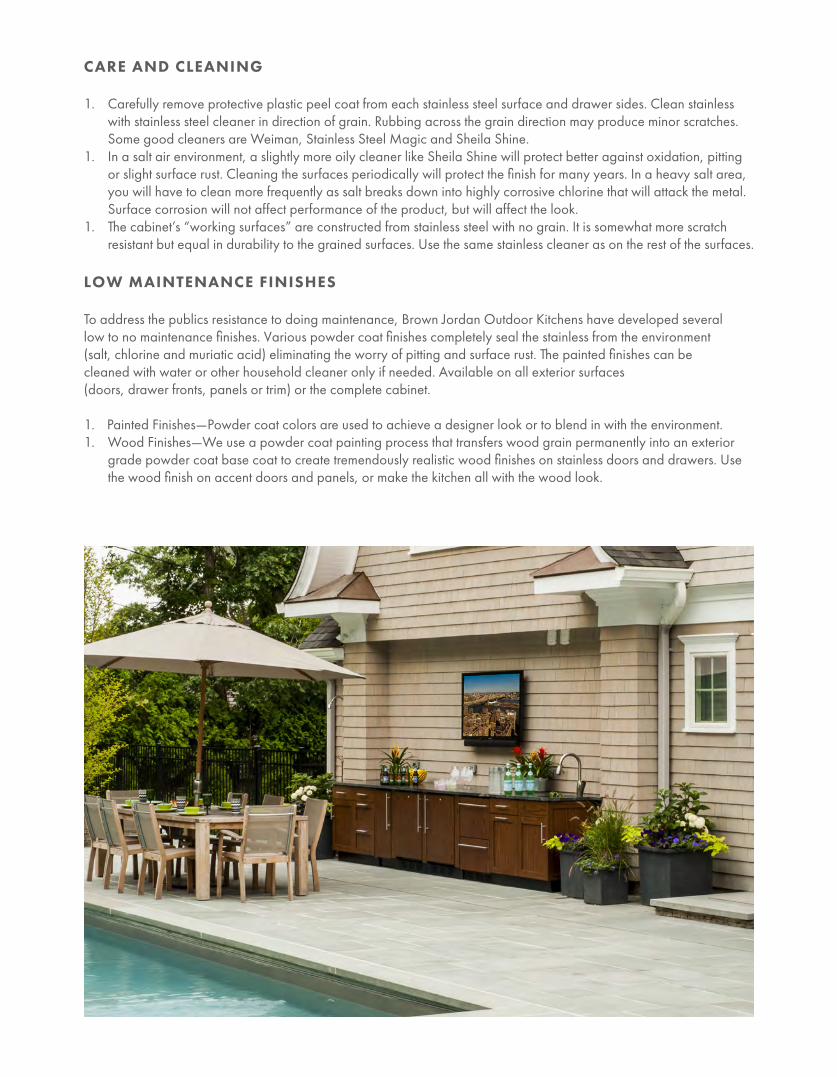
CARE AND CLEANING
1. Carefully remove protective plastic peel coat from each stainless steel surface and drawer sides. Clean stainlesswith stainless steel cleaner in direction of grain. Rubbing across the grain direction may produce minor scratches.Some good cleaners are Weiman, Stainless Steel Magic and Sheila Shine.
1. In a salt air environment, a slightly more oily cleaner like Sheila Shine will protect better against oxidation, pittingor slight surface rust. Cleaning the surfaces periodically will protect the finish for many years. In a heavy salt area,you will have to clean more frequently as salt breaks down into highly corrosive chlorine that will attack the metal.Surface corrosion will not affect performance of the product, but will affect the look.
1. The cabinet’s “working surfaces” are constructed from stainless steel with no grain. It is somewhat more scratchresistant but equal in durability to the grained surfaces. Use the same stainless cleaner as on the rest of the surfaces.
LOW MAINTENANCE FINISHES
To address the publics resistance to doing maintenance, Brown Jordan Outdoor Kitchens have developed several low to no maintenance finishes. Various powder coat finishes completely seal the stainless from the environment (salt, chlorine and muriatic acid) eliminating the worry of pitting and surface rust. The painted finishes can be cleaned with water or other household cleaner only if needed. Available on all exterior surfaces (doors, drawer fronts, panels or trim) or the complete cabinet.
1. Painted Finishes—Powder coat colors are used to achieve a designer look or to blend in with the environment.1. Wood Finishes—We use a powder coat painting process that transfers wood grain permanently into an exterior
grade powder coat base coat to create tremendously realistic wood finishes on stainless doors and drawers. Usethe wood finish on accent doors and panels, or make the kitchen all with the wood look.
OUTDOOR CABINETRYWARRANTY
Brown Jordan Outdoor Kitchens hereby warrants to the original consumer purchaser that its outdoor cabinets and related products and accessories are free from manufacturing defects and workmanship for the useful lifetime of the product. This warranty is not transferable and is for residential applications only. This warranty does not apply in the case of normal wear and tear, accidental misuse, abuse, or negligence, product modification, improper storage or improper installation. This warranty is expressly limited to repair or replacement of the defective part at the discretion of Brown Jordan Outdoor Kitchens and does not include expenses incurred in the removal, shipment or installation for removal or replacement. This warranty applies only to cabinets or related products purchased through an authorized Brown Jordan Outdoor Kitchens dealer. This warranty is in lieu of all other implied or expressed warranties. Surface corrosion and discoloration is not covered under warranty but can be minimized or eliminated with care and cleaning.
The drawer slides were chosen for strength and durability with use. They have been treated to withstand the elements, but their warranty is limited to two (2) years. Replacements are available if necessary.
Brown Jordan Outdoor Kitchens reserves the right to make changes in design, construction materials and prices as conditions require and as improvements are developed, without obligation to incorporate such changes in cabinetry or related products previously manufactured by Brown Jordan Outdoor Kitchens.
All implied warranties, including the warranties of merchantability and of fitness for a particular purpose, are limited in duration to the period of the express warranty stated above. In no event shall Brown Jordan Outdoor Kitchens be liable for incidental or consequential damage.
Some states do not allow the exclusion or limitation of incidental or consequential damages, so the above limitations and exclusion may not apply to some purchasers.
This warranty gives you specific legal rights. You may have other rights, which vary from state to state.
Claims – all claims for defective cabinets or related products must be submitted to Brown Jordan Outdoor Kitchens in writing and must specify the defects alleged to be present. Brown Jordan Outdoor Kitchens will, at its discretion, either repair or replace any defective cabinets or related products.
Stainless steel surfaces can be scratched and/or dented during normal use or installation. These marks are not covered as defective material or workmanship. Keep in mind that stainless steel needs periodic maintenance; more in harsh climates. All complaints about defective surface finishes must be inspected by an authorized representative of Brown Jordan Outdoor Kitchens prior to installation. Brown Jordan Outdoor Kitchens will not be responsible for any expense involved in removing or reinstalling cabinetry with a defective finish. Brown Jordan Outdoor Kitchens reserves the option of either approving field repair or returning the cabinetry or component to the factory for correction. If a field repair is possible, an accurate estimate of the cost must be obtained. No action can be taken without Brown Jordan Outdoor Kitchens’ authorization.
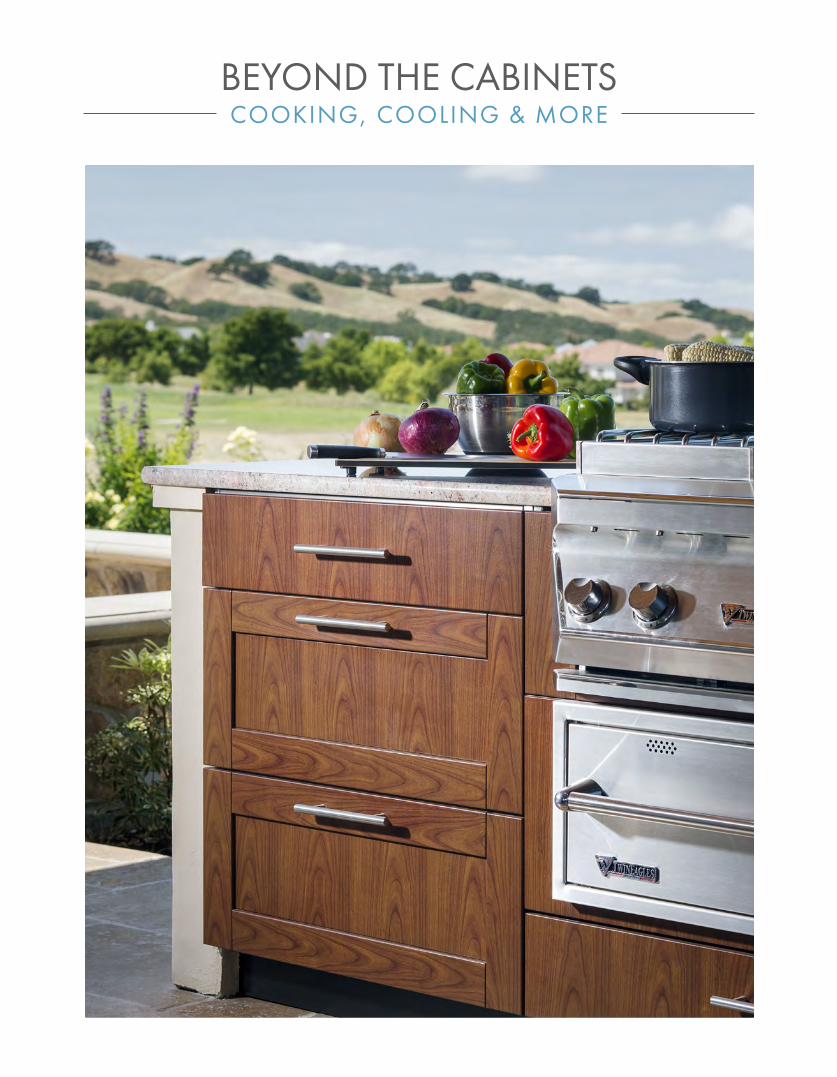
BEYOND THE CABINETSCOOKING, COOLING & MORE
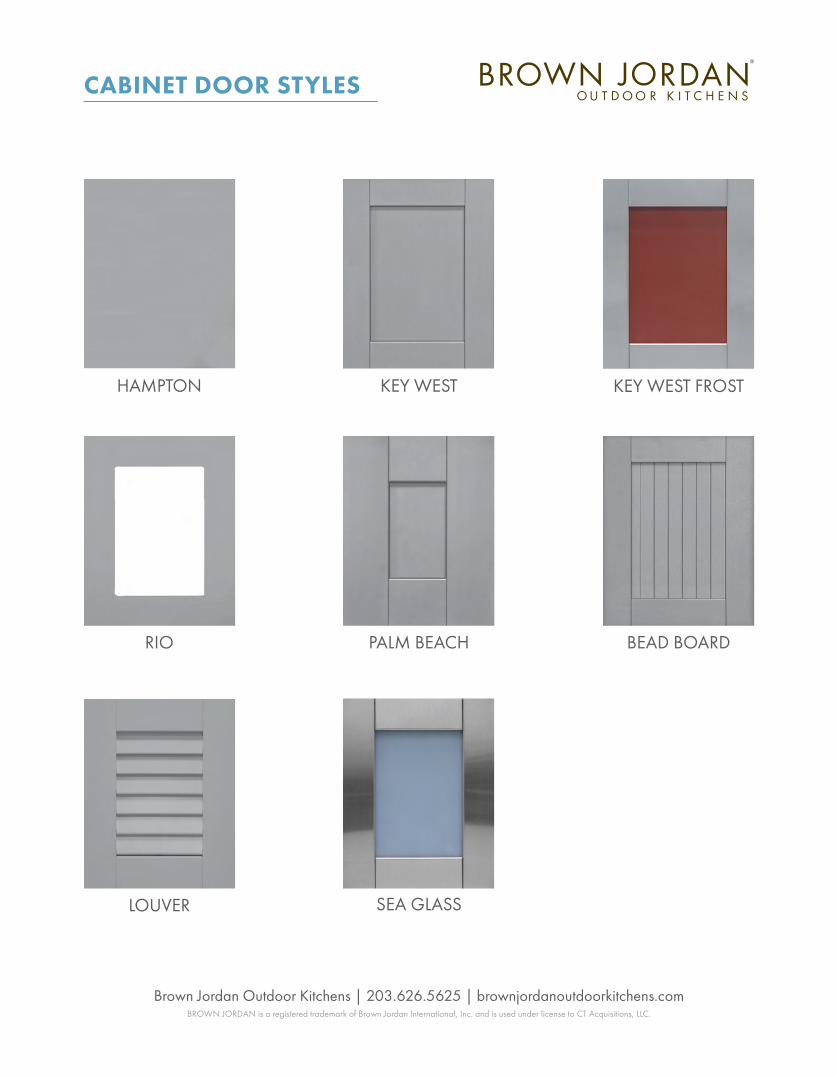
HAMPTON
PALM BEACH
KEY WEST KEY WEST FROST
BEAD BOARDRIO
LOUVER SEA GLASS
CABINET DOOR STYLES
Brown Jordan Outdoor Kitchens | 203.626.5625 | brownjordanoutdoorkitchens.com BROWN JORDAN is a registered trademark of Brown Jordan International, Inc. and is used under license to CT Acquisitions, LLC.
VERSAILLES WHITE LITE
LAUREL MICAJAVA II NIGHT
TITANIUMPLATINUM SEAFOAM METALLICPOMPEIIAN GOLD
BURLWOODBAMBOO CHERRY FLAMEAMERICAN MAPLE
SEAFOAM GREEN SEA GLASS INSERT
CLOUD WHITE SEA GLASS INSERT
SKY BLUE SEA GLASS INSERT
WHITE-WASHED WOOD
CHESTNUT DRIFT TABLE BEECH TEAK
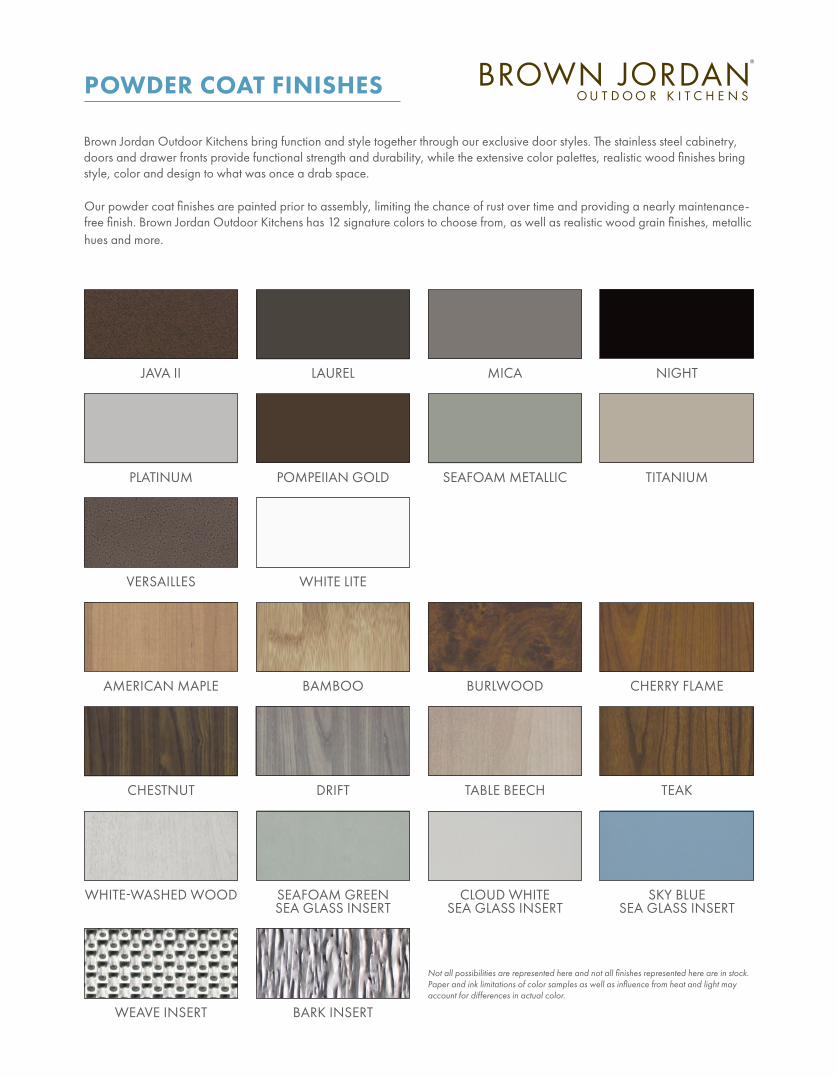
Brown Jordan Outdoor Kitchens bring function and style together through our exclusive door styles. The stainless steel cabinetry, doors and drawer fronts provide functional strength and durability, while the extensive color palettes, realistic wood finishes bring style, color and design to what was once a drab space.
Our powder coat finishes are painted prior to assembly, limiting the chance of rust over time and providing a nearly maintenance-free finish. Brown Jordan Outdoor Kitchens has 12 signature colors to choose from, as well as realistic wood grain finishes, metallic hues and more.
Not all possibilities are represented here and not all finishes represented here are in stock. Paper and ink limitations of color samples as well as influence from heat and light may account for differences in actual color.
BARK INSERTWEAVE INSERT
POWDER COAT FINISHES
COUNTERTOPS & BBQ HOODS
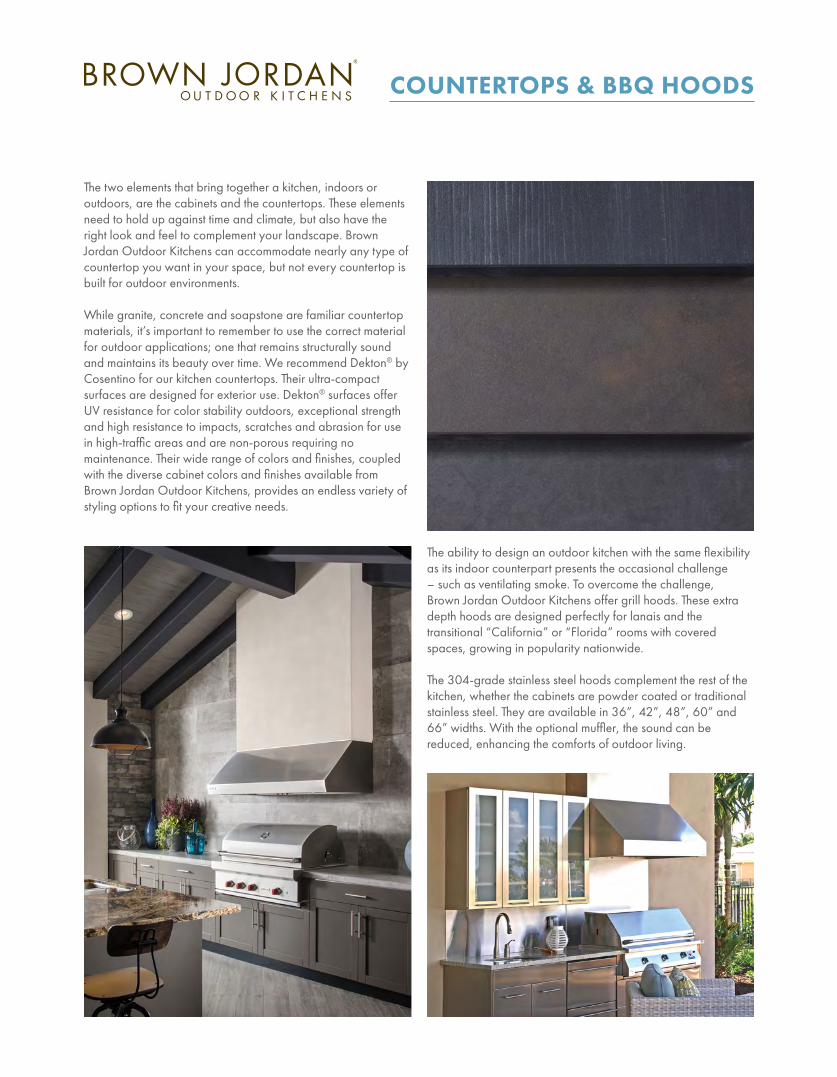
The two elements that bring together a kitchen, indoors or outdoors, are the cabinets and the countertops. These elements need to hold up against time and climate, but also have the right look and feel to complement your landscape. Brown Jordan Outdoor Kitchens can accommodate nearly any type of countertop you want in your space, but not every countertop is built for outdoor environments.
While granite, concrete and soapstone are familiar countertop materials, it’s important to remember to use the correct material for outdoor applications; one that remains structurally sound and maintains its beauty over time. We recommend Dekton® by Cosentino for our kitchen countertops. Their ultra-compact surfaces are designed for exterior use. Dekton® surfaces offer UV resistance for color stability outdoors, exceptional strength and high resistance to impacts, scratches and abrasion for use in high-traffic areas and are non-porous requiring no maintenance. Their wide range of colors and finishes, coupled with the diverse cabinet colors and finishes available from Brown Jordan Outdoor Kitchens, provides an endless variety of styling options to fit your creative needs.
The ability to design an outdoor kitchen with the same flexibility as its indoor counterpart presents the occasional challenge – such as ventilating smoke. To overcome the challenge, Brown Jordan Outdoor Kitchens offer grill hoods. These extra depth hoods are designed perfectly for lanais and the transitional “California” or “Florida” rooms with covered spaces, growing in popularity nationwide.
The 304-grade stainless steel hoods complement the rest of the kitchen, whether the cabinets are powder coated or traditional stainless steel. They are available in 36”, 42”, 48”, 60” and 66” widths. With the optional muffler, the sound can be reduced, enhancing the comforts of outdoor living.
COOKING/GRILLING
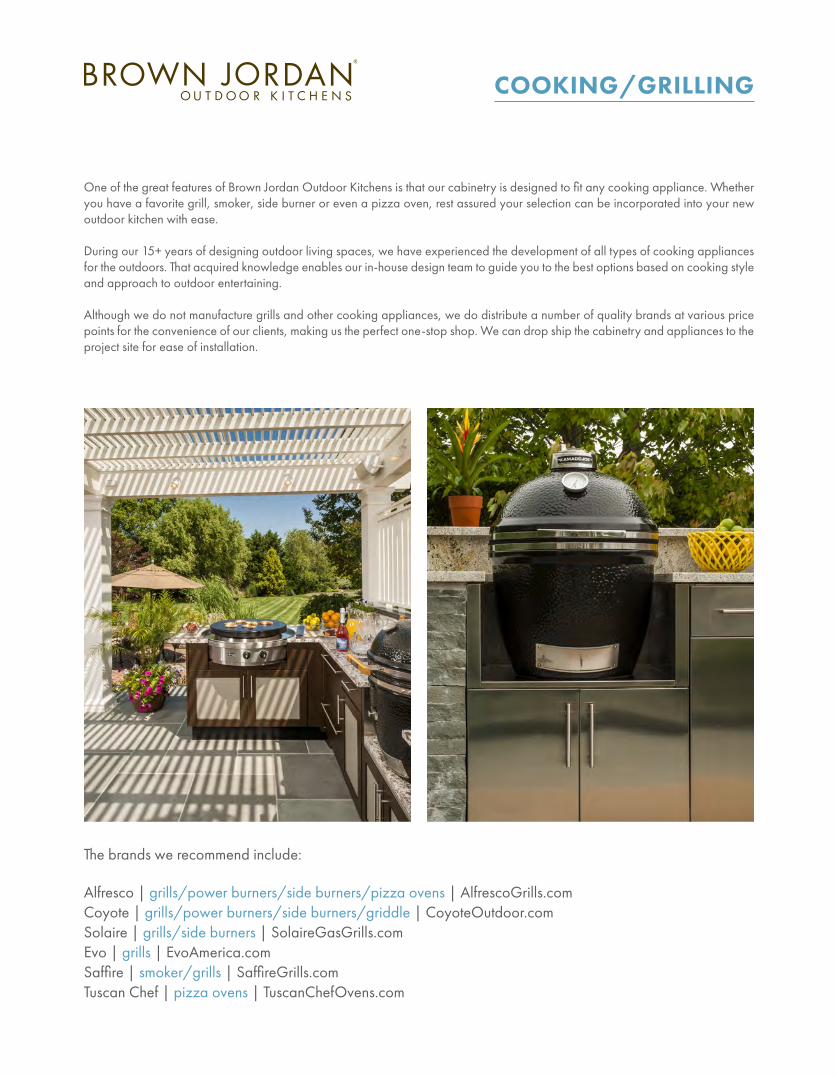
One of the great features of Brown Jordan Outdoor Kitchens is that our cabinetry is designed to fit any cooking appliance. Whether you have a favorite grill, smoker, side burner or even a pizza oven, rest assured your selection can be incorporated into your new outdoor kitchen with ease.
During our 15+ years of designing outdoor living spaces, we have experienced the development of all types of cooking appliances for the outdoors. That acquired knowledge enables our in-house design team to guide you to the best options based on cooking style and approach to outdoor entertaining.
Although we do not manufacture grills and other cooking appliances, we do distribute a number of quality brands at various price points for the convenience of our clients, making us the perfect one-stop shop. We can drop ship the cabinetry and appliances to the project site for ease of installation.
The brands we recommend include:
Alfresco | grills/power burners/side burners/pizza ovens | AlfrescoGrills.comCoyote | grills/power burners/side burners/griddle | CoyoteOutdoor.com Solaire | grills/side burners | SolaireGasGrills.comEvo | grills | EvoAmerica.comSaffire | smoker/grills | SaffireGrills.comTuscan Chef | pizza ovens | TuscanChefOvens.com
COOLING/BARTENDING
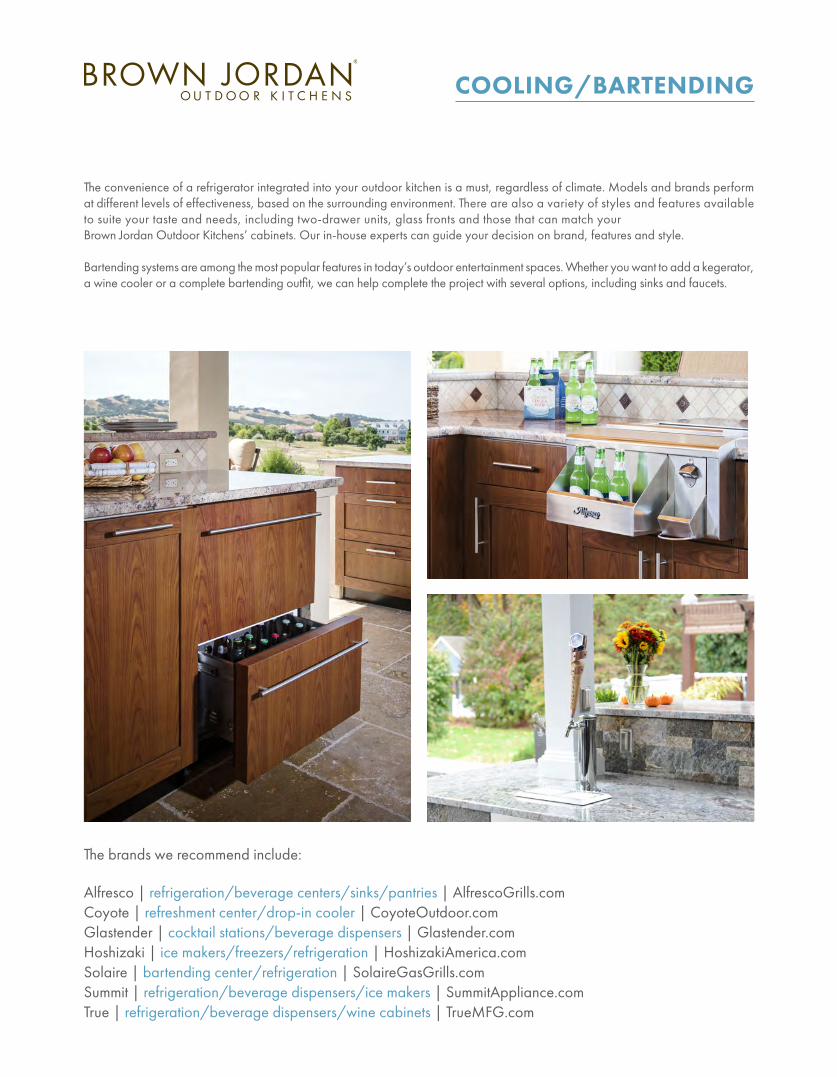
The convenience of a refrigerator integrated into your outdoor kitchen is a must, regardless of climate. Models and brands perform at different levels of effectiveness, based on the surrounding environment. There are also a variety of styles and features available to suite your taste and needs, including two-drawer units, glass fronts and those that can match your Brown Jordan Outdoor Kitchens’ cabinets. Our in-house experts can guide your decision on brand, features and style.
Bartending systems are among the most popular features in today’s outdoor entertainment spaces. Whether you want to add a kegerator, a wine cooler or a complete bartending outfit, we can help complete the project with several options, including sinks and faucets.
Alfresco | refrigeration/beverage centers/sinks/pantries | AlfrescoGrills.comCoyote | refreshment center/drop-in cooler | CoyoteOutdoor.comGlastender | cocktail stations/beverage dispensers | Glastender.comHoshizaki | ice makers/freezers/refrigeration | HoshizakiAmerica.comSolaire | bartending center/refrigeration | SolaireGasGrills.com Summit | refrigeration/beverage dispensers/ice makers | SummitAppliance.comTrue | refrigeration/beverage dispensers/wine cabinets | TrueMFG.com
The brands we recommend include:
Brown Jordan Outdoor Kitchens1 Grand Street, Wallingford, CT 06492brownjordanoutdoorkitchens.comPhone: 203.626.5625
Brown Jordan Outdoor Kitchens Contacts:
Name
Mitch Slater, President
Philip Zaleon, Marketing Director
Sharon DeManche, Office Manager
Clark Johnson, Inside Sales / Design
Denise Litchfield, Inside Sales / Design
Drew Fiondella, Inside Sales / Design
Samuel Slater, Administrative / Marketing
Ryan Drozd, Shipping & Administration, QAD
Elizabeth Vitali, Graphic Designer
Extension
142
141
140
150
153
147
148
100
157
ORDERING INSTRUCTIONS
Orders are to be faxed or emailed to: Clark Johnson, Denise Litchfield, Drew Fiondella or Ryan Drozd. Lead time on BJOK cabinetry orders is 4 weeks. Designer powder coat finishes do not require extra lead time. Custom components or cabinet modifications can add 1 week or more to the lead time. Please discuss with a sales associate. The lead time for orders requiring wood grain powder coat finishes is 6 – 8 weeks. BJOK requires a 50% deposit to enter the order for fabrication. The customer will then receive a QUOTE via e-mail or fax. HOWEVER, the lead time clock does not commence until the QUOTE is reviewed, signed, and returned; NOT WHEN THE DEPOSIT IS RECEIVED. The expect-ed ship date will be extended if a signed quote is not received. The order is put on the production floor when the signed quote and deposit is received. Changes to an order already on the production floor will most likely add to the lead time. Communicate changes as soon as possible! Changes to an order already in production will INCUR ADDITION-AL CHARGES and add to the lead time. Charges are as follows: 25% of the cabinet cost if the metal has been sheared, 50% of the cost if the metal has been punched, and the entire cabinet cost if it has been formed. BJOK requires the bal-ance of each order plus freight to be paid in full upon shipping unless other arrangements have been made. Customers may opt to ship using their trucking company or schedule to pick-up directly from our production facility. Deposits and balance/freight transactions may be made by credit card (Visa, MasterCard, American Express are accepted) or by check. We offer a 1% discount for total payment up front by check but not for payments made with a credit card. BJOK does not accept returns for cabinetry, cabinetry accessories (end panels, side panels, etc.), and appliances since these products are made to order.
Order Checklist: An order is not complete and cannot begin production until all questions below are answered by the customer.
1. Hinge direction: Confirm that hinge direction is listed on ALL one door cabinets, wall cabinets, andinserts. Wall cabinets 12”-24” only have 1 door! Single door hinge direction is most commonlyoverlooked detail on quotes.
2. Cabinets: Width and Style: Cabinet nomenclature relates to the cabinet type (Full Height door, Doorand Drawer, 3-Drawer or one of the appliance or specialty cabinets). Cabinets are OB (F, D, M, T) pluswidth, number of drawers and number of doors. For example, Full Height cabinets are OBF2101 (21”wide with no drawers and one door); Door/Drawer cabinets OBD1811 (18” wide with one drawer andone door); Three drawer cabinets OBM2430 (24” wide with three drawers and no doors; Trash PullsOBT 1810 (18” wide with one drawer and no doors- the trash pull is not considered separately).
• Depths: Cabinets are available in 24” and 27” depths. These are nominal numbers and with thedoor it adds 7/8”. So the actual dimensions are 24 7/8” and 27 7/8”. The standard depth is 277/8” so all cabinet names with no additional designation are 27 7/8” deep. 24” deep cabinetsneed the -24 designation like OBD2402-24.
• Appliances Cabinets: Appliances must be predetermined for ALL appliance cabinets. Without this,the trim kit cannot be determined for the cabinet. This is the complete list of all cabinets that requireappliance model #’s before ordering:
OGB (grill base)OGW (grill/warming drawer base and warming drawer only bases) OBB (burner base cabinet)OBC (bar tending center)OGC (Glastender specific)OBMW (base microwave cabinet)
“Deep” cabinets refer to a deeper cabinet shelf depth due to the height of the grill. The following grill manufacturers always require deep cabinets: Fire Magic, Twin Eagles, Wolf, Golden Blount, and Vidalia. Deep cabinets are designated with a “D” at the end of the cabinet name like this: 0GB3602D. Trim kits always follow the same format: OGTK - Grill brand->type->grill size->cabinet size.*
Ex: OGTK TWIN EAGLE->PB->24/27
The same applies to warming drawer trim: *OGWK - Warming drawer brand->warming drawer size->cabinet size.*
Ex: OGWK ALFR 30/36
3. Handles and handle holes: Hampton (slab) doors are assumed to have our standard stainless bar pullinstalled for BJOK. These handles are included in the cost of the cabinets. If the client does not want handle holes punched on base or wall units, this should be in the quote in ALL CAPS! The same applies to custom handle hole drilling (for a customer-supplied handle or optional BJOK handle). Custom drilling has a $25 PER HANDLE cost and requires a drawing of handle hole placement, otherwise the assumption is that handles are being drilled in our standard horizontal (Danver) or vertical (BJOK) locations. A handle option must be chosen before production because the doors are manufactured first.
4. Side Panels, Flush End Panels, Back Panels and Fillers: Check to make sure the proper side panels and fillersare listed on the quote. There are key differences between these panels.
• OSP - Side Panel, comes flush to the face of the door/drawer, 3/4” thick, they are sized for the exactdepth of the cabinets (OSP24 7/8” or OSP27 7/8”) or an extra 3/4” deep to cover the back panel wheninstalled (OSP25 5/8” or 0SP28 5/8”). Note: The seam for back panels is at the back! OFE Flush Endpanel doesn’t add anything to end of run. They are sized for the exact depth of the cabinets (0FE24 7/8”or 0FE27 7/8”)
• WFE - Wall Flush End panel, doesn’t add anything to end of run.• WFEP - Wall Finished End Panel, comes flush to the face of the door, 3/4” thick• OFLF - Front Filler with joggle bend to create reveal.• OFL - Rear filler, straight bend, no joggle.• OAF - Angle Front filler. Standard is 4” on left and 4” on right. 90 degree or 135 degree angle, custom
sizes available.• OAR - Angle Rear filler. If the OAF size is made at a custom size, the OAR size must be custom as well.
This part comes with 2 panels: THE PANELS MUST BE SELECTED ACCORDING TO WHERE THEY WILLATTACH (BACK PANELS, NO BACK PANELS, 1 BACK PANEL (THEN LEFT OR RIGHT)
• OBP - Back Panel. Used to cover unfinished back of cabinets. Designed to use 1 or 2 (on larger cabinets)per cabinet, so seams are at each cabinet. OBPV - Vented Back Panel. Used to cover unfinished back ofAPPLIANCE cabinets.
• OBPGF - Back Galvanized Filler Panel for applying a door, cement board, stone veneer, etc.• OFEGF - Side Galvanized Filler Panel for applying a door, cement board, stone veneer, etc.
5. Powder coat color: Standard colors only have a 25% upcharge, no set up charge. Custom colors have a$650 set up charge plus the 25% upcharge. Wood Powder Coat has a $950 set up charge, plus a 35%upcharge.
6. Shelves: Shelves are OPTIONAL in base cabinets. They come in 3 depths: 15”, and two full-depthoptions 24” and 27”. The designations are OSH with the width of the cabinet for a 15” deep one (e.g.OSH21 = 15” deep shelf for a 21” wide cabinet). For full-depth shelves you need to add the depth (e.g.OSH2124 or 0SH2127 = a 24” deep for a 21” wide cabinet or a 27” deep for a 21” wide cabinet). Theappropriate cabinet has to be ordered as discussed above (e.g. OBD21 11 for a 27” deep or OBD2111-24 for a 24” deep).
• Shelves are STANDARD in wall cabinets. Two or three depending on the height.
7. Multiple door styles: If a quote has door upgrades that do not apply to every cabinet on the order,just add one KW UPGRADE line. If part of the order is Key West, add the “KW” designation to eachindividual line where it applies.
• Applied Doors: Option to apply matching Key West, Palm Beach, Bead Board, or Louver doors as Sideand Back Panels. These are quoted separately and require a galvanized filler (either OFEGF or OBPGF)to install each door. The fabricated door is attached to the galvanized filler and then installed on the sidesor backs of cabinets for a custom look.
8. Leg Covering Options:• Toe Kick comes in two heights, 4 3/8” and 6”. It can be made in black anodized aluminum (OTK4
and OTK6)which can be chopped to size or ripped lengthwise in the field to address pitch on a patioor stainless steel (OTK4-SS and OTK6-SS) which is more difficult to work with in the field. Clips (forattaching to the legs) are included with a toe kick order. The clips are attached to the toe kick withaggressive double stick tape. TOE KICK IS SHIPPED SEPARATELY FROM THE CABINETS IN A TUBE TOPROTECT IT. A series of “splices” is provided to handle straight seam attachments and inside and outsidecorners.
• Leg Covers are square covers that cover just the leg where toe kick may not be called for (e.g. decks wherethe homeowner wants to blow leaves out from under the cabinets). They are available in the 4 3/8” heightonly and they attach to the legs with the same included clips as the toe kick. These may be painted to matchthe cabinets.
• Tapered Stainless Legs are available as a decorative leg (SSLeg). We build them so they can be paintedas well. These also come in ADA height (SSLeg-ADA) for ADA Outdoor Kitchen applications which we areseeing more and more frequently.
9. Dealing with Refrigerators: We make a refrigerator spacer (ORS) in several of the common refrigeratorwidths to create a space. The spacers are essentially back panels with vents for the refrigerator space.They attach to the flange on the rear side of the cabinets in pre-punched holes and to the sides of theback panels when they are installed.
When a refrigerator, beer dispenser, dishwasher, etc. is installed at the end of a cabinet run, we employa refrigerator end panel (ORP) to attach to the ORS to create the space for placement of the appliance aswell as to support the counter top. The ORP is 3 7/8” wide to place its legs at the same inbound dimensionas on the cabinets so the toe kick lines up. One side is finished. As with side panels (OSP), they come indimensions that match the depth of the cabinets (0RP24 7/8” or 0RP27 7/8”) or the cabinets plus the backpanels (0RP25 5/8” or ORP 28 5/8”). When a refrigerator, beer dispenser, dishwasher, etc. is installed on either side of a corner where an angle filler is incorporated (OAF), we employ a box column (OBX) that attaches to the back of one of the faces of the OAF to support the counter top as it enters the corner. The appliance then fits in the cavity with the counter supported by the OBX. The OBX is 3 7/8” wide like the ORP, but unlike the ORP, it is finished only at the front and back. The OBX is also frequently used to separate appliances that are placed next to each other (like a refrigerator and freezer) to create a more definite space for each appliance. As with side panels (OSP), they come in dimensions that match the depth of the cabinets (0BX24 7/8” or 0BX27 7/8”) or the cabinets plus the back panels (0BX25 5/8” or 0BX28 5/8”)
10. Wall units used as bases: If wall units are being used as base cabinets this must be noted in the line itemdescription so that the door size will be adjusted accordingly. A wall leg kit must also be added.
• Lead time on Brown Jordan Outdoor Kitchens cabinetry orders is 4 weeks. Production does notbegin until: 1) a finalized signed and dated Quotation is received confirming that the items listed onthe Quotation are correct, and 2) a 50% deposit is received via check or credit card. Once theserequirements are met, a Sales Acknowledgment will be e-mailed to the buyer as confirmation that theorder is now in the production queue. The “Ship by:” date is listed on the Sales Acknowledgment. Customcomponents or cabinet modifications can add 1 week or more to the lead time. Please discuss this withyour salesperson. Orders with wood grain powder coat have a lead time of 6-8 weeks.
• Brown Jordan Outdoor Kitchens can assist in the design of a project, but the content of the finalized orderis ultimately the responsibility of the buyer.
• Modifying an order in production will result in a flat $150.00 administrative fee.• Changes to an order already in production will INCUR ADDITIONAL CHARGES and add to the lead
time. Charges are as follows: 25% of the cabinet cost if the metal has been sheared, 50% of the cost ifthe metal has been punched, and the entire cabinet cost if it has been formed.
• Brown Jordan Outdoor Kitchens requires the balance of each order INCLUDING freight to be paid in fullbefore shipping, unless other arrangements have been made. Customers may also opt to ship using theirown trucking company or schedule a pick-up directly from our factory.
• Cabinet orders not shipped within 4 weeks of completion will incur a $100 MONTHLY STORAGECHARGE PER SKID.
• Brown Jordan Outdoor Kitchens does not accept returns for cabinetry, cabinetry accessories (endpanels, side panels, etc.), and appliances since these products are made to order. Floating shelves andkitchen carts may be returned in their original packaging at a restocking fee of 25% (authorization isrequired prior to return). The buyer is responsible for return shipping costs.
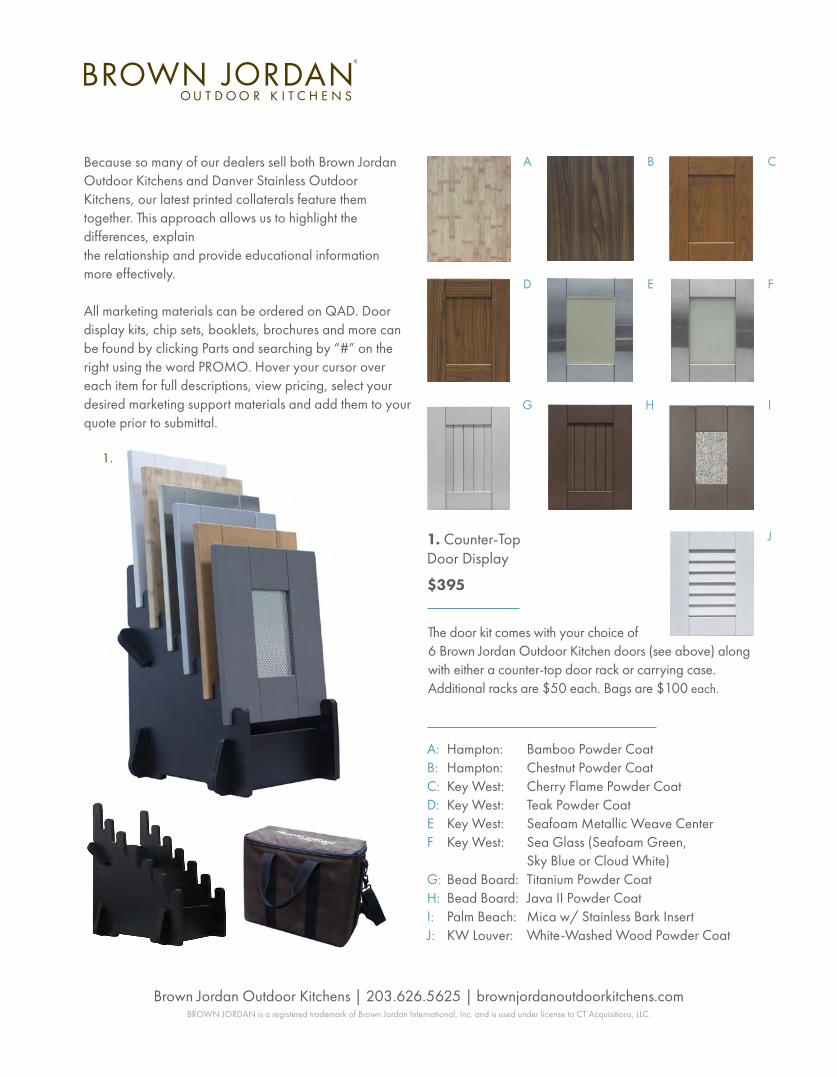
A: Hampton: Bamboo Powder CoatB: Hampton: Chestnut Powder CoatC: Key West: Cherry Flame Powder CoatD: Key West: Teak Powder CoatE Key West: Seafoam Metallic Weave CenterF Key West: Sea Glass (Seafoam Green, Sky Blue or Cloud White)G: Bead Board: Titanium Powder Coat H: Bead Board: Java II Powder CoatI: Palm Beach: Mica w/ Stainless Bark InsertJ: KW Louver: White-Washed Wood Powder Coat
1. Counter-Top Door Display
$395
The door kit comes with your choice of 6 Brown Jordan Outdoor Kitchen doors (see above) along with either a counter-top door rack or carrying case. Additional racks are $50 each. Bags are $100 each.
A B C
D E F
G H I
1.
Because so many of our dealers sell both Brown Jordan Outdoor Kitchens and Danver Stainless Outdoor Kitchens, our latest printed collaterals feature them together. This approach allows us to highlight the differences, explain the relationship and provide educational information more effectively.
All marketing materials can be ordered on QAD. Door display kits, chip sets, booklets, brochures and more can be found by clicking Parts and searching by “#” on the right using the word PROMO. Hover your cursor over each item for full descriptions, view pricing, select your desired marketing support materials and add them to your quote prior to submittal.
1.
J
Brown Jordan Outdoor Kitchens | 203.626.5625 | brownjordanoutdoorkitchens.com BROWN JORDAN is a registered trademark of Brown Jordan International, Inc. and is used under license to CT Acquisitions, LLC.
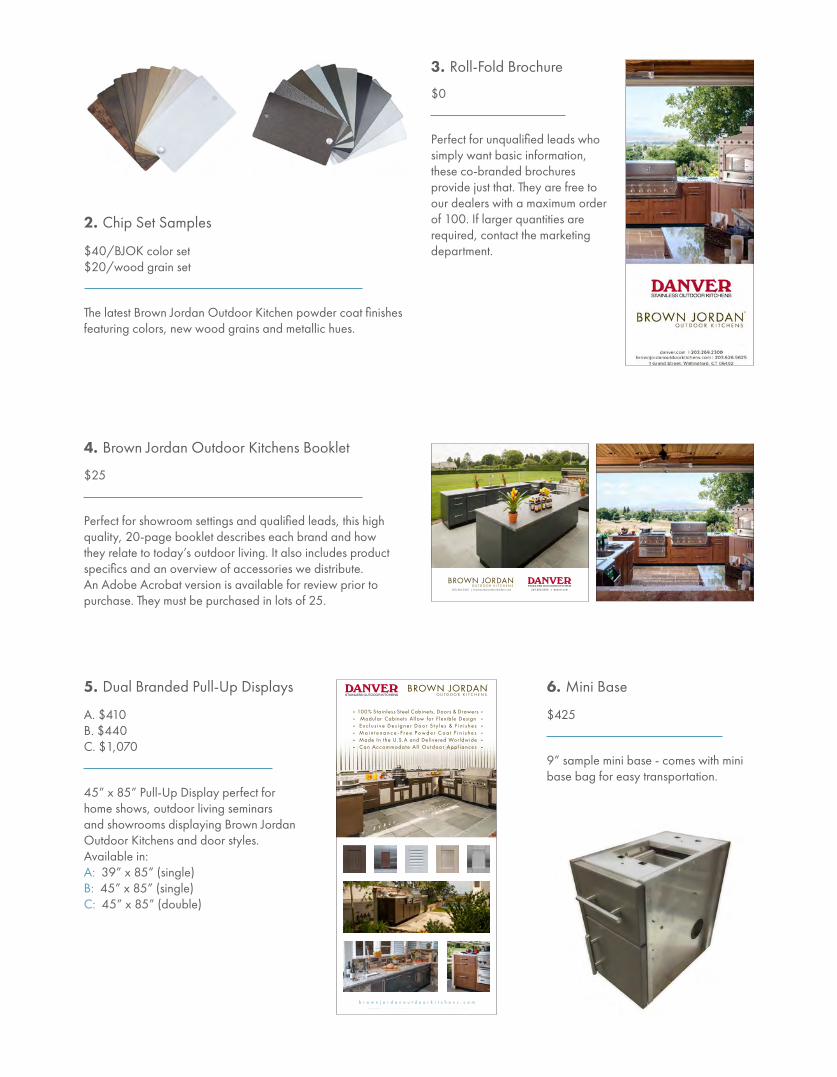
$0
Perfect for unqualified leads who simply want basic information, these co-branded brochures provide just that. They are free to our dealers with a maximum order of 100. If larger quantities are required, contact the marketing department.
3. Roll-Fold Brochure
$25
Perfect for showroom settings and qualified leads, this high quality, 20-page booklet describes each brand and how they relate to today’s outdoor living. It also includes product specifics and an overview of accessories we distribute. An Adobe Acrobat version is available for review prior to purchase. They must be purchased in lots of 25.
4. Brown Jordan Outdoor Kitchens Booklet
203.626.5625 | brownjordanoutdoorkitchens.com 203.269.2300 | danver.com
- 100% Stainless Steel Cabinets, Doors & Drawers -- Modular Cabinets Al low for F lexible Design -
- C a n A c c o m m o d a t e A l l O u t d o o r A p p l i a n c e s -
- E x c l u s i v e D e s i g n e r D o o r S t y l e s & F i n i s h e s -- M a i n t e n a n c e - F r e e P o w d e r C o a t F i n i s h e s -- Made In the U.S .A and Del ivered Wor ldwide -
A. $410B. $440C. $1,070
45” x 85” Pull-Up Display perfect for home shows, outdoor living seminars and showrooms displaying Brown Jordan Outdoor Kitchens and door styles. Available in: A: 39” x 85” (single) B: 45” x 85” (single) C: 45” x 85” (double)
5. Dual Branded Pull-Up Displays
$425
9” sample mini base - comes with mini base bag for easy transportation.
6. Mini Base
$40/BJOK color set$20/wood grain set
The latest Brown Jordan Outdoor Kitchen powder coat finishes featuring colors, new wood grains and metallic hues.
2. Chip Set Samples