stacked performance monster roll -...
TRANSCRIPT
866-795-2732 – www.ecoreathletic.com 1
TECHNICAL MANUAL
Installation · Maintenance · Warranty
Manufactured in the U.S.A. by:
Revised on 10/19/2017 Supersedes all previous versions.
Check website for updates.
STACKED PERFORMANCE
MONSTER ROLL
866.795.2732 – www.ecoreathletic.com 2
Performance Monster Roll Technical Manual
Job Site Conditions 3
Subfloors 3
Subfloor Preparation 3
Storage & Handling 4-5
Installation of Base Layer 5-6
Installation of Wear Layer 7-8
Temporary Installation Tape Down 8-9
Floor Protection 10
Assignment of Cleaning & Maintenance 10
Cleaning Products 10
Cleaning Chart 11
Cleaning Procedures 11
Warranty 12
INSTALLATION
MAINTENANCE
WARRANTY
TABLE OF CONTENTS
866.795.2732 – www.ecoreathletic.com 3
Performance Monster Roll Technical Manual
I. JOB SITE CONDITIONS
1. Installation should not begin until after all other trades are finished in the area. If the job requires other
trades to work in the area after the installation of the floor, the floor should be protected with an
appropriate cover. Kraft paper or plastic works well.
2. Areas to receive flooring should be weather tight and maintained at a minimum uniform temperature of
65°F (18°C) for 48 hours before, during, and after the installation.
II. SUBFLOORS
Ecore Athletic Monster Rolls, may be installed over concrete, approved Portland-based patching and leveling
materials, and wood.
NOTE: Gypsum-based patching and leveling compounds are not acceptable.
1. Wood Subfloors – Wood subfloors should be double construction with a minimum thickness of one inch.
The floor must be rigid and free from movement with a minimum of 18 inches of well-ventilated air space
below.
2. Underlayments – The preferred underlayment panel is American Plywood Association (APA)
underlayment grade plywood, minimum thickness of 1/4-inch, with a fully sanded face.
NOTE: Particleboard, chipboard, Masonite and lauan are not considered suitable underlayments.
3. Concrete Floors – Concrete shall have a minimum compressive strength of 3000 psi. New concrete slabs
should cure for a minimum of 28 days before installing Monster Rolls. It must be fully cured and
permanently dried.
III. SUBFLOOR REQUIREMENTS AND PREPARATION
1. Subfloors shall be dry, clean, smooth, level, and structurally sound. They should be free of dust, solvent,
paint, wax, oil, grease, asphalt, sealers, curing and hardening compounds, alkaline salts, old adhesive
residue, and other extraneous materials, according to ASTM F710.
2. Subfloors should be smooth to prevent irregularities, roughness, or other defects from telegraphing
through the new flooring. The surface should be flat to the equivalent of 3/16˝ (4.8 mm) in 10´ (3.0 m).
3. Mechanically remove all traces of old adhesives, paint, or other debris by scraping, sanding, or scarifying
the substrate. Do not use solvents. All high spots shall be ground level and low spots filled with an
approved Portland-based patching compound.
4. All saw cuts (control joints), cracks, indentations, and other non-moving joints in the concrete must be
filled with an approved Portland-based patching compound.
5. Expansion joints in the concrete are designed to allow for expansion and contraction of the concrete. If a
floor covering is installed over an expansion joint, it will likely fail in that area. Use expansion joint covers
designed for resilient flooring.
6. Always allow patching materials to dry thoroughly and install according to the manufacturer’s instructions.
Excessive moisture in patching material may cause bonding problems or a bubbling reaction with the E-
Grip III adhesive.
INSTALLATION
866.795.2732 – www.ecoreathletic.com 4
Performance Monster Roll Technical Manual
HAZARDS:
SILICA WARNING – Concrete, floor patching compounds, toppings, and leveling compounds can contain
free crystalline silica. Cutting, sawing, grinding, or drilling can produce respirable crystalline silica (particles 1-
10 micrometers). Classified by OSHA as an IA carcinogen, respirable silica is known to cause silicosis and
other respiratory diseases. Avoid actions that may cause dust to become airborne. Use local or general
ventilation or provide protective equipment to reduce exposure to below the applicable exposure limits.
ASBESTOS WARNING – Resilient flooring, backing, lining felt, paint, or asphaltic “cutback” adhesives can
contain asbestos fibers. Avoid actions that cause dust to become airborne. Do not sand, dry sweep, dry
scrape, drill, saw, beadblast, or mechanically chip or pulverize. Regulations may require that the material be
tested to determine the asbestos content. Consult the document “Recommended Work Practices for
Removal of Existing Resilient Floor Coverings” available from the Resilient Floor Covering Institute.
LEAD WARNING – Certain paints can contain lead. Exposure to excessive amounts of lead dust presents a
health hazard. Refer to applicable federal, state, and local laws and the publication “Lead Based Paint:
Guidelines for Hazard Identification and Abatement in Public and Indian Housing” available from the United
States Department of Housing and Urban Development.
7. Moisture must be measured using the RH Relative Humidity test method per ASTM F2170 standard.
Moisture content should not exceed 85% RH. If the levels exceed the limitations, the installation should
not proceed until the situation has been corrected.
8. In the event that a moisture mitigation system is required, it must conform to the ASTM F3010 Standard
Practice for Two-Component Resin Based Membrane Forming Moisture Mitigation Systems for use Under
Resilient Floor Coverings.
9. It is essential that pH tests be taken on all concrete floors. If the pH is greater than 9, it must be
neutralized prior to beginning the installation.
10. Adhesive bond tests should be conducted in several locations throughout the area. Glue down 3´ x 3´
test pieces of the flooring with the recommended adhesive and trowel. Allow to set for 72 hours before
attempting to remove. A sufficient amount of force should be required to remove the flooring and, when
removed, there should be adhesive residue on the subfloor and on the back of the test pieces.
IV. MATERIAL STORAGE AND HANDLING
1. Material should be delivered to the job site in its original, unopened packaging with all labels intact.
2. Roll material should always be stored laying down. Storing rubber on end will curl the edges resulting in
permanent memory of the material. All edges with memory curl must be straight edge cut before
installation. Do not store rolls higher than 4 rolls or for more than six months. Material should only be
stored on a clean, dry, smooth surface.
3. Inspect all materials for visual defects before beginning the installation. No labor claim will be
honored on material installed with visual defects. Verify the material delivered is the correct style,
color, and amount. Any discrepancies must be reported immediately before beginning installation.
NOTE: Ecore Athletic Performance Monster Rolls are manufactured from recycled materials and
slight variance in shade and color chip dispersion is normal. It is the installer’s responsibility to
inspect all products to insure the correct style, thickness, and color. Any moderate to severe
discrepancies should be reported immediately before beginning the installation.
INSTALLATION
866.795.2732 – www.ecoreathletic.com 5
Performance Monster Roll Technical Manual
INSTALLATION
4. The material and adhesive must be acclimated at room temperature for a minimum of 48 hours before
starting installation.
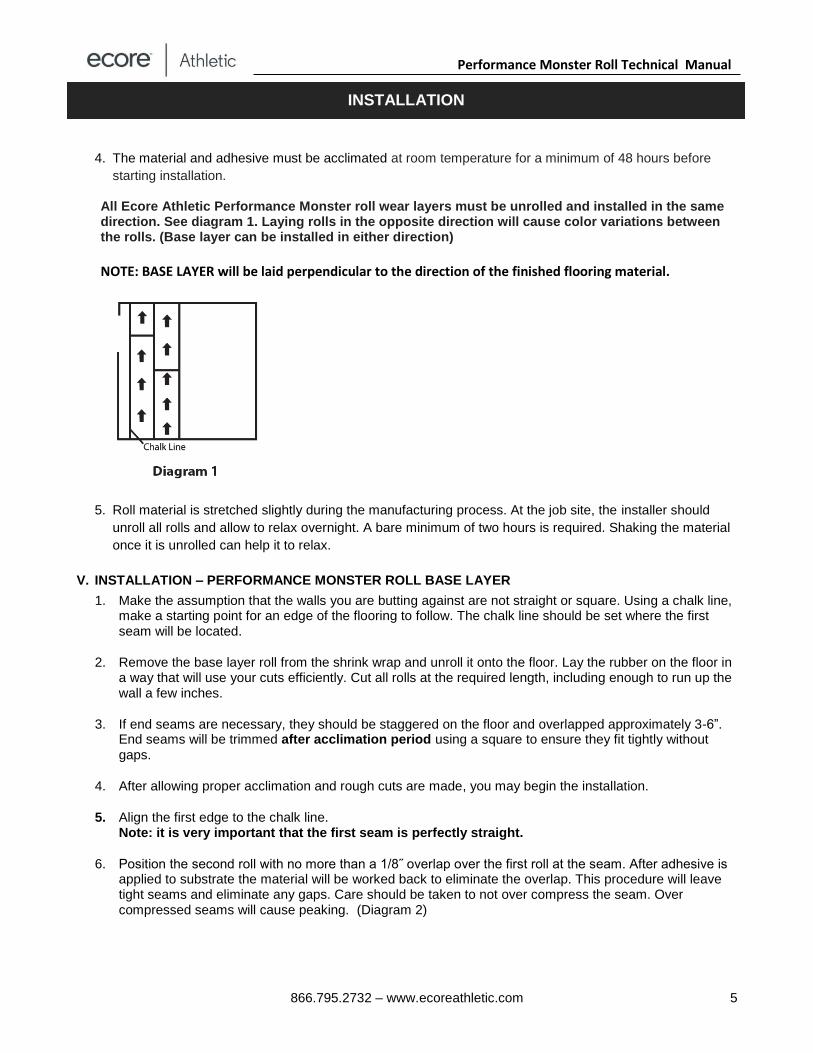
All Ecore Athletic Performance Monster roll wear layers must be unrolled and installed in the same direction. See diagram 1. Laying rolls in the opposite direction will cause color variations between the rolls. (Base layer can be installed in either direction)
NOTE: BASE LAYER will be laid perpendicular to the direction of the finished flooring material.
5. Roll material is stretched slightly during the manufacturing process. At the job site, the installer should
unroll all rolls and allow to relax overnight. A bare minimum of two hours is required. Shaking the material
once it is unrolled can help it to relax.
V. INSTALLATION – PERFORMANCE MONSTER ROLL BASE LAYER
1. Make the assumption that the walls you are butting against are not straight or square. Using a chalk line, make a starting point for an edge of the flooring to follow. The chalk line should be set where the first seam will be located.
2. Remove the base layer roll from the shrink wrap and unroll it onto the floor. Lay the rubber on the floor in a way that will use your cuts efficiently. Cut all rolls at the required length, including enough to run up the wall a few inches.
3. If end seams are necessary, they should be staggered on the floor and overlapped approximately 3-6”. End seams will be trimmed after acclimation period using a square to ensure they fit tightly without
gaps.
4. After allowing proper acclimation and rough cuts are made, you may begin the installation.
5. Align the first edge to the chalk line. Note: it is very important that the first seam is perfectly straight.
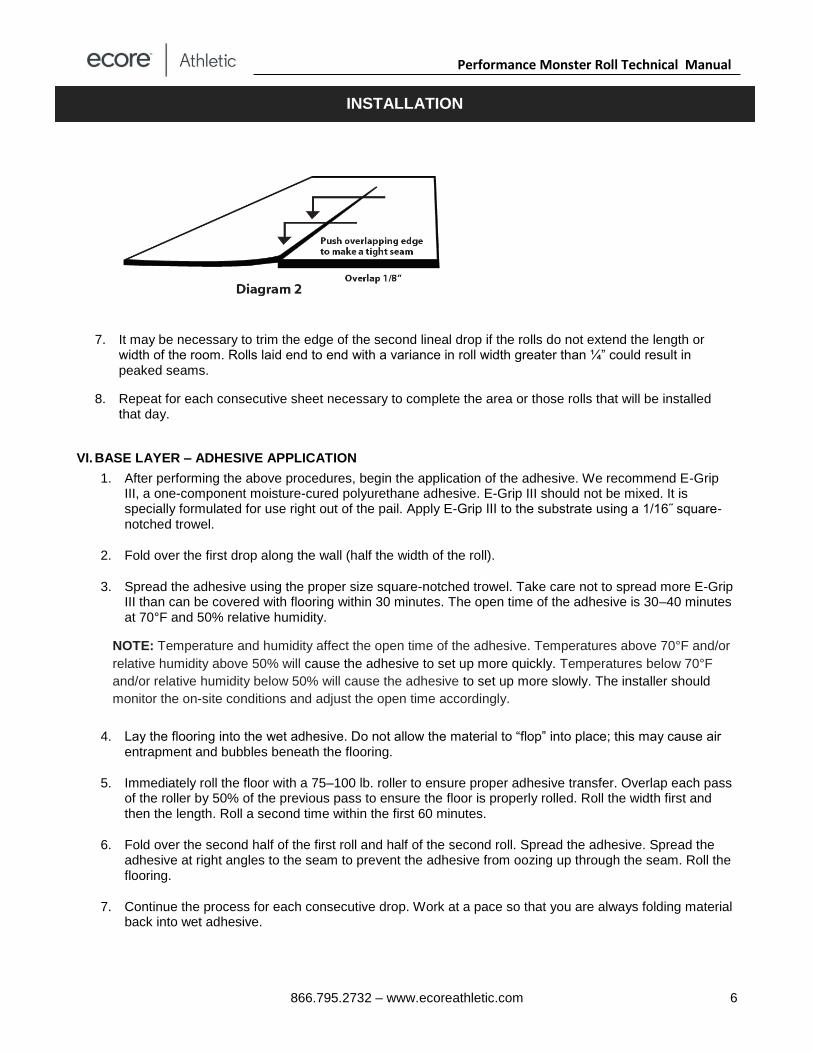
6. Position the second roll with no more than a 1/8˝ overlap over the first roll at the seam. After adhesive is applied to substrate the material will be worked back to eliminate the overlap. This procedure will leave tight seams and eliminate any gaps. Care should be taken to not over compress the seam. Over compressed seams will cause peaking. (Diagram 2)
866.795.2732 – www.ecoreathletic.com 6
Performance Monster Roll Technical Manual
INSTALLATION
7. It may be necessary to trim the edge of the second lineal drop if the rolls do not extend the length or width of the room. Rolls laid end to end with a variance in roll width greater than ¼” could result in peaked seams.
8. Repeat for each consecutive sheet necessary to complete the area or those rolls that will be installed that day.
VI. BASE LAYER – ADHESIVE APPLICATION
1. After performing the above procedures, begin the application of the adhesive. We recommend E-Grip III, a one-component moisture-cured polyurethane adhesive. E-Grip III should not be mixed. It is specially formulated for use right out of the pail. Apply E-Grip III to the substrate using a 1/16˝ square- notched trowel.
2. Fold over the first drop along the wall (half the width of the roll).
3. Spread the adhesive using the proper size square-notched trowel. Take care not to spread more E-Grip III than can be covered with flooring within 30 minutes. The open time of the adhesive is 30–40 minutes at 70°F and 50% relative humidity.
NOTE: Temperature and humidity affect the open time of the adhesive. Temperatures above 70°F and/or
relative humidity above 50% will cause the adhesive to set up more quickly. Temperatures below 70°F
and/or relative humidity below 50% will cause the adhesive to set up more slowly. The installer should
monitor the on-site conditions and adjust the open time accordingly.
4. Lay the flooring into the wet adhesive. Do not allow the material to “flop” into place; this may cause air entrapment and bubbles beneath the flooring.
5. Immediately roll the floor with a 75–100 lb. roller to ensure proper adhesive transfer. Overlap each pass of the roller by 50% of the previous pass to ensure the floor is properly rolled. Roll the width first and then the length. Roll a second time within the first 60 minutes.
6. Fold over the second half of the first roll and half of the second roll. Spread the adhesive. Spread the adhesive at right angles to the seam to prevent the adhesive from oozing up through the seam. Roll the flooring.
7. Continue the process for each consecutive drop. Work at a pace so that you are always folding material back into wet adhesive.
866.795.2732 – www.ecoreathletic.com 7
Performance Monster Roll Technical Manual
INSTALLATION
VII. INSTALLATION – PERFORMANCE MONSTER ROLL WEAR LAYER
1. Make the assumption that the walls you are butting against are not straight or square. Using a chalk line, make a starting point for an edge of the flooring to follow. The chalk line should be set where the first seam will be located.
2. Remove the Performance Monster Roll from the shrink wrap and unroll it onto the floor. Lay the rubber on the floor in a way that will use your cuts efficiently. Cut all rolls at the required length, including enough to run up the wall a few inches.
3. If end seams are necessary, they should be staggered on the floor and overlapped approximately 3-6”. End seams will be trimmed after acclimation period using a square to ensure they fit tightly without
gaps.
4. After allowing proper acclimation and rough cuts are made, you may begin the installation.
5. Align the first edge to the chalk line. Note: it is very important that the first seam is perfectly straight.
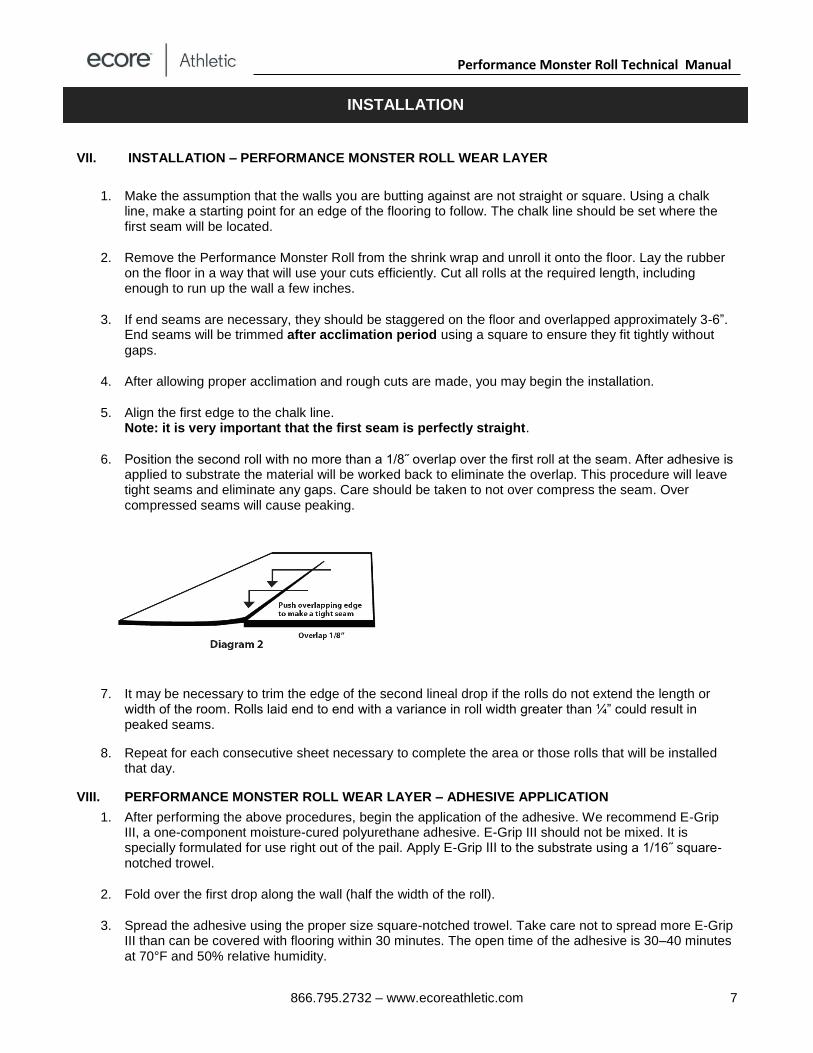
6. Position the second roll with no more than a 1/8˝ overlap over the first roll at the seam. After adhesive is applied to substrate the material will be worked back to eliminate the overlap. This procedure will leave tight seams and eliminate any gaps. Care should be taken to not over compress the seam. Over compressed seams will cause peaking.
7. It may be necessary to trim the edge of the second lineal drop if the rolls do not extend the length or width of the room. Rolls laid end to end with a variance in roll width greater than ¼” could result in peaked seams.
8. Repeat for each consecutive sheet necessary to complete the area or those rolls that will be installed that day.
VIII. PERFORMANCE MONSTER ROLL WEAR LAYER – ADHESIVE APPLICATION
1. After performing the above procedures, begin the application of the adhesive. We recommend E-Grip III, a one-component moisture-cured polyurethane adhesive. E-Grip III should not be mixed. It is specially formulated for use right out of the pail. Apply E-Grip III to the substrate using a 1/16˝ square- notched trowel.
2. Fold over the first drop along the wall (half the width of the roll).
3. Spread the adhesive using the proper size square-notched trowel. Take care not to spread more E-Grip III than can be covered with flooring within 30 minutes. The open time of the adhesive is 30–40 minutes at 70°F and 50% relative humidity.
866.795.2732 – www.ecoreathletic.com 8
Performance Monster Roll Technical Manual
NOTE: Temperature and humidity affect the open time of the adhesive. Temperatures above 70°F and/or
relative humidity above 50% will cause the adhesive to set up more quickly. Temperatures below 70°F
and/or relative humidity below 50% will cause the adhesive to set up more slowly. The installer should
monitor the on-site conditions and adjust the open time accordingly.
4. Lay the flooring into the wet adhesive. Do not allow the material to “flop” into place; this may cause air entrapment and bubbles beneath the flooring.
5. Immediately roll the floor with a 75–100 lb. roller to ensure proper adhesive transfer. Overlap each pass of the roller by 50% of the previous pass to ensure the floor is properly rolled. Roll the width first and then the length. Roll a second time within the first 60 minutes.
6. Fold over the second half of the first roll and half of the second roll. Spread the adhesive. Spread the adhesive at right angles to the seam to prevent the adhesive from oozing up through the seam. Roll the flooring.
7. Continue the process for each consecutive drop. Work at a pace so that you are always folding material back into wet adhesive.
NOTE: Never leave adhesive ridges or puddles. They will telegraph through the material.
8. Do not allow E-Grip III to cure on your hands or the flooring. Cured adhesive is very difficult to remove. We strongly suggest wearing gloves while using E-Grip III. Immediately wipe off excess adhesive with a rag slightly dampened with mineral spirits. Follow the mineral spirits with a rag dampened with water to remove the mineral spirits.
NOTE: Use mineral spirits sparingly. Saturating the rubber with mineral spirits may darken the
flooring and cause the adhesive to be pushed too deeply into the pores of the rubber.
9. If some seams are gapping it is possible to hold them together temporarily with blue painters tape. Tape MUST be removed after adhesive has developed a firm set, which is approximately 2-3 hours. Allowing tape to remain longer than 2-3 hours or using aggressive tapes may result in adhesive residue. Ecore Athletic will not be responsible for residue left behind from tape of any kind.
10. In some instances, it may be necessary to weigh down the seam until the adhesive develops a firm set. Boxes of cove base or tile work well. Keep traffic off the floor for a minimum of 24 hours. Floor should be free from rolling loads for a minimum of 48-72 hours. Foot traffic and rolling loads can cause permanent indentations or debonding in the uncured adhesive.
IX. TAPE DOWN METHOD (Intended for temporary installations, such as short term leased spaces)
NOTE: It is characteristic for rubber flooring to expand and contract with changes in temperature and
humidity. Dependent upon conditions, double face tape may not be strong enough to hold rubber in place
in every situation. For permanent installations it is recommended to use our EGRIP III urethane adhesive.
NOTE: Tape method is not an approved procedure for ice rink applications. Please contact Ecore Athletic
technical department (866-795-2732) for guidelines on ice rinks or outdoor applications.
INSTALLATION

866.795.2732 – www.ecoreathletic.com 9
Performance Monster Roll Technical Manual
INSTALLATION
1. Dry lay the base layer rolls onto the subfloor.
2. Draw a pencil line beneath all seams to be taped.
3. Use a high-quality double-faced carpet tape with a minimum width of two inches.
4. Fold over the first drop along the chalk line (half the width of the roll).
5. Apply two strips of the double-faced tape along the seam, one on each side of the pencil mark.
6. Remove the release paper and place the flooring onto the exposed tape.
7. When butting one roll next to another, overlap the seams by no more than 1/8˝. Work the material back to eliminate the overlap. This procedure will leave tight seams over the tape and eliminate any gaps.
8. Hand-roll the seams to ensure adequate contact. Do not roll the entire floor.
9. Run wear layer perpendicular to base layer and follow instructions above for installation.

866.795.2732 – www.ecoreathletic.com 10
Performance Monster Roll Technical Manual
IMPORTANT INFORMATION FOR THE INSTALLER
Ecore Athletic recommends our environmentally friendly maintenance products for Ecore Athletic
Performance Monster Roll.
FLOOR PROTECTION
The specifier should include specification details to protect the floor post-installation and until job construction is
complete, such as covering the entire floor with paper or other floor covering device (plastic, plywood, etc.) until
construction is completed and thorough cleaning and maintenance can be implemented.
ASSIGNMENT OF CLEANING AND MAINTENANCE
The specifier should determine and assign the responsibility for the initial cleaning and finishing. This
responsibility should be specifically assigned to either the flooring contractor, general contractor, maintenance
contractor, or owner.
PRODUCTS AVAILABLE FOR PURCHASE
Ecore Athletic E-Cleaner
Ecore Athletic E-Strip
The recommendations contained in this manual are listed because of their extensive testing and field experience
with the Ecore Athletic product. These instructions are given only as guidance to our customers and for use with
our recommended tools and adhesives. Ecore Athletic cannot accept any responsibility for loss or damage that
may result from the use of this information, due to variations in working conditions and/or workmanship of the
installer. Users are advised to conduct their own tests for a particular application and assign installers that are
familiar with this type of flooring product.
Inspect all rolls for visual defects including shade variances prior to beginning installation. No labor claim will be
honored on material installed with visual defects or shade variances. It may be necessary to lay out and hand
select tiles for color consistency. Any discrepancies must be reported immediately before beginning installation.
Ensure that all job site and subfloor conditions are met.
MAINTENANCE

866.795.2732 – www.ecoreathletic.com 11
Performance Monster Roll Technical Manual
Steps Cleaning Product Mixture Equipment
Initial Cleaning E-Cleaner 10 oz./gal. water Soft nylon brush or
approved pad*
Daily Cleaning E-Cleaner 2-4 oz./gal. water Soft nylon brush, or
microfiber mop
Heavy Soil & Restorative Cleaning
E-Cleaner or E-Strip 16 oz./gal. water Approved pad*
* Please contact Ecore Athletic Technical Department for guidance on pad selection: 866-795-2732. VIII. CLEANING PROCEDURES
1. Initial Cleaning a. Remove all surface soil, debris, sand, and grit by sweeping, dust mopping, or vacuuming with a high
CFM vacuum. For large areas, use auto scrubbers to clean floors.
b. Scrub floor with E-Cleaner (10 oz./gal. of water), using buffer or auto scrubber with a soft nylon brush or approved pad. Avoid flooding the floor.
c. Pick up solution with a wet vacuum, rinse with clean water, picking up the rinse water with a wet vacuum and allow to dry thoroughly (6-8 hours).
2. Daily/Regular Cleaning a. Sweep, dust mop, or vacuum floor to remove surface soil, debris, sand, and grit.
b. Damp mop with a microfiber mop or auto- scrub using an approved pad or nylon brush with E-Cleaner
(2-4 oz./gal. of water).
3. Restorative Maintenance a. Sweep and dry vacuum floor thoroughly.
b. Heavy scrub floor with E-Cleaner (10 oz./gal. of water) or E-Strip. This cleaning may be performed with
an auto scrubber or rotary scrubber.
c. Vacuum soiled solution with a wet/dry vacuum.
d. Rinse with clean water.
e. Pick up solution with wet vacuum.
f. Allow floor to thoroughly dry.
4. Heavy Soil a. Remove as much surface soil, debris, sand, and grit as possible by sweeping, dust mopping, or
vacuuming.
b. Scrub floor with E-Cleaner or E-Strip, using a buffer or auto scrubber with an approved pad.
c. Pick up solution with a wet vacuum, rinse with clean water, and allow to dry thoroughly (6-8 hours).
MAINTENANCE

866.795.2732 – www.ecoreathletic.com 12
Performance Monster Roll Technical Manual
All Ecore Athletic rubber flooring is guaranteed to be free from manufacturing defects on both material and
workmanship. If such a defect is discovered, the customer must notify Ecore Athletic either through the
contracting installer, distributor, or directly. If found to be defective within ten years under normal non-abusive
conditions, the sole remedy against the seller will be the replacement or repair of the defective goods, or at the
seller’s option, credit may be issued not exceeding the selling price of the defective goods.
Ecore Athletic Performance Monster Roll warranty shall not cover dissatisfaction due to improper installation,
normal wear or quality of installation expected from the use or environment of installation, damage from
improper maintenance or usage, or general misuse, including and without limitation: burns, cuts, tears,
scratches, scuffs, damage from rolling loads, damage from cleaning products not recommended by Ecore
Athletic, slight shade variations or shade variations due to exposure to direct sunlight, or differences in color
between samples or photographs and actual flooring.
Excluded from Warranty - These warranties do not apply to the following.
1. The exact matching of shade, color, or mottling. 2. Any express or implied promise made by any salesman or representative. 3. Tears, burns, cuts, or damage due to improper installation, improper use or improper cleaning agents,
or maintenance methods. 4. Wear from chairs or other furniture without proper floor protectors will void the warranty. Care should be
taken to protect the flooring from damage by using good quality protective feet for chairs, tables, and other furniture. Chair mats may be required under chairs with casters/wheels.
5. Labor costs for installation of original or replacement material. 6. Sale of “Remnants”, “Seconds”, “Off Goods”, or other irregular (non-first-quality) flooring materials. With
respect to “Seconds”, “Off Goods”, or “Remnants”, such are sold “as is,” and Ecore Athletic makes no warranties whatsoever, express or implied with respect thereto, including warranties of merchantability, or fitness for a particular purpose.
7. Problems caused by moisture, hydrostatic pressure, or alkali in the sub-floor. 8. Problems caused by uses, maintenance, and installation that are contrary to Ecore Athletic
specifications, recommendations, or instructions. 9. Material installed with obvious defects. 10. Damage to flooring products from high heels or spike heels. 11. Damage or discoloration to flooring products from rubber mats, rubber backed mats, or car tires. 12. Installation of Ecore Athletic products with adhesives other than those recommended by Ecore Athletic. 13. Fading and/or discoloration resulting from heavy sunlight penetration and ultraviolet ray exposure from
direct or glass-filtered sunlight. 14. Material that is not installed and maintained as recommended by Ecore Athletic. 15. Damage to flooring products from pallet jack and tow-motor traffic. 16. Environments where the product will be exposed to animal fats, vegetable oils, grease or petroleum
based materials. i.e. commercial kitchens or auto repair facilities. 17. Premature wear and deterioration from spikes and skate blade exposure. 18. Differences in color between products and photography. 19. Embossing, or density deviations between product and samples, photography.
These warranties are in lieu of any other warranty expressed or implied. Ecore Athletic shall not be liable for any incidental or consequential damages that may result from a defect. Some states do not allow the exclusion or limitation of incidental or consequential damages, so the above limitation or exclusion may not apply to you. These warranties give you specific rights, and you may also have rights which may vary from state to state. To know what your legal rights are in your state, consult your local or state Consumer Affairs Office or your State Attorney General.
For the most recent warranty information for products within the Ecore Athletic collection, please visit: www.ecoreathletic.com.
WARRANTY
866.795.2732 – www.ecoreathletic.com
Manufactured in the U.S.A. by:
715 Fountain Ave – Lancaster, PA 17601
© All designs and colors are copyrighted by Ecore International.