ssps providerone claim submission and creating … providerone claim submission and creating...
TRANSCRIPT

SSPS ProviderOne Claim Submission and
Creating Templates
Date: 2014
1

Accessing ProviderOne
2
Before logging into ProviderOne:
Make sure you are using Microsoft Internet Explorer version 6.0 and above
Pop Up Blocker should be turned “OFF” You are using a PC (MACs are not
supported by ProviderOne)

Manage Profiles
3

4
Accessing ProviderOne
Use web address https://www.waproviderone.org
Ensure that your system “Pop
Up Blocker” is turned “OFF” Login using assigned Domain,
Username, and Password Click on the “Login” button

5
Determine What Profile to Use
For updating profiles use the following profile:
EXT Provider System Administrator (only for setting up and updating user files)

How to add system profiles
6
Click on “Maintain Users” from the Provider Portal
The system will display the “User List” screen
Click on the “Name” of the person to be updated

How to add system profiles
7
The “User Details” page is displayed. Choose “Associated Profiles” from the “Show” Menu
dropdown

How to add system profiles
8
The “Manage User Profiles” page is displayed Choose “Add” from the upper left corner

How to add system profiles
9
Choose the “EXT Provider Social Services Medical” profile from “Available Profiles” list
Use arrows to move selected profile to the “Associated Profiles”
Click on the “OK” button in lower right corner

How to add system profiles
10
The “Manage User Details” page is displayed with the new added profile showing as “In Review”
Check the box on the “In Review” profile and select the “Approve” button in the upper left

How to add system profiles
11
Click on the “OK” button from screen that is displayed to approve the profile
No remark is needed

How to add system profiles
12
The “Manage User Details” page is displayed with the new added profile showing as “Approved”
Click on the “Close” button in the upper left of screen

How to add system profiles
13
The “User Details” page is displayed Click on the “Doorway Icon” to logoff. You need to log
back in to allow the update to take effect.

Direct Data Entry Claims (DDE)
14

After this training, you can:
Submit individual ProviderOne Direct Data Entry (DDE) claims
Create and save claim templates
Submit claim templates as claims through the ProviderOne Direct Data Entry (DDE) system
15

Direct Data Entry Claims (DDE)
16
ProviderOne allows providers to enter claims directly into the payment system
All claim types can be submitted through the DDE system Professional (CMS 1500)

17
Accessing ProviderOne
Use web address https://www.waproviderone.org
Ensure that your system “Pop
Up Blocker” is turned “OFF” Login using assigned Domain,
Username, and Password Click on the “Login” button

18
Determine What Profile to Use
For claims submission choose one of the following profiles:
EXT Provider Social Services Medical (use for submitting claims and viewing authorization list page
EXT Provider Super User (can use for everything except for authorization list page)
EXT Provider System Administrator (only for setting up and updating user files)
Direct Data Entry Claims (DDE)
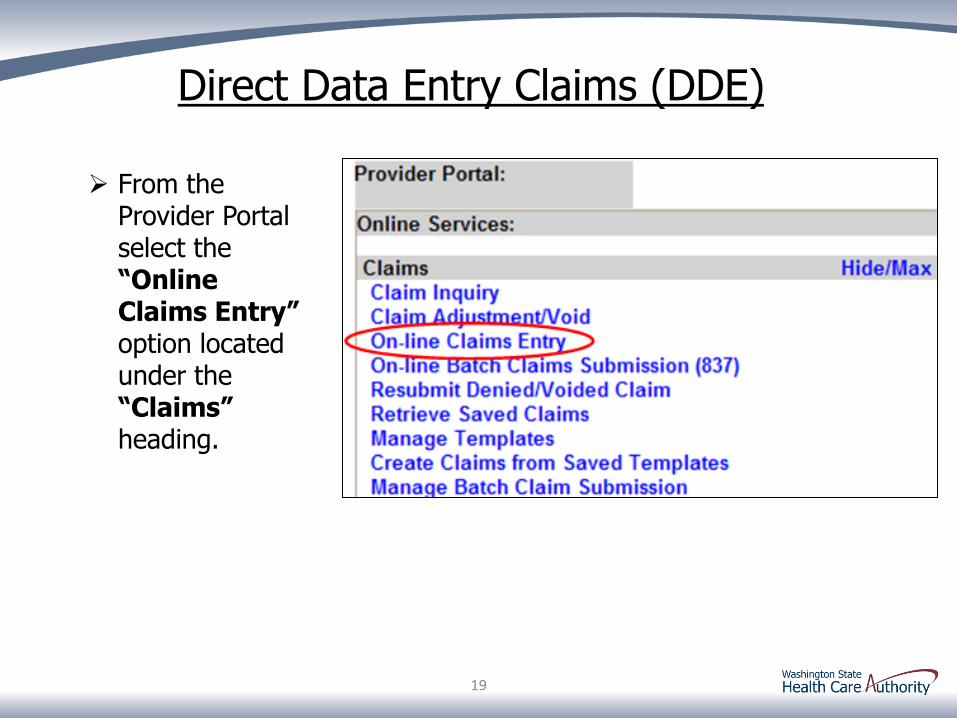
19
From the Provider Portal select the “Online Claims Entry” option located under the “Claims” heading.

Direct Data Entry Claims (DDE)
20
Choose the type of claim that you would like to
submit.
Professional is the CMS 1500
Institutional is the UB04
Dental is the 2006 ADA form
Note: you will always choose “Professional” as the claim type

Direct Data Entry Claims (DDE)
21
Screen shot of first half of claim form

Direct Data Entry Claims (DDE)
22
Screen shot of second half of claim form

23
Billing Provider Information
Section 1: Billing Provider Information of the DDE Professional claim form
Note: Questions to be answered in section one of the claim form. Next slides show each question individually.

24
Billing Provider Information
Enter the Billing Provider NPI and taxonomy code
Use your NPI number and the taxonomy code of 163W00000X
Note: This taxonomy code is the only one used for nurse delegation.

25
Rendering Provider Information
This question should always be answered “YES” for your billing

26
Referring Provider Information
Note: This type of referral is from doctor to doctor.
This question should always be answered “NO”. You will get your referrals from the case manager and through the authorization process

27
Subscriber/Client Information
Section 2: Subscriber/Client Information
Note: Questions to be answered in section two of the claim form. Next slides show each question individually.

28
Subscriber/Client Information
Enter the Subscriber/Client ID found on the WA Medicaid medical card. This ID is a 9 digit number followed by a “WA”
Example: 123456789WA
Click on the red “+” to expand the “Additional Subscriber/Client Information” to enter required information

29
Subscriber/Client Information
Once the field is expanded enter the “Patient’s Last Name, Date of Birth, and Gender”
Date of birth must be in the following format: MM/DD/CCYY
Additional shown information fields are not needed

30
Baby on Mom’s Client ID
Answer this question “NO”

31
Medicare Crossover Claim
This question should be answered “NO”
32
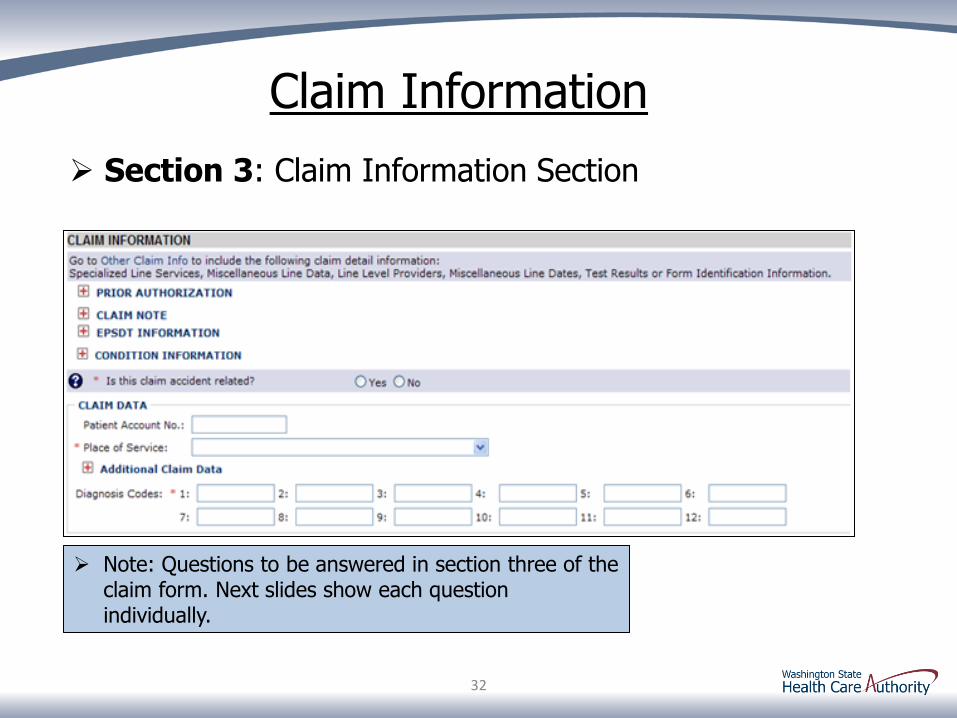
Claim Information
Section 3: Claim Information Section
Note: Questions to be answered in section three of the claim form. Next slides show each question individually.

33
Prior Authorization
Click on the red “+” to expand the “Prior Authorization” field
Enter the Authorization number given to you by the case manager
34
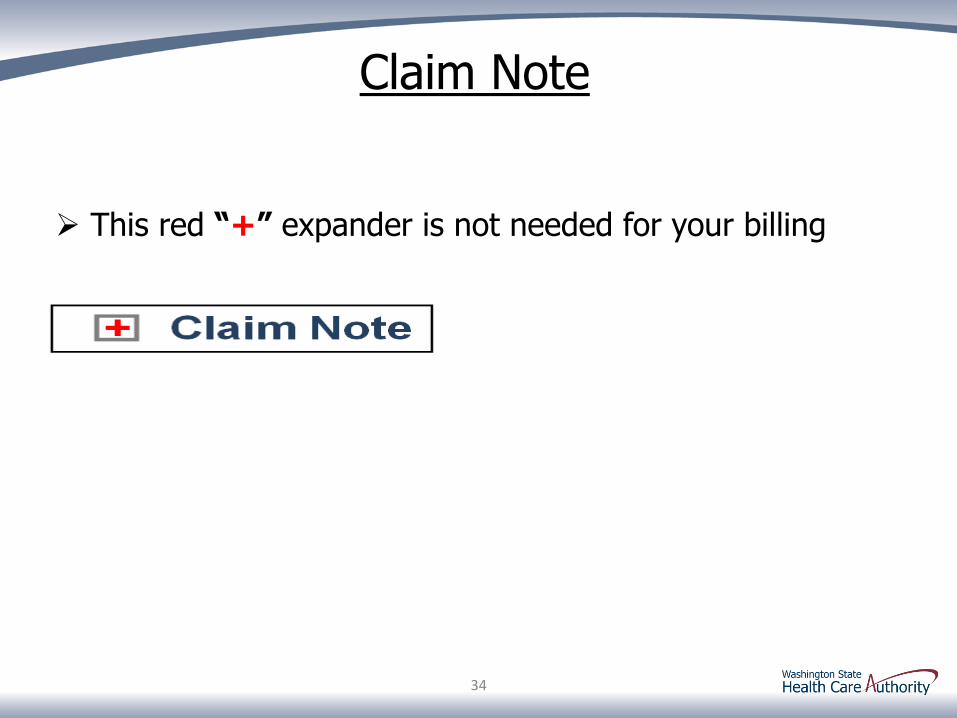
Claim Note
This red “+” expander is not needed for your billing

35
EPSDT Information
This red “+” expander is not needed for your billing

36
Condition Information
This red “+” expander is not needed for your billing

37
Is the Claim Accident Related?
This question will always be answered “NO” as Washington Medicaid has a specific casualty office that handles claims where another casualty insurance may be primary

38
Patient Account Number
The “Patient Account No.” field allows the provider to enter their internal patient account numbers assigned to the patient by their practice management system
This step is “Optional”
Note: Entering internal patient account numbers may make it easier to reconcile the weekly remittance and status report (RA) as these numbers will be posted on the RA.

39
Place of Service
The “Place of Service” code is required
Note: Your billing will always be place of service 12

40
Additional Claim Data
The “Additional Claim Data” red (+) expander is not needed for your billing

41
Diagnosis Codes
Enter the appropriate ICD-9 diagnosis code or codes
Note: Use the most appropriate diagnosis code for the medical condition of the patient. Only use “One” diagnosis. DO NOT enter decimal codes on the diagnosis.

42
Basic Service Line Items
Section 4: Basic Line Item Information
Note: Questions to be answered in section four of the claim form. Next slides show each question individually.

43
Basic Service Line Items
Enter the “From Service Date”
Enter the “To Service Date”
Note: The dates of service must be in the format of 2 digit month, 2 digit day, and 4 digit year, for example 10/03/2011.

44
Basic Service Line Items
Optional “Place of Service Code” (Not required here as already entered)
Note: Use the “Blue Arrow” drop down to display all POS codes
loaded in ProviderOne.
POS codes available:

45
Basic Service Line Items
Enter the “Procedure Code”. Your only Procedure code will be H2014. The authorization form will have the code to bill.
Note: Your only procedure code will be H2014. The
authorization form will show this procedure code.

46
Basic Service Line Items
Enter Modifier “U5” - this modifier will be used on all your billing
Note: Your only modifier will be U5. The
authorization form will show this modifier.

47
Basic Service Line Items
Enter “Submitted Charges”
Note: If dollar amount is a whole number no decimal point is needed.
Note: You will need to do the math depending on how many units you are billing.

48
Basic Service Line Items
Enter appropriate “Diagnosis Pointer”
Note: Use drop down from box “1” Select the number “1” from this list to add into box “1”

49
Basic Service Line Items
Enter procedure “Units”. The units for this billing are in 15 minute unit increments.
Note: At least 1 unit is required.

50
Basic Service Line Items
The following are not needed for this billing
Already entered

Add Service Line Items
Click on the “Add Service Line Item” button to list the procedure line on the claim
Note: Once the procedure line item is added, ProviderOne will refresh and return to the top of the claim form.
Note: Please ensure all necessary claim information has been entered before clicking the “Add Service Line Item” button to add the service line to the claim.
51

52
Add Additional Service Line Items If additional service lines need to be added, click on the
“Service” hyperlink at the top of page to get quickly back to the “Basic Service Line Items” section.
Then follow the same procedure as outlined above for entering data for each line.

53
Update Service Line Items
Update a previously added service line item by clicking on the line number of the line that needs to be updated. This will repopulate the service line item boxes for changes to be made.
Note: Once the line number is chosen, ProviderOne will refresh the screen and return to the top of the claim form. Use the “Service” hyperlink to quickly return to the service line item boxes and make corrections.

54
Update Service Line Items
Once the service line is corrected, click on the “Update Service Line Item” button to add corrected information on the claim.
Note: Once the “Update Service Line Item” button is chosen, ProviderOne will refresh the screen and return to the top of the claim form. Use the “Service” hyperlink to quickly return to the service line item section to view and verify that changes were completed.

55
Delete Service Line Items
A service line can easily be “Deleted” from the claim before submission by clicking on the “Delete” option at the end of the added service line.
Note: Once the service line item is deleted it will be permanently removed from the claim. If the service line was accidently deleted, the provider will need to re-enter the information following previous instructions.

56
Submit Claim for Processing
When the claim is ready for processing, click the “Submit Claim” button at the top of the claim form.
Note: Make sure the browser “Pop Up Blocker” is OFF or the system will not allow
the claim to be submitted.

57
Submit Claim for Processing After the “Submit Claim” button is pushed, the
following “Pop Up” is displayed
Click on the “Cancel” button if no backup is to be sent
Note: Your program will not require you to send in any backup documentation. Always answer this question “Cancel”.

58
Submit Claim for Processing
ProviderOne now displays the “Submitted Professional Claim Detail” screen
Click on the “OK” button to finish submitting the claim
WARNING: You must click the “OK” button to complete the claims submission

Creating a Claim Template
ProviderOne allows creating and saving templates
59
Log into ProviderOne Click on the “Manage
Templates” hyperlink

Creating a Claim Template
60
At the Create a Claim Template and list screen, click the “Type of Claim” option
Click the “ADD” button to bring up the claim template form
Note: You will want to make sure that the “Type of Claim” is always “Professional”.
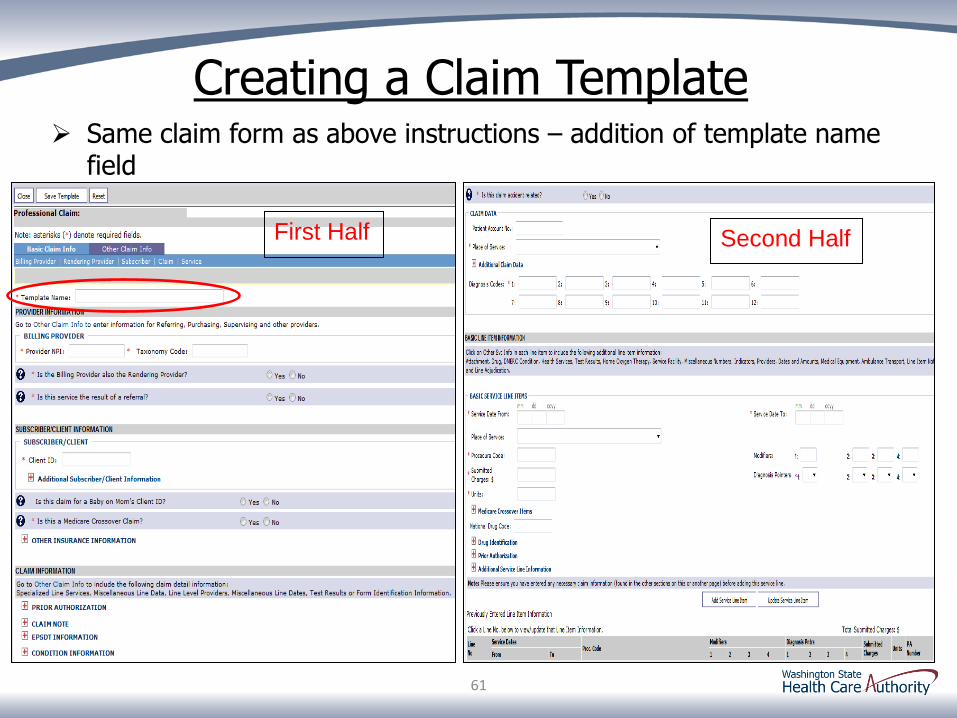
Creating a Claim Template Same claim form as above instructions – addition of template name
field
61
First Half Second Half

Creating a Claim Template Minimum required information to save template shown below:
62
Note: You can fill in as much information on the claim form template as long as the minimum information above is entered.

Saving a Claim Template
When done entering information needed, click on the “Save Template” button in the upper left corner
63

Saving a Claim Template
You will receive a pop up asking if you would like to save the template. Answer “OK” to save.
64

Claim Template List
After the template is saved, it is listed on the “Claim Template List”
65

Claim Template List
Claim options from the “Claim Template List” are:
Edit template
View template
Delete template
Save As/Copy template
66

Edit Template To edit a template, enter a check mark in the box next to
the template name
Click on the “Edit” button
67

Edit Template
The claim template will be displayed and will allow changes to be made. Once updated, click on the “Save Template” button in the upper left corner.
68

View Template To view the template, enter a check mark in the box next to
the template name
Click on the “View” button
69

View Template The claim template will be displayed and the user can only
view what has been entered. No changes will be allowed. Notice the “Save Template” button is not active.
70
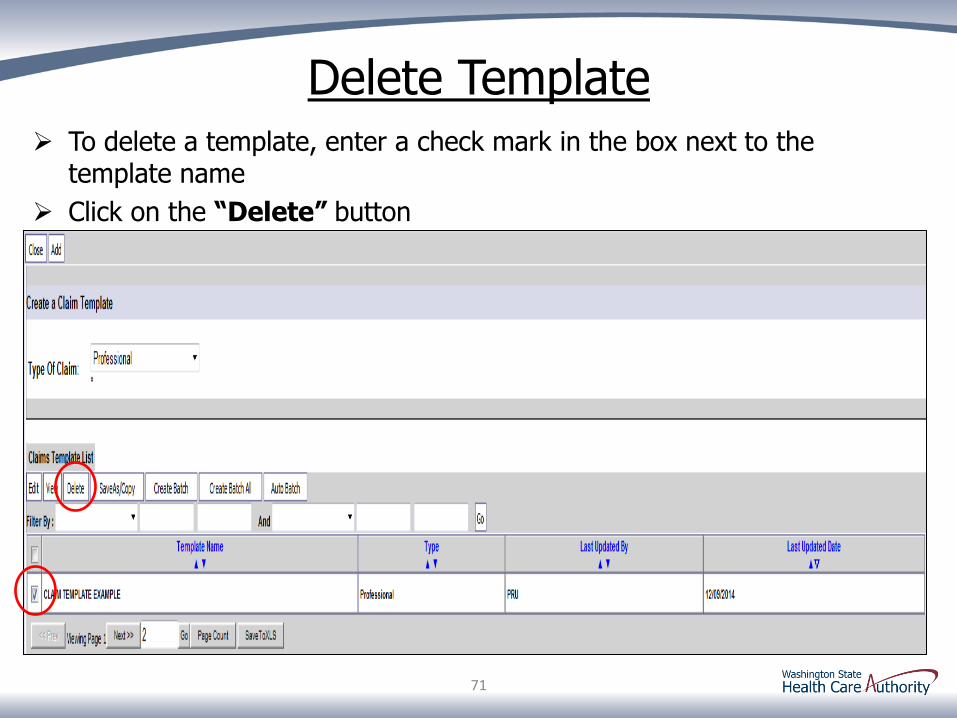
Delete Template To delete a template, enter a check mark in the box next to the
template name
Click on the “Delete” button
71

Delete Template
The following pop up will appear. To complete deletion of the template, click on the “OK” button.
72
Note: Once the template is deleted, it will be permanently removed from the template list. If the template is deleted accidently, it will need to be recreated and saved again.

Save As/Copy Template You can Save As/Copy a template creating a new template with the
same information. Enter a check mark in the box next to the template name.
Click on the “Save As/Copy” button
73

Save As/Copy Template Rename the template
Change any other information needed
Click on the “Save Template” button in upper left corner
74

Save As/Copy Template You now have another template listed in the “Claims Template
List”
If additional templates need to be created, follow above steps again
75

Submitting a Template Claim
Claims can be submitted from a Template
76
Log into ProviderOne Click on the “Create Claims from
Saved Templates” hyperlink

Submitting a Template Claim
The “Create Claims from Saved Templates List” is displayed
Click on the “Template Name” to bring up the template
77

Submitting a Template Claim Once the claim is displayed, continue to fill out the remaining missing
information. This is the same process as shown in the previous slides.
Click on the “Submit Claim” button in the upper left corner.
78

Q & A
79