spotngo payment module manual v1 -ip 05-24-06
TRANSCRIPT

Spotngo Payment Module Manual – V2.0
Spotngo Payment Module User Guide V2.X.X

Spotngo Payment Module Manual – V2.0
Page 2 Copyrights ©2006 Spotngo http://www.spotngo.ca
©2006 Spotngo Wireless ltd This document contains proprietary and confidential information of Spotngo and shall not be reproduced or transferred to other documents, disclosed to others, or used for any purpose other than that for which it is furnished, without the prior written consent of Spotngo. It shall be returned to the Spotngo upon request.
The trademark and service marks of Spotngo wireless, including the Spotngo logo, are the exclusive property of Spotngo, and may not be used without permission.
All other marks mentioned in this material are the property of their respective owners.
3Hhttp://www.spotngo.ca
Document Information Software Version: 2.0 Document Version: 1.0 Publication Date: March 2006 Contact information: Tomer Shahaf – Account Manager Spotngo Wireless ltd. http://www.spotngo.com Phone: 416-410-3518 [email protected]

Spotngo Payment Module Manual – V2.0
Page 3 Copyrights ©2006 Spotngo http://www.spotngo.ca
Contents Introduction................................................................................................................................................................4
About Spotngo Payment Module............................................................................................................................4 Features.....................................................................................................................................................................6 Live Demo:...............................................................................................................................................................8
Enhanced Captive Portal .......................................................................................................................................10 Captive Portal Composition ..................................................................................................................................10 End user service purchase......................................................................................................................................13
Credit Card Signup: ..........................................................................................................................................14 Credit Card Refill:.............................................................................................................................................18 Buy Pin Card:....................................................................................................................................................22 Pin Card Registration:.......................................................................................................................................28 Refill Account:..................................................................................................................................................30
Web Interfaces. ......................................................................................................................................................32 Captive Portal....................................................................................................................................................33
Web GUI Administration.......................................................................................................................................33 Changing Administrator Login Credentials - Username and password..............................................................34
Changing Administrator Login Credentials through the WebGUI. ...............................................................34 Setting the API Username and Password .............................................................................................................36 User’s Group assignment in Aradial.....................................................................................................................45
Appendix A - Installation instructions .................................................................................................................48 General ...................................................................................................................................................................48 Port setting – Firewall Port Setting. ......................................................................................................................48
Example: Windows firewall users can add a port exception as follows: .......................................................49 Changing the Administrator Credentials through the Registry Editor. ..........................................................53 Adding an API User in Aradial........................................................................................................................55
Securing Spotngo Payment Module Captive Portal and Admin Interface..........................................................55 Generating the private SSL.key. ......................................................................................................................56 Generating the certificate request:....................................................................................................................56 Purchasing the SSL Certificate from a Certification Authority, CA..............................................................57 Trouble shooting Spotngo Payment Module failure to start due to incorrect SSL certificates’ setting. ......64
Restarting the Spotngo Payment Module Service through Windows Services..................................................66 Setting the API Username and Password .............................................................................................................67

Spotngo Payment Module Manual – V2.0
Page 4 Copyrights ©2006 Spotngo http://www.spotngo.ca
Introduction
About Spotngo Payment Module Welcome to Spotngo Payment Module, an All-In-One prepaid billing solution.
Spotngo Payment modules include prepaid solutions for Scratch Cards and Online Credit Cards transactions through supported merchant processing for Hotspots, HotZones, ISP, WISP and VOIP deployments.
Spotngo Payment Module integrated with the Aradial Radius server will provide a powerful, yet easy to deploy and manage solution for prepaid Internet access and VOIP services through enhanced captive portal interface. The solution is scaleable to support the service provider growing needs.
Spotngo offers versions of the module to sale, control and manage user’s Internet access for Client’s self signup via prepaid scratch cards and online credit card transactions for Hotspots, HotZones, WISP and VOIP deployments.
The module is fully customizable to support the ISP’s image and branding as well as location based branding and advertising. The module further supports Affiliates branding, price groups and reporting.
Our design team went in to great efforts to simplify the deployment and maintenance of the solution thereby enabling efficient deployment with minimal technical skills requirements. The solution provides the tools and scalability to suite both start up and large service providers through their existing technical team and infrastructure.
Screenshot 1 - Client side captive portal

Spotngo Payment Module Manual – V2.0
Page 5 Copyrights ©2006 Spotngo http://www.spotngo.ca
Features • Online real time credit card purchases for account creation, user signup and refill
Supported Credit card merchant accounts include: o Authorize.net o Verisign o PSIGate o Quickpay o Tranzilla o Payment Planet o Others through customization.
• View / Queries payment history. • Plan/Tariff management (time, traffic and expiration). Creating a tariff. • User self care for sign up, activation and refill of prepaid account trough prepaid pin or scratch cards • Prepaid Card ID and pin generation
Supporting: o 0..9 o 0..9 and A..Z o 0..9, A..Z and a..z
• Pin Generation and management using plans • View / Queries of previously generated pins • Views /Queries of card’s status • Printing and exporting of generated cards to CSV files • Easy creation of prepaid plans
Including: o Auto Expiry – Time and date expiration o Time bank – Net usage o Data bank – Traffic o Combination of the above.
• Simple Secured Web GUI administration interface for local and remote management through SSL secured Web GUI technology.
• Enhanced, fully customizable Captive Portal supporting location’s, affiliates branding and price groups including multi portal support.
• Currency prefix and postfix. • Supporting fee and free based service. • Online and email receipts generation. • Support for Tax rate. • Simple integrations with Aradial Radius Server. • The user information is integrated in the radius database allowing for full control through single
database. • Great ROI due to affordable market entry and deployment requirements. • Flexible Network deployments supporting a wide range of access controllers and mixed networks

Spotngo Payment Module Manual – V2.0
Page 6 Copyrights ©2006 Spotngo http://www.spotngo.ca
Live Demo: Spotngo live demo can be viewed and accessed via a web browser. Sample captive portal with affiliate support: https://secure.spotngo.com:8015/Payment?CIP=100&cport=100 https://secure.spotngo.com:8015/Payment?Portal=example&CIP=100&cport=100
Screenshot 2 - Captive portal's Location Branding 1
Screenshot 3 - captive portal's location branding 2
Spotngo Demo Admin interface: https://secure.spotngo.com:8015/Payment?page=mainadmin Username: admin Password: password
Spotngo Payment Module Manual – V2.0
Page 7 Copyrights ©2006 Spotngo http://www.spotngo.ca
Enhanced Captive Portal
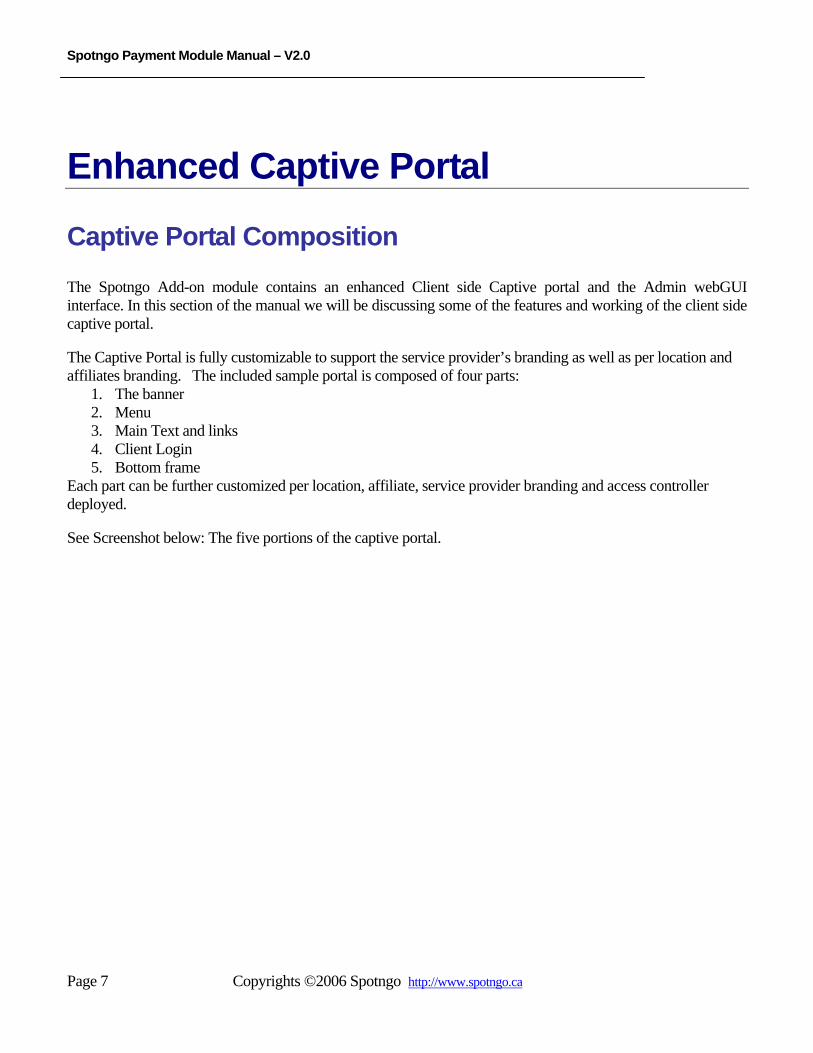
Captive Portal Composition The Spotngo Add-on module contains an enhanced Client side Captive portal and the Admin webGUI interface. In this section of the manual we will be discussing some of the features and working of the client side captive portal. The Captive Portal is fully customizable to support the service provider’s branding as well as per location and affiliates branding. The included sample portal is composed of four parts:
1. The banner 2. Menu 3. Main Text and links 4. Client Login 5. Bottom frame
Each part can be further customized per location, affiliate, service provider branding and access controller deployed. See Screenshot below: The five portions of the captive portal.

Spotngo Payment Module Manual – V2.0
Page 8 Copyrights ©2006 Spotngo http://www.spotngo.ca
Screenshot 4 - The Five portions of the captive portal
The portal Application calls the different portions of the portal page based on the Portal identifier and the access controller ID sent by the access controller during the redirection. Default portal identifier is &portal for example: &portal=example, &portal=example2, etc. The portal application will then look for the files to use under the appropriate subdirectory (ie. Example) existing files will be used and the rest will be used from the default portal directory. The Portal application will only display the username and password fields when being redirected by supported access controllers, Supported Access controllers include: Chillispot, Colubris, DD-WRT, Ikarus, Mikrotik, Monowall, Nomadix, PfSense, Planet, Value Point, Zyxel, and others. Additional access controllers’ support can be added to suite the deployment requirements. Service providers wishing to offer plan purchases through their website, the entire portal or portions of it can be called to process the purchase through online credit card and or prepaid cards activation and refill. This will eliminate the need of additional Ecommerce application and would insure direct user provisioning in the service provider’s radius server. Banner: The banner is a jpg file contained in the Images subdirectory of the Payment portal, which can be replaced with the service providers’ banner to act as the portal’s default banner. When creating subdirectories for per venue, affiliates the banner can be deployed using the default service provider’s banner or per venue, affiliate customized banner.

Spotngo Payment Module Manual – V2.0
Page 9 Copyrights ©2006 Spotngo http://www.spotngo.ca
Menu: The menu contains the different options available to the clients and menu items can easily be removed or added to suite the service provider’s requirements. By default, the menu contains the following options: • Home – linked to the main captive portal page. • Credit Cards Sign up – allows for credit cards sign up for account creation supporting either random
username / password or customer specified username / password. Depending on the service provider’s deployment. (by default, the portal is set to user specified login username and password parameters)
• Credit Card Refill- Enables the client to easily refill their existing account through self service online credit card purchase.
• Buy Pin Card – Enable the client to buy credit pin which can be applied for account creation or refill at time of purchase or at a later date.
• Pin Card Registration – supports client signup for service using a prepaid pin card purchased at venue, local retailers or through service provider’s distribution chain.
• Refill Account - Refill of existing accounts through prepaid pin card purchased at venues, local retailer or service provider’s distribution chain.
• Manage Account – Linked to Service provider’s Aradial user Web Self Care • Additional menu items – additional menu items can be added to suite the service provider’s requirements
such as about us, contact us, support, links to the service providers web site. Inner Frame: The Inner Frame can contain contains any service providers statements, information, venue specific information, details, links, logos, advertising etc. The inner frame also calls the script identifying the access controller used and presents the client with the appropriate Username / Password fields to enable network access. A wide range of access controllers are supported and additional models can be added to suite hardware deployment. Login Frame: The Username and Password fields are served by a script identifying the Access controller calling the portal. The script identifies the access controller used and will present the corresponding access controller specific parameters required for processing the client login. Bottom Frame: The frame by default includes the images gifs of supported payment methods, these payment methods depends on the service provides merchant account agreement and service. As well this is a perfect location to include the logos of any roaming partners supported by the network as well as any other associations.

Spotngo Payment Module Manual – V2.0
Page 10 Copyrights ©2006 Spotngo http://www.spotngo.ca
End user service purchase The captive portal supports four methods of client self signup and account refill and service purchase. Service providers can select which methods to deploy as well as deploy all of them. The four Methods are: • Credit Cards Sign up – allows for credit cards sign up for account creation supporting either random
username and password or customer requested username and password. Depending on the service provider’s deployment.
• Credit Card Refill- Enables the client to easily refill their existing account through self service online credit card purchase.
• Buy Pin Card – Enable the client to buy credit pin which can be applied for account creation or refill. • Pin Card Registration – supports client signup for service using a prepaid pin card purchased at venue,
local retailers or through service provider’s distribution chain. • Refill Account - Refill of existing accounts through prepaid pin card purchased at venues, local retailer or
service provider’s distribution chain.
Credit Card Signup: The customer credit card sign up allows for a one time account creation using either random generated username and password or customer defined username and password. The process is composed of four steps:
• Service Plan selection • Client Information • Credit Card Details • Confirmation and Receipt
Upon completion of the sign up process, the user can now login with their new account. Bellow is example of the four step signup procedure as experienced by the client:

Spotngo Payment Module Manual – V2.0
Service Plans: Service plans available to the clients are based on global service plans and location specific service plans as defined by the Service Provider
Screenshot 5 - Service Plans
Client Information: Client information requested and displayed can be modified based on the service provider’s requirements through manipulation of the HTS files. Required information is in Bold and fields can be set as required or optional in the Admin portal. Note: When selecting required fields, make sure to follow the guidelines set by your Credit Card merchant Processing account.
Screenshot 6 - User's Details

Spotngo Payment Module Manual – V2.0
Page 12 Copyrights ©2006 Spotngo http://www.spotngo.ca
Note: The term and conditions page should be set in the Access controller white list for allowed access pre-authentication.
Screenshot 7 – Client’s Credit Card Details
Clients Credit Card detail: The client’s credit card number associated with the above client info. Terms And conditions: This statement and check box is set as required by default and the terms and conditions can be linked to the service provider’s term and conditions.
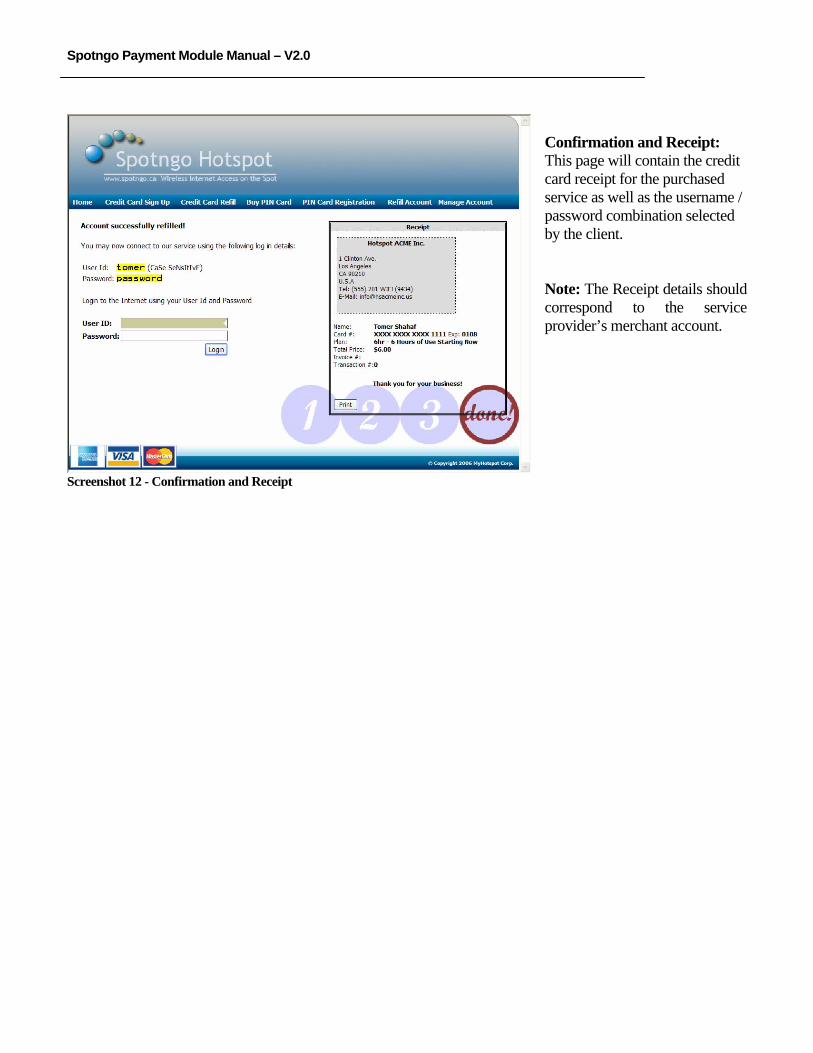
Screenshot 8 - Confirmation and Receipt
Confirmation and Receipt: This page will contain the credit card receipt for the purchased service as well as the username / password combination selected by the client. Note: The Receipt details should correspond to the service provider’s merchant account.

Spotngo Payment Module Manual – V2.0
Page 13 Copyrights ©2006 Spotngo http://www.spotngo.ca
Credit Card Refill: The credit card refill allows for an on line self service account refill of an existing account using a credit card. The process is composed of four steps:
• Service Plan selection • Client Information • Credit Card Details • Confirmation and Receipt
Upon completion of the sign up process, the user can now login with their new account. Bellow is example of the four step signup procedure as experienced by the client:
Screenshot 9 - Service Plan Selection
Service Plans: Service plans available to the clients are based on global service plans and location specific service plans as defined by the Service Provider

Spotngo Payment Module Manual – V2.0
Screenshot 10 - User Account to be refilled
Account to be refilled: Client’s existing account to be refilled. The user account information will be verified against existing client account in the Aradial Radius server.
Screenshot 11 - Credit Card Details Clients Credit Card detail: The client’s credit card number associated with the above client info. Terms And conditions: This statement and check box is set as required by default and the terms and conditions can be linked to the service provider’s term and conditions.
Spotngo Payment Module Manual – V2.0
Screenshot 12 - Confirmation and Receipt
Confirmation and Receipt: This page will contain the credit card receipt for the purchased service as well as the username / password combination selected by the client. Note: The Receipt details should correspond to the service provider’s merchant account.

Spotngo Payment Module Manual – V2.0
Page 16 Copyrights ©2006 Spotngo http://www.spotngo.ca
Buy Pin Card: The Buy Pin Card is similar to the credit card sign up above but instead of creating an account for the client, it creates a prepaid credit which will be used through the continuous process for creating a new account or refilling an existing account. Bellow is example of the four step signup procedure as experienced by the client:
Screenshot 13 - Service Plans
Service Plans: Service plans available to the clients are based on global service plans and location specific service plans as defined by the Service Provider

Spotngo Payment Module Manual – V2.0
Page 17 Copyrights ©2006 Spotngo http://www.spotngo.ca
Note: When selecting required fields, make sure to follow the guidelines set by your Credit Card merchant Processing account. Client Information: Client information requested and displayed can be modified based on the service provider’s requirements through manipulation of the HTS files. Required information is in Bold and fields can be set as required or optional in the Admin portal.
Screenshot 14 - Client Details
Screenshot 15 - Credit Card Information
Clients Credit Card detail: The client’s credit card number associated with the above client info. Terms And conditions: This statement and check box is set as required by default and the terms and conditions can be linked to the service provider’s term and conditions. Note: The term and conditions page should be set in the Access controller white list for allowed access pre-authentication.

Spotngo Payment Module Manual – V2.0
Page 18 Copyrights ©2006 Spotngo http://www.spotngo.ca
Account Refill and Receipt:
This page will contain the credit card receipt for the purchased service as well as credit voucher purchased by the client. In this page the client can chose to add the credit to an existing account through the user ID refill or sign up for a new account. Note: The Receipt details should correspond to the service provider’s merchant account.
Screenshot 16 - Account Refill and Receipt
Screenshot 17 - Successful Account Refill
Successful Account Refill: In the Above screen we chose the account refill and entered an existing account to refill upon clicking the refill we received confirmation for successful refill. At that point the client is given the option to log in using their newly refilled account.

Spotngo Payment Module Manual – V2.0
Screenshot 18 - Account Signup
Client signup through the purchased voucher: When selecting signup in the voucher/receipt page, the client can sign up for a new account using the credit voucher created. Client information requested and displayed can be modified based on the service provider’s requirements through manipulation of the HTS files. Required information is in Bold and fields can be set as required or optional through the Admin portal.
Confirmation Page: This page confirms the successful signup for the new account using the credit voucher purchased. At this point the client can login with the new account created by clicking login or go back the portal’s home page.
Spotngo Payment Module Manual – V2.0
Page 20 Copyrights ©2006 Spotngo http://www.spotngo.ca
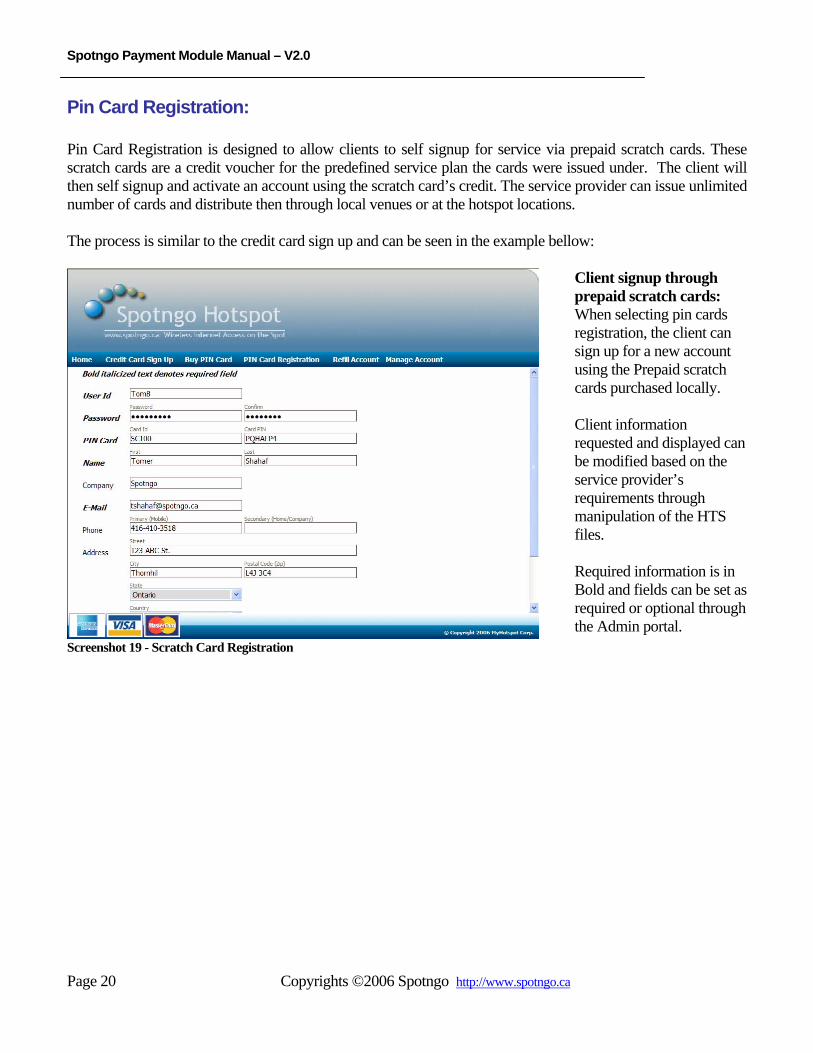
Pin Card Registration: Pin Card Registration is designed to allow clients to self signup for service via prepaid scratch cards. These scratch cards are a credit voucher for the predefined service plan the cards were issued under. The client will then self signup and activate an account using the scratch card’s credit. The service provider can issue unlimited number of cards and distribute then through local venues or at the hotspot locations. The process is similar to the credit card sign up and can be seen in the example bellow:
Screenshot 19 - Scratch Card Registration
Client signup through prepaid scratch cards: When selecting pin cards registration, the client can sign up for a new account using the Prepaid scratch cards purchased locally. Client information requested and displayed can be modified based on the service provider’s requirements through manipulation of the HTS files. Required information is in Bold and fields can be set as required or optional through the Admin portal.

Spotngo Payment Module Manual – V2.0
Screenshot 20 - Pin Card Registration Confirmation
Confirmation Page: This page confirms the successful signup for the new account using the Pin Card Registration with a prepaid Scratch Card. At this point the client can login with the new account created by clicking login or go back the portal’s home page.
Refill Account: Refill Account is designed to allow subscribers to refill their account via a prepaid scratch card / credit voucher. Existing account holders can continue to use their original self created account or service provider’s issued account through the prepaid card / credit voucher refill. The credit will be added to their account balance in form of net time / metering (time bank), Auto expiry or data bank according to the purchased credit voucher and original account. The pin card ID and Pin can be distributed through the service provider’s traditional sales channels such as electronic or physical media, trial vouchers available distributed through local vendors, online and hotspot locations.

Spotngo Payment Module Manual – V2.0
Screenshot 21 - Refill Account
Refill Account: This option will allow existing users to extend their existing service through prepaid card / credit voucher. This Page can not be used for new account signup. The client will enter their existing User ID, new card ID and Pin from their credit voucher.
The new Balances will be added to their existing accounts.
Screenshot 22 - Refill Account Confirmation
Refill Account Confirmation: This page will confirm the successful pin Application. Upon successful account refill the user will be presented with a shortcut to login using their recently refill account. Since the portal remembers the user, only the password is required. Or the user can select home to log in through another account or for additional services.
Spotngo Payment Module Manual – V2.0
Page 23 Copyrights ©2006 Spotngo http://www.spotngo.ca
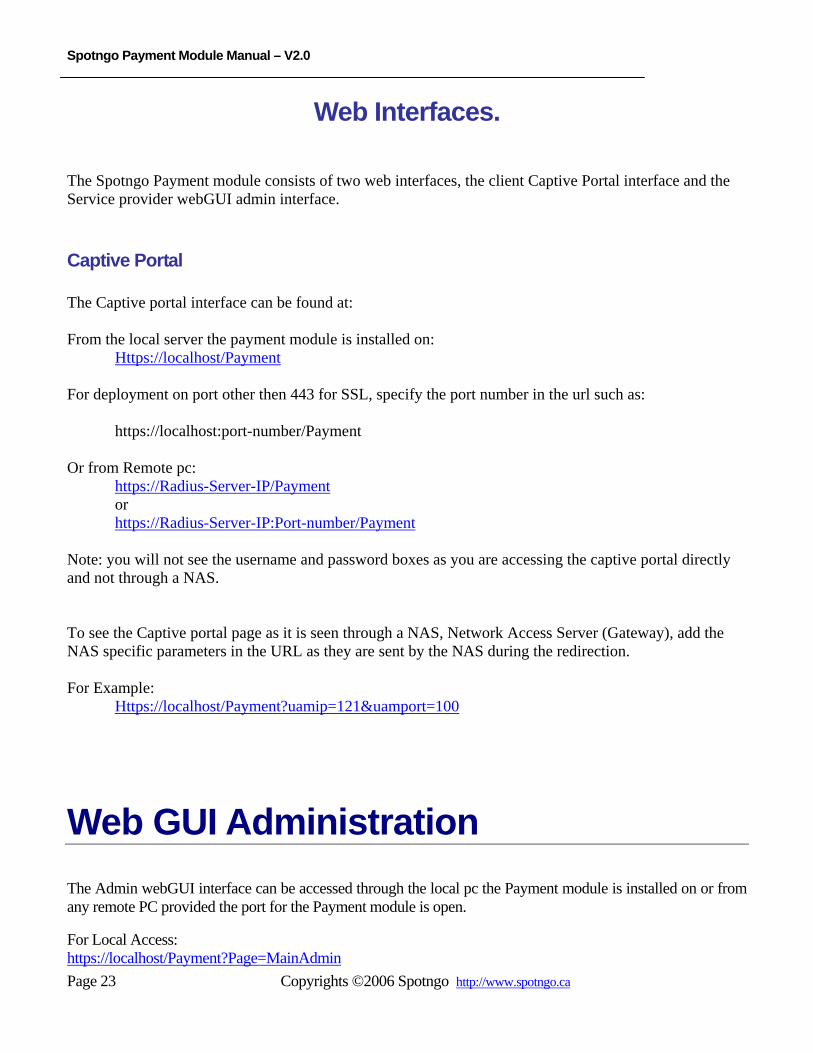
Web Interfaces. The Spotngo Payment module consists of two web interfaces, the client Captive Portal interface and the Service provider webGUI admin interface.
Captive Portal The Captive portal interface can be found at: From the local server the payment module is installed on:
Https://localhost/Payment For deployment on port other then 443 for SSL, specify the port number in the url such as:
https://localhost:port-number/Payment Or from Remote pc:
https://Radius-Server-IP/Payment or https://Radius-Server-IP:Port-number/Payment
Note: you will not see the username and password boxes as you are accessing the captive portal directly and not through a NAS. To see the Captive portal page as it is seen through a NAS, Network Access Server (Gateway), add the NAS specific parameters in the URL as they are sent by the NAS during the redirection. For Example:
Https://localhost/Payment?uamip=121&uamport=100
Web GUI Administration The Admin webGUI interface can be accessed through the local pc the Payment module is installed on or from any remote PC provided the port for the Payment module is open.
For Local Access: https://localhost/Payment?Page=MainAdmin

Spotngo Payment Module Manual – V2.0
Page 24 Copyrights ©2006 Spotngo http://www.spotngo.ca
Or https://localhost:port-number/Payment?Page=MainAdmin For Remote Access: https://Radius-Server-IP/Payment?Page=MainAdmin Or https://Radius-Server-IP:Port-Number/Payment?Page=MainAdmin The Default admin Username and passwords are: Username: admin Password: Password Note: you should always change the default login access credentials prior deployment. For ease of use, add the Captive Portal interface and the WebGUI interface to your web browser favorites or create short cuts on your desktop. To create short cuts on your desktop, drag and drop the website from the favorite list on to your desktop. Note: For security, do not save the admin username and password on share computers.
Changing Administrator Login Credentials - Username and password
Changing the Admin username and password for the Spotngo Payment Module admin interface can be done through the webGUI or through the Registry Editor should you require changing the admin credentials while not being able to access the Admin interface.
Changing Administrator Login Credentials through the WebGUI. In the Admin interface (https://localhost/Payment?page=MainAdmin )
1. In the side menu Go to advance Configuration. 2. Go to Authentication

Spotngo Payment Module Manual – V2.0
Page 25 Copyrights ©2006 Spotngo http://www.spotngo.ca
Figure 1: Advanced Configuration
a. Enter the new Username for the admin b. Enter the new Password c. Confirm new Password. d. Click on Save
The new username and password combination will take effect following a restart of the payment module service or a hardware restart. Screen shoot of the authentication screen:
Figure 2: Admin Authentication Credentials

Spotngo Payment Module Manual – V2.0
Page 26 Copyrights ©2006 Spotngo http://www.spotngo.ca
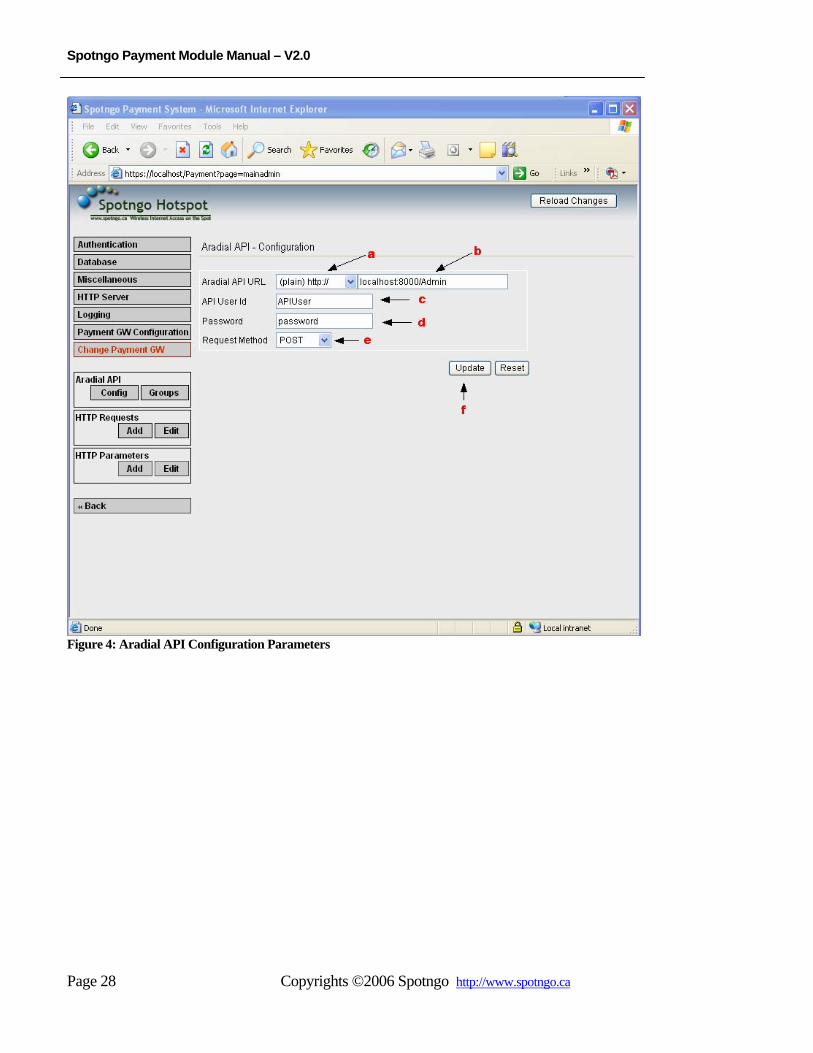
Setting the API Username and Password The API User name and password are used for the integration with Aradial. The API integration allows the Spotngo Payment Module to add or update client information based on the purchased plan. Note: a mismatch between the API Username and Password and the corresponding API Username and Password in Aradial will prevent the application from exchanging data with Aradial. In the Spotngo Payment Module Admin interface,
1. Select: Advanced Configuration 2. Under Aradial API, select: Config.
Figure 3: Aradial API Config

Spotngo Payment Module Manual – V2.0
Page 27 Copyrights ©2006 Spotngo http://www.spotngo.ca
The Aradial API Configuration consists of the following 5 parameters: Aradial API URL type: (Plain) http://: if the Aradial Admin interface is located at non secured interface accessed through http:// location. By default Aradial comes set to (plain) http:// and will be changed to (secure) https:// once the service provider deploy the SSL certificate to the Spotngo Payment Module captive portal interface or the Aradial built in Captive Portal interface. Easiest way to identify the protocol type is by observing the URL used to access the Aradial Admin interface. (Secure) https://: if the Aradial Admin interface is located at an SSL secured interface accessed through https:// These Parameters are based on your deployment of the Aradial Radius server. Aradial API URL Location: The relative location of the Aradial admin interface. By default for installation on the same server the Address would be: localhost:8000/Admin API User ID: Any user id for the interaction between the Aradial API interface and the Spotngo Payment Module as long as the user exist in Aradial with API permissions. (Default: APIUser) Password: Can be any password as long as it matches the one defined for the API user in Aradial. (Default: password) Request Method: In Most deployments the Parameter should be set to post as in most deployments the Spotngo will be posting the user information to the Aradial. Note: These Changes will take effect following the payment module service restart.
Spotngo Payment Module Manual – V2.0
Page 28 Copyrights ©2006 Spotngo http://www.spotngo.ca
Figure 4: Aradial API Configuration Parameters

Spotngo Payment Module Manual – V2.0
Page 29 Copyrights ©2006 Spotngo http://www.spotngo.ca
Service Plan Setup Spotngo enables service providers to offer flexible service plans. The service plans include Auto Expiry, Metering and combination of the two. Service Plan Variables: Plan Name: Unique Plan Identifier. (The plan name must not be changed for the duration of the plan validity as it will affect all associated transactions and vouchers.) Plan Description: Price: Enforcement Type: Price Group Identifier: Time Bank MB Auto Expire: (AutoExpire) – continuous use service plan. Clients will receive continuous access for the duration set in the Expiration Time from client first login regardless of the client actual usage. The time units are set in minutes. For example: when Expiration Time is set to 120 minutes, the client will receive service for 120 continuous minutes from client first login. Account activated at 1:05 PM by client first login will be valid through to 3:05 PM regardless of the amount of time the client utilized the service.
Screenshot 23 - Auto Expire Service Plan
Spotngo Payment Module Manual – V2.0
Page 30 Copyrights ©2006 Spotngo http://www.spotngo.ca
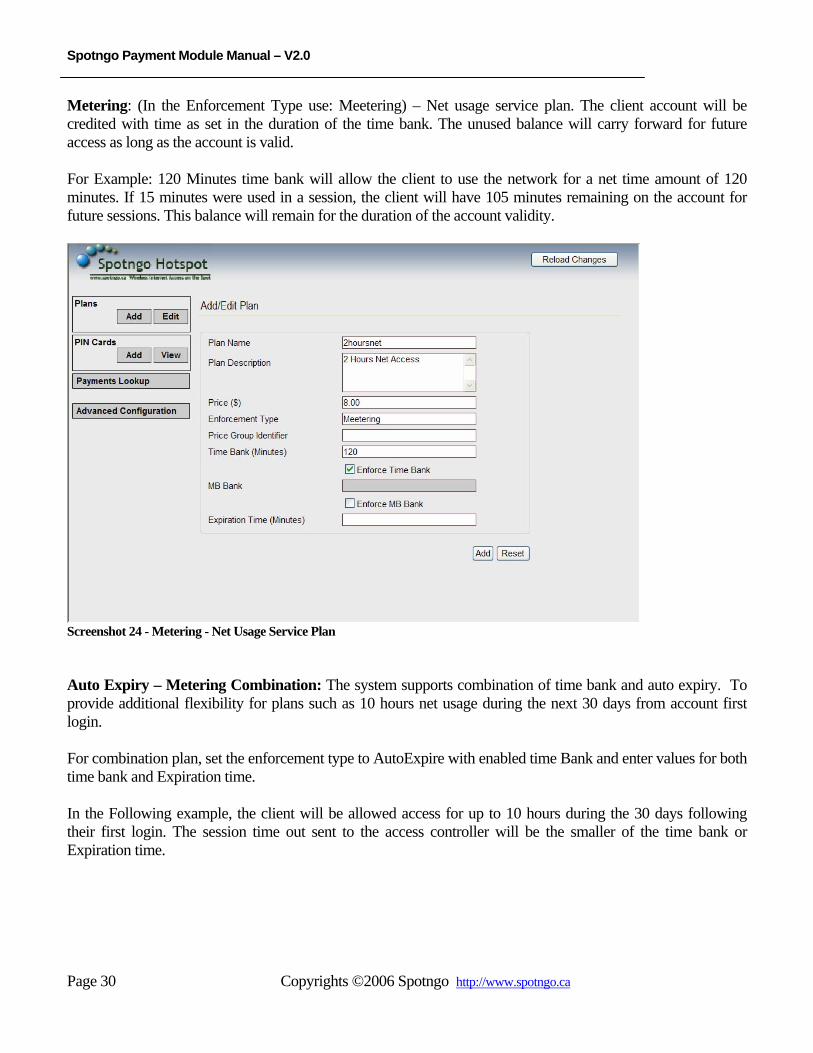
Metering: (In the Enforcement Type use: Meetering) – Net usage service plan. The client account will be credited with time as set in the duration of the time bank. The unused balance will carry forward for future access as long as the account is valid. For Example: 120 Minutes time bank will allow the client to use the network for a net time amount of 120 minutes. If 15 minutes were used in a session, the client will have 105 minutes remaining on the account for future sessions. This balance will remain for the duration of the account validity.
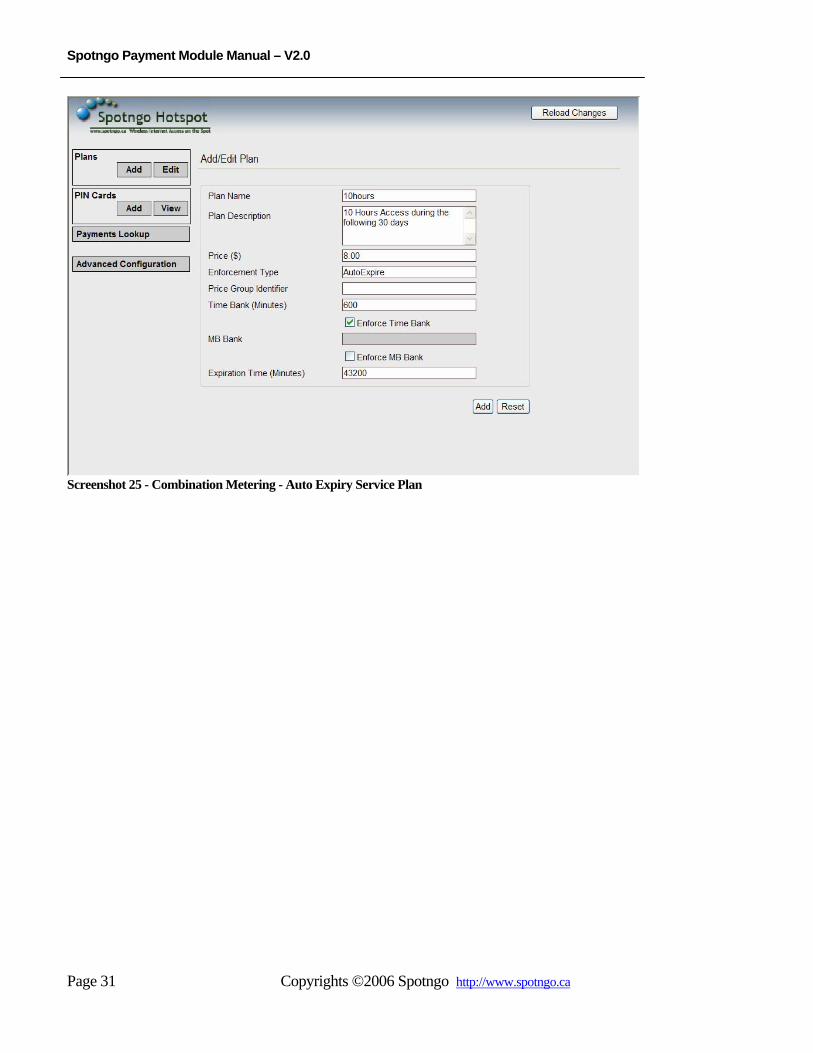
Screenshot 24 - Metering - Net Usage Service Plan Auto Expiry – Metering Combination: The system supports combination of time bank and auto expiry. To provide additional flexibility for plans such as 10 hours net usage during the next 30 days from account first login. For combination plan, set the enforcement type to AutoExpire with enabled time Bank and enter values for both time bank and Expiration time. In the Following example, the client will be allowed access for up to 10 hours during the 30 days following their first login. The session time out sent to the access controller will be the smaller of the time bank or Expiration time.
Spotngo Payment Module Manual – V2.0
Page 31 Copyrights ©2006 Spotngo http://www.spotngo.ca
Screenshot 25 - Combination Metering - Auto Expiry Service Plan

Spotngo Payment Module Manual – V2.0
Page 32 Copyrights ©2006 Spotngo http://www.spotngo.ca

Spotngo Payment Module Manual – V2.0
Page 33 Copyrights ©2006 Spotngo http://www.spotngo.ca
User’s Group assignment in Aradial The Spotngo Payment Module communicates with the Aradial Radius Server through the API interface. When Client self signup in Spotngo through the various methods available, the user is created in Aradial by the Spotngo Module. The Aradial API Group Assignment allows the service provider to select which group the user will be provisioned under in Aradial. By Default, Default Users created will be added under the Analog group, while metering users will be created under the Wifi Group. Service providers can further create service groups in Aradial to control client access attributes through service plans. These service plans will be set as groups in Aradial and service providers can set the service plan / group the user will be assigned to when added to Aradial. To select the groups the newly created users will be assigned to:
• Go to Advance Configuration • Go to Aradial API - Groups • Update the Group value one at a time (Note: Groups names are case sensitive and should be entered
exactly as provisioned in Aradial.) • Restart the Spotngo Service for the changes to apply.
Screenshot 26 - User creation - service group assignment

Spotngo Payment Module Manual – V2.0
Page 34 Copyrights ©2006 Spotngo http://www.spotngo.ca

Spotngo Payment Module Manual – V2.0
Page 35 Copyrights ©2006 Spotngo http://www.spotngo.ca
Appendix A - Installation instructions
General Spotngo Payment module is typically delivered as an email attachment SPNG Payment module v X.X.exe_. The underscore at the end of the exe file extension is to prevent it from being blocked by the various email software and servers. In order to run the program, rename the file without the underscore.
1. Upon running the module you will arrive at the welcome screen containing copyright warning, select Next > to accept and proceed with the installation.
2. Choose Destination Location. To simplify the installation and configuration , we recommend installing the application in the Aradial Default destination folder: C:\Program Files\Aradial
3. Start Installation, you are now ready to proceed with the installation. Select Next> to proceed with the installation or <Back if you would like to make any changes.
4. Installation Complete, upon successful installation, you will see: Spotngo Payment Module has been successfully installed. Press Finish the exit the installation.
5. Restart you server.
Port setting – Firewall Port Setting. The payment module by defaults uses ports 443 for the SSL secured captive portal and admin interfaces. In order to allow access to the Remote admin interface and for NAS, Network Access Servers to be able to access and redirect clients to the centralized Captive Portals, the port associated with the payment module has to be open in the Firewall. Note: The port settings for the Spotngo Payment Module can be changed in the Admin interface and should be changed accordingly in the firewall settings. To Open the ports in you firewall, please consult your firewall documentations for additional instructions.
Example: Windows firewall users can add a port exception as follows:
1. In Control Panel select Network and internet connections. (In Classic view select Windows Firewall)
2. Select Windows Firewall Settings 3. In the tab menu, select exceptions.

Spotngo Payment Module Manual – V2.0
Page 36 Copyrights ©2006 Spotngo http://www.spotngo.ca
Figure 5 - Firewall Exceptions
4. Select: Add Port.

Spotngo Payment Module Manual – V2.0
Page 37 Copyrights ©2006 Spotngo http://www.spotngo.ca
Figure 6 : Editing Firewall Exceptions
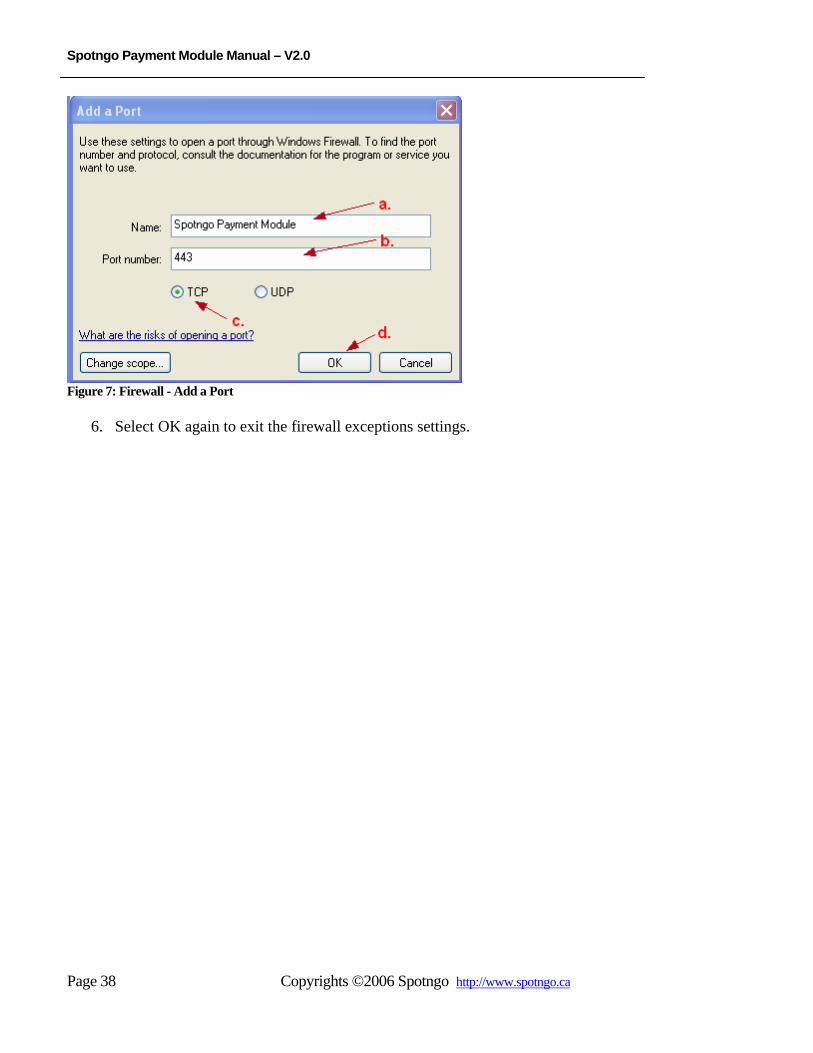
5. In the Add Port enter the following settings.
a. Name of the service, can be any name which will help you identify the service running on that port, in our example we used: “Spotngo Payment Module”.
b. Port number, the port number set for the Payment module in our example we used the default SSL port 443.
c. Protocol used for the Payment module: TCP d. Select OK to add the port.
Spotngo Payment Module Manual – V2.0
Page 38 Copyrights ©2006 Spotngo http://www.spotngo.ca
Figure 7: Firewall - Add a Port
6. Select OK again to exit the firewall exceptions settings.

Spotngo Payment Module Manual – V2.0
Page 39 Copyrights ©2006 Spotngo http://www.spotngo.ca
Changing the Administrator Credentials through the Registry Editor. Changing the Administrator credentials through the Registry editor allows gaining access back to the admin interface in case of lost / misplaced username password combination. Accessing the Registry Editor:
1. Click Start menu. 2. Select Run. 3. Type Regedit 4. Click OK.
I the new Registry Editor window:
1. Select: HKEY_LOCAL_MACHINE 2. Select: SOFTWARE 3. Select: Aradial 4. Select: PaymentModule 5. Select: 1.0 6. Select: Authentication
You will see a window similar to the one in the following figure.
Figure 8: Registry Editor - Authentication In the parameter window of the Registry Editor:
1. Right click on AdminLogin 2. Select Modify 3. In the new Edit String window, enter the value for the username and select OK.

Spotngo Payment Module Manual – V2.0
Page 40 Copyrights ©2006 Spotngo http://www.spotngo.ca
Figure 9: Changing the Administrator’s Username
4. Right Click on AdminPass 5. Select Modify 6. In the new Edit String window, enter the value for the Password and select OK
Figure 10: Changing the Administrator’s Password. The new username and password combination will take effect following a restart of the payment module service or a hardware restart.
Adding an API User in Aradial. In order for the Payment module to integrate with the Aradial Radius Server an API User has to be created in Aradial. In the Aradial Admin, go to User Manager then click Add User. Set the User ID and password as you previously set in the Spotngo Payment module Aradial API Config. In Aradial, the minimum requirements are: User ID: same as set in the Payment Module’s Aradial API Config. Password: Same as set in the Payment Module’s Aradial API Config. Group Name: Can be any of the groups as long as the user does not expire during the length of the required integration. Admin Rights: set to API

Spotngo Payment Module Manual – V2.0
Page 41 Copyrights ©2006 Spotngo http://www.spotngo.ca
Figure 11: Minimum Requirements for API User in Aradial Note: Only set the user to active if the API user will be used to for authentication. When installing on the same server, it is recommended not to set the user as active.
Securing Spotngo Payment Module Captive Portal and Admin Interface.
To insure the security of your data, client’s contact information, credit cards information and the admin interface, the module is designed to be deployed over secure SSL interface. By default the Payment module is shipped with a certificate issued by Spotngo.ca for the purpose of the initial integration and implementation. It is up to the provider to purchase their SSL Certificate from a recognized CA, Certification Authority prior deployment. In order to purchase an SSL certificate you will need two files created uniquely for your server, the SSL.key and Cert.csr. The Spotngo Payment module uses its own integrated web server supporting the openSSL technology for the creation of the SSL.key and Cert.csr the type of certificate used is PEM. The following two commands will be executed in Command window from within the openssl/out32dll directory.
Generating the private SSL.key. Using the openSSL library, from within the openssl/out32dll directory, issue the follow command: openssl genrsa -out ssl.key 2048 You unique, private key will be saved as ssl.key in the openssl/out32dll directory.
Generating the certificate request: Once the SSL.key is created, we can proceed to generate the certificate request, Cert.csr. From within the openssl/out32dll directory, issue the following command. openssl req -new -config ..\apps\openssl.cnf -key ssl.key -out cert.csr

Spotngo Payment Module Manual – V2.0
Page 42 Copyrights ©2006 Spotngo http://www.spotngo.ca
Once the above command is executed, you will be requested to enter the company and server information, this information will be used to further verify the validity of your certificate. Notes:
1. Pay special attention to the Common Name, CN when entering the information. The common is the URL of the server verification. For example for deployments as https://Server-IP/Payment use the server IP for the Common Name. For deployment through https://portal.domain.com , use portal.domain.com as your Common name.
2. Keep your SSL.key private and confidential, this is your unique random generated key for the encryption and decryption. Keep it in a safe place as you will not be able to recreate it and you will be required to install it in your server.
The cert.csr can be opened with Notepad and its text content will be used for the SSL Certificate purchasing request.
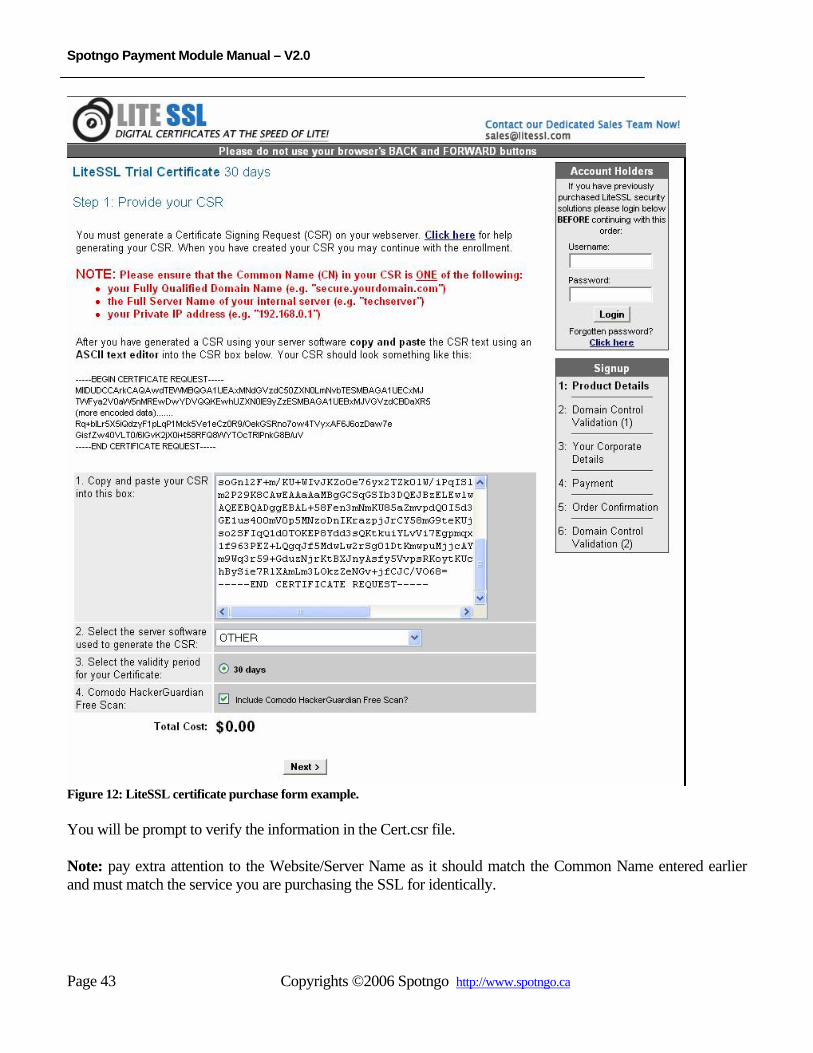
Purchasing the SSL Certificate from a Certification Authority, CA. Once you have generated the SSL.key and cert.csr, you can proceed to purchase a certificate from a Certification Authority. Different Certification Authorities offer various products, warrenties and services, chose the one most suitable for your application and requirements. Once you selected the Certificate Authority you would like to use, go to their website and fill their application form for the SSL certificate. The following is an example using the LiteSSL CA. We have chosen this CA as they offer 30 days trial certificate which works great for our example here. Additional information on LiteSSL can be found at: http://litessl.com Example of purchasing SSL certificate from a LiteSSL CA:
1. Go to: www.litessl.com 2. Click on the Lite SSL Trial 30 day’s free icon. 3. You will be redirected to the screen requiring you to enter your certificate request: cert.csr 4. Open you cert.csr file created earlier in notepad, copy its content and paste it in the box for the
certificate request. 5. As the web server used by Spotngo Payment Module is not listed, select other for the web server. 6. Select Next to continue.
Spotngo Payment Module Manual – V2.0
Page 43 Copyrights ©2006 Spotngo http://www.spotngo.ca
Figure 12: LiteSSL certificate purchase form example. You will be prompt to verify the information in the Cert.csr file. Note: pay extra attention to the Website/Server Name as it should match the Common Name entered earlier and must match the service you are purchasing the SSL for identically.

Spotngo Payment Module Manual – V2.0
Page 44 Copyrights ©2006 Spotngo http://www.spotngo.ca
Spotngo Payment Module Manual – V2.0
Page 45 Copyrights ©2006 Spotngo http://www.spotngo.ca
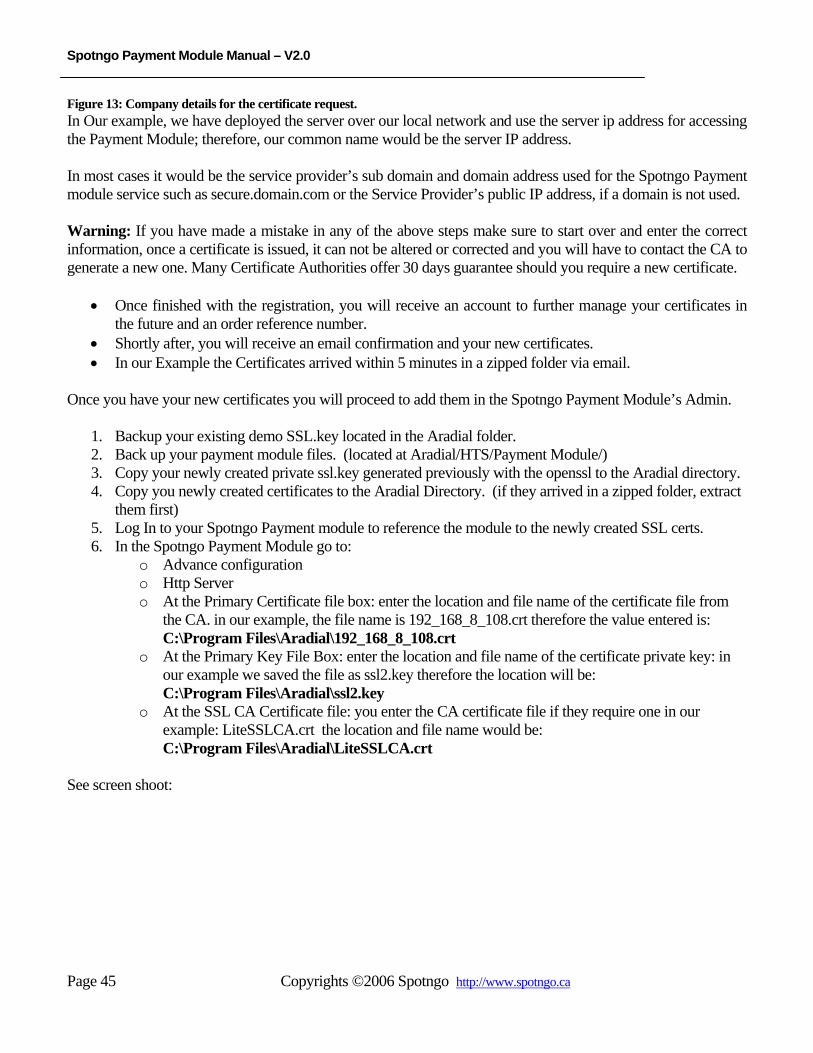
Figure 13: Company details for the certificate request. In Our example, we have deployed the server over our local network and use the server ip address for accessing the Payment Module; therefore, our common name would be the server IP address. In most cases it would be the service provider’s sub domain and domain address used for the Spotngo Payment module service such as secure.domain.com or the Service Provider’s public IP address, if a domain is not used. Warning: If you have made a mistake in any of the above steps make sure to start over and enter the correct information, once a certificate is issued, it can not be altered or corrected and you will have to contact the CA to generate a new one. Many Certificate Authorities offer 30 days guarantee should you require a new certificate.
• Once finished with the registration, you will receive an account to further manage your certificates in the future and an order reference number.
• Shortly after, you will receive an email confirmation and your new certificates. • In our Example the Certificates arrived within 5 minutes in a zipped folder via email.
Once you have your new certificates you will proceed to add them in the Spotngo Payment Module’s Admin.
1. Backup your existing demo SSL.key located in the Aradial folder. 2. Back up your payment module files. (located at Aradial/HTS/Payment Module/) 3. Copy your newly created private ssl.key generated previously with the openssl to the Aradial directory. 4. Copy you newly created certificates to the Aradial Directory. (if they arrived in a zipped folder, extract
them first) 5. Log In to your Spotngo Payment module to reference the module to the newly created SSL certs. 6. In the Spotngo Payment Module go to:
o Advance configuration o Http Server o At the Primary Certificate file box: enter the location and file name of the certificate file from
the CA. in our example, the file name is 192_168_8_108.crt therefore the value entered is: C:\Program Files\Aradial\192_168_8_108.crt
o At the Primary Key File Box: enter the location and file name of the certificate private key: in our example we saved the file as ssl2.key therefore the location will be: C:\Program Files\Aradial\ssl2.key
o At the SSL CA Certificate file: you enter the CA certificate file if they require one in our example: LiteSSLCA.crt the location and file name would be: C:\Program Files\Aradial\LiteSSLCA.crt
See screen shoot:

Spotngo Payment Module Manual – V2.0
Page 46 Copyrights ©2006 Spotngo http://www.spotngo.ca
Figure 14: SSL certification setting in the Spotngo Payment Admin. Warning: Make sure the files exist at the paths specified and referenced correctly or the Spotngo Payment Module will not start. For the new setting to take effect, restart the Spotngo Payment Module service.
Trouble shooting Spotngo Payment Module failure to start due to incorrect SSL certificates’ setting.
Spotngo Payment Module Manual – V2.0
Page 47 Copyrights ©2006 Spotngo http://www.spotngo.ca
In case of failure of the Spotngo Payment Module to start due to incorrect or missing SSL files and setting, you can always use the Registry Editor to verify or change the file names and path for the SSL settings. Example using the registry editor to verify the SSL certificates files and location:
1. Click Start menu. 2. Select Run. 3. Type Regedit 4. Click OK.
I the new Registry Editor window:
5. Select: HKEY_LOCAL_MACHINE 6. Select: SOFTWARE 7. Select: Aradial 8. Select: PaymentModule 9. Select: 1.0 10. The files are referenced in two location: HTTP Server and SSL 11. Verify the files are referenced correctly including the file names, locations, and extensions. 12. Verify the files exist in the location specified.
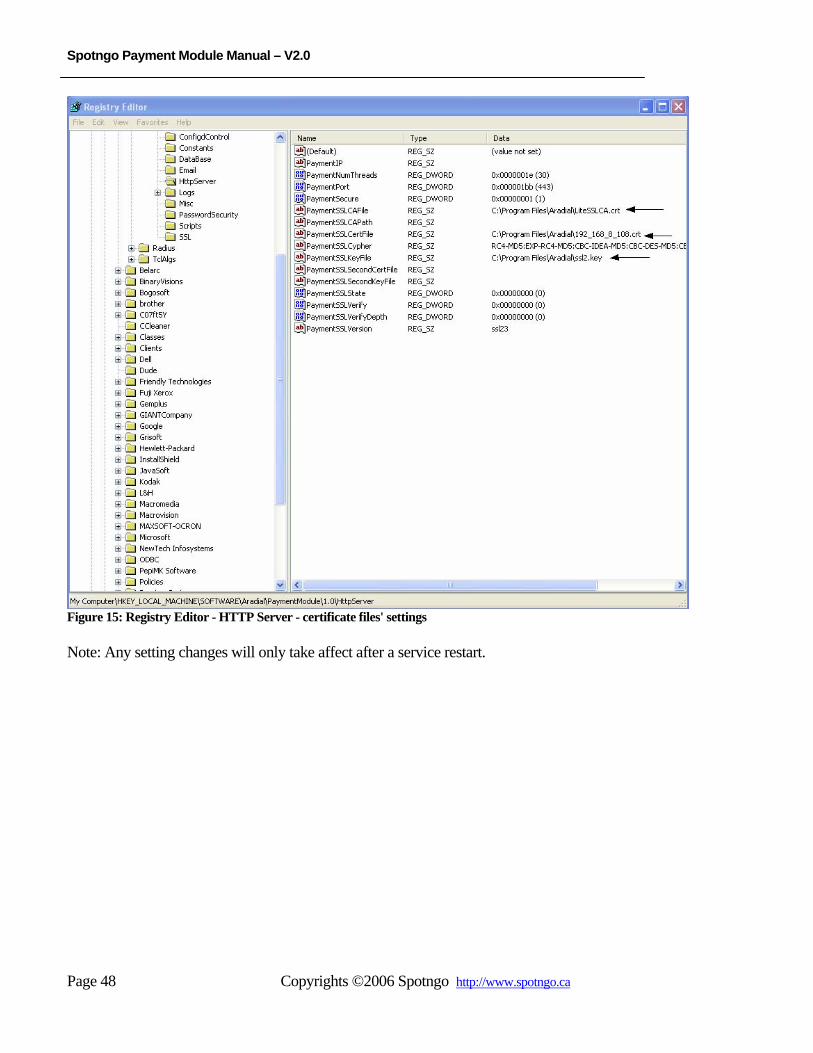
See Screen shot bellow for the registry editors’ HTTP Server settings for the SSL certificate files.
Spotngo Payment Module Manual – V2.0
Page 48 Copyrights ©2006 Spotngo http://www.spotngo.ca
Figure 15: Registry Editor - HTTP Server - certificate files' settings Note: Any setting changes will only take affect after a service restart.
Spotngo Payment Module Manual – V2.0
Page 49 Copyrights ©2006 Spotngo http://www.spotngo.ca
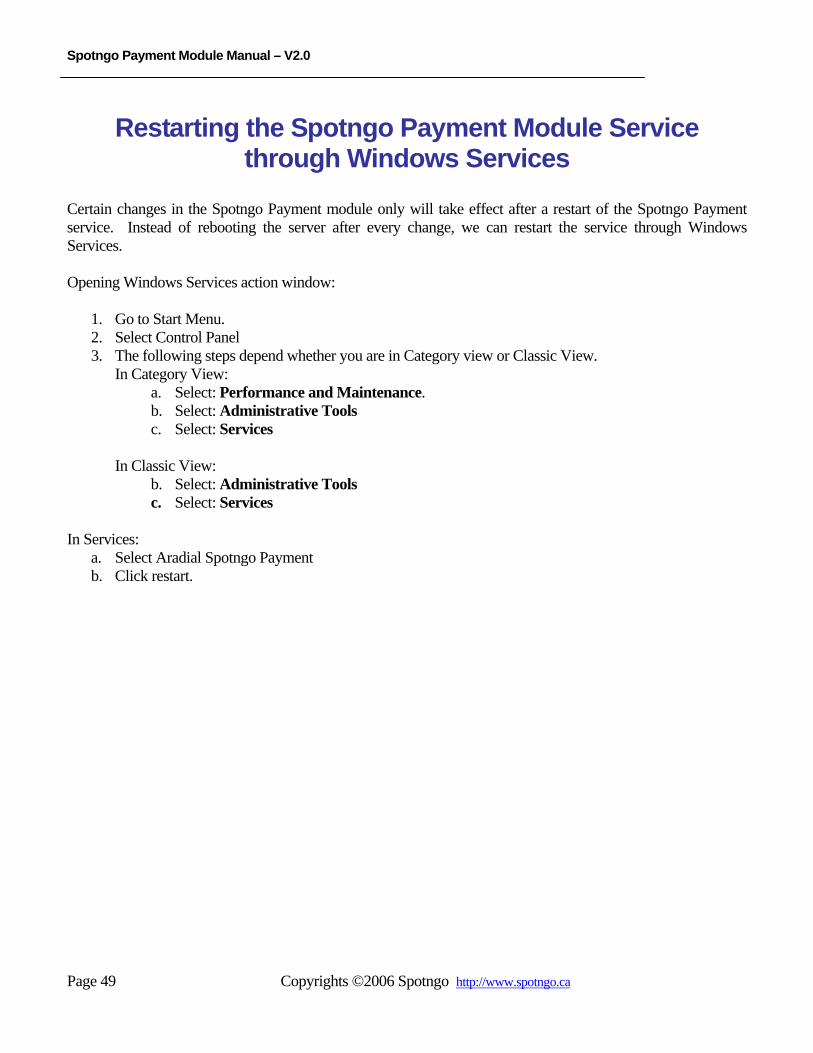
Restarting the Spotngo Payment Module Service through Windows Services
Certain changes in the Spotngo Payment module only will take effect after a restart of the Spotngo Payment service. Instead of rebooting the server after every change, we can restart the service through Windows Services. Opening Windows Services action window:
1. Go to Start Menu. 2. Select Control Panel 3. The following steps depend whether you are in Category view or Classic View.
In Category View: a. Select: Performance and Maintenance. b. Select: Administrative Tools c. Select: Services
In Classic View:
b. Select: Administrative Tools c. Select: Services
In Services:
a. Select Aradial Spotngo Payment b. Click restart.

Spotngo Payment Module Manual – V2.0
Page 50 Copyrights ©2006 Spotngo http://www.spotngo.ca
Setting the API Username and Password The API User name and password are used for the integration with Aradial. The API integration allows the Spotngo Payment Module to add or update client information based on the purchased plan. Note: a mismatch between the API Username and Password and the corresponding API Username and Password in Aradial will prevent the application from exchanging data with Aradial. In the Spotngo Payment Module Admin interface,
1. Select: Advanced Configuration 2. Under Aradial API, select: Config.
Figure 16: Aradial API Config The Aradial API Configuration consists of the following 5 parameters:

Spotngo Payment Module Manual – V2.0
Page 51 Copyrights ©2006 Spotngo http://www.spotngo.ca
Aradial API URL type: (Plain) http://: if the Aradial Admin interface is located at non secured interface accessed through http:// location. By default Aradial comes set to (plain) http:// and will be changed to (secure) https:// once the service provider deploy the SSL certificate to the Spotngo Payment Module captive portal interface or the Aradial built in Captive Portal interface. Easiest way to identify the protocol type is by observing the URL used to access the Aradial Admin interface. (Secure) https://: if the Aradial Admin interface is located at an SSL secured interface accessed through https:// These Parameters are based on your deployment of the Aradial Radius server. Aradial API URL Location: The relative location of the Aradial admin interface. By default for installation on the same server the Address would be: localhost:8000/Admin API User ID: Any user id for the interaction between the Aradial API interface and the Spotngo Payment Module as long as the user exist in Aradial with API permissions. (Default: APIUser) Password: Can be any password as long as it matches the one defined for the API user in Aradial. (Default: password) Request Method: In Most deployments the Parameter should be set to post as in most deployments the Spotngo will be posting the user information to the Aradial. Note: These Changes will take effect following the payment module service restart.

Spotngo Payment Module Manual – V2.0
Page 52 Copyrights ©2006 Spotngo http://www.spotngo.ca
Figure 17: Aradial API Configuration Parameters