spaghetti bridges the pasta sensations! take a look at some designs……
TRANSCRIPT

Spaghetti BridgesThe Pasta Sensations!
Take a look at some designs…….


Overview:Spaghetti Bridge Design Project
You will be building a bridge that you designed out of spaghetti! You can only use spaghetti and glue.
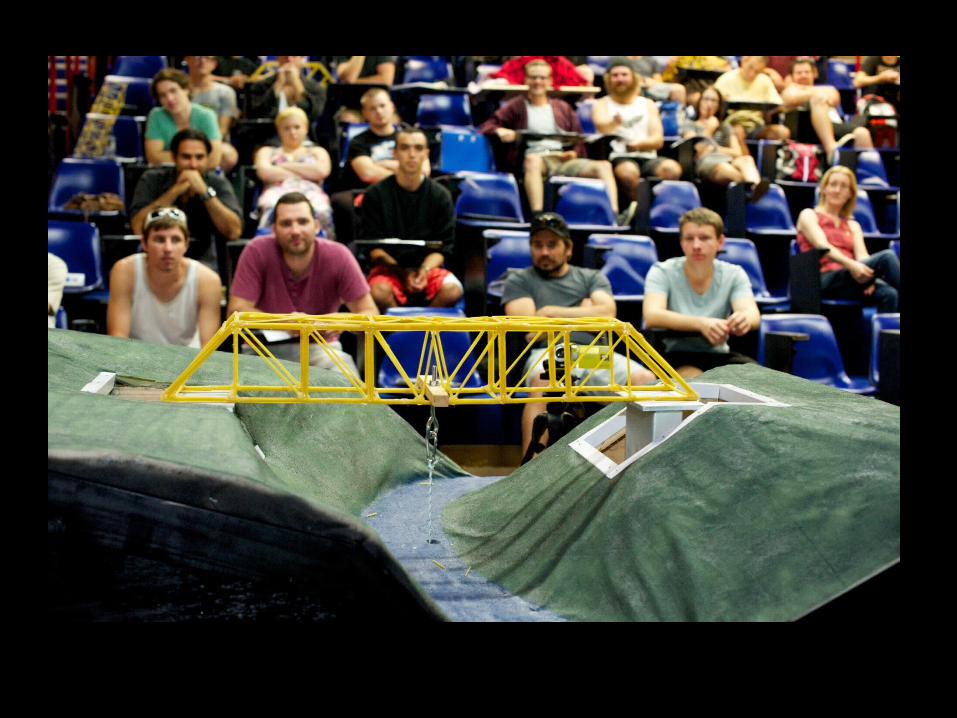
Once you have built your bridge, we will weigh it, then we will use destructive testing to determine your success.
In reality, we want our bridges to be very strong, but easy and inexpensive to build.
Therefore, your success will be determined by:-Overall weight of your completed bridge (dead load)-Weight that your bridge holds up (live load)
The team with the lightest, strongest bridgewill receive the highest score and a prize!!!!!

This is a balsa woodbridge. It is very similarto our spaghetti version.
Things To Consider:Your bridge will have fourmain parts.- Two sides- The span (roadway)- Two Piers (abutments)- Trusses- You should build these parts
flat,and then assemble them into a3D bridge- similar to the 4walls of a house.
How To Be Successful:Work together with your partner! There ismore than enough work to be done. Manyhands make light work, so let’s go!Build carefully. Each piece counts. Yourbridge may hold significantly more if it issymmetrical in both design and construction.If you have a weak side, the force of the testwill crush that side first, and it will pull thegood side down with it!

Essential Criteria of Bridge: Materials are hot glue and spaghetti only
• Each bridge MUST have a free span that is between 30 to 35 centimeters
• Span must have a reasonable roadway which a “vehicle” could travel over (toy car)
• Bridges MUST be supported on each end by piers that will fit within a 10cm x 10cm space. These are the only supports allowed.
• Lowest part of span MUST be at least 7.5cm above the “water”. This means if a truss is below the span, the bottom of the truss must meet those specifications.
• Bridge may be any height. • Bridge MUST have some kind of truss design. This truss can
be above or below the span or both. • Bridge should show symmetry in design

SPAGHETTI BRIDGE DESIGN PROJECTStep 1: Choose a design/pattern for your truss bridge. You can analyze the types of trusses on slides 13-14. You must have at least one truss design on your bridge. You can combine truss designs. You can have a truss above the span or under the span – or both!
Step 2: On the graph paper, design the parts of your truss bridge. In designing your parts, remember that triangles are the strongest shape. Keep thinking symmetry and balance in your design!
Step 4: Once your drawings are complete, add dimensions to them on the graph paper design. Each square on your graph paper is 2.5cm x 2.5cm Step 5: You can choose to build the parts of your bridge directly on top of the graph paper. Taping wax paper to the graph paper allows you to build on it without things “sticking”.
Step 6: After construction is finished, you will weigh your bridge to see how many ounces it weighs.
Step 7: We will test the bridges to find out what load they will hold in pounds. Then we Determine the success ratio: Weight of Bridge/Load. This success ratio will determine the overall winner for LOAD. There will also be a winner for Bridge Design that will consist of originality, quality of design and symmetrical aspects. The art teacher will be the judge for the design.
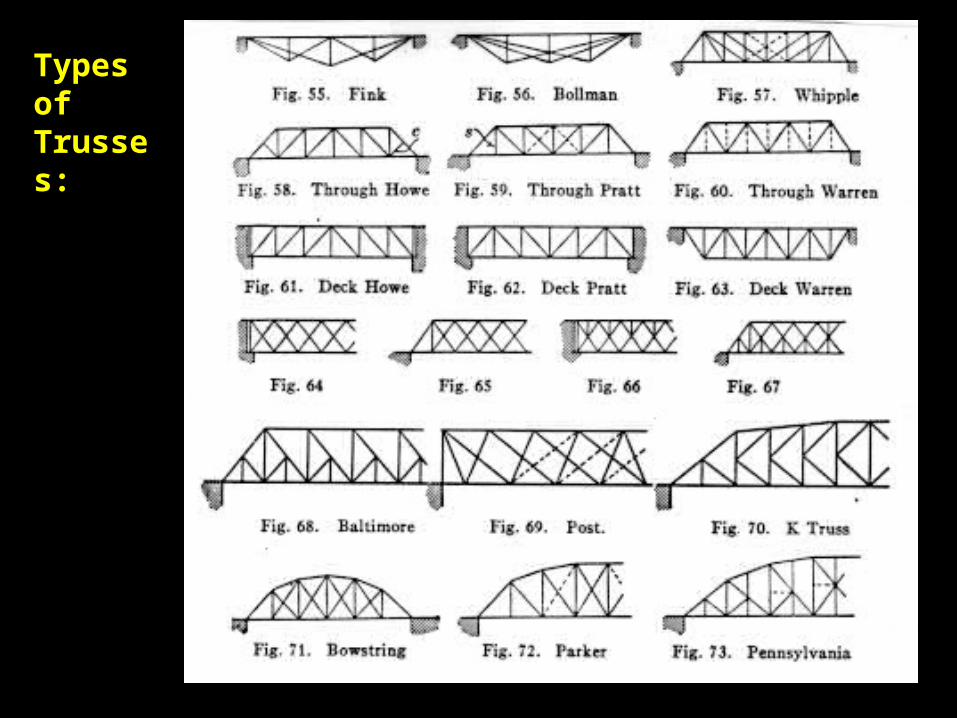
Types of Trusses:


FOOD FOR THOUGHT……

Design and construction ideas:
1) Triangles are a construction engineer’s best friend, i.e.there are no bending moments in triangular elements.
Good design
Bad design (truss strength depends on bendingstrengths of members)

Design and construction ideas (cont.):
2) Taller is better: note loads on these two structures.

Design and construction ideas (cont.):
.3) If a number of strands of spaghetti are to be used together as a single member, do not glue their entire lengths. “Spot” glue them at intervals of about 1”. This will provide adequate strength without adding excessive weight.
4) For economy of time, joints can be “overlaid” not “butted”. Butt joints require careful sizing. Overlaid joints do not. Excess material may be cut off after assembly.
Butt joints Overlaid joints

http://youtu.be/buhP8jcvGjA
Take a look at two girls explaining how they made their spaghetti bridge
HappyBridge
Building!