spa pool manual - alpinespas.co.nz · 4 1. introduction you are the proud new owner of an alpine...
TRANSCRIPT

1
SPA POOLMANUAL

2

3
1 Introduction........................................................................................................................................................
2 Welcome / Spa Pool Record....................................................................................................................
3 Important Safety & Operating Instructions............................................................................. Placing the spa pool........................................................................................................................................
4 Installation Instructions........................................................................................................................... Spa pool contents............................................................................................................................................. Assembling the accessories...................................................................................................................... Pre-fillprocedure............................................................................................................................................. Filling the spa pool........................................................................................................................................... Electricalwiring/poweringup................................................................................................................. 5 Startup & Refill Procedure..................................................................................................................... Installingthefiltercartridges.................................................................................................................... Switchingon&heatingup.......................................................................................................................... Balancing & sanitizing the water............................................................................................................. 6 Spa Pool Usage Guide & Tips................................................................................................................ Topsidecontrolpanelquickguides...................................................................................................... Spa pool operation - Balboa control systems................................................................................ Spa pool operation - SpaNet control systems...............................................................................
7 Getting to Know Your Spa Pool........................................................................................................... Spapooloverviewbymodel...................................................................................................................... Spapoolpartslabelled................................................................................................................................... Pressurediverter&airventurivalves.................................................................................................. Waterfall control................................................................................................................................................ Air blower & Aromatherapy....................................................................................................................... LED lights............................................................................................................................................................... Jets............................................................................................................................................................................. Soundsystem..................................................................................................................................................... 8 Spa Pool Care & Maintenance.............................................................................................................. Draining the spa pool...................................................................................................................................... Cleaningthefilters........................................................................................................................................... Cleaning the acrylic shell............................................................................................................................... Cleaning & maintaining the cabinet...................................................................................................... Caring for the spa pool cover..................................................................................................................... Performing a pipe clean................................................................................................................................. Leaving the spa pool short term............................................................................................................. Leaving the spa pool long term............................................................................................................... Cleaningschedule/checklist....................................................................................................................
9 Service Information...................................................................................................................................... Pumpmaintenance......................................................................................................................................... Barrelunionmaintenance........................................................................................................................... U.Vbulbreplacement...................................................................................................................................... Technicalsupportcontact........................................................................................................................... Troubleshooting.................................................................................................................................................
4
5
69
101010111214
16161920
21212630
343478828283848486
88888989909091929394
959595969697
TABLE OF CONTENTS

4
1. INTRODUCTION
YouaretheproudnewownerofanAlpineSpa!Itisourpleasuretowelcomeyou
totheAlpineSpafamily.Luxurioushourssoakingunderthestarswhilstenjoying
goodcompanyandhydrotherapymassage,isnowreadyandwaitingforyouevery
day,allwithintheconfinesofyourownbackyard!
Wetakeexceptionalprideinourproductandhaveworkedhardtoensureallour
spapoolsincludenotonlythelatestinspapooltechnology,butalsotheabsolute
bestindesign,qualityandconstruction.Soyoucanrestassuredourproductswill
lastyouformanyrelaxingyearstocome.
Cheers,
The Alpine Spas Team
Congratulations!

5
Please fill in this information below and keep on hand for future reference. Alpine Spas may request this information upon the submission of a service or technical request. Your Name.................................................................................................................................................... Spa Pool Model........................................................................................................................................
System Controller Balboa or SpaNet.....................................................................................
Serial Number (found on silver cabinet plaque)............................................................. Date of purchase.....................................................................................................................................
Date of installation.................................................................................................................................
2. WELCOME / SPA POOL RECORD
Spa Pool Details
Your Personal Record
Welcome
Pleasetakethetimetoreadthisentiremanualbeforeoperatingthespapool.Thismanualcontainsimportantinformationfortheownerandwesuggestkeepingitinasafeplaceforfuturereference. Everyefforthasbeenmadetoensuretheaccuracyofthismanual,howeverAlpineSpasreservestherighttochangeorimprovetheirproductsandthespecificationswithoutnotification. Ifyouhaveanyquestionsaboutthismanualorthespapool,pleasecontactAlpineSpas for assistance.
Thisownersmanual,alongwithotherhelpfulmaterialcanbedownloadedfromoursupportpage:http://alpinespas.co.nz/support/

6
3. IMPORTANT SAFETY INSTRUCTIONS
WHENINSTALLINGANDUSINGTHISSPAPOOLANDITSELECTRICALCOMPONENTS,
BESURETOFOLLOWBASICSAFETYPRECAUTIONSINCLUDINGTHEFOLLOWING: 1. WARNING: Toreducetheriskofinjury,donotpermitchildrentousethisproductunlesstheyareclosely supervisedatalltimes.
2. DANGER: Riskofaccidentaldrowning.Extremecautionmustbeexercisedtopreventunauthorizedaccess bychildren.
3. DANGER: Riskofinjury.Neveroperatethespapoolifsuctionfittingsarebrokenormissing.
4. DANGER: Riskofelectricalshock.Donotpermitanyelectricalappliancesuchasalight,radio,television,etc. within1.5mofaspapoolunlesssuchappliancesareinstalledandbuilt-inbythemanufacturer.
5. ELECTRICAL SUPPLY: Theelectricalsupplyforthisproductmustincludeasuitablyratedswitch&RCDto openallungroundedsupplyconductorstocomplywiththenationalelectricalstandards.This disconnectmustbereadilyaccessibleandvisibletothespapooloccupantbutinstalledatleast 1.5m from the spa pool’s water.
6. WARNING: Toreducetheriskofinjury: a)Watertemperaturebetween38°Cand42°Cisconsideredsafeforahealthyadult.Lowerwater temperaturesarerecommendedforyoungchildrenandwhenthespapooluseexceeds10minutes.
b)Sinceexcessivewatertemperatureshaveahighpotentialforcausingfetaldamageduring earlymonthsofpregnancy,pregnantwomenshouldlimitspapooluseandwatertemperaturesto nomorethan38°C.
c)Donotusealcohol,drugs,ormedicationbeforeorduringspapoolusage.
d)Personswithahistoryofheartdisease,loworhighbloodpressure, circulatorysystemproblems,ordiabetesshouldconsultaphysicianbeforeusingaspapool.
e)Personsusingmedicationshouldconsultaphysicianbeforeusingthespapoolassome medicationmayinducedrowsiness,whileothermedicationmayaffectheartrate,bloodpressure, andcirculation.
7. WARNING: Topreventelectrocution,donotmodifyorconnectanyadditionalauxiliarycomponents(for examplecable,speakers,headphones,additionalaudio/videocomponents,etc)tothesystem.
READ AND FOLLOW ALL INSTRUCTIONS!

7
8. CAUTION: Riskofelectricalshock.Donotservicethespapoolcontrolleryourselfasopeningormodifyingthe controllermayexposeyoutodangerousvoltageorotherriskofinjury.Referallservicingto qualifiedservicepersonnelunlessadvisedotherwisebytheretailer.
9. CAUTION: Riskofelectricalshock.Ifthepowersupplyconnectionsorpowersupplycord(s)are damaged,ifwaterisenteringtheaudio/videocompartmentoranyelectricalequipment compartmentarea,iftheprotectiveshieldsorbarriersareshowingsignsofdeterioration,orif therearesignsofotherpotentialdamagetotheunit:turnofftheunitandrefertheservicingto Alpine Spas.
10. Thespapoolshouldbesubjecttoperiodicroutinemaintenanceandcareaccordingtothe‘SpaPool Care&Maintenance’and‘ServiceInformation’sectionsofthismanual.
11. Installationofthespapoolforanythingotherthanaresidentialdwellingmayresultinvoidingthe manufacturer’swarranty.Pleasecontactthedealertoconfirm.
12. Donotbringanyobjectintothespapoolthatcoulddamagethespapoolshell.
13. Neverinsertanyobjectintoanyopening.
14. WARNING: Donotsitonthespapoolcoverorplaceobjectsonit.
15. Removeanywaterordebristhatmaycollectonthespapoolcover.
16. WARNING: Donotusethespapoolimmediatelyafterstrenuousexercise.
17. Ifyoufeelpainordizzinessatanytimewhileusingthespapool,discontinueuseandcontactaphysician.
18. WARNING: Observereasonabletimelimitswhenusingthespapool.Longexposuresathightemperaturescan causehighbodytemperatures.Symptomsmayincludedizziness,nausea,fainting,drowsiness, andreducedawareness.Theseeffectscouldpossiblyresultindrowningorhypothermia.
19. WARNING: Thespapool’sjetsproduceastreamofwaterwithrelativelyhighpressure.Prolongedexposureto localizedareasofthebodymaycausebruisestotheskin.
20. WARNING: Toavoidriskofdrowning,thespapoolcovershouldbeinplaceandproperlylatchedwhenspapool isnotinuse.
21. IMPORTANT: Readandunderstandthewarningsonthespapoolcover.

8
3. IMPORTANT OPERATING INSTRUCTIONS
DO NOT leavethespapoolemptyandexposedtodirectsunlightwithoutit’scover-doingsomaydamagetheacrylic.
DO NOT powerthespapoolwithoutfirstfillingwithwater.
DO NOT allowthewaterleveltofallbelowthefilter/skimmerbox.ThewaterlevelshouldbekeptinlinewiththeperimeterLEDsoratleast50mmabovethebottomoftheskimmerboxatalltimes.
DO NOT allowanypersonstoplacetheirheadunderthewater.
DO NOT rollorslidethespapoolonitsside.
DO NOT useanychemicalsorwaterbalancingproductsinthespapool,otherthanthosesoldbyAlpineSpasLtd,PureSpasLtdorSpaSuppliesLtd.
FAILING TO READ AND UNDERSTAND THE BELOW INSTRUCTIONS MAY VOID YOUR SPA POOL WARRANTY.
DO ensureawatermaintenanceregimeisusedandfollowedregularly.Failingtobalancewaterorsanitizecorrectlycandamagespapoolcomponentsandvoidwarranty.Aguideisprovidedwhichshouldbefollowedcarefully. DO ensurethespapoolcoverisplacedonthespapoolandlockedwhennotinuse. DO performaregularspapoolcleaningscheduleasinstructedbythismanual. DO drainandrefillyourspapoolatleastevery3-4monthsormorefrequentlyifrequired. DO ensureatleast4hoursoffiltrationisperformedbythespapooleachday(thisissetasadefault:2hours,twiceperday). DO ensurethespapoolcoverisopenedeveryfewdaysforafewminutes(ifunused)toavoidbuildupofgassesunderthecover.

9
Choosing the Best PositionWhenchoosingwheretopositionyourspapool,thefirstthingyoushouldconsideriswhatisgoingbeneathit.Yourspapoolisveryheavy,weighinganythingbetween1000kgand2500kgwhenfilled.Itisthereforeveryimportantyouchooseanadequatefoundationthatisstrongandleveltoensurethereisnoshiftingorstrainon the spa pool shell or framing.
Thebasewerecommendyouuseiseithera100mmconcretepad,orareinforceddeck.Ifyouchooseadeckasabase,pleasecheckthatitcomplieswithallNZbuildingstandardsandthatitsmaxloadratingwilladequatelywithstandyourspapool’sweight,plusthetotalbatherloadweight.
Check DrainageYouneedtobesuretheareainwhichthespapoolisplacedhasenoughdrainagecapacitytohandletheentirewatercontentofthespapool.Intheeventofspillage,areasaroundthespapoolmaybecomewet;therefore,allflooring,furniture,wallsandadjacentstructuresshouldbemoisture-resistant.
Check Service AccessItisimportanttoconsidertheaccesstothecabinetsurroundingthespapool.Intheunlikelyeventofaleakorissuewithcomponents,aserviceagentmayrequireaccesstoaparticularcabinet.Weadviseleavinga600mmperimeterofspacearoundtheentirespapool,otherwisethespapoolmayneedtobemovedbythecustomerintoapositionsuitableforatechnicianatthetimeofservice. Detailed Installation GuideFormoredetailedinformationandtipsonpositioningandinstalling,wehighlyrecommendyoureadthroughour‘Pre-DeliveryGuide’.Theguidewasemailedtoyouupon/afterpurchase.Acopycanbedownloadedfromthelinkatthebottomofthis page.
Placing/Installing the Spa Pool
Downloadthe‘Pre-DeliveryGuide’fromoursupportpage:http://alpinespas.co.nz/support/
FAILURE TO FOLLOW THE INSTRUCTIONS IN THE PRE-DELIVERY GUIDE MAY RESULT IN VOIDING YOUR SPA POOL WARRANTY.

10
4. INSTALLATION INSTRUCTIONS
Separate Items:
Items Packaged Inside the Spa Pool:
Items Packaged Inside the iPack:
SPA POOL CONTENTS
1-2 Filter/s &Two Filter Mesh(SelectModels)
Spa Pool Safety Cover
Spa Pool2-Tier Steps
Spa Pool
1 Spare Vertical Slat(SelectModels)
iPack
Spa Pool Water Care Kit
Cover Lifter (Optionalextra)
TwoFilterLid Cover Caps(Selectmodels-GrateSkimmer)
Drain Valve to GardenHoseAttachments
Spa Pool Cover Thecoverrequiresminimalinstallationotherthanunpackingandplacingontopofthespapool.Thereare8safetylockshangingoffthesidesofthecoverwhichneedtobescrewedintothespapoolcabinetbythecustomer.Fullinstructions,screwsandcoverkeyscanbefoundattachedtooneofthehangingsafetylocks.
Spa Pool StepsAssemblingthetwo-tierstepsisself-explanatory.Simplypresstogether-noscrewsortoolsrequired.Thestepsmeasure890x600mm(WxL).
Note:TheYukonSpausescombinationlocksratherthankeylocks.Thestepsareapre-assembled3-4tierladder.Screwsarenotincludedwiththecover.
ASSEMBLING THE ACCESSORIES
CableExitGrommet & ControllerGland (SelectModel)
Aromatherapy (Selectmodels)
Important Documents
Spa PoolWater Care
HandbookEasy to use illustrated guide to water maintenance.
0800 99 33 88 www.alpinespas.co.nz [email protected]
Copyright Alpine Spas Ltd - 2017 - Ver 1.3

11
Spa Pool Cover Lifter (Optional Extra)Thecoverlifterneedstobeassembledontothespapool,pleaseseetheinstructionsinthecoverlifterboxandfollowthemcarefully.Twobracketsneedtobesecuredintooppositesidesofthespapoolcabinet.Certainsetupsmayhaverestrictions-seeour‘CoverLifterInstallationGuide’forconfirmation.
Downloadthe‘CoverLifterInstallationGuide’fromoursupportpage:http://alpinespas.co.nz/support/
Steps to Prepare for Filling:
PRE-FILL PROCEDURE
BEFORE FILLING, START HERE!
FAILING TO FOLLOW THIS PROCEDURE MAY RESULT IN ISSUES STARTING UP THE SPA POOL OR VOIDING WARRANTY.
Checkthesilverplaqueonthesideofspapoolcabinet(orseeyourinvoice)tofindyourspapoolmodel’sname.Seepages34-77formorespecificinfoaboutyourspa pool.
Checktheexternaldrainvalveisinthe‘flow-locked’position(extended)withtheinnertwistcapscrewedintight.
As the spa pool has been water testedduringmanufacture,excesswaterresiduemayhavesplashedoutfromwithinthepipesduringtransportandmayrequireaquickwipe.
Openallofthespapooljetsbyturningthemanti-clockwise.Thiswillallowwatertoflowthroughallpipeswhenfillingandhelpavoidair-locks.
Removethe3M™blueprotectivefilmfromthestainlesssteelstripthatsurroundstheedgeoftheacrylic.
1
4
2 3
5

12
4. INSTALLATION INSTRUCTIONS
FILLING THE SPA POOL - FLOATING WEIR SKIMMER
DUO,NOVA,CUB,FRONTIER,OASIS,YUKON,ARCTIC&GLACIERSPAPOOLS
Placeyourhosethroughagapintheskimmerboxlidtosecureitandbeginfilling.
Filluntilthewaterlinereachesjustbelow the perimeter LED lights thatsurroundtheacrylic(selectmodels)oraimforaninchbelowtheheadrests.
1 2
Removetheskimmerlidcaps(ifinstalledalready)andunthreadthetwoplasticscrewstotakeoffthewholeskimmerlid.
Placeyourhoseinsidetheskimmerboxandbeginfilling(youmaywanttoplacetheskimmerlidbackontoptosecurethehoseinplace).
Filluntilthewaterlinereachesjustbelow the perimeter LED lights thatsurroundtheacrylic(selectmodels)oraimforaninchbelowtheheadrests.
FILLING THE SPA POOL - GRATE SKIMMER
MONTBLANC,WHISTLER,MAKALU,SUMMIT,MATTERHORN,LUCANIA,MCKINLEY,VANCOUVER,MUNRO,EVEREST&K2SPAPOOLS.
1 2 3
DO NOT POWER SPA POOL BEFORE COMPLETELY FILLED!

13
Placeyourhoseinsidetheskimmerboxandtuckbehindthefilterflaptosecure.
Filluntilthewaterlinereachesjustbelow the perimeter LED lights thatsurroundtheacrylic(selectmodels)oraimforaninchbelowtheheadrests.
FILLING THE SPA POOL - STANDARD WEIR SKIMMER
ENTERTAINER X80 & ENTERTAINER X90 SPA POOLS.
DO NOT POWER SPA POOL BEFORE COMPLETELY FILLED!
1 2

14
ELECTRICAL WIRING / POWERING UP
Electrical Information for Standard Series and Platinum Models:MODEL AMP CABLE/PLUG TECH INFO / WIRING
DUO 15A 15A CABLE INCLUDED See Page 34
NOVA 15A 15A CABLE INCLUDED See Page 36
MONT BLANC 15A 15A CABLE INCLUDED See Page 38
WHISTLER 15A 15A CABLE INCLUDED See Page 40
BLACKBURN 15A 15A CABLE INCLUDED See Page 42
YUKON 15A 15A CABLE INCLUDED See Page 44
MAKALU 15A 15A CABLE INCLUDED See Page 46
SUMMIT 15A 15A CABLE INCLUDED See Page 48
MATTERHORN 15A 15A CABLE INCLUDED See Page 50
LUCANIA 15A 15A CABLE INCLUDED See Page 52
MCKINLEY 25A HARDWIRE REQUIRED See Page 54
VANCOUVER 25A HARDWIRE REQUIRED See Page 56
MUNRO 25A HARDWIRE REQUIRED See Page 58
EVEREST 25A HARDWIRE REQUIRED See Page 60
K2 25A HARDWIRE REQUIRED See Page 62
CUB 32A HARDWIRE REQUIRED See Page 64
FRONTIER 32A HARDWIRE REQUIRED See Page 66
OASIS 45A* HARDWIRE REQUIRED See Page 68
ARCTIC 45A* HARDWIRE REQUIRED See Page 70
GLACIER 45A* HARDWIRE REQUIRED See Page 72
X80(Entertainer) 45A* HARDWIRE REQUIRED See Page 74
X90(Entertainer) 45A* HARDWIRE REQUIRED See Page 76
How to Check The Model of Your Spa Pool:Themodelnameisimprintedonasilverplaque,usuallylocatedalongthebottomedgeofthespapoolcabinet.Checkaroundthewholeperimeterof the spa pool to locate.
ANY ELECTRICAL WIRING WORK MUST BE PERFORMEDBY A LICENSED ELECTRICIAN.
4. INSTALLATION INSTRUCTIONS
Silver Plaque

15
Setting Up a 15A Model:
BydefaultthesespapoolswillNOTdrawmorethan15Aatanyonetime.Thisisthedefaultfactorysetupwhichdisablestheheaterwhenthepumps( jets)areturnedon*.
A15ampcablewith3-pinplughasbeenpre-wiredtothespapool’ssystemcontrollerandcanbefoundcoiledupinsidethecabinet.Tofindoutwhichcabinettoremove,seeyourspapool’scorrespondingtechinfo/wiringpage(usingthetableonthepreviouspage).
Setting Up a 25A/32A/45A Model:
A15Aspapoolrequiresa15Asocketandresidualcurrentdevice(RCD)forthedefaultsetup.
A25A/32A/45AspapoolrequiresadedicatedfeedfromyourcircuitboardandappropriateResidualCurrentDevice&Isolationswitch.
Anelectricianisrequiredtosetupandconnecttheappropriatewiring.Tolocatethesystemcontroller,seeyourspapool’scorrespondingtechinfo/wiringpage(usingthetableonthepreviouspage).
Thecableshouldbefedthroughthecabinetwall(acablegrommetissuppliedintheiPackshouldyouwishtousethis)andadrillwitha60mmhole-sawattachmentwillprovidetherightsizeforthegrommet(seeaboveimage).Alternatively,atighterfitcanbeachievedwithoutthegrommetbyjustusingadrillbitthesamesizeastheflexdiameteranddrillingthroughthecabinetwall.
Ifa45Aconnectioncannotbeachieved,loadshedding/limitingcanbeappliedtorestrictthetotalampdrawnbythespapool,allowingyoutofeed25-32A.
Informationforloadshed&changing15Ato25Acanbedownloadedfromoursupportpageat:http://alpinespas.co.nz/support/
*NOTE: Customers generally prefer the default 15A factory setting, however it is possible to wire a dedicated 25A electrical feed for both the heater and pump to run simultaneously. A guide for your electrician can be downloaded from our support page.
Thecablecanbeexitedthroughthecabinetwall(acablegrommetissuppliedintheiPack).Adrillwitha60mmhole-sawattachmentwillprovidetherightsizeforthegrommet.
Cable grommet after installation

16
5. STARTUP & REFILL PROCEDURE
INSTALLING THE FILTER CARTRIDGES - FLOATING WEIR SKIMMER
DUO,NOVA,CUB,FRONTIER,OASIS,YUKON,ARCTICANDGLACIERSPAPOOLS.
Filter(s)arefoundattachedtothestepbox.
Grabthetoplidwithtwohandsandtwistanti-clockwisetodetach(canbequitestiff).
Insertthefilterandplaceitoverthecircularholdingpiecesoitsitstight.
Liftoffthelidtorevealthebasketgrillunderneath.
Insertthebasketgrillintothetopofthefilter,liningupthecircularhole.
Liftoutthebasketgrillandplaceaside.
Pressthebasketdowngentlytoensureatightfit.
Insidetheskimmerbox,seethecircularholdingpiecethatthefiltercartridgewillsitover.
Replacethetoplidbygentlyputtingdownwardspressurewhileturningclockwise,untilitsnapsbackintoplace.
1
4
7
2
5
8
3
6
AVOID DAMAGE TO SPA POOL & VOIDING WARRANTY - ONLY USE FILTER CARTRIDGES PURCHASED FROM ALPINE SPAS.

17
INSTALLING THE FILTER CARTRIDGES - GRATE SKIMMER
MONTBLANC,WHISTLER,BLACKBURN,MAKALU,SUMMIT,MATTERHORN,LUCANIA,MCKINLEY,VANCOUVER,MUNRO,EVERESTANDK2SPAPOOLS.
Filter(s)arefoundattachedtothestepbox.NOTE:MontBlanc&Blackburnusea‘singulargrateskimmer’withadifferentdesignlid(noremovablecaps)andonlyhaveone‘threadhole’foronefilter.
Removethetwodrinkholdercapsfromthetopoftheskimmerlid.
Whileliftinguptheblackgrillflap,threadinthetwofiltersgently(clock-wise).
Unscrew the two plastic screws eithersideoftheskimmerlid.
Laytheblackgrillflapbackdownontopofthefilters.
Liftofftheskimmerlidtorevealtheinnerskimmerbox.
Optional:Ifyoufindyougetlargedebrisinthewater(leaves,grassetc),installthetwomeshpre-filtersasshowninimage.
Replacetheskimmerlidbythreadingtheplasticscrewsbackinandplacingthelidcapsbackon.
Locatethetwothreadholesatthebottomoftheskimmerbox.
11
4
7
2
5
8
3
6
AVOID DAMAGE TO SPA POOL & VOIDING WARRANTY - ONLY USE FILTER CARTRIDGES PURCHASED FROM ALPINE SPAS.

18
5. STARTUP & REFILL PROCEDURE
INSTALLING THE FILTER CARTRIDGES - STANDARD WEIR SKIMMER
ENTERTAINER X80 AND ENTERTAINER X90 SPA POOLS.
Filtersarefoundattachedtothestepbox.
Makesuretheinnerskimmerflapislayingdownasperphoto.
Pullthegrilltrayouttowardsyou.
Gripfrontlidasperphoto,andgentlyliftupwards(donotpulloutat this stage).
Thesetwoholeshavethreadsatthebottomforyourfilterstoscrew into.
Whentheinnerflaphitsthetopoftheskimmerbox,pullthefrontlidoutwards.
Placebothfiltersintothecorrespondingholesandfindthethreadtoscrewinto.
Gentlytwistclockwiseuntilthefilterislockedinplace(donotuseexcessiveforce).Replacetheslidinggrilltray.
Replacethefrontlidbypositioningtheflapinthemiddleoftheskimmerbox,andpressingthefrontlidintowardstheskimmerwhileusingdownwardspressure.
Locatetheslidinggrilltray. Takenoteofhowitsitsinsidetheskimmerforlaterreplacement.
1
4
7
2
5
8 9
3
6
AVOID DAMAGE TO SPA POOL & VOIDING WARRANTY - ONLY USE FILTER CARTRIDGES PURCHASED FROM ALPINE SPAS.

19
SWITCHING ON & HEATING UP
Automatic Startup ProcedureUponactivatingpower,thespapool’stopsidecontrolpanelshouldlightupandthescreenwilldisplayaseriesofspecificsequencesandnumbers.Resetyourspapoolifthescreenisblank.
PrimingThespapoolwillentera‘primingmode’wheneveritisfirstinitiatedorrestarted.Thisisstartupfunctionwhichwillrunthecirculationpumptoclearanyairintheplumbing(primingwillfinishandexitautomaticallyafter5-10minutes).
Thetopsidecontrolpanelwilldisplaythefollowingtoindicatetheprimingmodestate:
- “RUN PMPS PURG AIR ----”- “PRIMING”
Checkthatthecirculationpumphasengagedbyvisuallysightingmoving/ripplingwaterinsidespapool.Watermayflowfromthewaterfall(ifopenandequipped).
Iftheprimingfunctionfails,anerrormessagewilldisplayonthetopsidecontrolpanel-checkthetroubleshootingguideatthebackofthismanualforassistance.
AVOID PRESSING BUTTONS OTHER THAN ‘JETS’ ON THE TOPSIDE CONTROL PANEL UNTIL SPA POOL HAS FINISHED HEATING. SPA POOL WILL HEAT AUTOMATICALLY TO 38 OC.
HEAT-UP PROCESS
Automatic HeatingAfterpriminghasfinished,thespapoolisautomaticallyconfiguredtobeginheating to 38 OC.Thecirculationpumpwillengageandbeginfilteringandheatingautomatically. Installing the CoverPlaceyourspapoolcoverontopofthespapoolandlockitdownbyinstallingtheclips.Fullinstructionscanbefoundwiththeclipsandscrews,whichareattachedto one of the 8 hanging cover straps.
Heat Up TimeDependingonenvironment,itcantakeupto12-18hourstoheatthespapooltothedefault38OC.
BALBOA SYSTEMS SPANET SYSTEMS

20
5. STARTUP & REFILL PROCEDURE
BALANCING & SANITIZING THE WATER
Just like a car, your spa pool needs care and general maintenance to keep it looking good and running smoothly. An integral part of this maintenance is managing the water quality.
To ensure your spa pool is ready to be used at all times, the water needs to be sanitized and balanced to keep it clean and fresh.
You may have received a Water Care Startup Kit with your spa pool (please purchase one if you have not). Follow the ‘WaterCareHandbook’ found in your iPack or download a copy from our support page link at the bottom of this page.
Only use Alpine Spas, PureSpas or Spa Supplies approved products (including filter cartridges) in your spa pool. Use of unapproved products may result in your warranty becoming void, please contact us if in doubt.
FAILING TO BALANCE AND SANITIZE YOUR SPA POOL CORRECTLY MAY RESULT IN CORROSION OR DAMAGE TO COMPONENTS, WHICH IS NOT COVERED UNDER WARRANTY.
Downloadour‘SpaPoolWaterCareHandbook’fromoursupportpage:http://alpinespas.co.nz/support/
Your first steps in treating the spa pool water will require the use of the topside control panel. See the quick reference guides on the following pages.

21JET
S
Pre
ss to
cyc
le th
e je
t pum
p be
twee
n of
f/lo
w/h
igh
runn
ing
mod
es. '
Jets
' LE
D li
ght b
elow
the
scre
en in
dica
tes
whe
n th
e pu
mp
is ru
nnin
g.IN
VE
RT
P
ress
to c
hang
e th
e or
ient
atio
n of
th
e LC
D s
cree
n
LIG
HT
BU
TT
ON
P
ress
to a
ctiv
ate
the
spa
pool
's
LED
ligh
ts. E
ach
pres
s w
ill to
ggle
be
twee
n th
e 13
col
our o
ptio
ns
incl
udin
g th
e fa
de a
nd s
trob
e fu
ncti
ons.
'Lig
ht' L
ED
bel
ow th
e sc
reen
indi
cate
s w
hen
this
is o
n.
The
'LIG
HT
' but
ton
also
al
low
s yo
u to
scr
oll t
hrou
gh
adju
stm
ent o
ptio
ns to
inve
rt
scre
en, c
hang
e m
odes
and
cu
stom
ise
filt
er c
ycle
s. T
o do
th
is p
ress
the
'TE
MP
UP
' bu
tton
and
then
the
'LIG
HT
' bu
tton
.
TE
MP
UP
/DO
WN
A
sho
rt s
ingl
e pr
ess
togg
les
the
spa
pool
tem
pera
ture
. 'T
EM
P U
P' w
ill in
crea
se th
e te
mpe
ratu
re. '
TE
MP
DO
WN
' w
ill d
ecre
ase
the
tem
pera
ture
.
The
LE
D 'H
eat'
ligh
t bel
ow th
e di
spla
y sc
reen
indi
cate
s w
hen
your
spa
is h
eati
ng.
JET
SP
ress
to c
ycle
the
jet p
ump
betw
een
off/
low
/hig
h ru
nnin
g m
odes
. 'Je
ts' L
ED
ligh
t bel
ow th
e sc
reen
indi
cate
s w
hen
the
pum
p is
ru
nnin
g.
LIG
HT
BU
TT
ON
P
ress
to a
ctiv
ate
the
spa
pool
's
LED
ligh
ts. E
ach
pres
s w
ill to
ggle
be
twee
n th
e 13
col
our o
ptio
ns
incl
udin
g th
e fa
de a
nd s
trob
e fu
ncti
ons.
'Lig
ht' L
ED
bel
ow th
e sc
reen
indi
cate
s w
hen
this
is o
n.
The
ligh
t but
ton
also
allo
ws
you
to s
crol
l thr
ough
adj
ustm
ent
opti
ons
to in
vert
scr
een,
cha
nge
mod
es a
nd c
usto
mis
e fi
lter
cy
cles
. To
do th
is p
ress
eit
her
the
'WA
RM
/CO
OL'
but
ton,
then
th
e 'L
IGH
T' b
utto
n.
WA
RM
/CO
OL
A s
hort
sin
gle
pres
s to
ggle
s th
e sp
a po
ol te
mpe
ratu
re.
'WA
RM
' will
incr
ease
the
tem
pera
ture
, 'C
OO
L' w
ill
decr
ease
the
tem
pera
ture
.
The
'hea
t' li
ght b
elow
the
'WA
RM
' but
ton
indi
cate
s w
hen
your
spa
is h
eati
ng.
TOPSIDE CONTROL PANEL QUICK GUIDES
BALBOA TP400 (NOVAV1SPAPOOL,YUKONV1)
HEAT RANGE 26.5 - 40 OC
6. SPA USAGE GUIDE & TIPS

22
BALBOA TP600-1 (DUO,NOVAV2,MONTBLANC,YUKONV2,WHISTLER)
JET
S
Pre
ss to
cyc
le th
e je
t pum
p be
twee
n of
f/lo
w/h
igh
runn
ing
mod
es. '
Jets
' LE
D li
ght b
elow
the
scre
en in
dica
tes
whe
n th
e pu
mp
is ru
nnin
g.IN
VE
RT
P
ress
to c
hang
e th
e or
ient
atio
n of
th
e LC
D s
cree
n
LIG
HT
BU
TT
ON
P
ress
to a
ctiv
ate
the
spa
pool
's
LED
ligh
ts. E
ach
pres
s w
ill to
ggle
be
twee
n th
e 13
col
our o
ptio
ns
incl
udin
g th
e fa
de a
nd s
trob
e fu
ncti
ons.
'Lig
ht' L
ED
bel
ow th
e sc
reen
indi
cate
s w
hen
this
is o
n.
The
'LIG
HT
' but
ton
also
al
low
s yo
u to
scr
oll t
hrou
gh
adju
stm
ent o
ptio
ns to
inve
rt
scre
en, c
hang
e m
odes
and
cu
stom
ise
filt
er c
ycle
s. T
o do
th
is p
ress
the
'TE
MP
UP
' bu
tton
and
then
the
'LIG
HT
' bu
tton
.
TE
MP
UP
/DO
WN
A
sho
rt s
ingl
e pr
ess
togg
les
the
spa
pool
tem
pera
ture
. 'T
EM
P U
P' w
ill in
crea
se th
e te
mpe
ratu
re. '
TE
MP
DO
WN
' w
ill d
ecre
ase
the
tem
pera
ture
.
The
LE
D 'H
eat'
ligh
t bel
ow th
e di
spla
y sc
reen
indi
cate
s w
hen
your
spa
is h
eati
ng.
JET
SP
ress
to c
ycle
the
jet p
ump
betw
een
off/
low
/hig
h ru
nnin
g m
odes
. 'Je
ts' L
ED
ligh
t bel
ow th
e sc
reen
indi
cate
s w
hen
the
pum
p is
ru
nnin
g.
LIG
HT
BU
TT
ON
P
ress
to a
ctiv
ate
the
spa
pool
's
LED
ligh
ts. E
ach
pres
s w
ill to
ggle
be
twee
n th
e 13
col
our o
ptio
ns
incl
udin
g th
e fa
de a
nd s
trob
e fu
ncti
ons.
'Lig
ht' L
ED
bel
ow th
e sc
reen
indi
cate
s w
hen
this
is o
n.
The
ligh
t but
ton
also
allo
ws
you
to s
crol
l thr
ough
adj
ustm
ent
opti
ons
to in
vert
scr
een,
cha
nge
mod
es a
nd c
usto
mis
e fi
lter
cy
cles
. To
do th
is p
ress
eit
her
the
'WA
RM
/CO
OL'
but
ton,
then
th
e 'L
IGH
T' b
utto
n.
WA
RM
/CO
OL
A s
hort
sin
gle
pres
s to
ggle
s th
e sp
a po
ol te
mpe
ratu
re.
'WA
RM
' will
incr
ease
the
tem
pera
ture
, 'C
OO
L' w
ill
decr
ease
the
tem
pera
ture
.
The
'hea
t' li
ght b
elow
the
'WA
RM
' but
ton
indi
cate
s w
hen
your
spa
is h
eati
ng.
HEAT RANGE 26.5 - 40 OC
6. SPA USAGE GUIDE & TIPS

23
BALBOA TP600-2(MAKALU,MATTERHORN,SUMMIT,LUCANIASPAPOOLS)
JET
S 1
Pre
ss to
togg
le J
et p
ump
1 on
and
of
f. 'J
et 1
' lig
ht b
elow
the
scre
en
indi
cate
s w
hen
this
is ru
nnin
g. .
JET
S 2
P
ress
to to
ggle
Jet
s 2
on a
nd o
ff.
Jets
2 li
ght b
elow
the
LCD
scr
een
in
dica
tes
whe
n th
is is
runn
ing.
BL
OW
ER
P
ress
to to
ggle
the
air b
low
er
on/o
ff. T
urn
this
on
to a
ctiv
ate
the
aro
mat
hera
py s
yste
m.
LIG
HT
BU
TT
ON
P
ress
to a
ctiv
ate
the
spa
pool
's
LED
ligh
ts. E
ach
pres
s w
ill to
ggle
be
twee
n th
e 13
col
our o
ptio
ns
incl
udin
g th
e fa
de a
nd s
trob
e fu
ncti
ons.
'Lig
ht' L
ED
bel
ow th
e sc
reen
indi
cate
s w
hen
this
is o
n.
The
'LIG
HT
' but
ton
also
allo
ws
you
to s
crol
l thr
ough
adj
ustm
ent
opti
ons
to in
vert
scr
een,
cha
nge
mod
es a
nd c
usto
mis
e fi
lter
cy
cles
. To
do th
is p
ress
the
'TE
MP
UP
' but
ton
and
then
the
'LIG
HT
' but
ton.
TE
MP
UP
/DO
WN
A
sho
rt s
ingl
e pr
ess
togg
les
the
spa
pool
tem
pera
ture
. 'T
EM
P U
P' w
ill in
crea
se th
e te
mpe
ratu
re. '
TE
MP
DO
WN
' w
ill d
ecre
ase
the
tem
pera
ture
.
The
LE
D 'H
eat'
ligh
t bel
ow th
e di
spla
y sc
reen
indi
cate
s w
hen
your
spa
is h
eati
ng.
JET
S
Pre
ss to
togg
le je
t pum
p on
and
of
f. 'J
ets'
LED
ligh
t bel
ow th
e sc
reen
indi
cate
s w
hen
this
is
runn
ing.
Ens
ure
jet p
iece
s ar
e op
en a
nd u
se p
ress
ure
dive
rts
to
cust
omis
e yo
ur h
ydro
ther
apy
expe
rien
ce.
BL
OW
ER
P
ress
to to
ggle
the
air b
low
er o
n an
d of
f. 'B
low
er ' l
ight
bel
ow th
e LC
D s
cree
n in
dica
tes
whe
n th
is
is ru
nnin
g. T
urn
this
on
to
acti
vate
the
aro
mat
hera
py
syst
em.
LIG
HT
BU
TT
ON
P
ress
to a
ctiv
ate
the
spa
pool
's
LED
ligh
ts. E
ach
pres
s w
ill to
ggle
be
twee
n th
e 13
col
our o
ptio
ns
incl
udin
g th
e fa
de a
nd s
trob
e fu
ncti
ons.
'Lig
ht' L
ED
bel
ow th
e sc
reen
indi
cate
s w
hen
this
is o
n.
The
ligh
t but
ton
also
al
low
s yo
u to
scr
oll t
hrou
gh
adju
stm
ent o
ptio
ns to
set
te
mpe
ratu
re a
nd c
usto
mis
e fi
lter
cyc
les.
To
do th
is h
old
dow
n th
e T
emp
Up/
Dow
n bu
tton
, the
n us
e lig
ht b
utto
n to
se
lect
opt
ions
and
sav
e se
ttin
g ad
just
men
ts.
TE
MP
UP
/DO
WN
A
sho
rt s
ingl
e pr
ess
togg
les
the
spa
pool
tem
pera
ture
. 'T
EM
P U
P' w
ill in
crea
se th
e te
mpe
ratu
re. '
TE
MP
DO
WN
' w
ill d
ecre
ase
the
tem
pera
ture
.
The
LE
D 'H
eat'
ligh
t bel
ow th
e di
spla
y sc
reen
indi
cate
s w
hen
your
spa
is h
eati
ng.
INV
ER
T
Pre
ss to
cha
nge
the
orie
ntat
ion
of
your
LC
D s
cree
n.
HEAT RANGE 26.5 - 40 OC

24
BALBOA TP600-3(MCKINLEY,VANCOUVER,MUNROSPAPOOLS)
JET
S 1
Pre
ss to
togg
le J
et p
ump
1 on
and
of
f. 'J
et 1
' lig
ht b
elow
the
scre
en
indi
cate
s w
hen
this
is ru
nnin
g. .
JET
S 2
P
ress
to to
ggle
Jet
s 2
on a
nd o
ff.
Jets
2 li
ght b
elow
the
LCD
scr
een
in
dica
tes
whe
n th
is is
runn
ing.
BL
OW
ER
P
ress
to to
ggle
the
air b
low
er
on/o
ff. T
urn
this
on
to a
ctiv
ate
the
aro
mat
hera
py s
yste
m.
LIG
HT
BU
TT
ON
P
ress
to a
ctiv
ate
the
spa
pool
's
LED
ligh
ts. E
ach
pres
s w
ill to
ggle
be
twee
n th
e 13
col
our o
ptio
ns
incl
udin
g th
e fa
de a
nd s
trob
e fu
ncti
ons.
'Lig
ht' L
ED
bel
ow th
e sc
reen
indi
cate
s w
hen
this
is o
n.
The
'LIG
HT
' but
ton
also
allo
ws
you
to s
crol
l thr
ough
adj
ustm
ent
opti
ons
to in
vert
scr
een,
cha
nge
mod
es a
nd c
usto
mis
e fi
lter
cy
cles
. To
do th
is p
ress
the
'TE
MP
UP
' but
ton
and
then
the
'LIG
HT
' but
ton.
TE
MP
UP
/DO
WN
A
sho
rt s
ingl
e pr
ess
togg
les
the
spa
pool
tem
pera
ture
. 'T
EM
P U
P' w
ill in
crea
se th
e te
mpe
ratu
re. '
TE
MP
DO
WN
' w
ill d
ecre
ase
the
tem
pera
ture
.
The
LE
D 'H
eat'
ligh
t bel
ow th
e di
spla
y sc
reen
indi
cate
s w
hen
your
spa
is h
eati
ng.
JET
S
Pre
ss to
togg
le je
t pum
p on
and
of
f. 'J
ets'
LED
ligh
t bel
ow th
e sc
reen
indi
cate
s w
hen
this
is
runn
ing.
Ens
ure
jet p
iece
s ar
e op
en a
nd u
se p
ress
ure
dive
rts
to
cust
omis
e yo
ur h
ydro
ther
apy
expe
rien
ce.
BL
OW
ER
P
ress
to to
ggle
the
air b
low
er o
n an
d of
f. 'B
low
er ' l
ight
bel
ow th
e LC
D s
cree
n in
dica
tes
whe
n th
is
is ru
nnin
g. T
urn
this
on
to
acti
vate
the
aro
mat
hera
py
syst
em.
LIG
HT
BU
TT
ON
P
ress
to a
ctiv
ate
the
spa
pool
's
LED
ligh
ts. E
ach
pres
s w
ill to
ggle
be
twee
n th
e 13
col
our o
ptio
ns
incl
udin
g th
e fa
de a
nd s
trob
e fu
ncti
ons.
'Lig
ht' L
ED
bel
ow th
e sc
reen
indi
cate
s w
hen
this
is o
n.
The
ligh
t but
ton
also
al
low
s yo
u to
scr
oll t
hrou
gh
adju
stm
ent o
ptio
ns to
set
te
mpe
ratu
re a
nd c
usto
mis
e fi
lter
cyc
les.
To
do th
is h
old
dow
n th
e T
emp
Up/
Dow
n bu
tton
, the
n us
e lig
ht b
utto
n to
se
lect
opt
ions
and
sav
e se
ttin
g ad
just
men
ts.
TE
MP
UP
/DO
WN
A
sho
rt s
ingl
e pr
ess
togg
les
the
spa
pool
tem
pera
ture
. 'T
EM
P U
P' w
ill in
crea
se th
e te
mpe
ratu
re. '
TE
MP
DO
WN
' w
ill d
ecre
ase
the
tem
pera
ture
.
The
LE
D 'H
eat'
ligh
t bel
ow th
e di
spla
y sc
reen
indi
cate
s w
hen
your
spa
is h
eati
ng.
INV
ER
T
Pre
ss to
cha
nge
the
orie
ntat
ion
of
your
LC
D s
cree
n.
SA
NIT
IZE
Pressoncetoactivatea20minute
sanitisation&cleanupcycleto
refreshwaterqualityafterspause.A
secondpresswillcancelthecycleif
alreadyrunning.
JET
PU
MP
SPresstotoggleequippedpumps
on&off(somemodelsmayonly
havetwopumps).Greenlightwill
illuminatewhenrunning.
BLO
WE
RP
ress
to to
ggle
the
air
blow
er o
n/of
f. G
reen
lightwillilluminatewhen
running.
INV
ER
T/F
LIP
Presstoflipscreenupside
downforeasyviewingwhen
spainuse.
UP
/DO
WN
Shortpressesoftheup&down
buttonswilltogglethrough
threedisplaymodes:
W.TMP=WaterTemperature
S.TMP=SetTemperature
TIME=Clock.
Holdingtheupordownbuttons
will
forc
e th
e co
ntro
ller t
o be
gin
adjustingthesettemperature
inthedesireddirection.
OK
Usethisbuttontoconfirmand
savesettingadjustmentsor
toentersettingadjustment
menus.
LIG
HT
SLight:Presstotogglespa
light
s on
/ of
f.
LightMode:Presstoactivate
lightmodemenu&usetheup
&downbuttonstoselectone
offivedifferentlightingeffect
modes.
LightSpeed/Colour:Pressto
activatelightspeedoruser
colourselectionmenus.Use
up&downbuttonstoadjust.
HEAT RANGE 26.5 - 40 OC
6. SPA USAGE GUIDE & TIPS

25
SPANET SV3-VH(EVEREST,K2,CUB,FRONTIER,OASIS,ARCTIC,GLACIER,ENTERTAINERX80,ENTERTAINERX90SPAPOOLS)
SA
NIT
IZE
Pressoncetoactivatea20minute
sanitisation&cleanupcycleto
refreshwaterqualityafterspause.A
secondpresswillcancelthecycleif
alreadyrunning.
JET
PU
MP
SPresstotoggleequippedpumps
on&off(somemodelsmayonly
havetwopumps).Greenlightwill
illuminatewhenrunning.
BLO
WE
RP
ress
to to
ggle
the
air
blow
er o
n/of
f. G
reen
lightwillilluminatewhen
running.
INV
ER
T/F
LIP
Presstoflipscreenupside
downforeasyviewingwhen
spainuse.
UP
/DO
WN
Shortpressesoftheup&down
buttonswilltogglethrough
threedisplaymodes:
W.TMP=WaterTemperature
S.TMP=SetTemperature
TIME=Clock.
Holdingtheupordownbuttons
will
forc
e th
e co
ntro
ller t
o be
gin
adjustingthesettemperature
inthedesireddirection.
OK
Usethisbuttontoconfirmand
savesettingadjustmentsor
toentersettingadjustment
menus.
LIG
HT
SLight:Presstotogglespa
light
s on
/ of
f.
LightMode:Presstoactivate
lightmodemenu&usetheup
&downbuttonstoselectone
offivedifferentlightingeffect
modes.
LightSpeed/Colour:Pressto
activatelightspeedoruser
colourselectionmenus.Use
up&downbuttonstoadjust.
HEAT RANGE 10 - 41.0 OC

26
SPA POOL OPERATION - BALBOA SYSTEMS
Post Heat-up Oncethedefault38°Cisreached,thecirculationpumpwillstopoperatingandwillonlyre-engageifthespapoollosestemperature,aseparatejetpumpisturnedonmanually,orafiltercyclehasbegun.Everyhourthesystemchecksthetemperate(aprocesscalled‘polling’)byactivatingthecirculationpumpfor1minute.
Changing the Temperature Pressing‘TEMPUP’or‘TEMPDOWN’willcausethetemperaturetoflashonthescreen.Holdingdownthesebuttonsagainwilladjustthesettemperatureinthedirectionindicatedonthebutton.WhentheLCDstopsflashing,thespapoolwillbeginheatingtothenewsettemperature,butwilldisplaythecurrentwatertemperatureonthescreen.
6. SPA POOL USAGE GUIDE & TIPS
JETS 1Press to toggle Jet pump 1 on and off. 'Jet 1' light below the screen indicates when this is running. .
JETS 2 Press to toggle Jets 2 on and off. Jets 2 light below the LCD screen indicates when this is running.
BLOWER Press to toggle the air blower on/off. Turn this on to activate the aromatherapy system.
LIGHT BUTTON Press to activate the spa pool's LED lights. Each press will toggle between the 13 colour options including the fade and strobe functions. 'Light' LED below the screen indicates when this is on.
The 'LIGHT' button also allows you to scroll through adjustment options to invert screen, change modes and customise filter cycles. To do this press the 'TEMP UP' button and then the 'LIGHT' button.
TEMP UP/DOWN A short single press toggles the spa pool temperature. 'TEMP UP' will increase the temperature. 'TEMP DOWN' will decrease the temperature.
The LED 'Heat' light below the display screen indicates when your spa is heating.
JETS Press to toggle jet pump on and off. 'Jets' LED light below the screen indicates when this is running. Ensure jet pieces are open and use pressure diverts to customise your hydrotherapy experience.
BLOWER Press to toggle the air blower on and off. 'Blower ' light below the LCD screen indicates when this is running. Turn this on to activate the aromatherapy system.
LIGHT BUTTON Press to activate the spa pool's LED lights. Each press will toggle between the 13 colour options including the fade and strobe functions. 'Light' LED below the screen indicates when this is on.
The light button also allows you to scroll through adjustment options to set temperature and customise filter cycles. To do this hold down the Temp Up/Down button, then use light button to select options and save setting adjustments.
TEMP UP/DOWN A short single press toggles the spa pool temperature. 'TEMP UP' will increase the temperature. 'TEMP DOWN' will decrease the temperature.
The LED 'Heat' light below the display screen indicates when your spa is heating.
INVERT Press to change the orientation of your LCD screen.
The‘JETS’buttonwillactivatethejetpumpandhighpressuredwaterwillflowfromthejetpieces. The‘JETS/BLOWER’buttonwillactivatetheairblowerandbubbleairtothesurfaceofthewatercreatinga‘hottub/jacuzzi’typeeffect.
Testing the Components (Jet Pumps & Blower) Turneachindividualjetpieceanti-clockwisetoopentheflow.Thentestthejetpump(s)andairblower(ifequipped)viathetopsidecontrolpanelbypressingthebuttonslabeled‘JETS’or‘JETS/BLOWER’withthisicon:
JETS 1Press to toggle Jet pump 1 on and off. 'Jet 1' light below the screen indicates when this is running. .
JETS 2 Press to toggle Jets 2 on and off. Jets 2 light below the LCD screen indicates when this is running.
BLOWER Press to toggle the air blower on/off. Turn this on to activate the aromatherapy system.
LIGHT BUTTON Press to activate the spa pool's LED lights. Each press will toggle between the 13 colour options including the fade and strobe functions. 'Light' LED below the screen indicates when this is on.
The 'LIGHT' button also allows you to scroll through adjustment options to invert screen, change modes and customise filter cycles. To do this press the 'TEMP UP' button and then the 'LIGHT' button.
TEMP UP/DOWN A short single press toggles the spa pool temperature. 'TEMP UP' will increase the temperature. 'TEMP DOWN' will decrease the temperature.
The LED 'Heat' light below the display screen indicates when your spa is heating.
JETS Press to toggle jet pump on and off. 'Jets' LED light below the screen indicates when this is running. Ensure jet pieces are open and use pressure diverts to customise your hydrotherapy experience.
BLOWER Press to toggle the air blower on and off. 'Blower ' light below the LCD screen indicates when this is running. Turn this on to activate the aromatherapy system.
LIGHT BUTTON Press to activate the spa pool's LED lights. Each press will toggle between the 13 colour options including the fade and strobe functions. 'Light' LED below the screen indicates when this is on.
The light button also allows you to scroll through adjustment options to set temperature and customise filter cycles. To do this hold down the Temp Up/Down button, then use light button to select options and save setting adjustments.
TEMP UP/DOWN A short single press toggles the spa pool temperature. 'TEMP UP' will increase the temperature. 'TEMP DOWN' will decrease the temperature.
The LED 'Heat' light below the display screen indicates when your spa is heating.
INVERT Press to change the orientation of your LCD screen.
TEMP UP TEMP DOWN
NOTE: Duo, Nova, Mont Blanc and Whistler models have one two-speed jet pump and the speeds are cycled between low/high when pressing the ‘JETS’ button. For more info on Jet Pump and Blower operation see pages 84 - 85.
(DUO,NOVA,MONTBLANC,YUKON,WHISTLER,MAKALU,MATTERHORN,SUMMIT,LUCANIA,MCKINLEY,VANCOUVER,MUNROSPAPOOLS)
SPA POOL OPERATION - BALBOA SYSTEMS
BA
LB
OA
CO
NT
RO
L P
AN
EL
S B
AL
BO
A C
ON
TR
OL
PA
NE
LS
27
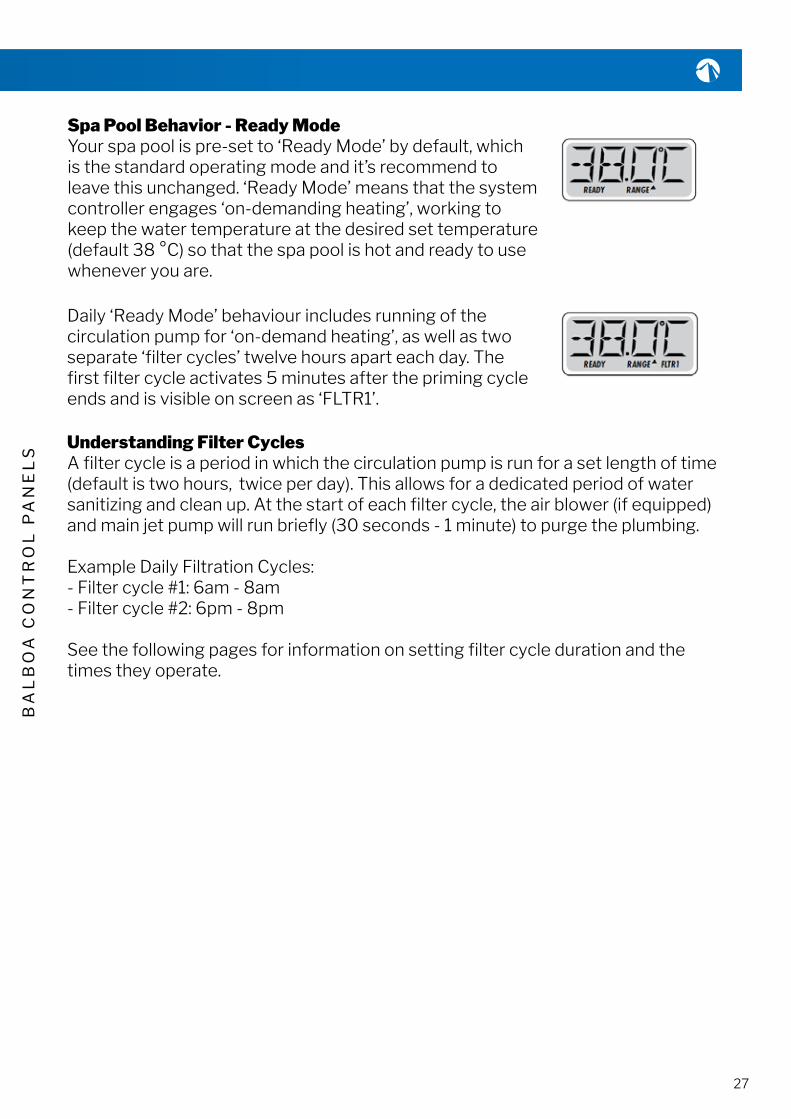
Spa Pool Behavior - Ready ModeYourspapoolispre-setto‘ReadyMode’bydefault,whichisthestandardoperatingmodeandit’srecommendtoleavethisunchanged.‘ReadyMode’meansthatthesystemcontrollerengages‘on-demandingheating’,workingtokeepthewatertemperatureatthedesiredsettemperature(default38°C)sothatthespapoolishotandreadytousewheneveryouare.
Daily‘ReadyMode’behaviourincludesrunningofthecirculationpumpfor‘on-demandheating’,aswellastwoseparate‘filtercycles’twelvehoursaparteachday.Thefirstfiltercycleactivates5minutesaftertheprimingcycleendsandisvisibleonscreenas‘FLTR1’.
Understanding Filter CyclesAfiltercycleisaperiodinwhichthecirculationpumpisrunforasetlengthoftime(defaultistwohours,twiceperday).Thisallowsforadedicatedperiodofwatersanitizingandcleanup.Atthestartofeachfiltercycle,theairblower(ifequipped)andmainjetpumpwillrunbriefly(30seconds-1minute)topurgetheplumbing. ExampleDailyFiltrationCycles: -Filtercycle#1:6am-8am -Filtercycle#2:6pm-8pm
Seethefollowingpagesforinformationonsettingfiltercycledurationandthetimes they operate.
BA
LB
OA
CO
NT
RO
L P
AN
EL
S B
AL
BO
A C
ON
TR
OL
PA
NE
LS

28
6. SPA POOL USAGE GUIDE & TIPS
Changing When the Filter Cycles Run Whenthespapoolisfirstpowered,filtercycle#1willbegin5minutesaftercompletingtheprimingcycleandfinishafter2hours.Filtercycle#2willbeginexactlytwelvehourslater.Toresetthefiltercyclestoengageatyourdesiredtimes,thespapoolshouldberestartedattheappropriatetimebyswitchingoffthepower,waiting5minutesandturningbackon.
Example:Ifyouwishedtosetthefiltercyclesas: -Filtercycle#1:6am-8am -Filtercycle#2:6pm-8pm
Thespapoolwouldneedtobeswitchedoffandpoweredbackonatapproximately5:50amforthefirstcycletobeginat6am,providingyouallowed5minutesbeforeswitchingbackon.
SPA POOL OPERATION - BALBOA SYSTEMS
Spa Pool Behavior - Rest ModeIn‘RestMode’,thespapoolwillonlyheattotheusersettemperatureduringtheprogrammedfiltercycles.Thiscanbeausefulmodetotakeadvantageofpowersavetimesgivenbyyourelectricityprovider(suchasnightrates). Toenter‘RestMode’:
When at default screen, press the
‘UP’ button.
Temperature will begin flashing on
screen, then press ‘LIGHT’ button.
‘FLIP’ will display on screen, then press
‘LIGHT’ button again.
‘READY’ will change to ‘REST’, then press the light
button.
Wait several seconds until
screen reverts to default display.
‘FLTR’ will display on screen, then
press ‘LIGHT’ button again
‘MODE’ will display on screen. Then
press the ‘UP’ button.
JETS 1Press to toggle Jet pump 1 on and off. 'Jet 1' light below the screen indicates when this is running. .
JETS 2 Press to toggle Jets 2 on and off. Jets 2 light below the LCD screen indicates when this is running.
BLOWER Press to toggle the air blower on/off. Turn this on to activate the aromatherapy system.
LIGHT BUTTON Press to activate the spa pool's LED lights. Each press will toggle between the 13 colour options including the fade and strobe functions. 'Light' LED below the screen indicates when this is on.
The 'LIGHT' button also allows you to scroll through adjustment options to invert screen, change modes and customise filter cycles. To do this press the 'TEMP UP' button and then the 'LIGHT' button.
TEMP UP/DOWN A short single press toggles the spa pool temperature. 'TEMP UP' will increase the temperature. 'TEMP DOWN' will decrease the temperature.
The LED 'Heat' light below the display screen indicates when your spa is heating.
JETS Press to toggle jet pump on and off. 'Jets' LED light below the screen indicates when this is running. Ensure jet pieces are open and use pressure diverts to customise your hydrotherapy experience.
BLOWER Press to toggle the air blower on and off. 'Blower ' light below the LCD screen indicates when this is running. Turn this on to activate the aromatherapy system.
LIGHT BUTTON Press to activate the spa pool's LED lights. Each press will toggle between the 13 colour options including the fade and strobe functions. 'Light' LED below the screen indicates when this is on.
The light button also allows you to scroll through adjustment options to set temperature and customise filter cycles. To do this hold down the Temp Up/Down button, then use light button to select options and save setting adjustments.
TEMP UP/DOWN A short single press toggles the spa pool temperature. 'TEMP UP' will increase the temperature. 'TEMP DOWN' will decrease the temperature.
The LED 'Heat' light below the display screen indicates when your spa is heating.
INVERT Press to change the orientation of your LCD screen.
BA
LB
OA
CO
NT
RO
L P
AN
EL
S B
AL
BO
A C
ON
TR
OL
PA
NE
LS

29
Changing the Filter Cycle Duration Ifyouhavelargebatherloadsorfindthatthespapoolrequiresextrafiltrationtime,youcanincreasethedurationofthefiltercycles.
Havinganunderstandingofincreasinganddecreasingfiltercycledurationwillbeusefulforwatermaintenanceissuessuchasfoamingorcloudywater.
Invert Screen Button ItispossibletoinverttheLCDscreentofaceyouwhileyouaresittinginthespa.Asinglepressoftheinvertbuttonwillflipthescreen180O:
When at default screen, press the
‘UP’ button.
Temperature will begin flashing on
screen, then press ‘LIGHT’ button.
‘FLIP’ will display on screen, then press
‘LIGHT’ button again.
Set the desired duration time by pressing the light
button.
‘FLTR’ will display on screen, then
press ‘UP’ button again.
‘2:00’ will blink on screen. Change
duration time with ‘UP & ‘DOWN’
buttons.
INVERT
JETS 1Press to toggle Jet pump 1 on and off. 'Jet 1' light below the screen indicates when this is running. .
JETS 2 Press to toggle Jets 2 on and off. Jets 2 light below the LCD screen indicates when this is running.
BLOWER Press to toggle the air blower on/off. Turn this on to activate the aromatherapy system.
LIGHT BUTTON Press to activate the spa pool's LED lights. Each press will toggle between the 13 colour options including the fade and strobe functions. 'Light' LED below the screen indicates when this is on.
The 'LIGHT' button also allows you to scroll through adjustment options to invert screen, change modes and customise filter cycles. To do this press the 'TEMP UP' button and then the 'LIGHT' button.
TEMP UP/DOWN A short single press toggles the spa pool temperature. 'TEMP UP' will increase the temperature. 'TEMP DOWN' will decrease the temperature.
The LED 'Heat' light below the display screen indicates when your spa is heating.
JETS Press to toggle jet pump on and off. 'Jets' LED light below the screen indicates when this is running. Ensure jet pieces are open and use pressure diverts to customise your hydrotherapy experience.
BLOWER Press to toggle the air blower on and off. 'Blower ' light below the LCD screen indicates when this is running. Turn this on to activate the aromatherapy system.
LIGHT BUTTON Press to activate the spa pool's LED lights. Each press will toggle between the 13 colour options including the fade and strobe functions. 'Light' LED below the screen indicates when this is on.
The light button also allows you to scroll through adjustment options to set temperature and customise filter cycles. To do this hold down the Temp Up/Down button, then use light button to select options and save setting adjustments.
TEMP UP/DOWN A short single press toggles the spa pool temperature. 'TEMP UP' will increase the temperature. 'TEMP DOWN' will decrease the temperature.
The LED 'Heat' light below the display screen indicates when your spa is heating.
INVERT Press to change the orientation of your LCD screen.
Afullcontrolpanelmanualcanbedownloadedfromoursupportpage:http://alpinespas.co.nz/support/
JETS 1Press to toggle Jet pump 1 on and off. 'Jet 1' light below the screen indicates when this is running. .
JETS 2 Press to toggle Jets 2 on and off. Jets 2 light below the LCD screen indicates when this is running.
BLOWER Press to toggle the air blower on/off. Turn this on to activate the aromatherapy system.
LIGHT BUTTON Press to activate the spa pool's LED lights. Each press will toggle between the 13 colour options including the fade and strobe functions. 'Light' LED below the screen indicates when this is on.
The 'LIGHT' button also allows you to scroll through adjustment options to invert screen, change modes and customise filter cycles. To do this press the 'TEMP UP' button and then the 'LIGHT' button.
TEMP UP/DOWN A short single press toggles the spa pool temperature. 'TEMP UP' will increase the temperature. 'TEMP DOWN' will decrease the temperature.
The LED 'Heat' light below the display screen indicates when your spa is heating.
JETS Press to toggle jet pump on and off. 'Jets' LED light below the screen indicates when this is running. Ensure jet pieces are open and use pressure diverts to customise your hydrotherapy experience.
BLOWER Press to toggle the air blower on and off. 'Blower ' light below the LCD screen indicates when this is running. Turn this on to activate the aromatherapy system.
LIGHT BUTTON Press to activate the spa pool's LED lights. Each press will toggle between the 13 colour options including the fade and strobe functions. 'Light' LED below the screen indicates when this is on.
The light button also allows you to scroll through adjustment options to set temperature and customise filter cycles. To do this hold down the Temp Up/Down button, then use light button to select options and save setting adjustments.
TEMP UP/DOWN A short single press toggles the spa pool temperature. 'TEMP UP' will increase the temperature. 'TEMP DOWN' will decrease the temperature.
The LED 'Heat' light below the display screen indicates when your spa is heating.
INVERT Press to change the orientation of your LCD screen.
BA
LB
OA
CO
NT
RO
L P
AN
EL
S B
AL
BO
A C
ON
TR
OL
PA
NE
LS

30
Understanding the Display Whenthespapoolisfirstpoweredandpriminghascompleted,thedefaultdisplaywillshowthecurrentwatertemperature-thisisreferredtoasW.TMP(watertemp).Youcancyclebetweenthebelowthreedisplaymodeswiththe‘UP’or‘DOWN’buttons:
W.TMPShows the current water temperature. This is the default screen.
Cycle through to next screen with up/down buttons.
Cycle through to next screen with up/down buttons.
Cycle through to next screen with up/down buttons.
S.TMPShows the SET water temperature. Also showsset temp bottom right.
TIMEShows the current set time.The time and date should be set if not correct.
It’srecommendedtoleavethedisplayonW.TMPtoseeacleardifferencebetweenyoursettemperatureandyourcurrentwatertemperature.
Post Heat-up Oncethedefault38°Cisreachedthecirculationpumpwillstopoperatingandwillonlyre-engageifthespapoollosestemperature,afiltercyclehasbegun,orthesystemispollingautomaticallytochecktemperature.
Changing the Temperature Pressingorholdingthe‘UP’or‘DOWN’buttonswilladjustthesettemperatureinthedirectionindicatedonthebuttoninincrementsof0.2°C.WhentheLCDstopsflashing,thespapoolwillheattothenewsettemperature(thespapoolcannotcool the water).
The‘PUMP’buttonwillactivatethejetpumpandhighpressuredwaterwillflowfromthejetpieces.The‘BLOWER’buttonwillbubbleairtothesurfaceofthewater,creatinga‘hottub/jacuzzi’typeeffect.
Testing the Components (Jet Pumps & Blower) Turneachindividualjetpieceanti-clockwisetoopentheflow.Thentestthejetpump(s)andairblower(ifequipped)viathetopsidecontrolpanelbypressing:
UP
PUMP
DOWN
BLOWER
6. SPA POOL USAGE GUIDE & TIPS
SPA POOL OPERATION - SPANET SYSTEMS
SP
AN
ET
CO
NT
RO
L P
AN
EL
S S
PA
NE
T C
ON
TR
OL
PA
NE
LS

31
AfullSpaNetcontrolpanelmanualwithadvancedfunctionscanbedownloadedfromoursupportpage:http://alpinespas.co.nz/support/
Setting the Time & DateBesuretosetthedateandtimebeforeoperatingthespapool.Vitalfunctionssuchasfiltration,sanitizationcyclesandpowersavingsettingsaredependentoncorrecttimeanddate.
NavigatetotheTIMEdisplaybyfollowingtheinstructionsonthepreviouspagethenfollowthesestepstosetthetime:
From the TIME display, press the
‘OK’ button to edittime parameters.
To set the preference and to proceed, press the
‘OK’ button.
The first parameter is time format. Select between 12/24hr with ‘UP/DOWN’ buttons.
Continue through the remaining parameters
selecting with ‘UP/DOWN’ and confirming
with ‘OK’.
Time & Date Parameters in order: Time Format (12/24 hr) Year (yyyy) Month (mm) Day (dd) Weekday (mon - sun) Hours (xx:oo) Minutes (oo:xx)
Spa Pool Behavior - Running ModesYourspapoolispre-setto‘Normal’runningmodebydefaultwhichisthestandardoperatingmodeandit’srecommendtoleavethisunchanged.‘Normal’modemeansthatthespapoolwillalwaysaimtokeepthewatertemperatureattheuserssettemperature(default38°C)soitisreadytousewheneveryouare. Threeothermodesareavailabletouse,whichmaybeusefulatdifferenttimesoftheyearorifyoucannotusethespapoolforasetperiodoftime.
Name Mode Function
NORM Normal Normaloperationfordemandheatingandfiltration
ECON Economy Demandheatingcanonlyoccurwhenfiltrationpumpisrunning
AWAY Away DemandheatingisDISABLED.Filtrationisfixedat1hourperday(thekeypadwillscroll“AWAYMODE”every60secs)
WEEK Week MondaytoThursday:DemandheatingisDISABLEDandfiltrationfixedat1hourperday.FridaytoSunday:NormalOperation
Changing the Running Mode.Fromanydisplaymode:
Press and hold the ‘UP/DOWN’ buttons together. The word [MODE] will display.
Select between the available modes
with the ‘UP/DOWN’ buttons.
Press the ‘OK’ button to enter
the [MODE] adjustment.
Press ‘OK’ to confirm and save the mode setting.
SP
AN
ET
CO
NT
RO
L P
AN
EL
S S
PA
NE
T C
ON
TR
OL
PA
NE
LS

32
Sanitize/Clean-up CycleThesanitizebuttonactivatesa20minutesanitizationcyclethatrunsthefiltrationpumpandozone/U.Vtofilterthespapoolwatertorestoreandrefreshwaterquality.Atthestartandendofthecycle,thecontrollerwillsequentially(oneatatime)runavarietyofpumpsandtheblowerforoneminuteeachtopurgetheplumbingandclearanyunfilteredwatertrappedinthoselines.
Key-lock FunctionThekeypadbuttonscanbelockedtopreventaccidentalkeypressesortolimitaccesstocertaincontrollerfunctions.Thisfeatureisparticularlyhelpfulwhenspapoolcoversareusedorwherechildrenarepresent. Therearetwotypesofkey-locksavailable: FullLockMode-locksallbuttonssoallpressesareineffectiveuntilunlocked.Toactivatefulllock,pressandholdtogether:
PartialLockMode-only‘PUMPS’,‘BLOWER’,‘LIGHT’and‘SANITIZE’buttonsallowed.Toactivatepartiallock,pressandholdtogether:
+
+
+
+
6. SPA POOL USAGE GUIDE & TIPS
SANITIZE
UP
UP
DOWN
DOWN
PUMP A
PUMP B
NOTE: To unlock, repeat the sequence. Pumps are labeled A, B, C from left to right on the control panel.
SPA POOL OPERATION - SPANET SYSTEMS
SP
AN
ET
CO
NT
RO
L P
AN
EL
S S
PA
NE
T C
ON
TR
OL
PA
NE
LS
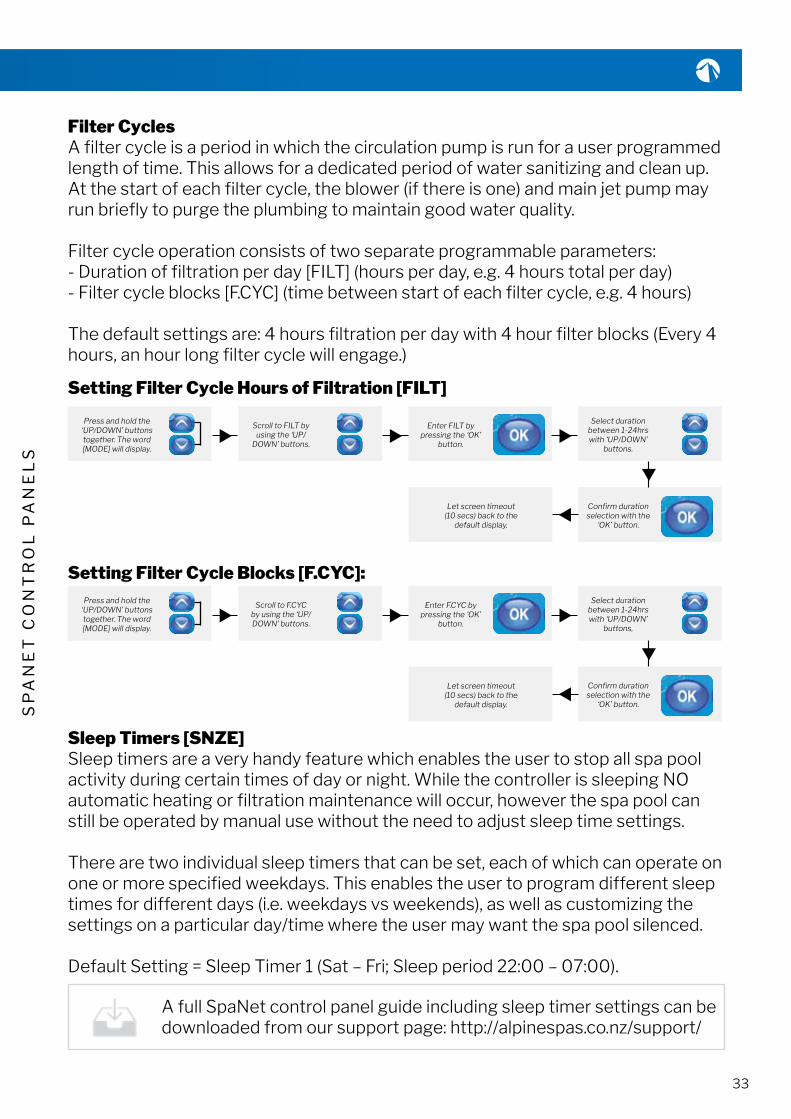
33
Filter CyclesAfiltercycleisaperiodinwhichthecirculationpumpisrunforauserprogrammedlengthoftime.Thisallowsforadedicatedperiodofwatersanitizingandcleanup.Atthestartofeachfiltercycle,theblower(ifthereisone)andmainjetpumpmayrunbrieflytopurgetheplumbingtomaintaingoodwaterquality.
Filtercycleoperationconsistsoftwoseparateprogrammableparameters:-Durationoffiltrationperday[FILT](hoursperday,e.g.4hourstotalperday)-Filtercycleblocks[F.CYC](timebetweenstartofeachfiltercycle,e.g.4hours) Thedefaultsettingsare:4hoursfiltrationperdaywith4hourfilterblocks(Every4hours,anhourlongfiltercyclewillengage.)
Setting Filter Cycle Hours of Filtration [FILT]
Setting Filter Cycle Blocks [F.CYC]:
Sleep Timers [SNZE]Sleeptimersareaveryhandyfeaturewhichenablestheusertostopallspapoolactivityduringcertaintimesofdayornight.WhilethecontrollerissleepingNOautomaticheatingorfiltrationmaintenancewilloccur,howeverthespapoolcanstillbeoperatedbymanualusewithouttheneedtoadjustsleeptimesettings. Therearetwoindividualsleeptimersthatcanbeset,eachofwhichcanoperateononeormorespecifiedweekdays.Thisenablestheusertoprogramdifferentsleeptimesfordifferentdays(i.e.weekdaysvsweekends),aswellascustomizingthesettingsonaparticularday/timewheretheusermaywantthespapoolsilenced.
DefaultSetting=SleepTimer1(Sat–Fri;Sleepperiod22:00–07:00).
AfullSpaNetcontrolpanelguideincludingsleeptimersettingscanbedownloadedfromoursupportpage:http://alpinespas.co.nz/support/
Press and hold the ‘UP/DOWN’ buttons together. The word [MODE] will display.
Press and hold the ‘UP/DOWN’ buttons together. The word [MODE] will display.
Enter FILT by pressing the ‘OK’
button.
Enter F.CYC by pressing the ‘OK’
button.
Scroll to FILT by using the ‘UP/
DOWN’ buttons.
Scroll to F.CYC by using the ‘UP/DOWN’ buttons.
Select duration between 1-24hrs with ‘UP/DOWN’
buttons.
Confirm duration selection with the
‘OK’ button.
Confirm duration selection with the
‘OK’ button.
Let screen timeout (10 secs) back to the
default display.
Let screen timeout (10 secs) back to the
default display.
Select duration between 1-24hrs with ‘UP/DOWN’
buttons,
SP
AN
ET
CO
NT
RO
L P
AN
EL
S S
PA
NE
T C
ON
TR
OL
PA
NE
LS

34
DUO SPA POOL OVERVIEW
7. GETTING TO KNOW YOUR SPA POOL
Components: Spa Pool Controller Balboa BP6013H
TopsideControlPanel Balboa TP600
Heater Element 3KW
Pumps Two-SpeedCirculation/JetMassagePump(2HP)
Skimmer/FilterType Floating Weir
Sanitizers Ozone
Electrical Info 15amps 230 - 240V AC 50hz IPX5
Cable 15ampCablePre-Connected
Tosetupforhighamp(25A,noloadshed*)seepage15forinformation.
Cable & Wiring:This15ampspapoolincludesa4.5metre15amppowercablethathasbeenpre-connectedandinstalledontothesystemcontroller.
Locating the Controller & CableRemovethecabinetpanelsfromthesideofthespapoolthathousesthesystemcontroller(seefollowingpageforexactlocation).Insideyouwillfindthecablecoiledup.
1
2
3
4
ON
S1
1
2
3
4 ON
S1
DO NOT POWER THE SPA BEFORE IT HAS BEEN FILLED
DO NOT POWER THE SPA BEFORE IT HAS BEEN FILLED
BELOW DIAGRAM IS FOR SINGLE PHASE 15A AND IS ONLY REQUIRED IF DISCONNECTING & RECONNECTING CABLE. DIP SWITCHES DO NOT NEED ALTERING.

35
Identify labeled parts on pages 78 - 81

36
7. GETTING TO KNOW YOUR SPA POOL
MONT BLANC SPA POOL OVERVIEW
Components: Spa Pool Controller Balboa BP6013H
TopsideControlPanel BalboaTP400(rectangle)orBalboaTP600(round)
Heater Element 3KW
Pumps Two-SpeedCirculation/JetMassagePump(3HP)
Skimmer/FilterType GrateFilter(Singular,onefilter)
Sanitizers Ozone,Ultra-Violet
Electrical Info 15amps 230 - 240V AC 50hz IPX5
Cable 15ampCablePre-Connected
Locating the Controller & CableRemovethecabinetpanelsfromthesideofthespapoolthathousesthesystemcontroller(seefollowingpageforexactlocation).Insideyouwillfindthecablecoiledup.
1
2
3
4
ON
S1
1
2
3
4 ON
S1
DO NOT POWER THE SPA BEFORE IT HAS BEEN FILLED
DO NOT POWER THE SPA BEFORE IT HAS BEEN FILLED
BELOW DIAGRAM IS FOR SINGLE PHASE 15A AND IS ONLY REQUIRED IF DISCONNECTING & RECONNECTING CABLE. DIP SWITCHES DO NOT NEED ALTERING.
Cable & Wiring:This15ampspapoolincludesa4.5metre15amppowercablethathasbeenpre-connectedandinstalledontothesystemcontroller.
Tosetupforhighamp(25A,noloadshed*)seepage15forinformation.

37
Identify labeled parts on pages 78 - 81

38
7. GETTING TO KNOW YOUR SPA POOL
NOVA SPA POOL OVERVIEW
Components: Spa Pool Controller Balboa BP6013H
TopsideControlPanel BalboaTP400(rectangle)orBalboaTP600(round)
Heater Element 3KW
Pumps Two-SpeedCirculation/JetMassagePump(3HP)
Skimmer/FilterType Floating Weir Filter
Sanitizers Ozone
Electrical Info 15amps 230 - 240V AC 50hz IPX5
Cable 15ampCablePre-Connected
Locating the Controller & CableRemovethecabinetpanelsfromthesideofthespapoolthathousesthesystemcontroller(seefollowingpageforexactlocation).Insideyouwillfindthecablecoiledup.
1
2
3
4
ON
S1
1
2
3
4 ON
S1
DO NOT POWER THE SPA BEFORE IT HAS BEEN FILLED
DO NOT POWER THE SPA BEFORE IT HAS BEEN FILLED
BELOW DIAGRAM IS FOR SINGLE PHASE 15A AND IS ONLY REQUIRED IF DISCONNECTING & RECONNECTING CABLE. DIP SWITCHES DO NOT NEED ALTERING.
Cable & Wiring:This15ampspapoolincludesa4.5metre15amppowercablethathasbeenpre-connectedandinstalledontothesystemcontroller.
Tosetupforhighamp(25A,noloadshed*)seepage15forinformation.

39
Identify labeled parts on pages 78 - 81

40
7. GETTING TO KNOW YOUR SPA POOL
WHISTLER SPA POOL OVERVIEW
Components: Spa Pool Controller Balboa BP6013H
TopsideControlPanel Balboa TP600
Heater Element 3KW
Pumps Two-SpeedCirculation/JetMassagePump(3HP)
Skimmer/FilterType Grate Filter
Sanitizers Ozone
Electrical Info 15amps 230 - 240V AC 50hz IPX5
Cable 15ampCablePre-Connected
Locating the Controller & CableRemovethecabinetpanelsfromthesideofthespapoolthathousesthesystemcontroller(seefollowingpageforexactlocation).Insideyouwillfindthecablecoiledup.
1
2
3
4
ON
S1
1
2
3
4 ON
S1
DO NOT POWER THE SPA BEFORE IT HAS BEEN FILLED
DO NOT POWER THE SPA BEFORE IT HAS BEEN FILLED
BELOW DIAGRAM IS FOR SINGLE PHASE 15A AND IS ONLY REQUIRED IF DISCONNECTING & RECONNECTING CABLE. DIP SWITCHES DO NOT NEED ALTERING.
Cable & Wiring:This15ampspapoolincludesa4.5metre15amppowercablethathasbeenpre-connectedandinstalledontothesystemcontroller.
Tosetupforhighamp(25A,noloadshed*)seepage15forinformation.
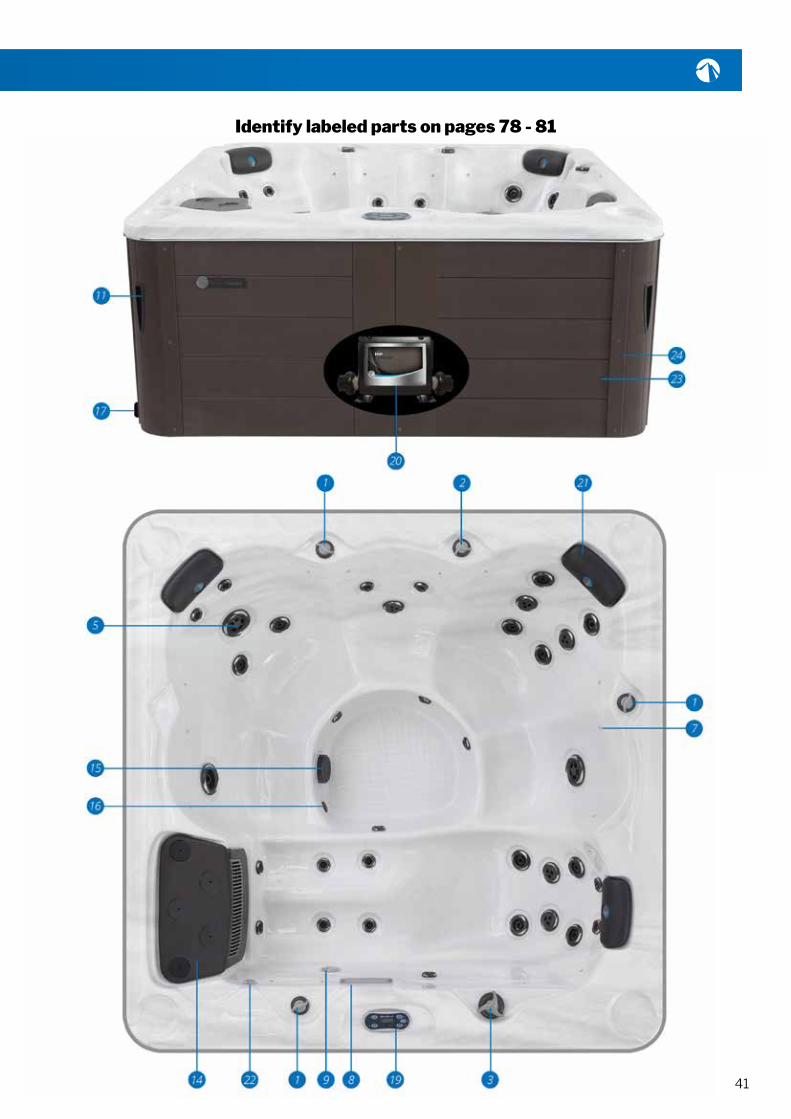
41
Identify labeled parts on pages 78 - 81
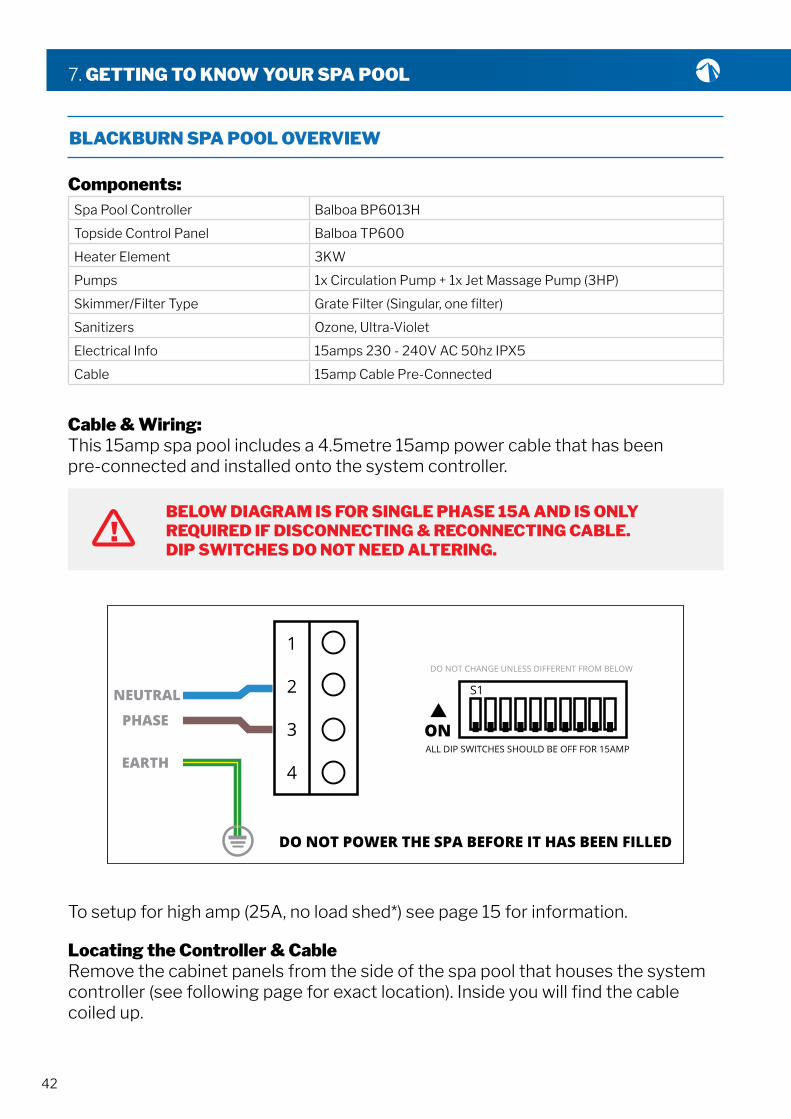
42
7. GETTING TO KNOW YOUR SPA POOL
BLACKBURN SPA POOL OVERVIEW
Components: Spa Pool Controller Balboa BP6013H
TopsideControlPanel Balboa TP600
Heater Element 3KW
Pumps 1xCirculationPump+1xJetMassagePump(3HP)
Skimmer/FilterType GrateFilter(Singular,onefilter)
Sanitizers Ozone,Ultra-Violet
Electrical Info 15amps 230 - 240V AC 50hz IPX5
Cable 15ampCablePre-Connected
Locating the Controller & CableRemovethecabinetpanelsfromthesideofthespapoolthathousesthesystemcontroller(seefollowingpageforexactlocation).Insideyouwillfindthecablecoiledup.
1
2
3
4
ON
S1
1
2
3
4 ON
S1
DO NOT POWER THE SPA BEFORE IT HAS BEEN FILLED
DO NOT POWER THE SPA BEFORE IT HAS BEEN FILLED
BELOW DIAGRAM IS FOR SINGLE PHASE 15A AND IS ONLY REQUIRED IF DISCONNECTING & RECONNECTING CABLE. DIP SWITCHES DO NOT NEED ALTERING.
Cable & Wiring:This15ampspapoolincludesa4.5metre15amppowercablethathasbeenpre-connectedandinstalledontothesystemcontroller.
Tosetupforhighamp(25A,noloadshed*)seepage15forinformation.

43
Identify labeled parts on pages 78 - 81

44
7. GETTING TO KNOW YOUR SPA POOL
YUKON SPA POOL OVERVIEW
Components: Spa Pool Controller Balboa BP6013H
TopsideControlPanel Balboa TP400 or TP600
Heater Element 3KW
Pumps 1xCirculationPump+1xJetMassagePump(3HP)
Skimmer/FilterType SingularGrateFilter
Sanitizers Ozone
Electrical Info 15amps 230 - 240V AC 50hz IPX5
Cable 15ampCablePre-Connected
Locating the Controller & CableRemovethecabinetpanelsfromthesideofthespapoolthathousesthesystemcontroller(seefollowingpageforexactlocation).Insideyouwillfindthecablecoiledup.
1
2
3
4
ON
S1
1
2
3
4 ON
S1
DO NOT POWER THE SPA BEFORE IT HAS BEEN FILLED
DO NOT POWER THE SPA BEFORE IT HAS BEEN FILLED
BELOW DIAGRAM IS FOR SINGLE PHASE 15A AND IS ONLY REQUIRED IF DISCONNECTING & RECONNECTING CABLE. DIP SWITCHES DO NOT NEED ALTERING.
Cable & Wiring:This15ampspapoolincludesa4.5metre15amppowercablethathasbeenpre-connectedandinstalledontothesystemcontroller.
Tosetupforhighamp(25A,noloadshed*)seepage15forinformation.
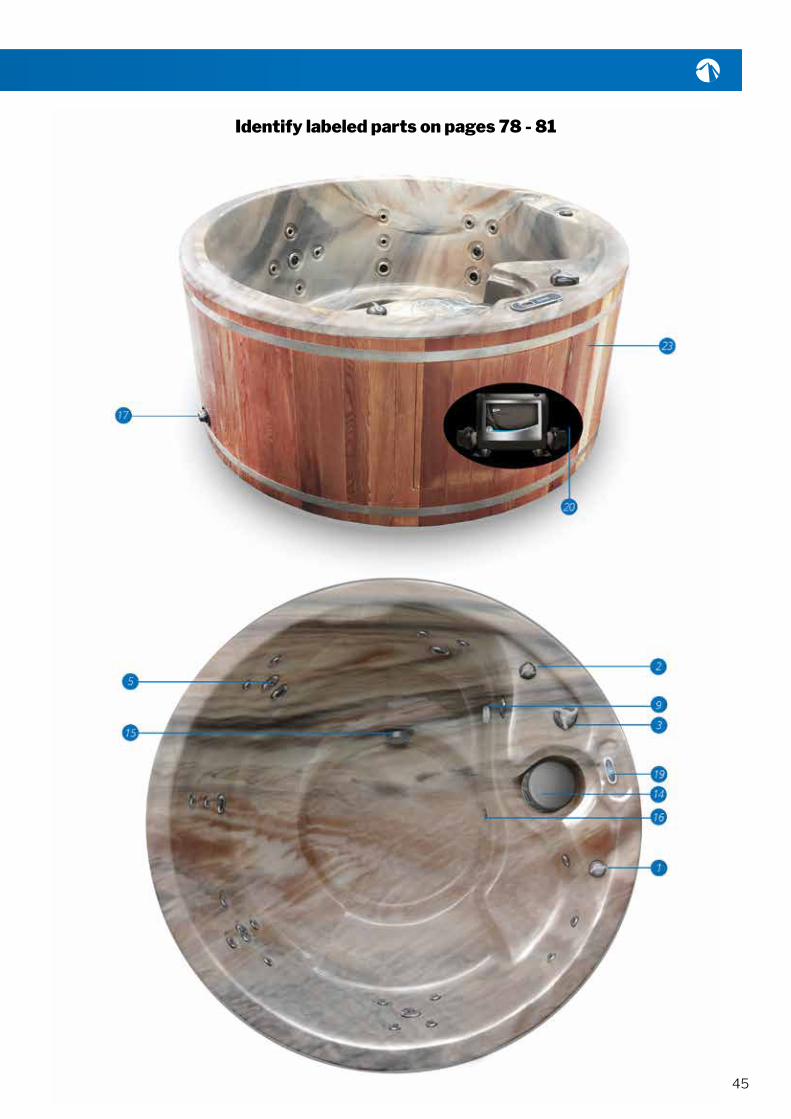
45
Identify labeled parts on pages 78 - 81

46
7. GETTING TO KNOW YOUR SPA POOL
MAKALU SPA POOL OVERVIEW
Components: Spa Pool Controller Balboa BP6013H
TopsideControlPanel Balboa TP600
Heater Element 3KW
Pumps 1xCirculationPump+1xJetMassagePump(3HP)+AirBlower
Skimmer/FilterType Grate Filter
Sanitizers Ozone,Ultra-Violet
Electrical Info 15amps 230 - 240V AC 50hz IPX5
Cable 15ampCablePre-Connected
Locating the Controller & CableRemovethecabinetpanelsfromthesideofthespapoolthathousesthesystemcontroller(seefollowingpageforexactlocation).Insideyouwillfindthecablecoiledup.
1
2
3
4
ON
S1
1
2
3
4 ON
S1
DO NOT POWER THE SPA BEFORE IT HAS BEEN FILLED
DO NOT POWER THE SPA BEFORE IT HAS BEEN FILLED
BELOW DIAGRAM IS FOR SINGLE PHASE 15A AND IS ONLY REQUIRED IF DISCONNECTING & RECONNECTING CABLE. DIP SWITCHES DO NOT NEED ALTERING.
Cable & Wiring:This15ampspapoolincludesa4.5metre15amppowercablethathasbeenpre-connectedandinstalledontothesystemcontroller.
Tosetupforhighamp(25A,noloadshed*)seepage15forinformation.

47
Identify labeled parts on pages 78 - 81

48
7. GETTING TO KNOW YOUR SPA POOL
MATTERHORN SPA POOL OVERVIEW
Components: Spa Pool Controller Balboa BP6013H
TopsideControlPanel Balboa TP600
Heater Element 3KW
Pumps 1xCirculationPump+1xJetMassagePump(3HP)+AirBlower
Skimmer/FilterType Grate Filter
Sanitizers Ozone,Ultra-Violet
Electrical Info 15amps 230 - 240V AC 50hz IPX5
Cable 15ampCablePre-Connected
Locating the Controller & CableRemovethecabinetpanelsfromthesideofthespapoolthathousesthesystemcontroller(seefollowingpageforexactlocation).Insideyouwillfindthecablecoiledup.
1
2
3
4
ON
S1
1
2
3
4 ON
S1
DO NOT POWER THE SPA BEFORE IT HAS BEEN FILLED
DO NOT POWER THE SPA BEFORE IT HAS BEEN FILLED
BELOW DIAGRAM IS FOR SINGLE PHASE 15A AND IS ONLY REQUIRED IF DISCONNECTING & RECONNECTING CABLE. DIP SWITCHES DO NOT NEED ALTERING.
Cable & Wiring:This15ampspapoolincludesa4.5metre15amppowercablethathasbeenpre-connectedandinstalledontothesystemcontroller.
Tosetupforhighamp(25A,noloadshed*)seepage15forinformation.
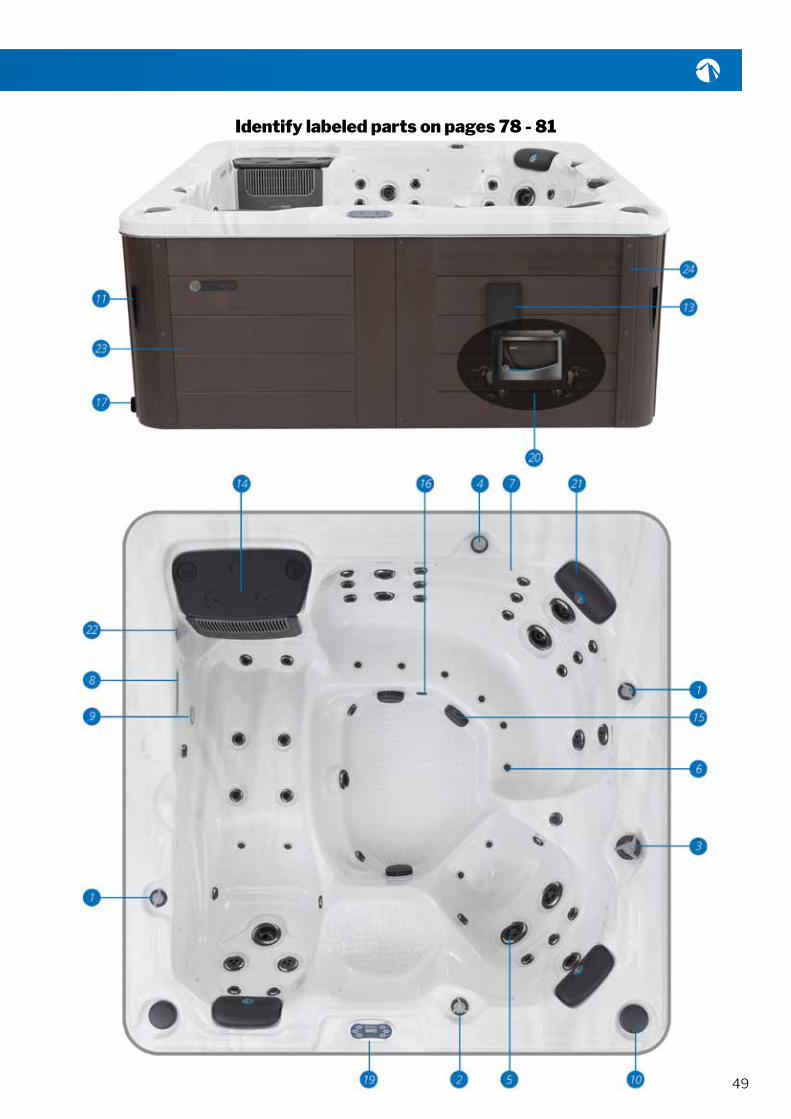
49
Identify labeled parts on pages 78 - 81

50
7. GETTING TO KNOW YOUR SPA POOL
SUMMIT SPA POOL OVERVIEW
Components: Spa Pool Controller Balboa BP6013H
TopsideControlPanel Balboa TP600
Heater Element 3KW
Pumps 1xCirculationPump+1xJetMassagePump(3HP)+AirBlower
Skimmer/FilterType Grate Filter
Sanitizers Ozone,Ultra-Violet
Electrical Info 15amps 230 - 240V AC 50hz IPX5
Cable 15ampCablePre-Connected
Locating the Controller & CableRemovethecabinetpanelsfromthesideofthespapoolthathousesthesystemcontroller(seefollowingpageforexactlocation).Insideyouwillfindthecablecoiledup.
1
2
3
4
ON
S1
1
2
3
4 ON
S1
DO NOT POWER THE SPA BEFORE IT HAS BEEN FILLED
DO NOT POWER THE SPA BEFORE IT HAS BEEN FILLED
BELOW DIAGRAM IS FOR SINGLE PHASE 15A AND IS ONLY REQUIRED IF DISCONNECTING & RECONNECTING CABLE. DIP SWITCHES DO NOT NEED ALTERING.
Cable & Wiring:This15ampspapoolincludesa4.5metre15amppowercablethathasbeenpre-connectedandinstalledontothesystemcontroller.
Tosetupforhighamp(25A,noloadshed*)seepage15forinformation.

51
Identify labeled parts on pages 78 - 81

52
7. GETTING TO KNOW YOUR SPA POOL
LUCANIA SPA POOL OVERVIEW
Components: Spa Pool Controller Balboa BP6013H
TopsideControlPanel Balboa TP600
Heater Element 3KW
Pumps 1xCirculationPump+1xJetMassagePump(3HP)+AirBlower
Skimmer/FilterType Grate Filter
Sanitizers Ozone,Ultra-Violet
Electrical Info 15amps 230 - 240V AC 50hz IPX5
Cable 15ampCablePre-Connected
Locating the Controller & CableRemovethecabinetpanelsfromthesideofthespapoolthathousesthesystemcontroller(seefollowingpageforexactlocation).Insideyouwillfindthecablecoiledup.
1
2
3
4
ON
S1
1
2
3
4 ON
S1
DO NOT POWER THE SPA BEFORE IT HAS BEEN FILLED
DO NOT POWER THE SPA BEFORE IT HAS BEEN FILLED
BELOW DIAGRAM IS FOR SINGLE PHASE 15A AND IS ONLY REQUIRED IF DISCONNECTING & RECONNECTING CABLE. DIP SWITCHES DO NOT NEED ALTERING.
Cable & Wiring:This15ampspapoolincludesa4.5metre15amppowercablethathasbeenpre-connectedandinstalledontothesystemcontroller.
Tosetupforhighamp(25A,noloadshed*)seepage15forinformation.

53
Identify labeled parts on pages 78 - 81

54
7. GETTING TO KNOW YOUR SPA POOL
MCKINLEY SPA POOL OVERVIEW
Components: Spa Pool Controller Balboa BP6013H
TopsideControlPanel Balboa TP600
Heater Element 3KW
Pumps 1xCirculationPump+2xJetMassagePump(3HP)+AirBlower
Skimmer/FilterType Grate Filter
Sanitizers Ozone,Ultra-Violet
Electrical Info 25amps 230 - 240V AC 50hz IPX5
Cable NoCable-HardwiringRequired.
Wiringofathreephaseconnectionisavailable,contactusformoreinformation.
Hardwire Required:Thisspapoolrequiresdirecthardwiringfromthecircuitboardtothesystemcontrollerwithsuitableelectricalcable.
Locating the ControllerRemovethecabinetpanelsfromthesideofthespathathousesthecontroller(seefollowingpictureforexactlocation).
BELOW DIAGRAM IS FOR SINGLE PHASE 25A CONNECTION. DIP SWITCHES ARE PRESET & SHOULD NOT NEED ALTERING.
1
2
3
4 ON
S1 S10
1
2
3
4 ON
S1 S10
DO NOT POWER THE SPA BEFORE IT HAS BEEN FILLED

55
Identify labeled parts on pages 78 - 81

56
7. GETTING TO KNOW YOUR SPA POOL
VANCOUVER SPA POOL OVERVIEW
Components: Spa Pool Controller Balboa BP6013H
TopsideControlPanel Balboa TP600
Heater Element 3KW
Pumps 1xCirculationPump+2xJetMassagePump(3HP)+AirBlower
Skimmer/FilterType Grate Filter
Sanitizers Ozone,Ultra-Violet
Electrical Info 25amps 230 - 240V AC 50hz IPX5
Cable NoCable-HardwiringRequired.
Wiringofathreephaseconnectionisavailable,contactusformoreinformation.
Hardwire Required:Thisspapoolrequiresdirecthardwiringfromthecircuitboardtothesystemcontrollerwithsuitableelectricalcable.
Locating the ControllerRemovethecabinetpanelsfromthesideofthespathathousesthecontroller(seefollowingpictureforexactlocation).
BELOW DIAGRAM IS FOR SINGLE PHASE 25A CONNECTION. DIP SWITCHES ARE PRESET & SHOULD NOT NEED ALTERING.
1
2
3
4 ON
S1 S10
1
2
3
4 ON
S1 S10
DO NOT POWER THE SPA BEFORE IT HAS BEEN FILLED

57
Identify labeled parts on pages 78 - 81

58
7. GETTING TO KNOW YOUR SPA POOL
MUNRO SPA POOL OVERVIEW
Components: Spa Pool Controller Balboa BP6013H
TopsideControlPanel Balboa TP600
Heater Element 3KW
Pumps 1xCirculationPump+2xJetMassagePump(3HP)+AirBlower
Skimmer/FilterType Grate Filter
Sanitizers Ozone,Ultra-Violet
Electrical Info 25amps 230 - 240V AC 50hz IPX5
Cable NoCable-HardwiringRequired.
Wiringofathreephaseconnectionisavailable,contactusformoreinformation.
Hardwire Required:Thisspapoolrequiresdirecthardwiringfromthecircuitboardtothesystemcontrollerwithsuitableelectricalcable.
Locating the ControllerRemovethecabinetpanelsfromthesideofthespapoolthathousesthecontroller(seefollowingpictureforexactlocation).
BELOW DIAGRAM IS FOR SINGLE PHASE 25A CONNECTION. DIP SWITCHES ARE PRESET & SHOULD NOT NEED ALTERING.
1
2
3
4 ON
S1 S10
1
2
3
4 ON
S1 S10
DO NOT POWER THE SPA POOL BEFORE IT HAS BEEN FILLED

59
Identify labeled parts on pages 78 - 81

60
7. GETTING TO KNOW YOUR SPA POOL
EVEREST SPA POOL OVERVIEW
Components: Spa Pool Controller SpaNet SV3-VH
TopsideControlPanel SpaNet SV3-VH
Heater Element 6KW(Variable)
Pumps 1xCirculationPump+2xJetMassagePump(3HP)+AirBlower
Skimmer/FilterType Grate Filter
Sanitizers Ozone,Ultra-Violet
Electrical Info 32amps 230 - 240V AC 50hz IPX5
Cable NoCable-HardwiringRequired.
Hardwire Required:Thisspapoolrequiresdirecthardwiringfromthecircuitboardtothesystemcontrollerwithsuitableelectricalcable.
Locating the ControllerRemovethecabinetpanelsfromthesideofthespapoolthathousesthecontroller(seefollowingpictureforexactlocation).
BELOW DIAGRAMS ARE FOR 32A CONNECTIONS. DIP SWITCHES ARE PRESET FOR SINGLE PHASE.
P3
P2
CS
P1
G
N
ON
S1 S6 S1 S6P3
P2
CS
P1
G
N
ON
DO NOT POWER THE SPA POOL BEFORE IT HAS BEEN FILLED
SINGLE PHASE THREE PHASE
DIP SWITCHES DIP SWITCHES

61
Identify labeled parts on pages 78 - 81

62
7. GETTING TO KNOW YOUR SPA POOL
K2 SPA POOL OVERVIEW
Components: Spa Pool Controller SpaNet SV3-VH
TopsideControlPanel SpaNet SV3-VH
Heater Element 6KW(Variable)
Pumps 1xCirculationPump+2xJetMassagePump(3HP)+AirBlower
Skimmer/FilterType Grate Filter
Sanitizers Ozone,Ultra-Violet
Electrical Info 32amps 230 - 240V AC 50hz IPX5
Cable NoCable-HardwiringRequired.
Hardwire Required:Thisspapoolrequiresdirecthardwiringfromthecircuitboardtothesystemcontrollerwithsuitableelectricalcable.
Locating the ControllerRemovethecabinetpanelsfromthesideofthespathathousesthecontroller(seefollowingpictureforexactlocation).
BELOW DIAGRAMS ARE FOR 32A CONNECTIONS. DIP SWITCHES ARE PRESET FOR SINGLE PHASE.
P3
P2
CS
P1
G
N
ON
S1 S6 S1 S6P3
P2
CS
P1
G
N
ON
DO NOT POWER THE SPA BEFORE IT HAS BEEN FILLED
SINGLE PHASE THREE PHASE
DIP SWITCHES DIP SWITCHES
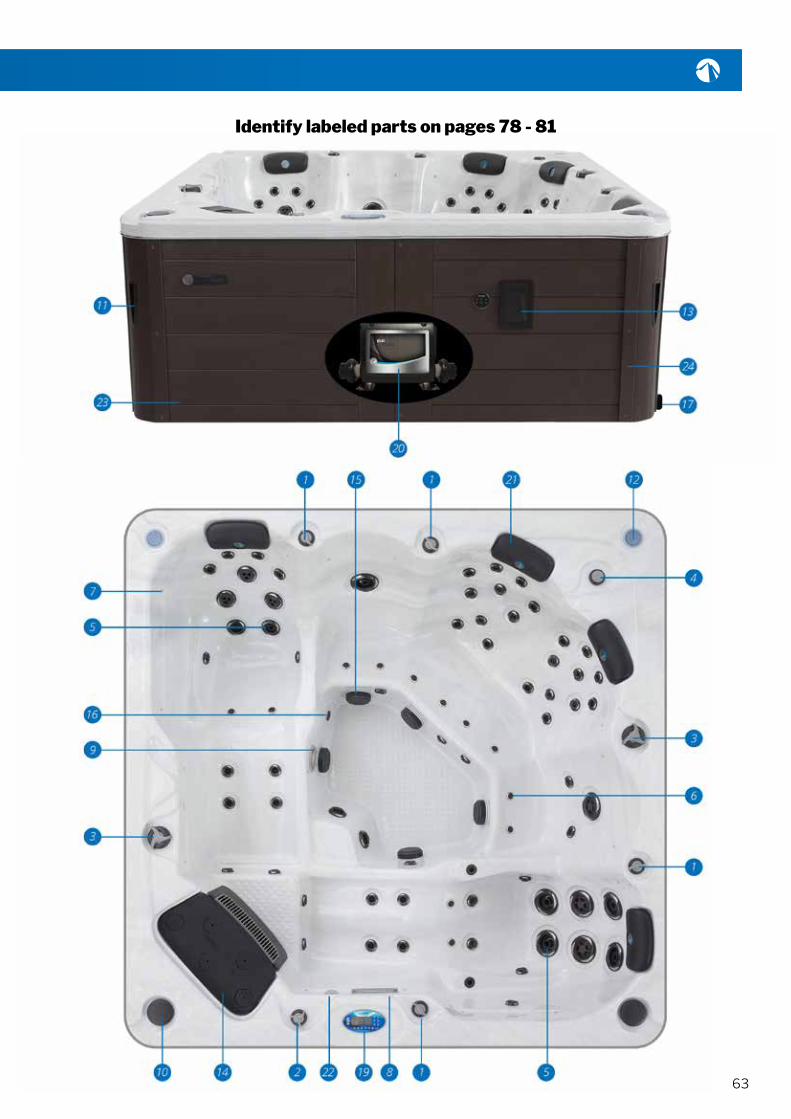
63
Identify labeled parts on pages 78 - 81

64
7. GETTING TO KNOW YOUR SPA POOL
CUB SPA POOL OVERVIEW
Components: Spa Pool Controller SpaNet SV3-VH
TopsideControlPanel SpaNet SV3-VH
Heater Element 6KW(Variable)
Pumps 1xCirculationPump+2xJetMassagePump(3HP)+AirBlower
Skimmer/FilterType Floating Weir Filter
Sanitizers Ozone,Ultra-Violet
Electrical Info 32amps 230 - 240V AC 50hz IPX5
Cable NoCable-HardwiringRequired.
Hardwire Required:Thisspapoolrequiresdirecthardwiringfromthecircuitboardtothesystemcontrollerwithsuitableelectricalcable.
Locating the ControllerRemovethecabinetpanelsfromthesideofthespathathousesthecontroller(seefollowingpictureforexactlocation).
BELOW DIAGRAMS ARE FOR 32A CONNECTIONS. DIP SWITCHES ARE PRESET FOR SINGLE PHASE.
P3
P2
CS
P1
G
N
ON
S1 S6 S1 S6P3
P2
CS
P1
G
N
ON
DO NOT POWER THE SPA BEFORE IT HAS BEEN FILLED
SINGLE PHASE THREE PHASE
DIP SWITCHES DIP SWITCHES

65
Identify labeled parts on pages 78 - 81

66
7. GETTING TO KNOW YOUR SPA POOL
FRONTIER SPA POOL OVERVIEW
Components: Spa Pool Controller SpaNet SV3-VH
TopsideControlPanel SpaNet SV3-VH
Heater Element 6KW(Variable)
Pumps 1xCirculationPump+2xJetMassagePump(3HP)+AirBlower
Skimmer/FilterType Floating Weir Filter
Sanitizers Ozone,Ultra-Violet
Electrical Info 32amps 230 - 240V AC 50hz IPX5
Cable NoCable-HardwiringRequired.
Hardwire Required:Thisspapoolrequiresdirecthardwiringfromthecircuitboardtothesystemcontrollerwithsuitableelectricalcable.
Locating the ControllerRemovethecabinetpanelsfromthesideofthespathathousesthecontroller(seefollowingpictureforexactlocation).
BELOW DIAGRAMS ARE FOR 32A CONNECTIONS. DIP SWITCHES ARE PRESET FOR SINGLE PHASE.
P3
P2
CS
P1
G
N
ON
S1 S6 S1 S6P3
P2
CS
P1
G
N
ON
DO NOT POWER THE SPA BEFORE IT HAS BEEN FILLED
SINGLE PHASE THREE PHASE
DIP SWITCHES DIP SWITCHES

67
Identify labeled parts on pages 78 - 81

68
7. GETTING TO KNOW YOUR SPA POOL
OASIS SPA POOL OVERVIEW
Components: Spa Pool Controller SpaNet SV3-VH
TopsideControlPanel SpaNet SV3-VH
Heater Element 6KW(Variable)
Pumps 1xCirculationPump+3xJetMassagePump(3HP)+AirBlower
Skimmer/FilterType 2xFloatingWeirFilter
Sanitizers Ozone,Ultra-Violet
Electrical Info 32amps - 45amps. 230 - 240V AC 50hz IPX5
Cable NoCable-HardwiringRequired.
Hardwire Required:Thisspapoolrequiresdirecthardwiringfromthecircuitboardtothesystemcontrollerwithsuitableelectricalcable.
Locating the ControllerRemovethecabinetpanelsfromthesideofthespathathousesthecontroller(seefollowingpictureforexactlocation).
BELOW DIAGRAMS ARE FOR 32A - 45A CONNECTIONS. DIP SWITCHES ARE PRESET FOR SINGLE PHASE.
P3
P2
CS
P1
G
N
ON
S1 S6 S1 S6P3
P2
CS
P1
G
N
ON
DO NOT POWER THE SPA BEFORE IT HAS BEEN FILLED
SINGLE PHASE THREE PHASE
DIP SWITCHES DIP SWITCHES
A32ampconnectionwillrequireloadshed/limitingforthecomponentsastheycannotallrunsimultaneously.SeetheSpaNetuserguideformoreinformation.A45ampconnectionprovidespowerforallcomponentstorun.

69
Controller locatedbehindcabinet panel
below the skimmerbox
Identify labeled parts on pages 78 - 81

70
7. GETTING TO KNOW YOUR SPA POOL
ARCTIC SPA POOL OVERVIEW
Components: Spa Pool Controller SpaNet SV3-VH
TopsideControlPanel SpaNet SV3-VH
Heater Element 6KW(Variable)
Pumps 1xCirculationPump+3xJetMassagePump(3HP)+AirBlower
Skimmer/FilterType 2xFloatingWeirFilter
Sanitizers Ozone,Ultra-Violet
Electrical Info 32amps - 45amps. 230 - 240V AC 50hz IPX5
Cable NoCable-HardwiringRequired.
Hardwire Required:Thisspapoolrequiresdirecthardwiringfromthecircuitboardtothesystemcontrollerwithsuitableelectricalcable.
Locating the ControllerRemovethecabinetpanelsfromthesideofthespathathousesthecontroller(seefollowingpictureforexactlocation).
BELOW DIAGRAMS ARE FOR 32A - 45A CONNECTIONS. DIP SWITCHES ARE PRESET FOR SINGLE PHASE.
P3
P2
CS
P1
G
N
ON
S1 S6 S1 S6P3
P2
CS
P1
G
N
ON
DO NOT POWER THE SPA BEFORE IT HAS BEEN FILLED
SINGLE PHASE THREE PHASE
DIP SWITCHES DIP SWITCHES
A32ampconnectionwillrequireloadshed/limitingforthecomponentsastheycannotallrunsimultaneously.SeetheSpaNetuserguideformoreinformation.A45ampconnectionprovidespowerforallcomponentstorun.

71
Identify labeled parts on pages 78 - 81

72
7. GETTING TO KNOW YOUR SPA POOL
GLACIER SPA POOL OVERVIEW
Components: Spa Pool Controller SpaNet SV3-VH
TopsideControlPanel SpaNet SV3-VH
Heater Element 6KW(Variable)
Pumps 1xCirculationPump+3xJetMassagePump(3HP)+AirBlower
Skimmer/FilterType 2xFloatingWeirFilter
Sanitizers Ozone,Ultra-Violet
Electrical Info 32amps - 45amps. 230 - 240V AC 50hz IPX5
Cable NoCable-HardwiringRequired.
Hardwire Required:Thisspapoolrequiresdirecthardwiringfromthecircuitboardtothesystemcontrollerwithsuitableelectricalcable.
Locating the ControllerRemovethecabinetpanelsfromthesideofthespathathousesthecontroller(seefollowingpictureforexactlocation).
BELOW DIAGRAMS ARE FOR 32A - 45A CONNECTIONS. DIP SWITCHES ARE PRESET FOR SINGLE PHASE.
P3
P2
CS
P1
G
N
ON
S1 S6 S1 S6P3
P2
CS
P1
G
N
ON
DO NOT POWER THE SPA BEFORE IT HAS BEEN FILLED
SINGLE PHASE THREE PHASE
DIP SWITCHES DIP SWITCHES
A32ampconnectionwillrequireloadshed/limitingforthecomponentsastheycannotallrunsimultaneously.SeetheSpaNetuserguideformoreinformation.A45ampconnectionprovidespowerforallcomponentstorun.
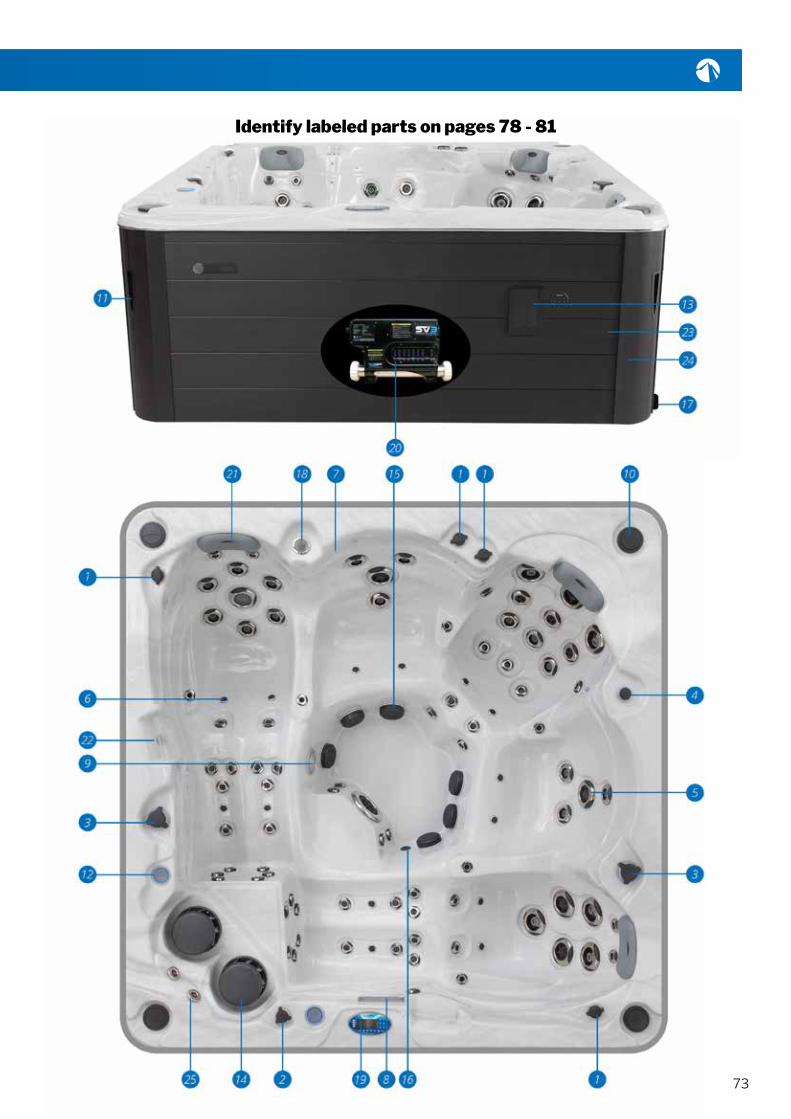
73
Identify labeled parts on pages 78 - 81

74
7. GETTING TO KNOW YOUR SPA POOL
ENTERTAINER X80 SPA POOL OVERVIEW
Components: Spa Pool Controller SpaNet SV3-VH
TopsideControlPanel SpaNet SV3-VH
Heater Element 6KW(Variable)
Pumps 1xCirculationPump+3xJetMassagePump(3HP)+AirBlower
Skimmer/FilterType StandardWeirFilter
Sanitizers Ozone,Ultra-Violet
Electrical Info 32amps - 45amps. 230 - 240V AC 50hz IPX5
Cable NoCable-HardwiringRequired.
Hardwire Required:Thisspapoolrequiresdirecthardwiringfromthecircuitboardtothesystemcontrollerwithsuitableelectricalcable.
Locating the ControllerRemovethecabinetpanelsfromthesideofthespathathousesthecontroller(seefollowingpictureforexactlocation).
BELOW DIAGRAMS ARE FOR 32A - 45A CONNECTIONS. DIP SWITCHES ARE PRESET FOR SINGLE PHASE.
P3
P2
CS
P1
G
N
ON
S1 S6 S1 S6P3
P2
CS
P1
G
N
ON
DO NOT POWER THE SPA BEFORE IT HAS BEEN FILLED
SINGLE PHASE THREE PHASE
DIP SWITCHES DIP SWITCHES
A32ampconnectionwillrequireloadshed/limitingforthecomponentsastheycannotallrunsimultaneously.SeetheSpaNetuserguideformoreinformation.A45ampconnectionprovidespowerforallcomponentstorun.

75
Controller locatedbehindlefthandsidemiddlecabinet
panel
Identify labeled parts on pages 78 - 81

76
7. GETTING TO KNOW YOUR SPA POOL
ENTERTAINER X90 SPA POOL OVERVIEW
Components: Spa Pool Controller SpaNet SV3-VH
TopsideControlPanel SpaNet SV3-VH
Heater Element 6KW(Variable)
Pumps 1xCirculationPump+3xJetMassagePump(3HP)+AirBlower
Skimmer/FilterType StandardWeirFilter
Sanitizers Ozone,Ultra-Violet
Electrical Info 32amps - 45amps. 230 - 240V AC 50hz IPX5
Cable NoCable-HardwiringRequired.
Hardwire Required:Thisspapoolrequiresdirecthardwiringfromthecircuitboardtothesystemcontrollerwithsuitableelectricalcable.
Locating the ControllerRemovethecabinetpanelsfromthesideofthespathathousesthecontroller(seefollowingpictureforexactlocation).
BELOW DIAGRAMS ARE FOR 32A - 45A CONNECTIONS. DIP SWITCHES ARE PRESET FOR SINGLE PHASE.
P3
P2
CS
P1
G
N
ON
S1 S6 S1 S6P3
P2
CS
P1
G
N
ON
DO NOT POWER THE SPA BEFORE IT HAS BEEN FILLED
SINGLE PHASE THREE PHASE
DIP SWITCHES DIP SWITCHES
A32ampconnectionwillrequireloadshed/limitingforthecomponentsastheycannotallrunsimultaneously.SeetheSpaNetuserguideformoreinformation.A45ampconnectionprovidespowerforallcomponentstorun.

77
Controller locatedbehindlefthandsidemiddlecabinet
panel
Identify labeled parts on pages 78 - 81

78
7. GETTING TO KNOW YOUR SPA POOL
StainlessSteelbearing-lessjetscomeinavarietyofsizesandconfigurationsinyourspapooltodeliverarangeofdifferentmassagepressurestothosepersonssoaking.Activatebyturningonthejetpumpviathetopsidecontrolpanel.
Airjetsarelocatedaroundthebottomoftheseatsandareactivatedbytheairblower.Bewarynottoover-usetheairblowerasitwillinjectcoldair(coolerthanthecurrentwatertemperature)intothespapool,coolingthewater.
Unscrewingthearomatherapycapprovidesaslotforyouraromatherapycannister.Whentheair-blowerruns,thefragrancewillbedrawnthroughtheairsystemandbubblestothesurfaceofthewaterforyoutoenjoy.
5
6
4
MASSAGE JETS
AIR JETS
AROMATHERAPY
Turningthisdialinjectsairintothejet-stream,boostingthepressureofthejetsinaparticularsetofseats(usuallytheonesclosesttothedial).Turndialoffwhenfinishedwiththejetstoavoidacontinuousflowofcoldairenteringthewaterwhenyouarenotsoaking.
1 AIR VENTURI
Thissmallerthreepinvalveisusedtoadjusttheflowrateofthewaterfallandfountains(ifequipped).Toturnoff-simplytwistclockwiseuntilfullyclosedandreversethisprocesstoturnon.Becarefulnottooverturnthedialandforceitpastit’snaturalstoppingpoint.
2 WATERFALL CONTROL DIAL
Thisdialgivesyoutheabilitytoforcemaximumjetpressureintoacertaingroupofseats.Turnitfullyleftorfullyrighttotransferwaterpressurebetweendifferentseatsinthespapool.Positionithalfway(50/50)todistributeanevenpressuretoallseatsatonce.
3 PRIMARY DIVERTER
ThereisaperimeterofminiLEDlightssurroundingthetopinneredgeoftheacrylic.Thesecanbeswitchedbetweenvariouscolouroptionsandmodesbyusingthetopsidecontrolpanel.TheLEDlineisagoodindicatorofhowhighyourwaterlevelshouldbe.
7 LED PERIMETER LIGHTING
SPA POOL PARTS LABELED

79
Pop-upspeakersmountedinthecornersofthespapoolacrylicwillplaymusicwhenadeviceispluggedintothedockingstation(locatedonoutsideofthespapool)seepart#13.Standardspapoolsusea3.5mmauxconnectionwhileplatinummodelsrequireaBluetoothconnection.
Onstandardmodels,twoLEDcornerlightsprovideilluminationontheexternalcabinet,enhancingtheaestheticsofyourspapoolatnighttime.Platinummodelshavealightonallfourcorners.
Selectmodelshaveaflatilluminatedcup-holderspacetoplaceyourfavouritedrink.
10
11
12
LED SPEAKERS
LED CORNER LIGHT
LED CUP-HOLDER
AlargeLEDfloodlightsitsbelowthewaterline,tintingthewatertotheselectedLEDcolourwhilesyncingwiththerestofthelightingpackage.
9 LED FLOODLIGHT
Aback-litwaterfallproducesasteadystreamofwaterandilluminateswiththecolourofthechosenLEDsetting.Thiscanbeturnedonandoffusingthewaterfallcontroldial.
8 LED WATERFALL
Theskimmerboxhousesyourfilter(s)whichwaterisdrawnthroughwhenthecirculationpumpisengaged.(Floatingweirskimmerpictured,seepages12-13formodelspecificskimmerboxexamples).
14 SKIMMER BOX
Thewaterproofdockingstationhousesyourdevicewhileyouconnectittotheaudiosystemviathe3.5mmauxcord.PlatinumspapoolshaveanadditionalmusiccontrolpadtoconnectwithBluetoothandchangetracksandvolume.
13 AUDIO DOCKING STATION

80
Theexternaldrainvalvesitsonacabinetpanelononesideofthespapool.Attachahoseandtwistandturntoreleasetheflowofwaterwhendraining.Usingthedrainvalveisexplainedonpage88.
Selectmodelshavefountainswhichpopupandruninconjunctionwiththewaterfall.TheyareilluminatedwithanLEDlightaspartofthelightingpackage.Itiscontrolledviathewaterfallcontroldial.
17
18
EXTERNAL DRAIN VALVE
FOUNTAIN
7. GETTING TO KNOW YOUR SPA POOL
Selecthydrotherapyseatshaveheadrestsasacomfortoptiontoaddtotherelaxationexperience.SomeheadrestshaveLEDlightsbehindtoilluminatethearea.
21 HEADREST
Pumpintakessitinthefoot-wellofthespapool.Waterissuckedthroughtheseandthenexpelledbackoutthejets.
15 PUMP INTAKES
Thespapoolwaterdrainsoutthisportwhentheexternaldrainvalveisreleased.SmallOzonebubblesmayemitfromthispiecefromtimetotime-thisisanormalfunction.
16 INTERNAL DRAIN
Thisisthebuttonpadandtemperaturedisplaypanellocatedonthetopofthespapoolintowhichvariouscommands,controlsequencesandoptionsforoperatingthespapoolcanbeentered.
Theheartofthespapool.Acomputersystemandheatermakesupthecontrollerasawholeandcontrolsallcomponentsinthespapoolincludingthetopsidecontrolpanel.
19
20
TOPSIDE CONTROL PANEL
SYSTEM CONTROLLER
SPA POOL PARTS LABELED - CONTINUED

81
Themultipleverticalslatsholdthecabinetpanelstotheframingofthe spa pool.
Selectmodelshavewaterspoutjetpieceswhichpopupandruninconjunctionwiththewaterfall.TheyareilluminatedwithanLEDlightaspartofthelightingpackage.Itiscontrolledviathewaterfallcontroldial-seepart#2.
24
25
VERTICAL SLAT
WATER SPOUT
Multiplecabinetpanelssurroundtheouteredgeofyourspapoolwhichprotectthecomponentsinside.Panelsareheldontotheframeofthespapoolwithverticalslatswhichsitateachendofthecabinetside.
Thisisausersafetyfeaturewhichensuresthatthesuctioninsidethespapoolishaltedifaintakeisblockedforanyreason.
23
22
CABINET PANEL
VACUUM BREAK

82
PRESSURE DIVERTER & AIR VENTURI VALVES
WATERFALL CONTROL
Pressure DiverterFoundonselectmodels,turningthisdialleft/rightwillswitchthejetpressurefromonesideofthespapooltotheother.Forevenjetpressureacrossallseats,leavethedialadjustedtothemiddleposition(50/50).
Air Venturi ValveTurningthesedialsonwillinjectairflowintoselectedjetstoincreasetheirpressure.Youwillnoticethewaterstreambecomesaeratedwhenfunctioning.Theseatlocatedclosesttothedialisusuallytheonetoreceivetheboost.Werecommendtoturnoffthesevalveswhenyouexitthepool.
Waterfall BehaviourAslongasthedialisturnedon,waterwillflowfromthewaterfallorfountainswhenthespapoolisheatingand/orfilteringORanytimeapumpisengaged.
Turning ON/OFFTurnthewaterfalldialanti-clockwisetoopentheflowofwater,clockwisetoshutitoff.BeEXTREMELYcarefulnottoover-twistandpushthedialpastthepointofnaturalresistance.Ifnowaterisflowingbutthevalveisopen,activateapumptoengageflow.
7. GETTING TO KNOW YOUR SPA POOL
AIR BLOWER
Air Blower OperationTheairblowerisactivatedviathebuttononthetopsidecontrolpanel.Thiswillbubbleairfromtheair-jetsfoundinthe bottom of the spa pool.
NOTE: Platinum dials and jets will have a slightly different appearance (translucent plastic) as select pieces are back-lit with LED lights.

83
AROMATHERAPY
AromatherapyAnaromatherapysystembuiltintothespapool(selectmodels)utilizestheairblowertodispersefragrancetothesurfaceofthewaterforyoutoenjoywhilesoaking.
Carefullyfollowtheseinstructionstousethearomatherapyfunction:
Openyouraromatherapypacketandtakeoutthepacketoffragrancebeadsandwhitecannister.
Open the aromatherapy cap by unscrewinganti-clockwise.Placethecannisterinside.
Remove the cap from the white cannisterandopenthefragrancebeads.Pourthebeadsintothecanister.
Ensurethecannistersitscomfortablyinsidelikeso.
Replacethelidonthecannistertightlybypressingitdown.
Replace the aromatherapy cap by screwingclockwise.Runtheairblower from the control panel to activate the system.
1
4
2
5
3
6
WARNING:• Do not run the air blower with the aromatherapy cap unscrewed/removed.• Use only Alpine Spas fragrance beads inside the white cannister.• Never place anything except for the cannister inside aromatherapy holder.• Do not pour beads into spa pool or anywhere else except for the white cannister.
Itiscompletelynormalfortheairtofeelcoolwhenyouruntheairblower.Thisisbecausethetemperatureoftheairislowerthanthetemperatureofthewater(andyourbodytemperature)andwillitfeelcoolerincomparisonwhenittouchesyourskin.Usetheblowersparingly.
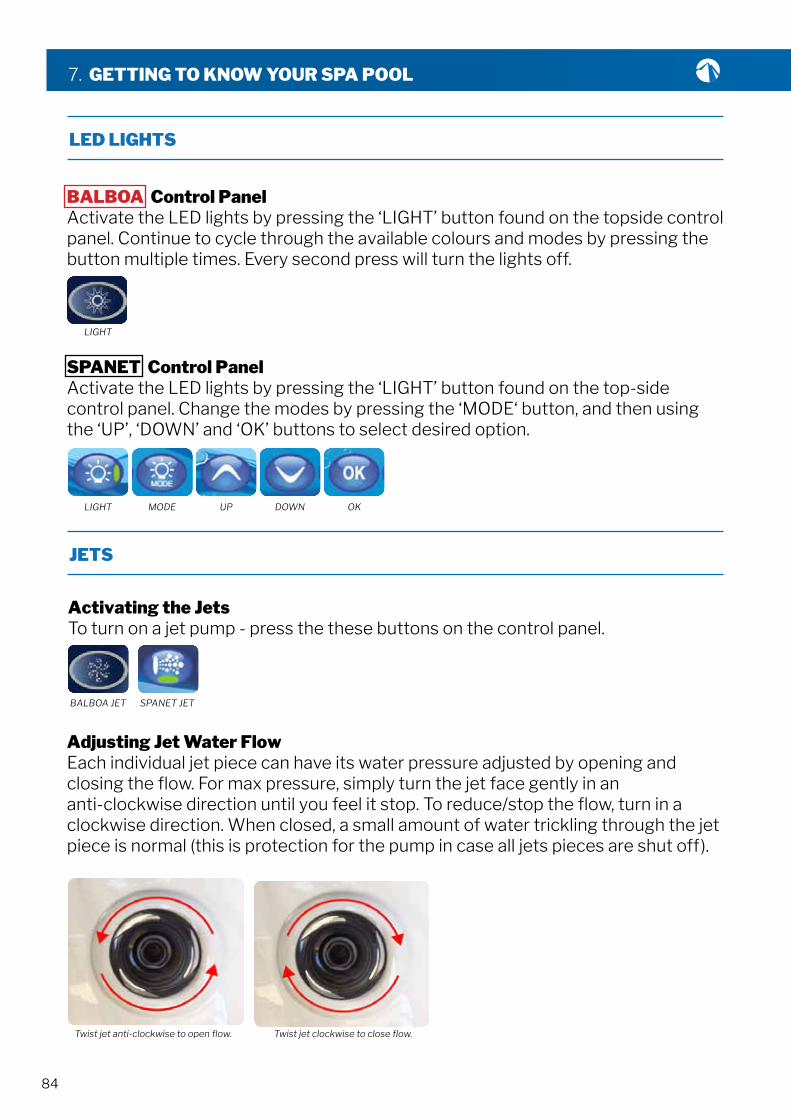
84
7. GETTING TO KNOW YOUR SPA POOL
LED LIGHTS
JETS
BALBOA Control PanelActivatetheLEDlightsbypressingthe‘LIGHT’buttonfoundonthetopsidecontrolpanel.Continuetocyclethroughtheavailablecoloursandmodesbypressingthebuttonmultipletimes.Everysecondpresswillturnthelightsoff.
SPANET Control PanelActivatetheLEDlightsbypressingthe‘LIGHT’buttonfoundonthetop-sidecontrolpanel.Changethemodesbypressingthe‘MODE‘button,andthenusingthe‘UP’,‘DOWN’and‘OK’buttonstoselectdesiredoption.
LIGHT
BALBOA JET
Twist jet anti-clockwise to open flow. Twist jet clockwise to close flow.
SPANET JET
LIGHT
MODE UP DOWN OK
Activating the JetsToturnonajetpump-pressthethesebuttonsonthecontrolpanel.
Adjusting Jet Water FlowEachindividualjetpiececanhaveitswaterpressureadjustedbyopeningandclosingtheflow.Formaxpressure,simplyturnthejetfacegentlyinan anti-clockwisedirectionuntilyoufeelitstop.Toreduce/stoptheflow,turninaclockwisedirection.Whenclosed,asmallamountofwatertricklingthroughthejetpieceisnormal(thisisprotectionforthepumpincasealljetspiecesareshutoff).
JETS 1Press to toggle Jet pump 1 on and off. 'Jet 1' light below the screen indicates when this is running. .
JETS 2 Press to toggle Jets 2 on and off. Jets 2 light below the LCD screen indicates when this is running.
BLOWER Press to toggle the air blower on/off. Turn this on to activate the aromatherapy system.
LIGHT BUTTON Press to activate the spa pool's LED lights. Each press will toggle between the 13 colour options including the fade and strobe functions. 'Light' LED below the screen indicates when this is on.
The 'LIGHT' button also allows you to scroll through adjustment options to invert screen, change modes and customise filter cycles. To do this press the 'TEMP UP' button and then the 'LIGHT' button.
TEMP UP/DOWN A short single press toggles the spa pool temperature. 'TEMP UP' will increase the temperature. 'TEMP DOWN' will decrease the temperature.
The LED 'Heat' light below the display screen indicates when your spa is heating.
JETS Press to toggle jet pump on and off. 'Jets' LED light below the screen indicates when this is running. Ensure jet pieces are open and use pressure diverts to customise your hydrotherapy experience.
BLOWER Press to toggle the air blower on and off. 'Blower ' light below the LCD screen indicates when this is running. Turn this on to activate the aromatherapy system.
LIGHT BUTTON Press to activate the spa pool's LED lights. Each press will toggle between the 13 colour options including the fade and strobe functions. 'Light' LED below the screen indicates when this is on.
The light button also allows you to scroll through adjustment options to set temperature and customise filter cycles. To do this hold down the Temp Up/Down button, then use light button to select options and save setting adjustments.
TEMP UP/DOWN A short single press toggles the spa pool temperature. 'TEMP UP' will increase the temperature. 'TEMP DOWN' will decrease the temperature.
The LED 'Heat' light below the display screen indicates when your spa is heating.
INVERT Press to change the orientation of your LCD screen.
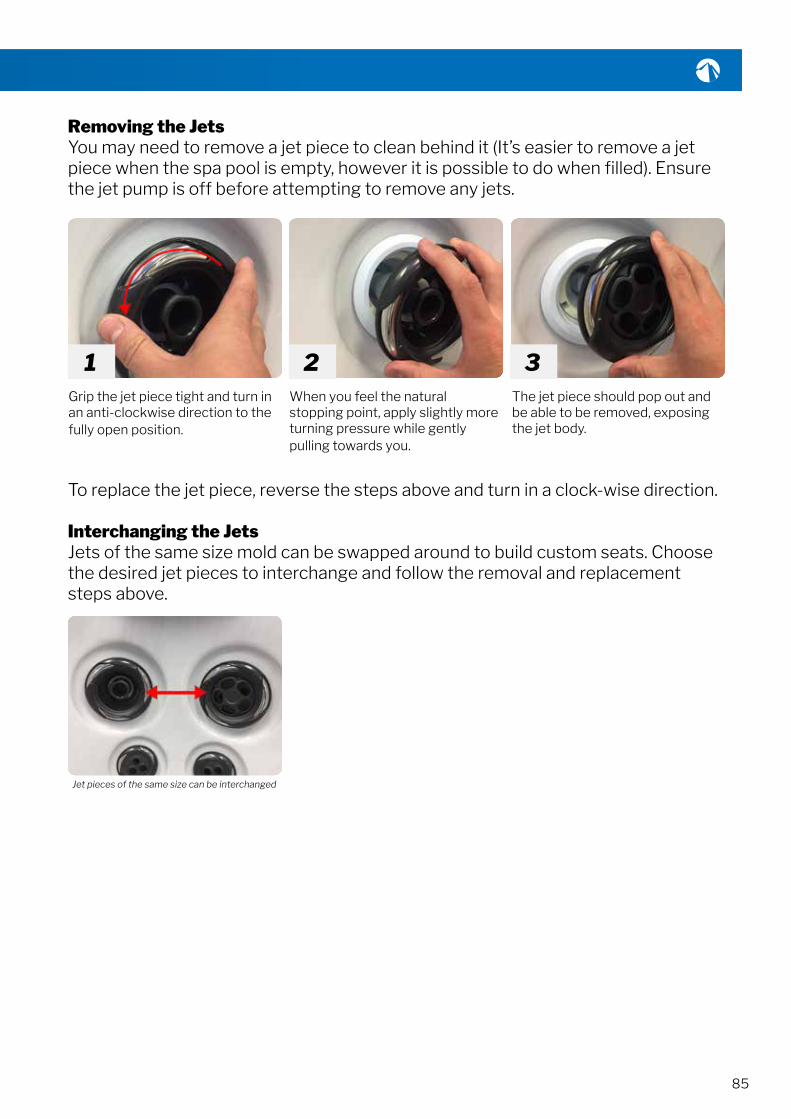
85
Jet pieces of the same size can be interchanged
Removing the JetsYoumayneedtoremoveajetpiecetocleanbehindit(It’seasiertoremoveajetpiecewhenthespapoolisempty,howeveritispossibletodowhenfilled).Ensurethejetpumpisoffbeforeattemptingtoremoveanyjets.
Toreplacethejetpiece,reversethestepsaboveandturninaclock-wisedirection.
Interchanging the JetsJetsofthesamesizemoldcanbeswappedaroundtobuildcustomseats.Choosethedesiredjetpiecestointerchangeandfollowtheremovalandreplacementsteps above.
Gripthejetpiecetightandturninananti-clockwisedirectiontothefullyopenposition.
Whenyoufeelthenaturalstoppingpoint,applyslightlymoreturningpressurewhilegentlypullingtowardsyou.
Thejetpieceshouldpopoutandbeabletoberemoved,exposingthejetbody.
1 2 3

86
7. GETTING TO KNOW YOUR SPA POOL
SOUND SYSTEM (AUX)
(MAKALU,SUMMIT,MATTERHORN,LUCANIA,MCKINLEY,VANCOUVER)
Overview Theabovespapoolmodelsincludeasoundsystemmadeupoftwopop-upLEDspeakers,anamplifieranda3.5mmauxiliarycordlocatedinsidethewaterproofdockingstation.
Audio Docking Station
Operating the SpeakersTheLEDspeakersarespringloadedandcanbe‘poppedup’bygentlypressingthemdownandreleasing.Theycanalsoberotatedbytwistingthemtofacethedesireddirection-becarefulnottoforcethespeakerpastitspointofresistance.
Connecting a DeviceSlideupthefrontpanelonthewaterproofdockingstation-thisislocatedonthefrontsideofthespapoolcabinet.Insidethedockisaauxiliaryconnectionwitha3.5mmheadphonejack.Thiswillfitstandardmp3players,cell-phonesandothersuchaudiodevices. Playing MusicSwitchonthesoundsystembypressingthepowerbuttonlocatedinsidethedockingstationinthetoprightcorner.ThepowersymbolshouldlightupredtoindicatepowerisON.Adjustingvolumeandchangingtrackscanonlybecontrolledviatheconnecteddevice.
NOTE: If the music does not play, check the on/off power button has been properly turned on inside the docking station as above.

87
SOUND SYSTEM (BLUETOOTH)
(MUNRO,EVEREST,K2,CUB,FRONTIER,OASIS,ARCTIC,GLACIER,ENTERTAINERX80,ENTERTAINERX90)
Overview Theabovespapoolmodelsincludeasoundsystemmadeupoftwoorfourpop-upLEDspeakers,anamplifier,asub-woofer*andaBluetoothmusiccontrolunitlocatedbesidethewaterproofdockingstation.
Sub ControlAudio Docking Station
Music Control Unit
Operating the SpeakersTheLEDspeakersarespringloadedandcanbe‘poppedup’bygentlypressingthemdownandreleasing.Theycanalsoberotatedbytwistingthemtofacethedesireddirection-becarefulnottoforcethespeakerpastitspointofresistance.
Connecting a DevicePresstheonbuttonlocatedonthemusiccontrolunit-itshouldlightupandflashtheLEDindicatorblue.ActivateBluetoothonthedeviceyouwishtoconnectandlookfor‘BTAUDIO’inyourdevice’s‘nearbydevices’list.Anaudiobeepwillbeheardthroughthespeakerswhenthedeviceissuccessfullyconnected. Playing MusicYoucanuseeitheryourdeviceorthemusiccontrolunitonthespapoolcabinettoadjustthevolumeandchangethetrack.Acontrolforthesub-wooferislocatedinsidethedockingstation*whereyoucanalsoplaceyourdeviceforwaterproofprotectionwhilesoaking..
NOTE: *The Munro, Everest and K2 models do not include a sub-woofer.

88
DRAINING THE SPA POOL
Draining WaterYourspapoolneedstobedrainedandrefilledevery3-4monthsdependingonusage.Thisisoutlinedinmoredetailinthe‘SpaPoolWaterCareHandbook’foundinyouriPack,alongwithaccessoriestohelpdrainthewater.
8. SPA POOL CARE & MAINTENANCE
Operating the Drain ValveTheexternaldrainvalveconsistsofasimpleturn&lockmechanismandaninnertwistcap.Waterwillnotflowoutofthedrainunlessitisinthe‘flowopen’positionandtheinnertwistcaphasbeenunscrewed.
Flow locked (Extended position)
Flow open (Retracted position
Inner twist cap still to be undone)
Startwiththedraininthe‘Flowlocked’position(extended).
Screwonthemale-endhoseattachment.
Unthreadtheinnertwistcapandremove it.
Attachyourhoseandruntheendtoadrainlocation.
Threadinthehose-adapterpiece.
Pushinandtwistthevalveanti-clockwiseintothe‘flowopen’position(retracted)tobegindrainingthewater.
1
4
2
5
3
6
TURN OFF POWER TO THE SPA POOL BEFORE ATTEMPTING TO DRAIN THE WATER!

89
CLEANING THE FILTERS
CLEANING THE ACRYLIC SHELL
Werecommendhavingasecondsetoffiltersonhandtorotatewhilecleaning.
Quick Clean (once per week)Onceaweek,removeyourfiltersfromthespapoolandwashthemdownwithahose.Maximizethewaterpressureofyourhoseandspraythecartridgethoroughly(putyourthumboverthetipofthehose).Youraimistoremoveanybuildupoffilteredmaterialstuckbetweenthefoldsofthefilterpaper.Donotleavefiltersoutofspapoolforprolongedperiodsoftime.
Soak Filters (once per month)Onceamonth,removeyourfiltersfromthespapoolandplacetheminabucketofwarmwater.Addfiltercleaningsolution(availablefromAlpineSpas)andleavetosoakovernight.Oncesoaked,removefrombucketandwashthoroughlywithahosetoremovelooseneddebris.Replacing Filters (as required)Afiltercartridgeshouldlastupto12monthswhencleanedasperthisguide.Filtersthatareseverelydiscolouredandbecomedifficulttocleanaresignsanewonemaybedue.OnlyAlpineSpasapprovedcartridgesaretobeusedinthespapool.
General Cleaning (as required)Theacrylicsurfaceisnon-porousandmostmarksordirtshouldcomeoffquicklyandeasily.Werecommendusingamicrofibreclothtowipetheshell.Formoreresistantmarksyoucandissolveasmallamountofbakingsodaintotheclothandapplyittothetargetedarea.
Fromtimetotimearing(sometimesreferredtoasscumringortideline)mayappearjustabovethewatersedge.Awipewithamicrofibreclothwilltakecareofthis,butgoodwaterbalancewillgenerallypreventthisfromoccurringinthefirstplace.
Cleaning When Draining (every 3-4 months)Whendoingyour3-4monthlydrainandrefill,it’sagoodchancetofullywipedowntheacrylicshell.Usesomebakingsodaoralow-strengthallpurposecleanerandwipeeverywherewithamicrofibrecloth,includingaroundthejets(youmaywanttopopthemouttogetinbehindthem). Hosedownthespapoolinterioroncefinishedanddrainorbucketoutthewateratthebottom.Youwanttoavoidrefillingwiththeleftoverremainsofyourcleaningsolutionasthismayfoamorcausetroublewhentryingtobalancethewateruponrefilling.

90
8. SPA POOL CARE & MAINTENANCE
CLEANING THE SPA POOL CABINET
CARING FOR THE SPA POOL COVER
Thesyntheticcabinet(compositewood)isvirtuallymaintenancefree,howeveryoushouldhoseitdownonceamonthorasrequiredtoremoveanycobwebsordirtaccumulating.Amildsoapandmicrofibreclothcouldbeusedtoassistifrequiredforstubbornmarks,aslongasitisthoroughlywashedoff.
Acedarcabinetcanbewasheddownandscrubedwithasoftbrushifrequired.Topreventnaturalsilveringofthecedarovertime,auv-protectantoilshouldbeusedevery6-12months.Thesilverbandsareeasilyremovabletoachieveaevencoat.
Thecoverconsistsofashrink-wrappedpolystyreneblockwrappedinamarine-gradeUVtreatedoutdoorvinyl.Althoughitstoughandmadetowithstandtheelements,thecoveriscontinuallyexposedtoharshsunlightandweatherconditionspluswhateverelseisthrownatitduringday-to-dayusage.Tomaximizeitslife-span,pleasefollowtheseguidelines:
General Cleaning (as required)Keepyourcoverascleanaspossible,andremoveanydebristhatmaybuildupontopofthevinyl.Wipewithamicrofibreclothorlargetowelandhosedownifrequired.
Dedicated Clean (once per month)Onceamonth,completelyremovethespapoolcoverfromthespapool(youmaywanttocoverthespapoolwithatarporsimilarprotectorduringthisprocess).Thoroughlycleanboththetopvinylandundersideofthecoverusingwarmwaterandmilddish-washingdetergent(donotuseharshchemicals).Hoseoffanddrythecoverwithatowel.Ensureyoucleanthelocksandstrapssotheyarefreeofanymoldorcobwebs.Unzipaportionofthezipandinasafeplace,standyourcoveruptoforman‘A-frame’andleavetodrylikethisfor1-2hoursbeforeplacingbackontopofyourspapool.
Protecting the Vinyl (every 3-4 months) Every3-4monthsoreachtimeyougotodrainyourspapool,it’sagoodchancetoapplyavinylprotectortothetopsideofthecover.Asprayonsolutionsuchas‘303AerospaceProtectant’withUVprotectingpropertiesorsimilarwouldbesufficient.Drycoverandremoveanydirtbeforeapplying.Alightcoatwillbringthecolourbacktolifeandhelpyourcoverstandthetestoftime. Note: Considerpurchasingacoverlifterifyouhaven’talready.Theseunitsincreasethelifespanofthecoverbykeepingitsuspendedoffthegroundandtuckingitneatlybehindthespapoolwhenitisinuse.

91
PERFORMING A PIPE CLEAN
Consistentwaterbalancingandgeneralfiltercleaningwillkeepyourwatercleanandclearandprotectyourspapoolcomponents.Butunfortunatelyit’salmostimpossibletoavoidbacteriaandorganicmaterialmakingahomeinsidethespapoolplumbing/pipes.
Bacteriahasawayofprotectingitselfbyformingas‘bio-film’whichstickstotheinsideofthepipes.Althoughthisrarelycausesissues,excessivebuildupcanmakewaterbalancingmoredifficultandyoumayfindbitsofbio-filmfloatinginthespapoolifsomeofitmanagestodetachfromtheinteriorpipewall. Todestroybio-filmoranyothernastieshiddeninthepipes,a‘PipeClean’shouldbeperformedevery6months.Keepinmindthatthespapool’swateristobedrainedafterthisprocess,soyoumayjustwanttoincorporateitintoyour3monthlydrainingschedule.‘PipeCleaner’canbepurchasedfromAlpineSpas. Stepstoperforma‘PipeClean’.
1. Clean FiltersThisprocesswillrelyheavilyonthefilterstocollectthegrimeejectedfromwithinthepipes.Afreshlycleanedsetshouldbeinstalledbeforeperforminga‘PipeClean’.
2. Open All JetsEnsurealljetsaroundthespapoolareopen(turnanti-clockwise). 3. Shock DoseRemovethecoverandshockdosethewatertokillanyexistingbacteriapresentinthewater.Wait30minutesbeforestartingthenextstep.
4. Add ‘Pipe Cleaner’Followdirectionsonthelabelandaddthesolutiontothewaterwithallpumpsturnedon.BepreparedforALOToffoamtobuildup.Youmaynoticethefoambecomesbrown,greenoryellow,thisisagoodsignofbio-filmremoval.Bucketoutthefoamwherepossibletorelievestressonthefilters.Engagepumpsagainwhentheytime-outuntilthefoamstopsaccumulatinginexcessiveamounts,whilecleaningoutfiltersin-between. 5. Leave OvernightPlacethecoverbackonthespapoolandleaveittocirculateovernight.Cleanthefiltersthenextday,wipetheacrylicedgeifrequiredanddrainthespapoolasperthedrainandrefillprocess.

92
8. SPA POOL CARE & MAINTENANCE
LEAVING THE SPA POOL SHORT TERM
Ifyouareheadingawayforaholidayorjustknowyouwon’tbeusingyourspapoolforashortperiodoftime(lessthanamonth),it’sagoodideatotakesomestepstoprotectyourspapoolandsaveyoutheheatingcosts!
1. Clean FiltersYourspapooloperatesbestwithacleansetoffilters.Removeandwashthoroughlyasperfiltercleaninginstructionsonpage89. 2. Remove HeadrestsUncliptheheadrestsanddryoffbeforeputtingtheminasafeplace.Whenthecoverstaysonthespapoolforanextendedperiodoftime,ozonegascanbuildupontopofthewaterandeatawayattheheadrestmaterial.
3. Remove Bromine (if applicable)Removethebrominedispenserifyouareusingbromineinsteadofchlorineasyoursanitizer.Discardthetabletsandstorethedispenserinasafeplace.
4. Shock Dose Shockdosethewaterusingacapfulof‘SpaChlor’andensurethecoverisleftofffor1hourbeforereplacingit.
5. Turn Down TemperatureTurnthetemperaturedowntothelow20’s,orplaceinaway/restmodeandmakesurethespapoolissettooperateitsfiltercyclesautomatically(thisisthedefault).
6. Secure CoverPlacethespapoolcoveronsecurelyandlockwiththeclips. Byfollowingthosestepsyourspapoolwillkeepfilteringandwillnotheatexcessivelywhileyouareaway.Youwillreturntoahealthy,cleanspapool.Ifpossible,whileyouareaway,haveaneighbourorfriendopenthespapoolcoveronceeveryaweekforafewminutestoairitoutandshockdosethewaterifrequired.

93
Theremaycomeatimewhenyouneedtoleavethespapoolforaperiodlongerthanamonthandwanttoshutthespapooloff.Followthesestepstosafelypreparethespapoolforhibernation:
1. See Previous StepsPerformsteps1to3from‘LeavingtheSpaPoolShortTerm’beforemoving on.
2. Turn OFF Spa PoolCompletelyturnoffthespapoolatyourisolationswitchormainsboard.
3. Drain the WaterDrainthewateroutofthespapoolviatheexternaldrainvalve.
4. Drain pipes via Barrel UnionsOpenupthecabinetssurroundingthespapoolandlocatethebarrelunionsatthecontrollerunitandthepumps.Loosen(stropwrenchmayberequired)thebarrelunionseithersideofthecomponenttodrainexcesswaterfromthesurroundingpipes.Putdownatowelifrequired,tosoakupwater.Tightentheunionsbackuponcefinished.
5. Blowout Pipes (recommended if switching off for 3+ months)Climbinsidethespapoolwitha‘Wet-Vac’.Removethejetpiecesandplacethevacuumnozzleintothejetbodytosuckwaterdirectlyoutofthepipe.Noteveryjetpieceneedstobeattendingto,aimfor3-4perseat.Otherpipestosuckwaterfromaretheinternaldrainvalveandthecirculationjetmountedonthesideofthespapoolacrylic(usuallynearthetopsidecontrolpanel). 6. Wipe Down Spa PoolRemoveanyexcessbuildupofwaterfrominsidethespapoolandwipetheacrylicshelldowncompletelywithamicrofibreclothandmildall-purposeanti-bacterial spray.
7. Secure CoverPlacethespapoolcoveronsecurelyandlockwithclips.Coverentirespapoolwithatarpor‘spapoolwintercover’forthebestlong-termprotection.
TURNING OFF LONG TERM

94
CLEANING SCHEDULE
Here’sahandychecklisttohelpyouwithcaringforyourspapool.
WEEKLY
Testandbalancethewater
Cleanfilters(quickcleanprocess)
ShockDose
Wipedowncover,cabinetandacrylicasrequired
MONTHLY
CleanFilters(soakprocess)
CleanCover(dedicatedcleanprocess)
EVERY 3-4 MONTHS
Drainandrefillprocess(pipecleanifrequired)
Cleanacrylicwhilewaterisdrained
Protectcover(applyvinylprotectant)
Checkpumpsandbarrelunions
8. SPA POOL CARE & MAINTENANCE

95
PUMP MAINTENANCE
BARREL UNION MAINTENANCE
Youshouldcheckthepumpsinsideyourspapoolonaregularbasistoensuretheyareoperatingasefficientlyaspossibleandthereisnoleakingorcorrosionoccurring.Issueswithpumps,particularlysealcorrosion,isgenerallycausedbyincorrectpHandalkalinitylevelsorexcessivedosageofsanitizerssuchaschlorineor bromine.
Maintaining/balancingthespapoolwateraccordingtowellestablishedmethodsandfollowingtheguideprovidedwillhelptoavoidsuchissues.
How to check your pump(s)Werecommendcheckingthepump(s)every3-4monthswhichshouldbecomepartofyourdrainandrefillprocess.Thenumberofpumpswillvaryperspapool,socheckyourspapooloverviewpage. Openupthecabinetsaroundthespapooltofindthepump(s).Anysignsofleaking,rust,calciumbuild-uporyellow/whitepowdertypesubstanceusuallybetweentheplasticwetendandmetalpartsofthepumpmayindicateanissueandservicemayberequired.PleasephotographandcontactAlpineSpas.
How to check your barrel unions. Openupthecabinetsaroundthespapool.Findthepump(s)andthesystemcontroller(thisunithousestheheater)andyouwillseethewhitebarrelunionswhichsitateitherendofthecomponent(pump,heateretc).Checktoseeiftheyneedtobetightenedandifso,gripandturnclock-wisetotighten.
Barrelunionsaretheconnectionpieceusedtojointheplumbingtothepumpsandtheheater.Beingabletoeasilyremovethepumpsorheaterisimportantforservicing.
Becausebarrelunionsareathreadfitting,theymayloosenslowlyovertimeduetofactorssuchasvibration(fromthepump)andneedtobecheckedperiodically.Loosebarrelunionswillpromoteleaks.
ISSUES OUTLINED ABOVE ARE NOT COVERED BY WARRANTY.
9. SERVICE INFORMATION

96
9. SERVICE INFORMATION
UV SYSTEM BULB REPLACEMENT
TECHNICAL SUPPORT CONTACT
ItisarequirementoftheownertochangetheUltra-Violetlightbulb(ifequipped)every18months,howeverlikeanylight-bulb,thereisachancethebulbcouldfailbeforeitsexpectedlifetimeisup.
Thesystemmayemitahighpitchnoiseifthebulbhasfailed.ContactAlpineSpastopurchaseanewU.Vbulb-thebulbcarriesa12monthpartswarranty.
Areplacementcanbeinstalledinanumberofminuteswithoutneedingtodrainthespapool.Pleasefollowourvideoorphotoguidefoundonoursupportpage(seelinkbelow).
Ifreadingthroughthismanualandfollowingthesolutionsfromthetroubleshootingguidehasnotresolvedyourissue,pleasecontactAlpineSpas:
SELECT TECHNICAL SUPPORT FROM THE OPTIONS Support is available Monday to Friday: 9.00am - 5.00pm
OR PHONE: 0800 99 33 88
Findsupportdocumentsandguidesonourwebsiteat: http://alpinespas.co.nz/support/

97
TROUBLESHOOTING
Pleaseseeour‘SpaPoolWaterCareHandbook’foracompleteguideoftroubleshootingwaterissues.Seepage20formoreinformation.
General Troubleshooting
Water Troubleshooting
ISSUE POSSIBLE CAUSE SOLUTIONDisplayisblank Dataconnectionfailed SwitchSpapoolOFFandONagain
No power BreakerorRCDOFF
Looseplugorwires
CheckRCDisturnedon
Checkplug&wireconnections(electrician)
RCD trips Mis-wiredconnections
Componentfailure
Checkwiringiscorrect&matchesdiagram(electrician)
Call for service
Spa pool NOT heating Spapoolinrest/away/sleepmode
Temp set low
Changemodetoready/normalmode
Increasesettemperature
Spapooldoesn’treach
settemperature
Spapoolinrest/away/sleepmode Changemodetoready/normalmode
Lowjetpressure Jetsclosed
2-SpeedPumpinlowspeed
Turnjetfaceanti-clockwisetoopen.
Pressjetbuttonagaintoenterhighspeed
Nojetpressure Air-lockinplumbing Primepumpbypressingjetsbuttonon/off2-3timesin
sequence.Bleedpumpbylooseningthebarrelunion
AirBloweremitscoldair Notafault,thisisnormalasair
temperatureiscolderthanwater
temperature
N/A
Speakersnot
working
Speakerpowerbuttonisoff
Device protection case interfering
Powerbuttonsitsatthetopofthedockingstation,pressto
turnon(seepage86-87formoreinfo)
Removeprotectivecasefromdevice&retry
Spa pool emits high
pitch ringing noise
UVsystemalarm(bulbhasfailed) CheckforleakingaroundtheUVchamber&replaceUVbulb
if necessary.
Spapoolisleaking/wa-
terappearsonground
aroundcabinets
Overflowvalveengaged
Leakingfrombarrelunion
Leakingfromcorrosion
ContactTechnicalSupport
Check&tightenbarrelunionsonpumps&controller
ContactTechnicalSupport

98
9. SERVICE INFORMATION
Diagnostic Messages - BALBOA TOPSIDE CONTROL PANEL
MESSAGE MEANING ACTION REQUIRED
-- -- -- WatertempunknownWait2minutesforsensorstopickup
temperature
TOO COLDWatertemptoocold,pumpswillengage
to prevent freezeNone
WATR TOO HOTWatertemphassurpassed42°C.Spa
poolfunctionsaretemporarilydisabled
Pumpmaybestuckon.Tryresettingthe
power&reducingsettemperature
HTR FLOW LOSS
HTR FLOW FAIL
HTR DRY
HTR TOO HOT
Issuewithwaterflowthroughtheheating
chamber
Checkforlowwaterlevel,suctionflow
restrictions,closedvalves,trappedair,too
manyclosedjetsandpumpprime.Once
issueisresolvedyoumayneedtopress
anybuttontorestartheater
NO COMMPanelisnotreceivingdatafromthe
controller
May be a loose cable or incorrect port -
contact tech for help
“T”appearsbesidetemp. SystemisintestmodeRemovalfromtestmode-contacttech
for help
STUK PUMP Apumpisstuckon Contact tech for help
CHEK PH
Theseareautomaticpre-programmed
reminderswhichdisplayonaperiodic
basistoremindyoutoperformanaction.
Theyarenotactualindicationsofthe
currentstateofthespapooloritswater
quality.Clearthemessagebypressingthe
up/downtemperaturebuttons
Appearsweeklyasaremindertocheck
PH
CHEK CHEMAppearsweeklyasaremindertoadd
sanitizer to the water
CLN FLTRAppearsmonthlyasaremindertoclean
yourfilters
TEST GFCI
Appearsmonthlyasaremindertotest
yourRCD(GFCIisAmericanterminology
for RCD)
CHNG WATRAppearsevery90daysasareminderto
drain&refillthespapool
CLN COVRAppearsevery180daysasareminderto
clean the cover
TRT WOOD N/A to an Alpine Spa
CHNG FLTRAppearsevery365daysasareminderto
replacethefilter/s
CHNG CART N/A to an Alpine Spa

99
Diagnostic Messages - SPANET TOPSIDE CONTROL PANEL
MESSAGE CAUSE ACTION REQUIREDER-2 HEATER PLUG
(noheatsensorcommunication)
Internalheatersensorcommunication
error
TurnmainspowerOFF,wait5minutes
then restart spa pool. Contact tech if
problemnotresolved
ER-3 WATER PRIME
(primehasfailed)
Airdetectedinheatertube
Low water level
Dirtyfiltercartridges
Airlockinpipework
Slice-valvesshut
PressPumpAbuttontoretrywaterprime.
Checkspapoolwaterlevel(refillif
necessary)
Removeandcleanfiltercartridgesthen
pressPumpAbuttontoretryprime
Bleedairfrompipesbylooseningbarrel
unionsonpumps
Checkallslicevalvesareopen
ER-4 THERMAL TRIP
(Heaterthermaltripactivated.Heaterhas
beenactive&hashadinsufficientwater
flowovertheelement.Lowornowater
flowhascausedtheheatertemperature
toexceeditsmaximumlimits&thespa
poolcontrolhasshutdownoperationto
preventanydamagetotheheaterunit)
Low water level
Airlockinpipework
Dirtyfiltercartridges
Slice-valvesshut
Checkspapoolwaterlevel(refillif
necessary)
Bleedairfrompipesbylooseningbarrel
unionsonpumps
Removeandcleanfiltercartridgesthen
pressPumpAbuttontoretryprime
Checkallslicevalvesareopen
ER-5 POOL TOO HOT
(Watertemperaturetoohigh,sensor
reading+45degrees)
Highambienttemp(summer)
Excessivefiltrationtime
Turnoffspapool,removecoverandallow
watertocoolbeforeswitchingbackon.
Reducefiltrationtime
ER-6 12V OVERLOAD 12Vportcurrentdrawexceeding1Alimit Call for service
ER-8 CTRL FAULT HVS
(heaterrelayonwhenitshouldbeoff)
PowerSurge
Periodsoflow/highvoltage
Water on controller terminal
TurnmainspowerOFF&backONagain
Inspectinsidespapoolcabinetforleaksor
evidenceofwaterexposuretocontroller.
Turnoffspapool,drywater/fixleakandlet
controllerdryout
ER-10 OVER CURRENT
(Mains230vcurrentdrawabovecurrent
limitedC.LMTdetected)
Componentscurrentdrawtoolargefor
C.LMT setting
PowerOFF/ON.CheckC.LMT/L.SHD/
L.LMT settings are correct. Do elimination
testoncomponentsusingthecontrol
paneltoidentifywhichconnectionis
causingthefault

1000800 99 33 88 | [email protected] | www.alpinespas.co.nz