sp500 / sp700 software manual for linux - star micronics · expand the...
TRANSCRIPT

Software ManualLinux
Rev. 2.0
Supported Models ■ SP500 Series■ SP700 Series

The company names and product names that appear in this manual are generally trademarks or registered trademarks of each company.

Table of Contents
1. Installation/Uninstallation Procedures ..........................................................1
1.1 InstallingPrinterDrivers............................................................................................................. 1
1.2 RegisteringthePrinter................................................................................................................ 3
1.3 UninstallingPrinterDrivers........................................................................................................ 8
2. Setting the Printer Functions ..........................................................................9
2.1 FunctionList................................................................................................................................ 11
3. Guidelines for Using an Ethernet Environment ...........................................17
3.1 SettingaTemporaryIPAddress............................................................................................... 17
3.2 SettingtheIPAddress<<TELNETUtility>>......................................................................... 18
4. Guidelines for Using the lpr Command ........................................................20
4.1 FunctionList................................................................................................................................ 21
5. Confirmed Operating Environments ............................................................23
6. Revision History .............................................................................................24

Software Manual for Linux
- 1 -
SP Printer
IntroductionThis manual explains how to operate the CUPS printer driver using Fedora 9 as an example. Images provided are different for other versions of Fedora or other distributions, but the same procedures can be used.The printer’s IP address must be set in advance to use a printer that supports LAN using this driver. If your LAN environment does not allow acquisition of an IP address from a DHCP server, set the IP address to the printer in advance. See 3. Guidelines for Using an Ethernet Environment for details on how to set the IP address for the printer.
1. Installation/Uninstallation Procedures
1.1 InstallingPrinterDriver
To install the driver, proceed as follows.
Caution : Before installing the driver, connect the interface cable to the printer and turn on the power.
See the hardware manual for details on how to connect the interface cable.
The new version sometimes cannot be installed if an older version remains installed on your
system. In such cases, see section 1.3 to uninstall the old version before installing a new version.
1. Startup the terminal.2. Use the “su” command to enable root account privileges. $ su3. Expand the starcupsdrv-x.xx.x_linux_yyyymmdd.tar.gz file downloaded via the website.4. Navigate to the directory where the rpm file "starcupsdrv-x.x.x-x.i386.rpm” is located.
Note: The x.x.x-x is module version. The yyyymmdd is the 8 digit date on which the package was release.
5. Run the rpm command using the ‘i’ and ‘v’ switches and the name of the RPM file. rpm -iv starcupsdrv-x.x.x-x.i386.rpm
The RPM has been installed.
Software Manual for Linux
- 2 -
SP Printer
Note:DebianGNU/Linux,ubuntuinstallationprocedures
It is necessary to install from the source code. Necessary package
• "gcc"
• "libcupsys2-dev"
• "libcupsimage2-dev"
After making sure that your PC is connected to the internet, perform the following operation to install the three packages above.
$ su - (Use the “su” command to enable root account privileges.)# apt-get update# apt-get install gcc# apt-get install libcupsys2-dev# apt-get install libcupsimage2-dev
It is not possible to attain administrator rights using su on ubuntu, so instead enter the sudo command at the top of the command. Ex.) $ sudo apt-get install gcc
After downloading the starcupsdrv-x.xx.x_linux_yyyymmdd.tar.gz file via the website, copy the file to your PC and perform the following operation.
# tar xzvf starcupsdrv-x.xx.x_linux_yyyymmdd.tar.gz# cd starcupsdrv-x.xx.x_linux# cd SourceCode# tar xzvf starcupsdrv-src-x.xx.x.tar.gz# cd starcupsdrv# make# make install
Note: The x.x.x-x is module version. The yyyymmdd is the 8 digit date on which the package was release.
Next, enter the CUPS management screen (http://localhost:631/admin). (Refer to section 1.2. Registering the Printer for details.)

Software Manual for Linux
- 3 -
SP Printer
1.2 RegisteringthePrinter
Procedures for registering the printer differ according to the type of interface you use. See the page relating to your environment.
1.2.1 WhenUsinganInterfaceotherthanEthernet.
1. Open your favorite web browser and navigate to “http://localhost:631/admin”.
2. Click on the “Add Printer” button. Note: When a dialog box is displayed requesting certification, enter the root password and press [Yes].
3. In the Add Printer screen, enter the printer name, location and description. Then click on the “Continue” button.
Location, and Description can be left blank.

Software Manual for Linux
- 4 -
SP Printer
4. Select the device(interface) to which the printer is connected. Then click on the “Continue” button.
5. Select the printer model/driver. Then click on the “Add Printer” button.
Caution : In some versions of CUPS, Star model name is not displayed in the model/driver pull-down menu.
In such cases, after performing the following, return to the previous page and reregister the printer.
$ su
# cp -fr /usr/share/cups/model/star /usr/share/ppd/star
This completes printer installation and registration.
Caution : In the case of parallel interface, Star Model Name is not displayed in the Device pull-down menu.
In such cases, perform the following.
1) Select the "LPT #1 (Unknown)" as the Device, then click on the “Continue” button.
2) Click on the “Add Printer” on the Model/Driver screen.
3) Select "STAR" as the Make, then click on the “Continue” button.

Software Manual for Linux
- 5 -
SP Printer
1.2.2 WhenusingaEthernetInterface
1. Open your favorite web browser and navigate to “http://localhost:631/admin”.
2. Click on the “Add Printer” button. Note: When a dialog box is displayed requesting certification, enter the root password and press [Yes].
3. In the Add Printer screen, enter the printer name, location and description. Then click on the “Continue” button.
Location, and Description can be left blank.
Software Manual for Linux
- 6 -
SP Printer
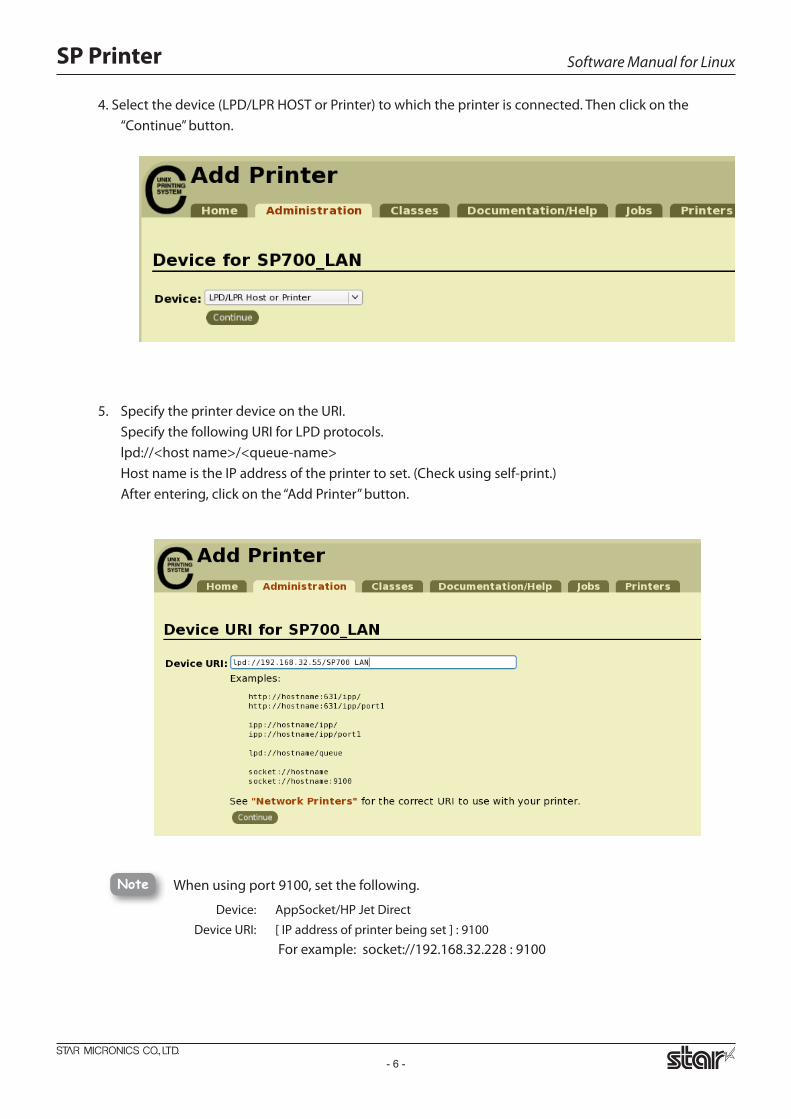
Note When using port 9100, set the following.
Device: AppSocket/HP Jet Direct
Device URI: [ IP address of printer being set ] : 9100 For example: socket://192.168.32.228 : 9100
4. Select the device (LPD/LPR HOST or Printer) to which the printer is connected. Then click on the “Continue” button.
5. Specify the printer device on the URI. Specify the following URI for LPD protocols. lpd://<host name>/<queue-name>
Host name is the IP address of the printer to set. (Check using self-print.) After entering, click on the “Add Printer” button.

Software Manual for Linux
- 7 -
SP Printer
Caution : In some versions of CUPS,Star model name is not displayed in the model/driver pull-down
menu. In such cases, after performing the following, return to the previous page and reregister
the printer.
$ su
# cp -fr /usr/share/cups/model/star /usr/share/ppd/star
This completes printer installation and registration.
6. Select "STAR" as the Make. Then click on the “Continue” button.
7. Select the printer model/driver. Then click on the “Add Printer” button.

Software Manual for Linux
- 8 -
SP Printer
1.3. UninstallationProcedures
To uninstall the driver, proceed as follows.
1. Open your favorite web browser and navigate to “http://localhost:631/printers”. Click on the “Delete Printer” button to delete the registered printers.
2. Startup the terminal.3. Use the “su” command to enable root account privileges. $ su4. Run the rpm command using the “e“ switches. rpm -e starcupsdrv
Note:DebianGNU/Linux,ubuntuuninstallingprocedures
$ cd “Source code highest level directory path”$ su -# make remove
Enter the following if work in the notes on page 4 or 7 was performed. # rm -fr /usr/share/ppd/star
Software Manual for Linux
- 9 -
SP Printer
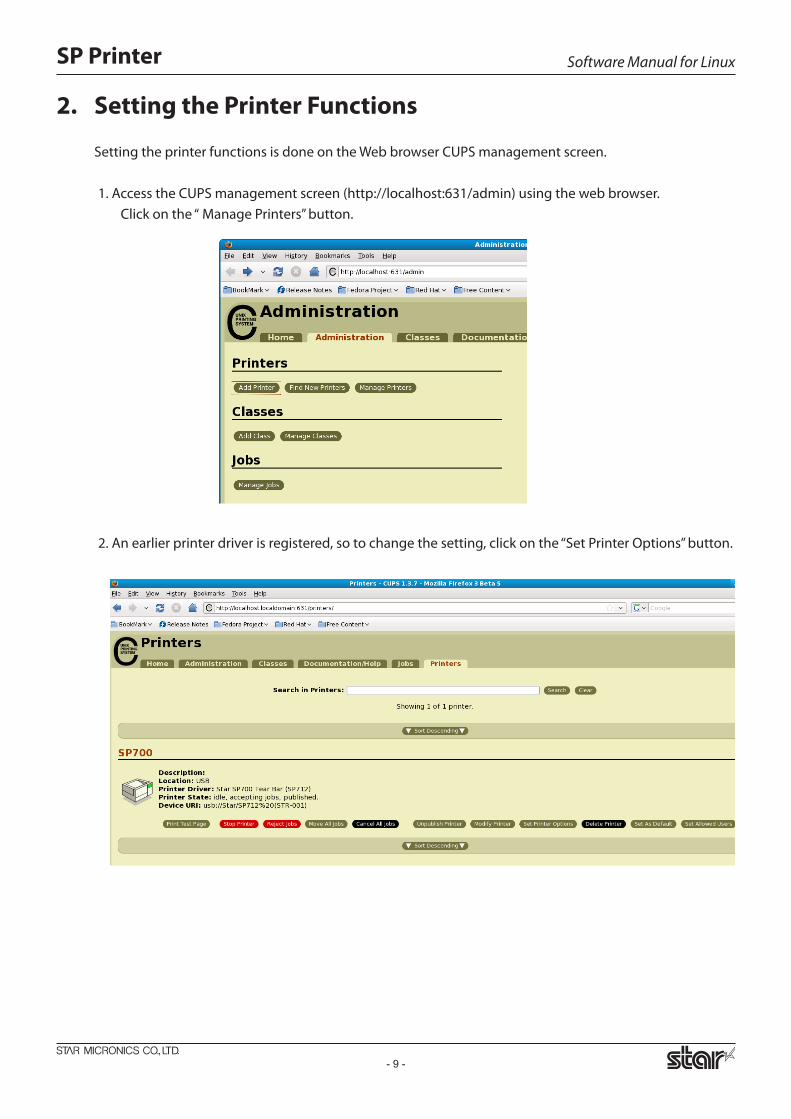
2. Setting the Printer Functions
Setting the printer functions is done on the Web browser CUPS management screen.
1. Access the CUPS management screen (http://localhost:631/admin) using the web browser. Click on the “ Manage Printers” button.
2. An earlier printer driver is registered, so to change the setting, click on the “Set Printer Options” button.

Software Manual for Linux
- 10 -
SP Printer
2.1 FunctionList
Depending on the printer that you select, the functions that are displayed may differ, and only the ones
displayed can be set.
1. Media Size: (paper size)The next page shows the paper sizes.
When a paper size is selected that exceeds the maximum printing width, the print is shrunk to fit the maximum printing width.
Note
■ General

Software Manual for Linux
- 11 -
SP Printer
The following paper sizes are available and can be set.
* is the default setting value. In some cases, they won’t function depending on the application being used
Paper SizeSupported Models
SP512 SP542 SP712 SP717 SP742 SP747
45 * 30mm
45 * 40mm
45 * 50mm
45 * 60mm
45 * 70mm
45 * 80mm
45 * 90mm
45 * 100mm
45 * 110mm
45 * 120mm
45 * 130mm
45 * 140mm
45 * 150mm
45 * 160mm
45 * 170mm
45 * 180mm
45 * 190mm
45 * 200mm
45 * 2000mm
48 * 30mm
48 * 40mm
48 * 50mm
48 * 60mm
48 * 70mm
48 * 80mm
48 * 90mm
48 * 100mm
48 * 110mm
48 * 120mm
48 * 130mm
48 * 140mm
48 * 150mm
48 * 160mm
48 * 170mm
48 * 180mm
48 * 190mm
48 * 200mm
48 * 2000mm
Paper SizeSupported Models
SP512 SP542 SP712 SP717 SP742 SP747
60 * 30mm
60 * 40mm
60 * 50mm
60 * 60mm
60 * 70mm
60 * 80mm
60 * 90mm
60 * 100mm
60 * 110mm
60 * 120mm
60 * 130mm
60 * 140mm
60 * 150mm
60 * 160mm
60 * 170mm
60 * 180mm
60 * 190mm
60 * 200mm
60 * 2000mm
63 * 30mm
63 * 40mm
63 * 50mm
63 * 60mm
63 * 70mm
63 * 80mm
63 * 90mm
63 * 100mm
63 * 110mm
63 * 120mm
63 * 130mm
63 * 140mm
63 * 150mm
63 * 160mm
63 * 170mm
63 * 180mm
63 * 190mm
63 * 200mm
63 * 2000mm

Software Manual for Linux
- 12 -
SP Printer
■ OutputOptions
•BidirectionalPrinting:Use this feature to select either unidirectional or bidirectional printing. Note that the setting affects both the print speed and the print quality. Available settings are as follows.
Setting Value Default Value Details
Budirectional ○ Printer prints in both directions.
Unidirectional Printer prints in one direction only.
•PageType:This sets the page type.
Setting Value Default Value Details
Variable Length ○Does not output blank data until the bottom of the page. Receipt ends
after final data is printed.
Fixed LengthOutputs blank data as a blank until the bottom of the page. Receipt
ends after printing the length specified by paper size.
•Resolution: This sets the print quality (resolution).
Setting Value Default Value Details
170 x 72 DPI ○ Print width is 170 dpi; print height is 72 dpi.
85 x 72 DPI Print width is 85 dpi; print height is 72 dpi.
DataTreatmentRecoverFromError
•DataTreatmentRecoverFromError:When an error occurs, you can handle the unprinted data which has already been sent to the printer as below.
Setting Default Details
No Use After the recovery, the unprinted data of the remainder is printed after the recovery from the error.
Clear Data By Document Unit ○ After the recovery, the unprinted data of the remainder is canceled after the
recovery from the error.
This function is supported by SP700 series.
Note : This feature does not operate correctly with old firmware. If you are using version 3.0 or earlier of the firmware, select 'No Use'. You can check the firmware version by executing Self-Printing. To update the printer's firmware, contact your STAR dealer.

Software Manual for Linux
- 13 -
SP Printer
■ CutOptions(CutterModel)
•PageCutType:This sets the cutting method for the end of all pages, excluding the last page.
Setting Value Default Value Details
No Cut ○ Does not perform a cut and page feed.
Partial CutFeeds paper to cutting position, then cuts the paper, leaving one uncut
point in center of paper.
Full Cut *1 Paper is fed to cutting position, then a full cut is applied.
*1 Not supported by model.
•DocumentCutType:This sets the cutting method for the last page.
Setting Value Default Value Details
No Cut Does not perform a cut and page feed.
Partial Cut ○Feeds paper to cutting position, then cuts the paper, leaving one uncut
point in center of paper.
Full Cut *1 Paper is fed to cutting position, then a full cut is applied.
*1 Not supported by model.
■ FeedOptions(TearBarModel)
•PageFeedType:This sets the page feed operation for the end of all pages, excluding the last page.
Setting Value Default Value Details
No Feed ○ The paper feed operation is not performed.
Tear Bar Paper is fed to the tear bar (cutting position).
•DocumentFeedType:This sets the page feed operation for the last page.
Setting Value Default Value Details
No Feed The paper feed operation is not performed.
Tear Bar ○ Paper is fed to the tear bar (cutting position).

Software Manual for Linux
- 14 -
SP Printer
■ CashDrawerControl
•CashDrawer:This sets the operations of the cash drawer.
Setting Value Default Value Details
Do Not Open Drawers ○ No cash drawer drive.
Open Drawer 1 Drives cash drawer 1 immediately after printing.
Open Drawer 2 Drives cash drawer 2 immediately after printing.
Open Drawer 1 and 2 Drives cash drawers 1 and 2 immediately after printing.
•CashDrawer1PulseWidth:This sets the cash drawer 1 pulse width.
Setting Value Default Value Details
10 milliseconds Sets the pulse width to 0.01 seconds.
100 milliseconds Sets the pulse width to 0.1 seconds.
200 milliseconds ○ Sets the pulse width to 0.2 seconds.
300 milliseconds Sets the pulse width to 0.3 seconds.
400 milliseconds Sets the pulse width to 0.4 seconds.
500 milliseconds Sets the pulse width to 0.5 seconds.
600 milliseconds Sets the pulse width to 0.6 seconds.
700 milliseconds Sets the pulse width to 0.7 seconds.
800 milliseconds Sets the pulse width to 0.8 seconds.
900 milliseconds Sets the pulse width to 0.9 seconds.
1000 milliseconds Sets the pulse width to 1.0 seconds.
1100 milliseconds Sets the pulse width to 1.1 seconds.
1200 milliseconds Sets the pulse width to 1.2 seconds.
Note : 1) Do not enable the cash drawer and buzzer at the same time.2) The pulse width for cash drawer 2 is fixed at 200 milliseconds.

Software Manual for Linux
- 15 -
SP Printer
■ Buzzer1ControlandBuzzer2Control
•Buzzer1(orBuzzer2):This sets the drive of either buzzer 1 or buzzer 2.
Setting Value Default Value DetailsNo Use ○ Buzzer 1 or buzzer 2 is not used.Document Top Executes buzzer 1 (or 2) at the top of the document.Document Bottom Executes buzzer 1 (or 2) at the bottom of the document.
•Buzzer1(Buzzer2)-OnTime:This sets the time to ring buzzer 1 or buzzer 2.
Setting Value Default Value Details20 milliseconds ○ Sets to 0.02 seconds.40 milliseconds Sets to 0.04 seconds.100 milliseconds Sets to 0.1 seconds.200 milliseconds Sets to 0.2 seconds.500 milliseconds Sets to 0.5 seconds.1000 milliseconds Sets to 1.0 seconds.2000 milliseconds Sets to 2.0 seconds.5000 milliseconds Sets to 5.0 seconds.
•Buzzer1(Buzzer2)-OffTime:This sets buzzer 1 or buzzer 2 off time.
Setting Value Default Value Details20 milliseconds ○ Sets to 0.02 seconds.40 milliseconds Sets to 0.04 seconds.100 milliseconds Sets to 0.1 seconds.200 milliseconds Sets to 0.2 seconds.500 milliseconds Sets to 0.5 seconds.1000 milliseconds Sets to 1.0 seconds.2000 milliseconds Sets to 2.0 seconds.5000 milliseconds Sets to 5.0 seconds.
Cautions : Whenadeviceotherthanabuzzer,suchasacashdrawer,isconnected,selectthe'NoUse'.Thereisthepossibilitythattheconnecteddeviceandthecircuitcanbedamagedbyusingthebuzzercontrolcommand.

Software Manual for Linux
- 16 -
SP Printer
•Buzzer1(Buzzer2)-Repeat:This sets the number of times to ring buzzer 1 (or buzzer 2) driven by the timing set at 1:Buzzer 1 (or Buzzer 2). The buzzer will stop regardless of the number of times set to ring by pressing the "FEED".
Setting Value Default Value Details1 ○ Rings buzzer 1 (or buzzer 2) Once.2 Rings buzzer 1 (or buzzer 2) twice.3 Rings buzzer 1 (or buzzer 2) three times.5 Rings buzzer 1 (or buzzer 2) five times.10 Rings buzzer 1 (or buzzer 2) ten times.15 Rings buzzer 1 (or buzzer 2) fifteen times.20 Rings buzzer 1 (or buzzer 2) twenty times.
Note : 1) Do not enable the cash drawer and buzzer at the same time. 2) The buzzer ringing time and off time should not exceed 90 seconds in total.
Cautions : Whenadeviceotherthanabuzzer,suchasacashdrawer,isconnected,selectthe'NoUse'.Thereisthepossibilitythattheconnecteddeviceandthecircuitcanbedamagedbyusingthebuzzercontrolcommand.

Software Manual for Linux
- 17 -
SP Printer
Note
3. Guidelines for Using an Ethernet Environment
The printer’s IP address must be set in advance to use a printer that supports LAN using this driver. If your LAN environment does not allow acquisition of an IP address from a DHCP server, set the IP address to the printer in advance.
3.1 SettingaTemporaryIPAddress
Use the following procedures to set a temporary IP address to the printer. By setting a temporary IP address, it is possible to connect to a printer that has not been set with an IP address.
Caution : Printer settings should be done by a user with administrator rights.
A MAC address of the printer to be set is necessary for the temporary IP address. Confirm the MAC
address in a self-print from the printer. See the Hardware Manual for details on running a self-print.
1. Startup the terminal.2. Use the “su” command to enable root account privileges.
3. Execute the following command in the terminal to set a temporary IP address to the printer.
1. arp -d [Printer temporary IP address]2. arp -s [Printer temporary IP address] [Printer MAC address]3. ping -c 4 [Printer temporary IP address]4. arp -d [Printer temporary IP address]
Example of temporary IP address (192.168.32.228)
arp -d 192.168.32.228 arp -s 192.168.32.228 00:11:62:04:83:98 ping -c 4 192.168.32.228 arp -d 192.168.32.228
Note: When you use Ubuntu, do not input "su -" command and input "sudo arp" command instead of "arp" command. The temporary IP address set here is erased when the printer power is turned off. Continue by setting the IP address.
Uset "exit" command to exit super user status.

Software Manual for Linux
- 18 -
SP Printer
3.2 SettingtheIPAddress(TELNETUtility)
The Telnet command connects directly to the printer to make settings.
1. Startup the terminal.2. Use the Telnet command to connect to the printer to set.
Ex. >telnet 192.168.32.228 (The IP address of the printer to be set.)
Note: YoucannotconnecttoaprinterthatdoesnothaveanIPaddress.Seesection3.1SettingaTemporaryIPAddressfordetailsonsettingsuchanaddressontheprinterinadvance.
3. Log-in to the printer to be set as a "root" user. The default password is "public." To change the password, input the changed password.
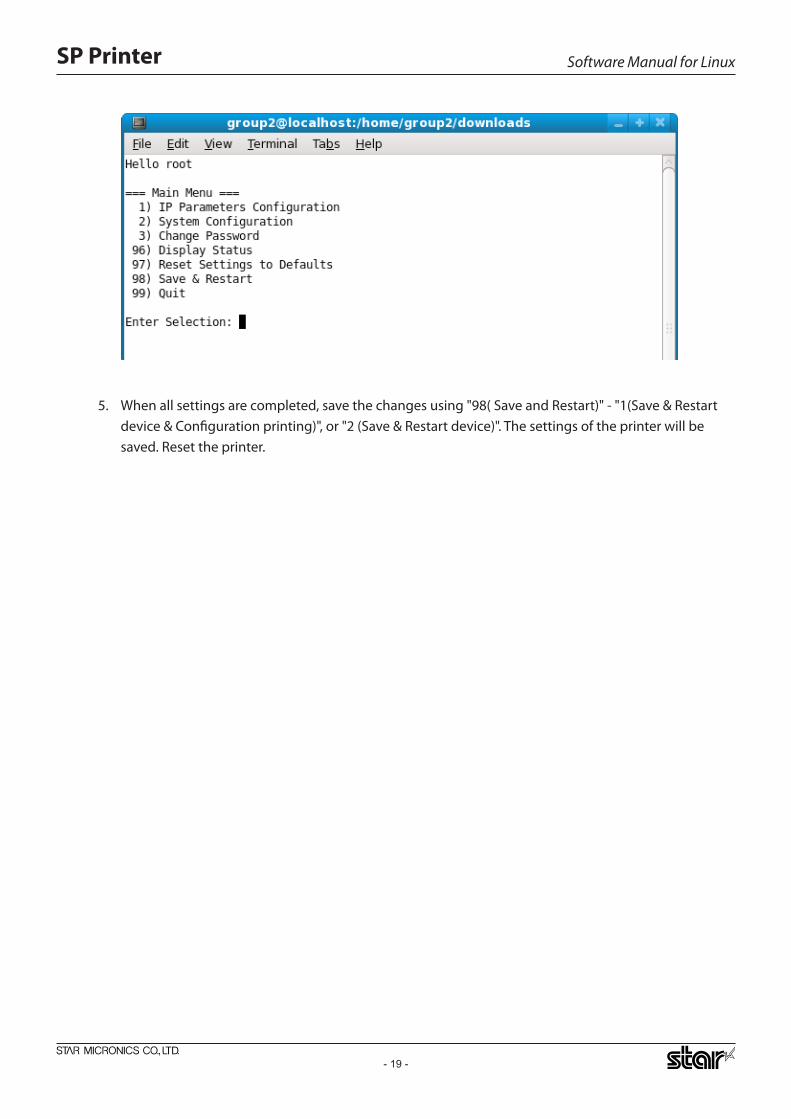
4. The following menu is displayed.
1) IP Parameters Configuration 2) System Configuration 3) Change Password 96) Display Status 97) Reset Settings to Defaults 98) Save and Restart 99) Quit Enter Selection
Input the number that corresponds to your selection.
Software Manual for Linux
- 19 -
SP Printer
5. When all settings are completed, save the changes using "98( Save and Restart)" - "1(Save & Restart device & Configuration printing)", or "2 (Save & Restart device)". The settings of the printer will be saved. Reset the printer.

Software Manual for Linux
- 20 -
SP Printer
4. Guidelines for Using the lpr Command
When printing useing the lpr command from the command line, you can specify options with the following format.
$lpr-o[option]=[value]-o[option]=[value]...[Filename]
In [option] and [value], specify the name shown in the command "specify name" in section 4.1 List of Supported Functions".Also for options not specified, print using the default driver settings.
Use the printer name confirmed using the "lpstat -p" command, when specifying the printer name using the option "-P".
Use Example 1
Printer Name : SP700File Name : sample1.txtPaper Size * : 63* 200mmMargin(top) * : 0mmMargin(bottom) * : 0mmMargin(left)* : 0mmMargin(right)* : 0mm
* This option is not a printer driver option, but an OS standard option.
Use Example 2
File Name : sample2.txtPrint Speed : Low
Use Example 3
File Name : sample3.txtDocument Cut Type : No Cut
$lpr-oPrintSpeed=2Lowsample2.txt
$lpr-oDocCutType=0NoCutDocsample3.txt
$ l p r - P S P 7 0 0 - o m e d i a = " X 6 3 M M Y 2 0 0 M M " - o
p a g e - t o p = 0 - o p a g e - b o t t o m = 0 - o p a g e - l e f t = 0
-opage-right=0sample1.txt

Software Manual for Linux
- 21 -
SP Printer
4.1 FunctionList
See section 2.1 Function List for the details on the functions.
Option Name CommandSupported Model
SP512 SP542 SP712 SP717 SP742 SP747option value [option] [value]
Output Option Bidirectional Printing
Bidirectional BidiPrinting 0Bidirectional
Unidirectional 1Unidirectional
Page Type Variable Length PageType 0Variable
Fixed Length 1Fixed
Resolution 170 x 72 DPI Resolusion 170x72dpi
85 x 72 DPI 85x72dpi
Cut Options( Cutter )
Page Cut Type No Cut PageCutType 0NoCutPage
Partial Cut 1PartialCutPage
Full Cut 2FullCutPage
DocumentCut Type
No Cut DocCutType 0NoCutDoc
Partial Cut 1PartialCutDoc
Full Cut 2FullCutDoc
Feed Options( TearBar )
Page Feed Type No Feed PageCutType 0NoCutPage
Tear Bar 3TearBarPage
DocumentFeed Type
No Feed DocCutType 0NoCutDoc
Tear Bar 3TearBarDoc
Cash Drawer Control
Cash Drawer Do Not Open Drawers CashDrawerSetting 0DoNotOpenDrawers
Open Drawer 1 1OpenDrawer1
Open Drawer 2 2OpenDrawer2
Open Drawer 1 and 2 3OpenDrawer3
Cash Drawer 1 Pulsh Width
10 milliseconds CashDrawer1PulseWidth 0Millis10
100 milliseconds 1Millis100
200 milliseconds 2Millis200
300 milliseconds 3Millis300
400 milliseconds 4Millis400
500 milliseconds 5Millis500
600 milliseconds 6Millis600
700 milliseconds 7Millis700
800 milliseconds 8Millis800
900 milliseconds 9Millis900
1000 milliseconds 10Millis1000
1100 milliseconds 11Millis1100
1200 milliseconds 12Millis1200
Data TreatmentRecover FromError
Data TreatmentRecover FromError
No Use DataTreatmentRecoverFromError
0NoUse
Clear Data By Document Unit
1ClearDataByDocumentUnit

Software Manual for Linux
- 22 -
SP Printer
Option Name CommandSupported Model
SP512 SP542 SP712 SP717 SP742 SP747option value [option] [value]
Buzzer1 Control / Buzzer1 / No Use Buzzer1Setting/ 0NoUse
Buzzer2 Control Buzzer2 Document Top Buzzer2Setting 1DocumentTop
Document Bottom 2DocumentBtm
Buzzer1- On Time / 20 milliseconds Buzzer1OnTime/ 0Millis20
Buzzer2 - On Time 40 milliseconds Buzzer2OnTime 1Millis40
100 milliseconds 2Millis100
200 milliseconds 3Millis200
500 milliseconds 4Millis500
1000 milliseconds 5Millis1000
2000 milliseconds 6Millis2000
5000 milliseconds 7Millis5000
Buzzer1 - Off Time / 20 milliseconds Buzzer1OffTime/ 0Millis20
Buzzer2 - Off Time 40 milliseconds Buzzer2OffTime 1Millis40
100 milliseconds 2Millis100
200 milliseconds 3Millis200
500 milliseconds 4Millis500
1000 milliseconds 5Millis1000
2000 milliseconds 6Millis2000
5000 milliseconds 7Millis5000
Buzzer1- Repeat / 1 Buzzer1Repeat/ 0Repeat1
Buzzer2 - Repeat 2 Buzzer2Repeat 1Repeat2
3 2Repeat3
5 3Repeat5
10 4Repeat10
15 5Repeat15
20 6Repeat20
* is the default setting value.

Software Manual for Linux
- 23 -
SP Printer
5. Confirmed Operating Environments
Distribution VersionRed Hat Enterprise Linux 5.3CentOS 5.2openSUSE 10.3Fedora 9ubuntu 8.04

Software Manual for Linux
- 24 -
SP Printer
6. Revision History
Rev. No. Date Content
Rev. 1.0 Jan, 2009New releaseCorresponded to the latest version (starcupsdrv3.0).
Rev. 2.0 Sep, 2010Added support for Star cups Driver 3.2.0.Added support for new models of 'Data Treatment Recover From Error Command' and 'Buzzer Command'.

SPECIAL PRODUCTS DIVISIONSTAR MICRONICS CO., LTD.536 Nanatsushinya, Shimizu-ku, Shizuoka, 424-0066 JapanTel: (int+81)-54-347-0112, Fax: (int+81)-54-347-0409
Please access the following URLhttp://www.star-m.jp/eng/dl/dl02.htmfor the latest revision of the manual.
OVERSEAS SUBSIDIARY COMPANIESSTAR MICRONICS AMERICA, INC.1150 King Georges Post Road, Edison, NJ 08837-3729 U.S.A.Tel: (int+1)-732-623-5555, Fax: (int+1)-732-623-5590
STAR MICRONICS EUROPE LTD.Star House, Peregrine Business Park, Gomm Road, High Wycombe, Bucks, HP13 7DL, U.K.Tel: (int+44)-1494-471111, Fax: (int+44)-1494-473333
STAR MICRONICS ASIA LTD.Rm. 1901-5, 19/F., Enterprise Square Two, 3 Sheung Yuet Road, Kowloon Bay, Hong KongTel: (int+852)-2796-2727, Fax: (int+852)-2799-9344
Common SP for Linux Rev. 2.0 2010.09.17Printed in Japan, sm78096EN