sp-5500 user’s manual - musikhaus thomann · do not expose the piano to high temperature, direct...
TRANSCRIPT

User’s Manual
SP-5500

PrecautionsPlease read the following carefully before use:
Do not expose the piano to high temperature, direct sunlight and excessive dusty places.
Do not place the piano too close to other electrical appliances such as television and radio as. It may cause interference.
Do not place the piano to excessive humid area. Avoid putting container with liquid on top of the piano in order to
prevent damage of the internal parts of the piano by flowing liquid.
Always unplug AC cord by gripping the plug firmly, but not pulling on the cable.
Do not apply excessive force to the switches and buttons.
When the piano is not in use or in the time of thunderstorm, please disconnect the power supply.
Avoid adjusting the volume level to the maximum or to the levels that you feel uncomfortable, we recommend you to
limit the volume level to two-third of the max for preventing the damage of audiory sense
Unplug the power cable before cleaning the piano. Do not connect or disconnect the power cable with a wet hand.
Check and clean the power plug periodically.
To avoid damage to the piano and other devices to which it is connected, turn the power switches of all related device
off prior to connecting or disconnecting cables.
Clean the piano and remove the dust with a dry soft cloth or a slightly damp cloth.
Never use cleaners such as thinner or alcohol. To prevent any damage on the surface of the LED display, please
use lens cleaning tissue to clean the display.
If the piano cable is damaged, please do not use the piano. Otherwise it may cause fire or electrical hazard.
In case of malfunction due to improper handling the piano, please switch off and on again after 30 seconds.
Do not attempt to disassemble or repair the piano. If the piano does not work properly, please contact the
approved repairer.
The piano should not be exposed to dripping or splashing.
Using the Instruction Manual
2
Congratulations on your purchase of this stage piano!
The piano is an user friendly piano with fabulous sound quality and advance feature such as
style record and self-learning. No matter you are adult or children, you will enjoy playing the piano
as it provides amazing styles for accompaniment, expressive tones, and real time record. Other features
such as numbered musical notation display chord dictionary, variety of songs will help you better master
the playing skill.
You are recommended to study this manual carefully before using the unit.

Keyboard: 88 hammer action key.
Operation: use DIAL & [+/YES] & [-/NO] button or direct select button to select desired menu & parameters .
Voice: 559 voices in total, 28 voices can be selected conveniently from the panel.
Style: 203 styles in total, including 3 user styles, 16 voices can be selected conveniently from the panel.
Song: 100 songs in total, each one has self-learning mode.
Demo: 2 demos in total.
Chord mode: fingered & full range.
Song learning: three learning mode of lesson 1/2/3, left and right hand to choose, and offers the GRADE function.
Chord dictionary: A function for you to learn the chords, including Dirct 1 mode (dictionary mode) and Dirct 2 (test mode).
Record: 3 user songs, each one includes 1 accomp track & 5 melody tracks.
Style record: 3 user styles, each one includes 8 paragraphs, each paragraph include 8 tracks.
SD card: Portable storage device to save & load the user songs,user styles and memory datas.
Memory: 48 memories in total (8 banks with 6 memories each).
Style control: sync start, sync stop, start/stop, fill in a/normal, fill in b/variation, intro/ending, fade in/out, chord mode
Function: tuning, beat, split point, pedal select, reverb level, chorus level, midi in, midi out.
Mixer: Rhythm_s£rhythm_m£bass£chord 1£chord 2£chord 3£phrase 1£phrase 2£voice r1£voice r2£voice l£
SD play.
Others: dual, split, dsp, piano, metronome, o.t.s., transpose +/-, accomp +/-, touch, pitch bend etc.
Pedal: sustain pedal (immovable); Multifunctional pedal (soft¡sostenuto¡start/stop¡memory select)
Interface: midi in/out, usb, phone, line in/out
Irradiance keys: style control£sync start£sync stop , fill in a/normal£fill in b/variation£intro/ending£fade£¡
style record¡record¡play/stop¡accomp¡melody 1¡melody 5,style,voice,song¡
Main Feature
3

Contents
4
General Guide..................................Front Panel..........................................................
LCD Display.....................................................
Rear Panel................................................................
Top Panel...............................................................
Power Jack...................................................................Setting Music Rest.............................................
AUX IN Jack........................................................
Headphones Jack...............................................
Sustain Jack....................................................
AUX OUT Jack................................................
Soft Jack...............................................................
USB Jack...............................................................
MIDI IN/OUT Jack...................................................
Connections...................................
Master volume control........................................
Demo.........................................................................
Preparation........................................Power on key combination....................................
Brilliance......................................................................
Piano................................................................
Touch Response..................................................
Voices and Effects.........................Select a Voice...................................................
Dual Voice...............................................................
Split Point................................................................
Pitch bend /Modulation joystick....................................
Transpose........................................................
DSP Effect.........................................................
Fill A/B...............................................................
Recognizing Chords..............................................
Tempo........................................................................
Fade..........................................................................
Style Control.....................................Select a Style........................................................
The Accompaniment Section..................................
Start a Style..............................................................
Stop a Style.......................................................
Accomp Volume........................................................
Metronome.................................................................
Reverb Level...................................................
Split Point........................................................
Pedal Assign.....................................................
Beat.................................................................
Function Menu...............................Tune.................................................................
Chorus Level........................................................
MIDI Setting..................................................
Mixer Menu..................................................
5-65
6
6
6
7
77
7-8
8
7
8
8
8
8
9
9
9
9
9
10
10-12
11
11
11
10
12
12
12
13
13-19
13
14
15
15
16
17
17
17
18-19
20
20-22
20
21
21
21
21
22
22
Memory..................................................Bank.....................................................................
Memory Data..................................................................
Store and Load...........................................................
One Touch Setting.............................................
Record..................................................
Delete Song.....................................................
Playback Song.........................................................
Record Song................................................
SD Function..................................................
Save........................................................................
Load........................................................................
Play..............................................................................
Delete........................................................................Format........................................................................
Style Record...........................................
Quantify a Style...................................................
Copy a Style............................................................
Edit a Style...........................................................
Start Style Record.................................................
Record a new Style.................................................
Delete a Style....................................................
Lesson 1....................................................................
Lesson 3.................................................................
Lesson 2..................................................................
Song....................................................
Lesson Mode.......................................................
Chord Dictionary...............................
Pedal........................................................
MIDI Function......................................
USB Connection.....................................................
What is MIDI............................................................
MIDI Application..............................................
MIDI Connection.....................................................
Specifications...........................................
Trouble Shooting.........................................
Appendix 6-MIDI Implementation Chart.............................
Appendix 3-Song List.........................................................
Appendix 1-Voice List...........................................
Appendix 5-Chord List.......................................................
Appendix..............................................
Appendix 4-Demo List.....................................................
Appendix 2-Style List.................................................
23
23
23
23
24
24-26
25
24-25
26
37-42
39
38
4141-42
40-41
27-3227-2828-29
30-31
31-32
32
30
33-3533-34
34
34
35
35-36
37
43-4443
43
44
44
45
45
46-57 46-50
53-55
51-52
55
56
57
STYLERECORD
RECORD PLAY/STOP
MELODY1
MELODY2
MELODY4
MELODY5
ACCOMPMELODY
3STYLE
RECORDPLAY/STOP
ACCOMPMELODY
1MELODY
2MELODY
3MELODY
4MELODY
5RECORD
297 OcOrchHi 318 FrHorn1 346 SoprSax1 359 Oboe1 371 Flute 374 SwPanFu 551 StandD
305 SweetTp
024 StHonk 080 StVibes 107 DrwOrDet 125 Accordi1 161 StCleGtr 229 TheVin 282 SoloStr
287 StChoir1 323 BrasSec1 355 FolkSax 368 Clarine1 372 JazzFlut 523 StPno&St DSP TOUCH EXECUTE
001 StGrPn1 029 StHarEp 092 StMarim 121 ChurOr2 147 VelSteGt 182 Abass1 274 SSlowStr
VOICESDUAL SPLIT SD
- / NO + / YES
33
35 36
134
3929
31
37
27
28
130
132
25
START /STOP
SYNCSTOP
CHORDMODEAINTRO/
ENDINGSYNCSTART B FADESTART
/STOPSYNCSTART
INTRO/ENDING A B FADE
CHORDMODE
SYNCSTOP
188 March
FINGERED
FULL RANGE
012 16Beat1 047 SlowRock 069 ChaCha1 084 Disco 130 Bluegras 141 BosaNov1 172 Waltz
064 Tango 112 Swing1 133 CntyPop1001 8BtRock 041 SlowBald 074 Samba1 154 Rumba1 184 Polka
STYLES
MELLOW BRIGHTBRILLIANCE
VOLUMEMAX MIN
ONE TOUCH SETTING
METRONOMEPIANOSTORE O.T.S.BANK M2 M3 M4 M5 M6M1MIXERFUNCTION
LESSON
NEXTBACK
CHORD DICT.
L & R
1
3
5
6
1
2
4 1
2
1
1
1
13
13
33
23
2315
15
35
25
16
16
36
26
26
11
11
21 21
12
12
22
22
14
114
34
24
124
1
1
1
1
9
19
19
39
29
31
7
17
17
37
27
8
8
18
18
38
28
10
20
30
32
3
4 5 6
7
110
120
SONG
STYLE VOICE
DEMO
REPEAT A/B
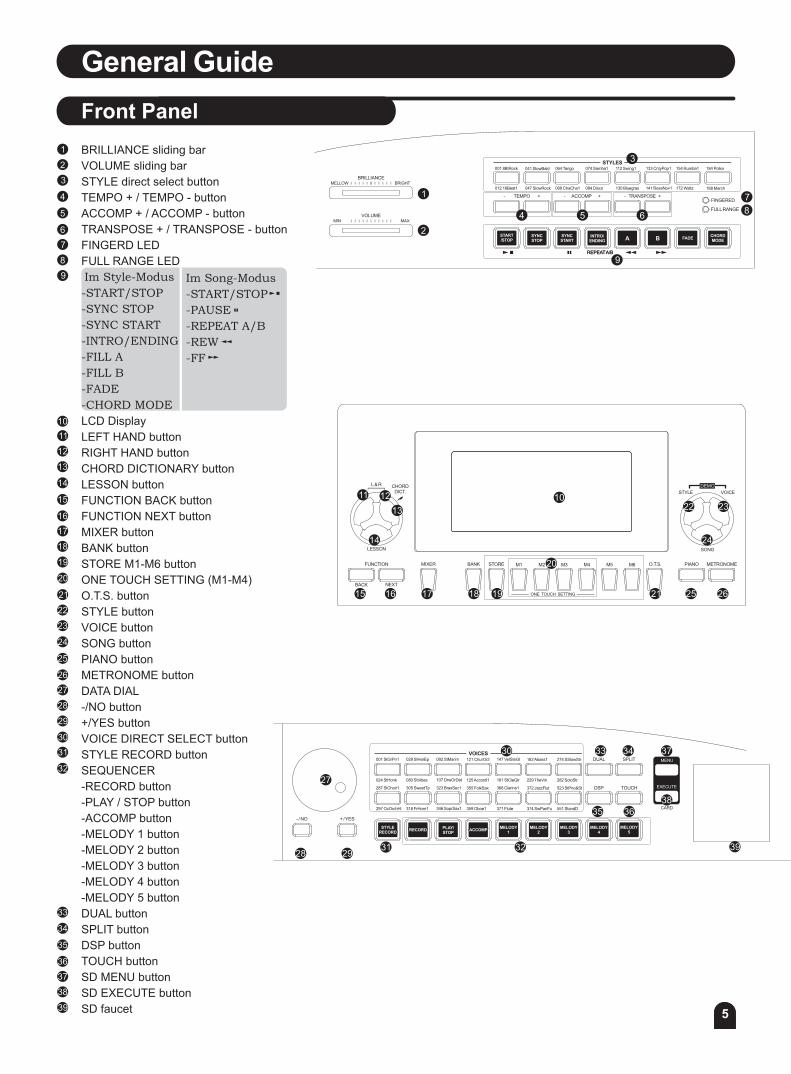
BRILLIANCE sliding bar
VOLUME sliding bar
STYLE direct select button
TEMPO + / TEMPO - button
ACCOMP + / ACCOMP - button
TRANSPOSE + / TRANSPOSE - button
FINGERD LED
FULL RANGE LED
Im Style-Modus
-START/STOP
-SYNC STOP
-SYNC START
-INTRO/ENDING
-FILL A
-FILL B
-FADE
-CHORD MODE
LCD Display
LEFT HAND button
RIGHT HAND button
CHORD DICTIONARY button
LESSON button
FUNCTION BACK button
FUNCTION NEXT button
MIXER button
BANK button
STORE M1-M6 button
ONE TOUCH SETTING (M1-M4)
O.T.S. button
STYLE button
VOICE button
SONG button
PIANO button
METRONOME button
DATA DIAL
-/NO button
+/YES button
VOICE DIRECT SELECT button
STYLE RECORD button
SEQUENCER
-RECORD button
-PLAY / STOP button
-ACCOMP button
-MELODY 1 button
-MELODY 2 button
-MELODY 3 button
-MELODY 4 button
-MELODY 5 button
DUAL button
SPLIT button
DSP button
TOUCH button
SD MENU button
SD EXECUTE button
SD faucet
Im Song-Modus
-START/STOP
-PAUSE
-REPEAT A/B
-REW
-FF
General Guide
Front Panel
5
38
9

L/MONO R ASSIGNSUSTAIN
USBAUX OUT AUX IN PEDAL MIDI IN MIDI OUTPOWER 12V
3 5 61 2 14 97 8 110
1
3
5
6
1
2
4
1
9
7
8
10
POWER ON / OFF switch
POWER Jack
AUX OUT L/MONO jack
AUX OUT R jack
AUX IN jack
SUSTAIN PEDAL jack
ASSIGN PEDAL jack
MIDI IN jack
MIDI OUT jack
USB jack
3
1
2
3
1
2
PITCH BEND / MODULATION joystick
PONES 1 jack
PONES 2 jack
1
13
15
16
11
12
14
1
3
5
6
1
2
4
1
9
7
8
10
DUAL
SPLIT
TOUCH
DSP
VOICE/STYLE/DEMO/SONG
RECORD / STYLE RECORD
MEASURE
BEAT
TEMPO
CHORD
MEMORY / ONE TOUCH SETTING
LEFT / RIGHT HAND LESSON MODE
NOTE Indication
FILL A / B
TREBLE CLEF
BASS CLEF
DUAL
SPLIT
TOUCH
DSP
6
5
3
1
2
14
9
110
7 8
11
12 13114
15
16
General Guide
LCD Display
Rear Panel
Top Panel
6

Headphones Jack
There are two phones jacks, speaker is shut off when headphone is plugged into one of the phones jacks, the other one is speaker sound is always on when headphoneis plugged. Speaker is shut off when a pair of headphones connected to the two jacks.
Cautions!
Never use the headphone with high volume,¡as it may hurt your ear.To prevent the damage of the speakers, ensure that the volume is set to the minimum level before connecting the power and other devices.
Connections
Power Jack
Setting Music Rest
This piano can be powered by current from a standard household wall outlet by using the specified AC adaptor. The power jack is located on the rear panel of the piano body.Make sure that only the AC adaptor specified for this pianois used. The adaptor shall be 12V DC output, and center positive type. Make sure to turn off the piano before you connect the adaptor into the AC wall outlet and the cord into the unit.
The piano is supplied with a music rest that can be attachedto the instrument by inserting it into slot at the rear of the control panel.Please set up the music rest as shown:
Cautions£
Use of another type of adaptor creates a danger of fire and electrical shock.¡For safety sake, make sure to unplug the AC adaptor from the wall outlet whenever leaving the piano unattended for a long time or during a thunderstorm.
L/MONO R ASSIGNSUSTAIN
USBAUX OUT AUX IN PEDAL MIDI IN MIDI OUTPOWER 12V
7
AUX OUT Jack
Cautions!
To avoid damaging the speakers, please ensure that volumehas set to the minimum level before connecting the powerand other devices.
When you want to listen to the voice with an amplifier, connect amplifiers to the AUX OUT L/MONO and R jacks on the rear panel. The volume is adjusted with the VOLUME button. (For monaural playback, use the L/MONO jack. For stereo playback, connect both L/MONO and R jacks.)
L/MONO R ASSIGNSUSTAIN
USBAUX OUT AUX IN PEDAL MIDI IN MIDI OUTPOWER 12V

WARNINGTo avoid damages, please be sure to turn off the powerswitches before you disconnect the related devices from the piano.
The audio output from a CD player connected to the AUX IN jack on the left panel can be mixed with the sound of the piano module. This function is convenient when you want to play along with a favourite song.The volume of the external signal is adjusted with the VOLUME button.
An optional footswitch can be plugged into the ASSIGN jack for control.
soft pedal,sostenuto pedal,memory select,style start/stop
Connection
AUX IN Jack
Sustain Jack
Assign Jack
L/MONO
L/MONO
L/MONO
R
R
R
ASSIGN
ASSIGN
ASSIGN
SUSTAIN
SUSTAIN
SUSTAIN
USB
USB
USB
AUX OUT
AUX OUT
AUX OUT
AUX IN
AUX IN
AUX IN
PEDAL
PEDAL
PEDAL
MIDI IN
MIDI IN
MIDI IN
MIDI OUT
MIDI OUT
MIDI OUT
POWER
POWER
POWER
12V
12V
12V
MIDI stand for Musical Instrument Digital Interface.
MIDI is a world wide standard that makes it possible for various electronic musical instruments and other devices.
MIDI IN:
received by this terminal.MIDI OUT:Data produced by the Digital Piano is transmitted to other MIDI instruments via MIDI from this terminal.
Data transmitted from other MIDI instrument via MIDI is
MIDI IN/OUT Jack
L/MONO R ASSIGNSUSTAIN
USBAUX OUT AUX IN PEDAL MIDI IN MIDI OUTPOWER 12V
Step on the footswitch, all notes played on the keyboard have a longer sustain effect.
USB Jack
Connect PC or other USB host devices that support USB Audio.
You can simply connect the MIDI/USB converter to your USB play on your computer and plug the MIDI in and out cables into the piano, after the driver is installed and initialization is finished, you can choose USB Audio Device in the device menu of the software to transfer midi data.
8

Press the [RECORD] & the [PLAY/STOP] button synchro-
nously when it is power on£It can clear the record data.
Press the [STORE] & the [M1] button synchronously when
it is power on£It can set all the memory data to default
value.
Press the [+/YES] & the [-/NO] button synchronously when
it is power on, it can reset all the setting to the default value
(Including Memory data, Record data, Style Record data.)
Preparation
Power on key combination
Master volume control
Brilliance
Demo
- / NO
- / NO
+ / YES
+ / YES
STYLERECORD
START/STOP
RECORD
SYNCSTOP
PLAY/STOP
SYNCSTART
MELODY1
A
MELODY2
B
ACCOMP
INTRO/ENDING
MELODY3
STORE O.T.S.BANK M2 M3 M4 M5 M6M1
ONE TOUCH SETTING
Push the [VOLUME] handspike rightwards, the volume
increases.
Push it leftwards, the volume decreases.
To create brighter sound, push [BRILLIANCE] handspike to
the right.
To create gloomy sound, push [BRILLIANCE] handspike to
the left.
You can change the piano brilliance as your wish.
VOLUMEMAX MIN
MELLOW BRIGHTBRILLIANCE
There are total of 2 Demos.
Press the [STYLE] & the [VOICE] button synchronously to
enter the demo mode, the DEMO flag on LCD is lightened.
It displays the first demo and plays all demos circularly.
Press the [STYLE] & the [VOICE] button again or press the
[START/STOP] button to stop playing and quit current mode.
When playing, press the [+/YES] & the [-/NO] button or rot-
ate the DIAL to select the song you want.
SONG
STYLE VOICE
DEMO
SONG
STYLE VOICE
DEMO
Jazz
1
1
2
2
3
3
9
Im Style-Modus
-START/STOP
-SYNC STOP
-SYNC START
-INTRO/ENDING
-FILL A
-FILL B
-FADE
-CHORD MODE
Im Song-Modus
-START/STOP
-PAUSE
-REPEAT A/B
-REW
-FF

Voices and Effects
Voice select
Dual voice
559 voices in total.
28 voices can be directly selected. Each direct select button
includes 2 different voices, the first press to select upper one,
the second to lower one. The default is upper voice when it is
power on.
When it is power on, LCD lightens the VOICE R1 flag and
displays the 001 voice name.
Press the voice direct select button, or use the [+/YES],
[-/NO] button and DIAL to select the others.
" "
When the state changes to the VOICE by pressing the [VOICE]
button for the first time, LCD displays the VOICE R1 state.
Press it again and later, LCD will switch and display the other
voice modes being opened in turn, the order is:
VOICE R1->VOICE R2->VOICE L->VOICE R1.
297 OcOrchHi 318 FrHorn1 346 SoprSax1 359 Oboe1 371 Flute 374 SwPanFu 551 StandD
024 StHonk 080 StVibes 107 DrwOrDet 125 Accordi1 161 StCleGtr 229 TheVin 282 SoloStr
305 SweetTp287 StChoir1 323 BrasSec1 355 FolkSax 368 Clarine1 372 JazzFlut 523 StPno&St
001 StGrPn1 029 StHarEp 092 StMarim 121 ChurOr2 147 VelSteGt 182 Abass1 274 SSlowStr
VOICES
StGrPn1
SynPno- / NO + / YES
SONG
STYLE VOICE
DEMO
SONG
STYLE VOICE
DEMO
During the VOICE R1 status, press [DUAL] button to enter
the dual voice mode. VOICE R2 and DUAL signal
would be lightened simultaneously. The number of the dual
voice will be displayed on the LCD. Now, you can get two
different sounds at the same time when pressing one key.
" " " "
Press [+/YES] / [-/NO] button, or rotate the DIAL to select
your desired voice. The default DUAL VOICE number is
No:265 The Strings .
Press [DUAL] button again to turn off the DUAL VOICE.
Voice R2 will be disabled, the note you play sounds a single
voice of Voice R1.
" "
You can play two sounds at the same time on the piano in Dual Voice mode.
When the dual function is off, the voice indicated is VOICE R1. When the dual function is on,
the voice indicated is VOICE R2.
While the keyboard is splited, only the right hand area will respond
to the dual voice, the left hand area produces sounds in chords.
DUAL
DSP
SPLIT
TOUCH
TheStr
SynStrs1
- / NO + / YES
Eg. Piano
Eg. Cello
DUAL
SPLIT
TOUCH
DSP
Two voices will sound at the same time.
1
1
2
2
3
3
10

Voices and Effects
Split point
DSP Effect
You can play two sounds on different parts of the keyboard. It is called Split mode.
""
Press [SPLIT] button to turn on the LOWER VOICE, LCD lights the SPLIT flag and displays "VOICE L" and its name. When you play in real time, you can activate Split Mode simply by pressing this button.
Press [+/YES] / [-/NO] button, or turn the DIAL to select the voice you want. The default LOWER VOICE number is No265 The Strings .
Press [SPLIT] button again to turn off the LOWER VOICE. LCD darkens its flag.
DUAL
DUAL
DSP
DSP
SPLIT
SPLIT
TOUCH
TOUCH
TheStr
Dsp
SynStrs1
- / NO + / YES
Melodyarea
Chord area
Default split point F#
DUAL
DUAL
SPLIT
SPLIT
TOUCH
TOUCH
DSP
DSP
DSP effect will enhances the piano with fuller and
expressive sound.
When power is on , LCD lightens the DSP flag. Press the
[DSP] button to switch the DSP setting. 4 DSP setting are
available for selection, DSP 1/2/3/off, the default setting is 2.
The DSP effect will be closed after being set to OFF, the
DSP flag goes out.
You can change the current setting by pressing the [DSP]
button continuously, and by adjusting the REVERB and
CHORUS level to change the current effect .
(See Function menu for detail)
1
1
2
2
3
Pitch bend/Modulation joystick
Turn the joystick left and right to activate the PITCH BEND
effect, it would adjust the tune of melody, turn left to increase
pitch, turn right to decrease pitch, ranging between +/- 2
semitones.
Turn the joystick up and down to activate the MODULATION
effect. Turn up or down to increase the effect, release the
joystick to turn off the effect.
1
2
11

Voices and Effects
Touch Response
Transpose
This function allows you to activate the dynamic level
when playing the keyboard.
Press the [TOUCH] button, LCD lightens the TOUCH flag
and displays touch response type "002 Touch" briefly.
4 setting are available for selection, TOUCH 001/002/003/
OFF, the default is 002. You can change the current setting
by pressing the [TOUCH] button.
If the type is set as "OFF", the "TOUCH" flag goes out,
there is no touch response to piano.
" "DUAL
DSP
- TRANSPOSE +
- TRANSPOSE +
SPLIT
TOUCH
Touch
Transpos
Transpos
DUAL
DUAL
DUAL
SPLIT
SPLIT
SPLIT
TOUCH
TOUCH
TOUCH
DSP
DSP
DSP
You can shift the pitch of the entire keyboard with the
TRANSPOSE function by adjusting the pitch in semitone
steps.
Press the [TRANSPOSE +] or [TRANSPOSE -] button for
the first time to enter the Transpose setting mode, LCD dis-
plays current transpose value briefly.
Press them again and later, the value will increase or decr-
ease by degrees, also you can use the [+/YES] and [-/NO]
button or the DIAL to adjust it, ranging from -12 to +12
semitones, the default value is 000.
In TRANSPOSE setting, pressing the [TRANSPOSE +] and
[TRANSPOSE -] button simultaneously will set the value to
default.
1
1
2
2
3
3
If you don't press any button for 5 seconds after entering the tran-
spose setting mode, it will quit this menu automatically.
Piano
1
2
3
Press the [PIANO] button to enter the PIANO mode, the
chord mode will be disabled automatically, the full range on
the keyboard is piano voice.
Press the [PIANO] button again to exit the current mode.
Press the [VOICE] + [STYLE] , [SONG] , [VOICE] and the
direct select button, or the [DUAL], [SPLIT], [M1]~[M6]
button, you can exit the piano mode.
You can select and play the style by pressing the [STYLE]
and the direct select button, LCD will then display the style
name. Accompaniment control will respond in effect as
usual only with the drum tracks.
PIANO METRONOME
PIANO
12

13
The keyboard has a total of 203 styles, from 001 to 203,
including 3 user styles. The default style is 001. (See
appendix: page 60)
Press [STYLE] button to set the keyboard to the "style
mode". The "STYLE " flag and the style number will
show up on the display.
Select a Style
Press [+/YES] / [-/NO] button or use DIAL to select the
style you want.
Use the Direct Select Button to select your desired style
(16 styles), 2 direct styles for each button (upper & nether).
Direct Select Button
While changing a style, pay attention to the rules:
If the same button has been pressed twice, the style will be
swapped from one to another.
When the upper/nether style is on, and you then press another
direct button, the corresponding upper/nether style will be selected.
8BtRock
8Beat2- / NO + / YES
SONG
STYLE VOICE
DEMO
STYLES
012 16Beat1 047 SlowRock 069 ChaCha1 084 Disco 130 Bluegras 141 BosaNov1 172 Waltz
064 Tango 112 Swing1 133 CntyPop1001 8BtRock 041 SlowBald 074 Samba1 154 Rumba1
3
Accompaniment consists of Intro, normal, variation, fill (a-a, a-b, b-a, b-b), ending. Using different sections based on the structure of styles enables you to enhance musical performance.
INTROPress the [INTRO/END] button to insert an intro section before playing . The rhythm will begin with a 2-4 measureintroduction which will be followed by a main section.
NORMAL and VARIATIONThere are two main sections: normal and variation. Each section consists of 2 to 4 measures.
FILL While the accompaniment is playing, you can fill in the rhythm/accompaniment by pressing the [FILL A] button or the [FILL B] button. This will automatically insert a fill section.
ENDINGWhen you press the [INTRO/END] button, in process of accompaniment playing,it brings the ending section appropriate for the accompaniment, and then stop the performance.
The Accompaniment Section
START/STOP
START/STOP
START/STOP
SYNCSTOP
SYNCSTOP
SYNCSTOP
SYNCSTART
SYNCSTART
SYNCSTART
A
A
A
FADE
FADE
FADE
B
B
B
CHORDMODE
CHORDMODE
CHORDMODE
INTRO/ENDING
INTRO/ENDING
INTRO/ENDING
1
1
2
2
3
3
4
Style Control

Style Control
Start a Style
Start immediately:
Use [START/STOP] button to start the style.
Chord. Mode:
Press the [CHORD MODE] button for the first time to enter
the FINGERED mode, the relevant LED is lightened.
The left area of keyboard are known as the chord area,
when playing the chord, both the bass and the chord voice
phonate.
Press the [CHORD MODE] button for the second time to
enter the FULL RANGE mode, the relevant LED is lightened.
The whole keyboard are known as the chord area, but only
to detect the chord and make the current voice of keyboard
while style playing.
Press the [CHORD MODE] button for the third time to close
the chord mode.
There are 2 ways to detect the chord: single finger detect
and fingers detect. If the chord playing accord with fingers
detect, it is recognized as the fingers chord. If not, single
finger chord will be recognized.
14
START/STOP
START/STOP
START/STOP
START/STOP
START/STOP
START/STOP
START/STOP
SYNCSTOP
SYNCSTOP
SYNCSTOP
SYNCSTOP
SYNCSTOP
SYNCSTOP
SYNCSTOP
SYNCSTART
SYNCSTART
SYNCSTART
SYNCSTART
SYNCSTART
SYNCSTART
SYNCSTART
A
A
A
A
A
A
A
FADE
FADE
FADE
FADE
FADE
FADE
FADE
B
B
B
B
B
B
B
CHORDMODE
CHORDMODE
CHORDMODE
CHORDMODE
CHORDMODE
CHORDMODE
CHORDMODE
INTRO/ENDING
INTRO/ENDING
INTRO/ENDING
INTRO/ENDING
INTRO/ENDING
INTRO/ENDING
INTRO/ENDING
FINGERED
FINGERED
FINGERED
FULL RANGE
FULL RANGE
FULL RANGE
1
2
3
4
Sync Start:
Press the [SYNC START] button, The SYNC START LED
lightens, LCD flashes 4 beats with current tempo. Press the
[INTRO/ENDING] button to insert INTRO. In this mode,
playing the keyboard will start the style automatically. 8Beat2
8Beat2Intro Start:
When style is not playing, press the [INTRO/ENDING] button,
"A" or "B" flashes on LCD, indicates the intro section is ready
to play. Length of intro varies in different style.
Press [START/STOP] button, then the style starts with an
intro section , followed by the main section.
If chord mode is off, play any key on keyboard to start the style.
If chord mode is on, only play the chord area key to start the style
with the Auto Bass Chord accompaniment.
FlashingFlashing

Fill A/B
Style Control
15
In NORMAL mode, press [A] button to insert 1 measure fill
and LCD flashes 'A'. After one measure is over, NORMAL
style will be returned.
In VARIATION mode, press [B] button to insert 1 measure
fill and LCD flashes 'B'. After one measure is over, VARIA-
TION style will be returned.
In NORMAL mode, press [B] button to insert 1 measure fill
and LCD flashes 'B'. After one measure is over, VARIATION
mode will be started.
In VARIATION mode, press [A] button to insert 1measure fill
and LCD flashes 'A' . After one measure is over, NORMAL
style will be started.
Hold down the [A] / [B] button when the style is playing, the selected
FILL pattern repeats continuously until button is released.
Press [A] when style stop, it will change to the normal section, the
flag "A" on LCD will be lightened;
Press [B] when style stop, it will change to the variation section, the
flag "B" on LCD will be lightened.
START/STOP
START/STOP
START/STOP
START/STOP
START/STOP
START/STOP
SYNCSTOP
SYNCSTOP
SYNCSTOP
SYNCSTOP
SYNCSTOP
SYNCSTOP
SYNCSTART
SYNCSTART
SYNCSTART
SYNCSTART
SYNCSTART
SYNCSTART
A
A
A
A
A
A
FADE
FADE
FADE
FADE
FADE
FADE
B
B
B
B
B
B
CHORDMODE
CHORDMODE
CHORDMODE
CHORDMODE
CHORDMODE
CHORDMODE
INTRO/ENDING
INTRO/ENDING
INTRO/ENDING
INTRO/ENDING
INTRO/ENDING
INTRO/ENDING
8Beat2
8Beat2
8Beat2
1
1
2
2
3
3
4
Stop immediately:The accompaniment can be stopped at any time by pressing the [START/STOP] button.
Sync Stop:
When chord mode is on and style is not playing, press the
[SYNC STOP] button, SYNC STOP and SYNC START LED
is lightened. In this mode, press the any key in left area of
keyboard to start the style playing and release the keyboard
will stop it.
When SYNC STOP LED is lightened and style is playing,
press the [SYNC STOP] button, the SYNC STOP LED will
be darken. In this mode, the style will playing continuously.
Ending stop:
Press the [INTRO/END] button
ENDING section over.
, the style will stop after the
Stop a Style
Flashing
Play a style
FINGERED
FINGERED
FULL RANGE
FULL RANGE
[SYNC STOP] would be enabled only when CHORD MODE
indicator is on.

Fade
Style Control
FADE IN:
Press the [FADE] button when style is not playing , FADE
LED lights.
"FADE" LED glimmers after style begins to play, style volume
will increase from 0 to maxima between 10 seconds, style is
played normally subsequently, 'FADE' LED darkens.
Press the [FADE] button again while FADE OUT state ,
"FADE" LED glimmers, style volume will be increased
to maxima on the basis of present volume, style is played
normally subsequently, 'FADE' LED darkens.
FADE OUT:
Press the [FADE] button when style is playing, "FADE" LED
glimmers, style volume will decrease from maxima to 0
between 10 seconds, style stops.
Press [FADE ] button while FADE IN state , will enter FADE
OUT state, volume is decrease to 0 on the basis of present
volume, style stop, 'FADE' lamp goes out.
Press [FADE ] button while FADE OUT state, will enter FADE
IN state, volume increase to maxima on the basis of present
volume, style is play normally subsequently, "FADE"lamp
goes out.
Keep FADE IN state not changing as FADE IN state stops
STYLE.
" "START/STOP
START/STOP
START/STOP
START/STOP
START/STOP
START/STOP
START/STOP
SYNCSTOP
SYNCSTOP
SYNCSTOP
SYNCSTOP
SYNCSTOP
SYNCSTOP
SYNCSTOP
SYNCSTART
SYNCSTART
SYNCSTART
SYNCSTART
SYNCSTART
SYNCSTART
SYNCSTART
A
A
A
A
A
A
A
FADE
FADE
FADE
FADE
FADE
FADE
FADE
B
B
B
B
B
B
B
CHORDMODE
CHORDMODE
CHORDMODE
CHORDMODE
CHORDMODE
CHORDMODE
CHORDMODE
INTRO/ENDING
INTRO/ENDING
INTRO/ENDING
INTRO/ENDING
INTRO/ENDING
INTRO/ENDING
INTRO/ENDING
1
2
Light
Glimmer
Glimmer
Darken
Light
Darken after
10 seconds
Glimmer
press it again
16
Style Control
17
Accomp Volume
Metronome
PIANO METRONOME
- ACCOMP +
- ACCOMP +
8Beat2
Accomp
Accomp
1
1
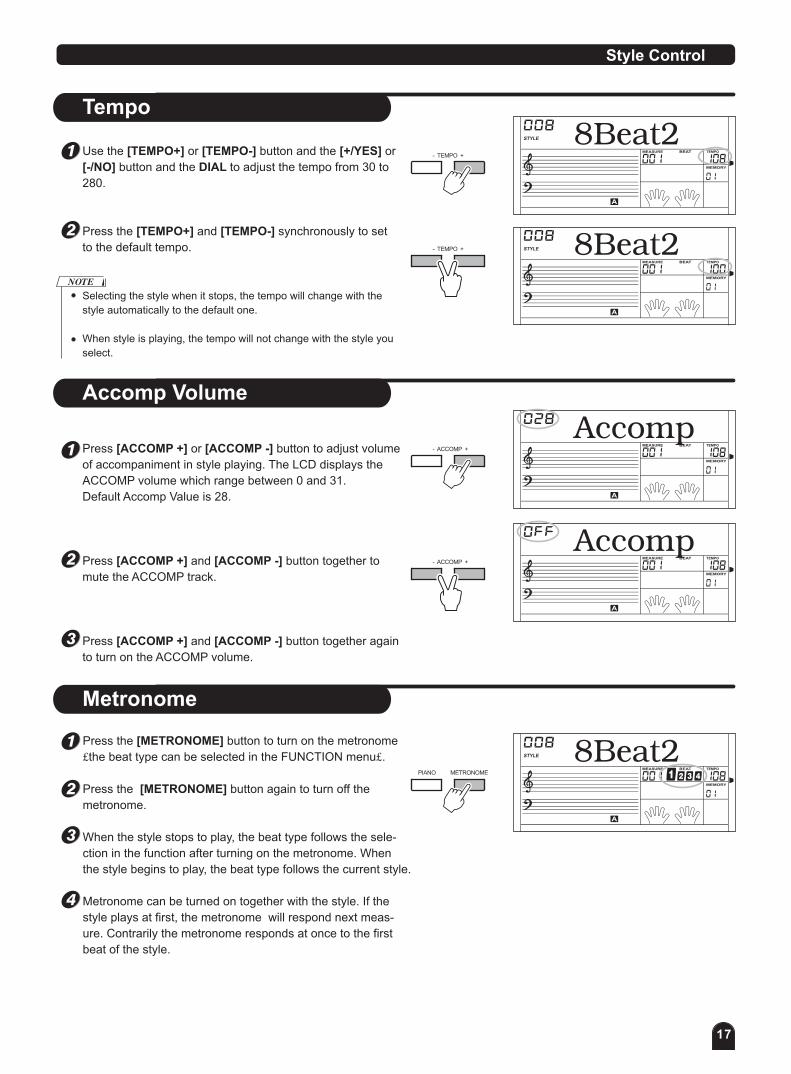
Tempo
Use the [TEMPO+] or [TEMPO-] button and the [+/YES] or
[-/NO] button and the DIAL to adjust the tempo from 30 to
280.
Press the [TEMPO+] and [TEMPO-] synchronously to set
to the default tempo.
Selecting the style when it stops, the tempo will change with the
style automatically to the default one.
When style is playing, the tempo will not change with the style you
select.
- TEMPO +
- TEMPO + 8Beat2
8Beat21
2
2
2
3
3
4
Press [ACCOMP +] or [ACCOMP -] button to adjust volume
of accompaniment in style playing. The LCD displays the
ACCOMP volume which range between 0 and 31.
Default Accomp Value is 28.
Press [ACCOMP +] and [ACCOMP -] button together to
mute the ACCOMP track.
Press [ACCOMP +] and [ACCOMP -] button together again
to turn on the ACCOMP volume.
Press the [METRONOME] button to turn on the metronome
£the beat type can be selected in the FUNCTION menu£.
Press the [METRONOME] button again to turn off the
metronome.
When the style stops to play, the beat type follows the sele-
ction in the function after turning on the metronome. When
the style begins to play, the beat type follows the current style.
Metronome can be turned on together with the style. If the
style plays at first, the metronome will respond next meas-
ure. Contrarily the metronome responds at once to the first
beat of the style.

Recognizing Chords
Style Control
18
Default mode for A.B.C. is off on the keyboard.
Press [CHORD MODE] button to turn on this "auto bass
chord" function. The left section of the keyboard is known
as the "chord area", while playing the chord, both the bass
and the chord voices sound.
There are 2 ways to detect the chord: "single finger detect" and "multi finger detect".
Single Finger Chords
If the chord played is based on "multi finger detect", it is recognized as the "multi finger chords".
If not, "single finger chord" will be recognized.
This method allows you to easily play chords
in the accompaniment range of the keyboard
using only one, two, or three fingers.
The examples of Single Finger Chord "C, Cm,
C7 and Cm7" are shown as below:
To play a major chordPress the root note of the chord
To play a minor chordPress the root note together with thenearest black key to the left of it .
To play a seventh chordPress the root note together with thenearest white key to the left of it .
To play a minor seventh chordPress the root notes together with the nearest white and black keys to the left of it (three keys altogether) .
Multi Finger Chords
This method allows you to produce an accompa-
niment by playing chords with normal fingerings
in the accompaniment range of the keyboard.
To play Multi Chords ( Example in C chords)
A total of 32 chords are provided as below:
Notes enclosed in parentheses are optional;
the chords could be recognized without them.
When A.B.C. is on, press the keys on the left of split point.
The chord will be recognized as single
finger chords.
Since the chord detection of A.B.C. is based on the Chord Root
priority, some chords that could be played under the Chord Dictio-
nary may not be recognised by A.B.C. , eg. B6。bB6。B6(9)。
bB6」9」。Baug。bBaug。bBm6。Bm6。Adim7。bBdim7。Bdim.
START/STOP
SYNCSTOP
SYNCSTART
A FADEBCHORDMODE
INTRO/ENDING
FINGERED
FULL RANGE

19
Style Control
Chord Basics
Reading Chord Names
Some Chord Types
Three or more notes played together constitute a "chord".
The most basic chord type is the "triad" consisting three notes:
the root, third, and fifth degrees of the corresponding scale.
A "C major triad", for example, is made up of the notes C (the root),
E(the third note of the C major scale),and G (the fifth note of the
C major scale).
In the C major triad shown above, the lowest note is the " root" of
the chord(this is the chord's "root position"...using other chord notes
for the lowest note results in "inversion"). The root is the central
sound of the chord, which supports and anchors the other chord notes.
The distance(interval) between adjacent notes of triad in root position
is either a major or minor third.
The lowest interval in our root-position trial (between the root and the
third) determines whether the triad is a major or minor chord, and we
can shift the highest note up or down by a semitone to produce two
additional chords, as shown below.
The basic characteristics of the chord sound remain intact even if we
change the order of the notes to create different inversions. Successive
chords in a chord progression can be smoothly connected, for example,
by choosing the appropriate inversions (or chord "voicings ").
Chord names tell you just about everything you need to know about a
chord (other than the inversion/voicing). The chord name tells you
what the root of a chord is, whether it is major, minor, or diminished,
whether it requires a major or flatted seventh, what alterations or
tension does it use...all at a glance.

Function Menu
Tune
Beat
20
Press [FUNCTION/NEXT] or [FUNCTION/BACK] button to enter the menu of function. The default
option of the menu is "TUNE". When you enter the menu next time, you will find the option is the same as
last time. Press [FUNCTION/NEXT] or [FUNCTION/BACK] button to select the option to be set.
Use [+/YES] / [-/NO] or the DIAL to set the parameter. The option and the parameters are as the follows:
If you don't press any button for 5 seconds after entering FUNCTION menu, it will quit this menu automatically.
The LCD displays the tune value. Use [+/YES] / [-/NO] or DIAL to change the tune value. Its range is from -50to 50 cents only by the right area of keyboard.
This function sets the pitch of entire keyboard by steps of cents.
Pressing [+/YES] and [-/NO] together will set the TUNE value back to its default setting.
FUNCTION
NEXTBACK
FUNCTION
NEXTBACK
- / NO + / YES
- / NO + / YES
The LCD displays the beat value.
This function sets the beat value ranging from 0, 2-9.
Use [+/YES] / [-/NO] or DIAL to change the BEAT value.
1
1
2
2
Split Point
This function sets the point that separate the entire
keyboard to two section.
The LCD displays the split point value.
Use [+/YES] / [-/NO] or DIAL to change the split point.
You may also use keyboard to change the split point by
simply selecting the note you desired to be the point of
separation. The part below the split point is the the
CHORD area.
FUNCTION
NEXTBACK
- / NO + / YES
1
2
Function Menu
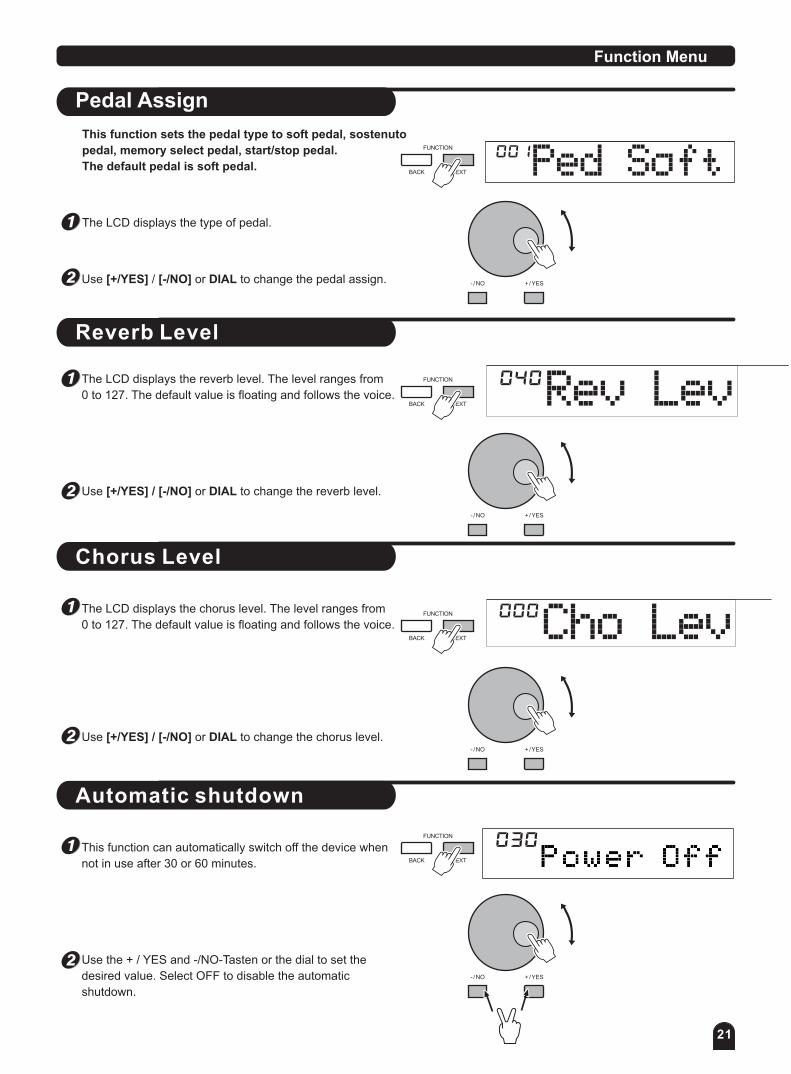
Pedal Assign
21
This function sets the pedal type to soft pedal, sostenuto
pedal, memory select pedal, start/stop pedal.
The default pedal is soft pedal.
The LCD displays the type of pedal.
FUNCTION
NEXTBACK
- / NO + / YES
FUNCTION
NEXTBACK
- / NO + / YES
FUNCTION
NEXTBACK
- / NO + / YES
Use [+/YES] / [-/NO] or DIAL to change the pedal assign.
Reverb Level
The LCD displays the reverb level.
0 to 127. The default value is floating and follows the voice.
Use [+/YES] / [-/NO] or DIAL to change the reverb level.
The level ranges from
Chorus Level
The LCD displays the chorus level. The level ranges from
0 to 127. The default value is floating and follows the voice.
Use [+/YES] / [-/NO] or DIAL to change the chorus level.
1
1
1
2
Automatic shutdown
This function can automatically switch off the device when
not in use after 30 or 60 minutes.
Use the + / YES and -/NO-Tasten or the dial to set the
desired value. Select OFF to disable the automatic
shutdown.
1
2
2
2
FUNCTION
NEXTBACK
- / NO + / YES

22
Function Menu
MIDI Setting
RECEIVE can be used to set the channel of MIDI IN.The default setting is "all ". Otherwise, channel 1~16 can also be selected separately.
Use [+/YES] / [-/NO] button or the DIAL to select the channel.
TRANSMIT can be used to set the channel of MIDI OUT.There are total of 16 channels for selection. Default setting is "001".
Use [+/YES] / [-/NO] button or the DIAL to select the channel.
FUNCTION
NEXTBACK
FUNCTION
NEXTBACK
- / NO + / YES
- / NO + / YES
1
1
2
2
Mixer MenuPress the [MIXER] button to enter the menu of mixer. The default option of the menu is "Rhythm_s", then the optionyou enter next time will be the same as last time you exit.
Press the [MIXER] button continuously to select the option you want, then use the [+/YES] / [-/NO] button or the DIAL to set the parameters.
If you don't press any button for 5 seconds after entering the MIXER menu, it will quit this menu automatically.
Option LCD Display Range Deafult
Rhythm_s Volume
Rhythm_m Volume
026 Rhythm_s
026 Rhythm_m
026 Bass
026 Chord1
026 Chord2
026 Chord3
026 Phrase1
026 Phrase2
026Voice R1
010 Voice R2
010 Voice L
020 Sd play
000 -031 026
000 -031
Bass Volume
Chord 1 Volume
Chord 2 Volume
Chord 3 Volume
Phrase 1 Volume
Phrase 2 Volume
Voice R1 Volume
000 -031
000 -031
000 -031
000 -031
000 -031
000 -031
000 -031 026
026
026
026
026
026
026
026
percussion instrument 1
percussion instrument 2
bass foil
symphonic melody 1
symphonic melody 2
symphonic melody 3
intermezzo snippet 1
intermezzo snippet 2
single voice
dual voice
lower voice
Description
Voice R2 Volume
Voice L Volume
000 -031 020
000 -031
012
SD MIDI PLAY Volume 000 -031 020
FUNCTION
NEXTBACK
STORE
The option and the parameters in detail as belows:

Memory
Bank
23
Memory feature can be used to preset 48 complete
control-panel setups which could be recalled
whenever needed.
There are 8 banks in total; each bank has 6 memories
(M1~M6).
Press [BANK] button, the LCD displays "00x Mem Bank",
with 00x showing the Bank that has been selected.
Use [+/YES] / [-/NO] button or DIAL to select the bank.
If the current memory data be changed, the corresponding memory
flag on LCD will be erased.
Memory Data
Mem Bank
STORESTORE O.T.S.O.T.S.BANKBANK M2M2 M3M3 M4M4 M5M5 M6M6M1M1
ONE TOUCH SETTINGONE TOUCH SETTING
1
2
The data can be stored to the memory are as follows:
Voice R1, Voice R2, Voice L, Sustain, Style, Tempo,
Function, Mixer, Accomp Volume and Octave.
Store and Load
Press and hold the [STORE] button, then press the [M1]
button (or [M2] ~ [M6]) , the current data will be stored in
them.
Press the [M1] button (or [M2 ~ [M6] ) to load the data
from them and replace the current parameters.
Mem Stor
NewRegga
1
2
Press [STORE] and [M1] together while power the piano , the
memory data will be set as the default value.
STORESTORE O.T.S.O.T.S.BANKBANK M2M2 M3M3 M4M4 M5M5 M6M6M1M1
ONE TOUCH SETTINGONE TOUCH SETTING
Press and Hold
STORESTORE O.T.S.O.T.S.BANKBANK M2M2 M3M3 M4M4 M5M5 M6M6M1M1
ONE TOUCH SETTINGONE TOUCH SETTING

One Touch Setting
24
Press [O.T.S.] button to turn this mode on and the O.T.S.
Flag lighten on the LCD.
Press any of the [M1] ~ [M4] button, it will load the
relative type of parameter to be suited for the current style.
A.B.C. mode is automatically turned on during O.T.S. Mode.
Press any of the M1-M4 buttons, which is corresponded
to your desired setting.
One Touch Setting is a powerful and convenient
function that allows you to reconfigure all settings
instantly with the touch of a single button. In this
function, 4 types of parameters (M1~M4) will be
loaded to match the current style.
Press button again to turn off the O.T.S. Mode.[O.T.S.]
The default parameters stored in the O.T.S. including:
Voice R1, Voice R2, Voice L, Octave , Voice R1 Volume,
Voice R2 Volume, Chorus Level, Reverb Level.
STORE
STORE
STORE
STORE
O.T.S.
O.T.S.
O.T.S.
O.T.S.
BANK
BANK
BANK
BANK
M2
M2
M2
M2
M3
M3
M3
M3
M4
M4
M4
M4
M5
M5
M5
M5
M6
M6
M6
M6
M1
M1
M1
M1
ONE TOUCH SETTING
ONE TOUCH SETTING
ONE TOUCH SETTING
ONE TOUCH SETTING
8BtRock
8BtRock
Rec_song
1
2
3
4
Record
3 user songs can be recorded in the piano with 6 tracks
(1 ACCOMP track, 5 MELODY tracks) in each song.
Hold down [RECORD] and [PLAY/BACK] button, then power
on the piano, all recorded data will be erased.
STYLERECORD
STYLERECORD
RECORD
RECORD
PLAY/STOP
PLAY/STOP
MELODY1
MELODY1
MELODY2
MELODY2
MELODY4
MELODY4
MELODY5
MELODY5
ACCOMP
ACCOMP
MELODY3
MELODY3
Press the three buttons together
Record Song
Press the [RECORD] button for the first time to enter the
user song selection mode. The LCD displays the current
song name and number.
Use the [+/YES] or [-/NO] button and DIAl to select one
you want to record.

Record
Waiting for recording: Press the [RECORD] button for the second time to enter the record mode. The LCD lightens the REC flag, four beats flashes synchronously to indicate waiting for recording.At the same time an empty track will be selected to be recorded automatically and relative track flag flashes (the selection order is Melody1,Melody2...Melody5 and Accomp, the Melody1 will be selected while all tracks are't empty ). Press the [ACCOMP], [MELODY 1] ...[MELODY 5] button to select the track you want to record.
Start recording: When 4 beats on LCD flashes, press the [START/STOP] button or play the keyboard to start recording.
when entering record mode, the old data of the selected track will be overwritten.
StGrPn1
STYLERECORD
STYLERECORD
STYLERECORD
STYLERECORD
Flash synchronously
Flash
Lighten
Darken
Flashing
RECORD
RECORD
RECORD
RECORD
PLAY/STOP
PLAY/STOP
PLAY/STOP
PLAY/STOP
MELODY1
MELODY1
MELODY1
MELODY1
MELODY2
MELODY2
MELODY2
MELODY2
MELODY4
MELODY4
MELODY4
MELODY4
MELODY5
MELODY5
MELODY5
MELODY5
ACCOMP
ACCOMP
ACCOMP
ACCOMP
MELODY3
MELODY3
MELODY3
MELODY3
START/STOP
SYNCSTOP
SYNCSTART
A FADEBCHORDMODE
INTRO/ENDING
1
2
3
25
There are 3 states of choosing tracks in the light buttons:Lighten, Flashing, Darken.
When the light of button is flashing, it indicates the flashing track is the track chosen to be recorded.
When the light of button is lightened, it indicates there is recorded material in this track for the selected song. Material on this track will be played simultaneously while recording for another track.
When the light of button is darkened, it indicates there's no data in this track or there's data on this track but it's forbid to play the recorded material while recording.
Press "Accomp" (or "Melody 1" to "Melody 5") to select the desired track. The corresponding track will be switched between the above three states.
Only 1 Melody track can be recorded at a time, whereas "Accomp" track can be recorded with a Melody track at the same time.
Style can only be recorded in "Accomp".
Choosing tracks
Full
STYLERECORD RECORD PLAY/
STOP
MELODY1
MELODY2
MELODY4
MELODY5ACCOMP
MELODY3
START/STOP
SYNCSTOP
SYNCSTART
A FADEBCHORDMODE
INTRO/ENDING
4 Stop recording: Press the [RECORD] button for the third time to stop recording.
If Accomp track is recording, press the [INTRO/ENDING] button to stop recording after the ending accompaniment is over.
If the capacity is full while recording, the recording will be stopped automatically with the FULL display on LCD.
26
Record
Delete Song
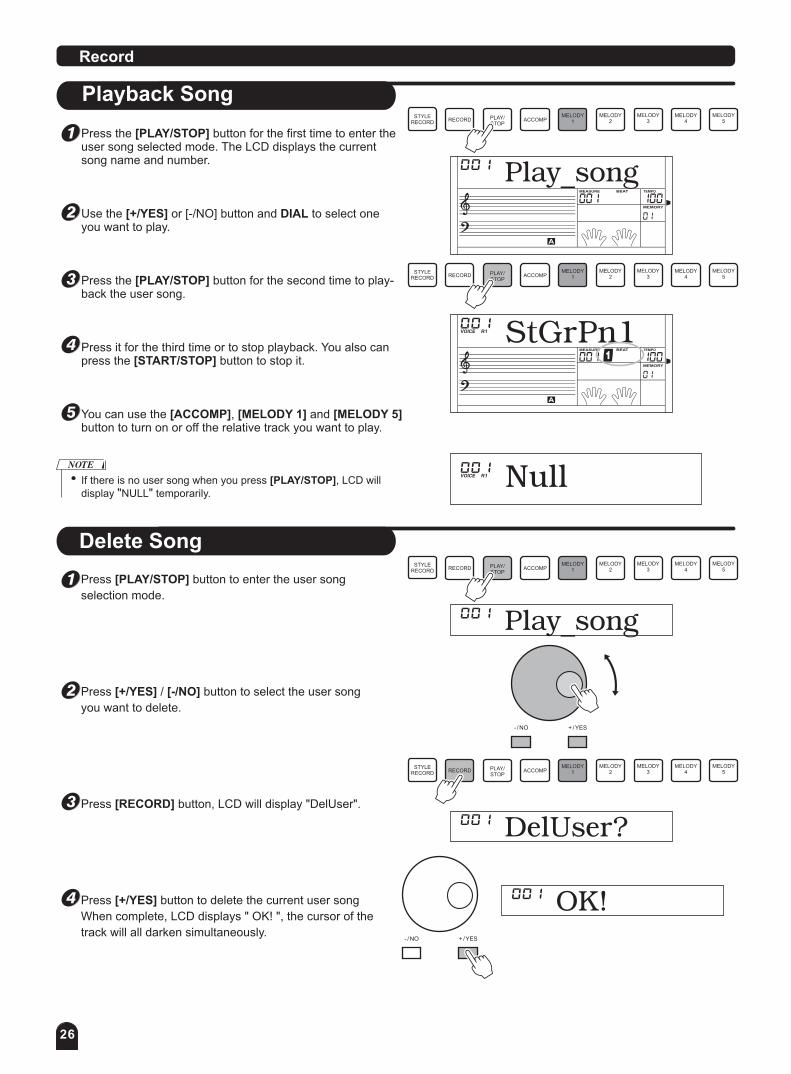
Press [PLAY/STOP] button to enter the user song
selection mode.
Press [+/YES] / [-/NO] button to select the user song
you want to delete.
Press [RECORD] button, LCD will display "DelUser".
Press [+/YES] button to delete the current user song
When complete, LCD displays " OK! ", the cursor of the
track will all darken simultaneously.
STYLERECORD RECORD PLAY/
STOP
MELODY1
MELODY2
MELODY4
MELODY5ACCOMP
MELODY3
Play_song
DelUser?
OK!
- / NO + / YES
- / NO + / YES
STYLERECORD RECORD PLAY/
STOP
MELODY1
MELODY2
MELODY4
MELODY5ACCOMP
MELODY3
1
2
3
4
StGrPn1
Null
STYLERECORD
STYLERECORD
RECORD
RECORD
PLAY/STOP
PLAY/STOP
MELODY1
MELODY1
MELODY2
MELODY2
MELODY4
MELODY4
MELODY5
MELODY5
ACCOMP
ACCOMP
MELODY3
MELODY3
Playback Song
Press the [PLAY/STOP] button for the first time to enter the user song selected mode. The LCD displays the current song name and number.
Use the [+/YES] or [-/NO] button and DIAL to select one you want to play.
Press the [PLAY/STOP] button for the second time to play-back the user song.
Press it for the third time or to stop playback. You also can press the [START/STOP] button to stop it.
You can use the [ACCOMP], [MELODY 1] and [MELODY 5] button to turn on or off the relative track you want to play.
If there is no user song when you press [PLAY/STOP], LCD will display "NULL" temporarily.
Play_song
1
2
3
4
5
27
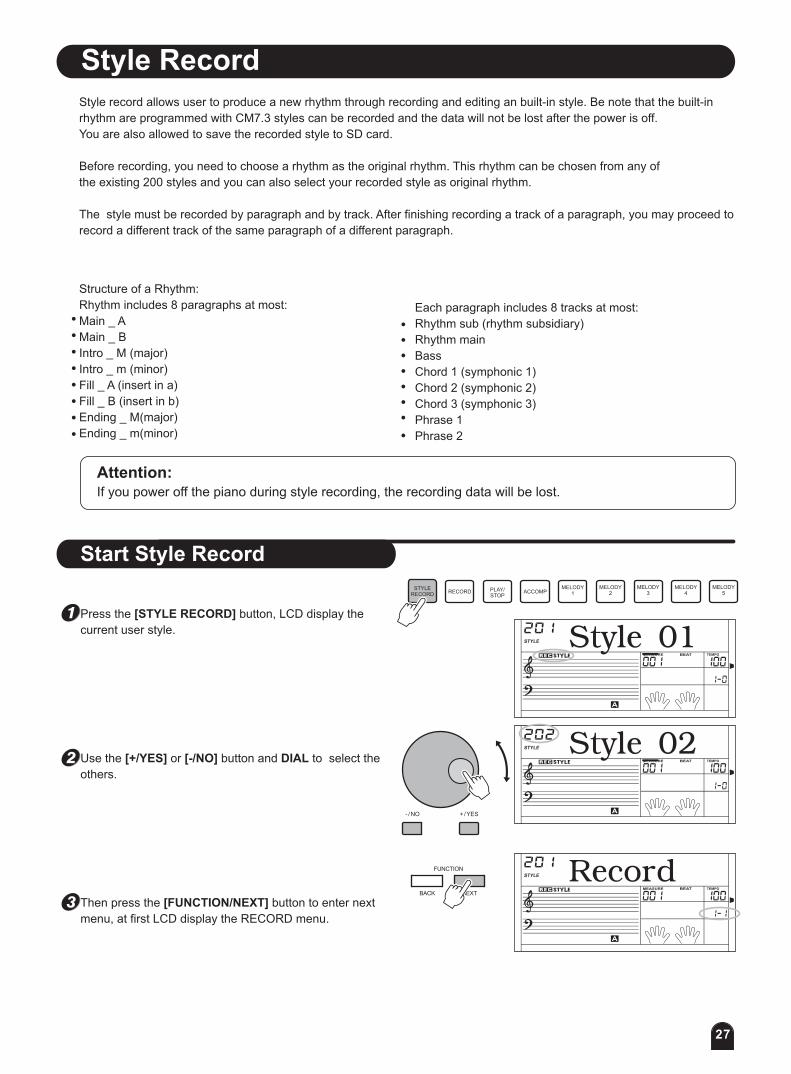
Press the [STYLE RECORD] button, LCD display the
current user style.
Use the [+/YES] or [-/NO] button and DIAL to select the
others.
Then press the [FUNCTION/NEXT] button to enter next
menu, at first LCD display the RECORD menu.
Start Style Record
Style_02
STYLERECORD RECORD PLAY/
STOP
MELODY1
MELODY2
MELODY4
MELODY5ACCOMP
MELODY3
Style_01
RecordFUNCTION
NEXTBACK
- / NO + / YES
1
2
3
Style RecordStyle record allows user to produce a new rhythm through recording and editing an built-in style. Be note that the built-in
rhythm are programmed with CM7.3 styles can be recorded and the data will not be lost after the power is off.
You are also allowed to save the recorded style to SD card.
Before recording, you need to choose a rhythm as the original rhythm. This rhythm can be chosen from any of
the existing 200 styles and you can also select your recorded style as original rhythm.
The style must be recorded by paragraph and by track. After finishing recording a track of a paragraph, you may proceed to
record a different track of the same paragraph of a different paragraph.
Structure of a Rhythm:
Rhythm includes 8 paragraphs at most:
Main _ A
Main _ B
Intro _ M (major)
Intro _ m (minor)
Fill _ A (insert in a)
Fill _ B (insert in b)
Ending _ M(major)
Ending _ m(minor)
Each paragraph includes 8 tracks at most:
Rhythm sub (rhythm subsidiary)
Rhythm main
Bass
Chord 1 (symphonic 1)
Chord 2 (symphonic 2)
Chord 3 (symphonic 3)
Phrase 1
Phrase 2
Attention:If you power off the piano during style recording, the recording data will be lost.

28
Style Record
Record a new Style
Select RECORD in style record menu level1.
Press [FUNCTION / NEXT] to enter record mode menu.LCD now displays "Overdub".
Press [+/YES], [-/NO] button or rotate the DIAL to select a recording mode. 2 options for recording mode: overdub and replace.
In Overdub mode, the newly recorded data will be added to the original style data.
In Replace mode, the original style data will be overwritten with the newly recorded data.
Record
Overdub
Replace
FUNCTION
NEXTBACK
FUNCTION
NEXTBACK
- / NO + / YES
1
2
Use the [+/YES] or [-/NO] button and DIAL to select the
others includes Record, Copy, Quantify, Edit and Delete.
If the user style selected is empty, only Record and Copy
can be selected.
At any moment of style recording state, pressing
[STYLE RECORD] button again will exit from the
recording state. The data will not be saved.
Copy
Quantify
Edit
Delete
- / NO + / YES
4
5
6

Style Record
29
Press the [FUNCTION / NEXT] button to enter the record ready menu. The style record is on the synchronized start mode, and the beat display will flash at the current tempo. At that time you can use the [+/YES], [-/NO] button or DIAL or direct select buttons to change the voice for the current track. If you've picked the drum track, you would only have drum kits for selection. Press the [FUNCTION / BACK] button to return previous menu.
Press the [START/STOP] button to start recording. The style will play with CM7 chord, the selected paragraph of the original rhythm begins to play in a loop way. Play the keyboard to record, the recorded data in current loop would be replayed in next loop. Also you can delete thenote being recorded in last loop by pressing the same note at same time in next loop within 1/8-quarter note around itplayed.
Press the [START/STOP] button again to stop recording and return to the synchronized start state.
Press the [ ] button to exit the current mode. You can also repeat the operation by pressing the [FUNCTION / BACK] button to return previous menu and select other options.
STYLE RECORD
M_A:Chd1
M_A:Chd1
FUNCTION
Flash together
NEXTBACK
START/STOP
SYNCSTOP
SYNCSTART
A FADEBCHORDMODE
INTRO/ENDING
6
7
8
9
Press [FUNCTION / NEXT] to enter rhythm selection menu.
Press [+/YES], [-/NO] button or rotate the DIAL to select a original rhythm. Press [FUNCTION / BACK] to return previous menu.
8BtRock
Main_A
Chord1
Main_B
GtPop1
FUNCTION
NEXTBACK
FUNCTION
NEXTBACK
FUNCTION
NEXTBACK
- / NO + / YES
- / NO + / YES
Press [FUNCTION/NEXT] button to enter the paragraph
menu.
Press [FUNCTION/NEXT] button to enter the paragraph
menu.
Press button or rotate
the paragraph of rhythm. There are 8 paragraphs to be
selected includes: Main _ A, Main _ B, Intro _ M, Intro _ m,
Fill _ A, Fill _ B, Ending _ M, Ending _ m.
[+/YES], [-/NO] the DIAL to select
Press [+/YES], [-/NO] button or rotate the DIAL to select
the track: Rhythm sub, Rhythm main, bass, chord 1, chord 2,
chord 3, phrase 1, phrase 2.
3
4
5
30
Style Record
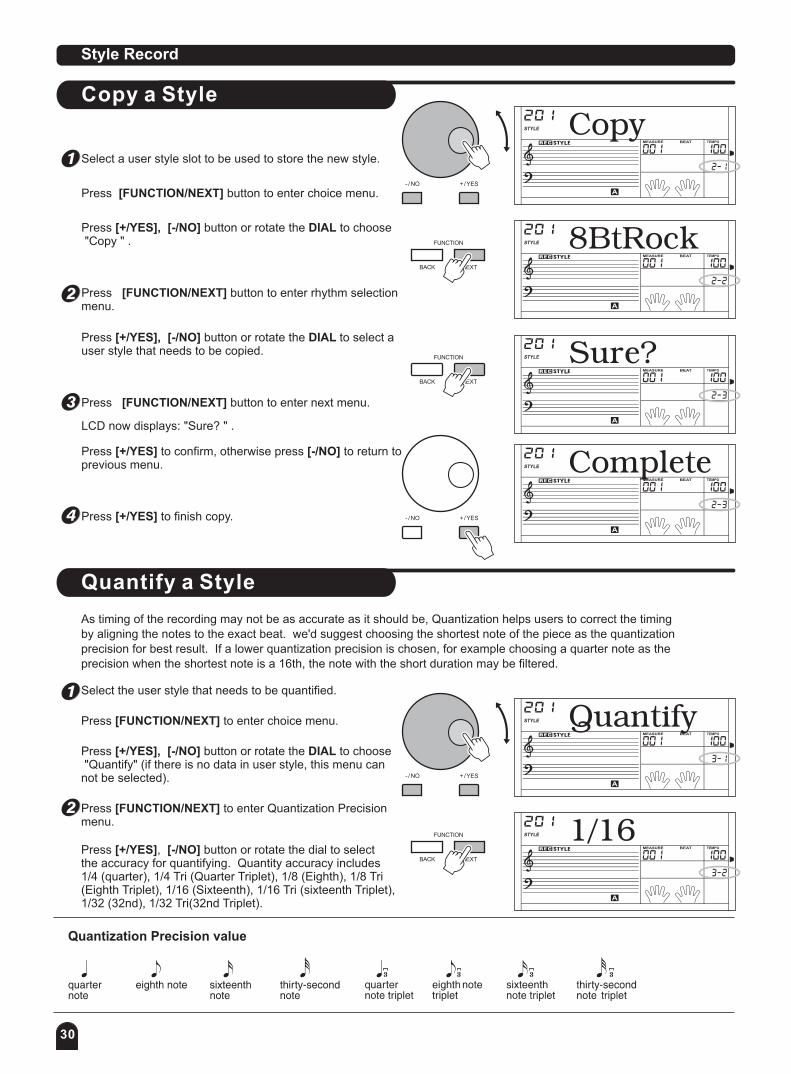
Quantify a Style
As timing of the recording may not be as accurate as it should be, Quantization helps users to correct the timing by aligning the notes to the exact beat. we'd suggest choosing the shortest note of the piece as the quantization precision for best result. If a lower quantization precision is chosen, for example choosing a quarter note as the precision when the shortest note is a 16th, the note with the short duration may be filtered.
Select the user style that needs to be quantified.
Press to enter [FUNCTION/NEXT] choice menu.
Press to choose Quantify (if there is no data in user style, this menu cannot be selected).
[+/YES], [-/NO] button or rotate the DIAL" "
Press to enter menu.
[FUNCTION/NEXT] Quantization Precision
Press button or rotate the dial to select includes
1/4 (quarter), 1/4 Tri (Quarter Triplet), 1/8 (Eighth), 1/8 Tri(Eighth Triplet), 1/16 (Sixteenth), 1/16 Tri (sixteenth Triplet), 1/32 (32nd), 1/32 Tri(32nd Triplet).
[+/YES], [-/NO]the accuracy for quantifying. Quantity accuracy
Quantization Precision value
Quantify
- / NO + / YES
1/16FUNCTION
NEXTBACK
1
2
Copy
- / NO + / YES
- / NO + / YES
Copy a Style
Select a user style slot to be used to store the new style.
Press [FUNCTION/NEXT] button to enter choice menu.
Press [+/YES], [-/NO] button or rotate the DIAL to choose "Copy " .
Press [+/YES] to finish copy.
Press [FUNCTION/NEXT] button to enter rhythm selection menu.
Press [+/YES], [-/NO] button or rotate the DIAL to select a user style that needs to be copied.
Press [FUNCTION/NEXT] button to enter next menu.
LCD now displays: "Sure? " .
Press [+/YES] to confirm, otherwise press [-/NO] to return to previous menu.
8BtRock
Sure?
Complete
FUNCTION
NEXTBACK
FUNCTION
NEXTBACK
1
2
3
4

31
Style Record
Edit a Style
Select the style that needs to be editted.
Press [FUNCTION/NEXT] button to enter choice menu.
Press [+/YES], [-/NO] button or rotate the DIAL tochoose "Edit".
Press [FUNCTION/NEXT] button to enter tempo edit menu.
Press [+/YES], [-/NO] button or rotate the DIAL to modify tempo.
Edit
- / NO + / YES
Tempo
8 Beat R
FUNCTION
NEXTBACK
FUNCTION
NEXTBACK
Press the button to enter the renamemenu(full name). Use the keyboard to input the style whole name. It may include 26 letters and characters with the most length of 32 characters. Press the button to return previousmenu.Please refer to page 42 for naming function.
[FUNCTION/NEXT]
[FUNCTION/BACK]
Flash
1
2
3
Press to enter the paragraph menu. [FUNCTION/NEXT]
Press to select the paragraph of rhythm: Main _ A, Main _ B, Intro _ M, Intro_m, Fill _ A, Fill _ B, Ending _ M, Ending _ m.
[+/YES], [-/NO] button or rotate the DIAL
Main_A
Chord1
Sure?
Complete
FUNCTION
NEXTBACK
FUNCTION
NEXTBACK
FUNCTION
NEXTBACK
3
4
5
6
Press to enter the Track menu. [FUNCTION/NEXT]
Press to select the track: Rhythm sub, Rhythm main, bass, chord 1,chord 2, chord 3, phrase 1, phrase 2.
[+/YES], [-/NO] button or rotate the DIAL
Press to enter next menu. [FUNCTION/NEXT]
LCD now displays Sure?" ".
The original time and length of note will not be recoveredafter quantization.
Press [+/YES] to confirm. Style will be quantified accordingly. Otherwise, press [-/NO] to return to previous menu.
LCD displays Complete . The recorded style will be played with
" "the desired accuracy.
- / NO + / YES
32
Style Record
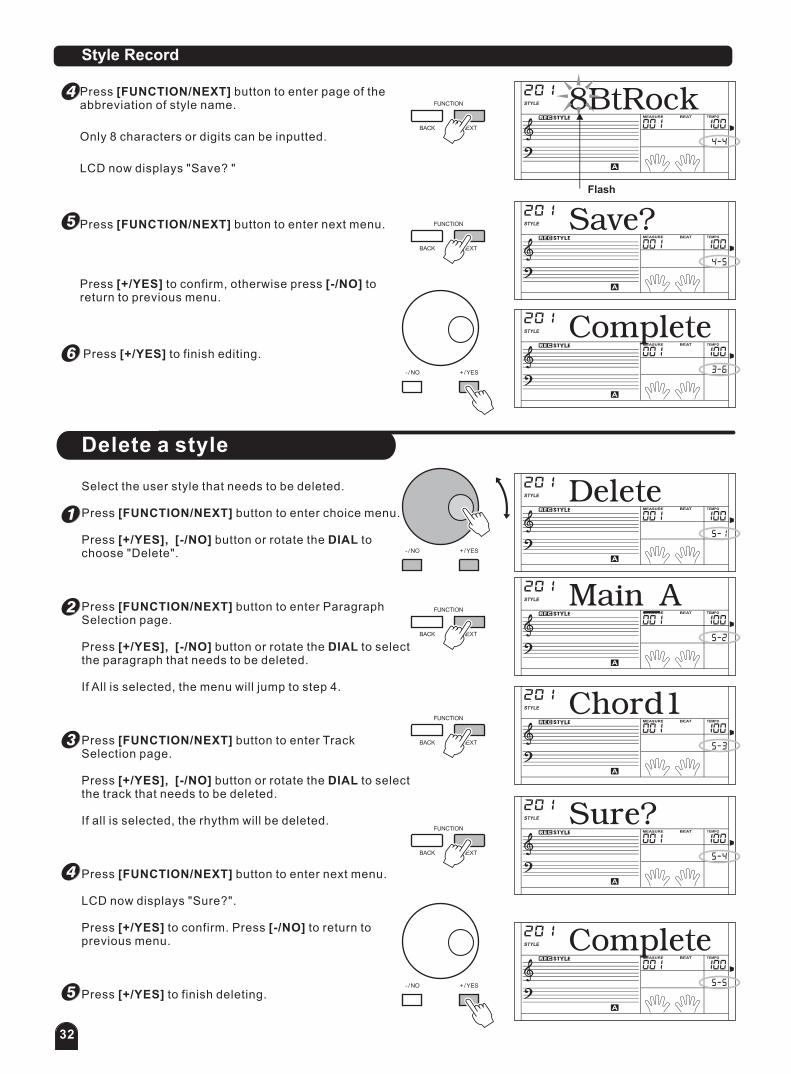
Delete a style
Select the user style that needs to be deleted.
Press [FUNCTION/NEXT] button to enter choice menu.
Press [+/YES], [-/NO] button or rotate the DIAL to choose "Delete".
Press [FUNCTION/NEXT] button to enter Paragraph Selection page.
Press [+/YES], [-/NO] button or rotate the DIAL to selectthe paragraph that needs to be deleted.
If All is selected, the menu will jump to step 4.
Press [FUNCTION/NEXT] button to enter Track Selection page.
Press [+/YES], [-/NO] button or rotate the DIAL to select the track that needs to be deleted.
If all is selected, the rhythm will be deleted.
Press [FUNCTION/NEXT] button to enter next menu.
LCD now displays "Sure?".
Press [+/YES] to confirm. Press [-/NO] to return to previous menu.
Press [+/YES] to finish deleting.
Delete
Main_A
Chord1
Sure?
- / NO + / YES
FUNCTION
NEXTBACK
FUNCTION
NEXTBACK
FUNCTION
NEXTBACK
Complete- / NO + / YES
1
2
3
4
5
8BtRock
Save?
FUNCTION
NEXTBACK
FUNCTION
NEXTBACK
Flash
Press [FUNCTION/NEXT] button to enter page of the abbreviation of style name.
Only 8 characters or digits can be inputted.
Press [FUNCTION/NEXT] button to enter next menu.
LCD now displays "Save? "
Press [+/YES] to confirm, otherwise press [-/NO] to return to previous menu.
Press [+/YES] to finish editing.
Complete- / NO + / YES
4
5
6
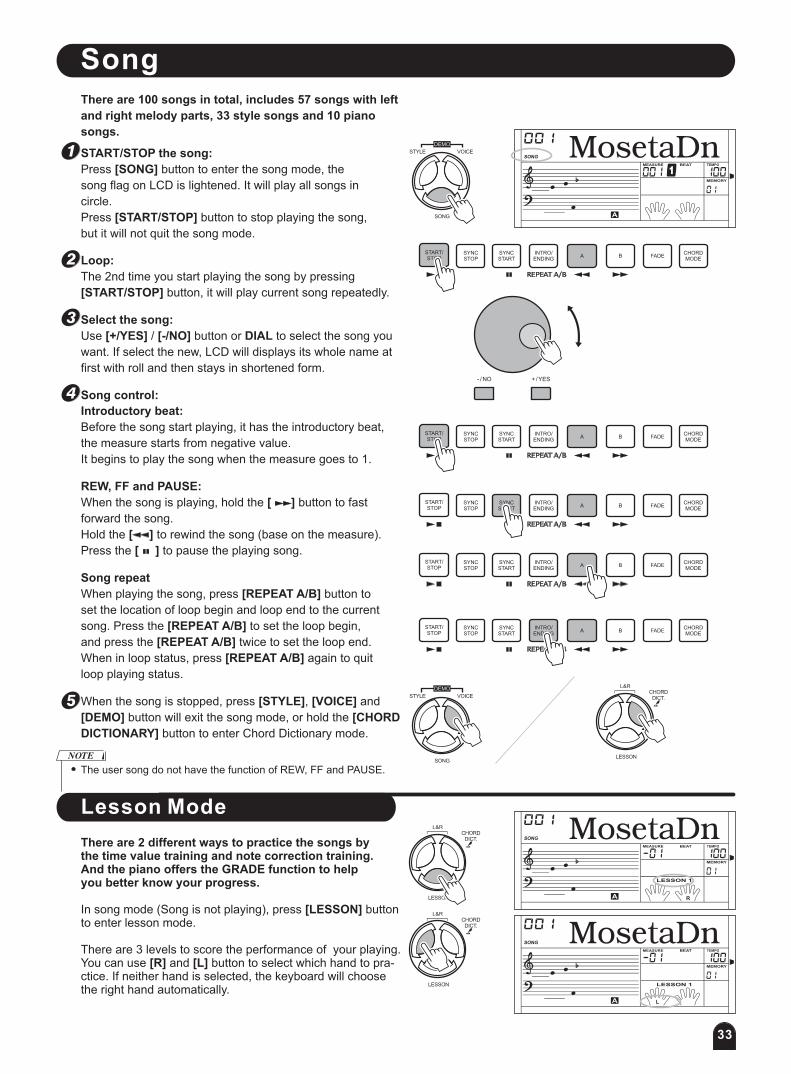
SongThere are 100 songs in total, includes 57 songs with left
and right melody parts, 33 style songs and 10 piano
songs.
START/STOP the song:
Press [SONG] button to enter the song mode, the
song flag on LCD is lightened. It will play all songs in
circle.
Press [START/STOP] button to stop playing the song,
but it will not quit the song mode.
Loop:
The 2nd time you start playing the song by pressing
[START/STOP] button, it will play current song repeatedly.
Select the song:
Use [+/YES] / [-/NO] button or DIAL to select the song you
want. If select the new, LCD will displays its whole name at
first with roll and then stays in shortened form.
Song control:
Introductory beat:
Before the song start playing, it has the introductory beat,
the measure starts from negative value.
It begins to play the song when the measure goes to 1.
When the song is stopped, press [STYLE], [VOICE] and
[DEMO] button will exit the song mode, or hold the [CHORD
DICTIONARY] button to enter Chord Dictionary mode.
The user song do not have the function of REW, FF and PAUSE.
Song repeat
When playing the song, press [REPEAT A/B] button to
set the location of loop begin and loop end to the current
song. Press the [REPEAT A/B] to set the loop begin,
and press the [REPEAT A/B] twice to set the loop end.
When in loop status, press [REPEAT A/B] again to quit
loop playing status.
REW, FF and PAUSE:
When the song is playing, hold the [ ] button to fast
forward the song.
Hold the [ ] to rewind the song (base on the measure).
Press the [ ] to pause the playing song.
SONG
STYLE VOICE
DEMO
SONG
STYLE VOICE
DEMO L&R
L&R
L&R
LESSON
LESSON
LESSON
MosetaDn
MosetaDn
START/STOP
START/STOP
START/STOP
START/STOP
START/STOP
SYNCSTOP
SYNCSTOP
SYNCSTOP
SYNCSTOP
SYNCSTOP
SYNCSTART
SYNCSTART
SYNCSTART
SYNCSTART
SYNCSTART
A
A
A
A
A
FADE
FADE
FADE
FADE
FADE
B
B
B
B
B
CHORDMODE
CHORDMODE
CHORDMODE
CHORDMODE
CHORDMODE
INTRO/ENDING
INTRO/ENDING
INTRO/ENDING
INTRO/ENDING
INTRO/ENDING
- / NO + / YES
1
2
3
4
5
CHORDDICT.
CHORDDICT.
CHORDDICT.
Lesson Mode
There are 2 different ways to practice the songs by the time value training and note correction training.And the piano offers the GRADE function to help you better know your progress.
In song mode (Song is not playing), press [LESSON] button to enter lesson mode.
There are 3 levels to score the performance of your playing. You can use [R] and [L] button to select which hand to pra-ctice. If neither hand is selected, the keyboard will choose the right hand automatically.
LESSON 1
MosetaDnLESSON 1
33

Song
Lesson 1-Practice timing
Press [LESSON] button to enter the lesson mode, the
lesson 1 flag is lightened on LCD.
In LESSON 1 mode, the piano only grade the time value
of the playing, accuracy of note playing will not be accounted
for.
Press [START/STOP] to start to practise.
If [R] is selected; it will mute the melody of right hand and
you will have to follow the timing of the right hand. As long
as the timing is correct, the melody will sound.
If [L] is selected ; it will mute the changing chord and
melody by left hand. You will have to follow timing of the
left hand. As long as the timing is correct, the chord /
melody will sound.
If [L] and [R] are selected, the melody on left and right
hand will be muted. You will have to follow timing on both
left and right hand.
Once completed, the result of evaluation will be voiced.
According to the type of the song, the content of your practice by left hand is not the same. If you choose chord song, the left hand
practices the chord, otherwise, left hand practise the melody.
1-42, 57 song can permission practice the left hand and right hand. 43-56 , 58-100 song only used to right hand practice.
When the song is playing, the staff displayed on the LCD indicate the melody and chord position, LCD shows the last note played
by RIGHT track, and it will be convenient for you to practice .
Because the melody track note span of song may exceed the range that staff can reveal, staff high notes district might have +12, +24
display at this moment, show whom staff reveal high one octave or two octave of notes at present.
The display of this +12, +24 chord to style song is invalid, Chord of style song reveal first octave in staff bass all the time when revealing
+12/+24, study chord part time according to chord bond potential prompt play the musical instruments or play the musical instruments
transposition chord all validity.
L&R
LESSON
CHORDDICT. MosetaDn
LESSON 1
L&R
LESSON
CHORDDICT. MosetaDn
LESSON 2
L&R
LESSON
CHORDDICT. MosetaDn
LESSON 1
L&R
LESSON
CHORDDICT. MosetaDn
LESSON 1
L&R
LESSON
CHORDDICT. MosetaDn
LESSON 1
1
2
3
Lesson 2-Practice a note accuracy
Press [LESSON] button again to enter the lesson 2 mode.
In LESSON 2 mode, the piano only grade your practice
by the note, accuracy of time value will not be considered
as the song will only continue to the next when the correct
note is played.
Only when you play the correct note, the song will continue
to the next note.
Press [START/STOP ] button to start to practise.
START/STOP
SYNCSTOP
SYNCSTART
A FADEBCHORDMODE
INTRO/ENDING
34
Song
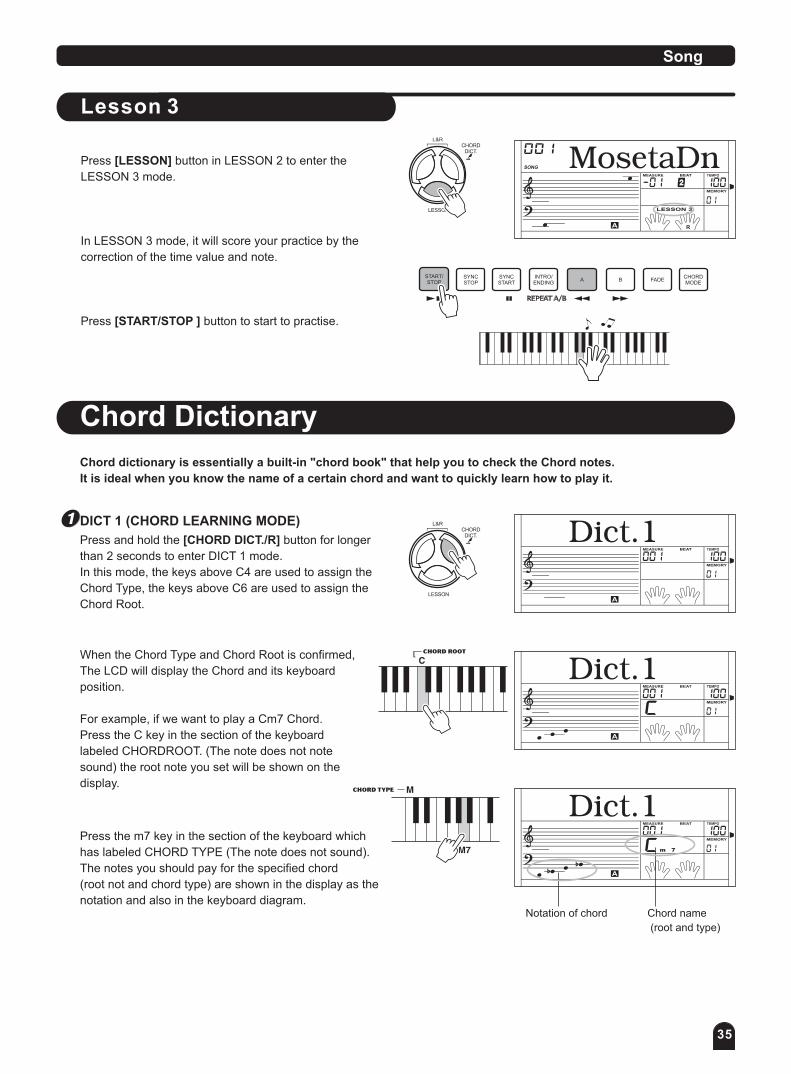
Lesson 3
35
Press [LESSON] button in LESSON 2 to enter the
LESSON 3 mode.
In LESSON 3 mode, it will score your practice by the
correction of the time value and note.
Press [START/STOP ] button to start to practise.
L&R
LESSON
CHORDDICT. MosetaDn
LESSON 3
START/STOP
SYNCSTOP
SYNCSTART
A FADEBCHORDMODE
INTRO/ENDING
1
Chord Dictionary
Chord dictionary is essentially a built-in "chord book" that help you to check the Chord notes.
It is ideal when you know the name of a certain chord and want to quickly learn how to play it.
DICT 1 (CHORD LEARNING MODE)
Press and hold the [CHORD DICT./R] button for longer
than 2 seconds to enter DICT 1 mode.
In this mode, the keys above C4 are used to assign the
Chord Type, the keys above C6 are used to assign the
Chord Root.
When the Chord Type and Chord Root is confirmed,
The LCD will display the Chord and its keyboard
position.
For example, if we want to play a Cm7 Chord.
Press the C key in the section of the keyboard
labeled CHORDROOT. (The note does not note
sound) the root note you set will be shown on the
display.
Press the m7 key in the section of the keyboard which
has labeled CHORD TYPE (The note does not sound).
The notes you should pay for the specified chord
(root not and chord type) are shown in the display as the
notation and also in the keyboard diagram.
L&R
LESSON
CHORDDICT. Dict.1
LESSON 1
Dict.1LESSON 1
Dict.1LESSON 1
Notation of chord Chord name
(root and type)

36
DICT 2 (CHORD TEST MODE)
Press [R] button again to enter DICT 2 mode. The chord
area on the LCD will display a random chord , while the
keyboard position doesn't display anything on LCD.
When you play the correct chord within 3 seconds,
the next chord (random) will be displayed on LCD to
wait for the correct chord playing, if not, LCD displays the
corresponding keyboard position automatically.
Press [R] button for the third time to turn off chord dictionary.
Chord Dictionary
L&R
LESSON
CHORDDICT. Dict.2
LESSON 1
2
C4 M
C5
7(b9)
M(9)
C 5
7(9)
D4 6
D5
7(#9)
E 4b mM7
E 5
7(b13)
E4 M7
E5
7(13)
F4 m
F5
7( 11)
m(9)
F 5
dim7
G4 m6
G5
dim
m7(9)
A 5
7aug
A4 m7
A5
aug
B 4 m7b5
B 5
7sus4
B4 7
B5
sus4
#
Note
24 chords will be displayed in the dictionary mode as follows:
Note
Chord Root
Chord Root:
Chord Type:
Chord Type
Note
Note
Chord Root
Chord Type
C6 C F 6
C 6 G6 G
D6 D A 6
E 6 A6 A
E6 E B 6
F6 F B6 B
## C /D
E /D
# F / G
#A / G
#
B /A#
#
C 4# #
F 4#
A 4b
#

- / NO + / YES
Pedal
Foot Switch
37
The keyboard can assign the pedal in function menu.
(See FUNCTION)
PEDAL SOFT
If pedal assign is set as pedal soft , it will activate the
soft effect when you step the pedal.
" "
1
1
PEDAL START/STOP
If pedal assign is set as pedal ST/S , the pedal will have
the same function as [START/STOP] button.
" "
4
PEDAL MEMORY SELECT
If pedal assign is set as pedal mem , it will load the next
memory parameter when you step the pedal.
" "
3
3
PEDAL SOSTENUTO
If pedal assign is set as sostenuto he notes played before
you step on have a sustain effect. Release the pedal,
sostenuto effect is turned off .
" ", t
2
2
FUNCTION
NEXTBACK
SD Function
SPLIT
TOUCH
Play
Load
No CardWait...!
SaveDeleteFormat
LESSON 1
card
- / NO + / YES
SD
SPLIT
TOUCH
SD
There is a standard SD external interface which supports
SD cards with capacity of 16M ~ 2G. It is compatible with
the FAT 16/32 file system format.
Press the [MENU] button to enter the SD CARD sub menu
which includes: PLAY, LOAD, SAVE¡DELETE and FORMAT.
If there is no card, it will display "No Card",then you can
press [MENU] to exit. Otherwise, "Wait... !" will disappear
temporarily for 3 seconds then it will show "Play"on the
LCD.
You can also press any DIRECT SELECT BUTTON/[VOICE] / [STYLE] / [SONG] / [DEMO] / [DUAL] / [SPLIT] / [PIANO] to exit SD CARD menu.
In midi play mode,you can press mixer button then press [+/YES] [-/NO] button to adjust the volume to play.
,
In SD card mode, you could press [MENU]button repeatedly to exit sd menu step by step,you also could press and hold [MENU] button for 2 seconds to exit directly.

Play
Play
FOLDER01
..
No File
SNG_1111
1
SD Function
- / NO + / YES
SNG_11112
3
3
START/STOP
START/STOP
SYNCSTOP
SYNCSTOP
SYNCSTART
SYNCSTART
A
A
FADE
FADE
B
B
CHORDMODE
CHORDMODE
INTRO/ENDING
INTRO/ENDING
38
In the SD mode, it won't respond to the other function.
Use the [+/YES], [-/NO] button and DIAL to choose the
SD menu you want.
Press the [EXECUTE] button to take a step forward.
Press the [MENU] button to take a step back.
Please refer to page 42 for naming function.
SPLIT
SPLIT
SPLIT
SPLIT
SPLIT
TOUCH
TOUCH
TOUCH
TOUCH
TOUCH
FOLDER01
SD
SD
SD
SD
SD
SPLIT
TOUCH
SD
Select the menu Play and press the [EXECUTE]
LCD will display the MIDI files and directories in the root of
the SD card.
If the MIDI file in SD could be identified and selected, LCD
will display file name and the "F" sign.
" " button,
If there is no midi file identified inside the current directory,
LCD will display the sub-directory name and the "d" sign.
Press the [EXECUTE] button to enter the current sub-direc-
tory, then new MIDI files or subdirectories of the directory
will be displayed.
If there is neither MIDI file nor subdirectory in the current
directory, LCD will display " . . "and the "d" sign, you can
press the [EXECUTE] button to exit the directory.
If there is neither MIDI file nor subdirectory in the root ,
LCD will display "No file".
Use the [+/YES], [-/NO] button and DIAL to select the
MIDI file.
Then press the [START/STOP] button to play it repeatedly.
Press the [EXECUTE] button to play all files in the current
directory circularly.
When the file is playing, you can select new file in the
current directory or other subdirectory.
When the file is playing, you can adjust the tempo with the
[TEMPO +], [TEMPO -] button, press them synchronously,
the current tempo will reset the default one of the file.
When the file is playing, press the [START/STOP] button to
stop playing. Also you can press the [MENU] button to return
PLAY menu, or press the [MENU] button 2 seconds to
exit the SD mode, then stop to play the file.
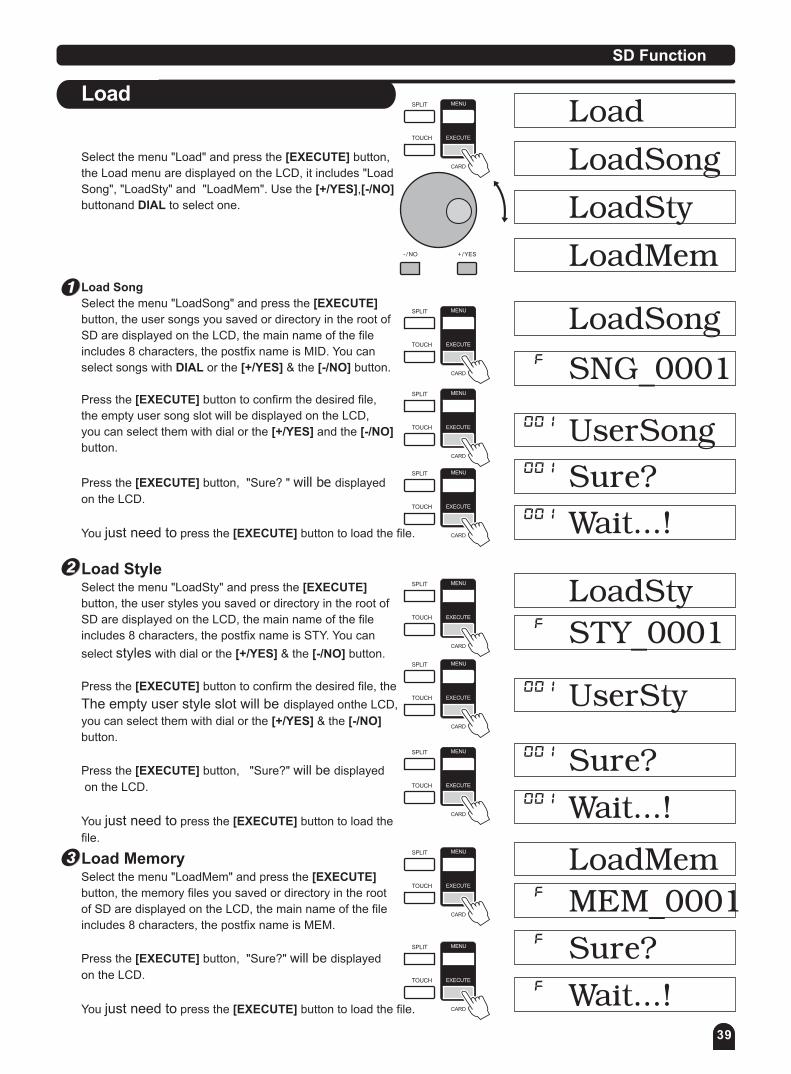
Load
SD Function
Load
LoadSong
LoadSong
SNG_0001
UserSong
UserSty
Wait...!
LoadSty
LoadSty
LoadMem
LoadMem
Sure?
Wait...!
Wait...!
Sure?
Sure?
- / NO + / YES
STY_0001
MEM_0001
1
2
3
39
Select the menu Load and press the [EXECUTE] button,
the Load menu are displayed on the LCD, it includes "Load
Song", "LoadSty" and "LoadMem". Use the [+/YES],[-/NO]
buttonand DIAL to select one.
" "
SPLIT
TOUCH
SD
SPLIT
TOUCH
SD
SPLIT
TOUCH
SD
SPLIT
TOUCH
SD
SPLIT
TOUCH
SD
SPLIT
TOUCH
SD
SPLIT
TOUCH
SD
SPLIT
TOUCH
SD
SPLIT
TOUCH
SD
Load MemorySelect the menu "LoadMem" and press the [EXECUTE]
button, the memory files you saved or directory in the root
of SD are displayed on the LCD, the main name of the file
includes 8 characters, the postfix name is MEM.
Press the [EXECUTE] button, "Sure?" will be displayed
on the LCD.
You just need to press the [EXECUTE] button to load the file.
Load Song
Select the menu "LoadSong" and press the [EXECUTE]
button, the user songs you saved or directory in the root of
SD are displayed on the LCD, the main name of the file
includes 8 characters, the postfix name is MID. You can
select songs with DIAL or the [+/YES] & the [-/NO] button.
Press the [EXECUTE] button to confirm the desired file,
the empty user song slot will be displayed on the LCD,
you can select them with dial or the [+/YES] and the [-/NO]
button.
Press the [EXECUTE] button, "Sure? " will be displayed
on the LCD.
You just need to press the [EXECUTE] button to load the file.
Load StyleSelect the menu "LoadSty" and press the [EXECUTE]
button, the user styles you saved or directory in the root of
SD are displayed on the LCD, the main name of the file
includes 8 characters, the postfix name is STY. You can
select styles with dial or the [+/YES] & the [-/NO] button.
Press the [EXECUTE] button to confirm the desired file, the
The empty user style slot will be displayed onthe LCD,
you can select them with dial or the [+/YES] & the [-/NO]
button.
Press the [EXECUTE] button, "Sure?" will be displayed
on the LCD.
You just need to press the [EXECUTE] button to load the
file.

SD Function
Save
Save
SaveSong
SaveSong
SaveSty
SaveSty
SaveMem- / NO + / YES
FOLDER01
FOLDER01
SNG_1111
STY_1111
UserSong
UserSty
1
2
Wait...!
Sure?
Wait...!
Sure?
40
Select the menu Save and press the [EXECUTE]
the Save menu are displayed on the LCD, it includes
"SaveSong", "SaveSty" and "SaveMem".
You can select either with DIAL or the [+/YES] and the
[-/NO] button
The operation of SAVE is same as PLAY.
[+/YES]¡[-/NO]
When "SaveHere" displayed on the LCD, press [EXECUTE]
to save the file to the current directory.
Save SongSelect the menu "SaveSong" and press the [EXECUTE ]
button, the user song recorded is displayed on the LCD.
Select a user song to be saved with DIAL or the [+/YES],
[-/NO] button.
Press the [EXECUTE] button to go to next step, you can
select the storage directory with DIAL or the [+/YES] , [-/NO]
button.
Press the [EXECUTE ] button to enter next step, LCD will
display the naming state, you can play the keyboard to
input the file name.
Press the [EXECUTE] button to enter the enquiry page,
"Sure?" will be displayed on the LCD.
You just need to press the [EXECUTE] button to save the
file.
" " button,
If there is no any
subdirectory or recognized files in the storage directory you
select,".."will displayed on LCD,and you are allowed to use
button or DIAL to change to "SaveHere".
Save StyleSelect the menu "SaveSty" and press the [EXECUTE]
button, the user style recorded is displayed on the LCD.
Select a user style be saved with DIAL or the [+/YES],
[-/NO] button.
Press the [EXECUTE] button to go to next step. Select the
storage directory with DIAL or the [+/YES] ,[-/NO] button.
Press the [EXECUTE] button to enter next step, LCD will
display the naming state, you can play the keyboard to
input the filename.
Press the [EXECUTE] button to enter the enquiry page,
"Sure?" will be displayed on the LCD.
You just need to press the [EXECUTE] button to save the
file.
SPLIT
TOUCH
SD
SPLIT
TOUCH
SD
SPLIT
TOUCH
SD
SPLIT
TOUCH
SD
SPLIT
TOUCH
SD
SPLIT
TOUCH
SD
SPLIT
TOUCH
SD
SPLIT
TOUCH
SD
SPLIT
TOUCH
SD

SD Function
Delete
Format
Sty_0001
Wait...!
Wait...!
Sure?
Sure?
3
41
Save MemorySelect the menu "SaveMem" and press the [EXECUTE]
button, you can select the storage directory with DIAL or
the [+/YES] ,[-/NO] button.
Press the [EXECUTE] button to enter next step, LCD will
display the naming state, you can play the keyboard to
input the filename.
Press the [ EXECUTE] button to enter the enquiry page,
"Sure?" will be displayed on the LCD.
You just need to press the [EXECUTE] button to save
all the datas includes 48 memorizers.
Select the menu "Delete" and press the [EXECUTE] button,
all files includes MIDI files, user songs and user styles or
all directories in the root of SD are displayed on the LCD.
You can select the file that need to be deleted with DIAL
or the [+/YES] & the [-/NO] button.
Press the [EXECUTE] button, "Sure?" will be displayed
on the LCD.
You just need to press the [EXECUTE] button to delete the
file.
Select the menu Format and press the [ ] button,
"Sure?" will be displayed on the LCD.
Press the [EXECUTE] button to format it, the card will be
formatted.
" " EXECUTE
The directorids is unable to delete.
SaveMemFOLDER01
MEM_1111
Wait...!Sure?
SPLIT
TOUCH
SD
SPLIT
TOUCH
SD
SPLIT
TOUCH
SD
SPLIT
TOUCH
SD
SPLIT
TOUCH
SD
SPLIT
TOUCH
SD
SPLIT
TOUCH
SD
SPLIT
TOUCH
SD
Delete
Format

SD Function
The file name includes 1-8 characters which can be inputted with the keyboard.
Keyboard & ASCII Character Relative Table is as follows:
[DELETE]: To erase the character whichcursor flashes.
[BACK]: move the current cursor to the left.
[NEXT]: move the current cursor to the right.
[SHIFT]: 26 letters will be displayed with capital letter by pressing the key-board in letter area directly.
Explanation:
While in the SD mode, press the [SHIFT] key hold on, it won't
respond to it.
If the name input has already existed, LCD will display "SameName"
temporarily, then exit the SD mode to return the previous state.
If there's no enough space in the card after name input, LCD will
display "CardFull" temporarily, then exit the SD mode to return the
previous state.
42
SameName
CardFull

MIDI Function
43
What is MIDI
USB Connection
MIDI stands for Musical Instrument Digital Interface
that is the standard interface between a PC and other
electronic instrument(s).
USB connection can be used for midi data transference
with computer or other USB host devices that support
USB audio device with an USB cable.
The keyboard can be connected to the PC or other
USB host device with an USB interface.
Use the keyboard as a tone generator, the data (MIDI)
recorded on the PC or other USB host devices can be
played on the keyboard.
" ",
While a recording is playing back and a style
is playing, you can not use the MIDI IN
function, or the song you are playing will have
error occurs for the same channel.
Activate the computer from a sleep/suspended/
standby mode before connecting the USB cable.
Connect the USB cable to the instrument and
a computer before turning the power of the
instrument on.
L/MONO R ASSIGNSUSTAIN
USBAUX OUT AUX IN PEDAL MIDI IN MIDI OUTPOWER 12V
1
System Requirements
CPU: 300 MHz or higher, Pentium 2
Memory: 64MB or more
Hard Disk: at least 2 MB of free base
OS: WINDOWS 2000/XP
1
2
The Method of Connection
Connect a standard USB cable between the rear-panel
of the USB jack of the instrument and the USB jack
on your computer (USB cable sold separately).
2
3
USB PrecautionsPlease observe the following precautions when conne-
cting the instrument to a computer via a USB cable.
Failure to do so can cause the instrument and/or the
computer to hang up(freeze), possibly causing
corruption or losing the data.
If the instrument or computer does hang up, turn the
power of both devices off and then turn it on again
after a few seconds.
3
4

44
MIDI Connection
Connection ruleIn midi connection, the equipment which control another
one is called "Host equipment", while another is called
"Affiliated equipment".
The host equipment's MIDI OUT connects with affiliated
equipment's MIDI IN
Note that MIDI OUT cannot be connected with MIDI IN on
the same equipment.
The method of connectionConnect the MIDI interface with PC.
Connect the MIDI interface with the other MIDI interface.
MIDI Function
MIDI Application
The keyboard can control other equipments or electronic instruments.
Some equipments can be used to control the keyboard.
PC recorded data (MIDI) can be played on the keyboard.
1
2

Specifications
45
Trouble Shooting
LCD display
Keys
Voice
Polyphony
Style
Song
Demo
Control button
Accompaniment Control
Record Function
Panel Memory
Connectors
Speaker
Dimension
Weight
Accessories
No matter the instrument is turned on or off, a popping sound will be temporarily produced.
There is no sound even when the keyboard is played or when a song or style is being played.
This is normal and indicates that the instrumentis receiving electrical power.
Check if any cable or headphone is connected to the PHONES jack on the rear panel. When a set of headphonesis plugged into this jack, no sound is output.
Problem Possible Cause and Solution
4¦ 15w x 2 ; 4¦ 25w x 2
1360(L)x370(W)x143(H)mm
19.5kg
Adaptor, Music Rest, Manual
Multi-functional LCD
88 hammer action key
559 Voices
64-note polyphony(max)
203 Styles, including 3 user styles.
100 Songs
2 Demos
Power on/off, Volume, Brilliance, Accomp +/-,Tempo +/-, Lesson, L&R, Chord Dictionary, Mixer, Function Back/Next, Voice, Style, Song, O.T.S. , M1-M6, Store, Bank, Start/Stop , Sync Start , Sync Stop, Intro/End/Repeat A/B, A , B , FADE, Chord mode,Record, Style Record, Play/Stop, Accomp, Melody 1, Melody 2, Melody 3Melody 4, Melody 5, Dual, Split, Touch, DSP, Demo, SD Menu, Execute,+/YES,-/NO, Dial, Piano, Metronome,Tranpose +/-
Record, Style Record, Play/Stop, Accomp, Melody 1, Melody 2, Melody 3Melody 4, Melody 5
48 Memory Storage
DC Power, Headphones, Aux.Out (L/MONO R), Aux. IN, Sustain pedal, Soft pedal, USB, MIDI IN/OUT
All specifications and appearances are subject to change without notice.
Start/Stop , Sync Start , Sync Stop, Intro/End/Repeat A/B, A , B , FADE,

Appendix 1-Voice List
Velocity Crossfade E.P. 2
Layered E.P. 1
Layered E.P. 2
Nylon E.P.
Warm E.P.
Cloudy E.P.
Grand Harpsichord
Harpsichord 1
Harpsichord 2
Harpsichord 1 / W
Harpsichord 2 / W
Harpsichord Octave 1
Harpsichord Octave 2
Harpsichord Release
Harpsikd / O
Piano & Harpschord
Stereo Clavichord
Clavichord 1
Clavichord 2
Clavichord 1 / W
Clavichord 2 / W
Clavichord Wah
Punchy Clavichord
Mallet Celesta 1
Celesta 2
Birght Celeasta
Celesta & Sine
Reecho Bell
Celesta & Music Box
Glockenspiel 1
Glockenspiel 2
Glockenspiel & Sine Glockenspiel & Celesta
Music Box 1 Music Box 2 Music Box 3 Toy Box
Music Box & Harp
Stereo Vibrapho
Rigid Vibraphone
Vibraphone 1
Vibraphone 2
042
043
044
045
046
047
048
049
050
051
052
053
054
055
056
057
058
059
060
061
062
063
064
065
066
067
068
069
070
071
072
073
074
075
076
077
078
079
080
081
082
083
46
Stereo Grand Piano 1
Stereo Grand Piano 2
Stereo Grand Piano / W
Grand Piano / W
Stereo Piano Dark
Octave Piano 1
Octave Piano 2
Synth Piano
Dreamscape
ano & Strings
Piano & Choir
Acoustic Grand Piano
Stereo Bright Piano
Bright Piano 1
Bright Piano 2
Bright Piano 1 / W
Bright Piano 2 / W
Detuned Piano
Chorus Piano
Velocity Crossfade Piano
Piano Pad
Piano & Vibraphone
Electric Grand Piano
Stereo Honk-Tonk
Honky -Tonk
Honky -Tonk Dark
Honky-Tonk 1 / W
Honky -Tonk 2 / W
Stereo Hard E.P.
Detuned E.P. 1
Detuned E.P. 2 E Piano 1 E Piano 2 E.Piano 1 / W E.Piano 2 / W E.Piano 3 / W
E.Piano 4 / W
Hard E.P.
Soft E.P.
Deep E.P.
Velocity Crossfade E.P. 1
Pi
001
002
003
004
005
006
007
008
009
010
011
012
013
014
015
016
017
018
019
020
021
022
023
024
025
026
027
028
029
030
031
032
033
034
035
036
037
038
039
040
041
Piano
NameNo
Vibraphone 1 / W
Vibraphone 2 / W
Vibraphone & Bell
ibraphone & Harpsichord
Marimba 1
Marimba 2
Marimba
/ W
SinMarimba
Stereo Marimba
Marimba & Vibraphone
Wood Drum
Xylophone 1
Xylophone 2
Tubular Bells 1
Tubular Bells 2
Tubular Bells 3
Dulcimer
Santur
Shorty
Organ
Drawbar Organ Stereo
Soft Stereo Drawbar Organ
Mellow Drawbar Organ
Drawbar Organ
Drawbar Organ Detuned
Bright Drawbar Organ
1960 Drawbar Organ 1970 Percussive Organ Percussive Organ 1 Percussive Organ 2
Light Click Organ
Percussive Organ Detuned
Stereo Rotary Organ
Rock Organ
Rotary Organ
Slow Rotary Organ
Detuned Church Organ
Church Organ 1
Church Organ 2
Octave Church Organ Stereo Reed Organ
Reed Organ
Accordion 1
V
084
085
086
087
088
089
090
091
092
093
094
095
096
097
098
099
100
101
102
103
104
105
106
107
108
109
110
111
112
113
114
115
116
117
118
119
120
121
122
123
124
125
NameNo
Appendix 1- Voice List
47
Accordion 2
Accordion 3
Chorus Accordion
Mustte
Accord It Solo
Harmonica 1
Harmonica 2
Detuned Harmonica
Sweet Harmonica
Tango Accordion
Guitar
Nylon G.T. 1
Nylon G.T. 2
Nylon G.T. / R
Velocity Nylon G.T.
Detuned Nylon G.T.
Chorus Nylon G.T.
Bright Nylon G.T.
Steel G.T. 1
Steel G.T. 2
Detuned Steel G.T.
Velocity Steel G.T.
Velocity Steel G.T.(Fx)
Pedal Steel G.T.
Velocity Pedal Steel G.T.
12 String G.T.
Chorus Steel G.T. Nylon & Steel G.T. Jazz G.T. 1 Jazz G.T. 2
Mellow G.T.
Velocity Jazz G.T.
Jazz G.T. Detuned
Clean G.T. 1
Clean G.T. 2
Clean G.T. 3
Stereo Clean G.T.
Velocity Clean G.T.
Chorus Clean G.T.
Muted G.T. 1 Muted G.T. 2
Funk G.T.
Jazz Boy
126
127
128
129
130
131
132
133
134
135
136
137
138
139
140
141
142
143
144
145
146
147
148
149
150
151 152 153 154
155
156
157
158
159
160
161
162
163
164 165
166
167
NameNo
Stereo Muted G.T.
OverDriven G.T. 1
OverDriven G.T. 2
Detuned Overdriven G.T.
Distortion G.T. 1
Distorted G.T. 2
Feedback G.T. 1
Feedback G.T. 2
Distorted Rhythm G.T.
5th Distortion
Distortion G.T. Octave
Stereo Distorted G.T.
G.T. Harmonics 1
G.T. Harmonics 2
Bass
Acoustic Bass 1
Acoustic Bass 2
Acoustic Bass Detuned
Acoustic Bass Filter
Jazz Style
A.Bass & Mute G.T.
Resonant Bass
Velocity Crossfade Bass
Wah Bass 1
Wah Bass 2
Finger Bass 1
Finger Bass 2
Detuned Finger Bass
Dark Finger Bass Jazz Bass Resonant Finger Bass Velocity Bass
Velocity Finger Bass (FX)
Bass & Distorted Elec Guitar
Pick Bass 1
Pick Bass 2
Mute Pick Bass
Detuned Pick bass
Fretless Bass 1
Fretless Bass 2
1990 Bass
Fretless Bass & Sine
Fretless Bass Detuned 1
168
169
170
171
172
173
174
175
176
177
178
179
180
181
182
183
184
185
186
187
188
189
190
191
192
193
194
195
196
197
198
199
200
201
202
203
204
205
206
207
208
209
NameNo
Fretless Bass Detuned 2
Fretless Bass Detuned 3
Slap Bass 1
Slap Bass 2
Slap Bass 3
Slap Bass 4
Power Slap Bass
Lash Thumb Bass
Resonant Slap Bass
Velocity Switch Slap Bass
Synth Bass 1
Synth Bass 2
Synth Bass 3
Synth Bass 4
Synth Bass 5
Super Synth Bass
Tech Synth Bass
Synth Bass / O
Fast Syntonic Bass
Strings
The ViOlin
Violin 1
Violin 2
Violin 3
Mono Violin
Octave Violin
Electric Violin
Slow Violin
Two Violin Soft Violin Largo Violin Viola 1
Viola 2
Viola 3
Dark Viola
Cello 1
Cello 2
Cello 3
Cello 4
Celloen 16'
Chamber Music
ntrabass 1
Contrabass 2
210
211
212
213
214
215
216
217
218
219
220
221
222
223
224
225
226
227
228
229
230
231
232
233
234
235
236
237
238
239
240
241
242
243
244
245
246
247
248
249
250 Co
251
NameNo
Appendix 1- Voice list
48
Tremolo Strings 1
Tremolo Strings 2
Slow Tremolo Strings 1
Slow Tremolo Strings 2
Pizzicato Strings 1
Pizzicato Strings 2
Octave Pizzicato
Orchestral Harp 1
Orchestral Harp 2
locity City
Africa
Timpani 1
Timpani 2
Strings Ensembl
The Strings
Synth Strings 1
Synth Strings 2
Synth Strings 3
Synth Strings 4
Synth Strings 5
Strings Ensemble 1
Strings Ensemble 2
Resonant Strings
Stereo Slow Strings
Slow Strings
Sforzato Strings
Orchestra
Legato Strings
Arco Strings
1960 Strings
1970 Strings
Solo Strings
Choir Aahs 1
Choir Aahs 2
Choir Aahs 3
Mellow Choir
Stereo Choir Aahs 1
Stereo Choir Aahs 2
Strings Choir
Voice Oohs 1
Voice Oohs 2
Synth Voice 1
Synth Voice 2
252
253
254
255
256
257
258
259
260
261 Ve
262
263
264
265
266
267
268
269
270
271
272
273
274
275
276
277
278
279
280
281
282
283
284
285
286
287
288
289
290
291
292
293
NameNo
Echo Synth Voice
Orchestra Hit 1
Orchestra Hit 2
Orchestra Hit Octave
Orchestra Hit Stereo
6th Orchestra Hit
Brass
Trumpet 1
Trumpet 2
rumpet 3
Dark Trumpet
Resonant Trumpet
Sweet Trumpet
Wah Trumpet
Trombone 1
Trombone 2
Trombone 3
Dark Trombone
Strings & Trombone
Tuba 1
Tuba 2
Tuba Solo
Soft Tuba
Muted Trumpet 1
Muted Trumpet 2
French Horn 1
French Horn 2
Soft Horn
Stereo French Horn
5th Horn Orchestr
Brass Section 1
Brass Section 2
Brass Section 3
Brass Section 4
Brass Section Octave
Brass Swell
Brassband
Bright Brass Section
Dark Brass
Mute Brass Ensemble
Sforzato Brass
Stereo Brass & Strings
Synth Brass 1
294
295
296
297
298
299
300
301
302 T
303
304
305
306
307
308
309
310
311
312
313
314
315
316
317
318
319
320
321
322
323
324
325
326
327
328
329
330
331
332
333
334
335
NameNo
Synth Brass 2
Synth Brass 3
Synth Brass 4
Synth Brass 5
Leap Brass
Octave Synth Brass
Synth Brass & Strings 1
Synth Brass & Strings 2
Echo Brass
Sooth Brass
Reed
Soprano Sax 1
Soprano Sax 2
Soprano Sax Soft
Solw Soprano Sax
Sweet Soprano Sax
Alto Sax
Alto Sax & Breath
Super Alto Sax
Sax Band
Folk Sax
Tenor Sax
Baritone Sax
Baritone Sax & Breath
Oboe 1
Oboe 2
Sweet Oboe
English Horn 1
English Horn 2
Analog Horns
Woodwinds
Bassoon 1
Bassoon 2
Clarinet 1
Clarinet 2
Pipe
Piccolo
Flute
Jazz Flute
Recorder
Sweet Pan Flute
Pan Flute
Dark Pan Flute
336
337
338
339
340
341
342
343
344
345
346
347
348
349
350
351
352
353
354
355
356
357
358
359
360
361
362
363
364
365
366
367
368
369
370
371
372
373
374
375
376
NameNo

Appendix 1- Voice List
49
PWM Pad
Sine Pad
Warmly Pad
Horn Pad
Pad 3 (Polysynth)
Click Pad
Analog Pad
Poly Pad
Poly Synth Pad
Pad 4 (choir)
Choir Pad 2
Pad 5 (bowed)
Bowed Pad 2
Pad 6 (metallic)
Metallic Pad 2
Pan Pad
Pad 7 (halo)
Halo Pad 2
Pad 8 (sweep)
Sweep Pad 2
Dipolar Pad
Rising
Congregate
Effects
FX1 (rain)
FX2 (soundtrack)
Progenitor
Prelude
FX3 (crystal)
FX4 (atmsphere)
Warm Air
FX5 (brightness)
Smog
FX6 (goblins)
Choir Bell
FX7 (echoes)
Reecho Pan
Large Pan
Echordrzz Slow
Fantasyland
FX8 (sci-fi)
Ethnic
418
419
420
421
422
423
424
425
426
427
428
429
430
431
432
433
434
435
436
437
438
439
440
441
442
443
444
445
446
447
448
449
450
451
452
453
454
455
456
457
NameNo
Sitar
Detuned Sitar
Banjo
Shamisen
Koto
Kalimba
Bagpipe
Fiddle
Shanai
Percussive
Tinkle Bell
Agogo
Steel Drums
Wood Block
Taiko Drum
Melodic Tom
Synth Drum
Reverse Cymba l
Sound Effects
Guitar Fret Noise
Breath Noise 1
Stream
Helicopter 2
Seashore 1
Telephone Ring 2
OpenDoor
Starship
CloseDoor
Siren
Gunshot 2
Rise2
Bird Tweet
Ambulance
Rise1
Fall
Seashore 2
Bird 1
Clop
Wind
Cattle
Horse
Telephone Ring 1
Bird
458
459
460
461
462
463
464
465
466
467
468
469
470
471
472
473
474
475
476
477
478
479
480
481
482
483
484
485
486
487
488
489
490
491
492
493
494
495
496
497
498
NameNo
Blown Bottle
Shakuhachi
Whistle 1
Whistle 2
Ocarina
Lead
Lead 1 (square)
Square
Lead Sine
Slow Square Lead
Sine Solo
Square Lead 1
Square Lead 2
Thick Square
Corrie
Quint
2 Oscillators Lead
Sawtooth Lead 1
Sawtooth Lead 2
Wavy Sawtooth
Lead 2 (sawtooth)
Solw Saw
Super Analog
Synther
Heavy Sawtooth
Bauble Lead
PWM 4th
Lead 3 (calliope)
Lead 4 (chiff)
Lead 5 (charang)
Lead 6 (voice)
Voice Lead
Lead 7 (fifths)
Fifths Lead Soft
Fifth Lead
Lead 8 (Bass & Lead)
Massiness
Bass Lead
Pad
Pad 1 (newage)
Slow Square
New Year Pad
377
378
379
380
381
382
383
384
385
386
387
388
389
390
391
392
393
394
395
396
397
398
399
400
401
402
403
404
405
406
407
408
409
410
411
412
413
414
415
416
Pad2 (warm) 417
NameNo

Appendix 1- Voice List
50
Breath Noise 2
Heartbeat
Laugh
Applause 2
Helicopter 1
Fire
Punch
ScratchCut
Fight 1
Shot
Fight 2
Applause 1
Sheep
Firework
Lion
Frog
Bird 2
Dog
Spring
Gunshot 1
Gunshot 3
Laser Gun
Drip
Siren 2
Combined Voice
Stereo Piano & Strings Pad
Stereo Piano & Choir
Piano & Warm Pad
FM Electric Piano
Old Electric Piano
Digital Piano
E.Piano & Strings
Harpsichord & Stereo Strings
Digital Music Box
Serenity
Vibraphone & Stereo Strings
FM Tubular Bells
Organ & Stereo Strings
Stereo Organ & Piano
Accordian 2
Power Distorted Guitar
Dynamic Bass
X Fade Bass
499
500
501
502
503
504
505
506
507
508
509
510
511
512
513
514
515
516
517
518
519
520
521
522
523
524
525
526
527
528
529
530
531
532
533
534
535
536
537
538
539
540
NameNo
Stereo Strings & Piano
Orchestra
Full Strings 1
Full Strings 2
Symphonic
Stereo Choir & Strings
Trombone & Stereo Strings
Club Brass
Woodwinds & Strings
Pan Flute & Strings Pad
541
542
543
544
545
546
547
548
549
550
NameNo
Drum Set
Standard Kit551
Room Kit
552
Power Kit
Electronic Kit
Analog Kit
Jazz Kit
Brush Kit
Orchestra Kit
SFX Kit
553
554
555
556
557
558
559

Appendix 2- Style List
51
8BEAT
001 8 Beat Rock
002 Guitar Pop 1
003 8 Beat 1
004 Sweet Beat
005 8 Beat Dance
006 8 Beat Disco
007 Pop Funk
008 8 Beat 2
009 60 s 8 Beat'
010 Rhythm & Beat
011 Miami Beat
16BEAT
012 16 Beat 1
013 Pop 16 Beat 1
014 Pop 16 Beat 2
015 Modern 16 Beat
016 16 Beat Hot
017 16 Beat Modern
018 16 Beat Funk
019 16 Beat 2
020 Cool Beat
021 16 Beat Ballad
022 16 Beat 3
023 Pop Shfl
024 Guitar Funk
025 16 Beat Funk 1
POP
026 6/8 Pop
027 Brit. Pop 1
028 Brit. Pop 2
029 Pop Hit
030 Fusion Shuffle
031 Analog Night
032 Guitar Pop 2
033 Pop beat
034 Soft Beat
035 60 s Pop'
036 Sting Latin
BALLAD
037 Soft Ballad
NameNumber
038 Natural Ballad
039 Love Ballad
040 Easy Ballad
041 Slow Ballad
042 Folk Ballad
043 Pop Ballad 1
044 Pop Ballad 2
045 EP Ballad
046 New R&B Ballad
ROCK
047 Slow Rock
048 70 s Rock & Roll'
049 Folk Rock
050 Soft Rock
051 Pop Rock
052 Old Rock
053 Easy Rock
054 New Shuffle
055 Rock Hip Hop
056 Rock & Roll
057 Rock1
058 Rock Shuffle
059 R'N'R 1
060 Rock Shuffle
BALLROOM 061 Twist1
062 Twist2
063 Big Band Fox 1
064 Tango
065 Slow Fox 1
066 Slow Waltz 1
067 Swing Fox
068 Salsa 2
069 Cha Cha 1
070 Cha Cha 2
071 Beguine1
072 Beguine2
073 Rhumba 1
074 Samba1
075 Samba2
076 Jive 077 Foxtrot
NameNumber
078 Quick Step
DANCE
079 Down Beat
080 Techno
081 Progressive
082 Rap 1
083 Rap 2
084 Disco
085 Soft Disco
086 Disco Party
087 70 s Disco'
088 70 s Disco Funk'
089 Clubdance
090 Euro Dance
091 80 s Dance'
092 Hip Hop
093 Garage
SOUL & FUNK
094 Jay R&B
095 Gospel Swing
096 Gospel
097 Funk
098 Electric Funk
099 Groove Funk
100 Rubber Funk
101 Cool Funky
102 Jazz Funk
103 Groove
104 Soul
105 Hip Hop Soul
106 Hip Hop Beat
107 R & B
108 Soul Beat
109 R & B Ballad
110 British Soul Pop
111 Samba Funk
SWING&JAZZ
112 Swing1
113 Swing2
114 Jazz Brush
115 Latin Jazz
116 Fusion
NameNumber

Appendix 2- Style List
117 Acid Jazz
118 Cool Jazz Ballad
119 Swing Shuffle
120 Big Band 40 s'
121 Big Band Medium
122 Dixieland
123 Acoustic Jazz
124 Guitar Swing
125 Ragtime
126 Modern Jazz Ballad
127 Swing Ballad
128 Big Band Bal lad
129 Orchestra Swing
COUNTRY
130 Bluegrass
131 Country 8 Beat
132 Modern Country
133 Country Pop1
134 Country Pop2
135 2/4 Country
136 Country
137 Country Quick Steps
138 Country Rock
139 Country Fo kl
140 Country Shuffle
Latin/Latin Dance
141 Bossa Nova 1
142 Latin
143 Bossa Nova 2
144 New Reggae
145 Dance Reggae
146 Pasodoble
147 Lite Bossa
148 Latin Rock
149 Beguine
150 Slow Bolero
151 Disco Samba
152 Mambo
153 Meneito
154 Rumba1
155 Rumba2
156 Tikitikita
NameNumber
52
157 Lambada
158 Pop Cha Cha1
159 Pop Cha Cha2
160 Salsa
161 Bossa1
World
162 Enka Ballad
163 Laendler
164 Hawaiian
165 Sirtake
166 Venezia
167 6/8 Flipper
168 New Age
169 Tarantella
170 Scottish
171 Norteno
Waltz
172 Waltz
173 Old Waltz
174 English Waltz
175 French Waltz
176 German Waltz
177 Italian Mazurka
178 Mariachi Waltz
179 ViennaWaltz 1
180 Slow Waltz 2
181 ViennaWaltz 2
182 Slow Waltz 1
183 Jazz Waltz
TRADITIONAL
184 Polka
185 6/8 March
186 German Polka
187 Party Polka
188 March
NameNumber
195 Dan dut1 g
196 Dan dut2g
197
198
199
200
189 Polka2
190 US March
191 Musette
192 French Musette
193 Mazurke
194 1-Mar
ORIENTAL
NameNumber
Dan dut3g
Dan dut4g
Dan dut5g
Dan dut6g
USER STYLE
201 Style 1
202 Style 2
203 Style 3
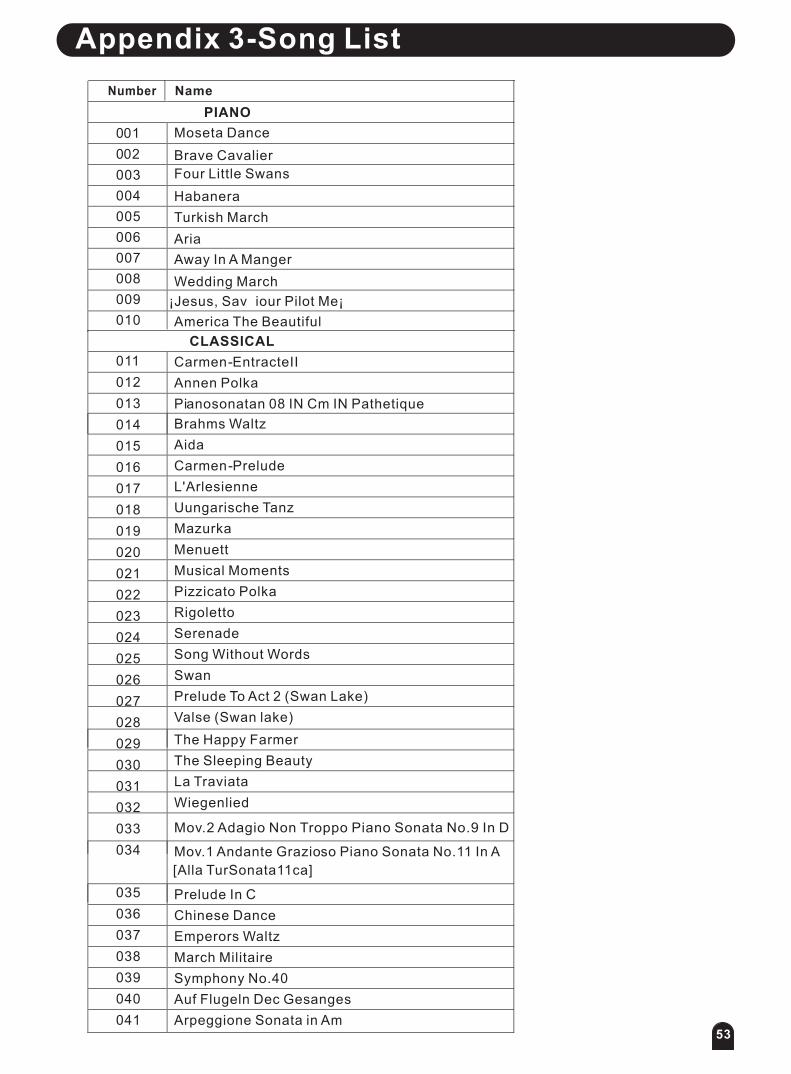
PIANO 001
Habanera
002
Four Little Swans
003
004
005
006
007
008
009
010
011
012
013
014
015
016
017
018
019
020
021
022
023
024
025
026
027
028
029
030
031
032
033
034
035
036
037
038
039
040
041
Turkish March
Moseta Dance
Aria
Away In A Manger
Wedding March
¡Jesus, Sav iour Pilot Me¡
Brave Cavalier
America The Beautiful
Appendix 3-Song List
CLASSICAL
Carmen-Entracte II
Annen Polka
Pianosonatan 08 IN Cm IN Pathetique
Brahms Waltz
Aida
Carmen-Prelude
L'Arlesienne
Uungarische Tanz
Mazurka
Menuett
Musical Moments
Pizzicato Polka
Rigoletto
Serenade
Song Without Words
Swan
Prelude To Act 2 (Swan Lake)
Valse (Swan lake)
The Happy Farmer
The Sleeping Beauty
La Traviata
Wiegenlied
Mov.2 Adagio Non Troppo Piano Sonata No.9 In D
Mov.1 Andante Grazioso Piano Sonata No.11 In A
[Alla TurSonata11ca]
Prelude In C
Chinese Dance
Emperors Waltz
March Militaire
Symphony No.40
Auf Flugeln Dec Gesanges
Arpeggione Sonata in Am
NameNumber
53

FOLK & COUNTRY
042 Santa Lucia
043 Country
044 Jambalaya
045 Susanna
046 Bridge
047 Battle Hymne Of The Republic
048 The Old Gray Mare
049 American Patrol
Appendix 3- Song List
050 In The Rain
051
GOLDEN & POP
052 On London Bridge
053 Are You Lonesome Tonight
054 Only You
055 End Of The World
056 House Of Rising Sun
057 Solveig¡s Song
058 The Blue-Bells Of Scotland
059 Over The Rainbow
060 Beautiful Dreamer
061 It¡S Been A Long £Long Time
062 Edelweiss
063 O Sole Mio
064 Der Deitcher¡S Dog
065 Joy To The World
066 Silent Night
067 Ave Maria
068 Five Hundred Miles
069 Happy New Year
070 It¡S Beginning To Look A Lot
Like Christmas
54
071 Jeanie With The Light Brown Hair
072 My Bonnie
073 Song Of The Pearlfisher
074 Summer Palace
075 The Stage Coach
076 Entertainer
077 Annie Laurie
078 Killing Me Softly With His Song
079 Love Is Blue
080 Last Rose Of Summer
081 The Old King Cole
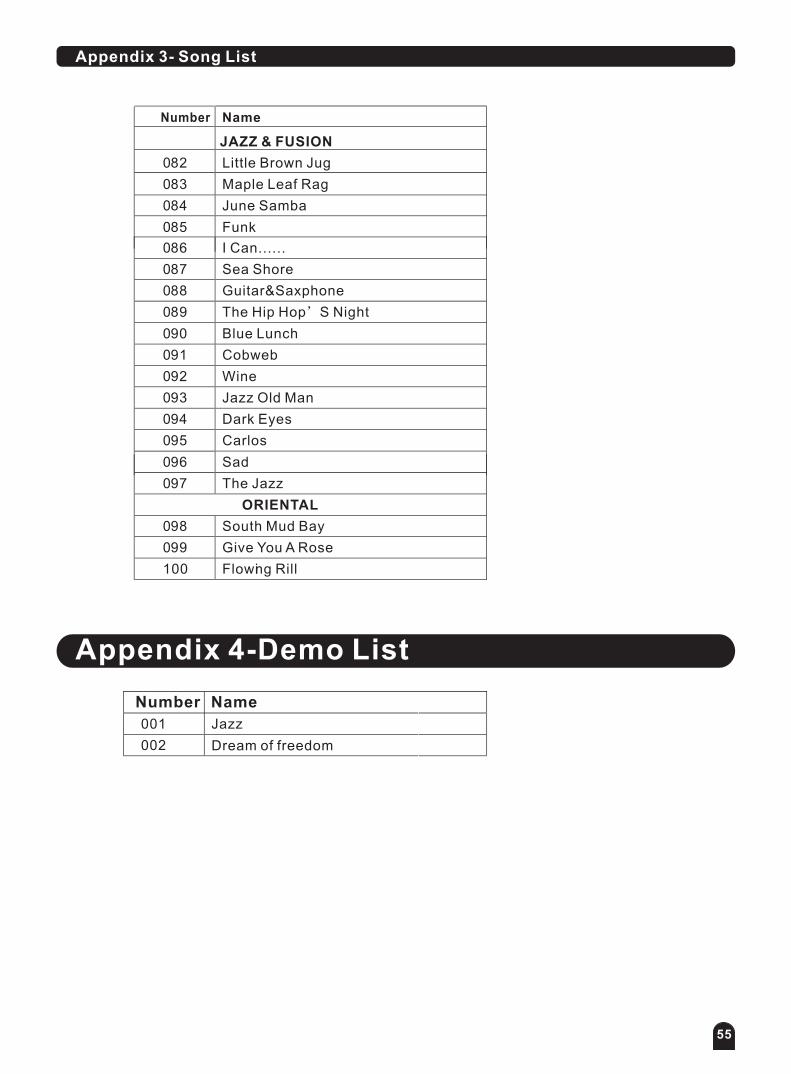
Appendix 3- Song List
Appendix 4-Demo List
086 I Can......
087 Sea Shore
088 Guitar&Saxphone
089
090 Blue Lunch
091 Cobweb
092 Wine
093 Jazz Old Man
094 Dark Eyes
095 Carlos
096 Sad
097 The Jazz
ORIENTAL
098 South Mud Bay
099 Give You A Rose
100 Flowing Rill
001 Jazz
002 Dream of freedom
NameNumber
NameNumber
55
JAZZ & FUSION
Little Brown Jug
Maple Leaf Rag
June Samba
082
083
084
085 Funk

Appendix 5- Chord List
CMadd9
56

Function
Transmitted
Recognized
Remarks
Basic
Default
ChangedChannel
1ch
1- 16ch
ALL
1- 16ch
Default
Mode
Messages
Altered
。
。
***********
3
。
NoteNumber」
True voice
0- 127
***********
Velocity: Note on
Note off ゥ 9nH,V=1-127
。 」9nH,V=0」 ゥ 9nH,V=1- 127
。(9nH,V=0; 8nH,V=0 - 127)
After
Touch
Keys
Chs 。
。 。
PitchBend ゥ ゥ
Control
Change
0
1
5
6
7
10
11
64
65
66
67
80
81
91
93
120
121
123
。
。
。
。
。
。
。
。
。
。
。
。
。
。
。
。
。
。
。
。
。
。
。
。
。
。
。
。
Program
Change
」True #
。 ***********
。
0-127
System Exclusive 。 System 」Song Position
」Song Select 」Tune
。
。
。
System
Real Time : Clock 」Commands
。
。 *1
*1
Aux
Messages
: Local on/off
: All Notes off
」Active sense
」Reset
。
。
。
。 。 。 。 。 。
。 ゥ
ゥ
ゥ
Note」
0- 127
0- 127
Appendix 6- MIDI Implementation Chart
3
。
。
。
。
。
。
。
。
。
ゥ
57X
O
Bank Select
Modulation
Portamento Time
Data Entry
Volume
Pan
Expression
Sustain Pedal
Portamento ON/OFF
Sostenuto Pedal
Soft Pedal Reverb Program
Chorus Program
Level
Chorus Level All Sound
Off
Reset All Controllers
All Notes Off
Reverb
*1 When the accompaniment is started, an FAH message is transmitted. When accompaniment is stoped, an FCH message is transmitted. When an FAH message is received, accompaniment is started. When an FCH message is received, accompaniment is stoped.
Mode 1: OMNI ON , POLY Mode 2 : OMNI ON , MONO : YESMode 3: OMNI OFF , POLY Mode 4 : OMNI OFF , MONO : NO

Version: G06


Musikhaus Thomann • Treppendorf 30 • 96138 Burgebrach Germany • www.thomann.de •