sp 212/sp 213 series wi-fi settings guide -...
TRANSCRIPT

1
Model No.SP 212/SP 213 Series
Wi-Fi Settings GuideIntroduction ◆
There are two wireless LAN modes: infrastructure mode for connection through an access point and ad-hoc mode for establishing direct connection with a wireless LAN-capable device (such as a laptop). This manual explains wireless LAN configuration for infrastructure mode.
Infrastructure Mode•
Computer Access point (router)
The settings are complete. To be configured.
Machine
For details about configuring ad-hoc mode, see "Configuring Network Settings" in the User •Guide .

2
1. Before Configuring Wireless LAN Settings
Checking the Wireless LAN Access Point (Router)This information is required when you configure wireless LAN settings manually. It cannot be viewed using the machine.
Checking the SSID and encryption keyThe SSID and encryption key for the wireless LAN access point (router) may be printed on a label affixed to the access point (router). For details about the SSID and encryption key, refer to the access point (router) manual.
SSID :XXXXXXXXXXXXXEncryption key :XXXXXXXXXXXXX
CVW901
Check the SSID and encryption key, and write them down on the blank space as shown.SSID:
Encryption key:

3
Number of characters used for the encryption keyThe number of characters used for the encryption key varies.
Authentication Encryption WEP Key Length
WEP Key Format
WEP Key/ WPA Passphrase(Maximum character)
Open System None - - -Open System WEP 64 bit ASCII 5 characters
Hexadecimal 10 characters128 bit ASCII 13 characters
Hexadecimal 26 charactersShared Key WEP 64 bit ASCII 5 characters
Hexadecimal 10 characters128 bit ASCII 13 characters
Hexadecimal 26 charactersWPA2-PSK CCMP (AES) - - 8 to 63 digits ASCII or 64
digits HexMixed Mode WPA/WPA2 TKIP/AES - - 8 to 63 digits ASCII or 64
digits Hex
Depending on the model, the "Encryption", "WEP Key Length", and "WEP Key Format" settings •may be combined as a single item such as [WEP 64 bit ASCII].
Configuring/Checking the Settings on the MachineBefore you configure the wireless LAN settings, print out the configuration page to obtain the information required for configuring the settings.
Printing a configuration page
SP 212w/SP 212Nw/SP 213w/SP 213Nw While holding the [Stop/Start] key down, switch the power on and do not release the [Stop/Start] key until 13 seconds elapse.
DCT887

4
SP 212SNw/SP 212SUw/SP 212SFw/SP 212SFNw/SP 213SNw/SP 213SUw/ SP 213SFw/SP 213SFNw
Press the [User Tools] key.
DCT845
Press the [ ] or [ ] key to select [Print List/Report], and then press the [OK] key. Press the [ ] or [ ] key to select [Configuration Page], and then press the [OK] key. Press [Yes] in the confirmation screen.
Obtaining the wireless LAN information from the configuration pageTo configure the wireless LAN settings, the following information is required:
Status•This appears under Wireless Status.You can check the wireless LAN connection status.Communication Mode•This appears under Wireless Status.Check that "Communication Mode" is set to "Infrastructure". For details about configuring the communication mode, see "Connection Problems" in 5, "Troubleshooting".IP Address•With the SP 212w/SP 212Nw/SP 213w/SP 213Nw, this appears under Host Interface. With the SP 212SNw/SP 212SUw/SP 212SFw/SP 212SFNw/SP 213SNw/SP 213SUw/SP 213SFw/SP 213SFNw, this appears under Network Settings.To change the IP address in the configuration page, For details about configuring the IP address, see Setup Guide.

5
2. Checking Your Wireless Network EnvironmentCheck which wireless LAN settings you need to configure using the following chart:The connection method may vary depending on the specifications of the wireless LAN access point (router) you are using. See the access point (router) manual.
Make sure your access point (router) is connected to the network.•
Easy Setup Using the WPS ButtonSP 212w/SP 212Nw/SP 213w/SP 213Nw For details, see page 6.
SP 212SNw/SP 212SUw/SP 212SFw/SP 212SFNw/SP 213SNw/SP 213SUw/SP 213SFw/SP 213SFNw For details, see page 22.
Easy Setup Using a PIN CodeSP 212w/SP 212Nw/SP 213w/SP 213Nw For details, see page 9.
SP 212SNw/SP 212SUw/SP 212SFw/SP 212SFNw/SP 213SNw/SP 213SUw/SP 213SFw/SP 213SFNw For details, see page 23.
Manual SetupSP 212w/SP 212Nw/SP 213w/SP 213Nw For details, see page 13.
SP 212SNw/SP 212SUw/SP 212SFw/SP 212SFNw/SP 213SNw/SP 213SUw/SP 213SFw/SP 213SFNw For details, see page 25.
Does the device support WPS?
Yes
Yes
No
NoWPS
CHV607
Does the device have a WPS button?
About the WPS button and connection using a PIN code ◆
Depending on the access point (router) used, setup may be possible using either the WPS •button, a PIN code, or both methods.To establish a connection using a PIN code, the configuration screen of the access point •(router) must be displayed on the computer.
About WPS connection security ◆
The encryption method for the devices is automatically configured by WPS.Security settings depend on the connection environment. Accordingly, it cannot be assumed that the configured security setting is the most secure.

6
3. Configure the Wireless LAN (SP 212w/SP 212Nw/SP 213w/SP 213Nw)
Easy Setup Using the WPS Button
If the access point (router) cannot be detected within two minutes, the search session expires.•
Device availabilityControl Panel YesWeb Image Monitor NoSmart Organizing Monitor* Yes
* Before using Smart Organizing Monitor, install it. For details about installation, see "Installing the Software" in the Setup Guide and "Installing the Driver and Software" in the User Guide .
Using control panel
Check that the wireless LAN access point (router) is working correctly. When the Power indicator is lit, press and hold the [Wi-Fi] key for two seconds or more.
DCT869
All the indicators light in sequence for three seconds. If you do not operate the machine during the three-second period, the machine starts establishing a connection by the PBC method.
DCT872

7
Press the WPS button on the access point (router) within two minutes.
WPS
CHV607
Check the result.Connection has succeeded: ◆
The [Wi-Fi] key changes from flashing to continuous lighting.
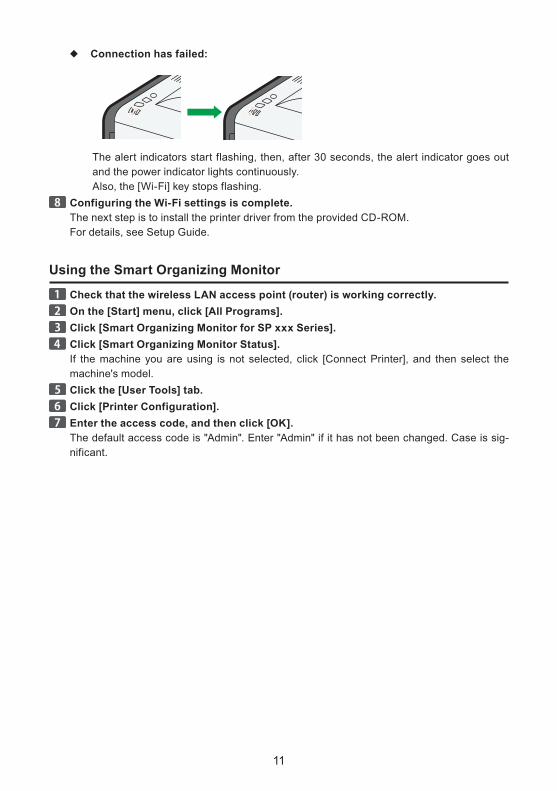
Connection has failed: ◆
The alert indicators start flashing, then, after 30 seconds, the alert indicator goes out and the power indicator lights continuously.Also, the [Wi-Fi] key stops flashing.
Configuring the Wi-Fi settings is complete.The next step is to install the printer driver from the provided CD-ROM.For details, see Setup Guide.
Using the Smart Organizing Monitor
Check that the wireless LAN access point (router) is working correctly. On the [Start] menu, click [All Programs]. Click [Smart Organizing Monitor for SP xxx Series]. Click [Smart Organizing Monitor Status].If the machine you are using is not selected, click [Connect Printer], and then select the machine's model.
Click the [User Tools] tab. Click [Printer Configuration]. Enter the access code, and then click [OK].The default access code is "Admin". Enter "Admin" if it has not been changed. Case is sig-nificant.

8
Click the [Wireless] tab.Configure settings as follows:
DCT863
1
2
3
1. Select [Setup with WPS].
2. Select [Wi-Fi Protected Setup with Push Button].
3. After configuring the settings in Steps 1 to 2, click [Connect] to establish a connection. Press the WPS button on the access point (router).
WPS
CHV607
Check the result.Connection has succeeded:When "Connected to the access point." is displayed, the connection has been established.Connection has failed:When "Failed to connect to the access point." is displayed, the connection has not been es-tablished. Start again from the beginning.

9
Easy Setup Using a PIN Code
If the access point (router) cannot be detected within two minutes, the search session expires.•
Device availabilityControl Panel YesWeb Image Monitor NoSmart Organizing Monitor* Yes
* Before Smart Organizing Monitor can be used, it must be installed. For details about installation, see "In-stalling the Software" in the Setup Guide and "Installing the Driver and Software" in the User Guide .
Using control panel
Check that the wireless LAN access point (router) is working correctly. Open the PIN code configuration screen for the wireless LAN access point (router) on your computer.
When the Power indicator is lit, press and hold the [Wi-Fi] key for two seconds or less.
DCT869
All the indicators will repeatedly flash in this order.
DCT872

10
Press the [Stop/Start] key in the three-second period during which the three indica-tors sequentially flash.
The PIN code will be printed.•The [Wi-Fi] key LED starts flashing and the machine starts establishing a connection by •the PIN method.
Enter the machine’s PIN code on the access point (router)’s web page.
Execute WPS (PIN system) from the access point (router)'s web page.
Check the result.Connection has succeeded: ◆
The [Wi-Fi] key changes from flashing to continuous lighting.
11
Connection has failed: ◆
The alert indicators start flashing, then, after 30 seconds, the alert indicator goes out and the power indicator lights continuously.Also, the [Wi-Fi] key stops flashing.
Configuring the Wi-Fi settings is complete.The next step is to install the printer driver from the provided CD-ROM.For details, see Setup Guide.
Using the Smart Organizing Monitor
Check that the wireless LAN access point (router) is working correctly. On the [Start] menu, click [All Programs]. Click [Smart Organizing Monitor for SP xxx Series]. Click [Smart Organizing Monitor Status].If the machine you are using is not selected, click [Connect Printer], and then select the machine's model.
Click the [User Tools] tab. Click [Printer Configuration]. Enter the access code, and then click [OK].The default access code is "Admin". Enter "Admin" if it has not been changed. Case is sig-nificant.

12
Click the [Wireless] tab.Configure settings as follows:
DCT864
41 3
2
1. Select [Setup with WPS].
2. Select [Wi-Fi Protected Setup with PIN Code].
3. You can display the PIN code by clicking [Get PIN Code].
4. After configuring the settings in Steps 1 to 3, click [Connect] to establish a connection. Enter the machine’s PIN code on the access point (router)’s web page.
Execute WPS (PIN system) from the access point (router)'s web page.

13
Check the result.Connection has succeeded: ◆
When "Connected to the access point." is displayed, the connection has been estab-lished.
Connection has failed: ◆
When "Failed to connect to the access point." is displayed, the connection has not been established. Start again from the beginning.
Manual SetupIf you cannot ascertain the settings of the access point (router) being used or the access point (router) does not support WPS, configure the wireless LAN settings manually.
Check the SSID and encryption key (WEP key/Passphrase) by referring to the manual of the •wireless LAN access point (router) being used.Ascertain the security method employed by the access point (router) being used. If you are •unsure which security method is supported by the wireless LAN access point (router) being used, refer to the access point (router) manual.If DHCP is enabled, specify the wireless LAN settings over a wired connection, and then rees-•tablish the connection using the wireless IP address.
Device availabilityControl Panel NoWeb Image Monitor YesSmart Organizing Monitor* Yes
* Before Smart Organizing Monitor can be used, it must be installed. For details about installation, see "In-stalling the Software" in the Setup Guide and "Installing the Driver and Software" in the User Guide .
Using the Smart Organizing Monitor
Check that the wireless LAN access point (router) is working correctly. On the [Start] menu, click [All Programs]. Click [Smart Organizing Monitor for SP xxx Series]. Click [Smart Organizing Monitor Status].If the machine you are using is not selected, click [Connect Printer], and then select the machine's model.
Click the [User Tools] tab. Click [Printer Configuration]. Enter the access code, and then click [OK].The default access code is "Admin". Enter "Admin" if it has not been changed. Case is sig-nificant.
14
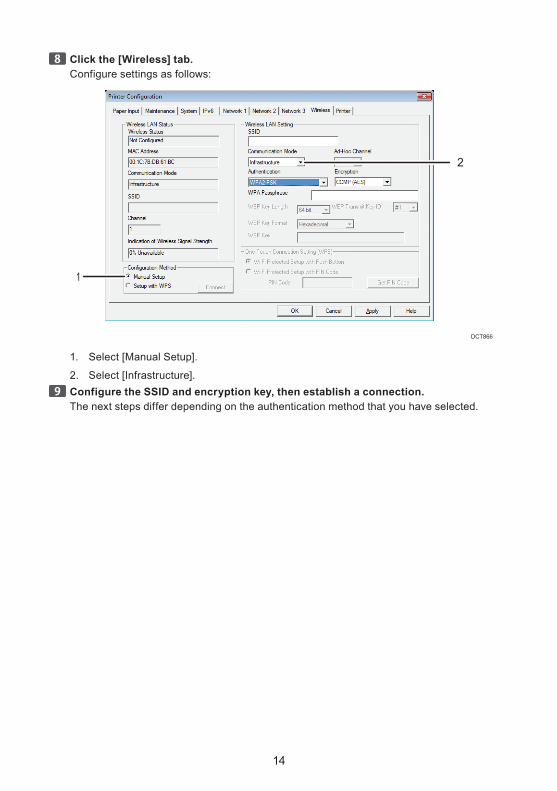
Click the [Wireless] tab.Configure settings as follows:
DCT866
1
2
1. Select [Manual Setup].
2. Select [Infrastructure]. Configure the SSID and encryption key, then establish a connection.The next steps differ depending on the authentication method that you have selected.

15
A. Connecting to devices using the WPA2-PSK or Mix Mode WPA2/WPA au-thentication
For details about checking the SSID and encryption key, see page 2 "Checking the SSID •and encryption key".
DCT867
21
3
4
1. Enter the SSID of the access point (router).
2. Select [WPA2-PSK] or [Mix Mode WPA/WPA2].
3. Enter the encryption key for the access point (router).
4. After configuring the settings in Steps 1 to 3, click [OK] to establish a connection.

16
B. Connecting to the devices using the Open System or Shared Key authen-tication
For details about checking the SSID and encryption key, see page 2 "Checking the SSID •and encryption key".If [Encryption] is set to [None], it is not necessary to enter the WEP key. Click [OK].•
DCT868
21
3
654
7
8
1. Enter the SSID of the access point (router).
2. Select [Open System] or [Shared Key].
3. Select the encryption method.
4. Select the ID.
5. Select 64 bit or 128 bit.
6. Select ASCII or Hexadecimal.
7. Enter the encryption key for the access point (router).
8. After configuring the settings in Steps 1 to 7, click [OK] to establish a connection. Press the [Wi-Fi] key.
DCT869

17
Check the result.Connection has succeeded: ◆
The [Wi-Fi] key changes from flashing to continuous lighting.
Connection has failed: ◆
The alert indicators start flashing, then, after 30 seconds, the alert indicator goes out and the power indicator lights continuously.Also, the [Wi-Fi] key stops flashing.
Configuring the Wi-Fi settings is complete.The next step is to install the printer driver from the provided CD-ROM.For details, see Setup Guide.

18
Using the Web Image MonitorWeb Image Monitor is a device-monitoring tool which allows you to configure the machine set-tings using the Web browser of a computer on the same network.
If DHCP is enabled, specify the wireless LAN settings over a wired connection, and then rees-•tablish the connection using the wireless IP address.
Connect the network cable to the Ethernet port. Plug the other end of the cable into a network device, such as a hub. Launch the Web browser. In the Web browser's address bar, enter "http://(machine’s IP address)/" to access the machine.
Click [Network Settings]. Click [Wireless] tab. Set [Wireless] to [Active]. Click [Scan List] to display the list, select the destination SSID, and then click [OK].If you cannot find the destination SSID, configure the SSID according to the following pro-cedure.
1. In [SSID], enter the SSID for the access point (router). Set [Communication Mode] to [Infrastructure]. In [Authentication], select the authentication method. In [Encryption], select the encryption option.
If the authentication method is set to [Open System], set the encryption option to [None] •or [WEP].If the authentication method is set to [Shared Key], set the encryption option to [WEP].•If the authentication method is set to [WPA2-PSK], set the encryption option to [CCMP •(AES)].If the authentication method is set to [Mixed Mode WPA/WPA2], set the encryption option •to [TKIP/AES].
If the encryption method is set to [None] ◆
If you have selected [None], proceed to Step .

19
If the encryption method is set to [CCMP (AES)] or [TKIP/AES] ◆
1
DCT884
1. Enter the encryption key for the access point (router).
If the encryption method is set to [WEP] ◆
1
432
DCT883
1. Select 64 bit or 128 bit.
2. Select the ID.
3. Select ASCII or Hexadecimal.
4. Enter the encryption key for the access point (router). Enter the administrator password if required. Click [OK]. Press the [Wi-Fi] key.

20
Check the result.Connection has succeeded: ◆
The [Wi-Fi] key changes from flashing to continuous lighting.
Connection has failed: ◆
The alert indicators start flashing, then, after 30 seconds, the alert indicator goes out and the power indicator lights continuously.Also, the [Wi-Fi] key stops flashing.
Configuring the Wi-Fi settings is complete.The next step is to install the printer driver from the provided CD-ROM.For details, see Setup Guide.
Reestablishing Wireless LAN ConnectionTo reestablish a wireless LAN connection using the previously configured settings, do as fol-lows:
Check that the wireless LAN access point (router) is working correctly. Press the [Wi-Fi] key.
DCT869

21
4. Configure the Wireless LAN (SP 212SNw/SP 212SUw/SP 212SFw/SP 212SFNw/ SP 213SNw/SP 213SUw/SP 213SFw/SP 213SFNw)
Enabling Wireless LAN Press the [User Tools] key.
DCT845
Press the [ ] or [ ] key to select [Network Settings], and then press the [OK] key. If you are requested to enter a password, enter the password using the number keys, and then press the [OK] key.
Press the [ ] or [ ] key to select [Wi-Fi], and then press the [OK] key. Press the [ ] or [ ] key to select [Wi-Fi Enable], and then press the [OK] key. Press the [ ] or [ ] key to select [Enable], and then press the [OK] key. Press the [User Tools] key to return to the Initial screen.After a setting is changed, the machine automatically restarts.
A password for accessing the [Admin. Tools] menu can be specified in [Admin. Tools Lock].•
Specifying [Wi-Fi Key]Select the mode that appears if the [Wi-Fi] key is pressed.
Press the [User Tools] key.
DCT845
Press the [ ] or [ ] key to select [Network Settings], and then press the [OK] key. If you are requested to enter a password, enter the password using the number keys, and then press the [OK] key.
Press the [ ] or [ ] key to select [Wi-Fi], and then press the [OK] key. Press the [ ] or [ ] key to select [Wi-Fi Key], and then press the [OK] key. Press the [ ] or [ ] key to select [Infrastructure Mode], and then press the [OK] key.

22
Press the [User Tools] key to return to the Initial screen.
A password for accessing the [Admin. Tools] menu can be specified in [Admin. Tools Lock].•
Easy Setup Using the WPS Button
If the access point (router) cannot be detected within two minutes, the search session expires.•
Device availabilityControl Panel YesWeb Image Monitor NoSmart Organizing Monitor No
Using control panel
Check that the wireless LAN access point (router) is working correctly. Hold down [Wi-Fi] key.
DCT853
If [Wi-Fi Enable] is set to [Disable], you cannot use the [Wi-Fi] key. Press [PBC].
Press [Yes].
"Please push the [AP] within 2 minutes" appears, and the machine starts to connect in PBC method.

23
Press the WPS button on the access point (router) within two minutes.
WPS
CHV607
If the connection is successful, "Connection to AP has Succeeded" will be displayed.If the connection fails, "Connection to AP has Failed" is displayed.
Configuring the Wi-Fi settings is complete.The next step is to install the driver from the CD-ROM provided.For details, see Setup Guide.
Easy Setup Using a PIN Code
If the access point (router) cannot be detected within two minutes, the search session expires.•To establish a connection using the PIN code, use a computer that is connected to the wireless •LAN access point (router).
Device availabilityControl Panel YesWeb Image Monitor NoSmart Organizing Monitor No
Using control panel
Check that the wireless LAN access point (router) is working correctly. Open the PIN code configuration screen for the wireless LAN access point (router) on your computer.

24
Hold down [Wi-Fi] key.
DCT853
If [Wi-Fi Enable] is set to [Disable], you cannot use the [Wi-Fi] key. Press [PIN].
Check the PIN code.PINPIN Code:XXXXXXXX
Abor tConnec t
Enter the machine's PIN code on the access point (router)'s Web page.
Press [Connect].PINPIN Code:XXXXXXXX
Abor tConnec t
Execute WPS (PIN system) from the access point (router)'s web page.
If the connection is successful, "Connection to AP has Succeeded" will be displayed.If the connection fails, "Connection to AP has Failed" is displayed.
Configuring the Wi-Fi settings is complete.The next step is to install the driver from the CD-ROM provided.For details, see Setup Guide.

25
Manual SetupIf you cannot check the settings of the access point (router) being used or the access point (router) does not support WPS, configure the wireless LAN settings manually.
Check the SSID and encryption key (WEP key/Passphrase) by referring to the manual of the •wireless LAN access point (router) being used.Check the security method employed by the access point (router) being used. If you are unsure •which security method is supported by the wireless LAN access point (router) being used, refer to the access point (router) manual.
Device availabilityControl Panel YesWeb Image Monitor YesSmart Organizing Monitor No
Using control panel
If you have previously configured wireless LAN settings, configure the settings using [Setup •Wizard] in [Network Settings]. For details about using [Setup Wizard], see "Wireless LAN Set-up" in the User Guide . Check that the wireless LAN access point (router) is working correctly. Press the [Wi-Fi] key.
DCT853
If [Wi-Fi Enable] is set to [Disable], you cannot use the [Wi-Fi] key. If [Frequency Channel] appears first, set [Wi-Fi Key] to [Infrastructure Mode].
26
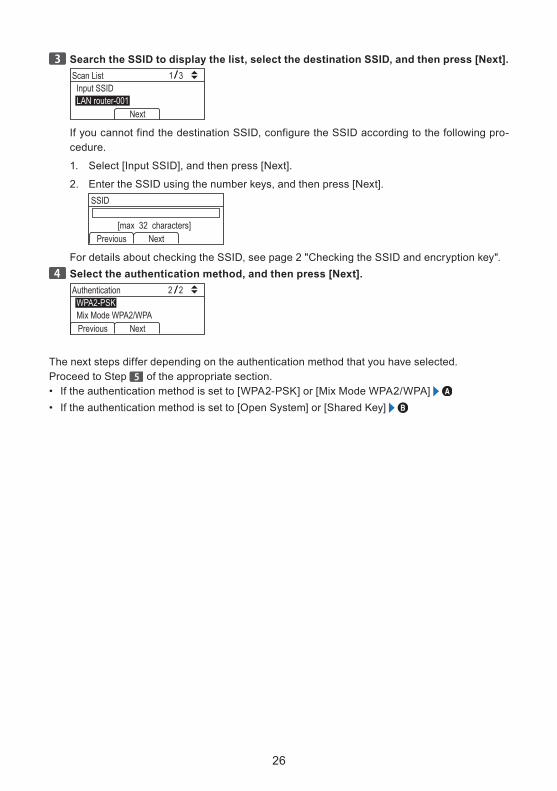
Search the SSID to display the list, select the destination SSID, and then press [Next].
If you cannot find the destination SSID, configure the SSID according to the following pro-cedure.
1. Select [Input SSID], and then press [Next].
2. Enter the SSID using the number keys, and then press [Next].
For details about checking the SSID, see page 2 "Checking the SSID and encryption key". Select the authentication method, and then press [Next].
The next steps differ depending on the authentication method that you have selected.Proceed to Step of the appropriate section.
If the authentication method is set to [WPA2-PSK] or [Mix Mode WPA2/WPA] • If the authentication method is set to [Open System] or [Shared Key] •

27
Connecting to devices using the WPA2-PSK or Mix Mode WPA2/WPA au-thentication
Enter the encryption key using the number keys, and then press [Connect].
For details about checking the encryption key, see page 2 "Checking the SSID and encryp-tion key".For details about the number of characters used for the encryption key, see page 3 "Number of characters used for the encryption key" in 1, "Before Configuring Wireless LAN Settings".
Press [Yes].
Check the connection using [Wi-Fi Status].[User Tools] key [Network Settings] [Wi-Fi] [Wi-Fi Status]
When "Connected" is displayed, the connection has been established.•When "Connecting..." is displayed, the connection is being established.•When "Disconnected" is displayed, the connection has not been established. Start again •from the beginning.
Configuring the Wi-Fi settings is complete.The next step is to install the driver from the CD-ROM provided.For details, see Setup Guide.
Connecting to the devices using the Open System or Shared Key authentica-tion
Select the encryption method, and then press [Next].
Enter the encryption key and ID using the number keys, and then press [Connect].
The ID is used for identifying the encryption key. You can register four encryption keys (ID 1 to 4).For details about checking the encryption key, see page 2 "Checking the SSID and encryp-tion key".For details about the number of characters used for the encryption key, see page 3 "Number of characters used for the encryption key" in 1, "Before Configuring Wireless LAN Settings".

28
Press [Yes].
Check the connection using [Wi-Fi Status].[User Tools] key [Network Settings] [Wi-Fi] [Wi-Fi Status]
When "Connected" is displayed, the connection has been established.•When "Connecting..." is displayed, the connection is being established.•When "Disconnected" is displayed, the connection has not been established. Start again •from the beginning.
Configuring the Wi-Fi settings is complete.The next step is to install the driver from the CD-ROM provided.For details, see Setup Guide.
Using the Web Image MonitorYou can configure Web Image Monitor in the same way as with the SP 212w/SP 212Nw/SP 213w/SP 213Nw model. For details about configuring the Web Image Monitor settings, see page 18, "Using the Web Image Monitor".
Check the result. ◆
[User Tools] key [Network Settings] [Wi-Fi] [Wi-Fi Status]When "Connected" is displayed, the connection has been established.•When "Connecting..." is displayed, the connection is being established.•When "Disconnected" is displayed, the connection has not been established. Start again •from the beginning.
Reestablishing Wireless LAN ConnectionTo reestablish a wireless LAN connection using the previously configured settings, do as fol-lows:
Check that the wireless LAN access point (router) is working correctly. Press the [Wi-Fi] key.
DCT853
The [Wi-Fi] key flashes.

29
5. Troubleshooting
Connection ProblemsIf problems occur even after you configure the connection settings again, check the following:
Are the settings for the wireless LAN access point (router) correctly configured? ■
Check that the WPS function is not set to "inactive" or "Off".•Functions other than WPS may interfere with the WPS function depending on their set-•tings. For details, refer to the manuals for the wireless LAN access point (router).
Are the wireless LAN access point (router) placed in an area in which they can receive ■
radio waves?The area in which the devices can receive radio waves varies depending on the structure •of the building. If the machine is away from the wireless LAN access point (router), place it closer to either of them. Then connect the machine to the devices.
Is the button you pressed the WPS button? ■
The WPS button has different names, pressing or holding times depending on the wireless •LAN access point (router) you are using. For details about which button you need to press or hold for a specific period of time, refer to the manual.
Is the PIN code configured correctly? ■
Configure the PIN code correctly according to the manuals for the wireless LAN access •point (router).Check the PIN code when it is displayed or printed.•
Is the communication mode set to Ad-Hoc Mode? ■
Set the communication mode to Infrastructure Mode.•SP 212w/SP 212Nw/SP 213w/SP 213Nw (Smart Organizing Monitor)•[User Tools] tab [Printer Configuration] [Wireless] tab [Communication Mode] [Infrastructure]SP 212SNw/SP 212SUw/SP 212SFw/SP 212SFNw/SP 213SNw/SP 213SUw/SP 213SFw/ •SP 213SFNw[User Tools] key [Network Settings] [Wi-Fi] [Setup Wizard] [Infrastructure Mode]
Have you entered the SSID and encryption key correctly? ■
Make sure you have entered them correctly. The SSID and encryption key are case-sensi-•tive.
The encryption key specified for the access point (router) cannot be configured. ■
The machine supports WPS 2.0, lower encryption levels such as WEP and TKIP cannot •be used.To connect to an operating environment using a WEP or TKIP encryption, specify the set-•ting manually as described in "Manual Setup", or configure the access point (router) to use more secure encryption.
30
Connection was Successful but Wireless LAN Cannot be UsedIf a connection has been established but the wireless LAN cannot be used, check the following:
Connection may fail due to radio wave conditions. ■
If there is another wireless network nearby, the wireless connection may fail. Wait for a •while, and then connect to the network again.
Are the IP address settings correctly configured? ■
Make sure the IP address settings are configured correctly.•Configuring the IPv4 address for wireless LAN connection•
SP 212w/SP 212Nw/SP 213w/SP 213Nw (Smart Organizing Monitor)•[User Tools] tab [IP Address]SP 212SNw/SP 212SUw/SP 212SFw/SP 212SFNw/SP 213SNw/SP 213SUw/SP 213SFw/ •SP 213SFNw (Control Panel)[User Tools] key [Network Settings] [IPv4 Configuration]
Configuring the IPv6 address for wireless LAN connection•For details , see "Configuring Network Settings" in the User Guide .
The previously established connection cannot be established again. ■
To reconfigure the wireless LAN settings, first reset the network settings.SP 212SNw/SP 212SUw/SP 212SFw/SP 212SFNw/SP 213SNw/SP 213SUw/SP 213SFw/•SP 213SFNw(Control Panel)[User Tools] key [Admin. Tools] Reset Settings [Reset Network Settings] [Yes]

31
Glossary of Wireless LAN TermsWireless LAN Access Point (Router)•This device routes data between wireless LAN-capable devices and the Internet.Infrastructure Mode•Select this to communicate via an access point (router).Ad-Hoc Mode•Select this to connect directly to a device equipped with wireless LAN (such as a laptop).WPS (Wi-Fi Protected Setup)•WPS is a standard for encryption settings for connections between devices that support Wi-Fi. Devices that support this standard can be connected easily using a wireless LAN with encryp-tion.
PBC•A WPS connection method using a push button.PIN•A WPS connection method using a PIN code.
SSID•This is a network identifier for differentiating one wireless LAN access point (router) from an-other. It is also called the network name or access point name.Encryption key (WEP key/Passphrase)•This is the password for accessing the wireless LAN access point (router). It is also called the network key or key.

© 2014EN GB EN US EN AU M213-8626
32