somfy: motors, automatisms, controls and smart …...your home’s doors and windows (windows,...
TRANSCRIPT


Thank you!
for choosing
Do you need any information? Do you need any help?www.somfy.com

3/53
1 UNIT, 3 ENVIRONMENTS, 3 APPLICATIONS

4/53
A choice of 3 apps to control 3 home environments from a smartphone: window shutters and blinds - the terrace - entrances
The benefits of being connected to your house and your devices, whether you are personally present or away from home.
Unique, intuitive, convenient functions that everyone can use and that bring the peace-of-mind and well-being that make home living even more enjoyable.
3 apps to switch the device in your home to connected mode
SWITCH TO CONNECTED MODE
5/53
ALWAYS IN CONTROL
Always in control!To programme your home living scenarios, leave home in complete peace of mind or check the status of
your home’s doors and windows (windows, shutters, blinds), wherever you are.
Main functions:
Click & Go!
Trigger the closing of your roller shutters, activate an alarm with a single press … so you can leave home
with complete peace-of-mind, quickly and easily.
Cocoon
Programme opening/closing scenarios for the roller shutters or Exterior Venetian Blinds associated with weather sensors, a timer or an alarm. Child’s play for a securely protected house.
Check Window
Checking whether your windows and roller shutters are properly closed when you leave the house or are away from home is so simple. Just press! Stay in control!

6/53
Connexoon Window is compatible with:
Roller Shutters io
Exterior Vertical Blind io
Exterior Venetian Blind io
Skylight io Velux io
Alarm ioRoof Window Roller Shutter io Velux io
ON-AC
Lights io Philips Hue Lighting
Sun Sensor io Temperature Sensor io
NEWOpening
Detector io
20,0°
New

7/53
CONTENTSConnexoon• The Pack• The Connexoon unit
Installing Connexoon• Quickly store the io-homecontrol products in the
Connexoon unit (prog-prog)• Activate the Connexoon unit• Download the Connexoon application
Using Connexoon Window• The interface• Controlling my products• Making life easy: the modes• Check Window• My timer• Managing sunlight intensity• Managing the temperature• Protecting my windows
Managing my installation• Dashboard• Messages system• Parameters• My Account• Help
Advanced installation functions• Connecting io-homecontrol devices• Managing the io-homecontrol system key (only for installers)• Sending the io-homecontrol security key• Generating the io-homecontrol security key
These contents are interactive

8/53
< Back to Contents

9/53
< Back to Contents
A. THE PACK
2
65
1
The pack contains
Connexoon unit
USB charger
Mains adapter
Ethernet cable
2 Quick-start installation guides (installer and end user)
Legal notice
1
2
3
4
5
6
43

10/53
< Back to Contents
B. THE CONNEXOON UNIT
Button used for the fast pairing of your Connexoon unit and your Somfy power-operated devices, without an internet connection see page 12 pairing prog-prog products.
Connect the ethernet cable between your Connexoon unit and your broadband modem.
Connect the USB charger to the USB port on your Connexoon unit in order supply power to your product.

11/53
< Back to Contents
INSTALLING
Enjoy!Quickly store the io-homecontrol products in the Connexoon unit (prog-prog)
Activate the Connexoon unit
Download the Connexoon app
A B C D

12/53
< Back to Contents
A. QUICKLY STORE THE io-homecontrol PRODUCTS in the Connexoon unit (prog-prog)
If the installation contains a control with feedback function, see page 45 (function intended for installers only).
If the devices you want to connect are paired with a remote control without feedback function (Smoove, Keygo, Situo):
The simplified procedure below makes it possible to perform pairing without an internet connection and without activating the account.
Connect Connexoon to the power supply.
Press the Prog button on the control point for 2 secs.
Then press briefly for 0.5 sec. on the Connexoon unit.
After pairing your devices, press for 8 seconds on Connexoon. Your devices will then move up and down a short distance. This confirms that your products are paired.
PROG 2s
PROG 0,5
PROG 8s

13/53
< Back to Contents
B. ACTIVATE THE CONNEXOON UNITLog in to
somfy-connect.com
Enter your PIN code Select your environmentChoose your deviceEnter your login details
Step 1 Step 2 Step 3 Step 4

14/53
< Back to Contents
Enter your personal details
Login and password Summary Confirmation
Steps needed to activate Connexoon Window
B. ACTIVATE THE CONNEXOON UNIT
Step 5 Step 6 Step 7 Step 8

15/53
< Back to Contents
You receive a confirmation email
Confirmation email
B. ACTIVATE THE CONNEXOON UNIT

16/53
< Back to Contents
Download the Connexoon Window smartphone application that is available for IOS and Android.
C. DOWNLOAD THE CONNEXOON WINDOW APPLICATION

17/53
< Back to Contents
B Define your user name. Via the user name, you can find out what actions have been performed from your smartphone.
You can change your user name at any time in the “Parameters” tab in the menu that you will find in the history.(see page 40, Menu)
C. DOWNLOAD THE CONNEXOON WINDOW APPLICATION
A Enter the email address and password that you defined when activating your Connexoon unit. (see page 13, Activation screen)
< Back to Contents
USING CONNEXOON WINDOW
18/53

19/53
A. THE INTERFACE
Home pageTimerSunlight ProtectionTemperature ProtectionWindow Protection
Check Window
Products stored in Connexoon
Edit modes
Menu
Customisable modes
Weather
Description< Back to Contents

20/53
B. CONTROLLING MY PRODUCTSSetup
A You can control your roller shutters, exterior Venetian blinds, lighting etc. in the grey box at the bottom of the interface.
Press the icon corresponding to the product you want to control by dragging the list to the right or left (for example: roller shutter).
B Adjust its position using the arrow and then press .
< Back to Contents

21/53
B. CONTROLLING MY SENSORS*
You can press to access the history for the last day / week / month / year of measurements.
Press to return to the home page.
*(opening detectors io, sunlight sensor io and temperature sensor io)
Description< Back to Contents

22/53
Connexoon Window provides you with 4 modes “I’m at home – I’m leaving – I’m on holiday – Do not disturb”.
You can customise each of these modes by choosing the actions you want to perform (open or close your roller shutters, switch your lights on or off, activate your alarm) and by activating or deactivating your programmes or your alerts.
You can then find your modes again with a single press!....
For example: you are leaving on holiday. Press once to shut your ground floor roller shutters, activate the alarm, switch off the lights and activate simulated presence.
C. MAKING LIFE EASY: THE MODESDescription
< Back to Contents

23/53
C For each mode:
• Select the devices that you want to control.
• Activate or deactivate the timer, simulated presence, the sunlight / temperature / window protections.
* These programming operations are only available if you have connected a sunlight /temperature / opening sensor
A Press to programme a mode. B Select the mode that you want to customise from the following options:
“I’m at home – I’m leaving – I’m on holiday – Do not disturb”
Setup
C. MAKING LIFE EASY: THE MODES< Back to Contents

24/53
D. CHECK WINDOW
Press once on the Check Window icon to make sure – wherever you are – that your roller shutters are closed properly, that your lights are switched off, that your alarm is activated.
Description< Back to Contents

25/53
D. CHECK WINDOWSetup
C Select the questions that you want Connexoon to answer when you press Check Window.
For example, when I go away I keep wondering whether I switched off all the lights or whether I closed the ground floor shutters.
A Press the button.
B Press in the centre of the interface.
< Back to Contents

26/53
E. MY TIMERDescription
Press the icon to access the timer menu. The timer is used to programme your devices depending on the time of day.
< Back to Contents

27/53
E. MY TIMERSetup
Activate or deactivate your timer
A Press to access the “Timer” menu
and then press to make the settings for
this function.
B To programme another timed function, press .
< Back to Contents

28/53
E. MY TIMERSetup
C Name the “timed function” you have programmed (e.g.: morning, wake-up, sun, evening, bed time, etc.).
D Define the programmed time.
E Select the days on which you want your timer to become active.
F Select the devices you want to control.
07:30
< Back to Contents

29/53
F. MANAGING SUNLIGHT INTENSITY
Sunlight protection* allows you to control your roller shutters, exterior Venetian blinds, etc. depending on the intensity of the sunlight. For example, this allows you to keep your home cool in the summer by lowering your window shutters or blinds automatically.
Description
*only if you possess a Sunis wirefree io sunlight sensor
< Back to Contents

30/53
F. MANAGING SUNLIGHT INTENSITYSetup
A programme for each level of sunlight intensity, 4 programmes possible per sensor.
B Press the button to create a new sunlight condition.
A Press the icon.
Activate or deactivate your sunlight protection
< Back to Contents

31/53
F. MANAGING SUNLIGHT INTENSITYSetup
D Define the brightness level by selecting one of the two conditions:
“greater than” or “less than”, followed by the
triggering threshold, which you set by dragging the cursor.To help you define this threshold, the currently measured brightness is displayed at the very top of the page.
C Give a name to your “sunlight protection”. e.g. Winter sun, summer sun, etc.
F Select the devices you want to control. Then choose whether or not you want to receive an email alert and/or push notifications when the programme is triggered*.
* First activate email notifications and/or push notifications in the menu (see page 42)
E Define the time range and then the days on which you want this condition to apply.
2000 lux
11:30
< Back to Contents

32/53
G. MANAGING THE TEMPERATURE* Description
Temperature protection* allows you to control your roller shutters, exterior Venetian blinds, etc. depending on the indoor or outdoor temperature. This allows you, for example, to insulate your home better in the summer by closing the roller shutters as soon as the outdoor temperature becomes too high while you are away.
* only if you possess a Thermis wirefree io temperature sensor
< Back to Contents

33/53
Setup
G. MANAGING THE TEMPERATURE*
B Press the button to create a new temperature condition.
A Press the icon.
Activate or deactivate your temperature protection
< Back to Contents

34/53
G. MANAGING THE TEMPERATURE* Setup
F Define the devices you want to control. Then choose whether or not you want to receive an email alert and/or push notifications when the programme is triggered*.
* First activate email notifications and/or push notifications in the menu (see page 42)
D Define the temperature threshold by selecting one of the two conditions:
“greater than” or “less than”, followed
by the trigger value, which you set by dragging the cursor.
To help you define this threshold, the current temperature is displayed at the very top of the page.
E Define the time range and then the days on which you want this condition to apply.
C Give a name to your “temperature protection”.
11:30
25 °C
< Back to Contents

35/53
H. PROTECTING MY WINDOWS
Window protection* allows you to make sure that your windows are properly closed when you are away from home. If you have forgotten to do so, you can automatically close a window’s roller shutter for greater security. Window protection allows you to trigger your devices automatically depending on the position of your window (open or closed).
Description
WAITING FOR THENEW
PHOTODETECTOR
*only if you possess an io opening detector (1 detector per window).
< Back to Contents

36/53
H. PROTECTING MY WINDOWSSetup
B Press the button to create a new window protection condition.
A Press the round button.
Activate or deactivate your window protection
< Back to Contents

37/53
F Define the devices you want to control. Then choose whether you want to receive an email alert and/or push notifications when the programme is triggered*.
* First activate email notifications and/or push notifications in the menu (see page 42)
E Define the time range and the days on which you want this condition to apply.
H. PROTECTING MY WINDOWS
C Give a name to your window protection.
Setup
D Define the condition or .
11:30
Opened
< Back to Contents
< Back to Contents
MANAGING MY INSTALLATION4
38/53

< Back to Contents
You press to access a range of functions that allow you to configure and manage your Connexoon Window application:
• the dashboard, • your messaging system, • the parameters, • your account, • the help system, • disconnecting from your application.
The “Configuration” menu provides access to the advanced installation functions. This menu is intended only for installers (see section 5).
MANAGING MY INSTALLATIONDescription
39/53

< Back to Contents
Just press on this menu to open a history of all your connected devices.
• A green dot in front of a command indicates that the action was completed correctly.
• A red dot indicates that the action was interrupted deliberately.
• An orange triangle indicates that a problem occurred.
Press the icon for more information.
A. DASHBOARDDescription
40/53

< Back to Contents
B. MESSAGES
You will find all the information you need about updates and planned new features in your messaging system (“Messages” menu).
Description
Connexoon Window update
Dear Connexoon user,Please download the new update of your Connexoon application.
WEDNESDAY 28 JANUARY 2015
MESSAGES
41/53

< Back to Contents
C. PARAMETERS
This menu allows you to activate the display of weather data and activate alerts and/or push notifications. It also allows you to display the widgets on your smartphone and/or Apple watch and to define your user name so that you can customise your history.
Specify the geolocation of your home in order to receive local weather information.
Activate / deactivate the weather display on the home page.
Activate / deactivate email alerts.
Change your user name.
Description
42/53

< Back to Contents
D. MY ACCOUNT
This tab contains the information you entered when you activated Connexoon.
Description
43/53

< Back to Contents
E. HELP
Either you or your installer may fill in the information in this tab so that you can contact him directly if you have any questions.
Stay in touch with the installer by entering his contact details in the application. Just press once to contact him.
Description
44/53

< Back to Contents
ADVANCED INSTALLATION FUNCTIONS
45/53

< Back to Contents
ADVANCED INSTALLATION FUNCTIONS
This menu is used to:
• Store new compatible io-homecontrol devices in your Connexoon.
• Remove devices.
• Manage the installation’s io-homecontrol security key.
Caution: These functions can impair the correct functioning of your Connexoon and should only be used by your installer.
To access these functions, press .
Description
46/53

< Back to Contents
A. CONNECTING io-homecontrol DEVICES
C Press .B Press the Configuration tab.A Press the menu.
Setup
47/53

< Back to Contents
A. CONNECTING io-homecontrol DEVICES
F The devices are stored. You can:
• Rename them by pressing .• Remove them by pressing .
D Select the type of product that you want to add to the installation: io drives/actuators, io sensors or detectors or Philips Hue lighting, then press to confirm.
E Select the type of control point – 1-way or 2-way – that controls the devices you want to connect and then follow the procedure indicated on the screen to connect the io devices.
Setup
LOUNGE_WINDOW
BEDROOM_WINDOW
SHUTTERS_OPEN
48/53

< Back to Contents
B.MANAGING THE io-homecontrol SYSTEM KEY
C Press the “ io system” tab.B Press .A Press the menu.
Setup
49/53

< Back to Contents
C. SENDING THE io-homecontrol security key of the Connexoon unit to
an io-homecontrol remote control with feedback function
C Follow the instructions.
Setup
B Press to confirm your choice.
A Press the icon.
50/53
< Back to Contents
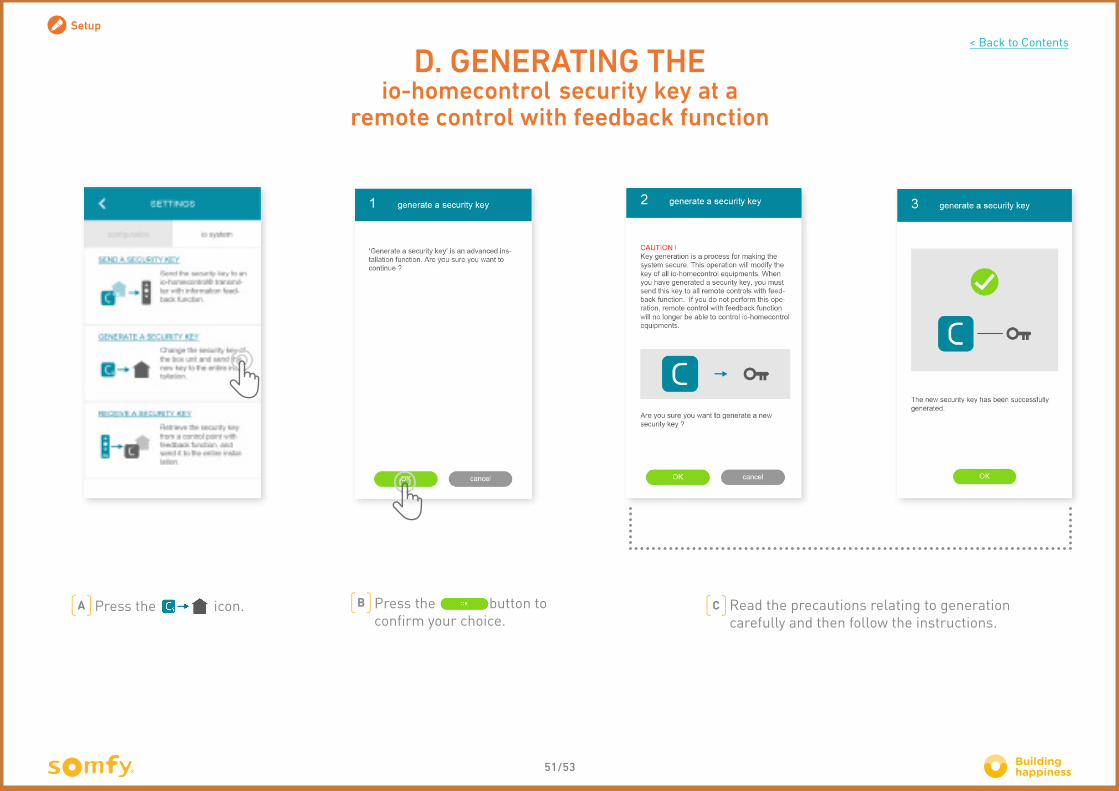
D. GENERATING THE io-homecontrol security key at a
remote control with feedback function
Setup
C Read the precautions relating to generation carefully and then follow the instructions.
B Press the button to confirm your choice.
A Press the icon.
51/53

< Back to Contents
D. GENERATING AN io-homecontrol SECURITY KEY
C Read the precautions relating to generation carefully and then follow the instructions.
A Press the icon. B Press the button to confirm your choice.
Setup
52/53

< Back to Contents
AVAILABLE TUTORIALSList of available video tutorials
TUTORIAL # 1 TUTORIAL # 2Check Window Sun Protection
53/53