solaredge configuration tool software guide · the solaredge configuration tool is a software...
TRANSCRIPT

Version 2.0

About This Guide
This user guide is intended for Photovoltaic (PV) system owners, installers,
technicians, maintainers, administrators, and integrators who are authorized
to configure the SolarEdge power harvesting system.
This guide describes how to use the SolarEdge Configuration Tool that runs
in a standard Windows GUI, to configure SolarEdge site-specific
parameters, and to display and troubleshoot site-specific issues.
This guide assumes that you have read the SolarEdge Installation Guide.
The guide includes the following chapters:
Chapter 1, Introduction, on page 7, introduces the SolarEdge
Configuration Tool and describes the workflow for installing and using
this software application. This chapter also provides an overview of the
user interface.
Chapter 2, Configuring an Inverter, on page 17, describes each of the
configuration tabs provided in the Configuration Tool.
Chapter 3, Setting Up Multiple Inverters, on page 37, describes how to
set up multiple Inverters in a Master/Slave configuration.
Important Notice
SolarEdge Configuration Tool Software Guide
3
Important Notice
Copyright © 2011 SolarEdge Inc. All rights reserved.
No part of this document may be reproduced, stored in a retrieval system or transmitted, in
any form or by any means, electronic, mechanical, photographic, magnetic or otherwise,
without the prior written permission of SolarEdge Inc.
This document is solely for the use of SolarEdge customers and employees.
The material furnished in this document is believed to be accurate and reliable. However,
SolarEdge assumes no responsibility for the use of this material. SolarEdge reserves the
right to make changes to the material at any time and without notice.
You may refer to the SolarEdge web site (www.solaredge.com) for the most updated
version.
All company and brand products and service names are trademarks or registered trademarks
of their respective holders.
Exclusion of Liability
The general terms and conditions of delivery of SolarEdge shall apply.
The content of these documents is continually reviewed and amended, where necessary.
However, discrepancies cannot be excluded. No guarantee is made for the completeness of
these documents.

Table of Contents
SolarEdge Configuration Tool Software Guide
4
Table of Contents
List of Figures ........................................................................................................................ 5
Support and Contact Information........................................................................................ 6
Chapter 1, Introduction ............................................................................ 7
What is the Configuration Tool? .......................................................................................... 7
Installing the SolarEdge Configuration Tool ...................................................................... 8
Setting Up the Connection to the Inverter ............................. Error! Bookmark not defined.
Starting the Configuration Tool ........................................................................................... 9 Defining the COM Port to the Inverter ........................................................................... 10 Redefining the COM Port ............................................................................................... 10 Connecting to the Inverter .............................................................................................. 11
Main Window ....................................................................................................................... 11 Inverter List .................................................................................................................... 12 Configuration Tool Tabs ................................................................................................ 12 Toolbar ........................................................................................................................... 13 System Specifications Section ........................................................................................ 14 Settings Section .............................................................................................................. 14 Inverter LCD Display ..................................................................................................... 15
Chapter 2, Configuring an Inverter ....................................................... 17
Communication Settings ..................................................................................................... 17 Communication Dataflow .............................................................................................. 17 Communications Settings Tab ........................................................................................ 18 RS232 Status ................................................................................................................. 19 RS485 Status .................................................................................................................. 20 ZigBee Status ................................................................................................................. 21 LAN Status ..................................................................................................................... 23 Server Connection Status ............................................................................................... 24 Inter-Inverter Comm Status ............................................................................................ 27
Regional Settings...................................................................... Error! Bookmark not defined.
Optimizers Data ................................................................................................................... 30 Adding an optimizer ....................................................................................................... 33
Firmware Upgrade .............................................................................................................. 33
Miscellaneous ....................................................................................................................... 35

List of Figures
SolarEdge Configuration Tool Software Guide
5
Setting the Real-Time Clock .......................................................................................... 36
Chapter 3, Setting Up Multiple Inverters .............................................. 37
Master/Slave Configuration ............................................................................................... 37 Setting the Communication Configuration of the Master .............................................. 38 Reviewing Installation Information ............................................................................... 39
Appendix A, Verifying the RS-232 COM Port ...................................... 40
Verifying the RS-232 Port .................................................................................................. 40
List of Figures
Figure 1: Inverter Connectors ........................................................................................................ 9
Figure 2: Selecting the COM Port ................................................................................................ 10
Figure 3: The Configuration Tool Main Window ........................................................................ 11
Figure 4: Communication Settings Sub-Tab ................................................................................ 18
Figure 5: RS232 Regular Communication ................................................................................... 19
Figure 6: RS232 GSM Communication ....................................................................................... 20
Figure 7: RS485 Settings ............................................................................................................. 21
Figure 8: ZigBee Enabled ............................................................................................................ 22
Figure 9: LAN Settings when DHCP Disabled ............................................................................ 23
Figure 10: Ping Test ..................................................................................................................... 25
Figure 11: Server Connection Settings......................................................................................... 26
Figure 12: Inter-Inverter Communication Settings ......................................................... 28
Figure 13: Regional Settings Sub-Tab ......................................................................................... 29
Figure 14: Optimizers Data Tab ................................................................................................... 31
Figure 15: Adding an optimizer ................................................................................................... 33
Figure 16: Firmware Upgrade Sub-Tab ....................................................................................... 34
Figure 17: Miscellaneous Sub-Tab .............................................................................................. 35
Figure 18: Setting Real-Time Clock ............................................................................................ 36
Figure 19: Example of RS485 Bus Connection ........................................................................... 37

Support and Contact Information
SolarEdge Configuration Tool Software Guide
6
Support and Contact Information
If you have technical problems concerning our products, contact us at:
USA & Worldwide Support Line: +1.650.319.8843
Germany: +49.89.23513100
France: +33.(0)970.465.662
Israel: +972.73.2403116
Fax: +972.73.2403117
Email: [email protected]
Alternatively, you can click the Support option on the toolbar of the
Configuration Tool’s main window, and click the Contact Us button to
automatically create a support report for the SolarEdge support team. In this
case, your email client is opened with SolarEdge Support as the recipient.
From the window that opens, you can either click Send to save the relevant
site information in a textual .dat file, and send it to SolarEdge, or you can
click Save to save it to the .dat file, for sending at a later time. This file
includes various details about your installation, including all the serial
numbers of the Inverters and Optimizers at the site, how the Inverters are
configured, and a snapshot of the module level monitoring data. This
information is in text format, enabling you to review it before sending it.
These details help the SolarEdge support team diagnose the installation and
provide site-specific troubleshooting information.
If you do not use the Support option described above, before contacting
SolarEdge, collect the following information: Inverter and Optimizer types,
serial number(s) of the relevant Inverter(s) and Optimizer(es) in question,
the error indicated on the Inverter screen or on the SolarEdge Monitoring
Portal, System configuration information (including the type and number of
modules connected, and the number and length of strings), and the
communication method to the SolarEdge server.
Introduction
SolarEdge Configuration Tool Software Guide
7
Chapter 1
Introduction
What is the Configuration Tool?
The SolarEdge Configuration Tool is a software application that enables
you to configure SolarEdge site-specific parameters and to display and
troubleshoot site-specific issues. The Configuration Tool provides a
standard Windows GUI that can be accessed by connecting a computer or
laptop to the Inverter through its RS-232 connector.
The Configuration Tool enables you to define various kinds of installation
site-specific parameters, such as:
The country’s grid power specifications of the installation site
The Inverter communication option used to interact with the SolarEdge
Monitoring server
The Inverter’s status and Master/Slave configuration
The firmware versions installed on the Inverter
The Configuration Tool also enables you to easily display and verify
various site parameters, such as the Inverters’ and Optimizers’ serial
numbers and power outputs.
The SolarEdge Configuration Tool provides several additional options that
are not accessible using the LCD panel, such as enabling a firmware
upgrade of the Inverter and retrieval of a list of the serial numbers of the
Optimizers connected to the Inverter.

Introduction
SolarEdge Configuration Tool Software Guide
8
Installing the SolarEdge
Configuration Tool
► To install the SolarEdge Configuration Tool:
1 Download the application from the SolarEdge website (see the
following procedure) or drag the InConfTool folder from the supplied
CD on to your computer.
2 Double-click the setup.exe installation file and follow the steps in the
Setup Wizard.
► To download the application from the SolarEdge
website:
1 On your browser, navigate to http://www.solaredge.com, and click the
Downloads link.
2 In the Downloads tab, in Categories, select Software Tools.
3 In the drop-down list on the bottom of the page, select SolarEdge
Inverter Configuration Tool v2.0.2 – Software Download.
4 From the File Download dialog box that opens, download the file.
Setting Up the Connection to the
Inverter
Any standard laptop or PC can be used to run the SolarEdge Configuration
Tool. To do so, it must be connected to the Inverter. If you are connecting
multiple Inverters (refer to Chapter 3, Setting Up Multiple Inverters on
page 37), you can connect the PC either to a Slave Inverter or to the Master
Inverter.
Introduction
SolarEdge Configuration Tool Software Guide
9
NOTE:
At any time, you can connect a standard PC or computer to the Inverter without
turning it off, in order to display general information about the Inverter(s) and the
Optimizers to which it is connected at the site. However, be aware that changing
parameters or firmware, results in the Configuration Tool shutting off and restarting
the Inverter.
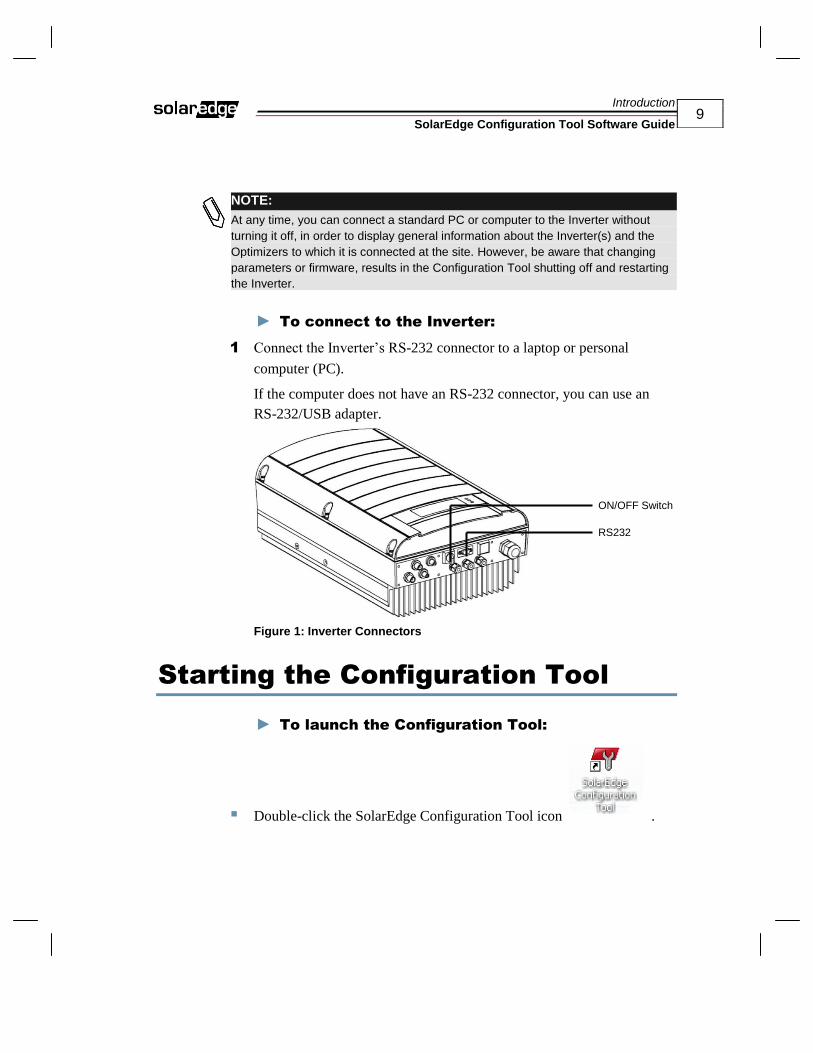
► To connect to the Inverter:
1 Connect the Inverter’s RS-232 connector to a laptop or personal
computer (PC).
If the computer does not have an RS-232 connector, you can use an
RS-232/USB adapter.
Figure 1: Inverter Connectors
Starting the Configuration Tool
► To launch the Configuration Tool:
Double-click the SolarEdge Configuration Tool icon .
ON/OFF Switch
RS232
Introduction
SolarEdge Configuration Tool Software Guide
10
Defining COM Port to Inverter
The first time that you launch the Configuration Tool, the Connect to
Device window opens.
Figure 2: Selecting the COM Port
In this window, you must specify the COM port through which the
computer is to communicate with the Inverter. To do so, you must verify
the RS-232 COM port on your computer. Instructions are provided in
Appendix A, Verifying the RS-232 COM Port, on page 40.
Selecting the Show on Startup checkbox causes subsequent launches of
the Configuration Tool to view this window upon startup, without having to
select the Connect button.
Redefining the COM Port
At any time, you can change the COM port through which the computer
connects to the Inverter.
► To redefine the COM port through which the
computer connects:
On the toolbar, select the Options button to redisplay the Connect
to Device window (see Figure 2).

Introduction
SolarEdge Configuration Tool Software Guide
11
Connecting to the Inverter
When the computer is not connected to the Inverter, the CONNECTION
STATUS displayed in the toolbar becomes OFFLINE. In this case, you
can connect the computer to the Inverter through the predefined COM port.
► To connect to the Inverter:
In the Configuration Tool main window, in the toolbar, click the
Connect button.
The Connect button changes to Disconnect and the
CONNECTION STATUS displayed in the toolbar becomes
ONLINE.
Main Window
After the Configuration Tool is launched and connected, the Main Window
displays the Inverter Information.
Figure 3: The Configuration Tool Main Window
Toolbar
Inverter List
Selected Inverter
Configuration Tool Tabs
Configuration Workspace
Introduction
SolarEdge Configuration Tool Software Guide
12
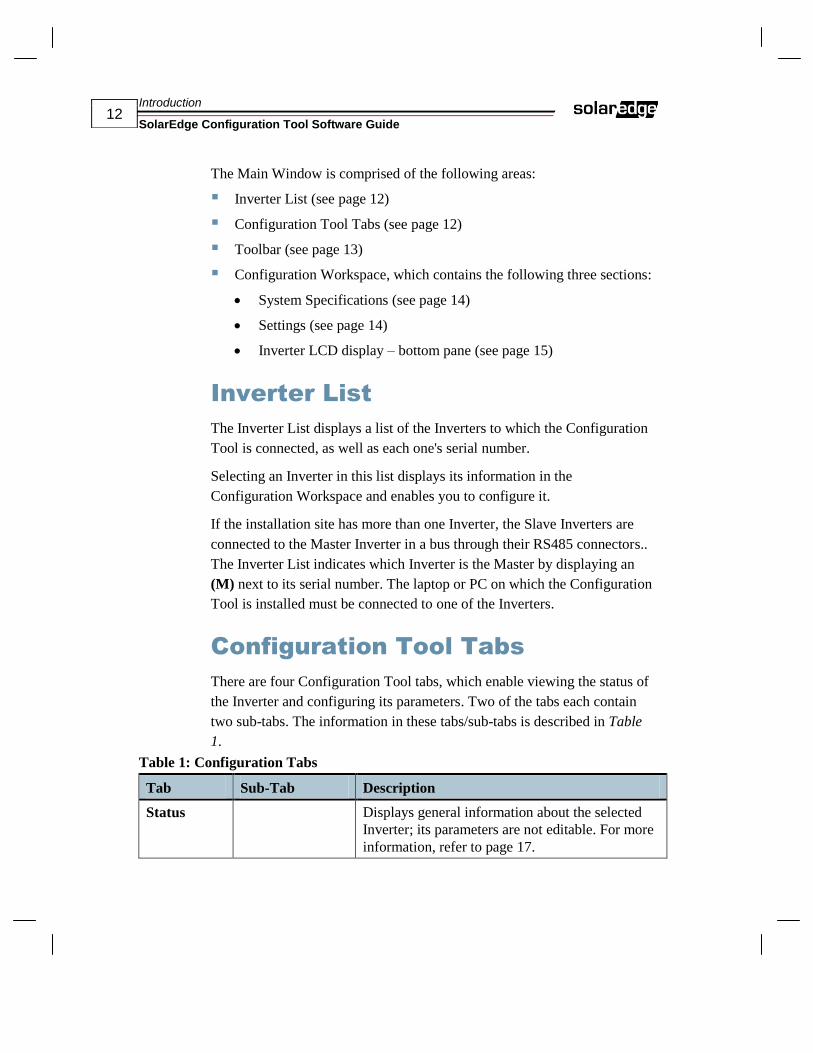
The Main Window is comprised of the following areas:
Inverter List (see page 12)
Configuration Tool Tabs (see page 12)
Toolbar (see page 13)
Configuration Workspace, which contains the following three sections:
System Specifications (see page 14)
Settings (see page 14)
Inverter LCD display – bottom pane (see page 15)
Inverter List
The Inverter List displays a list of the Inverters to which the Configuration
Tool is connected, as well as each one's serial number.
Selecting an Inverter in this list displays its information in the
Configuration Workspace and enables you to configure it.
If the installation site has more than one Inverter, the Slave Inverters are
connected to the Master Inverter in a bus through their RS485 connectors..
The Inverter List indicates which Inverter is the Master by displaying an
(M) next to its serial number. The laptop or PC on which the Configuration
Tool is installed must be connected to one of the Inverters.
Configuration Tool Tabs
There are four Configuration Tool tabs, which enable viewing the status of
the Inverter and configuring its parameters. Two of the tabs each contain
two sub-tabs. The information in these tabs/sub-tabs is described in Table
1.
Table 1: Configuration Tabs
Tab Sub-Tab Description
Status Displays general information about the selected
Inverter; its parameters are not editable. For more
information, refer to page 17.

Introduction
SolarEdge Configuration Tool Software Guide
13
Tab Sub-Tab Description
Settings
Communication
Settings
Displays information about the communication
method used to transfer SolarEdge site
information to the SolarEdge Monitoring Portal.
For more information, refer to page 17.
Regional
Settings
Displays various aspects (such as power and
language) of the Inverter that relate to the country
in which it is installed. For more information,
refer to page 29.
Optimizers
Data
Displays information about the Optimizers
connected to the selected Inverter. For more
information, refer to page 30.
Tools
Firmware
Upgrade
Enables you to upgrade the firmware of the
CPU, DSP1, and/or DSP2 versions. For more
information, refer to page 34.
Miscellaneous Enables you to set the RTC and to enable/disable
power balancing. For more information, refer to
page 35.
Toolbar
Table 2 describes the Configuration Tool toolbar buttons.
Table 2: Toolbar Buttons
Button Function
Connects the computer to the Inverter through the defined COM port.
Refer to the Connecting to the Inverter section on page 11 for more
information.
Refreshes the currently displayed information on the Configuration Tool
screen, by reading the current data from the Inverter.
Displays a window which describes how to contact SolarEdge support.
Refer to the section on page 37 for more information.
Enables you to redefine the COM port through which the computer
connects. Refer to the Defining the COM Port to the Inverter section on
page 10 for more information.

Introduction
SolarEdge Configuration Tool Software Guide
14
Button Function
Exits the Configuration Tool application. Make sure to save all changes
before exiting. Before disconnecting the Inverter, make sure that you
have saved all changes and exited the Configuration Tool application.
System Specifications
Section
describes the parameters in the System Specifications section.
Table 3: System Specifications Parameters
Parameter Description
Inverter Model Specifies the model number of the Inverter; for example, SE3300,
SE4000, and SE5000.
Inverter ID Specifies the serial number of the Inverter. This serial number appears
on the sticker on the side of the Inverter. The Inverter serial number is
also indicated on the warranty card that is provided with the Inverter.
CPU Version Specifies the firmware version of the Inverter’s CPU.
DSP1 Version Specifies the firmware version of the Inverter’s DSP1.
DSP2 Version Specifies the firmware version of the Inverter’s DSP2.
Settings Section
The following are the fields in the Settings section.
Table 4: Settings Section Parameters
Parameter Description
Language Specifies the language of the Inverter interface. This is the language of
the Inverter LCD panel display. The language can be changed in the
Regional Settings tab, as described in the Regional Settings section on
page 29.
Country Specifies the country for which the Inverter is configured. This
determines the electrical specifications of the Inverter. The Country
configuration can be changed in the Regional Settings tab, as described
in the Regional Settings section on page 29.
Introduction
SolarEdge Configuration Tool Software Guide
15
Parameter Description
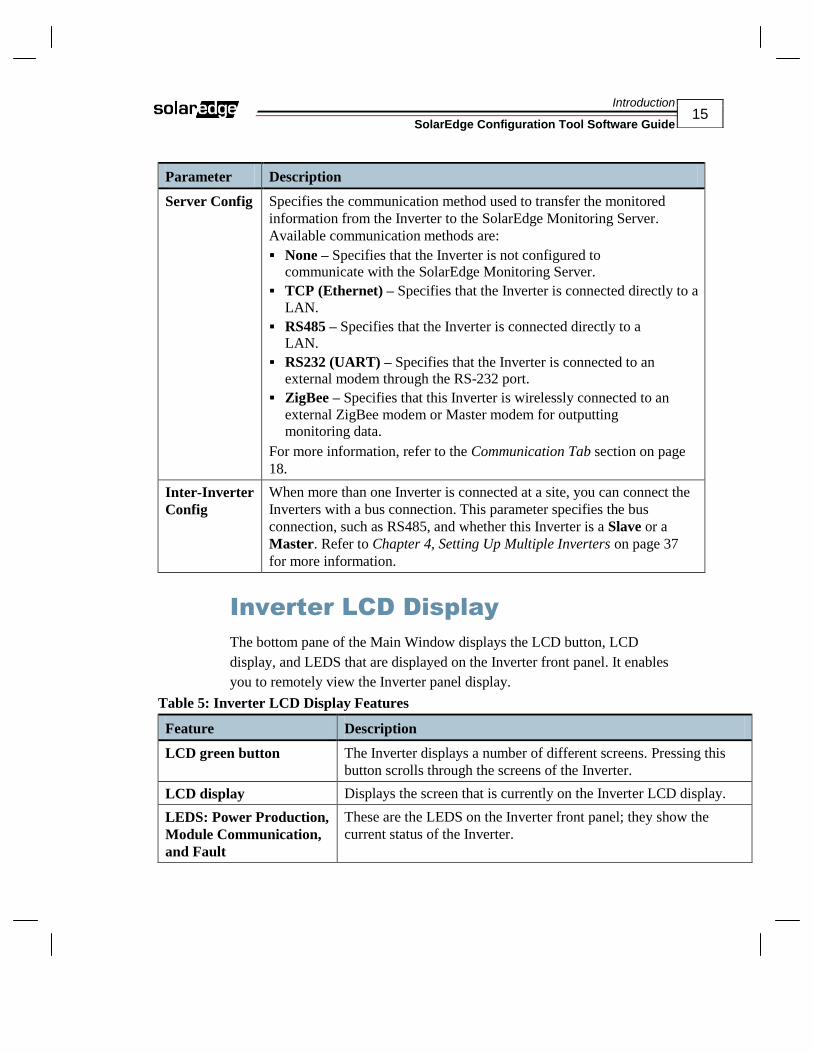
Server Config Specifies the communication method used to transfer the monitored
information from the Inverter to the SolarEdge Monitoring Server.
Available communication methods are:
None – Specifies that the Inverter is not configured to communicate with the SolarEdge Monitoring Server.
TCP (Ethernet) – Specifies that the Inverter is connected directly to a
LAN.
RS485 – Specifies that the Inverter is connected directly to a LAN.
RS232 (UART) – Specifies that the Inverter is connected to an external modem through the RS-232 port.
ZigBee – Specifies that this Inverter is wirelessly connected to an
external ZigBee modem or Master modem for outputting monitoring data.
For more information, refer to the Communication Tab section on page
18.
Inter-Inverter
Config
When more than one Inverter is connected at a site, you can connect the
Inverters with a bus connection. This parameter specifies the bus
connection, such as RS485, and whether this Inverter is a Slave or a
Master. Refer to Chapter 4, Setting Up Multiple Inverters on page 37
for more information.
Inverter LCD Display
The bottom pane of the Main Window displays the LCD button, LCD
display, and LEDS that are displayed on the Inverter front panel. It enables
you to remotely view the Inverter panel display.
Table 5: Inverter LCD Display Features
Feature Description
LCD green button The Inverter displays a number of different screens. Pressing this
button scrolls through the screens of the Inverter.
LCD display Displays the screen that is currently on the Inverter LCD display.
LEDS: Power Production,
Module Communication,
and Fault
These are the LEDS on the Inverter front panel; they show the
current status of the Inverter.

Introduction
SolarEdge Configuration Tool Software Guide
16
Feature Description
Update Panel As the parameters of the Inverter are constantly changing, the LCD
displays are also constantly changing. Selecting this checkbox
displays on the Main Window, the most updated LCD display.
Clearing this checkbox freezes the LCD display.

Configuring an Inverter
SolarEdge Configuration Tool Software Guide
17
Chapter 2
Configuring an Inverter
Communication Settings
Communication Dataflow
The SolarEdge site information can be accessed remotely using the
SolarEdge Monitoring Portal, as described in the SolarEdge Monitoring
Portal User Guide.
In order to transfer monitoring data from a SolarEdge site to the SolarEdge
Monitoring Portal, a communication connection must be set up, as
described below. Communication setup is not required for power
harvesting.
Optimizers send information to the SolarEdge Inverter via DC lines. No
added wires or configuration are required for this purpose. The Inverter
sends this information to the SolarEdge Monitoring Server through the
Internet.
For more information about installation and connection, refer to the
SolarEdge Installation Guide.

Configuring an Inverter
SolarEdge Configuration Tool Software Guide
18
Communications Settings
Tab
The Communication Settings tab is opened from the Settings tab in the
Main Window. It enables you to view the communication method used to
transfer SolarEdge site information to the SolarEdge Monitoring Portal, and
to change it, as required.
Figure 4: Communication Settings Sub-Tab
The Communications Settings screen displays the current communication
settings of the Inverter. Each of the following communication connection
settings is displayed on the screen in an individual sub-window: RS232,
RS485, ZigBee, LAN, Server Connection, and Inter-Inverter Comm.
The Communications Settings screen displays color-coded lines between
the sub-windows and system components, which show the status of each
communication connection, as follows:
Green – The interface is on and working well
Grey – The interface is not being used
Red – There is an error with the interface

Configuring an Inverter
SolarEdge Configuration Tool Software Guide
19
You can change the settings of any communication connection, by clicking
anywhere in its sub-window. This opens up a window for configuring new
parameter values for that communication connection. After configuring the
settings, you can click the Apply button on the window to upload the new
parameters. After the Configuration Tool finishes uploading the parameters
to the Inverter, the Inverter automatically shuts down and restarts.
The following sections describe the sub-windows in the Communication
Settings window, along with their corresponding windows for configuring
new parameter settings.
RS232 Status
Table 6 describes the parameter displayed in the RS232 Status sub-window
in the Communication Settings window.
Table 6: RS232 Status Parameter
Parameter Description
Comm Type Specifies the type of serial communication between the laptop or
external modem, and the Inverter. Possible values are:
Regular – Serial cable connection
GSM – External serially connected GSM modem
Setting the RS232 Parameters
Clicking inside the RS232 Status sub-window displays the relevant RS232
Settings screen (regular or GSM).
Figure 5: RS232 Regular Communication

Configuring an Inverter
SolarEdge Configuration Tool Software Guide
20
Figure 6: RS232 GSM Communication
Changing the Comm Type value (from Regular to GSM, or vice versa),
changes the RS232 Settings screen that appears.
The parameters on the window that appear for Comm Type = GSM (see
Figure 6) are attainable through your mobile operator.
Table 7: RS232 GSM Parameters
Parameter Description
Modem Type Select the make and model of the GSM modem.
APN Type the Access Point Name, which is a GPRS network identifier.
Username,
Password
Type the username and password for accessing GPRS; these fields
must be filled in, only if your carrier policy requires them.
RS485 Status
Inverters can be connected to each other at a single site through an RS485
bus connection. In this case, one Inverter is the Master, and the remaining
Inverters are the Slaves. In this sub-window, you can display the RS485
status of the selected Inverter:
Slave – the default
Master

Configuring an Inverter
SolarEdge Configuration Tool Software Guide
21
Setting the RS485 Parameters
Clicking inside the RS485 Status sub-window displays the RS485 Settings
window, in which you can change the status of the Inverter from Master to
Slave or vice versa, as required.
Figure 7: RS485 Settings
Refer to Chapter 4, Setting Up Multiple Inverters, on page 37 for more
information about defining an Inverter as a Master or Slave.
This field has no relationship to the definition of the communication
method used to transfer the monitored information from the Inverter to the
SolarEdge Monitoring Server, as defined in the Inter-Inverter Comm Status
Comm Type field, in the Inter-Inverter Comm Status section.
ZigBee Status
The ZigBee sub-window displays the ZigBee status of the selected Inverter:
Disabled – if the ZigBee modem is not installed in the Inverter
Master – if a ZigBee Coordinator is installed in the Inverter
Slave – if a ZigBee Slave is installed in the Inverter

Configuring an Inverter
SolarEdge Configuration Tool Software Guide
22
Setting the ZigBee Parameters
Clicking inside the ZigBee Status sub-window displays the relevant ZigBee
Settings window.
Figure 8: ZigBee Enabled
Table 8 describes the parameters of the ZigBee Settings window.
Table 8: ZigBee Parameters
Parameter Description
Configuration Type one of the following:
Master – if the ZigBee Coordinator is installed in the Inverter
Slave – if the ZigBee Slave is installed in the Inverter
Disabled – if the ZigBee modem is not installed in the Inverter
Pan ID For ZigBee enabled, type the external ZigBee modem Personal
Area Network ID in hex. This ID differentiates this group from
other groups of Inverters that may be installed in the vicinity.
For ZigBee disabled, type 0.
Scan Channel For ZigBee enabled, select the external modem network
channel, in hex. This enables manually checking which of 16
frequencies the ZigBee supports. You can force a specific channel, if required.
For ZigBee disabled, type 0.
After changing the ZigBee settings, you must click the Apply button, in
order to configure the internal parameters to the ZigBee card.

Configuring an Inverter
SolarEdge Configuration Tool Software Guide
23
LAN Status
The LAN Status sub-window displays the settings of the communication
parameters of the router interface, used to connect the Inverter to the
Internet. Table 9 describes these parameters.
Table 9: LAN Status Parameters
Parameter Description
DHCP When DHCP is Enabled, the Inverter’s IP address has
automatically been set by the Internet Gateway, and is
displayed in the IP field (the following parameter).
When DHCP is Disabled, you have to manually enter a fixed IP address for this Inverter.
IP Displays the current IP address of the Inverter.
Subnet A router parameter used for connecting to the Internet.
Gateway A router parameter used for connecting to the Internet.
Setting the LAN Parameters
Clicking inside the LAN Status sub-window opens the LAN Settings
window.
Figure 9: LAN Settings when DHCP Disabled
If DHCP is Enabled in the Communication Settings window, the Use
DHCP checkbox is selected, and the Settings column is disabled.
Configuring an Inverter
SolarEdge Configuration Tool Software Guide
24
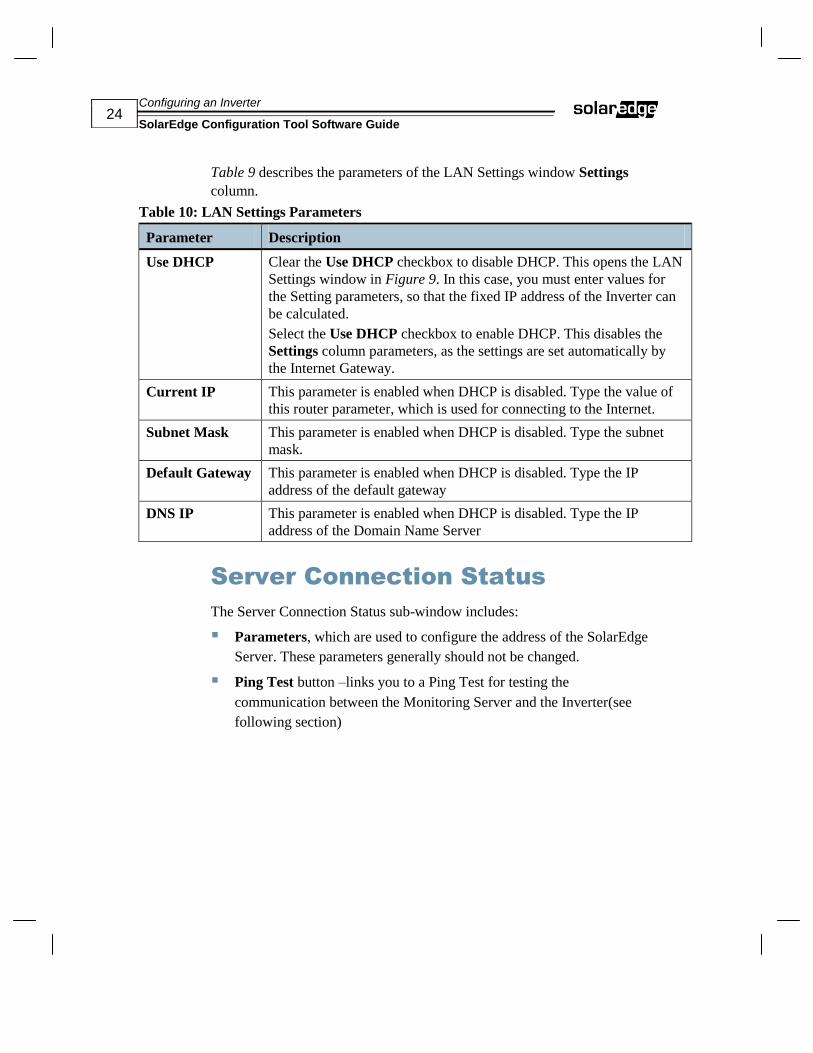
Table 9 describes the parameters of the LAN Settings window Settings
column.
Table 10: LAN Settings Parameters
Parameter Description
Use DHCP Clear the Use DHCP checkbox to disable DHCP. This opens the LAN
Settings window in Figure 9. In this case, you must enter values for
the Setting parameters, so that the fixed IP address of the Inverter can
be calculated.
Select the Use DHCP checkbox to enable DHCP. This disables the
Settings column parameters, as the settings are set automatically by
the Internet Gateway.
Current IP This parameter is enabled when DHCP is disabled. Type the value of
this router parameter, which is used for connecting to the Internet.
Subnet Mask This parameter is enabled when DHCP is disabled. Type the subnet
mask.
Default Gateway This parameter is enabled when DHCP is disabled. Type the IP
address of the default gateway
DNS IP This parameter is enabled when DHCP is disabled. Type the IP
address of the Domain Name Server
Server Connection Status
The Server Connection Status sub-window includes:
Parameters, which are used to configure the address of the SolarEdge
Server. These parameters generally should not be changed.
Ping Test button –links you to a Ping Test for testing the
communication between the Monitoring Server and the Inverter(see
following section)

Configuring an Inverter
SolarEdge Configuration Tool Software Guide
25
Table 11: Server Connection Status Parameters
Parameter Description
Address The address of the Monitoring Server.
Port The port of the Monitoring Server.
Via Specifies the communication method used to transfer the monitored
information from the Inverter to the SolarEdge Monitoring Server.
Performing the Ping Test
Clicking the Ping Test button in the Monitor Server Status sub-window,
opens the Ping Test window.
Figure 10: Ping Test
In the Ping Test window, you can set the parameters for the Ping Test, and
then perform the test.
Table 12: Ping Test Parameters/Buttons
Parameter/Button Description
Address Type the address of the Monitoring Server that is displayed in the
Address field in the Monitor Server Status sub-window.
[Ping] Click this button to check the communication between the Server
and Inverter.
[Clear] Clears the Ping results pane.
[Cancel] Click this button to cancel the Ping Test.
Ping results pane Displays a Success message, if the Ping Test results indicate a
successful connection between the Monitoring Server and the

Configuring an Inverter
SolarEdge Configuration Tool Software Guide
26
Parameter/Button Description
Inverter; otherwise, it displays a Failure message.
NOTE:
If your Inverter does not indicate a proper connection to the SolarEdge Server
(indicated by S_OK on the Inverter’s LCD screen), you can use the Ping option
to ping any Internet site in order to verify whether the problem is an Internet
connection or configuration problem. If you cannot ping any sites, you should
check the IP configuration and your local firewall settings.
Setting the Server Connection
Parameters
Clicking inside the Server Connection Status sub-window opens the Server
Connection Settings window.
NOTE:
Generally, the Server Connection settings should not be changed.
Figure 11: Server Connection Settings
The Server Connection Settings parameters are defined in Table 13.
Table 13: Server Connection Settings Parameters
Parameter Description
Address Type the address of the Monitoring Server.
Port Type the port of the Monitoring Server.

Configuring an Inverter
SolarEdge Configuration Tool Software Guide
27
Parameter Description
Via Select the communication method used to transfer the monitored
information from the Inverter to the SolarEdge Monitoring Server.
Available options are:
None – Specifies that the Inverter is not configured to communicate with the SolarEdge Monitoring Server.
Ethernet (TCP) – Enables the connection of the Inverter directly to a LAN.
RS485 – If multiple Inverters are connected through an RS485 bus
in a Master/Slave relationship, selecting this option specifies that
the Slaves on this bus will output the monitoring data via this
RS485.
RS232 (UART) – Enables the connection of the Inverter to an external modem through the RS-232 port.
ZigBee – Enables you to specify that this Inverter is wirelessly
connected to an external ZigBee modem or a Master modem for
outputting monitoring data.
Inter-Inverter Comm Status
The Configuration Tool is connected either to a Slave Inverter or a Master
Inverter. This sub-window displays the logical communication mode
between the Master Inverter and Slave Invertors. Also, if the selected
Inverter is a Master, you can detect and display all its Slaves in the Inverter
List. The parameter and button of this sub-window are described in Table
14.
Table 14: Inter-Inverter Comm Status Parameters/Button
Parameter/Button Description
Comm Type The logical communication mode between the
Master Inverter and Slave Inverters.
[Detect Slaves] Click this button to detect all the Slave Inverters connected to the
Master Inverter, and to display them and their serial numbers in
the Inverter list on the left of the Main Window. The Inverter List
indicates the Master Inverter by displaying an (M) next to its
serial number.

Configuring an Inverter
SolarEdge Configuration Tool Software Guide
28
Setting the Inter-Inverter Communication
Parameters
Clicking inside the Inter-Inverter Comm Status sub-window displays the
Inter-Inverter Communication Settings window.
Figure 12: Inter-Inverter Communication Settings
Table 15 describes the parameters of this window.
Table 15: Inter-Inverter Communication Settings Parameters
Parameter Description
Comm Type Select the logical communication between the Slave Inverters and
the Master Inverter. Possible options are:
RS485
ZigBee
Comm Mode When Comm Type is ZigBee, enables defining the ZigBee
communication mode, as either:
Peer to Peer – Full Mesh
M/S – Point-to-point communication (M/S)

Configuring an Inverter
SolarEdge Configuration Tool Software Guide
29
Regional Settings
The Regional Settings sub-tab can be opened from the Settings tab on the
Main Window. The Inverter arrives preconfigured in the local language.
This window displays the current Inverter values, and enables you to
configure various aspects of the Inverter that relate to the country in which
the SolarEdge site is installed. Several parameters can be viewed or
changed only by certified technicians or SolarEdge personnel.
Figure 13: Regional Settings Sub-Tab
Table 16: Regional Settings Parameters
Parameter Description
Language Select the interface language of the Inverter; this is the language in which
the LCD panel of the Inverter is displayed.
Country Select the country for which the Inverter’s power parameters are
configured. The DSP1 parameters (see following field) are automatically
set according to the country that is selected in this field.
DSP1
Parameters
Specifies the Inverter’s power parameters. (Refer to Table 17 for the
meanings of these parameters.) These values are set automatically
according to the country that is selected in the Country field, as described
above. The parameters for each country are specified according to each

Configuring an Inverter
SolarEdge Configuration Tool Software Guide
30
Parameter Description
country’s local certification requirements. However, if you get proper
authorization from your local grid and code bodies, these parameters can
be changed to accommodate different grid parameters. After getting this
authorization, contact SolarEdge for instructions on how to change these
parameters.
[Apply] Click this button to upload the new Regional parameters to the Inverter.
After the Configuration Tool finishes uploading the parameters to the
Inverter, the Inverter automatically shuts down and restarts.
Table 17 shows the DSP1 parameters and their meanings. Note that these
parameters have a viewing access level and change access level.
Monitoring is the lowest level access.
Table 17: DSP1 Parameter Definitions
Parameter Meaning Write
Access
Viewing
INVGRID_VOUT_MAX Maximum Grid Voltage –
transient (V)
Technician Monitoring
INVGRID_VOUT_MIN Minimum Grid Voltage (V) Technician Monitoring
INVGRID_VOUT_MAX2 Maximum Grid Voltage –
steady state (V)
Technician Monitoring
INVGRID_F_GRID_MAX Maximum Grid Frequency (Hz) Technician Monitoring
INVGRID_ F_GRID_MIN Minimum Grid Frequency (Hz) Technician Monitoring
Optimizers Data
The Optimizers Data tab comprises two sections:
Connected Optimizers Live Parameters – a table which displays
information about the Optimizers that are connected to the selected
Inverter
Data Control – buttons for performing operations on Optimizer
Records, Optimizer Data, and Telemetry Control

Configuring an Inverter
SolarEdge Configuration Tool Software Guide
31
Figure 14: Optimizers Data Tab
The Inverter automatically identifies the serial numbers of the Optimizers
connected to it, and lists them and the other Optimizer information, in the
Connected Optimizers Live Parameters table. The table is refreshed
periodically, thus displaying the latest statuses of the Optimizers connected
to the Inverter(s). Table 18 describes the parameters of the Optimizers.
Table 18: Connected Optimizers Live Parameters
Parameter Description
# Specifies a sequential number of the rows in this window
ID Specifies the unique identifier of the Optimizer
VIn [v] Specifies the DC input voltage to the Optimizer, in Volts
VOut [v] Specifies the DC output voltage from the Optimizer, in Volts
IIn [A] Specifies the input current to the Optimizer, in Amperes
Version Specifies the software version of the Optimizer.
Time Specifies the last time that the telemetry of the data was received;
this indicates the time of the data

Configuring an Inverter
SolarEdge Configuration Tool Software Guide
32
Table 19 describes the functions of the Data Control buttons.
Table 19: Data Control Buttons
Button Function
Export Data Clicking this button saves the Optimizers' parameters information
on this screen to an Excel file. A standard file selection window is
displayed, enabling you to specify a file with an .xls file extension
to which to save the information.
Load List Clicking this button loads the Optimizers' parameters information
from an Excel file onto this screen. A standard file selection
window is displayed, enabling you to specify the file with an .xls
file extension, which you want to load.
Add Optimizer Clicking this button manually enables you to add a specific
Optimizer to the list (see Adding an Optimizer section). This is
used in the event that you replace a defective optimizer.
Remove
Optimizer
Clicking this button removes an optimizer from the list. This is
used if for some reason you removed an optimizer from
installation.
Update Versions Clicking this button updates the software version of the Optimizer
firmware. This changes the software of all the Optimizers.
Normal Clicking this button returns communication to Normal speed.
Fast By default, each Optimizer communicates when it wants to (about
every five minutes), and there is no synchronization between the
Optimizers. Clicking this button causes Optimizers to
communicate constantly. A disclaimer appears. This feature is
convenient for speeding up installation.
Force Telemetry Clicking this button after highlighting an optimizer on the list,
displays the telemetry of that Optimizer.

Configuring an Inverter
SolarEdge Configuration Tool Software Guide
33
Adding an Optimizer
You can manually add an optimizer to an Inverter. This may be necessary if
an optimizer has to be replaced. Clicking the Add Optimizer Data Control
button opens the following window.
Figure 15: Adding an optimizer
Table 20: Enter Optimizer Serial ID
Parameter Description
Serial ID Type the Optimizer serial ID.
Checksum Type the Optimizer Checksum.
Use Barcode Select this checkbox to use the information on the Optimizer
barcode. This feature can be used provided that a barcode scanner
is connected to your computer.
[Accept] Add the Optimizer to the list of Optimizers.
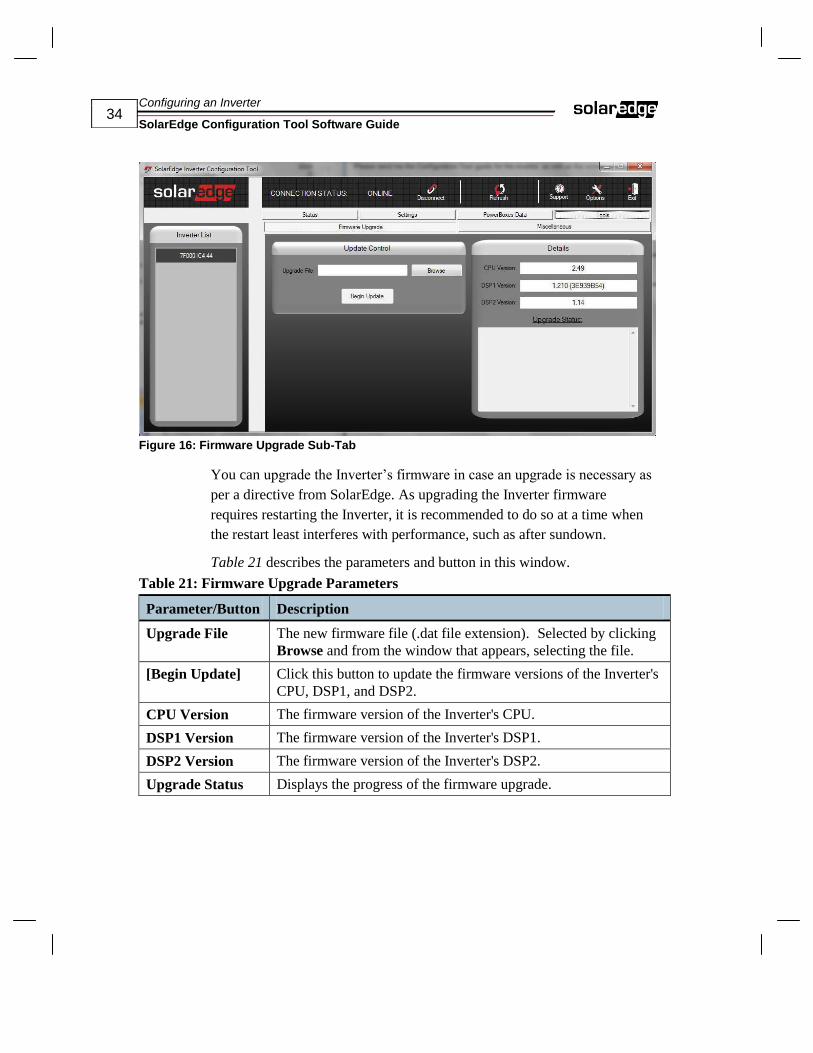
Firmware Upgrade
The Firmware Upgrade sub-tab can be opened from the Tools
tab on the Main Window. It enables you to update the firmware
version of the CPU, DSP1, and/or DSP2.
Configuring an Inverter
SolarEdge Configuration Tool Software Guide
34
Figure 16: Firmware Upgrade Sub-Tab
You can upgrade the Inverter’s firmware in case an upgrade is necessary as
per a directive from SolarEdge. As upgrading the Inverter firmware
requires restarting the Inverter, it is recommended to do so at a time when
the restart least interferes with performance, such as after sundown.
Table 21 describes the parameters and button in this window.
Table 21: Firmware Upgrade Parameters
Parameter/Button Description
Upgrade File The new firmware file (.dat file extension). Selected by clicking
Browse and from the window that appears, selecting the file.
[Begin Update] Click this button to update the firmware versions of the Inverter's
CPU, DSP1, and DSP2.
CPU Version The firmware version of the Inverter's CPU.
DSP1 Version The firmware version of the Inverter's DSP1.
DSP2 Version The firmware version of the Inverter's DSP2.
Upgrade Status Displays the progress of the firmware upgrade.

Configuring an Inverter
SolarEdge Configuration Tool Software Guide
35
Miscellaneous
The Miscellaneous tab sub-tab is opened from the Tools tab on
the Main Window. It enables you to set the following:
Real-Time Clock (RTC) – Generating accurate reports such as daily
energy statistical reports, requires the Inverter real-time clock to be set
accurately. The Inverter real-time clock arrives set, and is automatically
updated by the server. However, if you do not have a server connection,
you may have to set the clock.
Power Balancing status – After installing a power balancer in the
Inverter according to its installation manual, you are required to enable
it.
Figure 17: Miscellaneous Sub-Tab
Table 22 describes the parameters and buttons in this window:
Table 22: Miscellaneous Parameters
Parameter/Button Description
GMT Offset Displays the current GMT offset in hours.
[Set RTC] Click this button to set the real-time clock. Opens a window for
setting the real-time clock of the Inverter.
Configuring an Inverter
SolarEdge Configuration Tool Software Guide
36
Parameter/Button Description
Status Select one of the following options:
Enable – to enable Power Balancing.
Disable – to disable Power Balancing
[Set Status] Click this button to set the Power Balancing status.
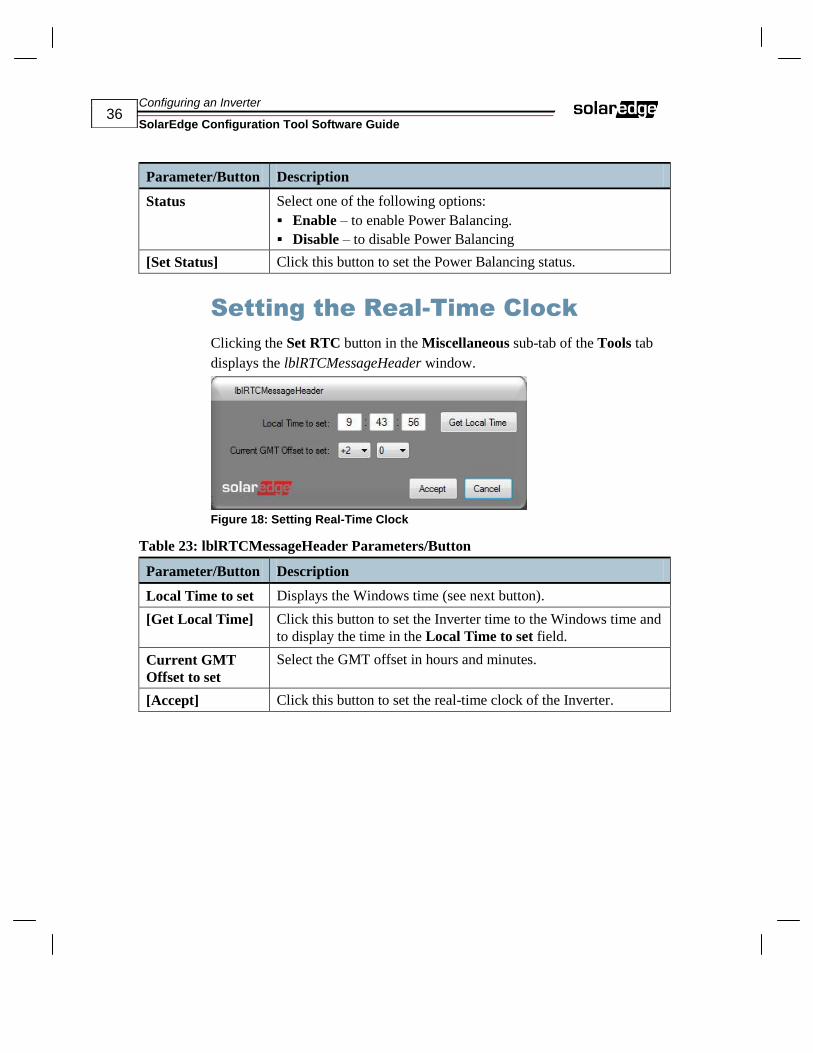
Setting the Real-Time Clock
Clicking the Set RTC button in the Miscellaneous sub-tab of the Tools tab
displays the lblRTCMessageHeader window.
Figure 18: Setting Real-Time Clock
Table 23: lblRTCMessageHeader Parameters/Button
Parameter/Button Description
Local Time to set Displays the Windows time (see next button).
[Get Local Time] Click this button to set the Inverter time to the Windows time and
to display the time in the Local Time to set field.
Current GMT
Offset to set
Select the GMT offset in hours and minutes.
[Accept] Click this button to set the real-time clock of the Inverter.
Setting Up Multiple Inverters
SolarEdge Configuration Tool Software Guide
37
Chapter 3
Setting Up Multiple
Inverters
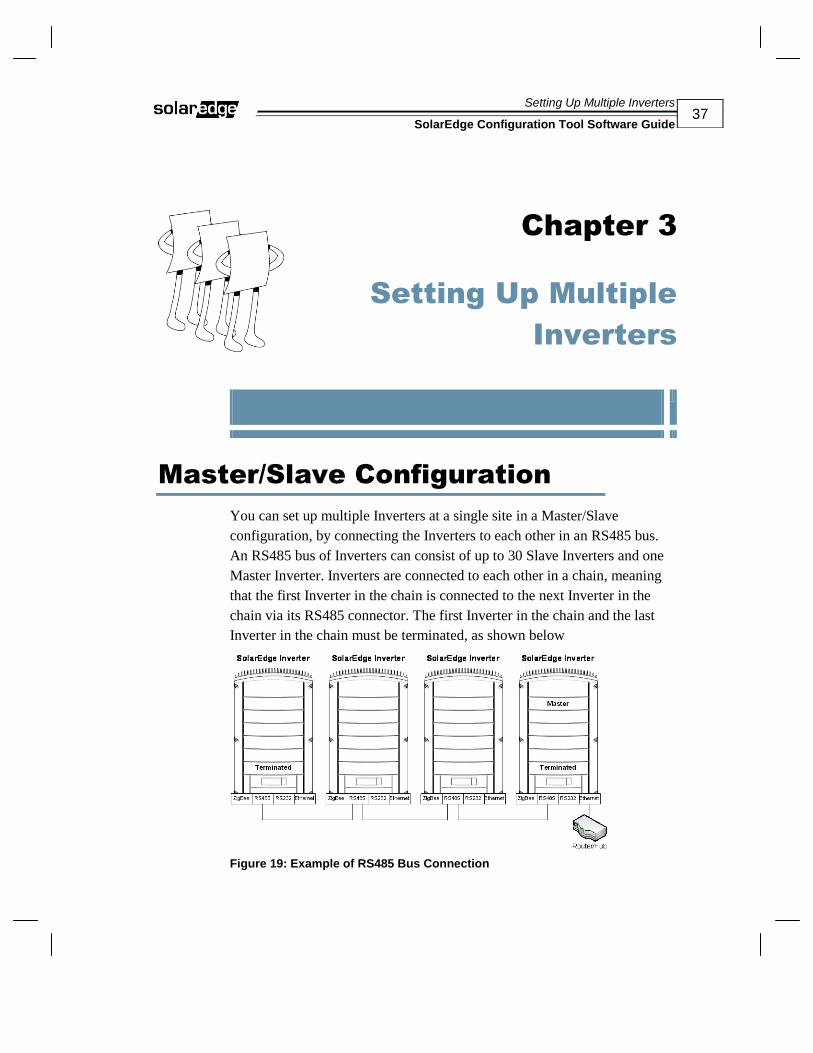
Master/Slave Configuration
You can set up multiple Inverters at a single site in a Master/Slave
configuration, by connecting the Inverters to each other in an RS485 bus.
An RS485 bus of Inverters can consist of up to 30 Slave Inverters and one
Master Inverter. Inverters are connected to each other in a chain, meaning
that the first Inverter in the chain is connected to the next Inverter in the
chain via its RS485 connector. The first Inverter in the chain and the last
Inverter in the chain must be terminated, as shown below
Figure 19: Example of RS485 Bus Connection

Setting Up Multiple Inverters
SolarEdge Configuration Tool Software Guide
38
Setting the Communication
Configuration of the Master
By default, all Inverters are provided as a Slave. You can connect the
standard laptop or PC (on which the Configuration Tool is installed) to a
Slave Inverter or to the Master Inverter. This enables you to configure the
Master Inverter and all the Slave Inverters through a single interface (the
Configuration Tool).
► To set up the Master Inverter:
1 In the Communication Settings tab, in the RS 485 Status field,
change the value to Master.
2 In the Server Communication Status section, in the Via field, define
the communication method used to transfer SolarEdge site information
from the Master (and collected Slave site information) to the SolarEdge
Monitoring Portal, as described in the Communication Dataflow
section on page 17.
► To set up the Slave Inverters on the RS485 Bus:
1 In the Inter-Inverter Comm Status section, in the Comm Type field,
select the communication status used between the slave Inverters.
2 Click the Detect Slaves button to detect all the Slave Inverters
connected to this Master Inverter and to display them in the Inverter
List on the left.
A progress message is displayed during the detection process. Wait
until the following message is displayed:
Each Inverter shows its serial number. The Inverter List indicates the
Master Inverter by displaying an (M) next to its serial number.
Setting Up Multiple Inverters
SolarEdge Configuration Tool Software Guide
39
► To set up each Slave’s configuration:
1 Select a Slave Inverter in the Inverter List to display its configuration.
2 Set the configuration parameters as necessary. For example, set the
Country configuration in the Regional Settings tab, as described in the
the Regional Settings section on page 29.
3 Perform steps 1 and 2 above for each Slave Inverter.
Reviewing Installation
Information
The Inverter List lists all the Inverters to which the Configuration Tool is
connected, as well as their serial numbers.
Selecting an Inverter in this list displays its information. You can review
each Inverter’s information in the Status tab, as described on page 17, and
in the Optimizers Data tab, as described on page 30.

Verifying the RS-232 COM Port
SolarEdge Configuration Tool Software Guide
40
Appendix A
Verifying the RS-232
COM Port
Verifying the RS-232 Port
You can check which COM port on your computer is RS-232, so that you
connect it to the Inverter.
► To verify the RS-232 COM port on your computer:
1 Right-click the My Computer icon on your desktop and select the
Properties option.
The System Properties window is displayed.
2 Select the Hardware tab.
3 Click the Device Manager button.
The Device Manager window is displayed.

Verifying the RS-232 COM Port
SolarEdge Configuration Tool Software Guide
41
4 Expand the Ports (COM & LPT) branch, as shown below:
Take note of the COM port that is displayed in the RS-232 Port branch. For
example, the screen above shows the COM25 port. The number of this
COM port must be specified by you later when you use the Configuration
Tool to connect to the Inverter, as described in the Defining COM Port to
Inverter section on page 10.
The example above shows the RS-232 Isolated Port branch, as an RS-
232/USB adapter is being used to connect the Inverter to the computer. The
RS-232/USB adaptor must be installed according to its manufacturer’s
specifications.
Verifying the RS-232 COM Port
SolarEdge Configuration Tool Software Guide
42
Kk