solar panel 3-phase inverter controlled by the pxs20 inverter topologies solar panel 3-phase...
TRANSCRIPT

Freescale SemiconductorApplication Note
Document Number: AN4437Rev. 0, 1/2012
Contents
Introduction . . . . . . . . . . . . . . . . . . . . . . . . . . . . . . . . . . . 11.1 Application features and components . . . . . . . . . . . 23-phase inverter topologies . . . . . . . . . . . . . . . . . . . . . . . 2
2.1 H-bridge topology description . . . . . . . . . . . . . . . . . 22.2 H5 topology description . . . . . . . . . . . . . . . . . . . . . . 42.3 Control of a 3-phase inverter with a PXS20 . . . . . . 6The PXS20 for 3-phase solar panel inverter . . . . . . . . . . 7
3.1 PXS20 Features . . . . . . . . . . . . . . . . . . . . . . . . . . . 73.2 PXS20 block diagram . . . . . . . . . . . . . . . . . . . . . . . 93.3 PXS20 peripheral utilization for solar panel 3-phase
inverter . . . . . . . . . . . . . . . . . . . . . . . . . . . . . . . . . 10Solar panel 3-phase inverter demonstrator . . . . . . . . . . 17
4.1 Hardware. . . . . . . . . . . . . . . . . . . . . . . . . . . . . . . . 184.2 Software implementation . . . . . . . . . . . . . . . . . . . . 194.3 FreeMASTER user interface . . . . . . . . . . . . . . . . . 21References . . . . . . . . . . . . . . . . . . . . . . . . . . . . . . . . . . 22Revision history . . . . . . . . . . . . . . . . . . . . . . . . . . . . . . . 22
Solar Panel 3-Phase Inverter Controlled by the PXS20by: Libor Prokop
Rožnov pod Radhoštem, Czech Republic
1 IntroductionToday, the demand for green energy is very strong. One possible option for meeting this demand is to convert solar energy into electrical energy. This process is supported by the photovoltaic (PV) solar panel, which produces various DC output voltages and output power.
In the conversion from DC to AC power, dedicated inverters maintain the right working point for the solar panel to maximize its use of solar energy. Freescale Semiconductor’s processors built on Power Architecture® technology are well suited for the control of such inverters. Freescale offers a broad portfolio of PX microcontrollers built on Power Architecture technology for power management and motor control applications. The target portfolio for these devices includes consumer, industrial, and other markets. One microcontroller from the PX Series of Power Architecture devices can control the whole 3-phase inverter in various configurations and output power.
1
2
3
4
56
© Freescale Semiconductor, Inc., 2012. All rights reserved.

3-phase inverter topologies
1.1 Application features and componentsThe aim of this application note is to show the control of a 3-phase DC to AC inverter by a Freescale PXS20 microcontroller. This inverter is intended for use with solar PV panels as the power source. The solar panels have to be connected to three equal panel arrays, one for each phase, electrically isolated from each other. The generated 3-phase output voltage is not isolated from the solar panels.
A 3-phase power stage board has been designed to evaluate and demonstrate the PXS20’s ability to control such 3-phase inverter applications.
2 3-phase inverter topologiesThere are several main topologies used in the power stages of inverters. The most usable are:
• Standard 3-phase power modules (three half-bridges specially connected in a single case), mostly used in motor control applications
• Three H-bridges (HB), transformerless, connected directly to the solar panel arrays, or isolated at the input and connected at the output to the 3-phase system
• Three H5 bridges, transformerless, connected directly to the solar panel arrays, or isolated at the input and connected at the output to the 3-phase system
• Three HERIC bridges, transformerless, corrected directly to solar panels arrays, or isolated at the input and connected at the output to the 3-phase system
All topologies can be equipped with a boost stage. The main improvements in implementing the boost stage are the wide input voltage range and the possibility of implementing an MPPT algorithm.
The H5 and HERIC topologies are patent protected; the others are free for use. Because the H5 and clear HB topologies are very similar in hardware configuration, these two topologies have been selected for our control example.
2.1 H-bridge topology description This topology uses three standard H-bridge (HB) power stages. Each of them is powered by a separate DC power source. There are three power sources used—one for each phase (solar panel with a boost stage). See Figure 1.
Figure 1. 1-phase H-bridge (HB) power stage topology
Figure description:
12
12
12
12
12
S1
S2
S3
S4
20kHz
L1
C1
PV
L2
GRID
12
Solar Panel 3-Phase Inverter Controlled by the PXS20, Rev. 0
Freescale Semiconductor 2
3-phase inverter topologies
PV—solar panel
C1—input capacitor
S1–S4—power switches (MOSFETs on the board)
L1, L2—output inductors
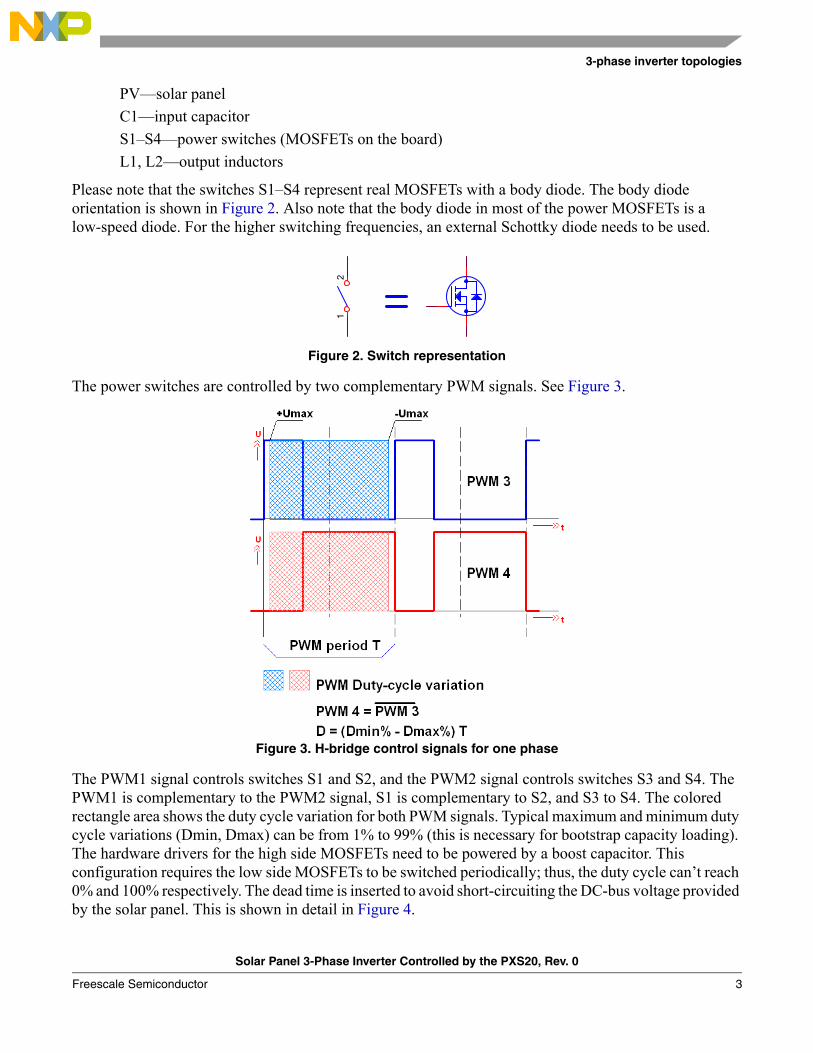
Please note that the switches S1–S4 represent real MOSFETs with a body diode. The body diode orientation is shown in Figure 2. Also note that the body diode in most of the power MOSFETs is a low-speed diode. For the higher switching frequencies, an external Schottky diode needs to be used.
Figure 2. Switch representation
The power switches are controlled by two complementary PWM signals. See Figure 3.
Figure 3. H-bridge control signals for one phase
The PWM1 signal controls switches S1 and S2, and the PWM2 signal controls switches S3 and S4. The PWM1 is complementary to the PWM2 signal, S1 is complementary to S2, and S3 to S4. The colored rectangle area shows the duty cycle variation for both PWM signals. Typical maximum and minimum duty cycle variations (Dmin, Dmax) can be from 1% to 99% (this is necessary for bootstrap capacity loading). The hardware drivers for the high side MOSFETs need to be powered by a boost capacitor. This configuration requires the low side MOSFETs to be switched periodically; thus, the duty cycle can’t reach 0% and 100% respectively. The dead time is inserted to avoid short-circuiting the DC-bus voltage provided by the solar panel. This is shown in detail in Figure 4.
12
Solar Panel 3-Phase Inverter Controlled by the PXS20, Rev. 0
Freescale Semiconductor 3

3-phase inverter topologies
The true sine shape output voltage is generated in a very simple way. Let’s imagine the duty cycles of both the PWM signals are the same, and equal to 50%. Then the output voltages at the output inductors L1 and L2 (see Figure 1) have the same value, equal to half of the power DC voltage (usually called the DC-bus).
Figure 4. Dead time period
Now let’s imagine the situation depicted in Figure 4. The PWM1 has the duty cycle equal to 30% and the PWM2 equals 70%. Then the average output voltage of the S1–S2 pair differs from the average output voltage of the S2–S3 pair, and the output current flows through the output inductors to the load (to the grid, for grid connected inverters). The sine shape output current is maintained through the PWM control by the controller.
For control of the 3-phase inverter with a full-bridge configuration, the six PWM channels need to be used.
A significant issue can arise when a non-isolation inverter is used. Because the grid has a galvanic connection with the solar panel, the ground impedance of the grid in conjunction with the stray capacitance of the solar panel can involve unwanted common-mode leakage current oscillations. This leakage current increases the system losses, reduces the grid-connected current quality, and induces the EMI and safety problems. To avoid these problems, the solar DC power line needs to be disconnected from the grid line during all commutation states of the inverter. This task can be resolved using the H5 topology.
2.2 H5 topology descriptionThis topology (SMA patent) is very similar to HB topology. Only one switch (S0) is added, as can be seen in Figure 5.
t
t
U
U
PWM period T
PWM 2
PWM 1
Solar Panel 3-Phase Inverter Controlled by the PXS20, Rev. 0
Freescale Semiconductor 4

3-phase inverter topologies
Figure 5. H5 topology
During the positive half-wave, S1 is switched on, S2 and S3 are switched off, and S0 with S4 commutation is controlled by the high frequency PWM modulation (see Figure 6). During the negative half-wave, S3 is switched on, S1 and S4 are switched off, and S0 with S2 are commutated. This type of control maintains the isolation between the grid and the solar panel during all commutation states.
Figure 6. Active voltage vector applied
During the freewheeling state, the S0 and S4 are switched off and the current flows through S1, L1, load (grid), L2, and through the body diode S3 (see Figure 7).
Figure 7. Zero voltage vector applied
The next improvement is the higher efficiency, because of the lower switching losses of the S1 and S3 switches and the ZVS (zero volt switching) of the S2 and S4 switches. This topology is patented.
GRID
12
50Hz
12
12
12
S1 S3
S2 S4
20kHz
C1
L1
PV
L2
S0
12
12
1 2
GRID
12
50Hz
12
12
12
S1 S3
S2 S4
20kHz
C1
L1
PV
L2
S01
212
12
I
GRID
12
50Hz
12
12
12
12
S1 S3
S2 S4
20kHz
C1
L1
PV
L2
12S0
12
I
Solar Panel 3-Phase Inverter Controlled by the PXS20, Rev. 0
Freescale Semiconductor 5
3-phase inverter topologies
2.3 Control of a 3-phase inverter with a PXS20
Figure 8. Basic structure of the inverter control
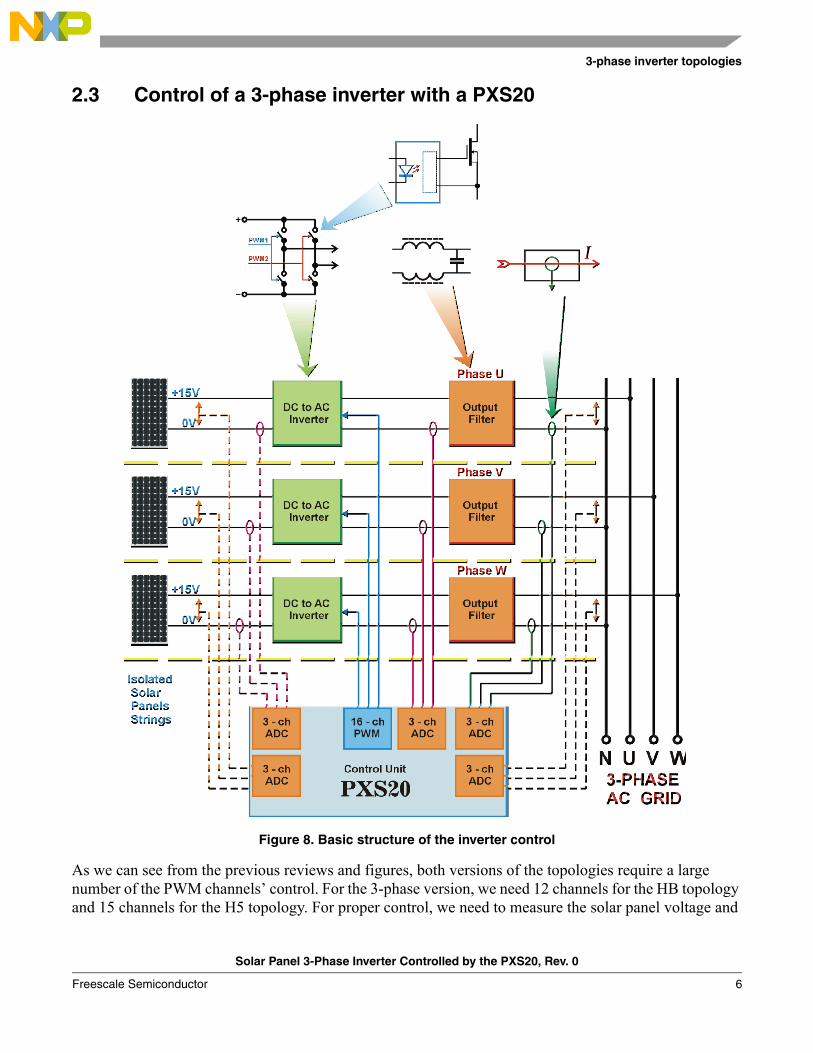
As we can see from the previous reviews and figures, both versions of the topologies require a large number of the PWM channels’ control. For the 3-phase version, we need 12 channels for the HB topology and 15 channels for the H5 topology. For proper control, we need to measure the solar panel voltage and
Solar Panel 3-Phase Inverter Controlled by the PXS20, Rev. 0
Freescale Semiconductor 6

The PXS20 for 3-phase solar panel inverter
current of each panel string, the output current of each HB or H5 power stage inverter, and the output voltage and current of each phase of the grid. This means 15 analog inputs for one 3-phase inverter. Figure 8 shows the basic structure of the measurement and control signals. The dashed lines mean that this measurement is not implemented in our demonstrator example, but the PXS20 is ready to use them in the real application.
Usually, the 20 kHz (or 16 kHz) switching frequency is used for the control of power devices. This means a PWM update with a 50.0 (rep. 62.5) msec time period. The time to measure, compute, and set the control signals must be within this range. These heavy demands on the number of PWM outputs, analog measurement inputs, and high computational power are fulfilled by the PXS20 dual-core processor.
3 The PXS20 for 3-phase solar panel inverterThe PXS20 series of 32-bit microcontrollers are system-on-chip (SoC) devices, built on Power Architecture technology and:
• Are 100% user-mode compatible with the classic Power Architecture instruction set
• Contain enhancements that improve the architecture’s fit in embedded applications
• Include additional instruction support for digital signal processing (DSP)
• Integrate technologies, such as an enhanced time processor unit, enhanced queued Analog-to-Digital Converter (ADC), Controller Area Network (CAN), and an enhanced modular input-output system.
• Are designed to specifically address the requirements of the safety standards IEC61511 and IEC61508 (Safety Integrity Level—SIL3). This reduces design complexity and component count by putting key functional safety features on a single chip with a dual-core, dual-issue architecture that can be statically switched between Lockstep mode (redundant processing and calculations) and Decoupled Parallel mode (independent core operation).
The host processor core of the PXS20 is the latest CPU from the e200 family of Power Architecture compatible cores. The e200z4d five-stage pipeline dual-issue core provides a very high level of efficiency, allowing high performance with minimum power consumption. The peripheral set provides high-end inverter and electrical motor control capability with a reasonable CPU intervention. The on-chip Cross Triggering Unit (CTU) interconnects the peripherals in a flexible way, creating an effective control process.
This device incorporates high performance 90 nm embedded flash memory technology to provide substantial cost reduction per feature and significant performance improvement.
3.1 PXS20 Features• CPU
— Dual core: 2 × e200z4
— Execution speed: 0–120 MHz
— Performance: > 240 MIPS
• Buses
— Core bus: AHB, 32-bit address, 64-bit data
Solar Panel 3-Phase Inverter Controlled by the PXS20, Rev. 0
Freescale Semiconductor 7

The PXS20 for 3-phase solar panel inverter
— Internal periphery bus: 32-bit address, 32-bit data
• Crossbar
— Lock Step mode: 4 × 3 master × slave ports
— Decoupled Parallel mode: 6 × 3 ports
• Memory
— Code/data flash: 1 MB, ECC, RWW
— Static RAM: 128 KB, ECC
• Modules
— Interrupt controller: 16 levels
— Periodic Interrupt Timer (PIT): 1 × 4 channels
— System timer module: 1 × 4 channels
— eDMA: 16 channels
— FlexRay: 1 × 64 message buffer, dual channel
— FlexCAN: 2 × 32 message buffer
— LINFlexD: 2
— Fault control unit (FCCU)
— Cross triggering unit (CTU)
— eTimer: 3 × 6 channels
— FlexPWM: 2 module 4 × (2 + 1) channels
— ADC: 2 × 12-bit, 16 channels per ADC
— DSPI: 3
— CRC unit
• Supply
— 3.3V digital, 3.0–3.6V analog, 4.5–5.5V analog reference
Solar Panel 3-Phase Inverter Controlled by the PXS20, Rev. 0
Freescale Semiconductor 8

The PXS20 for 3-phase solar panel inverter
3.2 PXS20 block diagram
Figure 9. PXS20 block diagram
Table 1. PXS20 module legend
Abbreviation Name Abbreviation Name
ADC Analog-to-Digital Converter LINFlexD LIN with DMA support
BAM Boot Assist Module MC Mode Entry, Clock, Reset and Power
CMU Clock Monitoring Unit PBRIDGE Peripheral Bridge
CRC Cyclic Redundancy Check Unit PIT Periodic Interrupt Timer
CTU Cross Triggering Unit PMU Power Management Unit
DSPI Serial Peripheral Interface RC Redundancy Checker
ECC Error Correction Code RTC Real Time Clock
Solar Panel 3-Phase Inverter Controlled by the PXS20, Rev. 0
Freescale Semiconductor 9

The PXS20 for 3-phase solar panel inverter
Detailed information can be found in the PXS20 Microcontroller Data Sheet, available at www.freescale.com.
3.3 PXS20 peripheral utilization for solar panel 3-phase inverterThis section describes a configuration of the most important PXS20 peripherals used for the solar panel 3-phase inverter application.
3.3.1 Clock
The PXS20 device includes two PLLs. PLL1 is used to generate the motor clock time domain of 120 MHz. The Clock Generation Module generates the reference clock MC_PLL_CLK for all the motor control modules (FlexPWM, CTU, ADC0 and ADC1, eTimer0 and eTimer1). Sys_CLK = 80 MHz. The internal oscillator frequency is 16 MHz.
3.3.2 FlexPWM for H-bridge topology
The 3-phase inverter with the H-bridge hard switching topology requires 3 × 4 PWM signals. The PXS20 has two FlexPWM modules, each with 4 × 2 PWM signals. One of the most suitable topologies is then to control each half of the H-bridge with a different PWM module. See Figure 10 for details of one H-bridge connection and Figure 11 for the whole 3-phase topology.
The synchronization between the FlexPWM0 and FlexPWM1 modules is done by a Master Reload Signal (MRS) from the FlexPWM0 module, as shown in Figure 16. This signal is internally connected to the “external sync” input of module 1.
FlexPWM0 submodule 0 is configured to run as a master and to generate the MRS and counter synchronization signal (master sync) for other submodules in module FlexPWM0 and also for FlexPWM1 and its submodules. The MRS signal is generated on every occurrence of submodule 0, VAL1 compare. All double buffered registers are updated on the occurrence of an MRS; therefore, the update of a new PWM duty cycle is done every PWM period.
ECSM Error Correction Status Module SEMA4 Semaphore Unit
eDMA Enhanced Direct Memory Access SIUL System Integration Unit Lite
FCCU Fault Collection and Control Unit SSCM System Status and Configuration Module
FlexCAN Controlled Area Network Controller STM System Timer Module
FMPLL Frequency Modulated PLL SWG Sine Wave Generator
INTC Interrupt Controller SWT Software Watchdog Timer
IRCOSC Internal RC Oscillator TSENS Temperature Sensor
JTAG Joint Test Action Group Interface XOSC Crystal Oscillator
Table 1. PXS20 module legend (continued)
Abbreviation Name Abbreviation Name
Solar Panel 3-Phase Inverter Controlled by the PXS20, Rev. 0
Freescale Semiconductor 10

The PXS20 for 3-phase solar panel inverter
Figure 10. PWM connection of one inverter phase with H-bridge topology
Figure 11. PWM connection of the 3-phase inverter with H-bridge topology
Solar Panel 3-Phase Inverter Controlled by the PXS20, Rev. 0
Freescale Semiconductor 11

The PXS20 for 3-phase solar panel inverter
The application uses center-aligned PWMs. The VAL0 register defines the centre of the period and is set to zero and the INIT register to the negative value of VAL1. Suppose that the PWM clock frequency is 120 MHz and the required PWM output is 20 kHz, then the VAL1, VAL0, and INIT registers are set as follows:
VAL1 = MODULO/2 = (120000000/20000)/2 = 3000 = 0x0BB8hex
VAL0 = 0
INIT = –MODULO/2 = –VAL1 = –3000 = 0xF448hex
Figure 12. FlexPWM signals for the H-bridge topology with bipolar switching
The duty cycle is given by setting the value of the VAL2 and VAL3 registers. Due to the implemented center-aligned switching, the VAL2 register value is the negative of VAL3.
In the bipolar PWM and H-bridge topology from Figure 10, the FlexPWM0, submodule 0 controls one half of the H-bridge with positive PWM signals (PWM0.DTSRCSEL.SEL23_0 = 0)
VAL3 = (DUTY+1)/2*MODULO/2 = (DUTY+1)/2*6000)/2
VAL2 = –VAL3
where DUTY is the duty cycle fractional value <–1,1>. Figure 12 displays the situation where DUTY = 0.
The second half of the H-bridge is controlled with FlexPWM1, submodule 0 and the same VAL values, but setting PWM1.DTSRCSEL.SEL23_0 = 01 provides an inversion of the output signal according to Figure 12. This way, bipolar switching is generated.
The same setting will be used for the other two phases of the 3-phase inverter.
PWMCounterPWM 0Counter
PWM0, sub0, A
PWM0, sub0, B
PWM 1Counter
PWM1, sub0, A
PWM1, sub0, B
PWM0, Sub0, VAL1 = +MODULO/2PWM0, Sub0, VAL3 = (DUTY+1)/2*MODULO/2PWM0, Sub0, VAL0PWM0, Sub0, VAL2 = - (DUTY+1)/2*MODULO/2PWM0, Sub0, INIT = - MODULO/2
PWM1, Sub0, VAL1 = +MODULO/2PWM0, Sub0, VAL3 = (DUTY+1)/2*MODULO/2PWM1, Sub0, VAL0PWM0, Sub0, VAL2 = - (DUTY+1)/2*MODULO/2PWM1, Sub0, INIT = - MODULO/2
PWM0.DTSRCSEL.SEL23_0 = 00
PWM1.DTSRCSEL.SEL23_0 = 01
Dead Time
Solar Panel 3-Phase Inverter Controlled by the PXS20, Rev. 0
Freescale Semiconductor 12

The PXS20 for 3-phase solar panel inverter
3.3.3 FlexPWM for H5 topology
One of the most suitable PXS20 connections for the H5 inverter topology is displayed in Figure 13 and Figure 14. Figure 13 details one H-bridge connection and Figure 14 shows the whole 3-phase topology. The fifth signal for the switch S0 is utilized by the PWM module 0 with submodule 3.
Figure 13. PWM connection of one inverter phase with H5 topology
Figure 14. PWM connection of the 3-phase inverter with H5 topology
Solar Panel 3-Phase Inverter Controlled by the PXS20, Rev. 0
Freescale Semiconductor 13

The PXS20 for 3-phase solar panel inverter
Submodule 3 is used as an independent. The PWM0 and PWM1 submodules 0 are complementary. So, in this way, the complementary control signals for the bottom transistors may be created. The synchronizations with the MRS signal are the same as for the H-bridge topology described in the previous section. The setting of all three subchannels’ VAL0, VAL1, and INIT registers is also the same as for the H-bridge topology:
VAL1 = MODULO/2 = (120000000/20000)/2 = 3000 = 0x0BB8hex
VAL0 = 0
INIT = –MODULO/2 = –VAL1 = –3000 = 0xF448hex
Figure 15. FlexPWM signals for H5 topology switching
The duty cycle is given by setting the value of the VAL2 and VAL3 registers. The VAL2 register value is the negative value of VAL3.
In the PWM H5 topology from Figure 13 and Figure 14, the FlexPWM0, submodule 0 controls one half of the H-bridge with positive PWM signals (PWM0.DTSRCSEL.SEL23_0 = 01)
VAL3 = DUTY*MODULO/2 = DUTY*6000/2
VAL2 = –VAL3
where DUTY is the duty cycle fractional value <–1,1>. Figure 15 displays situation where DUTY = 0.5. The PWM0, sub0, A entry gives the PWM signal and the PWM1, sub0, B entry gives the complementary signal with dead time insertion.
PWM 0Counter
PWM0, Sub0, VAL1 = +MODULO/2PWM0, Sub0, VAL3 = DUTY*MODULO/2PWM0, Sub0, VAL0PWM0, Sub0, VAL2 = - DUTY*MODULO/2PWM0, Sub0, INIT = - MODULO/2
PWM0, sub0, A
PWM0, sub0, B
PWM1, Sub0, VAL1 = +MODULOPWM1, Sub0, VAL2 = DUTY*MODULO/2PWM1, Sub0, VAL0PWM1, Sub0, VAL3 = - DUTY*MODULOPWM1, Sub0, INIT = - MODULO
PWM 1Counter
PWM1, sub0, A
PWM1, sub0, B
PWM0.DTSRCSEL.SEL23_0 = 01
PWM1.DTSRCSEL.SEL23_0 = 01
PWM0, Sub3 VAL1 = mod/2PWM0, Sub3, VAL3 = abs(DUTY*MODULO2)-offEdgePWM0, Sub3, VAL0PWM0, Sub3, VAL2 = - abs(DUTY*MODULO/2)-onEdgePWM0, Sub3, INIT = -mod/2
PWM 0Counter
PWM0, sub3, A
Dead Time
onEdge offEdge
Solar Panel 3-Phase Inverter Controlled by the PXS20, Rev. 0
Freescale Semiconductor 14

The PXS20 for 3-phase solar panel inverter
The second half of the H-bridge is controlled with FlexPWM1, submodule 0 with the same setting of PWM1.DTSRCSEL.SEL23_0 = 01, but:
VAL2 = DUTY*MODULO/2 = DUTY*6000/2
VAL3 = –VAL2
This means that the VAL2 and VAL3 values of the PWM0 (left half of the bridge) are negative to the VAL registers of the PWM1. The FlexPWM has a useful feature in that when VAL3 < VAL2, the output is 0! Since PWM1.DTSRCSEL.SEL23_0 = 01 (negative) the PWM1, sub0, A output is 1.
This situation is actual when the duty cycle DUTY > 0. If DUTY < 0, then the PWM0, sub0, A signal is logical 1, and the PWM1, sub 0, A gives a PWM (because for DUTY = –x, VAL3 > VAL2 on the PWM1).
The last signal is the S0 switch. This switch is controlled with the FlexPWM module 0, submodule 3, A signal in Figure 15. This signal is a PWM, regardless of whether PWM0, sub0, A or PWM1, sub0, A is logical 1 or PWM; therefore, the VAL2,3 setting is:
PWM0, sub3, VAL3 = abs(DUTY*MODULO/2) – dtComp.offEdge
PWM0, sub3, VAL2 = –abs(DUTY*MODULO/2) – dtComp.onEdge
Where dtComp.onEdge and dtComp.offEdge give some offset from other PWM signal edges. The setting can be set for optimal inverter switching to minimize inverter losses.
3.3.4 Cross Triggering Unit (CTU)
Figure 16. FlexPWMs, CTU, and ADCs
The basic connection between the FlexPWM, CTU, and ADC is displayed in Figure 16.
The CTU module works in triggered mode. The Master Reload signal (MRS) from the FlexPWM0 submodule0 is selected from the Input Selection Register (TGSISR) to reload the TGS counter register
Solar Panel 3-Phase Inverter Controlled by the PXS20, Rev. 0
Freescale Semiconductor 15

The PXS20 for 3-phase solar panel inverter
with the value of the TGS Counter Reload Register (TGSCRR). The TGS is able to generate up to eight events. Each trigger can be delayed from an MRS occurrence; that delay is set in the TGS Compare Registers.
The MRS signal is generated every PWM period. The counter can count up to 12000DEC (TGSCCR); the initial (TGSCRR) value is zero.
Figure 17. PWM signal and ADC sensing with PWM synchronization
The application uses four trigger events for measuring all three inverter phases: Phase U (TCR0), Phase V (TCR1), Phase W (TCR2) currents, and the fourth event, which can be used for any value and which generates the ADC interrupt Inverter_Fast_ISR.
The other triggers are free and can be used for triggering other application events.
• T0CR = delayPWMtoADCOffset (delay from the FlexPWM reload to the ADC sample)—Phase U current triggering
• T1CR = T0CR + ADC_T_MIN_SAMPLE—Phase V current sample triggering
• T2CR = T1CR + ADC_T_MIN_SAMPLE—Phase W current sample triggering
• T3CR = T2CR + ADC_T_MIN_SAMPLE—reserved for a future value (voltage, for example) and generates an interrupt
The CTU Scheduler subUnit (SU) generates the trigger event output according to the occurred trigger event. In this application, the CTU is set to generate ADC command outputs:
VAL1VAL3VAL0VAL2INIT
PWMCounter
TCR[0]CTUTimers
ADC0, ADC1Sampling(Current sensing)
TCR[1]TCR[2]TCR[3]
PWMOutput
ADC 0Channelssampling
Ch[11]Ch[12]
Ch[any]ADC1Channelssampling
Ch[13]Ch[14]
Ch[A2]
Ch[B2]
MRSMRSt
Solar Panel 3-Phase Inverter Controlled by the PXS20, Rev. 0
Freescale Semiconductor 16
Solar panel 3-phase inverter demonstrator
• The T0CR generates an ADC command 0 as CLCR1.T0_INDEX = 0. Command 0 is executed according to the CLR0 register setting: LC = 1 (one command, no sequence), CMS = 1 (dual conversation mode). CLR0.CH_B = 13 provides sampling of ADC input 13 (phase U load current). CLR0.CHA = 11 provides sampling of ADC input 11 (phase U H-bridge current). So, the CTU provides the phase U load current and the H-bridge current sampling at one time, with the command offset initially set to delayPWMtoADCOffset (default = 0).
• In the same way, the T1CR generates the ADC command 1 (CLCR1.T1_INDEX = 1) for phase V sampling, delayed by ADC_T_MIN_SAMPLE.
• T2CR generates the ADC command 2 (CLCR1.T2_INDEX = 2) for phase W sampling, delayed by another ADC_T_MIN_SAMPLE. T3CR generates the ADC command 3 for any other variables setting as defined in CLR3, and the CLR3.CIR = 1 setting causes generation of the interrupt Inverter_Fast_ISR.
3.3.5 Analog-to-Digital Converter (ADC)
The ADC sampling control is provided with the CTU. Therefore, the cross trigger unit is enabled by setting the CTUEN field to 1 in the ADC register ADCMCR.
The PXS20 uses two ADC modules that can operate in dual conversion mode. This mode is used in this application as defined in each dedicated CTU command CLR0x.
In this application, the CTU FIFO register is not used to read the sample results. Instead, each sample result is read from a dedicated channel register, CDRx. This means that, for example, the phase U load current (which is hardware connected to AN13) is to be read from the ADC1 CDR13 register, and the U H-bridge current is to be read from the ADC0 CDR11 register.
3.3.6 IRQ controller
The application uses the following interrupts:
• IRQ206—CTU ADC command calls:
Inverter_Fast_ISR, which is the main application interrupt, called with a frequency of 20 kHz at T3CR according to CLR3.
• IRQ79—LINFlex_Rxi FMSTR_Isr and IRQ80 LINFlex_Rxi, priority calls:
LINFlex_Txi FMSTR_Isr
4 Solar panel 3-phase inverter demonstratorThe low-voltage power stage board was designed for the H-bridge and H5 topologies to allow the PXS20 to meet all requirements for the inverter control. The board provides the basic functionality for this demonstration, including the sets of the isolated PWM inputs for the control signals, and the set of the isolated analog signals for the voltage and current measurement.
Solar Panel 3-Phase Inverter Controlled by the PXS20, Rev. 0
Freescale Semiconductor 17

Solar panel 3-phase inverter demonstrator
4.1 Hardware
Figure 18. Solar panel 3-phase inverter demonstrator
The demonstrator uses a standard PXS20 controller board and a 3-phase inverter analog board that can support an H-bridge or H5 topology. The input of each phase is represented by the isolated 15V DC power supplies (replacing the solar panels in this demonstrator). The control and measurement circuitry can be powered by the separated DC power source, or by one of the phase power sources.
Solar Panel 3-Phase Inverter Controlled by the PXS20, Rev. 0
Freescale Semiconductor 18

Solar panel 3-phase inverter demonstrator
4.2 Software implementationThis section describes the application software framework that was designed for the demonstrator and can help users create their own applications.
4.2.1 Software blocks and components
The application software was written in the C-language. The software structure supports the Eclipse™ editor tool and the Green Hills™ compiler. However, the software includes a make file and startup codes that could be used for other C-language compilers such as CodeWarrior.
The software utilizes some standard Freescale components and libraries:
• MCLIB for the MPC564XL and PXS20: Freescale Motor Control Library Set with floating point arithmetic.
• FreeMASTER: Freescale library set for application monitoring and control from a host PC during run time
• LLD: Low Level Drivers for the CTU, and FlexPWM control (part of the software structure)
• MPC5643L system peripherals: System peripherals description (part of the software structure)
• BSP: Board Support Package, software configurations for the utilized MPC5643L controller board (part of the software structure)
And the Solar Inverter application dedicated functional blocks:
• PXS20_Solar_Inverter_Float and state_machine: The main software functions with the application state_table
• Solar_Inverter_FP_INPWM.c: Higher level PWM control functions for the solar panel inverter
• Solar_Inverter_FP_MCADC: Higher level ADC control functions for the solar panel inverter
The main processes used in the software are displayed in Figure 19.
Solar Panel 3-Phase Inverter Controlled by the PXS20, Rev. 0
Freescale Semiconductor 19

Solar panel 3-phase inverter demonstrator
Figure 19. Application main processes
The software processes are:
• FreeMASTER—tool for communicating with a superior system (PC computer) for application monitoring and control during run time
• Application state machine—main application state process
• 3-phase sine generation process—sinusoidal generation
• ADC, CTU sample scheduling—sampling scheduling process that calculates the required delay from a PWM reload to each of the three phase currents
• Read ADC current—driver for reading the current samples read
• CTU driver—driver for setting the CTU timing
• 3-Phase PWM set—driver for setting the PWM duty cycle according to v123; 3-phase required voltages and the DC bus voltage vDcb (hardware is not designed to read the voltage)
The most important data variables are:
• switchAppOnOff—application on/off request
• switchAppReset—application reset request
• Inverter (struct.)—main inverter structure with amplitude, frequency and other values
• iUvwLoad—sensed load current of the three phases (U,V,W); three argument structure
Solar Panel 3-Phase Inverter Controlled by the PXS20, Rev. 0
Freescale Semiconductor 20

Solar panel 3-phase inverter demonstrator
• iUvwHBridge—sensed H-bridge current of the three phases (U,V,W); three argument structure
• v123—required voltage of the three phases (U,V,W); three argument structure
• vDcb—DC bus voltage
• delayPWMtoADC—required time delays from the PWM reload to the ADC sampling of phase U,V,W; three argument field
• delayPWMtoADCCorrected—time delay from the PWM reload to the ADC sampling of phase U,V,W; three argument field
• &pwm—handler, variable with the address of the installed hardware PWM module periphery
• &adc—handler, variable with the address of the installed hardware ADC module periphery
The most important PXS20 modules used in this application are:
• FlexPWM—hardware used for generating the PWM control signals for the 3-phase inverter
• CTU—hardware used for ADC sampling timing
• ADC—hardware used for sensing 3-phase currents and other analog quantities
4.3 FreeMASTER user interfaceFreeMASTER is a tool for communication with a superior system (PC computer) for application monitoring and control during run time. The superior system is a PC computer running the FreeMASTER protocol. The physical layer of the FreeMASTER can be a serial port. This application uses the SCI module for serial communication.
Current PC computers usually do not have a COM port. Therefore, the PXS20 controller board is equipped with a USB-to-COM converter using a CP2102 device. There must be a driver for the physical USB interface, CP2102, installed on the host PC that creates a virtual COM port from the USB. The driver can be installed from www.silabs.com.
The application configures the LINFlex module of the MPC5643L for a communication speed of 115200 bit/s (set in file uart_init.c).
The FreeMASTER on the host PC is able to run a control HTML page. The inverter control page is displayed in Figure 20.
Solar Panel 3-Phase Inverter Controlled by the PXS20, Rev. 0
Freescale Semiconductor 21

References
Figure 20. Application user interface based on FreeMASTER
5 References
6 Revision history
Table 2. References
Doc ID Title Availability
PXS20RM PXS20 Microcontroller Reference Manual www.freescale.com
Table 3. Changes made April 20121
1 No substantive changes were made to the content of this document; therefore the revision number was not incremented.
Section Description
Front page Add SafeAssure branding.
Back page Apply new back page format.
Solar Panel 3-Phase Inverter Controlled by the PXS20, Rev. 0
Freescale Semiconductor 22

Document Number: AN4437Rev. 01/2012
Information in this document is provided solely to enable system and software
implementers to use Freescale products. There are no express or implied copyright
licenses granted hereunder to design or fabricate any integrated circuits based on the
information in this document.
Freescale reserves the right to make changes without further notice to any products
herein. Freescale makes no warranty, representation, or guarantee regarding the
suitability of its products for any particular purpose, nor does Freescale assume any
liability arising out of the application or use of any product or circuit, and specifically
disclaims any and all liability, including without limitation consequential or incidental
damages. “Typical” parameters that may be provided in Freescale data sheets and/or
specifications can and do vary in different applications, and actual performance may
vary over time. All operating parameters, including “typicals,” must be validated for each
customer application by customer’s technical experts. Freescale does not convey any
license under its patent rights nor the rights of others. Freescale sells products
pursuant to standard terms and conditions of sale, which can be found at the following
address: http://www.reg.net/v2/webservices/Freescale/Docs/TermsandConditions.htm
How to Reach Us:
Home Page: freescale.com
Web Support: freescale.com/support
Freescale, the Freescale logo, AltiVec, C-5, CodeTest, CodeWarrior, ColdFire, C-Ware,
Energy Efficient Solutions logo, Kinetis, mobileGT, PowerQUICC, Processor Expert,
QorIQ, Qorivva, StarCore, Symphony, and VortiQa are trademarks of Freescale
Semiconductor, Inc., Reg. U.S. Pat. & Tm. Off. Airfast, BeeKit, BeeStack, ColdFire+,
CoreNet, Flexis, MagniV, MXC, Platform in a Package, QorIQ Qonverge, QUICC
Engine, Ready Play, SafeAssure, SMARTMOS, TurboLink, Vybrid, and Xtrinsic are
trademarks of Freescale Semiconductor, Inc. All other product or service names are
the property of their respective owners. The Power Architecture and Power.org
word marks and the Power and Power.org logos and related marks are
trademarks and service marks licensed by Power.org.
© 2012 Freescale Semiconductor, Inc.