solar imaging in ha with small scale aperture telescopes · solar imaging in ha with small scale...
TRANSCRIPT

Solar imaging in Ha with small scale aperture telescopes When the Coronado PST came out, it was a very intriguing device opening to most of us the access to the Ha layer of our sun for an acceptable price. I always had some kind of interest in photography and after having bought this entry level Ha telescope, I couldn’t resist giving it a try. But I soon realized that shooting beautiful crispy and full of contrast pictures of the sun was a process requiring a good deal of methodology. Before covering step by step the technique ranging from CCD capturing down to the contrast enhancement during post treatment, I want to highlight that the process described here is mainly dedicated to small scale aperture telescopes. Small scale aperture limits indeed the level of complexity in the imaging process, as the seeing effect may be considered as manageable. It is probably also where we want to start climbing up a new learning curve: at entry level setup, up to 60mm aperture. Solar imaging versus common astrophotography There are lots of unusual ingredients in solar imaging. First of all, it is a daytime activity, which is at its best when the sun is high in altitude in order to minimize the thickness of the atmosphere layer. As a consequence, there is no need anymore to spend out terrible nights at low or freezing temperatures. A pleasant summer day in the backyard or, as I often do, during a vacation, is the most appropriate time.
Fig. 1. Solar imaging is a day activity, far from cold and inhospitable environment. Solar imaging is easier and cheaper than first thought. High precision tracking as for deep sky astrophotography is not required. The tracking mount can be

of basic level and no additional auto-guiding setup is required. A rough alignment to the north using a compass fits the bill. A tracking error is indeed usually acceptable as exposure times are short and only an occasional repositioning of the telescope may be required in case of a more severe off-alignment. Regarding planetary photography, medium to large telescopes are commonly used. On the other side, the solar imaging as presented here is made possible with small aperture telescopes, so on the base of lower cost equipment. Among other interesting features in solar imaging is that light pollution, as often faced in populated area, is not an issue, neither the moon glow. Considering all the good sides of this kind of astrophotography, I found solar imaging worth the investment in a Ha filter, making the activity a strong competitor to deep sky and planetary counterparts. There is something more with the sun: not as Orion or any other deep sky object who remain the same year after year, the sun’s appearance is continuously changing. New sunspots, new prominences appear every day but also other phenomena emerging out of the continuous boiling surface bring day after day, hour after hour, minute after minute, continuous changes down to subtle sun’s details. We should also not forget spectacular events like flares, eruptive prominences and the like. There is however one thing that I found binding in the hobby regarding deep sky astrophotography. Because of its continuous change, solar imaging is a live activity. An observation session is better treated off the shelf and the resulting images directly posted on Internet. I’m used to astrophotography, where images are published sometimes several months after the object passed the sky. With solar imaging, the context is different. Before carrying on with the imaging process, let’s define some wording: A sequence is a series of (high speed) raw captures taken in bursts. An image is the result of a sequence treatment (Stack). In order to produce a combined result (Animation, mosaic, etc.), we need frames, each being an intermediate image. At the end of the treatment process, we obtain a picture. Considerations for a camera selection Which camera sensor type is suited for solar imaging? Should we go for a color or a black/white sensor? The light emitted in Ha is centered on a unique wavelength in the visible light domain, more especially in the red part. Should we then take a color sensor? In the case of color sensors, because of their usual Bayer matrix, only one of the 4 pixels will be excited by the captured photons (*), leading to a loss of resolution. A B/W sensor will be able to fetch most photons, and each pixel of the sensor will be adequately used. These last sensors are the most suitable to cover the need. (*) In practice, the filter of the Bayer matrix suffers some leak so that part of the photons will reach the blue and green pixels. But as color sensors are not the piece of choice for solar imaging, this topic will not be covered here.

With the sun shining at the meridian, there is plenty of light. However, because of the atmosphere temperature rising during the day, turbulences are an even more noticeable issue than during the night. It becomes quite obvious that using the same technique for freezing the seeing effects as for planetary imaging will be beneficial. Here, we enter the world of high speed video cameras able to record sequences of hundreds to thousands captures in one operation. One important characteristic of the sun is the very fast changing of its features. Animations of solar activities show really quick changes of the sun’s details. In order to capture those without blurring effect, the total capture time for an image must be limited to typically 60s. As for planetary imaging, the more raw captures are taken, the better will be the result. If you want some numbers, capturing during 1 minute at 15 frames per seconds results in 900 frames, which is a good starting value. The higher the frame rate the better. I recently changed my camera to a more sensitive one; 30fps was for me a minimal criterion, also because I had in mind to go in the future for higher resolution, thus requiring shorter capturing time. Link: An animation demonstrates the fast changing of the sun’s features. http://www.groupeastronomiespa.be/20120728_01_S01_12_05_014fps.gif 1 frame taken every 2 minute, over a total of 2 hours 20 minutes What about the sensor characteristics? Part of the answer lies in the imaging target. Is the full disk aimed to be imaged? I cover the full disk with a scope of 360 mm focal length associated to a sensor of 1024x768 pixels at 4.65µm each. The wider range of 1024 pixels allows some flexibility in misalignment of the mount. This 360mm setup is very convenient: it is small, light and very transportable. Now, as my preference clearly lies in higher resolution, the same setup can easily be fitted with a Barlow. For full disc imaging at a higher resolution, the mosaic technique is required, but it has some limitations as detailed later. Other limitations are related to the acquisition chain. Nowadays, new wider video sensors (3Mpix and more) are coming on the market, offering imaging of the full disk at high resolution. These cameras are also often capable of 10, 12, ... bit analogue to digital conversion. If 30 frames per second is a good reference in the imaging process, the interface and the computer behind the camera must afford a large bandwidth. A USB3 interface and a performing computer fitted out with high capacity solid state disk has become the norm. As we will discuss later, several sequences are usually taken per solar feature. Reflecting this in disk size, a capture session of several sun features can end up in several hundred gigabytes in disk space. If the budget is a concern, we found nowadays plenty of good second hand cameras of 1.4Mpixels/8-bit outputting 30fps, compatible with USB2 and older PC running under XP. Smaller sensors are even capable of higher fps rate on such setup.

The CCD sensitivity is an important factor, but as in any astroimaging technique, the signal to noise ratio is the key. A careful selection of the package sensor/camera is very important in order to avoid noise and other artifact that may not be managed by image calibration. The left picture on fig. 2 is from a sequence captured with a very short exposure time on a peculiar camera. It has a subtle horizontal banding, which will show up during the sharpening process (right). A flat, which is anyway necessary for dust shadow management, gets rid of it.
Fig. 2 Imaging artifact: The left picture is a stacked image; after sharpening artifacts show up as horizontal banding (Right). Sequence capture as the first imaging step After reviewing some general aspects about solar imaging and other hardware considerations, we can go toward the next important step: capturing. Imaging on a sunny day in the summer time is a very pleasant feeling. The surplus of light available on these beautiful days however washes out the computer screen, making the process difficult. When seen through a Ha filter, other sun’s features are better rendered than in white light, but the difference between the high and low level details is weak. This poor surface contrast makes the imaging process even more uncomfortable. The tip is to shade the computer screen from its surrounding light; I personally protect the screen by means of a dedicated tent. By the way, such a tent is very useful for night time astronomy as it also protects the computer against humidity. To maximize the contrast and thus the viewing comfort, I even minimize the reflection of the bright environment toward the screen by wearing dark clothes.
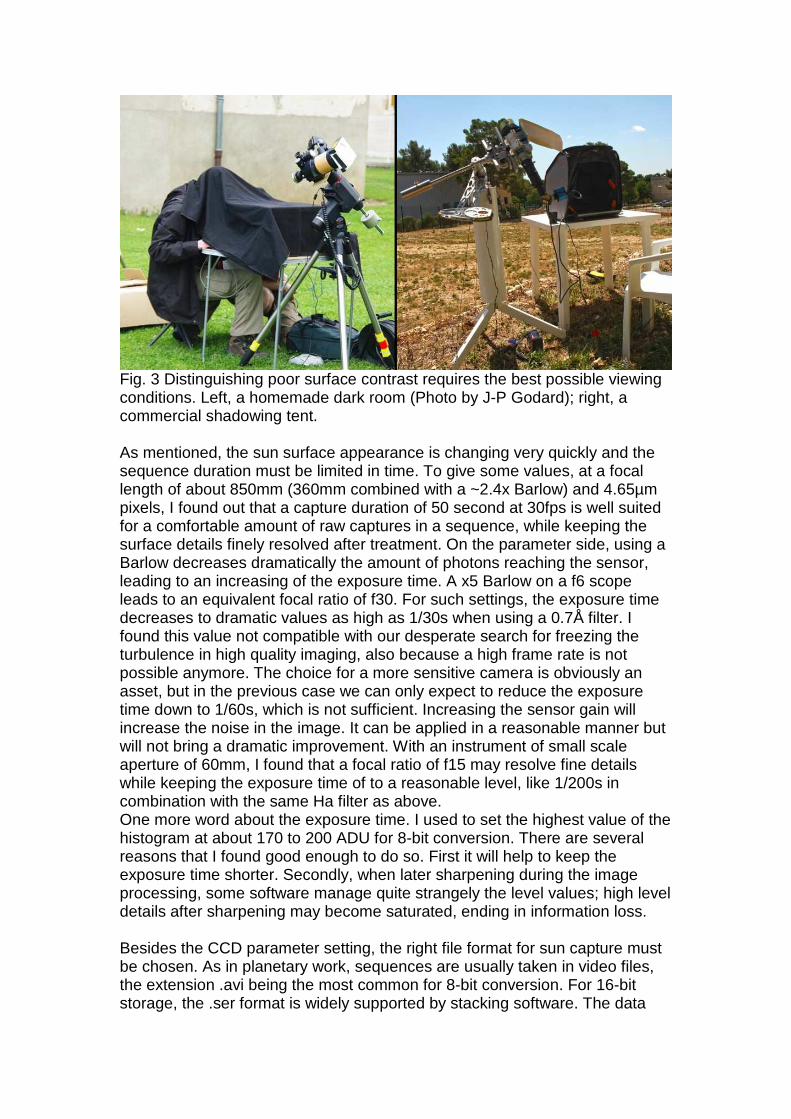
Fig. 3 Distinguishing poor surface contrast requires the best possible viewing conditions. Left, a homemade dark room (Photo by J-P Godard); right, a commercial shadowing tent. As mentioned, the sun surface appearance is changing very quickly and the sequence duration must be limited in time. To give some values, at a focal length of about 850mm (360mm combined with a ~2.4x Barlow) and 4.65µm pixels, I found out that a capture duration of 50 second at 30fps is well suited for a comfortable amount of raw captures in a sequence, while keeping the surface details finely resolved after treatment. On the parameter side, using a Barlow decreases dramatically the amount of photons reaching the sensor, leading to an increasing of the exposure time. A x5 Barlow on a f6 scope leads to an equivalent focal ratio of f30. For such settings, the exposure time decreases to dramatic values as high as 1/30s when using a 0.7Å filter. I found this value not compatible with our desperate search for freezing the turbulence in high quality imaging, also because a high frame rate is not possible anymore. The choice for a more sensitive camera is obviously an asset, but in the previous case we can only expect to reduce the exposure time down to 1/60s, which is not sufficient. Increasing the sensor gain will increase the noise in the image. It can be applied in a reasonable manner but will not bring a dramatic improvement. With an instrument of small scale aperture of 60mm, I found that a focal ratio of f15 may resolve fine details while keeping the exposure time of to a reasonable level, like 1/200s in combination with the same Ha filter as above. One more word about the exposure time. I used to set the highest value of the histogram at about 170 to 200 ADU for 8-bit conversion. There are several reasons that I found good enough to do so. First it will help to keep the exposure time shorter. Secondly, when later sharpening during the image processing, some software manage quite strangely the level values; high level details after sharpening may become saturated, ending in information loss. Besides the CCD parameter setting, the right file format for sun capture must be chosen. As in planetary work, sequences are usually taken in video files, the extension .avi being the most common for 8-bit conversion. For 16-bit storage, the .ser format is widely supported by stacking software. The data

should be saved uncompressed. Some compression codecs claim being without information loss. They may anyway introduce artifacts that show up annoyingly during process treatments like sharpening and stretching. Storing the capture in an uncompressed format remains so far the safest way.
Fig. 4 Left: a compressed sequence has grandly saved disk space but artifacts show up in the picture after treatment. The FFT on the right top was calculated on a stacked image of a flat taken without compression. Compressing the sequence leads to a pattern, which is highlighted by the related FFT (Right bottom).
Focus on the focus The seeing is a very annoying factor and it is even emphasized by the warming atmosphere, making focusing more difficult. To achieve the grail of fine detail resolving, focus must be as accurate as possible. Under poorly contrasted rendering of the sun surface on our washed out screen and because of the solar features, constantly dancing due to turbulence, focusing is a challenge. Be a patient man and focus ... on the focus! Carefully monitor a specific detail, concentrate your attention on it, focus up and down and wait for some quiescence in the turbulence. In solar observation, there is no tool like FWHM, Bahtinov mask and other robotic focusing. Seeing is a very random phenomenon and even if the best attention is taken during the focus and sequence start, the final resulting image may be disappointing. I tried to imitate the robotic focusing by alternating captures and a step-by-step focusing in one direction. Finally, I came to a less binding solution: pay the maximum of attention on the focus and capture several sequences while refocusing between each of them. All sequences will be later individually treated and sharpened. Finally, all pictures resulting from each of these sequences are compared in order to find out the very best one. With the great processing tools available today, batch processing of several capture sequences is a child’s play. In case of large file sequences and/or large CCD size, the processing can be launched during the night.

Fig. 5 The best and the worst. In a timed series of sequences taken during more than two hours in the purpose of making a solar animation, the image quality varies grandly from stacked frame to stacked frame. Here, the two extremes in quality are taken half an hour away. Neither a refocus, nor any other adjustment was accomplished over the complete capturing session; the seeing is the only changing factor. To come back to hardware considerations, the stronger the mount and optic system, the easier the focusing will be. Mosaics High resolution of the full disk is better achieved with the recent big size high performance CCD. The budget for such a system may refrain many observers and we may be tempted to go around by making mosaics. Unfortunately, mosaic has some caveats linked to the sun characteristics and to the seeing. As the details on the sun are changing very quickly, all individual frame of the mosaic are better captured in the shortest possible time. There is less or even no space for refocusing between each frame. One other limit comes from the seeing, which grandly varies from time to time, resulting in different quality in the individual frames as explained in the focusing section. These two factors combined together lead to a high risk of inconsistency in the final mosaic as shown on the picture presented here.

Fig. 6 As highlighted by the arrows, mosaics may present huge change in the image finesse from frame to frame, due to varying seeing conditions. Service frames on the sun? Like any astronomical process, the cleanliness of the optical train down to the sensor is important. Small tips may bring their effect, i.e. always keep the sensor down while taking out its cover cap. When dusts invite themselves in the system, a flat can manage them. Now, making a flat with a Ha filter lets only a very very small portion of the light to pass. Longer exposure times are required, thus leading to more serious technical captures (Darks, etc.). Alternatively, under some conditions, a flat can be provided on the bright sun

surface itself. The method proposed here is not suitable for sun full frame imaging. Anyway, for full frame imaging, a short focal length is required and dust spots are rarely a big issue. Should they become an issue, the mount may be of purpose misaligned so that a drift occurs during imaging. Later, at the time of stacking, the non-severe dust spots will be cleaned. For surface imaging, the scope should be moved towards the sun centre, as the sun edge shows a darker pattern. Preferably, areas with sunspots should be avoided. From this point, the sun surface details must be washed out, where two methods may be applied. First, defocus the scope, so that only blurred raw images will be captured and start a sequence. Despite not being recommended for making flats, the defocus method works quite well, but too strong defocus may leave some patterns in the picture. As an alternative, as small scale Ha filter systems often have a tuning facility, setting the filter out of the central Ha wavelength will do a great job. To ensure a good uniformity of the flat, I usually shake the optical system. Would big solar patterns like sunspots be present on the field of view, one may combine the detuning technique with a small defocus and do also some bit of shaking. Solar animation The sun with its constantly changing features opens the door to various way of observing. Making a solar animation is a rewarding activity. To ensure the consistent results between each frame of a solar animation, the same parameters must be applied. Some prominences may be very slow in changing their shape and we may have some room to refocus between every sequence. On the opposite, sun flares develop in a few tens of seconds. A special attention is better patiently paid on focusing prior to start a big set of sequence captures. As demonstrated before, depending on the seeing conditions, the quality of consecutive images may vary. Rather slow phenomena may tolerate each sequence to be taken a few seconds before/after the scheduled time, in the hope for better turbulence conditions. Imaging quick phenomena may require sequences to be taken down to every 20s, leaving a too little space for a high quality approach during the capture process. In the case of solar animation, consistency over the whole imaging operation is required. Watch out for steady weather conditions and keep the same CCD settings all over the capture schedule. For flare phenomena, under exposure of the surface is recommended, leaving room for the high intensities coming up during the explosive process. On treatment level, an identical methodology must be also applied: same quantity of stacked raw captures, same alignment & stacking settings, same sharpening, etc. On the software side we found for this many tools allowing automated processing as will be presented later. Sequence stacking On the treatment side, we are very fortunate that several great people are providing on Internet more than wonderful software for sequence stacking and processing. We should always have in memory the pioneers of planetary

image processing who developed stacking techniques for video sequences. I remember that at first high quality lunar imaging was made by dividing a capture into a series of sub frames covering smaller portions of the field of view. Each sequence of sub frames was then treated individually. The last step of this proceeding consisted in rebuilding a picture of the original image size by mosaic. The multi-point alignment technique was born. Some very clever software developers entered this field of image processing and integrated multi-point alignment in their processing. We could cover a complete article only with the software topic. Personally, I discovered this generation of multi-point processing in the following order and I still use them, thanks the mentioned features. 1° Registax was a pioneer of the multi-point processing. The software has a long story behind resulting in many features in it, somehow too many for simply image stacking. Today, I use Registax for more complex sharpening when at the same time denoising is required. I use Registax also to register the frames used in animations and save them directly in video format. Registax is very useful to sort by quality series of images as shown on figure 5. 2° With AviStack, we really have the feeling of the complete multi-point alignment processing. One key of the success of AviStack is its simpler use as it is aimed to do one job only in a straight process: stacking. This piece of software provides high quality results with fewer efforts. Onwards from version 1.74, wavelet sharpening is also included in it. AviStack has also a very powerful feature: the batch processing. The sequences captured during the search for the best focus can all be treated in one shot. I still use AviStack for its batch processing feature, especially for batch sharpening during the best focus process. 3° Another performer recently made a buzz in the multi-point alignment world: AutoStakkert! 2. This newcomer is even simpler to use: it requires only a very few settings and does a perfect job. And it does it most of the time better and faster, not to mention that it also supports batch processing. With such capabilities, there is no refrain to multiple sequence captures: on each feature found on a particular day, several filters (Also K-Line, Calcium,…) can be tested. For long series of sequences, the pre-processing can be launched in automatic mode even during the night. Sharpening as a first post-processing step At the end of the multi-point alignment processing, we come to a stacked image ready for post-processing. One very important stage of the post-processing - usually the first one - is the sharpening. In planetary observation, multi-frequency wavelet sharpening has become very popular. The sun’s surface has plenty of fine structures and details, which on wider level could represent large structures like sunspots and around. As my idea of solar imaging is to pull out every tiny detail, my technique evolved over time. From the multi-layer wavelet sharpening, I came to the idea of enhancing the finest possible features while pulling the first wavelet layer at the maximum. The left

image of fig. 7 shows an example while using AviStack: the first layer of the wavelet algorithm is pushed at the maximum amount (200) while the fine control of the image enhancement level is provided by adjusting the layer separation value (About 0.22). As usual, a trade off between noise and over-sharpening must be found. Here, each of us has a different feeling about how much setting to allow for a pleasant final result. The technique is very effective for selecting the best image of a series taken during the focusing process. Continuing on the idea that the finest detail should be enhanced and that only the belonging layer is finally used for sharpening, we come to an alternative ultra-fine sharpening technique. The first layer is still used for sharpening, but as far as the wavelet algorithm allows it, set the layer decomposition value to the lowest possible level for selecting the finest possible detail in the image. From here, apply the maximum sharpening setting on the layer 1 and repeat the process as many times as acceptable. A similar process can be applied on Photoshop, or on other non-commercial software. The unsharp mask function is grandly used in image enhancement, also in astronomy. In the proposed process, a very fine structure level is defined under unsharp mask, i.e. a radius of 0.3 pixel, and the power (Amount) of the function is set to the maximum: 500%. This sharpening process is applied a second time, and eventually a third time but at this stage with some moderation on the power factor (i.e. 200%).
Fig. 7 Sharpening under wavelet on a single layer during the best focus process. The finally selected image is later fine sharpened on the lowest structure level in a new process, here with a common unsharp mask function. Rendering contrast in the image Contrast enhancement of the primarily quite flat images is a very important step in solar imaging. The simplest method consists in applying a gamma factor to the stacked image. The inconvenience of this technique is the darkening of the sun’s rim where we find the prominences. Prominences are by nature darker than the sun surface by a factor of 5 to 10. As in deep sky astrophotography, we may apply curves to boost the low level area and

accommodate them with the high level but it is a difficult process in solar treatment. On the Internet, we found examples of processes, where the sun surface and the prominence areas are separated into different layers, treated separately and recombined in a final stage. The idea of a specific treatment for surface and prominence can even be applied at an earlier stage: at the time of the sequence capture, different exposure settings can be applied to separately capture each low and high level features. After treatment of each sequence the results are combined under post-processing software. I personally don’t like this cut and recombination process; it looks unnatural to me. The primary sequence may have been captured under 8-bit depth but during the stacking process, the resulting image will have a much higher bit depth resolution, giving room for strong contrast treatment. Here again, some functions found in Photoshop come to our rescue. At a very first stage, a contrast enhancement by “high pass” can be applied: copy image, apply a high pass filter on the copy and set the blending mode to overlay. In Photoshop again, I find the Shadows/Highlights function to be a very suitable tool for the purpose: it allows increasing the low level values and moderately adjusting the high level. At this stage, if previous contrast enhancement treatments were not sufficient, the Midtone Contrast parameter may be adjusted to refine the image’s good looks.

Fig. 8 Contrast enhancement with the Shadows/Highlights function for pulling out in one step the prominences while preserving the brightness of the surface. Mosaic of 6 frames. Some more post-treatments details. The sun’s visible brightness is not equal all over its surface; the centre looks brighter than the rim. Some people have developed techniques and tools to flatten their images. Browse the Internet for Artificial Flat Field (AFF) to find information about this topic. As to me, this difference in surface brightness is not disturbing, but I discovered that the AFF technique brings an interesting side effect. As the sun rim and around area are lightened, the prominence area is lightened as well, helping somehow in the contrast enhancement process. Applying an AFF after the Shadows/Highlights processing brings an interesting result also. Give it a try. So far, the obtained image has been treated in such a way that noise may become annoying. As final stage of the contrast treatment, I apply some denoising. Specific software is devoted to noise reduction, but they may first require to detect the noise in the image. For solar surface, this kind of software may detect the sun surface detail as being noise, thus softening the

picture. Finally, I’m happy with a technique as simple as a gaussian filtering. Typically, under the gaussian filter of Photoshop, a pixel setting of 0.2 brings almost no effect. A value of 0.4 pixel already softens the image too much; to me, 0.3 seems to be a good compromise. Would it still be too much, Photoshop has an interesting “Fade” capability, to damper the effect of some functions. For sun imaging with rim area, one may select the shadow area and apply a stronger filtering. Colorizing B/W images What a strange idea to image a colored object in black and white. Now we have to get the color back. As in this case, the color is artificial, any variation can be obtained. People photographing the sun with K-Line or Ca-K filter mostly color their images in the tint belonging to the captured wavelength: purple. For Ha imaging, deep red should be the choice, but a red-orange-yellow hue is generally used for esthetical reasons. Looking at a color map, orange is obtained by allowing 100% of Red, 50% of Green and no Blue. Applied on a B/W image, we end up with a uniformly colored image. Here further tweaks are required by i.e. applying curve or level on each color channel with the following principle: dark areas should have the red accentuated and bright areas are enhanced in the yellow hue. This procedure is good for understanding the principle but finally it is quite complicated. Other solar imagers showed me how to come easily to good results in just one operation with the image level adjustment. Load the picture in any post-processing software and adjust the midtone of each individual channel using settings similar to: Red=150%, Green=75%, Blue to a very low value like 35%. From here, final tweaks according to taste can be provided: higher range adjustment of the luminance histogram, slight refinement of the RVB levels, hue, saturation, etc.

Fig. 9 Basic technique for colorization: adjust the mid tone of each R/G/B channel. Further tweaks will be later applied. The very magic of the post-treatment like sharpening, level/midtone colorization and other tweaks lies in the fact that they are using numbers as settings. They can be repeated on a set of images by a script, rendering consistent results. With these powerful features of batch pre-processing of multiple sequences till batch colorization, we have now the full package for automated processing of solar timed observations, opening the door to consistent animations of fascinating events. With the very high sharpening of fine details, it becomes quite difficult to bring relief in the caught solar features. An interesting technique consists in inverting the black and white in an image prior to colorization. It brings out more relief in the picture and the resulting orange color is very pleasant to my taste. A last word about colorization is devoted to the screen quality and settings. The same image may look terrible on different computer screens. A very little change in the parameters during the colorization may bring out a green or blue hue. This is especially true if the colorization is provided without care on a not optimized video screen. One very important element for the image colorization is the computer screen calibration. Ha filter double stacking? The first time that we take a look through a doubly stacked filter system is a wonderful moment. A much more contrasted view of the sun shows up, with

plenty of details. Wow! Imaging with a double stack system comes to the same: a contrasted image without the need of any strong processing. The inconvenience of a double stack system in the imaging process is the resulting longer exposure time now required because of the stronger filtering. Longer exposure means less chance to freeze the turbulence and at the end less sharp results. In double stack technique, the exposure time may decrease at first to values as low as 1/30s. A high frame rate is impossible under these conditions and the resulting low amount of captured raw images becomes also a critical factor for qualitative results. With the double stack technique, raises again the question of the CCD sensitivity. The more sensitive a priori the better, and the interest for the new generation sensors comes up again. Alternatively, one may be tempted to increase the camera gain. Increasing the gain will be at the cost of increasing the noise in the primary sequence and in the picture. Gain, frame per second, exposure time, stack, noise and denoising are intricate parameters where a happy balance is difficult to find. I, personally, find that double stacking is not as beneficial as expected for imaging and continue with single stack observation combined with a strong contrast treatment. A new contrast enhancement technique, a new turn? The Shadows/Highlights function presented above provides interesting results. Can we do more to accommodate the quite flat image coming out of the capture process? Where do we end up with the stacking treatment? An image having a much higher dynamic range, as many 8-bit primary captures end into a stacked image usually saved under 16-bit. On the other hand, we found today in our software portfolio tools to manage images with deep information but rather badly balanced in luminosity. One tool is called ... High Dynamic Range processing, HDR. I did my first trials with a free program. Some patience is required to find the right settings as the worse is here very close to the best. But this new technique is promising. Continuing to search for an easy one-function-for-all solution, I came to Photoshop and found on a quite recent version (CS 6 in my case) an interesting new function: HDR Toning. Here again, finding the right settings is a difficult job. For the particular case of the sun surface combined with faint prominences, I found that the Scott5 preset is an interesting starting point. From here, the contrast needs to be adjusted, the right settings for detail enhancement found, further tweaks are required in order to minimize a dark ring artifact along the sun’s limb and finally large sunspots should not end up as bright as the surrounding surface.
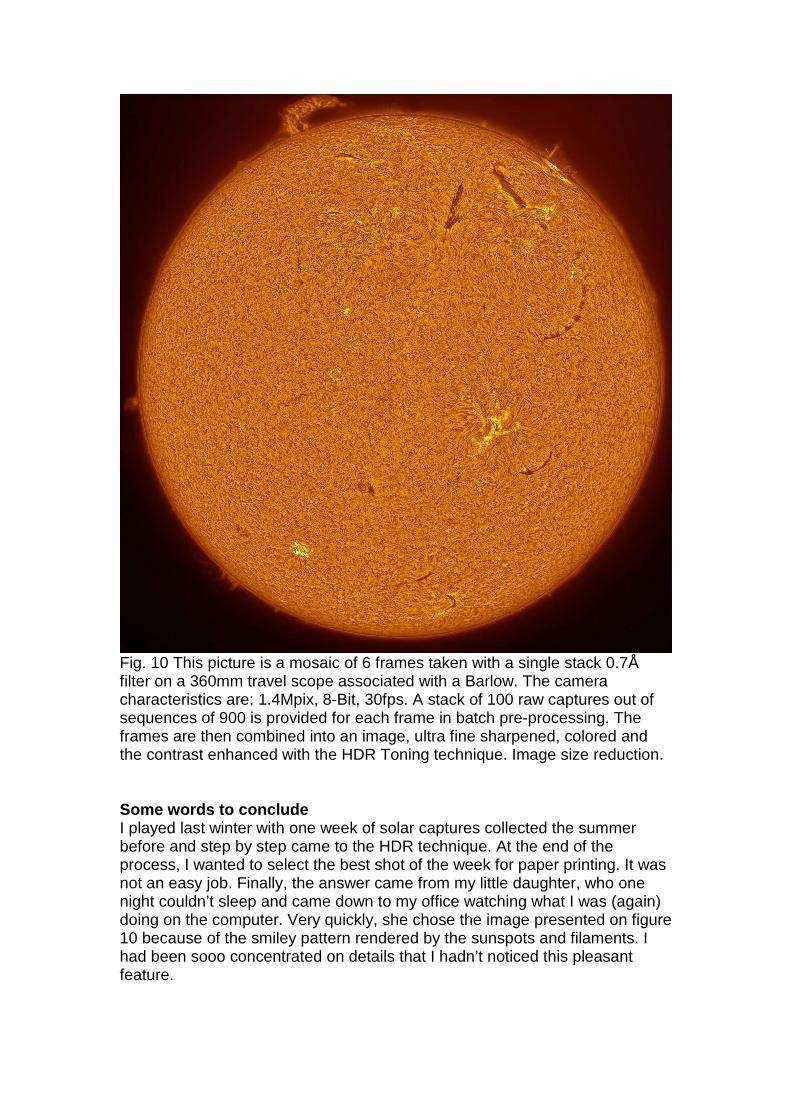
Fig. 10 This picture is a mosaic of 6 frames taken with a single stack 0.7Å filter on a 360mm travel scope associated with a Barlow. The camera characteristics are: 1.4Mpix, 8-Bit, 30fps. A stack of 100 raw captures out of sequences of 900 is provided for each frame in batch pre-processing. The frames are then combined into an image, ultra fine sharpened, colored and the contrast enhanced with the HDR Toning technique. Image size reduction. Some words to conclude I played last winter with one week of solar captures collected the summer before and step by step came to the HDR technique. At the end of the process, I wanted to select the best shot of the week for paper printing. It was not an easy job. Finally, the answer came from my little daughter, who one night couldn’t sleep and came down to my office watching what I was (again) doing on the computer. Very quickly, she chose the image presented on figure 10 because of the smiley pattern rendered by the sunspots and filaments. I had been sooo concentrated on details that I hadn’t noticed this pleasant feature.

It is not possible to cover all topics of solar imaging in just one article. The quantity of raw captures to stack has not been really covered. If you ask me to quickly give you some numbers, a stack of 30 to 150 captures associated with the suitable treatment provides comparable results, with only very little difference in the final picture. There are still many fields to investigate in solar imaging like noise reduction at capture level and on treatment level, management of artifacts generated by strong processing and others. Solar observation offers so many variations but in terms of data processing it offers so many possibilities that no high-end equipment is required to have plenty of fun. The images presented here are captured with a small scale aperture Ha filter, combined with a widely available camera, both available now at a much lower cost than a few years ago. The stacking software commonly used is developed by keen amateurs and the final processing software can be found as freeware so that the hobby has never been as accessible as it is today. allhoest V1.0 2014-Feb-05 V1.1 2014-Mar-08 Further links: Gain, Noise & Stack: http://www.presencenet.be/nucleus2.0/index.php?itemid=2294 Deconvolution: http://www.presencenet.be/nucleus2.0/index.php?itemid=2309 Sun with wonderful rising prominence: http://www.presencenet.be/nucleus2.0/index.php?itemid=2431 Animation – Prominence: http://www.presencenet.be/nucleus2.0/media/13/20121130-20120724_01_S07_05_03_Anim_15fps.gif Animation – Flare: http://www.groupeastronomiespa.be/20120730_01_S02_23_...Opt2.gif The result of various contrast enhancement techniques: http://www.groupeastronomiespa.be/20120730_01_S01_21_01-02-03-04-04-06_03s00.gif 3D rendering, thanks a funny tool: LuSol-3D. Red-cyan glasses are required. http://www.presencenet.be/nucleus2.0/index.php?imagepopup=13/20130430-20120802_01_S01_21_03_...Cosme_Col2_3D-Big.jpg&width=973&height=951&imagetext=