software configuration manager systemwalker
TRANSCRIPT
B1X1-0127-04ENZ0(00)January 2013
Windows/Linux
Systemwalker Software Configuration Manager
Installation Guide

Preface
Purpose of this Document
This document explains how to install and uninstall Systemwalker Software Configuration Manager V15.1.1.
Intended Readers
This document is intended for those who want to install or uninstall Systemwalker Software Configuration Manager.
It is assumed that readers of this document already have the following knowledge:
- Basic knowledge of the operating system being used
Structure of this Document
The structure of this document is as follows:
Chapter 1 Installation
This chapter explains the installation procedure for Systemwalker Software Configuration Manager.
Chapter 2 Setup
This chapter explains the setup procedure for Systemwalker Software Configuration Manager.
Chapter 3 Setup Cancellation
This chapter explains how to cancel the setup for Systemwalker Software Configuration Manager.
Chapter 4 Uninstallation
This chapter explains the uninstallation procedure for Systemwalker Software Configuration Manager.
Appendix A Port Number List
This section provides a list of the port numbers used with Systemwalker Software Configuration Manager.
Conventions Used in this Document
Refer to the Documentation Road Map for information on the names, abbreviations, and symbols used in this manual.
Abbreviations and Generic Terms Used for Operating Systems
This document uses the following abbreviations and generic terms to indicate operating systems.
Official name Abbreviation
Microsoft(R) Windows Server(R) 2012 DatacenterMicrosoft(R) Windows Server(R) 2012 Standard
Windows Server 2012
Windows
Microsoft(R) Windows Server(R) 2008 StandardMicrosoft(R) Windows Server(R) 2008 Standard without Hyper-VMicrosoft(R) Windows Server(R) 2008 EnterpriseMicrosoft(R) Windows Server(R) 2008 Enterprise without Hyper-V
Windows Server 2008
Microsoft(R) Windows Server(R) 2008 R2 StandardMicrosoft(R) Windows Server(R) 2008 R2 Enterprise
Windows Server 2008 R2
Microsoft(R) Windows Server(R) 2003 R2, Standard EditionMicrosoft(R) Windows Server(R) 2003 R2, Enterprise EditionMicrosoft(R) Windows Server(R) 2003 R2, Standard x64 EditionMicrosoft(R) Windows Server(R) 2003 R2, Enterprise x64 Edition
Windows Server 2003 R2
- i -

Official name Abbreviation
Red Hat(R) Enterprise Linux(R) (for x86) RHEL (x86) RHEL
Red Hat(R) Enterprise Linux(R) (for Intel64) RHEL (Intel64)
Export Restrictions
If this document is to be exported or provided overseas, confirm legal requirements for the Foreign Exchange and Foreign Trade Act aswell as other laws and regulations, including U.S. Export Administration Regulations, and follow the required procedures.
Trademarks
- Adobe, Adobe Reader, and Flash are either registered trademarks or trademarks of Adobe Systems Incorporated in the United Statesand/or other countries.
- Interstage, ServerView, and Systemwalker are registered trademarks of Fujitsu Limited.
- Linux is a registered trademark of Linus Torvalds.
- Red Hat, RPM, and all Red Hat-based trademarks and logos are trademarks or registered trademarks of Red Hat, Inc. in the UnitedStates and other countries.
- VMware, the VMware "boxes" logo and design, Virtual SMP, and VMotion are registered trademarks or trademarks of VMware, Inc.in the United States and/or other jurisdictions.
- Xen, and XenSource are trademarks or registered trademarks of XenSource, Inc. in the United States and/or other countries.
- Other company names and product names are trademarks or registered trademarks of their respective owners.
- Note that system names and product names in this document are not accompanied by trademark symbols such as (TM) or (R).
Issue Date and Version
Version Manual code
July 2012: First edition B1X1-0127-02ENZ0(00) / B1X1-0127-02ENZ2(00)
July 2012: Second edition B1X1-0127-03ENZ0(00) / B1X1-0127-03ENZ2(00)
January 2013: Third edition B1X1-0127-04ENZ0(00) / B1X1-0127-04ENZ2(00)
Copyright
Copyright 2010-2013 FUJITSU LIMITED
- ii -

ContentsChapter 1 Installation................................................................................................................................................................1
1.1 Pre-installation Notes...........................................................................................................................................................................11.1.1 Check the Port Numbers and Firewall Settings............................................................................................................................11.1.2 Checking the Settings in the Hosts File or the DNS Server.........................................................................................................11.1.3 Creating Linkage Servers (Repository Servers)...........................................................................................................................1
1.2 Installing on the Admin Server............................................................................................................................................................11.2.1 Points to Note before Installing on the Admin Server..................................................................................................................11.2.2 Tasks Required before Installing on the Admin Server................................................................................................................4
1.2.2.1 Stopping ServerView Resource Orchestrator........................................................................................................................41.2.2.2 Changing Terminal Services to Install Mode [Windows].....................................................................................................51.2.2.3 Tuning System Parameters [Linux].......................................................................................................................................51.2.2.4 syslog Settings [Linux]..........................................................................................................................................................7
1.2.3 Procedure for Installing on the Admin Server..............................................................................................................................81.3 Installing on Business Servers...........................................................................................................................................................13
1.3.1 Points to Note before Installing on Business Servers.................................................................................................................131.3.2 Tasks Required before Installing on Business Servers...............................................................................................................14
1.3.2.1 Tuning System Parameters [Linux].....................................................................................................................................141.3.3 Procedure for Installing on Business Servers.............................................................................................................................16
1.4 Installing on Linkage Servers [Windows].........................................................................................................................................221.4.1 Points to Note before Installing on Linkage Servers..................................................................................................................221.4.2 Procedure for Installing on Linkage Servers..............................................................................................................................23
1.5 If the Installation Fails.......................................................................................................................................................................28
Chapter 2 Setup.....................................................................................................................................................................292.1 Setting up the Admin Server..............................................................................................................................................................29
2.1.1 Pre-setup Tasks...........................................................................................................................................................................292.1.1.1 Stopping ServerView Resource Orchestrator......................................................................................................................29
2.1.2 Setting up Systemwalker Software Configuration Manager......................................................................................................292.1.3 Post-setup Tasks.........................................................................................................................................................................39
2.1.3.1 Starting ServerView Resource Orchestrator........................................................................................................................392.1.3.2 Starting Systemwalker Software Configuration Manager...................................................................................................402.1.3.3 Executing the Initial Discovery...........................................................................................................................................402.1.3.4 Registering Discovery Schedules........................................................................................................................................422.1.3.5 Registering a Configuration Baseline Creation Schedule....................................................................................................49
2.2 Setting up the Software Parameter Settings Function.......................................................................................................................542.2.1 Changing the Settings for the ServerView Resource Orchestrator Manager.............................................................................542.2.2 Registering Middleware Information..........................................................................................................................................55
2.3 Setting up Business Servers...............................................................................................................................................................552.3.1 Settings for Managing Windows Patches...................................................................................................................................552.3.2 Settings for Managing Linux Patches.........................................................................................................................................562.3.3 Settings for UpdateAdvisor (Middleware).................................................................................................................................56
Chapter 3 Setup Cancellation.................................................................................................................................................573.1 Points to Note before Canceling the Setup........................................................................................................................................57
3.1.1 Backing up the Resources...........................................................................................................................................................573.2 Canceling the Setup for the Admin Server........................................................................................................................................57
3.2.1 Tasks Required before Setup Cancellation.................................................................................................................................573.2.1.1 Deleting the Discovery Schedule.........................................................................................................................................573.2.1.2 Deleting the Configuration Baseline Creation Schedule.....................................................................................................583.2.1.3 Stopping ServerView Resource Orchestrator......................................................................................................................59
3.2.2 Canceling the Setup for Systemwalker Software Configuration Manager.................................................................................603.2.3 Tasks Required after Setup Cancellation....................................................................................................................................60
3.2.3.1 Starting ServerView Resource Orchestrator........................................................................................................................603.2.3.2 Deleting an Automated Operation Process Group...............................................................................................................60
- iii -

Chapter 4 Uninstallation.........................................................................................................................................................624.1 Pre-uninstallation Notes.....................................................................................................................................................................624.2 Uninstalling from the Admin Server.................................................................................................................................................624.3 Uninstalling from Business Servers...................................................................................................................................................65
4.3.1 Pre-uninstallation Notes..............................................................................................................................................................654.3.2 Uninstallation..............................................................................................................................................................................65
4.4 Uninstalling from Linkage Servers [Windows].................................................................................................................................684.5 Post-uninstallation Notes...................................................................................................................................................................69
4.5.1 Files that Remain after Uninstallation........................................................................................................................................694.5.2 Uninstalling the "Uninstall (middleware)".................................................................................................................................69
Appendix A Port Number List.................................................................................................................................................72A.1 Port Number List...............................................................................................................................................................................72A.2 Procedure for Changing Ports...........................................................................................................................................................73
A.2.1 When the Port for the File Transfer Infrastructure (the Patch Application Function or the Software Parameter Settings Function)is Duplicated.......................................................................................................................................................................74
A.2.2 When the Port Number for the File Transfer Infrastructure (the Discovery Function) is Duplicated.......................................75A.2.3 When the Port Number for syslog is Changed [Linux].............................................................................................................76
- iv -

Chapter 1 InstallationThis chapter explains how to install Systemwalker Software Configuration Manager.
1.1 Pre-installation NotesPerform the following tasks before installing this product.
1.1.1 Check the Port Numbers and Firewall SettingsCheck whether the port numbers to be used by Systemwalker Software Configuration Manager are already being used. For the ports tobe used, refer to "Appendix A Port Number List" and check each server to see that none of the required ports are being used.
When installing this product in an environment where a firewall function is being used, the firewall function must be set up to allowcommunications via the necessary ports. Refer to "Appendix A Port Number List" for information on the required ports, and set up the"port numbers for which communications from external servers must be allowed" for each server. Refer to the operating system manualsfor information on how to set up the firewall function so as to allow communications via the necessary ports.
1.1.2 Checking the Settings in the Hosts File or the DNS ServerIt must be possible to resolve the IP address correctly from the local host name. Check the hosts file or the DNS server settings beforeinstalling the product, also check that the host name can be resolved to the IP address correctly.
1.1.3 Creating Linkage Servers (Repository Servers)To manage OS patches, create repository servers.
Refer to the operating system manuals for information on how to install and set up repository servers.
- Managing Windows patches
- Windows Server Update Services (WSUS)
- Managing Linux patches
- Yellowdog Updater Modified (yum) repository
1.2 Installing on the Admin ServerThis section explains how to install the product on the admin server.
The manager of Systemwalker Software Configuration Manager is installed on the admin server.
1.2.1 Points to Note before Installing on the Admin Server
Checking the required software
Check that the following software has been installed and can be used:
- ServerView Resource Orchestrator V3.1.1
Mandatory software for Linux
Install the following software which attached operating system.
Install them referring to operating system manuals.
- redhat-lsb packages
- 1 -

- Elfutils package
Red Hat Enterprise Linux 5.2 or earlier
elfutils-libelf-0.125-3.el5.i386.rpm (*1)
Red Hat Enterprise Linux 5.3 or later
elfutils-libelf-0.137-3.el5.i386.rpm
Red Hat Enterprise Linux 6.0 or later
elfutils-libelf-0.148-1.el6.i686.rpm
*1: Install 32-bit version of elfutils package even if Linux operating system is 64-bit version.
For Red Hat Enterprise Linux 6.0 or later, also install the software listed below, which is distributed with the operating system (refer tothe operating system manual before installing).
Red Hat Enterprise Linux 6.0 or later (for x86)
- alsa-lib package (32-bit version)
- cloog-ppl package (32-bit version)
- compat-readline5 package (32-bit version)
- compat-libtermcap package (32-bit version)
- cpp package (32-bit version)
- file package (32-bit version)
- gcc package (32-bit version)
- gcc-c++ package (32-bit version)
- gdb package (32-bit version)
- glibc-devel package (32-bit version)
- glibc-headers package (32-bit version)
- kernel-headers package (32-bit version)
- libICE package (32-bit version)
- libSM package (32-bit version)
- libX11 package (32-bit version)
- libX11-common package
- libXau package (32-bit version)
- libXext package (32-bit version)
- libXi package (32-bit version)
- libXp package (32-bit version)
- libXt package (32-bit version)
- libXtst package (32-bit version)
- libgomp package (32-bit version)
- libstdc++-devel package (32-bit version)
- libtool-ltdl package (32-bit version)
- libxcb package (32-bit version)
- make package (32-bit version)
- 2 -

- mpfr package (32-bit version)
- nss-softokn-freebl package (32-bit version)
- perl package (32-bit version)
- perl-Module-Pluggable package (32-bit version)
- perl-Pod-Escapes package (32-bit version)
- perl-Pod-Simple package (32-bit version)
- perl-libs package (32-bit version)
- perl-version package (32-bit version)
- ppl package (32-bit version)
- strace package (32-bit version)
- tcsh package (32-bit version)
- unixODBC package (32-bit version)
Red Hat Enterprise Linux 6.0 or later (for Intel64)
- alsa-lib package (32-bit version)
- audit-libs package (32-bit version)
- cloog-ppl package (64-bit version)
- compat-readline5 package (32-bit version)
- compat-libtermcap package (32-bit version)
- cpp package (64-bit version)
- cracklib package (32-bit version)
- db4 package (32-bit version)
- expat package (32-bit version)
- file package (64-bit version)
- gcc package (64-bit version)
- gcc-c++ package (64-bit version)
- glibc package (32-bit version)
- glibc-devel package (32-bit version)
- glibc-headers package (64-bit version)
- kernel-headers package (64-bit version)
- libICE package (32-bit version)
- libSM package (32-bit version)
- libX11 package (32-bit version)
- libX11-common package
- libXau package (32-bit version)
- libXext package (32-bit version)
- libXi package (32-bit version)
- libXp package (32-bit version)
- 3 -
- libXt package (32-bit version)
- libXtst package (32-bit version)
- libattr package (32-bit version)
- libcap package (32-bit version)
- libgcc package (32-bit version)
- libgomp package (64-bit version)
- libselinux package (32-bit version)
- libstdc++ package (32-bit version)
- libstdc++-devel package (64-bit version)
- libtool-ltdl package (32-bit version)
- libuuid package (32-bit version)
- libxcb package (32-bit version)
- make package (64-bit version)
- mpfr package (64-bit version)
- ncurses-libs package (32-bit version)
- nss-softokn-freebl package (32-bit version)
- pam package (32-bit version)
- perl package (64-bit version)
- perl-Module-Pluggable package (64-bit version)
- perl-Pod-Escapes package (64-bit version)
- perl-Pod-Simple package (64-bit version)
- perl-libs package (64-bit version)
- perl-version package (64-bit version)
- ppl package (64-bit version)
- readline package (32-bit version)
- tcsh package (64-bit version)
- unixODBC package (32-bit version)
- zlib package (32-bit version)
1.2.2 Tasks Required before Installing on the Admin Server
1.2.2.1 Stopping ServerView Resource OrchestratorIf ServerView Resource Orchestrator is running, stop it by executing the following command:
[Windows]
<ServerView Resource Orchestrator installation directory>\SVROR\Manager\bin\rcxmgrctlstop
[Linux]
/opt/FJSVrcvmr/bin/rcxmgrctl stop
- 4 -

1.2.2.2 Changing Terminal Services to Install Mode [Windows]If a Terminal Server has been installed, change the Terminal Services to Install mode by executing the following command:
CHANGE USER /INSTALL
1.2.2.3 Tuning System Parameters [Linux]The system parameters must be tuned.
Tuning values for system parameters
Refer to the following tables for information on the system parameters that require tuning and their values:
- Semaphores
For the semaphore settings, specify each parameter value using the following format:
kernel.sem = para1 para2 para3 para4
Parameter Description Value Type
para1 Maximum number of semaphores persemaphore identifier
1 Maximum
para2 Number of semaphores for the entire system 2 Addition
para3 Maximum number of operators per semaphorecall
1 Maximum
para4 Number of semaphore operators for the entiresystem
2 Addition
- Message queues
Parameter Description Value Type
kernel.msgmnb Maximum number of messages that can be heldin a single message queue
106496 Maximum
kernel.msgmni Maximum number of message queue IDs 1024 Addition
Settings dependent on the parameter type
Set the parameters as below, depending on the "Type" shown in the table above.
- If the Type is "Maximum":
If the value that has already been set (either the initial value or the previous setting) is equal to or greater than the value in the tableabove, there is no need to change the parameter value. If the current value is smaller than the value in the table, change the parameterto the value in the table.
- If the Type is "Addition":
Add the value in the table above to the value that has already been set (either the initial value or the previous setting). Check the upperlimit for the system before setting the parameter to the result of the addition, and if the result of the addition is greater than the upperlimit for the system, then set the parameter to the upper limit for the system.
Refer to the Linux manuals and other documents for details.
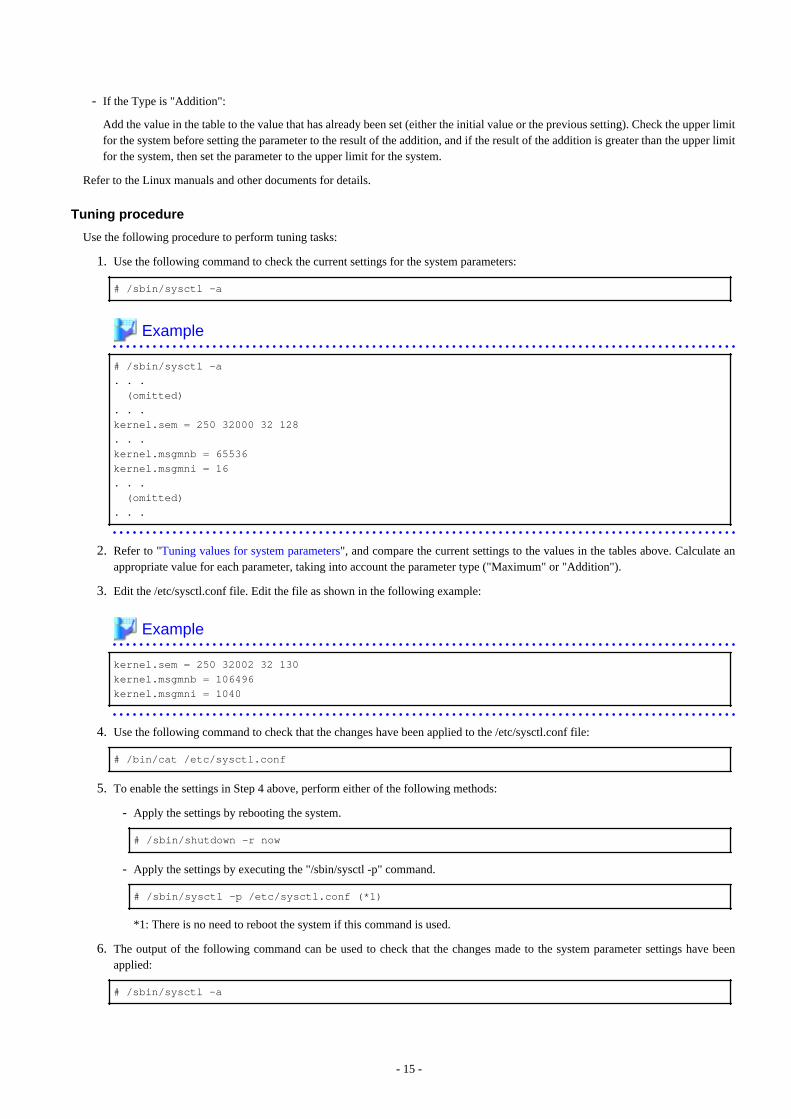
Tuning procedure
Use the following procedure to perform tuning tasks:
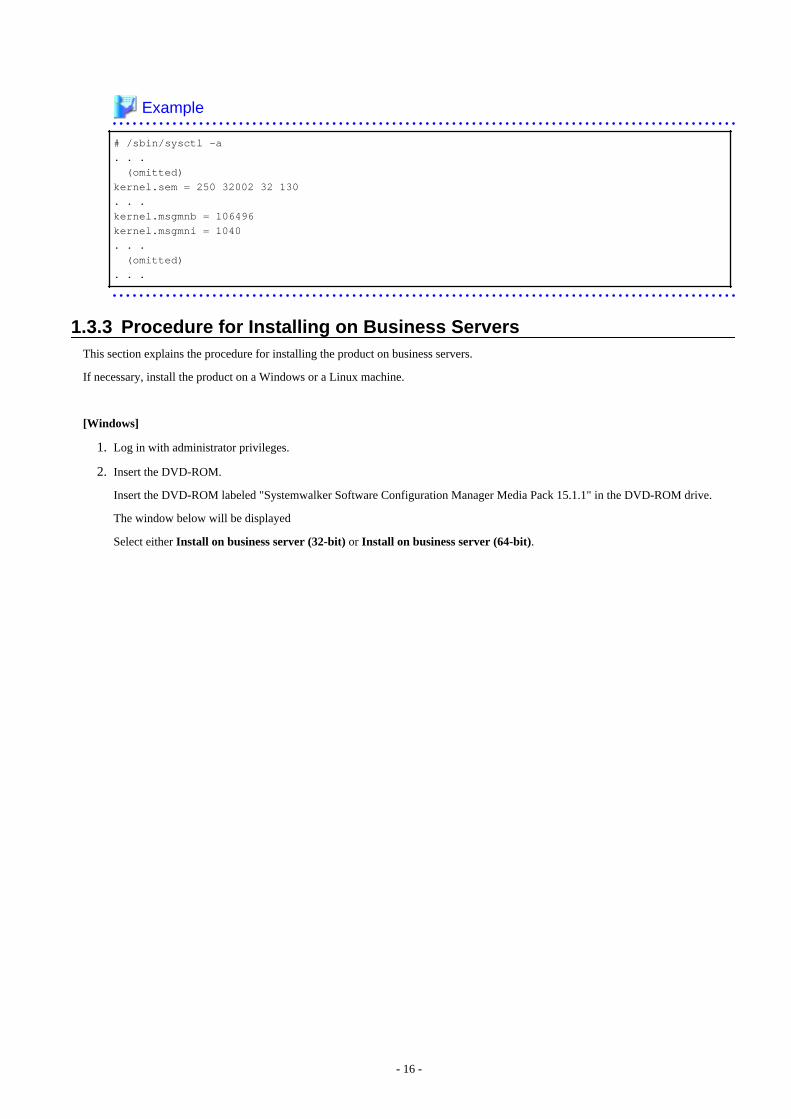
1. Use the following command to check the current settings for the system parameters:
# /sbin/sysctl -a
- 5 -

Example
# /sbin/sysctl -a
. . .
(omitted)
. . .
kernel.sem = 250 32000 32 128
. . .
kernel.msgmnb = 65536
kernel.msgmni = 16
. . .
(omitted)
. . .
2. Refer to "Tuning values for system parameters", and compare the current settings to the values in the tables above. Calculate anappropriate value for each parameter, taking into account the parameter type ("Maximum" or "Addition").
3. Edit the /etc/sysctl.conf file. Edit the file as shown in the following example:
Example
kernel.sem = 250 32002 32 130
kernel.msgmnb = 106496
kernel.msgmni = 1040
4. Use the following command to check that the changes have been applied to the /etc/sysctl.conf file:
# /bin/cat /etc/sysctl.conf
5. To enable the settings in Step 4 above, perform either of the following methods:
- Apply the settings by rebooting the system.
# /sbin/shutdown -r now
- Apply the settings by executing the "/sbin/sysctl -p" command.
# /sbin/sysctl -p /etc/sysctl.conf (*1)
*1: There is no need to reboot the system if this command is used.
6. The output of the following command can be used to check that the changes made to the system parameter settings have beenapplied:
# /sbin/sysctl -a
Example
# /sbin/sysctl -a
. . .
(omitted)
kernel.sem = 250 32002 32 130
. . .
kernel.msgmnb = 106496
kernel.msgmni = 1040
. . .
(omitted)
. . .
- 6 -

1.2.2.4 syslog Settings [Linux]This product outputs logs to syslog. In order to output logs to syslog, check the following settings and adjust the settings if necessary.
Settings for syslog.conf or rsyslog.conf
It is recommended that the default settings for the operating system be used.
Systemwalker Software Configuration Manager outputs logs using local0 (facility). The following settings are required. If the followingsettings are missing even though syslog.conf or rsyslog.conf has already been edited, add the following settings to syslog.conf orrsyslog.conf.
Refer to the syslog.conf manuals for information on how to edit the syslog.conf file. Refer to the rsyslog.conf manuals for information onhow to edit the rsyslog.conf file.
- "/etc/syslog.conf" (for RHEL5)
Selector field (facility.priority) Action field
local0.info /var/log/messages
- "/etc/rsyslog.conf" (for RHEL6)
<Rules>
Selector field (facility.priority) Action field
local0.info /var/log/messages
Point
There is no need to make modifications if "*.info" has been set for the selector field (facility.priority).
Enabling remote reception for syslog
Remote reception must be enabled in order to output logs to the syslog on the admin server from Systemwalker Software ConfigurationManager.
Configure settings so that syslog automatically starts in remote reception mode when the operating system starts.
Edit the following files:
- "/etc/sysconfig/syslog" (for RHEL5)
Add the "-r" option to SYSLOGD_OPTIONS.
Example:
SYSLOGD_OPTIONS="-r -m 0"
- "/etc/rsyslog.conf" (for RHEL6)
Enable $UDPServerRun.
$ModLoad imudp.so
$UDPServerRun 514
Note that the port used for remote reception is "514/udp". Refer to "Appendix A Port Number List" for a list of ports used bySystemwalker Software Configuration Manager.
Restarting syslogd or rsyslogd
If the settings have been changed in "Settings for syslog.conf or rsyslog.conf" or "Enabling remote reception for syslog", restart syslogdor rsyslogd for the changes to take effect.
- 7 -

Refer to the syslogd manuals for information on syslogd. Refer to the rsyslogd manuals for information on rsyslogd.
- "syslogd" (for RHEL5)
>/etc/init.d/syslog stop
>/etc/init.d/syslog start
- "rsyslogd" (for RHEL6)
>/etc/init.d/rsyslog stop
>/etc/init.d/rsyslog start
1.2.3 Procedure for Installing on the Admin ServerUse the following procedure to install the product on the admin server:
Install the product on a Windows or a Linux machine.
[Windows]
1. Log in with administrator privileges.
2. Insert the DVD-ROM labeled "Systemwalker Software Configuration Manager Media Pack 15.1.1" in the DVD-ROM drive.
The following window will be displayed:
- 8 -

Note
If this window is not displayed automatically, start the installer manually by executing "swsetup.exe" on the DVD-ROM.
3. Select Install on admin server.
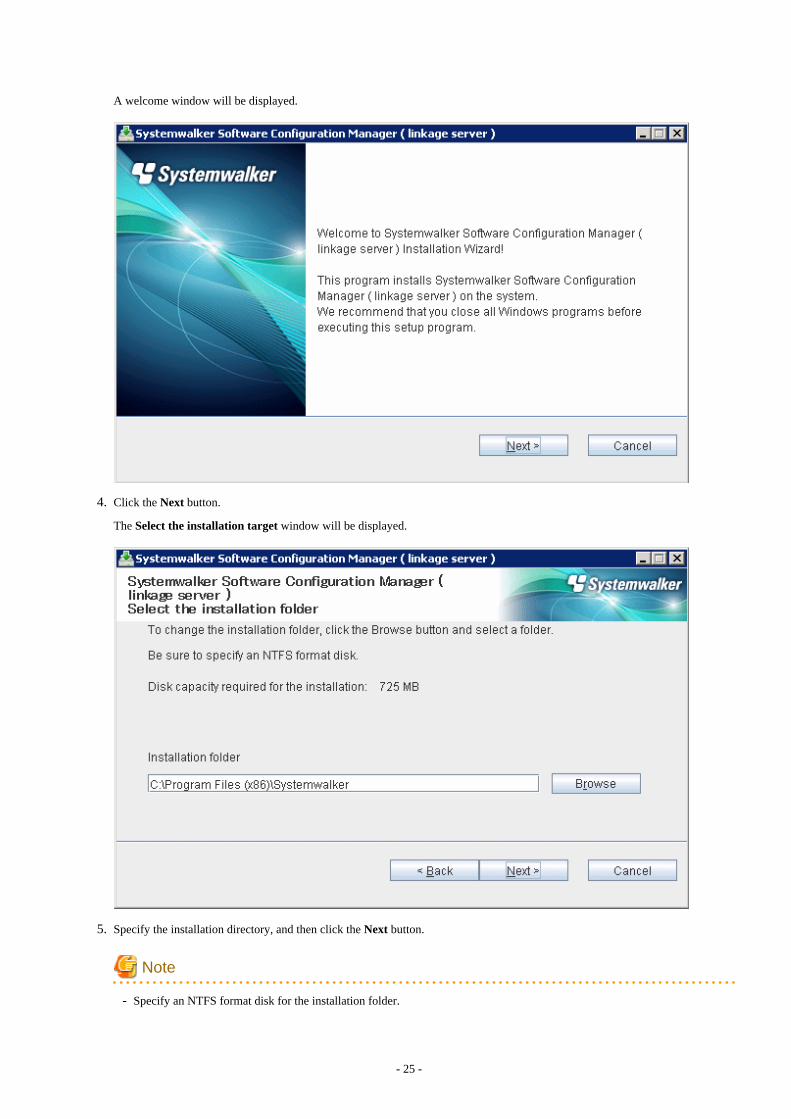
A welcome window will be displayed.
4. Click the Next button.
The Select the installation target window will be displayed.
- 9 -

5. Specify the installation directory, and then click the Next button.
Note
- Specify an NTFS format disk for the installation folder.
- The maximum length of the path to the installation directory is 40 characters.
- Be sure to specify a new folder.
- Relative paths and paths that start with "\\" cannot be specified.
- Only the following characters can be used for the folder name: alphanumeric characters, spaces, hyphens (-), underscores (_)and parentheses (“(” ”)”).
The Confirm the installation settings window will be displayed.
- 10 -
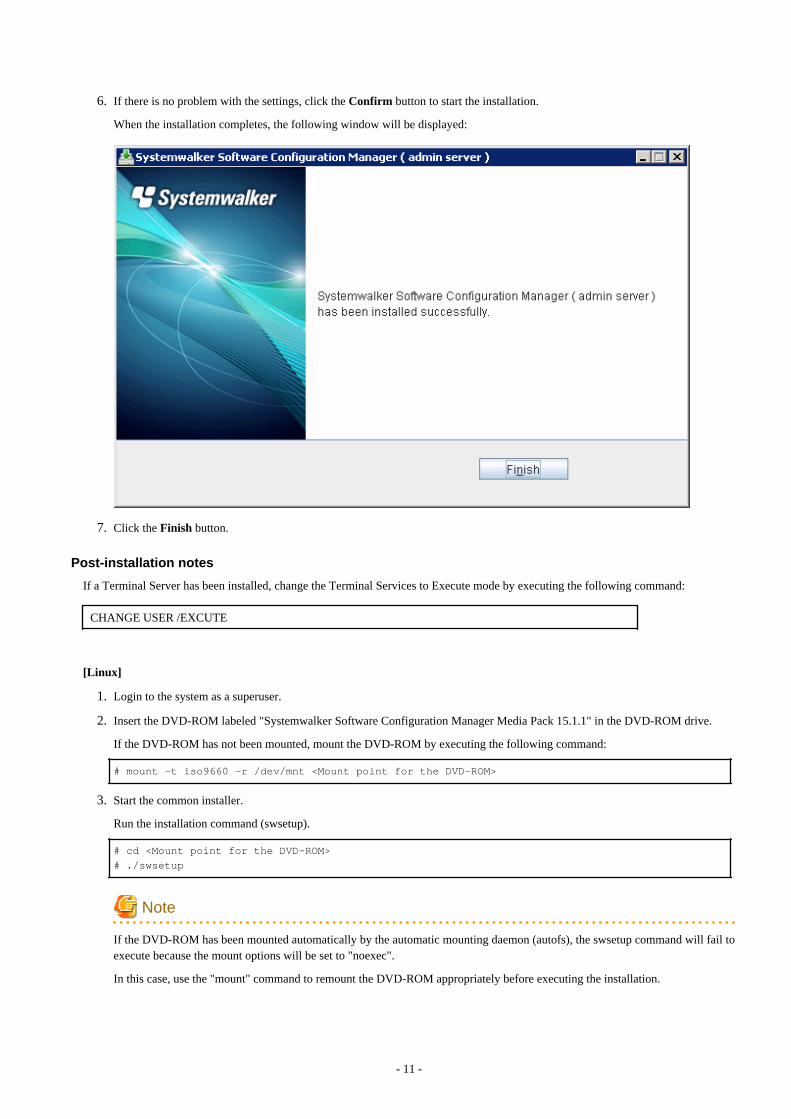
6. If there is no problem with the settings, click the Confirm button to start the installation.
When the installation completes, the following window will be displayed:
7. Click the Finish button.
Post-installation notes
If a Terminal Server has been installed, change the Terminal Services to Execute mode by executing the following command:
CHANGE USER /EXCUTE
[Linux]
1. Login to the system as a superuser.
2. Insert the DVD-ROM labeled "Systemwalker Software Configuration Manager Media Pack 15.1.1" in the DVD-ROM drive.
If the DVD-ROM has not been mounted, mount the DVD-ROM by executing the following command:
# mount -t iso9660 -r /dev/mnt <Mount point for the DVD-ROM>
3. Start the common installer.
Run the installation command (swsetup).
# cd <Mount point for the DVD-ROM>
# ./swsetup
Note
If the DVD-ROM has been mounted automatically by the automatic mounting daemon (autofs), the swsetup command will fail toexecute because the mount options will be set to "noexec".
In this case, use the "mount" command to remount the DVD-ROM appropriately before executing the installation.
- 11 -

The mount options for the DVD-ROM that has been mounted can be checked by executing the "mount" command without anyparameters.
4. Start installation.
A welcome window will be displayed. Press the Enter key.
================================================================================
Systemwalker Software Configuration Manager Setup
V15.1.1
Copyright 2010-2013 FUJITSU LIMITED
================================================================================
Welcome to the Systemwalker Setup!
The setup will install Systemwalker Software Configuration Manager.
Press ENTER.
5. The Select the installation target window will be displayed.
Select Install on admin server. Enter "1".
================================================================================
Systemwalker Software Configuration Manager Setup
V15.1.1
Copyright 2010-2013 FUJITSU LIMITED
================================================================================
<< Select the installation target >>
1. Install on admin server
2. Install on business server (32-bit)
3. Install on business server (64-bit)
================================================================================
Select one of the items above.
[q,number]
=>
6. The installation for the admin server will start. To start the installation process, press "y".
Systemwalker Software Configuration Manager ( admin server )
Do you want to start install?
[y,n]
=>
7. Check the installation directory. The storage directory cannot be changed, so enter "y".
=== < Installation directory > ===
Program location(Can't Change): /opt
Configuration file location(Can't Change): /etc/opt
Work file location(Can't Change): /var/opt
Install the product using these settings?
[y,q]
=>
8. The installation will start.
Once the preparations for the installation are complete, the following message will be displayed, and the installation will start:
Installing...
- 12 -

9. The installation will complete.
When the installation completes, the following message will be displayed:
Systemwalker Software Configuration Manager ( admin server ) install completed.
1.3 Installing on Business ServersThis section explains how to install the product on business servers.
A Systemwalker Software Configuration Manager agent is installed on business servers.
An agent is a Systemwalker Software Configuration Manager program that runs on L-Servers that are deployed from the admin server.
1.3.1 Points to Note before Installing on Business ServersThis section explains points to note before installing the product on business servers.
Checking the required software and settings
The following software and settings are required on business servers separately for each function used:
- Windows patch management
- Register the business server with Windows Server Update Services (WSUS)
Refer to "2.3.1 Settings for Managing Windows Patches" for information on the registration method.
- Linux patch management
- Set up the Yellowdog Updater Modified (yum) repository to be looked up
Refer to the yum manuals for information on the setup method.
- Collecting patch management and software information for Fujitsu middleware
- Install the UpdateAdvisor (middleware)
Refer to the UpdateAdvisor (middleware) manuals for information on the installation method.
To collect patch management information for Linux operating systems, or patch management and software information for Fujitsumiddleware, it is recommended that the installations and settings above be performed on the L-Server for the infrastructure administratorbefore deployment.
Mandatory software for Linux
Install the software shown below, which is provided with the operating system (refer to the operating system manual before installing it).
- redhat-lsb packages
On Red Hat Enterprise Linux 6 (for Intel64) environments, install the 32-bit version of the following software provided with the operatingsystem. Refer to the operating system manual for the installation procedure. [Linux]
- expat package
- glibc package
- libattr package
- libcap package
- libgcc package
- libstdc++ package
- nss-softokn-freebl package
- zlib package
- 13 -

The functions installed
- The following functions are installed as a result of installing a Systemwalker Software Configuration Manager agent:
- File transfer infrastructure
If a Systemwalker IT Change Manager V14.1.0 agent has been installed [Windows]
To install a Systemwalker Software Configuration Manager agent in an environment where a Systemwalker IT Change Manager V14.1.0agent has been installed, the Systemwalker IT Change Manager V14.1.0 agent must be uninstalled in advance. Install a SystemwalkerSoftware Configuration Manager agent first and then a Systemwalker IT Change Manager V14.1.0 agent.
1.3.2 Tasks Required before Installing on Business ServersThis section explains the tasks that need to be performed before installation.
1.3.2.1 Tuning System Parameters [Linux]The system parameters must be tuned.
Tuning values for system parameters
Refer to the following tables for information on the system parameters that require tuning and their values.
- Semaphores
For the semaphore settings, specify each parameter value using the following format:
kernel.sem = para1 para2 para3 para4
Parameter Description Value Type
para1 Maximum number ofsemaphores persemaphore identifier
1 Maximum
para2 Number of semaphoresfor the entire system
2 Addition
para3 Maximum number ofoperators per semaphorecall
1 Maximum
para4 Number of semaphoreoperators for the entiresystem
2 Addition
- Message queues
Parameter Description Value Type
kernel.msgmnb Maximum number of messages that can beheld in a single message queue
106496 Maximum
kernel.msgmni Maximum number of message queue IDs 1024 Addition
Settings dependent on the parameter type
Set the parameters as below, depending on the "Type" above.
- If the Type is "Maximum":
If the value that has already been set (either the initial value or the previous setting) is equal to or greater than the value in the tableabove, there is no need to change the parameter value. If the current value is smaller than the value in the table, change the parameterto the value in the table.
- 14 -
- If the Type is "Addition":
Add the value in the table to the value that has already been set (either the initial value or the previous setting). Check the upper limitfor the system before setting the parameter to the result of the addition, and if the result of the addition is greater than the upper limitfor the system, then set the parameter to the upper limit for the system.
Refer to the Linux manuals and other documents for details.
Tuning procedure
Use the following procedure to perform tuning tasks:
1. Use the following command to check the current settings for the system parameters:
# /sbin/sysctl -a
Example
# /sbin/sysctl -a
. . .
(omitted)
. . .
kernel.sem = 250 32000 32 128
. . .
kernel.msgmnb = 65536
kernel.msgmni = 16
. . .
(omitted)
. . .
2. Refer to "Tuning values for system parameters", and compare the current settings to the values in the tables above. Calculate anappropriate value for each parameter, taking into account the parameter type ("Maximum" or "Addition").
3. Edit the /etc/sysctl.conf file. Edit the file as shown in the following example:
Example
kernel.sem = 250 32002 32 130
kernel.msgmnb = 106496
kernel.msgmni = 1040
4. Use the following command to check that the changes have been applied to the /etc/sysctl.conf file:
# /bin/cat /etc/sysctl.conf
5. To enable the settings in Step 4 above, perform either of the following methods:
- Apply the settings by rebooting the system.
# /sbin/shutdown -r now
- Apply the settings by executing the "/sbin/sysctl -p" command.
# /sbin/sysctl -p /etc/sysctl.conf (*1)
*1: There is no need to reboot the system if this command is used.
6. The output of the following command can be used to check that the changes made to the system parameter settings have beenapplied:
# /sbin/sysctl -a
- 15 -
Example
# /sbin/sysctl -a
. . .
(omitted)
kernel.sem = 250 32002 32 130
. . .
kernel.msgmnb = 106496
kernel.msgmni = 1040
. . .
(omitted)
. . .
1.3.3 Procedure for Installing on Business ServersThis section explains the procedure for installing the product on business servers.
If necessary, install the product on a Windows or a Linux machine.
[Windows]
1. Log in with administrator privileges.
2. Insert the DVD-ROM.
Insert the DVD-ROM labeled "Systemwalker Software Configuration Manager Media Pack 15.1.1" in the DVD-ROM drive.
The window below will be displayed
Select either Install on business server (32-bit) or Install on business server (64-bit).
- 16 -

Select either the 32-bit version or the 64-bit version depending on the CPU architecture for the server where the product is to beinstalled.
Note
If this window is not displayed automatically, start the installer manually by executing "swsetup.exe" on the DVD-ROM.
- 17 -
3. A welcome window will be displayed.
Click the Next button.
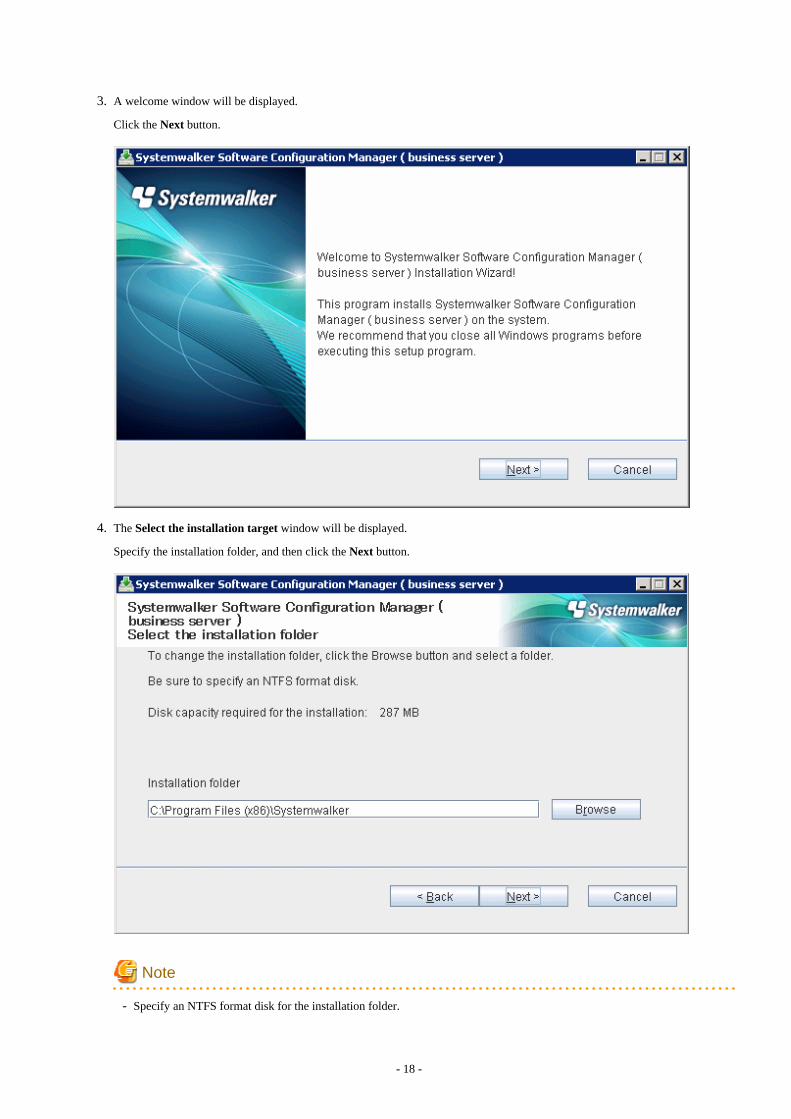
4. The Select the installation target window will be displayed.
Specify the installation folder, and then click the Next button.
Note
- Specify an NTFS format disk for the installation folder.
- 18 -

- The maximum length of the path to the installation directory is 51 characters.
- Be sure to specify a new folder.
- Relative paths and paths that start with "\\" cannot be specified.
- Only the following characters can be used for the folder name: alphanumeric characters, spaces, hyphens (-), and underscores(_).
A standard directory under "<System Drive>:\Program Files" or "<System Drive>:\Program Files (x86)" can also be specified.
5. The Confirm the installation settings window will be displayed.
If there is no problem with the settings, click the Confirm button to start the installation.
- 19 -
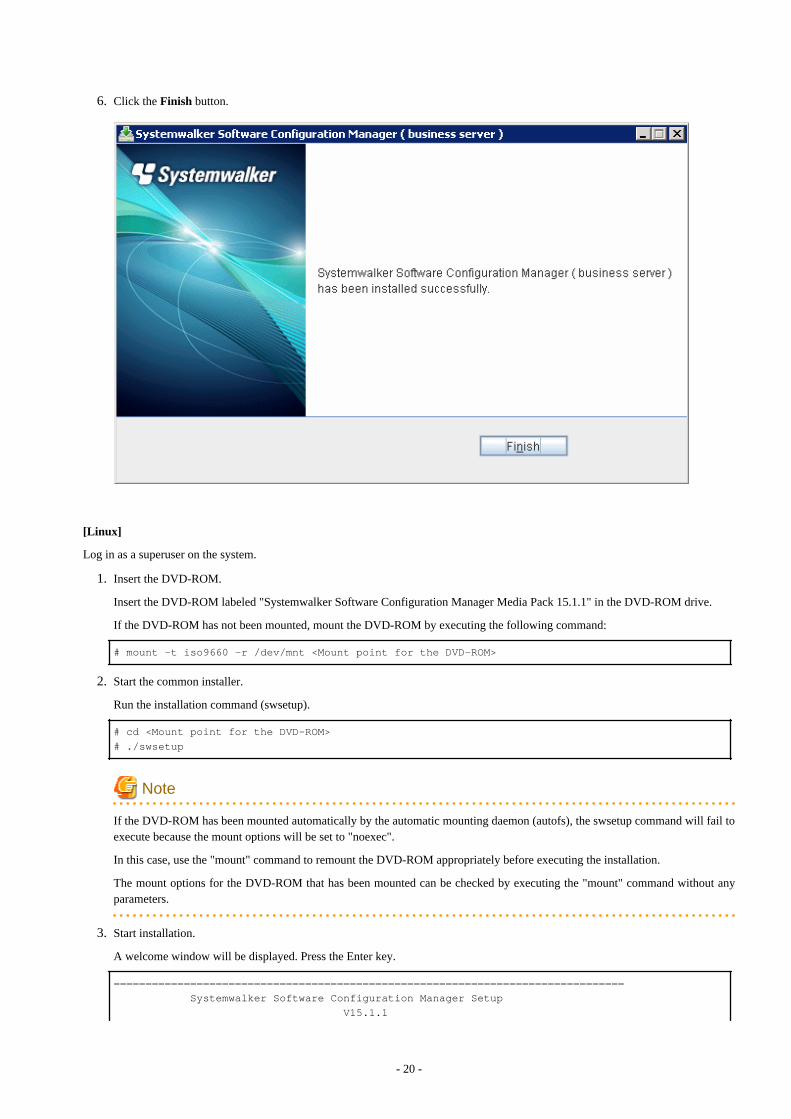
6. Click the Finish button.
[Linux]
Log in as a superuser on the system.
1. Insert the DVD-ROM.
Insert the DVD-ROM labeled "Systemwalker Software Configuration Manager Media Pack 15.1.1" in the DVD-ROM drive.
If the DVD-ROM has not been mounted, mount the DVD-ROM by executing the following command:
# mount -t iso9660 -r /dev/mnt <Mount point for the DVD-ROM>
2. Start the common installer.
Run the installation command (swsetup).
# cd <Mount point for the DVD-ROM>
# ./swsetup
Note
If the DVD-ROM has been mounted automatically by the automatic mounting daemon (autofs), the swsetup command will fail toexecute because the mount options will be set to "noexec".
In this case, use the "mount" command to remount the DVD-ROM appropriately before executing the installation.
The mount options for the DVD-ROM that has been mounted can be checked by executing the "mount" command without anyparameters.
3. Start installation.
A welcome window will be displayed. Press the Enter key.
================================================================================
Systemwalker Software Configuration Manager Setup
V15.1.1
- 20 -

Copyright 2010-2013 FUJITSU LIMITED
================================================================================
Welcome to Systemwalker Setup!
The setup will install Systemwalker Software Configuration Manager.
Press ENTER.
4. The Select the installation target window will be displayed.
Select Install on business server. Select either the 32-bit version or the 64-bit version depending on the CPU architecture for theserver where the product is to be installed.
================================================================================
Systemwalker Software Configuration Manager Setup
V15.1.1
Copyright 2010-2013 FUJITSU LIMITED
================================================================================
<< Select the installation target >>
1. Install on admin server
2. Install on business server (32-bit)
3. Install on business server (64-bit)
================================================================================
Select one of the items above.
[q,number]
=>
5. The installation for the business server will start. To start the installation process, press "y".
Preparing installation.
Please wait for a while.
Systemwalker Software Configuration Manager ( business server )
Do you want to start install?
[y,n]
=>
6. Check the installation directory. The storage directory cannot be changed, so enter "y".
=== < Installation directory > ===
Program location(Can't Change): /opt
Configuration file location(Can't Change): /etc/opt
Work file location(Can't Change): /var/opt
Install the product using these settings?
[y,q]
=>
7. The installation will start.
Once the preparations for the installation are complete, the following message will be displayed, and the installation will start:
Installing...
8. The installation will complete.
When the installation completes, the following message will be displayed:
Systemwalker Software Configuration Manager ( business server ) install completed.
- 21 -

1.4 Installing on Linkage Servers [Windows]This section explains how to install the product on linkage servers.
A Systemwalker Software Configuration Manager agent is installed on linkage servers.
1.4.1 Points to Note before Installing on Linkage ServersThis section explains points to note before installing the product on linkage servers.
Conditions required for installing the product on a linkage server
To use the following function, install a Systemwalker Software Configuration Manager agent on the linkage server:
- Windows patch management
The functions installed
- The following functions are installed as a result of installing a Systemwalker Software Configuration Manager agent:
- CMDB agent
- SMEE, SecureCrypt library runtime
- Systemwalker communication infrastructure
- File transfer infrastructure
Coexistence with Systemwalker Operation Manager V13.4.0
Systemwalker Software Configuration Manager can only coexist with Systemwalker Operation Manager V13.4.0 in the followingcombinations:
[Combinations]
- To enable Systemwalker Software Configuration Manager to coexist with the 32-bit version of Systemwalker Operation ManagerV13.4.0
To enable Systemwalker Software Configuration Manager to coexist with Systemwalker Operation Manager that has been installedusing "Systemwalker Operation Manager Standard Edition Media Pack V13 (13.4)" or "Systemwalker Operation Manager EnterpriseEdition Media Pack V13 (13.4)", install Systemwalker Software Configuration Manager using the following media pack:
- Linkage server (32-bit)
- To enable Systemwalker Software Configuration Manager to coexist with the 64-bit version of Systemwalker Operation ManagerV13.4.0
To enable Systemwalker Software Configuration Manager to coexist with Systemwalker Operation Manager that has been installedusing "Systemwalker Operation Manager Standard Edition Media Pack (64 bit) V13 (13.4)" or "Systemwalker Operation ManagerEnterprise Edition Media Pack (64 bit) V13 (13.4)", install Systemwalker Software Configuration Manager using the following mediapack:
- Linkage server (64-bit)
Stopping Systemwalker products
Stop the following Systemwalker product before starting the installation:
- Systemwalker Operation Manager V13.4.0
If an agent (communication infrastructure) is running, stop it by executing the following command:
%F4AN_INSTALL_PATH%\F4ANswnc\bin\swncctrl stop
- 22 -

1.4.2 Procedure for Installing on Linkage ServersThis section explains the procedure for installing the product on linkage servers.
Point
Using multiple WSUS servers
Install a Systemwalker Software Configuration Manager agent on all WSUS servers.
- If WSUS servers have been chained (with upstream servers and downstream servers)
Install Systemwalker Software Configuration Manager agents on both upstream and downstream servers.
Procedure for installing on linkage servers
Use the following procedure to install Systemwalker Software Configuration Manager agents:
1. Log in with administrator privileges.
- 23 -
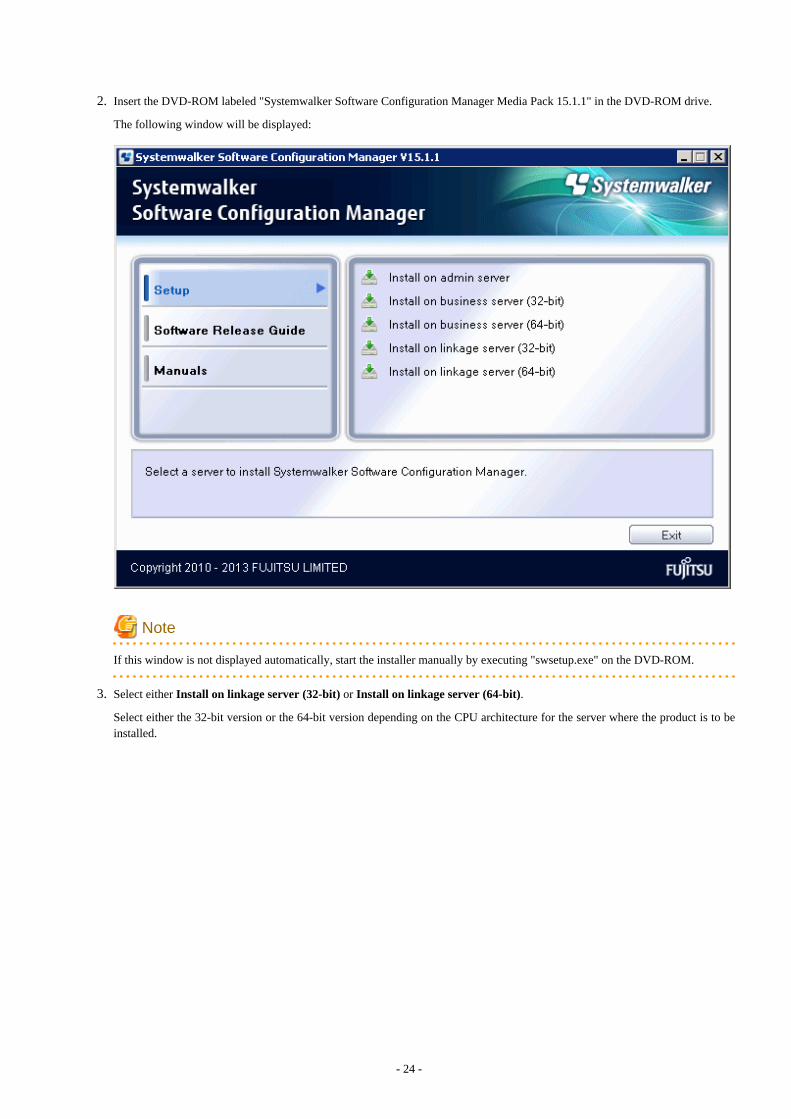
2. Insert the DVD-ROM labeled "Systemwalker Software Configuration Manager Media Pack 15.1.1" in the DVD-ROM drive.
The following window will be displayed:
Note
If this window is not displayed automatically, start the installer manually by executing "swsetup.exe" on the DVD-ROM.
3. Select either Install on linkage server (32-bit) or Install on linkage server (64-bit).
Select either the 32-bit version or the 64-bit version depending on the CPU architecture for the server where the product is to beinstalled.
- 24 -
A welcome window will be displayed.
4. Click the Next button.
The Select the installation target window will be displayed.
5. Specify the installation directory, and then click the Next button.
Note
- Specify an NTFS format disk for the installation folder.
- 25 -

- The maximum length of the path to the installation directory is 51 characters.
- Be sure to specify a new folder.
- Relative paths and paths that start with "\\" cannot be specified.
- Only the following characters can be used for the folder name: alphanumeric characters, spaces, hyphens (-), and underscores(_).
A standard directory under "<System Drive>:\Program Files" or "<System Drive>:\Program Files (x86)" can also be specified.
The Admin server settings window will be displayed.
6. Enter the appropriate values for the following items and then click the Next button.
- Host name or IP address of the admin server
- Port number for the admin server (Web server)
- 26 -

The Confirm the installation settings window will be displayed.
7. If there is no problem with the settings, click the Confirm button to start the installation.
When the installation completes, the following window will be displayed:
8. Click the Finish button.
- 27 -

1.5 If the Installation FailsIf the installation fails, restart the system and then log in again as the same user that performed the installation. Remove the cause of theproblem based on the message that has been output, and then perform the installation again.
- 28 -
Chapter 2 SetupThis chapter explains how to set up Systemwalker Software Configuration Manager.
2.1 Setting up the Admin ServerThis section explains how to set up the admin server.
2.1.1 Pre-setup TasksThis section explains the tasks required before setup for the admin server.
2.1.1.1 Stopping ServerView Resource OrchestratorStop ServerView Resource Orchestrator by executing the following command:
[Windows]
<ServerView Resource Orchestrator installation directory>\SVROR\Manager\bin\rcxmgrctl stop
[Linux]
/opt/FJSVrcvmr/bin/rcxmgrctl stop
2.1.2 Setting up Systemwalker Software Configuration ManagerIf necessary, set up the product on a Windows or a Linux machine.
[Windows]
Perform the setup by opening a new command prompt and executing the following command:
<Systemwalker Software Configuration Manager installation directory>\SWCFMGM\bin\swcfmg_setup -s
- 29 -
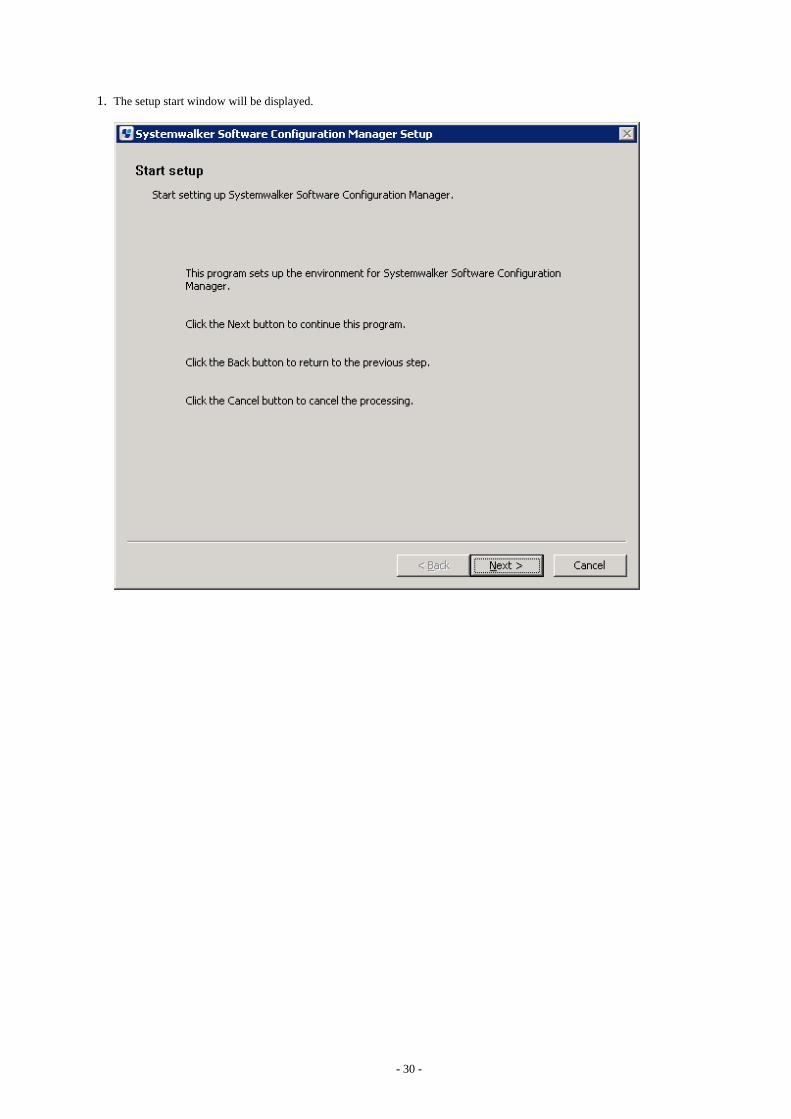
1. The setup start window will be displayed.
- 30 -
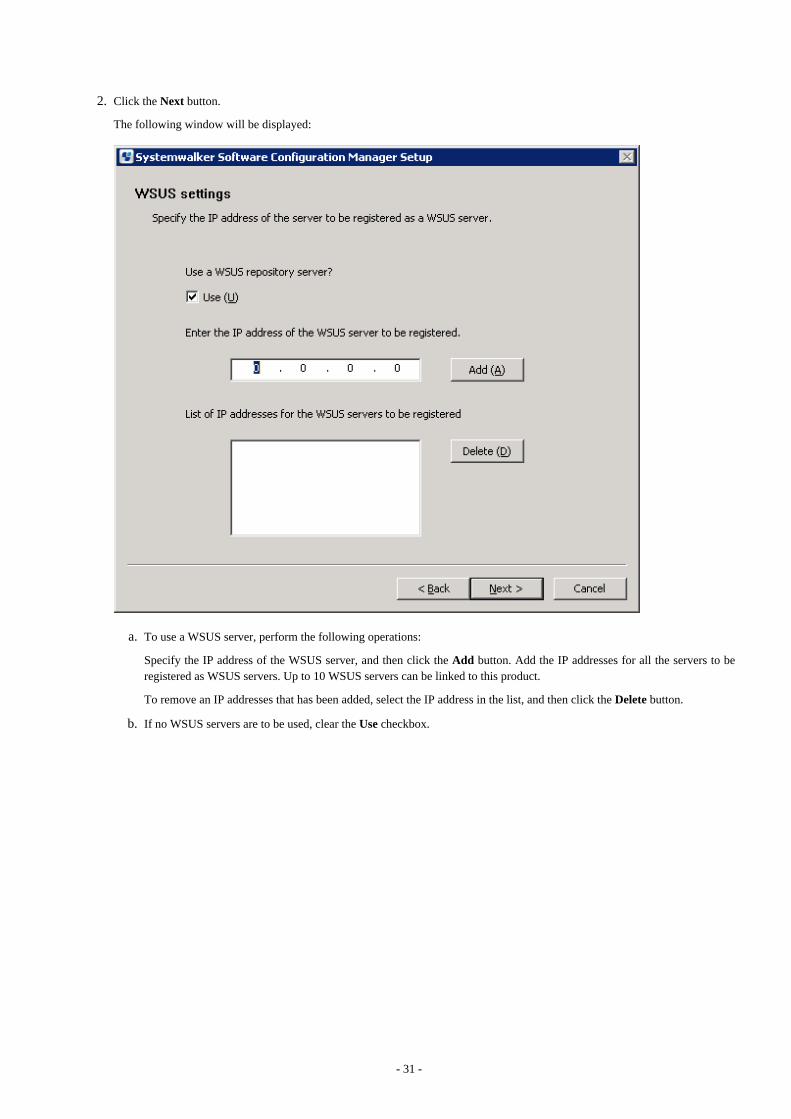
2. Click the Next button.
The following window will be displayed:
a. To use a WSUS server, perform the following operations:
Specify the IP address of the WSUS server, and then click the Add button. Add the IP addresses for all the servers to beregistered as WSUS servers. Up to 10 WSUS servers can be linked to this product.
To remove an IP addresses that has been added, select the IP address in the list, and then click the Delete button.
b. If no WSUS servers are to be used, clear the Use checkbox.
- 31 -

3. Click the Next button.
The following window will be displayed:
Set up patch management for Fujitsu middleware. Enter the following items:
Input item Default value
Media library installation folder <Systemwalker Software Configuration Manager installationdirectory>\SWCFMGM\repository
- 32 -

4. Click the Next button.
The following window will be displayed:
5. Specify the information required when the email transmission function is used.
a. To use the email transmission function, set the following items:
Input item Default value
Host name or IP address of the SMTP server None
Port number for the SMTP server 25
Sender email address None
Sender name None
Retry interval (in seconds) used when transmission errorsoccur
300
Number of retries when transmission errors occur 10
Point
Set the Retry interval (in seconds) used when transmission errors occur and Number of retries when transmissionerrors occur items to match the operation policy, such as the target time for recovering from problems.
If there is no clear operation policy, use the default values.
b. If the email transmission function is not to be used, clear the Use checkbox.
- 33 -

6. Click the Next button.
The following confirmation window will be displayed:
- 34 -
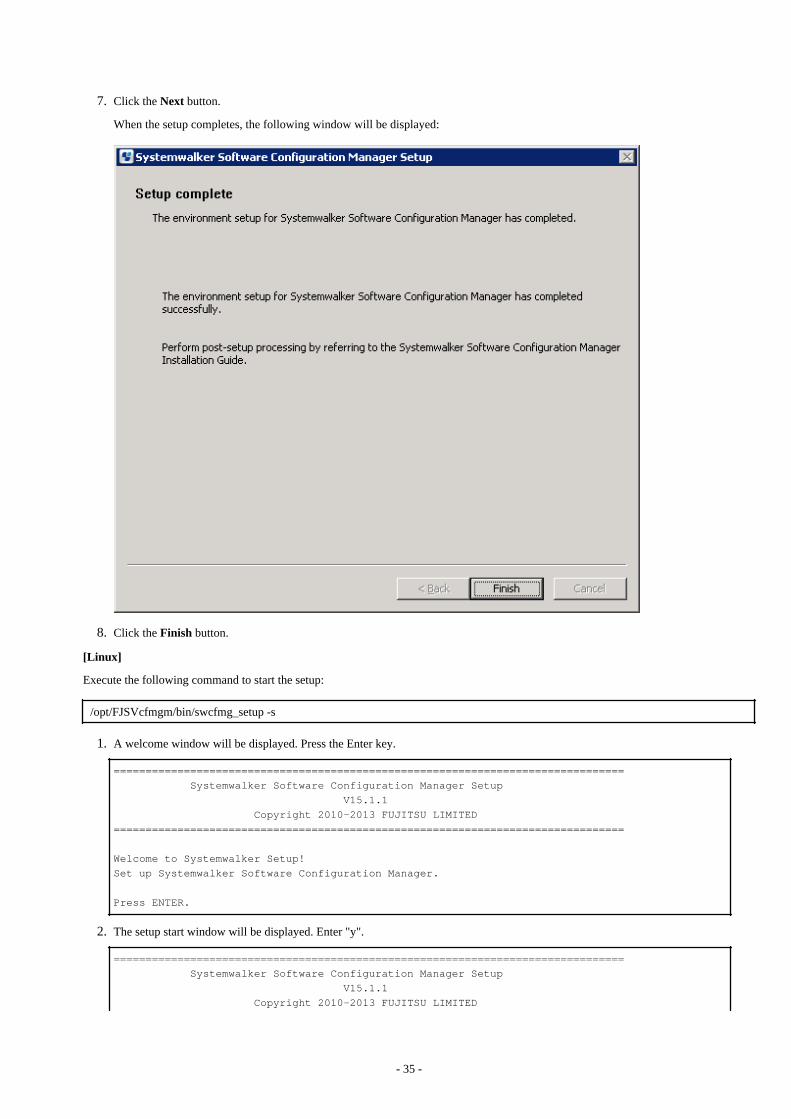
7. Click the Next button.
When the setup completes, the following window will be displayed:
8. Click the Finish button.
[Linux]
Execute the following command to start the setup:
/opt/FJSVcfmgm/bin/swcfmg_setup -s
1. A welcome window will be displayed. Press the Enter key.
================================================================================
Systemwalker Software Configuration Manager Setup
V15.1.1
Copyright 2010-2013 FUJITSU LIMITED
================================================================================
Welcome to Systemwalker Setup!
Set up Systemwalker Software Configuration Manager.
Press ENTER.
2. The setup start window will be displayed. Enter "y".
================================================================================
Systemwalker Software Configuration Manager Setup
V15.1.1
Copyright 2010-2013 FUJITSU LIMITED
- 35 -

================================================================================
Systemwalker Software Configuration Manager ( admin server )
Start the setup?
[y,n]
=>
3. Set up WSUS.
<< WSUS settings >>
Specify the environment information required to use the WSUS server.
=================================================================================
Use a WSUS repository server?
1. Use
2. Do not use
[number,q]
=>
4. To use a WSUS server, enter the IP address of the WSUS server.
<< WSUS settings >>
Specify the IP address of the server to be registered as a WSUS server.
=================================================================================
Enter the IP address of the WSUS server to be registered.
=>
5. Enter the IP address of the WSUS if continuing registration.
<< WSUS settings >>
Specify the IP address of the server to be registered as a WSUS server.
=================================================================================
[List of IP addresses for the WSUS servers to be registered]
WSUS server 1: 192.168.10.10
Enter the IP address if continuing registration, or enter [e] if completing registration.
[IPAddress,e,q]
=>
6. Set up patch management for Fujitsu middleware. Specify the directory where the media library is to be installed.
<< Settings for Fujitsu middleware patch management >>
Configure settings for Fujitsu middleware patch management.
=================================================================================
Specify the media library installation directory.
Installation directory (can be changed): /var/opt/FJSVcfmgm/repository
Accept the above settings?
[y,n,q]
=>
7. Set up an environment for the email transmission function.
<< Environment settings for the email transmission function >>
Specify the environment information required to use the email transmission function.
=================================================================================
Specify whether to use the email transmission function.
- 36 -

1. Use
2. Do not use
[number,q]
=>
8. To use the email transmission function, set up the email function.
a. Enter the host name or IP address of the SMTP server.
<< Environment settings for the email transmission function >>
Specify the environment information required to use the email transmission function.
=================================================================================
[Settings Information]
Email transmission function: Use
Host name of the SMTP server:
Port number for the SMTP server: 25
Sender email address:
Sender name:
Retry interval (in seconds) used when transmission errors occur: 300
Number of retries when transmission errors occur: 10
Enter the host name or IP address of the SMTP server.
=>
b. Enter the port number for the SMTP server.
<< Environment settings for the email transmission function >>
Specify the environment information required to use the email transmission function.
=================================================================================
[Settings Information]
Email transmission function: Use
Host name of the SMTP server: smtp-server.example.com
Port number for the SMTP server: 25
Sender email address:
Sender name:
Retry interval (in seconds) used when transmission errors occur: 300
Number of retries when transmission errors occur: 10
Enter the port number of the SMTP server.
If the return key is pressed without any input, [default: 25] will be set.
=>
c. Enter the email address of the sender.
<< Environment settings for the email transmission function >>
Specify the environment information required to use the email transmission function.
=================================================================================
[Settings Information]
Email transmission function: Use
Host name of the SMTP server: smtp-server.example.com
Port number for the SMTP server: 25
Sender email address:
Sender name:
Retry interval (in seconds) used when transmission errors occur: 300
Number of retries when transmission errors occur: 10
Enter the sender's email address.
=>
- 37 -

d. Enter the name of the sender.
<< Environment settings for the email transmission function >>
Specify the environment information required to use the email transmission function.
=================================================================================
[Settings Information]
Email transmission function: Use
Host name of the SMTP server: smtp-server.example.com
Port number for the SMTP server: 25
Sender email address: [email protected]
Sender name:
Retry interval (in seconds) used when transmission errors occur: 300
Number of retries when transmission errors occur: 10
Enter the sender's name.
=>
e. Enter the retry interval to be used when transmission errors occur.
<< Environment settings for the email transmission function >>
Specify the environment information required to use the email transmission function.
=================================================================================
[Settings Information]
Email transmission function: Use
Host name of the SMTP server: smtp-server.example.com
Port number for the SMTP server: 25
Sender email address: [email protected]
Sender name: Smtp Server
Retry interval (in seconds) used when transmission errors occur: 300
Number of retries when transmission errors occur: 10
Enter the retry interval (in seconds) used when transmission errors occur.
If the return key is pressed without any input, [default: 300] will be set.
=>
f. Enter the number of retries to be performed when transmission errors occur.
<< Environment settings for the email transmission function >>
Specify the environment information required to use the email transmission function.
=================================================================================
[Settings Information]
Email transmission function: Use
Host name of the SMTP server: smtp-server.example.com
Port number for the SMTP server: 25
Sender email address: [email protected]
Sender name: Smtp Server
Retry interval (in seconds) used when transmission errors occur: 300
Number of retries when transmission errors occur: 10
Enter the number of retries when transmission errors occur.
If the return key is pressed without any input, [default: 10] will be set.
=>
g. Check the settings for the email transmission function, and then enter "y".
<< Environment settings for the email transmission function >>
Specify the environment information required to use the email transmission function.
=================================================================================
[Settings Information]
Email transmission function: Use
- 38 -
Host name of the SMTP server: smtp-server.example.com
Port number for the SMTP server: 25
Sender email address: [email protected]
Sender name: Smtp Server
Retry interval (in seconds) used when transmission errors occur: 300
Number of retries when transmission errors occur: 10
Accept the above settings?
[y,n,q]
=>
9. Check the setup information.
Check the information entered in the settings window, and then enter "y" to start the setup processing.
<< Check the settings >>
Ensure the settings are correct, and then start setup.
=================================================================================
[WSUS settings]
WSUS servers: Use
List of IP addresses for the WSUS servers to be registered:
WSUS server 1: 192.168.10.10
[Settings for Fujitsu middleware patch management]
Media library installation directory: /var/opt/FJSVcfmgm/repository
[Environment settings for the email transmission function]
Email transmission function: Use
Host name of the SMTP server: smtp-server.example.com
Port number for the SMTP server: 25
Sender email address: [email protected]
Sender name: Smtp Server
Retry interval (in seconds) used when transmission errors occur: 300
Number of retries when transmission errors occur: 10
Start the setup with the above settings?
[y,q]
=>
10. When the setup completes, the following message will be displayed:
The environment setup for Systemwalker Software Configuration Manager has completed successfully.
Perform post-setup processing by referring to the Systemwalker Software Configuration Manager
Installation Guide.
2.1.3 Post-setup TasksThis section explains the tasks required after setup for the admin server.
2.1.3.1 Starting ServerView Resource OrchestratorStart ServerView Resource Orchestrator by executing the following command:
[Windows]
<ServerView Resource Orchestrator installation directory>\SVROR\Manager\bin\rcxmgrctl start
[Linux]
/opt/FJSVrcvmr/bin/rcxmgrctl start
- 39 -

2.1.3.2 Starting Systemwalker Software Configuration ManagerUse the following command to start Systemwalker Software Configuration Manager:
[Windows]
<Systemwalker Software Configuration Manager installation directory>\SWCFMGM\bin\swcfmg_start
[Linux]
/opt/FJSVcfmgm/bin/swcfmg_start
2.1.3.3 Executing the Initial DiscoveryEstablish the following environment before performing the initial discovery:
- Discovering Windows patch information
- Create linkage servers
Refer to "1.1.3 Creating Linkage Servers (Repository Servers)".
- Set up business servers
Refer to "2.3.1 Settings for Managing Windows Patches".
- Discovering Linux patch information
- Create linkage servers
Refer to "1.1.3 Creating Linkage Servers (Repository Servers)".
- Set up business servers
Refer to "2.3.2 Settings for Managing Linux Patches".
- Discovering Fujitsu middleware patch information and Fujitsu middleware product information
- Set up business servers
Refer to "2.3.3 Settings for UpdateAdvisor (Middleware)".
- Configure settings on the admin server
Register the update application management registry configuration file.
Refer to Step 1 and Step 2 under "Fujitsu Middleware Patch Management" in "Operation Flow" in the Operation Guide.
Perform the initial discovery by executing the following command:
[Windows]
<Systemwalker Software Configuration Manager installation directory>\SWCFMGM\bin\swcfmg_patch_updateinfo.exe -repository
[Linux]
/opt/FJSVcfmgm/bin/swcfmg_patch_updateinfo -repository
To discover only particular information, execute the following command:
- Windows patch information
[Windows]
<Systemwalker Software Configuration Manager installation directory>\SWCFMGM\bin\swcfmg_patch_updateinfo.exe -twindows -repository
[Linux]
- 40 -

/opt/FJSVcfmgm/bin/swcfmg_patch_updateinfo -t windows -repository
- Linux patch information
[Windows]
<Systemwalker Software Configuration Manager installation directory>\SWCFMGM\bin\swcfmg_patch_updateinfo.exe -tlinux
[Linux]
/opt/FJSVcfmgm/bin/swcfmg_patch_updateinfo -t linux
- Fujitsu middleware patch information and Fujitsu middleware product information
[Windows]
<Systemwalker Software Configuration Manager installation directory>\SWCFMGM\bin\swcfmg_patch_updateinfo.exe -tmiddleware
[Linux]
/opt/FJSVcfmgm/bin/swcfmg_patch_updateinfo -t middleware
Register newly released Fujitsu middleware patches after the initial discovery has been performed.
Refer to Step 5 to Step 7 under "Fujitsu Middleware Patch Management" in "Operation Flow" in the Operation Guide for informationon how to register newly released Fujitsu middleware patches.
Note
- Perform the procedure in "2.1.3.4 Registering Discovery Schedules" after the initial discovery is complete. The initial discovery cantake quite a long time, so if the execution of a discovery registered using the procedure in "2.1.3.4 Registering Discovery Schedules"coincides with the execution of the initial discovery, then the regular discovery will fail to execute.
- Perform the procedure in "2.1.3.5 Registering a Configuration Baseline Creation Schedule" after the initial discovery is complete.The initial discovery can take quite a long time, so if a configuration baseline creation registered using the procedure in "2.1.3.5Registering a Configuration Baseline Creation Schedule" coincides with the execution of the initial discovery, then the configurationbaseline will not be created correctly.
Point
Guide to the time required for the initial discovery
It is recommended that the initial discovery be executed before operations commence.
The following tables show an approximate indication of the time required for the initial discovery:
- Windows patch information
Number of business servers Number of WSUS servers (*1) Time required for the initial
discovery
500 1 240 minutes or more
1,000 2 330 minutes or more
1,500 3 420 minutes or more
*1: The "Number of WSUS servers" refers to the recommended number of WSUS servers when business servers are managed bydistributing them to multiple WSUS servers in order to balance the load on WSUS servers. It is recommended that each WSUSserver manage no more than 500 business servers.
- 41 -
- Linux patch information
Number of business servers Time required for the initial discovery
500 240 minutes or more
1,000 420 minutes or more
1,500 600 minutes or more
- Fujitsu middleware patch information and Fujitsu middleware product information
Number of business servers Time required for the initial discovery
500 90 minutes or more
1,000 120 minutes or more
1,500 150 minutes or more
- All information
To discover all information, estimate the time required for discovery based on the following conditions:
The time required for the initial discovery for all information is either of the following, whichever is longer:
- Time required for the initial discovery for Windows patch information
- Time required for the initial discovery for Linux patch information + time required for the initial discovery forFujitsu middleware patch information and Fujitsu middleware product information
Example:
To discover OS patch information and Fujitsu middleware patch information for 1,500 business servers (1,000 Windows businessservers + 500 Linux business servers), the time required for the initial discovery is as follows:
- Time required for the initial discovery for Windows patch information (1,000 business servers): At least 330 minutes
- Time required for the initial discovery for Linux patch information (500 business servers): At least 240 minutes
- Processing time for the initial discovery for Fujitsu middleware patch information and Fujitsu middleware product information(1,500 business servers): At least 150 minutes
The time required for the initial discovery will be at least 390 minutes (i.e., 240 + 150 minutes).
2.1.3.4 Registering Discovery SchedulesRegister schedules for regular discoveries.
For Windows, register the following program with the Task Scheduler:
For Linux, add the following program to cron. Refer to the cron manuals for information on cron.
- [Program]
[Windows]
<Systemwalker Software Configuration Manager installation directory>\SWCFMGM\bin\swcfmg_patch_updateinfo.exe
[Linux]
/opt/FJSVcmdbm/bin/swcfmg_patch_updateinfo
- [Options]
-repository
- 42 -
To perform regular discovery for only particular information, register the following program:
- Windows patch information
- [Program]
[Windows]
<Systemwalker Software Configuration Manager installation directory>\SWCFMGM\bin\swcfmg_patch_updateinfo.exe
[Linux]
/opt/FJSVcmdbm/bin/swcfmg_patch_updateinfo
- [Options]
-t windows -repository
- Linux patch information
- [Program]
[Windows]
<Systemwalker Software Configuration Manager installation directory>\SWCFMGM\bin\swcfmg_patch_updateinfo.exe
[Linux]
/opt/FJSVcmdbm/bin/swcfmg_patch_updateinfo
- [Options]
-t linux
- Fujitsu middleware patch information and Fujitsu middleware product information
- [Program]
[Windows]
<Systemwalker Software Configuration Manager installation directory>\SWCFMGM\bin\swcfmg_patch_updateinfo.exe
[Linux]
/opt/FJSVcmdbm/bin/swcfmg_patch_updateinfo
- [Options]
-t middleware
Note
To perform regular discovery for only particular information, discovery for only the following combinations of information can beexecuted simultaneously:
- 43 -

Information collected by regulardiscovery
Windows patchinformation
Linux patch information Fujitsu middleware patchinformation and Fujitsu
middleware productinformation
Windows patch information - Y Y
Linux patch information Y - -
Fujitsu middleware patchinformation and Fujitsu middlewareproduct information
Y - -
Y: Can be executed simultaneously
-: Cannot be executed simultaneously
[Windows]
The following example shows how to register a schedule with the Task Scheduler:
1. Log in to Windows using an account that belongs to the Administrators group.
2. Select Start >> Administrative Tools >> Task Scheduler.
The Task Scheduler window will be displayed.
3. Select Action >> Create Task.
The Create New window will be displayed.
a. Enter a task name in the Name field in the General tab, and then select Run whether user is logged on or not.
- 44 -

b. Select the Triggers tab, and then click the New button.
The New Trigger window will be displayed.
Register the discovery schedule.
- 45 -

c. Select the Actions tab, and then click the New button.
The New Action window will be displayed.
Configure the following settings:
- Select Start a program from the Action pull-down menu.
- Add the following command to the Program/script field:
<Systemwalker Software Configuration Manager installation directory>\SWCFMGM\bin\swcfmg_patch_updateinfo.exe
- Add the following argument to the Add arguments (optional) field:
-repository
- 46 -

4. Click the OK button in the Create Task window.
The following window will be displayed:
5. Enter the user name for an account belonging to the Administrators group and the corresponding password, and then click the OKbutton.
[Linux]
The following example shows how to register the program with cron:
Perform the following procedure as the root user:
1. Check that the cron service has started
>/etc/rc.d/init.d/crond status
crond (pid xxx) is running...
2. If the cron service is not running, use the following command to start the cron service:
>/etc/rc.d/init.d/crond start
Starting crond:
Point
The cron service normally starts when the operating system starts.
By executing the following command, it is possible to check whether the cron service has been set to start when the operating systemstarts:
>chkconfig --list crond
crond 0:off 1:off 2:on 3:on 4:on 5:on 6:off
If the cron service has been set to start when the operating system starts, the numbers 2, 3, 4 and 5 above are set to "on" as shownabove.
To set the cron service to start when the operating system starts, execute the following command:
>chkconfig --level 2345 crond on
3. Execute the following command to edit the schedule definitions:
>crontab -e
Executing the "crontab -e" command starts the vi editor. Refer to the vi editor manuals for information on the vi editor.
Example: Discovering all information everyday at 2:00
- 47 -

0 2 * * * /opt/FJSVcfmgm/bin/swcfmg_patch_updateinfo -repository > /dev/null 2>&1
Point
Guide to the execution interval for regular discovery
It is recommended that regular discovery be executed once a day, outside business hours (such as late at night).
Take the following guide into account when setting an execution interval:
- Windows patch information
Number of business servers Number of WSUS servers (*1) Execution interval
500 1 30 minutes or more
1,000 2 60 minutes or more
1,500 3 60 minutes or more
*1: The "Number of WSUS servers" refers to the recommended number of WSUS servers when business servers are managed bydistributing them to multiple WSUS servers in order to balance the load on WSUS servers. It is recommended that each WSUSserver manage no more than 500 business servers.
- Linux patch information
Number of business servers Execution interval
500 90 minutes or more
1,000 150 minutes or more
1,500 210 minutes or more
- Fujitsu middleware patch information and Fujitsu middleware product information
Number of business servers Execution interval
500 60 minutes or more
1,000 90 minutes or more
1,500 120 minutes or more
- All information
To perform regular discovery for all information, estimate the discovery execution interval based on the following conditions:
The execution interval for regular discovery for all information is either of the following, whichever is longer:
- Discovery execution interval for Windows patch information
- Discovery execution interval for Linux patch information + discovery execution interval for Fujitsu middlewarepatch information and Fujitsu middleware product information
Example:
To discover OS patch information and Fujitsu middleware information for 1,500 business servers (1,000 Windows business servers+ 500 Linux business servers), the discovery execution interval is as follows:
- Discovery execution interval for Windows patch information (1,000 business servers): At least 60 minutes
- Discovery execution interval for Linux patch information (500 business servers): At least 90 minutes
- Discovery execution interval for Fujitsu middleware patch information and Fujitsu middleware product information (1,500business servers): At least 120 minutes
The execution interval for regular discovery will be at least 210 minutes (i.e., 90 + 120 minutes).
- 48 -

Note
If the system is stopped at the specified discovery start time (due to maintenance, for example), discovery will be performed at the nextscheduled time.
2.1.3.5 Registering a Configuration Baseline Creation ScheduleRegister the configuration baseline creation.schedule
For Windows, register the following program with the Task Scheduler:
For Linux, add the following program to cron. Refer to the cron manuals for information on cron.
- [Program]
[Windows]
<ServerView Resource Orchestrator installation directory>\SWRBAM\CMDB\FJSVcmdbm\bin\snapcreate.exe
[Linux]
/opt/FJSVcmdbm/bin/snapcreate.sh
- [Options]
-q
[Windows]
The following example shows how to register a schedule with the Task Scheduler:
1. Log in to Windows using an account that belongs to the Administrators group.
2. Select Start >> Administrative Tools >> Task Scheduler.
The Task Scheduler window will be displayed.
- 49 -

3. Select Action >> Create Task.
The Create New window will be displayed.
a. Enter a task name in the Name field in the General tab, and then select Run whether user is logged on or not.
- 50 -
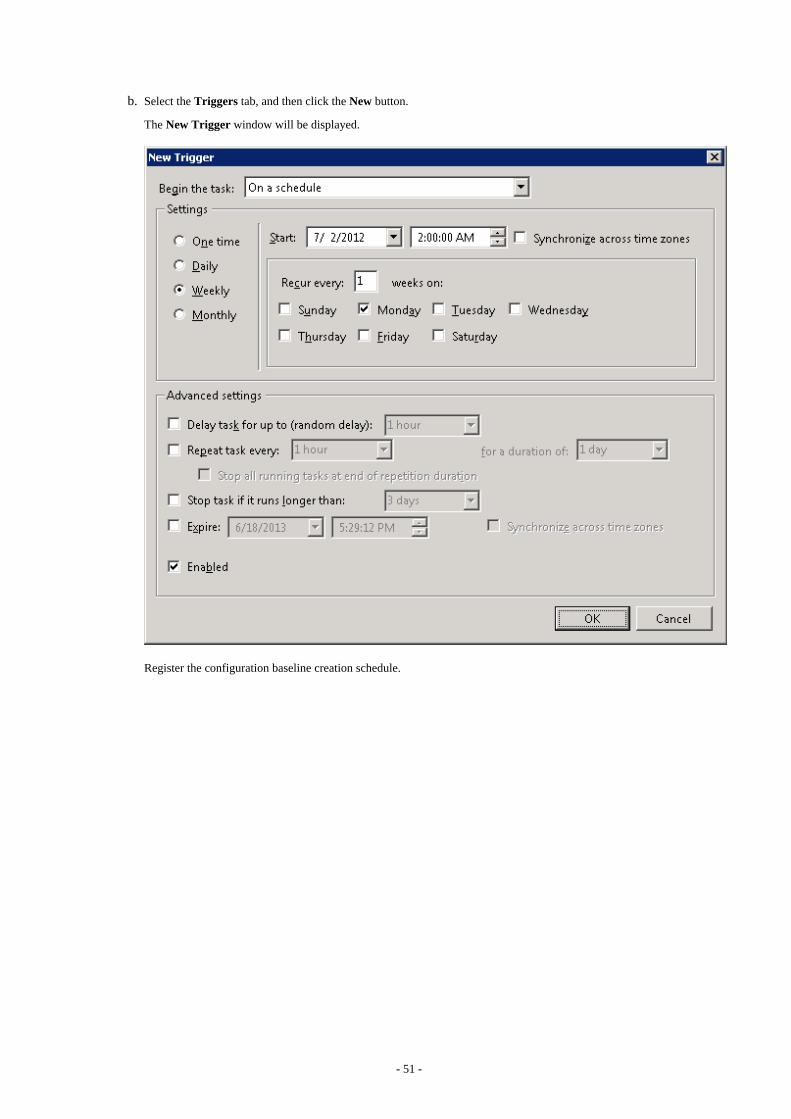
b. Select the Triggers tab, and then click the New button.
The New Trigger window will be displayed.
Register the configuration baseline creation schedule.
- 51 -

c. Select the Actions tab, and then click the New button.
The New Action window will be displayed.
Configure the following settings:
- Select Start a program from the Action pull-down menu.
- Add the following command to the Program/script field:
<ServerView Resource Orchestrator installation directory>\SWRBAM\CMDB\FJSVcmdbm\bin\snapcreate.exe
- Add the following argument to the Add arguments (optional) field:
-q
- 52 -

4. Click the OK button in the Create Task window.
The following window will be displayed:
5. Enter the user name for an account belonging to the Administrators group and the corresponding password, and then click the OKbutton.
[Linux]
The following example shows how to register the program with cron:
Perform the following procedure as the root user:
1. Check that the cron service has started
>/etc/rc.d/init.d/crond status
crond (pid xxx) is running...
2. If the cron service is not running, use the following command to start the cron service:
>/etc/rc.d/init.d/crond start
Starting crond:
Point
The cron service normally starts when the operating system starts.
By executing the following command, it is possible to check whether the cron service has been set to start when the operating systemstarts:
>chkconfig --list crond
crond 0:off 1:off 2:on 3:on 4:on 5:on 6:off
If the cron service has been set to start when the operating system starts, the numbers 2, 3, 4 and 5 above are set to "on" as shownabove.
To set the cron service to start when the operating system starts, execute the following command:
>chkconfig --level 2345 crond on
3. Execute the following command to edit the schedule definitions:
>crontab -e
Executing the "crontab -e" command starts the vi editor. Refer to the vi editor manuals for information on the vi editor.
- 53 -

Example: Creating a configuration baseline every Monday at 6:00
0 6 * * 1 /opt/FJSVcmdbm/bin/snapcreate.sh -q> /dev/null 2>&1
Note
- Set up a schedule so that configuration baselines are created no more than once a week.
- Take care that the configuration baseline creation schedule does not conflict with the regular discovery schedule. If the creation of aconfiguration baseline conflicts with the execution of regular discovery, the configuration baseline will not be created correctly.
2.2 Setting up the Software Parameter Settings FunctionBefore starting this setup, perform the procedure in "1.2 Installing on the Admin Server".
The tasks required to set up the software parameter settings function are described below. Perform these tasks as a superuser.
- Changing the settings for the ServerView Resource Orchestrator manager
To enable the software parameter settings function, it is necessary to change the settings for the manager.The manager is a ServerView Resource Orchestrator program that runs on the admin server. This program manages and controls theresources that have been registered with ServerView Resource Orchestrator.
- Registering middleware information
Software information and software setup information for middleware is not registered with ServerView Resource Orchestrator. Thismeans that this information must be registered using commands.
2.2.1 Changing the Settings for the ServerView Resource OrchestratorManager
Change the settings for the manager to enable the software parameter settings function.
Use the following procedure to change the settings:
1. Open the definition file in a text editor. The definition file is stored in the following location:
[Windows]
<ServerView Resource Orchestrator installation directory>\RCXCFMG\config\vsys_config.xml
[Linux]
/etc/opt/FJSVcfmg/config/vsys_config.xml
2. Add the following key and value:
Key Value
use-mwsetup no: Disables the software parameter settings function
yes: Enables the software parameter settings function
A settings example is shown below.
<?xml version="1.0" encoding="UTF-8"?>
<!DOCTYPE properties SYSTEM "http://java.sun.com/dtd/properties.dtd">
<properties>
:
<entry key="use-mwsetup">yes</entry>
</properties>
- 54 -

3. Save the file.
4. Restart the manager.
Refer to "Starting and Stopping the Manager" in the ServerView Resource Orchestrator Cloud Edition Operation Guide forinformation on how to restart the manager.
2.2.2 Registering Middleware InformationRegister software information and software setup information for middleware.
Refer to "Software Information and Software IDs" and "Registered Software Setup IDs" in the Operator's Guide - Software ParameterSettings for information on the software information and software setup information to be registered, The software ID is determined whenthe command is executed.
The procedure for registering middleware information is described below. Execute two commands that register middleware information.
1. Execute the commands while the manager is running.
2. Execute the first command that registers middleware information. The command is stored in the following location:
[Windows]
<ServerView Resource Orchestrator installation directory>\RCXCFMG\bin\cfmg_registermwsetup.bat
[Linux]
/opt/FJSVcfmg/bin/cfmg_registermwsetup
3. Execute the second command that registers middleware information. The command is stored in the following location:
[Windows]
<Systemwalker Software Configuration Manager installation directory>
\SWCFMGM\templates\swcfmg_registermwsetup.bat
[Linux]
/opt/FJSVcfmgm/templates/swcfmg_registermwsetup
4. Check the message.
If the command is successful, the following kind of message will be displayed. The software IDs that have been registered are allof the software IDs between the ID indicated by "start" and the ID indicated by "end".
INFO: SPAC00003: The registration processing is completed. [start=SW00000010, end=SW00000057]
If an error message is output, check the explanation for the message. Refer to "Software Parameter Setting Command Messages"in the Operator's Guide - Software Parameter Settings for information on messages.
2.3 Setting up Business ServersThis section explains how to set up business servers.
2.3.1 Settings for Managing Windows PatchesTo manage Windows patches, business servers must be registered as the computers managed by WSUS.
There are the following two methods for registering business servers as the computers managed by WSUS, as published by Microsoft.Refer to the information published by Microsoft for details.
- Modifying the registry
- Editing the group policy (gpedit.msc)
- 55 -
Information
Systemwalker Software Configuration Manager provides a connection destination repository server registration command(swcfmg_register_repsv) in order to simplify the task of registering business servers as the computers managed by WSUS. Refer to theReference Guide for information on the connection destination repository server registration command.
Note the following points when using the connection destination repository server registration command.
When creating a new business server
When a new business server is deployed using ServerView Resource Orchestrator, use the software parameter settings function toexecute the connection destination repository server registration command.
Refer to the Operator's Guide - Software Parameter Settings for information on the software parameter settings function.
Registering an existing business server as the computer managed by WSUS
Either the tenant administrator or a tenant user should obtain the connection destination repository server registration command fromthe infrastructure administrator, and then execute the command by copying it to an arbitrary directory on the business server.
2.3.2 Settings for Managing Linux PatchesTo manage Linux patches, the Yellowdog Updater Modified (yum) repository server that business servers refer to must be set up on thebusiness servers. Refer to "1.3.1 Points to Note before Installing on Business Servers" for details.
2.3.3 Settings for UpdateAdvisor (Middleware)To manage software information and patches for Fujitsu middleware, the latest version of the UpdateAdvisor (middleware) must beinstalled on business servers. Refer to "1.3.1 Points to Note before Installing on Business Servers" for details.
- 56 -

Chapter 3 Setup CancellationThis chapter explains how to cancel the setup for Systemwalker Software Configuration Manager.
3.1 Points to Note before Canceling the SetupNote the following points when canceling the setup.
3.1.1 Backing up the ResourcesIf setup is canceled, all files and settings information including user assets will be deleted. For this reason, back up any necessary assetsbefore canceling the setup.
Refer to "Backing up the Admin Server" in the Operation Guide for information on the various assets to back up.
3.2 Canceling the Setup for the Admin ServerThis section explains how to cancel the setup for the admin server.
3.2.1 Tasks Required before Setup CancellationThis section explains the tasks required before setup cancellation for the admin server.
3.2.1.1 Deleting the Discovery Schedule[Windows]
Delete the discovery schedule that has been registered with the Task Scheduler.
1. Log in to Windows using an account that belongs to the Administrators group.
- 57 -
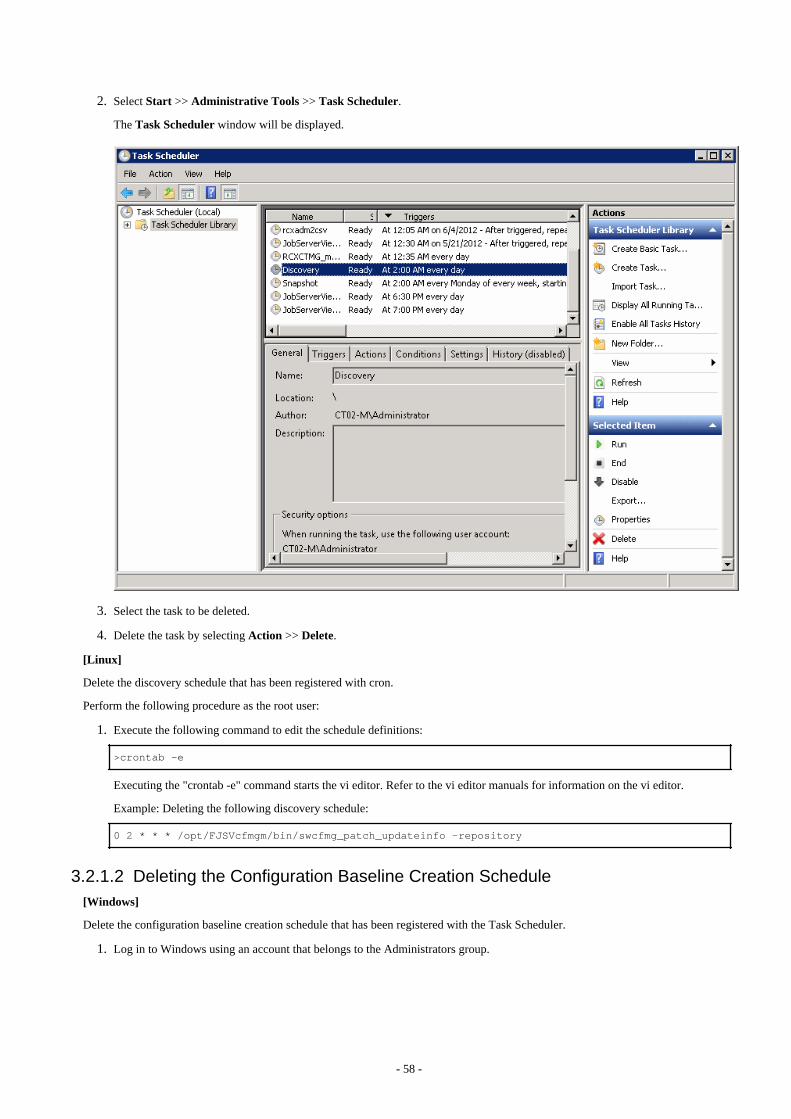
2. Select Start >> Administrative Tools >> Task Scheduler.
The Task Scheduler window will be displayed.
3. Select the task to be deleted.
4. Delete the task by selecting Action >> Delete.
[Linux]
Delete the discovery schedule that has been registered with cron.
Perform the following procedure as the root user:
1. Execute the following command to edit the schedule definitions:
>crontab -e
Executing the "crontab -e" command starts the vi editor. Refer to the vi editor manuals for information on the vi editor.
Example: Deleting the following discovery schedule:
0 2 * * * /opt/FJSVcfmgm/bin/swcfmg_patch_updateinfo -repository
3.2.1.2 Deleting the Configuration Baseline Creation Schedule[Windows]
Delete the configuration baseline creation schedule that has been registered with the Task Scheduler.
1. Log in to Windows using an account that belongs to the Administrators group.
- 58 -

2. Select Start >> Administrative Tools >> Task Scheduler.
The Task Scheduler window will be displayed.
3. Select the task to be deleted.
4. Delete the task by selecting Action >> Delete.
[Linux]
Delete the configuration baseline creation schedule that has been registered with cron.
Perform the following procedure as the root user:
1. Execute the following command to edit the schedule definitions:
>crontab -e
Executing the "crontab -e" command starts the vi editor. Refer to the vi editor manuals for information on the vi editor.
Example: Deleting the following configuration baseline creation schedule:
0 6 * * 1 /opt/FJSVcmdbm/bin/snapcreate.sh -q
3.2.1.3 Stopping ServerView Resource OrchestratorStop ServerView Resource Orchestrator by executing the following command:
[Windows]
<ServerView Resource Orchestrator installation directory>\SVROR\Manager\bin\rcxmgrctl stop
[Linux]
- 59 -

/opt/FJSVrcvmr/bin/rcxmgrctl stop
3.2.2 Canceling the Setup for Systemwalker Software ConfigurationManager
Cancel the setup for Systemwalker Software Configuration Manager by executing the following command:
[Windows]
<Systemwalker Software Configuration Manager installation directory>\SWCFMGM\bin\swcfmg_setup -u
[Linux]
/opt/FJSVcfmgm/bin/swcfmg_setup -u
3.2.3 Tasks Required after Setup CancellationThis section explains the tasks required after setup cancellation for the admin server.
3.2.3.1 Starting ServerView Resource OrchestratorStart ServerView Resource Orchestrator by executing the following command:
[Windows]
<ServerView Resource Orchestrator installation directory>\SVROR\Manager\bin\rcxmgrctl start
[Linux]
/opt/FJSVrcvmr/bin/rcxmgrctl start
3.2.3.2 Deleting an Automated Operation Process GroupTo delete an automated operation process group for patch distribution/application processing, there must be no process instances in theautomated operation process group, and the state must be Offline. Taking this into consideration, perform the following procedure:
1. Log in to the Web console for Systemwalker Runbook Automation.
http://<Name of the admin server>:<Port number>/console/Default/
If the port number has been changed from the initial value "80", specify the new port number.
User ID swrbaadmin
Password systemwalker#1
If these values have been changed from the initial values, log in using the new values.
cfmgApplication
Note
Be careful not to select automated operation process groups other than "cfmgApplication". Otherwise, operations of other productsmay be affected.
2. Click the Process Instances submenu on the Process Management tab to display the Process Instances tab in the work area.
- 60 -

3. Select All Processes in the Process Filters pull-down menu, and delete all of the process instances that are displayed.
Select the process instances to be deleted and then click the Delete button. Multiple process instances can be selected using the Shiftkey.
4. Click the Process Group Settings submenu on the System Administration tab to display the Process Group Settings tab in thework area.
5. Select the "cfmgApplication" automated operation process group from the process group list, and then select Offline in the Detailstab of the details panel.
The status of the automated operation process group will change to Offline.
6. Select the "cfmgApplication" automated operation process group from the process group list, and then select Uninstall in the Detailstab of the details panel.
Note
Be careful not to uninstall automated operation process groups other than "cfmgApplication". Otherwise, operations of other productsmay be affected.
7. Click the OK button in the deletion confirmation message window.
- 61 -

Chapter 4 UninstallationThis chapter explains how to uninstall Systemwalker Software Configuration Manager.
4.1 Pre-uninstallation NotesBefore uninstalling Systemwalker Software Configuration Manager, the environment settings for Systemwalker Software ConfigurationManager must be canceled. Refer to "Chapter 3 Setup Cancellation" for information on setup cancellation.
4.2 Uninstalling from the Admin ServerThis section explains the procedure for uninstalling the manager of Systemwalker Software Configuration Manager from the admin server.
Uninstall the product from a Windows or a Linux machine.
[Windows]
1. Log in with administrator privileges.
2. Select Start >> All Programs or All apps >> Fujitsu >> Uninstall (middleware).
The uninstaller will start.
When uninstalling Systemwalker Software Configuration Manager because of installation failure or for some other reason,Systemwalker Software Configuration Manager may be displayed in the Incomplete install tab. If Systemwalker SoftwareConfiguration Manager is not displayed in the Currently installed products tab, click the Incomplete install tab to check thatSystemwalker Software Configuration Manager is displayed there. The subsequent uninstallation procedure is the same even ifSystemwalker Software Configuration Manager is displayed in the Incomplete install tab.
- 62 -
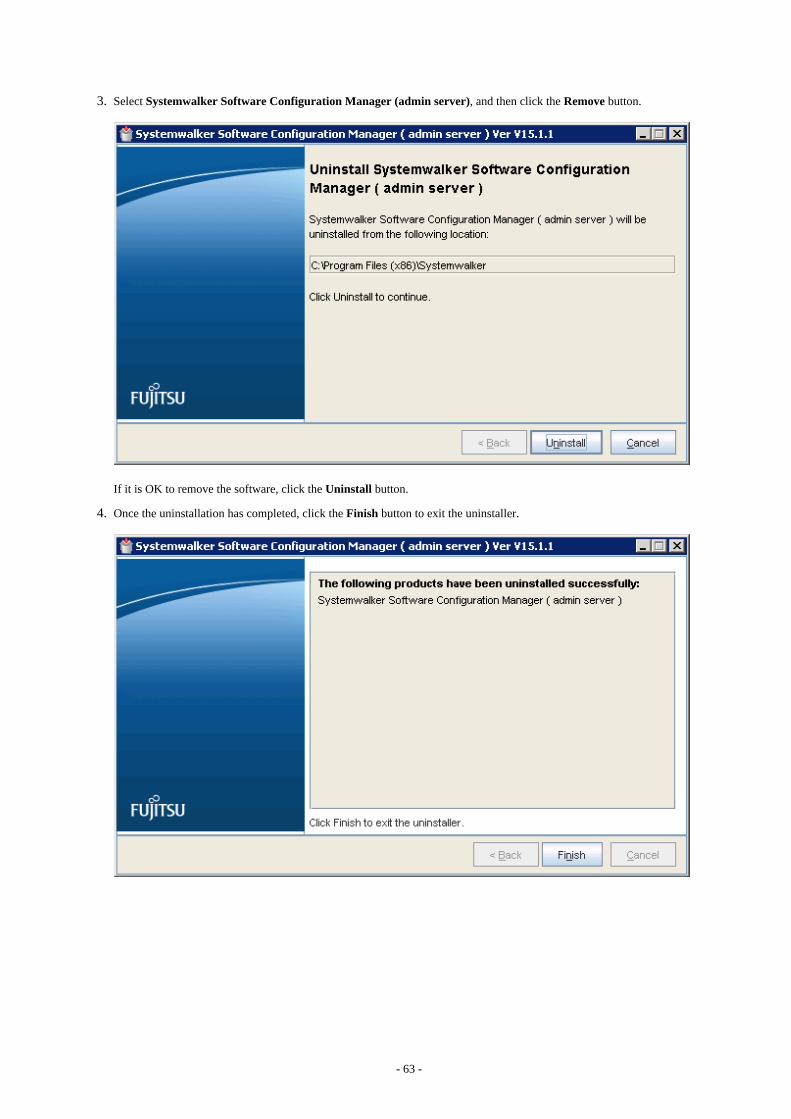
3. Select Systemwalker Software Configuration Manager (admin server), and then click the Remove button.
If it is OK to remove the software, click the Uninstall button.
4. Once the uninstallation has completed, click the Finish button to exit the uninstaller.
- 63 -

5. Click the Yes button to restart the system.
[Linux]
1. Login to the system as a superuser.
2. Start the uninstaller.
# /opt/FJSVcir/cimanager.sh -c
3. The window for selecting the product to uninstall will be displayed.
Select Systemwalker Software Configuration Manager (admin server). Select "q" to close the uninstaller.
Loading Uninstaller...
Currently installed products.
1. ServerView Resource Orchestrator Manager Cloud Edition V3.1.1
2. Systemwalker Software Configuration Manager ( admin server ) V15.1.1
Type [number] to select the software you want to uninstall.
[number,q]
=>
4. Execute the uninstallation.
Select "y" if it is OK to uninstall the software. Select "b" to go back to the previous window. Select "q" to close the uninstaller.
Systemwalker Software Configuration Manager ( admin server )
Description: Systemwalker Software Configuration Manager ( admin server )
Version: V15.1.1
Manufacture: Fujitsu Limited
Install directory: /opt
Date of Installation: 2013-02-10
Starting the uninstall of the software. Are you sure you want to continue?
[y,b,q]
=>
5. Start uninstallation.
When the uninstallation completes, the following window will be displayed:
Uninstalling...
The following products have been uninstalled successfully:
Systemwalker Software Configuration Manager ( admin server )
Exiting Uninstaller.
- 64 -

4.3 Uninstalling from Business ServersThis section explains how to uninstall a Systemwalker Software Configuration Manager agent from business servers.
4.3.1 Pre-uninstallation Notes
If a Systemwalker IT Change Manager V14.1.0 agent has been installed
Use the following procedure to perform uninstallation tasks in an environment where both the Systemwalker Software ConfigurationManager agent and the Systemwalker IT Change Manager V14.1.0 agent have been installed on the same business server:
1. Uninstall the Systemwalker IT Change Manager V14.1.0 agent.
2. Uninstall the Systemwalker Software Configuration Manager agent.
Then, if either the Systemwalker Software Configuration Manager agent or the Systemwalker IT Change Manager V14.1.0 agent continuesto be used, install the appropriate agent again.
4.3.2 UninstallationThis section explains how to uninstall a Systemwalker Software Configuration Manager agent from business servers.
If necessary, uninstall the agents from a Windows or a Linux machine.
[Windows]
1. Log in with administrator privileges.
2. Start the uninstaller.
Select Start >> All Programs or All apps >> Fujitsu >> Uninstall (middleware).
When uninstalling Systemwalker Software Configuration Manager because of installation failure or for some other reason,Systemwalker Software Configuration Manager may be displayed in the Incomplete install tab. If Systemwalker SoftwareConfiguration Manager is not displayed in the Currently installed products tab, click the Incomplete install tab to check thatSystemwalker Software Configuration Manager is displayed there. The subsequent uninstallation procedure is the same even ifSystemwalker Software Configuration Manager is displayed in the Incomplete install tab.
- 65 -

3. Select Systemwalker Software Configuration Manager (business server), and then click the Remove button.
If it is OK to remove the software, click the Uninstall button.
4. Once the uninstallation has completed, click the Finish button to exit the uninstaller.
- 66 -

5. Restart the server.
Be sure to restart the server after uninstalling the agent from the business server.
[Linux]
1. Log in as a superuser on the system.
2. Start the uninstaller.
# /opt/FJSVcir/cimanager.sh -c
3. The window for selecting the product to uninstall will be displayed.
Select Systemwalker Software Configuration Manager (business server). Selecting "q" closes the uninstaller.
Loading Uninstaller...
Currently installed products.
1. Systemwalker Software Configuration Manager ( business server ) V15.1.1
Type [number] to select the software you want to uninstall.
[number,q]
=>
4. Execute the uninstallation.
Select "y" if it is OK to uninstall the software. Select "b" to return to the previous window. Select "q" to close the uninstaller.
Systemwalker Software Configuration Manager ( business server )
Description: Systemwalker Software Configuration Manager ( business server )
Version: V15.1.1
Manufacture: Fujitsu Limited
Installation directory: /opt
Date of Installation: 2013-02-10
Starting the uninstall of the software. Are you sure you want to continue?
[y,b,q]
=>
5. The uninstallation will start.
When the uninstallation completes, the following window will be displayed:
Uninstalling...
The following products have been uninstalled successfully:
Systemwalker Software Configuration Manager ( business server )
Exiting Uninstaller.
- 67 -
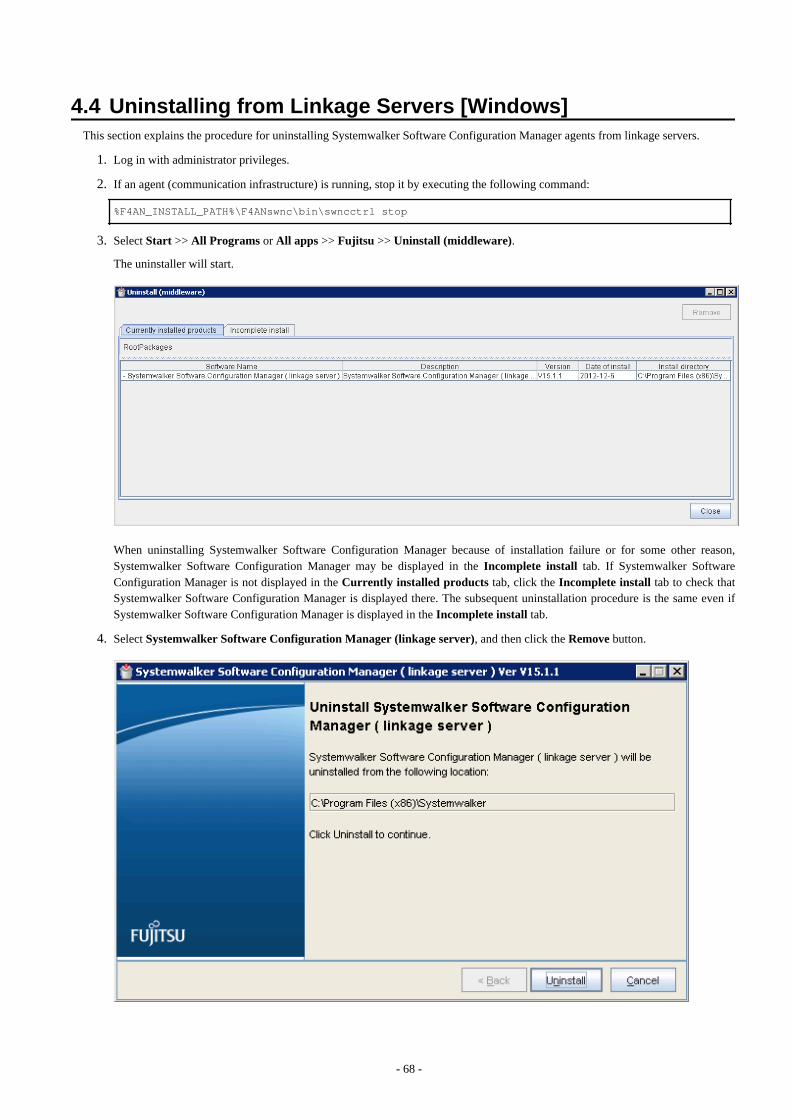
4.4 Uninstalling from Linkage Servers [Windows]This section explains the procedure for uninstalling Systemwalker Software Configuration Manager agents from linkage servers.
1. Log in with administrator privileges.
2. If an agent (communication infrastructure) is running, stop it by executing the following command:
%F4AN_INSTALL_PATH%\F4ANswnc\bin\swncctrl stop
3. Select Start >> All Programs or All apps >> Fujitsu >> Uninstall (middleware).
The uninstaller will start.
When uninstalling Systemwalker Software Configuration Manager because of installation failure or for some other reason,Systemwalker Software Configuration Manager may be displayed in the Incomplete install tab. If Systemwalker SoftwareConfiguration Manager is not displayed in the Currently installed products tab, click the Incomplete install tab to check thatSystemwalker Software Configuration Manager is displayed there. The subsequent uninstallation procedure is the same even ifSystemwalker Software Configuration Manager is displayed in the Incomplete install tab.
4. Select Systemwalker Software Configuration Manager (linkage server), and then click the Remove button.
- 68 -

If it is OK to remove the software, click the Uninstall button.
5. Once the uninstallation has completed, click the Finish button to exit the uninstaller.
6. Click the Yes button to restart the system.
4.5 Post-uninstallation Notes
4.5.1 Files that Remain after UninstallationThe following directory and the files that it contains may still remain after the uninstallation. Delete any unnecessary files manually.
<Systemwalker Software Configuration Manager installation directory>
Note
Deletion may fail if these files are locked. In this case, restart the operating system and then delete the files.
4.5.2 Uninstalling the "Uninstall (middleware)"The "Uninstall (middleware)" is a common tool for Fujitsu middleware products.
This tool manages information about the Fujitsu middleware products that have been installed, as well as launching the product uninstallers.
This product supports the Uninstall (middleware).
- 69 -

When this product is installed, the "Uninstall (middleware)" is installed first, after which the installation and uninstallation of Fujitsumiddleware products is controlled by this tool. The installation processing for the "Uninstall (middleware)" tool will not be performed ifit has already been installed.
This section explains how to uninstall the "Uninstall (middleware)". It also presents points to note during uninstallation.
Note
- Be sure to use the "Uninstall (middleware)" tool when uninstalling this product .
- This tool also manages information for Fujitsu middleware products other than this product. Do not uninstall this tool unless absolutelynecessary.
If this tool is uninstalled by mistake, use the following procedure to reinstall it:
[Windows]
1. Log in to the target machine (where the tool is to be installed) using an account with administrator privileges.
2. Insert the DVD-ROM.
Insert the DVD-ROM labeled "Systemwalker Software Configuration Manager Media Pack 15.1.1" in the DVD-ROM drive.
3. Execute the installation command.
<DVD-ROM mount point>\<CIR installer root directory>\cirinst.exe
[Linux]
1. Log in as a superuser on the system.
2. Insert the DVD-ROM.
Insert the DVD-ROM labeled "Systemwalker Software Configuration Manager Media Pack 15.1.1" in the DVD-ROM drive.
If the DVD-ROM has not been mounted, mount the DVD-ROM by executing the following command:
# mount -t iso9660 -r /dev/mnt <DVD-ROM mount point>
3. Execute the installation command.
# <DVD-ROM mount point>/<CIR installer root directory>/cirinst.sh
Use the following procedure to uninstall the Uninstall (middleware):
1. Start the "Uninstall (middleware)" to check whether there are any other Fujitsu middleware products left on the system. The methodfor starting this tool is as below.
[Windows]
Select Start >> All Programs or All apps >> Fujitsu >> Uninstall (middleware).
[Linux]
/opt/FJSVcir/cimanager.sh [-c]
-c: Command interface
Information
To run the tool in command mode, specify "-c". If "-c" is not specified, the tool will run in GUI mode if there is a GUI environment,or in command mode if there is no GUI environment.
2. If no Fujitsu middleware products have been installed, execute the following uninstallation command:
[Windows]
- 70 -

%SystemDrive%\FujitsuF4CR\bin\cirremove.exe
[Linux]
# /opt/FJSVcir/bin/cirremove.sh
3. When "This software is a tool that is shared with other Fujitsu products. Are you sure you want to remove this software? [y/n]" isdisplayed, enter "y" to continue with the uninstallation process.
The uninstallation process will finish in a few seconds.
4. After the uninstallation completes, the following directory and the files that it contains will still remain, so delete them:
[Windows]
%SystemDrive%\FujitsuF4CR
%ProgramData%\Fujitsu\FujitsuF4CR (Other than Windows Server 2003)
%ALLUSERSPROFILE%\Application Data\Fujitsu\FujitsuF4CR (For Windows Server 2003)
[Linux]
/var/opt/FJSVcir/
- 71 -
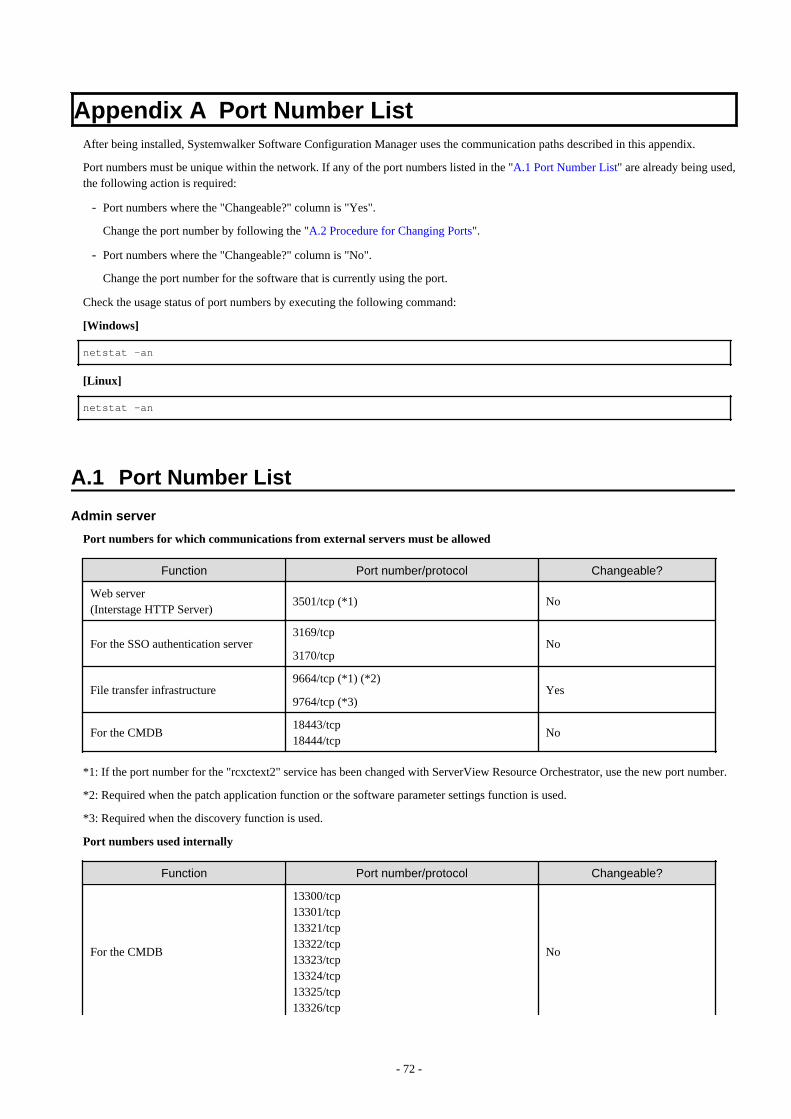
Appendix A Port Number ListAfter being installed, Systemwalker Software Configuration Manager uses the communication paths described in this appendix.
Port numbers must be unique within the network. If any of the port numbers listed in the "A.1 Port Number List" are already being used,the following action is required:
- Port numbers where the "Changeable?" column is "Yes".
Change the port number by following the "A.2 Procedure for Changing Ports".
- Port numbers where the "Changeable?" column is "No".
Change the port number for the software that is currently using the port.
Check the usage status of port numbers by executing the following command:
[Windows]
netstat -an
[Linux]
netstat -an
A.1 Port Number List
Admin server
Port numbers for which communications from external servers must be allowed
Function Port number/protocol Changeable?
Web server(Interstage HTTP Server)
3501/tcp (*1) No
For the SSO authentication server3169/tcp
3170/tcpNo
File transfer infrastructure9664/tcp (*1) (*2)
9764/tcp (*3)Yes
For the CMDB18443/tcp18444/tcp
No
*1: If the port number for the "rcxctext2" service has been changed with ServerView Resource Orchestrator, use the new port number.
*2: Required when the patch application function or the software parameter settings function is used.
*3: Required when the discovery function is used.
Port numbers used internally
Function Port number/protocol Changeable?
For the CMDB
13300/tcp13301/tcp13321/tcp13322/tcp13323/tcp13324/tcp13325/tcp13326/tcp
No
- 72 -

Function Port number/protocol Changeable?
13327/tcp13328/tcp13331/tcp13332/tcp13333/tcp
Communication infrastructure18005/tcp18009/tcp
No
syslog 514/udp (*1) Yes
*1: Only used by Linux.
Linkage server
Port numbers for which communications from external servers must be allowed
Function Port number/protocol Changeable?
File transfer infrastructure9664/tcp (*1)9764/tcp (*2)
Yes
For the CMDB18443/tcp18444/tcp
No
*1: Required when the software parameter settings function is used.
*2: Required when the discovery function is used.
Port numbers used internally
Function Port number/protocol Changeable?
Communication infrastructure18005/tcp18009/tcp
No
Business server
Port numbers for which communications from external servers must be allowed
Function Port number/protocol Changeable?
File transfer infrastructure9664/tcp (*1)9764/tcp (*2)
Yes
*1: Required when the patch application function or the software parameter settings function is used.
*2: Required when the discovery function is used.
Note
If Windows Server 2008 or Windows Server 2012 is being used as the operating system for the communication destination, the Windowsfirewall function is enabled by default, and so firewall exceptions need to be specified for the port numbers and protocols in the tableabove.
A.2 Procedure for Changing PortsThis section explains the procedure for changing ports.
- 73 -

A.2.1 When the Port for the File Transfer Infrastructure (the PatchApplication Function or the Software Parameter Settings Function) isDuplicated
When either the patch application function or the software parameter settings function is used, the file transfer infrastructure uses portnumber 9664. If port number duplication occurs, this port number must be changed. Change the port number for the target server and forall the servers linking to that server.
Changing the content registered in the "services" file
[Windows]
Change the following port number in the "<Windows system installation directory>\SYSTEM32\DRIVERS\ETC\SERVICES" file toa free port number:
dtranf02 9664/tcp #FJSVlnkbs
[Linux]
Change the following port number in the "/etc/services" file to a free port number:
dtranf02 9664/tcp #FJSVlnkbs
Specify a port number between 1 and 65535.
Changing the network definition
For the port number specified in the network definition file for the file transfer infrastructure, specify the same value as the port numberset above.
1. Change the port number in the following network definition file:
[Windows]
- Admin server/linkage servers/business servers
%LNKBS_HOME%\lnk02\gen\network_def.txt
* The installation folder for the file transfer infrastructure is set to the "%LNKBS_HOME
%" environment variable.
[Linux]
- Admin server/business servers
/opt/FJSVlnkbs/lnk02/gen/network_def.txt
2. After changing the network definition file, execute the following command to update the definition information:
[Windows]
- Admin server/linkage servers/business servers
%LNKBS_HOME%\lnk02\bin\f3jtlxgentrn.exe -i 02 %LNKBS_HOME%\lnk02\gen\network_def.txt
[Linux]
- Admin server/business servers
/opt/FJSVlnkbs/lnk02/bin/f3jtlxgentrn -i 02 /opt/FJSVlnkbs/lnk02/gen/network_def.txt
3. Restart the file transfer infrastructure.
[Windows]
- Admin server/linkage servers/business servers
Restart the "Systemwalker File Transfer Library Control" service.
- 74 -
[Linux]
- Admin server/business servers
Execute the following commands:
# service FJSVlnkbs stop
# service FJSVlnkbs start
A.2.2 When the Port Number for the File Transfer Infrastructure (theDiscovery Function) is Duplicated
When the discovery function is used, the file transfer infrastructure uses port number 9764. If port number duplication occurs, this portnumber must be changed. Change the port number for the target server and for all the servers linking to that server.
Changing the content registered in the "services" file
[Windows]
Change the following port number in the "<Windows system installation directory>\SYSTEM32\DRIVERS\ETC\SERVICES" file toa free port number:
dtranh03 9764/tcp #FJSVlnkcf
[Linux]
Change the following port number in the "/etc/services" file to a free port number:
dtranh03 9764/tcp #FJSVlnkcf
Specify a port number between 1 and 65535.
Changing the network definition
For the port number specified in the network definition file for the file transfer infrastructure, specify the same value as the port numberset above.
1. Change the port number in the following network definition file:
[Windows]
- Admin server/linkage servers/business servers
%LNKCF_HOME%\lnk03\gen\network_def.txt
* The installation folder for the file transfer infrastructure is set to the "%LNKCF_HOME
%" environment variable.
The default folder for the admin server is C:\Fujitsu\Systemwalker\SWCFMGM\FJSVlnkcf.
The default folder for linkage servers is C:\Fujitsu\Systemwalker\SWCFMGA\FJSVlnkcf.
The default folder for business servers is C:\Fujitsu\Systemwalker\SWCFMGB\FJSVlnkcf.
[Linux]
- Admin server/business servers
/opt/FJSVlnkcf/lnk03/gen/network_def.txt
2. After changing the network definition file, execute the following command to update the definition information:
[Windows]
- Admin server/linkage servers/business servers
%LNKCF_HOME%\lnk03\bin\f3jtlxgentrn.exe -i 03 %LNKCF_HOME%\lnk03\gen\network_def.txt
[Linux]
- 75 -

- Admin server/business servers
/opt/FJSVlnkcf/lnk03/bin/f3jtlxgentrn -i 03 /opt/FJSVlnkcf/lnk03/gen/network_def.txt
3. Restart the file transfer infrastructure.
[Windows]
- Admin server/linkage servers/business servers
Restart the "Systemwalker File Transfer Library Control (SWCFMG)" service.
[Linux]
- Admin server/business servers
Execute the following commands:
# service FJSVlnkcf stop
# service FJSVlnkcf start
A.2.3 When the Port Number for syslog is Changed [Linux]If the port number for syslog has been changed, modify the following files:
File names
- manager_base_log4j.xml
- manager_discovery_fjmw_log4j.xml
- manager_discovery_log4j.xml
- manager_discovery_wsus_log4j.xml
- manager_discovery_yum_log4j.xml
- manager_log4j.xml
File location
/etc/opt/FJSVcfmgm/config
How to modify the files
Add the port number to "SyslogHost" under SyslogAppender(appender name="cfmgevent"). Add the port number after the colon (":").
localhost:<Port number>
Example: Changing the port number to "415"
<appender name="cfmgevent" class="org.apache.log4j.net.SyslogAppender">
<param name="SyslogHost" value="localhost:415" />
. . .(omitted) . . .
</appender>
After the files have been modified, there is no need to restart Systemwalker Software Configuration Manager.
- 76 -