sn - its. implant
TRANSCRIPT

Implantstrauma
SNSupracondylar Nail

www.its-implant.com

1. Introduction
P. 5 PrefaceP. 6 ScrewsP. 6 PropertiesP. 7 Indications & Contraindications P. 8 Preoperative planning
2. Surgical Technique
P. 8 Pre-operative patient preparationP. 8 AccessP. 9 Applying the nailP. 9 Distal interlockingP. 10 Proximal interlockingP. 11 Postoperative treatmentP. 11 ExplantationP. 11 Case studies
3. Information
P. 13 Dotize®P. 14 Order listP. 16 Sterilization guidelinesP. 18 Notes
Contents

1.
Introduction

5
Preface
The retrograde femur nail is an excellent addition to existing methods for treating distal and diacondylar fractures of the femur, as well as of the distal epiphysis of the femur.The challenge is in implanting and securing the nail in a minimally invasive procedure. This technique is especially important with hip or knee endoprostheses, as in these cases the retrograde nail is the only useful option.This nail, now available in a modified form, has 5 distal bolt holes which can be used depending on the fracture and fragment situation.Three fixation bolts can be inserted in the proximal end of the nail.

6
32651-XX
61535-280
54501-170
34471-XX
61386-280
54351-170
Screws
Bolt double-thread, D=4.7mm
Step Drill, D=3.8/4.7mm, L=280mm, AO Connector
Screwdriver Shank, WS 3.5, L=170mm, Solid
Cortical Screw, D=6.5mm
Drill, D=5.3mm, L=280mm, AO Connector
Screwdriver Shank, WS 5.0, L=170mm
PropertiesProperties of the material:
• Material: TiAl6V4 ELI• Easier removal of the implant after the
fracture has healed• Improved fatigue strength of the
implant• Reduced risk of inflammation and
allergy
Properties of the implant:
• External diameter D=11mm• Lengths: 200, 240, 280mm• 5 distal bolt holes• 3 proximal fixation bolt holes• Minimal invasive treatment

2.
Indications & ContraindicationsIndications:
• Supracondylar fractures, with or without intraarticular involvement• Osteoporosis and nonhealing fractures• Malpositioning and pathological fractures• Fractures proximal to femur-knee-joint implants• Distal femoral fractures with knee and hip endoprostheses
Contraindications:
• Open epiphyseal plate in young patients• History of septic gonarthrosis• Extensor contracture of the knee• Existing infections in the fracture zone and operation area• Common situations that do not allow osteosynthesis• Obesity• Lack of patient compliance
Surgical Technique
8
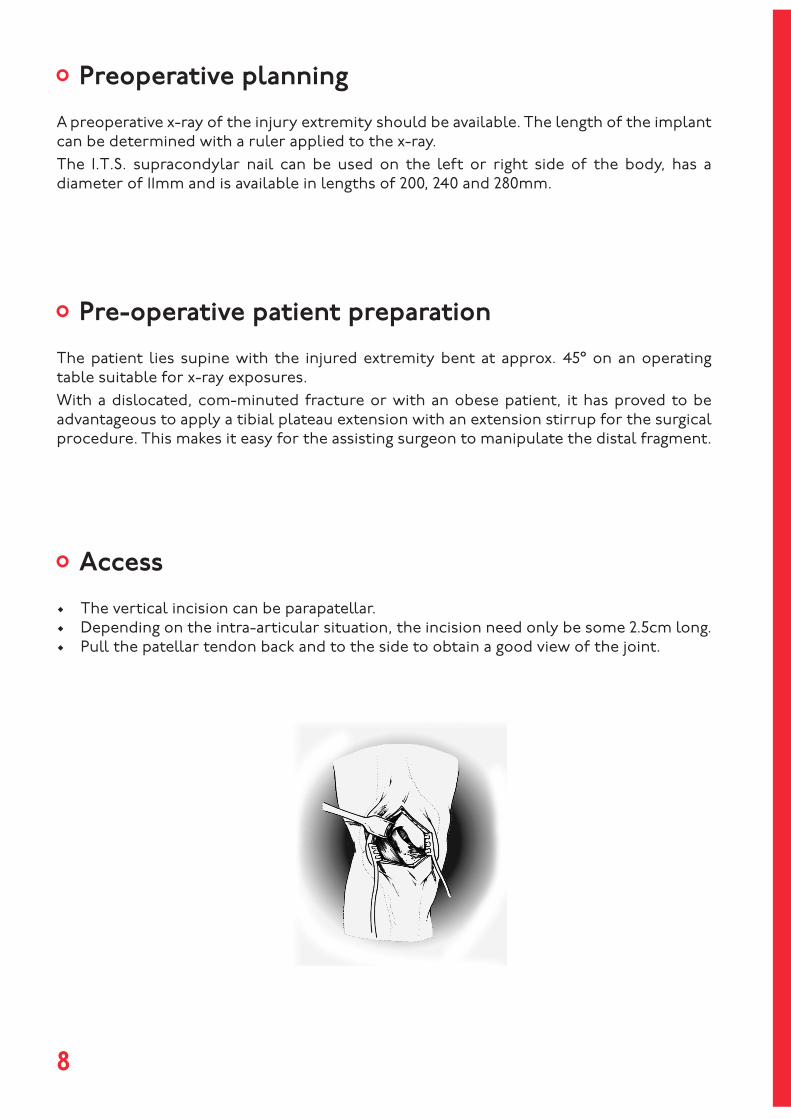
Access• The vertical incision can be parapatellar. • Depending on the intra-articular situation, the incision need only be some 2.5cm long.• Pull the patellar tendon back and to the side to obtain a good view of the joint.
Preoperative planningA preoperative x-ray of the injury extremity should be available. The length of the implant can be determined with a ruler applied to the x-ray.The I.T.S. supracondylar nail can be used on the left or right side of the body, has a diameter of 11mm and is available in lengths of 200, 240 and 280mm.
Pre-operative patient preparationThe patient lies supine with the injured extremity bent at approx. 45° on an operating table suitable for x-ray exposures.With a dislocated, com-minuted fracture or with an obese patient, it has proved to be advantageous to apply a tibial plateau extension with an extension stirrup for the surgical procedure. This makes it easy for the assisting surgeon to manipulate the distal fragment.

9
Applying the nail• Open the femoral canal directly before the insertion of the posterior cruciate ligament,
as an extension of the axis of the marrow canal.• To open the canal, use an awl or insert a 40cm long guide wire centrally into the
femoral canal until you are above the fracture• Drill with a step drill to open the femur to 12mm to conform to the distal diameter of
the nail.• The nail of appropriate size is placed on the screw aiming device and screwed in with
the adapter.• You should take care that the nail is firmly but not too tightly in place on the intermediate
piece. Check to see that the bore hole for the nail is centric by inserting the tissue-protective cover into the screw-aiming device.
• The nail is then inserted into the opened femoral canal and pushed in 3 - 5mm retrograde under the surface of the joint, either by hand or with gentle taps with a hammer.
Distal interlocking• On the distal end of the nail there are five holes for D=6.5mm cortical screws.• To apply the first screw, push the protective cover system through the chosen hole in
the aiming device.• Push the drill bit for the D=5.3mm drill through the protective cover and drill through
to the contracortex. • You can immediately read the correct length of screw on the calibrated drill.• Remove the drill cover and apply the self-cutting D=6.5mm cortical screw through the
protective cover with the WS 5.0mm hexagonal screw driver. Follow this procedure for all the remaining screws.
• Before the implant is secured, the surgeon decides on the basis of the individual case which and how many bolt holes should be used.
• It should be noted that at least two proximal and two distal holes should be used.• Check the rotation and axis of the femur before the implant is secured proximally.
10
Proximal interlocking• On the proximal end of the nail there are three holes for D=4.7mm securing bolts. The
screw aiming device can be used for closure for all lengths of nails.• Insert the protective cover through one of the proximal holes, corresponding to the
length of the attached nail (the aiming device shows the respective lengths).• Insert the drill bit for the D=3.8/4.7mm step drill through the protective cover. Then
drill through to the contacortex. You can immediately read the suitable screw length from the calibrated drill.
• Then apply the D=4.7mm securing bolts with the WS 3.5mm hexagonal screwdriver. Repeat this procedure for the remaining screws.
• Do not apply pressure to the aiming device as this could change the axis of the femur.• Check the fracture position and fixation with an x-ray. Remove the intermediate piece
and the aiming device, then screw the end cup onto the distal end of the nail. • Close the wound as usual.• Fix the end cup firmly to the nail so that it cannot become detached.• The long end cup is an additional fixation for the distal screw. It must be removed
before the most distal screw is removed.• The long end cup is an additional fixation for the distal screw. It must be removed
before the most distal screw is removed.

11
Postoperative treatment• Position the patient in a slight knee band and bedrest• After reduction of swelling, beginning of the passive mobilization - Partial weight bearing with crutches - Encourage active motion of all joints (hip, knee, ankle and toes) - Full weight bearing after radiographic verification of the healed bone
• Clinical and radiological follow-up after 2, 6 and 12 weeks
ExplantationIf desired by the patient, the implant can be removed.Removal should be performed at the earliest 1 1/2 years later or after radiographic verification of the healed bone.
The problem of cold welding was resolved by using a special surface treatment (for further information see page 13).
Case studies

3.
Information

13
Dotize®
Ti-Oxid
* White Paper: Ti6Al4V with Anodization Type II: Biological Behavior and Biomechanical Effects; Axel Baumann, Nils Zander
• Oxygen and silicon absorbing conversion layer• Decrease in protein adsorption• Closing of micro pores and micro cracks• Reduced risk of inflammation and allergy• Hardened titanium surface• Reduced tendency of cold welding of titanium implants• Increased fatigue resistance of implants• Improved wear and friction characteristics
Chemical process - anodization in a strong alkaline solution*
Type III anodization
• Layer thickness 60-200nm + Different colors - Implant surface remains sensitive to: Chipping
Peeling Discoloration
DotizeType II anodization
• Layer thickness 2000-10 000nm + Film becomes an interstitial part of the titanium - No visible cosmetic effect
Anodization Type II leads to following benefits*
Type - IIIDotize® Type - II

14
Supracondylar Nail, D=11mm, L=200mm 1211-200Supracondylar Nail, D=11mm, L=240mm 1211-240Supracondylar Nail, D=11mm, L=280mm 1211-280
Targeting Jig, Supracondylar Nail 1280
Jig Adaptor, Supracondylar Nail 1281
Sheath, 6.5mm Screw 1282
Drill Guide, 5.3mm Drill 1283
Sheath, 4.7mm Locking Bolt 1182
Drill Sleeve, 5.3mm, 3.8/4.7mm Step Drill 1183
Screwdriver Shank, WS 3.5, L=170mm, Solid 54351-170Screwdriver Shank, WS 5.0, L=170mm 54501-170
Step Drill, D=3.8/4.7mm 61386-280Drill, D=5.3mm, L=280mm 61535-280
T-Handle, Cannulated 53022
Screwdriver, 3.5mm, Socket Key with Clamping Piece 56351
Guide Wire, Steel, D=3.2mm, L=400mm, RR 35325-400
Endcap for Supracondylar Nail, Short 1241Endcap for Supracondylar Nail, Long 1242
Trochar 1184
Double Thread Bolt, D=4.7mm, L=28mm 34471-28Double Thread Bolt, D=4.7mm, L=32mm 34471-32Double Thread Bolt, D=4.7mm, L=36mm 34471-36Double Thread Bolt, D=4.7mm, L=40mm 34471-40Double Thread Bolt, D=4.7mm, L=44mm 34471-44Double Thread Bolt, D=4.7mm, L=48mm 34471-48Double Thread Bolt, D=4.7mm, L=52mm 34471-52Double Thread Bolt, D=4.7mm, L=56mm 34471-56Double Thread Bolt, D=4.7mm, L=60mm 34471-60
Order list

15
Tray
Double Thread Bolt, D=4.7mm, L=65mm 34471-65Double Thread Bolt, D=4.7mm, L=70mm 34471-70Double Thread Bolt, D=4.7mm, L=75mm 34471-75Double Thread Bolt, D=4.7mm, L=80mm 34471-80
Cortical Screw, D=6.5mm, L=35mm 32651-35Cortical Screw, D=6.5mm, L=40mm 32651-40Cortical Screw, D=6.5mm, L=45mm 32651-45Cortical Screw, D=6.5mm, L=50mm 32651-50Cortical Screw, D=6.5mm, L=55mm 32651-55Cortical Screw, D=6.5mm, L=60mm 32651-60Cortical Screw, D=6.5mm, L=65mm 32651-65Cortical Screw, D=6.5mm, L=70mm 32651-70Cortical Screw, D=6.5mm, L=75mm 32651-75Cortical Screw, D=6.5mm, L=80mm 32651-80Cortical Screw, D=6.5mm, L=85mm 32651-85Cortical Screw, D=6.5mm, L=90mm 32651-90
Sterilization Tray, Supracondylar Nail 50121

16
Sterilization guidelines
The following remarks should serve as a guideline in the sterilization of medical products.
IMPORTANT INDICATIONS FOR DOCTORS AND OPERATING THEATRE PERSONNELThis instruction leaflet refers to all supplied non-sterile implants and all reusable instruments from ITS GmbH. Detailed information for the identification of the product (such as system classification, cat. no.) can be found in the product identification code and/ or on the packaging label. Make sure that you are familiar with the possible application, combinability and correct handling of the product. Please note that product systems can undergo modifications which can affect the combinability of the implant with other implants or instruments. Detailed user information can be found in the respective surgical instructions.
Intended Use of the ImplantThe implant temporarily stabilises bone segments until bony consolidation has taken place. After this, the implant has no more use and can be removed.
Indications and Contra-Indications of the ImplantIndications and contra-indications are determined by current medical practice.
Side Effects of the ImplantUp to now, no allergic reactions have been identified with titanium implants. Allergic reactions to steel implants cannot be ruled out.
Warnings and Preventive Measures• Pay attention to the instructions on the packaging.• Implants are only to be used once.• Always treat implants carefully to avoid surface damage or
geometric alterations.• Any alterations to the design of implants from ITS GmbH are
prohibited.• Regular postoperative follow-up examinations (e.g. X-ray check-
ups) are to be carried out.• For metallurgical, mechanical and design reasons, never
combine implants from different producers. The materials used are stated in the product catalogue or on the label.
• The length, angle and right or left version of a particular type of implant can differ.
• The precise positioning and fastening of a properly made connection between the implant and instrument must be repeatedly checked during the course of an operation.
• In the case of magnetic resonance imaging (MRI), it is generally recommended to check back with the manufacturer of the MR scanner. The use of MRI with steel implants is prohibited by ITS GmbH, and in such cases the user must contact the manufacturer of the MRI scanner.
• Staff who come into contact with contaminated or potentially contaminated medical products should follow the generally recognised preventive measures. Due care is to be taken when handling medical products with sharp points or edges.
• Appropriate protective measures must be taken to ensure safe handling when dealing with contaminated or potentially contaminated medical products (e.g. gloves, etc.)
• In countries with stricter safety requirements regarding recycling medical products, these safety requirements apply and are to be adhered to.
• Any supplied non-sterile medical products must be thoroughly prepared according to these instructions before use.
• No metal brushes or abrasive cleaning materials are to be used for manual cleaning purposes. The use of these materials can lead to damage of surfaces and coatings. Instead, soft brushes made of nylon should be used.
• Steam (damp heat) is the recommended sterilization method of medical products from ITS GmbH.
• All the following described steps for cleaning and sterilization are made easier when contaminants (e.g. blood) are not allowed to dry beforehand.
Restrictions• Unless otherwise stated, repeated preparation of re-usable
instruments of ITS GmbH has minimal effects on them when following the procedures mentioned below.
• The end of the product service life is usually determined by wear and damage caused by use.
• Instruments containing aluminium or anodised aluminium are damaged by alkaline (pH > 7) cleaning agents and solutions.
INSTRUCTIONS FOR RECONDITIONINGPreparation at the Location of Use• Remove surface dirt using a disposable cloth or paper towel.
Storage and Transport• No special requirements.• It is recommended that medical products are reconditioned as
soon as possible after their previous use.
Cleaning/ Disinfection/ DryingCleaning automatic Recommended equipment: commercially available disinfector authorized for use with medical products, with tested efficiency; commercially available cleaning agent authorized for use with medical products (alkaline – with pH value < 11).Step 1 Each instrument that can be dismantled should be taken
apart for cleaning. Jointed instruments are to be opened so that water can flow out of the cannulae and blind holes.
Step 2 Set the cycle. Adhere to the guidelines of the manufacturer of the disinfector.
Step 3 After removing the instruments from the disinfector, check the cannulae, blind holes, etc, for visible dirt. If required, repeat cycle or clean by hand.
Cleaning manualRecommended equipment: commercially available cleaning agent authorized for medical products (alkaline – with a pH value < 11); soft brushes made of nylon; running waterStep 1 Each instrument that can be dismantled should be taken
apart for cleaning. Rinse off surface dirt from instrument.Step 2 Apply cleaning agent solution to all surfaces using a
brush. Make sure that jointed instruments are cleaned in both open and closed positions. N.B.: A suitable brush must be used for cleaning cannulae and blind holes so that every part can be reached. The concentration and residence time as stated by the cleaning agent manufacturer must be adhered to without exception.
Step 3 Rinse the medical product for a minimum of 1 minute with clean water. Openings and other areas which are not easily accessible should be thoroughly rinsed.
DisinfectionEquipment: Commercially available disinfectants authorized for use with medical products e.g. MEDICLEAN FORTE) can be used (but only according to the instructions of the disinfectant producer). In the case of automatic cleaning, a final rinse cycle at 90 °C for 5 minutes can be carried out at the end to provide thermal disinfection.

17
DryingDrying as part of the cleaning/ disinfection cycle should not exceed 110 °C.
Checking, Maintenance and Inspection• Each instrument or implant is to be inspected carefully to make
sure that all visible dirt has been removed. If any ingrained dirt is found, the cleaning/ disinfection cycled should be repeated.
• Any instruments with an attached movable mechanism should be treated with a commercially available lubricant authorized for sterilisable surgical instruments.
• The mobility of movable parts should be checked to ensure that the planned sequence of motion can be completely carried out.
• In the case of instruments which can be reassembled into larger units, check whether the single parts can be put together easily.
PackageThe delivery package is purely for transport use and not suitable for sterilization.
Sterilization• The hospital is responsible for in-house procedures
regarding assembly, inspection and packaging of instruments. Furthermore, the hospital should recommend protective measures covering sharp or potentially dangerous parts of the instruments.
• All instruments and implants should be laid out in such a way that the steam can reach all the surfaces.
• Each instrument that can be dismantled should be taken apart for sterilization.
• Sterilization by means of heat/ steam is the preferred method for instruments and implants from ITS GmbH.
• The manufacturer’s recommendations regarding sterilization appliances should always be followed. When several instruments are sterilised in one sterilization cycle, care must be taken not to exceed the maximum amount of items to be sterilized in the appliance as stated in the manufacturer’s instructions.
Cycle Duration of sterilization
Tempera-ture
Pressure Duration of drying
Prevacuum 4 minutes 132°C270°F
3.04 bar27 psi
60 minutes
Prevacuum² 18 minutes 134°C273 °F
3 bar28.5 psi
30 minutes
² From the World Health Organization’s (WHO) recommended disinfection/ steam sterilization parameters for the reconditioning of instruments when there is a risk of TSE/CJD contamination
DisposalThe valid guidelines of the hospital operator apply for disposal.
Patient InformationImplantation has consequences for the discomfort, mobility and general life circumstances of the patient. For this reason, the patient should be given instructions about appropriate behaviour to adopt after implantation, and it should be explained to him or her the necessity and the importance of reporting negative changes in the area of the implant as well as any falls and accidents which may appear not to have damaged the implant or the site of the operation.
Responsibility of the Hospital for Instruments lent by ITS GmbH• Surgical instruments generally have a long service life. But
their life expectancy can be quickly reduced due to misuse or insufficient protection. Instruments which no longer work correctly, whether due to wear, misuse or improper care, have to be disposed of.
• Medical products which are returned to ITS GmbH must undergo cleaning, disinfection, inspection and a final sterilization. Products returned to ITS GmbH must be accompanied by a confirmation of the decontamination they were subjected to.
Important Note• The above-mentioned instructions have been validated by
the medical products manufacturer for the preparation of a medical product where re-use is deemed SUITABLE. It is the responsibility of the reconditioner to ensure that any reconditioning carried out using the equipment, materials and staff in the preparation facility achieves the desired results. For this, validation and routine inspections of the preparation process are usually necessary. Likewise, any deviation from the instructions provided by the preparer should be evaluated for its efficiency and possible disadvantageous consequences.
• In the case of questions or problems, please contact us at the address above.
Symbols
PrescriptionSingle useExpiry date (year/month)Charge numberSterilization by steamSterilization by radiation Sterilization by ethylene oxideOrder numberMaterial usedPackage content (no. of items)SizePay attention to instructions
Latex Free
Non Sterile
Do not use if package is damaged RL 93/42/EWG
ÖNORM EN ISO 13485ISO 17664

18
Notes

19

ITS. GmbHAutal 28, 8301 Lassnitzhöhe, Austria
Tel.: +43 (0) 316 / 211 21 0Fax: +43 (0) 316 / 211 21 [email protected]
www.its-implant.com
Order No. SN-OP-0314-EEdition: March/2014
© ITS. GmbH Graz/Austria 2014. Subject to technical alterations, errors and misprints excepted.