smart meeting pro™ · pdf file tools/ admintoolsmeetingpro2010.htm. note
TRANSCRIPT
PLEASE THINK BEFORE YOU PRINT
SMART Meeting Pro™System Administrator’s Guide
Windows® Operating Systems
Product Registration
If you register your SMART product, we’ll notify you of new features and software
upgrades.
Register online at www.smarttech.com/registration.
Keep the following information available in case you need to contact SMART
Technical Support.
Serial Number: ___________________________________________________
Date of Purchase: ___________________________________________________
Trademark NoticeSMART Meeting Pro, the SMART logo, SMART Board and smarttech are trademarks or registered trademarks of SMART Technologies ULC in the U.S. and/or other countries. Microsoft, Windows, Windows Vista, DirectX and Internet Explorer are either trademarks or trademarks of Microsoft Corporation in the U.S. and/or other countries. All other third-party product and company names may be trademarks of their respective owners.
Copyright Notice©2010 SMART Technologies ULC. All rights reserved. No part of this publication may be reproduced, transmitted, transcribed, stored in a retrieval system or translated into any language in any form by any means without the prior written consent of SMART Technologies ULC. Information in this manual is subject to change without notice and does not represent a commitment on the part of SMART.
Patent No. US6320597; US6326954; US6741267; US7151533; US7499033; and CA2252302. Other patents pending.
01/2010
Contents1 Welcome ............................................................................................................... 1
About This Guide ............................................................................................ 1
About SMART Meeting Pro ............................................................................ 1
SMART Product Drivers ........................................................................... 2
Computer Requirements................................................................................. 2
Hardware.................................................................................................. 2
Software ................................................................................................... 2
2 Installing SMART Meeting Pro .............................................................................. 3
Selecting a Tool .............................................................................................. 3
Gathering Required and Optional Information ................................................ 4
Upgrading from a Previous Version................................................................ 4
Installing Service Packs.................................................................................. 4
Completing your SMART Meeting Pro Installation ......................................... 5
3 Using the Installation Wizard................................................................................. 7
Downloading the Software.............................................................................. 7
Using the Installation Wizard .......................................................................... 8
Removing the Software .................................................................................. 8
4 Using the Command Line Interface....................................................................... 9
Locating the Installation Packages ................................................................. 9
Completing SMART Meeting Pro Installation Tasks..................................... 10
Installing SMART Product Drivers ................................................................ 10
Properties for the SMART Product Drivers Installation Package ........... 11
Installing SMART Meeting Pro...................................................................... 12
Properties for the SMART Meeting Pro Installation Package................. 13
i i | CONTENTS
Transforms ............................................................................................. 16
Parameters............................................................................................. 17
Removing SMART Product Drivers .............................................................. 18
Removing SMART Meeting Pro.................................................................... 18
Examples of Msiexec Command Lines......................................................... 19
Silent Installation with a Product Key ..................................................... 19
Silent Removal ....................................................................................... 19
5 Using SMART Install Manager............................................................................ 21
Installing SMART Install Manager ................................................................ 21
Working with SMART Install Manager .......................................................... 21
Opening an Installation Package ........................................................... 22
Saving Your Changes ............................................................................ 22
Publishing Your Changes....................................................................... 22
Customizing the SMART Meeting Pro Installation Package......................... 23
Customizing the SMART Product Drivers Installation Package ................... 24
Deploying the Installation Package............................................................... 26
6 Activating SMART Meeting Pro........................................................................... 29
A Customer Support ............................................................................................... 31
Online Information and Support.................................................................... 31
Training......................................................................................................... 31
Technical Support......................................................................................... 31
General Inquiries .......................................................................................... 32
Registration................................................................................................... 32

Chapter 1
WelcomeSMART Meeting Pro™ is a SMART interactive whiteboard business software
solution designed specifically for meeting management. The SMART Business toolbar
and very intuitive interactive whiteboard features makes it easy to use so you can
deliver better meetings and better results.
About This GuideThis guide explains how to install or remove SMART Meeting Pro software and
SMART Product Drivers, as well as how to customize your installation.
This guide is intended for IT administrators and others experienced with installing,
configuring and administering Windows® software in a networked environment. To
use this guide, you must:
• Know IT terminology, such as “registry” and “domain controller”
• Know how to complete basic administrative tasks in Windows operating systems,
such as opening Windows Control Panel and modifying the registry
• Have administrative privileges and access to your company’s servers
• Have access to the SMART support site at http://www.smarttech.com/support
About SMART Meeting ProSMART Meeting Pro is an easy-to-use interactive whiteboard application that
enhances your SMART interactive product experience.
In Whiteboard mode, you can make digital notes in the drawing area and then
distribute those notes to meeting participants. You can also use Whiteboard mode to
create new presentations or to open existing ones.
2 | CHAPTER 1 – WELCOME
In Desktop mode, you can launch application files or a web browser, use the Ink Layer
to write over these applications, and then capture the marked up screen image into
your Whiteboard presentation. You can also save your notes and drawings directly
into your active file when using an Ink Aware application.
SMART Product DriversSMART Meeting Pro includes SMART Product Drivers, which translate screen contact
into mouse behavior. When you install SMART Meeting Pro on a computer that’s
connected to a SMART interactive product, such as an interactive whiteboard, you
have touch control of the computer as soon as the computer starts.
Computer RequirementsBefore installing SMART Meeting Pro, ensure your computer meets the following
requirements.
Hardware• 1 GHz Pentium® 4 processor or faster
• 1 GB of RAM (2 GB recommended)
• 275 MB of disk space for minimum installation (1.35 GB recommended)
• 10 Mbps network connection (100 Mbps recommended) supporting TCP/IP
• Video card support for Microsoft® DirectX® technology
• Available powered USB or serial port
Software• Windows XP SP3, Windows Vista® (32-bit or 64-bit), Windows 7 (32-bit or 64-bit)
• DirectX 9 or later (recommended)
• Internet Explorer® 6.0 or later
• Adobe® Reader® 5 or later (recommended)
Chapter 2
Installing SMART Meeting ProYou can install SMART Meeting Pro on your computers using the installation wizard,
the command line interface or SMART Install Manager (using Windows Group Policy
for deployment). Regardless of which tool you use, review the information in this
chapter before proceeding with the installation.
Selecting a ToolYou can customize the SMART Meeting Pro installation packages using one of the
following tools:
• Installation wizard
• Command line interface
• SMART Install Manager
The installation wizard is best if you’re installing SMART Meeting Pro on a small
number of computers. For more information, see Chapter 3, Using the Installation
Wizard on page 7.
The command line interface is best if you use Windows Installer with remote
management software to automate the installation of software across your company’s
network. For more information, see Chapter 4, Using the Command Line Interface on
page 9.
SMART Install Manager is best if you’re deploying SMART Meeting Pro across a
network and prefer to use SMART Install Manager, rather than a command line
interface, to customize the installation packages. You can then use third-party
software to automate the installation of software across your company’s network. For
more information, see Chapter 5, Using SMART Install Manager on page 21.
4 | CHAPTER 2 – INSTALLING SMART MEETING PRO
Gathering Required and Optional InformationBefore installing SMART Meeting Pro, have the following information available:
• Your software product key. When you order a SMART Meeting Pro license, your
authorized SMART reseller gives you a product key to activate the software. If you
don’t have a product key, you can use the software for a 30-day trial period.
• Your e-mail server and e-mail address. Omitting this option disables the e-mail
function, so you’re unable to send meeting notes from the interactive whiteboard
by e-mail.
Upgrading from a Previous VersionWhen you install SMART Meeting Pro, the software automatically removes older
versions of the software and drivers, and then installs the most recent SMART
Product Drivers before upgrading SMART Meeting Pro. You don’t need to manually
remove previous versions before upgrading.
NOTES
• Record the current SMART Meeting Pro settings, such as the e-mail server
name, because you may need to re-enter this information when you upgrade
SMART Meeting Pro.
• You don’t have to reactivate SMART Meeting Pro, because your computer
retains your product key information.
Installing Service PacksSMART offers upgrades for licensed users.
You can use SMART Product Update (SPU) to download any available service packs
and install them to add new features and to fix known problems.
To update SMART Meeting
Pro using SPU
1. Click the SMART Meeting Pro icon, and then select Control Panel.
2. Select About Software and Product Support > Tools > Check for Updates.
3. Click Check Now, and then click Update if any service packs are available.
4. Follow the on-screen instructions to install the service pack.

5 | CHAPTER 2 – INSTALLING SMART MEETING PRO
Completing your SMART Meeting Pro InstallationYou must activate SMART Meeting Pro within 30 days if you didn’t activate it during
the installation. For more information, see Chapter 6, Activating SMART Meeting Pro
on page 29.

6 | CHAPTER 2 – INSTALLING SMART MEETING PRO
Chapter 3
Using the Installation WizardAfter you gather the information listed in Gathering Required and Optional Information
on page 4, you can use the installation wizard to install the software.
SMART Meeting Pro includes two components:
• SMART Product Drivers
• SMART Meeting Pro
NOTE
SMART Meeting Pro requires SMART Product Drivers 10.6 or later, which are
included in the software download before SMART Meeting Pro is installed.
No earlier releases of SMART Product Drivers are supported.
Downloading the SoftwareYou can install SMART Meeting Pro from the SMART Support site.
To download the software 1. Access the installation wizard .exe file by downloading SMART Meeting Pro from:
http://www2.smarttech.com/st/en-US/Support/Downloads/SMART+Meeting+Pro/
Windows.
2. Click tDownload.
3. When prompted, select Save to save the file to your desktop.
8 | CHAPTER 3 – USING THE INSTALLATION WIZARD
Using the Installation WizardUse the installation wizard to install or upgrade SMART Meeting Pro by following the
instructions in this section.
NOTE
These procedures can vary depending on your version of Windows operating
system and your system preferences.
To install or upgrade
SMART Meeting Pro using
the installation wizard
1. Browse to and double-click the SMARTMeetingProWrapper.exe file you
downloaded previously.
The SMART Product Drivers installation wizard appears.
2. Follow the on-screen instructions to install SMART Product Drivers.
The wizard installs SMART Product Drivers, and then the SMART Meeting Pro
installation wizard appears.
3. Follow the on-screen instructions to install SMART Meeting Pro.
Removing the SoftwareYou can remove SMART Meeting Pro and SMART Product Drivers from:
• Windows XP
Windows Control Panel > Add or Remove Programs
• Windows Vista or Windows 7
Control Panel > Programs and Features
Chapter 4
Using the Command Line InterfaceAfter you gather the information listed in Gathering Required and Optional Information
on page 4, you can use the command line interface to install the software.
Locating the Installation PackagesThe SMART Meeting Pro installation packages (the .msi files) contain all the
information required to install or remove SMART Meeting Pro and to run the user
interface setup.
You can download the zipped installation packages from:
http://www2.smarttech.com/st/en-US/Support/Downloads/Admin+tools/
AdminToolsMeetingPro2010.htm.
NOTE
Each zip file contains separate .mst transform files with language information that
you can apply to the installation user interface. For more information, see
page 16.
Installation Package File Name
SMART Meeting Pro SMART Meeting Pro Setup.msi
SMART Product Drivers SMART Product Drivers.msi
10 | CHAPTER 4 – USING THE COMMAND LINE INTERFACE
Completing SMART Meeting Pro Installation TasksUse the SMART Meeting Pro installation package to complete the following tasks from
a command line interface:
• Installing SMART Product Drivers
• Installing SMART Meeting Pro
• Removing SMART Meeting Pro
Installing SMART Product DriversInstall SMART Product Drivers by following the instructions in this section.
IMPORTANT
Install SMART Product Drivers before you install SMART Meeting Pro. Otherwise,
the SMART Meeting Pro installation will fail. This doesn’t occur if you use the
installation wizard (see page 7) because the wizard installs the two applications in
the correct order.
To install or upgrade
SMART Product Drivers
using the command
line interface
1. Open the command line interface with administrator rights.
2. Type the following command line (including quotation marks), and then click
ENTER:
msiexec /i "[Path]\SMART Product Drivers.msi"[Properties][Parameter]
Where:
– [Path] is the path to the SMART Product Driver.msi file.
– [Properties] is a set of properties you can include to customize the installation
(see page 11).
– [Parameter] is the installation parameter (see page 17).
Windows Installer installs SMART Product Drivers with the selected properties.
11 | CHAPTER 4 – USING THE COMMAND LINE INTERFACE
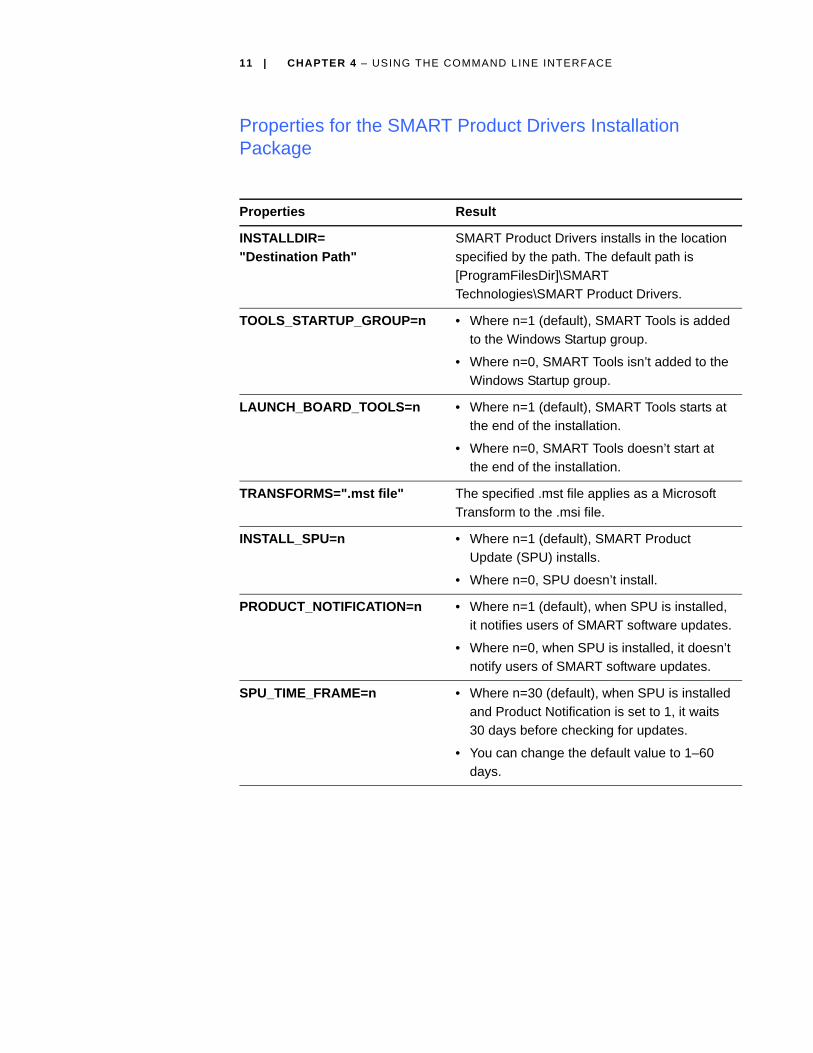
Properties for the SMART Product Drivers Installation Package
Properties Result
INSTALLDIR=
"Destination Path"
SMART Product Drivers installs in the location
specified by the path. The default path is
[ProgramFilesDir]\SMART
Technologies\SMART Product Drivers.
TOOLS_STARTUP_GROUP=n • Where n=1 (default), SMART Tools is added
to the Windows Startup group.
• Where n=0, SMART Tools isn’t added to the
Windows Startup group.
LAUNCH_BOARD_TOOLS=n • Where n=1 (default), SMART Tools starts at
the end of the installation.
• Where n=0, SMART Tools doesn’t start at
the end of the installation.
TRANSFORMS=".mst file" The specified .mst file applies as a Microsoft
Transform to the .msi file.
INSTALL_SPU=n • Where n=1 (default), SMART Product
Update (SPU) installs.
• Where n=0, SPU doesn’t install.
PRODUCT_NOTIFICATION=n • Where n=1 (default), when SPU is installed,
it notifies users of SMART software updates.
• Where n=0, when SPU is installed, it doesn’t
notify users of SMART software updates.
SPU_TIME_FRAME=n • Where n=30 (default), when SPU is installed
and Product Notification is set to 1, it waits
30 days before checking for updates.
• You can change the default value to 1–60
days.
12 | CHAPTER 4 – USING THE COMMAND LINE INTERFACE
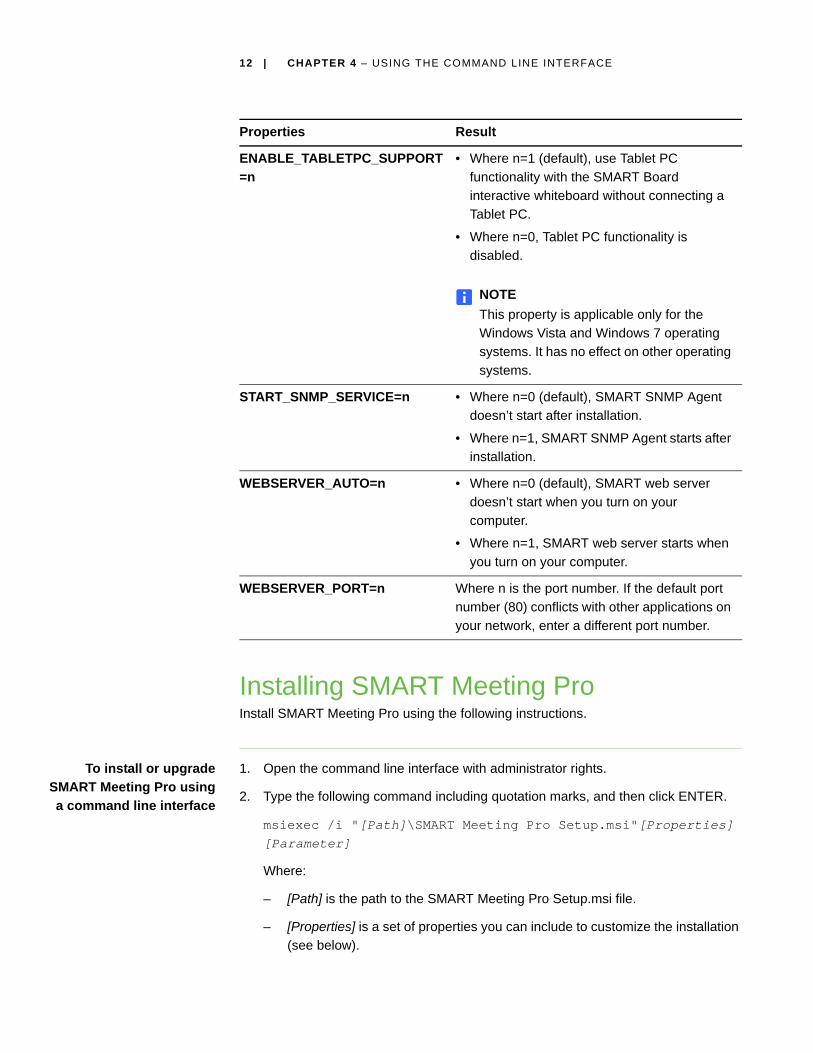
Installing SMART Meeting ProInstall SMART Meeting Pro using the following instructions.
To install or upgrade
SMART Meeting Pro using
a command line interface
1. Open the command line interface with administrator rights.
2. Type the following command including quotation marks, and then click ENTER.
msiexec /i "[Path]\SMART Meeting Pro Setup.msi"[Properties] [Parameter]
Where:
– [Path] is the path to the SMART Meeting Pro Setup.msi file.
– [Properties] is a set of properties you can include to customize the installation
(see below).
ENABLE_TABLETPC_SUPPORT
=n
• Where n=1 (default), use Tablet PC
functionality with the SMART Board
interactive whiteboard without connecting a
Tablet PC.
• Where n=0, Tablet PC functionality is
disabled.
NOTE
This property is applicable only for the
Windows Vista and Windows 7 operating
systems. It has no effect on other operating
systems.
START_SNMP_SERVICE=n • Where n=0 (default), SMART SNMP Agent
doesn’t start after installation.
• Where n=1, SMART SNMP Agent starts after
installation.
WEBSERVER_AUTO=n • Where n=0 (default), SMART web server
doesn’t start when you turn on your
computer.
• Where n=1, SMART web server starts when
you turn on your computer.
WEBSERVER_PORT=n Where n is the port number. If the default port
number (80) conflicts with other applications on
your network, enter a different port number.
Properties Result
13 | CHAPTER 4 – USING THE COMMAND LINE INTERFACE
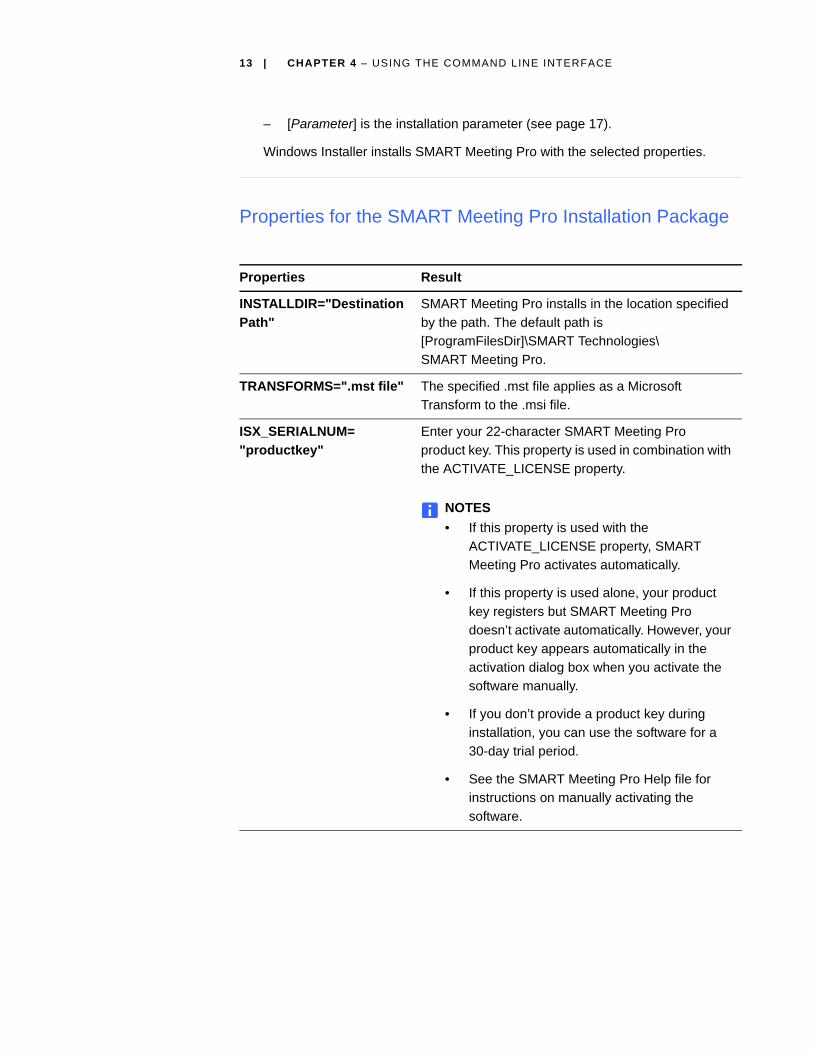
– [Parameter] is the installation parameter (see page 17).
Windows Installer installs SMART Meeting Pro with the selected properties.
Properties for the SMART Meeting Pro Installation Package
Properties Result
INSTALLDIR="Destination
Path"
SMART Meeting Pro installs in the location specified
by the path. The default path is
[ProgramFilesDir]\SMART Technologies\
SMART Meeting Pro.
TRANSFORMS=".mst file" The specified .mst file applies as a Microsoft
Transform to the .msi file.
ISX_SERIALNUM=
"productkey"
Enter your 22-character SMART Meeting Pro
product key. This property is used in combination with
the ACTIVATE_LICENSE property.
NOTES
• If this property is used with the
ACTIVATE_LICENSE property, SMART
Meeting Pro activates automatically.
• If this property is used alone, your product
key registers but SMART Meeting Pro
doesn’t activate automatically. However, your
product key appears automatically in the
activation dialog box when you activate the
software manually.
• If you don’t provide a product key during
installation, you can use the software for a
30-day trial period.
• See the SMART Meeting Pro Help file for
instructions on manually activating the
software.
14 | CHAPTER 4 – USING THE COMMAND LINE INTERFACE
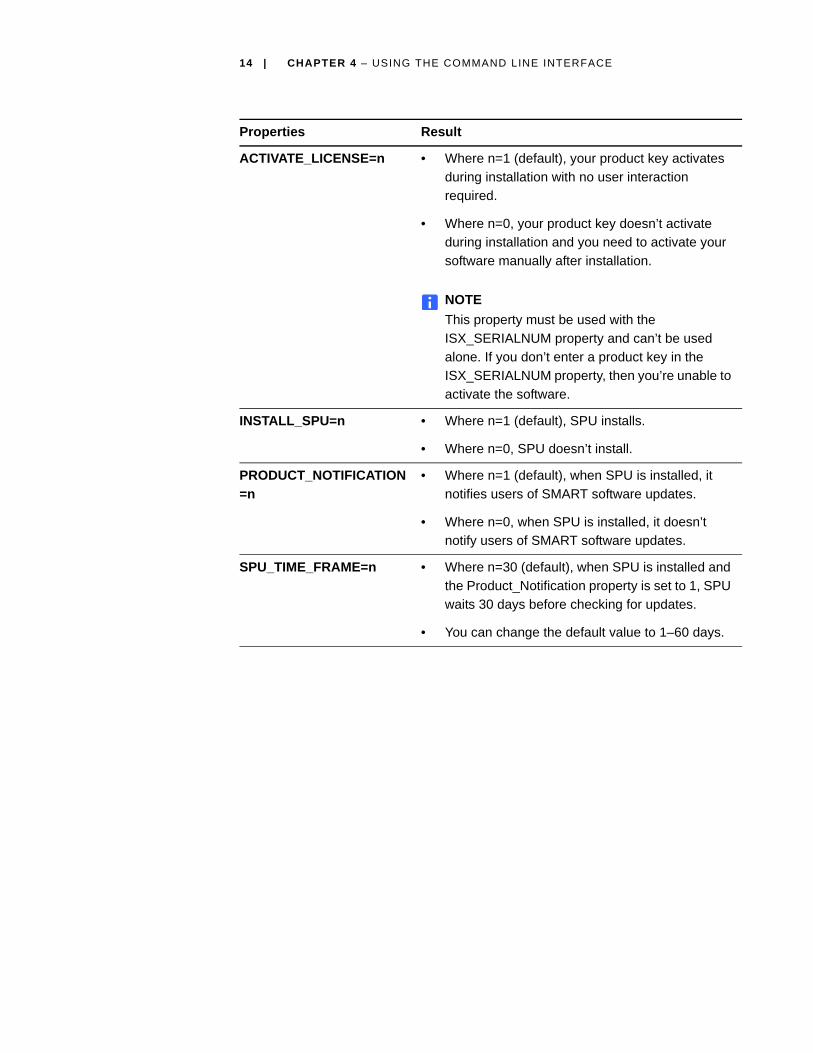
ACTIVATE_LICENSE=n • Where n=1 (default), your product key activates
during installation with no user interaction
required.
• Where n=0, your product key doesn’t activate
during installation and you need to activate your
software manually after installation.
NOTE
This property must be used with the
ISX_SERIALNUM property and can’t be used
alone. If you don’t enter a product key in the
ISX_SERIALNUM property, then you’re unable to
activate the software.
INSTALL_SPU=n • Where n=1 (default), SPU installs.
• Where n=0, SPU doesn’t install.
PRODUCT_NOTIFICATION
=n
• Where n=1 (default), when SPU is installed, it
notifies users of SMART software updates.
• Where n=0, when SPU is installed, it doesn’t
notify users of SMART software updates.
SPU_TIME_FRAME=n • Where n=30 (default), when SPU is installed and
the Product_Notification property is set to 1, SPU
waits 30 days before checking for updates.
• You can change the default value to 1–60 days.
Properties Result
15 | CHAPTER 4 – USING THE COMMAND LINE INTERFACE
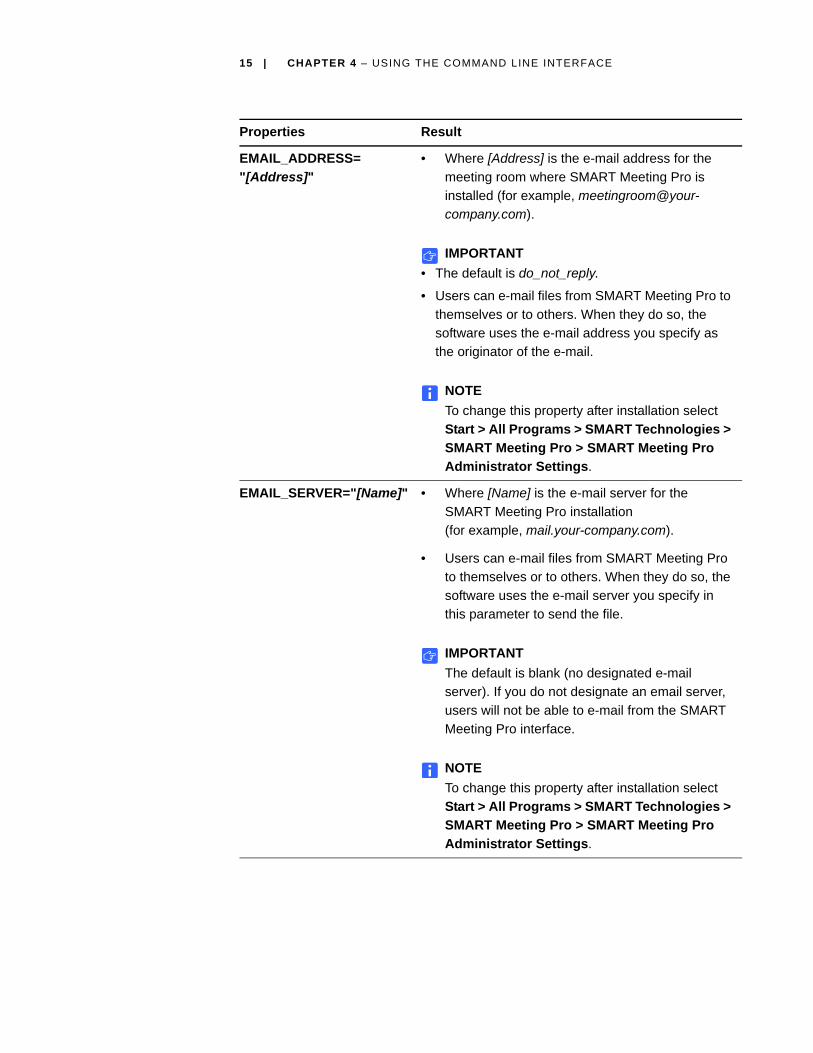
EMAIL_ADDRESS=
"[Address]"
• Where [Address] is the e-mail address for the
meeting room where SMART Meeting Pro is
installed (for example, meetingroom@your-
company.com).
IMPORTANT
• The default is do_not_reply.
• Users can e-mail files from SMART Meeting Pro to
themselves or to others. When they do so, the
software uses the e-mail address you specify as
the originator of the e-mail.
NOTE
To change this property after installation select
Start > All Programs > SMART Technologies >
SMART Meeting Pro > SMART Meeting Pro
Administrator Settings.
EMAIL_SERVER="[Name]" • Where [Name] is the e-mail server for the
SMART Meeting Pro installation
(for example, mail.your-company.com).
• Users can e-mail files from SMART Meeting Pro
to themselves or to others. When they do so, the
software uses the e-mail server you specify in
this parameter to send the file.
IMPORTANT
The default is blank (no designated e-mail
server). If you do not designate an email server,
users will not be able to e-mail from the SMART
Meeting Pro interface.
NOTE
To change this property after installation select
Start > All Programs > SMART Technologies >
SMART Meeting Pro > SMART Meeting Pro
Administrator Settings.
Properties Result
16 | CHAPTER 4 – USING THE COMMAND LINE INTERFACE
TransformsThe SMART Meeting Pro installation packages contain separate .mst transform files
with language information that you can apply during installation by using the
TRANSFORMS=.mst file optional parameter. This paramater affects what language
your installation wizard runs in and doesn’t modify what language SMART Meeting
Pro operates in.
NOTE
The installation of language packs is determined by the language of the Windows
operating system. The TRANSFORMS=.mst file parameter doesn’t affect the
language pack installation.
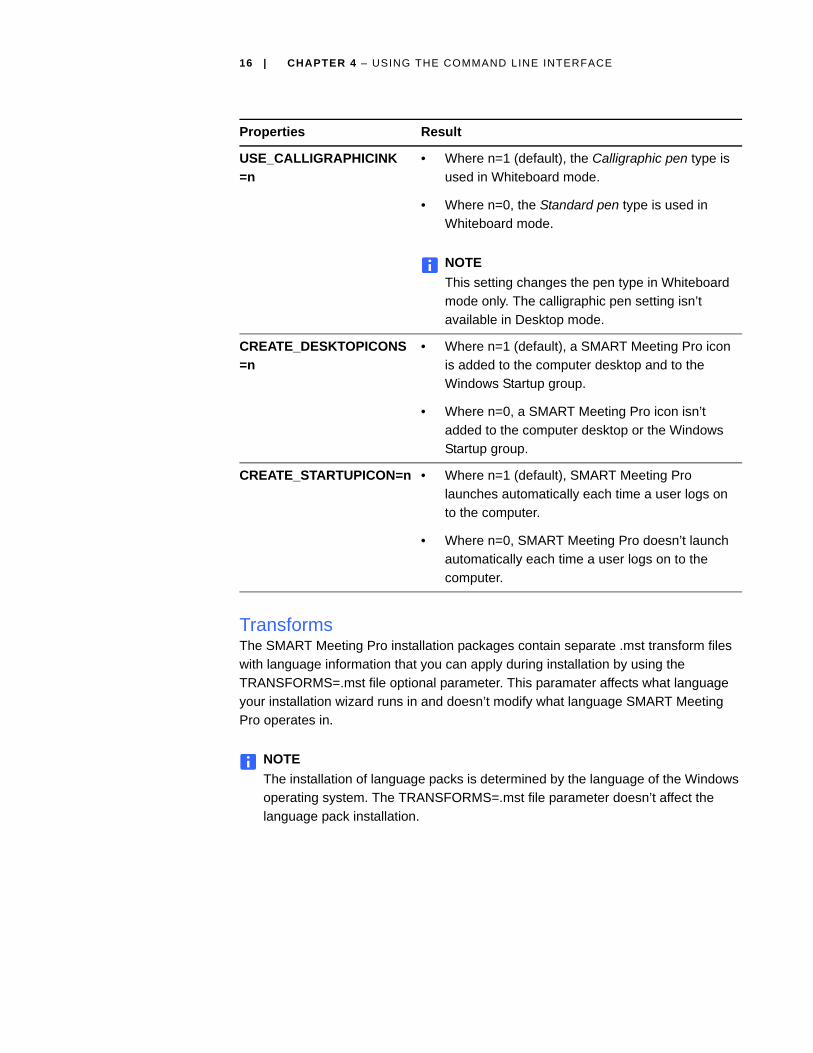
USE_CALLIGRAPHICINK
=n
• Where n=1 (default), the Calligraphic pen type is
used in Whiteboard mode.
• Where n=0, the Standard pen type is used in
Whiteboard mode.
NOTE
This setting changes the pen type in Whiteboard
mode only. The calligraphic pen setting isn’t
available in Desktop mode.
CREATE_DESKTOPICONS
=n
• Where n=1 (default), a SMART Meeting Pro icon
is added to the computer desktop and to the
Windows Startup group.
• Where n=0, a SMART Meeting Pro icon isn’t
added to the computer desktop or the Windows
Startup group.
CREATE_STARTUPICON=n • Where n=1 (default), SMART Meeting Pro
launches automatically each time a user logs on
to the computer.
• Where n=0, SMART Meeting Pro doesn’t launch
automatically each time a user logs on to the
computer.
Properties Result
17 | CHAPTER 4 – USING THE COMMAND LINE INTERFACE
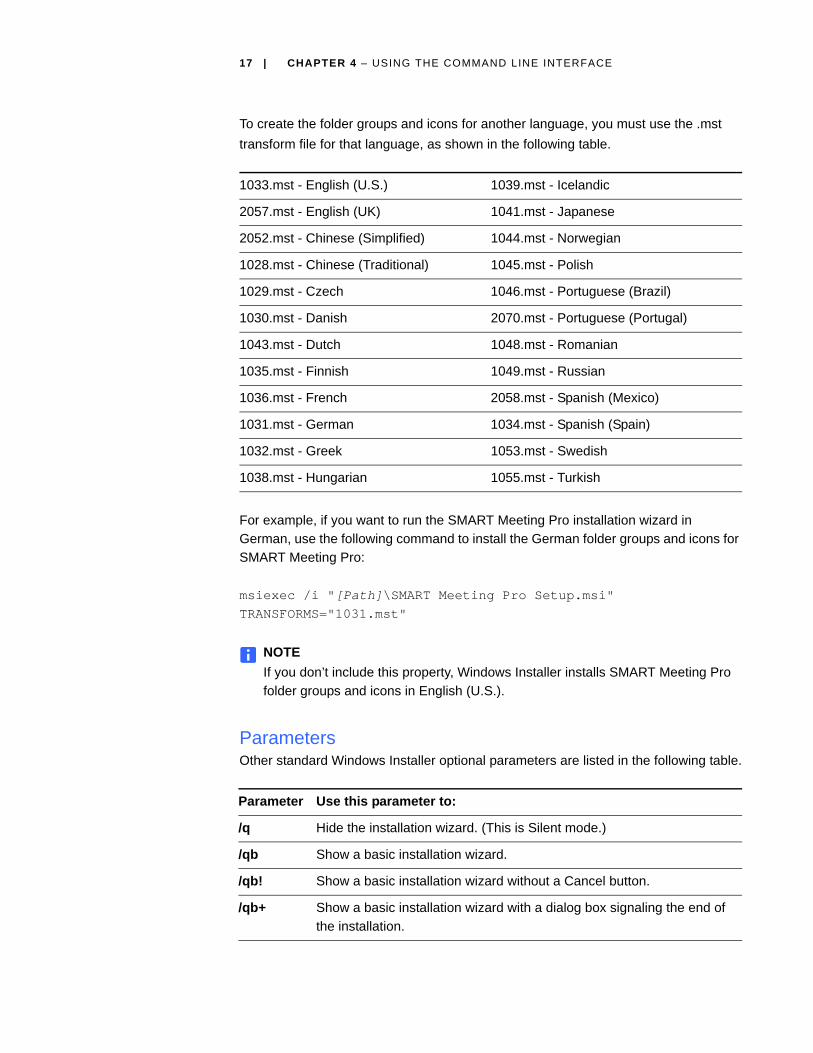
To create the folder groups and icons for another language, you must use the .mst
transform file for that language, as shown in the following table.
For example, if you want to run the SMART Meeting Pro installation wizard in
German, use the following command to install the German folder groups and icons for
SMART Meeting Pro:
msiexec /i "[Path]\SMART Meeting Pro Setup.msi" TRANSFORMS="1031.mst"
NOTE
If you don’t include this property, Windows Installer installs SMART Meeting Pro
folder groups and icons in English (U.S.).
ParametersOther standard Windows Installer optional parameters are listed in the following table.
1033.mst - English (U.S.) 1039.mst - Icelandic
2057.mst - English (UK) 1041.mst - Japanese
2052.mst - Chinese (Simplified) 1044.mst - Norwegian
1028.mst - Chinese (Traditional) 1045.mst - Polish
1029.mst - Czech 1046.mst - Portuguese (Brazil)
1030.mst - Danish 2070.mst - Portuguese (Portugal)
1043.mst - Dutch 1048.mst - Romanian
1035.mst - Finnish 1049.mst - Russian
1036.mst - French 2058.mst - Spanish (Mexico)
1031.mst - German 1034.mst - Spanish (Spain)
1032.mst - Greek 1053.mst - Swedish
1038.mst - Hungarian 1055.mst - Turkish
Parameter Use this parameter to:
/q Hide the installation wizard. (This is Silent mode.)
/qb Show a basic installation wizard.
/qb! Show a basic installation wizard without a Cancel button.
/qb+ Show a basic installation wizard with a dialog box signaling the end of
the installation.
18 | CHAPTER 4 – USING THE COMMAND LINE INTERFACE
Removing SMART Product DriversYou can remove SMART Product Drivers using the following instructions.
To remove SMART
Product Drivers using a
command line interface
1. Open the command line interface with administrator rights.
2. Type the following command (including quotation marks), and then click ENTER.
msiexec /x "[Path]\SMART Product Drivers.msi" /q
Where [Path] is the path to the SMART Product Drivers.msi file.
Windows Installer silently removes SMART Product Drivers.
Removing SMART Meeting ProYou can remove SMART Meeting Pro using the following instructions.
To remove SMART
Meeting Pro using a
command line interface
1. Open the command line interface with administrator rights.
2. Type the following command (including quotation marks), and then click ENTER.
msiexec /x "[Path]\SMART Meeting Pro Setup.msi" /q
Where [Path] is the path to the SMART Meeting Pro Setup.msi file.
Windows Installer silently removes SMART Meeting Pro.
/qb+! Show a basic installation wizard without a Cancel button but with a
dialog box signaling the end of the installation.
/qr Show a reduced installation wizard.
/qf Show the full installation wizard, including a dialog box signaling the
end of the installation or the Fatal Error, User Exit or Exit dialog box.
/qn Hide the installation wizard and the dialog box signaling the end of the
installation.
/qn+ Hide the installation wizard but show the dialog box signaling the end of
the installation.
Examples of Msiexec Command LinesIn the following examples, [Path] is the path to the SMART Meeting Pro Setup.msi file.
NOTE
Silent installation and removal using the quiet option (/q) can take several
minutes, with no indication of activity or completion.
Silent Installation with a Product KeyThis example installs and activates SMART Meeting Pro silently.
msiexec /i "[Path]\SMART Meeting Pro Setup.msi" ISX_SERIALNUM="SM-ABCDE-FGHIJ-KLMNO-PQRST" ACTIVATE_LICENSE=1/q
Silent RemovalThe following example removes SMART Meeting Pro silently.
msiexec /x "[Path]\SMART Meeting Pro Setup.msi" /q

20 | CHAPTER 4 – USING THE COMMAND LINE INTERFACE
21 | CHAPTER 5 – USING SMART INSTALL MANAGER
Chapter 5
Using SMART Install ManagerAfter you gather the required and optional information listed on page 4, you can use
the SMART Install Manager to install the software.
SMART Install Manager allows you to customize the SMART Meeting Pro installation
package (also known as an .msi file) by publishing .mst files. You can then deploy the
.msi and .mst files to the computers on your network using Windows Group Policy.
Installing SMART Install ManagerYou can download and install SMART Install Manager from the SMART Support
website.
To install SMART
Install Manager
1. Go to http://www2.smarttech.com/st/en-US/Support/Downloads/Admin+tools/
AdminToolsMeetingPro2010.htm.
2. Click SMART Install Manager to download the SMART Install Manager
installation wizard to your computer.
3. Browse to and double-click Install Manager.exe.
4. Follow the on-screen instructions to install SMART Install Manager.
Working with SMART Install ManagerAfter you install SMART Install Manager, shortcuts to the software appear on the
desktop and in the Start menu under All Programs > SMART Technologies >
SMART Install Manager.
With SMART Install Manager, you can do the following:
• Open an installation package.
22 | CHAPTER 5 – USING SMART INSTALL MANAGER
• Save your changes to the installation package.
• Publish your changes to the installation packages as an .mst file.
Opening an Installation PackageTo open an installation package, open the installation package’s .msi file in SMART
Install Manager in either of the following ways:
• Select File > Open.
• Drag the .msi file into the SMART Install Manager window.
TIP
All installation packages that you’ve previously opened in SMART Install Manager
appear in the Unmodified Packages tab.
After you open an installation package, a set of pages for that installation package
appears in SMART Install Manager. Customize the installation package using the
controls on these pages. For more information on customization, see Customizing the
SMART Meeting Pro Installation Package on page 23.
Saving Your ChangesAfter customizing an installation package, save your changes as an XML file by
selecting File > Save As. When you next start SMART Install Manager, you can load
the XML file by selecting File > Open or by opening the .msi file and then selecting
File > Import.
Publishing Your ChangesThe final step in using SMART Install Manager to customize an installation package is
to publish your changes as an .mst file. To do this, select File > Publish, use the
dialog box to define a location for the .mst file, and then create the .mst file.

23 | CHAPTER 5 – USING SMART INSTALL MANAGER
Customizing the SMART Meeting Pro Installation PackageTo customize the SMART Meeting Pro installation package, open the
SMART Meeting Pro.msi file in SMART Install Manager, and then complete the
following procedures. (See Opening an Installation Package on page 22.)
To set installation
options
1. Click Installation Options.
2. In the Installation directory box, type the path to your preferred folder for the
SMART Meeting Pro programs.
NOTE
If you don’t specify a folder, the Installation Wizard installs the programs in
%PROGRAMFILES%\SMART Technologies\SMART Meeting Pro\LE.
3. In the key box, type the 22-character product key you received from your
authorized SMART Reseller to activate SMART Meeting Pro.
NOTE
If you don’t provide a product key during installation, the activation dialog box
appears when the user starts SMART Meeting Pro. Enter the product key in
this dialog box within 30 days of installing the software to continue using this
software.
To configure SPU 1. Click SMART Product Update (SPU) Options.
2. Select the Install SMART Product Update check box to install SPU.
3. In the Check for updates box, type the number of days between SPU product
update checks.
NOTE
By default, SPU checks for product updates every 30 days. You can set SPU
to check for product updates at intervals of 1 to 60 days.
4. Select the Notify users about SMART product updates check box to notify the
user when product updates are available.
To add shortcuts 1. Click Shortcuts.
2. Select the Install Desktop shortcut if you want a shortcut on the desktop.
3. Select the Launch SMART Meeting Pro at Startup option if you want SMART
Meeting Pro to start automatically when you start your computer.
24 | CHAPTER 5 – USING SMART INSTALL MANAGER
To configure
administrator settings
1. Click Configuration.
2. Select either Calligraphic pen or Standard pen in the Pen type field.
NOTE
This setting changes the pen type in Whiteboard mode only. The calligraphic
pen isn’t available in Desktop mode.
3. In the E-mail Address box, type the e-mail address of the originator you want to
use when e-mailing files from SMART Meeting Pro.
NOTE
If the SMART Meeting Pro computer doesn't have an e-mail client installed,
don’t change the do_not_reply default value. This indicates to e-mail
recipients that they can’t reply to e-mail they receive.
4. In the E-mail Server box, type your SMTP (e-mail) server name.
NOTE
If you omit this option, you disable Whiteboard’s E-mail (as Attachment)
feature.
Customizing the SMART Product Drivers Installation PackageOpen the SMART Product Drivers.msi file in SMART Install Manager (see page 22),
and then complete the procedures in the following sections.
To set
installation options
1. Click Installation Options.
The Installation Options page appears.
2. In the Installation directory box, type the path to your preferred folder for SMART
Product Drivers.
NOTE
If you don’t specify a folder, the Installation Wizard installs the programs in
%PROGRAMFILES%\SMART Technologies\SMART Product Drivers.
To configure SPU 1. Click SMART Product Update (SPU) Options.
The SMART Product Update (SPU) Options page appears.
2. Select the Install SMART Product Update check box to install SPU.
25 | CHAPTER 5 – USING SMART INSTALL MANAGER
3. In the Check for updates box, type the number of days between SPU checks.
NOTE
By default, SPU checks for product updates every 30 days. You can set SPU
to check for product updates at intervals of 1–60 days.
4. Select the Notify users about SMART product updates check box to notify the
user when product updates are available.
To configure
post-installation options
1. Click SMART Tools.
The SMART Tools page appears.
2. Select the Start SMART Tools at logon check box to start SMART Tools when
the teacher logs on.
3. Click Tablet PC Support.
The Tablet PC Support page appears.
4. Select the Enable Tablet PC Support check box to use Tablet PC functionality
with the SMART Board interactive whiteboard without having to connect a
Tablet PC.
NOTE
This check box is applicable only for the Windows Vista and WIndows 7
operating systems. It has no effect on other operating systems.
5. Click SNMP Agent.
The SNMP Agent page appears.
6. Select the Start Simple Network Management Protocol (SNMP) Agent
check box to enable remote monitoring and control of your SMART products and
projectors from a central location using SMART SNMP Agent.
NOTE
For more information on SMART SNMP Agent, see the SMART SNMP Agent
Administrator’s Guide (document 128702).
7. Click Web Server.
The Web Server page appears.
8. Select the Start SMART Web Server at startup check box to start
SMART Web Server when the teacher logs on.
9. In the Port box, type a new port number for SMART Web Server if the default port
(80) is being used by another program.
26 | CHAPTER 5 – USING SMART INSTALL MANAGER
To set
removal options
1. Click Removal Options.
The Removal Options page appears.
2. Select the Save configuration settings when removing software check box to
retain configuration settings when removing suite programs.
NOTE
If you select this check box and remove a suite program, the program’s
configuration settings remain.
Deploying the Installation PackageAfter publishing .mst files for the SMART Meeting Pro installation package, deploy this
installation package using Windows Group Policy on your server.
NOTE
These procedures can vary depending on your version of Windows operating
system and your system preferences.
To deploy an installation
package
1. Copy the .msi file and the .mst file you published using SMART Install Manager
(see page 22) to
\\[Domain Controller]\NETLOGON, where [Domain Controller] is your company’s
domain controller.
2. Open Control Panel, and then double-click Administrative Tools.
3. Double-click Active Directory Users and Computers.
4. Right-click your company’s domain, and then select Properties.
5. Click the Group Policy tab, and then click Edit.
6. Browse to and open Computer Configuration\Software Settings.
7. Right-click Software Installation, and then select New > Package.
8. Browse to and select the .msi file from step 1.
9. In the Deploy Software section, click Advanced, and then click OK.
10. Click the Modifications tab, and then click Add.
11. Browse to and select the .mst file from step 1.
12. Click OK to apply the .mst file to the .msi file.
13. Close all open windows and dialog boxes.
27 | CHAPTER 5 – USING SMART INSTALL MANAGER
The next time each computer on the domain starts, it automatically installs the
software in Silent mode with the customizations defined in the .mst file.
To remove a deployed
installation package
1. Open Control Panel.
2. Double-click Administrative Tools.
3. Double-click Active Directory Users and Computers.
4. Right-click your company’s domain, and then select Properties.
5. Click the Group Policy tab, and then click Edit.
6. Browse to and open Computer Configuration\Software Settings\Software
Installation.
7. Right-click the software you want to remove, and then select All Tasks >
Remove.
8. Select Immediately uninstall the software from users and computers, and
then click OK.
The next time each computer on the domain starts, it automatically removes the
software.

28 | CHAPTER 5 – USING SMART INSTALL MANAGER
29 | CHAPTER 6 – ACTIVATING SMART MEETING PRO
Chapter 6
Activating SMART Meeting ProTo continue using SMART Meeting Pro, you must activate your software within 30
days after installation.
If you entered the product key during installation, you automatically activated the
software on your computer. Alternatively, if you didn’t enter the product key during the
installation, you can activate the software after you install it.
NOTE
Each installation requires a unique product key.
To activate SMART
Meeting Pro with an
Internet connection
1. Select Start > All Programs > SMART Technologies > SMART Meeting Pro >
Activate Meeting Pro.
The SMART Software Activation window appears.
NOTE
If your software is already activated, a dialog box appears showing the
product key. Click Finish.
2. Type your product key into the box if not already entered, and then click Next.
3. Select the Activate automatically option, and then click Next.
4. Click Finish when the product key appears in the SMART Software Activation
dialog box.
SMART Meeting Pro is now activated.
To activate SMART
Meeting Pro without an
Internet connection
1. Select Start > All Programs > SMART Technologies > SMART Meeting Pro >
Activate Meeting Pro.
The SMART Software Activation window appears.
NOTE
If your software is already activated, a dialog box appears showing the
product key. Click Finish.
2. Type your product key into the box, if it isn’t already there, and then click Next.
30 | CHAPTER 6 – ACTIVATING SMART MEETING PRO
3. Select the Activate manually option, and then click Next.
4. Choose a method of activation.
• If you choose to activate by e-mail, your default e-mail client opens a
message addressed to SMART Technical Support. Send the e-mail when the
Internet connection is restored.
• If you choose to activate by phone, use the contact information in the SMART
Software Activation dialog box to contact SMART Technical Support.
NOTE
SMART Technical Support will give you a product key to unlock the
software.
5. Type the product key number into the Manual Activation dialog box, and then
click Next.
The Activation Successful window appears.
6. Click Finish.
31 | APPENDIX A – CUSTOMER SUPPORT
Appendix A
Customer SupportOnline Information and SupportVisit www.smarttech.com/support to view and download user’s guides, how-to and
troubleshooting articles, software and more.
TrainingVisit www.smarttech.com/trainingcenter for training materials and information about
our training services.
Technical SupportIf you experience difficulty with your SMART product, please contact your local
reseller before contacting SMART Technical Support. Your local reseller can resolve
most issues.
NOTE
To locate your local reseller, visit www.smarttech.com/where.
All SMART products include online, telephone, fax and e-mail support:
Online www.smarttech.com/contactsupport
Telephone +1.403.228.5940 or
Toll Free 1.866.518.6791 (U.S./Canada)
(Monday to Friday, 5 a.m. – 6 p.m. Mountain Time)
Fax +1.403.806.1256
E-mail [email protected]
32 | APPENDIX A – CUSTOMER SUPPORT
General Inquiries
RegistrationTo help us serve you, register online at www.smarttech.com/registration.
Address SMART Technologies
3636 Research Road NW
Calgary, AB T2L 1Y1
CANADA
Switchboard +1.403.228.5940 or
Toll Free 1.866.518.6791 (U.S./Canada)
Fax +1.403.228.2500
E-mail [email protected]