small ranch manual - university of nevada cooperative extension
TRANSCRIPT
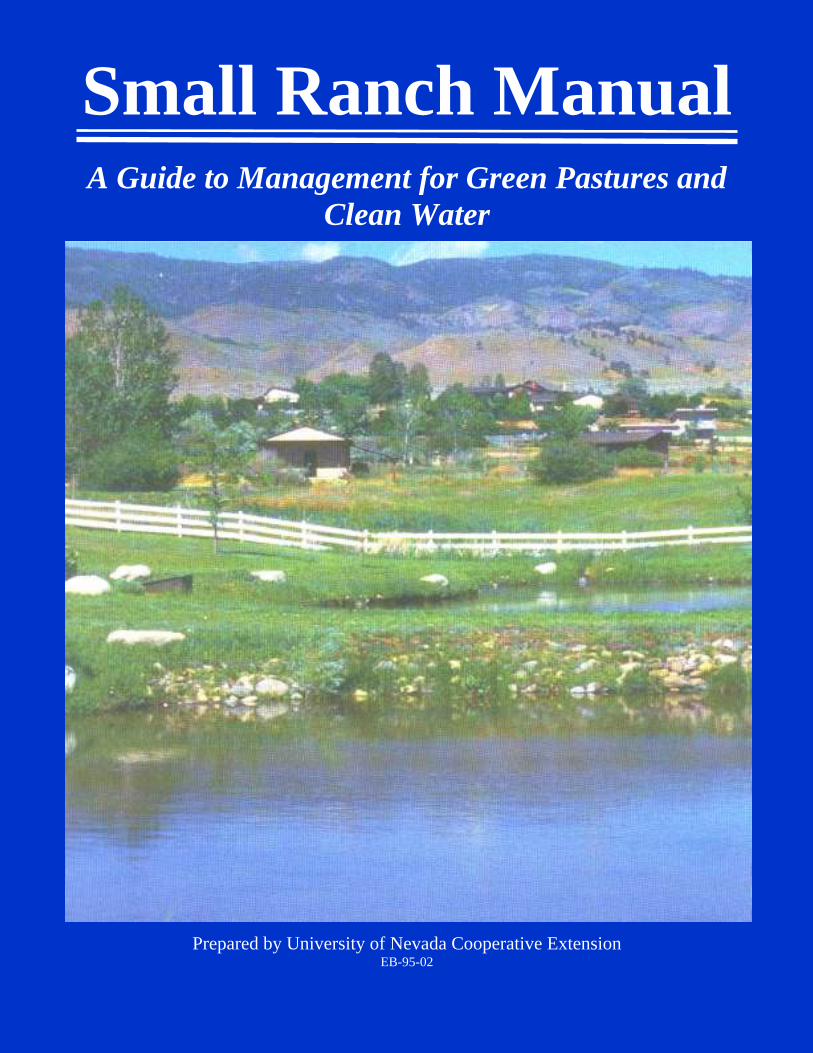
Small Ranch Manual
A Guide to Management for Green Pastures and Clean Water
Prepared by University of Nevada Cooperative Extension EB-95-02

Important Telephone Numbers (all area code 702)
Erosion Control
University of Nevada Cooperative Extension, Washoe County Offices….......................................... 784-4848 Washoe-Storey Conservation District........................... 322-9934 U.S. Natural Resources Conservation Service................ 784-5408
Proper Use of Pesticides and Fertilizers
University of Nevada Cooperative Extension.................. 784-4848
Suburban Agriculture and Pasture Management
University of Nevada Cooperative Extension
Livestock Specialist........................................ 784-1624 Horse Specialist.............................................. 784-1635 Washoe-Storey Conservation District....................................775-847-0966
Wetlands
Washoe County Comprehensive Planning..................... 328-3600
Septic Tank Systems
Washoe County Environmental Health Division............... 328-2434 Sanitary Engineers - Septic System Cleanout.................. See Yellow Pages
Drinking Water from Private Wells
Nevada Bureau of Health Protection Services................ 687-4750 Nevada Health Laboratory (water testing)..................... 688-1335 Nevada Ground Water Protection Program, Nevada Division of Environmental Protection......... 687-4670 x 3104 Well Engineers - Maintenance & Drilling...................... See Yellow Pages
Leaking Underground Storage Tanks
Nevada State Bureau of Corrective Action..................... 687-4670 x 3047
For additional copies of this manual, please mail a check payable to the Board of Regents in the amount of $2.00 per manual to cover postage and handling, to:
Cooperative Extension P.O. Box 11130
Reno, NV 89520-2893 (Call for quantity rates.)
Small Ranch Manual
A Guide to Management for Green Pastures and
Clean Water
Principal Authors: John Cobourn, Extension Water Resource Specialist
Susan Donaldson, Extension Water Quality Specialist University of Nevada Cooperative Extension
Sponsored by
University of Nevada Cooperative Extension Washoe County Department of Comprehensive Planning
Washoe-Storey Conservation District USDA Natural Resources Conservation Service
Funded by a U.S. EPA Clean Water Act grant through the Nevada Division of Environmental Protection
EB-95-02

Acknowledgements The authors acknowledge the following individuals who shared their knowledge with us and our Small Ranch Water Quality Program. Without their expertise, it would have been extremely difficult to describe how to adapt best management practices for small ranch applications. Our program and this Manual were made possible by the teamwork and inter-agency cooperation contributed by these individuals.
Hugh Bevans, U.S. Geological Survey Gayle Bowers, Washoe-Storey Conservation District Jeff Boyer, Federal Water Master's Office Doug Busselman, Nevada Farm Bureau Carl Cahill, Washoe County Environmental Health Division John Capurro, Natural Resources Conservation Service Bill Carlos, University of Nevada Cooperative Extension John Christopherson, University of Nevada Cooperative Extension Al Cirelli, University of Nevada Ron Collins, U.S. Geological Survey Leonard Crowe, Washoe County Comprehensive Planning Department Chris Freeman, Nevada Division of Conservation Districts Chris Hoag, Aberdeen Plant Materials Center, Natural Resources Conservation Service Wayne Johnson, University of Nevada Clark Leedy, University of Nevada Cooperative Extension Joanna Lott, University of Nevada Cooperative Extension Peggy McKie, University of Nevada Cooperative Extension John Maxfield, University of Nevada Cooperative Extension Dick Post, University of Nevada Cooperative Extension Kathy Sertic, Nevada Division of Environmental Protection JoAnne Skelly, University of Nevada Cooperative Extension Harry Smith, University of Nevada Sherman Swanson, University of Nevada Janet Usinger, University of Nevada Cooperative Extension Gary Vineyard, University of Nevada
2

Table of Contents
CHAPTER PAGE
Inside Front Cover: Important Telephone Numbers
Inside Back Cover: About University of Nevada Cooperative Extension
1.
Introduction
5
2. A Typical Small Ranch in Western Nevada
9
3. Pasture Management - More Than Meets the Eye
11
4. Getting the Most From Your Pasture Irrigation System
19
5. Managing Creeks, Ponds, Wet Areas and Ditches to Protect Water Quality 29
6. Principles and Techniques of Erosion Control Vegetation for Streambank Stabilization in Western Nevada (Key and Table)
3745
7. How to Manage Animal Waste and Reap Its Benefits
49
8. Wells - How to Maintain the Purity of Your Drinking Water
53
9. Septic Tank Systems Require Regular Maintenance
57
10. Underground Fuel Storage Tanks
63
11. Planning Ahead to Prevent and/or Safely Control Pests Such as Weeds, Rodents and Insects Controlling the Ten Most Wanted Pests in Northern Nevada Gardens (tables) Common Animal Pests in Northern Nevada Pastures (table)
656774
12. Your Residential Landscape Can Be Beautiful, Water Efficient, and Easy on the Environment
75
Month by Month Residential Landscape Tips for Western Nevada
79
Landscape Maintenance Calendar
84
Low Water Use Plants for Western Nevada 85Glossary
87
References 92Note Pages 93-94
3

4

Chapter 1
INTRODUCTION
This handbook has been assembled by University of Nevada Cooperative Extension as part of its Small Ranch Water Quality Education Program. While it is written specifically for small ranches in Western Nevada, many of its principles apply to small ranches in other arid regions where pastures are flood-irrigated by water from irrigation ditches.
This manual was written for the growing number of people who have moved onto 1 to 10 acre ranches in search of a closer relationship with the land and perhaps for the purpose of keeping a few horses or other animals for personal use. Since many of these residents may not have extensive backgrounds in agriculture, this guide explains the basics of ranch land management.
A central goal has been to gather the advice and knowledge of local residents, experts from federal agencies and University of Nevada faculty to answer the question: "How can we best manage our ranches to protect ourselves, our family, our animals and our environment?"
In most cases, the best ways to care for soil and water are also best for your livestock, your property value and the well-being of your family and neighbors, particularly those downstream. Safe-guarding the quality of our water directly affects the quality of our lives. As more and more small
ranches are established, more pollutants may be swept into our creeks by intense rain or excess irrigation water which runs over the soil surface. In fact, runoff can carry much of what it encounters on the surface − including loose soil, livestock manure, fertilizers, pesticides, septic system overflows, and household chemicals − into adjacent streams, ditches and ponds.
What washes away from your property does not simply go away; it goes somewhere else, potentially posing a threat to the receiving water body. For example, in southwest Reno, runoff flows through Dry Creek to the Boynton Slough, then to Steamboat Creek, a major tributary of the Truckee River. Steamboat Creek contributes a significant amount of total phosphorus and total suspended solids to the Truckee River, as well as nitrogen. Land management practices which were adequate in the past may no longer be the best choice for protecting our precious community water resources.
Proper land management protects water bodies such as the Truckee River, making their water safe for swimming, fishing and other important uses.
5

Throughout this manual, we will use the example of Dry Creek to illustrate the kinds of problems and solutions applicable to small watersheds in the Great Basin. The small ranch management principles which apply in Dry Creek will also apply, generally, to most small ranches throughout the arid west.
What do we mean by Water Quality?
Water quality has several different meanings. The Federal Clean Water Act (CWA) focuses on the water in our rivers, lakes and streams with the general goal of making them "fishable and swimable". This is the same water quality this manual addresses. The CWA also sets specific water quality standards based on the intended use of the water. In Nevada, the water in water bodies like the Truckee and Carson Rivers is used and reused. It must therefore meet standards for such "beneficial uses" as municipal and industrial supplies, agricultural irrigation and habitat for fish and wildlife.
The CWA also divides water pollution broadly into two main categories. Contaminants which enter water bodies from the discharge pipe of a factory or a wastewater treatment plant are called point sources. Since these discharges are easy to see and monitor, they have been regulated by the U.S.
Environmental Protection Agency for more than twenty years.
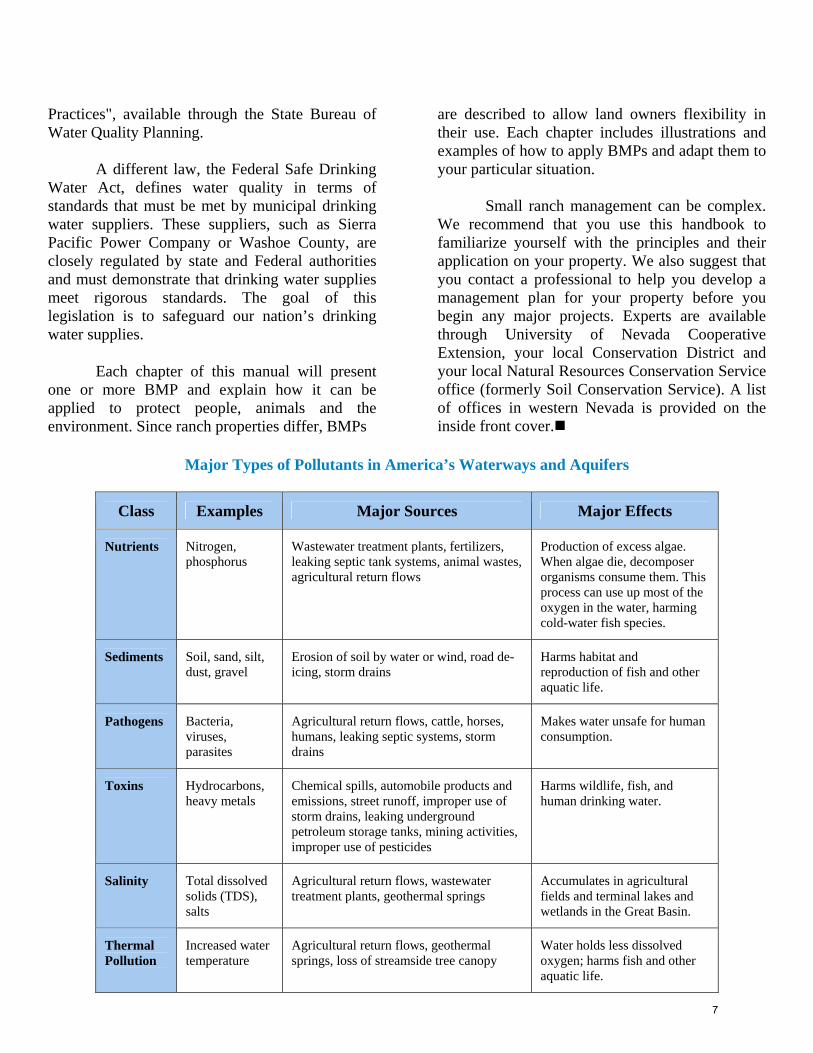
The other broad category of contaminants is known as nonpoint source (NPS) pollution because it doesn’t come from an easily identifiable point such as a discharge pipe. Instead, it comes from everywhere else − from our yards, driveways, streets, parking lots, construction sites, agricultural fields, pastures, litter, spills, illegal dumping, improperly maintained septic tank systems, and any form of soil disturbance which can accelerate soil erosion. Nonpoint source pollution is now America’s largest water quality problem and is the focus of this manual. Each year our stormdrains, creeks, ditches and riverbanks convey millions of pounds of pollutants of all types to the nation’s water bodies, including groundwater aquifers. Some categories of major pollutants are shown in the table on the next page.
Across the nation, nonpoint source water pollution is being addressed by teaching people about techniques known as Best Management Practices (BMPs), which were developed to prevent soil erosion and protect surface water and groundwater from NPS pollution. These practices have been approved by the State of Nevada and published as the "Handbook of Best Management
In Southwest Reno, much of the water from suburban agricultural areas drains to Steamboat Creek, which contributes nitrogen and phosphorus to the Truckee River
6
Practices", available through the State Bureau of Water Quality Planning. A different law, the Federal Safe Drinking Water Act, defines water quality in terms of standards that must be met by municipal drinking water suppliers. These suppliers, such as Sierra Pacific Power Company or Washoe County, are closely regulated by state and Federal authorities and must demonstrate that drinking water supplies meet rigorous standards. The goal of this legislation is to safeguard our nation’s drinking water supplies.
Each chapter of this manual will present one or more BMP and explain how it can be applied to protect people, animals and the environment. Since ranch properties differ, BMPs
are described to allow land owners flexibility in their use. Each chapter includes illustrations and examples of how to apply BMPs and adapt them to your particular situation. Small ranch management can be complex. We recommend that you use this handbook to familiarize yourself with the principles and their application on your property. We also suggest that you contact a professional to help you develop a management plan for your property before you begin any major projects. Experts are available through University of Nevada Cooperative Extension, your local Conservation District and your local Natural Resources Conservation Service office (formerly Soil Conservation Service). A list of offices in western Nevada is provided on the inside front cover.
Major Types of Pollutants in America’s Waterways and Aquifers
Class Examples Major Sources Major Effects
Nutrients Nitrogen, phosphorus
Wastewater treatment plants, fertilizers, leaking septic tank systems, animal wastes, agricultural return flows
Production of excess algae. When algae die, decomposer organisms consume them. This process can use up most of the oxygen in the water, harming cold-water fish species.
Sediments Soil, sand, silt, dust, gravel
Erosion of soil by water or wind, road de-icing, storm drains
Harms habitat and reproduction of fish and other aquatic life.
Pathogens Bacteria, viruses, parasites
Agricultural return flows, cattle, horses, humans, leaking septic systems, storm drains
Makes water unsafe for human consumption.
Toxins Hydrocarbons, heavy metals
Chemical spills, automobile products and emissions, street runoff, improper use of storm drains, leaking underground petroleum storage tanks, mining activities, improper use of pesticides
Harms wildlife, fish, and human drinking water.
Salinity Total dissolved solids (TDS), salts
Agricultural return flows, wastewater treatment plants, geothermal springs
Accumulates in agricultural fields and terminal lakes and wetlands in the Great Basin.
Thermal Pollution
Increased water temperature
Agricultural return flows, geothermal springs, loss of streamside tree canopy
Water holds less dissolved oxygen; harms fish and other aquatic life.
7

8
Chapter 2
A TYPICAL SMALL RANCH IN WESTERN NEVADA
Throughout this manual, we will focus on a representative, suburban/agricultural neighborhood which is located in southwest Reno, west of U.S. Highway 395. This neighborhood, which is drained by Dry Creek, has been zoned for small (2 1/2 to 10 acre) ranches. Residents build on parcels subdivided from ranch land that has been flood or border irrigated for many decades. During the irrigation season, water in the Steamboat, Last Chance and Lake irrigation ditches flows into this area from diversion dams on the Truckee River 10 to 15 miles west of downtown Reno.
Many of the ranches are home to several horses and often to other livestock, including cattle, sheep or llamas. A major portion of the ranch property is devoted to irrigated pastures. Other sections of the property are used for stables, paddocks, riding areas, storage sheds, animal waste storage, and compost piles. Gardens and residential landscaping surround the house itself, as shown below.
In most cases, these small ranches are not connected to the city drinking water supply or the sanitary sewer system. This means they must rely on private domestic wells for their household water supply, and they must maintain a septic tank system for disposal of household wastewater from sinks and toilets. As noted above, irrigation of pastures and gardens is accomplished using ditch water. Water supplies are managed by an
irrigation water company which charges a yearly fee for ditch maintenance. Property owners must own ditch water rights in order to use this water.
Much time, effort and many resources are required to properly manage and maintain the animals, buildings and fields of a small ranch. Many residents have a landscape maintenance service or a gardener to help manage their property. Small ranchers should share the information in this manual with their gardener or maintenance service.
This manual will examine the various components of the ranch, and each chapter will give practical information about the best management practices for each component. By applying the techniques in this manual, residents will help safeguard their property value and maintain clean water for themselves, their neighbors, and the environment.
9

A Typical Small Ranch in Western Nevada
10
Chapter 3
PASTURE MANAGEMENT - MORE THAN MEETS THE EYE Commonly, the majority of the land on a small ranch is used for pasture. Pastures may appear to be uncomplicated, but keeping them healthy, productive, safe for animals, and non-polluting requires proper pasture management.
Good pasture management results in better weed control, improves and protects the soil, increases forage production, extends the life of pastures and encourages better animal health. It helps the soil absorb excess water and nutrients and protects local water quality by reducing the amount of runoff.
Overgrazing Pasturing too many animals on a parcel of land or allowing them to graze for too long in the same area causes loss of grass cover and compacts and exposes soils. This reduces water absorption capacity and crop recovery. This condition, known as overgrazing, is the main reason for pasture decline, and is a common problem on small farms. Overgrazing affects rooting depth and plant vigor, allows weeds to invade, and can actually result in death of pasture grasses.
Overgrazing encourages weed invasion. Winter annual weeds prevail in weak spring pastures mismanaged the summer before. Persistent perennial weeds may invade at any time, but are most prevalent in pastures that are continuously mistreated. They are most difficult to control and may require complete renovation and replanting of pastures.
Overgrazing can increase soil erosion and sedimentation as water flows over the soil surface, depositing sediment downstream. Erosion is the displacement of soil particles from your field. Once they are displaced, they may be carried along with moving water as sediment. Erosion removes valuable topsoil and sediments fill ditches, weirs, canals, rivers and dams, reducing their usefulness and affecting fish and animal habitat.
The two main causes of overgrazing are (1) overstocking, or keeping too many animals on a single pasture for a prolonged period, and (2) not allowing rest periods for forage regrowth. To avoid overstocking, respect the livestock carrying capacity of each pasture and do not exceed it. The maximum number of animals should not exceed the capacity of the pastures to regrow during each irrigation season. You will need about 1 1/2 acres per horse or cow for
the growing season. In order to maintain a good quality pasture, a ratio of 2 acres per animal is better. During the five month growing period from May 15 to Sept. 15, if there is adequate water, appropriately stocked and maintained pastures can provide nearly 100% of mature livestock nutritional needs, thus eliminating the need to purchase additional feed during that period. If you have more animals than the carrying capacity of the pasture, then sell some of the animals and/or remove some to a corral and feed them. Do not overstock pastures and supplement feed in the pasture. The pasture condition will still decline. It is better to rotate animals in and out of the feeding corral and keep the correct number in the pasture.
Western Nevada's growing season varies widely, and is very dependent on water supplies. Don't overuse your pasture early in the season simply because the water may be shut off by mid-summer or before. Plants grazed close to the soil surface (less than 2 inches tall) may die or have poor vigor the following year.
Specific guidelines for the carrying capacity or stocking rate for your soil type and pasture conditions are available through your Conservation District or Cooperative Extension office (See Fact Sheet 91-26).
Pasture Rotation Recovery periods without animal grazing are critical to proper pasture growth and longevity. A grazing rotation cycle that allows foliage 28 to 35 days of undisturbed regrowth between grazing periods is recommended. The regrowth requirements of some common forage plants are provided on the following page.
Caution: The smaller the pasture size, the greater the chance of plant damage and poor or no recovery from overgrazing, even when supplemental hay is provided. Your rotation schedule will depend on the season, weather conditions, soil type, forage condition, the number of pasture units available, the type of animal grazing the pasture, and most importantly, the number of animals per acre of
11
pasture. Do not exceed the carrying capacity of the whole pasture. The key indicator for rotation is the minimum stubble height. Check the table below for stubble heights for common forage plants.
Regrowth Requirements and Minimum Stubble Heights for Grazed Pasture
(from Natural Resources Conservation Service)
Regrowth
Period (days)
Minimum Stubble Height (inches)
smooth bromegrass
24 to 30 4
tall fescue 20 to 36 4 orchardgrass 20 to 36 3 timothy 28 to 36 3 intermediate wheatgrass
24 to 30 4
clover 20 to 26 2 to 3 alfalfa 28 to 40 2
If you put livestock on wet pastures, they will trample the soil and damage the plant's crown and roots, increasing erosion potential and decreasing your pasture's yield. To reduce risk of hoof problems and minimize soil compaction, you should avoid turning horses and other livestock out on wet ground by confining them in stalls or paddocks. In addition, schedule the exercise period (riding and training) each day just before turning horses into the pasture. This will reduce the incidence of playful running, which tramples forage and compacts soil.
What Is A Paddock?
A paddock (corral) is a small, non- irrigated, non-grazable holding pen or exercise lot, often adjacent to a horse's stall. It is used as a place to hold horses rather than as a source of pasture feed. This definition should not be confused with the use of "paddock" as a term referring to one division of a rangeland grazing unit.
A paddock is generally small, but should have at least 600 square feet per horse. Route irrigation water around the paddock to keep it dry. This protects animals from hoof disease and also minimizes nutrient contamination of your irrigation water. Locate the paddock where there is proper drainage, with only a mild 1 to 2 percent slope, which does not drain directly into a water body. Avoid low, frequently wet and muddy areas for good animal health, and never locate the paddock over any
part of the septic system, including the leach field. Paddocks placed to the south, west and east of structures dry out better than those to the north or those that are constantly in the shade. Provide suitable bedding materials such as wood shavings, sawdust, or straw. Make sure wood products are safe for use as bedding. Be sure to keep the paddock clean and dry to prevent hoof disease and internal parasite infection.
Other Tips To Preventing Overgrazing and Pasture Damage
• The ideal time to irrigate is during the regrowth period. Avoid unnecessary irrigation runoff. For further information see Chapter 4, "Getting the Most From Your Pasture Irrigation System".
• Mow the ungrazed, vegetated buffer areas, also called filter strips, which are adjacent to surface waters. (Described in Chapter 5) Avoid letting a mat of dead grasses form in buffer strip areas, since this provides ideal habitat for voles (meadow mice). Periodically mow the area 6 inches high and remove the cuttings. After dormancy begins in the fall or in the spring before greenup, if dead grasses have formed a mat, remove or burn the decaying matter, exposing the voles to natural predators. Be sure to follow all county burning ordinances. For more information on controlling voles, see Chapter 7; for information on burn permits, see Chapter 4.
PADDOCK DESIGN Use a 10” to 12” compacted gravel layer (pea gravel) with decomposed granite (DG) on top. For stalls, cover DG with 1” rubber matting. Maintain a 2% slope away from the shelter. Any drainage should go to a vegetated filter strip (see Rule 4, Chapter 5) and never directly into the water body. Advantages: • Keeps pen dry, which prevents hoof disease and
reduces parasite problems. • Directs urine and contaminated runoff to a filter
strip which prevents it from flowing directly into water bodies.
• DG on top of the gravel bed will serve as a cushion and help prevent foot sores and lameness.
12

Best Management Practice #1: Rotational Grazing
Crossfence pastures and rotate livestock among the smaller areas. This uses all of the pasture and allows the forage time to recover, which increases yields. Divide pasture acreage into at least four smaller pastures or paddocks (ungrazed holding areas) using temporary or permanent fencing. Rotate animals from one pasture to the next after forage is grazed down to three or four inches, so that pasture plants can recover from grazing. Do not exceed the carrying capacity of the whole pasture. Only return animals to a grazed pasture after the forage is six inches high and growing well. (See illustration below).
• Provide stock water in each pasture. Locate the water trough on a pad of decomposed granite. This minimizes damage to the pasture grasses, reduces soil erosion resulting from excessive traffic, and protects water quality.
• Place salt licks, shade structures and supple-mental feeding stations at the opposite end of the pasture from water supplies or wet ground to encourage even grazing and prevent erosion and damage to sensitive wet areas.
By dividing your main pasture into several units and grazing them in a rotation, you will increase yields, improve forage quality and protect water quality. Cross fence the field. Put animals in each pasture in sequence. Allow each pasture to recover and re-grow for four weeks before grazing again.
• Feed livestock hay when pastures dry up, are grazed to two inches in height, or when soils are saturated. Keep livestock off the pasture at these times. Buying and feeding hay until your forage is at least six inches high saves money in the long run. This practice protects your investment in your pasture plants and prevents the need to replant the pasture. Forage quality also improves, ensuring healthier animals.
• If your pasture acreage is small and the number of animals you have exceeds its carrying capacity, limit grazing to a short period each day. Feed with hay and other feed in a stall or paddock. Suburban area horse owners with limited acreage will often find that pasture grasses provide only a supplement to feeding hay rather than meeting the total nutritional needs of their livestock.
Pasture Maintenance Pastures can be grazed intensively during peak periods of growth, but need to receive regular attention. They require several weeks after being grazed for roots and shoots to recover and provide sufficient new forage for grazing.
• Mow pastures in late May or early June for annual weed control, before seed heads have a chance to form but after an initial grazing period has occurred. A second mowing may be needed in July or August if summer annual weeds are present. Mowing prior to a rest period will promote more uniform growth. Be sure to graze or mow before the weed seeds form; otherwise seeds will be distributed. See Chapter 11 for more information on weed control. Note: If your rotational grazing system is managed properly, you may not need to mow.
• Get your soil tested, and follow recommendations for appropriate amounts of fertilizer or other amendments. Your Conservation District representative or Cooperative Extension office can help you with information on soil testing, application rates, and appropriate application schedules.
• Drag pastures several times a year to break up and evenly distribute manure. This also promotes uniform grazing. Harrowing prior to the rest period will increase the absorption of nutrients and water into the soil.
• Restrict animal access to rivers, seasonal creeks, marshy areas, ditch banks and ponds. Protecting
13

the creekside vegetation or riparian zone is important to maintaining water quality. When animals have unlimited access to ditches, they can trample the edges, increase soil erosion, harm water quality, and increase maintenance.
Windbreaks
Windbreaks, such as those provided by a row of evergreen trees planted along the length of a fence, help decrease wind across the field, minimizing the drying effect and thus the amount of irrigation water needed. They also provide shade and shelter for livestock, decreasing their nutrient requirements. A drip system can be used to get the trees established, and then ditch water may provide sufficient moisture for the more mature trees. Some type of additional fence, such as a hot wire, is needed to protect young trees from livestock. If the windbreak is located along a ditch, this fence would also help to keep the ditch from being trampled by cattle, which saves you time and effort.
Pasture Renovation (starting over)
If you have an overgrazed pasture, and if damage is severe, if perennial weeds have taken over, or if the forage yield is low, renovate your pasture by tilling and preparing the soil, controlling weeds and reseeding with an appropriate grass mixture. Remove all livestock from the pasture for at least a year to allow new grasses to become well established. If you have divided your pasture into a series of grazing units, they can be renovated sequentially, reseeding one unit every one or two years.
Ideally, pasture renovation entails plowing and growing an alternate annual crop, such as wheat, barley, oats or annual rye grass, before reseeding with a pasture mix. If an alternate crop is not possible, discing and reseeding will improve the plantings. If the sod is dense, a power tiller can be used to cut out the sod and work it into the soil prior to seeding. When perennial weeds are the problem rather than the grasses, spray the pasture with the herbicide Roundupâ (glyphosate) 10 to 14 days before you plow it. This kills the root systems of perennial weeds and reduces competition during seed germination.
When renovating pastures, to avoid tearing them up entirely, one alternative is to use a seed drill. Seed drills insert seeds directly into the soil, bypassing the sod layer. Alternatively, bands of herbicides such as Roundupâ or 2,4-D can be sprayed over the field before broadcast reseeding
(casting the seed on the ground by hand, or with a seed spreader). Roundupâ will kill all vegetation, including desirable pasture plants. 2,4-D is a selective broadleaf weed killer which may be used in grass pastures before reseeding. RoundupÒ has some residual activity, so you must wait the appropriate interval as detailed on the package before reseeding. In all cases, explicitly follow the instructions on the product label. Doing so eliminates pesticide contamination of water bodies. For additional information on the appropriate use of pesticides, contact Cooperative Extension and see Chapter 11.
More About Reseeding
Before seeding, it is essential to learn something about your soils. Soils should have at least 20 inches of usable depth for best production of improved irrigated forages. Soils less than 10 inches deep may require irrigating too frequently for effective use, especially if water supplies are restricted. You can tell something about your soil depth by digging a pit about two feet deep. Is there evidence of a clay layer? Is there a zone of gravel and rocks? Either of these may determine how and what you plant.
Where layers exist, deep ripping to 18 to 24 inches is recommended. This reduces compaction and improves root penetration and movement of soil moisture. Other soil information can be obtained from the Natural Resources Conservation Service's Survey of Washoe County Soils.
If you have determined that reseeding is necessary, collect a soil sample for nutritional analysis. Commercial agricultural soil testing laboratories will analyze the soil and make fertilizer and amendment recommendations based upon their findings. The cost usually runs from $35 to $50. Contact Cooperative Extension for a list of certified soil testing laboratories. Extension Educators and Natural Resources Conservation Service personnel can help you interpret the analysis should you have questions about it.
Soil texture tells you the proportion of sand, silt and clay in your soil. A good balance of the three, called "loamy" soil, provides optimal growing conditions. If your soil is high in sand or clay, add organic matter. Several inches of compost or manure can be spread over the fields and tilled into the soil. A green manure crop also adds much organic matter to the soil when worked in. Other amendments may also be needed. Contact a Cooperative Extension office for further help with your soil.
14
Another consideration prior to reseeding is the outlook for the year's water supply. If you reseed, but the irrigation season is limited in duration, the new growth may not survive the dry season and you may be left with bare, erodible fields. Estimates of the length of the irrigation season may be obtained from the Federal Watermaster's office by April 15
each year. You can make some estimates of your own by monitoring the winter snowpack. An ample snowpack by February suggests a good irrigation season. Likewise, if Lake Tahoe is full, it can provide flow to the Truckee River, and potentially to the irrigation ditches, during the summer months.
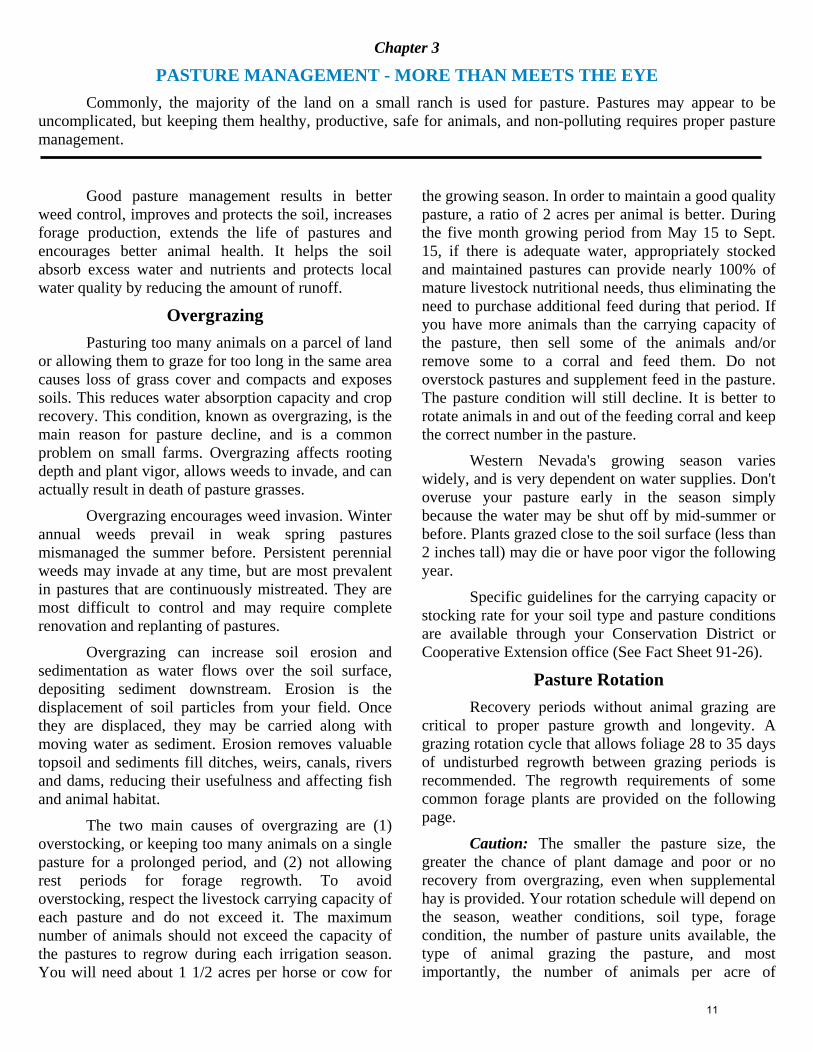
Soil disc
Spring-toothed harrow
No-till seed drill
Chisel (for ripping)
Pasture Maintenance Tools
15
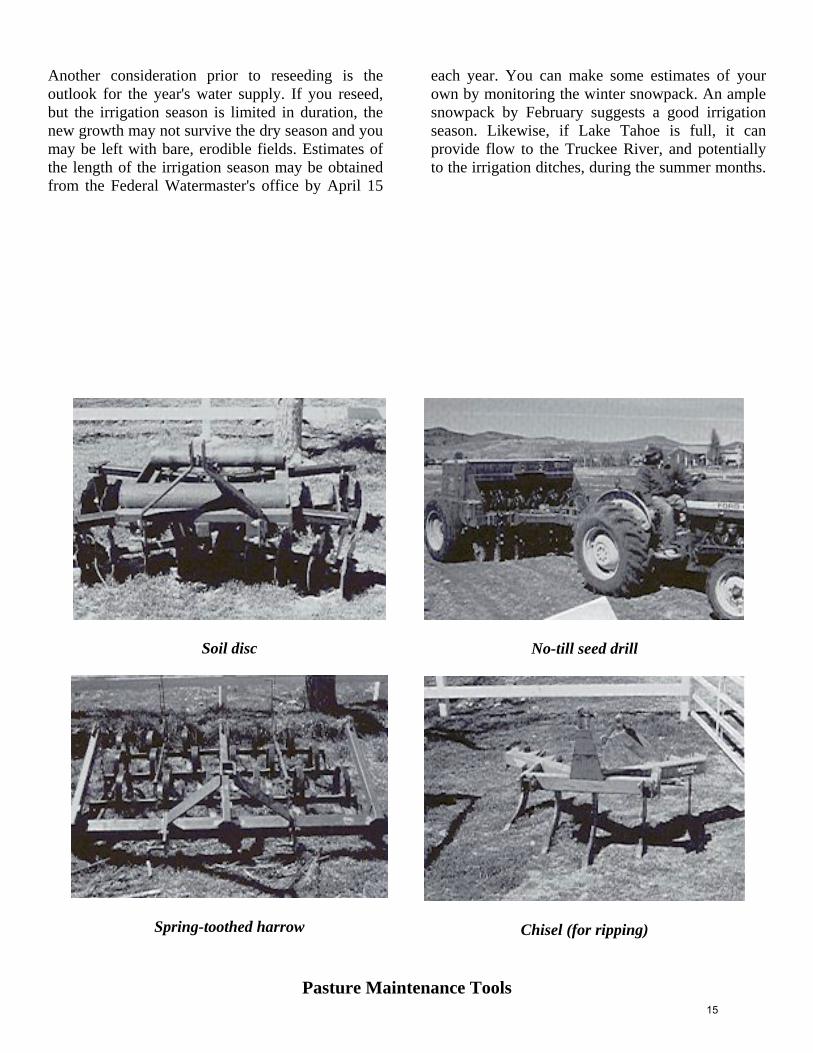
Before: Drought and neglect by former owners resulted in a pasture
filled with weeds and few valuable grasses.
After: Renovation of the pasture included weed control, soil preparation and fertilization,
drill seeding, efficient irrigation and exclusion of livestock for one year.
16

Pasture Forage Mixtures for Western Nevada
Traditional Flood Irrigated Pasture Less Frequently Irrigated Pasture
45% Potomac Orchardgrass 20% Crested Wheatgrass 20% Smooth Bromegrass 20% Fawn Tall Fescue 15% Fawn Tall Fescue 15% Manchar Smooth Brome 15% Perennial Ryegrass 15% Paiute Orchardgrass 5% Timothy Grass 15% Oahe Intermediate Wheatgrass OR 10% Western Wheatgrass 80% Fawn Tall Fescue 5% Ladak Alfalfa 20% Ladino Clover
Dryland Pasture Mixture Dryland Pasture Mixture (Establishment and infrequent additional moisture) (Establishment and no additional moisture) 40% Oahe Intermediate Wheatgrass 40% Crested Wheatgrass 30% Crested Wheatgrass 30% Critana Thickspike Wheatgrass 25% Smooth Bromegrass 30% Russian Wildrye 5% Perennial Ryegrass Note: These mixtures are provided for illustrative purposes only. The mixture you use will depend upon your soil type, water availability, animal species and personal preferences. Local seed dealers can provide an appropriate mixture to your specifications.
Pasture Plant Selection If the water forecast is favorable, you then must determine the best mixture of seeds to use in your pasture. This will depend upon the soil type and depth, the type of livestock you intend to maintain, and other considerations related to longevity, species drought tolerance, and compatibility of the planting mixture. Cooperative Extension publications BE-91-02, Irrigated Forages for Western Nevada-Type Climate, and Fact Sheet 88-1, Grasses for Irrigated Pasture and Hay Meadows in Nevada contain information about all these factors. Three main considerations should guide you in choosing a seed mixture: good productivity and palatability; a mixture of grasses and legumes; and an absence of weed seeds. Buy only certified seed to avoid weeds. Other factors include fertilization needs, soil and water conditions and groundwater fluctuations. A successful pasture mix often consists of four parts of one grass species to one part of a legume species. Legumes are plants which add nitrogen to the soil, thus decreasing the need for fertilizers. Common legumes include alfalfa and clovers. Avoid straight legumes in pastures. They may cause cattle and sheep to bloat. Grass pastures are best for horses, to eliminate digestive problems.
For cattle, popular mixtures may include bluegrass, orchardgrass and bromegrass. Fescues, ryegrass and brome or orchardgrass are recommended in seed mixtures for horses. Fescues are hardy and somewhat drought tolerant, but they get very tall and sometimes become rank or “wolfy”, so that many animals won’t eat them. If you have fescue in your pasture, you can mow it to encourage tender growth, or divide the field into separate pastures and rotate livestock, for better utilization of the less palatable plants. When using fescues, make sure you get endophyte-free seed to avoid animal toxicity. Sudan grass can cause bladder infections in horses and is not recommended. Other pasture mixtures are presented in the table above.
Once you have chosen your seed mixture, decide what area to renovate. It is best to work on only one pasture each year, since the livestock must be excluded for a minimum of 12 months. In January or February, if there has been some rain or snow, plow and level the field. If the forecast for water delivery looks good, in the spring, prior to water arrival, prepare the field with a spring-tooth or spike-tooth harrow. In the week prior to water arrival, broadcast seed and drag the field. The amount of seed you apply will depend upon your soil type and
17

seed mixture. Apply irrigation water slowly and carefully to avoid erosion until grasses are established. Continue watering during the irrigation season and mow as high as possible, only enough to remove weed seed heads. Planting in the winter months can also be very successful, particularly if the early winter snowfall through mid-January is normal or above normal. Some grass seeds are established best when they are exposed to winter freezing. However, this type of “dormant” seeding must be timed so seeds don’t sprout during freezing winter months. Spot seeding of smaller, bare areas can be done in the fall or winter using a whirlybird-type applicator to broadcast the seeds. After sowing, rake the area to ensure good contact between the seeds and soil. Small spots may be sprinkler irrigated even if the irrigation season turns out to be short.
Winter Grazing Tips
• Allow grasses to regrow to 6 inches tall before
the autumn frosts by removing livestock in mid to late September. Continue to irrigate pastures if water is available. Maintaining strong healthy plants, adequate soil fertility, and encouraging
seasonal dormancy are the best means of reducing pasture winter-kill.
• Restrict pasture use by animals to short daily
periods (1 to 2 hours) when plants are dormant. Use your ungrazed paddock to contain animals during the winter season. This practice keeps animals from destroying pastures and confines animal waste to a small area so that it can be managed properly.
• Restrict pasture use when soils are wet. Keep
animals off saturated pasture during winter rainy periods, avoiding even daily use. Pastures cannot survive continuous grazing and trampling in winter, especially when they are saturated with water. Hooves displace soil and cut plant crowns and roots, sometimes killing them.
• Let plant cover become established in spring
before turning out horses. Let the grasses re-grow to a 6 to 8 inch height for long term irrigated cover, or 4 to 6 inches for dryland annual pasture.
• If a pasture is often used for exercising horses,
consider cultivating a low growing, sod-forming ground cover that will recover more rapidly from the impact of their hooves.
18

Chapter 4
GETTING THE MOST FROM YOUR PASTURE IRRIGATION SYSTEM
Many small ranches in the Dry Creek area use irrigation water conveyed from the Truckee River by ditches. Irrigation ditch water is supplied to property owners who own water rights. A ditch company supplies water to the main lateral ditches, which carry water from Steamboat, Last Chance or Lake Ditch to a small group of individual ranches. It is up to each resident to make efficient use of his or her water during the hours it is delivered to the property. In addition, all residents served by a given lateral should cooperate to determine an appropriate schedule to serve all the properties on the lateral ditch. Scheduling is the responsibility of the landowners and is not determined by the ditch companies. Neighbors should also work together to ensure that necessary ditch cleaning and maintenance is performed each year on smaller lateral delivery ditches. As noted in the previous chapter, western Nevada ranchers who rely on irrigation water are sometimes limited in their water use due to drought conditions which reduce the supply. Because of the uncertainty of the ditch water supply, efficient irrigation water management is of utmost importance to those who wish to maintain productive, attractive pastures. Incidentally, domestic wells may not be used for pasture irrigation. This is important because excessive pumping of domestic wells can lower the local water table, causing nearby wells to go dry. In fact, total use of private domestic wells is limited by the State to a maximum of 1800 gallons per day. Domestic use is defined by law as the use of water inside the home, plus supplying water to domestic animals (pets) and the ornamental landscape.
Best Management Practice #2: Irrigation Water Management (IWM)
This is a flexible strategy to be adapted by each pasture manager to suit the particular soil, slope, aspect and vegetation conditions of the property. The purpose of IWM is to thoroughly wet the root zone of the whole pasture each time water is delivered and to prevent over-watering which: a) leaches nutrients and pesticides below the root
zone which pollutes groundwater, b) can cause surface water runoff and soil erosion,
polluting waters downstream c) can cause fungus or root disease in pasture
grasses and our precious water resource. This BMP is achieved by maintaining a water-delivery system, using slide gates, valves, and gated pipe or other structures which allow the rancher to control the amount and timing of water delivery.
Proper irrigation management is not only desirable for livestock and pastures, but essential for the water quality of the neighborhood creek as well. By applying the correct amount of water at the optimal rate, small ranch owners can thoroughly soak the root zone of their pasture grasses without causing ponding, runoff or soil erosion. Likewise, land nutrients will be delivered to the grasses, not leached into groundwater nor carried downstream by surface water runoff.
Flood Irrigation
While there are many different ways to irrigate pastures, the typical small ranch in the Reno area uses flood irrigation to deliver irrigation water to pastures. The practice of surface irrigation is thousands of years old and is very little changed today. The water is distributed to a corner of each pasture through a network of small ditches and gates, with water flowing downslope with the pull of gravity and confined within areas bordered by low soil berms, as seen in the diagram below. If water is allowed to flow unimpeded over the land surface without the use of furrows, borders or other structures, it is called wild-flood irrigation. Border irrigation allows better control of the flow of water over gentle slopes (1 to 2% grade) than wild-flood irrigation. In this variation of flood irrigation, 15 to 18-inch tall soil berms, thrown up with a plow or disc, are used to keep irrigation water in a given portion of the pasture. Water is delivered to the top of a bordered area and is allowed to flow downhill to wet the entire area. The spacing of the border varies with the soil type. In a sandy soil, the borders must be fairly close together, but they may be spaced further apart in soils which have more clay. Furrows parallel to the borders can be useful in directing water, especially on sloping ground. If the pasture slopes more than 2% or has varying slope, borders placed along the contour of the slope will help ensure more even water distribution.
19

Typical irrigation system components
Furrows are shallow, parallel channels which can improve the efficiency of flood irrigation
down the length of a pasture.
A concrete check structure with slide gates allows control of irrigation flows and minimizes maintenance requirements.
20

If the terrain is very flat, with virtually no slope, basin irrigation may be used. A soil berm is constructed around the entire area to be irrigated, and the soil overall is flooded with several inches of water. No runoff occurs since the flow is confined by borders. Often a system of slide gates is used to split the flow and control the volume and rate of delivery of the irrigation water at the head of the pasture. Slide gates may be used with wild-flood, border, or basin irrigation. The goal is to apply enough water over the entire pasture to uniformly wet the soil to the depth of the root zone, without excess runoff, soil erosion, or leaching to groundwater. A concrete-lined ditch with sturdy slide gates can be constructed to minimize maintenance chores and loss to seepage. A design for a concrete check structure is shown in the photograph above. Lining of the ditches is expensive, but yearly maintenance is reduced, less water is lost to seepage and these structures last many years. Concrete lining should only be used in areas with suitable, stable soils. Do not use them where soils expand and shrink when wetted. Livestock should be fenced away from concrete-lined ditches for their safety. Using pipes to deliver water, where practical, helps minimize erosion, seepage, and evaporative loss, and decreases the need for maintenance. All pipes should include clean-out valves to allow the flushing of sediments from the lines. For more control over the delivery of water, gated pipe may be used. This plastic or aluminum
pipe has many small gates, or individual adjustable openings, spaced 18 to 24 inches apart (see the picture on the next page). The gates are initially closed to allow the pipe to fill with water. The gates can then be opened individually to allow the precise amount of water to flow on a given area of pasture. A more sophisticated form of gated pipe, called cablegation, allows automation of the process, but is very expensive. Many other flood irrigation delivery systems are also available. Small ditches can be used to distribute water to each section of each pasture. Parallel furrows or corrugations in the field on 3 to 4 foot centers help spread the water across the entire pasture more evenly. If your delivery system does not work well, you can contact the Washoe-Storey Conservation District. They may be able to help you design a more efficient delivery system. Private consultants and businesses are also available which can design and implement irrigation systems.
Is The Pasture Level? Traditional flood irrigation systems depend upon gravity to move the water across a gently sloping field. When a field has high and low spots, it is much more difficult to deliver irrigation water evenly. During the irrigation water season, you will be able to observe the location of high and low spots on your pasture. You may even be able to move soil from the high spots and use it to fill in the low spots. Of course, you will then need to reseed these areas. If the field is large or there are many uneven areas, you will want to use equipment such as spreaders or graders to help level the pasture. A small amount of
The many small, adjustable openings on this gated pipe allow precise application of water to pastures.
21

slope is needed (no more than 2%) to ensure water will continue to flow across the field. Tilling and grading by eye, using field stakes, may be sufficient to level a pasture if the operator is experienced. From year to year, there will continue to be some variation in the soil surface as loose soil settles, or irrigation water erodes soils. Annual spot leveling is important to properly direct water flows. One high-tech way to level or grade your field is to use laser-controlled leveling equipment during establishment and/or renovation. If the pasture is difficult to irrigate, this may be a reason to renovate it. Laser leveling provides a very accurately smoothed and graded field. This allows for ideal control of water distribution, which wastes less water. Prior to leveling, a field design must be determined, with adequate slope. Discing or plowing precedes leveling. Laser leveling is expensive, but a good value. It improves irrigation efficiency and reduces the potential for nutrient and erosion pollution through better irrigation and runoff control. As with all renovation, the cost of reseeding, the loss of production, and possible feed costs must be considered, since all livestock must be removed from the pasture for at least 12 months. Smoothing and leveling to a given slope is important not only to ensure good irrigation water delivery, but also for good animal health and quality forage production. Water should not stand on a pasture more than 24 hours. Persistent ponding invites mosquito breeding, and saturation of the soil will starve the root system of oxygen and encourage the growth of undesirable plants, such as wire or water grass (rushes). Adequate drainage as provided by leveling is essential.
Alternatives To Flood Irrigation
Most people are aware that drip irrigation systems efficiently distribute water to trees, shrubs, and planters with very little waste. Drip irrigation may not be the best choice for pastures however, since it would probably not survive livestock grazing and would require a vast amount of equipment. One alternative to flood irrigation that many people are trying on their pastures is a sprinkler system. Sprinkler irrigation, also called overhead irrigation, is useful on either level or hilly pastures. Permanent and portable sprinkler systems are available. Both may be adapted to draw water from a ditch or farm pond supplied by the ditch. Both are expensive. If tailwater (the water which drains off your fields) is collected in a pond, it can be reapplied through a sprinkler system. This also increases
efficiency and benefits water quality, since tailwater, also called “irrigation runoff” or “irrigation return flows”, may reduce water quality if returned to a creek or an irrigation ditch. These types of ponds are discussed at the end of Chapter 5. Because of water right concerns, it is legal to collect water into such ponds only during your allotted irrigation hours. A typical sprinkler irrigation system is shown on the next page. These systems are designed to deliver water to the field without depending on the soil surface for water conveyance or distribution. Sprinkler irrigation systems should be designed to apply water to the soil at an application rate that does not exceed the ability of the soil to soak up , or absorb the water (the infiltration rate). Sprinkler systems are thus useful in preventing runoff as well as in irrigating shallow and sloping soils, or even rough terrain which would be difficult or impossible to irrigate efficiently with a flood system. They are strongly recommended for pastures which have greater than a 2% slope. Sprinkler irrigation systems require little or no surface grading but are more expensive initially than border or flood irrigation systems, except where extensive land leveling has been involved. Although portable systems (automatic rolling wheel lines or aluminum pipe hand lines) are available, solid-set (permanently installed) sprinkler systems are more convenient because they require less operator time and labor. In either case, head to head coverage with matched nozzles is required for uniform coverage. Sprinklers are difficult to manage in areas of strong wind. Low angle nozzles are recommended where winds greater than 5 mph are common during times when the sprinklers are running. To avoid excessive losses to evaporation and drift, the best time to use sprinklers in western Nevada is early morning, when winds are calm. Sprinkler systems require regular maintenance, including unclogging of fittings and draining all lines each winter. Sprinkler systems may require protective barriers to prevent damage by livestock or to prevent horse injury. You can encircle exposed sprinkler pipes with a chicken wire cage and fill the cage with rocks to prevent damage by livestock. Some owners use old tires for this purpose or otherwise fence the sprinkler heads. Alternatively, some solid-set systems can be designed with sprinkler heads on removable risers with a coupler system to allow ease of mowing and head maintenance. Delivery pipes should be buried 6 to 8 inches as well. Care must be used when mowing or haying fields with exposed sprinkler
22

A sprinkler irrigation system allows precise applicationof water with little runoff even on sloping surfaces. To reduce maintenance chores, bury pipes in trenches
6 to 8 inches deep, and encase sprinkler heads in protective cages.
When using irrigation ditch water for sprinkler or drip irrigation, a water desilting box and trash screen is important to prevent clossing of the irrigation system.
23

heads to avoid damaging the sprinklers or other equipment. Sediment in the water supply wears out and plugs nozzles of sprinklers. It may fill lateral lines too. Control sediments by placing a desilting box and trash screen in the main ditch control structure on your property, as shown in the diagram on the next page. Encase the intake end of the pump supply line in a screen as well toreduce wear and plugging. Such boxes and screens require periodic cleaning and maintenance. The sediment-free water can then be applied through a sprinkler system to every corner of your property. Alternatively, a screen placed in the delivery pipe can be used to remove solids. Daily removal and cleaning of the screens is essential. Before installing or purchasing sprinkler irrigation equipment, you must design the system to ensure even distribution of water and constant pressure. See a local irrigation supplier for more information on proper design. If the design is not adequate, the system will fail.
How To Tell When The Soil Is Wet Enough
Do not assume that if a little water is good, then more is always better. In irrigation, just enough is best, which means applying a controlled quantity of water sufficient to meet the requirements of the plants and to prevent accumulation of salts. Too little water decreases the pasture quality and may affect the balance between weeds and desirable forage crops, but too much water will also harm your pasture. Excessive irrigation of the land impedes soil aeration, leaches nutrients, induces greater evaporation and can even raise water tables so close to the soil surface that forage grasses can’t grow and undesirable weed species will take over. Too much water also may carry nutrients into the groundwater and affect the water quality of nearby domestic wells. When livestock are continually kept on wet fields, they may develop fungal infections of their hooves. Although you receive a given amount of water you should not apply it in excess of soil and plant needs! Monitoring the soil moisture content is the traditional method of determining when and how much to irrigate. The idea is to observe the moisture reserve of the root zone as it gradually decreases following each irrigation. This will allow you to determine when that reserve has been used up to some minimum allowable level. This determines the timing of irrigation, as well as the volume needed to replenish soil moisture of the root zone to its “full” level.
Adequate soil moisture for plant growth should be maintained throughout the entire rooting zone of the plants in the pasture. This requires deep, infrequent irrigations. Water must be available to keep both shallow-rooted and deeper-rooted plants such as alfalfa growing vigorously. Grasses typically extract water to about an 18-inch depth. If too little water or too much water is applied, plant roots will be affected These root systems will grow near the soil surface and will not be able to access nutrients deeper in the soil. This weakens the plants. The amount of water to apply depends not only on the type of forage in the pasture, but also on the type of soil and the frequency of delivery. Sandy soils have low water-holding capacities and therefore require more frequent irrigation. Loam soils generally have water-holding capacities intermediate to sandy and clay soils. To determine what type of soil you have, you can first consult the Soil Survey of Washoe County, South Part (USDA-NRCS). Information is provided on soil types, characteristics, and limitations. To get more specific information on your soils, you need to send a soil sample to a commercial agricultural soil testing laboratory for analysis. The laboratory can also determine the amount and type of fertilizers needed. Not all moisture in the soil is available to plants. As water is lost from the soil as it dries, less and less water is available for plants to take up. At some point, plants absorb less water than they need, and they begin to wilt. To prevent plant stress, it is best to irrigate just before the soil reaches this level of dryness. Slight stress for a short period will not permanently damage the crop, but production may suffer. Climate, wind, heat, season, type of forage, pasture use, stage of growth, precipitation, etc. all affect the timing of irrigation. Use good judgment in applying the water. Once the irrigation water season is over, however, you no longer have a choice. Plants will then go dormant in wait for the next rainy or irrigation season. Hopefully, water will be available season-long and the plants can go dormant naturally with the onset of shorter days and colder temperatures. If water is available in late October or early November, apply it to help the pasture survive the normally dry winter in northern Nevada. Soil moisture can be determined using augers or other tools which extract a core of soil from the pasture 1 to 2-feet deep. When you pull out a plug, the soil should be moist throughout but not dripping wet. Light soils, sandy and loamy soils will not hold together once you open your hand after squeezing them in your palm if they are dry. Dry silts and clays
24
property. An acre foot of water will cover an acre of land one foot deep in water. This volume of water is the water right for the land. Legally you may not claim more, and many years the total allotment may not be available due to drought or other shortage.
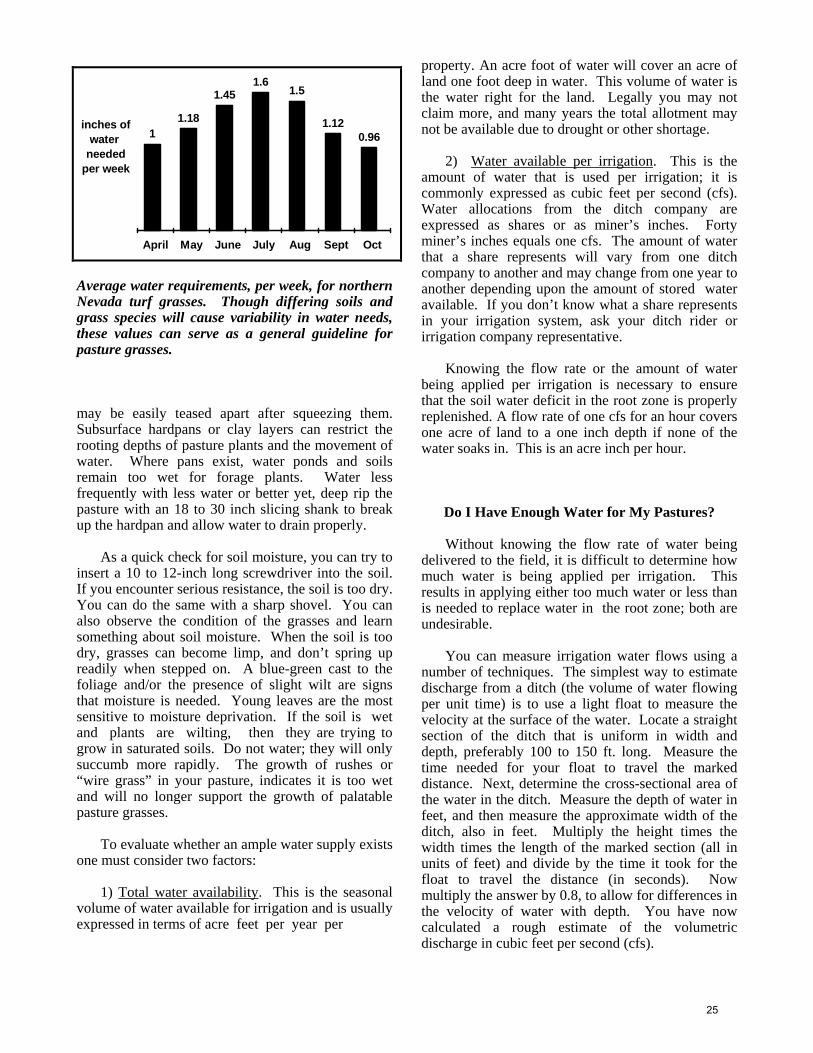
inches ofwater
neededper week
April May June July Aug Sept Oct
11.18
1.451.6
1.5
1.120.96
2) Water available per irrigation. This is the amount of water that is used per irrigation; it is commonly expressed as cubic feet per second (cfs). Water allocations from the ditch company are expressed as shares or as miner’s inches. Forty miner’s inches equals one cfs. The amount of water that a share represents will vary from one ditch company to another and may change from one year to another depending upon the amount of stored water available. If you don’t know what a share represents in your irrigation system, ask your ditch rider or irrigation company representative.
Average water requirements, per week, for northern Nevada turf grasses. Though differing soils and grass species will cause variability in water needs, these values can serve as a general guideline for pasture grasses. Knowing the flow rate or the amount of water
being applied per irrigation is necessary to ensure that the soil water deficit in the root zone is properly replenished. A flow rate of one cfs for an hour covers one acre of land to a one inch depth if none of the water soaks in. This is an acre inch per hour.
may be easily teased apart after squeezing them. Subsurface hardpans or clay layers can restrict the rooting depths of pasture plants and the movement of water. Where pans exist, water ponds and soils remain too wet for forage plants. Water less frequently with less water or better yet, deep rip the pasture with an 18 to 30 inch slicing shank to break up the hardpan and allow water to drain properly.
Do I Have Enough Water for My Pastures?
Without knowing the flow rate of water being delivered to the field, it is difficult to determine how much water is being applied per irrigation. This results in applying either too much water or less than is needed to replace water in the root zone; both are undesirable.
As a quick check for soil moisture, you can try to insert a 10 to 12-inch long screwdriver into the soil. If you encounter serious resistance, the soil is too dry. You can do the same with a sharp shovel. You can also observe the condition of the grasses and learn something about soil moisture. When the soil is too dry, grasses can become limp, and don’t spring up readily when stepped on. A blue-green cast to the foliage and/or the presence of slight wilt are signs that moisture is needed. Young leaves are the most sensitive to moisture deprivation. If the soil is wet and plants are wilting, then they are trying to grow in saturated soils. Do not water; they will only succumb more rapidly. The growth of rushes or “wire grass” in your pasture, indicates it is too wet and will no longer support the growth of palatable pasture grasses.
You can measure irrigation water flows using a number of techniques. The simplest way to estimate discharge from a ditch (the volume of water flowing per unit time) is to use a light float to measure the velocity at the surface of the water. Locate a straight section of the ditch that is uniform in width and depth, preferably 100 to 150 ft. long. Measure the time needed for your float to travel the marked distance. Next, determine the cross-sectional area of the water in the ditch. Measure the depth of water in feet, and then measure the approximate width of the ditch, also in feet. Multiply the height times the width times the length of the marked section (all in units of feet) and divide by the time it took for the float to travel the distance (in seconds). Now multiply the answer by 0.8, to allow for differences in the velocity of water with depth. You have now calculated a rough estimate of the volumetric discharge in cubic feet per second (cfs).
To evaluate whether an ample water supply exists one must consider two factors: 1) Total water availability. This is the seasonal volume of water available for irrigation and is usually expressed in terms of acre feet per year per
25

CALCULATING DITCH FLOW RATE:
For example, a rancher measures a 100 ft. long stretch of a ditch. It takes 50 seconds for the float to travel this distance. The depth of water is 6 inches (0.5 feet). The width of the ditch is 15 inches (1.25 feet). The volumetric discharge is calculated as
(0.5 ft x 1.25 ft x 100 ft) ÷ 50 seconds
x 0.8 = 1.0 cfs
A number of structures are commonly used to measure flow in open water bodies, including weirs and flumes (see the figure below). These structures are available from irrigation supply companies, whose employees can give you tips on installing the devices and calculating the flow. These structures are expensive and must be precisely installed or the measurements will be inaccurate. It may not be possible to reliably determine a standard flow of water to your property. In this case, it will become doubly important to test your soil for adequate moisture or wetness on a regular basis. This way, you will learn how much water to apply to a given area and how often during each season. Knowing how much water is available for irrigation and the water requirements of the crop being grown is a good starting point to becoming an efficient irrigator. Learning the best way to irrigate a field requires a lot of trial and error as well as a lot of time. It is important to study and observe the
effectiveness of an irrigation, and make adjustments based on results. Eventually, you will develop a system compatible with your situation.
Routine Irrigation System Maintenance Routine maintenance of the delivery system involves the control of weeds and other vegetation in your ditches, as well as maintaining the shape and capacity of the ditches and removing trash and debris. One way to accomplish weed and brush control is to burn the vegetation in the ditches in early spring (see box on next page). During the irrigation season, it may be necessary to mow vegetation in ditches to accommodate flow. Mowing also discourages voles (meadow mice) from setting up housekeeping in your pastures. Livestock are very hard on ditches. Their hooves disturb the soil on the sides of the ditch, resulting in erosion and increased ditch width. This results in more erosion, disturbance to the vegetation, and more maintenance, as well as sediment pollution downstream. Run a fence or hot wire along the ditch to exclude livestock. This reduces ditch management and improves the quality of the water, especially if the animals defecate and urinate in the ditch. Never dump anything into irrigation ditches or streams. Be a good neighbor. Remember, downstream users depend on your good ditch management practices to preserve water quality. Ditches have been used in the past as disposal sites for landscape clippings, garbage and dead animals, all of which have a detrimental effect on water quality.
Water-measuring devices (other types include weirs) from Hillel, 1987
26
Spring Ditch Cleaning (March & April)
• A burn permit is required for burning excess
vegetation inside the ditch. Permitted burning is only allowed from 6 a.m. to noon on legal burn days. The spring burn season generally begins in March and the fall season in October. Contact your local county fire department for more information on burning and to obtain permits. It is important to have a shovel and water available when burning.
• Clean the ditch once a year, at and below the
water line, to remove debris before the water is turned on. Keep it clean during the season.
• Restore the designed shape and capacity of each
ditch by removing sediments or vegetation from within the ditch itself. Vegetation on ditch banks is useful for holding soil in place.
• Avoid the use of chemicals for vegetation
control. Never use soil sterilants in ditches or on ditch banks.
Preventing Erosion When Irrigating To maintain the quality of your pasture grasses and avoid erosion, livestock should be excluded from the pasture during irrigation and until the soil surface dries. Wet soils are compacted by trampling, thus retarding root growth and water infiltration. This is a major source of pasture abuse that is easily avoided by moving animals to a paddock or a dry pasture during and shortly after irrigation. The damage to grasses and their root systems from trampling also increases erosion potential. As is often the case, the best practice (excluding livestock from wet pastures) is good for the animal, the forage, and for water quality. You should also periodically observe irrigation of sloping areas to be sure water is not running downslope in small channels (rills) or larger gullies, both of which are agents of erosion. If this occurs, you may need to re-design the irrigation sytem in that area. Special care, such as hand watering, may be necessary on slopes that have been recently reseeded. Another good practice is to place coarse material such as gravel or decomposed granite (DG) around high traffic areas such as fence gates and water troughs. If a minor delivery ditch passes through a horse chute or walkway, bury it in a pipe under a gravel or DG path. Other important erosion control practices are described in Chapters 5 and 6.
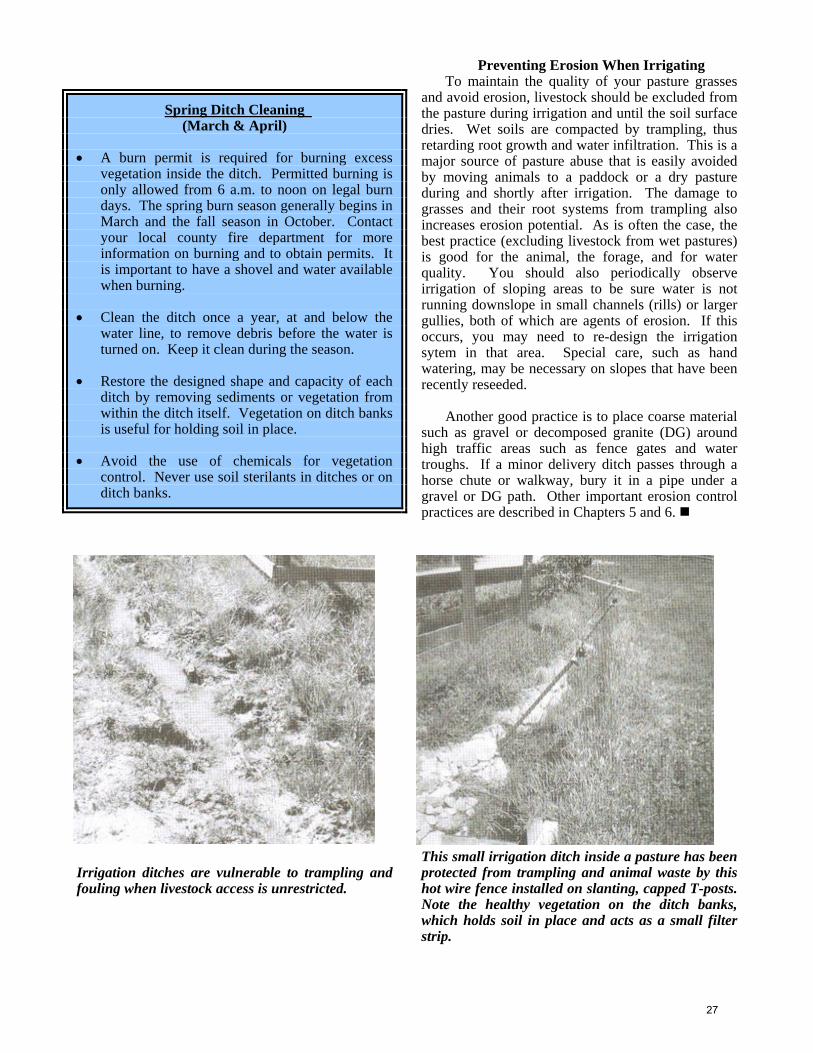
Irrigation ditches are vulnerable to trampling and fouling when livestock access is unrestricted.
This small irrigation ditch inside a pasture has been protected from trampling and animal waste by this hot wire fence installed on slanting, capped T-posts. Note the healthy vegetation on the ditch banks, which holds soil in place and acts as a small filter strip.
27

28

Chapter 5
MANAGING CREEKS, PONDS, AND WET AREAS TO PROTECT WATER QUALITY
While every chapter in this book contains information on protecting water quality, this chapter focuses specifically on the management of surface water bodies: creeks, ponds and wet areas, to prevent water pollution. Our main goal is to keep these areas as natural and non-polluting as possible by protecting them from adverse impacts from disturbance, construction or contamination. When maintained in their natural state, these areas provide many benefits, including wildlife habitat, flood control, nutrient uptake, and erosion control. These areas need to be protected even during dry periods. If they are not, our occasional heavy rains will wash accumulated pollutants downstream where they can impair fish and wildlife habitat as far as Pyramid Lake. How to Protect Wet Areas: Some General Rules
Whether you have a creek, a pond, or a wetland on your property, certain practices can be universally beneficial in safeguarding water quality. Note: These practices also apply to irrigation ditches, which are covered in more detail in Chapter 4. Rule #1: Maintain vegetation along streambanks and around other water bodies. Trees, shrubs, and other herbaceous perennial plants along streambanks provide shade to keep water cool. Warm water is detrimental to fish and promotes rapid growth of pond weeds and algae. Plants provide cover, food, and sediment-free spawning grounds for fish and other aquatic life. Wildlife of all sizes also need trees and brush for cover and food. Vegetation may protect streambanks from erosion and filters pollutants out of stormwater before they reach the stream. Every water body is important and should be properly protected and managed. Many seemingly insignificant dry washes, creeks, seeps, and springs have an essential role in maintaining the quality of downstream waters. Rule #2: Fence off or otherwise control livestock access to streambanks, ponds, and wetlands to protect them from overgrazing and trampling. While some riparian areas can tolerate carefully managed periods of grazing, none of these areas should be available to livestock on a continuing basis.
Fencing keeps livestock from degrading the natural bank system of trees and undergrowth along streams and edges of ponds. Vegetation prevents erosion, provides food and shelter for fish and wildlife. It also prevents sediment-laden runoff and filters contaminants from water moving through the area. Fencing also prevents livestock from entering the stream and depositing manure and wastes directly into the water. Note: All fences must be maintained. Damaged fences can trap and hold livestock, causing injury or death. Rule #3: Establish livestock water troughs, feeding stations, shade, and salt licks away from wet areas or slopes and roads that lead to water bodies. Locating feeding and watering areas away from stream courses will encourage livestock not to congregate near a stream. They tend to “loaf” where there is shade and water. These techniques help discourage livestock from trying to access riparian areas where they might damage fences and hot wires. Rule #4: If natural vegetation is lacking, create a buffer strip or filter strip of adapted vegetation next to each water body and protect it. A buffer or filter strip is a swath of ungrazed vegetation adjacent to the water body. Buffer strips provide filtration and absorption of pollutants which may be carried by runoff from above. They also help stabilize stream banks. With your Conservation District representative or Cooperative Extension staff member, determine the degree of slope, soil types, and the quantity and types of vegetation to help calculate how wide a buffer is necessary to filter runoff and preserve habitat. Install mulch and/or plant grasses and legumes to hold the soil until trees and shrubs become established, especially on steep banks, slopes, and
29
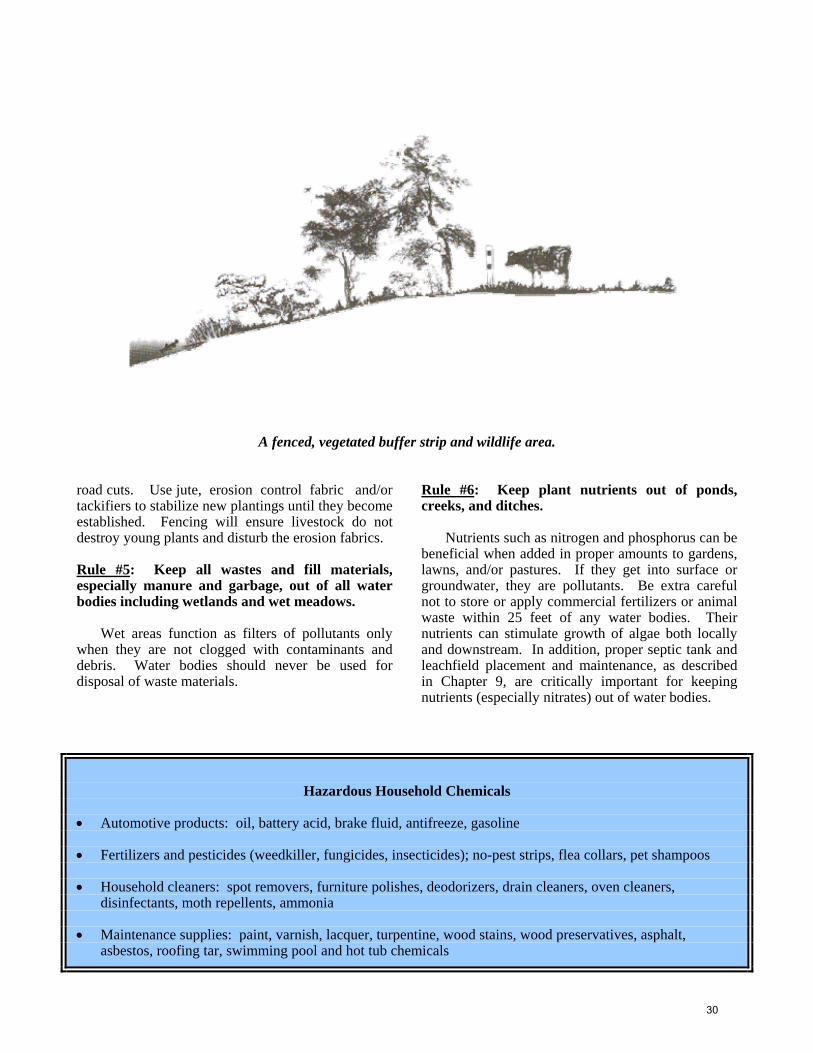
A fenced, vegetated buffer strip and wildlife area.
road cuts. Use jute, erosion control fabric and/or tackifiers to stabilize new plantings until they become established. Fencing will ensure livestock do not destroy young plants and disturb the erosion fabrics. Rule #5: Keep all wastes and fill materials, especially manure and garbage, out of all water bodies including wetlands and wet meadows. Wet areas function as filters of pollutants only when they are not clogged with contaminants and debris. Water bodies should never be used for disposal of waste materials.
Rule #6: Keep plant nutrients out of ponds, creeks, and ditches. Nutrients such as nitrogen and phosphorus can be beneficial when added in proper amounts to gardens, lawns, and/or pastures. If they get into surface or groundwater, they are pollutants. Be extra careful not to store or apply commercial fertilizers or animal waste within 25 feet of any water bodies. Their nutrients can stimulate growth of algae both locally and downstream. In addition, proper septic tank and leachfield placement and maintenance, as described in Chapter 9, are critically important for keeping nutrients (especially nitrates) out of water bodies.
Hazardous Household Chemicals
• Automotive products: oil, battery acid, brake fluid, antifreeze, gasoline • Fertilizers and pesticides (weedkiller, fungicides, insecticides); no-pest strips, flea collars, pet shampoos • Household cleaners: spot removers, furniture polishes, deodorizers, drain cleaners, oven cleaners,
disinfectants, moth repellents, ammonia • Maintenance supplies: paint, varnish, lacquer, turpentine, wood stains, wood preservatives, asphalt,
asbestos, roofing tar, swimming pool and hot tub chemicals
30

Rule #7: Keep home, yard and garden chemicals out of your water bodies. If you use pesticides as described in Chapter 11, or if you use any of the hazardous chemicals listed in the box at left, it is especially important that they be used and stored with great care. These chemicals must never be dumped on the ground, in a hole, down a drain, or anywhere except at an authorized hazardous waste collection center. These centers also accept used motor oil and antifreeze. Check your local newspaper for information on a household waste collection day and call auto parts stores for the location of nearby collection centers. As with other sources of water pollution, we must ask ourselves: “Could the next heavy rainstorm wash any of this substance downstream to pollute a stream or pond?” Rule #8: Locate barns, corrals, paddocks, and pasture fences appropriately. A good rule is to keep as much filtering vegetation as possible between animals or animal wastes and any water body. Never locate high-use areas adjacent to creeks, streams, or wet areas. Pollution is difficult to control from bare, trampled soil. Pasture units should not contain a creek or other water body. Allowing livestock unlimited access to the creek will break down the streambank and deposit waste directly into the water. Ensure that animal holding areas slope away from nearby water bodies to reduce the risk of water runoff pollution. A berm around paddocks is sometimes useful for rerouting water flows.
The preceeding general rules apply to all creeks, ponds, and wet areas. Following is more specific information about wetlands, creeks, and ponds. Special Information About Wet Areas (Wetlands) Wetlands form the transition between dry habitats and the deeper waters of creeks, ponds and lakes. They include the shallow waters along lakes, marshes, most streams, and the shallow edges of rivers. For at least a portion of each spring and early summer, wetland soils get saturated with water. When water fills soil pores, there’s little air left for soil microbes to actively decay dead plant materials. These materials build up, resulting in the characteristic peat-like, high-organic matter soils of wetlands. Only plants which have adapted to the lack of air in the soil can grow in wetlands. Historically, wetlands were regarded as wastelands, to be dredged or filled as desired. In the lower 48 states of the United States, less than half of our original wetlands remain. Most people don’t realize the many important functions of a wetland. Plentiful food, vegetative cover and water provide a home to a great diversity of wildlife, including birds, fish, amphibians, and mammals. Water quality often improves as water passes through a wetland. Soil microbes, plant litter and living plants reduce pollution levels. Organic matter in the wetland absorbs much of the nutrients and chemical contaminants. Nitrogen and phosphorus are taken up by plant roots, and these same plants and their roots help slow the flow of surface runoff, allowing sediment to settle out.
A healthy wetland provides habitat for birds and wildlife and improves water quality through its natural filtration system.
31

Wetlands also play a vital role in storing floodwaters and slowly releasing accumulated water back into adjacent streams or rivers, helping to avoid extreme high water levels. This decreases downstream flooding and property damage. Plants growing in these wet areas help bind soils and decrease streambank erosion and any resultant sediment loading downstream. For many of us, wetlands provide valuable recreational opportunities, from bird watching to fishing, hunting, hiking and boating. Wetlands add diversity, beauty, and value to our properties. In arid climates such as we have in the Truckee Meadows, their value increases. It benefits everyone to learn how to manage wet areas, including creeks and ponds, to protect their many valuable characteristics.
Special Information About Creeks This manual focuses on the Dry Creek watershed which collects local precipitation, snowmelt, and excess irrigation ditch water, and carries it to Boynton Slough and eventually into Steamboat Creek and the Truckee River. It is very important that residents in the watershed protect Dry Creek’s fragile streamside environments to maintain the beauty of the area and increase property values. Streamside environments, or riparian zones, are wetlands, and they provide many benefits if they are left in a natural, undisturbed state. If you have a creek in or next to your property, or if your irrigation runoff water flows to a creek, you should pay particular attention to protecting these wet areas from
disturbances or contamination, even when they are dry. Even though many of our local creeks are dry during summer and fall, we should manage them so that they will withstand our occasional flood flows without damage. In some cases, an engineer could help fortify the channel by building structures at vulnerable sites like the outside banks of curves. Generally, however, it is best merely to encourage the growth of native vegetation and to revegetate disturbed areas with willows, grasses and shrubs. Note: Channel stabilization is described in greater detail in the following chapter on erosion control.
Best Management Practice #3: Stream Protection and Stabilization
The goal of this best management practice (BMP) is to reduce erosion and the delivery of sediment into creeks. Primary objectives include stabilization of the stream banks and the channel bottom, improvement of fish and wildlife habitat and maintenance of channel capacity. If a creek has major blockages such as fallen trees, large stumps, trash, or remnant dam or culvert structures, these should sometimes be removed under the guidance of an engineer. The goal is to restore naturally stable channel conditions. This includes an appropriate shape, pattern and gradient for the materials, watershed, and land form.
When livestock hooves break down the vegetated banks of streams, both the pasture quality and the water quality can be harmed.
32

To prevent erosion from horse or cow hooves, it is often best to fence off the riparian zone and provide drinking water in troughs located in level areas surfaced with gravel. Herding, tethering or other “disincentives” such as “fenceless” fences may also be somewhat effective in protecting sensitive areas. Overgrazing or uncontrolled grazing of riparian areas for much of the growing season may damage the very resource that attracts such use. It can damage the vegetation that may be holding a stream bank together and helping water slowly flood its floodplain. If high flows in the channel erode severely and cut down through the soil, riparian zones may be left high and dry, and water-loving streambank vegetation may be replaced by weeds. Fences are not the only management tool for riparian areas, but they may allow pressures to be removed so that vegetation can thrive, and other parts of the pasture can get more appropriate use. When riparian zones are used for pasture, they must be closely managed so that animal access is limited to the appropriate season, length of grazing period and number of animals. Plans should be based upon the actual effects of livestock on stream banks and stream bank vegetation, and on the stream’s need for vegetation to maintain, recover or improve itself. Suburban ranchers often lack the time and experience to manage these areas properly.For this reason, fencing may be the most appropriate solution. Note: It is also wise to avoid driving vehicles or operating heavy machinery in wet areas or in channels, even when they are dry, to avoid damaging the soil or channel.
Special Information About Ponds Many small ranches have ponds. Some are ornamental; others are incorporated into the irrigation system; and some act as sediment-detention basins or places where sediments drop out of running water. Ranchers who envision a clear, cool ornamental pond in their landscape generally encounter more problems and headaches than they expected. If you are thinking about building a pond, read the following closely and think twice about doing so. Pond Sedimentation Ponds located on a stream channel or irrigation ditch act like sediment- detention basins. These are places where sediment being carried with flowing water can settle out due to reduced water velocity. It is very difficult for sediment to leave the pond once it
has been deposited there, unless a heavy flow during a big storm washes out the dam and destroys the pond. The natural role of such a pond is to fill up and progress from being a deep pond, to a shallow pond, to a swamp, then marsh, then meadow, then dry meadow. This is the expected sequence of events. It is thus important to realize that constructed ponds will tend to fill up with sediments along with animal wastes and vegetation. This course of events is not “bad”, but it may not meet your aesthetic goals. You may then try to manage the pond to increase its depth or to kill or remove excessive vegetation, which can result in more disturbance to other parts of the streamside ecosystem. The simplest way to control sediment pollution is to prevent the sediments from reaching your pond. This requires stabilization of streambanks as well as maintaining good vegetation cover on your pastures, especially on steep slopes. For more information on stabilizing streambanks, see Chapter 6: Principles and Techniques of Erosion Control. Pond Weeds Some aquatic plants are good for streams and ponds. These plants stabilize banks, add oxygen to the water, protect small fish, and act as food sources and habitat for wildlife. However in ponds, when too many plants grow, or if one type of plant takes over, then we call the plants weeds. Weeds in ponds can often be controlled by cutting, raking or uprooting plants. There are many types of water weed cutters which are commercially available and work well on stringy growth. String trimmers tend to knock down weeds along banks, rather than cut them, and may not be effective on thick brush or submerged plants. A basic landscape rake, which is sturdier and wider than a garden rake, is a very versatile tool which works especially well on sparse weeds and filamentous (hair-like) algae. You can also use it around the yard and pasture. Floating plant matter in your ponds can be gathered in nets and added to your compost pile. For removing rooted weeds, a baling hook works well and makes the job easier, especially on weeds like water lilies and cattails. Leave some (at least 20%) of these plants in the pond, since they help stabilize soft sediments and are useful in taking up nutrients. If all rooted weeds are removed, something else will grow in the pond - perhaps “pea soup algae.” When-ever possible, slope the bottom of the pond to a depth greater than 3 feet. This will help control many pond weeds which cannot survive in deep water. Other means of controlling pond weeds include the use of liquid dyes, which cut down on sunlight
33
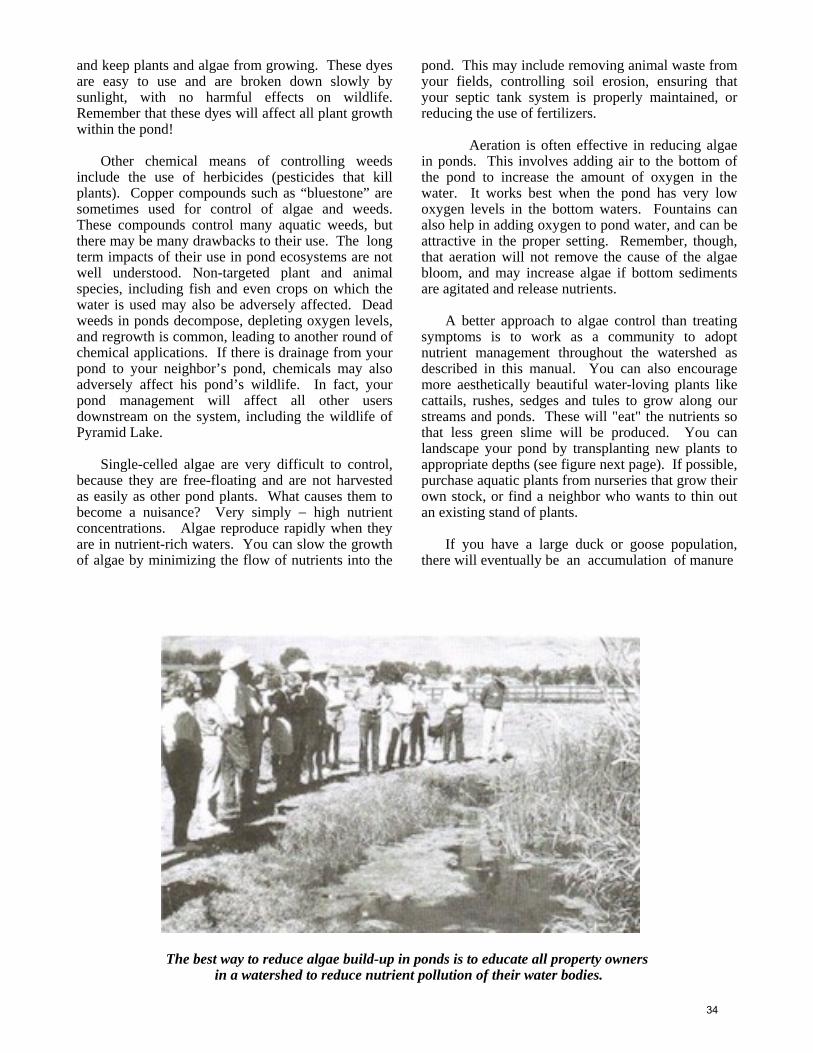
and keep plants and algae from growing. These dyes are easy to use and are broken down slowly by sunlight, with no harmful effects on wildlife. Remember that these dyes will affect all plant growth within the pond! Other chemical means of controlling weeds include the use of herbicides (pesticides that kill plants). Copper compounds such as “bluestone” are sometimes used for control of algae and weeds. These compounds control many aquatic weeds, but there may be many drawbacks to their use. The long term impacts of their use in pond ecosystems are not well understood. Non-targeted plant and animal species, including fish and even crops on which the water is used may also be adversely affected. Dead weeds in ponds decompose, depleting oxygen levels, and regrowth is common, leading to another round of chemical applications. If there is drainage from your pond to your neighbor’s pond, chemicals may also adversely affect his pond’s wildlife. In fact, your pond management will affect all other users downstream on the system, including the wildlife of Pyramid Lake. Single-celled algae are very difficult to control, because they are free-floating and are not harvested as easily as other pond plants. What causes them to become a nuisance? Very simply − high nutrient concentrations. Algae reproduce rapidly when they are in nutrient-rich waters. You can slow the growth of algae by minimizing the flow of nutrients into the
pond. This may include removing animal waste from your fields, controlling soil erosion, ensuring that your septic tank system is properly maintained, or reducing the use of fertilizers. Aeration is often effective in reducing algae in ponds. This involves adding air to the bottom of the pond to increase the amount of oxygen in the water. It works best when the pond has very low oxygen levels in the bottom waters. Fountains can also help in adding oxygen to pond water, and can be attractive in the proper setting. Remember, though, that aeration will not remove the cause of the algae bloom, and may increase algae if bottom sediments are agitated and release nutrients. A better approach to algae control than treating symptoms is to work as a community to adopt nutrient management throughout the watershed as described in this manual. You can also encourage more aesthetically beautiful water-loving plants like cattails, rushes, sedges and tules to grow along our streams and ponds. These will "eat" the nutrients so that less green slime will be produced. You can landscape your pond by transplanting new plants to appropriate depths (see figure next page). If possible, purchase aquatic plants from nurseries that grow their own stock, or find a neighbor who wants to thin out an existing stand of plants. If you have a large duck or goose population, there will eventually be an accumulation of manure
The best way to reduce algae build-up in ponds is to educate all property owners in a watershed to reduce nutrient pollution of their water bodies.
34

35
and a lot of nitrogen and phosphorus. One maintenance approach is to use biological or physical filters. Physical filters are expensive and require routine maintenance. It may be possible to establish a population of rooted water plants to utilize the nutrients in the waterfowl manure and help break it down. Some water-loving plants are listed in the diagram on the next page and in Chapter 6. It will probably be necessary to cage the young plants using chicken wire to keep ducks and geese from eating them. You may find it helpful to let a pond dry out part of the year. During dry periods, rake out excess duck muck and pond weeds. Try to leave the tules, rushes, and sedges undisturbed around the shore. These plants can survive 1 to 3 months without water. However, since only some species can survive in these circumstances, you may be affecting the natural balance of vegetation. It is also true that as water evaporates, there is a concentration effect which results in a decrease in water quality. Legality of Ponds Letting ponds dry out may actually be the best policy for the environment and in many cases, the best legal choice as well. An administrative policy of the Nevada State Engineer allows development and use of a small detention pond as part of your irrigation system without a special permit. It is legal to temporarily detain your entitled ditch water in such a pond, known as a regulating reservoir, for use in a sprinkler irrigation system. This type of pond should go dry at the end of the irrigation season. One of the reasons these legal, water-righted ponds need to go dry when the ditch goes dry is that in most cases it is illegal to keep them full using well water. As mentioned in Chapter 4, by law domestic, household wells must not pump more than 1800 gallons of groundwater in any 24 hour period and outdoor use of domestic well water is restricted to residential landscaping. Well water may not be used for pasture irrigation. One of the most efficient and beneficial ways to design a detention pond is to locate the pond at the lower end of your property where it can collect and store the irrigation runoff or tailwater. This runoff can then be pumped back to selected areas of your property and re-applied as needed. Excess or runoff irrigation water can carry pollutants (sediment and nutrients) downstream to water bodies such as Dry Creek and the Truckee River. If you capture and reuse this “tailwater” on your property, you benefit
your pasture grasses, which can use that soil and fertilizer to grow better forage for your livestock. This also protects the water quality of downstream water bodies. Note: This is legal if you capture only your rightfully allotted water during your irrigation period. An alternative to the tailwater return system is to divert your allotment of ditch water directly into a regulating reservoir each week and then apply it when needed with a sprinkler system. Such systems are also described at the end of Chapter 4. This allows you to time irrigation according to the plant and soil needs, rather than on a regimented weekly schedule. One more point about legal matters. If you intend to use your ditch water for a strictly ornamental pond, it is necessary to file for a change of use permit with the Nevada State Engineer’s office. You must have sufficient water rights to secure approval for such a permit. Furthermore, all ponds/reservoirs exceeding 20 acre feet in volume or with a dam exceeding 20 ft. in height are subject to permit requirements under NRS 535.010. Washoe County also requires a grading permit when excavating 50 cubic yards or more of material to make a pond or reservoir. If you are considering an ornamental pond or a small regulating reservoir, we recommend you seek the assistance of the Conservation District and a professional engineer.
Leaky Ponds To keep water from draining out the bottom of your pond, you can line the pond with a rubber or PVC liner designed for this purpose. Don’t try to use ordinary sheet plastic, as it is easily punctured and will not last long before cracking and degrading. While commercial liners are expensive, they are much thicker and have been treated to resist breakdown by sunlight. Another approach is to seal the bottom and sides of the pond with bentonite, which is a naturally occurring clay. When this clay gets wet, it swells up seals the pond because water moves through it very slowly.
Did you know?
Surface water bodies in western Nevada lose or evaporate 3.5 feet of water each
year from their surface. That’s a lot of lost water.
36

Chapter 6
PRINCIPLES AND TECHNIQUES OF EROSION CONTROL Soil erosion occurs when soil particles are detached and moved from their original location, usually by water, wind and gravity. Though soil erosion is a natural and important process, accelerated erosion caused by flooding, animals or human activities can cause serious environmental problems. Soil lost from your property because of rainstorms, gusty winds or irrigation runoff can make your property less attractive and less fertile. It may also degrade water quality and fish habitat if eroded soil finds its way to a river or lake.
How Erosion Hurts Water Quality Soil displaced by erosion, referred to as “sediment,” can be a source of water pollution. Unlike pollution that comes from easily identifiable sources like the discharge pipe of a factory, sediment from accelerated erosion originates from less obvious sources such as lands disturbed by human or animal activity. We call this “nonpoint source pollution.” During rainstorms, snowmelt, flooding or irrigation, water can move sediment. Often in our area, moving water can transport sediment to the Truckee River via ditches, creeks, and storm drains. Once in the river, sediment can bury aquatic organisms, clog fish spawning gravels, smother fish eggs, clog fish gills and muddy clean waters. Eroded sediments also increase the cost of treating water for drinking purposes. In addition, eroded sediments may carry fertilizers, pesticides, and other chemicals with them, any of which cause additional pollution concerns to watercourses, ponds and lakes. Excess sediment combined with increased flow will also cause a stream or river to erode and/or meander more.
How to Spot and Correct Erosion Problems Evaluate your property by observing or imagining what happens during flood irrigation, an intense rainstorm or strong winds. Do you see muddy water flowing off your property or dust clouds carrying your soil away? If so, then you have an erosion problem. Different soil types will have differing erosion potentials. Soil properties which will influence erosion include the size of the particles, the amount of soil organic matter, the degree to which soil particles form clumps, or aggregates, and the moisture content of the soil. The relative amount of fine and coarse mineral particles in the soil is referred to as texture. Soil texture depends on the proportions of sand, silt and clay in the soil. The
coarser mineral particles of the soil are called sand. These particles feel rough when rubbed between the thumb and fingers. Relatively small soil particles that feel smooth and “floury” are called silt. When wet, silt feels smooth but is not slick or sticky. When dry, it is smooth and when pressed between the thumb and finger will retain an imprint. Clays are the smallest soil particles. They feel extremely smooth when dry, and become slick and sticky when wet. Texture is an important soil characteristic because it helps determine the rate at which water enters soil, the amount of air and water in the soil, and the erosion potential of the soil. As you probably already know, clay soils can be very cohesive, or sticky. This means that they will tend not to erode easily. On the other hand, sand particles, while they don’t stick together easily, are larger and heavier and require more force to move. When soil particles join together to form aggregates, A cultivated loam soil (20% clay, 40% each silt and sand) in good physical condition for plant growth, contains about half solids and half pore spaces. The pore spaces may be occupied by half air and half water; half of the water may be available to plants, and the other half may be unavailable)
37

Small channels running down slopes after a heavy rain are evidence of what is called “rill erosion” this helps guard against erosion. Organic matter, or the remains of decaying plants and animals, helps bind soil grains together into aggregates. This also improves water movement into soil. It is typically best if rainwater, snowmelt and irrigation water are absorbed by the soil and vegetation on your property. Ideally, you want your landscape to absorb all the water it receives, like a sponge. When water cannot infiltrate or “soak” into your soil, it first accumulates on the surface, then flows downslope as a sheet, or thin film, potentially taking soil with it. Of greater importance are streams
of water that cut separate channels called rills. The presence of rills following a rainstorm is clear evidence of soil erosion. So is the accumulation of soil at the bottom of slopes or in other low lying areas. When water runs across pavement or compacted soils, it often picks up dirt and chemicals from the surface. It also accelerates. Unless this runoff is directed to an area of your property where it can be absorbed, it may carve rills or gullies and carry sediment into tributaries of the Truckee River, where it degrades water quality. Note: To reduce soil erosion, evaluate your property for problem areas like bare soil, especially on slopes, eroding stream banks, soil disturbed by construction or grading, and unpaved areas where soil has been compacted by vehicles, foot traffic, or by livestock, and take the following corrective actions: BARE SOIL: Without a protective cover of vegetation or some type of mulch, bare soil is vulnerable to raindrop impact and soil loss by wind and water. Cover the ground. There are many options to prevent erosion, but most involve living groundcovers or physical covers such as organic or inorganic mulches. The objective is to promote rapid water infiltration and prevent the forceful flow of water across the ground surface.
Slope gradients and revegetation potential
38

Contoured ditch
• Many plant species effectively cover and protect
soil on slopes of less than 50% (2:1 gradient; see illustration on previous page). Once established, plants can provide excellent long-term erosion control. Their roots knit together to hold the soil in place. Their leaves and twigs reduce the impact of rain and wind, and the organic matter they add to the soil improves water infiltration. This is especially important on sloping pastures, where the action of animals’ hooves tends to disturb the soil.
• Mulches like rock, bark chips or stones provide a
good protective cover on moderate slopes (less than 33%) and can be an attractive component of your landscape. Mulches are also useful to provide temporary groundcover until vegetation can become established.
• Irrigation of newly seeded slopes or pastures
causes less runoff when applied in a fine spray with sprinklers rather than by flood irrigation.
• Use of a drip irrigation system provides slow
delivery of water to landscape plants so it will infiltrate with little or no runoff.On steep slopes (greater than 50%), terraces or retaining walls can be used to reduce the gradient and provide level or gently sloping areas for landscape plantings. Retaining walls and terrace walls can be constructed with boulders, railroad ties and/or bricks. Walls over three feet in height should be designed by an engineer. Covering the slope surface with filter fabric and then large rocks (riprap) is another effective treatment which can provide an attractive, stable component to your
landscape. See page 41 for more information on riprap.
• Contoured ditches (ditches running across the
slope or along the contour line) can also control erosion on slopes (see illustration above). These ditches collect water running down the slope, slow its flow, and discharge it to a safe place such as a lawn, a well vegetated buffer strip, or a pasture.
UNSTABLE OR ERODING
STREAMBANKS: Streambanks are considered to be critical erosion areas, because soil detached from the bank often falls or washes directly into the stream channel. At that point, it is classed as sediment, and even if the creek is not flowing at the time, during the next wet period that sediment will impair water quality. Note: Most channel erosion problems occur as a result of the removal of vegetation, the loss of the creek’s access to its floodplain, the accelerated runoff from an altered watershed, and/or from channel straightening. As discussed throughout Chapters 4 and 5, the best non-structural protection for stream banks is a well-established stand of vegetation. Grasses, ground covers, shrubs and trees are all beneficial. A mixture of various types of riparian vegetation provides varied wildlife habitat. Livestock should be excluded from the stream channel until vegetation has been established on banks that are bare and eroding. A list of suitable vegetation for streambank stabilization is provided at the end of the chapter.
39

Structural Approaches In some of the main branches of Dry Creek, property owners would be wise to place a protective covering along certain portions of their stream channel to prepare it to withstand the strong erosive forces of occasional high-velocity flood flows. If sturdy vegetation is absent or sparse and erodible banks are exposed, then structural methods may be beneficial in stabilizing the channel. As mentioned in Chapter 5, stream stabilization structures are usually only recommended for vulnerable spots such as the outside banks of curves in the channel or portions of the banks that have been disturbed by roads, stream crossings or other construction activities. There is a science and an art to the proper design and construction of erosion control structures. The law requires that such structural work in natural waterways be designed by a licensed engineer and approved by Washoe County prior to implementation. Most structures are expensive to install, which is another reason to employ an experienced engineer. If not properly built, structures can backfire in a big storm and make erosion, flooding and maintenance problems worse than they were before. Though specific design criteria are beyond the scope of this manual, a general introduction to the terminology of erosion control methods is presented in the box on the following page.
Construction and Grading Sites: Most soil loss occurs when the terrain is disturbed. Construction activities such as bulldozing, grading, contouring, etc. can disturb soil by removing vegetation and digging up existing stable soil layers. Disturbed soil is vulnerable to wind and water erosion. To guard against erosion during construction, follow these steps: • Disturb as little ground as possible. Use
boundary flagging and colored fencing to mark areas to be left undisturbed. Meet with the contractor before work begins to ensure that the flagging is understood by him, his workers and any subcontractors he hires.
• Control blowing dust from disturbed areas by
spraying water on exposed soil surfaces. • Topsoil from disturbed areas should be
stockpiled for future use in revegetation efforts. Before work begins, install temporary sediment control measures such as contoured ditches, straw bale sediment barriers, filter fences, sod and catch basins immediately down slope from the areas to be disturbed (see illustration below). These will catch water, sediments and pollutants and keep them from leaving the property and polluting water downstream. Following construction, redistribute sediment accumulated behind the barriers. Since these sediments may be primarily the finer silts and clays, it may be necessary to add sand and organic material to create good loamy topsoil.
Straw bale sediment barrier
40

Best Management Practice #4: Stream Bank Erosion Control Methods
1. Nonstructural Controls a. Steep Bank protection: On some steep slopes, blankets or mats made of straw, plastic mesh, or fiber can be used to hold the soil and seed in place until vegetation cover matures. These erosion control blankets act as a complement to the vegetation itself. b. Vegetation: Vegetation can be very effective above the water on the face of the bank. Basic ground cover includes grasses, shrubs and trees. Vegetation is the desirable, long-term, low-maintenance approach for bank stabilization when slopes are no steeper than 1:1 (100% slope), as seen on page 38. A list of plants is provided in Chapter 5 and at the end of this chapter. For rapidly moving water, structural armor, as described in the next section, will be needed on some stream banks to control erosion. 2. Structural Controls a. Cribbing and deflectors: These structural controls create areas of still or slowly moving water along the bank, which allow sediment to settle out and deposit. Deflectors also cause turbulence, which may create pools and increase the amount of oxygen in the water. One type of cribbing consists of a log fence along a stream bank, with large-size rocks placed behind the fence. Cribbing may become undercut if not protected by deflectors. These structures should be placed properly by experts. b. Revetments: Another approach for protecting stream banks below the water line is the use of revetments. Armor, such as rocks, is placed on the bank above and below the water line. Riprap is one example of a revetment technique. It is composed of loose rocks placed on the streambank and in the water. The rocks are placed on top of a filter blanket such as “Miramat” (shown on the next page) so that soil particles will not wash away. Riprap on stream banks acts as a shock absorber, with the roughness of the rock helping to decrease water forces that cause erosion. Vegetation growing in between riprap particles can help stabilize it. Be very cautious about installing rigid concrete, such as concrete walls. These structures are very susceptible to undercutting and failure. Other types of revetment include rootrap and interlocking blocks. Rootrap is a modification of riprap. In this revetment, topsoil is added over the rocks, and vegetation is planted. The plant roots hold the rocks in place and stabilize the structure. Another type of revetment involves the use of interlocking blocks, which are often made of concrete. Most landscaping firms will either carry or can order these blocks for you. Usually, only a single layer of armor block is needed. Because the blocks lock together, the structure is stable, but also flexible and can adjust to some settling or shifting of underlying soil or sediments. These blocks are placed by hand. Be sure to use filter fabric underneath them to prevent undercutting. Retaining walls are one type of rigid revetment. These walls form a barrier between the land surface and the waterbody. Like any of the structural controls listed in this box, these walls must be carefully designed and are best built by experts.
Compacted Soil: Soil which has been tightly packed by
vehicles or livestock hooves loses most of its ability to infiltrate water, since the amount of pore space has decreased.
• If areas of compacted soil are not needed for
animal chutes, driveways, or parking, they can be fenced and rehabilitated by deep ripping followed
by rototilling the soil, replanting or simply mulching.
• Unpaved driveways or parking areas should be
paved or covered with gravel and bordered with an infiltration system.
• Place decomposed granite (DG) on chutes and
walkways
41
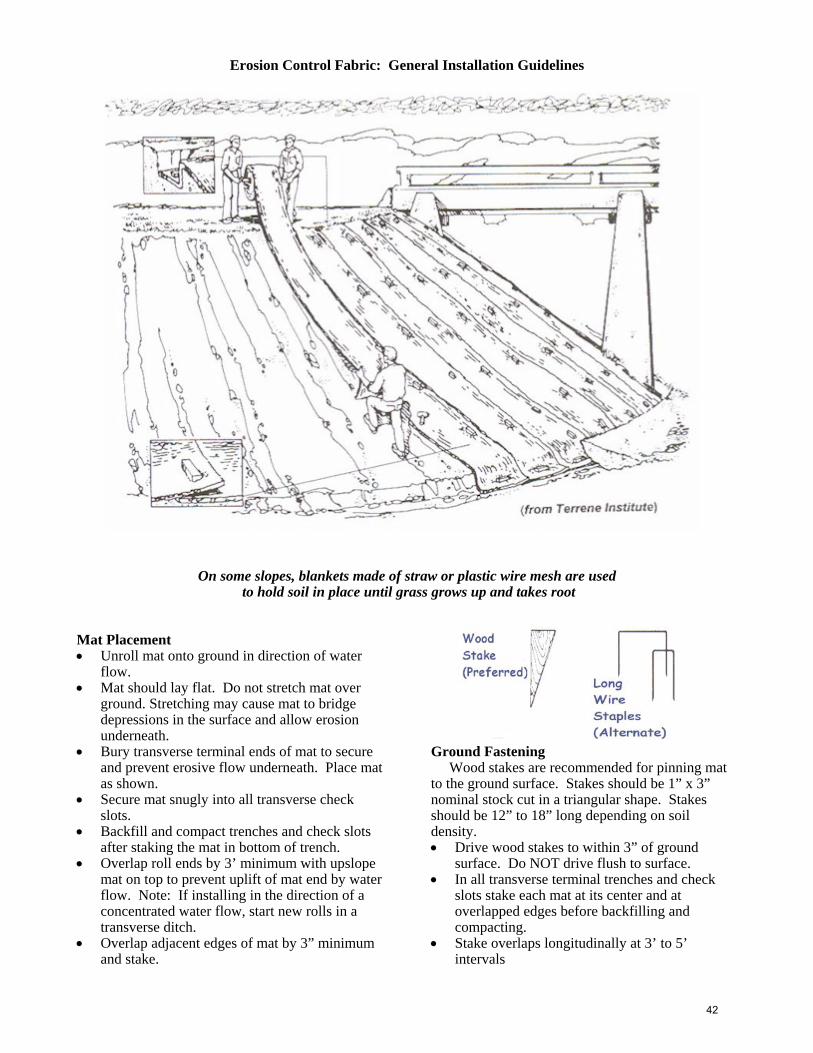
Erosion Control Fabric: General Installation Guidelines
On some slopes, blankets made of straw or plastic wire mesh are used to hold soil in place until grass grows up and takes root
Mat Placement • Unroll mat onto ground in direction of water
flow. • Mat should lay flat. Do not stretch mat over
ground. Stretching may cause mat to bridge depressions in the surface and allow erosion underneath.
• Bury transverse terminal ends of mat to secure and prevent erosive flow underneath. Place mat as shown.
• Secure mat snugly into all transverse check slots.
• Backfill and compact trenches and check slots after staking the mat in bottom of trench.
• Overlap roll ends by 3’ minimum with upslope mat on top to prevent uplift of mat end by water flow. Note: If installing in the direction of a concentrated water flow, start new rolls in a transverse ditch.
• Overlap adjacent edges of mat by 3” minimum and stake.
Ground Fastening Wood stakes are recommended for pinning mat to the ground surface. Stakes should be 1” x 3” nominal stock cut in a triangular shape. Stakes should be 12” to 18” long depending on soil density. • Drive wood stakes to within 3” of ground
surface. Do NOT drive flush to surface. • In all transverse terminal trenches and check
slots stake each mat at its center and at overlapped edges before backfilling and compacting.
• Stake overlaps longitudinally at 3’ to 5’ intervals
42

Rock riprap interspersed with native perennial vegetation can provide an attractive structural control of ditch banks
Infiltration Systems One of the most effective methods of controlling erosive runoff from rooftops and paved areas is to use an infiltration system. These systems collect runoff and store it until it can be absorbed by the soil. Common infiltration systems include grassy swales and trenches or pits lined with sediment-catching cloth, and then filled with gravel (i.e., infiltration trenches and dry wells; see illustrations). Infiltration trenches are useful as borders along paved areas (driveways and patios) and beneath the drip line of roof eaves. They capture runoff and allow it to
slowly infiltrate into the ground. Dry wells are useful for collecting concentrated runoff flowing out of roof gutters and downspouts. Dry wells must be designed by a qualified professional after a permit has been issued. Proper design is essential so that groundwater pollution does not occur. Infiltration systems require periodic maintenance to remove the sediment and debris they collect. An alternative to these measures is to spread concentrated runoff over grassed areas such as filter strips. With very little effort on your part, it may even be possible to capture runoff and reroute it into your ditch or nearby pond for use in irrigating pastures.
An infiltration trench Dry well (similar to but larger than an infiltration trench)
43

Irrigation Runoff Detention Ponds (Also called Sediment Basins or Regulating Reservoirs) As described at the conclusion of chapters 4 and 5, you can also capture runoff from irrigation water or rainstorms in a detention pond near the low end of your property. Legally, these ponds must be allowed to dry out during dry periods when the ditch water is turned off. When you capture surface runoff in such a pond, you can irrigate the dry areas of your property by pumping the water out for application by a sprinkler system.
Erosion Control as Part of a Landscape Plan The tips included in this chapter should be integrated into a complete landscape plan for your property before, during and after construction. The process of developing such a plan is described in Chapter 12, on Residential Landscaping.
Where to Go for Help Designing erosion control measures into your landscape can be very challenging. In addition to local landscaping and engineering firms and nurseries, you can call the Reno office of the U.S.D.A. Natural Resources Conservation Service at 784-5408 for erosion control tips and information on plant materials. You can also contact the Washoe-Storey Conservation District in Reno at 322-9934.
KEY TO VEGETATION FOR STREAMBANK STABILIZATION IN WESTERN NEVADA
Moisture zones: W = wetland zone; often flooded or muddy T = transition zone; very moist, sometimes wet to soil surface U = upland zone; near waterbody but seldom or never wet to soil surface Maintenance needs: D = prone to diseases E = easy to establish F = needs fluctuating water levels I = prone to insect pests P = needs regular pruning S = slow to establish SS = soil sensitivity, as to salts U = invasive, may spread to undesirable locations Propagation: A = all growing season B + B = balled and burlaped C = container Cu = cutting, taken and planted in late winter F = fall S = spring Su = summer
44
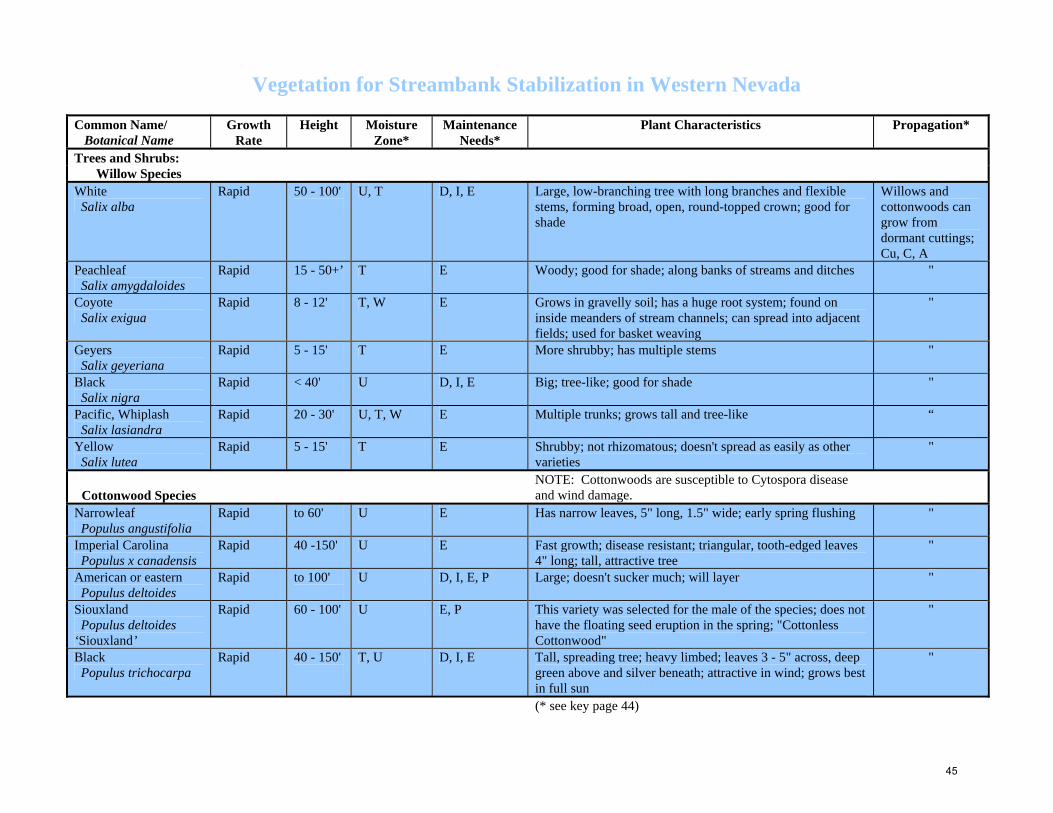
Vegetation for Streambank Stabilization in Western Nevada
Common Name/ Botanical Name
Growth Rate
Height
Moisture Zone*
Maintenance Needs*
Plant Characteristics Propagation*
Trees and Shrubs: Willow Species
White Salix alba
Rapid 50 - 100'
U, T D, I, E Large, low-branching tree with long branches and flexible stems, forming broad, open, round-topped crown; good for shade
Willows and cottonwoods can grow from dormant cuttings; Cu, C, A
Peachleaf Salix amygdaloides
Rapid 15 - 50+’ T E Woody; good for shade; along banks of streams and ditches "
Coyote Salix exigua
Rapid 8 - 12' T, W E Grows in gravelly soil; has a huge root system; found on inside meanders of stream channels; can spread into adjacent fields; used for basket weaving
"
Geyers Salix geyeriana
Rapid 5 - 15' T E More shrubby; has multiple stems "
Black Salix nigra
Rapid < 40' U D, I, E Big; tree-like; good for shade "
Pacific, Whiplash Salix lasiandra
Rapid 20 - 30' U, T, W E Multiple trunks; grows tall and tree-like “
Yellow Salix lutea
Rapid 5 - 15' T E Shrubby; not rhizomatous; doesn't spread as easily as other varieties
"
Cottonwood Species
NOTE: Cottonwoods are susceptible to Cytospora disease and wind damage.
Narrowleaf Populus angustifolia
Rapid to 60' U E Has narrow leaves, 5" long, 1.5" wide; early spring flushing "
Imperial Carolina Populus x canadensis
Rapid 40 -150' U E Fast growth; disease resistant; triangular, tooth-edged leaves 4" long; tall, attractive tree
"
American or eastern Populus deltoides
Rapid to 100'
U D, I, E, P Large; doesn't sucker much; will layer "
Siouxland Populus deltoides ‘Siouxland’
Rapid 60 - 100' U E, P This variety was selected for the male of the species; does not have the floating seed eruption in the spring; "Cottonless Cottonwood"
"
Black Populus trichocarpa
Rapid 40 - 150'
T, U D, I, E Tall, spreading tree; heavy limbed; leaves 3 - 5" across, deep green above and silver beneath; attractive in wind; grows best in full sun
"
(* see key page 44)
45

Common Name/ Botanical Name
Growth Rate
Height
Moisture Zone*
Maintenance Needs*
Plant Characteristics Propagation*
Evergreen Trees Eastern red cedar Juniperus virginiana
Moderate 40 - 50'
U E Conical dark green tree, turns reddish in cold weather
B+B in S; C, A
Engelmann spruce Picea engelmannii
Slow to moderate
80 - 150' U, T, W E Dense, pyramidal shape; needles are softer and tree less spreading at base than Colorado blue spruce; long, papery cone
B+B in S; C in S or F
Colorado blue spruce Picea pungens
Slow to moderate
80 - 100' U, T, W E Very stiff, regular, horizontal branches forming broad pyramid. Gray-blue or green color; long papery cone
B+B in S; C in S or F
Austrian pine Pinus nigra
Moderate 40 - 60'
U E Dense, stout pyramid when young; flat topped with spreading branches with age; branches form regular whorls; very hardy to winter cold and wind; won't tolerate as much water, so plant higher up on stream bank; tolerates many soil types; cones 2 - 3" long
B+B in S; C in S or F
Other Trees & Shrubs Mountain alder Alnus tenuifolia
Moderate to 25' T, U E, P Forms a thicket C in S or F
Redosier dogwood Cornus stolonifera
Rapid 5 - 15'
T E, U Tolerates wet conditions well; can tolerate shade; brilliant red fall color; attractive after leaf drop also; does not spread aggressively. Has creamy white flowers with white berries
Cu; C in S or F
Skunkbush sumac Rhus trilobata
Rapid 2 - 7'
U E, S Deciduous, shrubby plant; brilliant yellow to red fall color; clumping habit; skunk-like odor when leaves are broken; can tolerate occasional inundation and dry conditions; seeds provide wildlife diet
C, A
Golden currant Ribes aureum
Moderate 3' - 10'
U E, P Tolerant of dry or moist sites; makes a good hedge; densely twiggy and rounded; fruit in June - July; attracts wildlife. Has a greenish flower with yellow or red berries
C in S or F
Wood's rose Rosa woodsii
Rapid 3' - 10'
T, U E, P Multiple, thorny stems; grows vigorously in moist sites but also tolerates dry sites; suckering root system makes this plant excellent in erosion control; good hedge or barrier; whitish flower with pink or red berries
Root Cu; C, A
Silver buffaloberry Shepherdia argentea
Moderate to 15' U, T E Large, thorny shrub tolerates some water; makes a thicket which can be used as a cow barrier; spreads aggressively; good bird habitat; good cold and drought tolerance; may fix nitrogen; red or orange berries
C in S or F
(* see key page 44)
46

Common Name/ Botanical Name
Growth
Rate
Height
Moisture
Zone*
Maintenance
Needs*
Plant Characteristics
Propagation*
Wetland Plants Nebraska sedge Carex nebrascensis
Rapid 1 - 2 T, W E, F Excellent in riparian areas; rhizomatous; provides good nesting cover
Plugs; Su, S
Creeping spikerush Eleocharis palustris
Rapid 1 - 4 T, W E Excellent riparian plant; can tolerate lots of water, even 3' submergence; rhizomatous
Plugs; Su, S
Baltic rush (wiregrass) Juncus balticus
Rapid 1 - 3' T, W E Excellent for stabilizing stream banks; rhizomatous; bright green color, even when dry; tolerates wet and dry cycles; good nesting cover
Plugs or seeds; Su, S. The only rush which is easy to establish from seeds.
Common reed Phragmites australis
Moderate to rapid
4 -16' T, W E, U Good for erosion control, but doesn't like a lot of swift-flowing water; rhizomatous
Propagate from root cuttings; Su, S
Hardstem bulrush Scirpus acutus
Moderate to rapid
to 15' W F Also called tules; tall; grows in ponds in fluctuating water to 3' deep in large colonies; great wildlife habitat
Plugs; Su, S
Olney bulrush Scirpus americanis
Moderate 1.5 - 8' W F Excellent for water quality improvement; rhizomatous Plugs; Su, S
Common threesquare bulrush Scirpus pungens
Moderate 2.5 - 3' T, W F Tolerates wet and dry cycles; rhizomatous; several leaves near the base of the plant
Plugs; Su, S
Common cattail Typha latifolia
Moderate to rapid
4 - 8' T, W E, U Excellent habitat plant; stabilizes soil and spreads rapidly; has cigar-shaped flower in July or August
Plugs or spriggs, seeds; Su, S
Grasses and Legumes 'Garrison' creeping foxtail Alopecurus arundinaceus
Slow 1 - 3' T, U S, U Sod-former; good on streambanks and wet sites; long-lived pasture grass; heavy user of nutrients
Seeds; seedlings develop slowly
Crown vetch Coronilla varia
Moderate to rapid
1.5 - 2' U E, U Rhizomatous legume; tolerates more water than alfalfa; tolerates shade but thrives in full sun; pinkish white to deep pink flowers; tenacious groundcover; difficult to eliminate once established
Seeds or transplants
Tall fescue Festuca arundinacea
Slow 1 - 2' T, U E Bunch grass; needs some water; good for use in filter strips; good nesting cover
Seeds, early spring or early fall
Reed canarygrass Phalaris arundinacea
Moderate 2 - 8' T, W E, U Can tolerate very wet conditions; spreads aggressively; sod-former; heavy user of nutrients
Seeds or spriggs
(* see key page 44)
47

48

Chapter 7
HOW TO MANAGE ANIMAL WASTE AND REAP ITS BENEFITS
Animal waste is a resource that can help your pasture grasses grow and reduce the need for commercial fertilizer. Animal waste includes livestock and poultry manure, wasted feed, bedding, litter, and feedlot runoff. Manure is a valuable source of nitrogen and phosphorus and contains other nutrients essential for plant growth. The nutrient value of animal manure varies with the food eaten by the animal, the species and age of the animal, and its health and condition. The amount of useful nutrients found in common types of manure is shown in the table below. Manure can also increase the amount of organic matter in your soil and improve the tilth and water-holding capacity of your soil.
Pounds of Nitrogen, Phosphate and Potash
per Ton of Animal Manure (From the Encyclopedia of Organic Gardening, Rodale Press)
Source Nitrogen Phosphate Potash
Cattle 10.0 2.7 7.5 Horse 14.9 4.5 13.2 Poultry 29.9 14.3 7.0 Sheep 23.0 7.0 21.7 Swine 12.9 7.1 10.9 On the other hand, improperly managed animal waste can affect the quality of your water and soil. It can wash into streams and lakes from areas of dense livestock populations and unprotected manure piles. Poor soil conditions, steep or unprotected slopes, lack of vegetative cover, adverse climatic conditions and proximity to receiving waters are the types of site features that can result in animal wastes being washed into surface waters. As animal waste decomposes in surface water, the process of decay consumes dissolved oxygen, which endangers fish and other aquatic life. Nutrients from animal waste also promote excessive algae growth in ponds, creeks and rivers. Water pollution may occur when leachates, particularly water soluble nitrates and salts from manure piles or waste storage facilities, and leachate from land application of fresh manure seep into groundwater. Drinking water taken from groundwater containing nitrates can cause health problems in humans, especially infants and the elderly, as well as livestock.
Best Management Practice #5: Animal Waste Management System
Collect, store and treat animal waste in a way that minimizes impacts to air, soil, surface and groundwater resources, and that also protects public health and safety. To the extent practicable, recycle wastes through soil and vegetation. Once designed and installed, your waste management system should be operated and regularly maintained to ensure optimum results and effectiveness.
Planning an Animal Waste Management System
The objectives of this system are to improve the health of your animals, the productivity of your irrigated pasture and the quality of surface and groundwater resources. The basic steps to consider when managing animal waste are collection, storage, treatment (especially composting), use, and if you wish, marketing. Be sure to check with your local County Environmental Health Department so you are familiar with regulations governing the handling of manures.
Collection Animal waste should be collected from paddocks on a weekly basis, and from stalls on a daily basis. Manure may contain parasites which can affect animal health if left in place. If animals are kept in stalls, their bedding (straw or pine shavings, sawdust) should be cleaned out daily. Manure which is present in pastures should be dragged several times a year to redistribute the material and avoid killing grasses.
Storage If you do not compost your manure, store animal waste in a pile to allow it to dry before putting it to use. Place the pile on an impermeable surface, such as concrete or plastic sheeting, and cover with clear plastic to increase heating and to avoid air pollution by dry particles. Vent the plastic to allow air flow and drying to occur. Use caution when storing large
49

This manure storage pile should be relocated on an impermeable surface away from the irrigation ditch.
A better solution for animal waste is to place it in compost bins located in a dry area near the point of collection or use.
quantities of wet manure since spontaneous combustion could occur. Drying the manure kills some parasites and weed seeds, but can make the manure more difficult to apply with a spreader. Your storage pile should be located away from creeks, ditches or wells, and care should be taken to ensure that animal waste will not be washed down a slope and into any water body during an intense rainstorm. Vegetated filter strips down-slope from storage piles can provide protection (See Chapter 5).
Treatment - Composting Your Manure While dried manure is sometimes placed directly onto fields for use as a fertilizer, we recommend composting (see box on next page). When composted properly, many diseases and weed seeds are killed. Salts may be leached from the manure and the decomposed organic matter releases nutrients more rapidly into the soil. For efficient decomposition, a compost pile needs a good balance of materials containing nitrogen, such as fresh manure, grass clippings, other green materials, and brown materials such as fallen leaves and bedding straw. For fast decomposition, a compost pile needs nitrogen, moisture and oxygen to encourage the rapid growth of decomposer organisms in the pile. By following the steps below, your pile will turn into beautiful, brown compost with very little effort.
1. Combine your livestock manure with used straw or pine shaving bedding, grass clippings, leaves, weeds and plant-derived food scraps. Fresh manure is the highest in nitrogen content, so you can achieve the best results by collecting fresh manure and putting it directly into the compost pile. Avoid adding plants which spread by rhizomes (such as clover), cat and dog manure or plants infected by a disease or severe insect attack. Also, do not put large twigs or limbs into a compost pile without clipping them into small diameter pieces. They take too long to compost.
2. Add enough water to keep the pile about as moist
as a wrung-out sponge. Add water as you add layers of ingredients. This is most easily done if you scoop out a bowl or crater on the pile so water will not run off as you apply it. Add some sprinklings of soil or finished compost to each layer to ensure you have lots of decomposer organisms. Rewet the top of the pile as needed to keep it moist. Try to make the pile a minimum of 3 feet by 3 feet so it can work efficiently.
3. Whenever you add a new layer to the pile, add a
handful or two of inexpensive nitrogen fertilizer such as sulfate of ammonia if you have a lot of straw or aged manure in the pile. These materials are low in nitrogen, which will retard the growth of decomposer organisms.
50

In a layered compost heap, dried plant material is sandwiched between layers of manure or other nitrogen-rich material.
The Benefits of Compost in the Soil • Improves soil structure • Improves nutrient holding capacity of the soil • Aids in water retention (important in sandy soils) • Improves aeration and drainage (important in
clay soils) • Contains a low level of nutrients slowly released
to plants • Increases the number of microorganisms in the
soil • Helps lower soil pH by producing organic acids
upon breakdown
4. Turn the pile over to mix it at least once.
Turning the pile regularly speeds the composting process by adding oxygen and mixing the outer layers into the inner layers. Water the pile as you turn it.
Use a compost thermometer to check the temperature of the pile’s interior. Temperatures in excess of 140 degrees F for three or four days kills pathogens and weed seeds. To achieve hot composting, the pile must have a volume of at least three feet cubed (3 feet on each side and 3 feet high). Smaller piles will heat up but they do not stay hot long enough to kill a significant number of weed seeds and pathogens.
Fresh manure is effective in heating up a pile. When the temperature drops and remains down even after turning, the compost may be mature and ready to be used. The compost is ready to use when you sift through it and everything is broken down into nondiscernible brownish, sweet smelling humus or litter. If you want finished compost in a hurry, turn your pile often and keep it moist. Troubleshooting: 1. If your pile does not heat up, it may not have
enough nitrogen, and you may need to add fertilizer or thicker layers of fresh manure. As a rule of thumb, add one cup of sulfate of ammonia per 10 inch layer of browns. It may also be too dry. In this case, turn the pile and add water as you rebuild it. Remember, if the pile is too small (under 3 ft cubed) only the very center is warm and moist.
2. If your pile smells like rotten eggs, it is either too
wet or it lacks oxygen. Turn the pile to aerate it and add in some dry materials.
3. If the pile smells like ammonia, you have added
too much nitrogen, and you will need to turn the pile, adding some straw and soil.
51

4. When a pile is attracting pests and flies, chances are that attractive kitchen scraps were left near the surface of the pile. In this case, you will need to bury your scraps in the center of the pile. Never place meat, dairy products or greasy foods in your pile. They attract pests and could be a source of disease organisms.
Note: Compost and manure storage piles should be placed on non-irrigated ground, at least 100 feet away from your wellhead, ditches and other waterbodies on your property.
Compost and Manure Use • Apply manure evenly to pastures, fields, and
gardens for better plant growth. Spread manure in a 4 inch layer on fields at the start of the spring growing season and work it into the soil with a harrow. If you do not have a harrow, drag a weighted piece of chain link fence over your pasture to help break up and scatter the manure over the field. Drags are also discussed in Chapter 3.
• When starting a garden, turn under 2 to 4 inches
or more of compost into the top 6 to 8 inches of the garden bed. In established gardens, turn in 1/2 to 1 inch of compost before each planting. In established vegetable gardens, turn in 2 to 4 inches of compost annually.
• Apply dried manure with care. Excess manure
can wash off into surface waters, and nitrates may reach groundwater supplies. Dried animal waste has a high salt content, and if you use it on your pastures year after year, you may create excessive salt buildup in your soils, depending upon how you irrigate and how well your soils drain. Test the salt content of your manure and of your soil to learn if you are developing this problem. Your Conservation District representative or Cooperative Extension office will have information on effective use of manure.
• Do not apply manure to soils that are saturated or
frozen. • Apply manure carefully, away from all water
bodies such as open ditches, streams, ponds and wet areas. Make sure that a sudden thunderstorm will not wash manure into a creek.
• Leave a buffer strip between manure application
sites and surface waters to provide protection from contaminating the water. Your Conservation District representative can advise you on the appropriate width of the buffer strip according to the soils, slope, and type and quantity of vegetation. Buffer strips, also called filter strips, are discussed in Chapter 5.
• Till thoroughly dried manure into your riding
arena soil to make an excellent exercise surface for horses. Excessive use of dry manure on the soil surface will create dust problems, so be sure to incorporate it into the soil.
Marketing Manure and/or Compost Since there is considerable demand for manure and composted animal waste, it is possible to dispose of excess quantities by letting urban and suburban gardening enthusiasts know it is available. One way to accomplish this is to organize a neighborhood group to advertise that manure and compost are available and to locate and run a distribution lot. The group would set quality standards in coordination with the District Health Department and set prices for manure and compost based on supply and demand. You can also contact the Master Gardeners’ office at Cooperative Extension for help in locating gardeners who can use your excess material. By recycling organic wastes to beneficial uses, we improve our soils and crop growth, and protect our water resources from contamination.
52

Chapter 8
WELLS - HOW TO MAINTAIN THE PURITY OF YOUR DRINKING WATER Nevadans obtain their drinking water from two sources: groundwater and surface water. Residents of cities and towns get their domestic water from private or public utility companies which draw water from local wells, streams and reservoirs. In suburban and rural areas, homeowners and ranch owners rely on private wells for their household needs. While the quality of drinking water in urban systems is monitored by the utility company and regulated by the government to meet state and Federal Safe Drinking Water Standards, private well owners are responsible for testing and protecting their own drinking water supply. This chapter discusses basic concepts and strategies to ensure safe drinking water supplies from domestic wells.
Understanding Groundwater To learn how to protect wellwater, it is first necessary to understand some key terms. Groundwater is water that fills (saturates) the pore spaces among soil particles and throughout porous bedrock, such as limestone, sandstone or basalt. Groundwater can also fill cracks and fractures surrounding fault lines in non-porous bedrock such as the granitic core of our mountain ranges. Groundwater accumulates from precipitation or surface water which soaks into (infiltrates) the soil and moves (percolates) downward to the water table, which is the uppermost layer of the zone of saturation. (See the picture below.) The process by which underground water deposits (aquifers) are replenished from the surface is called recharge. Shallow aquifers are typically recharged not only by precipitation and seepage from lakes and rivers, but also from irrigated agricultural fields and ditches.
Their shallow nature makes them particularly susceptible to contamination, especially as human activity above them increases. Contamination of deep aquifers is less likely, but can occur when people improperly use abandoned wells as waste disposal sites. Deep aquifers may also be contaminated if wells are not properly sealed or if well houses are used to store fertilizers, pesticides or petroleum products, and they leak into the ground around the wellhead. How Does Groundwater Become Contaminated?
Groundwater is not always safe to drink. It can be contaminated by natural or human causes. Some deep aquifers contain water which has naturally high concentrations of salts (including those of boron, arsenic and copper) and other dissolved minerals. On the other hand, much of our groundwater is quite good, but can be threatened by human sources of contamination.
Groundwater terms
53

Best Management Practice #6: Wellhead Protection
This practice consists of preventative actions which communities and private well owners can take to protect and maintain the quality of their drinking water supply, now and in the future.
Many human activities and pollutants have contaminated our aquifers. Industrial and agricultural chemicals, fuels, nutrients from animal wastes or septic systems, and fertilizers are examples of pollutants that can reach groundwater. Such pollutants are sometimes misused or dumped on the ground, sometimes spilled or leaked and, in some cases, old-fashioned (and now illegal) industrial dry wells and leachfields used for industrial waste disposal have resulted in direct movement to groundwater. Pollutants can percolate downward by themselves or be dissolved in water, making the groundwater unusable by plants, animals and humans. The picture below illustrates sources of contamination to surface and groundwater.
How to Implement Wellhead Protection Wellhead protection is a basic strategy to protect groundwater. By alerting citizens to keep all hazardous or toxic substances away from the wellhead (the portion of the well above ground), the potential for pollution of groundwater can be reduced. Every well owner should establish a Wellhead Protection Area (WHPA) around his or her well. Private well owners should designate a protection area with a minimum radius of 100 feet around the wellhead. For larger public supply or agricultural wells, where groundwater flow patterns are known, the WHPA comprises all of the zone of contribution, which is the surface area contributing recharge to the well. Here are some ways to protect groundwater within the WHPA: • Residents must avoid spilling or disposing of
animal wastes, fuels, pesticides, fertilizers, paints, etc., within the WHPA or within the WHPA of adjacent properties.
• A well must be properly sealed with a 50-foot
deep concrete collar around the well casing to prevent contaminants from directly entering the
aquifer. In addition, the top of the well casing must be capped, and must be at least 12 inches above finished grade. If the well is within 1/4 mile of a stream or major irrigation ditch, it must be sealed to a 100 feet depth. For other construction details consult the office of the Nevada State Engineer, Division of Water Resources, Carson City, at 687-4380.
• The wellhouse should not be used to store fuels,
solvents, degreasers, paint products, pesticides, fertilizers, deicers, etc. These should be stored outside the WHPA.
Additional aspects of wellhead protection
include the following:
• Site the well outside areas of potential contamination. Wells should not be located in corrals, pastures, feedlots or drainage ways from such facilities, or near underground fuel storage tanks. A wellhead should be at least 150 feet from a septic tank and its leachfield. However, if it is a shallow leachfield (36" or less to the bottom of the trench) the separation can be as little as 100 feet.
• Nearby septic systems should be correctly sited,
installed and maintained. Pumping frequency depends on the size of the tank and the number of individuals in the household. As a general rule, most tanks should be pumped about every three years. Harmful substances should never be dumped down household drains or toilets attached to septic systems. See Chapter 9 on Septic System Maintenance.
• Abandoned wells should be capped and sealed.
Since they provide a direct conduit to the aquifer, the wellhead protection area around them should be maintained.
• Well owners should inventory all potential
sources of contamination on their property and adjacent properties, and protect the well against contamination by any sources which cannot be eliminated. The table below lists common sources of groundwater contamination.
• Well owners should test well water at least once
a year for coliform bacteria and at least every 3 years for the "Routine Domestic Water Analysis". See the Cooperative Extension brochure "Drinking Water Testing for Private Well Owners" for more information (FS92-30).
54
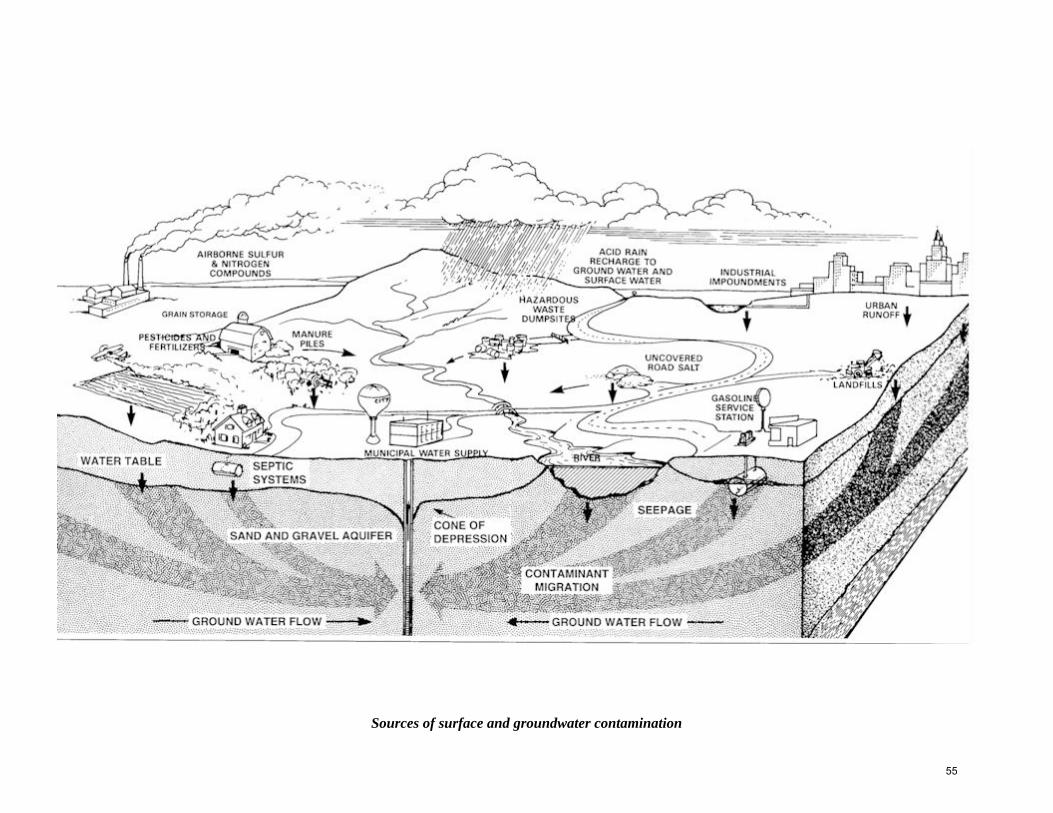
Sources of surface and groundwater contamination
55

Wellhead Protection Availability For Community Wells
The more water pumped from a well, the larger and more comprehensive the wellhead protection area should be. Several strategies may be employed to protect aquifers supplying community wells, including prohibiting land uses with high pollution potentials, enlarging the wellhead protection area (WHPA), re-zoning or purchasing key parcels within the WHPA. Qualified communities may
obtain grants through the Nevada Division of Environmental Protection to establish a local Wellhead Protection Program. Note: Although the focus of this chapter is protection of groundwater, it is equally important to prevent pollution of surface water (creeks, ditches and ponds). Be careful of all water resources.
Common Sources of Ground and Surface Water Contamination by Category
Agricultural
Animal burial areas Irrigation sites Animal feedlots Manure spreading areas/pits Fertilizer storage/use Pesticide storage/use
Residential
Fuel oil Septic systems, cesspools Furniture stripping/refinishing Sewer lines Household hazard products Swimming pools (chemicals) Household lawns
Commercial, Industrial, and Other
Asphalt plants Hazardous waste or municipal landfills
Auto repair shops Laundromats Chemical manufacture/storage Open burning sites Construction areas Petroleum pipelines Car washes Road de-icing operations Cemeteries Scrap and junkyards Dry cleaners Storage tanks Gas stations Storm water drains or basins Golf courses Wells (operating or abandoned)
56

Chapter 9
SEPTIC TANK SYSTEMS REQUIRE REGULAR MAINTENANCE Because they are out of sight, they are often out of mind, but septic systems cannot be neglected without problems for the homeowner. While public sewer lines carry away household waste in urban areas, rural properties rely on self-contained sewage treatment systems installed below ground on the property they serve. Such systems are called septic tank − soil absorption systems, otherwise known as "septic systems." Septic systems are called upon to receive and process household waste water from toilets, showers, washing machines, sinks and garbage disposal units (see figure below). Their efficiency is dependent upon their design, proper installation, and maintenance program. Failure in any one of these areas can lead to improper operation which can create a health hazard and a potential financial burden. To avoid contamination of groundwater supplies, septic systems should be installed at least 150 feet downslope of any drinking water well.
How A Septic System Works All septic systems function in the same general manner, piping household wastewater into a septic tank where solids fall out as sludge or float to the top as scum. Through bacterial action, some of the solids
57
Sources of household wastewater
are digested and converted to liquid for discharge into a "soil absorption area." The remaining solids accumulate and must be removed for disposal in an approved waste facility, usually a municipal sewer system. The septic tank was patented in London, England around 1900 and is described in Webster's Dictionary as "a tank in which waste matter is decomposed through bacterial action." The modern septic tank approved in Nevada is a two-chambered watertight box usually made of precast concrete, concrete blocks or reinforced fiberglass. When household waste material enters the box, several things occur: 1. Organic solid material floats to the surface and
forms a layer that is commonly called "scum." Bacteria in the septic tank convert this material into liquid.
2. Inorganic or inert solid materials that cannot be
biologically converted and the by-products of bacterial digestion sink to the bottom of the tank and form a layer commonly called "sludge."
3. A cloudy liquid lies between the two layers and
is the only ingredient that should overflow into the soil absorption area.
4. To work properly, there should be enough
volume in the septic tank so that it takes at least 24 hours for the water to pass through into the leach field. If shorter, the solids will pass over into and plug the leach field. Periodic pumping or cleaning out of the tank is required to keep sufficient liquid volume in the tank.
The overflow of solid material into the soil absorption area should be avoided because it will clog soil pores in the absorption area and result in system failure. Three factors contribute to solid material overflow: 1) effluent flows exceeding the design capacity, 2) bacterial loss and 3) scum and sludge accumulations that reduce the liquid capacity of the tank. The size of the septic tank to be installed is based upon the average number of residents in the home. The number of bedrooms in the house is the best indicator of permanent residents, with two persons
57

considered to occupy each bedroom. The minimum size septic tank allowable is 1000 gallons for a two bedroom home. Larger tanks are recommended for larger homes, with 250 gallons added for each additional bedroom. If additional bedrooms are added after the septic system is installed, if new owners have a larger family and have more than two persons per bedroom, and if long term house guests increase the flow of waste into the septic tank, measures should be taken to reduce the effluent entering the tank. If this is not done, the increased flow above the original design capacity will push suspended solid wastes into the leach field and plug the system. Bacteria must be present in the septic tank to digest the organic solids. Normal household waste provides enough bacteria to digest the solids UNLESS the bacteria is killed. Bacteria are very sensitive to environmental changes and may be destroyed by such common home-care products as:
58
Detergents Cleaning compounds Acids Disinfectants Polishes Caustic drain openers Bleach Sink and tub cleaners Alcohol Toilet cleaners
Petroleum products
(see also page 30, Hazardous Household Chemicals) Check the labels on these and other products used in the home. Labels carrying any of the following warnings indicate the presence of ingredients that will kill bacteria:
"Harmful if swallowed" "Avoid contact with the skin" "Do not get in open cuts or sores" "If comes in contact with eyes, call a physician immediately" Small, dilute doses of these household products are not a threat to the bacteria in the system. However, these products are examples of Household Hazardous Wastes (See BMP #7). Do not dump the concentrated products down the drain to get rid of them, but rather discard unwanted leftovers in the trash or as indicated on product labels. “Miracle” products are claimed to enhance microbial action in your system to eliminate the need for pumping and to “keep the system clean and free-
Best Management Practice #7: Household Hazardous Waste Management
Household products such as fuels, automotive fluids, solvents, pesticides, paints, paint thinners, batteries, some household cleaners, polishes, and spot removers should be bought only in quantities actually needed, and used up so that disposal of excess quantities is not necessary. These products should never be buried or dumped on the ground, in a water body, or down any kind of drain or toilet including those which are “treated” by a sewer system or a septic tank system. Follow label instructions exactly as written for proper product application, cleanup and disposal.
An individual sewage disposal system (septic tank system) consists of four parts: a sewage source (household
waste), septic tank, absorption field, and the soil.
58

A properly functioning septic tank
A failed septic tank
flowing.” Many testimonials abound, but no scientific evidence supports their claims. To repeat: there are sufficient microbes in household wastes for the efficient operation of your septic system, and there is no substitute for routine inspection and pumping. The sludge at the bottom of the septic tank is inorganic, inert material that is not biodegradable and will not decompose. If not removed on a periodic basis by a professional septic pumping company, it will accumulate and overflow, clogging the absorption area. The figure above illustrates a failed septic system.
Soil Absorption Areas There are three main types of absorption areas − leaching fields, filter beds and drainage pits, sometimes called drywells or cesspools. Leaching fields generally consist of a network of perforated pipes laid in a gravel-lined trench. If solids are permitted to enter the pipes, they can clog the perforations in the pipe as well as the pores in the surrounding soil, causing the draining of the effluent to slow and eventually stop, and causing the system effluent to back up into the home. Filter beds work on the same principle as leaching fields with a perforated pipe running through layers of sand and crushed stone. Filter beds are wider than leaching fields and can be constructed either above or below ground. Because of their smaller size, filter beds are used where the water table is high and where the property is too small to accommodate the long
trenches required for a leaching field. Again, solids must be kept out of the filter lines to prevent clogging. Drainage pits are constructed of either precast or concrete block cylinders. They have closed tops, open bottoms, and holes in the sidewalls. Some older septic systems consist of only a drainage pit or a cesspool; their use is no longer permitted.
Septic System Maintenance Routine, periodic inspection of the plumbing, the septic system and the leach field is important to ensure the parts are not plugged, cracked or broken. A malfunction in the system may be polluting the soil and groundwater without the residents ever knowing. A competent septic pumper will inspect the system when he pumps the septic tank. Individual awareness of any disruptions in the normal operation of the system, new wet spots near the septic tank and leach field or the occurrence of foul odors in the yard may indicate problems of the septic system that should be further investigated. The frequency of pumping of the septic tank depends on the size of the tank, the number of people occupying the home, the frequency of garbage disposal use and the condition of the system. Since there is no tank additive that will dissolve or eliminate the accumulation of sludge, IT MUST BE PUMPED OUT. Failure to periodically pump the septic tank can cause solids to overflow into the absorption area. This can clog the system and may force replacement of the absorption area at
59 59

Leaching field
considerable expense and inconvenience. Typical replacement costs are likely to exceed several thousand dollars. Generally, a properly installed 1,000 gallon tank used by a family of four people should be pumped about every three years. More frequent pumping may be necessary in larger families or if a garbage disposal is used or excessive amounts of household grease enter the system. Pumping of septic tanks should be performed by professionals who have the necessary equipment to do the job properly. They can be found in the Yellow Pages of your telephone directory under “Septic.”
Do’s and Don’ts for Septic System Maintenance • Do not flush materials into the system that will
not readily decompose, such as anything metal or plastic, hair, diapers, cigarette filters, sanitary napkins or tampons. They will reduce your system’s capacity and may clog the drainfield.
• Do not put grease down the drain. It does not
decompose rapidly and increases the amount of scum in the tank.
• Do not let soils over the drainfield get compacted
by traffic or heavy equipment. This can damage the pipes, interfering with the drainfield’s ability to clean the water. Ponding often results and shuts down the system. Do not use that area for a large animal pen, a roadway, parking spot, patio, or as a storage area.
• Do not cover the surface of the drainfield with any impermeable material such as plastic or cement. This reduces the soil’s ability to “breathe,” preventing proper function of the drainfield.
• Plant the absorption field area with grass. Roots
from trees and shrubs can clog the pipes of the soil absorption field.
• Divert roof drains and rainwater runoff away
from the drainfield. Excess water will saturate the soil and prevent absorption and drainage of wastewater from the septic system.
• Keep accurate records, including diagrams of the
design, location, and size of the entire septic system. They should include dates the system is inspected and when the tank has been pumped out. A septic system record page is included at the end of this chapter.
Commonly Asked Questions
Q: What causes the thick crust in my septic tank? A: This is organic material that has congealed into a solid mass. The condition indicates bacterial action has been slowed or stopped. Have the tank pumped to avoid future problems. Q: Will acid help my septic system? A: Acids and chemicals work only temporarily to clean the pipes and system surfaces. In excess, they may stop bacterial action temporarily They are
60 60
61
extremely dangerous to use and may be harmful to the environment. The Environmental Protection Agency has banned the use of these hazardous materials in many places. Q: Does it help to add yeast or baking soda or inoculants? A: Yeast provides a fermentation environment. It does not provide bacterial action. Baking soda raises the pH in the tank and also provides no bacteria. A high pH can harm the septic process. The benefits of inoculants are inconclusive. Q: My system recently backed up for the first time in years. What do I do now? A: A backup is the first sign of septic system failure. It will occur again unless maintenance is begun. Left untended, it could result in system failure which would require replacement of the system. Warning Signs Of Septic System Problems • Sluggish drains in the home • Plumbing backups • Gurgling sounds in pipes or drains
• Outdoor odors • Mushy ground or greener grass around septic
system Other Causes Of Septic Failure • Placement in poor drainage area. • Poor, improper installation, not performed
according to septic codes. • Overloading. Use water sparingly. Do only full
loads of wash at off-peak times if possible and try to limit the number of loads daily. Take shorter showers rather than baths.
• Extensive use of garbage disposals. Ground up
foods are hard on septic systems because they are not digested first by the human body and are thus slower to decompose.
• Use of salts and chemicals from water softeners
and washing machines can damage septic tanks. Channel washing machine water and waste from water softeners into a separate disposal area.
• Tree roots clogging pipes. Contact a septic
contractor for repairs.
61

SEPTIC SYSTEM MAINTENANCE RECORD
Address:___________________________________________________________________________ Property description:_________________________________________________________________ Owner:____________________________________________________________________________ Type of system:_____________________________________________________________________ Date installed:_______________________________________________________________________ SYSTEM PLOT: All lengths and distances measured Septic tank Driveway Distribution box and pump Structures Drainfield Service Record Date Work Performed, Company Name and Phone Number __________ ___________________________________________________________________________ __________ ___________________________________________________________________________ __________ ___________________________________________________________________________ __________ ___________________________________________________________________________ __________ ___________________________________________________________________________ __________ ___________________________________________________________________________ __________ ____________________________________________________________________________
62 62
63
Chapter 10
UNDERGROUND FUEL STORAGE TANKS
Older underground fuel tanks are made of unprotected steel. These tanks corrode after several years and leak their contents into the soil and eventually into groundwater supplies. One gallon of gasoline can potentially contaminate one million gallons of water, making it unfit to drink. If a storage tank or underground metal piping connected to the tank is past its prime (over 10 years old), there is a good chance it is leaking or will leak soon, particularly if the tank has no corrosion protection. Newer tank systems, especially the piping, can also leak. If the backfill material is poorly compacted or of the wrong type, or if the pipe fittings are inadequately attached, leaking is likely. Piping is smaller and less sturdy than tanks and is often installed near the ground surface. As a result, it is often damaged by heavy traffic or soil shifting, and leaks result.
Best Management Practice #8: Underground Storage Tanks
The installation, repair, removal or closure of underground tanks must be conducted by qualified professionals in accordance with local, state and federal regulations. These tanks should be tested and monitored periodically to detect any leaks.
One way to monitor your tank is to turn off all appliances which operate with heating oil (water heater, furnace, etc.) for 36 hours. For gasoline tanks, do not make a withdrawal for 48 hours. Measure the fuel level in the tank with a dip stick. After the 36 or 48 hours, remeasure the fuel level; the level should not have changed. If there is a season when your tank is not used (e.g., heating oil during summer), some companies will fill it in the spring and then come back in early fall to see if the level has gone down. This would detect even a slow leak. If you suspect a leak or if your tank is older than 10 years, it should be tested by a commercial leak-detection firm. If it leaks, it should be removed and replaced with a double-walled, corrosion-resistant system or an above ground tank over a catchment basin.
If you have an old tank that you no longer use, have it removed. In some cases it can be safely emptied, re-filled with an inert substance, and abandoned in place. The Washoe County Environmental Health Division (328-2612) or the Health Division in your county can answer your questions. Your local Fire Protection District also has jurisdiction to issue permits and answer questions. The Nevada Legislature set up the State Petroleum Fund in 1990 to assist in clean-up of petroleum leaks from underground fuel tanks. For owners of tanks 1,100 gallons or less in size, the fund will reimburse the owner for the clean-up costs up to $250,000, less a $250 deductible. Contact the State Bureau of Corrective Action (687-5872 ext. 3047) for further information about the Fund. You should take action now rather than wait because it is difficult to sell your property if you have a tank that has leaked. The lending institution will not accept the liability. In addition, it is generally believed that because of the severity of groundwater pollution caused by tanks, government regulations will only become more strict in the future.
63

64

Chapter 11
PLANNING AHEAD TO PREVENT AND/OR SAFELY CONTROL PESTS SUCH AS WEEDS, RODENTS, AND INSECTS
None of us like to see our pastures or residential landscapes decimated by pests, whether weeds, rodents, diseases or insects. If you have ever planted a tree and then discovered thousands of aphids devouring a new spring crop of leaves, you may have reached for an insecticide. You may also have applied herbicides or rodenticides if weeds or rodents have spoiled your pastures. While such measures can be safe and effective if practiced with great care in accordance with label instructions, most agricultural educators now recommend them only as part of a more comprehensive Integrated Pest Management (IPM) strategy.
Best Management Practice #9: Integrated Pest Management
IPM involves crop and pest monitoring along with pest control measures that integrate cultural, physical, biological and chemical means to reduce pest problems. To begin, learn which pests are likely to be a problem, which control measures are likely to be effective, and then plan how to prevent them from becoming a problem. Small ranch owners and suburban residents can control pests while protecting the environment by learning and using IPM techniques.
Basic steps of IPM include:
1. Learning what time of year is best to control each pest and which methods are least toxic. Develop a seasonal checklist to help you become pro-active in preventing recurring problems.
2. Learning what species of plants (grasses, trees, flowers, etc.) are best adapted to our area, and plant them. They will be less prone to pest problems and require less pest control.
3. Inspecting your property often, weekly during the spring, to catch the presence of pests early on. Carefully monitor their populations. Some pests, like weeds and rodents, may require immediate control. Others, like some insects, may diminish with the help of natural predators alone. NOTE: For this reason, IPM does not traditionally advocate preventive chemical treatment for insect pests. Do not treat a problem unless you know it exists.
4. Learning a variety of methods to reduce pest problems.
5. Keeping plants healthy and vigorous.
The four basic methods of control are: A. Cultural Control: Planting pest resistant species and creating healthy environments for plants by watering, fertilizing, planting and pruning appropriately. B. Physical (or Mechanical) Control: Mowing or burning weeds, blasting aphids or spider mites off plants with a strong jet of water from a hose, trapping rodents, etc. C. Biological Control: Introducing and encouraging pest predators such as lady bird beetles (lady bugs), or installing raptor poles to allow hawks a perch for preying on rodents. D. Chemical Controls (Pesticides): Though these can be safe and effective if used with great care and according to label instructions, they are viewed as a last resort. If you plan ahead according to the tips in this chapter, you will rarely need to use pesticides. Reasons to minimize use of pesticides include the following:
• Each time you use a spray or powder, you are exposed to danger of inhalation or absorption of the toxin.
• Pesticides can contaminate surface and groundwater supplies. If pesticides percolate down to the water table, your personal water supply - and your neighbor's - may be jeopardized.
• Continuous use of pesticides may induce tolerance and resistance in the pests.
• Pesticides may kill or harm beneficial insects, such as lady bird beetles (lady bugs), which feed on other small, harmful insects, larvae or eggs.
65
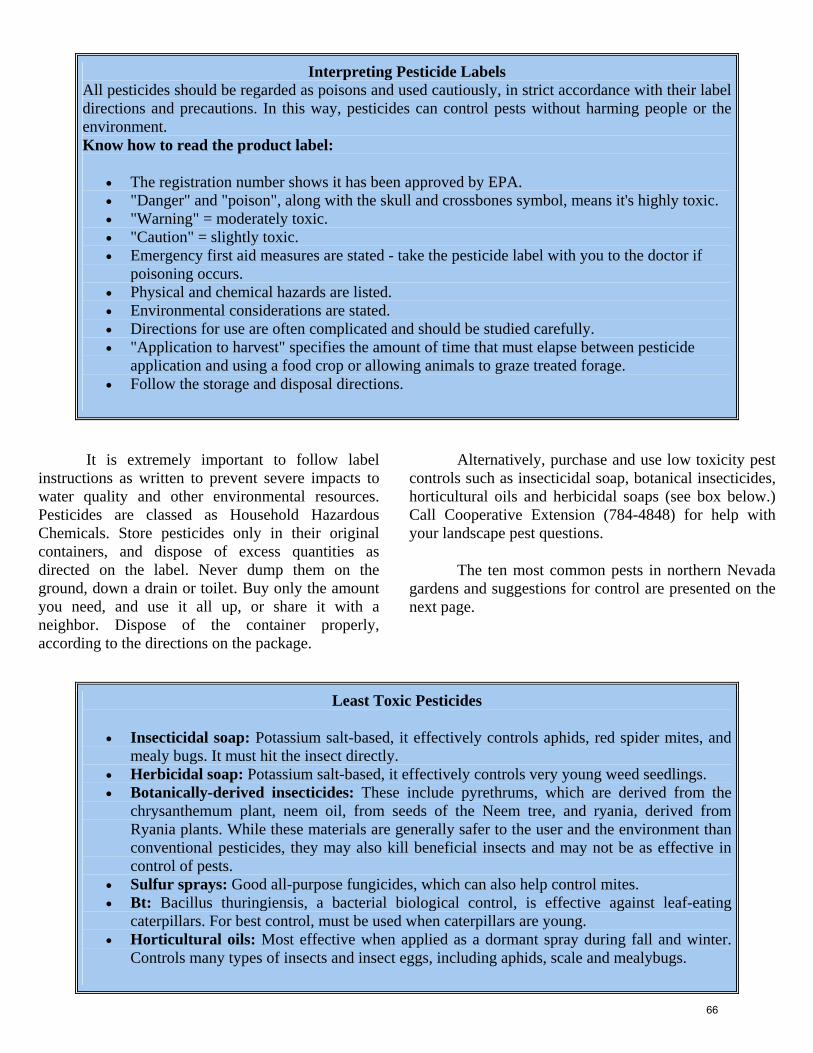
Interpreting Pesticide Labels All pesticides should be regarded as poisons and used cautiously, in strict accordance with their label directions and precautions. In this way, pesticides can control pests without harming people or the environment. Know how to read the product label:
• The registration number shows it has been approved by EPA. • "Danger" and "poison", along with the skull and crossbones symbol, means it's highly toxic. • "Warning" = moderately toxic. • "Caution" = slightly toxic. • Emergency first aid measures are stated - take the pesticide label with you to the doctor if
poisoning occurs. • Physical and chemical hazards are listed. • Environmental considerations are stated. • Directions for use are often complicated and should be studied carefully. • "Application to harvest" specifies the amount of time that must elapse between pesticide
application and using a food crop or allowing animals to graze treated forage. • Follow the storage and disposal directions.
It is extremely important to follow label instructions as written to prevent severe impacts to water quality and other environmental resources. Pesticides are classed as Household Hazardous Chemicals. Store pesticides only in their original containers, and dispose of excess quantities as directed on the label. Never dump them on the ground, down a drain or toilet. Buy only the amount you need, and use it all up, or share it with a neighbor. Dispose of the container properly, according to the directions on the package.
Alternatively, purchase and use low toxicity pest controls such as insecticidal soap, botanical insecticides, horticultural oils and herbicidal soaps (see box below.) Call Cooperative Extension (784-4848) for help with your landscape pest questions.
The ten most common pests in northern Nevada gardens and suggestions for control are presented on the next page.
Least Toxic Pesticides
• Insecticidal soap: Potassium salt-based, it effectively controls aphids, red spider mites, and mealy bugs. It must hit the insect directly.
• Herbicidal soap: Potassium salt-based, it effectively controls very young weed seedlings. • Botanically-derived insecticides: These include pyrethrums, which are derived from the
chrysanthemum plant, neem oil, from seeds of the Neem tree, and ryania, derived from Ryania plants. While these materials are generally safer to the user and the environment than conventional pesticides, they may also kill beneficial insects and may not be as effective in control of pests.
• Sulfur sprays: Good all-purpose fungicides, which can also help control mites. • Bt: Bacillus thuringiensis, a bacterial biological control, is effective against leaf-eating
caterpillars. For best control, must be used when caterpillars are young. • Horticultural oils: Most effective when applied as a dormant spray during fall and winter.
Controls many types of insects and insect eggs, including aphids, scale and mealybugs.
66
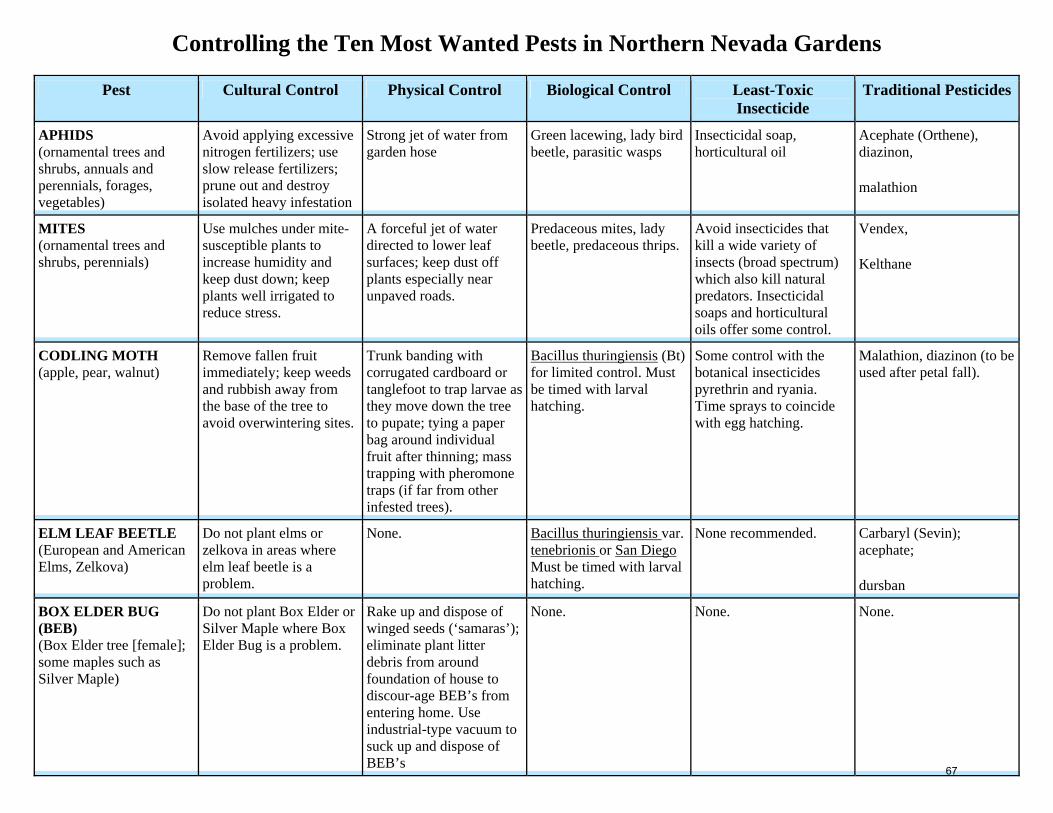
Controlling the Ten Most Wanted Pests in Northern Nevada Gardens
Pest Cultural Control Physical Control Biological Control Least-Toxic Insecticide
Traditional Pesticides
APHIDS (ornamental trees and shrubs, annuals and perennials, forages, vegetables)
Avoid applying excessive nitrogen fertilizers; use slow release fertilizers; prune out and destroy isolated heavy infestation
Strong jet of water from garden hose
Green lacewing, lady bird beetle, parasitic wasps
Insecticidal soap, horticultural oil
Acephate (Orthene), diazinon,
malathion
MITES (ornamental trees and shrubs, perennials)
Use mulches under mite-susceptible plants to increase humidity and keep dust down; keep plants well irrigated to reduce stress.
A forceful jet of water directed to lower leaf surfaces; keep dust off plants especially near unpaved roads.
Predaceous mites, lady beetle, predaceous thrips.
Avoid insecticides that kill a wide variety of insects (broad spectrum) which also kill natural predators. Insecticidal soaps and horticultural oils offer some control.
Vendex,
Kelthane
CODLING MOTH (apple, pear, walnut)
Remove fallen fruit immediately; keep weeds and rubbish away from the base of the tree to avoid overwintering sites.
Trunk banding with corrugated cardboard or tanglefoot to trap larvae as they move down the tree to pupate; tying a paper bag around individual fruit after thinning; mass trapping with pheromone traps (if far from other infested trees).
Bacillus thuringiensis (Bt) for limited control. Must be timed with larval hatching.
Some control with the botanical insecticides pyrethrin and ryania. Time sprays to coincide with egg hatching.
Malathion, diazinon (to be used after petal fall).
ELM LEAF BEETLE (European and American Elms, Zelkova)
Do not plant elms or zelkova in areas where elm leaf beetle is a problem.
None. Bacillus thuringiensis var. tenebrionis or San Diego Must be timed with larval hatching.
None recommended. Carbaryl (Sevin); acephate;
dursban
BOX ELDER BUG (BEB) (Box Elder tree [female]; some maples such as Silver Maple)
Do not plant Box Elder or Silver Maple where Box Elder Bug is a problem.
Rake up and dispose of winged seeds (‘samaras’); eliminate plant litter debris from around foundation of house to discour-age BEB’s from entering home. Use industrial-type vacuum to suck up and dispose of BEB’s
None. None. None.
67

Pest Cultural Control Physical Control Biological Control Least-Toxic Insecticide
Traditional Pesticides
POWDERY MILDEW (common to many landscape plants and vegetables)
Avoid excess fertilizer; plant mildew-resistant varieties; remove and dispose of fallen leaves.
If infestation is limited, prune out and destroy affected leaves; prune plant to open canopy and improve circulation; move plant to an area of less shade and more air circulation.
None. Baking soda spray, sulfur Triforine (Funginex by Ortho).
CYTOSPORA CANKER (cottonwood, aspen, willow, poplar, many ornamental trees)
Avoid planting susceptible species; keep trees well watered. Fertilize with moderate amounts of slow-release fertilizer.
Prune out infested twigs and branches when disease is first observed. Disinfect tools with 20% bleach solution between cuts. Once disease is in main trunk, nothing can be done.
None. None. None.
BLACK VINE WEEVIL (Rhododendron [some resistant], lilac, privet, euonymous
Select rhododendrons that are not as susceptible (P.J.M.); keep susceptible plants well watered throughout summer months.
Sticky barriers to prevent flightless adults from climbing into canopy.
Parasitic nematodes None recommended Acephate (apply to leaves and soil surface when leaf notching appears).
FIREBLIGHT (members of the Rose family including apple, pear, pyracantha, Mountain ash)
Plant resistant varieties or avoid members of the Rose family where fireblight has been a problem.
Prune out infested twigs and branches well below where symptoms appear. Disinfect tools with 20% bleach solution between cuts.
None. Limited control with Bordeaux (copper sulfate) or copper fungicides applied several times during bloom periods.
None recommended.
BROADLEAF LAWN WEEDS (stressed lawns)
Keep lawns healthy by irrigating, fertilizing, mowing and aerating appropriately to encourage vigorous growth. Remove lawns on steep slopes and replace with low-maintenance ground-covers.
Hand-pull perennial weeds; keep weed from going to seed.
None.
Herbicidal soaps (treat individual weeds).
Spot-treat with herbicides containing 2,4-D (avoid broadcast application of "weed-and-feed" products).
NOTE: Trade and/or brand names are for illustration purposes only and do not constitute an endorsement by University of Nevada Cooperative Extension. 68
Pasture Weed Control
The goal of weed control in pastures is to reduce the weed populations below the level at which they are damaging. It is often possible to use IPM techniques, including cultural, physical and biological methods, to effectively control weeds. While there are times when the use of herbicides is necessary to reduce weed populations so that other methods can be effective, an IPM approach to weed control will reduce the amount of herbicide needed and discourage haphazard and wasteful herbicide use.
The first step to controlling pasture weeds is to identify the problem weeds and their growth requirements and characteristics. For example, annual weeds are controlled differently than perennial weeds; deep-rooted weeds that spread by underground parts require a different type of control than weeds that spread by seed; and biological control is plant-specific and requires identification of weed and predator. The extent of the weed invasion and the environmental conditions must also be known. Is the invasion well-established over a large area or a small, spotty invasion? You may not want to till a permanent pasture repeatedly, but frequent mowing may be a reasonable solution. The amount of labor involved and the cost should also be considered.
Weed prevention is the first step in any weed control program. Prevention involves proper land, crop and water management (or "cultural control"). Providing competition from more desirable plants is the most common technique used in weed control, whether you introduce highly competitive plants or maintain the natural vegetation in the best possible condition. These tips will help prevent weed problems:
• Reseed bare areas with desirable varieties at the appropriate rates to discourage weed establishment. Before seeding, destroy weed competition by cultivation. Prepare the soil as a seedbed, water it and wait several weeks. Re-cultivate the soil to kill weed seedlings, then reseed.
• Plant only certified seed to ensure the seed is free of weeds. Pick the appropriate type and quality to provide forage for your animals.
• Use appropriate rotational grazing management to avoid overgrazing and stressing pastures; otherwise weeds will outcompete your pasture mixes. (see Chapter 3)
• Livestock should be contained for at least five days after grazing weeds bearing seeds before they are moved into weed-free areas. Many seeds are spread with animal manure.
• Properly treat animal waste to kill weed seeds by composting the manure prior to land application. (see Chapter 7)
• Apply the appropriate amount of water, neither too much nor too little, to keep your grasses healthy.
Annual weeds are spread when the mature plants produce seeds after flowering has occurred. These weeds can be effectively controlled by mechanical means which physically damage or destroy the weed, removing flowers before they go to seed, or by maintaining a full stand of desirable plants in the pasture. Mechanical controls include:
• Handpulling - for small scale infestations or where tillage instruments cannot be used.
• Digging or grubbing. This is useful in small infestations and when matured weeds need to be gathered for burning to confine the seed to one location. Some weeds need the entire root removed because remaining fragments will regrow. Be sure to identify the weed and its growth habits before pulling or digging.
• Cultivation, harrowing or tillage lifts the weed from the soil and buries it. Root disturbance and burial will control small weeds. Cultivation twice prior to reseeding can be an effective means of controlling weeds. This method is not as useful for established pastures, where disturbance to the sod should be minimized.
• Be cautious when cultivating established perennial weeds. If this method is not used properly and frequently, it can increase the rate of invasion.
• Mowing is very effective on tall growing weeds. Mowing prevents seed production and reduces the weed's ability to compete. It is most effective when it starts very early in the spring, when the weed's food reserve is low. Mowing frequently will prevent the weed from replenishing the root food reserve and scattering seed.
• Burning is used to reduce the weed population and to kill seeds. Weeds should be burned
69
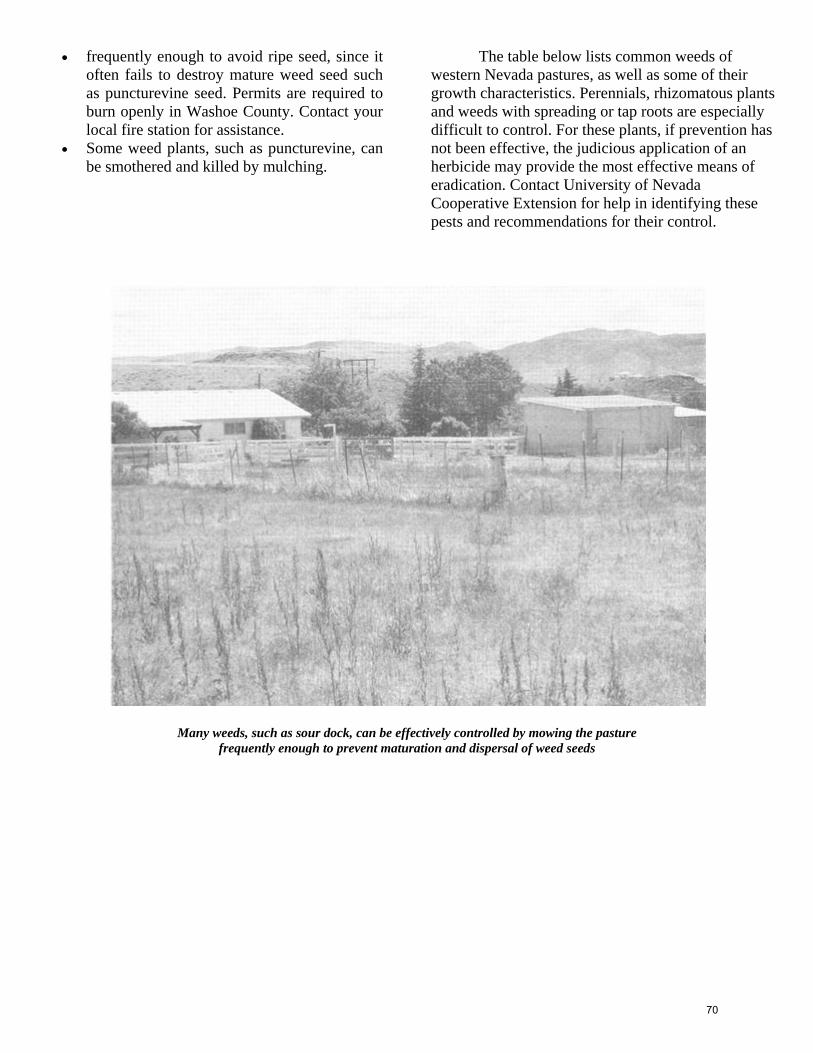
• frequently enough to avoid ripe seed, since it
often fails to destroy mature weed seed such as puncturevine seed. Permits are required to burn openly in Washoe County. Contact your local fire station for assistance.
The table below lists common weeds of western Nevada pastures, as well as some of their growth characteristics. Perennials, rhizomatous plants and weeds with spreading or tap roots are especially difficult to control. For these plants, if prevention has not been effective, the judicious application of an herbicide may provide the most effective means of eradication. Contact University of Nevada Cooperative Extension for help in identifying these pests and recommendations for their control.
• Some weed plants, such as puncturevine, can be smothered and killed by mulching.
Many weeds, such as sour dock, can be effectively controlled by mowing the pasture frequently enough to prevent maturation and dispersal of weed seeds
70

Common Pasture Weeds of Western Nevada
Annuals Plant Characteristics
Redroot pigweed Amaranthus retroflexus
grows on disturbed sites
Cheatgrass (chess) Bromus tectorum
Shepherdspurse Capsella bursa-pastoris
Diffuse knapweed Centaurea diffusa
grows in dry, compacted soil
Yellow starthistle Centaurea solstitialis
Lambsquarter Chenopodium berlandieri
very competitive
Flixweed Descurainia sophia
Prostrate spurge Euphorbia glyptosperma
rhizomatous
Clasping pepperweed Lepidium perfoliatum
Common mallow* Malva neglecta
Pineappleweed Matricaria matricaroides
Prostrate knotweed Polygonum aviculare
grows in dry, compacted soil
Russian thistle (tumbleweed) Salsola iberica
grows on disturbed sites
Puncturevine (goathead) Tribulus terrestris
has thorny burs
Biennials Plant Characteristics
Common burdock Arctium minus
Musk thistle Carduus nutans
very competitive
Redstem filaree* Erodium cicutarium
has forage value
Curlycup gumweed* Grindelia squarrosa
Prickly lettuce* Lactuca serriola
grows on disturbed sites; tap root
Scotch thistle Onopordum acanthium
very competitive
Western salsify Tragopogon dubius
tap root
Common mullein Verbascum thapus
Perennials Plant Characteristics
Showy milkweed Asclepias speciosa
spreading roots
Russian knapweed Centaurea repens
spreading roots
Chicory Cichorium intybus
grows on disturbed sites; tap root
Waterhemlock Cicuta douglasii
poisonous; tap root; grows in wet sites
Canada thistle Circium arvense
spreading roots - do not plow or till
Field bindweed Convolvulus arvensis
tap root
Nutsedge Cyperus rotundus
tubers
Squirreltail Sitanion hystrix
Scouringrush (horsetail) Equisetum laevignatum
Foxtail barley Hordeum jubatum
grows in wet areas
Perennial pepperweed (tall whitetop) Lepidium latifolium
spreading roots; rhizomatous; grows in wet areas
Buckhorn plantain Plantago lanceolata
Broadleaf plantain Plantago major
Curly dock (sour dock) Rumex crispus
grows on disturbed or wet sites; tap root
Dandelion Taraxacum officinale
tap root
Deathcamas Zigadenus venenosus
poisonous
* may also be biennial/annual
71

Rodent Control
The first and most important part of any pest program is to identify the pest you wish to control. Some rodents can be identified visually; others are identified by their tunnelling and mounding habits. For instance, a mole mound is conical and seldom more than a foot in diameter. The pushed-up dirt will be cloddy or coarse with the hole in the center of the mound. Gopher mounds, on the other hand, have fine soil pushed up around the edges, and will be 1 to 3 feet in diameter. A gopher mound resembles a horseshoe or kidney.
Once you have identified the pest, you may choose from all four methods of control: physical, cultural, biological, and chemical. Cultural controls include techniques which disturb the animal’s habitat, such as mowing, burning, dethatching or tilling. Voles, or meadow mice, for instance, prefer areas with a heavy ground cover of grasses, grass-like plants or litter. Voles are particularly troublesome because they are voracious feeders and can even cause tree death due to girdling. They also are carriers of plague (Yersinia pestis).
To effectively use cultural control for rodents, you will need to eliminate their protective cover of weeds and litter. Burning your fields in the fall or spring encourages natural predators such as hawks, owls and coyotes to feed upon the exposed varmints, reducing populations. You can encourage the presence of raptors in your pastures by installing raptor poles in the corners of fields. (see "biological controls") Tilling or furrowing affected areas can also be very effective, but may not be appropriate for permanent pasturelands.
Physical controls of rodents include live trapping, snap trapping, shooting or clubbing. Do not discharge firearms in congested areas. Check first with your local police department to determine legality.
The two most commonly used types of traps are the live-catch trap and the snap trap. Live-catch traps are usually rectangular boxes of wire mesh with a trap door that closes when the animal touches a trigger in the trap. Once caught, the animal can be carried in the trap to the local humane society or released in an acceptable area. Snap traps are
This sturdy raptor pole provides an ideal perch for hawks and other raptors who will help control rodent populations without use of traps or poisons.
72

designed to close on the leg or body of the animal when it touches the trigger. Some are designed to kill the animal, while others hold the animal until the trapper releases it. Snap traps must be staked or attached to a tree or pole so the animal can not drag the trap away. Be sure the snap trap is located in an area where you can not accidentally trap a child or pet. Whichever type of trap you choose to use, be sure to check it daily.
To trap moles or gophers successfully, first locate the mainburrow area. To determine which tunnels are in active use, flatten the soil ridges. Those that are raised the following day are still active. Use a rod or shovel to probe through these tunnels for the main burrow. Once found, expose the burrow using a shovel, and place two snap or live traps in the burrow. Each trap should have jaws or doors open towards the access tunnel. For moles, be sure to stake the trap, since these animals are strong enough to drag traps a long distance.
Biological controls include predators such as dogs and cats, as well as installation of raptor poles
to allow a perch for hawks preying on rodents. These poles should be about 20 feet high, with a sturdy crossbar at the top to provide a perch.
Chemical controls involve the use of poisoned baits. For certain types of rodents, such as voles, chemical controls can be very effective. The chemical of choice for voles is zinc phosphide, which is a restricted-use pesticide and can only be administered by a licensed applicator. These chemicals must be applied with extreme care to ensure only the target species can feed upon the poisoned grains. Before using any poisoned baits, check to make sure there is little chance of secondary kill of raptors or pets. Keep them out of reach of children when using and storing them.
The following page lists common rodent pests in northern Nevada gardens and pastures, as well as suggestions for physical, cultural and chemical controls for each pest. For assistance in identifying pests or mapping out a control strategy, contact the Integrated Pest Management Assistant at University of Nevada Cooperative Extension.
73

Common Animal Pests in Northern Nevada Pastures
Pest Cultural Control Physical Control Chemical Control
Vole ("meadow mouse") (grayish brown with short tail and nose, active day and night, feeds on grasses, seeds, bark, roots, some insects; reproduces prolifically)
Avoid accumulations of plant materials or weeds in fields and gardens. Burn, mow or rototill as needed. Attract raptors and natural predators. Use wire cylinders to exclude voles from seedlings and young trees (1/4" mesh or smaller). Bury wire 6" deep.
Populations are generally too large to effectively trap; try mouse traps or live traps.
Zinc phosphide. **Must be administered by a licensed applicator. Consult the yellow pages under "Pest Control".
Gopher (brown/tan burrowing rodents; live and feed underground; eat roots, bulbs and plants pulled underground; solitary and very territorial; leaves mounds of dirt on soil surface)
Tilling, harrowing or other means to disrupt the habitat. Plastic netting protects seedlings. Flood habitat areas. Cats can also help control populations.
Use live or snap traps inside main runways. Level mounds after trapping and check for new activity.
Poisoned grain baits may be effective. Contact a professional pesticide applicator.
Mole (small, to 6" long, gray to black, poor eyesight, live underground, eat insects, damage plants by their tunneling activities)
Tilling, harrowing or other means to disrupt the habitat. Control soil insect populations. Flood the affected area.
Use live or snap traps inside main runways. Level mounds after trapping and check for new activity.
Poisoned baits and repellents are generally ineffective, since this animal is an insectivore.
Ground squirrel (tan to brown, often social, living in underground colonies; feed on new green sprouting vegetation, seeds, nuts, vegetables, fruits, and grains; can transmit diseases)
Generally ineffective. Ground squirrels are good climbers so fencing is not a solution. Try flood irrigation and packing the soil. Cats and dogs may help control populations.
Traps are effective if populations are not excessive. Set traps near burrow entrances and bait with peanut butter, nuts, or raisins. Wear gloves and protective clothing when disposing of animals.
Poisoned grain baits may be effective. Contact a professional pesticide applicator.
Black-tailed jackrabbit (familiar long ears ["hare"], brownish gray in summer, active all year long, feed during the day, eat any tender plants, vegetables, bark, twigs and buds)
Use excluder fences of 1/4" mesh wire, buried 6" deep. Wire should be more than 42" high. Apply tree trunk guards. Plant less desirable crops. Dogs can help control populations.
Funnel traps may be effective. Shoot individuals if permitted.
Poisoned grain baits may be effective. Contact a professional pesticide applicator.
Yellow-bellied marmot (large, brown/black/ reddish; feed on grasses and hay)
Eliminate dry rock pile habitat areas. Use live traps or jawed traps. Shoot individuals if permitted.
None recommended.
74
Chapter 12
YOUR RESIDENTIAL LANDSCAPE CAN BE BEAUTIFUL, WATER EFFICIENT, AND EASY ON THE ENVIRONMENT
As discussed in Chapter Two, the typical small ranch in western Nevada consists of the agricultural landscape (pastures, vegetable garden, compost pile, outbuildings, etc.) and the residential landscape (lawn, shrubs, flower beds, trees, patio, etc.). Most residents fence off a half acre or so of residential landscape around the house for use by family and friends. Depending on the interests of the owners, the residential landscape can be a “labor of love” − an elaborate showplace requiring many hours of maintenance each week − or a smaller, simpler, low-maintenance landscape that almost takes care of itself. Whether you purchased your property with landscaping in place or you plan to install a landscape from scratch, a basic knowledge of appropriate landscaping practices for western Nevada is worth some time and study.
Appropriate Landscaping
A landscaping design that makes sense in Ohio, North Carolina or New York State is probably not appropriate in western Nevada. The climate, elevation and ecosystem are that of a classic “cold desert.” In fact, the Great Basin Desert is one of the three main deserts in North America, the other two being the Sonoran and Mojave, both of which are “warm deserts.” Nevada is the driest state in the nation. Its soils are alkaline and inorganic, and irrigation is required. The growing season is short with wind and lots of sun. Appropriate landscaping in western Nevada may be best defined in terms of regional planning goals. As a community, we should plan to use our surface and groundwater supplies in a beneficial and sustainable manner. We want to be sure to prevent pollution of our water supply and to avoid water waste or needless overuse. Wasting and polluting water limits the total water available and may create problems for our children and for wildlife for decades to come. Long range thinking incorporates appropriate landscaping to use water efficiently and protect the quality of our water resources. Getting the most benefit from limited supplies of water is possible by applying basic principles of landscape design and irrigation management.
1) Start with a plan A non-polluting, water-efficient landscape begins with a good design. Start by determining what you want the landscape to do for you. Consider room for entertaining or recreation, space for pets, gardening or even privacy. Maybe your children need a “yard” to play in. Most likely it will be a combination of all these. Once you decide what the function of your landscape will be, make a plan showing how much lawn is needed, where to place trees and shrubs, and where the outdoor living areas will be. The accuracy of the plan is important since it will be used to determine construction material needed and the number and placement of plants. 2) Get it on paper Draw a map of your property to scale. Use a scale of either 1/8 or 1/4 inch to equal one foot. Graph paper is available in both sizes. Draw your house, walks, driveway, boundaries, and other features, such as existing trees, power poles, ditches, well, septic system, etc. To show which parts of the yard will get the most sun, indicate on the map which side of the yard faces south. Identify possible microclimates in the yard. These are areas that may be cool in dense shade or hot in sunny spots. Problems such as a steep slope, poor drainage or the need to screen unattractive sights should be taken into consideration. Follow these rules in planning your residential landscaping for slopes: 1. The slope must be stable. Put a toe wall on the
slope to keep it from eroding. A toe or retaining wall can consist of a rock wall with drainage, landscape timbers, lock blocks or other materials.
2. Manage the water draining from the slope. You
may need to install a French drain or other engineered drain.
75

3. Consider the specific plant material to be used. It should have strong rooting characteristics so it will help stabilize the slope.
4. Use irrigation methods which are suited to
slopes. The best methods are drip irrigation or sprinkler irrigation. Apply more water at the top of the slope than at the bottom, and use short cycles of sprinkling to allow the water to soak in. Always avoid saturating the soils so slumping or runoff will not occur.
For more information on slope stabilization, see chapter 6. 3) Hard surfaces in the landscape Hard surfaces such as walks, decks and patios are important parts of the landscape. They provide areas that are easy to maintain for traffic and recreation. They need to be a useful size and should be a part of the overall landscape design. Keep in mind that hard surfaces reflect light and heat and can cause water runoff. The careful placement of trees and shrubs can intercept runoff and modify the intensity of the light or heat. 4) Examining the soil Knowing the type of soil you have in your yard is essential before planning and choosing plants for a water efficient landscape. Since each soil has its own unique structure, texture, percolation rate, water and nutrient holding capacity, and pH range, it’s important to have a soil test from a laboratory before doing any planting or landscape construction. Check in the Yellow Pages for laboratories that do agricultural soil testing. Cooperative Extension can also supply phone numbers for soil testing laboratories. If you have bought a new house, if you are extensively redoing your landscape or if you have serious soil problems due to compaction or deposition of heavy subsoils, follow these rules: 1. Check for compacted areas where water drainage
is poor. 2. Roughly grade the area, sloping the land away
from the house to avoid drainage problems. Remove rocks and debris.
3. Reduce compaction using 18 to 24 inch deep
spikes pulled behind a tractor. This rips compacted layers and introduces air into the soil.
4. Add trenches for your irrigation system pipes using light duty equipment to avoid re-compacting the soil.
5. Determine the amount of organic matter needed.
Use a minimum of 6 to 8 inches. Add one-third of the total organic matter needed, rototill into the soil, and repeat with the remaining organic matter. This helps avoid layering.
6. Regrade the soil, picking up any stones or debris. 5) Plant selection Appropriate plant selection is an important factor in a water efficient landscape. Choose plants that will tolerate the site, keeping in mind the soil type, topography, and climatic factors such as low temperatures, wind and exposure. Native plants are often associated with a water efficient landscape; however, some of them use just as much water as introduced species. If you plan to incorporate low water use plants into zones that are watered only once a week once established, see the plant list at the end of the chapter for suggestions. Other criteria important for plant selection include: • Mature Height and Spread Select plants that will mature to the height and spread needed according to your plan. If this is not done, the plant may overgrow its intended space and cause damage to structures, maintenance problems and competition with other plants for space, nutrients and water. • Practical Use Ask yourself - Is the plant suitable for the site? Will it block views? Will it grow into adjacent yards? Will it serve its intended use? Will the tree provide shade where needed? In general, deciduous shade trees are a good choice along the southeast, south, and southwest walls of a house. They provide shade in summer but allow sunlight to warm the house during winter. • Growth Characteristics Does it flower? Does it fruit? Does it produce fall color? How fast will it grow? What is its shape? Does it drop seeds, pods or other debris? • Texture Plants produce a wide variety of leaf shapes. A narrow leaf is considered fine textured while a wide
76
leaf is coarse. Variety in texture adds interest to the landscape. 6) Appropriate turf areas Turfgrasses are some of the most versatile and functional plants in the landscape. Lawns reduce runoff and control erosion. The water applied to them can help recharge the groundwater. Another benefit of turf is that it reduces heat build-up around our homes and lessens the need for air conditioning. It also cleans the air of dirt and dust before it enters our homes. All turfgrass species recommended for our area can survive on twice a week watering once they are established. Refer to The All Seeing, All Knowing Lawn Care Manual, produced by the University of Nevada Cooperative Extension, for lawn watering tips. Maximum water conservation is achieved when lawns are irrigated separately from trees and shrubs. However, when severe water restrictions are in place, lawns may begin to go dormant and turn brown. This does not necessarily mean the grasses are dying. They will regain their normal color as soon as they receive the normal amount of water. An appropriate turf area is one which uses lawn for a specific function. It can be a small oasis near the entrance of the home or a larger area for play. Whatever the need, make certain it is serving a purpose and is no larger than necessary. Plan turf areas in shapes that can be easily irrigated and maintained. Don’t design them with sharp, narrow angles and/or long slender planting strips which are difficult to irrigate efficiently, as well as mow. If your yard has a steep slope, avoid planting turfgrass. Rather, use ground covers that require little maintenance or erosion control grasses like Sheep Fescue which will stabilize a slope once established and do not require mowing. Ground covers, shrubs, mulches and trees can be used in areas not covered by lawn and efficiently irrigated with bubblers or drippers. 7) Efficient irrigation system To have a water efficient landscape, it is important that the irrigation system be designed according to the soil type and the needs of the plants. It’s also important for lawn sprinkler systems to be designed for 100% overlap or “head to head” coverage. This will ensure even distribution of water which will eliminate potential dry spots. Turf has a different water requirement than newly established trees, shrubs, flowers and vegetables, so zone the turf area separately. Other landscape areas can be
irrigated using a bubbler, drip emitters or micro-sprays. Run separate drip irrigation circuits to zones requiring water every 2 or 3 days after establishment and to areas needing only weekly watering. 8) Mulches Mulches play an important role in the landscape. Organic mulches such as bark, compost, sawdust and plant waste like straw, leaves and grass clippings will reduce evaporation from the soil, allow water to infiltrate and control weeds. Put mulch around plants to a depth of at least 2 to 3 inches. Because they decompose, they should be checked periodically and replenished to maintain this depth. Inorganic mulches include gravel, sand, river rock and plastic. They can be used in places where plants are not wanted, such as storage and work areas. Black plastic weed barriers covered with gravel are best for weed control, but not over the roots of landscape plants. Many Nevada residents have found that low sculpted mounds covered with river rock mulch or bark chips can make attractive sites for a variety of flowers or shrubs individually watered by drip emitters. A list of low water use plants has been included at the end of this chapter. For vegetable gardens, black plastic and drip irrigation conserves water, controls weeds, can increase yields and accelerates plant maturation. However, do not use plastic around the base of trees and shrubs. This interferes with air and water movement, which can cause root diseases in woody species. Use a weed barrier or landscape fabric around ornamentals instead. 9) Maintenance The primary objective of a water efficient landscape is to keep plants healthy with a minimum amount of water. Overwatering can contribute to weed invasion, more insects and disease problems in the landscape, especially root rot. A water efficient landscape is low maintenance, but not “no” maintenance. Frequent checks of lawn and drip irrigation systems are important to make certain they are working properly and supplying the right amount of water to the plants. The two main concerns are to make certain sprinklers are adjusted correctly and bubblers or drip emitters are unclogged. Fertilizing lawns during the spring and early fall is ideal for Nevada’s cool season grasses. Excessive summer fertilization promotes thatch, weakens roots and may cause leaf burn. Growth of cool season grasses is reduced during the hot summer months. A lush, dark green, vigorously growing fertilized lawn
77

Best Management Practice #10: Fertilizer Management
Fertilizer management involves the careful application of fertilizers, based upon plant nutritional requirements and soil nutrient deficiencies, to prevent excess nutrients from reaching surface and ground waters. Use of fertilizers is usually necessary to achieve complete establishment of plants when revegetating or landscaping. Overuse is harmful. Fertilizers should not be used in or near stream channels or wet areas.
during mid-summer becomes weak, because it is using stored energy that would otherwise be used for winter survival. 10) Correct mowing heights Research has shown that cutting cool season grasses too low causes roots to die. Roots should grow as deep as they can to take advantage of as much of the available moisture as possible. Cut bluegrasses and ryegrasses at 2 to 2.5 inches high and all fescues at 2.5 to 3 inches. Mow when the grass has grown a third higher. Removing more than 1/3 of the blade will injure the root system.
11) Aerating turfgrass If water runs off your lawn after a short watering period, you probably have compacted soils. By aerifying or coring your lawn in the spring or fall (simply poking holes in it), you can relieve compaction, reduce runoff, increase air and water movement into the soil and get better response from your fertilizer for a greener, sturdier grass. 12) Low maintenance in the landscape There are several ways to minimize maintenance. One of these is to use pest free plants. Gardening guides will often indicate if a plant is “pest free” or indicate if diseases or insects attack it. Limit flower beds to areas near patios or decks where they can be easily viewed and maintained, as shown below. Some portions of the yard should be paved. Heavily-trafficked areas are almost impossible to maintain if they are kept in grass or ground covers; it’s more practical to pave them. Often, placing paving stones among ground covers works well. Remember: THE WATER EFFICIENT LANDSCAPE begins with a plan that allows for future growth of both the family and the plants. It incorporates the various uses of the yard, advocates plants in appropriate areas, provides efficient irrigation systems, allows access for ease of maintenance and includes both hard and soft surfaces in the design. To help you keep track of your monthly maintenance needs, we have included a list of month-by-month landscape care tips and a calendar for planning your yearly maintenance chores.
A water efficient residential landscape combines appropriately sized turf areas with mulched beds where plants are irrigated with a drip system.
78

MONTH BY MONTH RESIDENTIAL LANDSCAPE TIPS FOR WESTERN NEVADA
(For more information or to obtain publications, contact the Horticulture Office at University of Nevada Cooperative Extension, 5305 Mill Street, Reno, 784-4848.
Due to variable weather, dates are somewhat flexible.)
JANUARY
Pruning Prune evergreen trees and shrubs, deciduous summer flowering plants, and possibly fruit trees towards the end of the month.
Watering Water trees and shrubs, deciduous or evergreen, if there has not been any precipitation for 3 to 4
weeks.
FEBRUARY Pests In February spray lime sulfur and dormant oils for insect and disease control. Use preemergent
weed controls at the end of the month. Pruning Prune evergreen trees and shrubs and deciduous summer flowering trees and shrubs. This is
also an excellent time to prune fruit trees. Watering Water as needed if there has been little precipitation and the ground has thawed.
MARCH Planting March is one of those unpredictable months. Be careful of starting your garden too early.
Sweet peas and other hardy seeds can be planted in the middle of the month. Asparagus and other hardy vegetables and perennials can go in. Perennials can be divided and replanted. Plant woody material like trees and shrubs. Bare-root ornamentals may be planted. Sod lawns can be started towards the end of the month. Lawns seeded with bluegrass seed will take off very slowly − more than 3 weeks for germination. Fescue seed germinates a little more rapidly than bluegrass, but still will be slow. Rye grass seed will germinate more quickly than the others. Once soils warm up a bit seed does better. Start vegetable and flower seeds of more tender plants indoors for later spring planting. Start them 6 weeks before you plan to put them outside.
Soils This is the perfect time to get your soil into shape. Start with a soil test at the University of
Nevada Cooperative Extension office. Work 3 to 6” of organic matter into the soil of vegetable gardens and place 1 1/2 to 2” on lawns once the soil has dried out a little. Aged manure works well.
Weeds This can be a good time for preemergent weed control in lawns and flower beds and dormant oil
and lime spraying for insect and disease control. Pruning Prune fruit trees, summer flowering deciduous plants and many evergreens early in the month. Lawns Fertilize and thatch or aerate the lawn. Ask for Cooperative Extension’s lawn care publications. You may need to start watering your yard as weather dictates.
79

APRIL General Clean up the yard. Planting Plant trees and shrubs. Fertilize existing trees and shrubs. Plant perennials and cold hardy
vegetables such as onions, spinach, peas, turnips, and asparagus. Plant bare-root stock early in the month.
Pests Water regularly and watch out for aphid infestations on fruit trees and ornamental deciduous
trees such as ash and willow. Spray fruit trees for codling moth control after 90% petal fall. Repeat weekly according to label directions. Keep your eye out for other insect problems. April can be an excellent time for disease control, including fire blight on fruit trees and cool season turf diseases. If caught early enough, control is often much easier, and the need to use chemicals may be avoided.
Lawns Now is a good time to seed lawns or plant sod. Aerate existing lawns to reduce soil compaction
and increase water penetration. Fertilize the lawn early in the month. Watch the ET (evapotranspiration) report in the newspaper to find out how much water your lawn needs each week. Avoid overwatering. Repair sprinklers and check for 100% overlap for complete coverage.
Pruning Rose pruning can take place from mid March through April. Prune junipers and other
evergreens.
MAY Frost The last frost date is about May 15 to May 23 in protected areas and closer to June 1 in outlying
valleys which are higher in elevation or less protected from inclement weather. Plant your vegetables accordingly.
Weeds Control weeds before they go to seed. This way you will reduce your weed problems for next
year. Pests Control codling moths by spraying according to label directions every week to 10 days until
harvest. Control aphid populations with biological controls or soap sprays. Wash down evergreens with water to discourage mite populations. Encourage birds, toads and beneficial insects by limiting your use of pesticides. They will help maintain the proper balance in your yard.
Lawns Fertilize the lawn, trees, and perennials. Obtain publications from Cooperative Extension. Pruning Shear and shape conifers at this time or later, after the new candle growth has ended. Remove up to 90% of the new growth but not all of it. Do not remove the leader of the tree.
JUNE Watering Check sprinkler systems to see if they are working properly. Deep waterings with a drying out
period are usually more beneficial than shallow, frequent waterings. The on/off method works well (on for a few minutes, off until the water soaks in, and repeat).
Planting Early in the month is the best time to set out annuals, perennials, warm season vegetables such
as tomatoes and peppers, herbs and strawberries. Thin fruits and vegetables. Thin apples, apricots, pears, peaches and plums. Space apricots and most plums 3 to 5 inches apart. Thin pears, peaches and apples 4 to 6 inches apart. Pull weakest beets, carrots, lettuce, radishes, turnips and other new vegetables to the recommended spacing.
80
Pruning Trim blooming shrubs such as forsythia and quince immediately after flowers have faded. Keep faded flowers cut off. Allow spring bulbs to completely dry out before removing their foliage.
Lawns Fertilize the lawn with a slow release fertilizer. Do not use weed killer/fertilizer combinations
around trees and shrubs because trees and shrubs absorb chemicals through the root system. These chemicals can seriously damage your broadleaf plants. It's a better practice to spot treat broadleaf weeds with 2,4-D and fertilize separately. It's more effective, cheaper, and safer, although more time consuming.
Fertilizing Feed perennials. Established perennials may need supplemental nutrients a year or two after
planting. Water in 2 to 3 pounds of a nitrogen fertilizer per 100 square feet of bed. Wash off any fertilizer that spills on leaves. Feed vegetables a complete fertilizer just after thinning and again as vegetables start to mature. Water fertilizer in thoroughly. Specific fertilizer recommendations may be obtained from Cooperative Extension. If your plants are showing symptoms of iron deficiency called chlorosis, which results in yellow leaves with prominent green veins, use chelated iron according to the label directions. Have your soil pH tested because higher pH can cause iron to be tied up in the soil and unavailable to your plants. Sulfur can help lower soil pH.
Pests Powdery mildew, a fungal infection, may show up on your roses this month. It affects other
plants as well, including apple, zinnias and dahlias. Thin inner branches of roses to increase air circulation, and apply a mildew-fighting fungicide to the foliage.
Weeds After removing all weeds from shrub areas, mulch the plants. Spread a layer of mulch at least 3
inches thick around plants to retain moisture and reduce further weed production.
JULY Pesticides A major problem in July is insects. Extreme care must be taken in the use of pesticides. The
best practice is to use them as a last resort. Learn what insect you are dealing with and find the right control. Pruning out damage, good sanitation and biological controls are the preferred best management practices. Don't apply insecticides if the wind is blowing or the temperature is above 85 degrees. Wear protective clothing. When finished, clean the sprayer and yourself. Store pesticides safely in their original containers under lock and key. See Chapter 11 for a complete pest management program and more information on the safe use of pesticides.
Pests Spider mites on shrubs can be a real dilemma. Evergreens that are fading in color and looking
sickly may on closer inspection be found to have dirty webbing covering branchlets. Frequent showers with the garden hose in addition to your regular watering can help you reduce spider mite populations for they thrive in hot dusty environments. You may need to use other controls as well. Squash bugs love your zucchini, pumpkins, cucumbers, watermelons, etc. The most direct control is to collect and destroy adults and egg clusters by hand. Adults can be trapped under boards or on pieces of burlap laid under plants.
Watering Proper watering is very important. Follow the ET report in the paper for lawn watering. Make
sure your trees are watered deeply (15'') to a distance equal to 2 to 3 times the dripline out from the trunk. Don't overwater lawns or trees, shrubs or other plants. Many problems result from overwatering and poor drainage, especially on evergreens, which will look greenish-yellow.
Mowing Mow lawns to a height of 2 to 3 inches. Lawns Avoid fertilizing the lawn with heavy amounts of nitrogen fertilizers at this time. The lush
tender growth encouraged by fertilizing does not withstand the summer stress of drought and heat. Mulching mowers work well.
Weeds Keep weeds down now, before they go to seed. This will help decrease the need for herbicides
next year. Mulch, cultivate or pull by hand. Chemicals should be used as a last resort.
81

Flowers Remove dead blossoms from your annual and perennial flowers to prolong bloom. This is
called “deadheading.”
AUGUST General Deep watering of trees, shrubs and lawns, mulching and weeding are main gardening events in
this hot month. Lawns Towards the end of the month or into September fertilize the lawn lightly with a slow release
fertilizer. As temperatures cool off, gradually reduce water to get your plants ready for the change of season.
Pruning Towards the end of the month and into September/October is a good time to prune maples,
birch, beeches, willows, poplars and elms. Always disinfect your tools with a 2 parts bleach to 8 parts water solution before pruning another tree. The best policy is to disinfect your pruning tools on every cut, because you can infest different parts of the same tree.
SEPTEMBER Lawns Lawn planting time − sod or seed − is here. Aerate your lawn. Fall fertilize your lawn with a
slow release fertilizer to reduce nitrogen leaching into your watershed. Follow the ET rate in the newspaper and begin to back off on watering the lawn.
Watering Towards the end of September, harden off trees and shrubs by gradually reducing your watering
frequency. Don’t abruptly turn off water. Planting This is a good time to plant trees, shrubs and perennials. New plants will need regular watering
from planting through the winter. You may want to consider root pruning - cutting part of a plant's roots with a sharp shovel if you plan on transplanting any trees and shrubs next month. By pruning about 1/3 of the roots about 6 weeks prior to transplanting, you can decrease the shock resulting from moving a plant.
Fertilizing Do not fertilize trees and shrubs at this time. You want to start hardening things off for winter
rather than encouraging tender new growth susceptible to freezing. Short days, cool nights, and reduced water and fertilizer causes woody plants to go dormant above ground for the winter.
Bulbs After the first frost when foliage has died down, tender bulbs such as canna, gladiolas, dahlias,
and begonias will need to be dug up and stored for winter at about 40 degrees. Frost To prolong your harvest, cover tender vegetables if freezes are expected. Harvest fruits as they
ripen on your trees. Records Keep garden records. What worked? What didn't work? What could work better? This will
help you plan next year's planting program.
OCTOBER Cleanup General cleanup of all plant materials is in order. This includes perennials, annuals, vegetables,
fallen leaves of shrubs and trees, old fruit, etc. Remember, good garden cleanup in the fall is the primary way to prevent disease and insect problems next year. By reducing the need for chemical use, you can reduce the amount of pesticide that may go into your watershed.
Watering Watering is the most crucial chore for the fall. Deciduous plants should be thoroughly watered
after leaf fall. Water 2 to 3 times beyond the drip line. Trees and shrubs, particularly
82

evergreens, should be watered deeply every 3 to 4 weeks throughout the winter if there has been no precipitation and if water will soak in. Lack of winter water will stress a plant as much as lack of summer water. Stressed plants suffer more disease and insect problems.
Winter Care Protect your plants for winter. Wrap thin-barked trees, such as maples, sycamores and fruit
trees to avoid sunscald. Apply a 3” layer of mulch on top of the soil around trees, leaving a 6” clearing around the trunk to avoid rodent damage. Mulching plants helps to conserve moisture. You may want to use antidessicant sprays on your evergreens to help reduce moisture loss from the needles. Reapply these products as needed after snow or rain. Screen broadleaf evergreens to reduce leaf burning. Prepare garden equipment and irrigation systems for winter by draining out water.
Lawns Sod lawns can still be planted until about the 15th if the soil is not frozen. It is too late to seed a
lawn. Planting Transplant trees, shrubs (after a couple of hard freezes) and perennials. Plant bulbs towards the
end of the month. Pests Apply dormant oil to fruit trees and the soil immediately around the trunk within a couple of
weeks after losing their leaves.
NOVEMBER
Fertilizing Your yard can benefit from a fertilization after things go dormant. You will encourage healthy
root production in soils still warm from summer. Next spring your plants will have already established root systems and grow very quickly. Use a fast or quick release soluble nitrogen fertilizer such as sulfate of ammonia.
Pruning This can be a good time for pruning evergreen trees and shrubs and summer flowering
deciduous plants. Remember to disinfect your tools − use 2 parts bleach to 8 parts water. Watering Deep water everything to get ready for the long freeze. Planting Bulbs should be planted. Winter Care Drain hoses and irrigation systems. Put tools and hoses away.
DECEMBER Watering Deep water if there has been no precipitation and if water will soak in. Every 3 to 4 weeks is a
good practice. Recording Write up your garden records. Sit back and plan next year. Look over your new garden catalogs and send away for seeds and plants.
83

LANDSCAPE MAINTENANCE CALENDAR
MAINTENANCE OPERATIONS JAN FEB MAR APR MAY JUNE JULY AUG SEPT OCT NOV DEC Trees, shrubs & woody ground covers
1 - Planting 2 - Fertilization 3 - Watering 4 - Insect control dormant oil dormant oil 5 - Disease control 6 - Pruning Evergreen Deciduous (spring flowering)
Deciduous (summer flowering)
Fruit trees Turf Areas 1 - Planting (fall seeding preferred)
2. Sodding 3 - Fertilization 4 - Watering 5 - Pest control 6 - Weed control Apply pre-emergent Apply post-emergent 7 - Renovation Core aerating Topdressing Overseeding Dethatching
Note: Long bars indicate optimal timing for the activity
84

Low Water Use Plants For Western Nevada
Once established with well developed root systems, the plants on this list could go on a separate drip line to be deep-watered once a week. Become familiar with water needs of individual species. Some may need supplemental irrigation and might do best in low spots or near downspouts, etc. Be particularly sensitive to drought stress during July and August. NOTE: These plants are intended for use in residential landscaping only. Some plants may be toxic to livestock, and have been noted with an asterisk (*).
Trees
Arizona Cypress Goldenrain Tree Russian Olive Cupressus arizonica Koelreuteria paniculata Elaeagnus angustifolia Ash London Planetree Scotch Pine Fraxinus spp. Platanus X acerifolia Pinus sylvestris Austrian Black Pine Northern Red Oak Singleleaf Pinyon Pine Pinus nigra Quercus rubra Pinus monophylla Black Locust* Norway Maple* Swamp White Oak* Robinia pseudoacacia Acer platanoides Quercus bicolor Green Ash Pinyon Pine Tree of Heaven Fraxinus pennyslvanica Pinus edulis Ailanthus altissima Hackberry Ponderosa Pine* Western Catalpa Celtis occidentalis Pinus ponderosa Catalpa speciosa Idaho Locust* Raywood Ash White Oak* Robinia ambigua ‘Idahoensis’ Fraxinus oxycarpa ‘Raywood’ Quercus alba Jeffrey Pine Rocky Mtn. Junipers* California Valley Oak Pinus jeffreyi Juniperus scopulorum Quercus lobata
Shrubs and Small Trees
Amur Maple* Desert Peach Scotch Broom Acer ginnala Prunus andersonii Cytisus scoparius Apache Plume Four wing Saltbrush Siberian Peashrub Fallugia paradoxa Artiplex canescens Caragana arborescens Austrian Copper Rose Harrison’s Yellow Rose Smoke Tree Rosa sp. Rosa harisonii Cotinus coggygria Bearberry Cotoneaster Junipers Snowberry Cotoneaster dammeri Juniperus spp. Symphoricarpos albus Big Sagebrush Lilacs Tamarisk, salt cedar Artemisia tridentata Syringa spp. Tamarix spp. Bitterbrush* Memorial Rose Tartarian Honeysuckle Purshia tridentata Rosa wichuraiana Lonicera tatarican Bush Cinquefoil Mormon Tea Western Chokecherry* Potentilla fruticosa Ephedra viridis Prunus virginiana var.
demissa Buffaloberry Mountain Mahogany Western Sand Cherry Shepherdia spp. Cercocarpus ledifolius Prunus besseyi Cliffrose Rabbitbrush (allergy) * Wormwoods Cowania mexicana Chrysothamnus spp. Artemsia spp. Creambush, Ocean Spray Ramanas Rose Yuccas Holodiscus discolor Rosa rugosa Yucca spp. Creeping Cotoneaster Cotoneaster adpressus
*may be toxic to livestock
85
Perennials
Baby’s Breath Feverfew* Palmer Penstemon Gypsophila paniculata Chrysanthemum parthenium Penstemon palmeri Blanket Flower Golden Perennial Flax Purple Sage* Gaillardia spp. Linum flavum Salvia dorrii Blue Beard Iris* Red Hot Poker Caryopteris incana Iris germanica Kniphofia uvaria Blue Flax Lupines* Rocky Mtn. Penstemon Linum perenne Lupinus spp. Penstemon strictus Buckwheat Michaelmas Daisy Russian Sage Eriogonum umbellatum Aster spp. Perovskia atriplicifolia Columbine Moss Pink Creeping Phlox Yarrows* Aquilegia spp. Phlox subulata Achillea spp. Coneflower Narrow Leaf Coreopsis Echinacea purpurea Coreopsis lanceolata Daylilies Ox-eye Daisy Hererocallis spp. Chrysanthemum leucanthemum
Ornamental Grasses - Meadow Grass
Blue Oat Grass Fountain Grass Raven Grass Helictotrichon sempervirens Pennisetum setaceum Erianthus ravennae Blue Fescue Pampas Grass Sea Oats Festuca ovina glauca Cortaderia selloana Uniola latifolia
Ground Cover (s= succulents)
Brooms Ice Plant (s) Silver Mound Genista spp. Delosperma spp. Artemisia schmidtiana
“Silvermound’ California Fuchsia Lamb’s-ears Snow-in-summer Zauschneria California Stachys byzantina Cerastium tomentosum Dragon’s Blood, Goldmoss, Stonecrop (s)
Lavender Lavandula spp.
Spurge* Euphorbia myrsinites
Sedum spp. Mexican Primrose Sulfur Flower Buckwheat Germander Oenothera speciosa Erigonum umbellatum Teucruim chamaedrys Mother-of-Thyme Virginia Creeper Hens-and-Chicks (s) Echeveria spp.
Thymus serpyllum Penstemon
Parthenocissus quinquefolia
Hall’s Japense Honeysuckle Penstemon spp. Woolly Yarrow* Lonicera japonica ‘Halliana’ Potentilla Achillea tomentosa Potentilla verna
Erosion Control Grasses
‘Covar’ Sheep Fescue Indian Rice Grass (sandy sites) Tall Wheatgrass Crested Wheatgrass ‘Scaldis’ Hard Fescue Streambank Wheatgrass Desert Wheatgrass Siberian Wheatgrass * may be toxic to livestock
86

GLOSSARY
A acid soil, alkaline soil, neutral soil. Acidity and alkalinity describe one aspect of the soil’s chemical reaction: A pH of 7 means that the soil is neutral, neither acid nor alkaline. A pH below 7 indicates acidity, above 7 indicates alkalinity. Many plants will grow well over a range of pH from slightly acid to slightly alkaline: some garden favorites are more particular. aeration - the process of loosening or puncturing the soil by mechanical means in order to increase water and air permeability. algal bloom - large, visible masses of algae found in bodies of water during warm weather. annual - a plant that completes its life cycle in a year or less. Seed germinates and the plant grows, blooms, sets seed, and dies - all in one growing season. The phrase “grow as an annual” or “treat as an annual” refers to technically perennial plants that are most attractive only during their first year - hence are better grown as new plants each year. aquatic - plants or animal life living in, growing in, or adapted to water. aquifer - a sand, gravel, or rock formation capable of storing or conveying water below the surface of the land. available nutrients - nutrient ions or compounds in forms that plants can absorb and utilize in growth. B bacteria - microscopic one-celled organisms which live everywhere and perform a variety of functions. While decomposing organic matter in water, bacteria can greatly reduce the amount of oxygen in the water. They also can make water unsafe to drink. Best Management Practices (BMP) - practices that have been determined to be the most effective, practical means of preventing or reducing water pollution from nonpoint sources. biodegradable - capable of being broken down (decomposed) by microorganisms.
biennial - a plant that completes its life cycle in two years. Typically you plant seeds in spring, set out the seedling plants in summer or fall. Plants bloom the following spring, then set seed and die. border - a soil berm 15 to 18 inches tall thrown up with a disk to keep flood irrigation water inside a given portion of the pasture. broadcast seeding - applying seed to a soil area by hand or with the aid of a seed spreader. buffer zone - neutral area which acts as a protective barrier separating two conflicting forces. An area which acts to minimize the impact of pollutants on the environment or public welfare. For example, a buffer zone is established between a composting facility and neighboring residents to minimize odor problems. A buffer strip is also a grassed or planted zone which acts as a protective barrier between an area which experiences livestock grazing or other activities and a water body. C check structure - also called a “cross-regulator” or “gate”. Water in a canal must pass through, over, or under a check structure. The check structure opening or position is typically a function of the flow rate, and is adjusted to maintain a certain flow rate or water level. Check structures are necessary to dam the water up during low flow rates so that all turnouts in the upstream can receive water. chlorosis - failure of plants to develop chlorophyll. Caused by a deficiency of an essential element. Chlorotic leaves range in color from light green through yellow to almost white. claypan - a dense, compact layer in the subsoil having a much higher clay content than the overlying material from which it is separated by a sharply defined boundary. Claypans usually impede the movement of water and air and the growth of plant roots. clay soil - (also called adobe, or just “heavy”). A soil composed of microscopically small mineral particles that are flattened and fit closely together; spaces between particles for air and water also are small. When clay soil gets wet it dries out slowly
87

because downward movement of water − drainage − is slow. coliform bacteria - a group of bacteria predominantly inhabiting the intestines of man or animal but also found in soil. While harmless themselves, coliform bacteria are commonly used as indicators of the possible presence of pathogenic organisms. complete fertilizer - any plant food that contains all three of the primary nutrient elements − nitrogen, phosphorus, potassium. compost - an organic soil amendment or mulch made by gardeners from organic waste materials (dead leaves, some kitchen scraps, etc.). The materials are assembled in a pile where moisture and heat partially decompose them in a matter of months. confined aquifer - water-bearing formation whose upper boundary is a layer which does not transmit water readily. contaminant - any physical, chemical, biological, or radiological substance causing an impurity in the environment. cultivate - to break up the soil surface, often removing weeds as you go. D deciduous - any plant that sheds all of its leaves at one time each year (typically in autumn). discharge - flow of surface water in a stream or the flow of groundwater from a spring, ditch, or flowing artesian well. dissolved oxygen (DO) - oxygen dissolved in water and readily available to fish and other aquatic organisms. diversion - a channel to divert water at a nonerosive velocity to sites where it can be used or disposed of through a stable outlet. dormancy - annual period when a plant’s growth processes greatly slow down. This occurs in many plants by the coming of winter as days grow shorter and temperatures colder. drag- a tool which is dragged, flat on the ground, behind a tractor, to pulverize and spread manure in a pasture.
drainage - downward movement of water through the soil. When this happens quickly, the drainage is “good”, “fast,” or the soil is “well drained;” when it happens slowly, the drainage is said to be “slow”, “bad”, or soil is “poorly drained”. Plant roots need oxygen as well as water, and soil that remains saturated deprives roots of necessary oxygen. drip irrigation - a system for watering at points on or just below the soil surface so that a plant’s root zone is thoroughly moistened without water being wasted. The irrigation is accomplished with very low pressure over a long period of time to achieve necessary penetration. dry well - a large infiltration trench for capturing runoff. E ecosystem - community of animals and plants and the physical environment in which they live. effluent - discharge or emission of a liquid or gas. endophyte-free seed - seed which has not been treated with a systemic fungus to reduce insect problems. The fungus is associated with several toxic symptoms in livestock. EPA - the United States Environmental Protection Agency. erosion - detachment and movement of rocks and soil particles by gravity, wind and water. established - a plant firmly rooted and producing a good growth of leaves. (remember that an established plant needs time to reestablish itself after you transplant it). eutrophication - degradation of water quality due to enrichment by nutrients, primarily nitrogen (N) and phosphorus (P), which results in excessive plant (principally algae) growth and decay. When levels of N:P are about 7:1, algae will thrive. Low dissolved oxygen (DO) in the water is a common consequence. evapotranspiration (ET) - loss of water to the atmosphere from the earth’s surface by evaporation and by transpiration through plants.
88

F
fertilizer - any organic or inorganic material of natural or synthetic origin (other than liming materials) that is added to a soil to supply one or more elements (nutrients) essential to the growth of plants. floodplain - the land bordering a stream, built up of sediments from overflow of the stream, and subject to inundation when the stream is at flood stage. Also, the surface of an alluvial fan subject to flash flooding from the canyon above. fungicide - a chemical material used to retard or prevent the growth of fungi. G groundwater - the subsurface water supply in the saturated zone below the water table. H hardness - characteristic of water which describes the presence of dissolved minerals. Carbonate hardness is caused by calcium and magnesium bicarbonate; noncarbonate hardness is caused by calcium sulfate, calcium chloride, magnesium sulfate, and magnesium chloride. hazardous waste - solid, liquid, or gaseous substance which because of its source or measurable characteristics, is classified under state or federal law as potentially dangerous and is subject to special handling, shipping, and disposal requirements. heavy metals - those metals that have high density; in agronomic usage includes copper, iron, manganese, molybdenum, cobalt, zinc, cadmium, mercury, nickel and lead. herbicide - chemical used to destroy undesirable plants and vegetation. Pre-emergent herbicides, applied to bare soil, prevent germination of weed seeds. humus - organic materials resulting from decay of plant or animal matter. Also referred to as compost. hydrologic cycle - the movement of water in and on the earth and atmosphere through processes such as precipitation, evaporation, runoff, and infiltration.
I infiltration - entry of water from precipitation, irrigation, or runoff into the soil profile. irrigation - applying water to soil when rainfall is insufficient to maintain desirable soil moisture for plant growth. insecticides - chemicals used to kill insects. L leaching - the washing out or flushing of a soluble substance from an insoluble one. Gardeners leach soil with water when they want to remove excess salts (see Salinity). In high-rainfall areas, rain water leaches both good and harmful substances from the soil. loading - the quantity of a substance (a contaminant) entering the receiving waters. loam - gardeners’ word for soil that is rich in organic material, does not compact easily, and drains well after watering; an “ideal” garden soil. M manure - organic material excreted from animals, used as fertilizer and organic amendment to enrich the soil. Also refered to as animal waste. microclimate - the climate of a small area or locality (such as a backyard or a portion of it), as opposed to the climate of a county or state. mulch - any loose, usually organic, material placed over the soil (such as bark chips, sawdust, straw, or leaves). The process of applying such materials is called mulching. A mulch can retard loss of moisture from soil; reduce or prevent weed growth; insulate soil from extreme or rapid changes of temperature. N nitrogen - one of the three major nutrients in a complete fertilizer and the first one listed in the formulation on a fertilizer label (e.g., 10-8-6). nonpoint source - entry of a pollutant into a water body from widespread or diffuse sources with no definite point of entry. The source is not a readily discernible point like a discharge pipe.
89

nutrient - that portion of any element or compound in the soil that can be readily absorbed and assimilated to nourish growing plants, e.g., nitrogen, phosphorus, iron, potassium. O organic matter - any material of organic origin - peat moss, ground bark, compost, and manure for example-to be dug into the soil to improve its condition. P pathogen- disease-causing biological agent such as a bacterium, virus, or fungus. permeability - capacity of soil, sediment, or porous rock to transmit water. perennial - a non-woody plant that lives for more than two years. With most perennials, the top growth dies down each winter and regrows the following spring. pesticide - a chemical substance used to kill or control pests such as weeds, insects, algae, rodents, and other undesirable agents. pH - the symbol for the logarithm of the reciprocal of hydrogen ion concentration, used to indicate an acid or alkaline condition. A pH of 7 indicates neutrality, less than 7 is acid, and greater than 7 is alkaline. phosphorus - the second element in a complete fertilizer (such as 10-8-6). point source - the release of a pollutant from a pipe or discrete conveyance into a water body or a water-course leading to a body of water. e.g., a wastewater treatment plant. pollutant - any substance of such character and in such quantities that when it reaches a body of water, soil, or air, it is degrading in effect so as to impair their usefulness or render them offensive. pruning - the judicious removal of plant parts to obtain a more desirably shaped plant. R recharge - downward movement of water through soil to groundwater.
recharge area - land area over which precipitation infiltrates into soil and percolates downward to replenish an aquifer. rill - a small, intermittent watercourse with steep sides; usually only several centimeters deep; caused by waterborne soil erosion. riparian zone - the transition area between the aquatic ecosystem and the nearby, upland terrestrial ecosystem. Zones are identified by soil characteristics or plant communities and include the wet areas in and near streams, ponds, lakes, springs and other surface waters. runoff - that portion of the precipitation or irrigation water which fails to infiltrate the soil and flows over the surface to streams or water bodies. S salinity - gardeners use this word when speaking of an excess of salts in the soil. Salinity can harm many plants, causing leaves to scorch and turn yellow, and stunting plant growth. sandy soil - soils that have comparatively large particles that are rounded rather than flattened. Compared to clay soils, sandy soils contain much more soil and air, drain well, and warm quickly. They also dry out quickly, which necessitates frequent watering that washes out valuable nutrients. Also referred to as “light” soil. saturated zone - portion of the soil or rock profile in which all pores are filled with water. sediment - the soil material, both mineral and organic, that is in suspension, is being transported, or has been moved from its site of origin by erosion (by air, water gravity, or ice) and has come to rest on the earth’s surface. septic tank - sewage disposal tank in which a continuous flow of waste material is decomposed by anaerobic (in the absence of oxygen) bacteria. silt - an intermediate soil textural class consisting of particles between 0.05 and 0.002 millimeters in diameter. soil amendment - organic matter added to soil to improve texture, aeration, drainage, and moisture retention. soil profile - the arrangement of soil horizons or layers below the ground surface.
90
soil texture - the relative proportions of the various soil separates (sand, silt and clay) in a soil. soluble - capable of being dissolved easily. stress - growing conditions that endanger a plant’s health. Examples are: lack of water; too much heat, wind, or moisture, low temperatures. The stressful condition varies according to the particular plant and its needs. systemic - a systemic is any chemical that is absorbed into a plant’s system, either to kill organisms that feed on the plant or to kill the plant itself. There are systemic insecticides, fungicides, and weed killers. T taproot - a main root that grows straight down. Dandelions have taproots, so do oak trees. Taproots can go very deep if there is a lack of surface water. thatch - dead stems that build up beneath certain ground covers and lawn grasses. thinning - this pruning term means to remove entire branches - large or small - back to the main trunk, a side branch or the ground. The object is to give the plant a more open structure. In growing plants from seed, thinning out means removing excess seedlings so those remaining are spaced far enough apart to develop well. toxic - substances that even in small quantities may poison, cause injury, or cause death when eaten or ingested through the mouth, absorbed through the skin or inhaled into the lungs.
transpiration - the release of moisture (absorbed largely by plant roots) through the leaves. Temperature and humidity affect transpiration rate. U unsaturated zone - portion of the soil profile which contains both air and water. Water in this zone cannot enter a well. W waterlogged - saturated or nearly saturated with water. watershed (drainage basin) - the land area (catchment) which captures precipitation and conveys it to a particular waterbody. It is bounded by ridges or “divides”, and a large watershed like that of the Truckee River is made up of the watersheds of all its tributaries, such as Dry Creek. water table - the upper level of a saturated zone in an aquifer below the soil surface. weed - a wild plant that grows out of place and competes with other plants for water, nutrients, and space. wellhead protection - the practice of preventing pollutants from seeping into wellwater at or near any active or abandoned well. wetlands - areas that are regularly wet or flooded and have a water table that stands at or above the land surface for at least part of the growing season.
91

References and Further Reading
1. Irrigated Forages for Western Nevada-Type Climate. Nevada Cooperative Extension and U.S. Soil Conservation Service, BE-91-02, Feb. 1991.
2. Soil Survey of Washoe County, Nevada, South Part.
USDA Soil Conservation Service, Aug. 1983. 3. Legumes for Irrigated Pasture and Hay Meadow in
Nevada, Nevada Cooperative Extension Fact Sheet 88-2.
4. Grasses for Irrigation Pasture and Hay Meadows in
Nevada, Nevada Cooperative Extension Fact Sheet 88-1.
5. Pastures for Horses, Nevada Cooperative Extension
Fact Sheet 91-26. 6. The Efficient Use of Water in Irrigation, by Daniel
Hillel. World Bank Technical Paper Number 64, 1987
7. Guidelines for Designing and Evaluating Surface
Irrigation Systems, by W. R. Walker. FAO Irrigation and Drainage Paper #45, 1989.
8. Management of Farm Irrigation Systems, edited by
G.J. Hoffman, T.A. Howell, and K.H. Solomon. American Society of Agricultural Engineers, 1990.
9. Lake Smarts by Steve McComas, produced by the
Terrene Institute, Washington, D.C., 1993. 10. “The Value of Healthy Riparian Areas” - Sherman
Swanson, UNR Cooperative Extension Fact Sheet 86-76.
11. Pond and Brook: A Guide to Nature in Freshwater
Environments. 1990. Michael J. Caduto, University Press of New England, Hanover.
12. Sunset Western Garden Book, p. 63, Sunset
Publishing Corp., 1988. 13. The Encyclopedia of Organic Gardening, pp. 236 -
247 and 713 - 717, Rodale Press, 1978. 14. Wellhead Protection, a Decision Makers Guide US
EPA, EPA 440/6-87-009, 1987. 15. Citizens Guide to Ground-Water Protection US EPA,
EPA 440/6-90-004 1990.
16. Control of Insects on Deciduous Fruits and Tree Nuts in the Home Orchard Without Insecticides, USDA Publications.
17. Insect Pest Management Guidelines for California
Landscape Ornamentals, UC Publication 3317. 18. Pests of Landscape Trees and Shrubs, Steve H.
Dreistadt, Jack Kelly Clark and Mary Louise Flint, Statewide IPM Project, UC Publication 3359, 1994.
19. Pests of the Garden and Small Farm, Mary Louise
Flint, Statewide IPM Project, UC Publication 3332, 1990.
20. The Ortho Problem Solver, fourth edition, Michael D.
Smith, editor, Ortho Informational Services, San Ramon, Ca., 1994.
21. Weeds of the West, Western Society of Weed
Science, revised 1993, P.O. Box 963, Newark, CA. 94560.
22. Water Quality Protection Guide, Recommended
Pollution Control Practices for Rural Homeowners and Small Farm Operators, Oregon Dept. of Agriculture.
23. Quantity and Quality of Nutrients in Animal Manures,
Clark D. Leedy, P-12-81, University of Nevada, Reno. 24. Composting on a Small Horse Pasture, Bill Hass,
Cost-share Participant, Colorado Small Lot Acreage Program
25. Irrigating Small Pastures, Paul Gallegos, Soil
Conservation Technician, Soil Conservation Service, Longmont.
26. Composting : “Piling Up Garden Benefits”, Susan
Stead, Washoe County Horticulture Assistant. Washoe County Cooperative Extension, University of Nevada. 1991.
27. Sunset Western Garden Book. 1995. Sunset
Publishing Corp, Menlo Park, Ca. 28. Wyman’s Garden Encyclopedia. 1986. Donald
Wyman, MacMillan Pub. Co., NY 29. Handbook of Best Management Practices. 1994.
Nevada State Environmental Commission.
92

Notes and Records
____________________________________________________________________________________________________________________________________________________________________________________________________________________________________________________________________________________________________________________________________________________________________________________________________________________________________________________________________________________________________________________________________________________________________________________________________________________________________________________________________________________________________________________________________________________________________________________________________________________________________________________________________________________________________________________________________________________________________________________________________________________________________________________________________________________________________________________________________________ ____________________________________________
93

Notes and Records
________________________________________________________________________________________________________________________________________________________________________________________________________________________________________________________________________________________________________________________________________________________________________________________________________________________________________________________________________________________________________________________________________________________________________________________________________________________________________________________________________________________________________________________________________________________________________________________________________________________________________________________________________________________________________________________________________________________________________________________________________________________________________________________________________________________________________________________________________________________________________________________
94

University of Nevada Cooperative Extension A hometown resource
WHO ARE WE?
Cooperative Extension is a statewide educational network bringing information into communities to help people improve their lives.
We are unique because our teaching efforts are made possible by a cooperative effort between the Federal Government, the State of Nevada, and each of the counties we serve.
WHERE ARE WE?
The Western Area of Cooperative Extension has offices in Reno, Incline Village, Carson City (includes Storey County), and Gardnerville (Douglas County). Cooperative Extension has offices in counties and urban areas throughout Nevada.
WHAT IS OUR PURPOSE?
"To discover, develop, disseminate, preserve and use knowledge to strengthen the social, economic and environmental well-being of people."
WHAT DO WE DO?
We teach. In classes, seminars, and workshops; public presentations; with newspaper columns and stories; on television and radio; on the telephone; and through research-based publications.
WHAT TOPICS DO WE EDUCATE ON?
Youth and family development (including the 4-H program); water resources; nutrition; money management; horticulture; and natural resource management.
WHAT DO WE TEACH?
Youth and family development programming addresses parenting skills, life skills for youth, literacy and school dropout.
Water resource issues include appropriate use of water on the landscape, and avoiding pollution.
Nutrition focuses on developing health eating habits that reduce the incidence of chronic disease.
Money management activities are directed at teaching people how to take control of their assets.
The horticulture department teaches good landscape management practices to both homeowners and businesses and answers questions about gardening concerns.
Natural resource management focuses on maintaining and improving the quality of our environment.
The University of Nevada, Reno is an Equal Opportunity/Affirmative Action employer and does not discriminate on the basis of race, color, religion, sex, age, creed, national origin, veteran status, physical or mental disability, and in accordance with University policy, sexual orientation, in any program or activity it operates. The University of Nevada employs only United States Citizens and aliens lawfully authorized to work in the United States.
Editing by Ed Spoon Graphics by Rick Cooper Layout by Susan Donaldson Photos by John Cobourn and Susan Donaldson