sm l05 - shift into the fast lane: fast detection and...
TRANSCRIPT
SM L05 - Shift into the Fast Lane: Fast Detection and Fast Recovery of Your Windows Application Hands-On Lab
Description Fast recovery of your critical Windows application is important; but you also want fast deployment. Get your hands dirty and learn how to setup a highly scalable, highly available environment for Microsoft SQL Server. Learn how you can stretch it across sites and configure storage to grow without violating site boundaries. Attend this lab for hands-on experience with Fast Failover, the Intelligent Monitoring Framework and Site-aware Allocation features in Veritas Storage Foundation and High Availability 6.0 for Windows
This lab assumes a prerequisite knowledge of basic storage and clustering concepts.
At the end of this lab, you should be able to
Understand how to configure fast failover by
Enabling the fast failover attribute for storage resources
Enabling/disabling Intelligent Monitoring
Understand recommended settings to improve failover performance and modify resource attributes to reduce failover time
Setup Site Aware Allocation
Migrate volumes to new storage locations with the Storage Migration Wizard and understand the impact of site awareness on migration

2 of 28
Notes A brief presentation will introduce this lab session and discuss key concepts.
The lab will be directed and provide you with step-by-step walkthroughs of key features.
Feel free to follow the lab using the instructions on the following pages. You can optionally perform this lab at your own pace.
Be sure to ask your instructor any questions you may have.
Thank you for coming to our lab session.
Configuration Operating System: Windows Server 2008 R2
Domain: Goldengate.symc
Domain Controller: SFWHA60-DC located on virtual machine SFWHA60_DC
Domain login: administrator
Password: Symc4now!
Cluster node1 (SFWHA60-N1): Located on virtual machine SFWHA60_N1
Cluster node2 (SFWHA60-N2): Located on virtual machine SFWHA60_N2
Cluster name: GGCLUS
Cluster login: admin
Cluster password: password
Storage: iSCSI
iSCSI Targets hosted on SFWHA60_DC
iSCSI Targets: GGTarget; GGTarget2
Shared storage: 125 iSCSI disks are configured and connected to cluster systems SFWHA60-N1 and SFWHA60-N2
GGTarget disks: Harddisk1 – Harddisk63
GGTarget2 disks: Harddisk64 – Harddisk125
SQL Server 2008 R2 and Veritas Storage Foundation and High Availability 6.0 for Windows installed on each cluster node
User databases = 20
SQL Service Group: SQL2008SG

3 of 28
FastFailover The Fast Failover feature was introduced in Veritas Storage Foundations and High Availability 6.0 for Windows. It uses an updated dynamic disk group architecture that unties failover time from storage configuration size, and the Intelligent Monitorinng Framework, which replaces traditional polling, which intermittently polls resources to check their state, with an asynchronous, event driven method of monitoring that immediately detects and reacts to faults.
In this portion of the lab, you will go through the paces of configuring the cluster for fast failover, including setting various resource attributes, compare disk group status and access before and after fast failover is configured and compare the times taken to failover with and without FastFailover, paying specific attention to the time taken for the storage to failover (go offline on one node and fully come online on the other).
Perform Failover Without FastFailover In this section, you will perform failovers of the SQL service group without fast failover configured. Note the failover times.
Online the Service Group 1. On virtual machine SFWHA60_N1, login to Windows
i. User: goldengate\Administrator
ii. Password: Symc4now!
2. Launch the VCS Cluster Explorer a. Start>All Programs>Symantec>Veritas Cluster Server> Veritas
Cluster Manager – Java Console
3. In the Cluster Monitor window, click on “Click here to login”
4 of 28
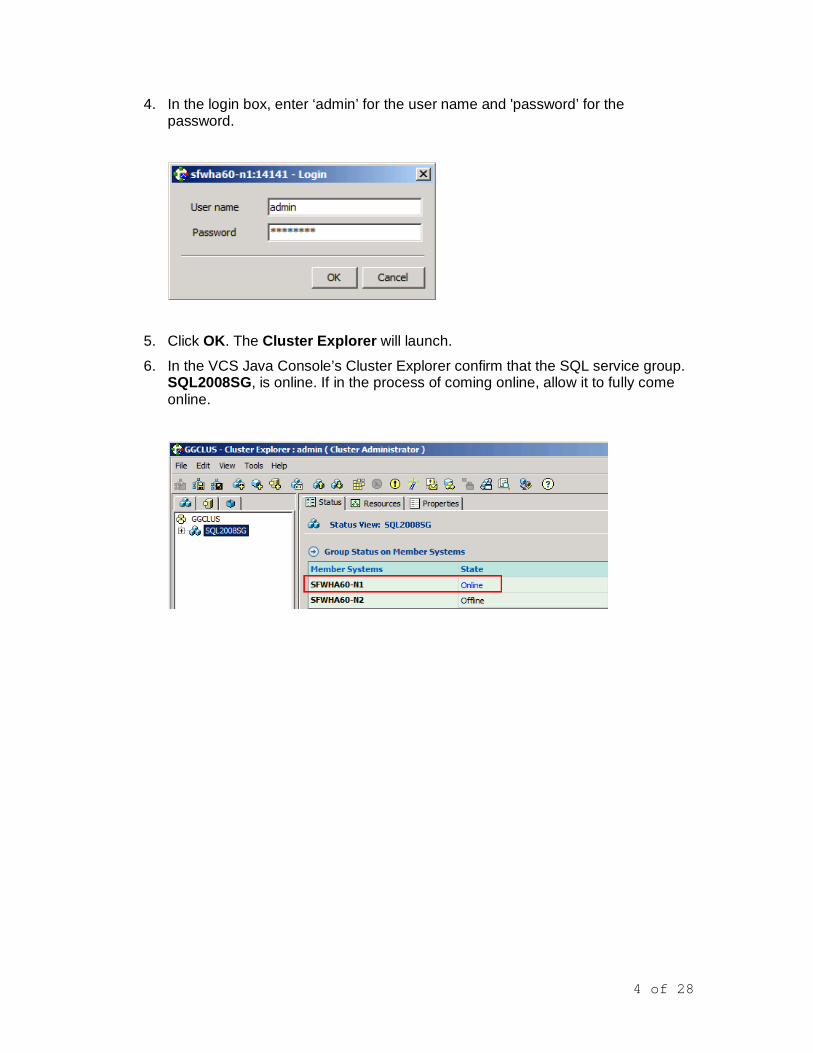
4. In the login box, enter ‘admin’ for the user name and 'password’ for the password.
5. Click OK. The Cluster Explorer will launch.
6. In the VCS Java Console’s Cluster Explorer confirm that the SQL service group. SQL2008SG, is online. If in the process of coming online, allow it to fully come online.

5 of 28
a. If not online, bring it online on SFWHA60-N1
i. Right-click SQL2008SG in the left pane of the Cluster Explorer and select Online > SFWHA60-N1 in the context menu
ii. Click Yes to confirm the operation.
6 of 28
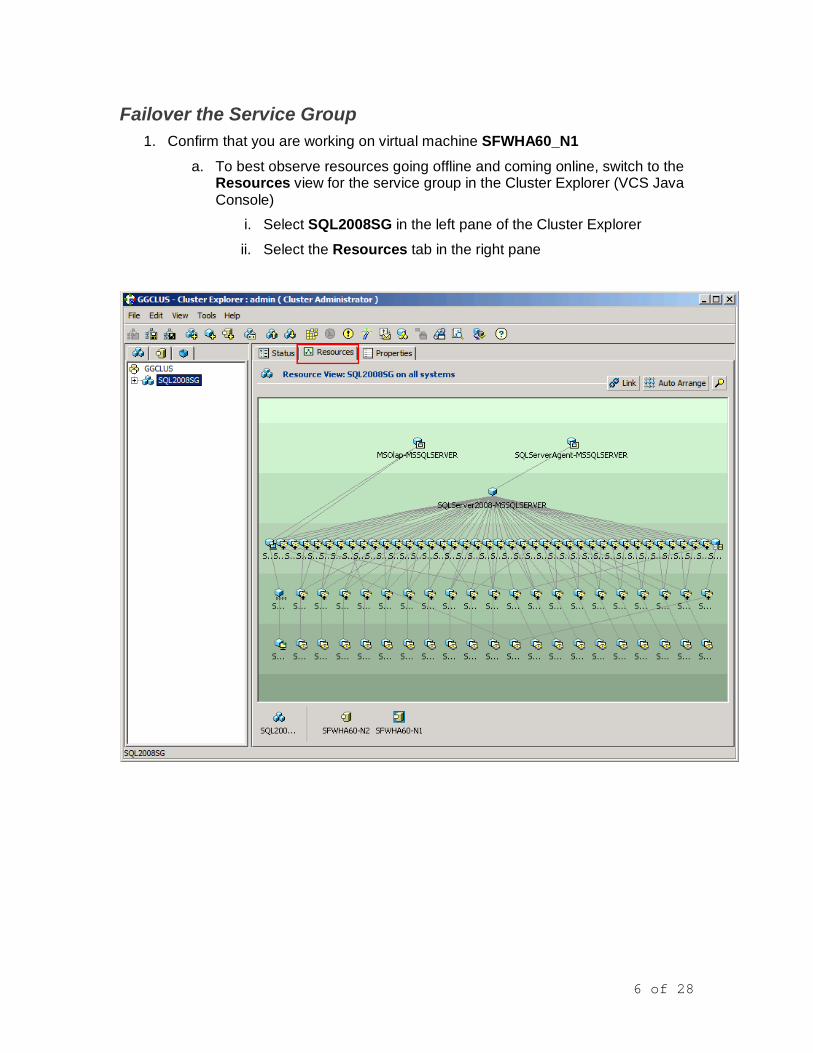
Failover the Service Group 1. Confirm that you are working on virtual machine SFWHA60_N1
a. To best observe resources going offline and coming online, switch to the Resources view for the service group in the Cluster Explorer (VCS Java Console)
i. Select SQL2008SG in the left pane of the Cluster Explorer
ii. Select the Resources tab in the right pane

7 of 28
2. Right-click SQL2008SG in the left pane and select Switch To > SFWHA60-N2
3. Click Yes to confirm the operation
a. Note the time taken for the failover, especially the time taken for storage.
4. Repeat the above steps (1x, or 3x if time permits) to fail back to SFWHA60-N1
5. Calculate the average time taken to failover the service group
Observe the disk group status on each cluster node Note the status of the disk group on each node
1. Launch PowerShell or a command window on SFWHA60-N1
PowerShell
a. Click on the powershell icon in the Quicklaunch bar

8 of 28
or
Command Window
b. Start>All Programs>Run
c. Type cmd in the Open: box and click OK
2. Enter the following command at the command prompt and press Enter
Vxdg –gDG1 dginfo
a. Note the values of Status and Access for the disk group
3. Repeat the above steps on the second node SFWHA60-N2, running on virtual machine SFWHA60_N2
a. Note the values of Status and Access for the disk group
9 of 28
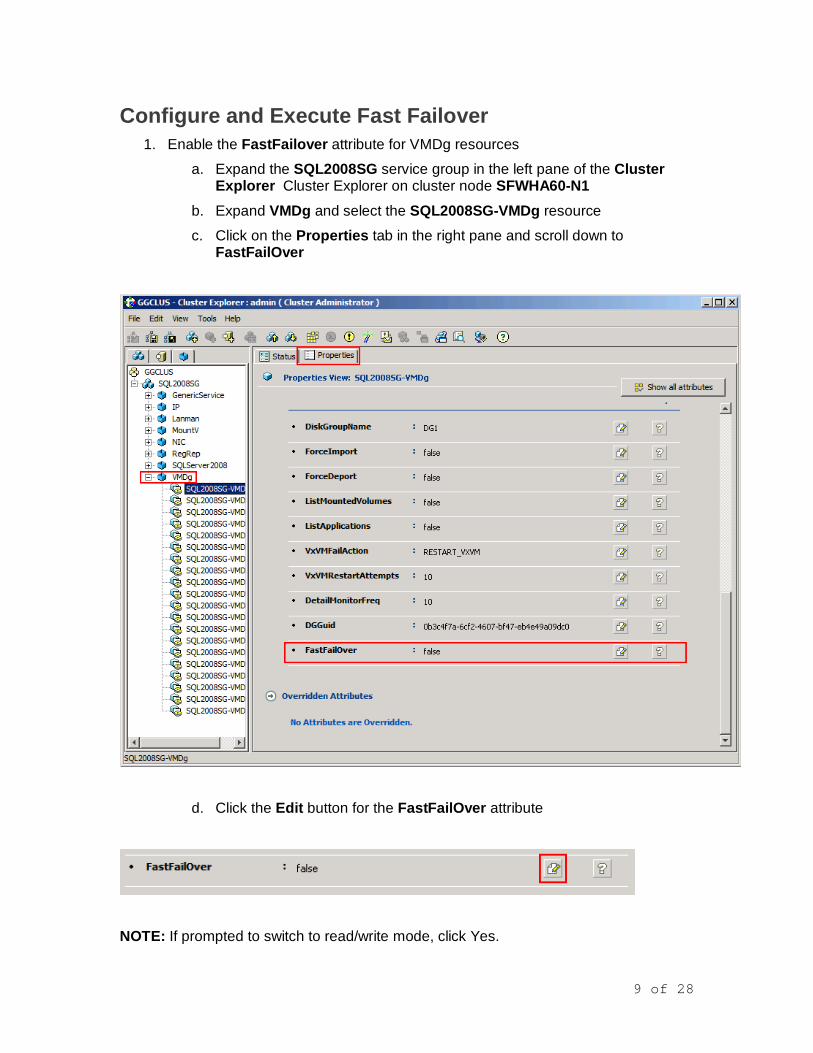
Configure and Execute Fast Failover 1. Enable the FastFailover attribute for VMDg resources
a. Expand the SQL2008SG service group in the left pane of the Cluster Explorer Cluster Explorer on cluster node SFWHA60-N1
b. Expand VMDg and select the SQL2008SG-VMDg resource
c. Click on the Properties tab in the right pane and scroll down to FastFailOver
d. Click the Edit button for the FastFailOver attribute
NOTE: If prompted to switch to read/write mode, click Yes.

10 of 28
i. In the Edit Attribute dialog box, check the FastFailOver check box.
ii. Click OK.
e. Repeat these steps for every VMDg resource in the service group by running the batch file C:\FFenable.bat
f. Perform a system rescan
a. Run the command ‘vxassist rescan’ at the command prompt
2. Enable the Intelligent Monitoring Framework (IMF) for resources
a. From a command window, run the following command to change the VCS configuration to read/write mode.
haconf –makerw
b. Run the following command at the CLI to enable intelligent monitoring of resources, replacing ‘resourtce_type’ with the name of the resource type:
hatype -modify resource_type IMF -update Mode 3

11 of 28
Run the command once for each of the following resource types from a command prompt to enable IMF for all resources:
GenericService
IP
NIC
MountV
VMDg
RegRep
SQLServer2008
Example: The following command enables IMF for the IP resource type.
hatype -modify IP IMF -update Mode 3
c. Run the following command to save the VCS configuration
haconf -dump –makero
Optionally, run the following from a command prompt to enable IMF for all resources via a batch file
C:\IMFenable.bat
3. Confirm attributes for the following resources:
a. MountV
i. Expand MountV in the left pane of the Cluster Explorer
ii. Select a MountV resource e.g. SQL2008SG-MountV, and click the Properties tab in the right pane
12 of 28
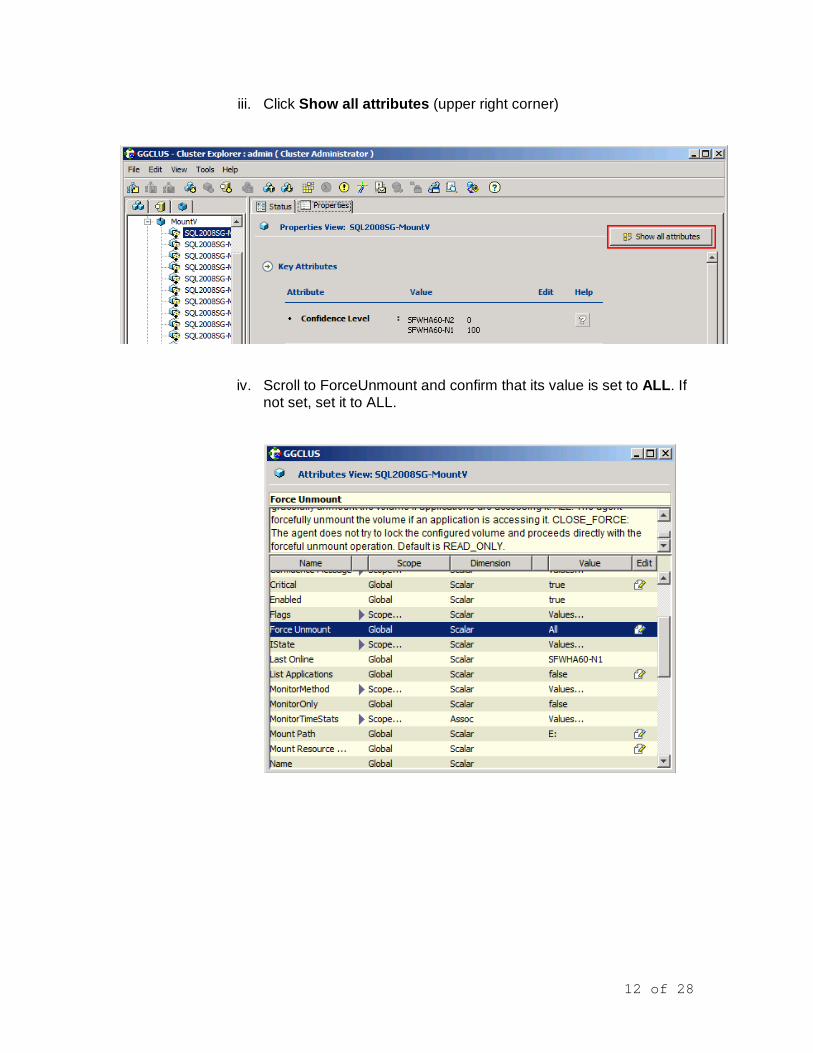
iii. Click Show all attributes (upper right corner)
iv. Scroll to ForceUnmount and confirm that its value is set to ALL. If not set, set it to ALL.

13 of 28
1. Click the Edit button and select ALL from the drop down for the Scalar Value (read the ForceUnmount description and the effect of each value)
2. Click OK.
v. Scroll to List Applications in the Attributes window and confirm that its value is set to false. If not false, set its value to false.
1. Click the Edit button and uncheck the ListApplications box. (read the ListApplications description and the effect of each value)
2. Click OK.
vi. Repeat for a couple of other MountV resources, confirming the above two attributes. They should all be correctly set.

14 of 28
4. Modify attributes for the MS-Olap and SQL Server Agent resource types
a. Expand GenericService in the left pane of the Cluster Explorer
b. Select the MS-Olap resource in the left pane
c. Select the Properties tab in the right pane.
15 of 28
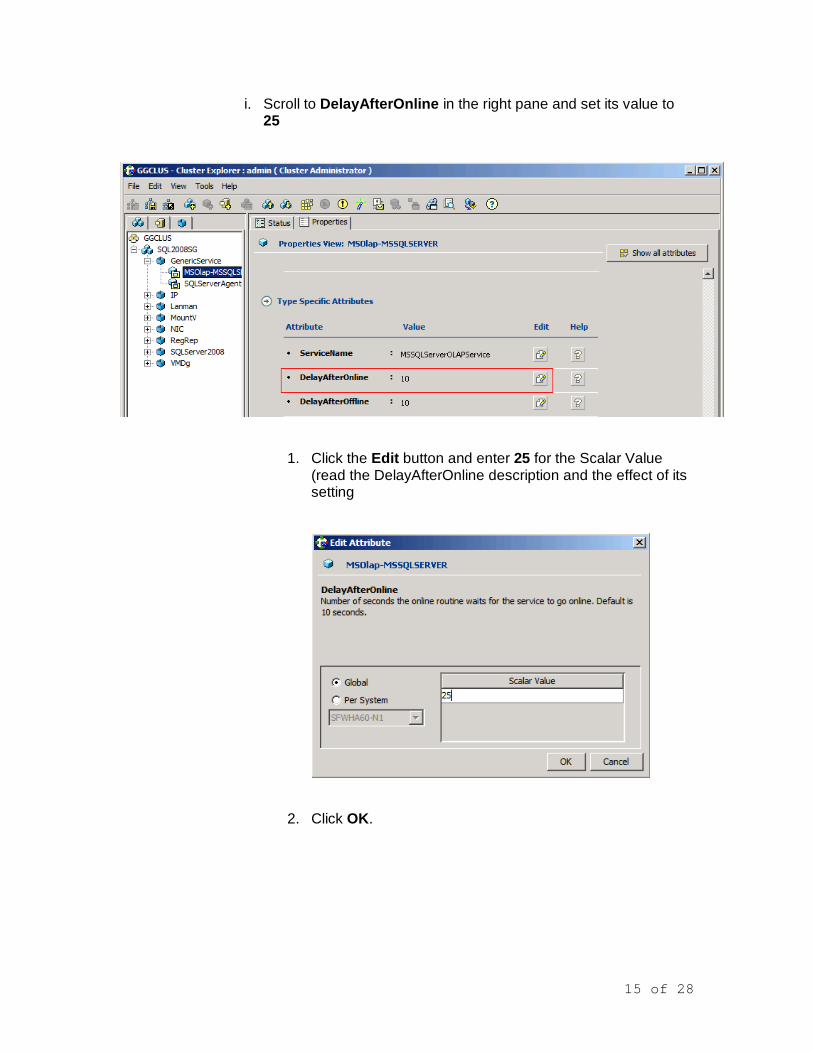
i. Scroll to DelayAfterOnline in the right pane and set its value to 25
1. Click the Edit button and enter 25 for the Scalar Value (read the DelayAfterOnline description and the effect of its setting
2. Click OK.

16 of 28
ii. Scroll to DelayAfterOffline in the right pane and set its value to 25
1. Click the Edit button and enter 25 for the Scalar Value (read the DelayAfterOffline description and the effect of its setting)
2. Click OK.

17 of 28
d. Select the SQL Server Agent resource in the left pane
i. Scroll to DelayAfterOnline and set its value to 25
1. Click the Edit button and enter 25 for the Scalar Value.
2. Click OK.
ii. Scroll to DelayAfterOffline and set its value to 25
1. Click the Edit button and enter 25 for the Scalar Value.
2. Click OK.
18 of 28
5. Modify attributes for the VMDg and MountV resource types
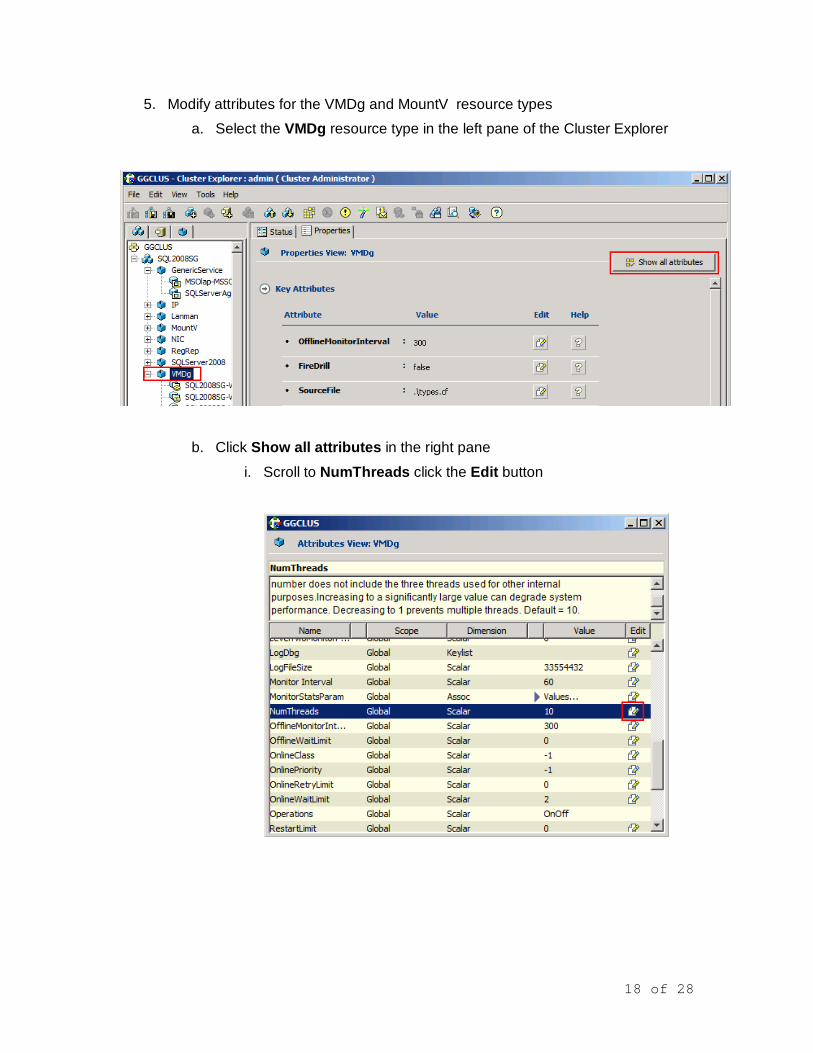
a. Select the VMDg resource type in the left pane of the Cluster Explorer
b. Click Show all attributes in the right pane
i. Scroll to NumThreads click the Edit button

19 of 28
1. Read the NumThreads description and the effect of its setting. Enter 20 for the Scalar Value
2. Click OK.
c. Select MountV in the left pane
d. Click Show all attributes in the right pane
i. Scroll to NumThreads and set its value to 20
1. Click the Edit button and enter 20 for the value.
2. Click OK.

20 of 28
Observe the disk group status on each cluster node Note the status of the disk group on each node
1. Launch Powershell or a command window on SFWHA60-N1
PowerShell a. Click on the powershell icon in the Quicklaunch bar
or
Command Window
b. Start>All Programs>Run
c. Type cmd in the Open: box and click OK
2. Enter the following command at the command prompt and press Enter
Vxdg –gDG1 dginfo
a. Note the values of Status and Access for the disk group
3. Repeat the above steps on the second node SFWHA60-N2, running on virtual machine SFWHA60_N2
a. Note the values of Status and Access for the disk group
4. Note the difference in Access value on the node where the disk group Status is Deported before and after fast failover is enabled.
Fail over the Service Group 1. In the Cluster Explorer right-click SQL2008SG and select Switch To >
SFWHA60-N2
2. Click Yes to confirm the operation
3. Note the time taken for the failover, especially the time taken for storage.nonnon
4. Repeat the above steps 3 times, alternately failing over between the nodes
5. Calculate the average time taken to failover the service group
6. Compare to the previous average failover time.

21 of 28
Site Aware Allocation Site aware allocation allows hosts and disks to be tagged to a user specified site and volumes to be allocated as siteless, site confined or site separated.
Siteless volumes are not restricted to any site oundaries. By default, all volumes are siteless when created.
Storage for a site separated volume is allocated so that each plex of the volume resides completely on the same site, i.e., if a Site Separated volume has two plexes on two sites 1 and 2, each plex will reside completely on a separate site. Operations such as volume resize, relocation and relayout keep each plex allocated to its own site.
Storage for a site confined volume will be allocated from the site that is specified for the volume. Multiple sites cannot be allocated for a site confined volume. It resides entirely on the same site. Operations such as resize, relocation and relayout will allocate storage from that site only.
Configure Site Separated Volumes The steps to configure site aware allocation are as follows:
1. Administer hosts for site aware allocation 2. Administer disks for site aware allocation 3. Administer volumes for site aware allocation
Administering hosts for site aware allocation - Add hosts to sites
1. Confirm that the SFWHA60-N1 is the active VCS node. If not, switch the SQL service group to it.
2. Connect to Veritas Enterprise Administrator (VEA) on SFWHA60-N1 a. Click Start>Run b. Enter vea –t 200 in the Open: boxb c. Click OK d. Enter SFWHA60-N1 in the Host Name box e. Click Connect f. If prompted for credentials enter goldengate\administrator for the user name
and Symc4now! for the password.
NOTE: Due to the number of devices in this configuration, VEA may fail to connect initially. If it fails, acknowledge the error and retry steps 1.d. and 1.e. above.
3. In the same console, connect to SFWHA60-N2 in VEA a. Click Connect in the upper left corner b. In the Connect windows, enter SFWHA60-N2 for Host Name. c. Click Connect d. If prompted for credentials enter goldengate\administrator for the user name
and Symc4now! for the password.

22 of 28
4. Select the SFWHA60-N1 (localhost) VEA connection a. Select vea://localhost/
5. Right-click the localhost (SFWHA60-N1) in VEA 6. Select Site>Add host to site
7. Enter Site1 for the name of the site in the Site dialogue box.
8. Repeat for the other node, SFWHA60-N2, entering Site2 for the site name

23 of 28
Administering disks for site aware allocation - Add disks to sites 1. Select the SFWHA60-N1 (localhost) VEA connection 2. Expand the Disks object in the left pane of the VEA 3. Right click one of the disks from harddisk1 – harddisk63 and select Add Disk to Site
4. In the Add Disk to Site screen, select Site1 from Available Sites a. Under Available disks, select all disks from Harddisk1 – Harddisk63 (use Ctrl or
Shift for multiple selections) and click Select to move them to Selected disks b. Click OK
5. Repeat above steps on SFWHA60-N2 for Harddisk64 – Harddisk125, adding them to Site2
a. Enter Site2 under Select a new site if it does not show up under Available Sites
24 of 28
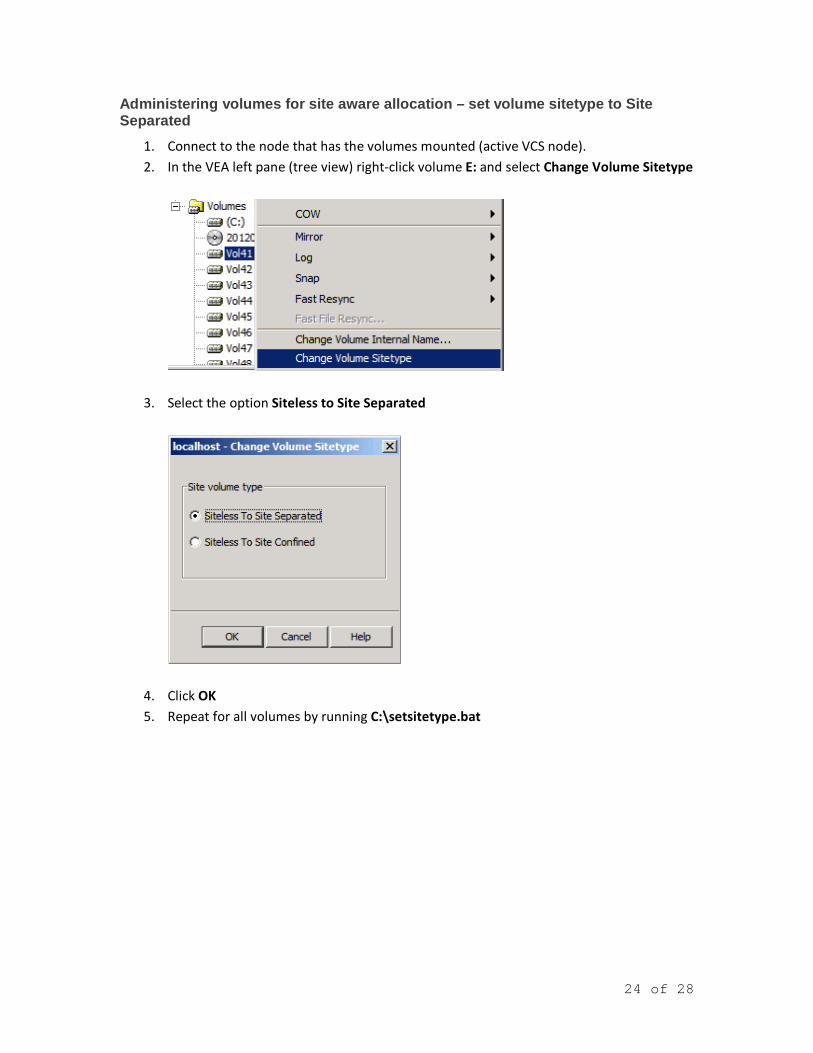
Administering volumes for site aware allocation – set volume sitetype to Site Separated
1. Connect to the node that has the volumes mounted (active VCS node). 2. In the VEA left pane (tree view) right-click volume E: and select Change Volume Sitetype
3. Select the option Siteless to Site Separated
4. Click OK 5. Repeat for all volumes by running C:\setsitetype.bat
25 of 28
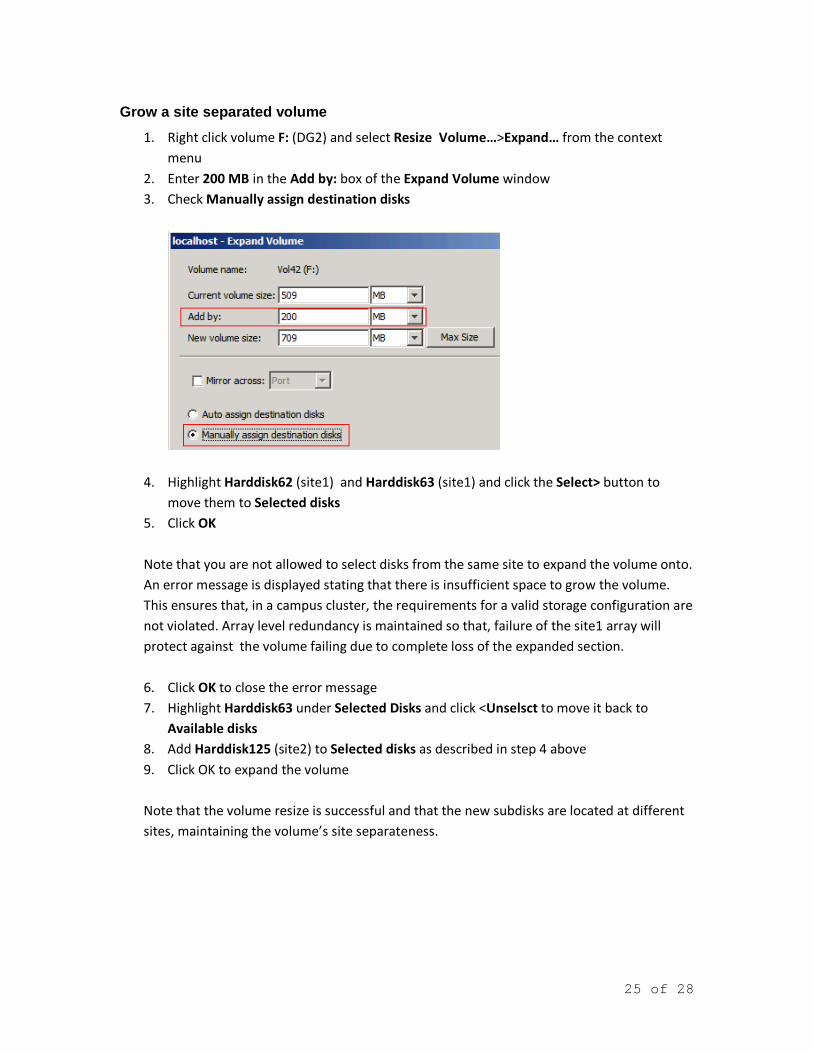
Grow a site separated volume 1. Right click volume F: (DG2) and select Resize Volume…>Expand… from the context
menu 2. Enter 200 MB in the Add by: box of the Expand Volume window 3. Check Manually assign destination disks
4. Highlight Harddisk62 (site1) and Harddisk63 (site1) and click the Select> button to move them to Selected disks
5. Click OK Note that you are not allowed to select disks from the same site to expand the volume onto. An error message is displayed stating that there is insufficient space to grow the volume. This ensures that, in a campus cluster, the requirements for a valid storage configuration are not violated. Array level redundancy is maintained so that, failure of the site1 array will protect against the volume failing due to complete loss of the expanded section. 6. Click OK to close the error message 7. Highlight Harddisk63 under Selected Disks and click <Unselsct to move it back to
Available disks 8. Add Harddisk125 (site2) to Selected disks as described in step 4 above 9. Click OK to expand the volume Note that the volume resize is successful and that the new subdisks are located at different sites, maintaining the volume’s site separateness.
26 of 28
Storage Migration The Storage Migration Wizard allows you to move volumes to new storage locations. Multiple volumes can be moved to different disks while they remain online. Volumes belonging to a SFW disk group or associated to a Hyper-V virtual machine can be moved while remaining online.
Volume layouts and site boundary constraints are preserved during storage migration.
Migrate a volume to a new storage location 1. Confirm that the SFWHA60-N1 is the active VCS node. If not, switch the SQL service
group to it. 2. Launch the Storage Migration Wizard (the wizard can be launched from the localhost,
the Disk Group node and individual disk group node from the Veritas Enterprise Administrator (VEA) GUI.
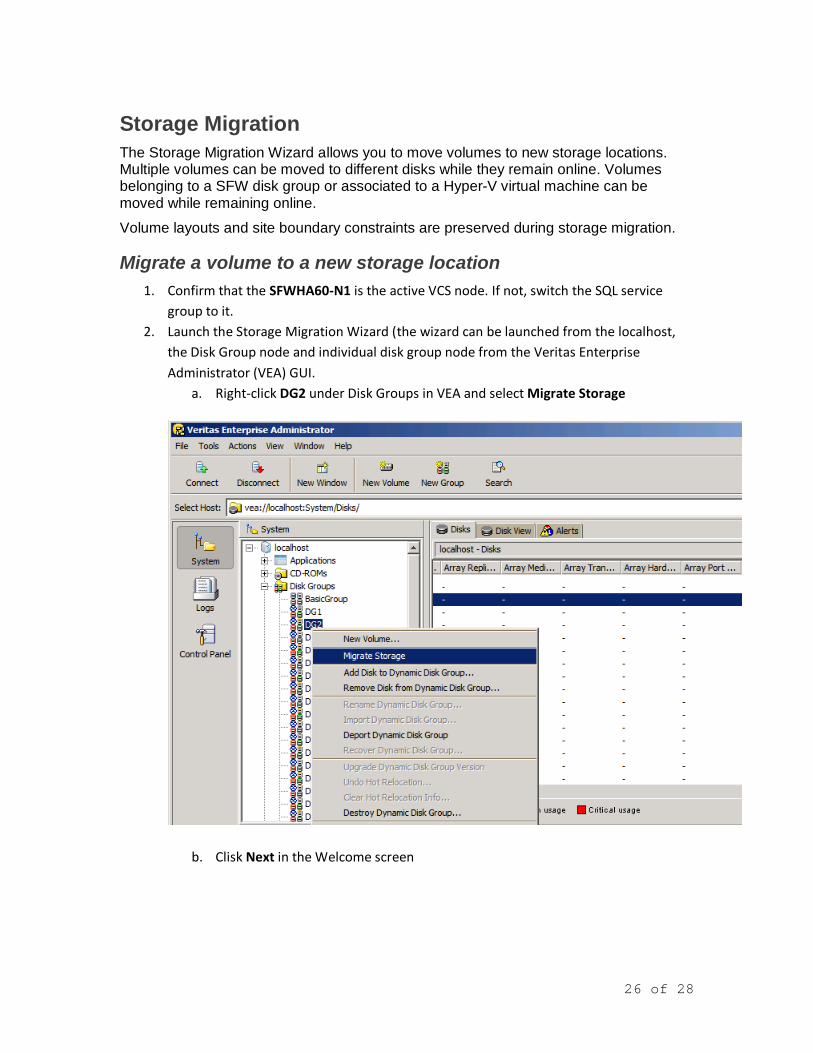
a. Right-click DG2 under Disk Groups in VEA and select Migrate Storage
b. Clisk Next in the Welcome screen

27 of 28
c. Note the options available to migrate – Disk Groups and Hyper-V Virtual Machines. Select Disk Groups (should already be selected)
d. Select DG2 from the list of disk groups (should already be selected) e. Select the volume F: (Vol42)
Note the current storage location of F: as being Harddisk42 (site1) and Harddisk104 (site2)
f. Click Next g. Select Harddisk124 (site2) and Harddisk125 (site2) under Selected Target
Disk(s)
28 of 28
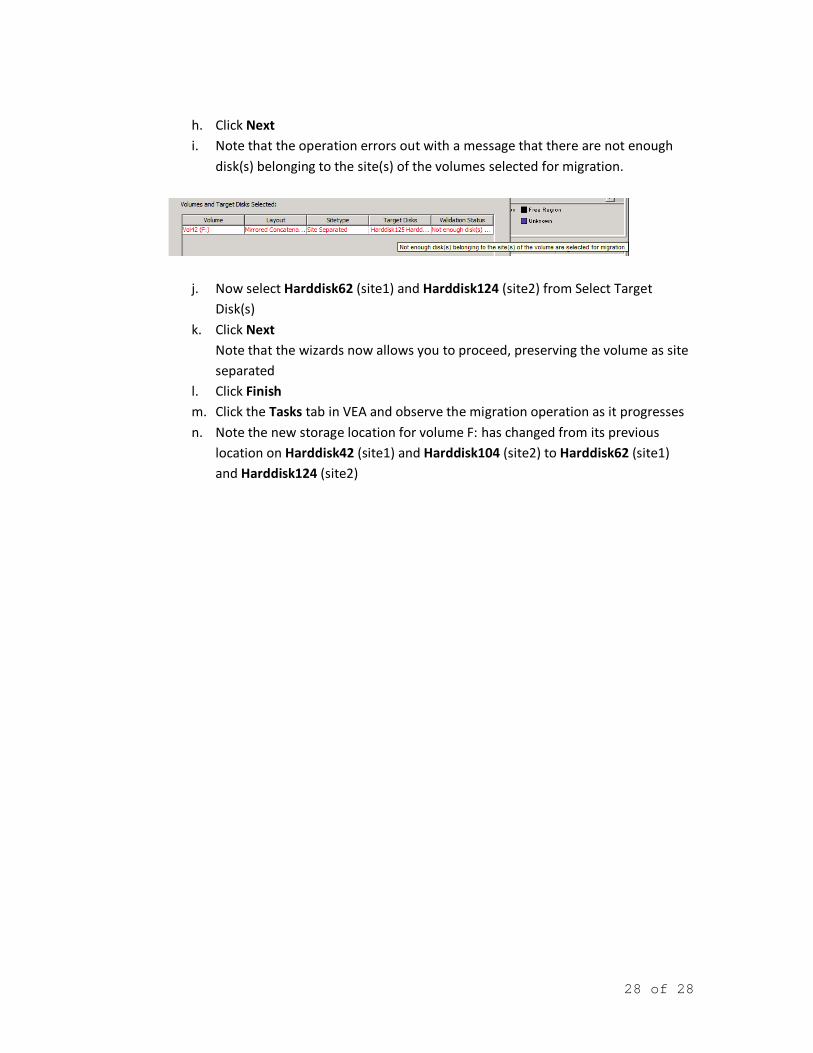
h. Click Next i. Note that the operation errors out with a message that there are not enough
disk(s) belonging to the site(s) of the volumes selected for migration.
j. Now select Harddisk62 (site1) and Harddisk124 (site2) from Select Target Disk(s)
k. Click Next Note that the wizards now allows you to proceed, preserving the volume as site separated
l. Click Finish m. Click the Tasks tab in VEA and observe the migration operation as it progresses n. Note the new storage location for volume F: has changed from its previous
location on Harddisk42 (site1) and Harddisk104 (site2) to Harddisk62 (site1) and Harddisk124 (site2)