sls-envr16 network video recorder v2.1 quick setup guide · 5 sls-envr16 nvr quick setup guide a....
TRANSCRIPT

1 SLS-ENVR16_RQ 12/12/12
Retaining screws
Retaining screws
Control button
Control button LED
Network connector
USB (not used)
Power connector
Back panel
Setting up your NVR
The initial setup of your SLS-ENVR16 NVR includes the following steps:
1. Installing the NVR on the local area network (LAN)
2. Discovering the NVR on your network
3. Using the Configuration Guide
4. Associating cameras with the NVR
5. Setting recording options
6. Viewing and exporting recordings
7. Adding users (usernames) to the system
Step 1. Installing the NVR on the LAN
1. Plug an Ethernet cable into the network connector on the back of the NVR. Plug the other end into a network access device, such as a network switch, hub, or router.
Ethernet cablePower adapter
cable
2. Plug the power adapter into the power connector on the back of the NVR.
3. Plug the power adapter cable into the power adapter, then into a standard 120 Vac outlet. The NVR should automatically power on within one minute.
Step 2. Discovering the NVR on your network
1. Power on your computer and allow it to boot up.
2. Insert the software CD provided with your NVR into the optical drive and allow it to initialize (autorun). The screen shown below should open.
The SLS-ENVR16 series NVR is an intelligent and compact appliance that provides a network interface to monitor, record and playback video from up to 16 IP cameras, with up to 6TB of data storage. It is very easy to install and use. Your SLS-ENVR16 product includes components shown in the picture below.
Software CD
SLS-ENVR16 NVR
Ethernet cable
Quick Setup Guide
Power adapter with cable
HDD extractor
What you need
Your SLS-ENVR16 NVR hardware is pre-configured with HDD(s). If you want to change the HDD or configure it differently (RAID options, trays, etc.), refer to the document SLS-ENVR Series Network Video Recorder V2.1 User Manual provided on the Software CD for specific instructions.
A PC is required to access and control your NVR. It must meet the following requirements:
• Operating system: Microsoft® Windows® 2003, 2008, XP, Vista, 7 (32- and 64-bit versions); Apple® OS X® 10.5 (Intel x86 only), 10.6, 10.7; Linux with 2.6 kernel or newer
• Internet browser: Mozilla® Firefox® 10 ESR and newer (recommended); Internet Explorer® 8 and 9 (32-bit version); Google Chrome® 21 and newer; Apple Safari® 5 (only on Mac OS X). Enable JavaScript and cookies (check the settings of your internet browser).
• Java™: Oracle® Java 6.0 or newer (32-bit version only), Oracle Java 7 (recommended). Download Java at: http://www.java.com.
• Hardware configuration: 2 GHz processor with 1GB RAM minimum; dependant on the NVR type and number of monitored cameras.
The SLS-ENVR16 allows the user to download videos and pictures from videos saved on a hard disk. The pictures are in standard JPEG format and can be displayed in every standard picture browser. To play video, install an FFDShow CODEC (download from http://www.freecodecs.com/download/FFDshow.htm) or similar filter. Also, VLC player contains the CODEC necessary to play SLS-ENVR4 videos (download at http://www.videolan.org).
NVR buttons and indicators
Power LED Tray 1 HDD active LED
Tray 2 HDD active LED
Network activity LED
Information LED
SLS-ENVR16 front panel
SLS-ENVR16 Network Video Recorder V2.1 Quick Setup Guide

2 © 2012 Observint Technologies, Inc. All rights reserved.
3. If Java is not loaded on your computer, click the Download Java button on the Solstice window, then follow the on-screen instructions to install it.
4. On the Solstice window, click the Start Discover button.
5. In the Solstice Discover window, click the Discover button in the lower-right corner and wait until your NVR is found. Verify that the NVR discovered is your target NVR by the MAC address; the MAC address of the NVR hardware is shown on a label on the underside of the unit. If your NVR was not found during the scan, click the Discover button again.
NVR device (MAC address) discovered
Step 3. Using the Configuration Guide
1. In the Discover window, double-click the entry for your NVR to access the unit through an internet browser.
In the login window, enter the default administrator Username and Password (admin and admin), then click Login In. Passwords are case sensitive.
2. In the Configuration Guide - Welcome window, click the button next to “English” open the drop-down list. Select your preferred language, then click Apply and Continue.
3. In the Configuration Guide - Change default administrator password window, enter your new password in both fields, then click Apply and Continue. It is strongly recommended that you change the password to one with high security strength.
4. In the Configuration Guide - User preferences window, select the options appropriate for installation, then click Apply and Continue.
5. In the Configuration Guide - Date and Time window, select the options appropriate for location, including the Time Zone Area and City, then click Apply and Continue. Note that an option is provided to synchronize the NVR with your computer.
Note that an option is provided to synchronize the NVR with your computer. If you change the clock time, the NVR will restart, then open the next configuration screen.
NOTE
Synchronize the camera clocks the same way the NVR is synchronized. The NVR and camera clocks must indicate the same time to ensure compatibility.
6. In the Configuration Guide - Network configuration window, enter the network and domain options you prefer. In the Domain Settings section, you can specify a Hostname for your NVR. Click Apply and Continue.
3 SLS-ENVR16 NVR Quick Setup Guide
NOTE
If you change the network settings of the NVR, the Configuration Guide may lead you to repeat some steps completed previously.
7. In the Configuration Guide - E-mail configuration window, enter the SMTP settings and other e-mail options to automatically send e-mail when events occur. Click Apply and Continue.
8. In the Configuration Guide - Guide Complete window, click Finish.
Step 4. Associating cameras with the NVR
Cameras can be added to (monitored by) the NVR in two ways:
• Add Manually method: A method for adding cameras that are on the same subnet as the NVR or a subnet different.
• Discover method: An automated method for adding cameras that are on the same subnet as the NVR.
Add Manually method
1. After logging into the NVR as an administrator, click the Settings option in the header of the screen.
2. In the right pane, click the Add New button to open the drop down list, then click Add Manually.
3. In the menu that opens in the right pane, enter the following:
a. Address. Enter the IP address of the device you want to add.
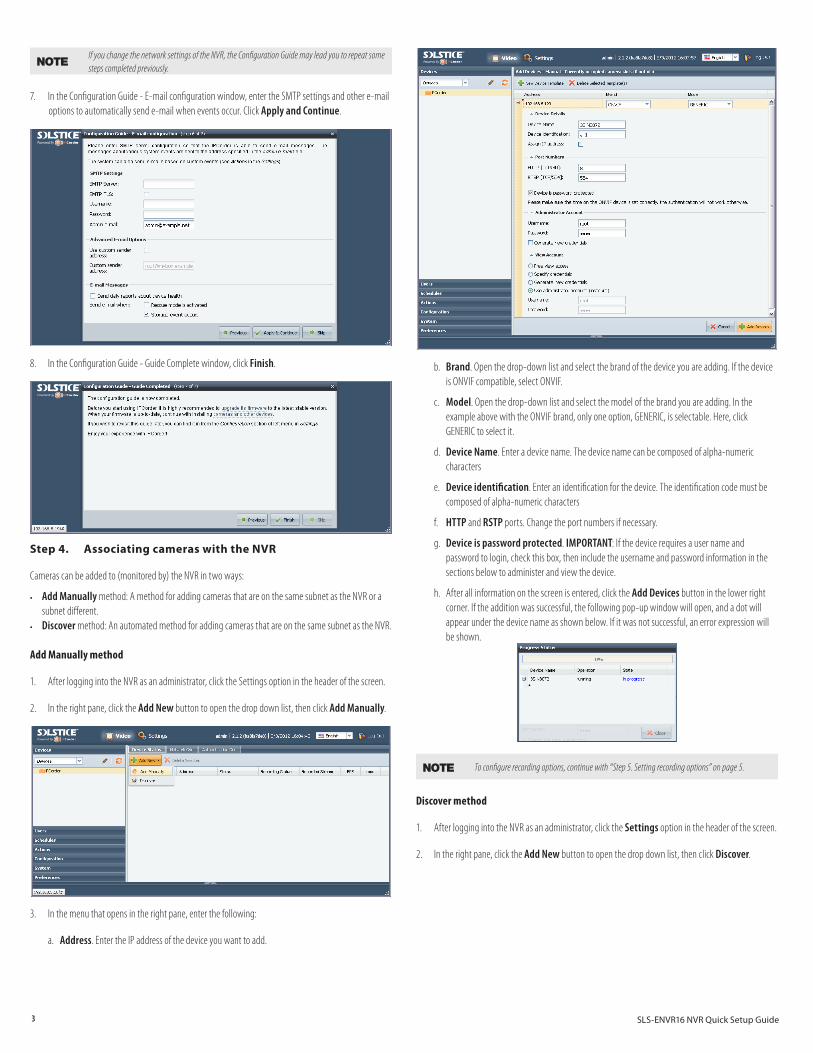
b. Brand. Open the drop-down list and select the brand of the device you are adding. If the device is ONVIF compatible, select ONVIF.
c. Model. Open the drop-down list and select the model of the brand you are adding. In the example above with the ONVIF brand, only one option, GENERIC, is selectable. Here, click GENERIC to select it.
d. Device Name. Enter a device name. The device name can be composed of alpha-numeric characters
e. Device identification. Enter an identification for the device. The identification code must be composed of alpha-numeric characters
f. HTTP and RSTP ports. Change the port numbers if necessary.
g. Device is password protected. IMPORTANT: If the device requires a user name and password to login, check this box, then include the username and password information in the sections below to administer and view the device.
h. After all information on the screen is entered, click the Add Devices button in the lower right corner. If the addition was successful, the following pop-up window will open, and a dot will appear under the device name as shown below. If it was not successful, an error expression will be shown.
NOTE To configure recording options, continue with “Step 5. Setting recording options” on page 5.
Discover method
1. After logging into the NVR as an administrator, click the Settings option in the header of the screen.
2. In the right pane, click the Add New button to open the drop down list, then click Discover.

4 © 2012 Observint Technologies, Inc. All rights reserved.
3. On the following screen, click the Start Discover button in the page header.
4. For each camera discovered on the network, check the select box to the left of the IP address, then enter the appropriate information required in the configuration menu as described above. IMPORTANT: If the device is password protected, click the checkbox (see below), then scroll down to enter the username and password information required.
5. For each camera discovered on the network that you want to add to the NVR system, check the select box to the left of the IP address, then click the Add Selected Devices button in the lower right corner. If an addition was successful, the following pop-up window will open and a dot will appear under the device name as shown below. If it was not successful, an error expression will be shown.
6. After a camera is added to the NVR, it appears in the Settings | Devices | Device Status tab. Verify that all Status indication for each is OK.
Step 5. Setting recording options
1. After logging into the NVR as an administrator, click the Settings option in the header of the screen.
2. In the left pane, click Schedules to establish the weekly time frame when recording can occur. In the following example, a time frame named My schedule was added to pre-set schedules included by default in the system.
a. Click the Create Schedule icon at the top of the right frame, then enter a unique schedule name in the entry field. In the example below, the name My schedule was entered.
b. Click the Add Period icon.
i. Click In the Day entry field twice to open a drop-down list, then select the option you prefer.
ii. The From and To fields define the start time and end time when recording will occur on the “Day” selected previously. The To and From fields are in the format HH:MM:SS in 24-hour notation (00:00:00 to 23:59:59). Edit these fields as needed.
c. Click the Add Period icon again to enter an additional time segment if needed.
3. Click the Create button to save the schedule. Notice that the new schedule is shown in the list in the left frame. Note: you can edit the default preset schedules.
4. Click Devices in the left frame, then, in the right pane, click the Device Status button.
5. Check the device select box to the left of the IP address of the camera you want to record, then click the Video tab in the frame below.
Device select box Video tab

5 SLS-ENVR16 NVR Quick Setup Guide
a. In the Video tab, click the Add Recording Mode icon to configure a scheduled recording mode.
b. Open the drop-down list to the right of When to record, then select the schedule you prefer.
c. Open the drop-down list to the right of Recording type, then select either Off, On Trigger, or Permanent (continuous when scheduled).
d. Open the drop-down list to the right of Camera Stream, then select the stream (resolution) you prefer.
e. You can open the Advanced Recording Options and Advanced Video Options submenus by clicking the q icons. Edit the fields in those submenus if necessary.
Click to open/close the submenu
6. Click the Apply button to complete the recording mode setup for the camera.
7. Setup the recording modes for other cameras in the system as needed.
Step 6. Live view
Click the Video button in the header to return to the video display. Verify that you can see a thumbnail-sized video stream from your camera in the Camera List near the top of the window.
To see and expanded view of a camera, drag and drop the thumbnail for the camera into a cell in the View frame. See above.
Step 7. Playback and export recordings
1. In the Video view, click the Recordings icon for the camera you want to playback or download video from. A timeline will open at the bottom of the window indicating when video and other recordings were made. In the screen below, the Playback icons were selected for both cameras.
Recordings icons
Playback control buttons Timeline
2. To play recorded video (see screen capture below):
a. Click on the camera used to record the video you want to payback.
b. Click the calendar icon, then select the day on which the video was recorded.
c. In a section of the timeline that shows recorded video (green segment, see below), click (once) the time at which you want to start playing video. The current play position is indicated by a white marker.

6 © 2012 Observint Technologies, Inc. All rights reserved.
Shift left
CenterPayback rate
Expand
Contract
Open Legend
Open calendarExport video More actions
Shift right
Play position marker (white)
Video recorded area (green)
Controls on the time line include: - Click the Expand icon to widen the timeline- Click Shift left icon or Shift right icon to shift the time span - Click the Playback rate icon to adjust the playback speed.
d. Click the Play button ( u ) in the playback controls to watch the video. Click the Pause icon (;) to Stop.
e. To mark a segment of the time line for repeated playback (or export), drag your mouse cursor from the start of the segment to the end of the segment. The segment you selected will be indicated by a green marker at the start and a red marker at the end.
Playback start marker (green) Playback end marker (red)
Play position (white)
f. Click anywhere between the red marker and the green marker to set the play position, then click the play button to continuously replay the segment. Click the Pause icon (;) to stop.
g. To export the video segment between the green marker and the red marker:
i. Stop the video playback.
ii. Click the Export video icon.
Export video icon
h. In the pop-up window, uncheck the cameras that you don’t want to download video from, then click Browse and select the location where the video segment will be saved on your computer.
i. Click OK to export (download) the video segment. A window will open showing the progress of the download.
Step 8. Add users to the NVR system
1. After logging into the NVR as an administrator, click the Settings option in the header of the screen.
2. In the left pane, click Users.
3. Click the Create User button. In the Use Details menu, enter a Username, enter then re-enter a password (note that the password strength is calculated), then click a Permissions level.
The Admin and User options have pre-set User Permissions, however, as an Admin you can change any permissions assigned to any user.
Create User - User Permissions list
4. After selecting the permissions for the new user, scroll to the bottom of the frame, then click Create.