slik-da tutorial - software...
TRANSCRIPT

SLIK-DA Tutorial
Creating a simple server in Visual Studio 2013

Page 2 of 24
Table of Contents
INTRODUCTION 3
Intended Audience 3
Pre-Requisites 3
CREATING AN OPC SERVER 4
HOW TO EXPOSE TAGS 13
ONREAD EVENT 15
SUBSCRIPTION READS 19
ONWRITE EVENT 21
ONCLIENTCONNECT AND ONCLIENTDISCONNECT EVENTS 22
SUMMARY 23
CONTACT US 24

Page 3 of 24
Introduction
Do you have a need to incorporate OPC Server functionality within your existing Application? Or, do you
need to create an OPC Server from scratch?
If the answer is YES to either of these questions, then this document will tell you step-by-step how to
accomplish this using Visual Studio 2013 with the SLIK-DA ActiveX Control. This detailed step-by-step
guide will leave few questions with regards to how quick and easily you can create your own OPC Server.
Intended Audience
This paper is intended for both experienced and new developers who need to create their own customized
DA Server.
Pre-Requisites
Some familiarity with OPC, Visual Studio 2013 and ActiveX Controls
Visual Studio 2013
Although this example uses VB .NET, the SLIK-DA can be used in the following languages as well:
Visual Basic
C++
Borland Delphi
C#

Page 4 of 24
Creating An OPC Server
1. Start Visual Studio 2013
2. To create a new application select Project… next to the Create label. You can also start a new
project by going to File New Project…
3. Under the Visual Basic project type you will select Windows. You will want to choose the Windows
Forms Applications Template. You can name your project. My project will use the default name of
WindowsApplication1
Figure 1.1 Create a new Visual Studio Project.
4. When the development environment opens, you will see your blank form. We now need to add the
SLIK-DA ActiveX control to our toolbox.
5. Right-click in the Toolbox section where you want to add your component. I am creating mine in its
own category called Northern Dynamics. Select Choose Items… to populate the list of items. This
may take some time to initialize.

Page 5 of 24
Figure 1.2 Choose Items to add to your Toolbox (the left pane in your development environment)
6. Under the .NET components tab click Browse and browse to the Interop.NDISLIKDA.dll. This is in
the Redistributables folder in the location where you installed the SLIK-DA. Click Open.
Figure 1.3 Browse to the Interop.NDISLIKDA.dll
7. Make sure the SLIKServer box is checked and click OK. This will add the component to the toolbox.

Page 6 of 24
Figure 1.4 Select the SLIK-DA control to add it to your toolbox
NOTE: It is important that you add the component in this manner. The interop wrapper that is created
by Visual Studio when adding the COM component is known to have problems.
8. We will now need to place an instance of the ActiveX control onto our empty form. You can either
double-click on the SLIKServer Icon, or you can drag-and-drop it onto the form.
Figure1.5 Add the SLIK-DA control to the form
9. With the SLIK-DA control still selected, we will now modify the Properties of the SLIK-DA ActiveX.

Page 7 of 24
10. First, we need to give our OPC Server a unique identifier, a Class ID (CLSID). This is a long alpha-
numeric name that is unique and will identify this OPC Server. Locate the “CLSID” property in the
properties window on the right and click on the drop-down. Choose AutoGenerate.
Figure 1.6 AutoGenerate the CLSID and AppID
11. The automatically generated number will appear in the CLSID property. Please note that the Class
ID is totally unique and it based on the hardware where the class was generated. Yours will differ
from the example shown.
12. We now need to follow a similar process to create the Application ID. Locate the AppID property
and select AutoGenerate from the drop=down box.
Figure 1.7 The CLSID and AppID that were created for my application.
13. We will now complete the “identification” of our OPC Server by setting the following Properties for
the SLIK-DA control in the code of our program. Double-click on any empty space on the form and

Page 8 of 24
the code window will open at the Form_Load event. We will set the following properties
programmatically:
a. ProgID = “MyFirst.OPCServer.1”
This is the name of the Server that users will see when browsing a list of available OPC
Servers on your computer.
NOTE: The “.1” on the end of the name references the version number of the OPC Server. It is
important that you place a number here as the SLIK-DA ActiveX control will not allow you to
register the server without a .versionnumber.
b. AppName = “My First OPC Server”
This is the humanly-readable name of the OPC Server.
c. Description = “My First OPC Server created with SLIK-DA”
This is the humanly-understandable description of what the Server is for.
d. VendorName = “Software Toolbox, Inc.”
This is the name of your company.
14. This information will be entered into the Form_Load event as shown below:
Figure 1.8 Creating the “Identity” of my OPC Server in the Form_Load event.

Page 9 of 24
Note: The additional Import statements and the declaration of the ISLIKTags Collection at the top of
the code window will be necessary as well
15. We have now done everything necessary to identify our OPC Server, but we still need to register it
with Windows. It is possible to do this from within our program by calling the “RegisterServer”
method built in to the SLIK-DA control.
However, we are going to register the OPC Server so that is can be seen by OPC Clients, but we will
do this via a command-line parameter. We are choosing this method instead of the one described
above because we do NOT want to register/unregister the OPC Server each time the software is
opened or closed. This would prevent the Server from being used by OPC Clients while the server is
not running. Therefore, we will allow the user to register the server via a command-line parameter once
(preferably after the server has been installed). Likewise, the server can be unregistered through the
command-line parameter (preferably when the OPC Server is uninstalled).
16. We will now append the Form_Load event to incorporate the command-line parameter as shown
below.

Page 10 of 24
Figure 1.9 Add the command-line parameter that will allow us to register or unregister our OPC
Server
17. Now we need to compile this application into an executable. Go to File Save All. You will be
prompted to select the location where you want to save your application. Once the project is saved
you call select Build <Name of Project> from the Build menu, where <Name of Project> is the
name you gave your application when you created it.
18. Now we want to actually register the server. Go to the Windows Start Menu and click on Run.
Browse to the executable you have just created and select Open. This will appear in the Browse
dialog as shown below.

Page 11 of 24
Figure 1.10 Browse to your executable file in the command prompt
19. Next, we want to edit the command line so we can add the command-line parameter to register our
server (we will use “unregserver” if we need to unregister our server).
Figure 1.11 Modify the command-line to register the server
20. When you click OK the server will be launched, registered and closed. This may happen so fast
that you do no see anything happen on the screen. This is OK.
21. Next we will want to verify that the OPC Server is listed as an installed server. You can test this by
opening up an OPC Client (such as the Software Toolbox OPC Quick Client) and browse for the
available Servers on your computer. The OPC Server that we just created should be displayed.

Page 12 of 24
Figure 1.12 Browsing the available servers using the OPC Quick Client
Note: It is important to add a line to the code that will actually initialize your server. For example, you
can add the Start command at the end of the Form_Load event.
Page 13 of 24
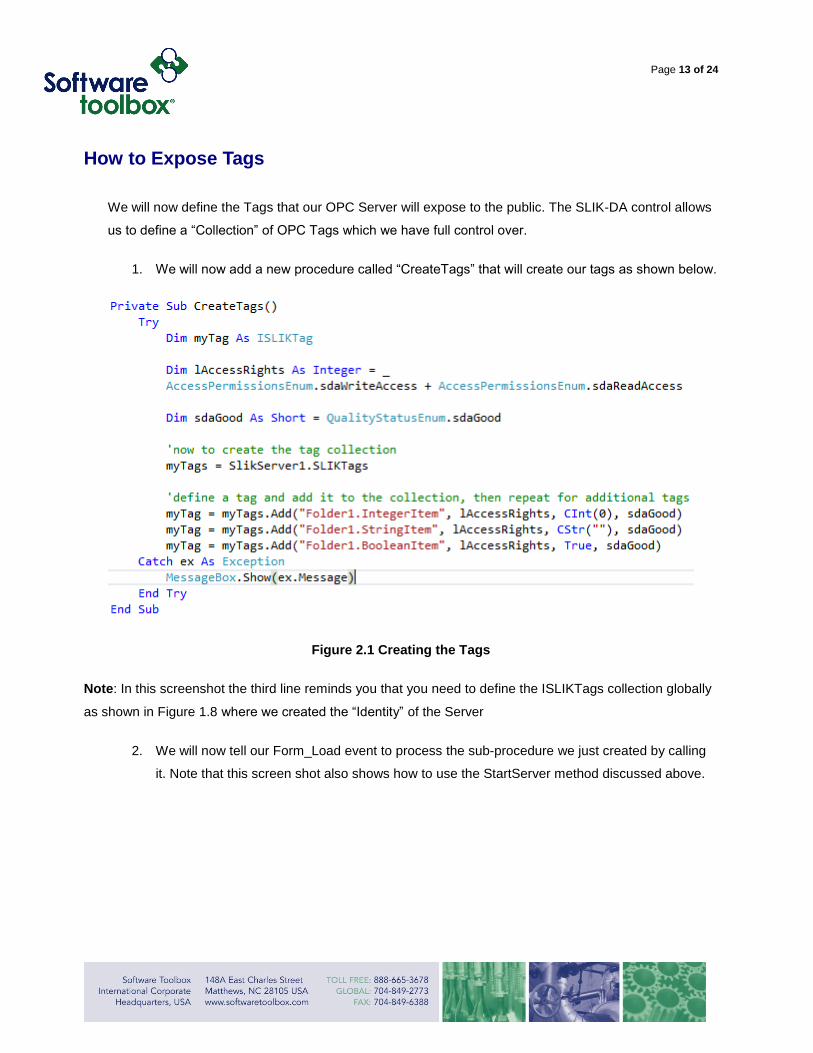
How to Expose Tags
We will now define the Tags that our OPC Server will expose to the public. The SLIK-DA control allows
us to define a “Collection” of OPC Tags which we have full control over.
1. We will now add a new procedure called “CreateTags” that will create our tags as shown below.
Figure 2.1 Creating the Tags
Note: In this screenshot the third line reminds you that you need to define the ISLIKTags collection globally
as shown in Figure 1.8 where we created the “Identity” of the Server
2. We will now tell our Form_Load event to process the sub-procedure we just created by calling
it. Note that this screen shot also shows how to use the StartServer method discussed above.
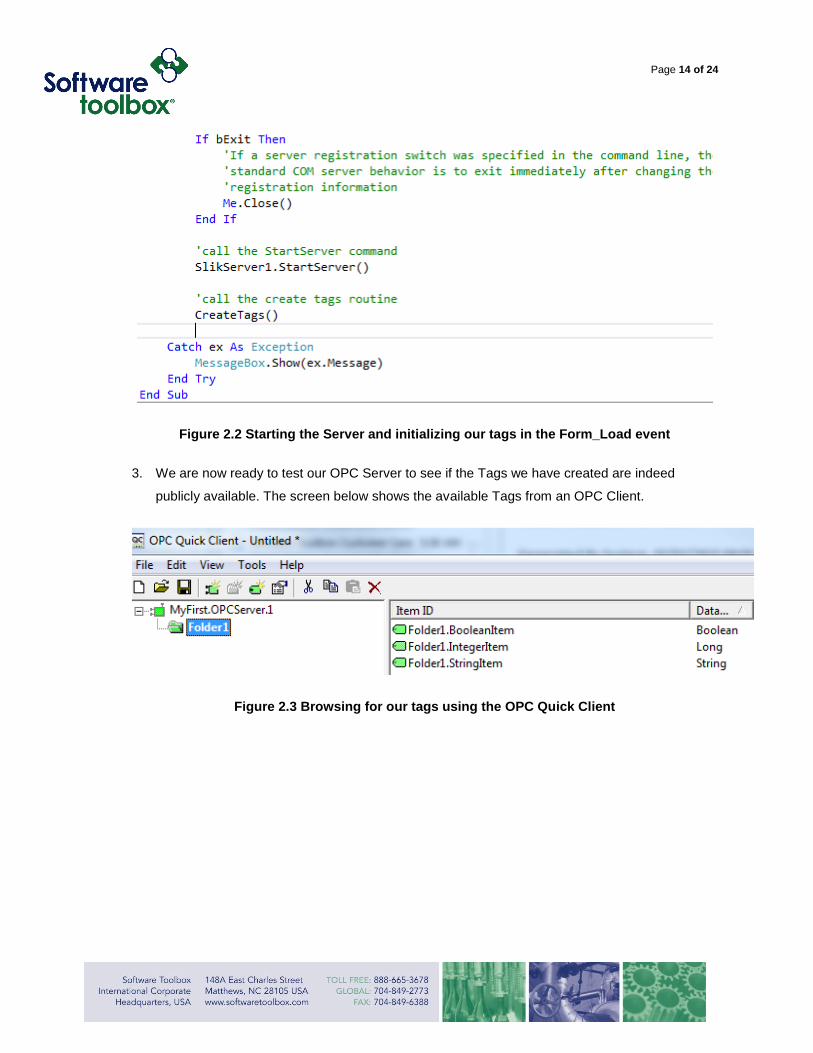
Page 14 of 24
Figure 2.2 Starting the Server and initializing our tags in the Form_Load event
3. We are now ready to test our OPC Server to see if the Tags we have created are indeed
publicly available. The screen below shows the available Tags from an OPC Client.
Figure 2.3 Browsing for our tags using the OPC Quick Client

Page 15 of 24
OnRead Event
At present, our OPC Server does not do anything other than exist and expose OPC Tags to the world.
As of now, we can not Read or Write to these Tags.
1. Now we are going to modify our Tags so that then have an initial value. We are going to directly
modify the Tags that we created earlier in the MyTags collection. We will later call this method
from the Form_Load
Figure 3.1 Set test values for the variables that can be read by the Client
2. Now we are going to add our Read Handler. In the Design window of Visual Studio, click on the
SLIKServer1 object. Then, in the Properties window click the Events Button.
Figure 3.2 Select the SLIKServer1 object

Page 16 of 24
3. In the Events drop-down box, choose OnRead. VS will create the heading for this event.
Figure 3.3 Select the OnRead Event
4. We will add a handling script within this procedure. This event is fired when an OPC Client
requests a Device Read (IOPSyncIO::Read()) for any number of Tags. Therefore, this event
houses a collection of tags that will be passed back directly to the Client, after we have handled
them.
Note: This procedure is ONLY required when the Client has specifically asked for a Read on the tag or
a group of tags. For most OPC Client applications you will want to use subscription reads. This means
that the Client does not call this Read method but instead they “subscribe” to the Tag and then the
Server automatically pushes the updated tag value to the Client as soon as the Tag’s value changes.
This is something that the SLIK-DA can automatically do for you. Remember, OPC Clients only call this
Read method when they need the value of a tag now.

Page 17 of 24
Figure 3.4 Create the OnRead event procedure
5. This procedure basically iterates through the collection of Tags as passed into the Event. Each
Tag is processed in the loop to see which tag is being processed using the Tag Name as our
search basis. Once the tag has been identified, its value is set to that of the equivalent Variable
we defined earlier.
6. Now that we have created the ability to Read our OPC Tags and that those Tags will contain
the values of the variables we defined in our application, it is time to test it to see if it works.
7. In order to test the OnRead event I will use the Software Toolbox OPC Quick Client application
to connect to our OPC Server to browse the Tags, and read them using the Synchronous
Device Read method.
Figure 3.5 Synchronous Device Read in the OPC Quick Client
Page 18 of 24
From within my OPC Client application, I click on the Synchronous Device Read option and wait for
the new data value to show up, which should be almost instantaneous.

Page 19 of 24
Subscription Reads
Subscription Reads differ from the type of Read that we just did in that instead of the Client asking the
Server for the value of a Tag, the OPC Server instead updates the client with the tag’s value whenever
that value changes. This is often referred to as “subscription reads”, “exception based reporting”, or
“callbacks”.
To use this kind of method, you only need to write a value to our SLIK-DA tag. So let us add simulation
ability to our server by means of a Timer Control. We will add a Timer that will modify our tags values
once every second.
1. Drag and drop a Timer on to your form. The Timer control will not appear on the form, like the
SLIK-DA control, but will be shown in the component tray. Set the Timer’s properties to enable
the timer. The interval should be set to 1000.
Figure 4.1 Add the Timer to the form and set the Enabled and Interval Properties

Page 20 of 24
2. Double click on the Timer to open the Timer_Tick event code. We will simply add some code to
modify the contents of our Tags.
Figure 4.2 Create the Timer_Tick event procedure
3. To test these subscriptions, simply open the OPC Quick Client again, and browse and add the
tags. This time, however, you will not need to right-click on the tag and request a Synchronous
Device Read to see its values. The OPC Server (SLIK-DA) will automatically push the latest
Tag values into the Quick Client. This “push” is instantaneous i.e. whenever the SLIK-DA tag’s
value changes, it causes the SLIK-DA to push the value to all “listening” OPC Clients.
In real-world servers, where you have data that you have collected from a device, for example, upon
reading that data you would directly update the SLIK-DA tags as shown in this particular example. By
doing this, the OPC Client would automatically receive notifications of the new tag values for those
tags that the OPC Client has subscribed to.

Page 21 of 24
OnWrite Event
Now we want to add the ability for the client to be able to write to our SLIK-DA Tags.
1. Just as you created the OnRead event by selecting it from the Event drop-down box, this time you
will select the OnWrite event. We will enter code that will act and look very similar to that of our
OnRead event. Instead of populating tag values with our variable values, we will instead populate
our variable values from our current Tag values passed-in by the client.
Figure 4.1 Create the OnWrite Event Procedure
2. We can test the OnWrite event by opening our OPC Quick Client and right-clicking on a tag. Select
Synchronous Write and then write a value with a valid type into the box.
Figure 4.2 Writing a 0 value to the Boolean Item Tag
Now our OPC Server has the ability to receive both Read and Write requests.

Page 22 of 24
OnClientConnect and OnClientDisconnect Events
The OnClientConnect event will be fired whenever a client tries to connect to your OPC Server. Similarly,
the OnClientDisconnect event will be fired whenever a client disconnects from the Server.
1. Select the OnClientConnect event from the event drop-down box and enter the code below. In this
example, we will display a message box confirming a connection has been made.
Figure 5.1 Create the OnClientConnect and OnClientDisconnect procedures
2. The OnClientDisconnect event can be created in the same way using the code shown above.
Page 23 of 24
Summary
In this tutorial we learned how to:
1. Insert the SLIK-DA ActiveX control into a Visual Basic Project
2. Configure your own OPC Server, register it with Windows and start the OPC Server
3. Test your OPC Server to see if it available by browsing for it with a client application
4. Expose tags to the public
5. Test that those tags are publicly accessible via an OPC Client Tag Browser
6. Add Event handling for “Synchronous Device Read” and “Synchronous Device Write” method calls
from an OPC Client
7. Let the OPC Server automatically update OPC Clients with Tag values when they change
(subscription reads)

Page 24 of 24
Contact Us
If you have any questions or are seeking further assistance, please contact us at:
Online Support: http://support.softwaretoolbox.com
Email Support: [email protected]
Phone Support: +1 (704) 849-2773
Fax: +1 (704) 849- 6388
Mailing Address: Software Toolbox, Inc. 148A East Charles Street, Matthews, NC 28105, USA