skyward(lesson(plan(tools( accessingtools( accessing ... ·...
TRANSCRIPT

Skyward Lesson Plan Tools Accessing Tools
Accessing Lesson Plan tools through educator access plus 1) Log on to skyward 2) Click on “Educator access plus” link 3) Click on “My Lesson Scheduler” link Accessing Lesson Plan Tools through Gradebook
1) Log on to skyward 2) Click “Educator Access plus” link 3) Click “My Gradebook” 4) Choose class 5) Click on the “other access” tab scroll to “Lesson Scheduler”
My lesson Scheduler
Lesson Scheduler within My Gradebook

Skyward Lesson Plan Tools Using Lesson Scheduler
Organizing Lesson Scheduler 1) Access lesson scheduler 2) Lesson scheduler can be viewed by month, week, or day just click on the preferred view in the right hand corner.
2) Lesson Scheduler screen can be customized to display preferences 3) Click on “Lesson Scheduler Display Options” on bottom of screen
4) Customize how you want
scheduler to look when opened a) If you choose the “display
daily lessons that have assignments in a bold green font” box that means any assignments attached to a lesson plan will show green in scheduler
5) Click “Save”
View can be month, week or day
Customize lesson scheduler

Adding to basic lesson in Scheduler Lesson scheduler is a calendar to add basic descriptions of lessons.
1) Open lesson scheduler 2) Click “+” in lesson scheduler this will open a new
window 3) Fill in desired information
Copying between classes
1) Open Lesson Scheduler 2) Click “Menu options” 3) Scroll down and click “Utilities: copy daily lesson(s) from class to class” 4) A new screen opens allowing for copying options
5) Choose and click wanted lesson plan
6) Click “next”
7) A new window will appear allowing
for date to be changed. 8) Click “Run”
9) Lesson will appear in new class on Lesson Scheduler
Printing Lesson Scheduler 1) Open Lesson Scheduler
2) Click “Print Schedule”
3) All information is sent to the print queue 4) After report is complete the option to view will
be available

5) Once viewing the report click “file” then “print” 6) Another option would be to click on “My Print Queue.”
7) This will bring all documents sent to printer. Click on document then “file” and “print”
Example of Printed Scheduler
Skyward Lesson Plan Tools
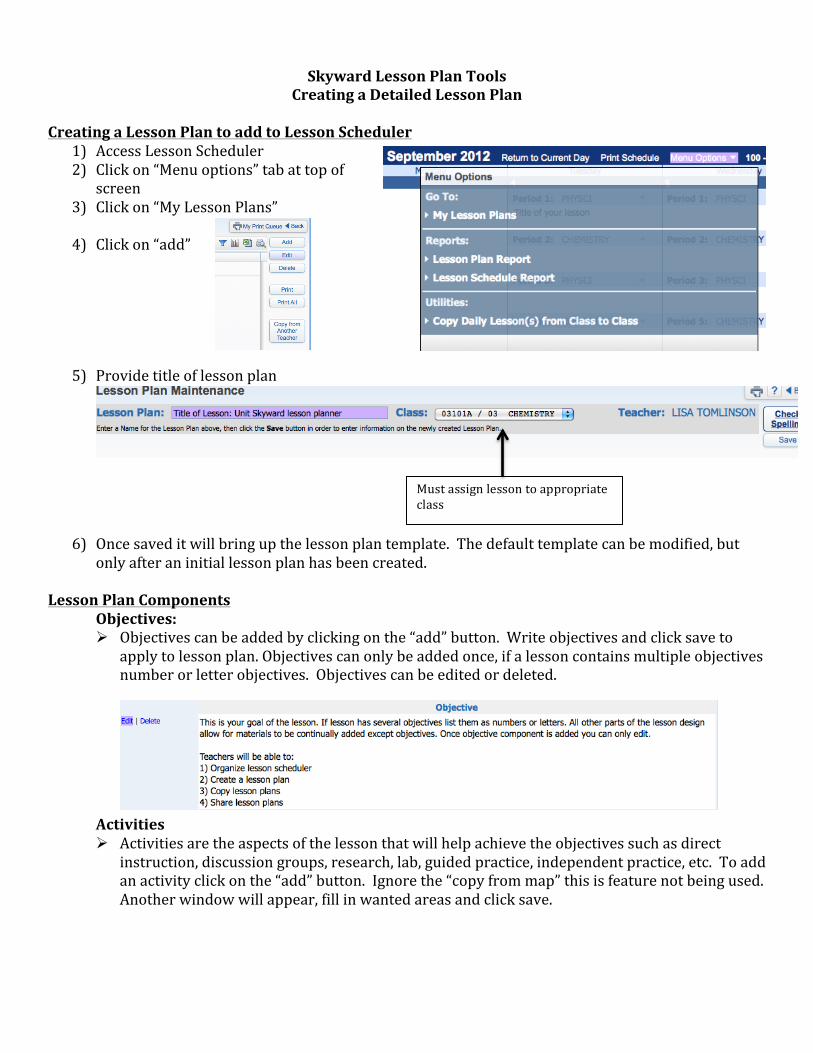
Creating a Detailed Lesson Plan Creating a Lesson Plan to add to Lesson Scheduler
1) Access Lesson Scheduler 2) Click on “Menu options” tab at top of
screen 3) Click on “My Lesson Plans”
4) Click on “add”
5) Provide title of lesson plan
5
6) Once saved it will bring up the lesson plan template. The default template can be modified, but only after an initial lesson plan has been created.
Lesson Plan Components Objectives: Ø Objectives can be added by clicking on the “add” button. Write objectives and click save to
apply to lesson plan. Objectives can only be added once, if a lesson contains multiple objectives number or letter objectives. Objectives can be edited or deleted.
Activities Ø Activities are the aspects of the lesson that will help achieve the objectives such as direct
instruction, discussion groups, research, lab, guided practice, independent practice, etc. To add an activity click on the “add” button. Ignore the “copy from map” this is feature not being used. Another window will appear, fill in wanted areas and click save.
Must assign lesson to appropriate class

Ø Each activity can be added separately using the add button this will numerically order the activities. Attachments can also be added for each activity added.
Assessments: Ø Assessment can be formative or summative. To add assessment information click “add” button
(ignore “copy from map”). This will open another window to write assessment information
Summary of activity will appear in lesson plan as a title. Type is the category of activities to be used for lessons. Types need to be decided and added
Details are the specifics wanted about activities
Multiple attachments can be added
Shows attachment. Click and it will bring up attachment
If you add multiple activities arrows can be used to change order
Assessments can be added to gradebook. This will not add until assigned to a date on lesson scheduler

Student and Teacher Resources: Ø Student and Teacher Resources can be a list or attachments of materials needed for this lesson.
To add student resources click “add” button (still ignoring “copy from map”). A new window will open up, add information or attach like materials. This component will not add any assignments to gradebook only an assessment provides that option. Click save to add information to lesson plan.
Notes: Ø The Notes component is an area to reflect or provide reminders for the lesson. It does not
provide a place for attachments if you would like to place class notes in a lesson plan attach to activities or student resources. To add notes click “add” button this will open a new window add information and save.
Once all wanted components are added click back. This page does not provide a save since saving occurred with each component added.

Skyward Lesson Plan Tools Customizing Lesson Plan Templates
Modifying Lesson Plan template 1) Open Lesson Scheduler 2) Click “Menu options” 3) Click “My lesson plans” 4) Click on arrow found near title to expand lesson plan 5) “Editing layout “link appears
6) Click “Edit Layout” opening a new window
7) Modify lesson plan to desired design click “save” 8) If you wish to change this template to all made lesson plans click “copy layout to all lesson
plans in my classes”
o If you choose to change to all classes a “pop up box” will confirm the decision
This will change your layout on family access
Provides the desired amount of rows
Allows rows to be split into components
Provides different components of lesson plans. (Academic standards applies to curriculum map which is not being used at this time)

Printing “My Lesson Plan” 1) If not in lesson plans open Lesson Scheduler 2) Click on “Menu Options” 3) Click “My Lesson Plans” 4) List of created lesson plans will appear 5) Choose to print an individual lesson plan or all lesson plans 6) After clicking “print” a pop up box will ask to print summaries or details. Summaries
will only be titles, while details will be all information added
Example of a lesson plan with details chosen.

Skyward Lesson Plan Tools Attaching detailed Lesson to a Specific Date
Attaching a Lesson Plan to Lesson Scheduler Detailed lessons that have been created in “My Lesson Plans” can be attached to lesson scheduler.
3) Open lesson scheduler 4) Click “+” in lesson scheduler this will open a new
window 3) Fill in desired information
5) Click “save” 6) “Create Assignment” becomes functional if the lesson plan has an
assessment that was chosen to go to gradebook . Only if an assignment was chosen for the gradebook will this box appear.
7) To create an assignment click “create assignment” 8) Assignment will appear in gradebook
Clicking on arrow will bring down any lesson plans that have been created for this class. If this is a lesson that applies to multiply classes it will need to be copied. However, no lesson plans have to be attached
If when creating an assessment the option to create an assignment was chosen this box appears, but will not allow for the assignment to be created until saved.

Skyward Lesson Plan Tools Copying Lesson Plans from teachers or self
Copying Lesson Plans Ø Copying From Another Teacher
1) Open Lesson Scheduler 2) Click “Menu options” 3) Click “My Lesson Plans” 4) Click “Copy from another teacher” 5) This will open a new window listing all teachers 6) Click on teacher 7) Choose appropriate lesson plan and click “copy”
Ø Copying From Class to Class (Review) 8) Open Lesson Scheduler 9) Click “Menu options” 10) Scroll down and click “Utilities: copy daily lesson(s) from class to class” 11) A new screen opens allowing for copying options
12) Choose and click wanted lesson plan
13) Click “next”
14) A new window will appear allowing for date to be changed.
8) Click “Run”
9) Lesson will appear in new class on Lesson Scheduler