skills summaries - first responders
TRANSCRIPT

Copyright © 2012 The Canadian Red Cross Society
Skills Summaries
Legend
Wear personal protective equipment
Communicate with patient or other responders
Record/document findings
Follow your local protocol
Treat for shock
Link to another skill
Six Rights of Medication
Additional resources

Close regulating valveand inflate cuff 20 mmHg beyondpoint where radial pulse disappears.
3
Skills SummariesBlood Pressure Measurement—Palpation
Select correct size of cuff and place lower edge of cuff 2.5 cm(1 in.) above crease of elbow, centred over brachial artery.
1 Locate radial pulse. 2
Slowly deflate cuffuntil radial pulsereturns, then deflatecuff fully. Record approximatesystolic bloodpressure.
5
4
Continuedeflating cuffuntil pulse isno longerheard, thenfully deflatecuff.Recordsystolic anddiastolicbloodpressure.
7
6
Blood Pressure Measurement—Auscultation
Close regulating valveand inflate cuff 20 mmHgbeyond point whereradial pulse disappears.
Position stethoscope overbrachial artery.
Slowly deflate cuff untilpulse is heard.
3 54
Copyright © 2012 The Canadian Red Cross Society
Select correct sizeof cuff and placelower edge of cuff2.5 cm (1 in.)above crease ofelbow, centred overbrachial artery.Locate radial pulse.2
1

Copyright © 2012 The Canadian Red Cross Society
Skills SummariesConscious, Choking Adult or Child
Perform a scene survey.Determine patient is chokingand tell patient you are here to help.
Position self and support patientfor back blows.
Give 5 firm back blows. 4321
Position self for abdominal thrustsand give 5 abdominal thrusts.
5 Repeat cycle of back blows and abdominal thrusts until object isdislodged or patient begins to breathe or cough or becomes unconscious.Adaptations: chest thrusts; choking in a seated position (e.g., in awheelchair); choking alone.
7
6
Conscious, Choking BabyPerform a scenesurvey.Determine baby ischoking. Position self low to the groundand support baby’shead and neck.
2
1
Turn baby face up and give 5 chest thrusts. Repeat cycle of back blows andchest thrusts until object iscoughed up, baby starts to cry,breathe, or cough or becomesunconscious.
5
6
Turn baby face down(head lower thanbody). Give 5 firm backblows.
3
4

Skills SummariesUnconscious, Choking Adult, Child, or Baby
Copyright © 2012 The Canadian Red Cross Society
Perform a scene survey.Determine unresponsiveness.
Open AirwayCheck Breathing and Circulation fora maximum of 5 to 10 seconds
4321
Start chest compressions (30 compressions).
Open patient’s airway and give 1 ventilation. If air does not go in, repositionhead and attempt to ventilateagain. If air still does not go in,repeat cycle of 30 compressions.
Look in mouth for an object(using a tongue-jaw lift); removeobject if seen.
85
7
6
Attempt to ventilate.If air does not go in, continue CPR sequence of 30 compressions and 2 ventilations. If first ventilation is successful, give another ventilation. Check pulse. If there is no pulse, follow CPR sequence. If there is a pulse, follow rescue breathing sequence. If there is any change in patient’s condition, stop CPR and check ABCs.
910
131211

Skills SummariesRescue Breathing for an Adult, Child, or Baby
Perform a scene survey.Determine unresponsiveness,then open Airway.
21
If using a BVM, give two 1-second ventilations.
4
Check Breathing and Circulation (carotid pulse for adult and child;brachial pulse for baby) for a maximum of 5 to 10 seconds.
3
Give ventilations (1 every 5–6seconds for adult; 1 every 3–5seconds for child or baby).Stop ventilations and checkABCs every 2 minutes or ifthere is any change in patient’scondition.
6
5
Suctioning
Measure distance of insertion(earlobe to corner of mouth).
1 With one hand, open mouth using crossed-finger technique and insert suction tip into mouth; never lose sight of tip and hold your breath while suctioning.
2
While withdrawingtip, suction untilairway is clear oryou can no longerhold your breath.
3 Immediatelyapplysupplementaloxygen aftersuctioning.
4
Copyright © 2012 The Canadian Red Cross Society

Copyright © 2012 The Canadian Red Cross Society
Skills SummariesInsertion of an Oropharyngeal Airway, Adult or Child
Determine unresponsiveness,then measure distance ofinsertion (earlobe to corner of mouth).
Select correct size of airway. Open mouth using crossed-finger technique or tongue-jawlift.
321
Insert airway halfway, with curved end facing roof of mouth; then rotate airway 180° into position.4
Insertion of an Oropharyngeal Airway, Baby
Determine unresponsiveness,then measure distance ofinsertion (earlobe to corner of mouth).
Select correct size of airway.Place padding under baby’sshoulders.
Open baby’s mouth. Using atongue depressor to assist withinsertion, insert airway withcurved end facing down,following natural curvature ofbaby’s airway.
321

Copyright © 2012 The Canadian Red Cross Society
Skills SummariesOxygen Set-up and Delivery
Check cylinder to ensure it is marked “oxygen.”Ensure oxygen cylinder is stable at all times.Clear valve:a. Remove protective covering and set aside
O-ring.b. Open cylinder for 1 second to clear valve,
ensuring valve is facing away from everyone.
2
1
Attach pressure regulator:a. Confirm regulator is designed to be used with an oxygen cylinder.b. Put O-ring into pressure regulator.c. Place pressure regulator on cylinder.d. Set metal prongs into valve.e. Hand-tighten screw until pressure regulator is snug.
3
Open cylinder 1 full turn, thencheck pressure gauge.
Attach delivery device. Adjust flowmeter to desiredflow rate.
4 65
Verify oxygen flow and fillreservoir of non-rebreathermask, if using.
Safely apply device on patient.7 8

Copyright © 2012 The Canadian Red Cross Society
Skills SummariesUsing a Bag-Valve-Mask (BVM) Resuscitator for Ventilations
Select and insert correct size ofOPA, if applicable.
Responder 1: assemble correctsize of BVM.
Responder 1: attach BVM(adult, child, or baby) tosupplemental oxygen.
321
Responder 1: position mask, then open airway and seal mask:a. Place thumbs on each side of mask.b. Place fingers of both hands along jawbone.c. Open airway using head-tilt/chin-lift (or jaw
thrust if head and/or spine injury is suspected);for a baby, place padding under shoulders priorto opening airway.
d. Apply downward pressure with thumbs whilelifting jaw upward with fingers.
Responder 2: begin ventilations:a. Squeeze bag smoothly just until chest
starts to rise.b. Give 1 ventilation every 5–6 seconds
(1 every 3–5 seconds for a child or baby).c. Watch chest to see if air is going in.d. Recheck pulse and breathing after 2 minutes
and every few minutes thereafter.
54

Copyright © 2012 The Canadian Red Cross Society
Skills SummariesCPR for an Adult or Child
Perform a scene survey.Determine unresponsiveness.
Open Airway. Check Breathing and Circulationfor a maximum of 5 to 10seconds.
4321
Place hands in appropriateposition and give 30compressions (at a rate of atleast 100/minute).
Give 2 ventilations with barrierdevice and supplementaloxygen.
5 6
Repeat cycle of 30 compressionsand 2 ventilations. Continue CPRuntil AED can be applied, moreadvanced care takes over, or local protocol dictates otherwise. If there is any change inpatient’s condition, stop CPR andcheck ABCs.
8
7
CPR for a Baby
Perform a scene survey.Determine unresponsiveness,then open Airway.
Check Breathing and Circulationfor a maximum of 5 to 10seconds.
Place fingers in appropriateposition and give 30compressions (at a rate of at least 100/minute).
4321
Place padding under shoulders to open airway. Give 2 ventilations with barrier device and supplemental oxygen.Repeat cycle of 30 compressions and 2 ventilations. Continue CPR until AEDcan be applied, more advanced care takes over, or local protocol dictatesotherwise. If there is any change in baby’s condition, stop CPR and check ABCs.7
5
6

Copyright © 2012 The Canadian Red Cross Society
Skills SummariesUsing an Automated External Defibrillator (AED)
Apply correct size of electrodepads based on patient’s age.
2
Turn on AED and follow voiceprompts.Stop CPR and ensure everybodyis clear of patient beforedelivering shock.
Apply shock (if indicated),operating AED properly.Resume CPR at appropriatetime.
Respond appropriately whenconfronted with simulatedproblems or hazards. If there is any change in patient’scondition, stop CPR and checkABCs.
7
6
5
4
3
Ensure chest is ready for electrode pad placement.1

Copyright © 2012 The Canadian Red Cross Society
Skills SummariesTwo-Rescuer CPR
Perform a scene survey.Determine unresponsiveness.Responder 1: open Airway and check Breathing and Circulation for a maximum of 5 to 10 seconds.
321
Responder 2: maintain airway, then position andseal mask. Responder 1: give 2 ventilations (eachlasting 1 second) until chest starts to rise.Repeat cycle of compressions and ventilations (at a rate of 30/2 for an adult or 15/2 for a child orbaby). Responder at head periodically checks foreffectiveness of compressions by feeling for carotidpulse.
Responders switch roles between cycles. ContinueCPR until AED can be applied, more advanced caretakes over, or local protocol dictates otherwise.Follow AED’s prompts and prepare for transport.If there is any change in patient’s condition, stopCPR and check ABCs.
7
6 8
109
Responder 1: place hands in appropriate position for chest compressions. Responder 2: prepare AED and barrier device/BVM with supplemental oxygen.
4
Responder 1: give 30 compressions (at a rate of at least 100/minute).
5

Copyright © 2012 The Canadian Red Cross Society
Skills SummariesControlling External Bleeding
Expose, examine, and applydirect pressure to wound, orappropriately control bleeding if object is impaled.
Apply pressure bandage ifbleeding continues.
If bleeding continues, assessdistal circulation, then applytourniquet 5 to 10 cm (2 to 4 in.) above injury.
1 32
Bandage wound securely.Reassess distal circulation; after 10 minutes, slowly remove tourniquet ifthere has been a significant reduction in bleeding.Maintain aseptic technique throughout procedure.Document application of tourniquet, including the times it was applied,tightened, and released.
76
54

Copyright © 2012 The Canadian Red Cross Society
Skills SummariesSplinting
Expose and examine injury.Perform manual stabilizationand control any bleeding.
Assess distal pulse and motorand sensory function.
21
Measure splintappropriately,then apply splintto immobilize limb above andbelow injury.
3
Pad splint asnecessary, thensecure splint inplace.
4
Reassesscirculation andmotor and sensoryfunction.Elevate splintedpart, if possible.
5
6
Copyright © 2012 The Canadian Red Cross Society
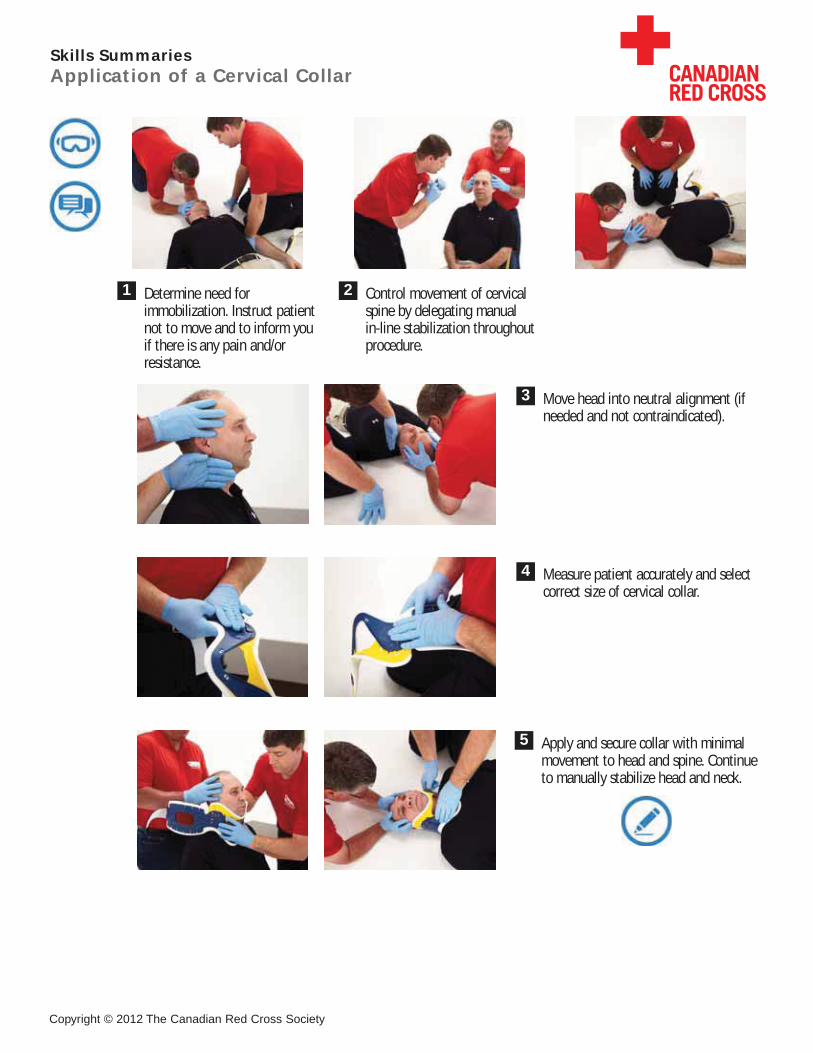
Skills SummariesApplication of a Cervical Collar
Determine need forimmobilization. Instruct patientnot to move and to inform youif there is any pain and/orresistance.
Control movement of cervicalspine by delegating manual in-line stabilization throughoutprocedure.
21
Move head into neutral alignment (ifneeded and not contraindicated).
Measure patient accurately and selectcorrect size of cervical collar.
4
3
Apply and secure collar with minimalmovement to head and spine. Continueto manually stabilize head and neck.
5
Copyright © 2012 The Canadian Red Cross Society
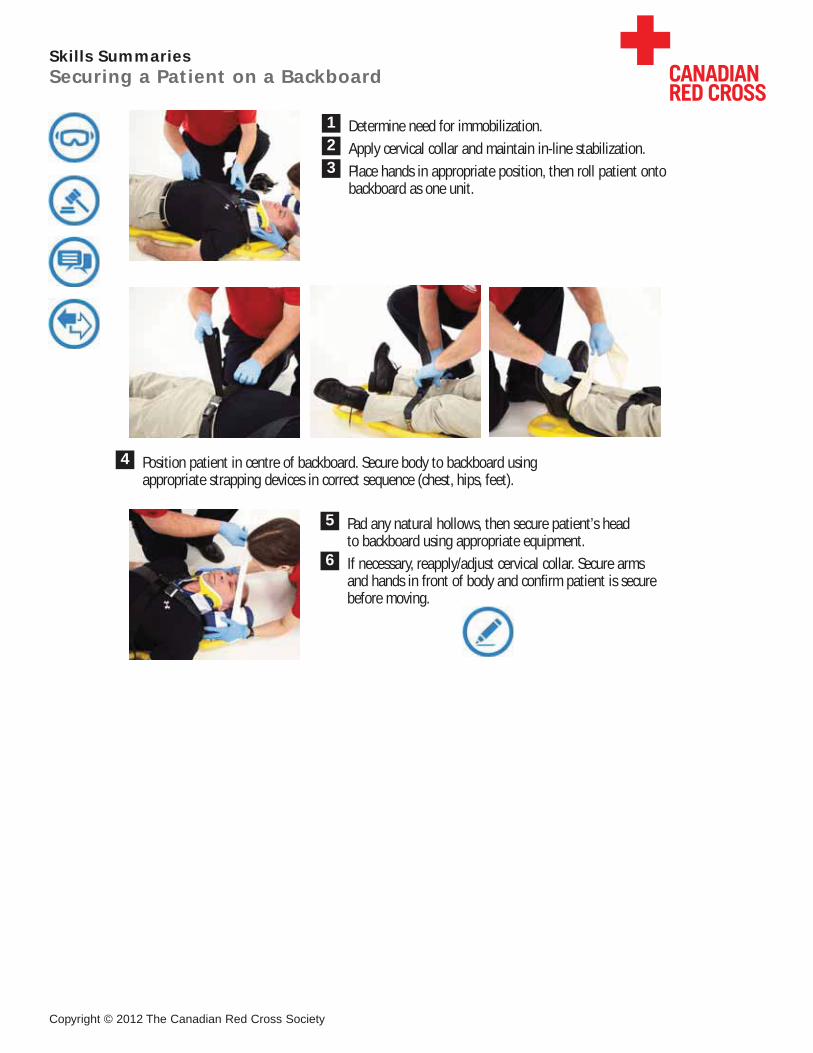
Skills SummariesSecuring a Patient on a Backboard
Determine need for immobilization. Apply cervical collar and maintain in-line stabilization. Place hands in appropriate position, then roll patient onto backboard as one unit.
321
Position patient in centre of backboard. Secure body to backboard usingappropriate strapping devices in correct sequence (chest, hips, feet).
4
Pad any natural hollows, then secure patient’s head to backboard using appropriate equipment.If necessary, reapply/adjust cervical collar. Secure armsand hands in front of body and confirm patient is securebefore moving.
6
5

Copyright © 2012 The Canadian Red Cross Society
Skills SummariesHelmet Removal
Responder 1: maintain manualstabilization throughout.
1
Responder 2: remove any face piece that interferes with normalbreathing, maintaining an open airway, or performing rescue breathing.
2
Responder 2: remove chin strap or any other securing devices (e.g., padding).3
Responder 2:support head.
4
Responder 1:slide helmet off.
5 Responder 1:continue tomaintain manualstabilization untilimmobilization iscomplete.
6

Copyright © 2012 The Canadian Red Cross Society
Skills SummariesShoulder Pad Removal
Cut away clothing.1
Release or cut any straps thatinterfere with pad removal.
Support patient’s chest and upper arms.
Slowly remove padding.Pad any natural hollows underpatient’s head.
2543

Copyright © 2012 The Canadian Red Cross Society
Skills SummariesApplication of an Upper Body Motion Restriction Device
Determine need for immobilization.Delegate manual in-line stabilization of head and neck until other equipment is applied.Apply and secure cervical collar with minimal movement to head and spine.
3
21
Position device according to manufacturer’srecommendations.
Confirm device positioning, thensecure straps in proper order,starting with middle and lowertorso straps.Secure leg straps.
Pad head appropriately.4 7
6
5
Secure head to device. Secure upper torso strap. Safely move patient to abackboard as a team.
8 109
Release leg straps and slowly lower patient’s legs to an in-line position.Secure patient to backboard.
11
12

Copyright © 2012 The Canadian Red Cross Society
Skills SummariesStanding Take-Down
Responder 1: maintain manual in-line stabilization. Responder 2: apply cervical collar. Responders stand on either side of patient. Responder 1: slide backboardbehind patient, ensuring that it is aligned properly (centred). Responder 2(and a third responder if available): brace bottom of backboard with onefoot.
2
1
While holding patient’s head steadywith one hand, responders placefree hand under patient’s armpitsand grasp next highest handhold on backboard.
3
Safely lower patient to the ground,maintaining manual in-linestabilization and using proper bodymechanics.
4
Ensure patient is appropriately held in place (e.g., elbows tucked).If there is a third responder, Responder 3: maintain manual in-linestabilization from behind backboard.Secure patient to backboard.7
65

Copyright © 2012 The Canadian Red Cross Society
Skills SummariesScene and Primary Survey
Identify and reduce anypotential environmental risks or hazards.Identify mechanism ofinjury/chief complaint. Identify number of patients.Identify and request otherneeded resources and introduceself.
Determine responsiveness andlevel of consciousness (AVPU:Alert, Verbal, Painful,Unresponsive).
Determine if manual spinalprecautions should be taken,and act appropriately.
54
3
2
1
Open Airway. Check Breathing.76
Check Circulation, including deadly bleeding.8

Copyright © 2012 The Canadian Red Cross Society
Skills SummariesSecondary Survey
Interview patient and/or bystanders:• Confirm chief complaint and mechanism of injury as determined by primary survey.• Collect patient history (SAMPLE: Signs and symptoms, Allergies, Medications, Past medical history, Last meal,
Events prior to incident).
1
Glasgow Coma Scale (GCS)
Eye Opening (E)Spontaneous–4To voice–3To pain–2No response–1
Best Verbal Response (V)Oriented and converses–5Disoriented and converses–4Inappropriate words–3Incomprehensible sounds–2No response–1
E + V + M = 3 to 15
Best Motor Response (M)To verbal command:
Obeys command–6To painful stimulus:
Localizes pain–5Withdrawal–4Abnormal flexion–3Abnormal extension–2No response–1
Check and record vital signs:• Level of consciousness (use Glasgow
Coma Scale)• Breathing (rate, rhythm, and quality)• Pulse (rate, rhythm, and quality)• Skin characteristics (colour, condition, and
temperature)• Blood pressure (rate)• Pupils (size, pupils of equal size, and
reactive to light)
2
Complete head-to-toe physical examination:• Get consent from patient before
touching her.• Carefully and systematically examine
(exposing when needed) and palpate:° Head and neck° Shoulders and collarbones° Chest° Back° Abdomen° Pelvis and hips° Legs and arms
3

Copyright © 2012 The Canadian Red Cross Society
Skills SummariesRolling a Patient onto a Backboard: From a Supine Position
Establish a plan with other responders and work as a team.Apply cervical collar, when appropriate. Responder 1: maintain manual in-line stabilization of patient’s head and neck throughoutprocedure.Responders 2 and 3: place backboard beside patient and kneel on other side of patient.4
321
Responder 2: grasp patient’s far shoulder and hip to controlpatient. Responder 3: grasppatient’s far hip and knee tocontrol patient.
Responder 1: give a pre-arranged command to rollpatient. Responders roll patientas one unit onto patient’s side.
Responder 2: examine patient’sback while keeping one hand on patient’s shoulder andsupporting patient againstthighs.
765
Responders 2 and 3: positionbackboard against patient.Responder 1: give pre-arrangedcommand to roll patient as oneunit onto backboard.
Responders roll patient as oneunit onto backboard. Securepatient in centre of backboard.
10
9
8

Copyright © 2012 The Canadian Red Cross Society
Skills SummariesRolling a Patient onto a Backboard: From a Prone Position
Establish a plan with other responders and work as a team.Responder 1: maintain manual in-line stabilization of patient’s head and neckthroughout procedure.Responder 2: examine patient’s back.Responders 2 and 3: kneel beside patient and place backboard between patientand themselves.
2
43
1
Responder 2: grasp patient’s farshoulder and hip to controlpatient.Responder 3: grasp patient’s farhip and knee to control patient.
Responder 1: give a pre-arranged command to rollpatient. Responders roll patientas one unit onto patient’s side.
Responder 3: positionbackboard against patient.
75 6
Responder 1: give command toroll patient as one unit ontobackboard.
8 Responders roll patient as oneunit onto backboard. If possible,apply cervical collar. Secure patient in centre ofbackboard.
10
9

Copyright © 2012 The Canadian Red Cross Society
Skills SummariesRolling a Patient onto a Backboard: From a Semi-Prone Position
Establish a plan with other responders and work as a team. Responder 1: maintain manual in-line stabilization of patient’s head and neck throughout procedure, beingcareful not to roll patient onto her face.Examine patient’s back.Responders 2 and 3: kneel beside patient and place backboard behind patient.Responder 2: grasp patient’s top shoulder and hip to control patient.Responder 3: grasp patient’s top hip and knee to control patient.Responder 1: give pre-arranged command to roll patient as one unit onto backboard.6
543
21
Responders roll patient as oneunit onto backboard.
Apply cervical collar. Secure patient in centre ofbackboard.
987