sites.temple.edu · web viewthis workbook also includes information on audits in an additional...
TRANSCRIPT

Building a Plan from a Roadmap (Version 20)Last Update 4/10/17
DARS u.achieve 4.3
Table of ContentsContents:
- FAQ Topic List (Page 2)- Creating a New Plan (Page 3)- The Move Preferred Button (Page 6)- Adding Courses (Page 7)- Adding Wildcard Courses (Page 8)- Adding Course Ranges (And Manually Choosing Courses) (Page 9)- Moving Courses On The Plan (Page 11)- Deleting Courses (Page 12)- Adding And Removing Semesters (Page 13)- Validating With An Audit (Page 15)- Preferred Plans (Page 16)- Logging Out (Page 16)- Icons (Page 17)- Audits – Running And Viewing Your Audit (Page 21)- Audits – Special Audit Features (Page 22)- Audits – Icons/Codes: Requirements And Subrequirements (Page 23)- Audits – Icons/Codes: Course Codes (Page 23)- Audits – Icons/Codes: Special Grades (Page 23)- FAQ (Page 24)
It is strongly suggested that you read the entire main workbook on how to create your Plan before beginning to construct the Plan.
This workbook also includes information on Audits in an additional section featured after the part about Plan-building. This should be referenced when verifying your Plan with your Degree Audit.
A list of FAQ topics is provided on the next page.
Page 1 of 32
FAQ:
- FAQ – What if I have already taken classes? (Page 24)- FAQ – Why are courses Planned in the current semester displaying a red X icon? (Page 24)- FAQ – Why are courses planned in future semesters displaying a red traffic sign icon? (Page 24)- FAQ – Why are some Requirements on my Audit displaying as Unmet when all of their
Subrequirements are showing as Planned? (Page 24)- FAQ – How do I plan for my double major? (Page 25)- FAQ – How do I plan for my minor/certificate? (Page 25)- FAQ – Does the Plan Builder check for prerequisites and corequisites? (Page 25)- FAQ – Why isn’t the Move Preferred button moving courses to my Plan? (Page 25)- FAQ – What if I am an Honors student? (Page 25)- FAQ – What if I don’t know what electives I want to take? (Page 25)- FAQ – Why am I seeing my registered courses twice on my Audit after planning courses? (Page
26)- FAQ – What if I change my major? (Page 26)- FAQ – What if I change my major to a future term? (Page 26)- FAQ – Who currently has access to the Roadmap and Plan Builder system? (Page 26)- FAQ – What if I have transfer courses or other completed work? (Page 26)- FAQ – What does the RG next to a course on my Plan mean? (Page 27)- FAQ – How do I know what Catalog Year I am / if I am GenEd-45? (Page 27)- FAQ – What do I do if a change to a plan is stuck ‘Processing’ or a delete action isn’t finishing?
(Page 27)- FAQ – Why has a term that I was planning courses from closed and become unopenable?
(Page 27)- FAQ – How can I see courses in closed-off terms on a Roadmap? (Page 27)- FAQ – What happens if I delete courses from my Plan and need to re-add them? (Page 27)- FAQ – Why does it say NT next to my course? (Page 28)- FAQ – Why is someone else’s user name next to my Plan? (Page 28)- FAQ – Why does it say I need more free electives when I have met my major’s total hours
requirement? (Page 28)
Page 2 of 32

Creating a New Plan To enter the Plan Builder, first log in to DARS Self-Service (located
at dars.temple.edu) using your AccessNet credentials.
When you have logged in, choose Plans from the Menu Bar.
If the system asks you to log in, simply re-enter your User Name and Password. Then click the Login button.
Page 3 of 32

Once you are on the Plans page, choose the ‘Create a New Plan’ tab.
Choose your major from the drill-down list nested within its college, department, and program. Nested under your major are the available Roadmaps for that major. Choose the Roadmap you want to plan from. Make sure that the Roadmap is for your Catalog Term, and only choose a GenEd-45/G-45 Roadmap if you are a GenEd-45 student. (To check your Catalog Term and whether you are a GenEd-45 student, run an Audit. See the FAQ for additional information).
Enter the Plan Name, Term, Year, and Years To Graduation for the Plan being created, then click the Add Plan button. For the Year and Term, make sure you enter the current or future term that you want to start you Plan in. This does not have to match your catalog term or year of the Roadmap selected (and cannot do so if you have a Catalog Term from the past). Note that you cannot create Plans that start in the past.
Page 4 of 32

Page 5 of 32

Your Plan has been created. To access and edit it, click its name in the list of your Plans. Pre-existing Plans can also be opened from this list.
The Plan Creation Page consists of two main sections. The Roadmap Side is on the left and displays the Roadmap you are planning from. It will come pre-constructed with the standard required set of courses for your degree program. The Plan Side is on the right. It is where you add courses to your own personal, customized Plan.
Page 6 of 32

The Move Preferred Button The Move Preferred Button is present on the Roadmap Side of the
Plan Creation Page. Clicking it will move every course that is marked as Required, Preferred, or Critical from the Roadmap to your Plan. See the Icons section for an overview of icons like Required, Preferred, and Critical. Clicking it is recommended (but is not required if you want to customize your Plan’s course-positioning).
Items will check off when added to the Plan.
Note: The Move Preferred Button can only be used when either (a) there are no courses present on your Plan or (b) you have just clicked the ‘Remove All Courses’ button.
Note: If you are starting a Plan in a spring semester instead of a fall semester, some courses that are only offered in the spring or the fall may be moved semesters on the Plan where they are not offered. Make sure you check course availability and adjust your Plans accordingly.
Page 7 of 32

Adding Courses Adding courses to your Plan is simple. Click and drag the name of
the course on the Roadmap that you want to add. Position it directly over the name of the target semester, which will highlight itself in blue. Then release.
The course is successfully added to the Roadmap.
Note: If you are adding courses in an order other than the one presented in the Roadmap, make sure that you check to make sure prerequisites are being satisfied for the courses you are adding. You can check prerequisites in the Courses section of the Bulletin.
Page 8 of 32

Adding Wildcard Courses Some courses, like Free Electives, are represented by a string of
wildcard characters rather than an individual course name. To add one of them to your Plan, simply drag the wildcard string over like any other course.
Then, when the popup appears asking what course you want to add, enter the Department Abbreviation and Course Number for the desired course, and then click OK. As you type in the Abbreviation and Number, the system will provide lists of auto-complete suggestions that include course names (allowing you to use the system for electives without knowing exact course numbers in advance).
The course will be added to the selected semester on the Plan
Page 9 of 32

Adding Course Ranges (And Manually Choosing Courses)
Most course ranges are currently represented with a partial wildcard. Dragging one of these courses over works in the same way that dragging the full-wildcard Free Elective does. Note that the pop-up for entering the course you want to take will only allow choices that meet the partial wildcard’s restrictions.
Some course ranges cannot be dragged over like individual courses or wildcards. A yellow box will be displayed, indicating that a course in the range listed in the requirement name has to be taken, but said course has to be added manually.
Click the plus sign inside the term on the Plan that the course within the range is to be added to.
Page 10 of 32

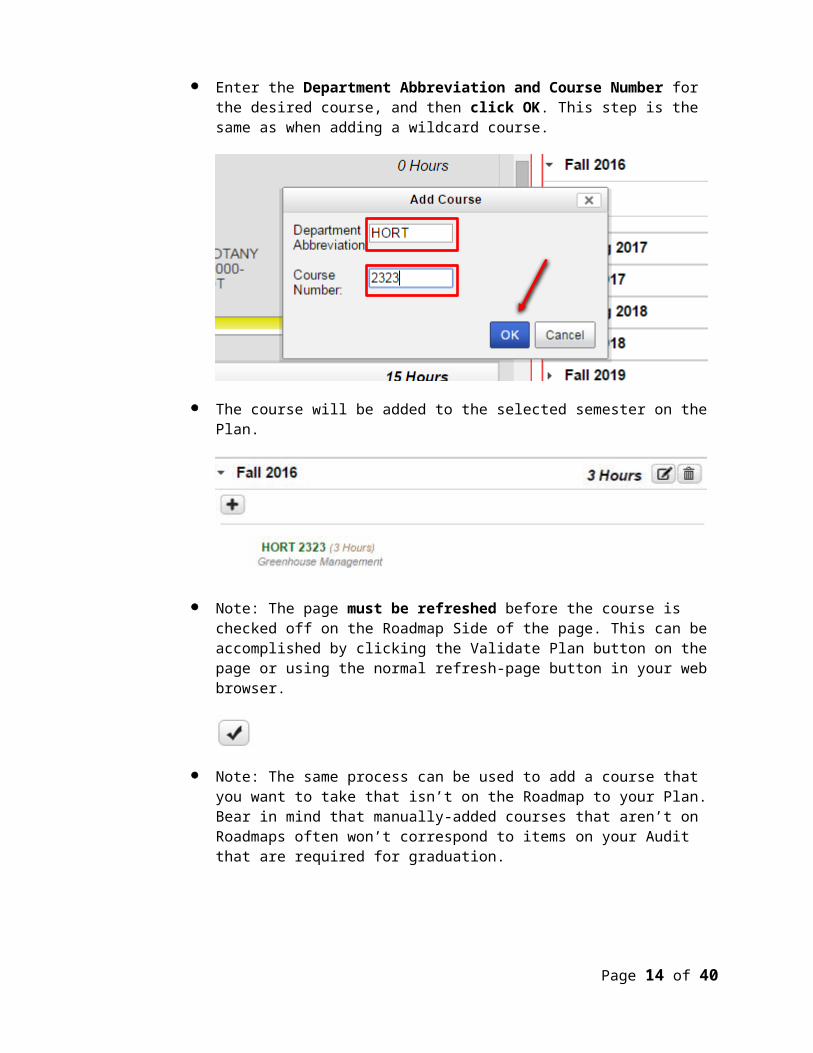
Enter the Department Abbreviation and Course Number for the desired course, and then click OK. This step is the same as when adding a wildcard course.
The course will be added to the selected semester on the Plan.
Note: The page must be refreshed before the course is checked off on the Roadmap Side of the page. This can be accomplished by clicking the Validate Plan button on the page or using the normal refresh-page button in your web browser.
Note: The same process can be used to add a course that you want to take that isn’t on the Roadmap to your Plan. Bear in mind that manually-added courses that aren’t on Roadmaps often won’t correspond to items on your Audit that are required for graduation.
Page 11 of 32

Moving Courses On The Plan If you want to move a course to a different semester, click its
name and drag it. Position it directly over the name of the target semester, which will highlight itself in blue. Then release.
The course will be moved to the target semester.
Note: If you are moving a course between non-adjacent semesters, it may be necessary to collapse all the semesters and then re-open the semester you are moving the course from before you drag it over. The Plan does not scroll up and down while a course is being moved, meaning that the target semester must be visible on the screen at the same time as its destination.
Page 12 of 32

Deleting Courses If you want to delete a course, select the Edit Button next to the
semester it is in.
Click the check mark next to the course you want deleted. Then select Delete.
Select Yes on the pop-up.
The course will be deleted.
Page 13 of 32
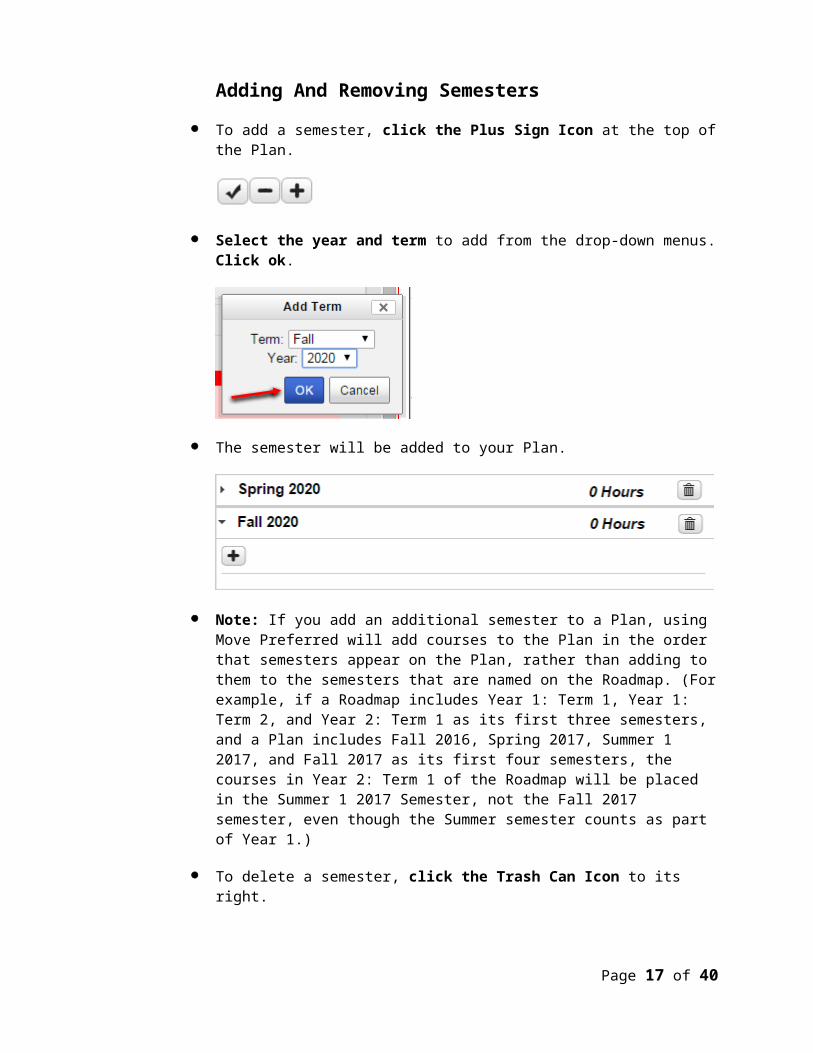
Adding And Removing Semesters To add a semester, click the Plus Sign Icon at the top of the Plan.
Select the year and term to add from the drop-down menus. Click ok.
The semester will be added to your Plan.
Note: If you add an additional semester to a Plan, using Move Preferred will add courses to the Plan in the order that semesters appear on the Plan, rather than adding to them to the semesters that are named on the Roadmap. (For example, if a Roadmap includes Year 1: Term 1, Year 1: Term 2, and Year 2: Term 1 as its first three semesters, and a Plan includes Fall 2016, Spring 2017, Summer 1 2017, and Fall 2017 as its first four semesters, the courses in Year 2: Term 1 of the Roadmap will be placed in the Summer 1 2017 Semester, not the Fall 2017 semester, even though the Summer semester counts as part of Year 1.)
To delete a semester, click the Trash Can Icon to its right.
Page 14 of 32

Select Yes on the pop-up.
The semester will be deleted.
Page 15 of 32

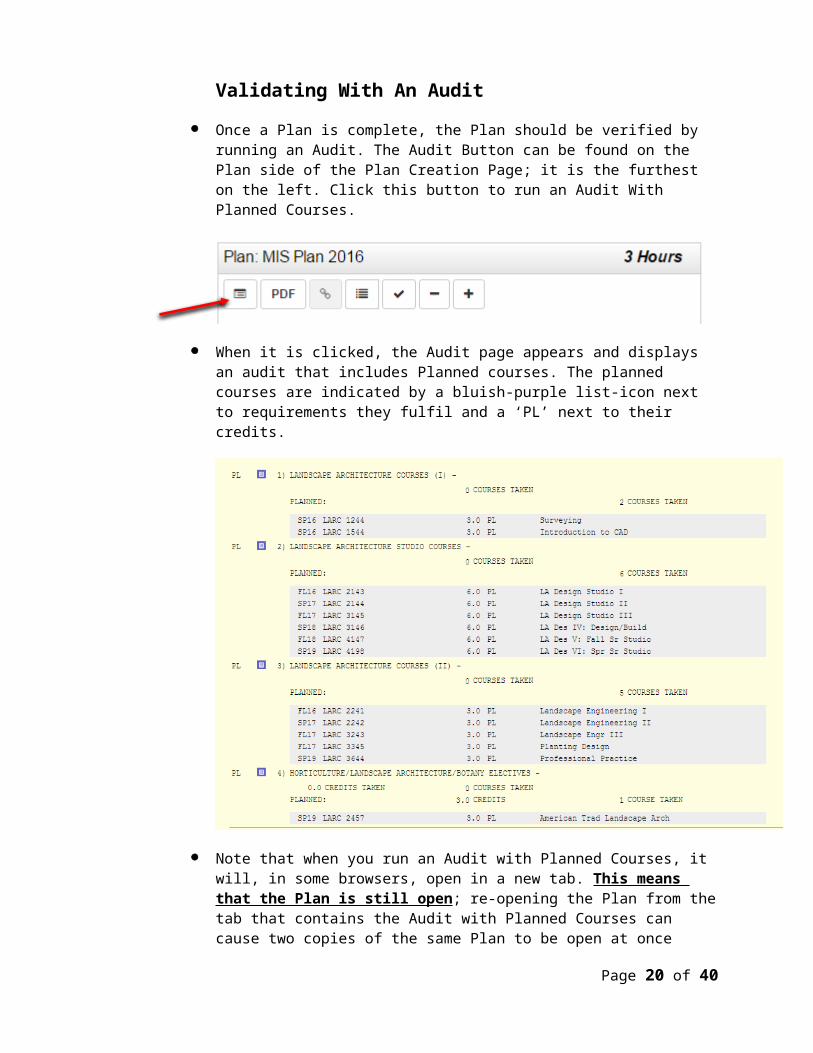
Validating With An Audit Once a Plan is complete, the Plan should be verified by running an
Audit. The Audit Button can be found on the Plan side of the Plan Creation Page; it is the furthest on the left. Click this button to run an Audit With Planned Courses.
When it is clicked, the Audit page appears and displays an audit that includes Planned courses. The planned courses are indicated by a bluish-purple list-icon next to requirements they fulfil and a ‘PL’ next to their credits.
Note that when you run an Audit with Planned Courses, it will, in some browsers, open in a new tab. This means that the Plan is still open; re-opening the Plan from the tab that contains the Audit with Planned Courses can cause two copies of the same Plan to be open at once (which should be avoided for system performance and stability reasons), so one of the two tabs should be closed when the Audit is done being reviewed.
Page 16 of 32
Preferred Plans When you have one or more plans, a single one of those plans is
considered your Preferred Plan. An individual’s Preferred Plan is marked with a radio button to its left. Which plan is currently considered Preferred can be changed by clicking one of the other radio buttons in the list.
Logging Out Log out when done. To do this, click the Cogwheel Icon in the
upper right, and then select Log Out from the drop-down menu.
Page 17 of 32

Icons The Roadmap/Audit PDF Button is found on the Roadmap/Audit
Side of the Plan Creation Page. Clicking it will open a PDF version of the Roadmap or Audit being viewed in a new tab.
The View Audit Button is found on the Plan Side of the Plan Creation Page. Clicking it displays an Audit of the Plan in its current state.
The Plan PDF Button is found on the Plan Side of the Plan Creation Page. Clicking it will open a PDF version of the Plan being created in a new page.
The See Completed Courses Button is found on the Plan Side of the Plan Creation Page. Clicking it will show which courses you have already completed so that the other parts of the plan can be filled out.
The Validate Plan Button performs a review of the current Plan, comparing it to the Degree Audit. It will highlight unnecessary courses, show the status of courses as complete/missed or failed/etc., and determine if the current Plan meets the requirements of the Degree Audit.
The Move Preferred Button is found on the Roadmap/Audit Side of the Plan Creation Page, but it is only present when a Roadmap is attached to the Plan being created. Clicking it moves all Preferred, Required, and Critical Courses (designated as such on the Roadmap during Roadmap creation).
Page 18 of 32

The Remove All Courses Button is found on the Plan Side of the Plan Creation Page, but it is only present when a Roadmap is attached to the Plan being created. Clicking it removes EVERY course from the Plan, leaving all semesters on the Plan empty. Its most common use is undoing an accidental use of the Move All Button instead of the Move Preferred Button.
The Add Term Button is found on the Plan Side of the Plan Creation Page, but it is only present when a Roadmap is attached to the Plan being created. Clicking it allows you to add an additional term to the Plan being created.
The Edit Button is found on the Plan Side of the Plan Creation Page, appearing next to semesters that contain requirements. Clicking it allows you to edit details about the semester (including removing courses from that semester).
The Delete Button is found on the Plan Side of the Plan Creation Page, appearing next to semesters. Clicking it allows for the semester in question to be removed from the Plan.
The Add Course Button is found on the Plan Side of the Plan Creation Page, appearing inside semesters. Clicking it allows you to add a course to the Plan regardless of whether or not it is on a Roadmap attached to the Plan.
The Incomplete Planned Course Icon is found on the Plan Side of the Plan Creation Page next to some courses. It is located next to courses that you have planned but have not completed with a grade.
The Course Not Offered Icon / Course Issue is found on the Plan Side of the Plan Creation Page next to some courses. It indicates that the course planned is not currently projected to be available in the term it was placed (or another, less-common issue).
Page 19 of 32
Page 20 of 32

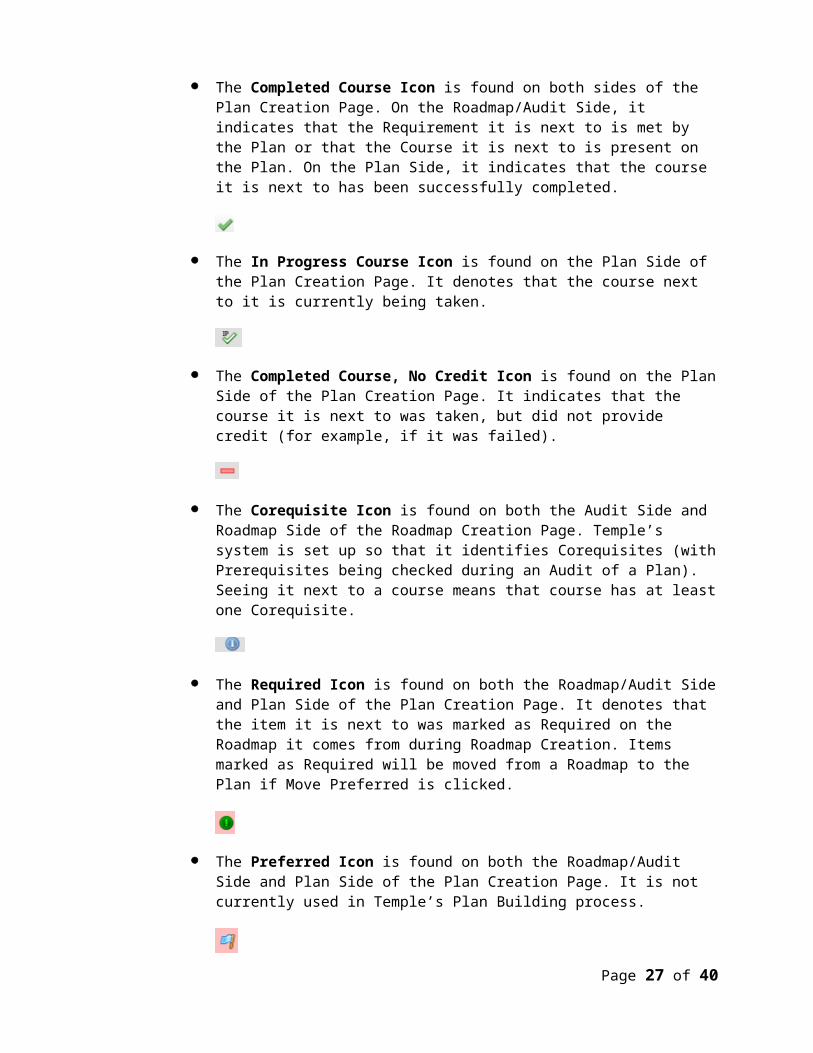
The Completed Course Icon is found on both sides of the Plan Creation Page. On the Roadmap/Audit Side, it indicates that the Requirement it is next to is met by the Plan or that the Course it is next to is present on the Plan. On the Plan Side, it indicates that the course it is next to has been successfully completed.
The In Progress Course Icon is found on the Plan Side of the Plan Creation Page. It denotes that the course next to it is currently being taken.
The Completed Course, No Credit Icon is found on the Plan Side of the Plan Creation Page. It indicates that the course it is next to was taken, but did not provide credit (for example, if it was failed).
The Corequisite Icon is found on both the Audit Side and Roadmap Side of the Roadmap Creation Page. Temple’s system is set up so that it identifies Corequisites (with Prerequisites being checked during an Audit of a Plan). Seeing it next to a course means that course has at least one Corequisite.
The Required Icon is found on both the Roadmap/Audit Side and Plan Side of the Plan Creation Page. It denotes that the item it is next to was marked as Required on the Roadmap it comes from during Roadmap Creation. Items marked as Required will be moved from a Roadmap to the Plan if Move Preferred is clicked.
The Preferred Icon is found on both the Roadmap/Audit Side and Plan Side of the Plan Creation Page. It is not currently used in Temple’s Plan Building process.
Page 21 of 32

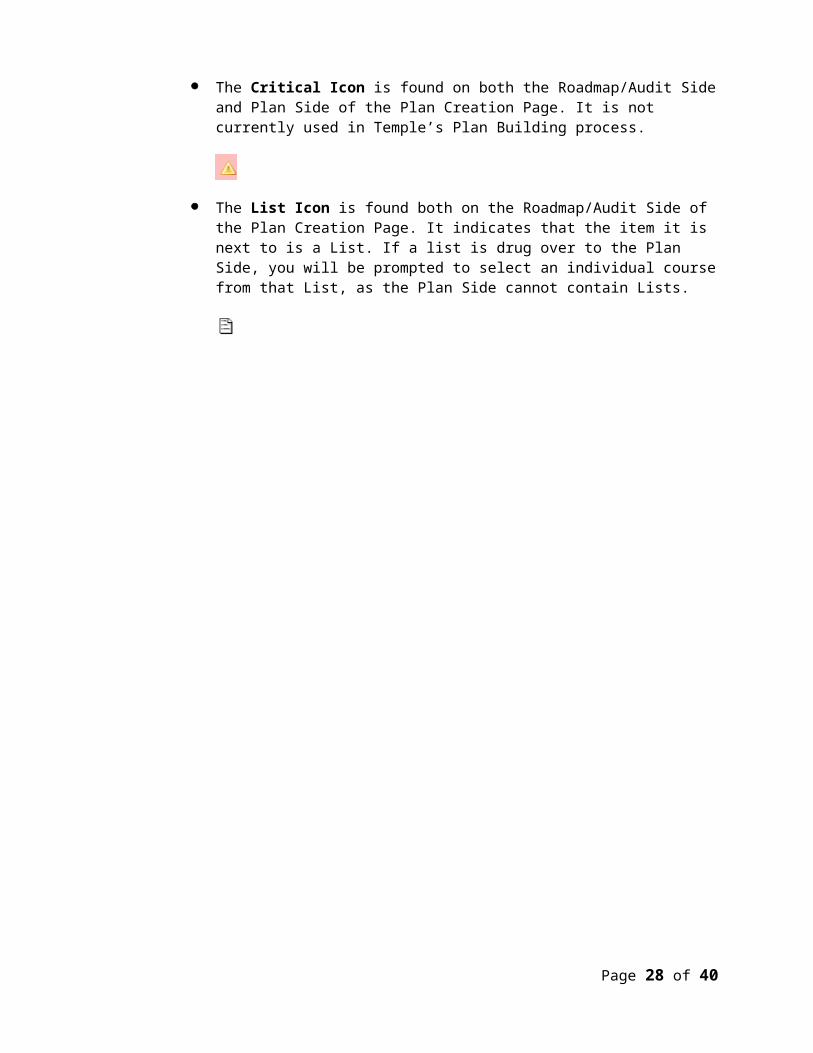
The Critical Icon is found on both the Roadmap/Audit Side and Plan Side of the Plan Creation Page. It is not currently used in Temple’s Plan Building process.
The List Icon is found both on the Roadmap/Audit Side of the Plan Creation Page. It indicates that the item it is next to is a List. If a list is drug over to the Plan Side, you will be prompted to select an individual course from that List, as the Plan Side cannot contain Lists.
Page 22 of 32

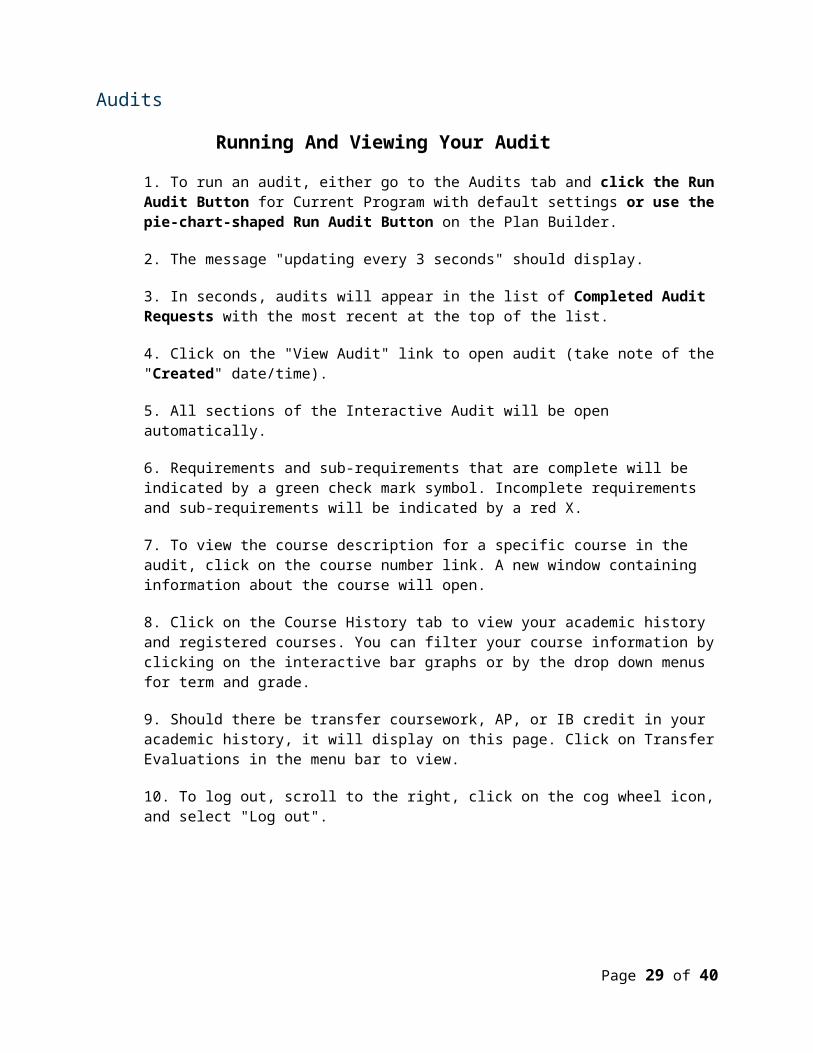
AuditsRunning And Viewing Your Audit
1. To run an audit, either go to the Audits tab and click the Run Audit Button for Current Program with default settings or use the pie-chart-shaped Run Audit Button on the Plan Builder.
2. The message "updating every 3 seconds" should display.
3. In seconds, audits will appear in the list of Completed Audit Requests with the most recent at the top of the list.
4. Click on the "View Audit" link to open audit (take note of the "Created" date/time).
5. All sections of the Interactive Audit will be open automatically.
6. Requirements and sub-requirements that are complete will be indicated by a green check mark symbol. Incomplete requirements and sub-requirements will be indicated by a red X.
7. To view the course description for a specific course in the audit, click on the course number link. A new window containing information about the course will open.
8. Click on the Course History tab to view your academic history and registered courses. You can filter your course information by clicking on the interactive bar graphs or by the drop down menus for term and grade.
9. Should there be transfer coursework, AP, or IB credit in your academic history, it will display on this page. Click on Transfer Evaluations in the menu bar to view.
10. To log out, scroll to the right, click on the cog wheel icon, and select "Log out".
Page 23 of 32

Special Audit Features Course Descriptions - To view the course description for a specific course
in the audit, click on the course number. A new window containing information about the course will open.
Course History -View academic history and registered courses. Filter course information by clicking on the interactive bar graphs or by the drop down menus for term and grade.
Transfer Evaluations - View all transfer coursework, AP, and IB credit. If courses were transferred from multiple institutions, click the down arrow next to the institution name to expand/collapse each record.
Components of a Transfer Evaluation are as follows:
Source ID - A unique identifier for the transfer institution.
Lock/Certify - Defines the type of locked status - a soft lock indicates that the evaluation can be updated if the equivalencies are reviewed by faculty.
Type - Identifies the course as either a transfer course or its Temple equivalent.
Course - The top course in the group is the course from the transferring institution and the bottom course is the Temple equivalent.
Grade - Displays TR if the student received transfer credit for the course or NT if the student did not receive transfer credit for the course.
Earned Credit - The amount of hours that counts towards academic history.
Page 24 of 32

Icons/Codes: Requirements And Subrequirements
Unfulfilled - Not yet complete
Complete - Currently satisfied
Planned - Satisfied if planned coursework is included
None - No status
Icons/Codes: Course Codes PL - Planned Course To Be Taken
* - Duplicate Course, Does Not Count
X - Duplicate Course, Course That Counts
RC - Requirement Complete Exception Type
SC - Substitute Course Exception Type
(R) - Required Course
Icons/Codes: Special Grades RG - Currently Registered
TR - Transfer Course
NT - Transfer Course (No Credit)
Page 25 of 32

Frequently Asked QuestionsQ: What if I have already taken classes?
A: If you have already taken classes, the courses you have completed will check off items on Roadmaps you are using to build your Plan from automatically. You will not be expected (or able) to add these pre-checked-off courses to your Plans. The Plan Builder system is for planning current and future semesters, not past ones. If you want to see what courses you have taken, click the See Completed Courses Button.
Q: Why are courses Planned in the current semester displaying a red X icon?
A: Your Plan is fine. If you have planned a course in a semester that is either the current semester or a point in the past, but have not yet completed the course with a final grade entered into the system, the Incomplete Planned Course icon will display; this looks similar to a red X icon but does not indicate a problem. You can verify that the icon is the Incomplete Planned Course icon by hovering the mouse over it and waiting for identifying text to appear.
Q: Why are courses Planned in the future semesters displaying a red traffic sign icon?
A: Your Plan is probably fine. The system checks to see if courses are scheduled in each semester that they are planned in and returns a warning icon saying ‘course not available’ if it does not see them scheduled for that semester. Temple University typically only schedules courses a year or so in advance, so future semesters will often display all courses as ‘not available’; the message will disappear as the course scheduling for those semesters is entered into temple’s systems.
Q: Why are some Requirements on my Audit displaying as Unmet when all of their Subrequirements are showing as Planned?
A: The Requirements you are looking at likely have a minimum GPA component. If the courses are only Planned and have not been taken yet, they do not have a grade assigned to them and therefore cannot register as having completed the GPA portion of the Requirement.
Page 26 of 32
Q: How do I plan for my double major?
A: The Roadmap system currently does not allow for double majors. Instead, plan for your primary major. You may still manually add courses to your Plans to meet the requirements for your second major, but you will need to verify that they are being met with your Audit and Advisor.
Q: How do I plan for my minor/certificate?
A: The Roadmap system currently does not include minors and certificates. You may still manually add courses to your Plans to meet the requirements for your minors and certificates, but you will need to verify that they are being met with your Audit and Advisor.
Q: Does the Plan Builder check for prerequisites and corequisites?
A: The Plan Builder displays an icon next to courses that possess corequisites but does not prevent courses from being planned without their corequisites. The Plan Builder system currently does not check for course prerequisites; a planned future upgrade will increase its capabilities in terms of handling prerequisite courses.
Q: Why isn’t the Move Preferred button moving courses to my Plan?
A: The Move Preferred button only moves courses if either (a) your Plan is empty or (b) you have just clicked the ‘Remove All Courses’ button. If courses have been added, you must either remove them or manually add the courses that Move Preferred would normally bring over.
Q: What if I am an Honors student?
A: If you are an Honors student, you will need to manually enter your Honors courses in the semesters you desire to take them. Use the Bulletin to obtain course numbers for the Honors courses. Ensure that the added courses meet their respective Requirements by running an Audit.
Q: What if I don’t know what electives I want to take?
A: It is perfectly understandable that you may not know what electives you will want to take multiple years in the future while a Freshman. Feel free to initially leave these electives off of your plan or to use placeholders; just make sure to
Page 27 of 32
add them later so that you don’t miss the required number of credits for your degree.
Page 28 of 32
Q: Why am I seeing my registered courses twice on my Audit after planning courses?
A: Audits run from inside a Plan include Planned courses. These appear alongside your actual Registered and Completed courses. If a course has both been Planned and Registered/Taken, it will appear twice. Removing the course from your Plan will remove the second copy from the audit. Be aware that you can always run a normal Audit that doesn’t include Planned courses from your Audits tab. These will not be affected by the courses you have Planned and will not show duplicate courses.
Q: What if I change my major?
A: If you change your major, it may take up to a day for the Roadmap system to become fully up-to-date with the change. If the tree of Roadmaps you can select to make Plans off of contains your old major but not your new one, you will need to wait for the Roadmap system to become in-sync with your degree change.
Q: What if I change my major to a future term?
A: The Plan Builder system bases Roadmaps and Plans on your degree term. If you change to a degree with a future term, for example, by changing majors in the spring and acquiring the following fall’s term on your new degree, it is possible that Roadmaps will not exist for your new degree until a point in the future when that term is reached. You will, however, still be able to open and examine your preexisting Plans while waiting for Roadmaps to become available for your new degree program and term.
Q: Who currently has access to the Roadmap and Plan Builder system?
A: The Roadmap and Plan Builder system is now available for all students who started in Fall 2016 or later! School advising departments may still be working on Roadmaps, so if Roadmaps aren’t available for your major yet, check again later in the semester. Some students in the Fox School of Business and the School of Tourism and Hospitality with catalog terms going back to Fall 2015 have access because those schools were involved in a special pilot program of the Roadmap and Plan Builder system.
Q: What if I have transfer courses or other completed work?
A: Transfer courses and courses completed at Temple with a passing grade automatically check-off the items they meet on Roadmaps. These courses do not need to be added to your Plan. You can view these transferred and completed
Page 29 of 32

courses on your Audit or using the See Completed Courses Button.
Page 30 of 32

Q: What does the RG next to a course on my Plan mean?
A: The RG means you are currently registered for that course.
Q: How do I know what Catalog Year I am / if I am GenEd-45?
A: Run a degree audit. Your Catalog Year will be in the top right-hand corner.
Your GenEd requirement on the audit will indicate whether you are GenEd-45 or not. If it just says GenEd with no ‘45’ present, you are a regular GenEd student and should not use the GenEd-45 Roadmaps.
Q: What do I do if a change to a plan is stuck ‘Processing’ or a delete action isn’t finishing?
A: First, wait a couple minutes. The system sometimes takes a while because it is working with a large database. If, after a couple minutes, no change is observed, refresh the page. Refreshing the page will often complete the action, and, if it does not, the action can be re-performed after the refresh.
Q: Why has a term that I was planning courses from closed and become unopenable?
A: If all courses in a term have been planned or taken, the Plan Builder will automatically close that term on the Roadmap. If the page is refreshed or exited and later re-entered once this has happened, the term will be unable to be opened. In cases where the courses in the term have been planned but not taken, deleting one or more of those courses from the Roadmap and refreshing the page will re-open the term. In cases where the courses have all been taken, the term will always remain closed.
Q: How do I see courses in closed-off terms on a Roadmap?
A: If all the courses in a term have been planned or completed and a Plan is opened or refreshed, that term will close-off and become unopenable (unless the courses were planned and are subsequently removed from the Plan). Full Roadmaps, including closed-off semesters, can always be seen in the PDF version of the Roadmap, which can be referenced by clicking the PDF button on the Roadmap side of the Plan Creation Page.
Q: What happens if I delete courses from my Plan and need to re-add them?
A: Refresh the page. Refreshing will return the courses to the Roadmap side of the Plan Creation page and re-open closed semesters that held those courses.
Page 31 of 32
Q: Why does it say NT next to my course?
A: See your advisor. If you have previously taken courses at a different school, but did not obtain a high enough grade for those courses to transfer over as their Temple equivalents, an NT will appear next to the Temple equivalents to those courses on your Plan. Similarly, courses that you transferred in will have their grade changed to NT if you later re-take those courses here at Temple. Bear in mind that the system will display NT on the plan instead of RG if a course has an NT grade and is one you are currently registered for.
Q: Why is someone else’s user name next to my Plan?
A: This indicates that one of your advisors was looking at or assisting in building the Plan. It does not necessarily mean that they changed anything in it.
Q: Why does it say I need more free electives when I have met my major’s total hours requirement?
A: See your advisor. The most likely explanation is that you took a higher-credit option for non-elective requirements that required a certain number of courses (as opposed to a certain number of course-hours) to complete, meaning that the excess hours from those wouldn’t automatically re-distribute itself into the free elective requirement even though it counts toward it. To be certain of the circumstances surrounding your particular situation, however, you will need to meet with an advisor.
Q: Why does my audit say that I need more free electives when the Roadmap says I don’t?
A: See your advisor. If you haven’t met your major’s Total Hours requirement, you will need to take more courses. Your unique array of courses, placement tests, and/or transfer work likely means that you have completed some other requirement for your major more easily than the standard student and require additional free electives in order to meet your major’s Total Hours requirement.
Page 32 of 32