sirio automatic humidifier instructions manual
TRANSCRIPT

Page 1 of 12 Rev 02
Automatic Humidifier Instructions ManualSIRIO
1 – Warnings for safe utilisation When using electrical appliances it is always required to adhere to some basic safety precautions, including the following:
1. READ THE INSTRUCTIONS IN THEIR ENTIRETY. 2. Use the appliance only with electrical system features complying with the label affixed on the appliance and with this
manual. 3. Do not place the unit close to heat sources and do not cover it with other objects. 4. Do not leave the appliance unattended for long periods of time when it is connected to the power mains. Do not use
the appliance with damaged cables or plugs, or appliances that have been dropped to the ground or damaged in some way. Consign the appliance to the nearest authorised service centre requesting check, or repair.
5. Use of accessories not recommended or not sold by the manufacturer is forbidden. 6. Do not use in the open. 7. The appliance can be use by children under 12 years of age and/or persons with reduced physical or mental capacity, or
without experience or the necessary knowledge, as long as supervised by an adult or after they have received instructions related to safe appliance use and understand the dangers related to it. The same is true for cleaning and maintenance.
8. Always start use by verifying power supply condition, therefore connect the power outlet. To remove it, detach it from the power outlet.
9. Disconnect the power supply from the power outlet when the appliance is not running. 10. The power supply must be placed so it is easy to access when it is necessary to disconnect it from the power mains. 11. To disconnect the power supply, grab it directly (not the cable) and detach it from the wall outlet. 12. Any modification to this product that has not been expressly authorised by the manufacturer, besides representing a
safety risk, will void the warranty. 13. STORE THESE INSTRUCTIONS WITH CARE.
Translation of original instructions

Page 2 of 12 Rev 02
Contents
1 – Warnings for safe utilisation .................................................................................................................................. 1
2 - Declaration of conformity ....................................................................................................................................... 3
3 - Identification plate ................................................................................................................................................ 4
4 – Presentation of the manual ................................................................................................................................... 5
5 – Technical features and specifications ..................................................................................................................... 5
6 - Preparation and commissioning of SIRIO ............................................................................................................... 6
6.1 Using SIRIO for the incubation phase ................................................................................................................ 6
6.2 Valve Insertion ................................................................................................................................................... 7
6.3 Sensor positioning ............................................................................................................................................. 7
7– Use of SIRIO during the incubation phase ........................................................................................................... 9
8 - Using SIRIO in the hatching phase ..................................................................................................................... 10
9- Humidity parameters for incubation.................................................................................................................. 10
10- Using SIRIO with other brand incubators ........................................................................................................ 10
11- Maintenance and cleaning of SIRIO ..................................................................................................................... 11
12 - Disposal ............................................................................................................................................................... 11
13 – Warranty / after sale service .............................................................................................................................. 12
Electronic format copy of this instructions manual can be downloaded from the site www.tradgardsteknik.se or can be
requested writing to the e-mail address [email protected] specifying the product and manual revision.

Page 3 of 12 Rev 02
2 - Declaration of conformity
UE Declaration of conformity
DECLARES
That the product as per label shown below:
Is intended for use as an accessory for maintaining humidity in incubator for animal eggs, specifically: hen,
pheasant, turkey, guinea fowl, quail, grey partridge, partridge, goose, Muscovy/common/wild duck, peacock, rock
partridge, pigeon, Virginia quail, exotic birds and birds of prey.
The following declaration of conformity is released under the exclusive responsibility of the manufacturer.
And conforms to the following directives:
Directive EN 61326 – 1: 2007
Directive EN 61010 – 1:2010
Directive EN 61000 – 3– 2 :2014
Directive EN 61000 – 3– 3 :2013
Directive EN 61326 – 1 :2013
The person responsible for the
technical dossier and legal
representative
BOROTTO ANDREA

Page 4 of 12 Rev 02
Attention, prior to performing any operation, carefully read
the instructions manual.
Warning symbols used on the product and in this manual
Symbol Description
Obligation to read the operating instructions before using the product
DC Direct Current power supply
Positive polarity at the centre of the power supply connector
.
3 - Identification plate The equipment is fitted with an identification plate showing the equipment's identification details and the main
technical specifications.
SIRIO automatic humidifier
Year: XXXX Code: SIRIO Capacity 0-5 l/h (ca.) Bar: 0.2 Serial Number: XXXX Weight Kg 0.435 Class II Imput voltage: 12 V DC MAX Power: 4W

Page 5 of 12 Rev 02
4 – Presentation of the manual This manual contains instructions for installation, maintenance and use of the SIRIO peristaltic pump, here below simply called SIRIO. This manual is intended for users of the equipment, and concerns its use after its production and sale. In the event the equipment should be subsequently be transferred to third parties for any reason (sale, loan for use, or any other reason), the equipment must be delivered complete with all its documentation. This manual contains proprietary information and may not be, even partially, provided to third parties for any purpose and in any form, without the prior written consent of the manufacturer. The manufacturer declares that the information contained in this manual are congruent with the technical and safety specifications of the equipment and for the manual refilling of water inside an incubator machine, making it possible to automatically maintain the set humidity rate.
5 – Technical features and specifications Equipment model SIRIO
SIRIO Power supply voltage 12V DC
Maximum absorbed power 4 W
Average daily consumption 1 W
Supply voltage of power supply (already
included)
100-240 V 50/60 Hz
Display For digital control of humidity parameters
Electronic board With microprocessor with modified PID algorithm
Range Humidity can be modified from a Min. of 40% to a Max.of 75%
Dimensions and weight Height mm 106 - Width mm 88 - Length mm 128 Weight: 0.440 Kg
Environmental operating conditions Temperature From + 10°C to MAX 40° C Relative humidity 20%-80%
Environmental storage conditions Temperature from + 5°C to MAX 50° C Relative humidity < 90% without
condensation
1 Water distribution valve
2 Water suction pipe
3 Control panel
4 Sensor
5 Power Supply

Page 6 of 12 Rev 02
6 - Preparation and commissioning of SIRIO During transportation pay attention not to cause collisions and/or damage to the equipment. Always position flat,
avoiding crushing and/or breakage.
6.1 Using SIRIO for the incubation phase
Demonstrative photo equivalent for all incubator models of the REAL series
Position SIRIO on a flat surface.
Do not place other objects between the product and the plane, for example tablecloths or covers.
Position SIRIO next to the incubator, moving close to a water container. Any container can be used: bottle, canister,
etc., as long as it is clean inside. Dirty containers may result in the development of bacterial flora during incubation,
causing the death of the embryo.
Insert the suction pipe (the one connected to the rubber holding connector with the writing “IN” engraved on the
transparent bottom of the appliance) in a container of water.
SIRIO also works with tap water! As long as it is clean.

Page 7 of 12 Rev 02
6.2 Valve Insertion
Insert the 2 valve with the pipes already connected to the incubator nozzles, making sure that they sufficiently penetrate the bottom in order to ensure hermetic seal. Attention to their insertion direction, it should follow the shape of the nozzle.
ATTENTION: if the filling nozzles become encrusted with limestone, remove it with anti-scaling agent before inserting the valves.
6.3 Sensor positioning
Insert the humidity sensor inside the incubator, positioning it above the flap in the corner (use a minimum amount of pressure to ensure blocking).
The sensor cable must remain resting on the flat side on the edge of the incubator in the photo. It is a special anti-crushing cable, therefore it will not be damaged with the machine closed.
Not perfectly closing the cover does not compromise functionality and the hatching results of the incubator in any way.
Page 8 of 12 Rev 02
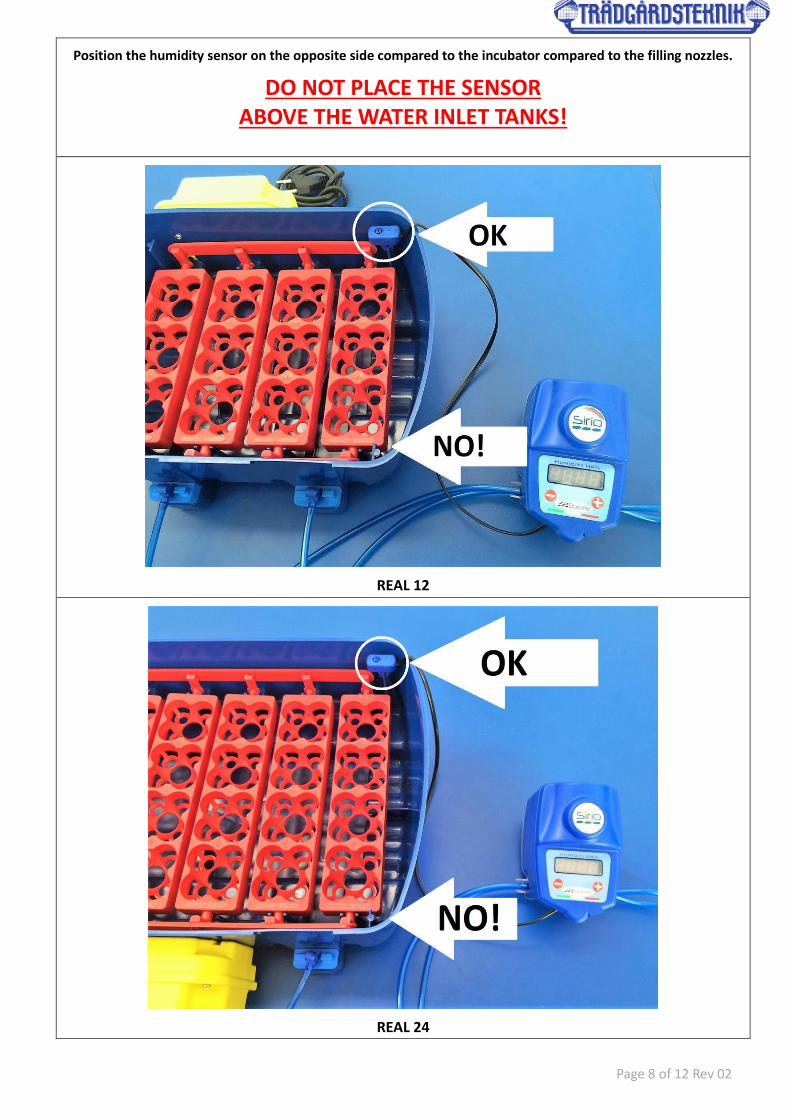
Position the humidity sensor on the opposite side compared to the incubator compared to the filling nozzles.
DO NOT PLACE THE SENSOR ABOVE THE WATER INLET TANKS!
REAL 12
REAL 24

Page 9 of 12 Rev 02
REAL 49
7– Use of SIRIO during the incubation phase
Turn on the incubator and make it run dry without water and without eggs for at least a few hours. Next insert the
eggs.
At this point it is possible to turn on SIRIO, inserting the power supply jack into the front socket. Next insert the
power supply plug into a power outlet.
The display will show the desired humidity value detected, the symbol “H” means “humidity”.
To set the desired humidity value, used the (+) and (-) buttons located on the control panel. Pressing indifferently
on of the two keys, you enter the memory (the letter “P” appears next to the numbers) next press the keys on
impulse until the desired value is reached. Set humidity, wait for this value to be saved (when current internal
humidity re-appears along with the letter “H” on the display.
From this moment, SIRIO starts working by pumping water inside the incubator when necessary, making a rotating
symbol appear on the display. In other moments the appliance remains in standby
SIRIO is programmed to inject small drops of water in order to allow evaporation which determines environment
relative humidity. Upon start-up, it will require 2 to 4 hours to reach the set humidity value. If the quantity of water
inside the incubator is more than necessary, the time required to reach the set humidity value may be longer.
ATTENTION: if for brief periods (even an entire day) the humidity is not correct, this does NOT result in any
imbalance in the incubating process in progress.
ATTENTION: if during incubation it were necessary to carry out candling or cool down the eggs (as with incubation
of palmipes), disconnect SIRIO from the power outlet. This will keep the pump from continuing to insert water into
the incubator when the humidity goes down due to opening. Once operations are complete, reconnect Sirio to the
power outlet only once incubator temperature has stabilised at the set value once again.
Page 10 of 12 Rev 02
8 - Using SIRIO in the hatching phase
Once the incubation phases is ended, to move on to the hatching phase:
- disconnect SIRIO from the power supply.
- next, proceed preparing the incubator for hatching (see instructions manual of your incubator).
- once preparation for incubation is complete, reconnect SIRIO to the power supply once incubator
temperature is once again stable at the set value.
ATTENTION: during hatching, especially if the incubator there is a dry environment, the water inserted by SIRIO
may overflow into the internal trays and spill onto the rest of the bottom of the incubator.
Take into account that the humidity percentage is NOT determined by the quantity of water inserted into the
incubator but from the water surface produced.
If the water level were to exceed the hatching grid during hatching, immediately disconnect the SIRIO power supply,
in order to avoid flooding the eggs!
Even not reaching the set humidity value does not compromise the result. In fact, the first chick births, since they
are wet, will cause a quick increase of the relative humidity level.
ATTENTION: at the end of the hatching, before disconnecting the incubator from the power outlet, remove the
SIRIO humidity sensor from inside. If left in the incubator after it has been turned off, it would be ruined due to the
possible condensation.
9- Humidity parameters for incubation
Indicative table for any poultry:
During incubation phase: 45% RH
During hatching phase 60% RH
Indicative table for exotic birds:
During incubation phase: 40% RH
During hatching phase: 60% RH
10- Using SIRIO with other brand incubators
The process and incubation parameters is not significantly different with other brand incubators, the only thing that
could change significantly is the structure of the machine that depends on the manufacturers design.
To apply SIRIO to an incubator machine different
- remove the 2 rubber valves from the tubes(those normally inserted in the nozzles);
- pas the 2 tubes by the ventilation holes. If there were any missing, add as needed. The PVC pipes must
reach the tray or the water trays present inside the incubator, leave the two tubes resting in the tray or
trays depending on the incubator model.
- position the humidity sensor into the incubator and fasten it with a zip tie at the egg level. If it was not
possible to insert the humidity sensor through any air intake, pass it through the egg loading door. The anti-
crushing cable will however ensure its functionality.

Page 11 of 12 Rev 02
11- Maintenance and cleaning of SIRIO The maintenance and cleaning activities must be carried out with the equipment off and the power supply disengaged. The operation described bere below is extremely recommended since if SIRIO is left stopped for more than one month, water may stagnate i the pipes, giving origin to bacterial flora that when pumped into the incubator may generate bacterial contamination of the embryo, causing it to die! Therefore, at the end of each incubation cycle:
blow (best if using compressed air) the sensor, absolutely avoiding opening the sensor-door;
Carry out the following cleaning and disinfection routing of the water circuit: - bring the humidity value set on the display to the maximum; - insert the water intake tube into a solution of water and 10% bleach or amukine; - let the pump run for approximately 15 minutes, recovering and disposing of the pumped aqueous
solution; - leave the pump running dry for another 15 minutes.
We recommend using bleach since it destroys the bacterial flora and any residue does not damage the embryos under development. DO NOT USE ANY OTHER CHEMICAL SUBSTANCES FOR CLEANING AND SANITISING SIRIO FOR ANY REASON! With variable frequency, depending on hardness of the water used and after a few hatching cycles, besides the described washing of the water circuit using disinfectant solution, it is possible to carry out a descaling cycle, using the same procedure, a solution of water and descaling agent or vinegar. During a stop period, at least once a month, turn on SIRIO and run it dry for few minutes, this will make it possible to eliminate the memory effect from the pumps where they are crushed.
12 - Disposal
In implementation of Directives 2011/65/UE and 2012/19/UE, LEGISLATIVE DECREE 4 March 2014, n. 27 and LEGISLATIVE DECREE 14 March 2014 , n. 49, relative to the use of hazardous substances in electrical and electronic equipment and the disposal of waste, the symbol of the crossed wheelie bin, shown here, indicates that at the end of its service life the product must be collected separately from other waste. The user shall therefore deliver the appliance at the end of its service life to the suitable electric and electronic separate waste collection facilities. Appropriate separate collection for subsequent recycling of the decommissioned appliance, treatment and environmentally compatible disposal contributes to avoiding possible negative effects on the environment and health and promotes the recycling of the materials the appliance consists of Unlawful disposal by the user involves the application of the administrative sanctions provided for by the laws in force. The information related to the correct procedure of available collection systems must be obtained from the Local Waste Disposal Service.

Page 12 of 12 Rev 02
13 – Warranty / after sale service (Hereinafter the Manufacturer) grants a 24 month warranty to the product from the date of purchase. During this period, the Manufacturer undertakes to repair at its expense any defect that might occur during normal operation of the appliance, attributable to manufacture. NOTE: the rubber pipes have no warranty Upon requesting servicing under warranty, show this contract complete with date, stamp and signature. The appliance must be shipped in its original packaging under the customer's responsibility. If the appliance is in the warranty period and has been used correctly it will be repaired free of charge. It is understood that no reimbursement shall be acknowledged in the event of lack of fault or defect of the product. However, the Manufacturer reserves the right to charge to the customer the expenses incurred for the demand for servicing in warranty in the absence of the prerequisites. The warranty does not cover damage caused by: transport; wear, water, dirt; use in conditions other than herein specified by the Manufacturer; repairs or modifications made by personnel not authorised by the Manufacturer; force majeure (earthquakes, floods, fires etc.). Only use the appliance for the purpose it is intended for; uses other than indicated in these instructions shall be deemed as hazardous and the Manufacturer disclaims any and all liability for any damage to persons, animals or property arising from failure to comply with this warning. The Manufacturer shall not be deemed liable, nor shall they grant any servicing under warranty or compensation for negative results due to failure to comply with these instructions, misuse, incorrect installation of the appliance or problems arising from the inadequacy of the electrical installations or other facilities, or arising from environmental, climate or other conditions, or from entrusting the appliance to minors or persons manifestly unsuitable to using or handling the appliance. No compensation shall be requested from the Manufacturer for indirect damage due to loss of material occurred as a consequence of product defects such as, eggs inserted or to be inserted in the incubator, or further damage to property, persons or animals.
Date, stamp and signature for the warranty
Trädgårdsteknik ABHelsingborgsvägen 578262 96 ÄngelholmTelefon: 0431-222 90Email : [email protected] : www.tradgardsteknik.se