sip trunking test results for - xo communications · sip trunk test result for shoretel 24 xo...
TRANSCRIPT

SIP Trunking Test Results for
Stand-alone SHORETEL (without SBC)
June 26, 2013
Version 1.0

SIP Trunk Test Result for ShoreTel
2 | P a g e XO Communications Confidential
Table of Contents 1 Executive Summary ....................................................................................... 3 2 Software and Hardware Equipment Requirements for Testing ...................... 5 3 Test Configurations ........................................................................................ 6
4 Test Bed Configuration Files .......................................................................... 7 4.1 ShoreTel basic Configuration guide 7

SIP Trunk Test Result for ShoreTel
3 | P a g e XO Communications Confidential
1 Executive Summary
This report provides the test results found to date for the ShoreTel IP PBX SIP Trunking evaluation which is without InGate SIParator (SBC). The following is a summary of the issues and limitations found while performing the test.
Call Forward Always/BUSY/No Answer to PSTN to work requires special changes on ShoreTel director to add ‘Diversion’ header.
- “Custom Parameters” – ‘HistoryInfo=diversion’ needs to be added via ShoreTel director.
- “Enable Original Called Information" flag under ‘Trunk Group’ on ShoreTel
director also needs to be enabled.
Detailed description of workaround can be found below.
Inbound fax call with T.38 is automatically fallback to G.711 pass through for PKG1, whereas PKG2 works fine.
Workarounds: - Contact XO Care for workaround.
Outbound Fax over G.711 pass through doesn’t work with XO PKG2 (G729) failed as ShoreTel doesn’t fall back to G711. Workarounds: - Contact XO Care for workaround.
In-band DTMF is not supported.
Registration Method
Static registration is utilized between the ShoreTel and the XO.

SIP Trunk Test Result for ShoreTel
4 | P a g e XO Communications Confidential
XO SIP Service Packages Supported
Pkg Codec DTMF Fax
1 G.711 RFC 2833 (In-band RTP DTMF NOT supported)
T38; G.711 pass-through
2 G.729a RFC2833 (In-band RTP DTMF NOT supported)
T38; G.711 pass-through

SIP Trunk Test Result for ShoreTel
5 | P a g e XO Communications Confidential
2 Software and Hardware Equipment Requirements for Testing
1. SHORETEL
a. ShoreTel Version: 13.2 b. ShoreTel Director: Build 18.42.1100.0
2. 3 - SIP Phones
Version: ShoreTel 230

SIP Trunk Test Result for ShoreTel
6 | P a g e XO Communications Confidential
3 Test Configurations
3.1
The following diagram shows the configuration used during lab testing.
214-635-5854 469-387-3260 469-387-3266
ShoreTel Voice Switch
(SG30)
201.1.251.50
SIP TRUNK TEST SHORETEL LAB SETUP
Eth1 201.1.251.1
255.255.255.0
NETGEAR FS108P
201.1.251.51
201.1.251.53
201.1.251.55
201.1.251.54201.1.251.53
ShoreTel
ServerVersion 13.2
XO VOIP Network
Cisco 2400
SER 1/0:0
200.1.251.2
192.192.192.2
469-387-3267 (analog)
Notes:
Above lab setup only shows main lab network elements.
For this lab setup public IPs used for Proxy and PBX so that vendor can access system remotely to help in lab testing. In real environment that may not be the case hence NAT on XO router may require.

SIP Trunk Test Result for ShoreTel
7 | P a g e XO Communications Confidential
4 Test Bed Configuration Files
4.1 ShoreTel basic Configuration guide
System Parameter – Numbering plan

SIP Trunk Test Result for ShoreTel
8 | P a g e XO Communications Confidential
System Parameter – System extension
Sites

SIP Trunk Test Result for ShoreTel
9 | P a g e XO Communications Confidential
Sites (Continue)
Switches
SIP Trunk Test Result for ShoreTel
10 | P a g e XO Communications Confidential
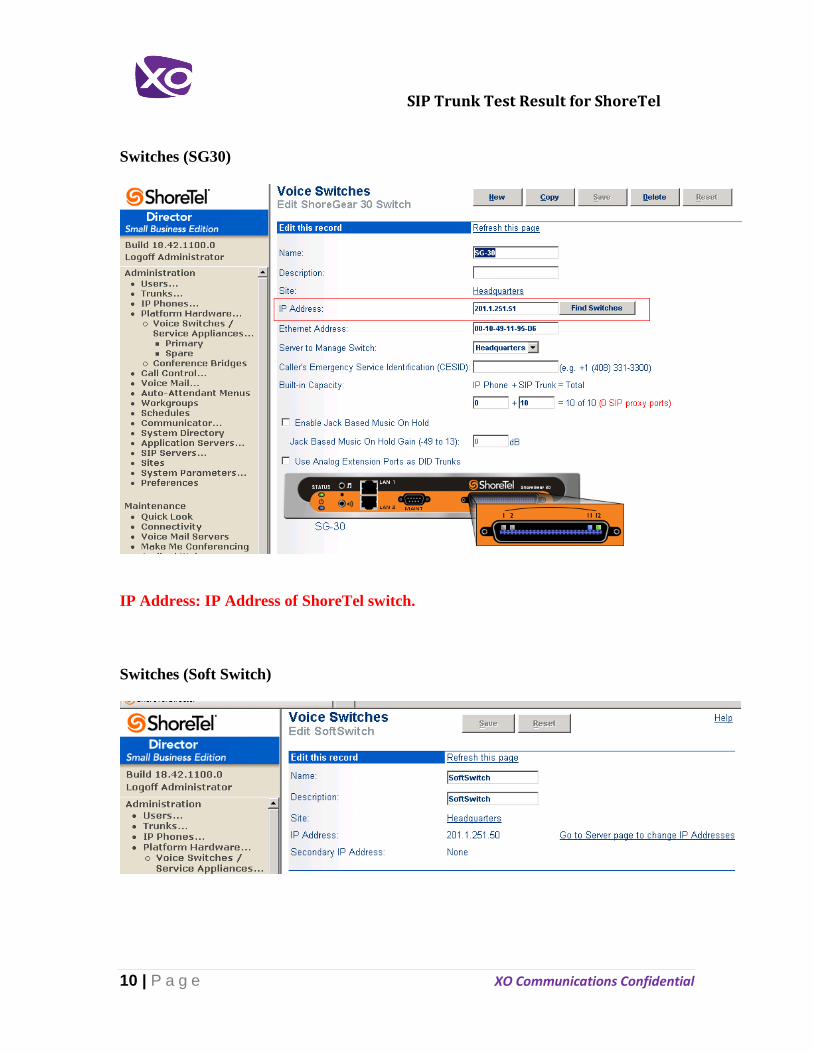
Switches (SG30)
IP Address: IP Address of ShoreTel switch.
Switches (Soft Switch)

SIP Trunk Test Result for ShoreTel
11 | P a g e XO Communications Confidential
IPPhones (Individual IP Phones)
Trunk (Individual Trunks)
Trunk (Individual Trunks) XO lab
“IP address” – pointing to NBS SIP Signaling Port (Proxy). This is stand-alone
ShoreTel PBX without InGate in front of ShoreTel.
SIP Trunk Test Result for ShoreTel
12 | P a g e XO Communications Confidential
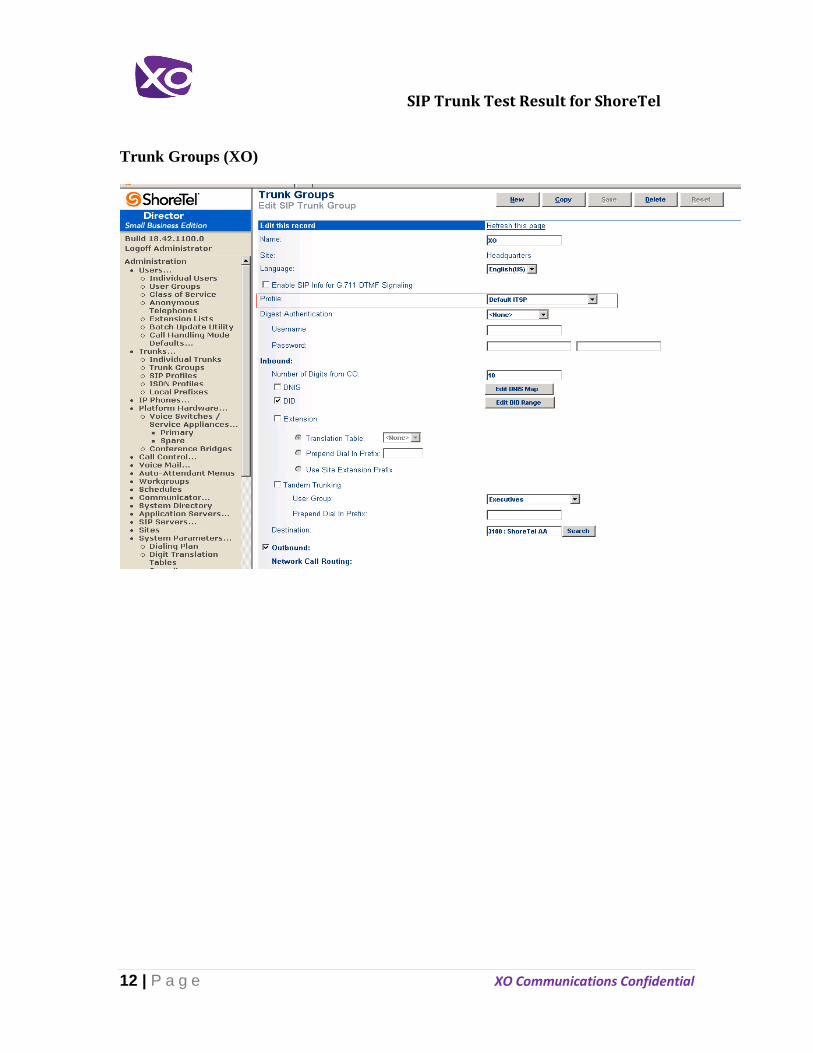
Trunk Groups (XO)

SIP Trunk Test Result for ShoreTel
13 | P a g e XO Communications Confidential
Trunk Groups (XO) continue:
Trunk Groups (XO) continue:

SIP Trunk Test Result for ShoreTel
14 | P a g e XO Communications Confidential
SIP Profile:
SIP Profile – ‘Default ITSP’

SIP Trunk Test Result for ShoreTel
15 | P a g e XO Communications Confidential
DID Range
SIP Trunk Test Result for ShoreTel
16 | P a g e XO Communications Confidential
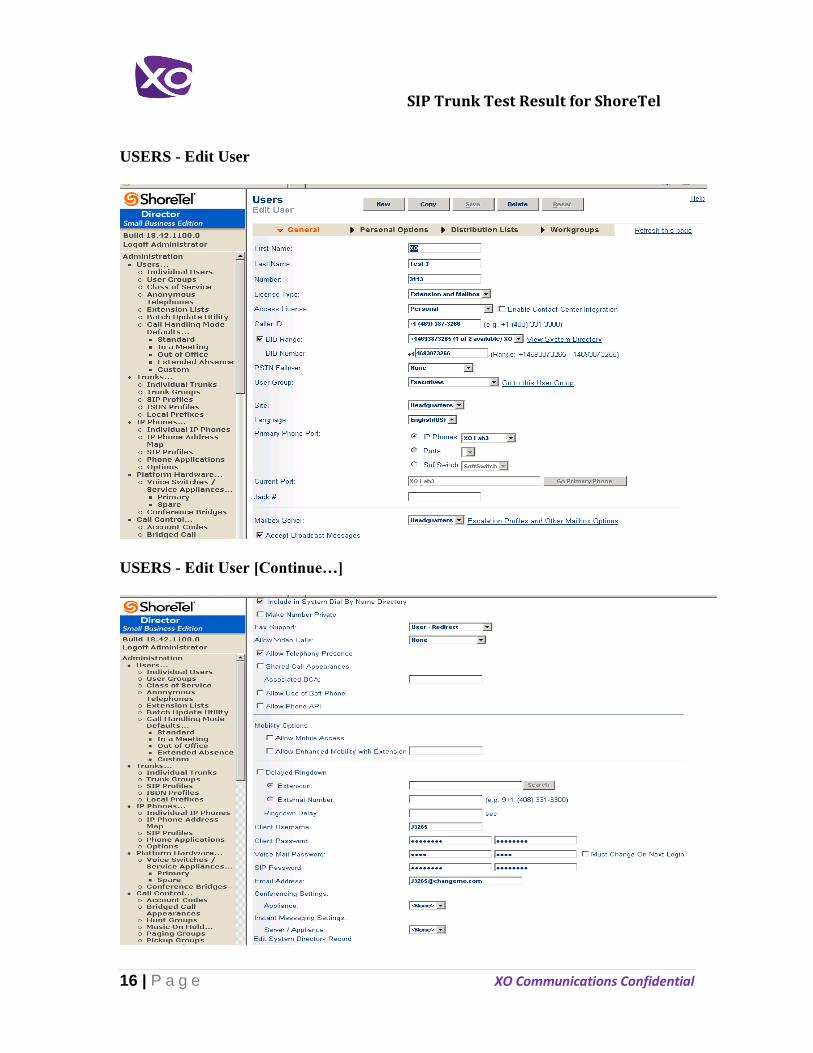
USERS - Edit User
USERS - Edit User [Continue…]

SIP Trunk Test Result for ShoreTel
17 | P a g e XO Communications Confidential
USER GROUPS
Codec list (XO both)

SIP Trunk Test Result for ShoreTel
18 | P a g e XO Communications Confidential
Options
SIP Trunk Test Result for ShoreTel
19 | P a g e XO Communications Confidential
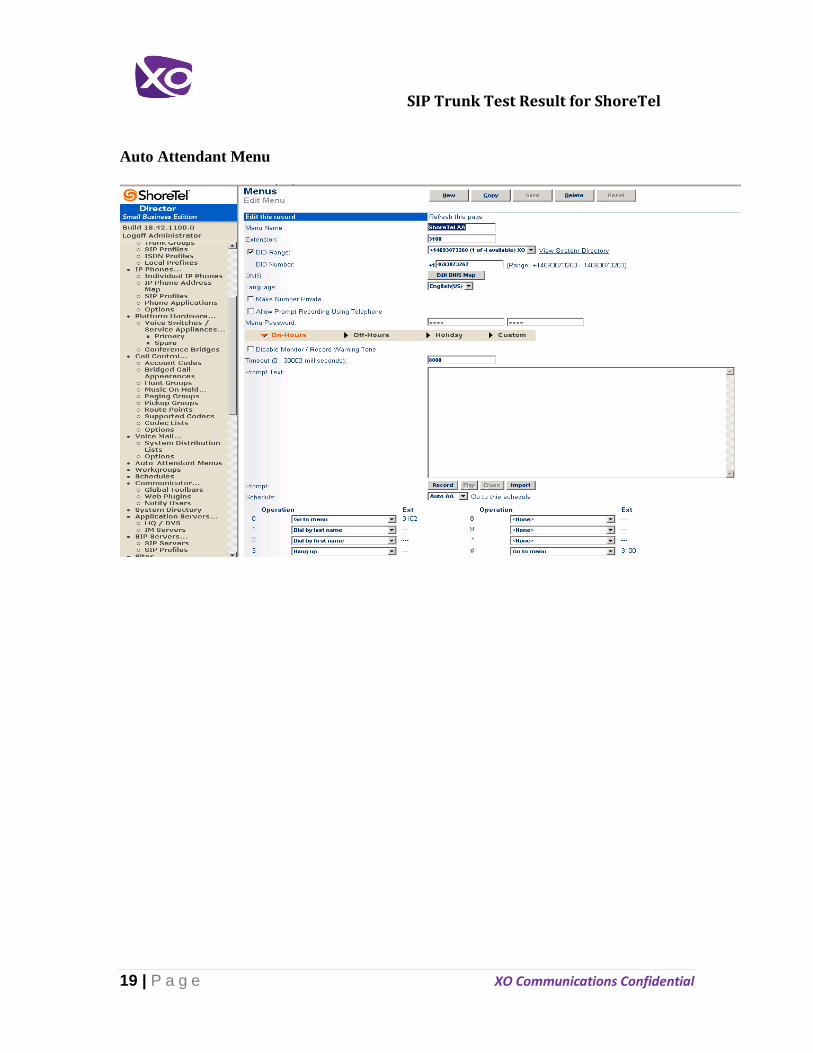
Auto Attendant Menu

SIP Trunk Test Result for ShoreTel
20 | P a g e XO Communications Confidential
Auto Attendant Menu (Continue)

SIP Trunk Test Result for ShoreTel
21 | P a g e XO Communications Confidential
Voice Mail
SIP Trunk Test Result for ShoreTel
22 | P a g e XO Communications Confidential
Special provisioning :
1. To change the Headquarters Server IP address without reinstalling ShoreTel
perform the following:
Login to ShoreTel Director, select “Application Servers…”, then select “HQ / DVS”, next select the HQ server listed and change the parameter “Host IP Address” to the new IP address. Logoff ShoreTel Director.
Change the registry HQ Server IP address. Go to Start, Run, cmd, regedit – browse to change the HQ Server IP address in the following registry locations: 1) My Computer\HKEY_LOCAL_MACHINE\SOFTWARE\Shoreline Teleworks\HQServerAddress 2) My Computer\HKEY_LOCAL_MACHINE\SOFTWARE\Shoreline Teleworks\LocalDBServerAddress
Change the Network card IP address to the new IP address Reboot the server Change IP address on ShoreGear Switch (SG-30):
1). Connect a serial cable between a personal computer and the ShoreGear switch (9-Pin
MAINT port). (This is a 1-1 connection and a regular straight-through serial cable will
work.) 2). Use a terminal emulation program such as HyperTerm or Tera Term to open a connection to the switch. Apply these values to the terminal settings:
Speed: 19.2 Kbps Data bit: 8 bits Stop bit: 1 Parity: No parity Flow Control: None
3). If prompted for authentication credentials, type the login creditials - Login: anonymous Password: ShoreTel 4). At the “ShoreTel>” prompt , press “0” to display a menu with all available
options. 5). Press “3” to change the configuration on the ShoreGear Switch. 6). A menu with all possible network parameters, that can be changed, will be
displayed. 7). Follow Menu to make appropriate changes to IP /Subnet/Gateway and other

SIP Trunk Test Result for ShoreTel
23 | P a g e XO Communications Confidential
necessary parameters. After making changes to each individual parameters , press “0”
to go back to previous menu. 8). When all parameters are saved , Press “4” to “Reboot” the switch and save configuration when prompted. 9). Once switch is rebooted , it will boot up with the new parameters (IP Address/Subnet/Gateway).
2. To remove ‘+1’ from FROM header.
At the Director login screen, hold down the CTRL and Shift keys and click on the "U" of User Id, if done correctly you should now see ***Support Entry*** displayed on the page, log in normally.
Go to the SIP Trunk Group you've defined and edit it. Scroll to bottom of the page, in the "Trunk Group Dialing Rules:" section, click on the "Custom" Edit button.
In the pop-up window enter ;10E and save the entry, that's it, you should now see the FROM and DIVERSION headers in non-E.164 format without a leading one.
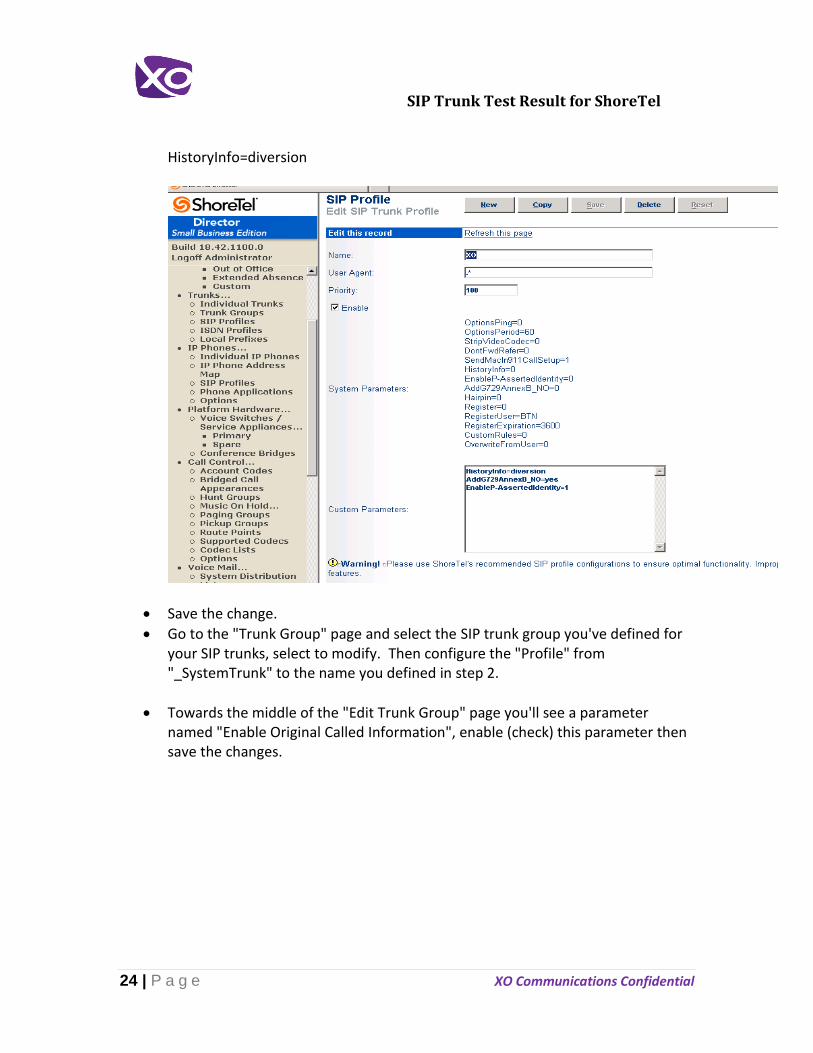
3. To add ‘Diversion’ header.
Go to the "Trunks" section, then to "SIP Profiles", and then click on the "New" button.
Define a "Name", set the "User Agent" to .* (just period then asterisk), check the "Enable" parameter, in the "Custom Parameters" area enter the following (case sensitive):
SIP Trunk Test Result for ShoreTel
24 | P a g e XO Communications Confidential
HistoryInfo=diversion
Save the change.
Go to the "Trunk Group" page and select the SIP trunk group you've defined for your SIP trunks, select to modify. Then configure the "Profile" from "_SystemTrunk" to the name you defined in step 2.
Towards the middle of the "Edit Trunk Group" page you'll see a parameter named "Enable Original Called Information", enable (check) this parameter then save the changes.

SIP Trunk Test Result for ShoreTel
25 | P a g e XO Communications Confidential
4. To add ‘P-Asserted-Identity’ header (to make ‘*67-9-xxxxxxxxx’ work)
- To make ShoreTel add 'P-Asserted-Identity’, create a new SIP Profile or use an existing one. If creating a new one, set the “User Agent:” parameter to “.*” (without the quotes). Leave the “Priority:” parameter at a default setting of 100. Check the box to the left of the “Enable” parameter by selecting it. In the “Custom Parameters:” section adds the following entries (these are the parameters that you would add to an already created profile):
EnableP-AssertedIdentity=1
These parameters are case sensitive, be sure to input them as noted without any spaces. Save the entry by selecting the “Save” option at the top of the page.