simple input device thank you for purchasing keypad library...english german chinese k orean sato...
TRANSCRIPT

En
glis
hG
erm
anC
hin
ese
Ko
rean
Sato Coporation
KeypadThank you for purchasingour Keypad (simple inputdevice).Read this manual carefullyto understand the func-tions of the Keypad andensure proper use.
Quick GuideSimple Input Device

2
En
glis
h
Safety Precautions
In this section, safety precautions about the simple input device operation are explained toensure proper care and usage. Make sure to read these carefully before using your simpleinput device.
Markings and SymbolsThe following symbols or makings are used in this Quick Guide and on the simple inputdevice so that you can properly use the simple input device, and to prevent any damage toproperty, harm, or injury to yourself and others. Make sure to read their explanationscarefully to familiarize yourself with their meanings.
WARNING This symbol indicates information that, if ignored or applied incorrectly,creates the danger or death or serious personal injury.
CAUTIONThis symbol indicates information that, if ignored or applied incorrectly,creates the possibility of personal injury or property damage.
Symbol examplesThe triangle indicates something you should take absolute care with. The cautions are indicated
concretely within the symbol. The symbol on the left indicates a risk of electric shock.
A circle with a diagonal line indicates something you should not do. The symbol on the leftindicates that you should not try to take the unit apart.
A black circle with a picture inside indicates something you need to do. The symbol on the leftindicates that you should unplug the unit from the wall outlet.
First Edition: February 15, 2008 2008 Sato Corporation
En
glis
h
3
store where you purchased the simpleinput device. Continue use of damagedcommunication cable may cause fire orelectric shock.
• Do not attempt to modify, jerk, knot,sharply bend, or otherwise abuse thecommunication cable. Continue use ofdamaged communication cable maycause fire or electric shock.
In case of drop or damage
If the simple input device was dropped ordamaged, turn off the power switch of theconnected printer immediately, disconnectthe connector of the communication cablefrom the printer, and contact your nearestdealer or service center or the storewhere you purchased the simple inputdevice. Continue use of the simple inputdevice in this condition may cause fire orelectric shock.
Do not use the simple input device inabnormal condition
In the case of abnormalities such as smokeor foul odors from the simple input device,stop using the simple input deviceimmediately. Continue use of the simpleinput device in this condition may causefire or electric shock. Turn off the powerswitch of the connected printerimmediately, disconnect the connector ofthe communication cable from the printer,and contact your nearest dealer or servicecenter or the store where you purchasedthe simple input device. Do not attempt torepair the simple input device yourself.
Do not disassemble
Do not attempt to disassemble or modifythe simple input device. Fire or electricshock may occur. For service and repairof internal problem, please contact yournearest dealer or service center or thestore where you purchased the simpleinput device for assistant.
Connecting a scanner or keyboard
Be sure to turn the power of the printer offbefore connecting a scanner to the simpleinput device. Connecting the cable whilethe power remains on may cause electricshock.
WARNING
Place the simple input device on asurface that is flat and level
Do not leave the simple input device onunstable surfaces. If the simple inputdevice falls and hits someone, it couldcause injury.
Do not expose the simple input deviceto liquids or moisture
Do not place objects filled with liquids, suchas beverages, vases, or chemical productnear the simple input device. Also, do notplace small metal objects near the simpleinput device. If liquid spills on or a smallmetal objects enters inside the equipment,immediately turn off the power switch of theconnected printer, disconnect the connectorof the communication cable from the printer,and contact your nearest dealer or servicecenter or the store where you purchasedthe simple input device. Continue use of thesimple input device in this condition maycause fire or electric shock.
Do not insert foreign material into thesimple input device
Do not insert or drop any metal orflammable objects into the scanner/keyboard connector, SD card slot, andother openings. If a foreign materials hasfallen into the simple input device, turn offthe power switch of the connected printerimmediately, disconnect the connector ofthe communication cable from the printer,and contact your nearest dealer or servicecenter or the store where you purchasedthe simple input device. Continue use ofthe simple input device in this conditionmay cause fire or electric shock.
Handling of the communication cable
• Do not attempt to damage, break, ormodify the communication cable. Also,avoid placing a heavy object on,heating, or pulling the communicationcable. This may damage thecommunication cable causing fire andelectric shock.
• If the communication cable becomesdamaged in any way (exposed cablecore, breaking of wire), contact yournearest dealer or service center or the

4
En
glis
h
When unused for long periods of time
Disconnect the connector of thecommunication cable from the printerwhen unused for long periods of time.
Maintenance and cleaning
Disconnect the connector of thecommunication cable from the printerwhen maintaining or cleaning the simpleinput device.
Handling of the SD card
• Do not drop or bend the card, orotherwise subject it to a strong impact.The stored data may be lost.
• Do not get water on the card. Thestored data may be lost.
• Do not place the card where it will besubject to direct sunlight or next to aheating appliance.
• Do not directly touch the contacts orallow dirt or dust to get inside the card.The stored data may be lost.
• Do not store the card in very hot andhumid places.
• To protect the card from staticelectricity, be sure to insert it in its casebefore transportation or storage.
Do not use in locations with highhumidity
Do not place the simple input device inany places where it will be subjected tohigh humidity or condensation. Ifcondensing, turn off the power switchimmediately, stop using it and drycompletely without using any heatproducing devices. Continued use underthese conditions may cause electricshock.
Carrying the simple input device
• Turn off the power of the printer, andthen disconnect the communicationcable before moving the simple inputdevice to other places. Leaving itconnected and moving the simple inputdevice will damage to the cord andconnections. This may cause fire orelectric shock.
• When placing the simple input deviceon the floor or the table, be careful notto get your fingers or hands caught inthe angle adjustment stand of thesimple input device.
Communication cable
• Keep the communication cable out ofany appliances that produce heat. Thismay melt the coating of thecommunication cable and cause fire orelectric shock.
• When disconnecting the communicationcable, pull on the connector. If not, itmay cause exposure of wire, breakingof wire, overheating, fire or electricshock.
CAUTION
Notes
1. Reproduction of all or part of this manual is prohibited without permission of the copyright owner.
2. The information in this manual is subject to change without notice.
3. If you find any ambiguous or erroneous information in this manual, please contact your nearestdealer or the place of purchase.

En
glis
h
5
Checking the Accessories
The box contains the following accessories in addition to the main unit. Be sure to checkthat all the accessories are included. If there are any accessories missing, contact theplace of purchase or dealer.
• Quick Guide (this guide)
6
En
glis
h
Communication cable
Display
Function keys
Numeric Keypad
Scanner/keyboardconnector cover
Scanner/keyboardconnector
Angle adjustmentstand
Communicationcable groove
Scanner/keyboardcable groove
Set the cables in the grooves according to the purpose of use.
Parts Names
Main unit of simple input device
Top
Underside

En
glis
h
7
Handling of the SD card
Inserting
1 Open the SD card slot cover.
2 Confirm the top/bottom and insertionorientation of the SD card, and fullyinsert the SD card all the way.
3 Close the SD card slot cover.
Ejecting
1 Open the SD card slot cover.
2 Push the SD card all the way in andrelease your finger to eject the SD cardslightly, and then pull out the SD card.
3 Close the SD card slot cover.
SD card slot cover
SD card slot
CAUTIONDo not insert or eject the SD card while the power of theprinter is on. The stored data may be lost. Be sure to turnoff the power of the printer before inserting or ejectingthe SD card.
Left side
8
En
glis
h
Connecting the Printer
Be sure to turn the power of the printer off before connecting the Keypad (simple inputdevice) to the printer.
Connecting the communication cable
1 Confirm the power of the printer is off.
2 Insert the connector of the communica-tion cable of the Keypad into theprinter unit.
Confirm the top and bottom of theconnector and insert the connector whileholding the printer with one hand, andthen tighten the screws.
3 Turn on the power switch of the printer.
Power is supplied to the Keypad from theprinter, and then the printer model andfirmware version appear on the display.
CAUTIONBe sure to turn off the power of the printer unit beforeconnecting or disconnecting the Keypad. Otherwise theKeypad or printer unit may be damaged.

En
glis
h
9
Key Operation
Key assignment
NAME FUNCCLR
1 2 3
4 5 6
7 8 9
., _ ;+ ?<>[
. - / : ABC
GHI
PQRS
JKL
TUV WXYZ
MNO
DEF
0 EnterF1 F2 F3 F4
The functions of the F1 to F4 keys differ depending on the screen displayed when thekeys are pressed.
Pressing the Enter key confirms entered data.
Possible input characters
*1: � indicates a single-byte space (character code: 0x20).
KeyStatus
Numeric InputUppercase Alphanumeric Input
(Lowercase Alphanumeric Input)

10
En
glis
h
Startup Screen and Format No Input Screen
If you turn on the power, the startup screen appears.
Startup ScreenThis screen displays the name of the connected printer.
You can press F1 and F4 to change the LCD brightness.Press any key other than F1 and F4 to transition toFormat No Input Screen 1. VER:29.01.00.00
DR308e
↑↓
Format No Input Screen 1
Enter the format number for printing.
The format data needs to be pre-registered to the unit orSD card.
• Input range: 1 to 9999
• Default input value: Blank
FORMAT NO [ 1]Format NameNAME CLR FUNC
Key Key EffectNumeric Keypad Transitions to Format No
Input Screen 1.
Enter Transitions to Format NoInput Screen 1.
F1 Decreases the LCDbrightness by 1 step.
F2 Transitions to Format NoInput Screen 1.
F3 Transitions to Format NoInput Screen 1.
F4 Increases the LCD brightnessby 1 step.
Key Key EffectNumeric Keypad Enters the format number.
Enter Confirms the entered formatnumber.
F1 Displays the format name.
F2 Clears the format numberand format name.
F3 -
F4 Transitions to Format NoInput Screen 2.

En
glis
h
11
Format No Input Screen 2
This screen allows you to change the settings of thisdevice.
FORMAT NO [ 1]Format NameCNFG FUNCKey Key Effect
Numeric Keypad Enters the format number.
Enter Confirms the entered formatnumber.
F1 Transitions to configurationmode.
F2 -
F3 -
F4 Transitions to Format NoInput Screen 1.

12
En
glis
h
Operation Settings
Structure of configuration mode
* A calendar IC needs to be installed in the printer unit.
Configuration mode menu
DEVICE SETTINGS
DATE/TIME
DATE/TIME setting
PRINT MONITER
MEMORY
LCD BRIGHTNESS
DATA COPY
INTERNAL→CARD
MEMORY CLEAR
CARD→INTERNAL
INTERNAL
CARD
Sets whether to change the date and timeof the printer unit. *
Sets the date and time of the printer unit. *
Sets whether to monitor the status of theprinter during printing.
Sets the memory for referencing theformat data and table data.
Sets the currency mark on the LCD.
Adjusts the LCD brightness.
Copies the following data from the SDcard to the internal memory.1 Format data (up to 99)2 Table data (up to 4)3 Device setting information
Copies the following data from the internalmemory to the SD card.1 Format data (up to 99)2 Table data (up to 4)3 Device setting information
Initializes the internal memory.(Clears the registered data.)
Initializes the SD card.(Clears the registered data.)
CURRENCY SELECT
En
glis
h
13
Configuration mode menu
This allows you to select each of the menu items of configuration mode.
Configuration mode menu
This allows you to select each of the menu items ofconfiguration mode.
<Menu Items>
z DEVICE SETTINGSx DATA COPYc MEMORY CLEARThe initial value is “DEVICE SETTINGS.”
CONFIGURATION1DEVICE SETTINGS2DATA COPYBACK OK↑ ↓
DEVICE SETTINGS
This configures the settings of the device.
DATE/TIME
This selects whether to change the settings of thecalendar IC installed in the printer unit. It is not displayedif there is no calendar IC in the printer unit.
<Input Range>
z DO NOT MODIFYx MODIFYThe initial value is “DO NOT MODIFY.”
DATE/TIME1DO NOT MODIFY2MODIFYBACK OK↑ ↓
Key Key EffectNumeric Keypad Selects and confirms an item.
Enter Confirms the selected item.
F1 Returns to Format No InputScreen.
F2 Moves the cursor up.
F3 Moves the cursor down.
F4 Confirms the selected item.
Key Key EffectNumeric Keypad Selects and confirms an item.
Enter Confirms the selected item.
F1 Returns to the configurationmode menu screen.
F2 Moves the cursor up.
F3 Moves the cursor down.
F4 Confirms the selected item.

14
En
glis
h
PRINT MONITER
This monitors the status of the printer during printing. Ifyou set it to “ENABLE,” the Keypad waits until tag stockprinting is complete and then enters the next data.
<Input Range>
z DISABLEx ENABLEThe initial value is “DISABLE.”
PRINT MONITOR1DISABLE2ENABLEBACK OK↑ ↓
DATE/TIME setting
This screen appears when you select “x MODIFY” inthe DATE/TIME screen. Re-enter the data in theconfirmation screen that appears to prevent uninten-tional operation.
DATE/TIME06/04/01 12:00
BACK OK↑ ↓
Key Key Effect
Numeric Keypad Enters the date and time.
Enter Confirms the selected item.
F1 Returns to the DATE/TIMEscreen.
F2 Moves the cursor left.
F3 Moves the cursor right.
F4 Confirms the selected item.
Key Key Effect
Numeric Keypad Selects and confirms an item.
Enter Confirms the selected item.
F1 Returns to the configurationmode menu screen.
F2 Moves the cursor up.
F3 Moves the cursor down.
F4 Confirms the selected item.
En
glis
h
15
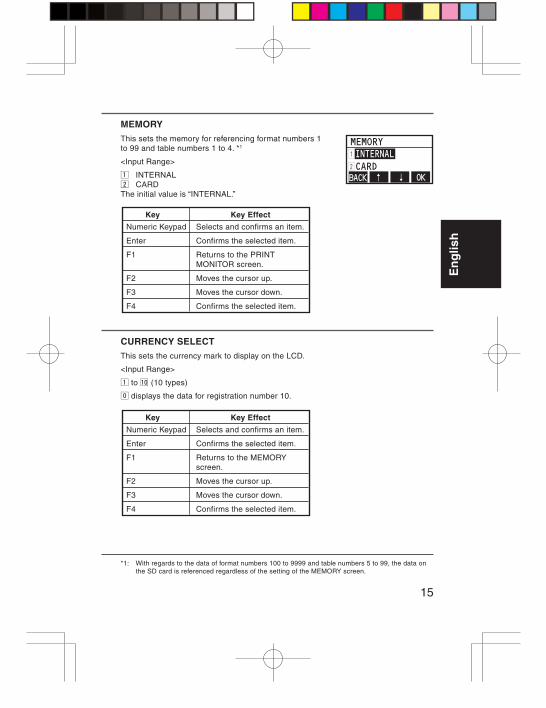
MEMORY
This sets the memory for referencing format numbers 1to 99 and table numbers 1 to 4. *1
<Input Range>
z INTERNALx CARDThe initial value is “INTERNAL.”
MEMORY1INTERNAL2CARDBACK OK↑ ↓
*1: With regards to the data of format numbers 100 to 9999 and table numbers 5 to 99, the data onthe SD card is referenced regardless of the setting of the MEMORY screen.
Key Key Effect
Numeric Keypad Selects and confirms an item.
Enter Confirms the selected item.
F1 Returns to the PRINTMONITOR screen.
F2 Moves the cursor up.
F3 Moves the cursor down.
F4 Confirms the selected item.
Key Key Effect
Numeric Keypad Selects and confirms an item.
Enter Confirms the selected item.
F1 Returns to the MEMORYscreen.
F2 Moves the cursor up.
F3 Moves the cursor down.
F4 Confirms the selected item.
CURRENCY SELECT
This sets the currency mark to display on the LCD.
<Input Range>
z to ⁄0 (10 types)
/ displays the data for registration number 10.

16
En
glis
h
DATA COPY
This copies the format data and table data registered in the SD card to the internalmemory. You can also copy data already registered in the internal memory to the SD card.
DATA COPY menu
This selects the data to copy.
<Input Range>
z CARD→INTERNALx INTERNAL→CARD
DATA COPY1CARD →INTERNAL2INTERNAL→CARDBACK OK↑ ↓
LCD BRIGHTNESS
This sets the LCD brightness.
<Input Range>
1 to 32The initial value is “16.”
LCD BRIGHTNESS
16 BACK OK↑↓
Key Key Effect
Numeric Keypad -
Enter Confirms the selected item.
F1 Returns to the CURRENCYSELECT screen.
F2 Decreases the LCDbrightness by 1 step.
F3 Increases the LCD brightnessby 1 step.
F4 Confirms the selected item.
Key Key Effect
Numeric Keypad Selects and confirms an item.
Enter Confirms the selected item.
F1 Returns to the configurationmode menu screen.
F2 Moves the cursor up.
F3 Moves the cursor down.
F4 Confirms the selected item.

En
glis
h
17
Copying the data from the SD card to the internal memory
You can simultaneously copy all applicable data (format numbers 1 to 99, tablenumbers 1 to 4, and device setting information in the SD card) to the internal memory.
1 Select and confirm “CARD→INTERNAL” inthe DATA COPY menu screen.
CARD→INTERNALCOPY COMPLETE
OK
3 When copying of the data is complete,press the Enter or F4 key to transition to theDATA COPY menu screen.
2 Press the Enter or F4 key to start copying.
If you press the F1 key, the DATA COPY menuscreen is redisplayed.
The progress is displayed on the LCD.
DATA COPY1CARD →INTERNAL2INTERNAL→CARDBACK OK↑ ↓
Supplementary Explanation
• All of the following data registered in the SD card is copied simultaneously.− Format data for format numbers 1 to 99− Table data for table numbers 1 to 4− Device setting information
• If copying is performed with this operation, all of the format data for 1 to 99 andtable data for 1 to 4 that has already been registered is deleted and overwrittenwith the newly copied data.
• If no data is registered in the SD card, data cannot be copied to the internalmemory.
• The size of the internal memory is 296 KB. If you attempt to copy data thatexceeds the size of the internal memory, a data size exceeded error occurs andan error message is displayed. If an error message is displayed, check the formatdata.
• If a data size exceeded error occurs during the copying of format data, the data ofthe format number up until immediately before the data size was exceeded iscopied to the internal memory.
CARD→INTERNALINIT INTERNALMEMORY, OK?BACK OK
18
En
glis
h
2 Press the Enter or F4 key to start copying.
If you press the F1 key, the DATA COPY menuscreen is redisplayed. The progress isdisplayed on the LCD.
DATA COPY1CARD→INTERNAL2INTERNAL→CARDBACK OK↑ ↓
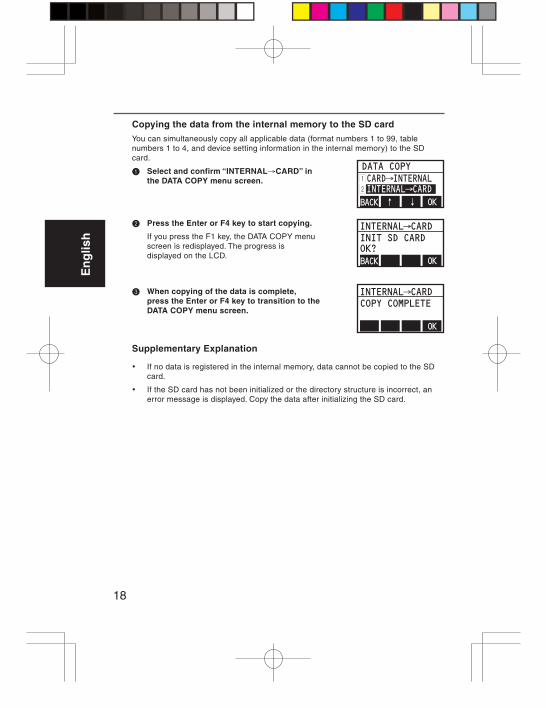
INTERNAL→CARDINIT SD CARDOK?BACK OK
INTERNAL→CARDCOPY COMPLETE
OK
Copying the data from the internal memory to the SD card
You can simultaneously copy all applicable data (format numbers 1 to 99, tablenumbers 1 to 4, and device setting information in the internal memory) to the SDcard.
1 Select and confirm “INTERNAL→CARD” inthe DATA COPY menu screen.
3 When copying of the data is complete,press the Enter or F4 key to transition to theDATA COPY menu screen.
Supplementary Explanation
• If no data is registered in the internal memory, data cannot be copied to the SDcard.
• If the SD card has not been initialized or the directory structure is incorrect, anerror message is displayed. Copy the data after initializing the SD card.
En
glis
h
19
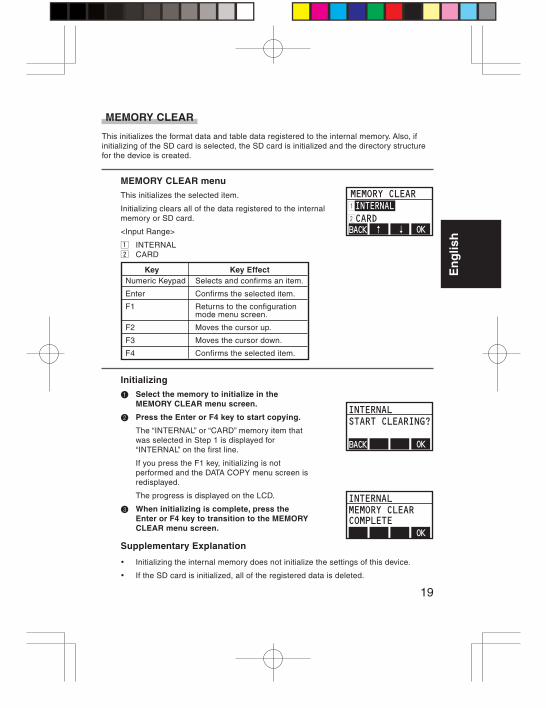
MEMORY CLEAR
This initializes the format data and table data registered to the internal memory. Also, ifinitializing of the SD card is selected, the SD card is initialized and the directory structurefor the device is created.
MEMORY CLEAR menu
This initializes the selected item.
Initializing clears all of the data registered to the internalmemory or SD card.
<Input Range>
z INTERNALx CARD
MEMORY CLEAR1INTERNAL2CARDBACK OK↑ ↓
Initializing
1 Select the memory to initialize in theMEMORY CLEAR menu screen.
2 Press the Enter or F4 key to start copying.
The “INTERNAL” or “CARD” memory item thatwas selected in Step 1 is displayed for“INTERNAL” on the first line.
If you press the F1 key, initializing is notperformed and the DATA COPY menu screen isredisplayed.
The progress is displayed on the LCD.
3 When initializing is complete, press theEnter or F4 key to transition to the MEMORYCLEAR menu screen.
Supplementary Explanation
• Initializing the internal memory does not initialize the settings of this device.
• If the SD card is initialized, all of the registered data is deleted.
INTERNALSTART CLEARING?
BACK OK
INTERNALMEMORY CLEARCOMPLETE
OK
Key Key EffectNumeric Keypad Selects and confirms an item.
Enter Confirms the selected item.
F1 Returns to the configurationmode menu screen.
F2 Moves the cursor up.
F3 Moves the cursor down.
F4 Confirms the selected item.

20
En
glis
h
This enters numbers in accordance with the input conditions set with Keypad Tool.
Numeric Input 1
This enters numbers in accordance with the inputconditions set with Keypad Tool.
<Input Range>
Maximum of 99 digits(14 digits can be displayed. If there are more than 15,the other digits can be displayed by scrolling.)
Format NameInput Data Name[ ]
FUNCNUM CLR ↓Numeric Input 2
This is for editing and modifying entered data.
You can move the cursor and then enter a number tooverwrite the character. You can also return to theprevious input item.
Format NameInput Data Name[ ]
FUNCBACK ↓
↓
Data Input
Numeric input mode
Key Key EffectNumeric Keypad Enters numbers.
Enter Confirms the entered data.
F1 Transitions to uppercasealphanumeric input mode.
F2 Clears the entered data.
F3 Moves the cursor one placeto the right.
F4 Transitions to Numeric Input 2.
Key Key EffectNumeric Keypad Enters numbers.
Enter Confirms the entered data.
F1 Returns to the previousscreen.
F2 Moves the cursor one placeto the left.
F3 Moves the cursor one placeto the right.
F4 Transitions to Numeric Input 3.

En
glis
h
21
Numeric Input 3You can return to Format No Input Screen 1.
You can also delete one character.Format NameInput Data Name[ ]
FUNCFNo DEL ↓
Supplementary Explanation
• The selected format name is displayed as the format name on the LCD.
• The item name set with Keypad Tool is displayed as the data item name on the LCD.
Alphanumeric input mode
This enters alphanumeric characters and symbols in accordance with the input rules of thespecified input command.
Uppercase Alphanumeric Input 1This enters uppercase alphanumeric characters inaccordance with the input conditions set with Keypad Tool.
<Input Range>
Maximum of 99 digits(14 digits can be displayed. If there are more than 15,the other digits can be displayed by scrolling.)
Format NameInput Data Name[ ]
FUNCA CLR ↓
Key Key EffectNumeric Keypad Enters numbers.
Enter Confirms the entered data.
F1 Returns to Format No InputScreen 1.
F2 Deletes the character at thecursor position.
F3 Moves the cursor one placeto the right.
F4 Transitions to Numeric Input 1.
Key Key EffectNumeric Keypad Enters alphanumeric
characters and symbols.
Enter Confirms the entered data.
F1 Transitions to lowercasealphanumeric input mode.
F2 Clears the entered data.
F3 Moves the cursor one placeto the right.
F4 Transitions to UppercaseAlphanumeric Input 2.

22
En
glis
h
Uppercase Alphanumeric Input 2
This is for editing and modifying entered data.
You can move the cursor and then enter an alphanu-meric character to overwrite the character. You can alsoreturn to the previous input item.
Format NameInput Data Name[ ]
FUNCBACK ↓
↓
Uppercase Alphanumeric Input 3
You can return to Format No Input Screen 1.
You can also delete one character.Format NameInput Data Name[ ]
FUNCFNo DEL ↓
Key Key Effect
Numeric Keypad Enters alphanumericcharacters and symbols.
Enter Confirms the entered data.
F1 Returns to the previousscreen.
F2 Moves the cursor one placeto the left.
F3 Moves the cursor one placeto the right.
F4 Transitions to UppercaseAlphanumeric Input 3.
Key Key Effect
Numeric Keypad Enters alphanumericcharacters and symbols.
Enter Confirms the entered data.
F1 Returns to Format No InputScreen 1.
F2 Deletes the character at thecursor position.
F3 Moves the cursor one placeto the right.
F4 Transitions to UppercaseAlphanumeric Input 1.

En
glis
h
23
Lowercase Alphanumeric Input 1
This enters lowercase alphanumeric characters inaccordance with the input conditions set with KeypadTool.
<Input Range>
Maximum of 99 digits(14 digits can be displayed. If there are more than 15,the other digits can be displayed by scrolling.)
Format NameInput Data Name[ ]
FUNCa CLR ↓
Lowercase Alphanumeric Input 2
This is for editing and modifying entered data.
You can move the cursor and then enter an alphanu-meric character to overwrite the character. You can alsoreturn to the previous input item.
Format NameInput Data Name[ ]
FUNCBACK ↓
↓
Key Key Effect
Numeric Keypad Enters alphanumericcharacters and symbols.
Enter Confirms the entered data.
F1 Transitions to numeric inputmode.
F2 Clears the entered data.
F3 Moves the cursor one placeto the right.
F4 Transitions to LowercaseAlphanumeric Input 2.
Key Key Effect
Numeric Keypad Enters alphanumericcharacters and symbols.
Enter Confirms the entered data.
F1 Returns to the previousscreen.
F2 Moves the cursor one placeto the left.
F3 Moves the cursor one placeto the right.
F4 Transitions to LowercaseAlphanumeric Input 3.

24
En
glis
h
Uppercase Alphanumeric Input 3
You can return to Format No Input Screen 1.
You can also delete one character.Format NameInput Data Name[ ]
FUNCFNo DEL ↓
Supplementary Explanation
• The selected format name is displayed as the format name on the LCD.
• The item name set with Keypad Tool is displayed as the data item name on theLCD.
• Enter symbols with the [.], [0], and [1] keys.
Key Key Effect
Numeric Keypad Enters alphanumericcharacters and symbols.
Enter Confirms the entered data.
F1 Returns to Format No InputScreen 1.
F2 Deletes the character at thecursor position.
F3 Moves the cursor one placeto the right.
F4 Transitions to LowercaseAlphanumeric Input 1.

En
glis
h
25
LCD Operation Specifications
If you turn on the power of the printer to which the simple input device is connected, thepower of the simple input device turns on.
Basic operation
If the device is started up in normal mode, the screens transition as shown below.
Format NameInput Data Name[ ]
FUNCCHAR CLR ↓
VER:29.01.00.00
DR308e
↑↓
FORMAT NO [ 1]Format NameNAME CLR FUNC
FUNC
FORMAT NO [ 1]Format NameCNFG
CNFG
FUNC
Format Name
FUNCNUM CLR ↓
Input Data Name[ ]
Format Name
PRN
PRN
FNo BACK CLR
Quantity [ 1]
Power ON
Format NoInput Screen 1
Format NoInput Screen 2
Press any key other thanthe F1 and F4 key.
Select the format data
Input Data
PRN

26
En
glis
h
CONFIGURATION1DEVICE SETTINGS2DATA COPYBACK OK↑ ↓
CONFIGURATION2DATA COPY3MEMORY CLEARBACK OK↑ ↓
DATE/TIME1DO NOT MODIFY2MODIFYBACK OK↑ ↓
DATE/TIME06/04/01 12:00
BACK OK
OK
↑ ↓
PRINT MONITOR1DISABLE2ENABLEBACK OK
OK
OK
OK
OK
↑ ↓
MEMORY1INTERNAL2CARDBACK OK↑ ↓
CURRENCY SELECT1DOLLAR $2YEN ¥ BACK OK↑ ↓
LCD BRIGHTNESS
16 BACK OK↑ ↓
DATA COPY1CARD→INTERNAL2INTERNAL→CARDBACK OK↑ ↓
MEMORY CLEAR1INTERNAL2CARDBACK OK↑ ↓
DO NOT MODIFY
MODIFY
CNFG
DEVICESETTINGS
DATA COPY
MEMORYCLEAR
En
glis
h
27
Explanation of Operation
• Enter a registered format number in the Format No Input Screen.
• Carry out display and key input of the input items in accordance with the settingsof Keypad Tool specified in the format data.
• Enter all the input items set with Keypad Tool, and then enter the quantity. Pressthe PRN key (F4) or the Enter key to print.
• To configure the settings of the device, press the configuration key (F1) from theFormat No Input Screen 2.
• If PRINT MONITOR was set to “ENABLE,” the process waits until printing iscomplete and then transitions to entering the next data.

28
En
glis
h 60
61
62
63
Error Screen
If an error is detected during data input, an error screen appears. The error number isdisplayed on the top right of the error screen.
This section describes the errors.
CARD ERROR [60]SD CARD IS NOTINSERTED
CARD ERROR [61]SD CARD ISWRITE PROTECTED
CARD ERROR [62]SD CARD ERROR
CARD ERROR [63]DATA SIZEEXCEEDED
Error No. Screen Description
This is the SD card is not inserted error screen.Cause: The SD card is not inserted in the
SD card slot.Solution: Insert the SD card in the SD card
slot.Canceling Error: The previous screen is redisplayed
after approximately three secondselapse or any key is pressed.
This is the SD card write protected error screen.Cause: The SD card is in the write protect
mode.Solution: Cancel the SD card write protect
mode.Canceling Error: The previous screen is redisplayed
after approximately three secondselapse or any key is pressed.
This is the SD card format error screen.Cause: The SD card format is not
supported.Solution: Format the SD card in a supported
format (FAT16).Canceling Error: The previous screen is redisplayed
after approximately three secondselapse or any key is pressed.
This is the SD card data size error screen.Cause: The size of the data registered to
the SD card is invalid.Solution: Reduce the volume of format data
to registered in the SD card to 150KB or less.
Canceling Error: The previous screen is redisplayedafter approximately three secondselapse or any key is pressed.

En
glis
h
29
CARD ERROR [64]SD CARD WRITEFAILURE
CARD ERROR [65]SD CARD READFAILURE
CARD ERROR [66]DATA NOT FOUNDIN SD CARD
CARD ERROR [67]SD CARDDATA ERROR
CARD ERROR [68]COMMAND DATANOT COMPATIBLE
64
65
66
67
68
Error No. Screen Description
This is the SD card write error screen.Cause: The process of writing to the SD
card was failed.Solution: Check the SD card. Eject and
insert the SD card. If the error stillappears, contact the place ofpurchase.
Canceling Error: The previous screen is redisplayedafter approximately three secondselapse or any key is pressed.
This is the SD card read error screen.Cause: The data was failed to be read
from the SD card.Solution: Check the SD card. Eject and
insert the SD card. If the error stillappears, contact the place ofpurchase.
Canceling Error: The previous screen is redisplayedafter approximately three secondselapse or any key is pressed.
This is the SD card unregistered error screen.Cause: There is no data registered to the
SD card.Solution: Register data to the SD card.Canceling Error: The previous screen is redisplayed
after approximately three secondselapse or any key is pressed.
This is the SD card data error screen.Cause: The data registered to the SD card
is invalid.Solution: Register data to the SD card from
Keypad Tool again.Canceling Error: The previous screen is redisplayed
after approximately three secondselapse or any key is pressed.
This is the SD card information error screen.Cause: The information data of the SD
card does not exist or is invalid.Solution: Register data to the SD card from
Keypad Tool again.Canceling Error: The previous screen is redisplayed
after approximately three secondselapse or any key is pressed.
30
En
glis
h
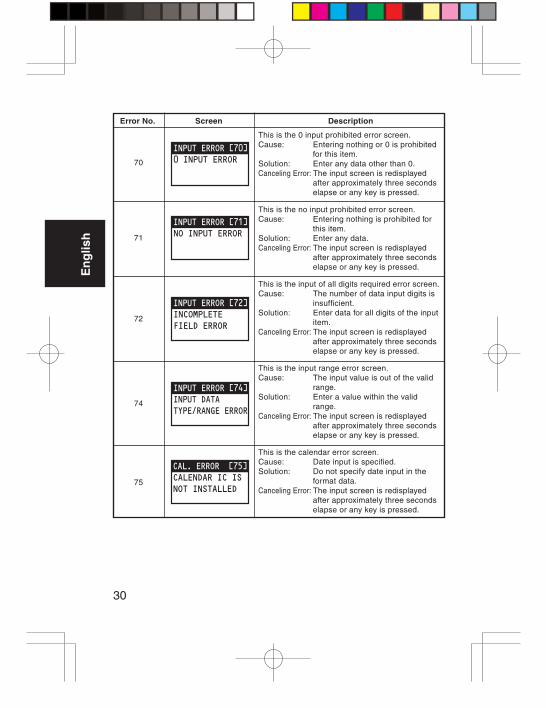
70
71
72
74
75
Error No. Screen Description
This is the 0 input prohibited error screen.Cause: Entering nothing or 0 is prohibited
for this item.Solution: Enter any data other than 0.Canceling Error: The input screen is redisplayed
after approximately three secondselapse or any key is pressed.
This is the no input prohibited error screen.Cause: Entering nothing is prohibited for
this item.Solution: Enter any data.Canceling Error: The input screen is redisplayed
after approximately three secondselapse or any key is pressed.
This is the input of all digits required error screen.Cause: The number of data input digits is
insufficient.Solution: Enter data for all digits of the input
item.Canceling Error: The input screen is redisplayed
after approximately three secondselapse or any key is pressed.
This is the input range error screen.Cause: The input value is out of the valid
range.Solution: Enter a value within the valid
range.Canceling Error: The input screen is redisplayed
after approximately three secondselapse or any key is pressed.
This is the calendar error screen.Cause: Date input is specified.Solution: Do not specify date input in the
format data.Canceling Error: The input screen is redisplayed
after approximately three secondselapse or any key is pressed.
INPUT ERROR [74]INPUT DATATYPE/RANGE ERROR
CAL. ERROR [75]CALENDAR IC ISNOT INSTALLED
INPUT ERROR [70]0 INPUT ERROR
INPUT ERROR [71]NO INPUT ERROR
INPUT ERROR [72]INCOMPLETEFIELD ERROR
En
glis
h
31
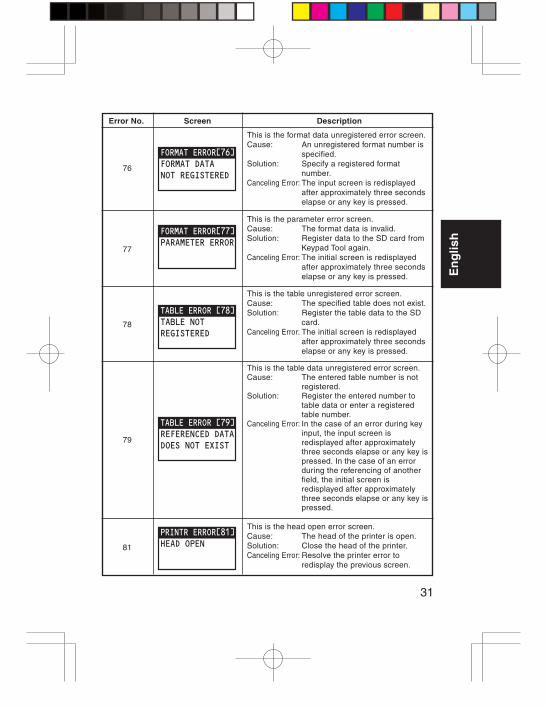
76
77
78
79
81
Error No. Screen Description
This is the format data unregistered error screen.Cause: An unregistered format number is
specified.Solution: Specify a registered format
number.Canceling Error: The input screen is redisplayed
after approximately three secondselapse or any key is pressed.
This is the parameter error screen.Cause: The format data is invalid.Solution: Register data to the SD card from
Keypad Tool again.Canceling Error: The initial screen is redisplayed
after approximately three secondselapse or any key is pressed.
This is the table unregistered error screen.Cause: The specified table does not exist.Solution: Register the table data to the SD
card.Canceling Error: The initial screen is redisplayed
after approximately three secondselapse or any key is pressed.
This is the table data unregistered error screen.Cause: The entered table number is not
registered.Solution: Register the entered number to
table data or enter a registeredtable number.
Canceling Error: In the case of an error during keyinput, the input screen isredisplayed after approximatelythree seconds elapse or any key ispressed. In the case of an errorduring the referencing of anotherfield, the initial screen isredisplayed after approximatelythree seconds elapse or any key ispressed.
This is the head open error screen.Cause: The head of the printer is open.Solution: Close the head of the printer.Canceling Error: Resolve the printer error to
redisplay the previous screen.
FORMAT ERROR[76]FORMAT DATANOT REGISTERED
FORMAT ERROR[77]PARAMETER ERROR
TABLE ERROR [78]TABLE NOTREGISTERED
TABLE ERROR [79]REFERENCED DATADOES NOT EXIST
PRINTR ERROR[81]HEAD OPEN
32
En
glis
h
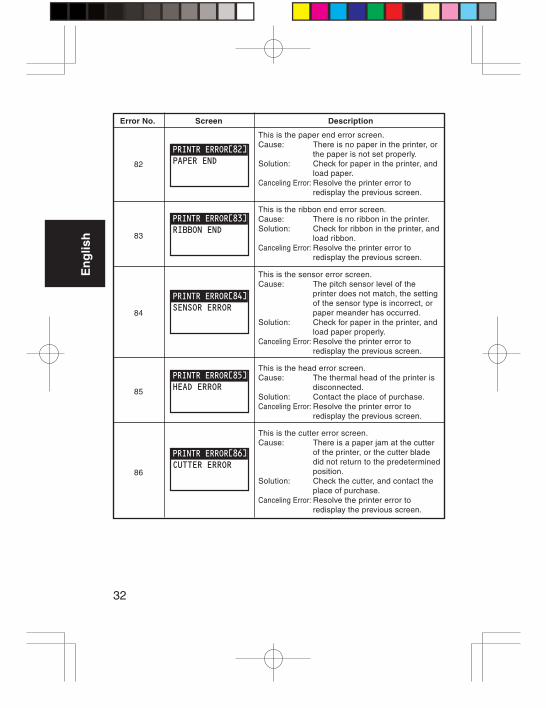
82
83
84
85
86
PRINTR ERROR[82]PAPER END
PRINTR ERROR[83]RIBBON END
PRINTR ERROR[84]SENSOR ERROR
PRINTR ERROR[85]HEAD ERROR
PRINTR ERROR[86]CUTTER ERROR
Error No. Screen Description
This is the paper end error screen.Cause: There is no paper in the printer, or
the paper is not set properly.Solution: Check for paper in the printer, and
load paper.Canceling Error: Resolve the printer error to
redisplay the previous screen.
This is the ribbon end error screen.Cause: There is no ribbon in the printer.Solution: Check for ribbon in the printer, and
load ribbon.Canceling Error: Resolve the printer error to
redisplay the previous screen.
This is the sensor error screen.Cause: The pitch sensor level of the
printer does not match, the settingof the sensor type is incorrect, orpaper meander has occurred.
Solution: Check for paper in the printer, andload paper properly.
Canceling Error: Resolve the printer error toredisplay the previous screen.
This is the head error screen.Cause: The thermal head of the printer is
disconnected.Solution: Contact the place of purchase.Canceling Error: Resolve the printer error to
redisplay the previous screen.
This is the cutter error screen.Cause: There is a paper jam at the cutter
of the printer, or the cutter bladedid not return to the predeterminedposition.
Solution: Check the cutter, and contact theplace of purchase.
Canceling Error: Resolve the printer error toredisplay the previous screen.

En
glis
h
33
87
80
90
91
92
Error No. Screen Description
This is the calendar error screen.Cause: The calendar settings of the printer
are set to an invalid date and time.Solution: Check the calendar settings of the
printer.Canceling Error: Resolve the printer error to
redisplay the previous screen.
This is the other printer error screen.Cause: A printer error other than error
numbers 81 to 87 has occurred.Solution: Check the printer, and contact the
place of purchase.Canceling Error: Resolve the printer error to
redisplay the previous screen.
This is the format data error screen.Cause: The target format data was invalid
during data registration.Solution: Check that the data does not
exceed the size of the internalmemory (296 KB), and create theformat data again.
Canceling Error: The previous screen is redisplayedafter approximately three secondselapse or any key is pressed.
This is the table data error screen.Cause: The target table data was invalid
during data registration.Solution: Check the table data, and create
the table data again.Canceling Error: The previous screen is redisplayed
after approximately three secondselapse or any key is pressed.
This is the device setting data error screen.Cause: The device setting data was invalid
during data registration.Solution: Check the device setting data.Canceling Error: The previous screen is redisplayed
after approximately three secondselapse or any key is pressed.
DATA ERROR [90]FORMAT DOWNLOADERROR
DATA ERROR [91]TABLE DOWNLOADERROR
DATA ERROR [92]SETTINGSDOWNLOAD ERROR
PRINTR ERROR[87]CALENDAR ERROR
PRINTR ERROR[80]PLEASE ADJUSTTHE PRINTER

34
En
glis
h
93
94
CAL. ERROR [93]SETTING ISINCORRECT
INPUT ERROR [94]CHECK DIGITINPUT ERROR
Error No. Screen Description
This is the calendar error screen.Cause: The date and time entered in each
of the DATE/TIME screen andconfirmation screen did not match.
Solution: Set the same date and time ineach of the DATE/TIME screenand confirmation screen.
Canceling Error: The previous screen is redisplayedafter approximately three secondselapse or any key is pressed.
This is the check digit error screen.Cause: An invalid check digit was entered
when setting the referencing of thecheck digit with the input data inbarcode input.
Solution: Enter the correct check digit.Canceling Error: The previous screen is redisplayed
after approximately three secondselapse or any key is pressed.

En
glis
h
35
Item Simple Input Device
Model name
Connection printer model
Dimensions
Weight
Control panel
Display
Communication interface
Card slot
Format data
Environment conditions:
Display angleadjustment function
Barcodes
2D codes
Keypad
T Series DR308e
152 mm (W) × 82 mm (D) × 33 mm (H)
320g
Function keys: F1 to F4 (4 keys)Numeric keypad: 0 to 9, ., and Enter (12 keys)
Graphics LCD64 dots high by 128 dots wide
1. Printer interfaceD-SUB 9-pin *1
2. PS/2 keyboard interfaceMini DIN 6-pin *2
SD card (1 GB standard)
Created with Keypad ToolNumber of storable items
Internal memory: 99SD card: 999
Operating ambient temperature: 5 to 40˚CHumidity: 30 to 80% (no condensation)Storage ambient temperature: -5 to 60˚CHumidity: 20 to 90% (no condensation)
The angle adjustment stand allows for adjusting theangle.
UPC-A/UPC-E, JAN/EAN, CODE39, CODE128,GS1-128 (UCC/EAN-128), CODABAR (NW-7), ITF
QR codes
*1 This is a dedicated connection for specific printers. Do not connect a computer or other device.*2 This interface is for connecting a scanner or full keyboard.
Notice About Registrations and Trademarks of Other Companies’ ProductsQR code is a registered trademark of Denso Wave Incorporated.
The SD logo is a trademark.
Use Keypad Tool to create the format data for printing from the Keypad.
Basic Specifications