silverfast · consistent colors and color manage-ment are often still a certain mystery for...
TRANSCRIPT
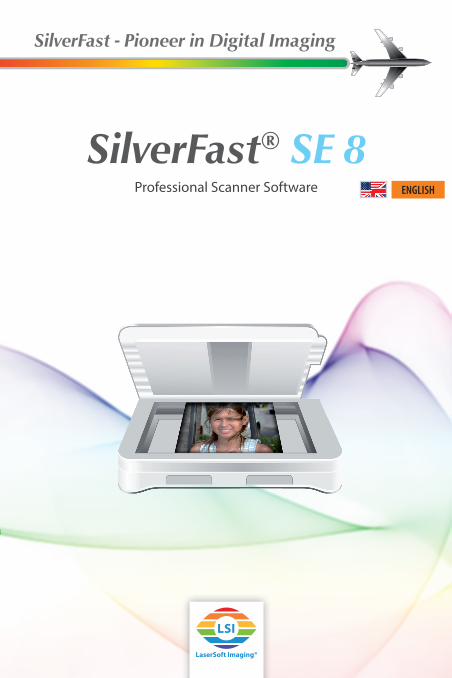
Professional Scanner Software ENGLISH
SilverFast® SE 8
SilverFast - Pioneer in Digital Imaging
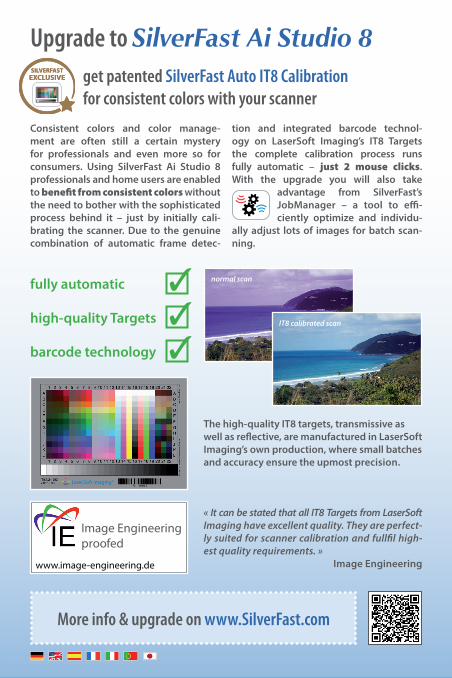
Consistent colors and color manage-ment are often still a certain mystery for professionals and even more so for consumers. Using SilverFast Ai Studio 8 professionals and home users are enabled to benefit from consistent colors without the need to bother with the sophisticated process behind it – just by initially cali-brating the scanner. Due to the genuine combination of automatic frame detec-
tion and integrated barcode technol-ogy on LaserSoft Imaging’s IT8 Targets the complete calibration process runs fully automatic – just 2 mouse clicks. With the upgrade you will also take
advantage from SilverFast’s JobManager – a tool to effi-ciently optimize and individu-
ally adjust lots of images for batch scan-ning.
Upgrade to SilverFast Ai Studio 8get patented SilverFast Auto IT8 Calibrationfor consistent colors with your scanner
« It can be stated that all IT8 Targets from LaserSoft Imaging have excellent quality. They are perfect-ly suited for scanner calibration and fullfil high-est quality requirements. »
Image Engineering
SILVERFASTEXCLUSIVESILVERFASTEXCLUSIVE
1 2 3 4 5 6 7 8 9 10 11 12 13 14 15 16 17 18 19 20 21 22
1 2 3 4 5 6 7 8 9 10 11 12 13 14 15 16 17 18 19 20 21 22
ABCDEFGHIJKL
ABCDEFGHIJKL
IT8.7/2-19932001:12
www.SilverFast.com Printed on Kodak Professional Digital
Charge: R011204
fully automatic ✓
barcode technology ✓high-quality Targets ✓
normal scan
IT8 calibrated scan
The high-quality IT8 targets, transmissive as well as reflective, are manufactured in LaserSoft Imaging’s own production, where small batches and accuracy ensure the upmost precision.
More info & upgrade on www.SilverFast.com
www.image-engineering.de
Image Engineeringproofed
3
ENGLISH
SilverFast® Software License Agreement Do not open the software package and do not use the SilverFast® software until you have read and agreed to the terms and conditions of this Software License
Agreement. If you do not agree with these terms and conditions, immediately return the unopened software sealed in its original packaging to LaserSoft Imaging AG. SilverFast® is a software package comprising software and supporting documentation for a method of generating an image file for the subsequent production of color
separations or print files. This is a license and not a purchase agreement. LaserSoft Imaging AG has developed SilverFast® and is the owner of all rights in the software and the copy thereof:
1. Copyright (1) The licensee acknowledges that LaserSoft Imaging AG is the owner of the copyright in the software both with regard to the source and the object code. (2) The documentation and the software are copyrighted. Unauthorized use, including the use of all visual and video material, gives rise to claims for compensatory
damages.2. License (1) LaserSoft Imaging AG grants the licensee an exclusive and non-transferable license to use the software object code of SilverFast and the supporting documentation
supplied for his or her own personal use. The term of the license is limited to the term of this Software License Agreement. (2) With this license the licensee is authorized to use the licensed product on a single personal computer at a time. In order to use the licensed product on multiple
processors and/or at different places at the same time, several licenses are required. (3) The licensee is not allowed to copy the software in whole or in part except for the purpose of making a backup copy for personal use. The same applies to the
documentation. (4) The software contains confidential information. With this license the licensee may not alter, adjust, decompile, disassemble the software nor in any other way try
to find out the source code. (5) The licensee may not rent, lease, sublicense or lend the software to third parties. Passing on of the software in any case requires the written approval of LaserSoft
Imaging AG. LaserSoft Imaging AG will grant approval provided (a) the licensee presents a written declaration of the new user in which the new user undertakes to adhere to the license agreement concluded for the software and (b) the licensee does not retain any (backup) copies and warrants to LaserSoft Imaging AG in writing that the licensee passed on original copies of the software to the third party and deleted all copies the licensee made.
(6) LaserSoft Imaging AG may include a licensee’s company name and logo for public relation and marketing for the purpose to name the licensee as a LaserSoft Imaging AG customer.
3. Effective Date and Term of the License (1) This license takes effect on the day the software package is opened. It remains in force until the day LaserSoft Imaging AG or the licensee terminates the License
Agreement. (2) This License Agreement may be terminated as follows: (a) LaserSoft Imaging AG may terminate this license upon written notice to the licensee if the licensee is in breach of this Agreement or parts thereof. (b) The licensee may terminate this license upon written notice to LaserSoft Imaging AG under the terms and conditions of No. 4, if he/she returns the opened software
package to LaserSoft Imaging AG and deletes the copy on his/her PC and the copy he/she may have made for backup purposes.4. Warranty (1) The software is provided “as is“. LaserSoft Imaging AG does not warrant – neither expressly nor implied – the usability of the software for a particular purpose nor
that the software meets the licensee’s requirements. Although every development effort has been made to eliminate errors, LaserSoft Imaging AG does not warrant that the software is free of defects.
(2) The licensee shall examine the software for visible, major defects within 14 days. These defects must be notified to LaserSoft Imaging AG in writing. Hidden defects are to be notified in the same manner upon detection. Otherwise software and supporting documentation are deemed to be approved without reserve.
(3) In the event of major defects LaserSoft Imaging AG may at its discretion either deliver a new version to the licensee (replacement delivery) or rectify the defect within a reasonable period of time (rectification of defects). If LaserSoft Imaging AG does not succeed to allow contractual use of the software within this given period, the licensee has the option to request reduction of the price or to cancel the contract.
(4) Upon assertion of warranty claims the licensee is obliged to return the software together with the notice of receipt at the charge of LaserSoft Imaging AG.5. Limitation of Liability (1) LaserSoft Imaging AG assumes full liability for intent or gross negligence, for personal injury or death, under the stipulations of the German Product Liability Act
(Produkthaftungsgesetz) as well as within the framework of a warranty granted by LaserSoft Imaging AG. (2) In the event of a slightly negligent breach of an obligation which is essential in order to fulfill the contractual purpose (cardinal obligation) the liability of LaserSoft
Imaging AG shall be limited to the amount of the damage foreseeable and typical for the kind of transaction in question. (3) Any liability of LaserSoft Imaging AG beyond that is excluded. In particular LaserSoft Imaging AG shall not be liable for any initial defects provided the conditions
of part 1 and 2 are not met. (4) The limitation of liability stated above also applies to the personal liability of employees, representatives and bodies of LaserSoft Imaging AG.6. Trademarks SilverFast and other trademarks (including those of other companies) mentioned in the documentation are (registered) trademarks of LaserSoft Imaging AG or their
respective owners. The use of these names, trademarks, logos, documentation, screenshots etc. requires approval by LaserSoft Imaging AG and/or the respective own-ers of the trademarks. Unauthorized use gives rise to claims for compensatory damages.
7. Ineffective Provisions Should individual provisions of this Agreement, for any reason, be or become ineffective, or should a gap arise that needs to be filled, this shall not affect the remain-
ing provisions of the Agreement. A provision that is closest in the scope of the legal possibilities of what the parties originally intended shall replace the ineffective provision or shall fill the gap, if necessary also retrospectively.
8. Amendments Amendments to this Agreement shall be made in writing.9. Applicable Law This Agreement is governed by German law. Application of the United Nations Convention on Contracts for the International Sale of Goods (CISG) is hereby expressively
excluded.
1996-2013 Copyright LaserSoft Imaging AG • Luisenweg 6-8 • 24105 Kiel • Germany
ENGLISH
4
ENGLISH
PrefaceDear Customer,We are pleased that you have chosen a quality product from LaserSoft Imaging. Meanwhile for almost 20 years, we are developing and distrib-uting our imaging software SilverFast, which is long considered as the world- wide standard especially in the field of scanner software.
The WorkflowPilot which has been specially developed for SilverFast 8 can be described as quintessence of the experience our experts have gained over decades. This intuitive-to-use tool guides you in the correct order through all steps that are required for your individual workflow. The WorkflowPilot was inspired from my experience as a Pilot with a commercial license. Pilots are using check lists assuring and safeguarding the success of all operations in aviation. Likewise we are now giving you, as SilverFast user a safeguarding process to achieve brilliant results with all your images.Optional in SilverFast 8.5 you can now have Printer-Calibration enabling creation of ICC-Profiles for precise colour printing.The SilverFast Preview Concept makes it especially easy to work with SilverFast. Any change you carry out is immediately visible in the preview window. The SilverFast SE version is our entry-level software that, thanks to features like WorkflowPilot, automatic image optimization and QuickTime movies, is especially easy to use. Nevertheless, the range of functionality with unique highlights such as NegaFix®, SRD® and iSRD® leaves almost nothing more to desire.
Have fun and success digitizing your slides, photos and negatives with your new SilverFast software.
« SilverFast - Pioneer & Expert in Digital Imaging »
Sincerely yours, Karl-Heinz Zahorsky President and Founder of LaserSoft Imaging, Kiel, Germany, November 2012
Support and Contact Information
Homepage: http://www.SilverFast.com
Online Support: http://www.SilverFast.com/support
Forum: http://forum.SilverFast.com
Support Hotline: (+49) (0)431-5600938
Fax: (+49) (0)431-562847
5
ENGLISH
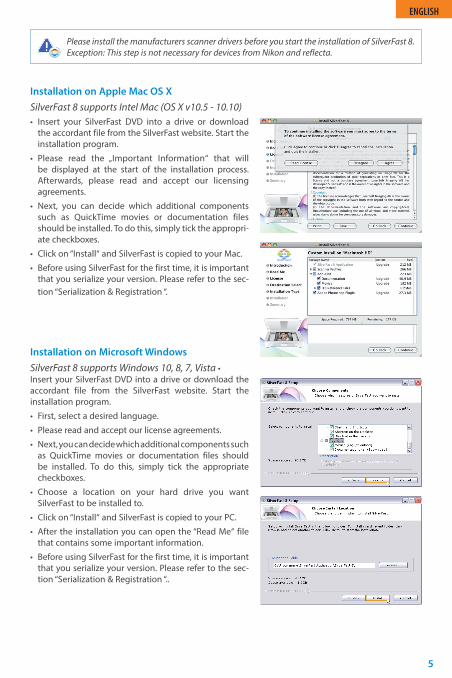
Installation on Apple Mac OS XSilverFast 8 supports Intel Mac (OS X v10.5 - 10.10)• Insert your SilverFast DVD into a drive or download
the accordant file from the SilverFast website. Start the installation program.
• Please read the „Important Information“ that will be displayed at the start of the installation process. Afterwards, please read and accept our licensing agreements.
• Next, you can decide which additional components such as QuickTime movies or documentation files should be installed. To do this, simply tick the appropri-ate checkboxes.
• Click on “Install“ and SilverFast is copied to your Mac.
• Before using SilverFast for the first time, it is important that you serialize your version. Please refer to the sec-tion “Serialization & Registration “.
Installation on Microsoft WindowsSilverFast 8 supports Windows 10, 8, 7, Vista • Insert your SilverFast DVD into a drive or download the accordant file from the SilverFast website. Start the installation program.
• First, select a desired language.
• Please read and accept our license agreements.
• Next, you can decide which additional components such as QuickTime movies or documentation files should be installed. To do this, simply tick the appropriate checkboxes.
• Choose a location on your hard drive you want SilverFast to be installed to.
• Click on “Install“ and SilverFast is copied to your PC.
• After the installation you can open the “Read Me“ file that contains some important information.
• Before using SilverFast for the first time, it is important that you serialize your version. Please refer to the sec-tion “Serialization & Registration “..
Please install the manufacturers scanner drivers before you start the installation of SilverFast 8. Exception: This step is not necessary for devices from Nikon and reflecta.
6
ENGLISH
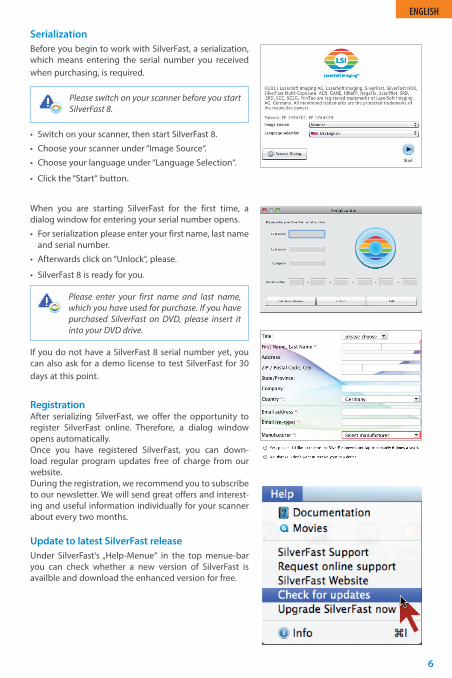
SerializationBefore you begin to work with SilverFast, a serialization, which means entering the serial number you received when purchasing, is required.
• Switch on your scanner, then start SilverFast 8.
• Choose your scanner under “Image Source“.
• Choose your language under “Language Selection“.
• Click the “Start“ button.
When you are starting SilverFast for the first time, a dialog window for entering your serial number opens.
• For serialization please enter your first name, last name and serial number.
• Afterwards click on “Unlock“, please.
• SilverFast 8 is ready for you.
If you do not have a SilverFast 8 serial number yet, you can also ask for a demo license to test SilverFast for 30 days at this point.
RegistrationAfter serializing SilverFast, we offer the opportunity to register SilverFast online. Therefore, a dialog window opens automatically.Once you have registered SilverFast, you can down-load regular program updates free of charge from our website.During the registration, we recommend you to subscribe to our newsletter. We will send great offers and interest-ing and useful information individually for your scanner about every two months.
Update to latest SilverFast releaseUnder SilverFast‘s „Help-Menue“ in the top menue-bar you can check whether a new version of SilverFast is availble and download the enhanced version for free.
Please switch on your scanner before you start SilverFast 8.
Please enter your first name and last name, which you have used for purchase. If you have purchased SilverFast on DVD, please insert it into your DVD drive.
7
ENGLISH
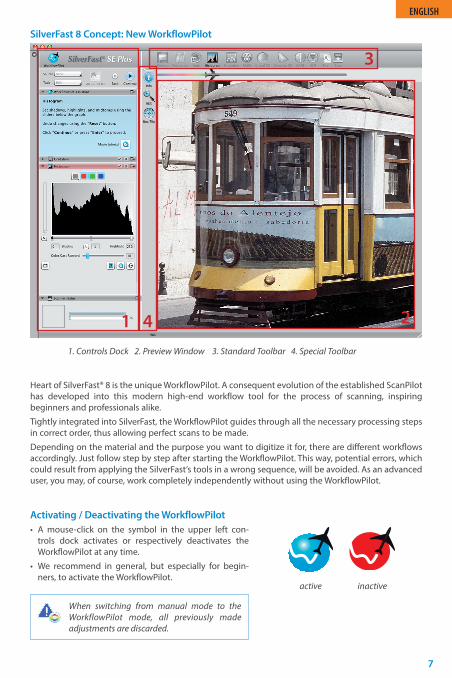
Activating / Deactivating the WorkflowPilot• A mouse-click on the symbol in the upper left con-
trols dock activates or respectively deactivates the WorkflowPilot at any time.
• We recommend in general, but especially for begin-ners, to activate the WorkflowPilot.
SilverFast 8 Concept: New WorkflowPilot
Heart of SilverFast® 8 is the unique WorkflowPilot. A consequent evolution of the established ScanPilot has developed into this modern high-end workflow tool for the process of scanning, inspiring beginners and professionals alike.
Tightly integrated into SilverFast, the WorkflowPilot guides through all the necessary processing steps in correct order, thus allowing perfect scans to be made.
Depending on the material and the purpose you want to digitize it for, there are different workflows accordingly. Just follow step by step after starting the WorkflowPilot. This way, potential errors, which could result from applying the SilverFast‘s tools in a wrong sequence, will be avoided. As an advanced user, you may, of course, work completely independently without using the WorkflowPilot.
When switching from manual mode to the WorkflowPilot mode, all previously made adjustments are discarded.
1. Controls Dock 2. Preview Window 3. Standard Toolbar 4. Special Toolbar
1. Kontroll-Dock 2. Vorschau-Fenster
3. Standard-Werkzeuge 4. Spezial-Werkzeuge
1
3
4 2
active inactive
8
ENGLISH
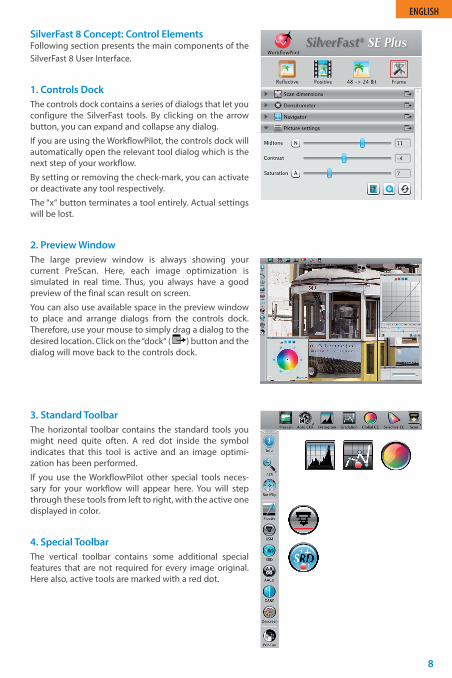
SilverFast 8 Concept: Control ElementsFollowing section presents the main components of the SilverFast 8 User Interface.
1. Controls DockThe controls dock contains a series of dialogs that let you configure the SilverFast tools. By clicking on the arrow button, you can expand and collapse any dialog.
If you are using the WorkflowPilot, the controls dock will automatically open the relevant tool dialog which is the next step of your workflow.
By setting or removing the check-mark, you can activate or deactivate any tool respectively.
The “x“ button terminates a tool entirely. Actual settings will be lost.
2. Preview WindowThe large preview window is always showing your current PreScan. Here, each image optimization is simulated in real time. Thus, you always have a good preview of the final scan result on screen.
You can also use available space in the preview window to place and arrange dialogs from the controls dock. Therefore, use your mouse to simply drag a dialog to the desired location. Click on the “dock“ ( ) button and the dialog will move back to the controls dock.
3. Standard ToolbarThe horizontal toolbar contains the standard tools you might need quite often. A red dot inside the symbol indicates that this tool is active and an image optimi- zation has been performed.
If you use the WorkflowPilot other special tools neces-sary for your workflow will appear here. You will step through these tools from left to right, with the active one displayed in color.
4. Special ToolbarThe vertical toolbar contains some additional special features that are not required for every image original. Here also, active tools are marked with a red dot.
9
ENGLISH
The 5 steps of Scanning using the WorkflowPilot 1. Select type of original and scanning purpose
2. Preview Scan
3. Select Resolution for Scanning
4. Adjust Image Optimizations
5. Choose Destination and Start Scanning
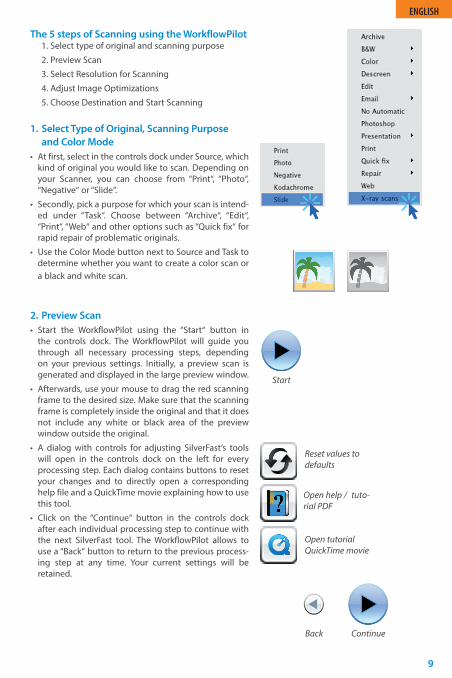
1. Select Type of Original, Scanning Purpose and Color Mode• At first, select in the controls dock under Source, which
kind of original you would like to scan. Depending on your Scanner, you can choose from “Print“, “Photo“, “Negative“ or “Slide“.
• Secondly, pick a purpose for which your scan is intend-ed under “Task“. Choose between “Archive“, “Edit“, “Print“, “Web“ and other options such as “Quick fix“ for rapid repair of problematic originals.
• Use the Color Mode button next to Source and Task to determine whether you want to create a color scan or a black and white scan.
2. Preview Scan• Start the WorkflowPilot using the “Start“ button in
the controls dock. The WorkflowPilot will guide you through all necessary processing steps, depending on your previous settings. Initially, a preview scan is generated and displayed in the large preview window.
• Afterwards, use your mouse to drag the red scanning frame to the desired size. Make sure that the scanning frame is completely inside the original and that it does not include any white or black area of the preview window outside the original.
• A dialog with controls for adjusting SilverFast‘s tools will open in the controls dock on the left for every processing step. Each dialog contains buttons to reset your changes and to directly open a corresponding help file and a QuickTime movie explaining how to use this tool.
• Click on the “Continue“ button in the controls dock after each individual processing step to continue with the next SilverFast tool. The WorkflowPilot allows to use a “Back“ button to return to the previous process-ing step at any time. Your current settings will be retained.
Reset values to defaults
Open help / tuto-rial PDF
Open tutorial QuickTime movie
Back Continue
Start
10
ENGLISH
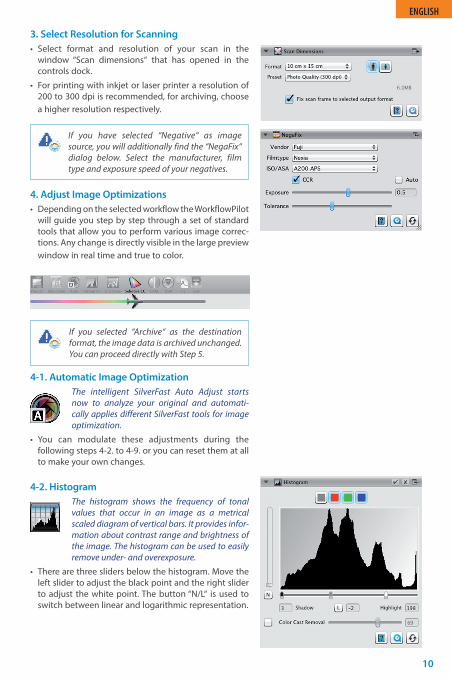
3. Select Resolution for Scanning• Select format and resolution of your scan in the
window “Scan dimensions“ that has opened in the controls dock.
• For printing with inkjet or laser printer a resolution of 200 to 300 dpi is recommended, for archiving, choose a higher resolution respectively.
4. Adjust Image Optimizations• Depending on the selected workflow the WorkflowPilot
will guide you step by step through a set of standard tools that allow you to perform various image correc-tions. Any change is directly visible in the large preview window in real time and true to color.
4-1. Automatic Image OptimizationThe intelligent SilverFast Auto Adjust starts now to analyze your original and automati-cally applies different SilverFast tools for image optimization.
• You can modulate these adjustments during the following steps 4-2. to 4-9. or you can reset them at all to make your own changes.
4-2. HistogramThe histogram shows the frequency of tonal values that occur in an image as a metrical scaled diagram of vertical bars. It provides infor-mation about contrast range and brightness of the image. The histogram can be used to easily remove under- and overexposure.
• There are three sliders below the histogram. Move the left slider to adjust the black point and the right slider to adjust the white point. The button “N/L“ is used to switch between linear and logarithmic representation.
If you have selected “Negative“ as image source, you will additionally find the “NegaFix“ dialog below. Select the manufacturer, film type and exposure speed of your negatives.
If you selected “Archive“ as the destination format, the image data is archived unchanged. You can proceed directly with Step 5.
11
ENGLISH
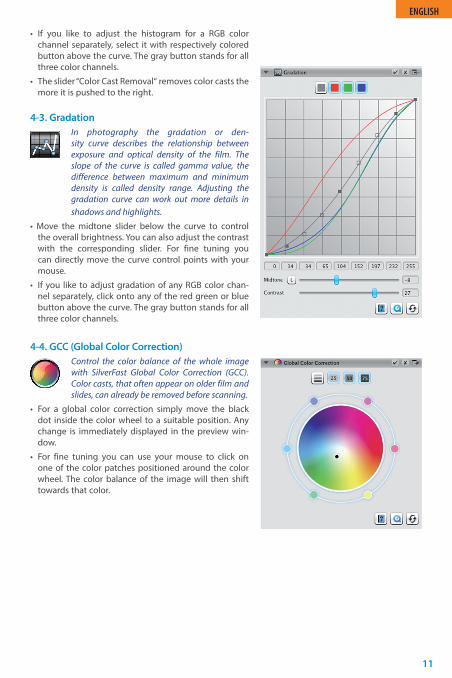
• If you like to adjust the histogram for a RGB color channel separately, select it with respectively colored button above the curve. The gray button stands for all three color channels.
• The slider “Color Cast Removal“ removes color casts the more it is pushed to the right.
4-3. GradationIn photography the gradation or den-sity curve describes the relationship between exposure and optical density of the film. The slope of the curve is called gamma value, the difference between maximum and minimum density is called density range. Adjusting the gradation curve can work out more details in shadows and highlights.
• Move the midtone slider below the curve to control the overall brightness. You can also adjust the contrast with the corresponding slider. For fine tuning you can directly move the curve control points with your mouse.
• If you like to adjust gradation of any RGB color chan-nel separately, click onto any of the red green or blue button above the curve. The gray button stands for all three color channels.
4-4. GCC (Global Color Correction)Control the color balance of the whole image with SilverFast Global Color Correction (GCC). Color casts, that often appear on older film and slides, can already be removed before scanning.
• For a global color correction simply move the black dot inside the color wheel to a suitable position. Any change is immediately displayed in the preview win-dow.
• For fine tuning you can use your mouse to click on one of the color patches positioned around the color wheel. The color balance of the image will then shift towards that color.
12
ENGLISH
4-5. SCC® (Selective Color Correction) ACR (Adaptive Color Restoration)
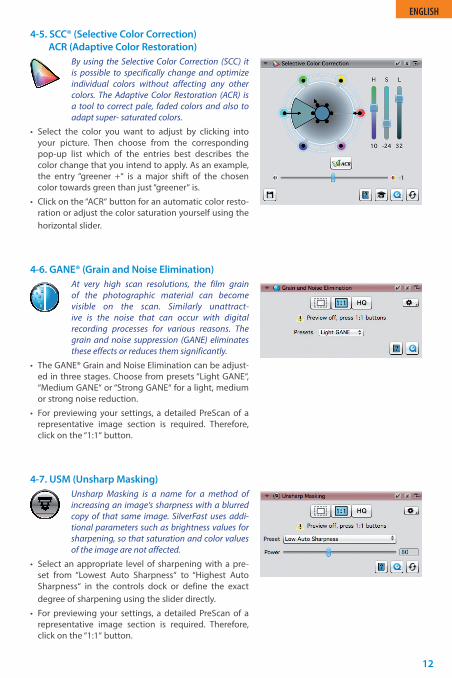
By using the Selective Color Correction (SCC) it is possible to specifically change and optimize individual colors without affecting any other colors. The Adaptive Color Restoration (ACR) is a tool to correct pale, faded colors and also to adapt super- saturated colors.
• Select the color you want to adjust by clicking into your picture. Then choose from the corresponding pop-up list which of the entries best describes the color change that you intend to apply. As an example, the entry “greener +“ is a major shift of the chosen color towards green than just “greener“ is.
• Click on the “ACR“ button for an automatic color resto-ration or adjust the color saturation yourself using the horizontal slider.
4-6. GANE® (Grain and Noise Elimination)At very high scan resolutions, the film grain of the photographic material can become visible on the scan. Similarly unattract-ive is the noise that can occur with digital recording processes for various reasons. The grain and noise suppression (GANE) eliminates these effects or reduces them significantly.
• The GANE® Grain and Noise Elimination can be adjust-ed in three stages. Choose from presets “Light GANE“, “Medium GANE“ or “Strong GANE“ for a light, medium or strong noise reduction.
• For previewing your settings, a detailed PreScan of a representative image section is required. Therefore, click on the “1:1“ button.
4-7. USM (Unsharp Masking)Unsharp Masking is a name for a method of increasing an image‘s sharpness with a blurred copy of that same image. SilverFast uses addi-tional parameters such as brightness values for sharpening, so that saturation and color values of the image are not affected.
• Select an appropriate level of sharpening with a pre-set from “Lowest Auto Sharpness“ to “Highest Auto Sharpness“ in the controls dock or define the exact degree of sharpening using the slider directly.
• For previewing your settings, a detailed PreScan of a representative image section is required. Therefore, click on the “1:1“ button.
13
ENGLISH
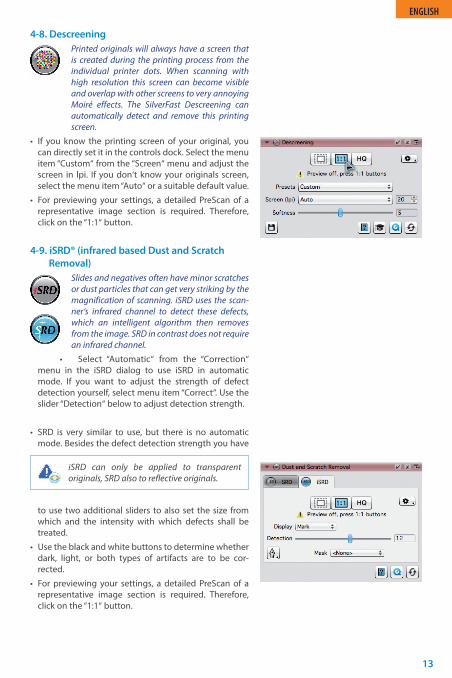
4-8. DescreeningPrinted originals will always have a screen that is created during the printing process from the individual printer dots. When scanning with high resolution this screen can become visible and overlap with other screens to very annoying Moiré effects. The SilverFast Descreening can automatically detect and remove this printing screen.
• If you know the printing screen of your original, you can directly set it in the controls dock. Select the menu item “Custom“ from the “Screen“ menu and adjust the screen in lpi. If you don‘t know your originals screen, select the menu item “Auto“ or a suitable default value.
• For previewing your settings, a detailed PreScan of a representative image section is required. Therefore, click on the “1:1“ button.
4-9. iSRD® (infrared based Dust and Scratch Removal)
Slides and negatives often have minor scratches or dust particles that can get very striking by the magnification of scanning. iSRD uses the scan-ner‘s infrared channel to detect these defects, which an intelligent algorithm then removes from the image. SRD in contrast does not require an infrared channel.
• Select “Automatic“ from the “Correction“ menu in the iSRD dialog to use iSRD in automatic mode. If you want to adjust the strength of defect detection yourself, select menu item “Correct“. Use the slider “Detection“ below to adjust detection strength.
• SRD is very similar to use, but there is no automatic mode. Besides the defect detection strength you have
to use two additional sliders to also set the size from which and the intensity with which defects shall be treated.
• Use the black and white buttons to determine whether dark, light, or both types of artifacts are to be cor-rected.
• For previewing your settings, a detailed PreScan of a representative image section is required. Therefore, click on the “1:1“ button.
iSRD can only be applied to transparent originals, SRD also to reflective originals.
14
ENGLISH
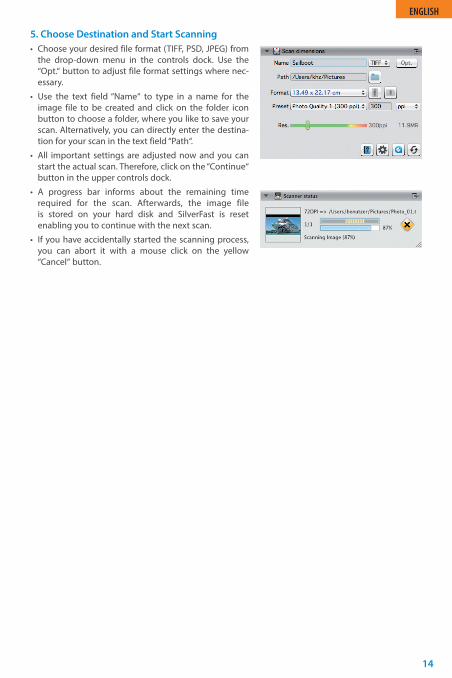
5. Choose Destination and Start Scanning• Choose your desired file format (TIFF, PSD, JPEG) from
the drop-down menu in the controls dock. Use the “Opt.“ button to adjust file format settings where nec-essary.
• Use the text field “Name“ to type in a name for the image file to be created and click on the folder icon button to choose a folder, where you like to save your scan. Alternatively, you can directly enter the destina-tion for your scan in the text field “Path“.
• All important settings are adjusted now and you can start the actual scan. Therefore, click on the “Continue“ button in the upper controls dock.
• A progress bar informs about the remaining time required for the scan. Afterwards, the image file is stored on your hard disk and SilverFast is reset enabling you to continue with the next scan.
• If you have accidentally started the scanning process, you can abort it with a mouse click on the yellow “Cancel“ button.

SilverFast - Pioneer in Digital Imaging
LaserSoft Imaging, Inc.7441 N. Tamiami Trail • Sarasota • FL 34277 • USAPhone: (+1) 941-351-9400Fax: (+1) 941-351-9402Support: www.SilverFast.com/supportInfo: www.SilverFast.com
System Requirements:Mac OS:
• Intel®-Processor• Mac OS X v10.5 through 10.10
Windows:• Processor: Minimum 2 GHz• Microsoft® Windows® XP with Service Pack 3,
Windows Vista® Home Premium, Business,Ultimate or Enterprise (32 bit and 64 bit),Windows 7 or Windows 8 (32 bit and 64 bit)
• 2 GB of RAM (4GB of RAM recommended)• 10 GB of available hard-disk space• 1024 x 768 display resolution• DVD-ROM drive• QuickTime® Player, PDF Reader
*SilverFast is individually adjusted to scanners and operating systems. Please check the availability of software and features for your device and operating system at:www.SilverFast.com/sf/product
LaserSoft Imaging AGLuisenweg 6-8 • 24105 Kiel • DeutschlandTel.: (+49) 431-56009-0Fax: (+49) 431-56009-96Support: www.SilverFast.de/supportInfo: www.SilverFast.de
Systemanforderungen:Mac OS:
• Intel®-Prozessor• Mac OS X v10.5 bis 10.10
Windows:• Prozessor: Minimum 2 GHz• Microsoft® Windows® XP mit Service Pack 3,
Windows Vista® Home Premium, Business,Ultimate oder Enterprise (32 Bit und 64 Bit),Windows 7 oder Windows 8 (32 Bit und 64 Bit)
• 2 GB RAM (4GB RAM empfohlen)• 10 GB freier Festplattenspeicher• 1024 x 768 Bildschirmauflösung• DVD-ROM-Laufwerk• QuickTime®-Player, PDF-Reader
*SilverFast wird individuell an Scanner und Betriebs-systeme angepasst. Bitte überprüfen Sie die Verfüg-barkeit der Software und Features für Ihr Gerät und Betriebssystem unter:www.SilverFast.de/sf/product
SilverFast® and LaserSoft Imaging™ are registered trademarks of LaserSoft Imaging AG, Germany. All mentioned trade-marks are the protected trademarks of the respective owners (Patents: EP 1594301, EP 1744278).