sigma / hyperterminal - selco · selco a/s sigma / hyperterminal manual revision: 11.08.2005 page...
TRANSCRIPT

SIGMA / HyperTerminal User’s Manual Revision: 11.08.2005

SELCO A/S SIGMA / HyperTerminal Manual
Revision: 11.08.2005 Page 2 of 35
Table of Contents 1 Preface......................................................................................................................... 3 2 Installing HyperTerminal............................................................................................ 4 3 Configuring HyperTerminal ....................................................................................... 8 4 Starting a pre-configured HyperTerminal................................................................. 13 5 Configuring the Sigma module................................................................................. 15 6 Backing up the configuration.................................................................................... 22 7 Restoring the configuration....................................................................................... 28 8 Reducing the Send Text speed.................................................................................. 31

SELCO A/S SIGMA / HyperTerminal Manual
Revision: 11.08.2005 Page 3 of 35
1 Preface The SELCO SIGMA modules are easily configured by clear text commands issued through the built-in RS232 interface. A standard TTY/ANSI terminal emulator is used as programming tool. This manual describes the installation and configuration of the HyperTerminal terminal emulator. HyperTerminal is included with the Microsoft Windows operating systems.
SELCO A/S SIGMA / HyperTerminal Manual
Revision: 11.08.2005 Page 4 of 35
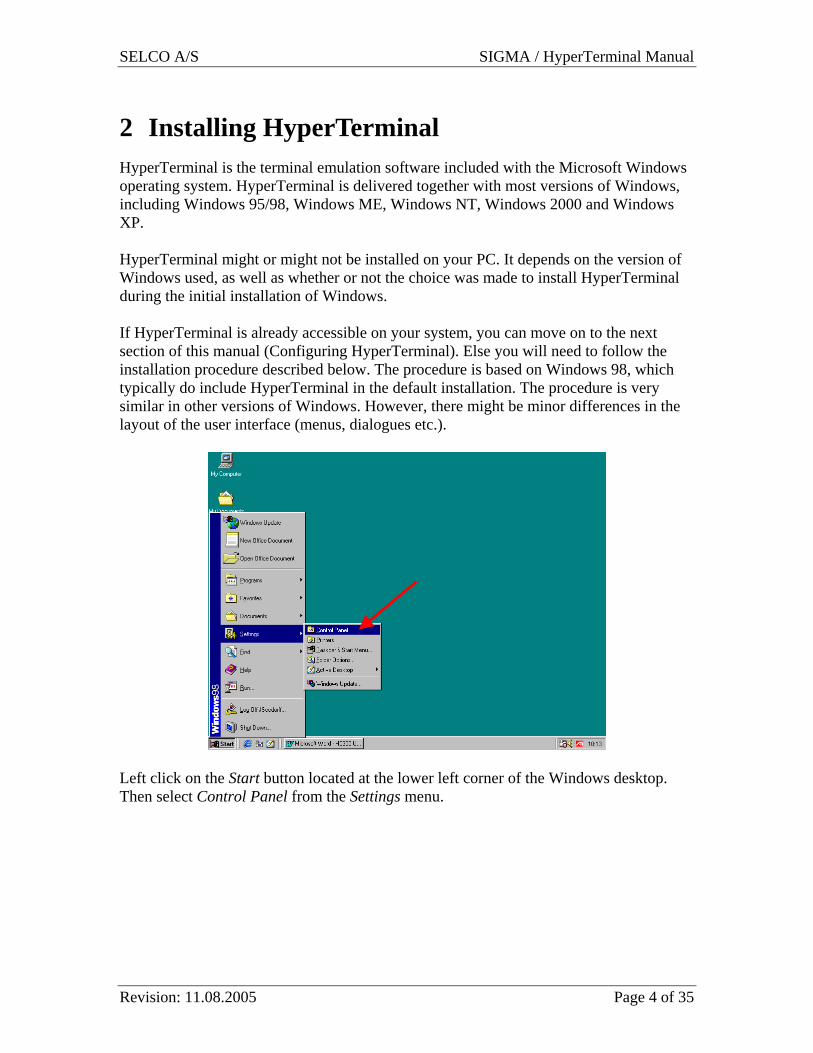
2 Installing HyperTerminal HyperTerminal is the terminal emulation software included with the Microsoft Windows operating system. HyperTerminal is delivered together with most versions of Windows, including Windows 95/98, Windows ME, Windows NT, Windows 2000 and Windows XP. HyperTerminal might or might not be installed on your PC. It depends on the version of Windows used, as well as whether or not the choice was made to install HyperTerminal during the initial installation of Windows. If HyperTerminal is already accessible on your system, you can move on to the next section of this manual (Configuring HyperTerminal). Else you will need to follow the installation procedure described below. The procedure is based on Windows 98, which typically do include HyperTerminal in the default installation. The procedure is very similar in other versions of Windows. However, there might be minor differences in the layout of the user interface (menus, dialogues etc.).
Left click on the Start button located at the lower left corner of the Windows desktop. Then select Control Panel from the Settings menu.

SELCO A/S SIGMA / HyperTerminal Manual
Revision: 11.08.2005 Page 5 of 35
The Control Panel windows will emerge on the screen. Now double-click (left mouse button) on the Add/Remove Programs icon.
Double clicking on the Add/Remove Programs icon will bring up the Add/Remove Programs Properties dialog.
The HyperTerminal application is part of the Windows setup (it’s on the Windows CD-ROM), thus its necessary to left click on the Windows Setup tab.
Before showing the installed components, Windows needs a couple of seconds to scan the PC. The above message is shown while this takes place.

SELCO A/S SIGMA / HyperTerminal Manual
Revision: 11.08.2005 Page 6 of 35
Now left click on Communications components. Then left click on the Details button.
Left click on the check box just left of the HyperTerminal application. Afterwards left click on the OK button.
Left click on the OK button to begin the installation of HyperTerminal.

SELCO A/S SIGMA / HyperTerminal Manual
Revision: 11.08.2005 Page 7 of 35
Windows might now ask for the Windows CD-ROM. After inserting the CD-ROM (if required), Windows will install the files associated with the HyperTerminal application. This concludes the installation of the HyperTerminal application.
SELCO A/S SIGMA / HyperTerminal Manual
Revision: 11.08.2005 Page 8 of 35
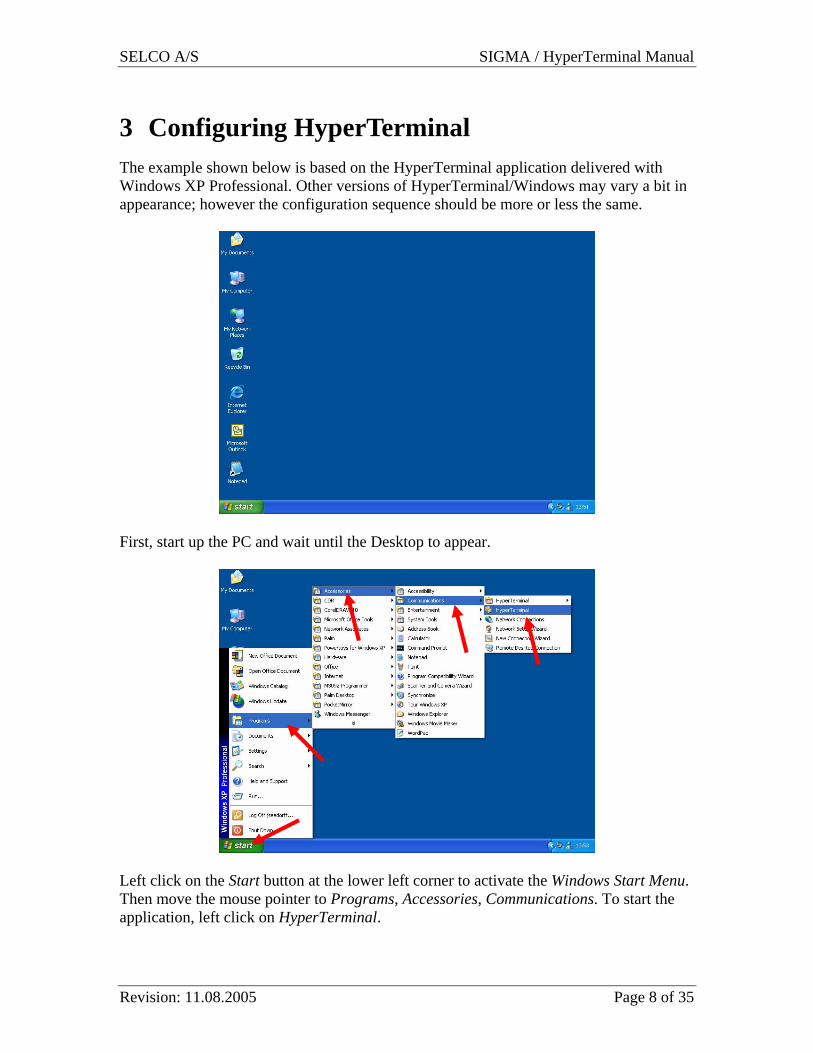
3 Configuring HyperTerminal The example shown below is based on the HyperTerminal application delivered with Windows XP Professional. Other versions of HyperTerminal/Windows may vary a bit in appearance; however the configuration sequence should be more or less the same.
First, start up the PC and wait until the Desktop to appear.
Left click on the Start button at the lower left corner to activate the Windows Start Menu. Then move the mouse pointer to Programs, Accessories, Communications. To start the application, left click on HyperTerminal.
SELCO A/S SIGMA / HyperTerminal Manual
Revision: 11.08.2005 Page 9 of 35
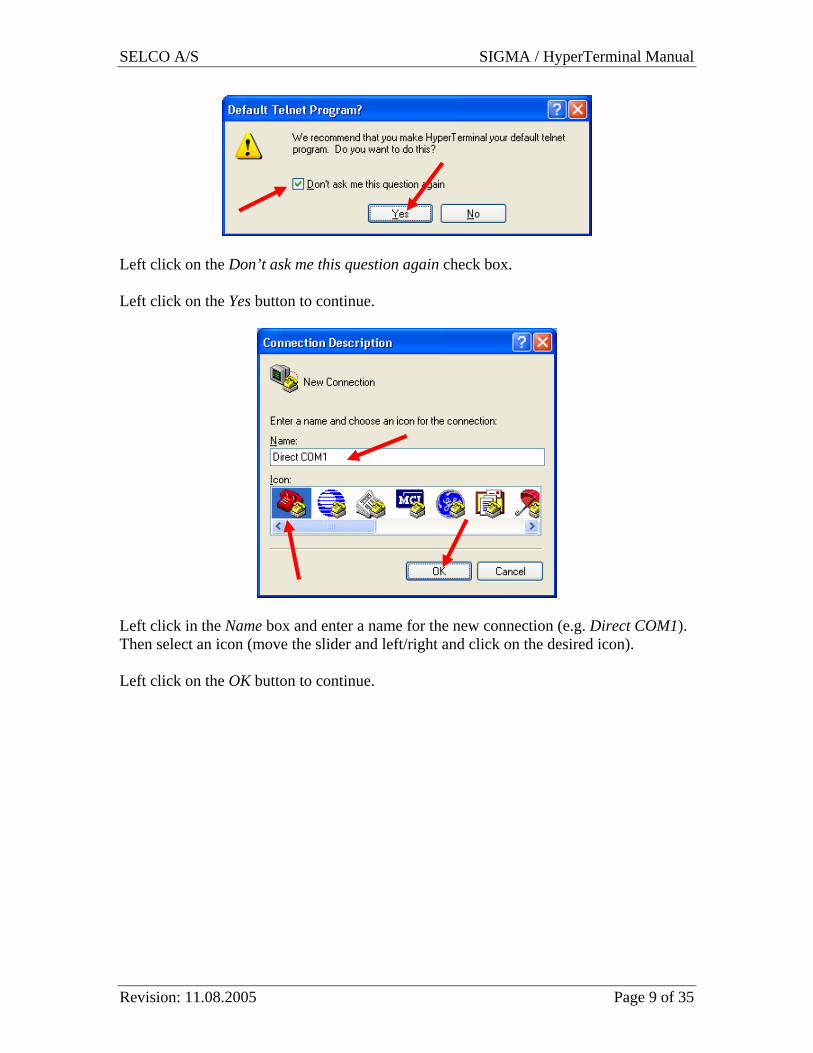
Left click on the Don’t ask me this question again check box. Left click on the Yes button to continue.
Left click in the Name box and enter a name for the new connection (e.g. Direct COM1). Then select an icon (move the slider and left/right and click on the desired icon). Left click on the OK button to continue.
SELCO A/S SIGMA / HyperTerminal Manual
Revision: 11.08.2005 Page 10 of 35
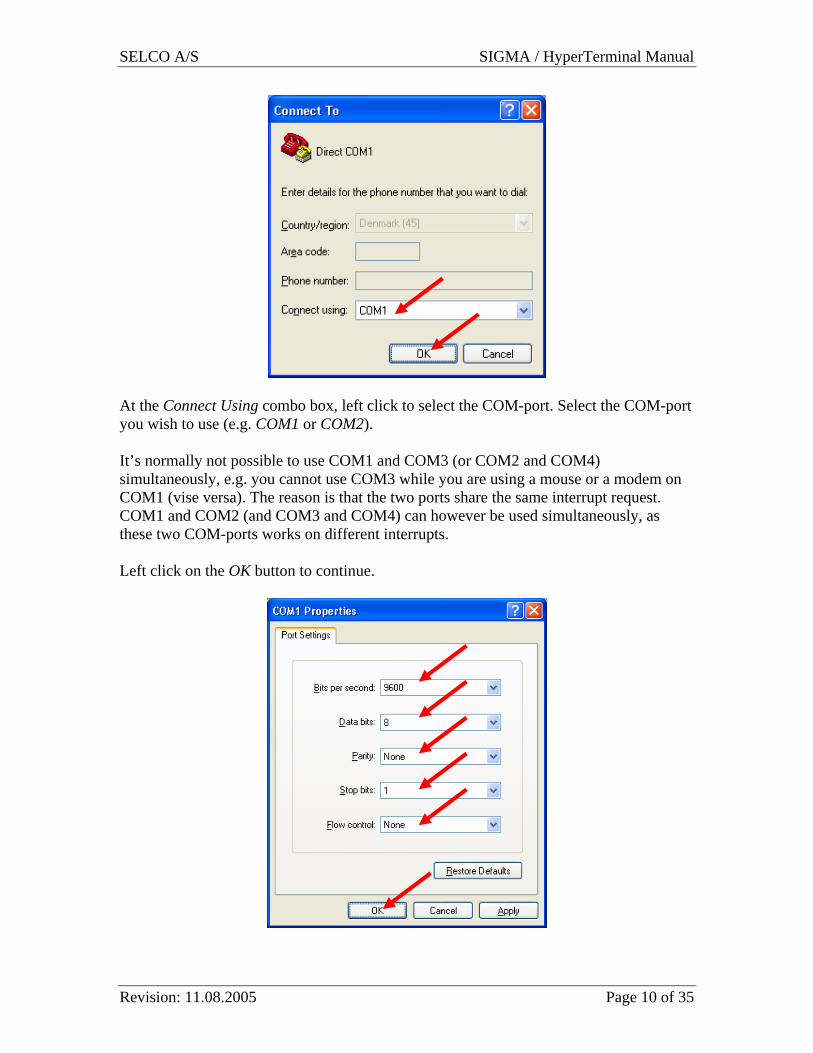
At the Connect Using combo box, left click to select the COM-port. Select the COM-port you wish to use (e.g. COM1 or COM2). It’s normally not possible to use COM1 and COM3 (or COM2 and COM4) simultaneously, e.g. you cannot use COM3 while you are using a mouse or a modem on COM1 (vise versa). The reason is that the two ports share the same interrupt request. COM1 and COM2 (and COM3 and COM4) can however be used simultaneously, as these two COM-ports works on different interrupts. Left click on the OK button to continue.

SELCO A/S SIGMA / HyperTerminal Manual
Revision: 11.08.2005 Page 11 of 35
Select 9600 from the Bits per second combo box. Select 8 from the Data bits combo box. Select None from the Parity combo box. Select 1 from the Stop bits combo box. Select None from the Flow control combo box. Left click on the OK button to continue.
The HyperTerminal application is now ready for use. Please note that the Sigma module will acknowledge active connection with a welcome message (showing the revision info of its hardware and software as a date) and a prompt. Also check that the word Connected appears at the low left hand corner of the window. If not, left click on the call icon (third icon on the toolbar). You might want to save a short-cut to the Desktop, so that you can easily start the pre-configured HyperTerminal next time you need it. Left click on the File menu. Choose Save As...
SELCO A/S SIGMA / HyperTerminal Manual
Revision: 11.08.2005 Page 12 of 35
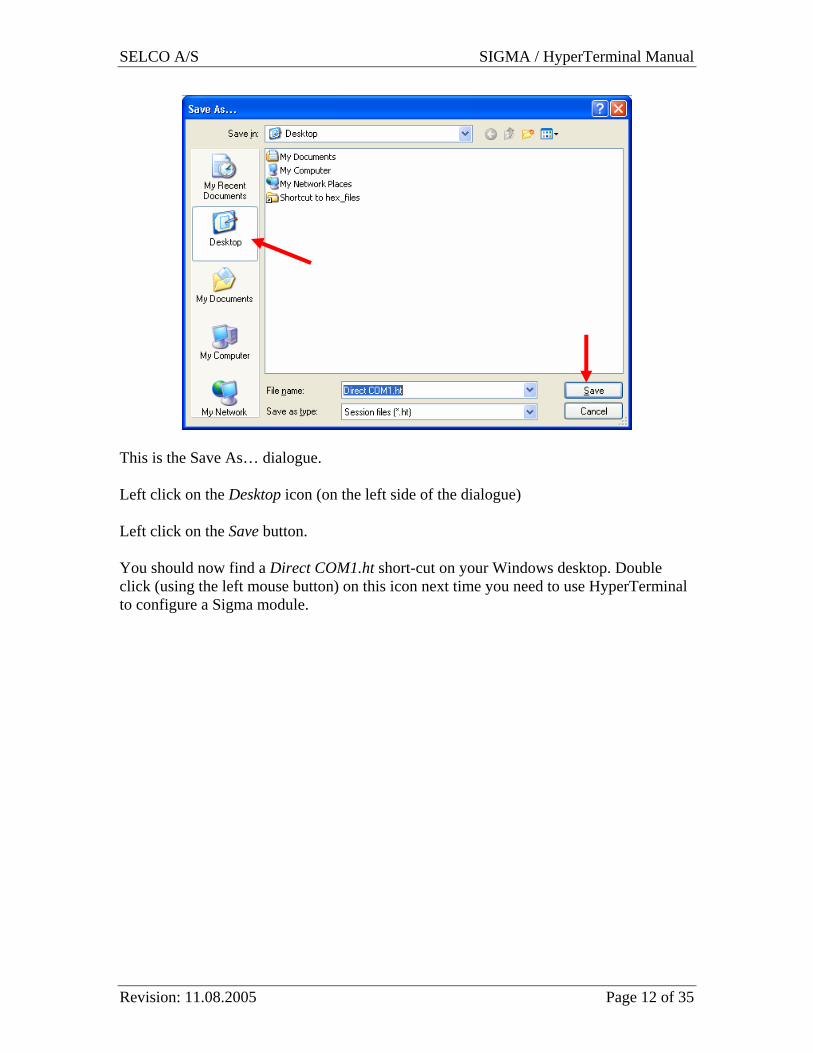
This is the Save As… dialogue. Left click on the Desktop icon (on the left side of the dialogue) Left click on the Save button. You should now find a Direct COM1.ht short-cut on your Windows desktop. Double click (using the left mouse button) on this icon next time you need to use HyperTerminal to configure a Sigma module.
SELCO A/S SIGMA / HyperTerminal Manual
Revision: 11.08.2005 Page 13 of 35
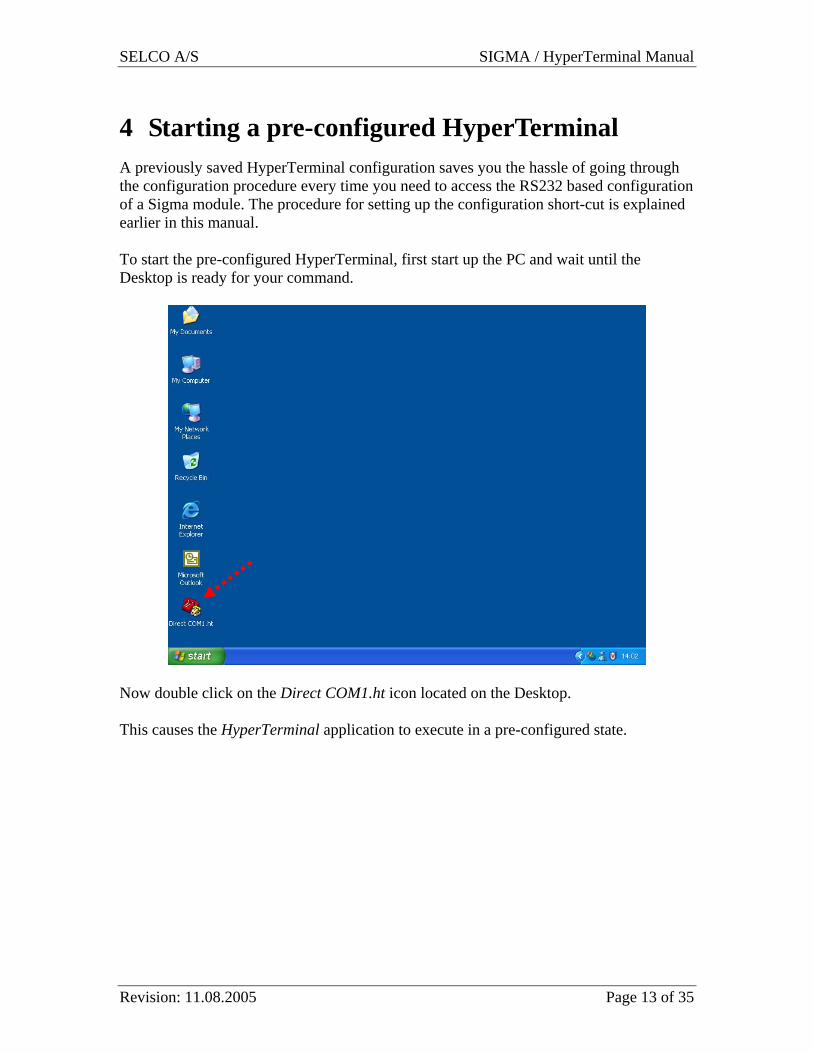
4 Starting a pre-configured HyperTerminal A previously saved HyperTerminal configuration saves you the hassle of going through the configuration procedure every time you need to access the RS232 based configuration of a Sigma module. The procedure for setting up the configuration short-cut is explained earlier in this manual.
To start the pre-configured HyperTerminal, first start up the PC and wait until the Desktop is ready for your command.
Now double click on the Direct COM1.ht icon located on the Desktop. This causes the HyperTerminal application to execute in a pre-configured state.
SELCO A/S SIGMA / HyperTerminal Manual
Revision: 11.08.2005 Page 14 of 35
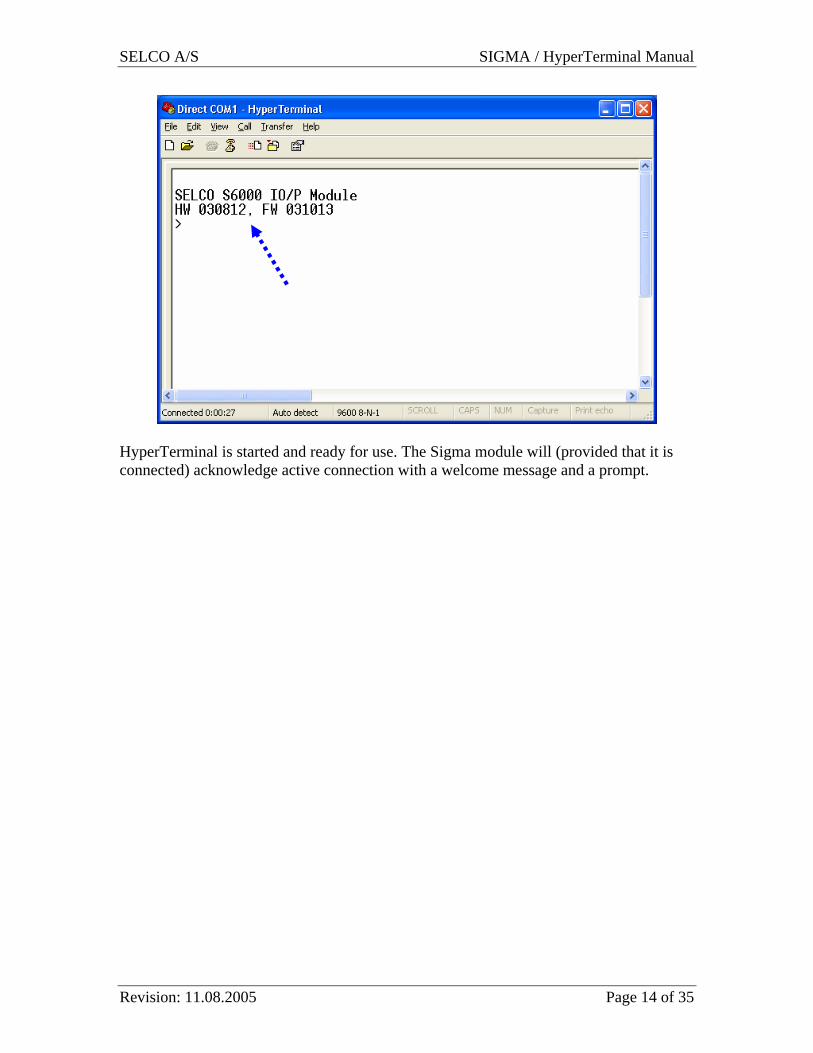
HyperTerminal is started and ready for use. The Sigma module will (provided that it is connected) acknowledge active connection with a welcome message and a prompt.

SELCO A/S SIGMA / HyperTerminal Manual
Revision: 11.08.2005 Page 15 of 35
5 Configuring the Sigma module The Sigma modules are configured by clear text commands using a terminal emulator. Each configuration parameter has its own text command, which means that it is only necessary to issue the commands for the parameters that needs to be changed.
Start the pre-configured HyperTerminal application as explained earlier in this manual (double click on the Direct COM1.ht short-cut located on the desktop).

SELCO A/S SIGMA / HyperTerminal Manual
Revision: 11.08.2005 Page 16 of 35
The HyperTerminal application will start and the Sigma module (in this case an S6000 IO/P module) will acknowledge the connection with a short welcome message and a “>” prompt. The prompt indicates that the module is ready to receive a command.
The first command to try out could be READ CONFIG (read configuration). The READ CONFIG command makes the module respond with a list of commands. The listed commands represent the current settings.

SELCO A/S SIGMA / HyperTerminal Manual
Revision: 11.08.2005 Page 17 of 35
Type READ CONFIG at the prompt and hit the ENTER key.
The list of configuration commands exceeds the number of lines in the HyperTerminal window (we will deal with this problem later). Note however that the current configuration of the module is shown as a list of commands. These commands are actually shown in the same way as they should be typed. In other words, the module responds as it would like to be commanded. Note that it is necessary to hit ENTER key to make the “>” prompt appear after a READ CONFIG command. The last command (WRITE RS485 STOPBITS 1) indicates that the number of stop bits on the RS485 port is currently set to 1. Lets for the sake of example, change the number of stop bits to 2. We will first have to switch the module from READ ONLY to READ/WRITE MODE. This is done using the ENABLE command.

SELCO A/S SIGMA / HyperTerminal Manual
Revision: 11.08.2005 Page 18 of 35
The module will now ask for the password. The default password is 0000 (four zeros). Please note that the RS232 console password works independently from the password of the user interface.
SELCO A/S SIGMA / HyperTerminal Manual
Revision: 11.08.2005 Page 19 of 35
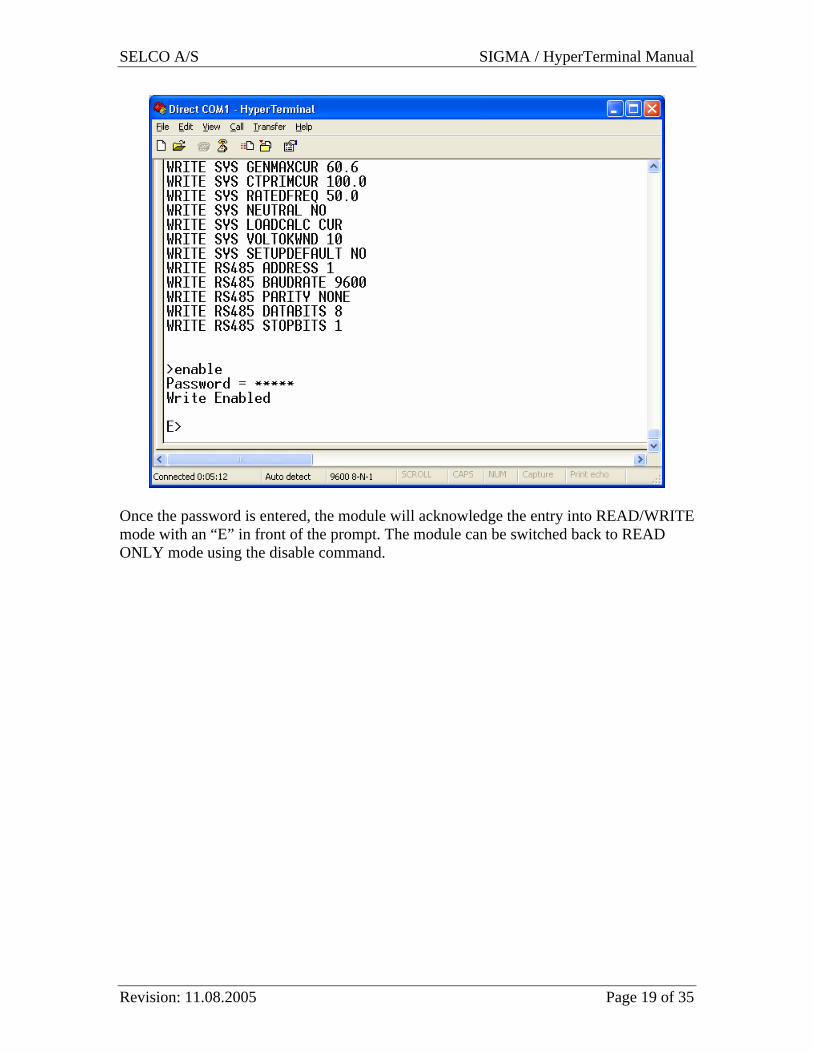
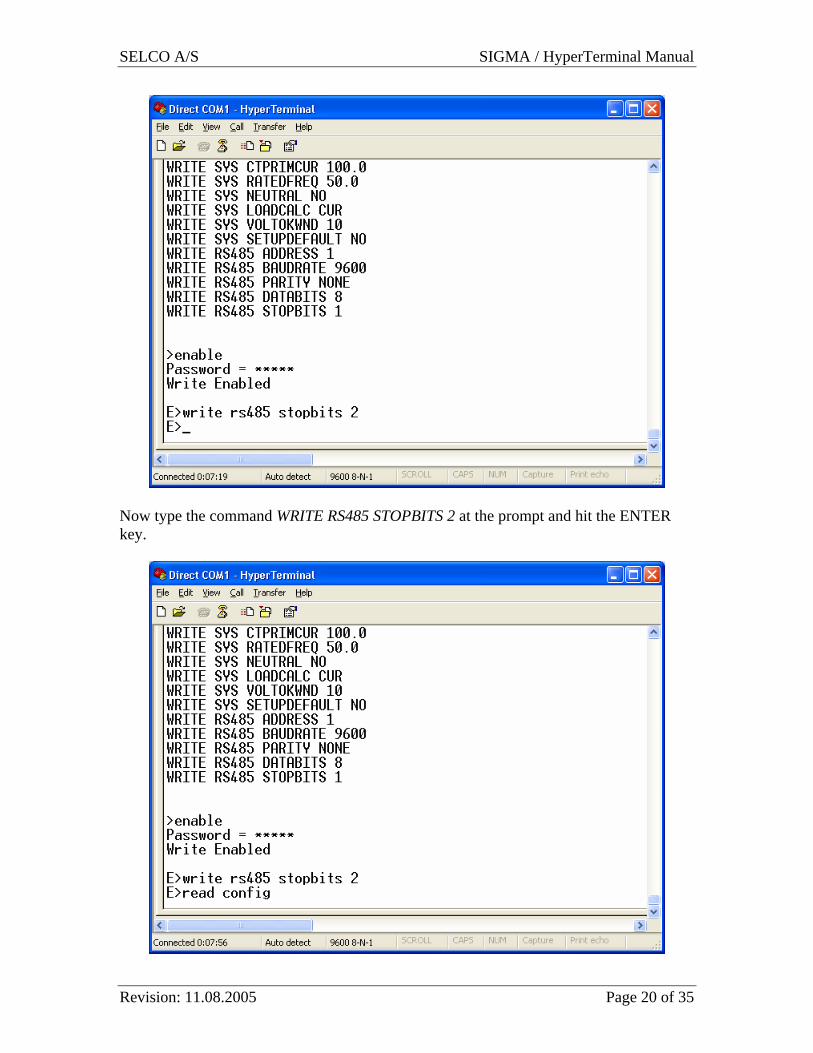
Once the password is entered, the module will acknowledge the entry into READ/WRITE mode with an “E” in front of the prompt. The module can be switched back to READ ONLY mode using the disable command.
SELCO A/S SIGMA / HyperTerminal Manual
Revision: 11.08.2005 Page 20 of 35
Now type the command WRITE RS485 STOPBITS 2 at the prompt and hit the ENTER key.
SELCO A/S SIGMA / HyperTerminal Manual
Revision: 11.08.2005 Page 21 of 35
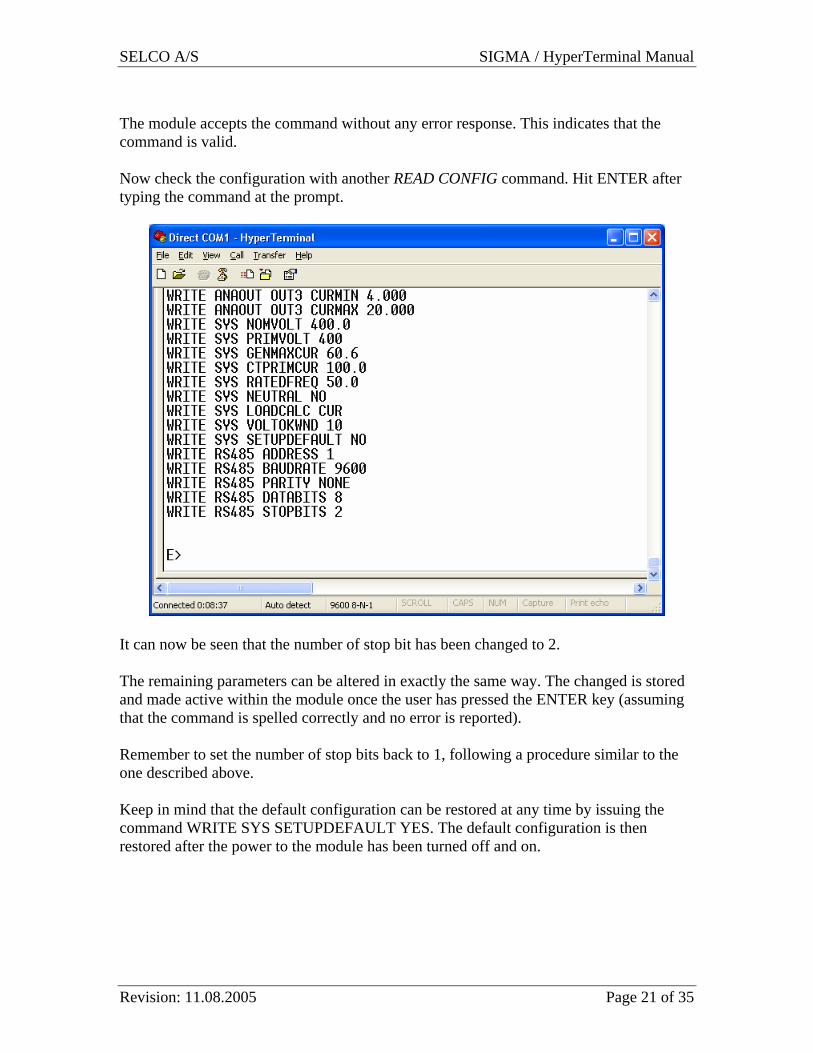
The module accepts the command without any error response. This indicates that the command is valid. Now check the configuration with another READ CONFIG command. Hit ENTER after typing the command at the prompt.
It can now be seen that the number of stop bit has been changed to 2. The remaining parameters can be altered in exactly the same way. The changed is stored and made active within the module once the user has pressed the ENTER key (assuming that the command is spelled correctly and no error is reported). Remember to set the number of stop bits back to 1, following a procedure similar to the one described above. Keep in mind that the default configuration can be restored at any time by issuing the command WRITE SYS SETUPDEFAULT YES. The default configuration is then restored after the power to the module has been turned off and on.

SELCO A/S SIGMA / HyperTerminal Manual
Revision: 11.08.2005 Page 22 of 35
6 Backing up the configuration It’s often practical to make a backup copy of the configuration. The backup copy can be stored for safe keeping or it can be sent to SELCO for evaluation and trouble shooting.
Start the HyperTerminal from the desktop short-cut (double click on the Direct COM1.ht short-cut).
SELCO A/S SIGMA / HyperTerminal Manual
Revision: 11.08.2005 Page 23 of 35
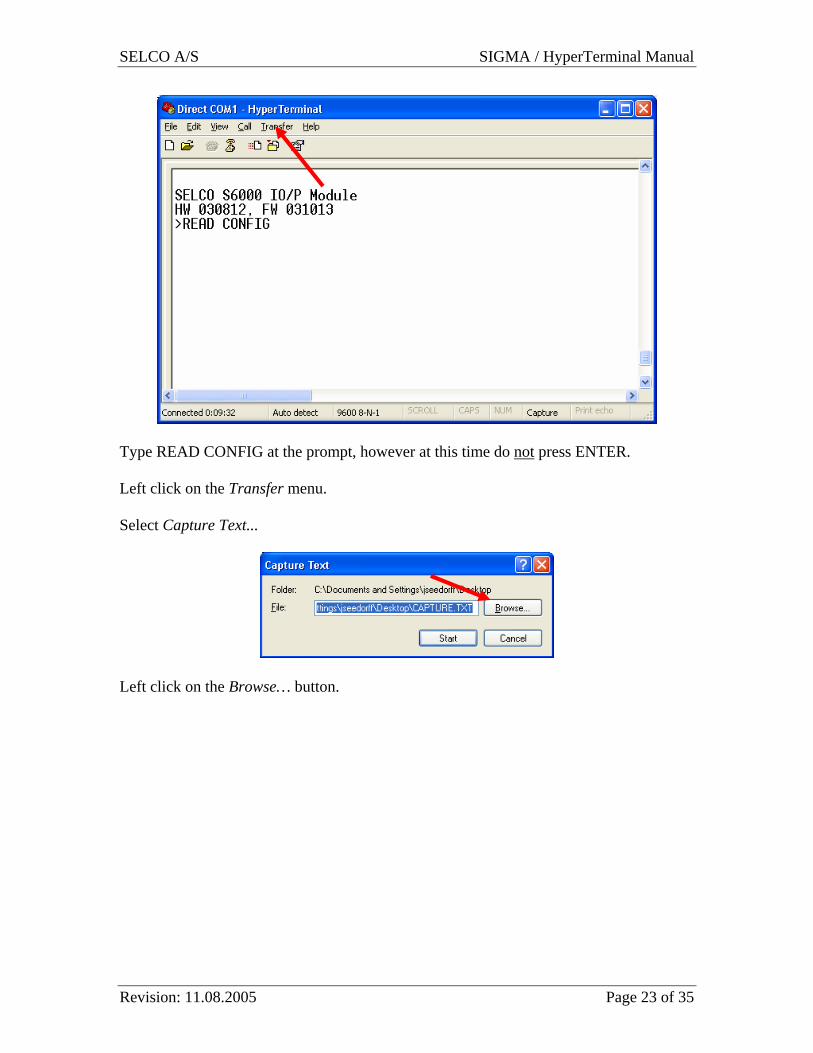
Type READ CONFIG at the prompt, however at this time do not press ENTER. Left click on the Transfer menu. Select Capture Text...
Left click on the Browse… button.

SELCO A/S SIGMA / HyperTerminal Manual
Revision: 11.08.2005 Page 24 of 35
It’s now necessary to choose a location and filename for the text file that is to contain the configuration backup. Left click on the Desktop icon at the left side of the dialogue. Enter S6000 Config (or whatever name you prefer) into the File name field. Left click on the Save button.
Left click on the Start button to start the capture. Now hit the ENTER key to execute the READ CONFIG command that was typed previously.
SELCO A/S SIGMA / HyperTerminal Manual
Revision: 11.08.2005 Page 25 of 35
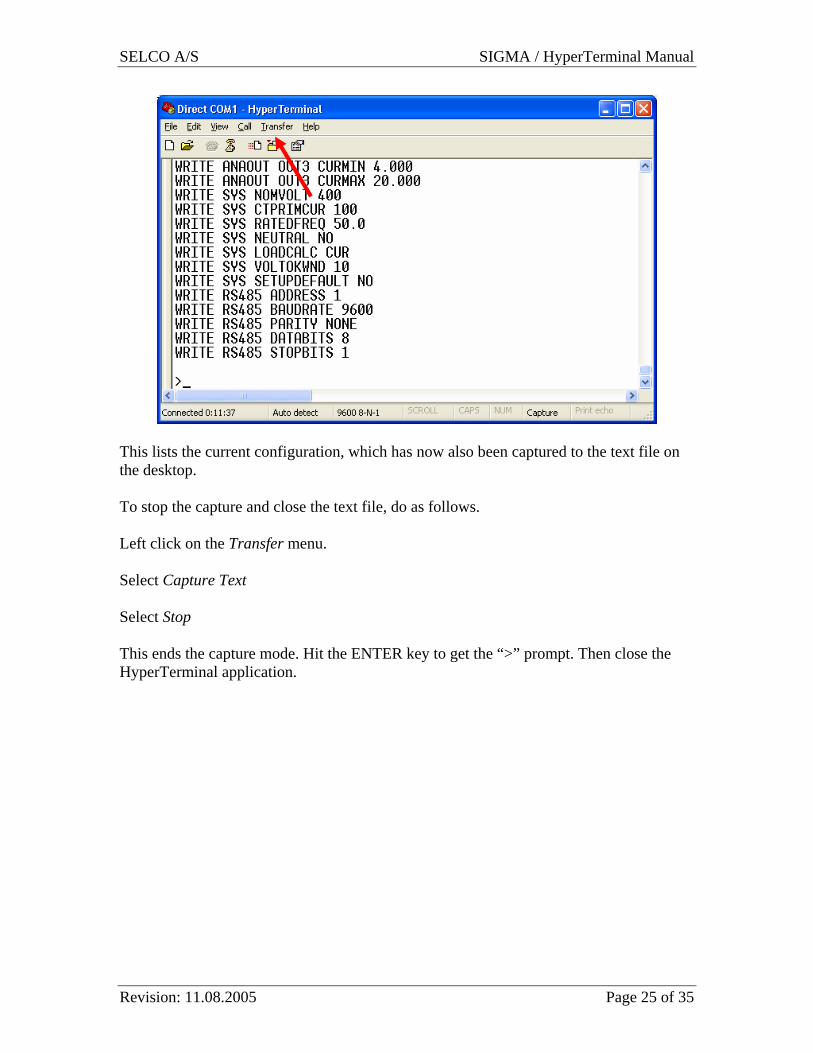
This lists the current configuration, which has now also been captured to the text file on the desktop. To stop the capture and close the text file, do as follows. Left click on the Transfer menu. Select Capture Text Select Stop This ends the capture mode. Hit the ENTER key to get the “>” prompt. Then close the HyperTerminal application.
SELCO A/S SIGMA / HyperTerminal Manual
Revision: 11.08.2005 Page 26 of 35
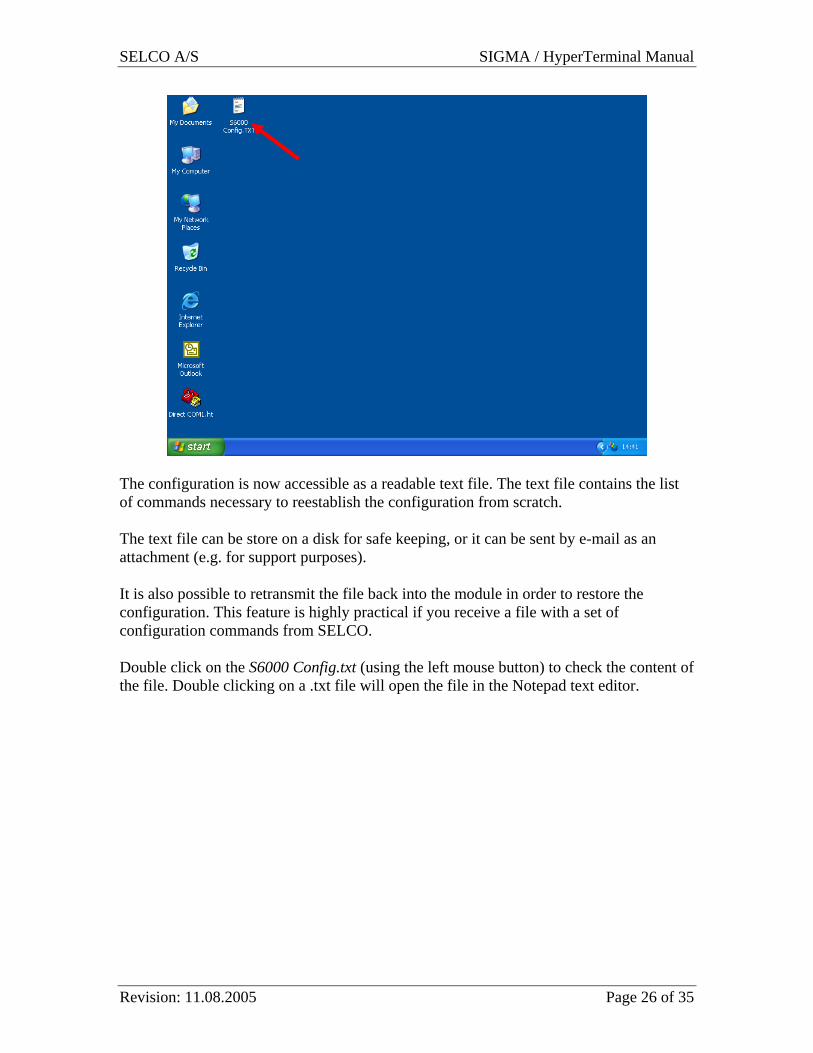
The configuration is now accessible as a readable text file. The text file contains the list of commands necessary to reestablish the configuration from scratch. The text file can be store on a disk for safe keeping, or it can be sent by e-mail as an attachment (e.g. for support purposes). It is also possible to retransmit the file back into the module in order to restore the configuration. This feature is highly practical if you receive a file with a set of configuration commands from SELCO. Double click on the S6000 Config.txt (using the left mouse button) to check the content of the file. Double clicking on a .txt file will open the file in the Notepad text editor.
SELCO A/S SIGMA / HyperTerminal Manual
Revision: 11.08.2005 Page 27 of 35
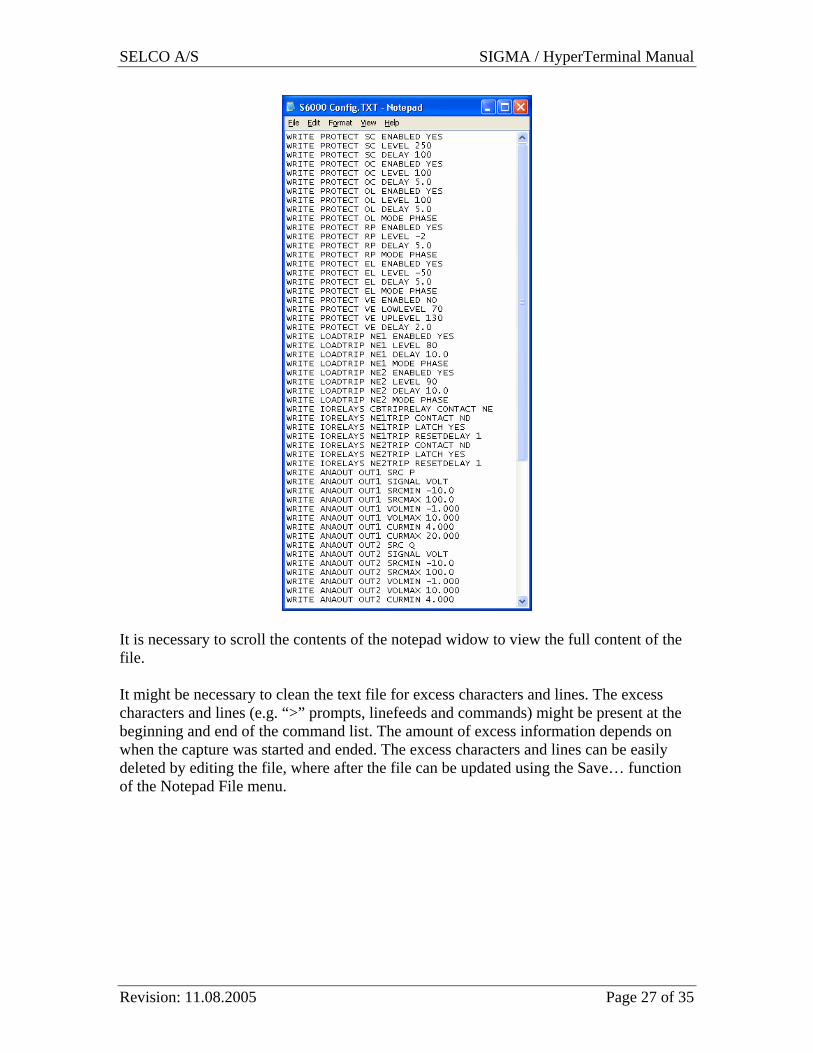
It is necessary to scroll the contents of the notepad widow to view the full content of the file. It might be necessary to clean the text file for excess characters and lines. The excess characters and lines (e.g. “>” prompts, linefeeds and commands) might be present at the beginning and end of the command list. The amount of excess information depends on when the capture was started and ended. The excess characters and lines can be easily deleted by editing the file, where after the file can be updated using the Save… function of the Notepad File menu.

SELCO A/S SIGMA / HyperTerminal Manual
Revision: 11.08.2005 Page 28 of 35
7 Restoring the configuration The configuration of the Sigma modules can be easily restored from a text file containing the setting. The generation of the text file (backup) is described above.
Start the HyperTerminal from the desktop short-cut (double click on the Direct COM1.ht short-cut).

SELCO A/S SIGMA / HyperTerminal Manual
Revision: 11.08.2005 Page 29 of 35
Enable the module for READ/WRITE access using the ENABLE command (default password is 0000). Then Left click on the Transfer menu. Select Send Text File...

SELCO A/S SIGMA / HyperTerminal Manual
Revision: 11.08.2005 Page 30 of 35
It’s now necessary to choose the location and filename of the text file containing the configuration. Left click on the Desktop icon at the left side of the dialogue. Click on the S6000 Config.txt (or whatever is the name of the file). Left click on the Open button.
This causes the content of the text file (S6000 Config.txt) to be written back into the Sigma module – line by line.

SELCO A/S SIGMA / HyperTerminal Manual
Revision: 11.08.2005 Page 31 of 35
8 Reducing the Send Text speed The transfer speed of the Send Text…function (described in conjunction with the Configuration Restore procedure) can be reduced. Normally it is perfectly OK to run at full speed (0 ms character and line delay), however in some cases it may be practical to slow down the process. One reason could be to visually confirm the restore line by line.
Start the HyperTerminal from the desktop short-cut (double click on the Direct COM1.ht short-cut).

SELCO A/S SIGMA / HyperTerminal Manual
Revision: 11.08.2005 Page 32 of 35
Click on the Disconnect icon to close the connection to the module.
Left click on the File menu. Select Properties

SELCO A/S SIGMA / HyperTerminal Manual
Revision: 11.08.2005 Page 33 of 35
Click on the Settings tab.
Click on the ASCII Setup…button.
SELCO A/S SIGMA / HyperTerminal Manual
Revision: 11.08.2005 Page 34 of 35
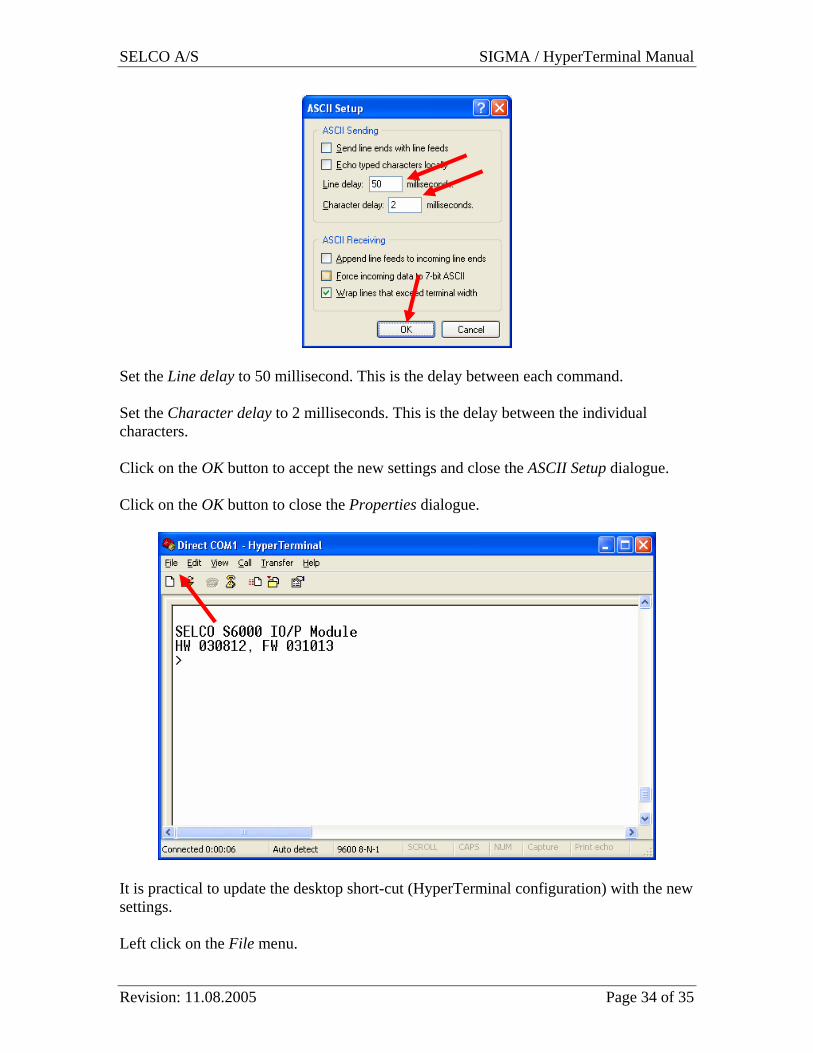
Set the Line delay to 50 millisecond. This is the delay between each command. Set the Character delay to 2 milliseconds. This is the delay between the individual characters. Click on the OK button to accept the new settings and close the ASCII Setup dialogue. Click on the OK button to close the Properties dialogue.
It is practical to update the desktop short-cut (HyperTerminal configuration) with the new settings. Left click on the File menu.
SELCO A/S SIGMA / HyperTerminal Manual
Revision: 11.08.2005 Page 35 of 35
Select Save. Rerun the Configuration Restore procedure, as described above.