shelf price submission user guide - cdph home document library...shelf price submission. user guide...
TRANSCRIPT

ShelfPriceSubmissionUserGuideforWICVendors Version 3.0 (Vendor)
Updated: August 18, 2015

ShelfPriceSubmission UserGuideforWICVendors
Table of Contents
1. Getting Started ........................................................................................................................... 2
2. Welcome and Home Page .........................................................................................................2
3. Select Shelf Price Submission ................................................................................................... 3
4. Enter Low/High Prices ................................................................................................................ 5
5. Print a Blank Worksheet ............................................................................................................. 6
6. Save a Submission..................................................................................................................... 7
7. Print a Completed Submission ................................................................................................... 8
8. Complete and Transmit a Submission........................................................................................9
9. Edit a Saved Submission ......................................................................................................... 10
10. Edit a Completed Submission ..................................................................................................11
11. View a Completed Submission .................................................................................................12
12. Vendor Groups ......................................................................................................................... 13
13. Group Maintenance – Create a New Vendor Group ................................................................14
14. Group Maintenance – Create a New Vendor Group based on an Existing Vendor Group.......16
15. Group Maintenance – Change an Existing Vendor Group .......................................................18
16. Group Maintenance – Delete an Existing Vendor Group..........................................................20
17. Assign Groups to a Submission ...............................................................................................22
18. View a Group ........................................................................................................................... 24
19. Print a Group ............................................................................................................................ 25

1. Getting Started
Before getting started on your submission, if you have two or more stores that have the same prices for every food item in the submission please go to page 12 to learn how you can create groups. Creating groups will make it easier to submit one submission for all of your stores that have the same pricing.
2. Welcome and Home Page
Type in the website address for VWIX – https://vwix.ca.gov/VWIX/SignIn.aspx
You will come to the Welcome to VWIX page of the VWIX website (Figure 1).
Enter your User ID and Password Click the GO button
Figure 1 – Welcome to VWIX page
At the VWIX Home Page, if a Shelf Price Submission has been assigned to your store(s), you will see a red alert message (Figure 2) that indicates you have a Shelf Price Submission that has not been started.
To access the submission, click on the Shelf Price Submission tab and then on Shelf Price Submission in the blue-bar submenu.
Figure 2 – VWIX Home page
Page 2 of 25

3. Select Shelf Price Submission
At the Select Shelf Price Submission screen (Figure 3) click on the drop down box.
Figure 3 – Select Shelf Price Submission
Select the submission by clicking on the submission in the drop down box. The beginning and end dates of the submission are displayed, as well as the submission number. You must complete your submission within the dates outlined. If you start your submission on the day it is set to end, make sure that you complete and transmit the submission before or by 11:59 PM (Figure 4).
Figure 4 – Select Shelf Price Submission
List Unstarted Submissions is the default. All vendor IDs that are assigned to the submission will display here. Check one or all of the boxes next to the vendor IDs (Figure 5).
Please note that if you select more than one vendor ID, you will be completing one submission for all vendor IDs you checked. You should only do this if all the prices are the same for all of the vendors you selected.
If you selected more than one vendor, make sure that you have enough time to finish the submission otherwise, if you SAVE the submission, when you return to finish it at a later time or date, you must complete a submission for each vendor ID individually.
Once you have verified that you checked the appropriate vendor IDs, click on the Begin Submission button to enter prices (Figure 5).
Page 3 of 25

Figure 5 – Shelf Price Submission – Unstarted Submissions
If you select more than one store, a dialogue box will appear and will give you information on creating a group (Figure 6). This step is optional. See page 12 for more information on how to create a group.
Figure 6 – Shelf Price Submission – Dialogue Box for Grouping Function
Page 4 of 25
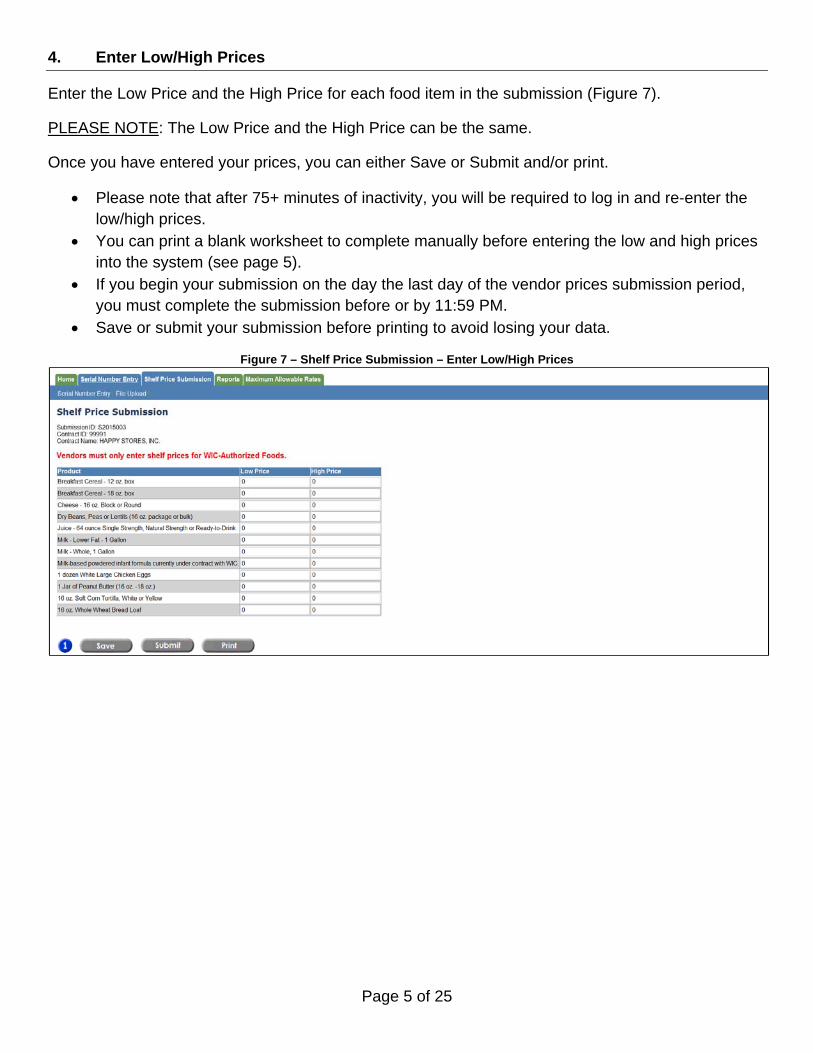
4. Enter Low/High Prices
Enter the Low Price and the High Price for each food item in the submission (Figure 7).
PLEASE NOTE: The Low Price and the High Price can be the same.
Once you have entered your prices, you can either Save or Submit and/or print.
Please note that after 75+ minutes of inactivity, you will be required to log in and re-enter the low/high prices.
You can print a blank worksheet to complete manually before entering the low and high prices into the system (see page 5).
If you begin your submission on the day the last day of the vendor prices submission period, you must complete the submission before or by 11:59 PM.
Save or submit your submission before printing to avoid losing your data.
Figure 7 – Shelf Price Submission – Enter Low/High Prices
Page 5 of 25
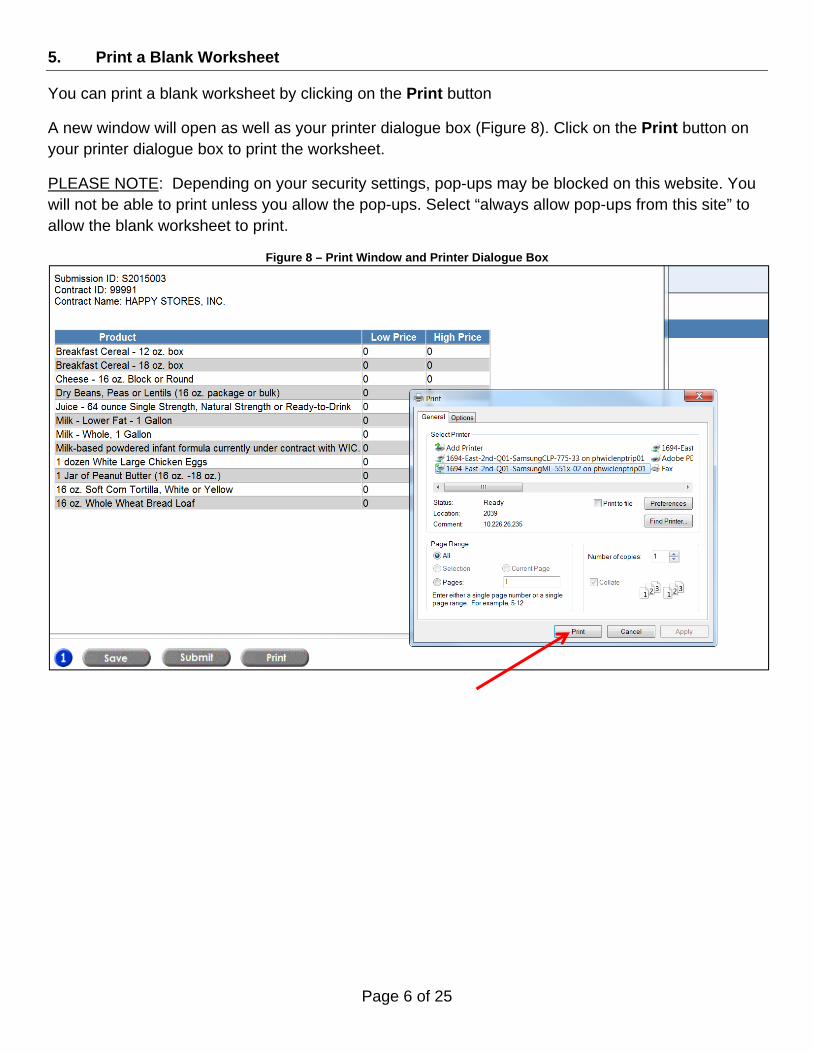
Figure 8 – Print Window and Printer Dialogue Box
5. Print a Blank Worksheet
You can print a blank worksheet by clicking on the Print button
A new window will open as well as your printer dialogue box (Figure 8). Click on the Print button on your printer dialogue box to print the worksheet.
PLEASE NOTE: Depending on your security settings, pop-ups may be blocked on this website. You will not be able to print unless you allow the pop-ups. Select “always allow pop-ups from this site” to allow the blank worksheet to print.
Page 6 of 25

Figure 9 – Shelf Price Submission – Save A Submission
6. Save a Submission
After you enter all or some of the low and high prices, you can save your submission to complete and submit at a later date by clicking on the Save button (Figure 9). The submission will be placed in the Incomplete Submissions list which you can access from the Select Shelf Price Submission page.
Your submission will not be complete or processed until you press the Submit button and receive a confirmation on your screen.
If you have saved a submission, the next time you log in to VWIX or if you return to the home page, you will see a red alert message (Figure 10) that indicates you have a Shelf Price Submission that is incomplete.
Figure 10 – VWIX Home page
Page 7 of 25
7. Print a Completed Submission
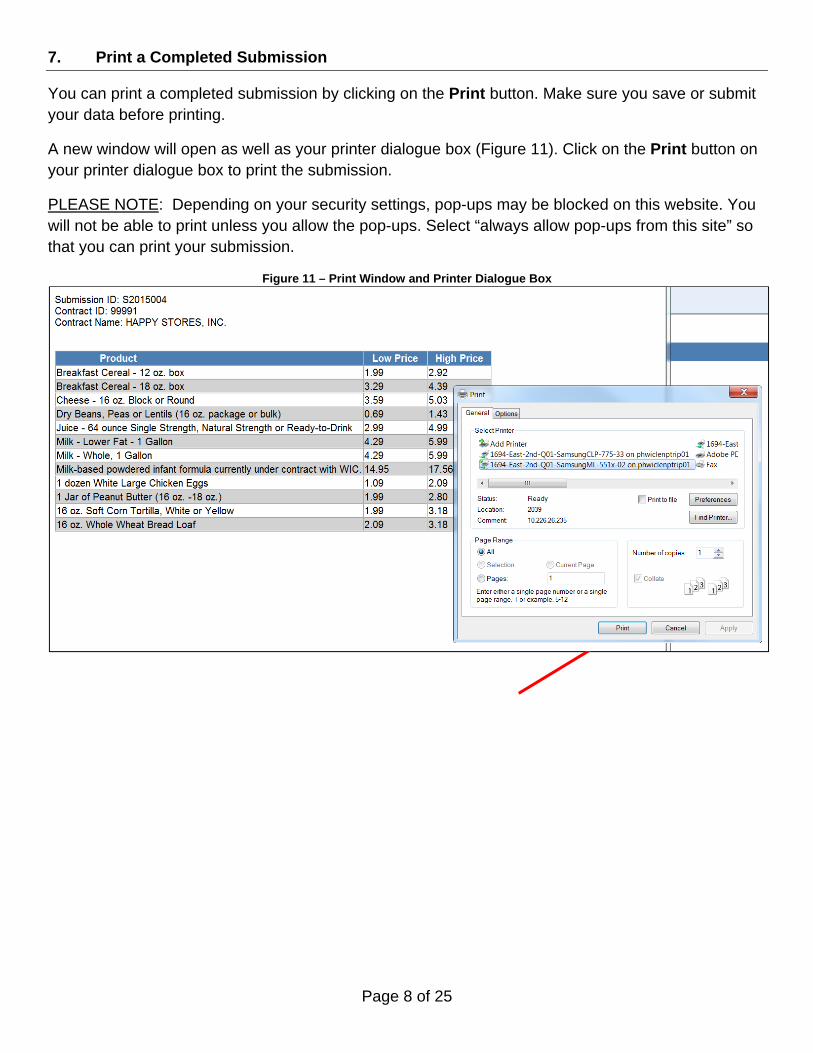
You can print a completed submission by clicking on the Print button. Make sure you save or submit your data before printing.
A new window will open as well as your printer dialogue box (Figure 11). Click on the Print button on your printer dialogue box to print the submission.
PLEASE NOTE: Depending on your security settings, pop-ups may be blocked on this website. You will not be able to print unless you allow the pop-ups. Select “always allow pop-ups from this site” so that you can print your submission.
Figure 11 – Print Window and Printer Dialogue Box
Page 8 of 25

8. Complete and Transmit a Submission
Once you have finished entering all of the low and high prices and verified your entries, you can complete and transmit your submission to the State for processing by clicking on the Submit button (Figure 12).
The submission will be placed in the Completed Submissions list which you can access from the Select Shelf Price Submission page.
Figure 12 – Shelf Price Submission – Complete and Transmit
Page 9 of 25
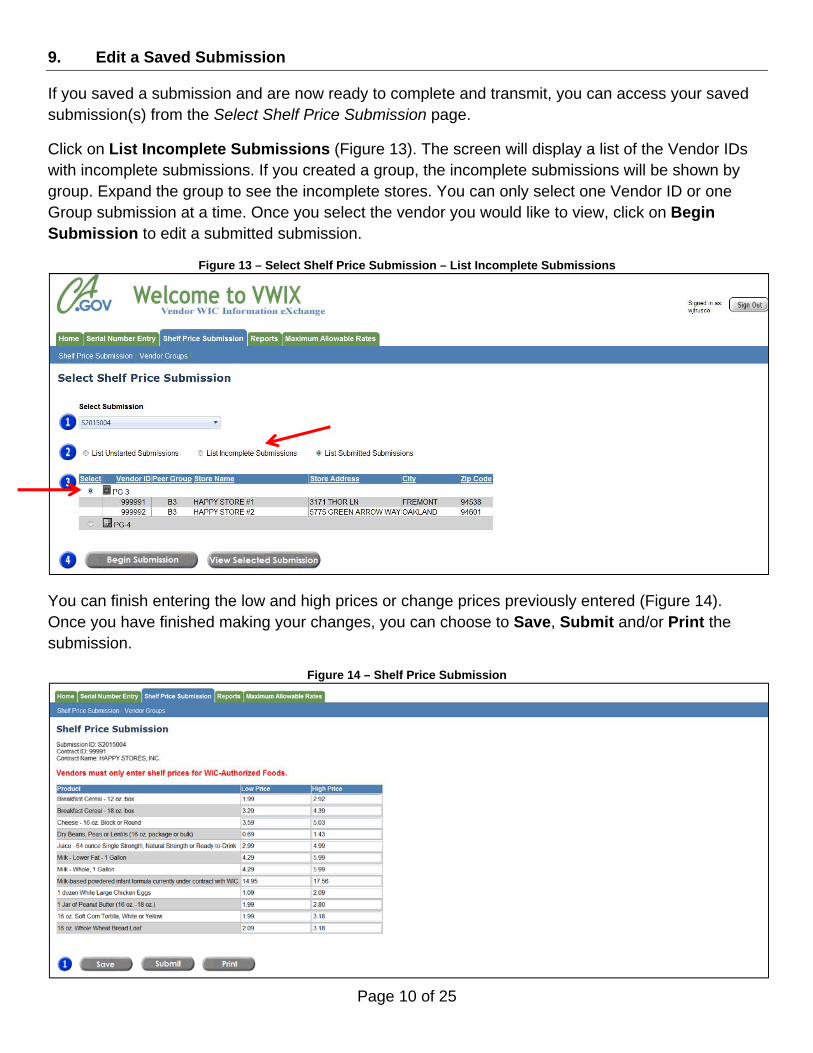
Figure 13 – Select Shelf Price Submission – List Incomplete Submissions
Figure 14 – Shelf Price Submission
9. Edit a Saved Submission
If you saved a submission and are now ready to complete and transmit, you can access your saved submission(s) from the Select Shelf Price Submission page.
Click on List Incomplete Submissions (Figure 13). The screen will display a list of the Vendor IDs with incomplete submissions. If you created a group, the incomplete submissions will be shown by group. Expand the group to see the incomplete stores. You can only select one Vendor ID or one Group submission at a time. Once you select the vendor you would like to view, click on Begin Submission to edit a submitted submission.
You can finish entering the low and high prices or change prices previously entered (Figure 14). Once you have finished making your changes, you can choose to Save, Submit and/or Print the submission.
Page 10 of 25

10. Edit a Completed Submission
If you completed and transmitted a submission and need to edit and resubmit or simply view, you can access your completed and transmitted submission(s) from the Select Shelf Price Submission page.
Click on List Submitted Submissions (Figure 15). The screen will display a list of the Vendor IDs with completed submissions. You can only select one Vendor ID submission at a time. Once you select the Vendor you would like to view, click on Begin Submission or View Selected Submission.
Figure 15 – Select Shelf Price Submission – List Completed Submissions
You can change prices previously entered and submitted (Figure 16). Once you have finished making your changes, you can choose to Save, Submit and/or Print the submission.
CAUTION: If a submission has already been submitted twice, you will not be able to re-submit. Contact the WIC Vendor Management Branch (VMB) at 1-855-WIC-STOR (1-855-942-7867) OR email to [email protected] to request approval to allow an override for one additional submission (Figure16).
Figure 16 – Contact VMB
Page 11 of 25

11. View a Completed Submission
To view and/or print a completed submission, select the Vendor ID you would like to view and click on View Selected Submission (Figure 17).
Figure 17 – View Selected Submission
You can print the submission by clicking on the Print button (Figure 18).
Figure 18 – View Selected Submission
Page 12 of 25

12. Vendor Groups
PLEASE NOTE: The Vendor Group function is only for contracts that have two or more stores with the exact same pricing for all of the food items in the submission.
To begin creating your groups, click on the Vendor Groups link in the Shelf Price Submission tab (Figure 19) on the VWIX Home Page.
Figure 19 – VWIX Home Page
You will be taken to the Vendor Group page. There are three links on this page that you will use to create/change/delete, assign and view your groups.
Click on the Group Maintenance link (Figure 20).
Figure 20 – Vendor Groups Page
Page 13 of 25
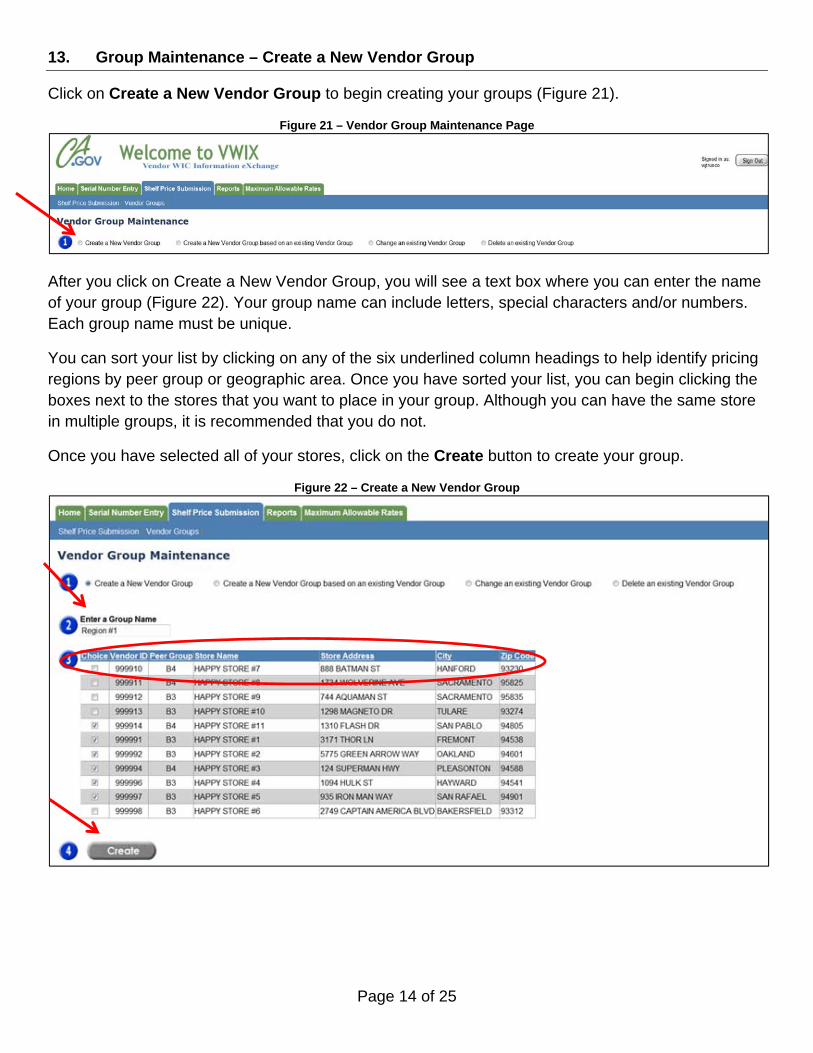
13. Group Maintenance – Create a New Vendor Group
Click on Create a New Vendor Group to begin creating your groups (Figure 21).
Figure 21 – Vendor Group Maintenance Page
After you click on Create a New Vendor Group, you will see a text box where you can enter the name of your group (Figure 22). Your group name can include letters, special characters and/or numbers. Each group name must be unique.
You can sort your list by clicking on any of the six underlined column headings to help identify pricing regions by peer group or geographic area. Once you have sorted your list, you can begin clicking the boxes next to the stores that you want to place in your group. Although you can have the same store in multiple groups, it is recommended that you do not.
Once you have selected all of your stores, click on the Create button to create your group.
Figure 22 – Create a New Vendor Group
Page 14 of 25

You will be returned to the Vendor Groups page and you will see a message that says your group was created successfully (Figure 23).
Figure 23 – Vendor Groups Page
Repeat the above steps until you have created all of your groups.
Page 15 of 25
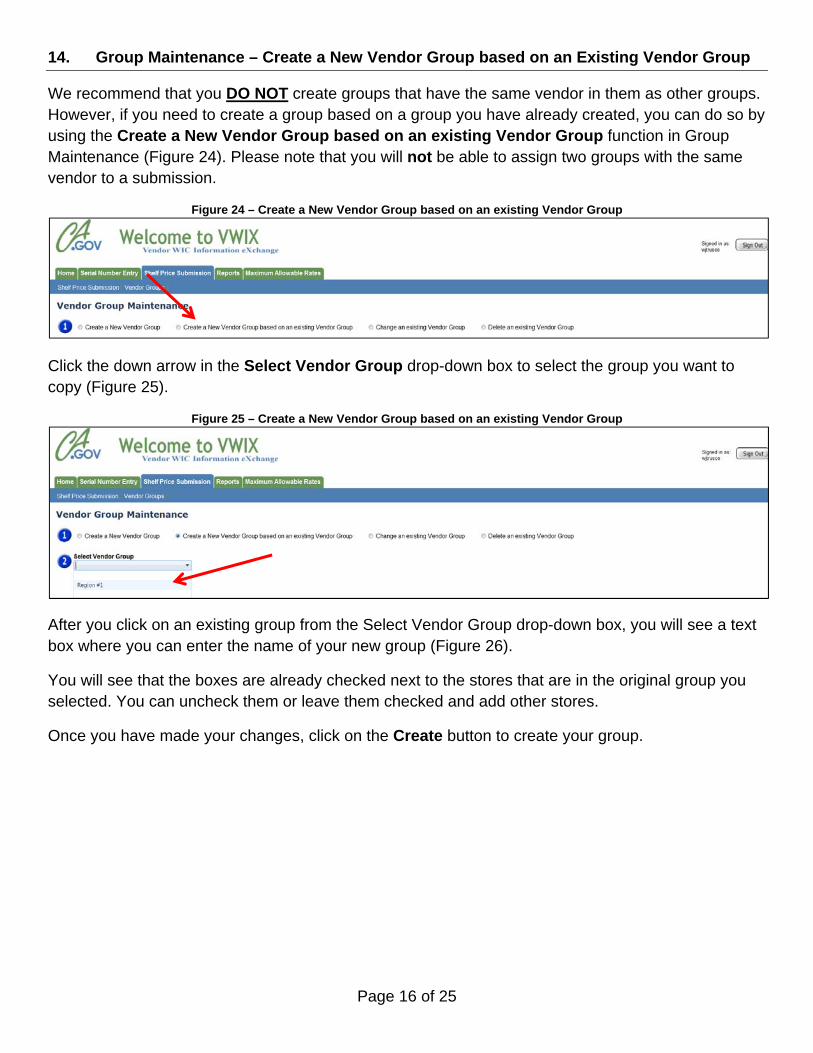
14. Group Maintenance – Create a New Vendor Group based on an Existing Vendor Group
We recommend that you DO NOT create groups that have the same vendor in them as other groups. However, if you need to create a group based on a group you have already created, you can do so by using the Create a New Vendor Group based on an existing Vendor Group function in Group Maintenance (Figure 24). Please note that you will not be able to assign two groups with the same vendor to a submission.
Figure 24 – Create a New Vendor Group based on an existing Vendor Group
Click the down arrow in the Select Vendor Group drop-down box to select the group you want to copy (Figure 25).
Figure 25 – Create a New Vendor Group based on an existing Vendor Group
After you click on an existing group from the Select Vendor Group drop-down box, you will see a text box where you can enter the name of your new group (Figure 26).
You will see that the boxes are already checked next to the stores that are in the original group you selected. You can uncheck them or leave them checked and add other stores.
Once you have made your changes, click on the Create button to create your group.
Page 16 of 25

Figure 26 – Create a New Vendor Group based on an Existing Vendor Group
You will be returned to the Vendor Groups page and you will see a message that says your group was created successfully (Figure 27).
Figure 27 – Vendor Groups Page – Success message
Page 17 of 25
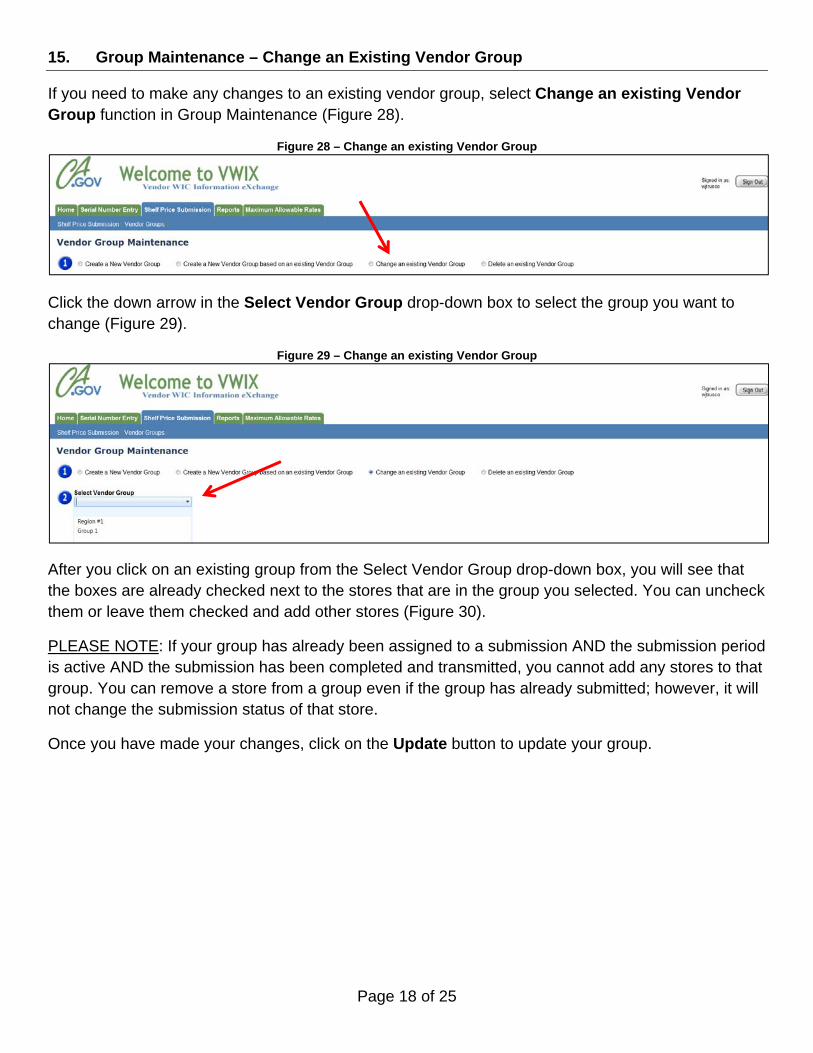
15. Group Maintenance – Change an Existing Vendor Group
If you need to make any changes to an existing vendor group, select Change an existing Vendor Group function in Group Maintenance (Figure 28).
Figure 28 – Change an existing Vendor Group
Click the down arrow in the Select Vendor Group drop-down box to select the group you want to change (Figure 29).
Figure 29 – Change an existing Vendor Group
After you click on an existing group from the Select Vendor Group drop-down box, you will see that the boxes are already checked next to the stores that are in the group you selected. You can uncheck them or leave them checked and add other stores (Figure 30).
PLEASE NOTE: If your group has already been assigned to a submission AND the submission period is active AND the submission has been completed and transmitted, you cannot add any stores to that group. You can remove a store from a group even if the group has already submitted; however, it will not change the submission status of that store.
Once you have made your changes, click on the Update button to update your group.
Page 18 of 25
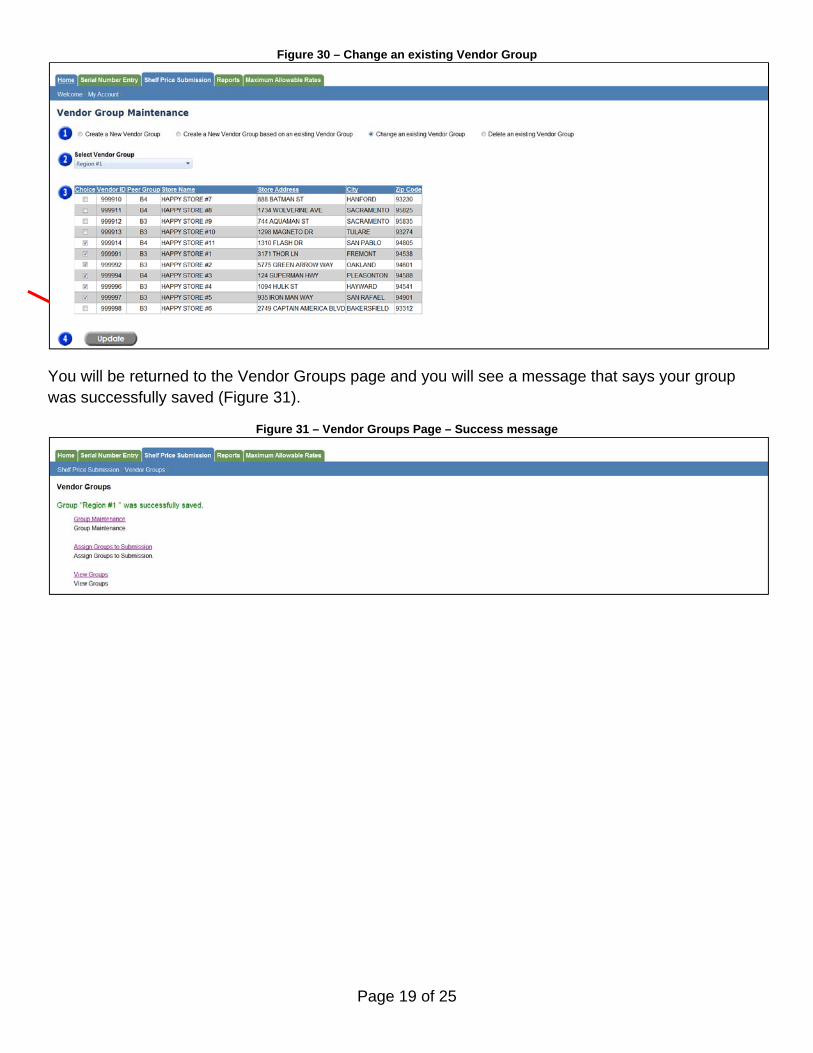
Figure 30 – Change an existing Vendor Group
You will be returned to the Vendor Groups page and you will see a message that says your group was successfully saved (Figure 31).
Figure 31 – Vendor Groups Page – Success message
Page 19 of 25

16. Group Maintenance – Delete an Existing Vendor Group
If you need to delete an existing vendor group, select the Delete an existing Vendor Group function in Group Maintenance (Figure 32).
Figure 32 – Delete an existing Vendor Group
Click the down arrow in the Select Vendor Group drop-down box to select the group you want to delete (Figure 33).
Figure 33 – Delete an existing Vendor Group
After you select the group you want to delete, you will see the Delete button. Click Delete if you are sure you want to delete the group that is displayed in the Select Vendor Group drop-down box (Figure 34).
PLEASE NOTE: If a group is assigned to an active submission period, the group cannot be deleted. Once the submission period expires, the group can be deleted even if the group has submitted their shelf prices.
Figure 34 – Delete an existing Vendor Group
Page 20 of 25

You will be returned to the Vendor Groups page and you will see a message that says your group was successfully deleted (Figure 35).
Figure 35 – Vendor Groups Page – Success message
Page 21 of 25
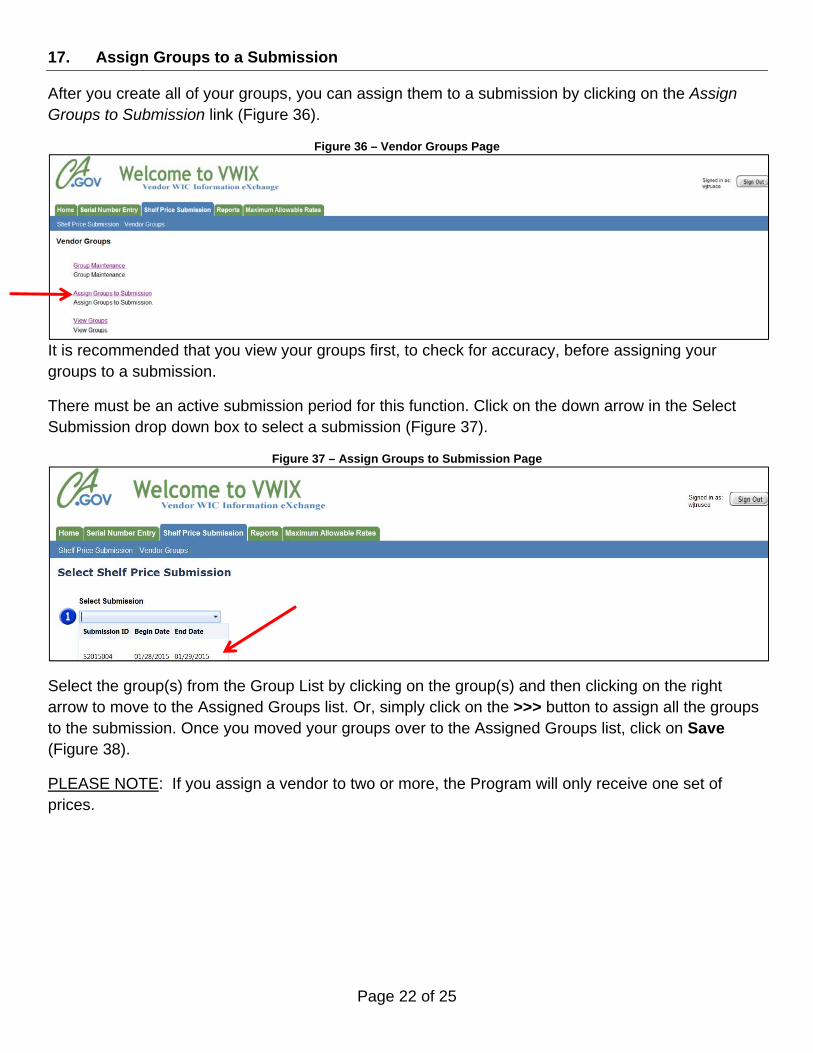
17. Assign Groups to a Submission
After you create all of your groups, you can assign them to a submission by clicking on the Assign Groups to Submission link (Figure 36).
Figure 36 – Vendor Groups Page
It is recommended that you view your groups first, to check for accuracy, before assigning your groups to a submission.
There must be an active submission period for this function. Click on the down arrow in the Select Submission drop down box to select a submission (Figure 37).
Figure 37 – Assign Groups to Submission Page
Select the group(s) from the Group List by clicking on the group(s) and then clicking on the right arrow to move to the Assigned Groups list. Or, simply click on the >>> button to assign all the groups to the submission. Once you moved your groups over to the Assigned Groups list, click on Save (Figure 38).
PLEASE NOTE: If you assign a vendor to two or more, the Program will only receive one set of prices.
Page 22 of 25

Figure 38 – Assign Groups to Submission Page
You will be returned to the Vendor Groups page and you will see a message that says your group was successfully assigned (Figure 39).
Figure 39 – Vendor Groups Page – Success message
Page 23 of 25

18. View a Group
After you create all of your groups, you can view them by clicking on the View Groups link (Figure 40).
It is recommended that you view your groups before assigning to a submission to check for accuracy.
Figure 40 – Vendor Groups Page
Click on the down arrow in the Select Vendor Group drop down box to select the group you want to view (Figure 41).
Figure 41 – Vendor Groups Page
The page will display all of the vendors in the selected group (Figure 42).
Figure 42 – Vendor Groups Page
Page 24 of 25

19. Print a Group
You can print the group by clicking on the Print button. A new print window will open. Click print on the print dialogue box to print the group list (Figure 43).
Figure 43 – Vendor Groups Page
Page 25 of 25