shelbynext | membership: check-in...
TRANSCRIPT
©2018 Shelby Systems, Inc. Other brand and product names are trademarks or registered trademarks of the respective holders.
ShelbyNext | Membership: Check-In Configuration
(Course #M113)
Presented by: Lisa Horn, Shelby Consultant

2
Objective
To understand the fundamentals of configuring CheckIn in ShelbyNext | Membership.
The following topics are presented in this session:
• Understanding Attendance Sessions • Establishing appropriate Groups and Group settings • Establishing CheckIn Mode • Establishing Checkin Station(s)
3
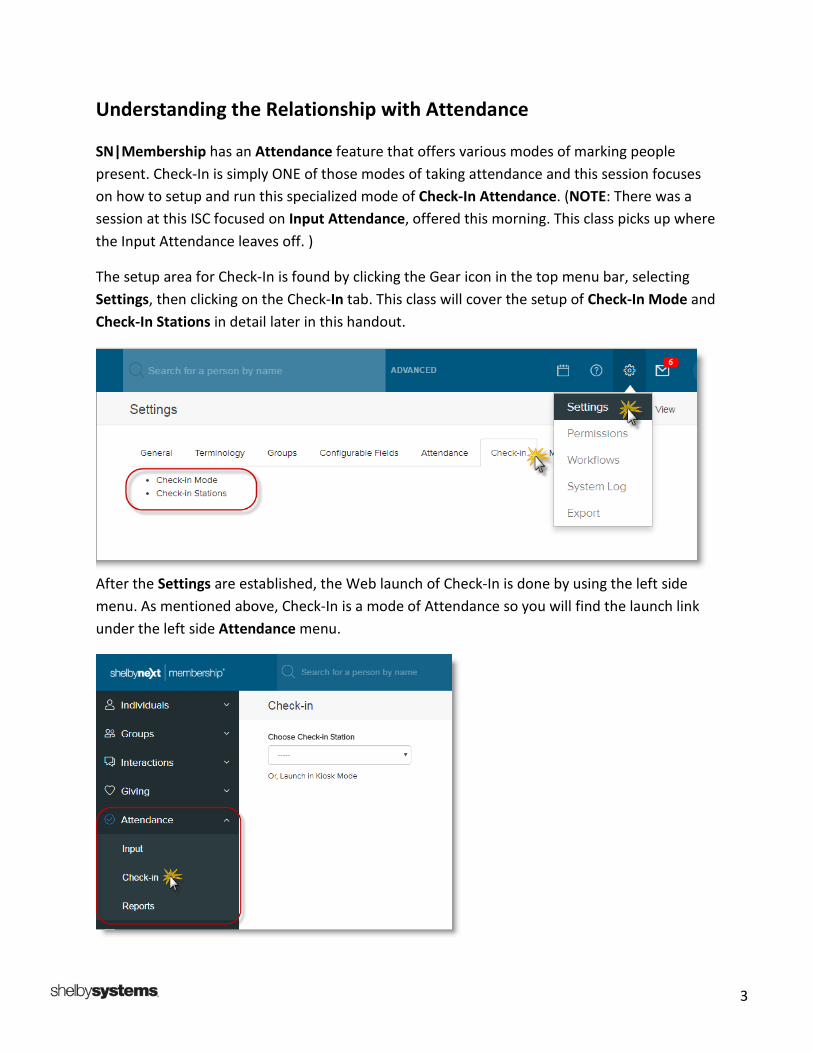
Understanding the Relationship with Attendance
SN|Membership has an Attendance feature that offers various modes of marking people present. Check-In is simply ONE of those modes of taking attendance and this session focuses on how to setup and run this specialized mode of Check-In Attendance. (NOTE: There was a session at this ISC focused on Input Attendance, offered this morning. This class picks up where the Input Attendance leaves off. )
The setup area for Check-In is found by clicking the Gear icon in the top menu bar, selecting Settings, then clicking on the Check-In tab. This class will cover the setup of Check-In Mode and Check-In Stations in detail later in this handout.
After the Settings are established, the Web launch of Check-In is done by using the left side menu. As mentioned above, Check-In is a mode of Attendance so you will find the launch link under the left side Attendance menu.

4
FOUNDATION: Groups & Group Settings
Groups are the foundation of Attendance and thus, CheckIn. They must be set up and populated before these functions are possible. Group Membership: Build Groups for each class where Attendance is desired. Populate these Groups by clicking on the Group name to open it and then click the Gear icon and choose the Add People option. Search for individuals by name and click to add them to the Group.
Group Settings: Each Group also has settings that control how it functions within the program. To edit Group Settings, you can click the Gear icon (shown above) and select Edit Group or if you are viewing the Group List (shown below), you can click on the Edit link on the right end of the row.
5
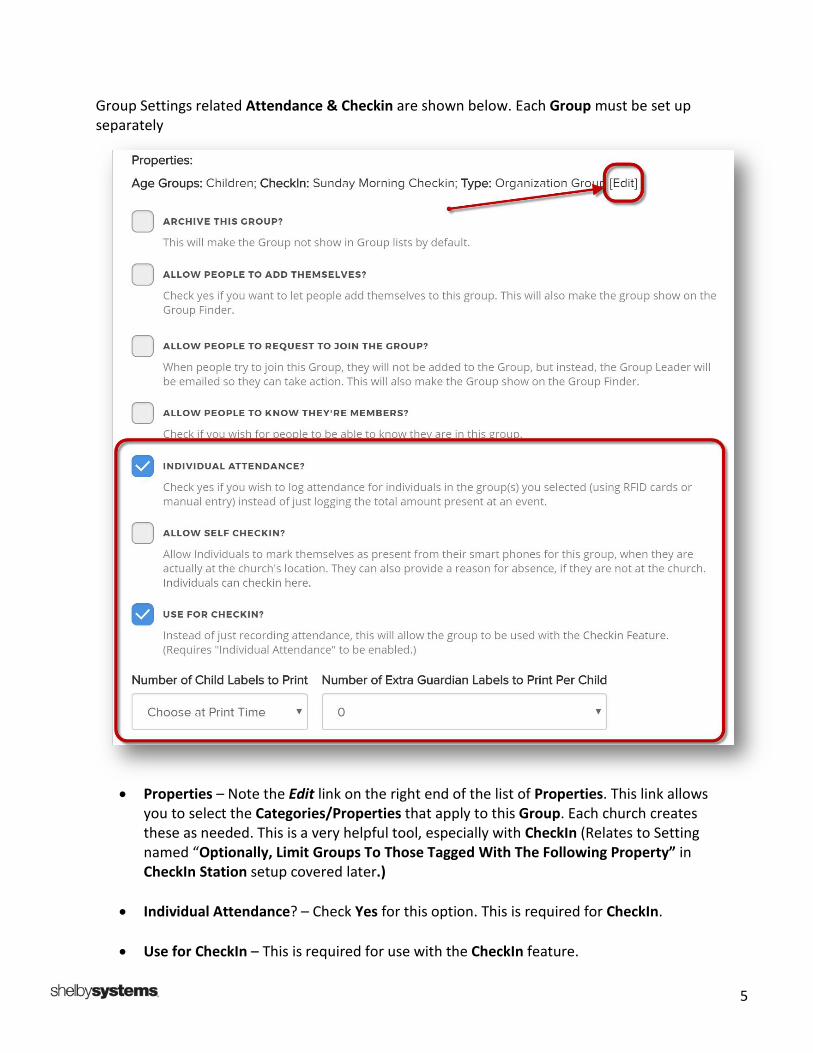
Group Settings related Attendance & Checkin are shown below. Each Group must be set up separately
• Properties – Note the Edit link on the right end of the list of Properties. This link allows
you to select the Categories/Properties that apply to this Group. Each church creates these as needed. This is a very helpful tool, especially with CheckIn (Relates to Setting named “Optionally, Limit Groups To Those Tagged With The Following Property” in CheckIn Station setup covered later.)
• Individual Attendance? – Check Yes for this option. This is required for CheckIn.
• Use for CheckIn – This is required for use with the CheckIn feature.

6
• Labels – This setting allows management of the labels for this specific Group. It is one of
3 areas where # of labels printed are affected. This setting overrides all the others with one exception (when the End User sets Child Labels and Guardian labels to 0).
7
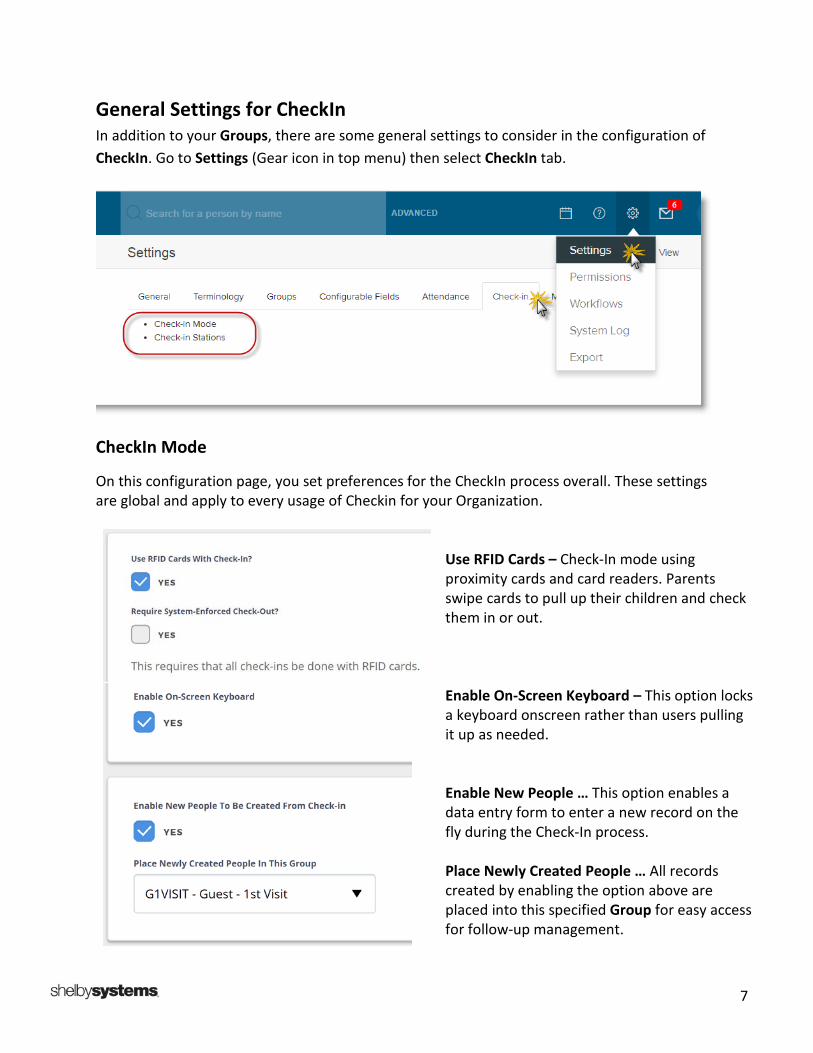
General Settings for CheckIn In addition to your Groups, there are some general settings to consider in the configuration of CheckIn. Go to Settings (Gear icon in top menu) then select CheckIn tab.
CheckIn Mode
On this configuration page, you set preferences for the CheckIn process overall. These settings are global and apply to every usage of Checkin for your Organization.
Use RFID Cards – Check-In mode using proximity cards and card readers. Parents swipe cards to pull up their children and check them in or out. Enable On-Screen Keyboard – This option locks a keyboard onscreen rather than users pulling it up as needed. Enable New People … This option enables a data entry form to enter a new record on the fly during the Check-In process. Place Newly Created People … All records created by enabling the option above are placed into this specified Group for easy access for follow-up management.

8
Enable Self CheckIn … This option is the master switch that enables Parents to Check-In their children from a mobile device and send labels to print inside the building, waiting on them. It has to also be enabled on a specific Check-In Station(s) that receive/print these remote checkins. How Close Must People … Allows admin to determine distance in miles that a person must be (requires Location access on mobile device) before the system will let them use the remote Check-In option.
Print Parent Label … Choose to add this label as an option at CheckIn. Label Printer Model – Choose your printer. SN|MB now supports selected Godex, Brother and Dymo printers. The Citizen printer is only for use with the iOS Checkin App.
NOTE: Though not listed, I successfully use the older model Brother QL 570, and the newer Brother QL-810W
Label Offsets – Tweak the placement of the text on the label.
9
CheckIn Stations
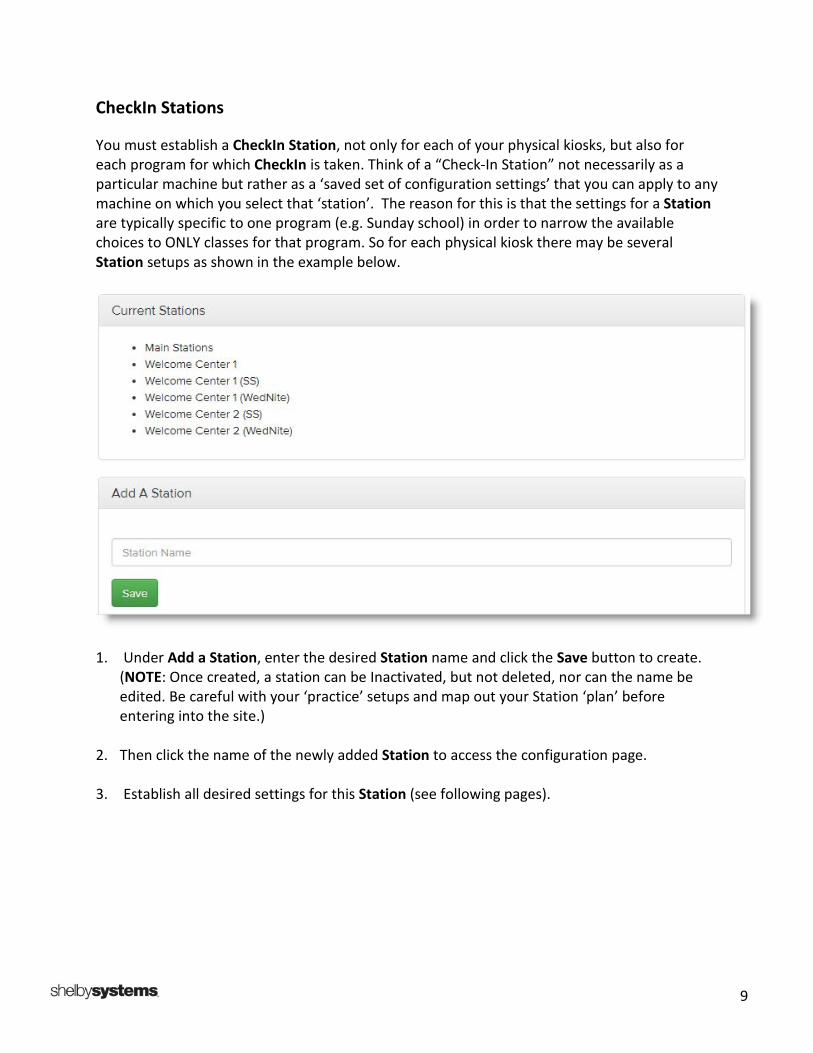
You must establish a CheckIn Station, not only for each of your physical kiosks, but also for each program for which CheckIn is taken. Think of a “Check-In Station” not necessarily as a particular machine but rather as a ‘saved set of configuration settings’ that you can apply to any machine on which you select that ‘station’. The reason for this is that the settings for a Station are typically specific to one program (e.g. Sunday school) in order to narrow the available choices to ONLY classes for that program. So for each physical kiosk there may be several Station setups as shown in the example below.
1. Under Add a Station, enter the desired Station name and click the Save button to create.
(NOTE: Once created, a station can be Inactivated, but not deleted, nor can the name be edited. Be careful with your ‘practice’ setups and map out your Station ‘plan’ before entering into the site.)
2. Then click the name of the newly added Station to access the configuration page. 3. Establish all desired settings for this Station (see following pages).
10
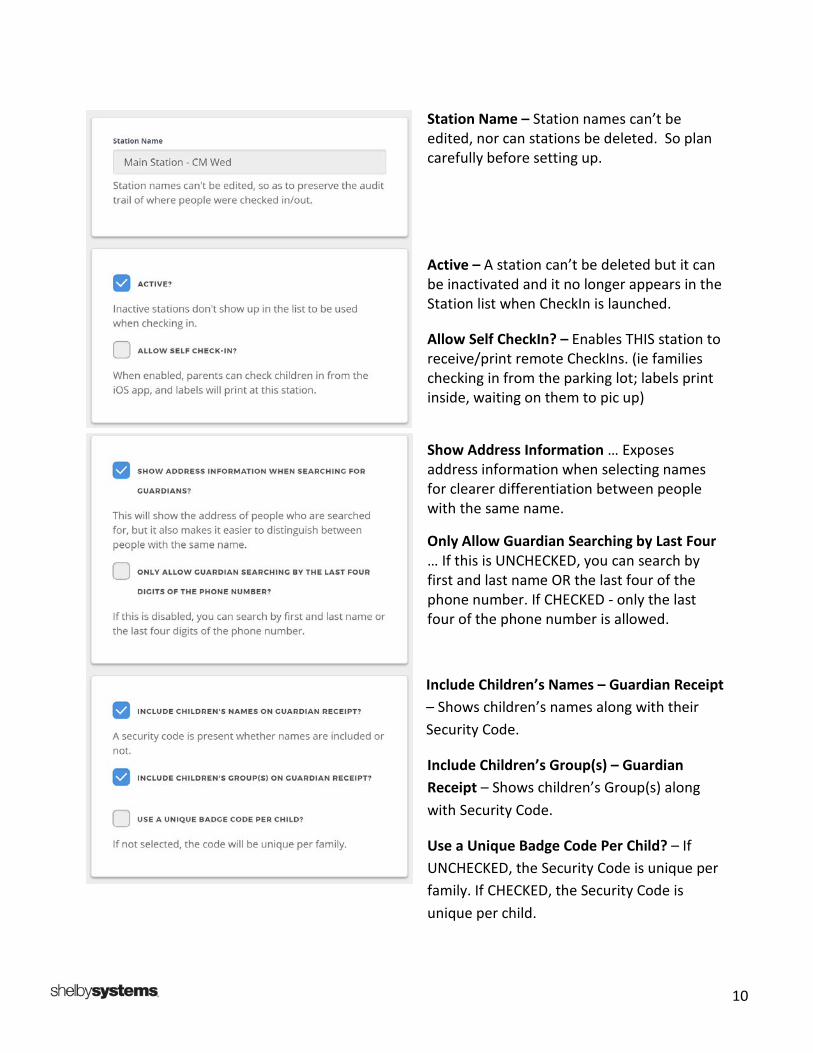
Station Name – Station names can’t be edited, nor can stations be deleted. So plan carefully before setting up.
Active – A station can’t be deleted but it can be inactivated and it no longer appears in the Station list when CheckIn is launched.
Allow Self CheckIn? – Enables THIS station to receive/print remote CheckIns. (ie families checking in from the parking lot; labels print inside, waiting on them to pic up)
Show Address Information … Exposes address information when selecting names for clearer differentiation between people with the same name.
Only Allow Guardian Searching by Last Four … If this is UNCHECKED, you can search by first and last name OR the last four of the phone number. If CHECKED - only the last four of the phone number is allowed.
Include Children’s Names – Guardian Receipt – Shows children’s names along with their Security Code.
Include Children’s Group(s) – Guardian Receipt – Shows children’s Group(s) along with Security Code.
Use a Unique Badge Code Per Child? – If UNCHECKED, the Security Code is unique per family. If CHECKED, the Security Code is unique per child.

11
Only Allow People to be Checked Into Groups of which they are a member? – Narrows list of classes for easier selection for parents.
Use Church Logo? – CHECK to use the same logo uploaded on General Settings for the site. UNCHECK for the option to add a station specific logo.
Upload a Background Image for Kiosk Mode - Use the Choose File button to upload an image behind the elements of Checkin on the screen.
Optionally, Limit Groups to Those Tagged … For example, allows you to specify that ONLY Sunday School Group(s) show as options for the specific Station CheckIn defined. This is the setting that enables you to narrow down the options that a parent sees on Check-In. Requires the setup and use of Group Properties.
Guardian Receipt Notes – Custom wording to print on the Guardian Receipt label
No Groups Available Message – Custom wording to show when there are no Group(s) available.

12
Default Number of Child Labels - This setting allows management of default # of Child labels for a specific Station setup (0-10). May be overridden if label defaults are set on specific Groups.
Default Number of Guardian Labels - This setting allows management of default # of Guardian labels for a specific Station setup (0-10). May be overridden if label defaults are set on specific Groups.
4. Click the Save button after setting options for this Station.
5. Repeat to establish each Checkin Station setup needed.

13
Additional Checkin Decisions/Setup Needed: There are mulitiple options for running Checkin (web launch, iOS app, Self-checkin by families). Each will be covered in more detail in the Part 2 of this session (ShelbyNext Membership: Setup & Launch). But here are some additional decisions and configuration you need to address.
Security Role Setup
In addition to the basic configuration already covered, Checkin volunteers will need to have permissions that allow them to launch and manage Checkin on ‘day of’.
Consider a couple of security Roles – one for Administrative tasks that would be used at the Welcome desk for looking up or editing information, running and printing reports, etc. But you will definitely need one for launching Checkin (logging into the site via a browser or logging into the iOS app if using an iPad).
The example here also shows some ‘dummy records’ that are established simply to login to the Checkin machines that are not tied to any individual user. This prevents personal information from being ‘exposed’ if a web launched station accidently got bumped out of Kiosk mode and thus returned to the main site.

14
A Checkin Launch Role needs to include (at a minimum) the following permissions:
Additional permissions can be set on this Launch role as well as your Checkin Admin Role, based on the responsibilities of your Checkin team. Examples might include:

15
Launch Options/Configuration
A longer look at the details of these options are addressed in Part 2 (ShelbyNext Membership: Setup & Launch) but a few items to keep mind with each are listed below:
Web Launch (Using a touch-screen PC)
• Ensure that you have Java installed on all computers that will be used with label printers. • Install your Printer (according to model instructions) AND install the unique SN application
drivers on these same computers. Links to the drivers can be found in the Help files of the ShelbyNEXT Membership program.
• If you wish to be able to SMS parents, ensure that you have added SMS to your account Go
to the gear (top menu bar), choose Settings -> and select the Services tab.
16
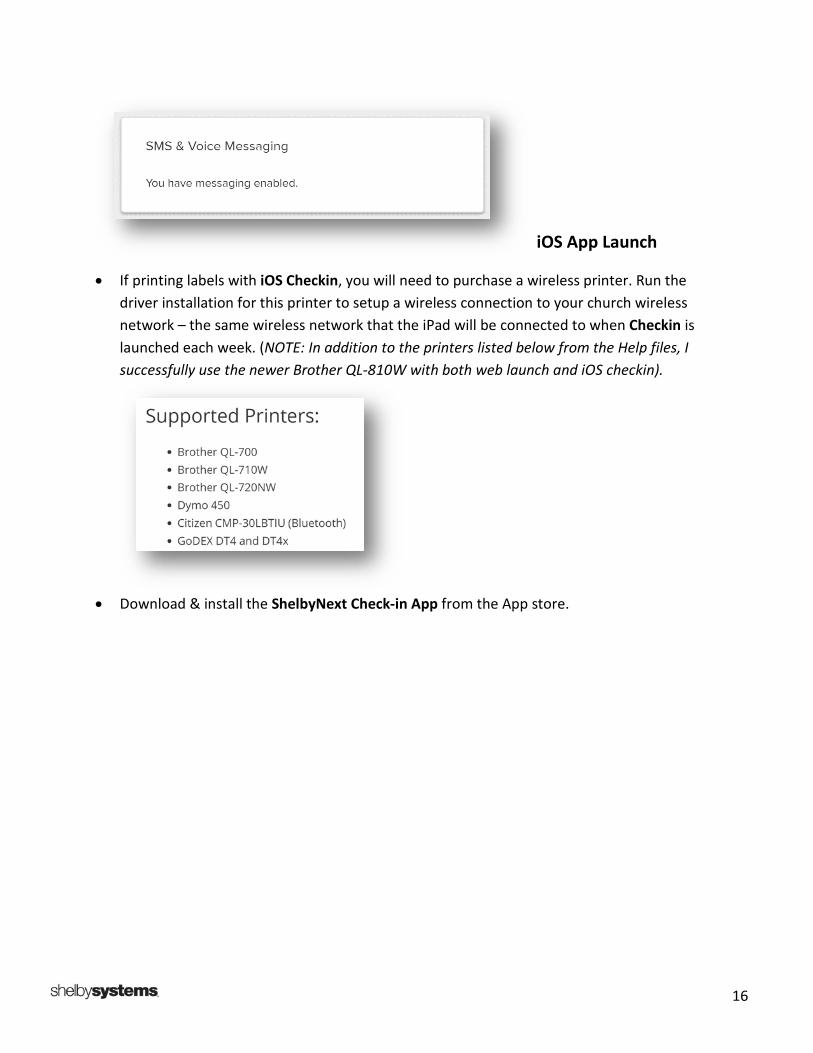
iOS App Launch
• If printing labels with iOS Checkin, you will need to purchase a wireless printer. Run the driver installation for this printer to setup a wireless connection to your church wireless network – the same wireless network that the iPad will be connected to when Checkin is launched each week. (NOTE: In addition to the printers listed below from the Help files, I successfully use the newer Brother QL-810W with both web launch and iOS checkin).
• Download & install the ShelbyNext Check-in App from the App store.

17
• Connect your iPad to the SAME church wireless network (where printer was installed). • Set iPad Auto-Lock to ‘Never’ (Settings -> Display & Brightness -> Auto-Lock)

18

19
• Login to the ShelbyNext Check-in App with your church domain and the established credentials for Checkin. The app will search for and find any installed wireless printers – select from screen. (NOTE: If you have multiple wireless printers of the same brand/model installed, you may want to login to the driver settings and manage the default name so that you can distinguish between printers.)

20
Remote Checkin (Self Check-in by families)
A special feature to Checkin allows families that are within .5 mile of the church address to use the ShelbyNext Membership App to Check-in their families from the parking lot (for example) and have their labels print inside. They only need to stop by a designated location and pick them up.
This feature requires:
• Checkin Mode setting – Enable Self Check-In
• Checkin Station setting
• PC running Web Launch Checkin (typically at Welcome Center so a volunteer can collect and
organize the labels that print out; hand to family as they come by) • Label printer installed and selected with Web Launch Check-in
21
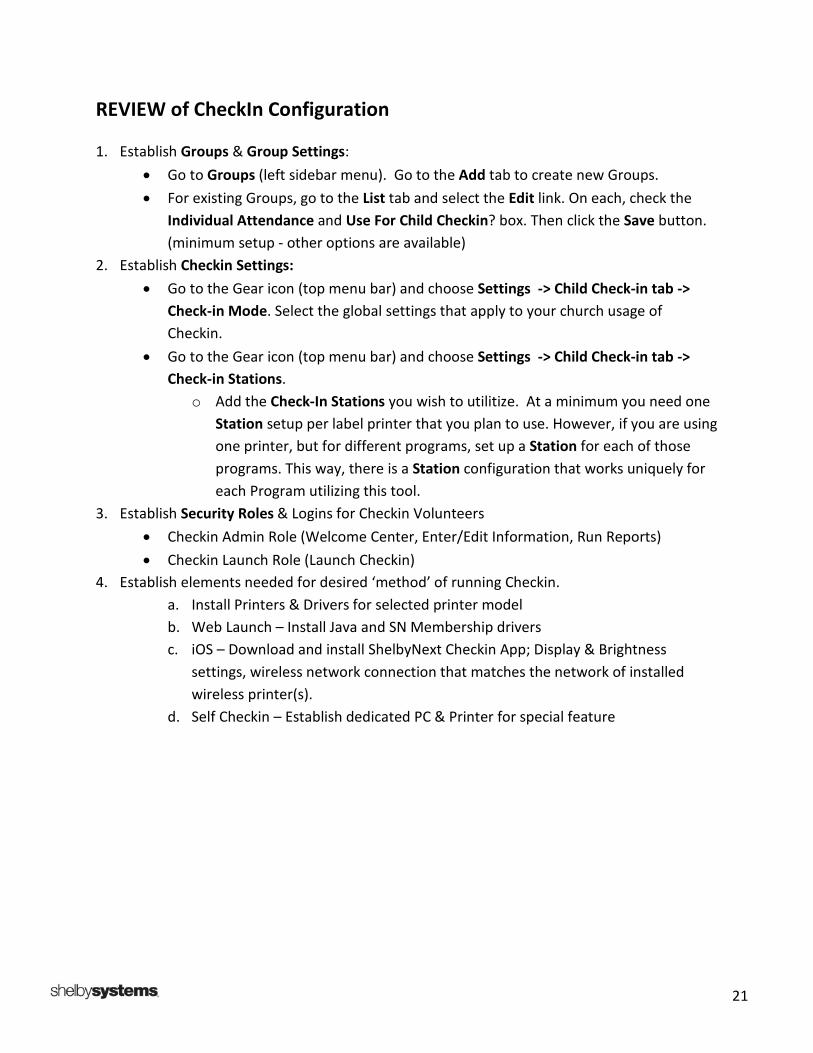
REVIEW of CheckIn Configuration
1. Establish Groups & Group Settings: • Go to Groups (left sidebar menu). Go to the Add tab to create new Groups. • For existing Groups, go to the List tab and select the Edit link. On each, check the
Individual Attendance and Use For Child Checkin? box. Then click the Save button. (minimum setup - other options are available)
2. Establish Checkin Settings: • Go to the Gear icon (top menu bar) and choose Settings -> Child Check-in tab ->
Check-in Mode. Select the global settings that apply to your church usage of Checkin.
• Go to the Gear icon (top menu bar) and choose Settings -> Child Check-in tab -> Check-in Stations.
o Add the Check-In Stations you wish to utilitize. At a minimum you need one Station setup per label printer that you plan to use. However, if you are using one printer, but for different programs, set up a Station for each of those programs. This way, there is a Station configuration that works uniquely for each Program utilizing this tool.
3. Establish Security Roles & Logins for Checkin Volunteers • Checkin Admin Role (Welcome Center, Enter/Edit Information, Run Reports) • Checkin Launch Role (Launch Checkin)
4. Establish elements needed for desired ‘method’ of running Checkin. a. Install Printers & Drivers for selected printer model b. Web Launch – Install Java and SN Membership drivers c. iOS – Download and install ShelbyNext Checkin App; Display & Brightness
settings, wireless network connection that matches the network of installed wireless printer(s).
d. Self Checkin – Establish dedicated PC & Printer for special feature

22
Q&A
Class Discussion
Lisa Horn Shelby Consultant
Lisa began working with Shelby software in 2000 as the database assistant at a large church in Austin, TX. She eventually took on the Shelby training of new and existing staff at that church and its’ associated churches and was project lead for the transition to Shelby Arena ChMS in 2008. During that same year she accepted the role of Shelby Certified Trainer and began serving churches across Texas. She now uses her background and skills with many other ministries across the United States as a Shelby Consultant on all Shelby products: v.5, Arena, and ShelbyNext. Lisa enjoys helping users of Shelby Software grow in confidence and skill as they use technology to strengthen ministry and assisting them to find creative and effective solutions to resource God’s work in their area of influence.