shawco k2 center learning management...
TRANSCRIPT

HONOURS PROJECT
SHAWCO K2 Center
Learning Management System
By:
Marvin Ngobeni
Supervised By:
Gary Stewart
Department of Computer Science
University of Cape Town
October 2007

i
Abstract
Learning Management Systems (LMS) are a software tool designed to manage user
learning interventions. Currently on the market there are numerous LMS available to
the public. Some of these packages are open source while others remain proprietary.
This report describes the customization of Moodle for the users at the SHAWCO K2
Center. The report covers problems faced at the K2 Center and the aims of the project.
Background into LMS and the technology used in developing LMS is covered such as
Moodle which use the following technologies PHP, MySQL and Apache. The design
of the customized modules for Moodle is covered in detail in this report and software
engineering methodologies are covered as well. Details of how the modules were
implemented are also covered and the evaluation of the custom modules is provided.
From the evaluation conclusions were drawn were it was discovered that Moodle is
highly customizable and it can be customized for inexperienced users such as those
from the SHAWCO K2 Center. The report ends off by touching on the future work
that could be done after this project.
Keywords: Learning Management Systems, Moodle, Learning Objects, Web based
Learning, educational strategies.

ii
Acknowledgment
Gary Stewart for his guidance and supervision and organizing equipments for the
project.
Phetola Maake for his valuable inputs and suggestions towards the project.
Jonathan Hoffenberg for all the help he provided from SHAWCO.
The student participants and tutors at the SHAWCO K2 center for their participation
in the evaluation.
University of Cape Town, Computer Science Honours class of 2007, it has been a
pleasure to be part of the class.

iii
Table of contents
Abstract ...........................................................................................................................i
Acknowledgment ...........................................................................................................ii
List of Figures ................................................................................................................v
List of Tables ................................................................................................................vi
1 Introduction........................................................................................................1
1.1 Project Introduction ...................................................................................1
1.2 Problem Definition.....................................................................................1
1.3 Project Aims...............................................................................................2
1.3.1 Research Questions ............................................................................2
1.4 Project Outcomes .......................................................................................4
1.5 Report Outline............................................................................................4
2 Related Research and Technology.....................................................................6
2.1 Research .....................................................................................................6
2.1.1 Learning Management Systems.........................................................6
2.2 Technology ................................................................................................9
2.2.1 Apache Web Server ...........................................................................9
2.2.2 MySQL Database...............................................................................9
2.2.3 PHP ..................................................................................................10
3 Design and Analysis ........................................................................................11
3.1 Analysis....................................................................................................11
3.1.1 Finding a solution ............................................................................11
3.1.2 Analysis of SHAWCO K2 Center work flow..................................11
3.2 Design ......................................................................................................13
3.2.1 System architecture Design..............................................................13
3.2.2 Proposed Solution ............................................................................14
3.2.3 Use Case Diagrams ..........................................................................19
3.2.4 Use Case Narratives .........................................................................20
3.2.5 Class Diagrams ................................................................................24
3.2.6 Sequence Diagrams..........................................................................26
3.2.7 System Overview .............................................................................27
3.2.8 Database Design...............................................................................28
3.2.9 Entity Relationship Diagrams for Attendance Module....................30
3.2.10 Web Server Design ..........................................................................31
4 Implementation and Integration.......................................................................32
4.1 Hardware..................................................................................................32
4.1.1 Development Systems......................................................................32
4.1.2 Test Systems ....................................................................................32
4.2 Integration of Modules.............................................................................32
4.3 Key System Features................................................................................33
4.3.1 Participants Attendance Register .....................................................33
4.3.2 Participants Bookmark.....................................................................33
4.3.3 Upload/Download Work..................................................................34
4.3.4 Tutor Attendance .............................................................................34
5 Experiments and Testing..................................................................................36
5.1 System Testing.........................................................................................36
5.1.1 Black Box Testing............................................................................36
5.1.2 Functional Testing ...........................................................................36

iv
5.1.3 Interface Testing ..............................................................................36
5.1.4 White Box Testing ...........................................................................36
5.2 Experiments .............................................................................................36
6 Results and Conclusions ..................................................................................38
6.1 Usability...................................................................................................38
6.1.1 Attendance Module ..........................................................................38
6.1.2 Upload/Download Module...............................................................39
6.1.3 Bookmark Module ...........................................................................39
6.2 Functionality ............................................................................................40
6.3 General Comments...................................................................................40
6.4 Conclusions..............................................................................................41
6.4.1 Software Engineering.......................................................................41
6.4.2 Customizability of Moodle ..............................................................41
7 Future Work .....................................................................................................43
Reference: ................................................................................................................44
Appendix A: User Tests and Questionnaires ...........................................................46

v
List of Figures
Figure 1: K2 Centre Application Architecture...............................................................3
Figure 2: Overview of the web architecture ................................................................13
Figure 3: Screen shot of the Moodle Home page ........................................................14
Figure 4: Screen shot of Upload/Download module....................................................15
Figure 5: Screen shot of bookmark module.................................................................15
Figure 6: Bookmark history section.............................................................................16
Figure 7: Participant view of attendance .....................................................................17
Figure 8: Day co-ordinators view of attendance records. ............................................17
Figure 9: Screen shot of attendance settings................................................................18
Figure 10: Screen shot to take register.........................................................................18
Figure 11: Student Use Case Diagram.........................................................................19
Figure 12: Tutor Use Case Diagram ............................................................................19
Figure 13: Administrator/Teacher Use Case Diagram.................................................20
Figure 14: System packages.........................................................................................24
Figure 15 Illustrates the main. .....................................................................................24
Figure 16: Attendance class diagram...........................................................................24
Figure 17: Upload/Download class diagram................................................................25
Figure 18: Bookmark class diagram ............................................................................25
Figure 19: Sequence diagram for bookmark feature....................................................26
Figure 20: Upload/Download sequence diagram.........................................................26
Figure 21: Attendance Register sequence diagram......................................................27
Figure 22: System Overview Diagram ........................................................................27
Figure 23: ER diagram for tutor attendance ................................................................30
Figure 24: Student bookmark table s ...........................................................................31
Figure 25: Upload/Download tables ............................................................................31
Figure 26: Web server Diagram...................................................................................31

vi
List of Tables
Table 1: Features of LMS. .............................................................................................8
Table 2: Mdl_currentwork_path database tables .........................................................28
Table 3: Mdl_studentattendance database tables .........................................................28
Table 4: Mdl_studentbookmark database tables..........................................................29
Table 5: Mdl_tutorattday database tables ....................................................................29
Table 6: Mdl_tutorattendance database tables .............................................................29
Table 7: Mdl_tutorattendance_records database tables ...............................................30
Table 8: Development Machine Specification.............................................................32
Table 9: Table of results for tutor attendance module .................................................38
Table 10: Table of results for tutor attendance settings ...............................................38
Table 11: Table of results for Upload/Download module ...........................................39
Table 12: Table of results for Bookmark module........................................................39

1
1 Introduction
1.1 Project Introduction
Khayelitsha which means “new home” was established between 1984 and 1985
during the apartheid era as a dormitory area for the working class and as a way for the
then apartheid regime to solve the problem of where to house the growing black
population in the Western Cape. Khayelitsha like most informal settlements is best
known for shacks which are a legacy which persists to date. Today Khayelitsha is
home to between 500 000 and 1 million people with an ethnic make up of 90% Black
African and 10% coloured and Xhosa being the prominent language spoken by the
residents [1, 2].
Khayelitsha is the largest township in the Cape Flats and the third largest in South
Africa. Since 1994 with the change of government in South Africa there have been
noticeable changes in Khayelitsha, such as brick houses, running water and electricity
in some of the areas. Since Khayelitsha is largely under-developed and the largest
township in the Cape Flats it attracts funding and partnerships from international
companies, Non Government Organisations (NGOs) and Government. All these
entities have one goal and that is to help better the inhabitants of Khayelitsha [1, 2].
SHAWCO is a student run UCT organisation which looks at helping the young
inhabitants of Khayelitsha better prepare themselves for finding work and gaining
access in Tertiary institutions in the future. Through a number of programs SHAWCO
tutors students and in the IT Center the students of the surrounding area are tutored by
UCT student volunteers at the K2 Center [4].
The SHAWCO IT Project was established at the K2 Center in 2002 with a large
expansion in 2004 as the computer center was built. With roughly 80 volunteers the
center tutors 90 grades 8 – grade 10 basic computer literacy in Khayelitsha. The
participants have between 2 – 4 hours of volunteer interaction a week during 1 or 2
sessions. The IT Project teaches participants how to use Microsoft Word, Excel,
Power point, Outlook and the Internet for a variety of tasks [4, 5].
1.2 Problem Definition
The IT Center currently has 30 computers for 30 participants for each session a week
and volunteers choose which day of the week they want to attend, mostly only
attending 1 session a week. The computers in the center are networked and they have
recently been provisioned with an Internet connection.
The participants on average will have 2 volunteer tutors depending on whether they
attend once or twice a week. Each week they are given notes on basic computer
literacy which they go through with the tutors who are available to them that week.
The notes are followed by computer exercises which test out the theory which they
read about in the notes.

2
At the beginning of each session the volunteer day co-ordinator for that day will start
by handing out printed notes on a piece of paper of what is to be done that day. The
participants and the volunteers will go through the notes and do the exercise that
follows with the volunteers assisting the participants if they require any help. At the
end of the day as the students leave the day co-ordinator will take attendance register
for that day, for the participants and the volunteers. The register is taken with the use
of a piece of paper with the names of the interested parties printed.
The following problem areas where discovered during an ethnographic study
conducted at the IT K2 Center:
• Since the participants share computers they have no area of securely
saving the work they have done
• Too much time is spent by the students explaining to the tutor for that
day what the last section they did is and what they understood
• Too much time is spent with taking the attendance register of the
participants and if the day co-ordinator does not show up, no one takes
register for that day
• The volunteers attendance register is also not taken on a regular basis
1.3 Project Aims
The problems identified above from the ethnographic study at the center, a decision
was reached to provide the IT center with a Learning Management System (LMS).
The following list of requirements was reached after meetings with Jonathan
Hoffenberg who is the education supervisor for SHAWCO:
• The use of the core functions of a LMS to store the resource material and
the user data
• A Custom built attendance register module to plug into the LMS for
tutors and participants
• A custom built bookmark feature for the students to keep track of work
done and who helped them
• A custom built module for the LMS where all the students can save the
work they are working on.
• All the modules had to be user friendly and easy to use
1.3.1 Research Questions
The primary research question of this project is whether:
• LMS are easy to use and intuitive for inexperienced computer users
• The other question is can LMS be customized for inexperienced computer
users.
The questions will be tackled through the customization of a LMS for the SHAWCO
K2 Center, which teaches basic computer skills to inexperienced users.

3
The project was designed to be a combination of software engineering and the adding
of functionality to a LMS. The main aim of the project was to provide the IT Center a
usable solution to be used by the participants and the volunteers. Since the
participants are still relatively new to computers a friendly and easy to use system was
required. The system also had to be easy to use on the administrative side. Our main
goal was to provide custom module plug-ins to a LMS for the IT Center.
The IT Project was separated into 2 distinct sub-systems which would later on be
integrated into the LMS. The one part of the project involved implementing the
modules for allowing the user to save their work, the attendance registers and the
student bookmark feature. The other part of the project involved facilitating
communication between the participants and the tutors through a cell phone based
system. This allowed both group members to proceed with the sub-system work
concurrently, and also ensuring that both members were allocated enough challenging
problems to resolve. The figure below shows how the work was divided for the
project.
Figure 1: K2 Centre Application Architecture
While the attendance register, bookmark and module to save users work involved the
interaction with a LMS and the core functionality of the LMS in terms of designing
the back-end, modules and the blocks that the users would interact with. The other
sub-system involved implementation of the modules, back-end, blocks and interaction
with a cell phone API.
The following report aims to present the analysis, design, testing, results and
conclusion of the custom participant and tutor attendance register, participant
bookmark feature and the feature for participants to save their work

4
1.4 Project Outcomes
The success of the project will alter the way the SHAWCO IT Project currently
operates. It will reduce the amount of paper that is currently being used for printing
out the attendance register sheets for the participants and tutors every week. There
would be no need to print out the work for the students on paper every day, since it
can be stored in the system.
More time will be spent by participants and tutors going through the actual work than
the participants trying to explain to the tutor what they covered in the last week. The
tutors will also have access to the notes to go through them before hand while in the
past this could not be done.
Through the use of the cell phone communication feature the participants will have a
place where they can reach the tutors outside of class. The use of LMS will introduce
the participants to a new web interface that they will come across in the future.
1.5 Report Outline
The remainder of the report is separated into the following section:
• Chapter 2: Related Technology and Research
• Chapter 3: Analysis and Design
• Chapter 4: Implementation and Integration
• Chapter 5: Experiments and Testing
• Chapter 6: Results and Conclusions
• Chapter 7: Future Work
The related technology and research covers the background into the project
technology, through the investigation of LMS and techniques used to develop LMS.
Numerous LMS were considered in the design and development phase of the project.
This section is included in order to understand the underlying technology used in
developing the system.
The analysis and design chapter focuses on the software engineering techniques used
to draw up the different system diagrams used to explain the system. Detailed
descriptions are given in support of each design choice and the diagrams that define
the structure of the different components are provided. A discussion of the overall
system design is also included.
The implementation and integration chapter discusses the hardware that was used to
develop the modules and how the back-end was structured. The integration discusses
how the modules were integrated into Moodle and how the 2 sub-systems were also
integrated with each other at the end.
The experiments and testing chapter has details of how testing was conducted with the
participants and the tutors at the K2 Center and the reasoning behind the tests are also

5
provided. The results gathered from the testing are provided in chapter six with the
conclusions regarding the questions raised from software engineering.
The last chapter proposes possible extensions to the project and possible approaches
are discussed as well.

6
2 Related Research and Technology
2.1 Research
For the system to be developed a decision was made to use one of the pre-existing
LMS and add custom functionality as gathered from the requirements. But before the
LMS was chosen as there are lots in the market, an investigation was conducted into
some of the available LMS and chose one that would meet the requirements of the K2
center.
2.1.1 Learning Management Systems
2.1.1.1 Drupal
Drupal was developed in 2000 by Dries Buytaert and some of his friends who wanted
to build a small news site with built in web board. The board would allow Dries and
his friends to leave each other notes and announcements. It was only in 2001 that the
software was released. Drupal is said to be modular and extensible, demands low
resources and is easy to use [3].
Simpson [7] wanted to move from a paper based “to-do” list to a neatly printed list on
a computer. The solution for this was a Content Management System (CMS). The
author wanted to experiment with different techniques in developing a CMS, they
looked at varies options, from building the CMS form scratch to comparing Open
Source package Drupal and Mambo. The final result was that the author leant how to
use the different tools in developing a CMS such as the database and server. From the
comparison of Drupal and Mambo, the author states that working with a pre built
package was better since it can be extended from what others have already done.
Between Drupal and Mambo the author found using Drupal was better than using
Mambo even though they could both facilitate the tasks the author had in mind [7].
Sawhney and Mund [13] had previous experience with using Drupal to build
successful websites and they share what they have learnt when they migrated the
Planetizen website to drupal. This allowed them to cut down on development time,
add features which they needed and benefit from the advantages that came with open
source software. Drupal was selected because of its user management, access control,
work flow, separation of content, web based editing and administration features. In
the paper the authors explain how they customized Drupal to fit what they needed
from selecting the module they wanted to use, configuring drupal, user roles and
permissions, taxonomy and finally choosing the themes.
2.1.1.2 Vula (Sakai Project)
Vula is a Sakaiproject initiative at UCT of an online LMS. Sakai is the consortium of
universities from around the world started to discuss and share teaching and learning
methodologies with the common goal to improve higher learning. The Sakai LMS

7
was selected at UCT because of the strength of the consortium, the solid architecture,
proven scalability and sustainability [11].
The core features that come with Sakai are announcements, drop box, resources, chat
room, forums, and message of the day and message center and many more. The sakai
community continue to develop new tools for the project, to keep up with
advancements in IT technology some of the future tools that will be included in the
coming Sakai installations are shared display, multi-point audio, pod-casting and
more [11].
2.1.1.3 Blackboard (WebCT)
Blackboards mission is to enable educational innovations everywhere by connecting
people with technology. Their role is to improve the educational experience with
Internet-enabled technology that connects students, faculty, researchers and the
community in a growing network of education environments dedicated to better
communication and content [12].
The products from Blackboard are proprietary. The LMS offers most of the features
most people have come to expect. It offers chat rooms and forums for the users,
central repository of resources, online submissions and online quizzes. WebCT which
is a product from Blackboard is mainly used in the Statistics department at UCT.
2.1.1.4 Moodle
Moodle is an Open Source LMS that was developed by Martin Dougaimas, then a
PhD candidate in Education with a background in computer science in 1999. The first
version of Moodle was released in August 2002 [9].
A single Moodle web site can host a large number of courses and students. Each
course has support for teachers, tutors and students. One or more teachers can manage
a course in Moodle and have control over what content is displayed on the course site
and the number of registered students and tutors.
The tutors in the course can view the work submitted by the students and grade the
work and post the results for the students to view. The tutors can also have access to
the forums. The students in the course site have access to login accounts and can
submit their work on Moodle and view their grades. They can also view their
submitted work as well as the content that the teachers make available to them.
Graf and List [8] compare a group of Open Source LMS in an attempt to find out
which was the most adaptive, Moodle and Sakai were amongst the list of LMS that
were compared. At the end of the study it was found that Moodle dominated the
evaluation by achieving the best results in five categories and the best rating in the
adaptation category. The strength of Moodle from the paper was the realization of
communication tools, and the creation and administration of learning objects [8].

8
Chavran and Pavri [10] conducted a study on Moodle. They looked at the installation
and configuration, administration and the customization of the product. The results
that were established from this study indicate that Moodle runs on the widest variety
of platforms, its easy to install and modify, it is modular to allow growth and it can be
used in conjunction with other systems and it is well documented.
Table 1: The following table shows the features that Blackboard, Sakai and Moodle support for more
detail visit [13].
©2007 EduTools / WCET
Product Name The Blackboard
Academic Suite
Sakai 2.3 Moodle 1.8
Developer Name BlackBoard Sakai 2.3 Moodlerooms
Communication Tools
Discussion Forums Supported Supported Supported
File Exchange Supported Supported Supported
Online
Journal/Notes Supported Supported Not supported
Real time Chat Supported Supported Supported
Productivity Tools
Bookmarks Supported Supported Not supported
Calender/Progress
Reviews Supported Supported Supported
Searching within
course Supported Supported Supported
Work offline/
Synchronisation Supported Supported
Orientation helper Supported Supported Supported
Student Involvement Tools
Group work Supported Supported Supported
Community
Networking Supported Supported Supported
Student Portfolios Supported Supported Supported
Administration Tools
Authentication Supported Supported Supported
Course
Authorization Supported Supported Supported
Registration
Integration Supported Supported Supported
Course Delivery Tools
Different Test types Supported Supported Supported
Automated testing
Management Supported Supported Supported
Automated testing
Support Supported Supported Supported
Online Marking
Tools Supported Supported Supported
Online Gradebook Supported Supported Supported
Student Tracking Supported Supported
Supported

9
Content Development Tools
Content
Sharing/Reuse Supported Supported Supported
Course Templates Supported Supported Supported
Customised Look n
Feel Supported Supported Supported
Instructional
Design tools Supported Supported Supported
Hardware/Software
Client Browser
Required Some Some All
Database
Requirements
Oracle, MySQL and
MS SQL server
Oracle and
MySQL
Oracle, MySQL,
MS SQL server
and PostGreSQL
Unix Server Supported Supported Supported
Windows Server Supported Supported Supported
2.2 Technology
2.2.1 Apache Web Server
After deciding on the LMS to be used for the system which was Moodle this left use a
few technology options which could use for a web server. Moodle comes with a built
in Apache web server. Apache is a web server notable for its key role in the
advancement of the World Wide Web (WWW). Currently Apache serves roughly
47.73% of all websites. Apache supports a variety of features which are implemented
as compiled modules which extend the core functionality. The core functionality
ranges from server side programming language support to authentication schemes [15,
16].
Apache provides common language interface support for PHP, PERL and Python.
Some of the security features include SSL and TSL. Apache is free over the Internet
and there is a lot of support on the Internet to assist users if they come to any technical
problems [15, 17].
2.2.2 MySQL Database
Moodle also comes with a built in MySQL database which is also free over the
Internet and there is lots of support for developers for MySQL over the Internet.
MySQL is a multithreaded, multi user SQL database management system, which runs
on a server providing multi user access. MySQL is popular for web applications,
which is tied to the popularity of PHP which is usually combined with MySQL [18,
19]

10
2.2.3 PHP
PHP is a reflective programming language designed for producing dynamic web
pages. PHP is mainly used on the server side as a scripting language. It is used mainly
in the web industry as a method of developing and deploying inexpensive, reliable,
scalable and secure web applications. PHP can also be used in a wide variety of
rational database management systems and runs on the most popular web servers and
is available for different operating systems. There is a lot of support on the web for
PHP developers [20, 21].

11
3 Design and Analysis
3.1 Analysis
3.1.1 Finding a solution
Before implementing any of the designs conceived, a prototype was implemented
which was presented to Jonathan Hoffenberg. Various software engineering practices
were considered at this phase ranging from a paper prototype to a system designed
with different tools to what will be used in the final design. Below is a discussion on
some of the software engineering practices used.
3.1.1.1 User Centered Design
On of the main key success feature of the project is that the system is user friendly
and easy to use and one of the design philosophies considered was User Centered
Design (UCD). Katz-Haas [15] stated that “User Centered Design is a philosophy and
process which places the user at the center; it is a process that focuses on cognitive
factors as they come into play during people’s interaction with things.” This
philosophy seeks to answer questions about the user including their goals as they
perform everyday tasks. The gathered information from this philosophy is used to fuel
user friendly development and design.
3.1.1.2 Ethnographic Study
Jones and Marsden in their Mobile Interaction Design book [22] state that
“Ethnographic studies focus on producing an account of what is going on in real
situations by observing the moment by moment behaviour of people interacting with
others and their environment over an extended period of time.” This results in the
ethnographer being able to collect first hand, eye witness accounts of how people go
about doing their work. An observation at the K2 center was set up, were the
participants and the tutors were observed as they went about their business. This
method of requirements gathering was helpful in that problem areas were noticed and
areas where improvements could be made at the K2 Center were highlighted.
3.1.2 Analysis of SHAWCO K2 Center work flow
Through the ethnographic study the K2 Center was visited and a properly observation
of the processes that take place at the center were noted. The K2 Center essentially
exists to provide the students at the K2 center with computer literacy. From the
observations the following main operations at the center where noticed:
• Taking of register for the participants and the tutors
• Students explaining to the tutors what they did with other tutors in the last
session

12
• The tutors helping the participants with the work.
These processes were partitioned into the following operations:
• The taking of the attendance register for the participants and tutors
• The bookmarking of work
• The ability for the participants to store their work
3.1.2.1 Participants Attendance Register
As the participants are about to leave they are asked to line up and the day co-
ordinator for that day will ask for each students name as they leave and tick it of the
register to note that the particular student was present on that day. This process is
repeated for each session.
3.1.2.2 Participants and Tutor Interaction
Before any work commences the participants wait to receive the printed piece of
paper with instruction for that session, while the tutors wait for the session to begin as
well. Once the notes for that day arrive; the participants and tutors start to discuss
where they left off with the other tutor and the participants explains if they were able
to understand before they can continue with this weeks work load.
3.1.2.3 Participants Work
Once the participants and the tutors have gone through the notes, if the participants
have an exercise which they were working on in the past session they will search for it
on the desktop or any of the other folders on the computer, so they can continue with
that exercise. Some of the participants will find the exercise others are not as fortunate
and have to start from the beginning.
3.1.2.4 Tutor Attendance Register
After the long session and the students have left; the day co-ordinator will proceed by
taking attendance register of the tutors who showed up that day. This process varies
according to the day co-ordinator as some will take register during the session and
others will wait until they are in the bus headed back to UCT, before they take the
attendance register. As with the participant attendance register this is also done on a
piece of paper which will need to be filed. The use of paper for attendance register
posses a problem since paper can get lost or the person given the task of filing and
updating the records could make a mistake or forget their responsibilities.

13
3.2 Design
3.2.1 System architecture Design
Due to the inherent design of Moodle it meant that three-tired web architecture would
be used. The separate components of the system are as follows:
Figure 2: Overview of the web architecture
• The client tier is responsible for translating the PHP scripts to the web
browser and displaying the information that the user interacts with
• The Logical tier (Middle tier) is responsible for the way transactions
take place between the user interface and the back end
• The data tier is responsible for the storing and retrieving of the data
The advantages of a three-tier architecture are well documented and understood; they
allow developers the freedom to make changes in one part of the system without the
need to change the other tiers of the system. This was an important factor as this
allowed the system to be developed in different phases. The interface could develop
without having to worry about the back end or the logical tier and when designing the
back end all that had to be done was to alter a couple of the middle tier classes to
make sure that they integrated well together.
Various software engineering techniques were addressed during this phase, the most
important methods are described in the following section and the resultant diagrams
are also provided.
14
3.2.2 Proposed Solution
3.2.2.1 Development Tool
As described earlier Moodle was chosen as the LMS that would be customized for
this project. Moodle comes with a MySQL database and an Apache web server and
for the scripting language PHP is used. This was due to the fact that most of the core
classes in Moodle are written in PHP and the Apache server can process PHP and.
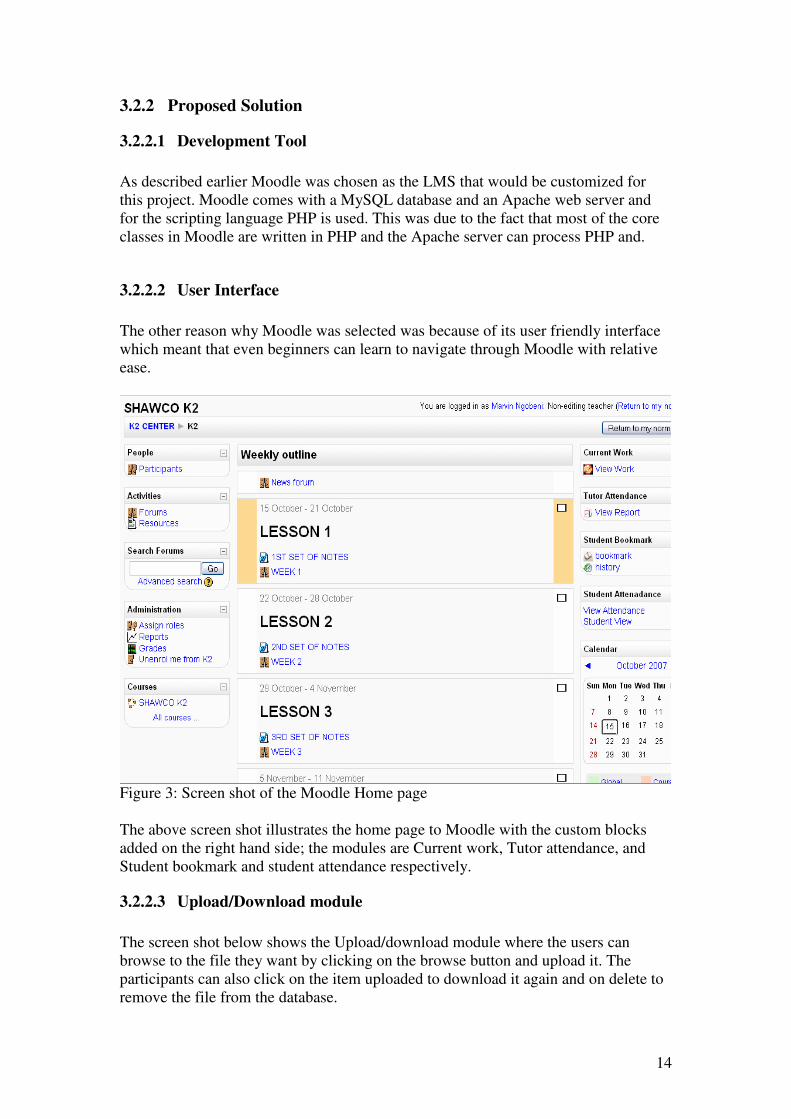
3.2.2.2 User Interface
The other reason why Moodle was selected was because of its user friendly interface
which meant that even beginners can learn to navigate through Moodle with relative
ease.
Figure 3: Screen shot of the Moodle Home page
The above screen shot illustrates the home page to Moodle with the custom blocks
added on the right hand side; the modules are Current work, Tutor attendance, and
Student bookmark and student attendance respectively.
3.2.2.3 Upload/Download module
The screen shot below shows the Upload/download module where the users can
browse to the file they want by clicking on the browse button and upload it. The
participants can also click on the item uploaded to download it again and on delete to
remove the file from the database.

15
Figure 4: Screen shot of Upload/Download module
The above design was selected after comparing different file upload methods, since
the users are new to LMS a simple design was selected. This design allows the
participants to view the work they have just uploaded and they use the same module
to download and delete the file. The choice for performing all the actions on one User
Interface was to reduce the number of clicks to perform simple tasks.
3.2.2.4 Student bookmark module
The screen shot below illustrates the bookmark feature were the user can enter the
fields required and after they submit the form the bookmark history is displayed.
Figure 5: Screen shot of bookmark module
The above design for bookmarking was selected after consultation with some of the
tutors from the K2 center. The section title was selected to help the participants know

16
which section they want to refer to and it is used for downloading purposes. The
comments field were selected so that the student can have a reminder why they
bookmarked that section, they can enter a sentence which would have meaning to
them when reviewing the bookmark. The tutor comment section was included as a
guide to others tutors so they can know where the previous tutor left off and the name
of the tutor was also included. The priority field was included as a guide for the
participants so that they can easily choose the most important section when reviewing
all they have gone through at the end of the year.
3.2.2.5 Bookmark history module
The screen shot below shows the bookmark history section of the module where the
participants can download the notes from this section as well as view the information
they entered about the bookmark. The participants also have the option to delete any
of the bookmarks they have.
Figure 6: Bookmark history section
The design for the bookmark history module was intuitive since it is retrieving the
information entered by the user from the previous field. The only information which
is retrieved from the system is the date which lets the user know when they made the
bookmark. The rest of the information is retrieved from the bookmark database table
for that particular user.
3.2.2.6 Student Attendance View module
The below screen shot is of the participant’s view of the attendance register, the
participant can only view their own attendance record.

17
Figure 7: Participant view of attendance
The view above is of the attendance record for a particular user, this design was
chosen since it allowed the participants to view the records for all the available
sessions. This view can only be seen by the participants and the tutors. The day co-
ordinators get to view the records for all the people in the course.
3.2.2.7 Tutor Attendance View module
The screen shot below is of the tutor attendance record which can be viewed by the
day co-ordinator. The tutors themselves just like the students can only see their own
status record. The day co-ordinator on the other hand can view the attendance records
of all the tutors and participants.
Figure 8: Day co-ordinators view of attendance records.
The above interface shows the view that the day co-ordinator sees when they view the
attendance records. This view shows all the records for all the tutors and participants
on different days. The headers of the table shows the actual days that a participant was
suppose to be there and the status of whether they attended or not.

18
3.2.2.8 Tutor Attendance Settings Module
The below screen shot is of the tutor settings where the administrator can select which
day each tutor is supposed to attend.
Figure 9: screen shot of attendance settings
The above screen shot is of the tutor attendance settings were the administrator can
select the day and the tutors to assign for that day. This design was selected since
Moodle emphasises simplicity for User interfaces. With this design the administrator
selects the day and clicks the tutors for that day and submits the form. The tutors will
be assigned to the selected day.
3.2.2.9 Take Tutor Attendance Module
The below screen shot is where the day co-ordinator takes attendance for the tutors on
that particular day.
Figure 10: screen shot to take register
The above take attendance design was designed to be similar to the settings module to
maintain a sense of consistency within the system. In this module the day co-ordinator
selects the day and checks the check boxes next to the names of the tutors who are
present to take register.

19
3.2.3 Use Case Diagrams
The following section will cover the use cases for the students, tutors and the
administrators in the K2 center project.
Figure 11: Student Use Case Diagram
The above figure illustrates the actions that can be performed by the student on the
system. Most of the functions such as viewing the resources, assignments and viewing
feedback are already present in Moodle. Functions such as the ability for the student
to bookmark the current notes they are viewing is not available in Moodle. With this
bookmark function the students can make a note on why that section was
bookmarked. The students will be presented with an interface to manage their
bookmarks and arrange them in any order they may want to for revision purposes.
Figure 12: Tutor Use Case Diagram
The above figure shows the tutor use case diagrams. The tutor will be able to view all
the assignments and as well as the submissions from the user. The tutors will be able
to give feedback to the assignment submitted by the students.

20
Figure 13: Administrator/Teacher Use Case Diagram
The above Use case is that of the administrator. The administrator will have complete
control over the course. The administrator will be able to load new resources into the
system, set the assignments and quizzes for the students. The administrator will also
be able to view the feedback given to the students. The administrator will have the
additional feature of being able to view the attendance register for the students and the
tutors and they will be able to print out the form.
3.2.4 Use Case Narratives
3.2.4.1 Bookmark Narrative
1. Brief Description: User can select work they want to bookmark
User can view pass bookmarks and comments
User can delete past bookmarks
2. Preconditions: User must registered and logged on
3. Business Trigger: User clicks on the bookmark or bookmark history
4. Basic Flow: Bookmark
5. User clicks on the bookmark link on the bookmark block
6. User is presented with a form to enter required bookmark data
7. User submits the form

21
8. User is re-directed to the bookmark history section
9. Post Condition: The bookmark should be displayed on the bookmark history
section which user is re-directed too.
10. Alternate Flow: Delete bookmark
11. When in 8
12. The user can delete required bookmark
13. By clicking on the delete link next to the bookmark
14. User will be asked to confirm the deletion of the document
15. Post Conditions: Item would have been deleted
16. Alternate Flow: Download document
17. When in 8
18. User can click on the name of the document to download it
19. Business Rules:
20. When the user clicks on the submit button all the information they have entered
into the form will be saved into the database
21. In the bookmark history section the resource table must be searched in order to
open the correct document
22. Prototype Screen:
3.2.4.2 Upload/Download Narrative
1. Brief Description:
User can view all the work current uploaded
User can upload new documents
User can download the work in module
User can delete old work

22
2. Preconditions: User must registered and logged on
3. Business Trigger: User clicks on the View work block
4. Basic Flow: Upload work
5. User clicks on the View work link on the current work block
6. User can view all the work they have uploaded in the past
7. User can upload new work by clicking on the browse buttons
8. Selecting the document they want to upload then clicking the upload button
9. Post Condition: The new document should be displayed on the list of
available documents
10. Alternate Flow: Download work
11. When in 6
12. The user can also download the work listed
13. Clicking on the name of the document
14. The user will be presented with the option to save or open or cancel the document
15. Post Conditions: The list will still have the number of items
16. Alternate Flow: Delete work
17. User can click on the delete link in same row as document
18. A confirmation of the delete will be required
19. Business Rules:
20. When the user uploads a document, the date, time, type of document, path of the
document and the name of the document are all save in the database
21. The size of the document is checked to assure it does not exceed maximum
22. Prototype Screen:
3.2.4.3 Attendance Record Narrative
1. Brief Description: User can select the tutors to allocate to a particular day
User can take attendance of the tutors
User can view the attendance record of all the tutors or

23
students
2. Preconditions: User must registered and logged on
3. Business Trigger: User clicks on the attendance blocks
4. Basic Flow: Bookmark
5. User clicks on the settings link on the attendance block
6. The user can select the day to assign tutors
7. User can select the tutors they want to allocate to that day
8. User can submit the selected users
9. Post Condition: User can select different day to assign tutors
10. Alternate Flow: Take attendance
11. When in 5
12. User can click on take attendance
13. Select the day for attendance
14. Select the present users
15. Submit the form to register the user for that day
16. Alternate Flow: View records
17. When in 5
18. User can click on view record
19. user will be presented with all the days and the list of user names suppose to
attend each week
20. Business Rules:
21. When user selects the names of tutors to register their status is saved in the
database
21. The day co-ordinator can only take attendance of the tutors for that particular day
23. For past days the tutor can only view the record
24. For coming days attendance can not be taken till that day arrives
25. Prototype Screen:

24
3.2.5 Class Diagrams
Based on the use cases above and their narratives the following class diagrams were
identified and will be elaborated:
3.2.5.1 System Overview
Figure 14: System packages
Figure 15 illustrates the main packages contained within Moodle. The MySQL and
Apache packages hold the compiled classes and modules for running MySQL
database and the Apache server. The Moodle package interacts with both these
packages in order to run as a web service. When data is stored in Moodle such as
word documents or any other file that’s uploaded it is stored in the Moodledata
package.
3.2.5.2 Attendance Class Diagram
Figure 16: Attendance class diagram

25
Figure 15 shows the PHP classes that are used for the tutor attendance module. The
classes that operate the User Interfaces are the index.php, report.php and the
settings.php. The block_attendance.php class is used to place the block instances into
the main page of Moodle. The lib.php has all the functions that are used to access the
database and retrieve the data to be used in the other classes.
3.2.5.3 Upload/Download Work Class Diagram
Figure 17: Upload/Download class diagram
Figure 16 shows the classes that are used the upload/download module. The
block_currentwork.php is used to add the block instance in the main page. The lib.php
holds the database methods for retrieving the data and the index.php is used for the
interface.
3.2.5.4 Bookmark Class Diagram
Figure 18: Bookmark class diagram

26
Figure 17 shows the classes that are used the bookmark module. The
block_bookmark.php is used to add the block instance in the main page. The lib.php
holds the database methods for retrieving the data and the index.php is used for the
interface and the bhistory.php is for the interface of the bookmark history page.
3.2.6 Sequence Diagrams
3.2.6.1 Bookmark Sequence Diagram
Figure 19: Sequence diagram for bookmark feature
Figure 18 shows the sequence that the user follows for using the bookmark feature
from logging in. This sequence diagram follows the user actions from clicking on the
block to open the module to when the participant submits the form and they are re-
directed to the bookmark history. The sequence also shows when the data is store in
the background.
3.2.6.2 Upload/Download Sequence Diagram
Figure 20: Upload/Download sequence diagram

27
Figure 19 shows the sequence diagram for the module where the students can save the
work they are working on. The sequence shows the steps the participant should follow
to upload and to download a document onto the system.
3.2.6.3 Attendance Register Sequence Diagram
Figure 21: Attendance Register sequence diagram
Figure 20 shows the steps that must be followed when using the attendance register.
The sequence diagram shows all the actions that can be performed from the
attendance module such as the settings, take attendance and view report feature.
3.2.7 System Overview
Figure 22: System Overview Diagram
Figure 21 gives a system overview of the entire system. The Graphical User Interface
(GUI) will obtain information from the user and the PHP Script will control what goes
on in the GUI. The GUI and the PHP Script make up the client side of the system. The
PHP Script also queries the Moodle data files and the database depending on the type
of information requested by the user. The PHP Script, Moodle data files and the
database make up the server side of the system.

28
3.2.8 Database Design
Moodle comes with the MySQL database pre installed with tables to store information
on users and the resources that they require for the course. To facilitate the modules
that will be implemented new tables will need to be created to store the information
for the new modules.
The new Moodle tables that will be created are:
• Mdl_currentwork_path
• Mdl_studentattendance
• Mdl_studentbookmark
• Mdl_tutorattday
• Mdl_tutorattendance_records
Table 2: Mdl_currentwork_path(id, course, userid, name, fname, type, size, path, timemodified)
Field Type Description
id Integer Table id
course Integer Course id
userid Integer User id
name Char User name
fname Char File name
type Char File type (extension)
size Integer File size
path Char File path (location)
timemodified Integer Date table entry was made
Table 2 is the database table structure for the upload/download work module. This is
where the data about the uploaded document is stored and it’s retrieved by the module
to display on the web page. The path is stores the location where the file is stored in
the moodledata file.
Table 3: Mdl_studentattendance(id, course, userid, name, wday, wkid, date_act, status,
timemodified)
Field Type Description
id Integer Table id
course Integer Course id
userid Integer User id
name Char User name
wday Char Day of week (mon … fri)
wkid Integer Week id (1 … 7)
date_act Char Actual date
status Integer Represents present or absent
timemodified Integer Date table entry was made
Table 3 is the database table to store the records for the student attendance, this table
interacts with the other attendance tables as illustrated by the ER diagrams below.

29
Table 4: Mdl_studentbookmark(id, course, name, userid, timeadded, title, priority, scomment,
tname, tcomment, timemodified)
Field Type Description
id Integer Table id
course Integer Course id
name Char User name
userid Integer User id
timeadded Char Time bookmark was added
title Char Selected title
priority Char Priority of bookmark
scomment Char Student comment
tname Char Tutor name
tcomment Char Tutor comment
timemodified Integer Date table entry was made
Table 4 describes the student bookmark database table. The user enters the
information on the web interface and the data is stored in the fields provided. The
timemodified field is retrieve from the system and not entered by the user.
Table 5: Mdl_tutorattday(id, course, username, wday, wkid, timemodified)
Field Type Description
id Integer Table id
course Integer Course id
username Char User name
wday Char Day of week (mon … fri)
wkid Integer Week id (1 … 7)
timemodified Integer Date table entry was made
Table 5 shows the tutorattday database table where information for when each user
should attend is stored. This table makes it easier when constructing the attendance
tables.
Table 6: Mdl_tutorattendance(id, course, userid, name, wday, wkid, date_act, status,
timemodified)
Field Type Description
id Integer Table id
course Integer Course id
userid Integer User id
name Char User name
wday Char Day of week (mon … fri)
wkid Integer Week id (1 … 7)
date_act Char Actual date
status Integer Represents present or absent
timemodified Integer Date table entry was made
Table 6 shows the attendance tables for tutor attendance records and works the same
way as the student attendance table.

30
Table 7: Mdl_tutorattendance_records(id, course, wday, wkid, date_act, timemodified)
Field Type Description
id Integer Table id
course Integer Course id
wday Char Day of week (mon … fri)
wkid Integer Week id (1 … 7)
date_act Char Actual date
timemodified Integer Date table entry was made
Table 7 show the attendance records for both tutors and students, this database table
stores the day and the week id is an integer representation.
3.2.9 Entity Relationship Diagrams for Attendance Module
The following diagram shows the relationships between the attendance tables.
Figure 23: ER diagram for tutor attendance
Figure 22 above it can be seen that the mdl_attendance_records store the days and
dates that attendance should be taken for a particular course. The
mdl_attendance_records table is used by the mdl_tutorattday which gets the days for
the course and associates those days with a particular user from the same course. Then
the mdl_tutorattday table is used by both the mdl_tutorattendance and the
mdl_studentattendance tables to capture the attendance status for all the users in the
course.
The other tables’ mdl_bookmark and mdl_currentwork do not have associations with
any other customised tables and only store data which they receive from the
participants.

31
Figure 24: Student bookmark tables Figure 25: Upload/Download tables
3.2.10 Web Server Design
Figure 26: Web server Diagram
The server will consist of server-side scripts which will make up the engine for the
whole module. The scripts will be used to capture the information from the interface
and the information will be processed according to the functions being run. The web
server provides an interface which is the GUI to pass information which is then
processed by the server scripts. The scripts are stored in files in the server.

32
4 Implementation and Integration
4.1 Hardware
4.1.1 Development Systems
The entire system web interface and the backend were developed concurrently on
entry-level hardware as this would assure an acceptable level of performance on the
machines which are used at the K2 Center. The specification for the development
machines are as follows:
Table 8: Development Machine
Components Specification
CPU Pentium ® 4
SPEED 3.04Ghz
RAM 256Mn DDR333
HDD 80GB Western Digital (7200rpm)
OS Windows XP SP2
4.1.2 Test Systems
The development machines doubled up as test machines. The demonstrations for the
prototype and a walkthrough of the system where also performed on these machines.
The user evaluation of the system was performed on the machines at the K2 Center;
this was to assure that the performance of the system on the end machines was
acceptable.
4.2 Integration of Modules
The back end and the modules for Moodle were built concurrently; this reduced the
amount of integration required. The blocks were the first to be built and they were
loaded into Moodle to assure that there were no errors when loaded into Moodle.
Blocks are the module instances loaded into the main page of Moodle and usually
have a link to the main page of the module.
The next phase of the implementation involved the implementation of the modules
which could be accessed through the blocks. After implementing all the modules and
making sure that they operated properly with the blocks, the back end could be built.
The back end that comes with Moodle was used to retrieve the required information
that was needed by the blocks. This included information about the users such as their
names and which course they are registered for. Information about the course was also
used such as which resources were loaded into the course. The final step for the back

33
end was to load the custom tables to store the information used and entered into the
modules.
4.3 Key System Features
The system workflow attempts to make the running of operations at the K2 Center
smoother by streamlining some of the operations that wasted time at the K2 Center
and resolving the problems identified. The list below contains the key features
implemented:
• Participants attendance register is performed automatically as the student
logs on to Moodle
• The participants can bookmark a document they are working with comments
from them and the tutor
• The participant can upload/download the work they are working on in
Moodle
• Day co-ordinators can set the day that certain tutors are suppose to be
available
• Day co-ordinators can take attendance register of the tutors for a particular
day
4.3.1 Participants Attendance Register
The K2 center teaches grade 8 – 10 which means that some of the groups attend at
least twice a week. This meant that the attendance register had to accommodate that
Monday through to Friday different participants were attending. This meant that the
interface for the administrator to set which users were supposed to attend for that
weeks needed to be easy to use and understand.
The feature also took register of the students automatically depending on whether they
are logged in on the day they are supposed to be there. The reporting for this feature
also needed to be easy to understand without too many labels or buttons to confuse
the users.
The other feature to the participants attendance register is that the administrator can
view all the participants status of whether they attended that day or not but the
participants could only view their own status for the days they are supposed to attend.
4.3.2 Participants Bookmark
The participants bookmark feature was designed to save time for the tutors and the
participants, by lessening the amount time it takes the participants to explain what
they did last. With this feature the participant can just open up the bookmark history,
view what they were doing in the last session and which tutor helped them.

34
This feature allows the student to select the document they are working on currently
from a drop down box; they can enter a comment about what they did not understand
about that topic. The tutor can then select their name from a drop down box and enter
a comment for the next tutor about what they think the participant did not understand
and submit the form.
Everything that the participant bookmarks is stored in the bookmark history section
according to date. The next time the participants attend they simply need to open the
bookmark history section and check the previous date and click on the document they
want to go over. The tutor can read the comments left by the other tutor and know
where they need to proceed from to help the student more effectively.
4.3.3 Upload/Download Work
This feature was designed to help the participants have a place where they can store
their work securely. Considering that the computers they work on are shared with
other users who might delete others work by accident. The participants needed a place
where they know that their work is stored privately.
This feature was designed to be user friendly and easy to use requiring the least
amount of effort from the user. The feature uses two buttons one to browse to the
work that they want to store and the other to actually upload the work into Moodle.
After uploading the participants can see the document they have just uploaded as a
link.
The link to the document that the participant just uploaded doubles as a download
feature as well meaning that the user can still upload more documents if they so
pleased or can download other documents they saved previously.
The uploaded work can only be viewed by the participants themselves and no one else
this allows the participants the security that their work can not be viewed by anyone
else until they are ready to submit it.
4.3.4 Tutor Attendance
The tutor attendance feature was designed to be similar to the students attendance
feature, given that the tutors also attend on certain days of the week. The differences
in the two modules is that the tutors only attend for one day of the week while some
of the students can attend twice. The tutors do not necessarily need to logon to the
system since the day co-ordinator can take attendance of the tutors.
This feature was design so that the administrator could set which tutors are supposed
to attend on which particular day and the tutors commit to one day to go tutor the
participants at the K2 center.
With this feature the day co-ordinator can select the current day and a list of the tutors
for that day are presented and the tutor can proceed by checking the boxes to confirm

35
that the following tutors are there that day. When the form is submitted the register for
those tutors selected is updated and they can not be selected again.
If it is Tuesday and the day co-ordinator selects Thursday by mistake they will not be
able to check the boxes since the system will not allow the day co-ordinator to take
attendance for that day.
The way that the attendance record is presented is similar to the participant’s
attendance record. For each day of the week a table is presented with the names of the
tutors and the dates that are available for that day. If the tutor was there a counter is
incremented. The total numbers of days that the tutor is supposed to attend is provided
as well.

36
5 Experiments and Testing
5.1 System Testing
5.1.1 Black Box Testing
The presence of user is required for testing of the system but while the system is going
through the implementation and design phase, testing is also required to ensure that the logic
of the system is correct and that the methods function correctly. Black box testing was
employed during the design and implementation phase with more emphasis on testing during
the implementation phase.
5.1.2 Functional Testing
In-line with the user requirements functional testing was performed as each new function was
added to the Moodle functionality. As Moodle promotes the modularity way of building
systems this made functional testing easy. The first was to add blocks into Moodle and test
that they were functioning properly. The next phase was to include the actual module
including the database tables that were to be used by the module. Each blocks function was
tested separately from the others since their functionality is also separate.
5.1.3 Interface Testing
Another important factor that required close attention during implementation was the
interface. The interface developed during the implementation phase stayed close as possible
to the one proposed during the design phase. The most important factor during his phase was
to make sure that the hyperlinks worked correctly and the buttons in the system worked
correctly. The other factor was to make sure that the look of the custom modules being
developed remained as close to the look that Moodle user are used too.
5.1.4 White Box Testing
White (Glass) Box Testing is the close examination of the internal procedural detail of the
system components. The main part of this form of testing is to ensure that all the logical paths
of the system function correctly and have at least been executed once during the testing phase.
In the later phase of the implementation flow graphs were employed to test all the “if” and
“loop” statements in the implemented system to ensure that they functioned properly. Basis
Path Testing was also used to test the “if “statements as well.
5.2 Experiments
For the final test a field test was conducted with the users at the K2 Center, using the
one of the Pentium 4 machines available at the K2 Center. The test cases for the field
test were derived from the use case diagrams to assure that the system performed as it
was supposed to.

37
Five tests were drawn up to test the following functionality:
• Tutor Attendance settings
• Taking the tutor attendance
• Participants bookmark feature
• Participants uploading work
• Participants downloading work
(The actual tests can be found in Appendix A)
As stated above one computer was selected at the K2 Center to perform the test. The
initial plan for the testing was to have 10 participant users from the K2 Center to test
out the system and to have 5 tutors test out the system as well. Due to the time
constraint it took to explain to the participants how the system worked the final
number of participants evaluated was 10, with 5 students participants and 5 tutors.
Before the start of the test the selected participants were taken through a walkthrough
of how to use the system and an explanation was provided to them why each of the
functionality was present in the system. The walkthrough took about 15 minutes and 5
minutes were assigned for questions that any of the test participants might have had.
The evaluation began with the student participants one at a time and it was soon
discovered that most of what they had observed during the walkthrough they had
forgotten. Before each student participants went through the test cases they were
asked to sign a consent form, then they would receive a quick 2 minute walkthrough
again, after they completed each test case they were given a questionnaire before they
continued with the next test case.
The tutor participants went after all the five student participants had gone through all
their test cases. There was essentially no need to explain to the tutor participants what
they had to do again, as all of them had; had past experience with LMS and web
interfaces.
The student participants went through the bookmark, upload and download features as
these would be the features they use on a daily basis. The tutor participants went
through the tutor attendance settings and the take tutor attendance feature.
During the test a method of “Think out Loud” was employed during the test
procedure. This was to gain insight into the cognitive process of the user. This method
was used while the user was about to perform a task they were asked to state out loud
why they were doing that action. All comments from the users were noted as they
used the system

38
6 Results and Conclusions
The user evaluation went well with the tutors and the student participants being able
to complete their tasks. The responses from the participants were then grouped into
these three main headings; Usability, functionality and general comments. Using
these heading as a guide conclusions are drawn about the ease of use, software
engineering and customizability questions asked earlier in the report.
6.1 Usability
6.1.1 Attendance Module
From the user evaluation and the comments that were received after the participants
used the system, these conclusions were reached. Most of the participants gave an
average score of 4 on a scale of 5 with 5 indicating the best score on the questions
given. The co-ordinator for that day even stated that in terms of taking register he
prefers the system over the paper way since it required less effort.
Table 9 shows all results the results received from the user evaluation for the tutor
attendance module. The users were given 4 questions each question was rated on a
scale of 1 to 5 with 5 indicating very useful or very easy to use.
From the results it can be concluded that the module was very easy to use and
understand since the overall average score received from the results is 4.55. This
indicates that the users understood how to use the module and found it easy as well.
The day co-ordinator gave a commenting saying “Ya, I like this, its good”.
The users were also asked which method they preferred when it came to taking
register, the system or the paper method and all the participants favoured the system
over the paper method.
Table 9: Results for tutor attendance module
Condition Mean Std dev N
Usefulness of attendance register 4.5 0.57735 5
Usefulness of select day option 4.75 0.5 5
Ease of use of feature 4.5 1 5
Understand ability of feature 4.75 0.5 5
Table 5 is a summary of the results received from the attendance settings module
where the participants where asked the same questions as for the module above. From
the results the users found the module easy to use and understandable with average
scores of 5 and 4.7 respectively. This shows that the tutors found this module easy to
use.
Table 10: Results for tutor attendance settings
Condition Mean Std dev N
Usefulness of attendance settings 4.5 0.57735 5
Usefulness of select day option 4 0.816497 5
Ease of use of feature 4.75 0.5 5
Understand ability of feature 5 0 5

39
6.1.2 Upload/Download Module
With the upload and download feature for the work the participants found it
particularly easy to use and download the work scoring 4.6 on ease of use and 3.6 on
understand ability. The participants were given a question on the way the resultant
data was presented after uploading a document and this received a low score at 3.8.
This leads use to conclude that the way the data is presented can be improved for the
users.
The users commented that the fact that it was all done in the same window uploading
and downloading was good since they did not have to go to another window to view
or download their work. The users were able to use the module and on average
understood how it was used. The users found the module useful. This leads us to
believe that the users will use the module.
Table 11: Table of results for Upload/Download module
Condition Mean Std dev N
Usefulness of upload module 4.2 1.095445 5
Presentation Understandable 3.8 1.30384 5
Ease of use of feature 4.6 0.894427 5
Understand ability of feature 3.6 0.894427 5
6.1.3 Bookmark Module
For the bookmark feature the same scale was used as in the attendance module. From
the module it can be seen that the users found the module easy to use and they
understood how to use the module each section received an average score of 4.4 and
3.8 respectively.
The section which got the lowest score was the priority module with a score of 3.6
this could mean that the users did not like this feature because they did not see the
need for selecting a priority on a bookmark. On average the user found the module
useful with an average score of 3.4 and deviation of 0.89.
Table 12: Table of results for Bookmark module
Condition Mean Std dev N
Usefulness of bookmark module 3.4 0.894427 5
Usefulness of tutor comments 3.4 1.140175 5
Usefulness of student comments 3.8 1.095445 5
Usefulness of priority 3.6 1.341641 5
Ease of use of feature 4.4 0.894427 5
Understand ability of feature 3.8 0.83666 5
Overall the participants were able to use the features provided and found the usability
of the system fine and they understood how to use the features.

40
6.2 Functionality
The day co-ordinator was pleased with most of the functionality from the system. He
stated that he found the tutor attendance settings feature easy to use since he could see
all the tutor names and select the ones that he wants to allocate to that day.
The day co-ordinator was also pleased that with the students they would not have to
take register anymore since the system would handle that and they could just check
from the report section who has been missing sessions.
One of the tutors suggested that the date or time should be added for when the register
was actually taken. Another tutor commented on adding more colour to the attendance
register report so that it is not just black and white.
6.3 General Comments
Most of the participants commented that most of the modules did not have headings,
until an explanation to them was given on how Moodle displays its heading.
“I did not see a heading so I was not sure what I was supposed to do”.
They actually wanted to see the title in bold above which ever feature they were
using. The tutor participants also commented that they prefer the system attendance
register since they are assured of the fact that their attendance status will be stored in
the system and not carried by the co-ordinator to someone else who they can not be
assured will store the information that day.
Some of the participants stated the following about the taking of register:
“When the day co-ordinator takes the attendance we never know where it goes
because we never see it”.
“Since joining I have never seen the attendance register.”
These comments show that the users especially the tutors want to see their attendance
records which is something the SHAWCO administrators could never provide to
them. This leads us to the conclusion that with this system where the participants can
view their status will lead to better communication between SHAWCO and its’
volunteers.

41
6.4 Conclusions
The following section will discuss the research questions raised in the project
proposal and in the report.
6.4.1 Software Engineering
Due to the time constraints of the project and the few users for the testing this is not
enough to make solid claims about the system. But the 5 tutors who tested the system
can be considered expert users since they have experience with LMS and their
comments should weigh more towards the conclusions made.
From the user testing a conclusion was reached that all the tutors were able to read the
tasks and perform the operations that they were supposed to perform. This leads use
to the conclusion that the system is easy to use and the participants were able to
understand what they were supposed to do. With user participants there was a bit of a
learning curve as they are new to web interfaces but after they were left to perform the
tasks a couple of times they did not require any assistance.
We can also conclude that the learning curve for the students to learn how to use the
system is short because the participants at the center after explaining to them and
showing them how the modules were suppose to work they were able to follow the
instructions without any aid from anyone.
With the tutors since they already have experience with using web browsers and
LMS, they could just read the instructions and know what they had to do. They could
also look at the screen and know what information was required where without having
to go over the instructions.
The user testing served as an acceptance test since when the participants were asked if
they would us the system they all agreed stating that it was easy to learn and to use.
They were also asked which functions they found useful and the attendance register
scored highest for this question.
6.4.2 Customizability of Moodle
One of the research questions that the project seeks to answer is how customizable
Moodle was? From the research conducted and the functioning modules that were
load to Moodle a conclusion that Moodle is highly customizable was reached.
This is enhanced by that fact that there is a lot of support for Moodle developers from
the Moodle community and there are a lot of people that continue to add functionality
to Moodle and those how continue to ask for more functionality to be added into
Moodle.
The modules that were added to Moodle were designed for users with basic to no
computer experience in mind and since those users were able to use the modules after

42
a few explanations and seemed enthusiastic enough to use the modules in the future. It
shows that Moodle can be used to facilitate learning for inexperienced computer users
as it emphasises a user friendly and not too complicated design. It is designed with
students in mind.

43
7 Future Work
Suggestions about changes to the interface and additional functionality were noted
during the testing.
One suggestion which was made by Jonathan Hoffenberg was that an integrate of the
system so that if a user has been late for a week or so the cell phone system could be
used to send a message to that student.
This could be done in the future were a template message is sent out to all the students
and tutors who have missed more than a week of sessions.
The other suggestion was that the way the attendance register is presented there
should be colour to the feature. This is more an issue of using a different theme since
that is where most of the changes to how the appearance of the modules is done.
After receiving positive feedback about the system doing a study for the future to see
whether it is actually used by the center and the tutors would be interesting. It would
also be interesting to see how much better this makes the students learning experience
and readiness for use of LMS in tertiary institutions.
44
Reference: 1. Qoboka, S. and Herringer, M (Unknown). eTownship new, views and profiles
from Cape Towns Townships: Khayelitsha (Unknown). DOI =
http://www.etownship.co.za/index.php?option=content&task=view&id=21;Ite
mid=34.
2. Wikipedia 2007. Khayelitsha October 19, 2007. DOI =
http://en.wikipedia.org/wiki/Khayelitsha.
3. Buytaert, D 2007. Drupal October 19, 2007. DOI = http://drupal.org/.
4. SHAWCO (Unknown). Khayelitsha K2 (Unkown). DOI =
http://www.shawco.org/content/view/32/62/.
5. SHAWCO (Unknown). SHAWCO IT (Unkown). DOI =
http://www.shawco.org/content/view/45/107/
6. Hanov Solutions (Unknown). Sequemce Diagrams October 19, 2007. DOI =
http://www.websequencediagrams.com/.
7. Simpson, D. L. 2005. Content for one: developing a personal content
management system. In Proceedings of the 33rd Annual ACM SIGUCCS
Conference on User Services (Monterey, CA, USA, November 06 - 09, 2005).
SIGUCCS '05. ACM Press, New York, NY, 338-342. DOI=
http://doi.acm.org/10.1145/1099435.1099512.
8. Graf, S. and List, B. 2005. An Evaluation of Open Source E-Learning
Platforms Stressing Adaptation Issues. In Proceedings of the Fifth IEEE
international Conference on Advanced Learning Technologies (July 05 - 08,
2005). ICALT. IEEE Computer Society, Washington, DC, 163-165. DOI=
http://dx.doi.org/10.1109/ICALT.2005.54.
9. Beck, E. Learning Management Systems: The Need for Critical Analysis. 10. Chavan, A. and Pavri, S. 2004. Open-source learning management with
moodle. Linux J. 2004, 128 (Dec. 2004), 2. 11. SakaiProject (Unknown). Sakai. DOI = http://sakaiproject.org/.
12. Blackboard Inc 2007. Blackboard: Educate, Innovate, Everywhere (2007). DOI =
http://www.blackboard.com/.
13. EduTools. 2007. CMS: CMS Home. Retrieved October 19, 2007. DOI =
http://www.edutools.info/static.jsp?pj=4&page=HOME.
14. Sawhney, A. and Mund, A. 1998. Simulation based construction management
learning system. In Proceedings of the 30th Conference on Winter Simulation
(Washington, D.C., United States, December 13 - 16, 1998). D. J. Medeiros,
E. F. Watson, J. S. Carson, and M. S. Manivannan, Eds. Winter Simulation
Conference. IEEE Computer Society Press, Los Alamitos, CA, 1319-1324
15. R. Katz-Haas 2005. User Centered Design and Web Development, Society for
Technical Communications, September 5, 2005. DOI =
http://www.stcsig.org/usability/topics/articles/ucd%20_web_devel.html.
16. Wikipedia 2007. Apache HTTP Server October 19, 2007. DOI =
http://en.wikipedia.org/wiki/Apache_HTTP_Server.
17. The Apache Software Foundation 2007. Apache, October 19, 2007. DOI =
http://www.apache.org/.
18. Wikipedia 2007. MySQL Server October 19, 2007. DOI =
http://en.wikipedia.org/wiki/MySQL.
19. MySQL AB 2007. MySQL, October 19, 2007. DOI = http://www.mysql.com/.
20. Wikipedia 2007. PHP October 19, 2007. DOI =
http://en.wikipedia.org/wiki/PHP.

45
21. The PHP Group 2007. PHP, October 19, 2007. DOI = http://www.php.net/.
22. Jones, M. and Marsden, G 2006. Mobile Interaction Design, October 19, 2007.

46
Appendix A: User Tests and Questionnaires
University of Cape Town
Department of Computer Science
CSC4000W: Honours SHAWCO K2 Project Consent Form
This is to acknowledge that _________________________participated in the user
evaluation, and agrees that the information will be used for research purposes.
Participants:
Name: _ _______________________ Signature: __________________________
Date: ________________________
Researcher:
Name: (Mr.) Marvin Ngobeni
Signature: ________________________

47
USER TESTING TASK 1: BOOKMARK
• Logon to the system
• Navigate to ‘Student Bookmark’ and click on ‘Bookmark’
• Enter the information into the fields provided
• Submit the form by clicking on ‘Submit’ button
1) How useful do you consider the bookmark feature?
Useless extremely useful
1 2 3 4 5
2) How useful do you consider the tutor comment to be?
Useless extremely useful
1 2 3 4 5
3) How useful do you consider the student comment section to be?
Useless extremely useful
1 2 3 4 5
4) How useful do you consider the priority option?
Useless extremely useful
1 2 3 4 5
5) Did you find bookmark feature easy to use?
Hard very easy
1 2 3 4 5
6) Did you find the bookmark feature easy to understand?
Hard very understandably
1 2 3 4 5
7) Which input field did you find un-necessary and why?
8) Did all the inputs make sense to you, and if not which ones did not make
sense?

48
9) How can the bookmark feature be improved?
10) General comments?

49
USER TESTING TASK 2: Upload Work
• From the K2 course page navigate to the ‘Current work’ block
• Click on View work
• Click on the browse button
• Navigate to desk top and selected the first file specified and click open
• Then click on the upload button
• Click on the continue button
1) How useful do you consider the upload work feature?
Useless extremely useful
1 2 3 4 5
2) Did you find the upload work feature to be easy to use?
Hard very easy
1 2 3 4 5
3) Did you find the upload work feature easy to understand?
Hard very understandably
1 2 3 4 5
4) Do you find the way the uploaded work presented understandable?
Hard very understandably
1 2 3 4 5
5) How can the upload feature be improved?
6) General comments?

50
USER TESTING TASK 3: Download Work
• Click on the document you just uploaded
• Click on the ‘Continue download’
• Then confirm the download
1) Did you find it easy to download the document you uploaded?
Hard very easy
1 2 3 4 5
2) Did you find the second download link useful?
Useless extremely useful
1 2 3 4 5
3) How can the download feature be improved?
4) General comments?

51
USER TESTING TASK 1: Tutor Attendance Register
• Navigate to tutor attendance
• Click on ‘Take Attendance’
• Select a day and click the submit button
• Confirm the selection
• Randomly select a group of tutors to take register of and submit
• Navigate to view report
1) How useful do you consider the attendance register feature?
Useless extremely useful
1 2 3 4 5
2) How useful did you find the view report feature?
Useless extremely useful
1 2 3 4 5
3) Did you find the feature easy to use?
Hard very easy
1 2 3 4 5
4) Did you find the view report easy to understand?
Hard very easy
1 2 3 4 5
5) How can the attendance register feature be improved?
6) Any comment on how the information can be displayed better?
7) Which way of taking register do you prefer; using the system or paper?
8) General comments?

52
USER TESTING TASK 2: Tutor Attendance Register Settings
• Navigate to the Tutor attendance block
• Click on the ‘Settings’ link
• Select a day
• Click on the check box to allocate tutors to that day
• Click on the ‘submit’ button
1) How useful do you consider the attendance register settings feature?
Useless extremely useful
1 2 3 4 5
2) How useful did you find select day option?
Useless extremely useful
1 2 3 4 5
3) Did you find the attendance register settings feature easy to use?
Hard very easy
1 2 3 4 5
4) Did you find the view report easy to understand?
Hard very easy
1 2 3 4 5
5) How can the feature be improved?
6) General comments?