sharepoint configuration guide - 36software...sharepoint sites so you can manage future growth as...
TRANSCRIPT

36Software WRITE ONCE. APPROVE ONCE. USE EVERYWHERE. www.36Software.com
SMARTDOCS 2018.1
SHAREPOINT CONFIGURATION GUIDE
36Software
UPDATED JANUARY 2019

SharePoint Configuration Guide SmartDocs 2018.1 Page 2 of 31
Table of Contents
Table of Contents .......................................................................................................................................... 2
1 │ About this Document .............................................................................................................................. 3
2 │ What is a SmartDocs Repository? ........................................................................................................... 4
3 │ SharePoint Site Architecture ................................................................................................................... 6
4 │ Your First SmartDocs Repository ............................................................................................................ 8
5 │ Create SharePoint Site Structure ............................................................................................................ 9
6 │ Install SmartDocs................................................................................................................................... 12
7 │ Create SmartDocs Repository ............................................................................................................... 14
8 │ Verify SmartDocs Repository ................................................................................................................ 18
Appendix A │ Upgrade Repository .............................................................................................................. 20
Appendix B │ Registry List Columns ............................................................................................................ 21
Appendix C │ SharePoint List GUID ............................................................................................................. 28
Appendix D │ SharePoint View GUID .......................................................................................................... 30

SharePoint Configuration Guide SmartDocs 2018.1 Page 3 of 31
1 │ About this Document The purpose of this document is to help you create and configure one or more SmartDocs repositories
on your SharePoint server. This document explains:
• What a SmartDocs repository is.
• How to organize your SmartDocs repositories within your SharePoint site structure.
• How to set-up a SmartDocs repository in SharePoint.
• How to test a newly created repository to verify it was set-up properly.
SharePoint Requirements
SmartDocs 2018.1 supports all editions of SharePoint 2007, SharePoint 2010, SharePoint 2013,
SharePoint 2016, and SharePoint 2019. SmartDocs 2018.1 also provides full support for Microsoft's
cloud-based Office 365 (SharePoint Online) hosting environment.
SharePoint Knowledge
This document assumes you have a basic working knowledge of SharePoint and are familiar with basic
SharePoint terminology, such as SharePoint site collections, subsites, lists, and libraries. You should also
have some prior experience creating subsites, lists, and libraries in SharePoint.
Upgrade Repository
If you have already created a SmartDocs repository in a prior version of SmartDocs and need to upgrade
this repository to SmartDocs 2018.1 format, then refer to Upgrade Repository for more information.
Need Some Help?
If you have a question or need assistance creating and configuring your SmartDocs repositories in
SharePoint, please send our support team a request using email or the Support Portal on our website.
Email: [email protected]
Website: http://support.36software.com
Copyright
This document may not be reproduced in any form for any purpose other than the purchaser’s use
without the express written permission of 36Software. All third party product and trade names are
trademarks of their respective owners and are used solely for identification purposes.
This document was last modified on January 6, 2019.
Copyright © 2019 36Software LLC. All Rights Reserved.
SharePoint Configuration Guide SmartDocs 2018.1 Page 4 of 31
2 │ What is a SmartDocs Repository? A SmartDocs repository is used to store reusable content (e.g., variables, snippets, and conditional tags)
for a team of SmartDocs users. A SmartDocs repository resides in a SharePoint site and consists of the
SharePoint lists and libraries described below.
LIST/LIBRARY DESCRIPTION
Conditional Tags SharePoint list that is used to store conditional tags that are shared by a team of
SmartDocs users.
Snippet Library SharePoint document library that is used to store reusable snippets that are shared a
team of SmartDocs users.
Snippet Statistics SharePoint list that is used to store the statistics for reusable snippets that are shared a
team of SmartDocs users.
Snippet Tracking SharePoint list that is used to store the usage tracking data for reusable snippets that
are shared a team of SmartDocs users.
Variables SharePoint list that is used to store reusable variables that are shared a team of
SmartDocs users.
An organization can create as many SmartDocs repositories as needed. Typically, your organization will
start with one SmartDocs repository for the team that will be using SmartDocs first. You can then add
more SmartDocs repositories as needed as additional teams adopt SmartDocs.
Each SmartDocs repository has its own configuration, metadata, and security model applied. Thus, each
writing team can control how their reusable content is classified, who has access to it, and what type of
access each user has.
Example Scenario
Let’s assume our company has two teams of writers using SmartDocs:
• Sales writers are using SmartDocs to create sales proposals.
• Technical writers are using SmartDocs to create and maintain technical documentation.
Given this scenario, our company decides to set-up three SmartDocs repositories as described in the
table below.
REPOSITORY DESCRIPTION WHO HAS ACCESS?
Corporate This repository stores company-level reusable
content, such as company logos, company
descriptions, and mission statements.
Sales Writers: Read Access
Technical Writers: Read Access

SharePoint Configuration Guide SmartDocs 2018.1 Page 5 of 31
Sales Proposals This repository stores reusable content used in
sales proposals, such as standard responses to
commonly asked proposal questions.
Sales Writers: Full Access
Technical Writers: No Access
Technical Publications This repository stores reusable content used in
technical documents, such as product
descriptions, how-to steps, and legal content.
Sales Writers: Read Access
Technical Writers: Full Access
In this scenario, we have set-up three SmartDocs repositories:
• The Corporate repository contains corporate-level reusable content and is accessible by all of
our SmartDocs users.
• The Sales Proposals repository is dedicated to our sales writers so they can reuse content to
create new sales proposals.
• The Technical Publications repository is managed by our technical writers for their technical
documentation, but we also grant read access to our sales writers so they can leverage some of
this content (such as product descriptions) in their sales proposals.
SmartDocs Repository Registry
The SmartDocs Repository Registry is a SharePoint list that is used to register each of the SmartDocs
repositories you create. Essentially, the Repository Registry list is the “master list” in SharePoint that
points to all of your SmartDocs repositories.
In the example scenario above, the Repository Registry list will contain three list items, one for each of
the SmartDocs repositories. Each list item in the SmartDocs Repository Registry contains the following
information:
• The name of the SmartDocs repository.
• The unique ID of the SmartDocs repository.
• The URL of the SharePoint site that contains the SmartDocs repository.
• Additional information that is used to configure the SmartDocs repository.
Once a SmartDocs repository is added to the SmartDocs Repository Registry, SmartDocs users can create
a connection to the repository by using the SmartDocs Repository Connections window in Microsoft
Word and begin working with its content.
SharePoint Configuration Guide SmartDocs 2018.1 Page 6 of 31
3 │ SharePoint Site Architecture Before creating a SmartDocs repository in SharePoint, it is important that you plan the structure of your
SharePoint sites so you can manage future growth as other teams in your organization begin to use
SmartDocs.
From a technical perspective, SmartDocs is completely flexible as to how you organize your site
structure in SharePoint. However, you should follow some best practices to ensure your SmartDocs
set-up in SharePoint is easy to manage and will accommodate future growth. These best practices
include:
• Dedicate a SharePoint site collection or a SharePoint subsite to SmartDocs.
• Create your Repository Registry list in the dedicated SmartDocs site.
• Create each SmartDocs repository in its own subsite underneath the dedicated SmartDocs site.
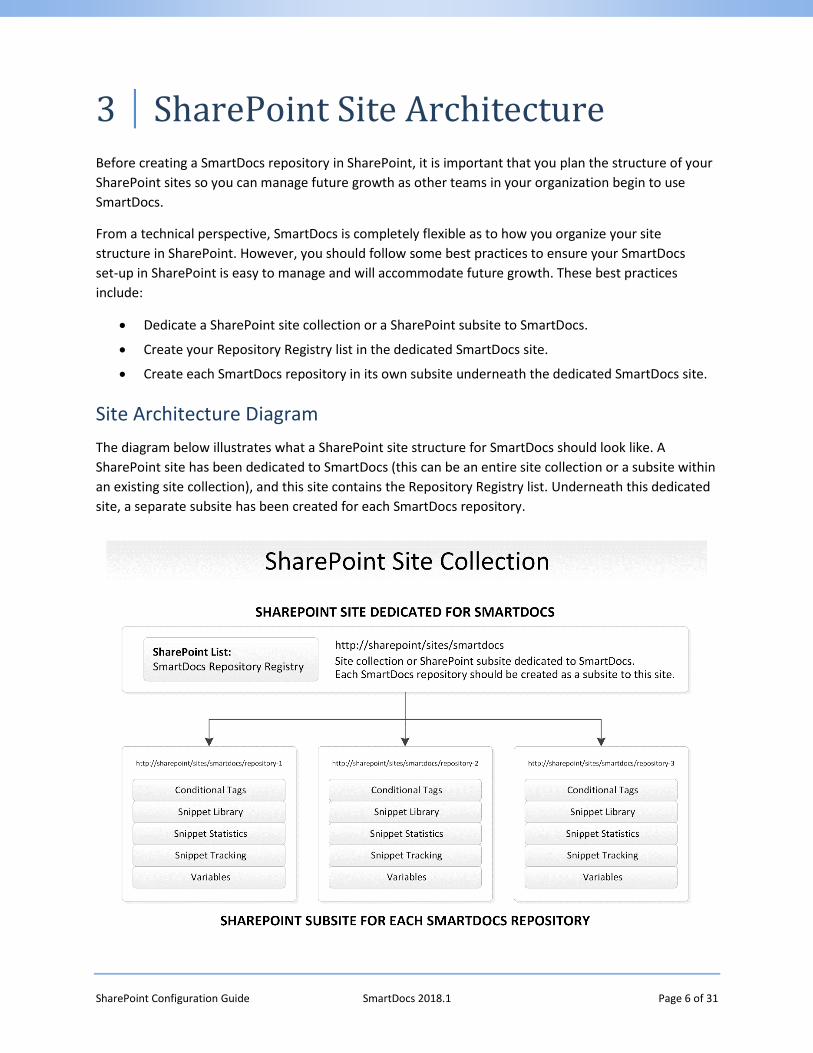
Site Architecture Diagram
The diagram below illustrates what a SharePoint site structure for SmartDocs should look like. A
SharePoint site has been dedicated to SmartDocs (this can be an entire site collection or a subsite within
an existing site collection), and this site contains the Repository Registry list. Underneath this dedicated
site, a separate subsite has been created for each SmartDocs repository.
SharePoint Configuration Guide SmartDocs 2018.1 Page 7 of 31
If you follow this site structure, your SmartDocs content will be isolated from all other content in
SharePoint. In addition, each SmartDocs repository will be isolated from other repositories, making it
easy to manage the security and metadata for each repository.
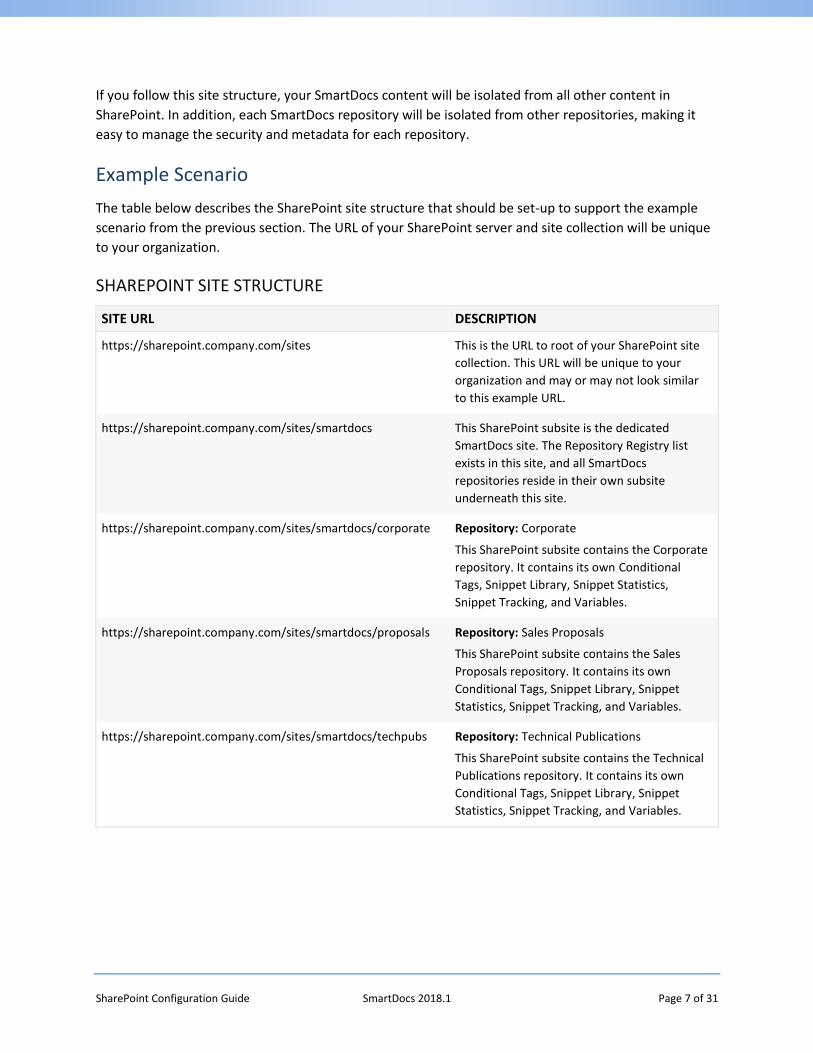
Example Scenario
The table below describes the SharePoint site structure that should be set-up to support the example
scenario from the previous section. The URL of your SharePoint server and site collection will be unique
to your organization.
SHAREPOINT SITE STRUCTURE
SITE URL DESCRIPTION
https://sharepoint.company.com/sites This is the URL to root of your SharePoint site
collection. This URL will be unique to your
organization and may or may not look similar
to this example URL.
https://sharepoint.company.com/sites/smartdocs This SharePoint subsite is the dedicated
SmartDocs site. The Repository Registry list
exists in this site, and all SmartDocs
repositories reside in their own subsite
underneath this site.
https://sharepoint.company.com/sites/smartdocs/corporate Repository: Corporate
This SharePoint subsite contains the Corporate
repository. It contains its own Conditional
Tags, Snippet Library, Snippet Statistics,
Snippet Tracking, and Variables.
https://sharepoint.company.com/sites/smartdocs/proposals Repository: Sales Proposals
This SharePoint subsite contains the Sales
Proposals repository. It contains its own
Conditional Tags, Snippet Library, Snippet
Statistics, Snippet Tracking, and Variables.
https://sharepoint.company.com/sites/smartdocs/techpubs Repository: Technical Publications
This SharePoint subsite contains the Technical
Publications repository. It contains its own
Conditional Tags, Snippet Library, Snippet
Statistics, Snippet Tracking, and Variables.

SharePoint Configuration Guide SmartDocs 2018.1 Page 8 of 31
4 │ Your First SmartDocs Repository The steps required to create your first SmartDocs repository are outlined below. Once you’ve decided
on your SharePoint site structure, the repository creation process takes only a few minutes to complete.
Step 1: Create SharePoint Site Structure
Before creating your first SmartDocs repository, you need to set-up an empty site structure in
SharePoint to store your SmartDocs repositories. You will create your Repository Registry list and first
SmartDocs repository in this site structure.
Refer to Create SharePoint Site Structure for more information.
Step 2: Install SmartDocs
Once you have created your site structure in SharePoint, the next step is to download and install
SmartDocs. Once installed, you will be able to use the Repository Administration features in SmartDocs
to create the SmartDocs lists and libraries in SharePoint.
Refer to Install SmartDocs for more information.
Step 3: Create SmartDocs Repository
Once you have installed SmartDocs, the next step is to use the Repository Administration features in
SmartDocs to create the SmartDocs repository in the SharePoint subsite you created in Step 1. You will
repeat this step every time you create a new SmartDocs repository.
Refer to Create SmartDocs Repository for more information.
Step 4: Verify SmartDocs Repository
Once you have created your SmartDocs repository in SharePoint, the final step is to connect to your
repository from SmartDocs to ensure it is properly set-up.
Refer to Verify SmartDocs Repository for more information.

SharePoint Configuration Guide SmartDocs 2018.1 Page 9 of 31
5 │ Create SharePoint Site Structure Before creating a SmartDocs repository, you must first create an empty site structure in SharePoint to
store the SmartDocs lists and libraries. This site structure includes the following:
• A new SharePoint site collection or SharePoint subsite for SmartDocs. This is referred to as the
“parent SmartDocs site” in the rest of this document.
• A new SharePoint subsite in your dedicated SmartDocs site for each SmartDocs repository. Each
subsite is referred to as a “SmartDocs repository subsite” in the rest of this document.
Parent SmartDocs Site
The parent SmartDocs site is the location in SharePoint underneath which all of your SmartDocs
repositories will reside. The parent SmartDocs site can be one of the following:
• A new site collection in SharePoint that is dedicated to SmartDocs.
OR
• Within an existing site collection, a new subsite in SharePoint that is dedicated to SmartDocs.
From a SmartDocs perspective, it does not matter which of the above options you choose. The
important thing is that you create a new area in SharePoint that is dedicated to SmartDocs. If you have
permission in SharePoint to create a new site collection, then this is preferred as the entire site
collection can then be dedicated to SmartDocs. However, it is perfectly reasonable to create a new
subsite for SmartDocs within an existing site collection.
When creating your parent SmartDocs site, we recommend using the value “SmartDocs” when naming
the site collection and assigning the URL. This will make the site collection or subsite easily identifiable
to other SharePoint users. For example, if you create a new SharePoint site collection for SmartDocs,
then the URL might look like one of the following:
https://sharepoint.company.com/sites/smartdocs (if you use path-based site collections)
https://smartdocs.company.com (if you use host-named site collections)
Likewise, if you create a new SharePoint subsite for SmartDocs within an existing site collection, then
the URL might look like:
https://sharepoint.company.com/sites/department/smartdocs
When creating the parent SmartDocs site, you should use the Blank Site template when SharePoint
prompts you to select a template for the new site. The Blank Site template will give you an empty
SharePoint site without the default SharePoint lists and libraries.
If you are using SharePoint 2013 or greater, the Blank Site template may not be available unless it has
been enabled by your SharePoint administrator. If the Blank Site template is not available, then you can
use another template (e.g., the Team Site template) and delete the unneeded lists and libraries that
SharePoint automatically creates (e.g., Notebook, Documents, etc.).

SharePoint Configuration Guide SmartDocs 2018.1 Page 10 of 31
SmartDocs Repository Subsite
Once you have created the parent SmartDocs site, the next step is to create an empty SharePoint
subsite that will be used to store your first SmartDocs repository.
1) Open your web browser and navigate to the parent SmartDocs site.
Example: https://sharepoint.company.com/sites/smartdocs
2) Open the All Site Content page.
SharePoint 2007: Quick Launch menu on left > View All Site Content link
SharePoint 2010: Quick Launch menu on left > All Site Content link
SharePoint 2013-2019: Settings menu (gear icon in top-right) > Site contents item
Office 365: Settings menu (gear icon in top-right) > Site contents item
3) Open the Create SharePoint Site page.
SharePoint 2007: Create button > Web Pages column > Sites and Workspaces link
SharePoint 2010: Create button > Blank Site template > More Options button
SharePoint 2013-2019: New subsite link (at bottom of page)
Office 365: New menu > Subsite item
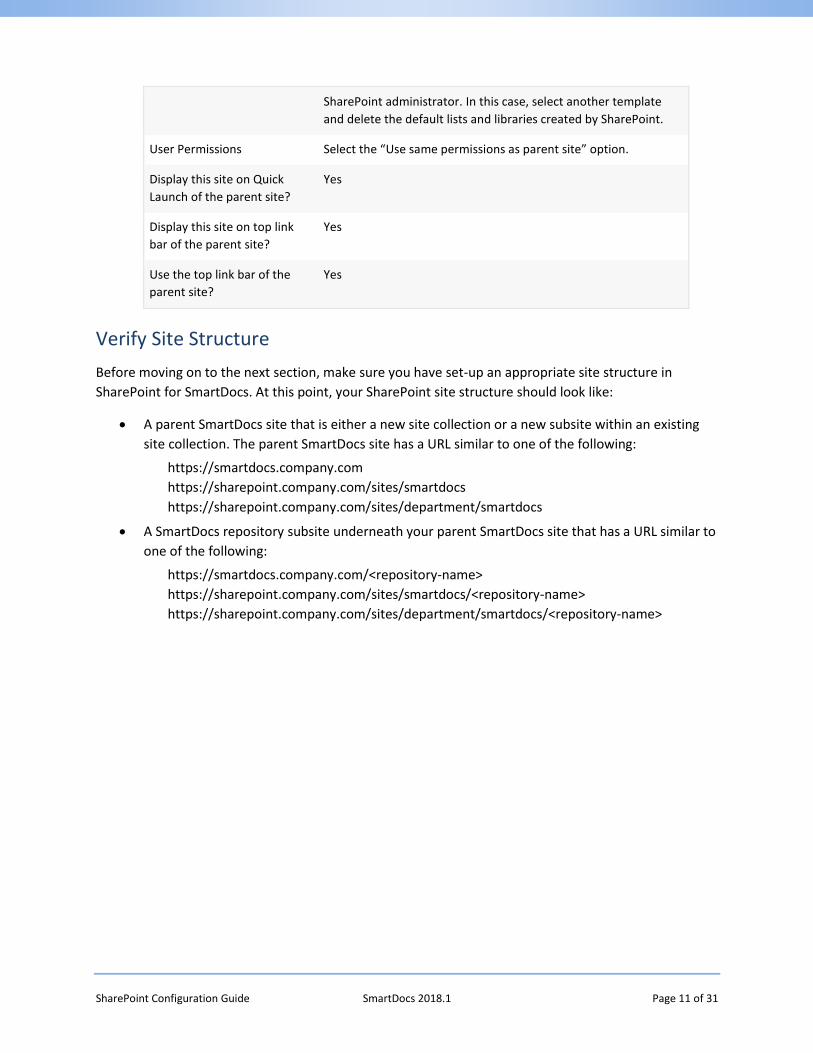
4) Enter the values in the table below and click Create. Depending on the version of SharePoint you are
using, some of the fields below may not be displayed (or additional fields may be displayed).
FIELD VALUE
Title Enter the name of the SmartDocs repository.
EXAMPLE 1: Technical Publications
EXAMPLE 2: Sales Proposals
Description (leave blank)
URL Name Enter the name of the SmartDocs repository, omitting spaces or
replacing spaces with dashes.
As a best practice, it is recommended that URL Name is all
lowercase (“smartdocs”) or camel case (“SmartDocs”). You can
choose whichever casing option you prefer; however, for
consistency, use the same casing option for all URL Names.
The examples are all valid URL Names showing both lowercase
and camel case.
EXAMPLE 1: techpubs (lowercase)
EXAMPLE 2: sales-proposals (lowercase with spaces replaced)
EXAMPLE 3: SalesProposals (camel case)
Template Selection Select the Blank Site template.
If you are using SharePoint 2010, this field is not displayed as you
selected the Blank Site template in the previous step.
If you are using SharePoint 2013/2016, the Blank Site template
may not be available unless it has been enabled by your
SharePoint Configuration Guide SmartDocs 2018.1 Page 11 of 31
SharePoint administrator. In this case, select another template
and delete the default lists and libraries created by SharePoint.
User Permissions Select the “Use same permissions as parent site” option.
Display this site on Quick
Launch of the parent site?
Yes
Display this site on top link
bar of the parent site?
Yes
Use the top link bar of the
parent site?
Yes
Verify Site Structure
Before moving on to the next section, make sure you have set-up an appropriate site structure in
SharePoint for SmartDocs. At this point, your SharePoint site structure should look like:
• A parent SmartDocs site that is either a new site collection or a new subsite within an existing
site collection. The parent SmartDocs site has a URL similar to one of the following:
https://smartdocs.company.com
https://sharepoint.company.com/sites/smartdocs
https://sharepoint.company.com/sites/department/smartdocs
• A SmartDocs repository subsite underneath your parent SmartDocs site that has a URL similar to
one of the following:
https://smartdocs.company.com/<repository-name>
https://sharepoint.company.com/sites/smartdocs/<repository-name>
https://sharepoint.company.com/sites/department/smartdocs/<repository-name>

SharePoint Configuration Guide SmartDocs 2018.1 Page 12 of 31
6 │ Install SmartDocs Once you have created the site structure in SharePoint, the next step is to install SmartDocs on your
computer. Once installed, you will use the Repository Administration features in SmartDocs to create
the SmartDocs lists and libraries in SharePoint.
If you are not a SmartDocs user and only responsible for setting-up and configuring SharePoint, you can
install SmartDocs and use the Repository Administration features without activating SmartDocs. You can
then uninstall SmartDocs when you have completed the SmartDocs repository set-up in SharePoint.
Download and Install SmartDocs
You can download the latest version of SmartDocs from the 36Software website.
Download SmartDocs: http://www.36software.com/smartdocs/download
After downloading the SmartDocs installer to your computer, close Microsoft Word and Microsoft Excel
and double-click the installer to begin the installation process. Follow the steps in the SmartDocs
installer to install SmartDocs on your computer.
After the installation has completed, you can close the installer and launch Microsoft Word. If
installation was successful, you will see a SmartDocs tab in the Microsoft Word ribbon.
Activate SmartDocs
After installing SmartDocs, you can optionally activate your SmartDocs license if you will be a SmartDocs
user. You activate SmartDocs using the Activate SmartDocs window in Microsoft Word (SmartDocs
ribbon tab > Activate License button).
If you are not a SmartDocs user and only responsible for setting-up SharePoint, then activation is not
required. You can still access the Repository Administration features without activating SmartDocs.
You activate SmartDocs using your SmartDocs activation code. Your activation code is a 12-digit number
(example: 1344-2760-3692) that was given to you when you began your SmartDocs trial or purchased
SmartDocs. Once activation is complete, a success message will be displayed and you will have access to
all SmartDocs features.
If you are unable to activate SmartDocs using your activation code, then your organization’s network or
firewall may be preventing your computer from accessing the SmartDocs activation server. Contact your
SmartDocs representative or our support team so we can provide you with an alternate activation
method.

SharePoint Configuration Guide SmartDocs 2018.1 Page 13 of 31
Enable Repository Administration Features
Once SmartDocs has been successfully installed, you need to enable the SmartDocs Repository
Administration features in your SmartDocs Preferences.
1) Open Microsoft Word.
2) Open the SmartDocs Preferences window. (SmartDocs ribbon tab > Preferences button)
3) Open the Advanced preferences group.
4) Under the Repository Administration header, check the “Turn on SmartDocs repository
administration features” box.
5) Click Save to close the SmartDocs Preferences window.

SharePoint Configuration Guide SmartDocs 2018.1 Page 14 of 31
7 │ Create SmartDocs Repository Once you have installed SmartDocs, the next step is to use the Repository Administration features in
SmartDocs to create the SmartDocs repository in SharePoint. When you create a SmartDocs repository
using the Repository Administration features, the following happens:
• SmartDocs checks your parent SmartDocs site to see if the Repository Registry list already exists.
If it does not already exist, then it is automatically created.
• The lists and libraries described in What is a SmartDocs Repository? are created in the
SmartDocs repository subsite.
• A list item is added to the Repository Registry list. This list item contains all the information
SmartDocs needs to connect to the SmartDocs repository you are creating.
SharePoint Sites
As described in SharePoint Site Architecture, you need to first create your parent SmartDocs site and a
SmartDocs repository subsite in SharePoint before you use the Repository Administration features to
create a SmartDocs repository.
Take note of the URL to the parent SmartDocs site and SmartDocs repository subsite. You will need to
enter these URLs when creating a SmartDocs repository using the Repository Administration features.
PARENT SMARTDOCS SITE
The parent SmartDocs site is the location in SharePoint where your Repository Registry list will be
created if it does not already exist. An example of where your parent SmartDocs site is located is shown
below.
DESCRIPTION EXAMPLE URL
If your SharePoint site collection resides here... https://sharepoint.company.com/sites
Then your parent site resides here... https://sharepoint.company.com/sites/smartdocs
SMARTDOCS REPOSITORY SUBSITE
The SmartDocs repository subsite is the location in SharePoint where the list and libraries for your
SmartDocs repository will be created. Each SmartDocs repository that you create must have its own
subsite to ensure that each SmartDocs repository is isolated from other repositories. An example of
where your parent SmartDocs site is located is shown below.
DESCRIPTION EXAMPLE URL
If your parent site resides here... https://sharepoint.company.com/sites/smartdocs
Then your repository subsite resides here... https://sharepoint.company.com/sites/smartdocs/<repository>
SharePoint Configuration Guide SmartDocs 2018.1 Page 15 of 31
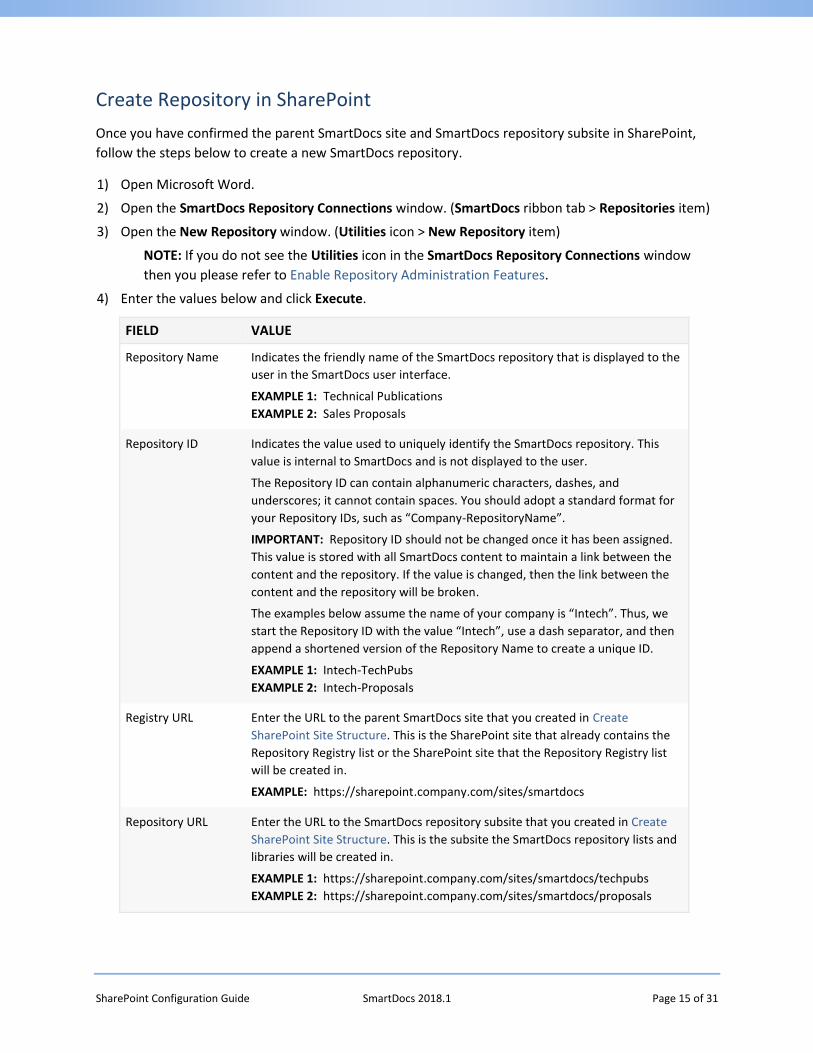
Create Repository in SharePoint
Once you have confirmed the parent SmartDocs site and SmartDocs repository subsite in SharePoint,
follow the steps below to create a new SmartDocs repository.
1) Open Microsoft Word.
2) Open the SmartDocs Repository Connections window. (SmartDocs ribbon tab > Repositories item)
3) Open the New Repository window. (Utilities icon > New Repository item)
NOTE: If you do not see the Utilities icon in the SmartDocs Repository Connections window
then you please refer to Enable Repository Administration Features.
4) Enter the values below and click Execute.
FIELD VALUE
Repository Name Indicates the friendly name of the SmartDocs repository that is displayed to the
user in the SmartDocs user interface.
EXAMPLE 1: Technical Publications
EXAMPLE 2: Sales Proposals
Repository ID Indicates the value used to uniquely identify the SmartDocs repository. This
value is internal to SmartDocs and is not displayed to the user.
The Repository ID can contain alphanumeric characters, dashes, and
underscores; it cannot contain spaces. You should adopt a standard format for
your Repository IDs, such as “Company-RepositoryName”.
IMPORTANT: Repository ID should not be changed once it has been assigned.
This value is stored with all SmartDocs content to maintain a link between the
content and the repository. If the value is changed, then the link between the
content and the repository will be broken.
The examples below assume the name of your company is “Intech”. Thus, we
start the Repository ID with the value “Intech”, use a dash separator, and then
append a shortened version of the Repository Name to create a unique ID.
EXAMPLE 1: Intech-TechPubs
EXAMPLE 2: Intech-Proposals
Registry URL Enter the URL to the parent SmartDocs site that you created in Create
SharePoint Site Structure. This is the SharePoint site that already contains the
Repository Registry list or the SharePoint site that the Repository Registry list
will be created in.
EXAMPLE: https://sharepoint.company.com/sites/smartdocs
Repository URL Enter the URL to the SmartDocs repository subsite that you created in Create
SharePoint Site Structure. This is the subsite the SmartDocs repository lists and
libraries will be created in.
EXAMPLE 1: https://sharepoint.company.com/sites/smartdocs/techpubs
EXAMPLE 2: https://sharepoint.company.com/sites/smartdocs/proposals

SharePoint Configuration Guide SmartDocs 2018.1 Page 16 of 31
SharePoint Hosting Select the option that indicates who is hosting the SharePoint server that you
are connecting to.
5) If you are prompted to enter your SharePoint credentials in the Default SharePoint Credentials
window, then provide the credentials you use to login to SharePoint and click Save.
OPTION DESCRIPTION
Enter Credentials Select this option to type in the user name and password you use to login to
SharePoint.
Windows Credentials Select this option to login to SharePoint automatically using your Windows
account.
If you are using Office 365 (or SharePoint Online) and your Office 365
environment is configured to support automatic login, then select the “Yes,
my Windows account is used to login to Office 365” option and enter the
Organizational Account you use to access Office 365 (e.g.,
6) The SmartDocs repository will be created and a success message will be displayed. Click OK to close
the message.
NOTE: Please be patient while your SmartDocs repository is created. Depending on the speed of
your network connection and your SharePoint server the creation process can take one minute
or more.
7) Congratulations, you have successfully created a SmartDocs repository!
Quick Verification
Once you have created your SmartDocs repository, you can open your web browser and quickly verify a
couple things in SharePoint to ensure the SmartDocs repository was successfully created.
First, open your web browser and navigate to your SmartDocs repository
subsite. The Quick Launch menu in SharePoint will contain links for the lists
and libraries it created (e.g., Conditional Tags, Snippet Library, Snippet
Statistics , Snippet Tracking, and Variables) and look similar to the screenshot.
Your screenshot may look different (e.g., it may have headings and/or
additional links in it) depending on the version and configuration of your
SharePoint server.
Next, in your web browser, navigate to your parent SmartDocs site and ensure you have a Repository
Registry list and that contains a list item for your newly created SmartDocs repository. The Repository
Registry list will look similar to the screenshot below; it may look slightly different depending on the
version and configuration of your SharePoint server (and it may contain additional list items if you have
previously created other SmartDocs repositories).

SharePoint Configuration Guide SmartDocs 2018.1 Page 17 of 31
Additional Notes
You may notice that the Repository Registry list has many columns that contain empty values. These
empty columns are optional and are used to customize the configuration of each SmartDocs repository.
You can safely leave these columns blank, as SmartDocs will automatically use the default configuration
for any column that contains an empty value.
As you begin using and learning more about SmartDocs, you will likely come back to the Repository
Registry list and update your configuration. Please refer to Registry List Columns for a complete list and
explanation for the Repository Registry list columns.

SharePoint Configuration Guide SmartDocs 2018.1 Page 18 of 31
8 │ Verify SmartDocs Repository Once you have created your SmartDocs repository, the final step is to create a connection to your
SmartDocs repository from SmartDocs and create a test reusable snippet to ensure that everything is
working correctly.
Connect to SmartDocs Repository
Follow the steps below to create a connection to your SmartDocs repository to ensure your SmartDocs
repository was properly created and registered.
1) Open Microsoft Word.
2) Open the SmartDocs Repository Connections window. (SmartDocs ribbon tab > Repositories item)
3) Click the New icon to open the Connect to SmartDocs Repository window.
4) Enter the values below and click Connect.
FIELD DESCRIPTION
SharePoint URL Enter the URL to the parent SmartDocs site that contains your Repository
Registry list.
Be sure to enter the URL to the SharePoint site that contains your
Repository Registry list, and not the URL to the SmartDocs repository
subsite.
EXAMPLE: https://sharepoint.company.com/sites/smartdocs
SharePoint Hosting Select the value indicating who is hosting the SharePoint server that
contains your SmartDocs repository.
5) When you are presented with a list of SmartDocs repositories, click Connect to all repositories.
6) Close the success message and then close the SmartDocs Repository Connections window.
7) Congratulations, you have successfully created a connection to your SmartDocs repository.
Create Test Snippet
Follow the steps below to create a test reusable snippet in your newly created SmartDocs repository to
ensure that it is properly configured. You will only be able to perform these steps if you have activated
your SmartDocs license. If your license is not activated, then a SmartDocs user with an active license will
need to perform these steps.
1) In a blank Microsoft Word document, type a sentence such as “This is a test snippet”.
2) Select the text you just typed and open the New Snippet window. (SmartDocs ribbon tab > New
Snippet button)
3) In the Repository field select the newly created SmartDocs repository, in the Snippet Name field
enter a name for the snippet (e.g., “Test Snippet”), and click Create.

SharePoint Configuration Guide SmartDocs 2018.1 Page 19 of 31
If the reusable snippet is successfully created, then your SmartDocs repository has been properly set-up
and configured. You can close Microsoft Word and then use your web browser to delete the newly
created snippet from your Snippet Library in SharePoint.
If the reusable snippet is not successfully created and you cannot resolve the issue, please take note of
any error messages you are receiving and contact our support team for assistance.
SharePoint Configuration Guide SmartDocs 2018.1 Page 20 of 31
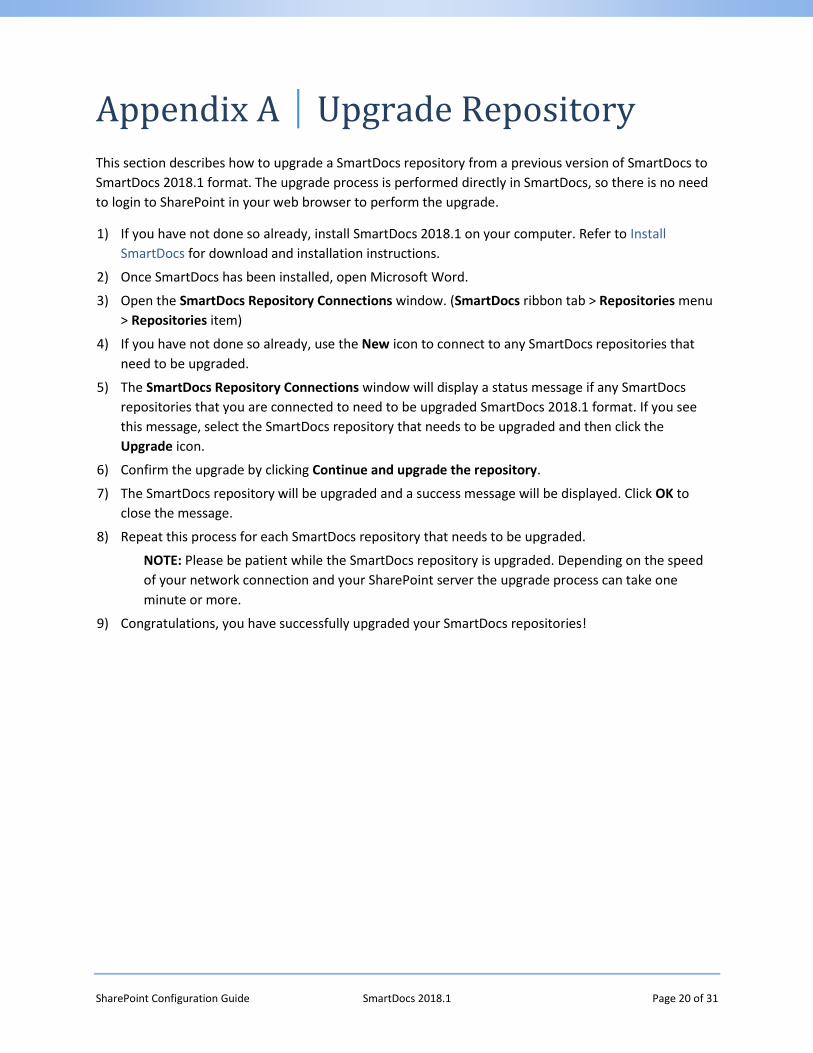
Appendix A │ Upgrade Repository This section describes how to upgrade a SmartDocs repository from a previous version of SmartDocs to
SmartDocs 2018.1 format. The upgrade process is performed directly in SmartDocs, so there is no need
to login to SharePoint in your web browser to perform the upgrade.
1) If you have not done so already, install SmartDocs 2018.1 on your computer. Refer to Install
SmartDocs for download and installation instructions.
2) Once SmartDocs has been installed, open Microsoft Word.
3) Open the SmartDocs Repository Connections window. (SmartDocs ribbon tab > Repositories menu
> Repositories item)
4) If you have not done so already, use the New icon to connect to any SmartDocs repositories that
need to be upgraded.
5) The SmartDocs Repository Connections window will display a status message if any SmartDocs
repositories that you are connected to need to be upgraded SmartDocs 2018.1 format. If you see
this message, select the SmartDocs repository that needs to be upgraded and then click the
Upgrade icon.
6) Confirm the upgrade by clicking Continue and upgrade the repository.
7) The SmartDocs repository will be upgraded and a success message will be displayed. Click OK to
close the message.
8) Repeat this process for each SmartDocs repository that needs to be upgraded.
NOTE: Please be patient while the SmartDocs repository is upgraded. Depending on the speed
of your network connection and your SharePoint server the upgrade process can take one
minute or more.
9) Congratulations, you have successfully upgraded your SmartDocs repositories!

SharePoint Configuration Guide SmartDocs 2018.1 Page 21 of 31
Appendix B │ Registry List Columns The table in this section lists of the columns for the Repository Registry list. Most of the columns are
optional and are used to customize the configuration of your SmartDocs repositories.
Important Note About SharePoint Column Names
Many of the columns in the Repository Registry list (e.g., Reusable Snippet Folder Format, Reusable
Snippet Cascading Metadata Columns, etc.) require that you enter one or column names from your
Reusable Snippet library. You should always enter the Internal Name of the SharePoint column, which
may not be the same as the Display Name of the SharePoint column.
The Internal Name is the name that SharePoint internally assigns to the column and it never changes,
even if you change the Display Name. The Internal Name is automatically generated from the Display
Name that you enter when you first create the column. In many cases, but not all, the Internal Name
and Display Name are the same.
For example, if you create a SharePoint column and name it “Category”, then the Display Name and
Internal Name of the column will be as follows:
Display Name = Category
Internal Name = Category (automatically generated by SharePoint from Display Name)
If you later change the Display Name to “Classification” the Internal Name will not change. That is, the
Internal Name always remains static. Thus, in this example, the Display Name and Internal Name of the
column will now be as follows:
Display Name = Classification
Internal Name = Category
In this example, you should use the value “Category” when configuring this column in the Repository
Registry list. By using the Internal Name in the Repository Registry list, you can be certain that your
repository configuration will not break if you change the Display Name of a SharePoint column.
If you are uncertain what the Internal Name of a SharePoint column is, then please refer to the blog post
below which describes how to retrieve the Internal Column name.
How to Retrieve the Internal Name for a SharePoint Column: https://bit.ly/1dAp2JZ
SharePoint Configuration Guide SmartDocs 2018.1 Page 22 of 31
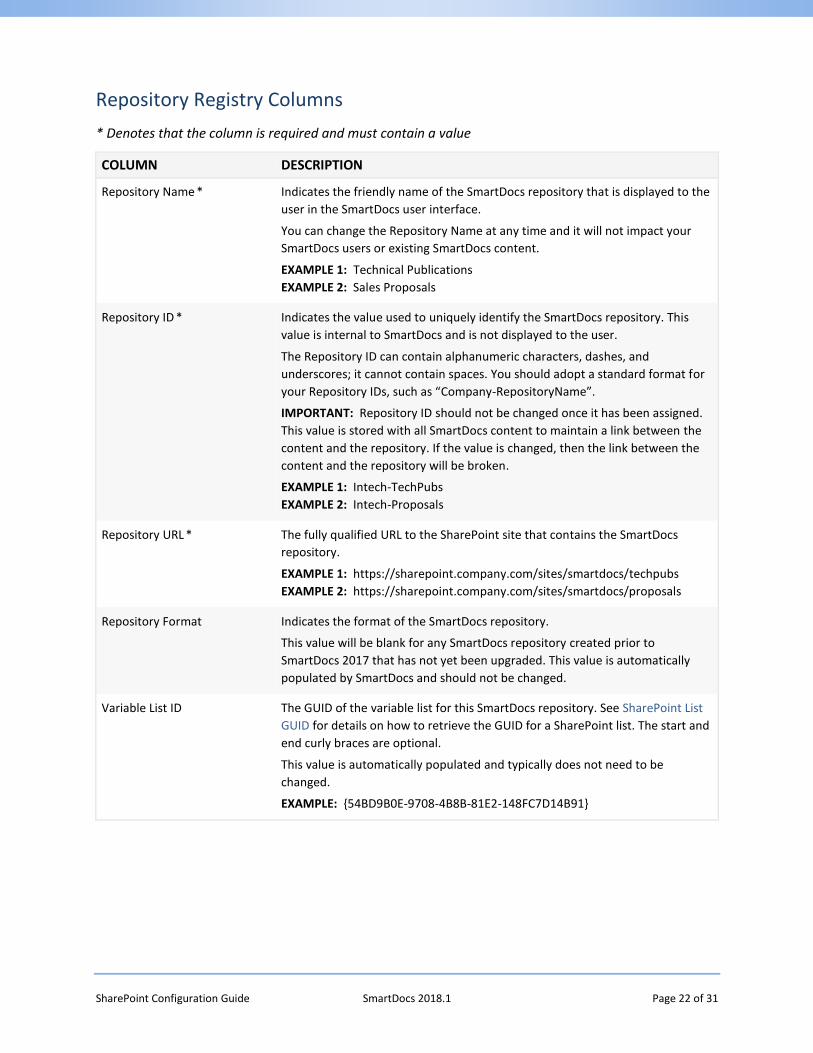
Repository Registry Columns
* Denotes that the column is required and must contain a value
COLUMN DESCRIPTION
Repository Name *
Indicates the friendly name of the SmartDocs repository that is displayed to the
user in the SmartDocs user interface.
You can change the Repository Name at any time and it will not impact your
SmartDocs users or existing SmartDocs content.
EXAMPLE 1: Technical Publications
EXAMPLE 2: Sales Proposals
Repository ID * Indicates the value used to uniquely identify the SmartDocs repository. This
value is internal to SmartDocs and is not displayed to the user.
The Repository ID can contain alphanumeric characters, dashes, and
underscores; it cannot contain spaces. You should adopt a standard format for
your Repository IDs, such as “Company-RepositoryName”.
IMPORTANT: Repository ID should not be changed once it has been assigned.
This value is stored with all SmartDocs content to maintain a link between the
content and the repository. If the value is changed, then the link between the
content and the repository will be broken.
EXAMPLE 1: Intech-TechPubs
EXAMPLE 2: Intech-Proposals
Repository URL * The fully qualified URL to the SharePoint site that contains the SmartDocs
repository.
EXAMPLE 1: https://sharepoint.company.com/sites/smartdocs/techpubs
EXAMPLE 2: https://sharepoint.company.com/sites/smartdocs/proposals
Repository Format Indicates the format of the SmartDocs repository.
This value will be blank for any SmartDocs repository created prior to
SmartDocs 2017 that has not yet been upgraded. This value is automatically
populated by SmartDocs and should not be changed.
Variable List ID The GUID of the variable list for this SmartDocs repository. See SharePoint List
GUID for details on how to retrieve the GUID for a SharePoint list. The start and
end curly braces are optional.
This value is automatically populated and typically does not need to be
changed.
EXAMPLE: {54BD9B0E-9708-4B8B-81E2-148FC7D14B91}

SharePoint Configuration Guide SmartDocs 2018.1 Page 23 of 31
COLUMN DESCRIPTION
Variable View ID The GUID of the SharePoint view in the variable list used by SmartDocs. See
SharePoint View GUID for details on how to retrieve the GUID for a SharePoint
view.
If this column is left blank, the default view for the variable list will be used.
Typically, you will leave this column blank.
You can use this column to filter the variables that are exposed to SmartDocs
users. You can create a SharePoint view that filters the list of available
variables, and then enter the GUID of the view in this column.
EXAMPLE: {A1A78FB4-E814-415C-B3DC-80CFFFEF7ADC}
Variable New Line The string value used to indicate where a new line should begin in a reusable
variable value.
This column is used to provide support for multiline variables in SharePoint
2007. Typically, you will leave this column set to its default value.
EXAMPLE: ##
Conditional Tag List ID The GUID of the conditional tag list for this SmartDocs repository. See
SharePoint List GUID for details on how to retrieve the GUID for a SharePoint
list. The start and end curly braces are optional.
This value is automatically populated and typically does not need to be
changed.
EXAMPLE: {7C943173-FF0E-4C5E-AA69-DF5B0C84FE72}
Conditional Tag View ID The GUID of the SharePoint view in the conditional tag list used by SmartDocs.
See SharePoint View GUID for details on how to retrieve the GUID for a
SharePoint view.
If this column is left blank, the default view for the conditional tag list will be
used. Typically, you will leave this column blank.
You can use this column to filter the conditional tags that are exposed to
SmartDocs users. You can create a SharePoint view that filters the list of
available tags, and then enter the GUID of the view in this column.
EXAMPLE: {448D9FE5-79C2-4483-89FF-A05C7A40492B}
Snippet Library ID The GUID of the snippet library for this SmartDocs repository. See SharePoint
List GUID for details on how to retrieve the GUID for a SharePoint library. The
start and end curly braces are optional.
This value is automatically populated and typically does not need to be
changed.
EXAMPLE: {20D1056A-0CD4-41BD-9B04-86163887872E}
SharePoint Configuration Guide SmartDocs 2018.1 Page 24 of 31
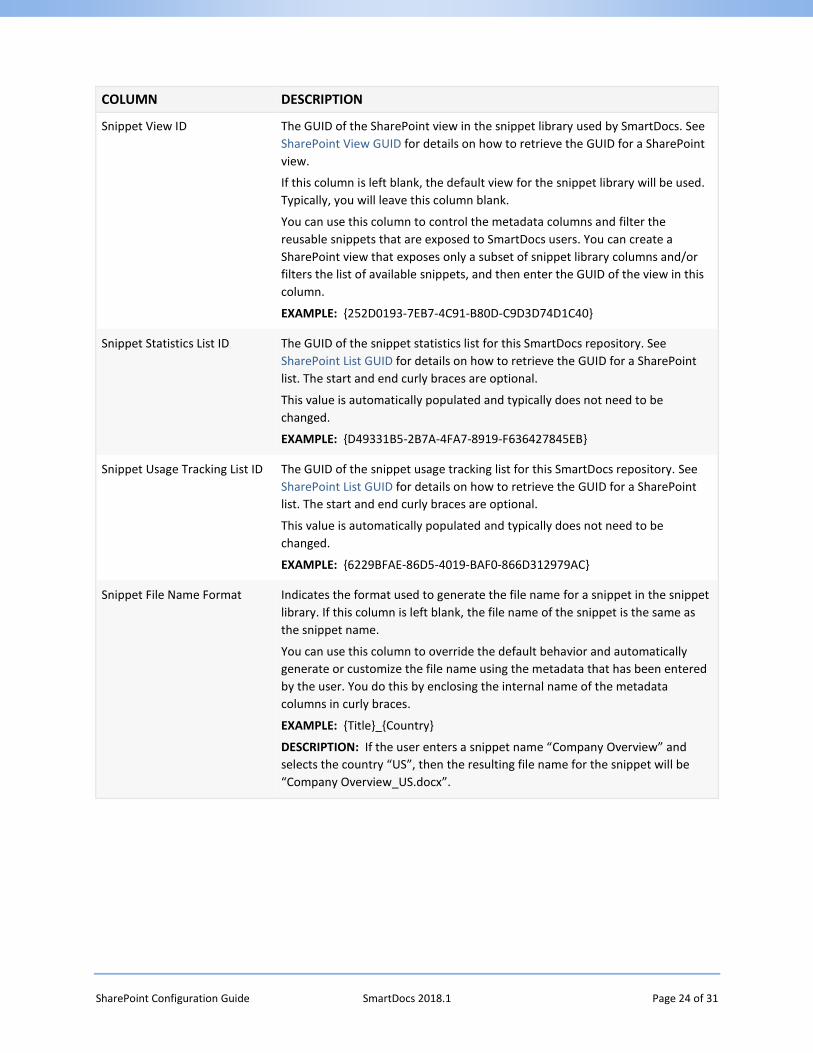
COLUMN DESCRIPTION
Snippet View ID The GUID of the SharePoint view in the snippet library used by SmartDocs. See
SharePoint View GUID for details on how to retrieve the GUID for a SharePoint
view.
If this column is left blank, the default view for the snippet library will be used.
Typically, you will leave this column blank.
You can use this column to control the metadata columns and filter the
reusable snippets that are exposed to SmartDocs users. You can create a
SharePoint view that exposes only a subset of snippet library columns and/or
filters the list of available snippets, and then enter the GUID of the view in this
column.
EXAMPLE: {252D0193-7EB7-4C91-B80D-C9D3D74D1C40}
Snippet Statistics List ID The GUID of the snippet statistics list for this SmartDocs repository. See
SharePoint List GUID for details on how to retrieve the GUID for a SharePoint
list. The start and end curly braces are optional.
This value is automatically populated and typically does not need to be
changed.
EXAMPLE: {D49331B5-2B7A-4FA7-8919-F636427845EB}
Snippet Usage Tracking List ID The GUID of the snippet usage tracking list for this SmartDocs repository. See
SharePoint List GUID for details on how to retrieve the GUID for a SharePoint
list. The start and end curly braces are optional.
This value is automatically populated and typically does not need to be
changed.
EXAMPLE: {6229BFAE-86D5-4019-BAF0-866D312979AC}
Snippet File Name Format Indicates the format used to generate the file name for a snippet in the snippet
library. If this column is left blank, the file name of the snippet is the same as
the snippet name.
You can use this column to override the default behavior and automatically
generate or customize the file name using the metadata that has been entered
by the user. You do this by enclosing the internal name of the metadata
columns in curly braces.
EXAMPLE: {Title}_{Country}
DESCRIPTION: If the user enters a snippet name “Company Overview” and
selects the country “US”, then the resulting file name for the snippet will be
“Company Overview_US.docx”.
SharePoint Configuration Guide SmartDocs 2018.1 Page 25 of 31
COLUMN DESCRIPTION
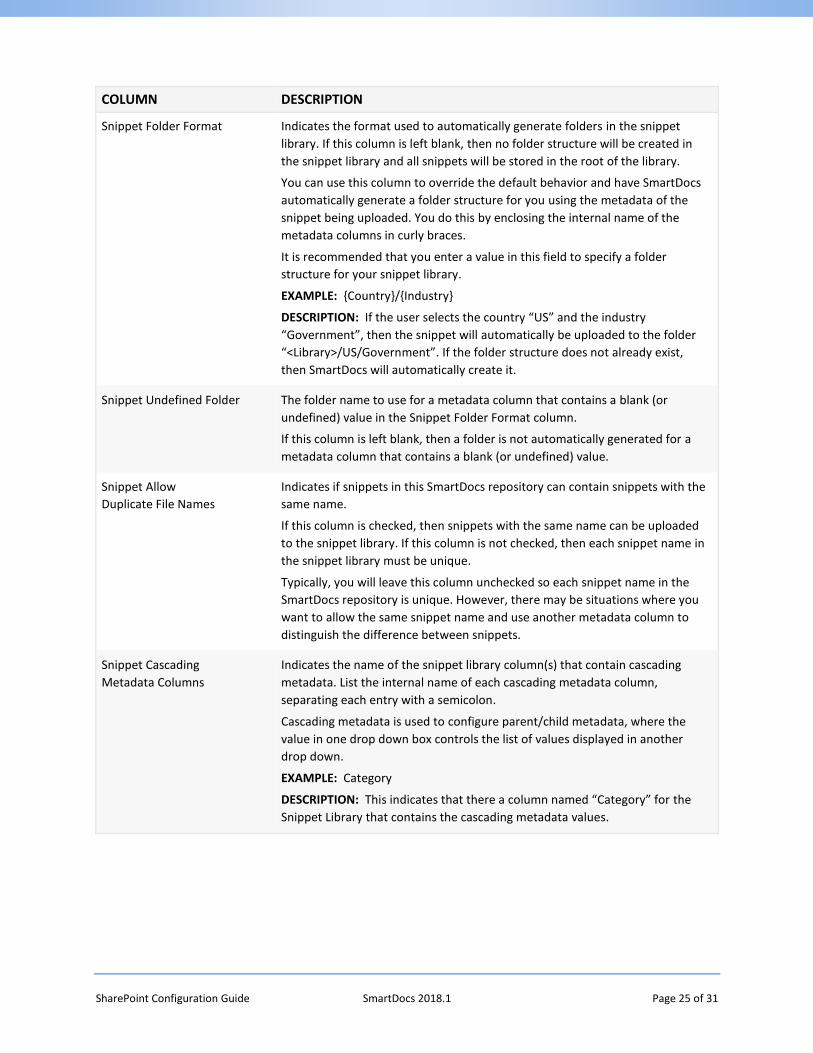
Snippet Folder Format Indicates the format used to automatically generate folders in the snippet
library. If this column is left blank, then no folder structure will be created in
the snippet library and all snippets will be stored in the root of the library.
You can use this column to override the default behavior and have SmartDocs
automatically generate a folder structure for you using the metadata of the
snippet being uploaded. You do this by enclosing the internal name of the
metadata columns in curly braces.
It is recommended that you enter a value in this field to specify a folder
structure for your snippet library.
EXAMPLE: {Country}/{Industry}
DESCRIPTION: If the user selects the country “US” and the industry
“Government”, then the snippet will automatically be uploaded to the folder
“<Library>/US/Government”. If the folder structure does not already exist,
then SmartDocs will automatically create it.
Snippet Undefined Folder The folder name to use for a metadata column that contains a blank (or
undefined) value in the Snippet Folder Format column.
If this column is left blank, then a folder is not automatically generated for a
metadata column that contains a blank (or undefined) value.
Snippet Allow
Duplicate File Names
Indicates if snippets in this SmartDocs repository can contain snippets with the
same name.
If this column is checked, then snippets with the same name can be uploaded
to the snippet library. If this column is not checked, then each snippet name in
the snippet library must be unique.
Typically, you will leave this column unchecked so each snippet name in the
SmartDocs repository is unique. However, there may be situations where you
want to allow the same snippet name and use another metadata column to
distinguish the difference between snippets.
Snippet Cascading
Metadata Columns
Indicates the name of the snippet library column(s) that contain cascading
metadata. List the internal name of each cascading metadata column,
separating each entry with a semicolon.
Cascading metadata is used to configure parent/child metadata, where the
value in one drop down box controls the list of values displayed in another
drop down.
EXAMPLE: Category
DESCRIPTION: This indicates that there a column named “Category” for the
Snippet Library that contains the cascading metadata values.
SharePoint Configuration Guide SmartDocs 2018.1 Page 26 of 31
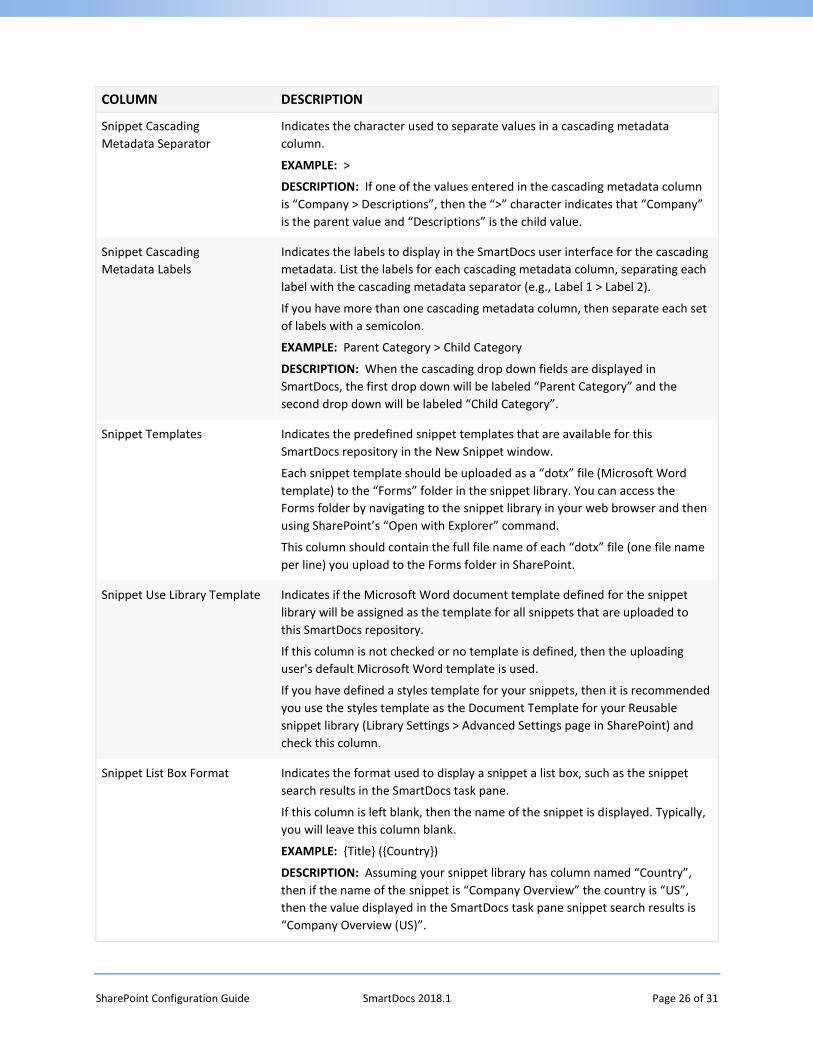
COLUMN DESCRIPTION
Snippet Cascading
Metadata Separator
Indicates the character used to separate values in a cascading metadata
column.
EXAMPLE: >
DESCRIPTION: If one of the values entered in the cascading metadata column
is “Company > Descriptions”, then the “>” character indicates that “Company”
is the parent value and “Descriptions” is the child value.
Snippet Cascading
Metadata Labels
Indicates the labels to display in the SmartDocs user interface for the cascading
metadata. List the labels for each cascading metadata column, separating each
label with the cascading metadata separator (e.g., Label 1 > Label 2).
If you have more than one cascading metadata column, then separate each set
of labels with a semicolon.
EXAMPLE: Parent Category > Child Category
DESCRIPTION: When the cascading drop down fields are displayed in
SmartDocs, the first drop down will be labeled “Parent Category” and the
second drop down will be labeled “Child Category”.
Snippet Templates Indicates the predefined snippet templates that are available for this
SmartDocs repository in the New Snippet window.
Each snippet template should be uploaded as a “dotx” file (Microsoft Word
template) to the “Forms” folder in the snippet library. You can access the
Forms folder by navigating to the snippet library in your web browser and then
using SharePoint’s “Open with Explorer” command.
This column should contain the full file name of each “dotx” file (one file name
per line) you upload to the Forms folder in SharePoint.
Snippet Use Library Template Indicates if the Microsoft Word document template defined for the snippet
library will be assigned as the template for all snippets that are uploaded to
this SmartDocs repository.
If this column is not checked or no template is defined, then the uploading
user's default Microsoft Word template is used.
If you have defined a styles template for your snippets, then it is recommended
you use the styles template as the Document Template for your Reusable
snippet library (Library Settings > Advanced Settings page in SharePoint) and
check this column.
Snippet List Box Format Indicates the format used to display a snippet a list box, such as the snippet
search results in the SmartDocs task pane.
If this column is left blank, then the name of the snippet is displayed. Typically,
you will leave this column blank.
EXAMPLE: {Title} ({Country})
DESCRIPTION: Assuming your snippet library has column named “Country”,
then if the name of the snippet is “Company Overview” the country is “US”,
then the value displayed in the SmartDocs task pane snippet search results is
“Company Overview (US)”.

SharePoint Configuration Guide SmartDocs 2018.1 Page 27 of 31
COLUMN DESCRIPTION
Snippet List View Columns Indicates the snippet library columns to display when snippets from this
SmartDocs repository are displayed in a list view (e.g., the Browse Snippets
window, the Search Snippets window, etc.). List the name of each metadata
column, separating each entry with a semicolon.
The snippet name is always displayed as the first column is a list view, even if it
is omitted from the list of columns to display.
If this field is left blank, the following default columns are used:
Version; Modify User; Modify Date
EXAMPLE: Country; Version; Modify User; Modify Date
Snippet Initial Version Indicates the initial version for a new snippet that is submitted to this
SmartDocs repository.
This column is only used if the snippet library has minor/major versioning
enabled and document check out is required. In this scenario, you can indicate
if the initial version of a newly created snippet should be 0.1 or 1.0.
Typically, this column will be set to 1.0.

SharePoint Configuration Guide SmartDocs 2018.1 Page 28 of 31
Appendix C │ SharePoint List GUID Every list and library in a SharePoint site is identified by a unique identifier, called a GUID (Globally
Unique Identifier). GUIDs are 36 character values, not including any surrounding curly braces or dashes
embedded in the value. A sample GUID value is shown below.
EXAMPLE (with curly braces): {252D0193-7EB7-4C91-B80D-C9D3D74D1C40}
EXAMPLE (without curly braces): 252D0193-7EB7-4C91-B80D-C9D3D74D1C40
The left and right curly braces that surround the GUID value are optional and can be removed if desired;
SmartDocs can handle GUID values with or without curly braces. In addition, GUID values are not case
sensitive and they can be entered in either upper or lower case.
The Repository Registry list uses GUIDs to uniquely identify which lists and libraries are included as part
of the repository. That is, when you create a SmartDocs repository in a SharePoint subsite, you are
creating the following SharePoint library and lists:
• Conditional Tags
• Snippet Library
• Snippet Statistics
• Snippet Tracking
• Variables
The GUID value assigned by SharePoint for each list and library must be obtained and entered into the
Repository Registry list so SmartDocs knows how to identify each SharePoint list and library listed above.
The GUID value is not displayed in the SharePoint user interface, but it can be extracted from the URL
displayed in your web browser address bar. Once the GUID value has been extracted for a list, library, or
view, the GUID can be pasted into the appropriate column in the Repository Registry list.
In order use the steps below to retrieve the GUID for a list or document library, your user account must
have Manage Lists permission on the SharePoint site that contains the SmartDocs repository. If you have
Full Control or Design access to a SharePoint site, then you have been granted Manage Lists permission.

SharePoint Configuration Guide SmartDocs 2018.1 Page 29 of 31
Retrieve GUID for SharePoint List or Library
Follow the steps below to retrieve the GUID for a SharePoint list or document library. Once you have
retrieved the GUID, you can enter or paste the GUID value into the appropriate column in your
Repository Registry list.
1) Login to the SharePoint site that contains the SmartDocs repository.
EXAMPLE: https://sharepoint/sites/smartdocs/<repository-name-here>
2) Open the All Site Content page.
SharePoint 2007: Quick Launch menu on left > View All Site Content link
SharePoint 2010: Quick Launch menu on left > All Site Content link
SharePoint 2013: Settings menu (gear icon in top-right) > Site contents item
3) Click the list or document library that you are retrieving the GUID for.
4) Open the List/Library Settings page.
SharePoint 2007: Settings menu > List/Library Settings item
SharePoint 2010: List/Library ribbon tab > List/Library Settings button
SharePoint 2013: List/Library ribbon tab > List/Library Settings button
5) Open the General Settings page. (General Settings column > Title, description and navigation link)
6) On the General Settings page, leave all values as-is and click Save.
7) Once the List/Library Settings page is displayed again, copy the GUID value from the URL displayed
in the address bar of your web browser. The URL will look something like:
https://sharepoint/sites/smartdocs/repository/_layouts/listedit.aspx?List={6011B728-ED3D-
42FB-96D6-9236B156550A}
The GUID for the list or library is contained at the end of this URL after the text “List=” (highlighted
in yellow above). For example, using the sample URL above, the GUID value is:
{6011B728-ED3D-42FB-96D6-9236B156550A}
Copy the GUID value to your clipboard so you can paste it into the appropriate column in your
Repository Registry list.
SharePoint Configuration Guide SmartDocs 2018.1 Page 30 of 31
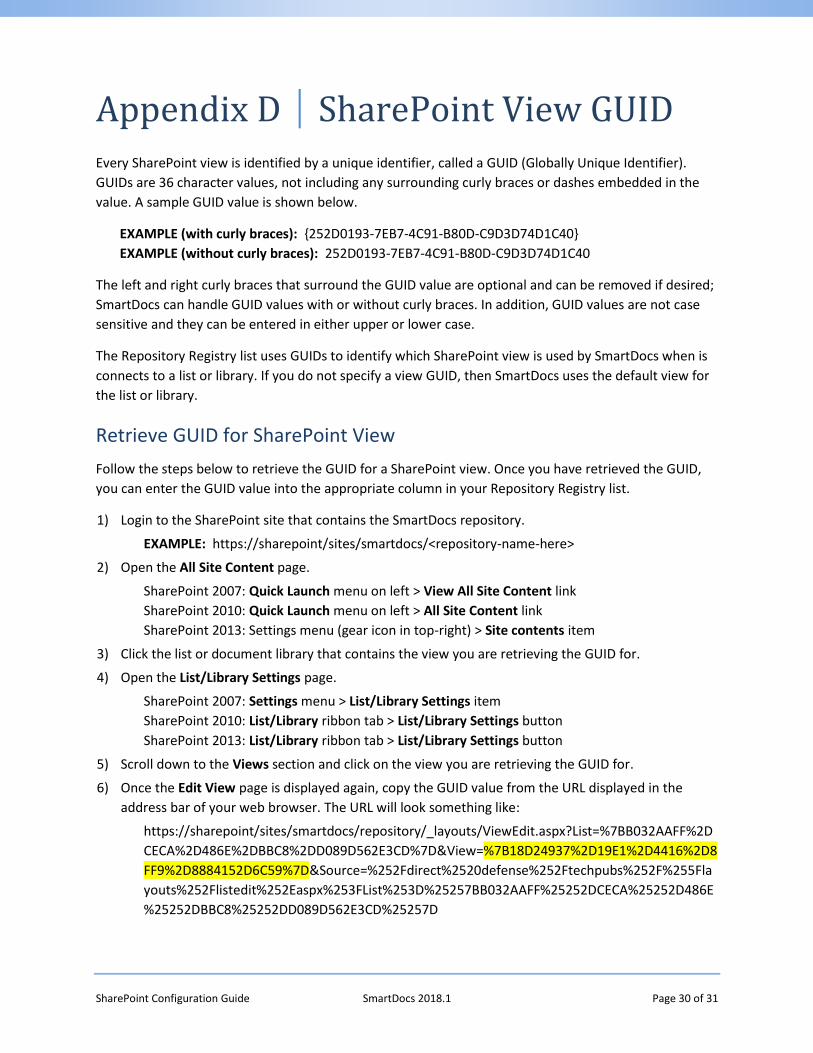
Appendix D │ SharePoint View GUID Every SharePoint view is identified by a unique identifier, called a GUID (Globally Unique Identifier).
GUIDs are 36 character values, not including any surrounding curly braces or dashes embedded in the
value. A sample GUID value is shown below.
EXAMPLE (with curly braces): {252D0193-7EB7-4C91-B80D-C9D3D74D1C40}
EXAMPLE (without curly braces): 252D0193-7EB7-4C91-B80D-C9D3D74D1C40
The left and right curly braces that surround the GUID value are optional and can be removed if desired;
SmartDocs can handle GUID values with or without curly braces. In addition, GUID values are not case
sensitive and they can be entered in either upper or lower case.
The Repository Registry list uses GUIDs to identify which SharePoint view is used by SmartDocs when is
connects to a list or library. If you do not specify a view GUID, then SmartDocs uses the default view for
the list or library.
Retrieve GUID for SharePoint View
Follow the steps below to retrieve the GUID for a SharePoint view. Once you have retrieved the GUID,
you can enter the GUID value into the appropriate column in your Repository Registry list.
1) Login to the SharePoint site that contains the SmartDocs repository.
EXAMPLE: https://sharepoint/sites/smartdocs/<repository-name-here>
2) Open the All Site Content page.
SharePoint 2007: Quick Launch menu on left > View All Site Content link
SharePoint 2010: Quick Launch menu on left > All Site Content link
SharePoint 2013: Settings menu (gear icon in top-right) > Site contents item
3) Click the list or document library that contains the view you are retrieving the GUID for.
4) Open the List/Library Settings page.
SharePoint 2007: Settings menu > List/Library Settings item
SharePoint 2010: List/Library ribbon tab > List/Library Settings button
SharePoint 2013: List/Library ribbon tab > List/Library Settings button
5) Scroll down to the Views section and click on the view you are retrieving the GUID for.
6) Once the Edit View page is displayed again, copy the GUID value from the URL displayed in the
address bar of your web browser. The URL will look something like:
https://sharepoint/sites/smartdocs/repository/_layouts/ViewEdit.aspx?List=%7BB032AAFF%2D
CECA%2D486E%2DBBC8%2DD089D562E3CD%7D&View=%7B18D24937%2D19E1%2D4416%2D8
FF9%2D8884152D6C59%7D&Source=%252Fdirect%2520defense%252Ftechpubs%252F%255Fla
youts%252Flistedit%252Easpx%253FList%253D%25257BB032AAFF%25252DCECA%25252D486E
%25252DBBC8%25252DD089D562E3CD%25257D
SharePoint Configuration Guide SmartDocs 2018.1 Page 31 of 31
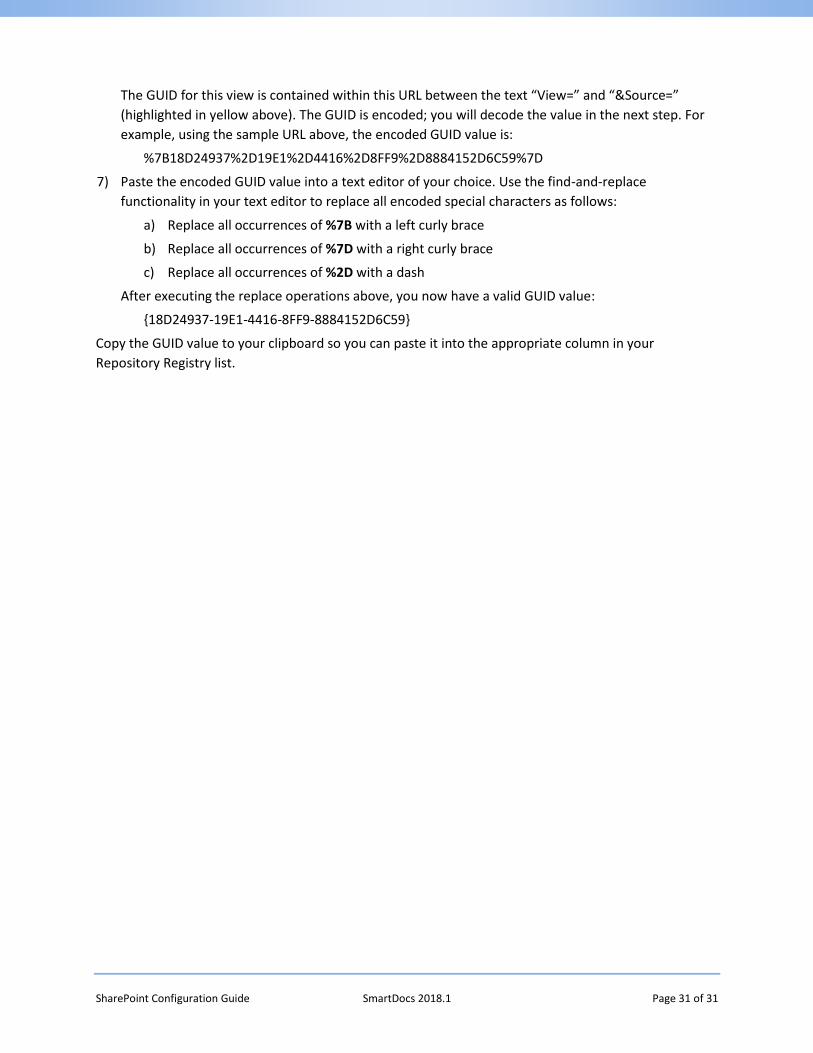
The GUID for this view is contained within this URL between the text “View=” and “&Source=”
(highlighted in yellow above). The GUID is encoded; you will decode the value in the next step. For
example, using the sample URL above, the encoded GUID value is:
%7B18D24937%2D19E1%2D4416%2D8FF9%2D8884152D6C59%7D
7) Paste the encoded GUID value into a text editor of your choice. Use the find-and-replace
functionality in your text editor to replace all encoded special characters as follows:
a) Replace all occurrences of %7B with a left curly brace
b) Replace all occurrences of %7D with a right curly brace
c) Replace all occurrences of %2D with a dash
After executing the replace operations above, you now have a valid GUID value:
{18D24937-19E1-4416-8FF9-8884152D6C59}
Copy the GUID value to your clipboard so you can paste it into the appropriate column in your
Repository Registry list.