sg printing
DESCRIPTION
AIXTRANSCRIPT

ÉÂÔ
IBM Network Station Printing Guide
Claude Bechard, Michael MillerMichael Burkhart, Marvin Heffler, Ravi Mandava
International Technical Support Organization
http://www.redbooks.ibm.com
SG24-5212-00


International Technical Support Organization
IBM Network Station Printing Guide
May 1998
SG24-5212-00
ÉÂÔ

Take Note!
Before using this information and the product it supports, be sure to read the general information in Appendix D, “SpecialNotices” on page 259.
First Edition (May 1998)
This edition applies to Release 3 of of the IBM Network Station Manager for use with OS/390, OS/400, AIX, Windows NT andWinCenter.
Note
This book is based on a pre-GA version of a product and may not apply when the product becomes generally available. Werecommend that you consult the product documentation or follow-on versions of this redbook for more current information.
Comments may be addressed to:IBM Corporation, International Technical Support OrganizationDept. HZ8 Building 678P.O. Box 12195Research Triangle Park, NC 27709-2195
When you send information to IBM, you grant IBM a non-exclusive right to use or distribute the information in any way it believesappropriate without incurring any obligation to you.
Copyright International Business Machines Corporation 1998. All rights reserved.Note to U.S. Government Users — Documentation related to restricted rights — Use, duplication or disclosure is subject torestrictions set forth in GSA ADP Schedule Contract with IBM Corp.

Contents
Figures . . . . . . . . . . . . . . . . . . . . . . . . . . . . . . . . . . . . . . . . . vii
Tables . . . . . . . . . . . . . . . . . . . . . . . . . . . . . . . . . . . . . . . . . . xiii
Preface . . . . . . . . . . . . . . . . . . . . . . . . . . . . . . . . . . . . . . . . . xvThe Team That Wrote This Redbook . . . . . . . . . . . . . . . . . . . . . . . . xvComments Welcome . . . . . . . . . . . . . . . . . . . . . . . . . . . . . . . . . . xvi
Chapter 1. Overview . . . . . . . . . . . . . . . . . . . . . . . . . . . . . . . . . . 11.1 History . . . . . . . . . . . . . . . . . . . . . . . . . . . . . . . . . . . . . . . . 11.2 Release 3 Print Support . . . . . . . . . . . . . . . . . . . . . . . . . . . . . . 11.3 Particularities of the IBM Network Station . . . . . . . . . . . . . . . . . . . . 41.4 Configuration Using the IBM Network Station Manager . . . . . . . . . . . . 51.5 What This Document Contains . . . . . . . . . . . . . . . . . . . . . . . . . . 6
Chapter 2. A Few Concepts . . . . . . . . . . . . . . . . . . . . . . . . . . . . . 92.1 What Are Printer Queues and Spooling? . . . . . . . . . . . . . . . . . . . . 92.2 What Are Printer Data Streams? . . . . . . . . . . . . . . . . . . . . . . . . 12
2.2.1 ASCII-Based Printer Data Streams . . . . . . . . . . . . . . . . . . . . 132.2.2 EBCDIC-Based Printer Data Streams . . . . . . . . . . . . . . . . . . . 14
2.3 What Are Printer Drivers? . . . . . . . . . . . . . . . . . . . . . . . . . . . . 142.4 What Are LPRs and LPDs? . . . . . . . . . . . . . . . . . . . . . . . . . . . 16
2.4.1 What Is Streaming Mode LPR/LPD? . . . . . . . . . . . . . . . . . . . 182.4.2 LPR/LPD Subcommands . . . . . . . . . . . . . . . . . . . . . . . . . . 182.4.3 What Is Non-Streaming Mode Send and Receive? . . . . . . . . . . . 192.4.4 What Is Streaming Mode Send and Receive? . . . . . . . . . . . . . . 20
Chapter 3. How Printing Works on the IBM Network Station . . . . . . . . 233.1 History of the IBM Network Station Printing Capabilities . . . . . . . . . . . 23
3.1.1 Release 1 Print Support (November 1996) . . . . . . . . . . . . . . . . 233.1.2 Release 2 Print Support (November 1997) . . . . . . . . . . . . . . . . 25
3.2 Summary of Release 3 Print Capabilities (June 1998) . . . . . . . . . . . . 273.3 How an IBM Network Station Application Prints . . . . . . . . . . . . . . . 303.4 The Printer Selection Process . . . . . . . . . . . . . . . . . . . . . . . . . . 32
3.4.1 The Print Dialog . . . . . . . . . . . . . . . . . . . . . . . . . . . . . . . 323.4.2 The Printer Selector . . . . . . . . . . . . . . . . . . . . . . . . . . . . . 343.4.3 The IBM Network Station Printer Table . . . . . . . . . . . . . . . . . . 35
3.5 Printer Access Control (Security) on the IBM Network Station . . . . . . . 363.6 How the IBM Network Station Implements LPR/LPD . . . . . . . . . . . . . 36
3.6.1 The LPR on the IBM Network Station . . . . . . . . . . . . . . . . . . . 383.6.2 The LPD on the IBM Network Station . . . . . . . . . . . . . . . . . . . 40
3.7 What is SERIALD? . . . . . . . . . . . . . . . . . . . . . . . . . . . . . . . . 43
Chapter 4. Configuration Using the IBM Network Station Manager . . . . 474.1 Printer Settings - System Defaults . . . . . . . . . . . . . . . . . . . . . . . 49
4.1.1 Print Client LPR . . . . . . . . . . . . . . . . . . . . . . . . . . . . . . . 504.1.2 The Print Server (LPD) . . . . . . . . . . . . . . . . . . . . . . . . . . . 514.1.3 Controlling Access to the IBM Network Station Printers . . . . . . . . 52
4.2 Adding Printers to the Printer List . . . . . . . . . . . . . . . . . . . . . . . . 534.3 Removing a Printer from the Printer List . . . . . . . . . . . . . . . . . . . . 56
Copyright IBM Corp. 1998 iii

4.4 Parallel and Serial Port Configuration . . . . . . . . . . . . . . . . . . . . . 56
Chapter 5. Host Applications Printing to IBM Network Station LocalPrinter . . . . . . . . . . . . . . . . . . . . . . . . . . . . . . . . . . . . . . . . . 57
5.1 Printing from an AIX Host . . . . . . . . . . . . . . . . . . . . . . . . . . . . 595.1.1 Using a Remote Print Queue . . . . . . . . . . . . . . . . . . . . . . . 595.1.2 Using a Modified JetDirect Queue . . . . . . . . . . . . . . . . . . . . . 65
5.2 Printing from a Windows NT Host . . . . . . . . . . . . . . . . . . . . . . . 725.2.1 Installing TCP/IP Printing Services . . . . . . . . . . . . . . . . . . . . 725.2.2 Creating a Definition for the IBM Network Station Printer . . . . . . . 74
5.3 Printing from a WinCenter Host . . . . . . . . . . . . . . . . . . . . . . . . . 805.3.1 Printing from WinCenter Using a WinStation Printer . . . . . . . . . . 825.3.2 Printing from WinCenter Using LPR . . . . . . . . . . . . . . . . . . . . 93
5.4 Printing from an AS/400 Host . . . . . . . . . . . . . . . . . . . . . . . . . . 985.4.1 Using a Remote Output Queue . . . . . . . . . . . . . . . . . . . . . . 995.4.2 Using an AS/400 Device Description . . . . . . . . . . . . . . . . . . 107
5.5 Printing from a VM Host . . . . . . . . . . . . . . . . . . . . . . . . . . . . 1135.5.1 Printing a PostScript File Using the LPR Command . . . . . . . . . 1135.5.2 Printing a Text File Using the LPR Command . . . . . . . . . . . . . 1155.5.3 Printing by Spooling to RSCS . . . . . . . . . . . . . . . . . . . . . . 116
5.6 Printing from an OS/390 Host . . . . . . . . . . . . . . . . . . . . . . . . . 1175.6.1 Using Network Print Facility . . . . . . . . . . . . . . . . . . . . . . . 1185.6.2 Using Netspool and IP Printway . . . . . . . . . . . . . . . . . . . . . 118
5.7 Printing from an OS/2 Host . . . . . . . . . . . . . . . . . . . . . . . . . . 119
Chapter 6. IBM Network Station Applications Printing Examples . . . . 1216.1 Printing from the 3270/5250 Emulator . . . . . . . . . . . . . . . . . . . . 122
6.1.1 3270 Emulator Printing Functions . . . . . . . . . . . . . . . . . . . . 1256.2 Printing from NC Navigator . . . . . . . . . . . . . . . . . . . . . . . . . . 126
6.2.1 Printing from the NC Navigator Browser . . . . . . . . . . . . . . . . 1266.2.2 Printing from the IBM Network Station Browser . . . . . . . . . . . . 129
6.3 Printing from Java Applications . . . . . . . . . . . . . . . . . . . . . . . . 1306.3.1 An Example of a Java Program That Prints . . . . . . . . . . . . . . 133
6.4 VTxxx Emulator . . . . . . . . . . . . . . . . . . . . . . . . . . . . . . . . . 1356.5 Printing from Lotus eSuite . . . . . . . . . . . . . . . . . . . . . . . . . . . 136
Chapter 7. Printing from an IBM Network Station to Remote PrintServers . . . . . . . . . . . . . . . . . . . . . . . . . . . . . . . . . . . . . . . 137
7.1 Printing to a Windows NT Server . . . . . . . . . . . . . . . . . . . . . . . 1387.1.1 Is the LPD Installed and Running? . . . . . . . . . . . . . . . . . . . 1387.1.2 Verifying Access Authority to Printers . . . . . . . . . . . . . . . . . . 1397.1.3 Choosing the Windows NT Printer Queue to Receive Print . . . . . 1397.1.4 Adding a New Printer to a Windows NT Server . . . . . . . . . . . . 139
7.2 Printing to an OS/400 Host . . . . . . . . . . . . . . . . . . . . . . . . . . 1447.2.1 Is LPD Active on the AS/400? . . . . . . . . . . . . . . . . . . . . . . 1447.2.2 Starting the LPD on the AS/400 . . . . . . . . . . . . . . . . . . . . . 1457.2.3 Verifying Access Authority . . . . . . . . . . . . . . . . . . . . . . . . 1467.2.4 Choosing the AS/400 Output Queue to Receive Print Requests . . 1467.2.5 Adding a New Printer to the AS/400 . . . . . . . . . . . . . . . . . . 1467.2.6 Data Stream Conversion on the AS/400 . . . . . . . . . . . . . . . . 150
7.3 Printing to an AIX Host . . . . . . . . . . . . . . . . . . . . . . . . . . . . . 1517.3.1 Is the LPD Active on AIX? . . . . . . . . . . . . . . . . . . . . . . . . 1517.3.2 Starting LPD on AIX . . . . . . . . . . . . . . . . . . . . . . . . . . . . 1527.3.3 Verifying Access to AIX Printers . . . . . . . . . . . . . . . . . . . . . 152
iv IBM Network Station Printing Guide

7.3.4 Enabling Print Access on AIX . . . . . . . . . . . . . . . . . . . . . . 1547.3.5 Choosing the AIX Printer Queue to Receive Print Requests . . . . 1547.3.6 Adding a New Printer to the RS/6000 . . . . . . . . . . . . . . . . . . 155
7.4 Printing to an OS/2 Host . . . . . . . . . . . . . . . . . . . . . . . . . . . . 1597.4.1 Is the LPD Active on OS/2? . . . . . . . . . . . . . . . . . . . . . . . 1597.4.2 Verifying Access Authority to the LPD . . . . . . . . . . . . . . . . . 1597.4.3 Starting the LPD on OS/2 . . . . . . . . . . . . . . . . . . . . . . . . 1597.4.4 Choosing the OS/2 Print Queue to Receive Print . . . . . . . . . . . 159
7.5 Printing to an S/390 Host . . . . . . . . . . . . . . . . . . . . . . . . . . . 159
Chapter 8. Practical Examples . . . . . . . . . . . . . . . . . . . . . . . . . 1618.1 Using the Spooling Capabilities of Other Hosts . . . . . . . . . . . . . . . 1618.2 Using the Transform Capabilities of Other Hosts . . . . . . . . . . . . . . 1638.3 A Sample Fictional Scenario - The Blundies Company . . . . . . . . . . 164
8.3.1 Introducing Blundies . . . . . . . . . . . . . . . . . . . . . . . . . . . . 1648.3.2 Nomenclature Used . . . . . . . . . . . . . . . . . . . . . . . . . . . . 1658.3.3 Defining the PAY6400 Printer . . . . . . . . . . . . . . . . . . . . . . 1668.3.4 Define the PAYNP17 Printer . . . . . . . . . . . . . . . . . . . . . . . 1668.3.5 Defining the PAY4029 Printer . . . . . . . . . . . . . . . . . . . . . . 1668.3.6 Creating a Payroll Group User Profile . . . . . . . . . . . . . . . . . 1678.3.7 Creating a Group Profile on the AS/400 . . . . . . . . . . . . . . . . 1688.3.8 Adding Users to the Group . . . . . . . . . . . . . . . . . . . . . . . . 1688.3.9 Changing the Group Defaults . . . . . . . . . . . . . . . . . . . . . . 1698.3.10 Changing the User Defaults . . . . . . . . . . . . . . . . . . . . . . 1738.3.11 Using Host Print Transform . . . . . . . . . . . . . . . . . . . . . . . 177
Chapter 9. Problem Determination Tools, Tips and Techniques . . . . . 1799.1 Mini Console . . . . . . . . . . . . . . . . . . . . . . . . . . . . . . . . . . . 1799.2 Printer Hex Mode . . . . . . . . . . . . . . . . . . . . . . . . . . . . . . . . 1799.3 PING . . . . . . . . . . . . . . . . . . . . . . . . . . . . . . . . . . . . . . . 1809.4 Problems When Sending from an IBM Network Station to an AS/400 . . 1809.5 Problems When Sending from an AS/400 to an IBM Network Station . . 1809.6 Using Windows NT Event Viewer . . . . . . . . . . . . . . . . . . . . . . . 1819.7 Message Log on the IBM Network Station . . . . . . . . . . . . . . . . . 181
9.7.1 Accessing the IBM Network Station Message Log Remotely . . . . 1819.8 Checking the Version of an IBM Network Station . . . . . . . . . . . . . . 1829.9 Verifying the Currently Loaded IBM Network Station Configuration . . . 182
9.9.1 The Print Section Configuration . . . . . . . . . . . . . . . . . . . . . 1839.9.2 The Access Control Section Configuration . . . . . . . . . . . . . . . 1889.9.3 Parallel and Serial Port Configuration Parameters . . . . . . . . . . 191
9.10 LPR/LPD Control Commands and Data Types . . . . . . . . . . . . . . 1949.10.1 Control File Names . . . . . . . . . . . . . . . . . . . . . . . . . . . 1949.10.2 Control File Options Used by the IBM Network Station . . . . . . . 1949.10.3 A Sample Control File . . . . . . . . . . . . . . . . . . . . . . . . . . 1979.10.4 Using the LPQ Command . . . . . . . . . . . . . . . . . . . . . . . . 1989.10.5 Viewing the Control File . . . . . . . . . . . . . . . . . . . . . . . . . 2019.10.6 Control Commands As Used in Windows NT . . . . . . . . . . . . 2019.10.7 Control Commands Used by OS/2 . . . . . . . . . . . . . . . . . . . 2129.10.8 Control Commands Used by AIX . . . . . . . . . . . . . . . . . . . 213
9.11 Working with Windows NT Printers/Queues . . . . . . . . . . . . . . . . 2139.11.1 Assigning Printers to Ports . . . . . . . . . . . . . . . . . . . . . . . 2139.11.2 Local Spooling for a LAN Printer . . . . . . . . . . . . . . . . . . . . 2169.11.3 Printing to File . . . . . . . . . . . . . . . . . . . . . . . . . . . . . . 218
9.12 Typical and Common Situations . . . . . . . . . . . . . . . . . . . . . . . 218
Contents v

9.12.1 No Printers Configured . . . . . . . . . . . . . . . . . . . . . . . . . 2189.12.2 Load Letter Message on the Printer . . . . . . . . . . . . . . . . . . 2189.12.3 Waiting Message on the Printer . . . . . . . . . . . . . . . . . . . . 219
Chapter 10. Application Programming Interfaces (APIs) . . . . . . . . . . 22110.1 Release 1 APIs . . . . . . . . . . . . . . . . . . . . . . . . . . . . . . . . 22110.2 Release 2 APIs . . . . . . . . . . . . . . . . . . . . . . . . . . . . . . . . 22110.3 Release 3 APIs . . . . . . . . . . . . . . . . . . . . . . . . . . . . . . . . 221
Chapter 11. DBCS Considerations . . . . . . . . . . . . . . . . . . . . . . . 225
Appendix A. Special Values of Image Configurations (AS/400) . . . . . 229
Appendix B. Printing from the VTxxx Emulator to a Remote IBM NetworkStation . . . . . . . . . . . . . . . . . . . . . . . . . . . . . . . . . . . . . . . . 233
Appendix C. Printing Related Configuration Parameters . . . . . . . . . 237
Appendix D. Special Notices . . . . . . . . . . . . . . . . . . . . . . . . . . . 259
Appendix E. Related Publications . . . . . . . . . . . . . . . . . . . . . . . 261E.1 International Technical Support Organization Publications . . . . . . . . 261E.2 Redbooks on CD-ROMs . . . . . . . . . . . . . . . . . . . . . . . . . . . . 261E.3 Other Publications . . . . . . . . . . . . . . . . . . . . . . . . . . . . . . . 261
How to Get ITSO Redbooks . . . . . . . . . . . . . . . . . . . . . . . . . . . . 263How IBM Employees Can Get ITSO Redbooks . . . . . . . . . . . . . . . . . 263How Customers Can Get ITSO Redbooks . . . . . . . . . . . . . . . . . . . . 264IBM Redbook Order Form . . . . . . . . . . . . . . . . . . . . . . . . . . . . . . 265
Index . . . . . . . . . . . . . . . . . . . . . . . . . . . . . . . . . . . . . . . . . . 267
ITSO Redbook Evaluation . . . . . . . . . . . . . . . . . . . . . . . . . . . . . 269
vi IBM Network Station Printing Guide

Figures
1. Release 3 Printing Capabilities Overview . . . . . . . . . . . . . . . . . . . . 22. A Sample Print Dialog . . . . . . . . . . . . . . . . . . . . . . . . . . . . . . . 33. The Printer Selector . . . . . . . . . . . . . . . . . . . . . . . . . . . . . . . . 44. The IBM Network Station Manager Printer Settings Configuration . . . . . 55. Printer List Parameters - System Defaults . . . . . . . . . . . . . . . . . . . 66. Spooling Output to Tape . . . . . . . . . . . . . . . . . . . . . . . . . . . . 107. Print Flow on a Typical Large Computer System . . . . . . . . . . . . . . 118. One Printer Serving Multiple Queues . . . . . . . . . . . . . . . . . . . . . 129. Printer Pooling . . . . . . . . . . . . . . . . . . . . . . . . . . . . . . . . . . 12
10. Using the Driver at Application Print Time . . . . . . . . . . . . . . . . . . 1511. Using the Driver at the Time the Output Is Sent to the Printer . . . . . . 1612. Sending a Spool File between Two Devices . . . . . . . . . . . . . . . . . 1713. Non-Streaming Mode Send/Receive . . . . . . . . . . . . . . . . . . . . . 2014. Streaming Mode Send/Receive . . . . . . . . . . . . . . . . . . . . . . . . 2115. Release 1 Printing Capabilities . . . . . . . . . . . . . . . . . . . . . . . . . 2416. Release 2 Printing Capabilities . . . . . . . . . . . . . . . . . . . . . . . . . 2617. Release 3 Printing Capabilities . . . . . . . . . . . . . . . . . . . . . . . . . 2818. An IBM Network Station Application Print Request . . . . . . . . . . . . . 3119. The Java Application Print Dialog . . . . . . . . . . . . . . . . . . . . . . . 3320. The NC Navigator Print Dialog . . . . . . . . . . . . . . . . . . . . . . . . . 3321. The Emulators Print Dialog . . . . . . . . . . . . . . . . . . . . . . . . . . . 3422. The Printer Selector Panel . . . . . . . . . . . . . . . . . . . . . . . . . . . 3423. Network Station - Streaming Mode Send (1) . . . . . . . . . . . . . . . . . 3924. Network Station Streaming Mode Send (2) . . . . . . . . . . . . . . . . . . 4025. LPD on the IBM Network Station . . . . . . . . . . . . . . . . . . . . . . . 4126. Network Station Streaming Mode Receive . . . . . . . . . . . . . . . . . . 4227. Port Numbers Associated with Printing on the IBM Network Station . . . 4428. Using the IBM Network Station Manager . . . . . . . . . . . . . . . . . . . 4729. The IBM Network Station Manager Printer Defaults Configuration Panel 4830. The Printer Settings - System Defaults . . . . . . . . . . . . . . . . . . . . 5031. Sample LPRD Messages . . . . . . . . . . . . . . . . . . . . . . . . . . . . 5132. Sample LPD Messages . . . . . . . . . . . . . . . . . . . . . . . . . . . . . 5233. Hosts Specified in the Access Control List . . . . . . . . . . . . . . . . . . 5334. Printer List Parameters - System Defaults . . . . . . . . . . . . . . . . . . 5335. The Printer Selector with PRT51 Added . . . . . . . . . . . . . . . . . . . 5636. Printing from Host Applications to the IBM Network Station Printer . . . . 5737. Host Application to Network Station - Components . . . . . . . . . . . . . 5838. Selecting an Attachment Type of Remote . . . . . . . . . . . . . . . . . . 6039. Selecting Local Filtering before Sending to Print Server . . . . . . . . . . 6040. Selecting the Remote Printer Type Manufacturer . . . . . . . . . . . . . . 6141. Selecting the Remote Printer Type Model . . . . . . . . . . . . . . . . . . 6242. Printer Support Not Installed . . . . . . . . . . . . . . . . . . . . . . . . . . 6243. Add a Remote Print Queue with Local Filtering . . . . . . . . . . . . . . . 6344. COMMAND STATUS Panel Showing Successful Completion . . . . . . . 6445. The New Printer in the Printer List . . . . . . . . . . . . . . . . . . . . . . 6546. An external JetDirect device . . . . . . . . . . . . . . . . . . . . . . . . . . 6547. Selecting an Attachment Type of hpJetDirect . . . . . . . . . . . . . . . . 6648. Selecting the Remote Printer Manufacturer . . . . . . . . . . . . . . . . . 6749. Selecting the Remote Printer Type . . . . . . . . . . . . . . . . . . . . . . 6750. BOOTP/TFTP Server Choice . . . . . . . . . . . . . . . . . . . . . . . . . . 68
Copyright IBM Corp. 1998 vii

51. Add a Print Queue . . . . . . . . . . . . . . . . . . . . . . . . . . . . . . . . 6952. Messages when Creating the Queue . . . . . . . . . . . . . . . . . . . . . 6953. Change/Show Characteristics of a Queue Device . . . . . . . . . . . . . . 7054. Change/Show Characteristics of a Queue Device . . . . . . . . . . . . . . 7155. Results of the more /etc/qconfig Command . . . . . . . . . . . . . . . . . 7256. Network Services . . . . . . . . . . . . . . . . . . . . . . . . . . . . . . . . 7357. Network Services - Add . . . . . . . . . . . . . . . . . . . . . . . . . . . . . 7358. Add Printers Wizard . . . . . . . . . . . . . . . . . . . . . . . . . . . . . . . 7459. Add Printers - Add Port . . . . . . . . . . . . . . . . . . . . . . . . . . . . . 7460. Adding a Printer Port . . . . . . . . . . . . . . . . . . . . . . . . . . . . . . 7561. Add LPR Compatible Printer . . . . . . . . . . . . . . . . . . . . . . . . . . 7562. Add Printer Wizard - New LPR Port Added . . . . . . . . . . . . . . . . . 7663. Choosing the Printer Driver . . . . . . . . . . . . . . . . . . . . . . . . . . . 7664. Naming the Printer . . . . . . . . . . . . . . . . . . . . . . . . . . . . . . . . 7765. Choosing Whether to Share the Printer . . . . . . . . . . . . . . . . . . . . 7766. Choosing Whether to Print a Test Page . . . . . . . . . . . . . . . . . . . 7867. Did the Test Page Print Correctly? . . . . . . . . . . . . . . . . . . . . . . 7868. A Sample Test Page Output . . . . . . . . . . . . . . . . . . . . . . . . . . 7969. The New Printer in the Printers Folder . . . . . . . . . . . . . . . . . . . . 7970. Windows NT Help . . . . . . . . . . . . . . . . . . . . . . . . . . . . . . . . 8071. Printing from WinCenter Applications . . . . . . . . . . . . . . . . . . . . . 8172. IBM Network Station Print Components - WinCenter . . . . . . . . . . . . 8273. WinStation Printer Configuration . . . . . . . . . . . . . . . . . . . . . . . . 8474. Administrative Tools Folder . . . . . . . . . . . . . . . . . . . . . . . . . . . 8575. WinStation Configuration . . . . . . . . . . . . . . . . . . . . . . . . . . . . 8576. Edit WinStation Configuration . . . . . . . . . . . . . . . . . . . . . . . . . 8677. Advanced WinStation Configuration . . . . . . . . . . . . . . . . . . . . . . 8778. User Manager . . . . . . . . . . . . . . . . . . . . . . . . . . . . . . . . . . 8879. User Properties . . . . . . . . . . . . . . . . . . . . . . . . . . . . . . . . . 8880. User Configuration . . . . . . . . . . . . . . . . . . . . . . . . . . . . . . . . 8981. Create a Printer . . . . . . . . . . . . . . . . . . . . . . . . . . . . . . . . . 9082. Printer Details . . . . . . . . . . . . . . . . . . . . . . . . . . . . . . . . . . 9083. Printer Manager . . . . . . . . . . . . . . . . . . . . . . . . . . . . . . . . . 9184. Parallel Port . . . . . . . . . . . . . . . . . . . . . . . . . . . . . . . . . . . 9185. Serial Port . . . . . . . . . . . . . . . . . . . . . . . . . . . . . . . . . . . . 9286. IBM Network Station Print Components - Using LPR/LPD . . . . . . . . . 9387. Create a Printer in WinFrame . . . . . . . . . . . . . . . . . . . . . . . . . 9488. Create a Printer in WinFrame . . . . . . . . . . . . . . . . . . . . . . . . . 9489. Print Destinations . . . . . . . . . . . . . . . . . . . . . . . . . . . . . . . . 9590. LPR Port . . . . . . . . . . . . . . . . . . . . . . . . . . . . . . . . . . . . . 9591. Printer Details . . . . . . . . . . . . . . . . . . . . . . . . . . . . . . . . . . 9692. Selecting a Printer . . . . . . . . . . . . . . . . . . . . . . . . . . . . . . . . 9793. Print Manager . . . . . . . . . . . . . . . . . . . . . . . . . . . . . . . . . . 9794. Accessing the Same Printer through Two Methods . . . . . . . . . . . . . 9895. The Prompted Create Output Queue Command . . . . . . . . . . . . . . . 9996. Create Output Queue Command - First Panel . . . . . . . . . . . . . . . 10097. Create Output Queue Command - Second Panel . . . . . . . . . . . . . 10198. Specifying Manufacturer, Type and Model . . . . . . . . . . . . . . . . . 10299. Entering the IP Address . . . . . . . . . . . . . . . . . . . . . . . . . . . . 103100. Entering a Printer Description . . . . . . . . . . . . . . . . . . . . . . . . 103101. The Output Queue Created Message . . . . . . . . . . . . . . . . . . . . 104102. Create Device Description (Printer) Command . . . . . . . . . . . . . . 105103. Specifying a Font Identifier . . . . . . . . . . . . . . . . . . . . . . . . . . 105104. The Error Message . . . . . . . . . . . . . . . . . . . . . . . . . . . . . . 106
viii IBM Network Station Printing Guide

105. The Start Remote Writer Command . . . . . . . . . . . . . . . . . . . . . 106106. Success Message When Starting the Writer . . . . . . . . . . . . . . . . 107107. The End Writer Command . . . . . . . . . . . . . . . . . . . . . . . . . . 107108. Success Message When Ending the Writer . . . . . . . . . . . . . . . . 107109. The Create Device Description (Printer) Command . . . . . . . . . . . . 108110. LAN Attachment and Port Number Parameters . . . . . . . . . . . . . . 109111. Host Print Transform Parameter . . . . . . . . . . . . . . . . . . . . . . . 110112. Manufacturer Type and Model Parameter . . . . . . . . . . . . . . . . . 111113. Remote Location Parameter . . . . . . . . . . . . . . . . . . . . . . . . . 112114. Device Description Created Message . . . . . . . . . . . . . . . . . . . . 112115. Printing a PostScript file from VM . . . . . . . . . . . . . . . . . . . . . . 113116. Messages on VM Following an LPR Command . . . . . . . . . . . . . . 114117. IBM Network Station Message Log for Print Job from VM . . . . . . . . 114118. Printing a Text File from VM . . . . . . . . . . . . . . . . . . . . . . . . . 115119. Printing a Text File from VM with Intermediate Spool . . . . . . . . . . . 116120. Network Print Facility . . . . . . . . . . . . . . . . . . . . . . . . . . . . . 118121. NetSpool and IP PrintWay . . . . . . . . . . . . . . . . . . . . . . . . . . 119122. IBM Network Station Applications . . . . . . . . . . . . . . . . . . . . . . 121123. Print Screen Function . . . . . . . . . . . . . . . . . . . . . . . . . . . . . 123124. 3270/5250 Emulator Print Dialog . . . . . . . . . . . . . . . . . . . . . . 124125. Printer Selector . . . . . . . . . . . . . . . . . . . . . . . . . . . . . . . . . 125126. 3270 LU1/LU3 . . . . . . . . . . . . . . . . . . . . . . . . . . . . . . . . . 126127. The NC Navigator Browser . . . . . . . . . . . . . . . . . . . . . . . . . . 127128. The NC Navigator Browser Print Dialog . . . . . . . . . . . . . . . . . . 128129. The NC Navigator Browser Print Dialog in Release 2 . . . . . . . . . . 129130. The Network Station Browser Print Dialog . . . . . . . . . . . . . . . . . 130131. The Network Station Browser - Printer List . . . . . . . . . . . . . . . . . 130132. Print Dialog on IBM Network Station . . . . . . . . . . . . . . . . . . . . 131133. Printer Selector on IBM Network Station . . . . . . . . . . . . . . . . . . 132134. SimplePrint - Sample Java Application Window . . . . . . . . . . . . . . 133135. SimplePrint Sample Output - IBM 4029 Printer . . . . . . . . . . . . . . 134136. SimplePrint Sample Output - Print to File . . . . . . . . . . . . . . . . . 134137. A Sample Java Print Program . . . . . . . . . . . . . . . . . . . . . . . . 135138. Printing to Remote Print Servers . . . . . . . . . . . . . . . . . . . . . . 137139. The Windows NT Services Window - TCP/IP Print Server . . . . . . . . 138140. Add Printer Wizard . . . . . . . . . . . . . . . . . . . . . . . . . . . . . . 140141. Select a Printer Port . . . . . . . . . . . . . . . . . . . . . . . . . . . . . . 140142. Select a Printer Type . . . . . . . . . . . . . . . . . . . . . . . . . . . . . 141143. Name the Printer/Queue . . . . . . . . . . . . . . . . . . . . . . . . . . . 142144. Shared Printer . . . . . . . . . . . . . . . . . . . . . . . . . . . . . . . . . 142145. Adding a Network Printer . . . . . . . . . . . . . . . . . . . . . . . . . . . 143146. Work with Active Jobs, Showing QTLPDxxxxx Jobs Running . . . . . . 144147. Changing LPD Attributes . . . . . . . . . . . . . . . . . . . . . . . . . . . 145148. Work with All Output Queues . . . . . . . . . . . . . . . . . . . . . . . . 146149. Create Device Desc (Printer) - 1 of 3 . . . . . . . . . . . . . . . . . . . . 148150. Create Device Desc (Printer) - 2 of 3 . . . . . . . . . . . . . . . . . . . . 149151. Create Device Desc (Printer) - 3 of 3 . . . . . . . . . . . . . . . . . . . . 149152. Changing Remote Output Queue to Allow Conversion from PostScript to
PCL . . . . . . . . . . . . . . . . . . . . . . . . . . . . . . . . . . . . . . . 151153. Show Status of the Print Server Subsystem . . . . . . . . . . . . . . . . 152154. Print Spooling Menu . . . . . . . . . . . . . . . . . . . . . . . . . . . . . . 152155. Manage Print Server Menu . . . . . . . . . . . . . . . . . . . . . . . . . . 153156. List of Remote Clients . . . . . . . . . . . . . . . . . . . . . . . . . . . . . 153157. Add Print Access for a Remote Client . . . . . . . . . . . . . . . . . . . 154
Figures ix

158. List All Print Queues . . . . . . . . . . . . . . . . . . . . . . . . . . . . . . 155159. Local Attachment Type . . . . . . . . . . . . . . . . . . . . . . . . . . . . 155160. Printer Types . . . . . . . . . . . . . . . . . . . . . . . . . . . . . . . . . . 156161. Printer Selection . . . . . . . . . . . . . . . . . . . . . . . . . . . . . . . . 156162. Interface Selection . . . . . . . . . . . . . . . . . . . . . . . . . . . . . . . 157163. Parent Adapter . . . . . . . . . . . . . . . . . . . . . . . . . . . . . . . . . 157164. Entering a Print Queue Name . . . . . . . . . . . . . . . . . . . . . . . . 158165. Printer Queue Added . . . . . . . . . . . . . . . . . . . . . . . . . . . . . 158166. Local Printing via Remote Spooler Host . . . . . . . . . . . . . . . . . . 162167. Printing via Remote Spooler Host to a Centralized Printer . . . . . . . . 163168. Network Diagram for Blundies . . . . . . . . . . . . . . . . . . . . . . . . 165169. The PAYNP17 Printer Parameters . . . . . . . . . . . . . . . . . . . . . 166170. The PAY4029 Printer Parameters . . . . . . . . . . . . . . . . . . . . . . 167171. Select User's Group Panel . . . . . . . . . . . . . . . . . . . . . . . . . . 168172. Select Group for RAVI . . . . . . . . . . . . . . . . . . . . . . . . . . . . 169173. Printing from IBM Network Stations Directly to PAYNP17 . . . . . . . . 170174. Using the AS/400, PAYROLL, to Queue Print for PAYNP17 . . . . . . . 171175. Selecting PAYGRP for Group Defaults . . . . . . . . . . . . . . . . . . . 172176. Adding PAYNP17 to the PAYGRP for Group Defaults . . . . . . . . . . 172177. Marvin's Printer Selector . . . . . . . . . . . . . . . . . . . . . . . . . . . 173178. Using the AS/400, PAYROLL, to Transform PostScript to PCL . . . . . 174179. The Printer Defaults Screen, Selecting Marvin's User Defaults . . . . . 175180. Printer Settings for MARVIN . . . . . . . . . . . . . . . . . . . . . . . . . 176181. Marvin's Printer Selector . . . . . . . . . . . . . . . . . . . . . . . . . . . 176182. Sample Mini Console . . . . . . . . . . . . . . . . . . . . . . . . . . . . . 179183. Show Version . . . . . . . . . . . . . . . . . . . . . . . . . . . . . . . . . . 182184. The Setup Menu on the Console . . . . . . . . . . . . . . . . . . . . . . 182185. The Sections Available through Setup . . . . . . . . . . . . . . . . . . . 183186. The Print Configuration Section . . . . . . . . . . . . . . . . . . . . . . . 184187. The LPRD/LPD Buffer Size Parameters . . . . . . . . . . . . . . . . . . 185188. The Printer Table Configuration Parameters . . . . . . . . . . . . . . . . 185189. The Printer Configuration Panel in IBM Network Station Manager . . . 186190. Changing the Local serial printer . . . . . . . . . . . . . . . . . . . . . . 187191. Printer Selector with PARALLEL1 and SERIAL1 Removed . . . . . . . 188192. Access Control List for Serial and Parallel Ports . . . . . . . . . . . . . 189193. The Serial Daemon Access Control Configuration Parameters . . . . . 189194. Access Control List for the LPD Daemon . . . . . . . . . . . . . . . . . . 190195. LPD Access Control List Parameters . . . . . . . . . . . . . . . . . . . . 190196. Parallel Port . . . . . . . . . . . . . . . . . . . . . . . . . . . . . . . . . . 191197. Parallel Port Configuration Parameters . . . . . . . . . . . . . . . . . . . 192198. Serial Port . . . . . . . . . . . . . . . . . . . . . . . . . . . . . . . . . . . 192199. Serial Port Configuration Parameters . . . . . . . . . . . . . . . . . . . . 193200. Parallel Daemon . . . . . . . . . . . . . . . . . . . . . . . . . . . . . . . . 193201. Connection Table . . . . . . . . . . . . . . . . . . . . . . . . . . . . . . . 194202. Sample Control File - Text File . . . . . . . . . . . . . . . . . . . . . . . . 198203. Sample Control File - Binary File . . . . . . . . . . . . . . . . . . . . . . 198204. LPQ Command Output - AIX LPD Server . . . . . . . . . . . . . . . . . 199205. LPQ Command Output - Windows NT LPD Server . . . . . . . . . . . . 199206. The IBM 4029 Printer Queue - Two LPR Jobs Paused . . . . . . . . . . 199207. Two Print Jobs in the Windows NT Spooler Queue . . . . . . . . . . . . 200208. A Sample SHD File . . . . . . . . . . . . . . . . . . . . . . . . . . . . . . 200209. The Windows NT 3.51 Registry Editor . . . . . . . . . . . . . . . . . . . 204210. The Windows NT 3.51 Registry Editor with SimulatePassThrough Added 204211. The Windows NT 3.51 Registry Editor with new LPD key created . . . 205
x IBM Network Station Printing Guide

212. The Windows NT 3.51 Warning Message . . . . . . . . . . . . . . . . . 205213. The Windows NT 3.51 Registry Editor with the LPDSVC Key Copied to
the LPD Key . . . . . . . . . . . . . . . . . . . . . . . . . . . . . . . . . . 206214. The Windows NT 4.0 Registry Editor . . . . . . . . . . . . . . . . . . . . 207215. The Windows NT 4.0 Registry Editor with SimulatePassThrough Added 208216. The Windows NT 4.0 Registry Editor . . . . . . . . . . . . . . . . . . . . 209217. The Windows NT 4.0 Registry Editor with SimulatePassThrough Added 210218. Document Details . . . . . . . . . . . . . . . . . . . . . . . . . . . . . . . 211219. Document Properties . . . . . . . . . . . . . . . . . . . . . . . . . . . . . 212220. Windows NT - Printers and Ports . . . . . . . . . . . . . . . . . . . . . . 213221. Windows NT - Printer Properties - Port Assignment . . . . . . . . . . . 214222. Windows NT - Printer Properties - Printer Pooling . . . . . . . . . . . . 215223. Windows NT - Printer Properties - Multiple Printers per Port . . . . . . 216224. Windows NT - Add Printer - Local Port . . . . . . . . . . . . . . . . . . . 217225. Windows NT - A Local Port for a LAN Printer . . . . . . . . . . . . . . . 217226. DBCS Conversion Processing . . . . . . . . . . . . . . . . . . . . . . . . 226227. Printer List Parameters - System Defaults . . . . . . . . . . . . . . . . . 227228. ASCII Options Configuration Panel . . . . . . . . . . . . . . . . . . . . . 228229. From IBM Network Stationto IBM Network Station . . . . . . . . . . . . 233230. From VTxxx Emulator to Remote IBM Network Station . . . . . . . . . . 234231. VTxxx Emulator File Pull-Down . . . . . . . . . . . . . . . . . . . . . . . 235
Figures xi

xii IBM Network Station Printing Guide

Tables
1. Local Applications in Release 1 . . . . . . . . . . . . . . . . . . . . . . . . 252. Host-Based Applications in Release 1 . . . . . . . . . . . . . . . . . . . . 253. Local Applications in Release 2 . . . . . . . . . . . . . . . . . . . . . . . . 274. Host-Based Applications in Release 2 . . . . . . . . . . . . . . . . . . . . 275. Local Applications in Release 3 . . . . . . . . . . . . . . . . . . . . . . . . 296. Host-Based Applications in Release 3 . . . . . . . . . . . . . . . . . . . . 307. LPR/LPD Support on Major Platforms . . . . . . . . . . . . . . . . . . . . 378. Printers Supporting PCL Data Streams . . . . . . . . . . . . . . . . . . . 2299. Printers Supporting PostScript Data Streams . . . . . . . . . . . . . . . 229
10. Printers Supporting IPDS Data Streams . . . . . . . . . . . . . . . . . . 23011. Printers Supporting PCL and PostScript Data Streams . . . . . . . . . . 23012. Recommended Image Configuration Objects for Some Common Printers 230
Copyright IBM Corp. 1998 xiii

xiv IBM Network Station Printing Guide

Preface
This redbook describes the printing capabilities of the IBM Network Station. Itapplies to Release 3 of the IBM Network Station software, and to previousreleases.
It is designed to help the reader understand how printing works on the IBM NetworkStation by discussing some of the basic concepts involved, illustrating the majorcomponents of the printing subsystem, providing examples of how local applicationsprint to local printers and/or send printer output to remote print servers, as well ashow remote applications can send print jobs to local printers.
These examples are provided for many platforms, such as OS/390, OS/400, AIX,Windows NT and WinCenter, and they include instructions on how to prepare thesesystems to receive print jobs from an IBM Network Station.
Details are also provided on the configuration requirements of the IBM NetworkStation, how to use the IBM Network Station Manager program to manipulate theseconfiguration parameters, and a few tools, tips and techniques helpful in performingproblem determination.
The Team That Wrote This RedbookThis redbook was produced by a team of specialists from around the world workingat the Systems Management and Networking ITSO Center, Raleigh.
Claude Bechard is a Senior Technical Marketing Support Representative at theSystems Management and Networking ITSO Center, Raleigh. When he joined theITSO seven years ago, his responsibility was to support SNA communicationsproducts and he produced numerous redbooks on IBM Communications Serverproducts. His responsibility in the last year has been to write and teach IBMclasses worldwide on the IBM Network Station. He is an IBM Canada employee,with 29 years of service with IBM, and holds a degree in Mechanical and IndustrialEngineering from the University of Montreal.
Michael Miller is an AS/400 Support Specialist in IBM UK. His current role is inthe Assist/400 Printing group, supporting customers with AS/400 printing issues.He has been working for IBM in this role for two years. He holds a degree inComputer Science from the University of Brighton.
We also include as authors the following people from the Network Computer DeviceDrivers Department in the IBM Network Computer Division developmentorganization without whom this project would not have been possible.
We owe them a very special mention because of their invaluable contributions tothis project, for their ideas, help, cooperation, access to early code, review, and forsharing their design documents from which we extracted some of the material inthis document.
Michael Burkhart is a Software Engineer on the IBM Network Computer PrintDevelopment Team in Austin. He has a B.S. in Computer Science from theUniversity of Texas and he has been working with IBM for four years. His expertiselies in Xterminals, Xwindows, TCP/IP networking and Java programming.
Copyright IBM Corp. 1998 xv

Marvin Heffler is a Development Programmer Manager in the Network StationDevice Drivers department of the IBM Network Computer Division. He managesthe department responsible for device drivers and print support on the IBM NetworkStation. His previous assignment was as a team leader of print development forAIX in the RISC System/6000 Division. Marvin has 14 years of experience insoftware development and has worked for IBM for five years. His areas ofexpertise include printing, commands, libraries, and project management.
Ravi Mandava is an Advisory Programmer in the IBM Network Computer DivisionDevelopment. He has a BS in Mechanical Engineering and a MS in ComputerScience from Osmania University in India. He has over 10 years of experience inthe system software development and has worked for IBM for about four years.His areas of expertise include printing, communications, GUIs and databases, andhe has written articles on printing in AIX, SNMP and EMS in DCE, and the IBMNetwork Station model 1000.
Comments WelcomeYour comments are important to us!
We want our redbooks to be as helpful as possible. Please send us yourcomments about this or other redbooks in one of the following ways:
� Fax the evaluation form found in “ITSO Redbook Evaluation” on page 269 tothe fax number shown on the form.
� Use the electronic evaluation form found on the Redbooks Web sites:
For Internet users http://www.redbooks.ibm.com/
For IBM Intranet users http://w3.itso.ibm.com/
� Send us a note at the following address:
xvi IBM Network Station Printing Guide

Chapter 1. Overview
Our objective in this chapter is to provide you with a summary of the informationyou need to understand the printing facilities that are available on the IBM NetworkStation.
Hopefully, we can accomplish this in just a few pages, leaving you to rummagethrough some of the other chapters when you require additional levels of detail.
From the start, we assume that you are already familiar with what the IBM NetworkStation is, and how it functions generally. Our focus here is specifically, and only,on the printing functionality of the IBM Network Station.
Our aim is to answer questions such as:
� Which local applications are able to print?
� Can applications print to the native serial or parallel port on the IBM NetworkStation?
� Can local applications send printer output to remote print servers?
� Can host-based applications send printer output to an IBM NetworkStation-attached printer?
� Can WinCenter applications print locally on the IBM Network Station?
1.1 HistoryThe IBM Network Station history only goes back to the end of 1996, at which timethe IBM Network Station only had what could be called rudimentary print support.
At that time, only the IBM Network Station browser and the local ASCII terminalemulator were able to print to a locally attached printer. Some remote systems,such as a WinCenter server, had the ability to send a print job to the local printeras well by directly accessing the local daemon controlling the serial and parallelports.
In a second release of the support software at the end of 1997, these capabilitieswere only marginally improved by the addition of a 5250 emulator which could printto the local printer.
However, it is with the advent of the Release 3 of the software in the summer of1998 that the printing capabilities of the IBM Network Station were significantlyenhanced with the addition of LPR/LPD capabilities.
1.2 Release 3 Print SupportRelease 3 of the IBM Network Station software provides support for the TCP/IPLPR/LPD protocol (RFC 1179), which allows the IBM Network Station to act aseither a print client or print server. This includes also LPR/LPD streaming support,which is a draft extension to RFC 1179.
This is summarized in the following diagram:
Copyright IBM Corp. 1998 1

Figure 1. Release 3 Printing Capabilities Overview
The printing capabilities of the IBM Network Station are as follows:
� LPD capabilities
On the right-hand side of the diagram, we show typical hosts systems thatimplement LPR/LPD functionality and that therefore have the ability to sendprint requests to an LPD server.
The LPD server on the IBM Network Station can receive print requests fromany remote system that implements the LPR functionality as described in RFC1179.
On receipt of these requests, the LPD server routes the print job through thelocal API and to the module controlling access to the local serial or parallel portwhere local printers are attached.
Note that the LPD server can reject print requests based on an access controllist of hosts with the required authority to use the printing facility on the IBMNetwork Station.
� LPR capabilities
On the left-hand side of the diagram, we show typical hosts systems thatimplement LPR/LPD functionality and that therefore have the ability to receiveprint requests from an LPR requester.
The LPRD requester on the IBM Network Station can send print requests toany remote system that implements the LPR functionality as described in RFC1179.
Note that this LPR requester is labeled LPRD to indicate that it is a daemon.This daemon runs in the background, handling requests from local applicationsto route print jobs to remote hosts instead of to the local printer(s).
2 IBM Network Station Printing Guide

Note that print requests can only come from local applications. Print requestsoriginating on remote hosts, and received by the LPD on the IBM NetworkStation cannot be routed back to another remote host through the use of theLPRD daemon.
� Printer Selector
In the top right-hand corner of the IBM Network Station, notice the PrinterSelector component. This component is called by local applications when theuser elects to print data, in order to provide the user with a choice of printers toselect from.
The printers listed in the Selector can be either the printers attached locally tothe network station or can be printers on remote hosts. Since all print requestsfrom local applications go through the print API, the API routes the request toeither the SERIALD component, which handles local printers, or to the LPRDcomponent if the requested printer is a remote printer.
Here are examples of the panels displayed to the user, on the IBM NetworkStation, when he or she elects to print. The user first gets a Print Dialog panel,such as the one illustrated below, on which he or she gets to choose a fewcharacteristics of the print job such as the number of copies, or paper size. Theentries available on this particular dialog panel varies dependent on theapplication used.
Figure 2. A Sample Print Dialog
If the printer selected by default is not appropriate, and the user wants to makeanother choice, clicking on the Browse button or Select Printer button bringsup the Printer Selector panel, a sample of which appears in the figure below.
Chapter 1. Overview 3

Figure 3. The Printer Selector
This panel looks the same for all applications. Notice that this one shows alocal parallel printer, a local serial printer as well as some remote printers,some being PostScript-capable, some being PCL-capable.
The list of printers appearing in this panel is configured by the Administratorusing the IBM Network Station Manager and are loaded by the IBM NetworkStation at boot time. Since the administrator has the ability to configureprinters for all users, or for certain specific workstations, or for certain groups ofusers and finally for specific users, this list of printers can be different for everyuser dependent on who he or she is, on the group he belongs to and on thespecific IBM Network Station that he or she is using.
� Local parallel and serial port
Although not shown in the summary diagram of the Release 3 capabilities, theprint APIs now allow applications to print to either the local serial port or to thelocal parallel port, as demonstrated by the entries available in the Print Selectorpanel.
� DBCS conversion
Also not shown in the diagram is the ability for local applications to invoke adata conversion program to convert ASCII data streams containing DBCScharacters into bitmap images that can be sent to printers that do not haveDBCS fonts loaded.
1.3 Particularities of the IBM Network StationWhen considering the use of the printing capabilities of the IBM Network Station, itis important to remember that as opposed to traditional systems, the IBM NetworkStation does not have local disk storage and that it has a limited amount of memoryfor applications and data.
These limitations negate the need for a traditional spooling system or for a printmanagement system. However, it still has the capability to handle large print jobs,whether received from a remote host or generated by a local application, byimplementing a streaming mode version of the LPR/LPD support.
4 IBM Network Station Printing Guide

This provides the IBM Network Station with the ability to stream print output to alocal printer without having yet received the whole job, or to stream output to aremote host without having generated the whole print job yet, assuming that theremote print server also implements streaming mode.
1.4 Configuration Using the IBM Network Station ManagerMost of the important parameters that relate to printing are available forconfiguration using the IBM Network Station Manager.
All these parameters are accessible through the Printers task of the IBM NetworkStation Manager Setup tasks menu. Below is an illustration of one section of themain configuration panel, to specify the print buffer sizes for the LPR and LPDdaemons, and the access control list identifying the hosts that are authorized tosend print jobs to the IBM Network Station. These parameters can be specified atthe system default level and at the workstation default level.
Figure 4. The IBM Network Station Manager Printer Settings Configuration
The second part of that same panel is shown below, where remote printers can beadded to the list of available printers, and where the local printers can be specifiedas available or not.
Chapter 1. Overview 5

Figure 5. Printer List Parameters - System Defaults
Remote printers can be configured not only at the system default level but also atthe workstation, group and user defaults levels.
1.5 What This Document ContainsThe rest of this document provides you with additional details to understand thefacilities we have highlighted above.
Here is a very brief overview of each chapter:
� A Few Concepts
A brief review of concepts such as spooling, printer queues, data streams,printer drivers, and LPR/LPD for those who may be new or rusty.
� How Printing Works on the IBM Network Station
Diagrams and tables summarizing all the printing capabilities since Release 1of the product, and an explanation of the main components involved inproviding the print support as well as the particularities of the IBM NetworkStation, especially the streaming mode support for LPR/LPD.
� Configuration Using the IBM Network Station Manager
How to use the IBM Network Station Manager tool to configure all the mainprinting-related parameters of the IBM Network Station.
� Host Applications Printing to IBM Network Station Local Printer
For each major platform, a look at how to define printers, or queues, or portsallowing applications on these hosts to print on printers attached to the IBMNetwork Station. These platforms include AIX, Windows NT, WinCenter,OS/400, VM and OS/390.
� IBM Network Station Application Printing Examples
This provides details on some of the particularities of each of the localapplications on the IBM Network Station which need to use the printingcapabilities. They include the 3270 and 5250 emulators, the NC Navigatorbrowser, Java applications and Lotus eSuite.
� Printing from the IBM Network Station to Remote Hosts
6 IBM Network Station Printing Guide

Here we take a look at the preparations required on remote hosts to receiveprint requests generated by applications on the IBM Network Station, such asensuring that the LPD daemon is functional, and that there are printers queuesdefined corresponding to the printers configured in the IBM Network StationPrinter Selector table.
� Problem Determination Tools, Tips and Techniques
A collection of miscellaneous considerations that might prove helpful inattempting to solve some of the problems that might arise initially. Also someadditional details on some of the more detailed and involved facilities, such asdirect access to some of the SERIALD daemon's port.
� Application Programming Interfaces
A very brief overview of the print APIs available. Since these APIs are notavailable to the user, this information is provided mainly for the sake ofcompleteness and because it may help in understanding how some of thefunctions work.
� DBCS Considerations
A very brief look at some of the parameters pertaining to using the DBCSconversion facility.
Chapter 1. Overview 7

8 IBM Network Station Printing Guide

Chapter 2. A Few Concepts
In this chapter, we explain a few concepts, mainly for the benefit of the uninitiated.The intent is not to produce an in-depth tutorial on all topics related to printing butrather to review some of the basic elements that one needs to be aware of in orderto better understand some of the requirements for printing and some of thefunctions discussed in this document.
2.1 What Are Printer Queues and Spooling?In the early days of electronic computing, it was very undesirable to have acomputer application print directly to the printer. Printers were slow devices,compared to the processor. They did not have large buffers to hold printed outputand controlling them wasted valuable processor time, as the mechanical printeroperated slower than the computer as the computer waited constantly for theprinter.
The solution to this was for the application to send its output to tape, a devicewhich operated much faster than the printer. This used less processing time, andmeant that the tape could be taken to another less expensive machine and then thedata could be read from the tape and sent to a printer attached to that machine.
The term used to describe this process was to spool data off to a peripheral device,maybe because it was an action somewhat reminiscent of the action of spinningwool onto a spool. Whether it was or not, the acronym spool was assigned ameaning of Simultaneous Peripheral Operation On-Line.
This spooling process is illustrated in the figure below.
Copyright IBM Corp. 1998 9

Figure 6. Spooling Output to Tape
As computers became more powerful and processor time and storage became lessexpensive, operating systems came into being in order to help manage all theresources attached to the computer, including printers, and to allow multipleoperations to be done simultaneously.
It became economical for the printer to be attached to the computer; however,since printers were still slow devices, it was still desirable to use spooling, so thatthe application producing the printed output did not have to wait for the printer, butexecuted more rapidly by sending its printed output to a faster device such as tape(or disk later on). That printed output could then be sent to a printer by anotherapplication, processing either in the background as a lower priority application or atnight.
This technique evolved considerably over time with the availability of faster andlarger disk storage capabilities and the sophistication of multitasking operatingsystems.
Today, even the personal computer operating systems have printing subsystems,whose job it is to manage any output produced by an application and destined for aprinter, whether that printer is locally attached or attached to a remote computer.
The proliferation of the types of printed output created by applications as well asthe different types of printers available also created the need to dissociate evenmore the link between an application and the physical printing device and gave riseto printer queues.
Printer queues are a mechanism allowing print jobs (a print job consisting of theoutput data produced by an application) to be held in storage in a wait area whichhas certain characteristics. These characteristics are usually representative of the
10 IBM Network Station Printing Guide

printer which will be used to print these specific jobs and allows a much finercontrol and management over the print jobs than a general spooling area.
For example, some systems allow an application to give a priority to output, so thatsome reports can always jump to the front of the queue or wait at the back of thequeue. In addition, some queues can be aware of different form types, so that ifdifferent applications use different preprinted forms, the queue can print all spoolfiles of one type before prompting the printer operator to load the next form type. Ifmultiple printers are available, they can each have an individual queue so thatdifferent types of reports can be sent to different printers.
This mechanism is illustrated in the diagram below.
Figure 7. Print Flow on a Typical Large Computer System
In the figure above, the application, when printing, usually sends its data to aspecific queue which represents a (logical) printer.
As jobs accumulate in a queue, an application called a print manager or job writer(the terminology used varies by platforms) takes these jobs one at at time andsends them to a printer.
If a printer becomes unavailable, the operator has the ability to reassign the queueto another printer. The operator also has the ability to move jobs from one queue toanother.
In some cases, more than one queue can be assigned to a single printer, ormultiple printers can be assigned to one queue, sometimes called printer pooling.
Chapter 2. A Few Concepts 11

Figure 8. One Printer Serving Multiple Queues
Figure 9. Printer Pooling
2.2 What Are Printer Data Streams?The term data stream refers to the data generated by an application when itcreates data to be sent to a printer device. These data streams are, for example,ASCII, PCL, PPDS, PostScript, SCS, IPDS and AFPDS.
Some printers have the ability to support more than one data stream; in that case,the printer can be set to receive a specific data stream, and in many cases, theprinter has the ability to automatically detect the type of data stream received, byexamining the first few lines, and automatically switch itself to the proper mode toprocess the received data.
Most data streams are based around two character sets:
� ASCII - American National Standard Code for Information Interchange
This is typical of Personal Computers and RISC/6000 computers.
� EBCDIC - Extended Binary Coded Decimal Interchange Code
12 IBM Network Station Printing Guide

This is typical of large systems such as S/390 and intermediate systems suchas AS/400.
2.2.1 ASCII-Based Printer Data StreamsASCII data streams are based on the ASCII character set. Many of the ASCII datastreams use escape sequences to send special commands to the printer. Thesections below (2.2.1.2, “PCL - Printer Control Language” and 2.2.1.3, “PPDS -Personal Printer Data Stream”) give examples of printer escape sequences.
For many years, each printer manufacturer used their own different set of escapesequences. Modern ASCII printers still tend to have their own proprietary sets ofescape sequences, but also tend to emulate some of the more popular printers.For example, many printers today offer PCL5 emulation.
2.2.1.1 Plain ASCIIPlain ASCII can be sent to the printer. This allows the printer to make all decisionsabout the output, such as which font and paper orientation to use. It may containvery basic control characters such as carriage returns and line feeds. This cancause messy output, as lines may not fit on the page correctly and may betruncated.
2.2.1.2 PCL - Printer Control LanguagePCL is a data stream devised by Hewlett-Packard. There are various versions ofPCL, and one of the most widely used is PCL5. PCL is an ASCII-based datastream, which allows printer commands to be inserted into the data stream usingescape sequences. It is called an escape sequence, because the start of eachcommand is indicated by the ASCII escape character, which is 1B in hex or 27 indecimal. For example, the escape sequence to instruct the printer to uselandscape page orientation is:
Esc & l 1 O
Translated into hexadecimal using an ASCII table this would be:
1B 26 6C 31 4F
PCL is supported on many printers from many printer manufacturers.
2.2.1.3 PPDS - Personal Printer Data StreamPPDS is a printer data stream devised by IBM, and it is similar in many ways toHewlett Packard's PCL.
For example, the escape sequence to instruct the printer to use landscape pageorientation is:
Esc l
Translated into hexadecimal using an ASCII table this would be:
1B 6C
Chapter 2. A Few Concepts 13

2.2.1.4 PostScriptPostScript was developed by Adobe, and was first introduced in 1985. It is alanguage that describes how a printed page should appear. The language is verysimilar to a high-level programming language and describes in detail what the pageshould look like when printed. Each print file that is created is like a program. Thisprogram is then sent to the printer, which generates the page based on theinstructions it is given. For example, the command to instruct the printer to useportrait page orientation is:
%%Orientation: Portrait
2.2.2 EBCDIC-Based Printer Data StreamsEBCDIC data streams are based on the EBCDIC character set and are in usemainly on large and intermediate systems.
2.2.2.1 SCS - SNA Character StreamThe SCS data stream is used to print basic text. It is possible to choose betweenprinter fonts and to perform some printer control using SCS, and this is typicallyused to control line printers.
2.2.2.2 IPDS - Intelligent Printer Data StreamThe IPDS data stream was developed by IBM. An IPDS data stream can usefunctions available on the printer. Each model of printer can support differentoptions of the IPDS. Resources such as fonts and images cannot be downloadedto the printer using IPDS, unless special software is used. IPDS can only use thefunctionality provided by the printer. It has more two-way conversation between thehost and the printer, which assists with error recovery on the printer.
2.2.2.3 AFPDS - Advanced Function Presentation Data StreamAFPDS is an IBM data stream used for printing to AFP printers. Using AFP, it ispossible to download objects such as fonts, overlays and images to the printer.
2.3 What Are Printer Drivers?There are a multitude of printers on the market today and even though they allhave many similar characteristics, each and every printer can be different from thenext. These differences have to do with the different features and functions thateach printer and manufacturer offers as well as the way that they react tocommands received from an application.
A simplistic example of this might be the command to go to a new page, which iscalled a page eject command. If the manufacturer of printer X1 decides that a pageeject command will be represented by a sequence of characters such as 1234,whereas manufacturer of printer Y2 decides that in his or her case, the command is4321, then each of these manufacturers needs to provide a program called adevice driver, which is going to be aware of these specific commands, and whenreceiving a generic page eject command from an application, will translate thispage eject into the physical command appropriate to this specific printer.
Therefore, printer drivers are programs that convert output from applications intoprinter specific data streams, which allows an application to be unaware of theprinter that will be used to produce output.
14 IBM Network Station Printing Guide

The application can specify the page layout it requires, and then pass thisinformation to a printer driver. The printer driver is then responsible for producing aprinter-specific data stream which can then be sent to the printer.
There are two main advantages of using printer drivers:
� The application does not have to have print routines for every possible printerthat it may use.
� The routines to convert the application output into printer-specific output onlyneed to be written once. Once the driver is written, it can be used by anyapplication.
There are two main ways in which printer drivers can be used by applications:
1. Some systems need the driver to be used at the time the application prints, asillustrated in the figure below:
Figure 10. Using the Driver at Application Print Time
As is shown above, since the application uses the printer driver at the time thatit generates the print data, this data is then printer-specific, in the sense that italready contains all the commands that are applicable only to the printer thatcorresponds to the printer driver that was used. Notice that the applicationcould also, if it was written to do so, generate printer-specific data directlywithout using a printer driver, but this would be rare today.
The main disadvantage of this method is that, once created, it is not possible toredirect the output to another printer because the print file is printer-specific.
2. A preferred method is to have the application create generic print data(sometimes called a metafile) which is not specific to any printer. This case isillustrated in the figure below.
Chapter 2. A Few Concepts 15

Figure 11. Using the Driver at the Time the Output Is Sent to the Printer
As shown in the figure, the print data is then put in a queue, and it is only whenthe data is taken from the queue and sent to a printer that a printer driver isused by the job writer or print manager responsible for emptying the queue.The conversion to printer-specific data only takes place at the last stage.
The main advantage of this method is that the print data generated by theapplication, once in a queue, can be moved to different queues and printed ondifferent printers.
2.4 What Are LPRs and LPDs?LPR and LPD is a TCP/IP-based printing facility. LPR is the Line Printer Requester(the client), used by the sending machine to communicate over IP with the LPD(Line Printer Daemon), which resides on the receiving machine (the server) anddeals with incoming print requests by listening on TCP/IP port 515. LPD is definedin RFC 1179.
16 IBM Network Station Printing Guide

Figure 12. Sending a Spool File between Two Devices
Once the request is received, the printer output is placed onto a printer queue onthe receiving system. (The printer queue is identified in the incoming request.) Oncomputer systems with many printer queues, the printer queue name ensures thatthe output is placed on the correct output queue.
There are printer adapter devices available, such as the IBM Network Print Server,which have several printer ports, and the printer queue value is used to differentiatebetween the various ports available. When printing to such devices it is important toknow what the correct printer queue name is.
LPD itself does not do any data stream conversion; it sends whatever it receives tothe printer, as is. It is the responsibility of the sending machine to ensure that thedata is suitable to be sent to the printer.
When sending a spool file using LPR, the sending system sends two parts to thereceiving system:
1. A control file
The control file contains details about the print job such as the number ofcopies requested, the type of formatting (PostScript, or passthrough mode,etc.), the user ID of the print job, job name, banner request or forced banner,etc.
2. A print file
This is the actual print data.
The original version of LPR/LPD was in BSD UNIX where the flow of informationwas always to send the data file first followed by the control file. Because BSDUNIX was used as the initial source of different varieties of UNIX, mostimplementations of LPR/LPD chose to maintain the same ordering of the two files.
Chapter 2. A Few Concepts 17

Several years later, RFC 1179 was issued to document the existingimplementations of LPR/LPD in an attempt to standardize how print clients andprint servers communicate. However, RFC 1179 chose not to restrict the order ofdata and control files. Specifically, the RFC states that "LPR servers must be ableto receive the control file subcommand first and should be able to receive the datafile subcommand first". Effectively this says that the control file and data file can besent in either order. Therefore, when new versions of LPR/LPD were developedafter RFC 1179 was issued, some of them chose to reverse the order used indefacto implementations of LPR/LPD and decided to send the control file before thedata file.
2.4.1 What Is Streaming Mode LPR/LPD?Streaming mode LPR/LPD is a facility that allows the LPR on a sending system tobegin sending data before the system has finished creating the spool file. On areceiving system, streaming mode allows LPD to begin sending the data to theprinter before the entire file has been received.
Therefore, streaming mode is useful for thin clients and systems with limitedstorage capabilities, such as the IBM Network Station.
Note that streaming is not part of the original specification for RFC 1179, andtherefore is not supported by all LPR/LPD implementations, but it is supported bythe Release 3 of the IBM Network Station. (See Table 7 on page 37 for a list ofsystems that support streaming.)
The advantages of streaming are:
� Less storage is required on the originating system. If streaming is not used,then storage is required for the entire spool file. With streaming, data can bedeleted as it is sent to the receiving system, thereby minimizing the storagerequirement on the originating system.
� The output may be printed faster. With streaming, the printer may begin printingthe first page of output, before the sending system has generated the last pageof output.
Following are a few diagrams to explain how LPR/LPD works generally on typicalsystems when it functions in non-streaming mode as well as in streaming mode. Inthe next chapter (see 3.6, “How the IBM Network Station Implements LPR/LPD” onpage 36) we also illustrate how specifically the IBM Network Station implementsthese two LPR/LPD modes, because of the particular characteristics of the IBMNetwork Station.
2.4.2 LPR/LPD SubcommandsTo better understand how LPR/LPD works, whether it is in streaming ornon-streaming mode, one must first be aware of a few of the commands usedbetween the LPR and LPD components.
We do not cover all the commands and subcommands here, but only those whichare required to have an appreciation for how this works, at a high level.
The following four subcommands are the primary ones we need to understand:
18 IBM Network Station Printing Guide

Receive Data File (RDF)Sent to the remote LPD to ask the LPD to start receiving thedata file. The size of the file to be sent in specified in therequest. The LPD does not start printing until it receives thecontrol file. This command is for when streaming mode isnot used.
Receive Control File (RCF)Sent to the remote LPD to ask the LPD to receive the controlfile. This command is for when streaming mode is not used.
Receive Control File First (RCFF)Sent to the remote LPD when streaming mode is used.Receipt of this command by the LPD is an indication that theLPR wants to use streaming mode instead of normal mode.It asks the LPD to receive the control file first, so that theLPD has the required specifications necessary to startprinting the data file as soon as it start receiving it. (Withoutthe control file, the LPD normally cannot print since it doesnot know the job id, job name, banner or not, etc.)
Receive Data File with Unspecified Length (RDFUL)Sent to the remote LPD after the RCFF has been accepted.It asks the remote LPD to receive a data file even though ithas not computed the length of the data file and thereforeeven though there is not length indication in the data file.This allows the LPD to start receiving the data file instreaming mode (while it is still being generated on thesending system) and to start printing it (based on the controlfile received earlier) before the entire file has been received.
Now that we understand a few of these subcommands, we use them in theexplanations below, to illustrate simplified flows of sending and receiving print data.
2.4.3 What Is Non-Streaming Mode Send and Receive?The diagram below illustrates a normal LPR/LPD process when streaming is notused.
Chapter 2. A Few Concepts 19

Figure 13. Non-Streaming Mode Send/Receive
Here is a brief description of the process illustrated in the above diagram:
1. The application initiates the process by making a print request to the LPR, andsending printer output.
2. The LPR spools the entire file into storage and then creates the control file(number of copies, job name, formatting, etc.).
3. The LPR then establishes a session with the LPD and requests to send thedata file, specifying the size of the data file.
4. The LPD receives the data file and stores it on disk. At this time, the LPDcannot yet print the data file since it does not have the control file containingthe print specifications.
5. The LPR then requests to send the control file, which the LPD accepts andstores on disk.
6. The LPD then uses the control file to send the data file to the printer, accordingto the specifications in the control file, such as number of copies, etc.
2.4.4 What Is Streaming Mode Send and Receive?Streaming mode send allows the LPR to start sending data as soon as it has datato send, without waiting for the entire data file to be generated.
In order for the receiving LPD side to be able to print the data as it is received, thecontrol file must therefore be sent before the data, which is where the streamingmode commands come into play.
Assuming that both the sending and receiving node support streaming modeLPR/LPD, the scenario is as follows:
20 IBM Network Station Printing Guide

1. The application requests to send data to the LPR component. The LPR firstcreates the control file for this data.
2. The LPR establishes a session with the LPD and requests to send the controlfile first, using the RCFF subcommand. The LPD receives the control file andstores it.
3. LPR then sends the Receive Data with Unspecified Length to the LPD,requesting that the LPD starts accepting data without knowing the size of theentire file.
4. Upon acceptance from the LPD, the LPR starts receiving data from theapplication and immediately starts sending it to the LPD.
5. The LPD receives the data, and starts printing the data based on thespecifications of the control file received earlier.
This process is illustrated in the figure below where we use water as an analogy toexplain streaming.
Figure 14. Streaming Mode Send/Receive
This process minimizes the amount of storage required to hold the data in both thesending system and receiving nodes.
Streaming is not supported by all implementations of the LPR/LPD. Systems thatcan use streaming mode send will usually attempt to use streaming first. If thereceiving system does not implement streaming, it either rejects the streamingrequest, returns an error, or sometimes just waits. When this occurs, the sendingsystem recognizes the error and reverts to using normal (non-streaming) mode.
See 3.6, “How the IBM Network Station Implements LPR/LPD” on page 36 foradditional details on how streaming mode the LPR/LPD is implemented on the IBMNetwork Station.
Chapter 2. A Few Concepts 21

22 IBM Network Station Printing Guide

Chapter 3. How Printing Works on the IBM Network Station
This chapter discusses the architecture and the components of the IBM NetworkStation related to printing. The intent is to make the reader understand how the IBMNetwork Station is structured to handle printing requests and to highlight areas thatare specific to the IBM Network Station relative to other printing subsystems.
There are three characteristics that one needs to remember about the IBM NetworkStation:
� It does not have any local disk storage and therefore cannot do any spooling.
� It has a limited amount of RAM and operates as a real memory system, andtherefore only has a limited print buffer capability.
� It does not use any printer drivers, so it must receive printer ready datastreams.
3.1 History of the IBM Network Station Printing CapabilitiesThis documents focuses on the printing capabilities available on the IBM NetworkStation as of Release 3 of the support software. However, it is appropriate to startby taking a look back to review the printing support that was available prior toRelease 3.
3.1.1 Release 1 Print Support (November 1996)Release 1 was the initial release of the IBM Network Station and it provided onlyrudimentary print support.
A set of print APIs were provided to allow local client applications to print directly tothe parallel port on the IBM Network Station. The APIs did not allow printing to theserial port or over the network to remote print servers.
These print APIs are used by the local applications but are not available directly tothe user. However, if you need to know a bit more about these APIs, please referto Chapter 10, “Application Programming Interfaces (APIs)” on page 221.
In addition to the print APIs, the operating system on the IBM Network Stationprovided a mechanism for printing directly to the parallel or serial ports, either froma local application or from a remote system. This method used a simple TCP/IPsockets protocol that is not part of any standard specification. The only localapplication that used this method for printing is the VTxxx emulator, which providedthe capability to do screen prints to either serial or parallel printers.
The same method worked for remote systems allowing them to print directly toeither serial or parallel printers similar to the way attached printing is supported onX terminals. When Release 1 shipped, the AS/400 had the capability to use thisfunction, as well as WinCenter and the IP PrintWay product on an S/390 host.
In Release 1, there was no support for local applications to send print jobs toremote print servers or LAN-attached printers.
Copyright IBM Corp. 1998 23

The following diagram provides a visual summary of the Release 1 print capabilitiesand the tables that follow the diagram describe the same functions in tabular formatfor local applications and for host-based applications.
Figure 15. Release 1 Printing Capabilities
For the local applications, Table 1 on page 25 shows whether or not theapplication uses the print APIs, whether or not the application can print on serial orparallel printers, whether or not the application can print to remote printers, andwhat print data streams are generated by the application.
24 IBM Network Station Printing Guide

Table 1. Local Applications in Release 1
Applications Uses API Local Print Remote Print Data Streams
5250 Emulator No No No N/A
3270 Emulator No No No N/A
Spyglass Browser Yes Yes (1) No PostScript
Java Applications No No No N/A
VTxxx Emulator No Yes (2) No (3) ASCII
Notes:
(1) Although the application can print locally, it is limited to using only the parallel port.
(2) The emulator does not use the APIs but uses SERIALD to send data to either the serial or parallel port.
(3) There is a way for the VTxxx emulator to send jobs to remote print servers using instructions from NCD Inc.See also Appendix B, “Printing from the VTxxx Emulator to a Remote IBM Network Station” on page 233 for anexample.
For host-based applications, Table 2 shows whether applications on the particularhost can print to an IBM Network Station-attached printer, whether the host canprint to a host-attached or LAN-attached printer, and what print data streamsapplications on the host are capable of producing.
Table 2. Host-Based Applications in Release 1
Host NS-Attached Printing Host-Attached orLAN-Attached Printing
Printers/Data Streams
OS/400 Yes Yes Any OS/400 Printer
OS/390 No (1) Yes Any OS/390 Printer
VM/ESA No Yes Any VM Printer
AIX No (2) Yes Any AIX Printer
OS/2 N/A N/A N/A
Windows NT No No Any Windows/NT Printer
WinCenter Yes (3) Yes Any Windows/NT Printer
Notes:
(1) Using IP PrintWay, OS/390 can print directly to the IBM Network Station's serial or parallel port. Additionally,an AFP-capable printer must be attached to that port.
(2) AIX has the ability to print directly to the IBM Network Station serial or parallel port, but there are noinstructions telling a user or system administrator how to do it.
(3) WinCenter has the ability to print directly to the IBM Network Station SERIALD daemon by defining, on theWinCenter Server, a WinStation printer.
3.1.2 Release 2 Print Support (November 1997)The second release of the Network Station client code provided some smallimprovements for printing.
One new API, printOpenSerial, was added to allow applications to print to the serialport but it was not advertized because it is removed in Release 3. It was addedspecifically for the 5250 emulator which had a requirement to print to the serial port.The rest of the print APIs did not change in Release 2.
Chapter 3. How Printing Works on the IBM Network Station 25

For Release 2, the NC Navigator Browser became available on the client. Theinitial version of NC Navigator did not make use of the print APIs. Instead, it usedthe same process as the VTxxx emulator to print directly to the parallel port on theIBM Network Station The NC Navigator Browser cannot print to the serial port or toremote printers in release 2.
From the host perspective, the only change in the time frame for Release 2 was forAIX and OS/390. Now there are published instructions for configuring a print queueon AIX that can print directly to either the serial or parallel port on the IBM NetworkStation; for the OS/390 server, the NetSpool support can receive 3270 applicationprint data and the IP PrintWay can then print these 3270 application print filesdirectly to the IBM Network Station parallel port.
The following diagram provides a visual summary of the Release 2 printingcapabilities, and it is followed by tables that provide the same information in tabularformat for local applications and for host-based applications.
Figure 16. Release 2 Printing Capabilities
For the local applications, Table 3 on page 27 shows whether or not theapplication uses the print APIs, whether or not the application can print on serial orparallel printers, whether or not the application can print to remote printers, andwhat print data streams are generated by the application.
26 IBM Network Station Printing Guide

Table 3. Local Applications in Release 2
Application Uses API Local Print Remote Print Data Streams
5250 Emulator Yes Yes (1) No ASCII
3270 Emulator No No No N/A
Spyglass Browser Yes Yes No PostScript
NC Navigator Browser No Yes (2) No PostScript
Java Applications No No No N/A
VTxxx Emulator No Yes (3) No (4) ASCII
Notes:
(1) The 5250 emulator can now print to both the serial and parallel ports using the print APIs.
(2) The NC Navigator browser can print to the local parallel port only. Additionally, NC Navigator does not usethe print APIs.
(3) The emulator does not use the APIs but uses SERIALD to send data to either the serial or parallel port.
(4) There is a way for the VTxxx emulator to send jobs to remote print servers using instructions from NCD Inc..See also Appendix B, “Printing from the VTxxx Emulator to a Remote IBM Network Station” on page 233 for anexample.
Table 4. Host-Based Applications in Release 2
Host NS-Attached Printing Host or LAN-AttachedPrinting
Printers/Data Streams
OS/400 Yes Yes Any OS/400 Printer
OS/390 No (1) Yes Any OS/390 Printer
VM/ESA No Yes Any VM Printer
AIX Yes Yes Any AIX Printer
OS/2 N/A N/A N/A
Windows NT No No Any Windows/NT Printer
WinCenter Yes (2) Yes Any Windows/NT Printer
Notes:
(1) Using IP PrintWay, OS/390 can print directly to the IBM Network Station's serial or parallel port. Additionally,an AFP-capable printer must be attached to that port.
(2) WinCenter has the ability to print directly to the IBM Network Station SERIALD daemon by defining, on theWinCenter Server, a WinStation printer.
3.2 Summary of Release 3 Print Capabilities (June 1998)As there are many new capabilities in Release 3, the following diagram attempts toprovide a visual summary of all these capabilities. It is followed by tables whichprovide the same information in tabular format, and by some additional details oneach important feature.
Chapter 3. How Printing Works on the IBM Network Station 27

Figure 17. Release 3 Printing Capabilities
The main points to notice in the diagram above are:
1. The capability of the 3270 and 5250 emulators to now produce PostScript, orPCL or ASCII output. Since a user might not have a PostScript capable printerat his or her disposal, he or she has the capability to specify PCL outputinstead.
Notice that the NC Navigator browser and Java applications, however, onlyproduce PostScript output.
2. The addition of a Printer Selector component allows local applications tochoose a print destination, which can be a local or a remote printer.
When a user prints from an application, a print dialog panel is presented first(choice of number of copies for example), then a Browse or Select printerbutton is available to display a list of target printers to choose from.
3. The addition of an LPRD daemon used to channel print requests from localapplications to remote print servers. Notice that we have indicated here theremote systems that support streaming and those that do not. If the print jobgenerated on the IBM Network Station is larger than the available print buffer, itis important that the receiving systems support streaming mode receive;otherwise the print job fails on the IBM Network Station. On the IBM NetworkStation receive side (LPD), this is less important since the LPD canautomatically stream data to the printer when the print buffer if overflowed.
4. The addition of an LPD daemon to accept print requests from the LPRrequesters wanting to print on the local printer. Note that print requestsincoming to the LPD daemon cannot be rerouted back out to a remote printerthrough the LPRD daemon; they can only be routed to local printers by theLPD daemon.
28 IBM Network Station Printing Guide

5. The SERIALD daemon (which was the only component to which print requestscould be directed at prior to Release 3) is still present and can still accept directrequests from applications that are able to connect directly to the SERIALD'sports, such as WinCenter.
6. The addition of a DBCS converter module that can be used to send ASCII textwith DBCS code point to printers that do not have DBCS code points loaded.
The following tables provide information for what print capabilities are available forlocal applications and for host-based applications.
For the local applications, Table 5 shows whether or not the application uses theprint APIs, whether or not the application can print on serial or parallel printers,whether or not the application can print to remote printers, and what print datastreams are generated by the application.
Table 5. Local Applications in Release 3
Application Uses API Local Print Remote Print Data Streams
5250 Emulator Yes Yes Yes PostScript,PCL, ASCII
3270 Emulator Yes Yes (1) Yes PostScript,PCL, ASCII
NC Navigator Browser Yes Yes Yes PostScript
Java Applications Yes Yes Yes PostScript
VTxxx Emulator No Yes (2) No (3) ASCII
Notes:
(1) The 3270 emulator only provides print screen support. It does not include 3270 LU1/LU3 client printingsupport at this time.
(2) The emulator does not use the APIs but uses SERIALD to send data to either the serial or parallel port.
(3) There is a way for the VTxxx emulator to send jobs to remote print servers using instructions from NCD Inc.See also Appendix B, “Printing from the VTxxx Emulator to a Remote IBM Network Station” on page 233 for anexample.
For host-based applications, Table 6 on page 30 shows whether applications onthe particular host can print to an IBM Network Station-attached printer, whether thehost can print to a host-attached or LAN-attached printer, and what print datastreams applications on the host are capable of producing.
Chapter 3. How Printing Works on the IBM Network Station 29

Table 6. Host-Based Applications in Release 3
Host NS-Attached Printing Host or LAN-AttachedPrinting
Printers/Data Streams
OS/400 Yes Yes Any OS/400 Printer
OS/390 Yes Yes Any OS/390 Printer
VM/ESA Yes Yes Any VM Printer
AIX Yes Yes Any AIX Printer
OS/2 Yes Yes Any OS/2 Printer
Windows NT Yes Yes Any Windows/NT Printer
WinCenter Yes (1) Yes Any Windows/NT Printer
Note:
(1) Applications on a WinCenter server can now use the LPR/LPD print support but also retain the capability touse a WinStation Printer to print directly to the SERIALD daemon.
3.3 How an IBM Network Station Application PrintsThe following diagram shows the way in which a typical IBM Network Stationapplication initiates a print request.
30 IBM Network Station Printing Guide

Figure 18. An IBM Network Station Application Print Request
An IBM Network Station application always goes through the print APIs whenever itneeds to print, whether it is to a local printer or to a remote printer.
The application obtains from the print APIs a list of available printers and also anindication of a default printer.
The user is presented with that information, and after he or she selects a targetprinter, the print request is directed at the print APIs.
If the target printer is local, the print API forwards the print request to the SERIALDdaemon which controls the local parallel and serial ports. If the target printer isremote, the print API forwards the print request to the LPRD daemon, which opensa connection with the destination print server and the proper print queue on thatserver.
Chapter 3. How Printing Works on the IBM Network Station 31

3.4 The Printer Selection ProcessWhenever an application on the IBM Network Station needs to print, it first presentsthe user with a Print dialog panel, on which the user can select entries that affectthe way the job is printed, and on which he or she can also select the destinationprinter for the print job.
This destination printer is chosen from information displayed when the applicationcalls the Printer Selector GUI interface and displays a list of available (configured)printers.
We take a look here at some of the display panels used for the Print dialog and thePrinter Selector. We take a look at some of the details of the printer table.
3.4.1 The Print DialogThe Print dialog is usually the first panel that gets displayed when clicking on thePrint button, and it allows the user to select certain characteristics of the print job,such as number of copies for example.
The Print dialog may be different dependent on what the application allows in termsof selections. Here are samples of these panels, to give you a feel for theselections that can be made on these panels.
The specific entries are explained in more detail in Chapter 6, “IBM NetworkStation Applications Printing Examples” on page 121 where we describe how eachtype of local application can use the printing facilities of the IBM Network Station.
From Java applications, the Print... option causes the following dialog box to bedisplayed:
32 IBM Network Station Printing Guide

Figure 19. The Java Application Print Dialog
From the NC Navigator Browser, the Print... option causes the following dialog boxto be displayed:
Figure 20. The NC Navigator Print Dialog
From an emulator session, the Print... option causes the following dialog box to bedisplayed:
Chapter 3. How Printing Works on the IBM Network Station 33

Figure 21. The Emulators Print Dialog
3.4.2 The Printer SelectorIn each of the print dialog panels above, there is a button labeled either Browse orSelect Printer which causes the application to retrieve a list of printers from theconfiguration tables (using API calls) and to display them in a Printer Selectorpanel.
The Printer Selector panel appears as shown below:
Figure 22. The Printer Selector Panel
The printers that appear in this list have been configured by the administrator usingthe IBM Network Station Manager, and they have been read by the IBM NetworkStation at boot time when reading the configuration files. When an application
34 IBM Network Station Printing Guide

needs to display the list, it queries the API which retrieves the list from theconfiguration files.
Print QueueThis identifies the location of the printer, in the form of:
printer queue @ remote location
For example, prt07 @ as400b.austin.ibm.com would indicate that theprinter is connected to a system called as400b, and that the remoteprinter queue prt07 is to be used. If the printer is local to the IBMNetwork Station, a print queue name of PARALLEL1 or SERIAL1 isused.
DescriptionThis is a text description used to identify the printer with a namemeaningful to the user. This value does not affect printing; it is purely toassist the user in choosing a printer. For example, it could saysomething such as IBM Network Printer 17 on AS4ððB.
Set as system defaultThis specifies that the selected printer should be marked as the systemdefault printer. In other words, if an application requests the name ofthe default printer, this is the printer name that is returned by the API, inthe current boot cycle of the IBM Network Station.
However, please note that if an application is already running, and if thatapplication has been designed to retain the last printer that was chosenby the user as the application default printer, that application may electto use this printer as the default, instead of the system default printer,the next time that a user initiates a print request.
So, setting a printer as the system default is not a guarantee that thisprinter will indeed be selected as the default, when the application hasthe ability to retain an application default printer.
Once a printer is selected, we can click OK to use the new selection, or Cancel tokeep the printer that was originally selected.
3.4.3 The IBM Network Station Printer TableThe printer table is an internal configuration table containing a list of printersavailable, along with the characteristics of each of these printers.
This table is configured by the administrator using the IBM Network StationManager. The administrator has the option of configuring printers that are availableto all users, or only to a certain workstation, or some that are available only tocertain groups of users, or only to specific users.
After the administrator configures the different printers using the IBM NetworkStation Manager, the actual print-lpr-servers parameter is added to one or more ofthe configuration files that get read by the IBM Network Station at boot time.
The printer table contains the following information about the printers:
� Location of the printer (host name/IP address or local)
� Printer queue name on the target system
� Data stream capability (PS, PCL, ASCII)
Chapter 3. How Printing Works on the IBM Network Station 35

� Description
� Some DBCS related information
� Banner page requirements (remote printers only)
� Whether the printer is the default printer
See Chapter 4, “Configuration Using the IBM Network Station Manager” onpage 47 for details on the configuration of this table using the IBM Network StationManager.
3.5 Printer Access Control (Security) on the IBM Network StationAccess to the local printers is controlled through configuration options in the IBMNetwork Station Manager.
The options are that access can be granted to:
� All systems
In other words, any remote host can send print requests to the local printers.
� No systems
This option restricts access to local printer(s) to local applications only.
� Selected systems
In this case, specific host names or IP addresses are entered in an accesscontrol list. Only print requests originating from these hosts are accepted bythe IBM Network Station.
See Chapter 4, “Configuration Using the IBM Network Station Manager” onpage 47 for information on how to configure access control using the IBM NetworkStation Manager.
3.6 How the IBM Network Station Implements LPR/LPDThe IBM Network Station has been enhanced in Release 3 to support the LPR/LPDprotocol as specified in RFC 1179. This allows local client applications on the IBMNetwork Station to send print jobs to remote print servers or remote printers.Additionally, remote print clients are able to send print jobs to either the serial portor parallel port on the IBM Network Station.
The accepted LPR/LPD protocol requires that the data file for a print job begenerated completely before submitting the request to the remote print server. Thiscauses difficulty for the IBM Network Station because there is no disk that can beused for spooling print data files and the LPR/LPD on the IBM Network Stationmust then allocate RAM to store the print data file. Some of the print data filesgenerated from graphical applications, such as a Web browser, can be severalmegabytes in size, and if multiple applications are running on the IBM NetworkStation, the LPR/LPD may run out of memory before it can completely spool theprint data file.
In 1992, a proposal was made to extend the LPR/LPD protocol to support what isknown as the streaming mode LPR/LPD. The protocol extensions allow a printclient to send a print request to a print server while the print data file is still being
36 IBM Network Station Printing Guide

generated. This is very useful for a print client or print server that has little or nostorage, such as the IBM Network Station. Although the streaming mode proposalwas never accepted, some vendors are adding support; within IBM, the OS/400and AIX already support streaming mode and S/390 as well through the PrintServer product.
The following table (Table 7) gives a snapshot of the current LPR/LPD supportacross major platforms. The information was accurate, to the best of ourknowledge, at the time that the table was built, but is very likely to change in thenear future.
Please note that the last column entitled LPR/LPD Streaming refers to the draftrevision of RFC 1179 dated March, 1992 by Glenn Trewitt (Line Print DaemonProtocol with streaming extensions); it does not have anything to do with theupcoming IPP standards work in process.
Table 7 (Page 1 of 2). LPR/LPD Support on Major Platforms
OPERATINGSYSTEM
HARDWARE VERSION ADDL. SW. LPR/LPDSTREAMING
AIX RS/6000 3.2.5 N/A No
AIX RS/6000 4.1.5 N/A No
AIX RS/6000 4.2.1 N/A No
AIX RS/6000 4.3(10/97) N/A Yes
OS/2 PC Server 2.1.1 LAN Server 4.0 No
OS/2 PC Server Warp Connect 3.0 N/A No
OS/2 PC Server Warp 4.0 N/A No
OS/2 PC Server WorkSpace OnDemand R2
N/A Yes
OS/390(1) S/390 1, 2, 3, and 4(9/97) N/A No
OS/390 S/390 5 (3/98) Print Server (2) Yes
VM/ESA S/390 1 VM TCP/IP Version2 (3)
No
VM/ESA S/390 2.1.0 and 2.2.0 VM TCP/IP Version2 (3)
No
VM/ESA S/390 2.3.0(1Q98) N/A No
OS/400 (RISC) AS/400 3.6,3.7,4.1,4.2 N/A YES
OS/400(NON-RISC)
AS/400 3.1,3.2 N/A YES
Windows NT PC Server 3.51 N/A No
Chapter 3. How Printing Works on the IBM Network Station 37

Table 7 (Page 2 of 2). LPR/LPD Support on Major Platforms
OPERATINGSYSTEM
HARDWARE VERSION ADDL. SW. LPR/LPDSTREAMING
Windows NT PC Server 4.0 N/A No
Notes:
(1) OS/390 in Versions 1-4 has RFC 1179-compliant LPD/LPR support. However, they cannot handle PostScriptfiles received via LPD due to ASCII/EBCDIC conversion problems. This is resolved in Version 5 with an optionalproduct called Print Server.
(2) Print Server is a separately priced product. It includes IP PrintWay and NetSpool, along with several otherprint-related packages. This product supplies both streaming LPR and LPD support. Please seewww.printers.ibm.com for more information.
(3) RSCS Version 3 Release 2 provides enhanced LPR and LPD services that can be used instead of those thatare provided with the VM TCP/IP product.
An overview of the streaming mode LPR/LPD was discussed in 2.4.1, “What IsStreaming Mode LPR/LPD?” on page 18, but here we discuss how it isimplemented on the IBM Network Station.
3.6.1 The LPR on the IBM Network StationThe LPR on the IBM Network Station is slightly different from LPR implementationson other platforms. The differences are mainly because of the fact that there is nolocal disk storage on the IBM Network Station to use for spooling and to therestricted amount of memory available on the IBM Network Station
To print using the LPR, the user selects a remote printer from the Printer Selector.The Printer Selector list is built from the print-lpr-servers table which is loaded whenthe IBM Network Station is booted and has been configured by the administrator toinclude a list of printers available to the user, local and remote. The remote entriescontains the host IP address and queue name of the remote LPD systems.
On that list, when the user selects a printer that is at a location other than localhost(localhost meaning a printer that is attached locally to the IBM Network Station),then the LPR function is used to route the request to the remote printer.
The simplified process is as follows; we address two situations, one where thetarget LPD node does not support streaming mode, and one where the target LPDnode does support streaming mode.
� The target LPD node does not support streaming mode. This situation isillustrated in the figure below:
38 IBM Network Station Printing Guide

Figure 23. Network Station - Streaming Mode Send (1)
The flow, in the figure above, is as follows:
1. LPR contacts the target LPD and sends a Receive Control File Firstsubcommand.
LPR always attempts to use streaming mode to find out if the target LPDsupports streaming, and it does so by sending a RCFF.
2. Because the LPD does not support streaming mode, it either closes theconnection, or returns an error message, or simply waits.
3. That causes the sending LPR to recognize that the LPD target does notsupport streaming mode, and it then switches to non-streaming mode. Itaccepts data from the application and builds the control file and data file instorage.
4. If the entire data file does not fit into the available print buffer in RAM, thejob fails.
There is a buffer size value on the IBM Network Station which defines howmuch memory may be used when spooling a file. By default this is 10% ofthe free memory at the time the print was requested. This free memory canvary greatly dependent on the number of active applications at the time thatthe print request is submitted. See Chapter 4, “Configuration Using theIBM Network Station Manager” on page 47 for details on the configurationof these parameters.
5. If the print buffer is sufficient to hold the entire data file and control file,then LPR sends a Receive Data File (includes the length of the data file) tothe target LPD, which the LPD accepts and the data file is received.
6. The LPR sends a receive control file, and the LPD receives the control file.
Chapter 3. How Printing Works on the IBM Network Station 39

7. The LPD then uses the control file information to print the data file.
� The target LPD node supports streaming mode.
This situation is illustrated in the figure below:
Figure 24. Network Station Streaming Mode Send (2)
1. The LPD accepts the RCFF, receives the control file, and stores it in theprint buffer.
2. The LPR sends a receive data file with unspecified length.
3. The LPD accepts the RDFUL and receives the data file as it is still beinggenerated by the application.
4. The LPD can then start printing the data file as it is received.
3.6.2 The LPD on the IBM Network StationThe line printer daemon on the IBM Network Station receives print requests fromremote systems and it uses the print API to send the data to the local printers, viathe SERIALD. (SERIALD is discussed in more detail in 3.7, “What is SERIALD?”on page 43.)
40 IBM Network Station Printing Guide

Figure 25. LPD on the IBM Network Station
The LPD on the IBM Network Station only sends data to the local parallel orserial-attached printers. It is not possible to configure the IBM Network Station totake a print job request that is received by the LPD and to forward it on to theLPRD component in order to reroute it to a remote printer. This is because theIBM Network Station is not really suited to act as a print job router.
The only two remote printer queues that can be accessed by an incoming LPRrequest are:
� PARALLEL1 - This uses LPD passthrough to the parallel port printer.
� SERIAL1 - This uses LPD passthrough to the serial port printer.
If print access control has been enabled on the IBM Network Station, it verifieswhether the sending system is authorized to print on the IBM Network Station. Theoptions for selecting print access control and updating the authorization table areconfigured in the IBM Network Station Manager. These options are discussed in3.5, “Printer Access Control (Security) on the IBM Network Station” on page 36.
On the receive side, the IBM Network Station also has a print buffer size which canbe configured to hold incoming print requests. By default this is also 10% of thefree memory at the time that the print request is received.
Chapter 3. How Printing Works on the IBM Network Station 41

See the figure below for an illustration of the LPD streaming mode receive process:
Figure 26. Network Station Streaming Mode Receive
If the received data file exceeds the available buffer size, then the IBM NetworkStation has the ability to begin emptying the data onto the printer before the entirefile is received. This is sort of an internal streaming mode capability which can beused even if the streaming protocol is not used between the remote LPR and thelocal LPD.
In fact, even if non-streaming mode receive is used by the LPD, it still has theability to begin printing the data file even if the entire file has not yet been receivedand even if the control file has not been received.
One of the reasons is that, at the moment, the LPD on the IBM Network Stationdoes not use the specifications present in the control file. Because of the specialnature of the IBM Network Station and the limited amount of storage, it is notcurrently set up to do more print management functions and does not support suchfunctions as multiple copies, or banner page, or job ID, job class, job title, etc.,which are specified in the control file. It can therefore start printing without waitingfor the control file.
If internal streaming (to start printing when the print buffer is exceeded) is notdesired, there is a configurable parameter called Bypass Print Buffer that can beset to NO. In that case, if a request is received which exceeds the print buffer, thejob fails.
If the LPD buffer size is configured as zero, then the Bypass Print Buffer isautomatically set to YES. Setting it to NO when the LPD buffer size is set to zerocauses print jobs to fail.
Following is a simplified description of the flow when receiving a print job from anon-streaming send node.
42 IBM Network Station Printing Guide
1. The LPD receives a receive data file (RDF) from a remote LPR requester whichcontains the size of the data file.
� If the data file is small enough to fit into the print buffer, the job is acceptedand the data is read into the print buffer.
� If the job is too large to fit into the print buffer, and the Bypass Print Bufferconfiguration option is set to NO, the print job request is rejected.
� If the job is too large to fit into the print buffer, but the Bypass Print Bufferconfiguration option is set to YES, the job is accepted, received, andemptied onto the printer as it is being received.
2. The remote LPR then sends a receive control file (RCF) which is accepted andthe control file is read into the print buffer.
If the sending node is a streaming mode node, then the flow is as follows:
1. The LPD receives a Receive Control File First from a remote LPR, indicatingthat the remote node wants to use streaming mode.
2. The control file is received by the LPD.
3. The LPD then receives a Receive Data File with Unspecified Length (RDFUL),accepts it and the data file is streamed to the printer.
3.7 What is SERIALD?SERIALD is a daemon responsible for controlling the serial and parallel interfaces.It is not limited to use for printing, but because printers can be connected to theparallel and serial interfaces, it supports printers. SERIALD is misleadingly named,because it controls both the serial and parallel port. Sometimes, it is referred to asPARALLELD, but internally to the IBM Network Station, PARALLELD is just analias for SERIALD. SERIALD has its own IP ports which can be accessed directlyby remote systems.
Chapter 3. How Printing Works on the IBM Network Station 43

Figure 27. Port Numbers Associated with Printing on the IBM Network Station
For implementing new applications it is preferable to send print requests to the IBMNetwork Station using LPR requests. However, for special applications such asWinCenter using WinStation printers, or for special needs, or for those stilloperating at a software level prior to Release 3, SERIALD is still available to allowcompatibility.
The ports available to communicate with SERIALD are:
� Serial interface uses port 87 or 6461
If port 6461 is used, command mode is always used, whereas port 87 usescommand mode if the Use Serial Protocol option is set to true and it usespassthrough mode if the Use Serial Protocol option is set to false.
See 9.9.3, “Parallel and Serial Port Configuration Parameters” on page 191 fordetails on how to verify and set these parameters.
� Parallel interface uses port 5964 or 6464.
44 IBM Network Station Printing Guide

If port 6464 is used, command mode is always used; whereas port 5964 usescommand mode if the Use Parallel Protocol option is set to true and it usespassthrough mode if the Use Parallel Protocol option is set to false.
See 9.9.3, “Parallel and Serial Port Configuration Parameters” on page 191 fordetails on how to verify and set these parameters.
An example of a remote application that currently sends print data directly toSERIALD's port 5964 is WinCenter. This is described in 5.3, “Printing from aWinCenter Host” on page 80.
We also provide examples for printing from the RS/6000 and AS/400 directly to port6464.
Chapter 3. How Printing Works on the IBM Network Station 45

46 IBM Network Station Printing Guide

Chapter 4. Configuration Using the IBM Network StationManager
The IBM Network Station Manager is a user-friendly tool that allows theconfiguration of IBM Network Station parameters and should always be used.
In certain cases, when certain parameters are not available through the IBMNetwork Station Manager configuration interface, then the administrator can resortto editing configuration files directly.
Most of the printer-related parameters can be configured using the IBM NetworkStation Manager. Only the serial port and parallel port-specific parameters cannotbe configured through the IBM Network Station Manager, but these are usually notrequired except in some special cases.
The IBM Network Station Manager is a Web server application (a CGI program)accessible from any JavaScript-enabled browser. As long as you have such abrowser and network access to the server where the IBM Network Stationconfiguration files are located, you can use that browser to configure the IBMNetwork Station parameters. This is illustrated in the figure below.
Figure 28. Using the IBM Network Station Manager
You must be provided with the address (the URL) of the IBM Network StationManager by the administrator in order to connect your browser to the proper Webserver and application. Once connected, you are asked for a user ID and
Copyright IBM Corp. 1998 47

password, after which, if properly authenticated, you are presented with the mainpanel of the IBM Network Station Manager.
On the left-hand side of the main panel, there is a list of tasks identified as SetupTasks. If you click on Hardware , it expands into two choices: Workstations andPrinters.
Selecting Printers displays the panel as shown below, which is the main panel forworking on Printer Configuration parameters.
Figure 29. The IBM Network Station Manager Printer Defaults Configuration Panel
Notice that it shows four levels at which you can configure printer-relatedparameters:
� System Defaults
Parameters configured at this level apply to all workstations and all users. Anyprinters defined here appears on the printer selection list for any user on any
48 IBM Network Station Printing Guide

workstation. Every printer's configuration parameters can be configured at thislevel. These are:
– The LPR buffer size– The LPD buffer size– The Bypass Print Buffer streaming option– The Access Control parameters– The printer table which lists available printers– The default printer
� Workstation Defaults
Parameters configured at this level apply to a particular workstation. Allparameters that can be configured at the system defaults level are alsoconfigurable at the workstation defaults level, but they apply only to the specificidentified workstation.
� Group Defaults
This is new in IBM Network Station Manager for Release 3, and it allowsparameters to be configured for a group of users. At this level, only the PrinterTable and Default Printer can be configured. This is so that certain printers canbe identified as being available to only certain users. For example, a printer inthe accounting office may be reserved for use only by the members of theaccounting department.
� User Defaults
Parameters at this level apply to a single individual user. Here also, only aPrinter Table and a Default Printer can be configured, and this would be usedfor example if a printer needs to be dedicated and available only to a specificuser.
Entries configured in the printer table are cumulative. In other words, a specific userwill see, when presented with a list of printers to choose from, printers defined atthe system level, and those defined for his or her workstation (if any), and thosedefined for the group to which he or she belongs and those defined specifically forhis or her user ID. He or she will not see printers defined for other groups, otherusers or other workstations.
4.1 Printer Settings - System DefaultsLet us first take a look at the parameters that can be configured at the systemlevel. Clicking on System Defaults and on the Next button at the bottom of themain panel brings up the following panel:
Chapter 4. Configuration Using the IBM Network Station Manager 49

Figure 30. The Printer Settings - System Defaults
4.1.1 Print Client LPRThe Print Client (LPR) parameter is used to specify the maximum size of the LPRbuffer.
This LPR buffer is the print buffer used when a print job generated by anapplication on the IBM Network Station needs to be routed to a remote printer.
By default, this is set to 10% of the free memory at the time that the print job isgenerated. In other words, the actual size of the print buffer can vary according tohow much actual memory is free at the time that a print job is created by anapplication.
It is possible to change this setting, so that up to 95% of the free memory can beused as a print buffer, or as low as 0%. If the user specifies a value lower than0%, then 0% is used, and if he or she specifies a value greater than 95%, then95% is actually used. However, note that if the chosen percentage of availablememory computes to less than 5 KB, then a minimum of 5 KB is used in all cases.
50 IBM Network Station Printing Guide

This determination of the cache size is done at the beginning of processing of aprint job. In addition, throughout the processing of a print job, the LPRD and LPDdaemons monitor how much memory they are using to ensure that the totalmemory used at any one point does not exceed this cache size; they also makesure that the available system memory (at that time) does not fall below 10 KB.
This is valid for both streaming and non-streaming sends and receives, andwhenever buffer allocation is done, such as during creation of a control file or datafile for example.
This buffer size is important because, when the LPRD daemon initially connectswith the remote print server, it always attempts to use streaming mode send.
� If the remote host supports streaming mode, then the size of the LPR printbuffer is less important because the LPRD daemon is able to send data as it isgenerated and therefore does not need to hold the entire print job in the bufferbefore sending it.
� However, if the remote host does not allow streaming mode, then the IBMNetwork Station must build the entire print file in the LPR print buffer beforesending it. If the buffer is too small to contain the entire print file, the print jobfails.
If the job fails because of insufficient print buffer space, the message log containsan NSK6108 message, as illustrated below:
à ðNSC62ð1: lprd: Starting.
NSC62ð6: lprd: Print job memory cache size set to 243239 bytes
(1 percent of free memory).
NSC6211: lprd: Sending print job STDIN to host 9.24.1ð4.32.
NSC61ð8: lprd: Out of memory.NSC62ð9: lprd: Cannot send print job STDIN to host 9.24.1ð4.32.
NSC62ð2: lprd: Ending.
á ñ
Figure 31. Sample LPRD Messages
4.1.2 The Print Server (LPD)The Print Server (LPD) parameter is used to specify the maximum size of the LPDbuffer.
This LPD buffer is the print buffer used when a print job request is received from aremote host, to be printed on a local printer.
By default, this is also set to 10% of the free memory at the time that the print jobis received, and it can be set from 0% to 95%.
This LPD buffer size is less important than the LPR size because the LPD daemonhas the ability to switch internally to steaming mode when the size of the print jobexceeds the size of the LPD buffer. (This is true whether the actual protocol usedbetween the remote LPR and the local LPD is using streaming mode or not.)
In other words, when the LPD print buffer is exceeded, the LPD daemon startsstreaming the data to the printer right away. However, this can be controlled with
Chapter 4. Configuration Using the IBM Network Station Manager 51

the parameter Bypass print buffer when file exceeds buffer size, which is locatedjust below the Maximum LPD Buffer Size.
If the Bypass print buffer parameter is set to Yes, then the IBM Network Stationbegins passing the print file to the printer before it has received the complete file.However, if however the Bypass print buffer parameter is set to No, then the printjob fails, and the message log contains an NSC6216 error message, as shownbelow:
à ðNSC62ð1: lpd: Starting.
NSC62ð6: lpd: Print job memory cache size set to 3387ð1 bytes
(1 percent of free memory).
NSC6218: lpd: Host WTRð5ð85.itso.ral.ibm.com requests local host
to receive a printer job for queue PARALLEL1.
NSK-??-: ð8ð-ðð1:accepting PARALLELD connection
from itsonct1.itso.ral.ibm.com
NSK53ð1: parallel 1: opened session from 9.24.1ð4.189
NSC6216: lpd: File dfA2ð3MILLERMG from hostWTRð5ð85.itso.ral.ibm.com too large for cache.
NSC621ð: lpd: Print job huge.doc received from host
WTRð5ð85.itso.ral.ibm.com
NSC6214: lpd: Print job huge.doc from host WTRð5ð85.itso.ral.ibm.com
failed.
NSC62ð2: lpd: Ending.
NSK53ð4: parallel 1: closed session from 9.24.1ð4.189
á ñ
Figure 32. Sample LPD Messages
4.1.3 Controlling Access to the IBM Network Station PrintersWhen print requests are received by the IBM Network Station from remote systems,the administrator can specify whether these requests are to be accepted or not.
The parameter for controlling this access is called Remote systems allowed to printon this IBM Network Station. and is located just after the Bypass print bufferparameter.
This parameter can be set to:
� Accept requests from all systems, which is the default setting.
� Reject all requests, which is the last option No systems. This means that onlylocal applications are allowed to print on the IBM Network Station-attachedprinter and that requests from remote hosts are all rejected.
� Accept requests on a selective basis, based on the hosts names specified inthe list appearing besides the Selected systems radio button. As indicatedbelow the list, host names or host IP addresses are entered in this list andseparated by commas, as illustrated in the figure below.
52 IBM Network Station Printing Guide

Figure 33. Hosts Specified in the Access Control List
Note that this option controls access to both the LPD daemon and the SERIALDdaemon. So whether the print request is received by the LPD daemon from an LPRrequester, or by the SERIALD daemon on a specific port such as 87 or 5964, theaccess control list is used if it is enabled.
4.2 Adding Printers to the Printer ListThe next printer configuration task is to define all the printers to be madeaccessible to the users.
On the same panel where we are defining System Defaults parameters such asLPR and LPD Print buffer size, if you scroll down to the bottom, the Printer Listspecifications appear, as shown in the figure below:
Figure 34. Printer List Parameters - System Defaults
All printers that are defined on this list, since this is at the System Defaults level,are available to all IBM Network Station users.
Notice that the first two entries are already pre-specified for the local printers, whichmight be using the serial or parallel port and that the queue names are fixed to
Chapter 4. Configuration Using the IBM Network Station Manager 53

either PARALLEL1 or SERIAL1. These two entries are in the default printer tableshipped with Release 3. Their stream types are pre-specified as PS for PostScript.
Note that these default entries can also be removed if needed by blanking out allthe fields and specifying None attached. This might be needed if none or most ofthe IBM Network Stations have local printers attached and you do not want theseentries to take up space in the Printer Selector panel which gets displayed to theuser when selecting a printer to use.
These entries for local printers are only available at either the System Defaults levelor the other Workstation Defaults level.
The last entry is for defining one or more remote printers.
Let us examine each of the parameters that can be specified here, starting with theLocal parallel printer line.
� Local Parallel printer
Default PrinterNotice that there is a radio button besides each entry. This is toindicate which printer, of all those that are defined here, should beconsidered the default printer. Once a printer is indicated as beingthe default one, it is this printer which appears as pre-selected in thePrinter Selector list that the user gets when selecting a printer touse.
PrinterThere are only two choices here, either None attached as shownhere or Printer attached to indicate that there is a printer physicallyattached to this port or not.
Queue NameThis is fixed to either PARALLEL1 (or SERIAL1 in the case of theprinter attached to the serial port).
Stream TypeThe three choices are PostScript, PCL or ASCII.
DescriptionA meaningful description to identify the printer. This is thedescription that is displayed in the Printer Selector panel from whichthe user chooses a printer.
Banner PageThis option is not supported for local printers.
ASCII Options...This button presents an additional panel where additional valuesrelative to DBCS are specified when using DBCS conversionprocessing.
These values are used by the 3270 and 5250 emulators to provideDouble Byte Character Set (DBCS) support and convert the symbolson the screen into bitmaps suitable for the printer. The parametersdescribe attributes of the printer such as dots per inch and theprinter control language. These parameters are only used by the3270 and 5250 emulators, when using DBCS. They are discussedin more detail in Chapter 11, “DBCS Considerations” on page 225.
54 IBM Network Station Printing Guide

� Local Serial printer
The options here are identical to the local parallel printer, except for the queuename which is set to SERIAL1.
� Remote Printer Server
This line, and the additional lines that can be added, are for defining targetprinters that exist on remote print servers. Remote printers can be defined atthis level, that is System Defaults, as well as at the Workstation Defaults level,Group Defaults and User Defaults level.
Remote printer serverThis is the host name or IP address of the remote server where thetarget print queue resides. In this example, we have usedralyas4c.itso.ral.ibm.com.
Queue nameThe name of the printer queue on the remote system to which weare sending the printer output. In this example, we have usedPRT51. This may be an optional parameters, in some cases,because some network printers do not need the queue name whilereceiving a remote print job.
Stream typeMost IBM Network Station applications can only generate aPostScript data stream. However, the 5250 and 3270 emulators arealso able to generate ASCII and PCL output, and these emulatorapplications are able to examine this parameter at print time andgenerate the data stream appropriate to the chosen printer. In thisexample, we have selected PCL. Most applications ignore thisparameter and produce PostScript anyway.
Description (optional)The description is an optional field, which is used to provide the userwith a helpful description, which is displayed by the Printer Selector(see 3.4.2, “The Printer Selector” on page 34). In this example, weuse a value of To AS/4ðð printer.
Banner pageThis value determines whether a banner page is to be producedwhen printing to this remote printer. In this example, we haveselected to print a banner page. Note that this option is valid onlyfor remote printers.
ASCII Options...As described above for the local printers.
To add more than one remote printer, click on the Add a Remote Printerbutton; this action produces another blank set of parameters to fill out.
Once completed, click on Finish to add the printer to the list.
The result of the above configuration of remote printer PRT51 is that it shouldappear in the Printer Selector, as shown below:
Chapter 4. Configuration Using the IBM Network Station Manager 55

Figure 35. The Printer Selector with PRT51 Added
4.3 Removing a Printer from the Printer ListTo remove a printer from the Printer List, start the IBM Network Station Managerand select Hardware → Printers from Setup Tasks.
From the Printer Defaults screen, select the default that you wish to edit. In thefollowing example, we remove a printer from the user defaults, but the samemethod can be used for removing a printer from any of the other printer lists.
On the line for the printer that you wish to remove, blank out the Remote printerserver, Queue name and Description.
Once the fields are blanked out, click on the Add a Remote Printer button.
The screen refreshes, and the line for the removed printer disappears from thescreen. Now click on Finish to finish removing the printer.
The printer no longer appears in Printer Selector for the users affected by thedefault selected.
4.4 Parallel and Serial Port ConfigurationThere are parameters that can be specified for the parallel and serial ports;however, these parameters are not configurable through the IBM Network StationManager.
Please refer to Chapter 9, “Problem Determination Tools, Tips and Techniques” onpage 179 for details on the parallel and serial port parameters.
56 IBM Network Station Printing Guide

Chapter 5. Host Applications Printing to IBM Network StationLocal Printer
This chapter illustrates multiple scenarios where host applications need to print onan IBM Network Station local printer. The host platforms we discuss are:
� AIX
� Windows NT
� WinCenter
� OS/400
� VM/ESA
� OS/390
� OS/2
These are not the only systems that can be used with the IBM Network Station forprinting purposes. Any system that implements LPR/LPD is capable of printing tothe IBM Network Station and receiving printed output from the IBM Network Station.
The figure below summarizes the environment that we are using.
Figure 36. Printing from Host Applications to the IBM Network Station Printer
In these examples, we are not concerned about applications residing in the IBMNetwork Station wishing to print to the local printer or to a remote printer, but onlyabout applications residing on a host, remote from the IBM Network Station, andwishing to print on a printer attached to the IBM Network Station.
Copyright IBM Corp. 1998 57

There are two methods that applications can use in this situation:
1. Use the TCP/IP LPR/LPD facilities. In this case, an LPR request is sent by therequesting system to the LPD daemon on the IBM Network Station.
This is the recommended method to use as of the availability of Release 3.
2. Print directly to the SERIALD daemon using ports such as 87, 5964, 6461 or6464.
This method is the only one that can be used with IBM Network Stationoperating at a release earlier than Release 3 since LPR/LPD was not availbleprior to Release 3.
This method is also used by a WinCenter server for example, when usingWinStation printer definitions on the server to represent the printer attached toa client such as an IBM Network Station. It can also be used by systems thathave the capability to address these ports directly, such as OS/400 or IPPrintway on an S/390.
We provide some examples of how this is accomplished in the followingchapters, when discussing the individual platforms that support this option.
These two methods are summarized in the figure below, where we highlight thecomponents involved by greying out some of the other components.
Notice that the LPD daemon receives print requests from LPR requesters onremote hosts and forwards these requests to the print API, which in turn, transmitsthese to the SERIALD daemon for printing. On the other hand, certain systemscan also access the SERIALD directly through some specific ports.
Figure 37. Host Application to Network Station - Components
58 IBM Network Station Printing Guide

The recommended, and easiest method is to use the LPR/LPD facility. In fact, withthe availability of the LPD daemon on the IBM Network Station, any application onthe network that can issue LPR requests can now print on the IBM Network Stationattached printer. The other method should only be used in cases where theLPR/LPD facility cannot be used.
From remote hosts, it is only possible to send printer output to the IBM NetworkStation for printing on the local printer(s) attached to the serial or parallel port. Inother words, the IBM Network Station cannot be used to receive a print request onthe LPD and send it back out to another remote hosts through the LPRD. Suchintermediate routing capability is applicable only to systems which have the abilityto spool locally in order to store and forward, which cannot be done on the IBMNetwork Station because of the lack of sufficient storage.
In the text that follows, we use scenarios to give an example of the configurationsteps required in order for applications to be able to send printed output to a IBMNetwork Station-attached printer. The objective is not a detailed tutorial on howprinting is implemented on each of the platforms discussed but only to give theessential steps required to successfully implement printing from these platforms.
5.1 Printing from an AIX HostIn this section, we discuss the case of applications residing on an AIX host wishingto print to a printer attached to an IBM Network Station.
There are two methods that can be used to print to the IBM Network Station localprinter from AIX:
1. Using a print output queue
This utilizes LPR/LPD functionality and is the preferred method for IBM NetworkStations that are at least at the Release 3 level of the IBM Network Stationsoftware.
2. Using a modified JetDirect queue
This method allows you to specify a specific port to connect to on a targetsystem and therefore allows us to go directly to the SERIALD daemon on theIBM Network Station instead of the LPD daemon. This is useful for IBMNetwork Stations that are not at the Release 3 level and therefore do not havean LPD daemon, or for special cases where this functionality might be desired.
5.1.1 Using a Remote Print QueueWe illustrate here the steps required on the AIX host to create a remote outputqueue.
1. Start SMIT.
First, start SMIT and at the System Management menu, select PrintSpooling →Add a Print Queue .
2. Specify the attachment type.
We are then prompted for the attachment type. We need to create a remoteprint queue, so we select Remote .
Chapter 5. Host Applications Printing to IBM Network Station Local Printer 59

Figure 38. Selecting an Attachment Type of Remote
3. Specify the type of processing.
On the next screen we are prompted by a box titled Type of Remote Printing,which asks us to specify the type of processing we wish to use on the print file.
Figure 39. Selecting Local Filtering before Sending to Print Server
The choices are:
Standard processingThis sends the print file as-is, without any modifications to the datastream. This is used when passing print files on from another host,
60 IBM Network Station Printing Guide

when the sending host already created a printer-specific datastream, or when sending to a print server that has its own printerdrivers.
Local filteringThis means that AIX changes the data stream to make itprinter-specific. When we select this option, we are prompted forthe printer model in a later screen, so that AIX knows what type ofchanges it should make to the data dependent on the type ofdestination printer.
When printing to an IBM Network Station, this is the most likely typeof queue that we use. This is because the IBM Network Stationdoes not have printer drivers and we therefore need to convert thedata stream before we send it to the printer.
In this example, we are using an HP LaserJet 4 PCL printer attached to theparallel port, so we need to make the print file printer-specific. We select Localfiltering before sending to the print server .
4. Specify the type of printer.
On the next two screens we are prompted to select the manufacturer and typeof printer that is used. In this example, we are using a Hewlett PackardLaserJet 4, printer, so we choose Hewlett Packard on the first panel andhplj-4 on the second panel.
Figure 40. Selecting the Remote Printer Type Manufacturer
Chapter 5. Host Applications Printing to IBM Network Station Local Printer 61

Figure 41. Selecting the Remote Printer Type Model
5. Install a printer driver, if required.
It may be necessary to install the printer driver if the selected printer does notalready have the required printer driver installed. If that is the case, we get thefollowing panel:
Figure 42. Printer Support Not Installed
62 IBM Network Station Printing Guide

In that case, follow the online instructions to load the relevant printer supportsoftware package.
In this example, the printer support was already installed on the system, so weproceed to the next step.
6. Specify a remote host name and queue name.
In this step, we identify the characteristics of the remote print queue.
Figure 43. Add a Remote Print Queue with Local Filtering
Here are a few details on the entries in the above panel:
Names of NEW print queues to addIn this example, the printer is a PCL printer, so we enter the queuename, nshp4, into the PCL space. If we had a printer capable ofPCL and PostScript, we could create two queues, so that we couldchoose which data stream to send, or we could send both file typesto the same queue and let the printer auto detect the format.
HOST NAME of remote serverWe enter the remote location of the IBM Network Station. In thisexample, we use the IP address, but we could use a host name ifrequired.
Name of QUEUE on remote serverThe printer we are using in this example is attached using theparallel port, so we use a queue name of PARALLEL1. If the printerwas attached to the serial port, the name of the queue to use wouldbe SERIAL1.
TYPE of print spooler on remote serverThis is used for formatting the status information received back fromthe IBM Network Station. It is best to set this to AIX Version 3 or 4.
Chapter 5. Host Applications Printing to IBM Network Station Local Printer 63

Send PASS-THROUGH FLAG to queue on remote server?We wish the IBM Network Station to use pass through (that is, notto perform any conversion on the data), so we select yes.
7. Complete the queue creation.
Once these details have been entered, press Enter, and messages aredisplayed while the queue is created. Once the queue creation process iscompleted, the Command field changes to .OK/, as shown below:
Figure 44. COMMAND STATUS Panel Showing Successful Completion
8. List the printer queue.
Once the printer queue has been added, press F10 to exit. To see the printerqueue that we just added, start SMIT, and select Print Spooling →List AllPrint Queues to see the list of printers:
64 IBM Network Station Printing Guide

Figure 45. The New Printer in the Printer List
5.1.2 Using a Modified JetDirect QueueAs mentioned previously, it is preferable to use the Remote Printer Queue method(5.1.1, “Using a Remote Print Queue” on page 59) to print to an IBM NetworkStation printer. However, if you need to access the SERIALD daemon directly forsome reason, here are the instructions on how to accomplish this.
The Hewlett-Packard JetDirect devices allow a printer to be connected to the LAN.They come in two main types, external and internal.
� Internal - A card that is installed in a printer, to provide a printer networkinterface. The internal versions of the JetDirect device are referred to asJetDirect Cards.
� External - A box (or "brick") that connects the LAN, and has either one or threeparallel ports and a LAN connector.
They can be used with LPD functionality, or the parallel port can be driven byspecial JetDirect software.
Figure 46. An external JetDirect device
Chapter 5. Host Applications Printing to IBM Network Station Local Printer 65

When the data is sent to the port directly, TCP/IP port 9100 is used. This is verysimilar to the IBM Network Station, which can send data to the parallel port directlyusing port 6464 (or 87). We can take advantage of this similarity, and use amodified JetDirect printer queue to print to the IBM Network Station printer throughport 6464 (or 87). To do this, we need to create a JetDirect queue, and modify it.
5.1.2.1 Installing the JetDirect SoftwareNote: The instructions below were reproduced from RS/6000 - IBM NetworkStation - A Companion Guide, SG24-2016, page 166.
If the software is not already installed, install the latest Hewlett-Packard JetDirectNetwork Printer attachment software from the hpJetDirect.attach fileset, found in theprinters.hp bundle delivered with the AIX system media. At AIX 4.1.5, make sure toalso install APAR IX68615 after installing the rest of the software. Even though thisis Hewlett-Packard based software, it will work well for all types of printers attachedto the IBM Network Station.
5.1.2.2 Creating a JetDirect QueueTo install a JetDirect queue, follow these steps:
1. Start SMIT.
Start SMIT, and at the System Management menu, select Print Spooling →Add a Print Queue .
2. Specify the attachment type.
We are then prompted for the ATTACHMENT TYPE. We need to create an HPJetDirect queue, so we select hpJetDirect :
Figure 47. Selecting an Attachment Type of hpJetDirect
3. Specify printer type and model.
66 IBM Network Station Printing Guide

Next we are prompted to select a printer type and model. In this example, weare using a Hewlett-Packard LaserJet 4 printer, so we select Hewlett-Packardon the first panel and hplj-4 on the second panel.
Figure 48. Selecting the Remote Printer Manufacturer
Figure 49. Selecting the Remote Printer Type
4. Specify BOOTP/TFTP server.
We are then prompted for whether to add this system as a BOOTP/TFTPserver. Select Do NOT make this system a BOOTP/TFTP server :
Chapter 5. Host Applications Printing to IBM Network Station Local Printer 67

Figure 50. BOOTP/TFTP Server Choice
5. Specify target host and queue.
Next we are prompted for the details of the JetDirect device:
Names of NEW print queues to addIn this example, the printer is a PCL printer, so we enter the queuename, nshp4, into the PCL space. If we had a printer capable ofPCL and PostScript, we could create two different queues, so thatwe could send either data stream to the printer.
HOSTNAME of the JetDirect CardWe enter the remote location of the IBM Network Station, instead ofthe JetDirect address. In this example, we have used the hostname, itsonct1.itso.ral.ibm.com, but it is also possible to use theIP address if required.
PORTLeave this set to 91ðð.
68 IBM Network Station Printing Guide

Figure 51. Add a Print Queue
6. Complete the queue creation.
Press Enter to see the messages while queue is created. When this hassuccessfully completed, the Command field shows as .OK/:
Figure 52. Messages when Creating the Queue
Once the queue has been added successfully, it can be changed to use the IBMNetwork Station SERIALD port (6464 or 87) instead of JetDirect port (9100).
Chapter 5. Host Applications Printing to IBM Network Station Local Printer 69

5.1.2.3 Changing the JetDirect Queue for Use with IBM NetworkStationThese steps detail how to change the JetDirect Queue which was created in5.1.2.2, “Creating a JetDirect Queue” on page 66.
1. Start SMIT.
Start SMIT, and at the System Management menu, select Print Spooling →Programming Tools → Queues and Queue Device → Queue Devices →Change/Show Characteristics of a Queue Device .
2. Select the queue to work on.
We see the Change/Show Characteristics of a Queue Device screen. Enterthe name of the queue we just created into the QUEUE to which device isattached field:
Figure 53. Change/Show Characteristics of a Queue Device
3. Change the port number.
On the following panel, select BACKEND PROGRAM pathname , scroll to thefar right of the entry, and overwrite 9100 with 6464
70 IBM Network Station Printing Guide

Figure 54. Change/Show Characteristics of a Queue Device
4. Complete the process.
Press Enter to make the change. We see the command run and completesuccessfully, and we can now press F10 to exit SMIT.
The changes we made are now reflected in the queue configuration file. We canexamine this by listing the file, and using the command more /etc/qconfig, whichdisplays the qconfig file one screen at a time (press Enter to see the next screen).
Because we just added this entry, it is likely to be at the end. Notice, in the nextfigure, that the backend line now shows 6464, the port number for SERIALDparallel interface. This confirms that the change has been successfully made, andthat this will now send data that is queued to the port 6464 on the IBM NetworkStation.
Chapter 5. Host Applications Printing to IBM Network Station Local Printer 71

Figure 55. Results of the more /etc/qconfig Command
5.2 Printing from a Windows NT HostPrinter output from applications on a Windows NT system can be sent to an IBMNetwork Station local printer, using the LPR on the Windows NT machine, providedthat the Microsoft TCP/IP Printing Services are installed.
If these services are not installed, the following section shows the procedurerequired to install TCP/IP Printing Services on Windows NT.
5.2.1 Installing TCP/IP Printing ServicesTo install the TCP/IP printing services on a Windows NT 4.0 system, follow thesesteps:
� Click on Start →Settings →Control Panel →Network , which brings up thefollowing panel:
72 IBM Network Station Printing Guide

Figure 56. Network Services
� Select the Services tab and click on Add to get the next panel:
Figure 57. Network Services - Add
Select TCP/IP Printing Services , click on OK and follow the rest of theinstructions.
Chapter 5. Host Applications Printing to IBM Network Station Local Printer 73

5.2.2 Creating a Definition for the IBM Network Station PrinterOnce the TCP/IP Printing Services are installed, create a printer definition torepresent the printer attached to the remote IBM Network Station.
Click on Start →Settings →Printers to bring up the Printers folder, on which youdouble-click the Add Printers icon, to start the Add Printers Wizard.
Figure 58. Add Printers Wizard
On the above screen, select that the printer should be controlled from our computerby selecting My Computer , and then clicking Next .
Note: You might be tempted to choose the Network Printer Server instead,because the description states Connect to a printer on another machine, but thatrefers to a printer that has already been defined on another server.
Figure 59. Add Printers - Add Port
On the above panel, click on Add Port , which brings up the following panel:
74 IBM Network Station Printing Guide

Figure 60. Adding a Printer Port
Select LPR port and click on New Port .
Figure 61. Add LPR Compatible Printer
Enter the hostname or IP address of the host to which the printer is attached; inthis case, it is the address of the IBM Network Station which, in our example, is9.24.104.189. Also enter the name of the printer or print queue on that host. Sinceour destination printer is on an IBM Network Station we need to use a print queuenames, which in our case is PARALLEL1. For a serially attached printer we woulduse SERIAL1.
Note: If our destination was another Windows NT server for example, that namewould be a printer name, which represents a queue on a Windows NT system.
Click on OK to return to the Add Printer Wizard panel which lists the availableports, and where you should now see the port that was just added. In our case, thisshows up in the list as 9.24.104.189:PARALLEL1.
Chapter 5. Host Applications Printing to IBM Network Station Local Printer 75

Figure 62. Add Printer Wizard - New LPR Port Added
Click on Next to go to the next step, which is to specify a printer driver to beassociated with the printer. In this example, we use the driver for the IBM 4029LaserPrinter.
Figure 63. Choosing the Printer Driver
Click on Next to get to the next panel where we need to assign a name to theprinter we just finished defining.
76 IBM Network Station Printing Guide

Figure 64. Naming the Printer
Enter a name for the printer and click on Next .
Note: We have used a very long name in this example. This might not be a goodidea if this name is used on some of the remote commands to send output to thisqueue. For example, if one uses the LPR command from a command prompt, oneof the parameters to enter is the queue name. It is therefore probably easier to usea shorter name. If the user does not have to use a command, but select a printerfrom a list, then the length of the name is less important.
The next Add Printer Wizard panel allows us to choose whether we wish to sharethis printer with other network users. In this example, we choose not to share theprinter, as shown below:
Figure 65. Choosing Whether to Share the Printer
A click on Next brings us to a panel where we are asked if we wish to print a testpage. If we choose to generate a test page, it automatically sends a test page to
Chapter 5. Host Applications Printing to IBM Network Station Local Printer 77

the printer. It is useful to produce a test page, to ensure that we have configuredthe printer correctly.
Figure 66. Choosing Whether to Print a Test Page
Click on Finish to complete the process. If we selected to print a test page, thefollowing screen is displayed.
Figure 67. Did the Test Page Print Correctly?
Check to see if the printer produced any output, and whether the output is correctlyformatted. If the test is successful, the test page should appear as shown below:
78 IBM Network Station Printing Guide

Figure 68. A Sample Test Page Output
If the test page prints correctly, click Yes. The printer is now installed and appearsin the Printers folder, illustrated below:
Figure 69. The New Printer in the Printers Folder
If the test page does not print correctly, one of the possible causes is that we haveselected an incorrect driver for the printer. When that happens, a click on Noautomatically brings up a Help panel to offer suggestions, as illustrated below:
Chapter 5. Host Applications Printing to IBM Network Station Local Printer 79

Figure 70. Windows NT Help
5.3 Printing from a WinCenter HostIn this section, we discuss the case of applications residing on a WinCenter serverwishing to print to an IBM Network Station-attached printer. In other words, an IBMNetwork Station user logs on to a WinCenter server, from his or her IBM NetworkStation, in order to use such Windows applications as Freelance Graphics or LotusSpreadsheet and requires the ability to print from these applications to a printerattached to the parallel port of his or her IBM Network Station, as illustrated in thefigure below.
80 IBM Network Station Printing Guide

Figure 71. Printing from WinCenter Applications
With the availability of the LPR/LPD print support on the IBM Network Station,applications on remote hosts wishing to print to the printer attached to an IBMNetwork Station can use the standard TCP/IP LPR/LPD print facility to send printoutput request to the LPD port (port 515), as illustrated in the figure below:
Chapter 5. Host Applications Printing to IBM Network Station Local Printer 81
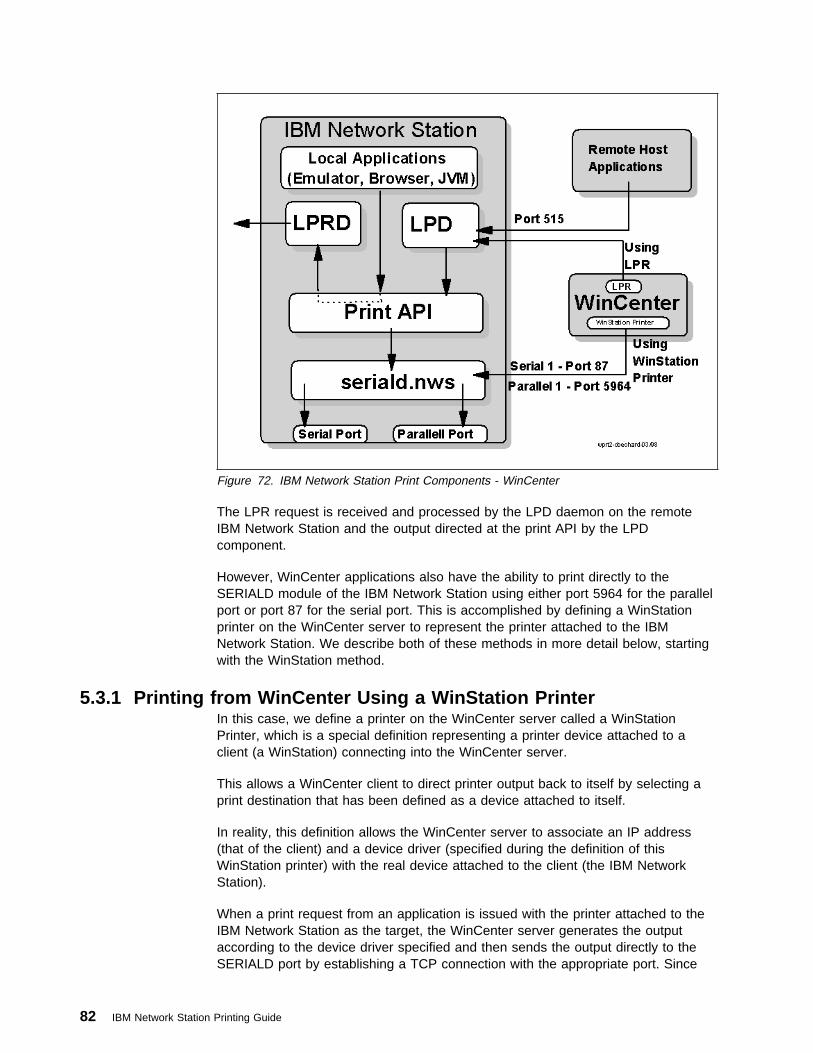
Figure 72. IBM Network Station Print Components - WinCenter
The LPR request is received and processed by the LPD daemon on the remoteIBM Network Station and the output directed at the print API by the LPDcomponent.
However, WinCenter applications also have the ability to print directly to theSERIALD module of the IBM Network Station using either port 5964 for the parallelport or port 87 for the serial port. This is accomplished by defining a WinStationprinter on the WinCenter server to represent the printer attached to the IBMNetwork Station. We describe both of these methods in more detail below, startingwith the WinStation method.
5.3.1 Printing from WinCenter Using a WinStation PrinterIn this case, we define a printer on the WinCenter server called a WinStationPrinter, which is a special definition representing a printer device attached to aclient (a WinStation) connecting into the WinCenter server.
This allows a WinCenter client to direct printer output back to itself by selecting aprint destination that has been defined as a device attached to itself.
In reality, this definition allows the WinCenter server to associate an IP address(that of the client) and a device driver (specified during the definition of thisWinStation printer) with the real device attached to the client (the IBM NetworkStation).
When a print request from an application is issued with the printer attached to theIBM Network Station as the target, the WinCenter server generates the outputaccording to the device driver specified and then sends the output directly to theSERIALD port by establishing a TCP connection with the appropriate port. Since
82 IBM Network Station Printing Guide

the output is already in the correct format for that printer, it is simply passedthrough by the SERIALD module to the actual physical printer.
5.3.1.1 WinStation Printer Configuration RequirementsWhat do we require then, in terms of configuration, on either the WinCenter serveror the IBM Network Station in order for applications on the WinCenter server toprint on the IBM Network Station attached printer.
The configuration requirements are as follows:
1. Configure WinStations definitions on the WinCenter server in order to indicatewhether client devices, such as a printer, should be connected at logon time forevery WinStation connecting in, or whether the user configuration should beused to determine the client device connection.
2. If we indicated above that the user configuration should be used (inherit userconfiguration), then configure the user configuration, which is similar (but notidentical) to the WinStation configuration.
3. Create a printer definition on the WinCenter server to represent the actualprinter attached to the IBM Network Station. This printer definition is thereforespecific to a client and one definition is required for each client (IBM NetworkStation) that has a printer attached.
4. Configure the parallel port interface on the IBM Network Station to match thecharacteristics expected by the WinCenter server, which are that port 5964 isused for the parallel port interface, port 87 for the serial port and that thepassthrough mode should be used (that is, use of the parallel protocol or serialprotocol configured as false).
These steps are summarized and illustrated in the figure below, where theapplication on the WinCenter server, when making a request for printing, ispresented with a list of available printers.
Chapter 5. Host Applications Printing to IBM Network Station Local Printer 83

Figure 73. WinStation Printer Configuration
One of these printers is the one called claudea#LPT1 which has been defined byuser claudea to represent the IBM 4029 printer attached to his IBM NetworkStation. This identifies the printer driver that should be used and where the printoutput should be sent. In this case, the destination is client/LPT1, which is anindication to WinCenter that the printer is at a remote IBM Network Station, forwhich WinCenter knows the IP address (since this is the client currently connectedas user claudea).
This triggers the establishment of a TCP connection to port 5964 of the IBMNetwork Station and print output is sent on that connection, where the SERIALDdaemon passes it through to the parallel port and hence to the IBM 4029 printer.
In the following few pages, we illustrate the steps above by taking you through therequired configuration panels.
5.3.1.2 WinStation ConfigurationThe first step is to configure the WinStations. In the Administrative tools folder onthe WinCenter desktop, double-click the icon labeled WinStation Configuration asshown in the figure below.
Note: This step must be done from the Console of the WinCenter server whilelogged on as Administrator.
84 IBM Network Station Printing Guide

Figure 74. Administrative Tools Folder
Before you make modifications to the WinStations' configuration, you must ensurethat no other users are logged on. To do so, double-click on the WinStationAdministration icon in the Administrative Tools folder, and view users. If someusers are actually logged on, you can send them a message asking them to log offor you can force them off by selecting their names and clicking Logoff .
The figure below illustrates the main WinStation Configuration panel which lists thecurrently configured WinStations. In this example, we happen to have configuredsix WinStations (numbered WinCenter#001-006) which use a transport mode ofWinCenter, and we also have configured four WinStations to use a transport modeof tcp and type of Citrix ICA. In other words, six of these WinStations connect intothe WinCenter server using NCD's WinCenter protocol and four use the Citrix ICAprotocol. (We used those in our tests with Citrix Java ICA client running on theIBM Network Station.) Notice that the console is also listed as a separate entry.
Figure 75. WinStation Configuration
Double-clicking on the WinCenter#001-006 entry brings up the following EditWinStation Configuration panel. Notice that this is where transport mode and typeof protocol used is configured.
Chapter 5. Host Applications Printing to IBM Network Station Local Printer 85

Figure 76. Edit WinStation Configuration
Double-clicking on the Advanced button brings up the Advanced WinStationConfiguration panel illustrated in the figure below.
86 IBM Network Station Printing Guide

Figure 77. Advanced WinStation Configuration
On the panel above, the only information we need to focus on at this point is thesection labeled Client Devices in the bottom left-hand corner of the panel.
If every IBM Network Station using this WinCenter server has a printer attachedand you want users on that IBM Network Station to be able to use this printer whenthey log on, then the entries in this section should be selected (which is the default)the entry labeled inherit user config should not be selected.
On the other hand, if only a few IBM Network Station have a printer attached, thenyou might want to set the default here for every IBM Network Station to NO (do notconnect client printer at logon) but instead use the inherit user config button toindicate to WinCenter that it should look up the user configuration informationinstead to determine whether a printer is attached or not. This latter case is theone we chose to illustrate in our example.
5.3.1.3 User ConfigurationWe then need to update the user configuration to reflect the presence of a printerthat we want to connect when a user logs on. To do this, we click the UserManager for Domains application also located in the Administrative Tools folder,which presents the panel shown below:
Chapter 5. Host Applications Printing to IBM Network Station Local Printer 87

Figure 78. User Manager
In the above panel, double-clicking on the user claudea for example opens up theUser Properties panel, as illustrated in the following figure.
Figure 79. User Properties
On this panel, notice on the bottom the button labeled Config located to the right ofthe Groups button. This button is specific to WinFrame/WinCenter and allows us toconfigure characteristics similar to the ones in the WinStation Configuration panelwe saw earlier, except that this panel is specific to a particular user.
Clicking on the Config button displays the panel illustrated below entitled UserConfiguration.
88 IBM Network Station Printing Guide

Figure 80. User Configuration
Once more, the only area of interest at this point, if we talk about printing, is thesection in the bottom left-hand corner labeled Client Devices. Notice that it isidentical to the one we saw earlier in Figure 77 on page 87 except that in this casethere is no inherit user config since the user configuration is what we are looking atnow.
So in the case of this user, we do select the entries indicating that there is a printerattached to the IBM Network Station that we want connected when this user logson.
5.3.1.4 Creating a Printer DefinitionThe next step is to create a printer definition to represent the actual physical printerwhich is attached to the IBM Network Station.
Note: To create this printer, you must log on to WinCenter as the user who will beusing this printer. This can be done from either the WinCenter Console, logging onas user claudea for example, or from an IBM Network Station logging on as userclaudea.
To create a printer, double-click Control Panel located in the Main Program group,double-click Printers , then select Printer →Create Printer which brings up thepanel shown below entitled Create Printer.
Chapter 5. Host Applications Printing to IBM Network Station Local Printer 89

Figure 81. Create a Printer
On the above panel, leave the Printer Name field empty; it will be filledautomatically when you set the Print to field. In the Driver field, select the printerdriver that corresponds to the physical printer attached to your IBM NetworkStation, and in the Print to field, select CLIENT/LPT1 for a printer attached to theparallel port or CLIENT/COM1 for a printer attached to the serial port. Click OK tocomplete.
Other characteristics can be set by clicking on the Details button, which brings upthe panel shown below.
Figure 82. Printer Details
90 IBM Network Station Printing Guide

Once this printer is defined, it can be managed through the Print Managerapplication, as shown in the figure below. Notice that the Print Manager shows twoprinters defined, one for user claudea and one for user Administrator.
Currently, the claudea#LPT1 printer is processing a print job originating from aFreelance Graphics application.
Figure 83. Printer Manager
5.3.1.5 IBM Network Station ConfigurationThe last step to accomplish in order to use our IBM Network Station-attachedprinter from a WinCenter application is to ensure that the IBM Network Stationconfiguration is correct.
This is typically not done by the IBM Network Station user but rather by theadministrator and is transparent to the user. When the user boots his or her IBMNetwork Station from a boot server, the configuration files that have been set up onthe boot server or on the configuration server already should have the properconfiguration parameters to enable the IBM Network Station-attached printer.
If the user has access to the Console menus for the Setup commands, he or shecan verify that the configuration is correct by accessing the Setup parametersmenu, selecting Parallel then locating the Parallel Daemon table, illustrated in thefigure below:
Figure 84. Parallel Port
Chapter 5. Host Applications Printing to IBM Network Station Local Printer 91

In the figure above, verify that the Use Parallel Protocol value reads False and thatthe TCP Port shows as 5964, since this is the port that WinCenter uses to accessthe print daemon.
If the serial port is the one used instead of the parallel port, then select the entrycalled Serial in the Change Setup parameters menu, which brings up the panelshown below.
Figure 85. Serial Port
Verify the entries in the Serial Daemons table to ensure that Use Serial Protocolshows as false (it is set to true, by default, in the example above) and that the TCPport is 87.
In the Serial Interfaces Table, the Port Use at Boot and the Current Port Useshould both be set to printer. As well, settings for Baud rate, Data Bits, Stop Bits,Parity and Handshake should match the settings recommended for the attachedprinter.
If these values are not correct, then the administrator in charge of the configurationfiles for your network station should be asked to correct these values.
For test purposes, these values can be changed temporarily through the IBMNetwork Station console setup panels, but remember that these changes aretemporary and will be overwritten when the configuration files are read again.
For additional details on the settings of these parameters, and for an example ofthe settings of the parameters in the configuration files and how to do problemdetermination, please refer to 9.9.3, “Parallel and Serial Port ConfigurationParameters” on page 191.
92 IBM Network Station Printing Guide

5.3.2 Printing from WinCenter Using LPRSince a WinCenter server is basically a Windows NT 3.51 system, it also has thecapability to use the LPR/LPD TCP/IP Print support, as long as that particularservice is installed on the server.
An LPR print port can therefore be defined, just as we do in the Windows NT 4.0example (see 5.2, “Printing from a Windows NT Host” on page 72), so that anyapplication can print to an LPR port, and that an LPR port can be configured topoint to a network station printer.
This is illustrated in the figure below:
Figure 86. IBM Network Station Print Components - Using LPR/LPD
The process of creating a printer definition on a WinFrame system is similar to aWindows NT 4.0 system; however, since there are slight differences in the panel,we briefly illustrate this process here.
From the Main folder, click on Control Panel and then Printers . This brings upthe Printer Manager panel, and from the Printer pull-down, illustrated in the figurebelow, select Create Printer .
Chapter 5. Host Applications Printing to IBM Network Station Local Printer 93

Figure 87. Create a Printer in WinFrame
In this example, we create a printer for the IBM 4029 printer attached to a networkstation at 9.24.105.189, so we name the printer NS4029, select the IBM 4029Laser Printer driver or a compatible driver, enter a description and select Other inthe Print to field.
Figure 88. Create a Printer in WinFrame
This brings up the Print Destination panel on which we select LPR Port . This isillustrated in the figure below:
94 IBM Network Station Printing Guide

Figure 89. Print Destinations
In the next panel, enter the host name or IP address of the destination host, and inthe field titled Name of printer on that machine enter the queue name on the IBMNetwork Station, which can only be PARALLEL1 or SERIAL1, dependent onwhether the physical printer is attached to the parallel or serial port.
Figure 90. LPR Port
Back on the Create Printer panel, clicking on Details brings up the followinginformation.
Chapter 5. Host Applications Printing to IBM Network Station Local Printer 95

Figure 91. Printer Details
When wishing to print from an application, clicking on the Print button brings up thefollowing panel where one can use the pull-down to choose a specific printer. Inthis example, we chose our NS4029 printer; notice that the Where field displays9.24.105.189:PARALLEL1.
96 IBM Network Station Printing Guide

Figure 92. Selecting a Printer
In the Print Manager window shown below, our NS4029 printer appears with anactive entry spooled. Notice the other printer called claudea#LPT1, which is theWinStation printer we used in the other method of printing to the IBM NetworkStation.
Figure 93. Print Manager
Both claudea#LPT1 and NS4029 represent the same physical printer except thatthe method of sending the printed output from the WinCenter server to the physicalprinter differs dependent on which printer queue is chosen. This is illustrated in thefigure below.
Chapter 5. Host Applications Printing to IBM Network Station Local Printer 97

Figure 94. Accessing the Same Printer through Two Methods
Notice that when the application chooses the NS4029 printer/queue, which isdefined as an LPR port, the output is routed to the LPR requester which makes aconnection to the LPD daemon on the IBM Network Station and the output isrouted to the physical printer attached to the IBM Network Station.
Similarly, if the application chooses the claudea#LPT1 printer/queue instead, thenthe output is routed through the WinStation Printer mechanism of WinCenter, whichestablishes a connection directly with port 5964 of the SERIALD daemon, whichroutes the output to the same physical printer attached to the IBM Network Station.
Notice that in both cases, an IBM 4029 printer driver is used on the WinCentermachine to produce an output that is compatible with the real printer used.
5.4 Printing from an AS/400 HostThere are two main methods that can be used to print to the IBM Network Stationlocal printer from the AS/400 depending on the release of OS/400:
� Using a remote output queue
It is possible to use a remote output queue at any release of OS/400 afterR310. This method uses the LPR/LPD printing services.
� Using a device description
A device description can be used at OS/400 releases of R370 and later. Thismethod uses direct connections to the SERIALD daemon ports.
It is preferable to use LPR/LPD for printing to the IBM Network Station, when theIBM Network Station is at Release 3 or later. The SERIALD instructions have beenincluded here only to illustrate how SERIALD works and can be used, and toenable people with IBM Network Station Releases 1 and 2 to print.
98 IBM Network Station Printing Guide

5.4.1 Using a Remote Output QueueIn the following example, we are connecting an IBM 4029 printer to the IBMNetwork Station. We define the printer with an output queue named NS4029.
5.4.1.1 Creating a Remote Output QueueFrom the OS/400 command line we enter the CRTOUTQ command and use the F4(Prompt) key to get the following screen:
Figure 95. The Prompted Create Output Queue Command
Output queue and LibraryWe need to use the QUSRSYS library, so that if it later becomesnecessary to create a dummy device description, this will be easier.Dummy device descriptions are explained after the instructions forcreating the output queue (see 5.4.1.2, “Creating a Dummy DeviceDescription” on page 104).
Remote systemIf the IBM Network Station has an assigned host name (for example,windy.raleigh.ibm.com) then we can enter this name in the Remotesystem field. Otherwise, we can specify *INTNETADR which will latercause a prompt for the IP address.
Press Enter to get the Remote Printer Queue parameter.
Remote printer queueIf the printer is physically attached to the IBM Network Station using aparallel cable, then specify PARALLEL1, or if the printer is attachedusing a serial cable, then specify SERIAL1. In this example, we areusing a printer attached to the parallel port:
Chapter 5. Host Applications Printing to IBM Network Station Local Printer 99

Figure 96. Create Output Queue Command - First Panel
Then use the Page Down key to get the next panel.
Connection typeChange this to *IP.
Destination typeThis parameter is used by the AS/400 to identify the type of LPD that isimplemented on the receiving node (in other words, does the receivingside support streaming or not). Streaming mode
If this is set to *OTHER, it indicates a basic LPR implementationwhich does not support streaming.
If this is set to *OS400, it uses an implementation suitable for talkingto other AS/400s, which includes support for streaming. Thisimplementation is also suitable for use with the IBM Network Stationsince streaming is supported by the IBM Network Station.
In this particular example, we use *OTHER, which does not usestreaming mode.
100 IBM Network Station Printing Guide

Figure 97. Create Output Queue Command - Second Panel
Press Enter. We are now presented with:
Host print transformHost Print Transform converts the spool file on the AS/400 to anASCII-based data stream such as PCL5 or PPDS. Set this to \YES.See 8.3.11, “Using Host Print Transform” on page 177 for moreinformation on host print transformation.
Press Enter again, and we get additional parameters, as follows:
Chapter 5. Host Applications Printing to IBM Network Station Local Printer 101

Figure 98. Specifying Manufacturer, Type and Model
Manufacturer type and modelThis parameter tells the AS/400 what type of printer the output is beingsent to. This allows the AS/400 to create the correct ASCII-based datastream. The default value is *IBM42011, but in this example we areusing an IBM 4029, so we change this to \IBM4ð29. A complete list ofthe possible values, can be obtained by pressing F4 while the cursor isin this field.
Internet addressIf we previously used *INTNETADR for Remote system, we then need toenter here the IP address of the IBM Network Station to which theprinter is attached. In our example, this address is 9.24.1ð4.189.
102 IBM Network Station Printing Guide

Figure 99. Entering the IP Address
Then page down to the last panel where we enter a text description for the printer:
Figure 100. Entering a Printer Description
Press Enter and the remote output queue is created. We see the message Object
NS4ð29 type \OUTQ created in library QUSRSYS at the bottom of the screen:
Chapter 5. Host Applications Printing to IBM Network Station Local Printer 103

Figure 101. The Output Queue Created Message
5.4.1.2 Creating a Dummy Device DescriptionPrinters that are physically attached (for example, using Twinax) to the AS/400 usedevice descriptions to store information about the printer configuration, and anoutput queue to store the spool files waiting to use this printer. When using aremote output queue, the Output Queue definition contains:
� The printer configuration information, such as the IP address and the printertype.
� The queued spool files waiting to be sent to the printer.
Therefore, since a remote output queue contains all of the information required, adevice description is usually not necessary when using remote output queues.
However, a dummy device description is usually required when an AS/400application gives the user a list of printers to choose from because applicationsgenerate a list of printers for the user by looking at the printer device descriptionsavailable on the AS/400. As the remote output queues do not have a devicedescription, such applications are not able to list the printers attached using remoteoutput queues.
Sometimes, applications validate the users' choice of printer, by ensuring that thereis a device description with the name the user specified.
OfficeVision/400 is an example of an application that uses device descriptions.
A dummy device description can thus be used to satisfy the above requirements,while still allowing the remote output queue to control sending the data to theprinter.
To create a dummy device description, type CRTDEVPRT at the command line, andpress the F4 key.
Device descriptionEnter the name of the device, which must be the same name as theoutput queue we just created, in this case NS4ð29.
Device class As this is not a device description for a printer that is directly connectedto the AS/400, we use virtual - \VRT.
Device type and modelFor the Device type, enter 3812 and Device model 1. We use 3812, asthis is a printer with many features. By using this value, applications areable to use more printer features. Where possible, the Host PrintTransform functionality converts the data so that these equivalent printerfeatures are used on the actual ASCII printer used.
104 IBM Network Station Printing Guide

Figure 102. Create Device Description (Printer) Command
Press Enter to see additional parameters and to specify a font identifier:
Figure 103. Specifying a Font Identifier
Chapter 5. Host Applications Printing to IBM Network Station Local Printer 105

Font identifierIn this example we use 11 which represents a Courier font at 10 CPI. Afont is required, as some applications use the default printer font. Analternative font ID can be specified if required. For a list of font IDsavailable on the AS/400, please refer to the AS/400 Printer DeviceProgramming, SC41-5713 which has an appendix listing the fontidentifiers.
When we have finished changing these fields, we can press Enter.
When this command is run, a dummy device description is created in the QSYSlibrary. In addition, we receive a message Output queue NS4ð29 in QUSRSYS
already exists This is because the CRTDEVPRT command usually creates:
� A device description in QSYS library
� An output queue, with the same name as the device description, in theQUSRSYS library
The CRTDEVPRT command finds that there is already an output queue with thesame name as the device description in QUSRSYS. This is normal because wehave already created a remote output queue in QUSRSYS, containing all of thedetails for printing to the IBM Network Station printer using the LPR, and theCRTDEVPRT command cannot create a new output queue.
Figure 104. The Error Message
5.4.1.3 Starting a Printer Writer to a Remote Output QueueA printer writer job is a job that runs on the AS/400, usually in the QSPLsubsystem, and is responsible for taking spool files from an output queue andsending them to a printer. To start a writer job, use the STRRMTWTR command(start a remote writer). A remote writer is a special kind of printer writer used forsending spool files to remote systems as opposed to locally attached printerdevices.
Figure 105. The Start Remote Writer Command
When this command is run, we see a message at the bottom of the screen thatsays Reader or writer xxxxxx/xxxxxxx/xxxxxx submitted to job queue QSPL inlib..., as shown below:
106 IBM Network Station Printing Guide

Figure 106. Success Message When Starting the Writer
5.4.1.4 Ending a Printer Writer to a Remote Output QueueTo end a writer job, use the ENDWTR command.
Figure 107. The End Writer Command
When this command is run, a message at the bottom of the screen says Writer
xxxxxx/xxxxxxx/xxxxxx in process of ending, as shown below:
Figure 108. Success Message When Ending the Writer
5.4.2 Using an AS/400 Device DescriptionThis is the second method that can be used; however, we remind you that it ispreferable to use the remote output queue method because it uses the LPR/LPDprotocol to communicate with the printer.
Creating a device description for an IBM Network Station is possible at releasesR370 and later of OS/400, and we include these instructions here for two reasons:
� For situations where the IBM Network Stations are not yet at the Release 3level
� To explain that SERIALD can be used as an alternative in special situationswhere this might be warranted.
5.4.2.1 R370, R410 and LaterAt R370, PTFs are required to add functions to support IBM Network Stationprinting on the AS/400. The PTF that can be ordered using the group PTF isSF99081.
To create a device description, type CRTDEVPRT at the command line and press F4.
Chapter 5. Host Applications Printing to IBM Network Station Local Printer 107

Figure 109. The Create Device Description (Printer) Command
Device descriptionIn this example, we use the name 'NS4029'.
Device classEnter this as \LAN because we connect to the printer through a network.
Device type and modelFor the Device type, enter 3812 and Device model 1:
Press Enter to see a new parameter appear called LAN attachment. We specify\IP, as we need to use the TCP/IP protocol.
Press Enter to see additional parameters.
108 IBM Network Station Printing Guide

Figure 110. LAN Attachment and Port Number Parameters
Port numberThis refers to the port number on the IBM Network Station. Enter 6464for a parallel-attached printer, or 87 for a serial-attached printer. Theseport numbers are explained in 3.7, “What is SERIALD?” on page 43. Ifa printer is attached to the serial port, then it is necessary to ensure thatthe printer serial port settings match the IBM Network Station serial portsettings.
Font identifierFor Font Identifier, enter 11 which represents a Courier font at 10 CPI.A font is required, as some applications use the default printer font. Wecould use a value other than 11, if required. For a list of font IDsavailable on the AS/400, please refer to AS/400 Printer DeviceProgramming, SC41-5713, which has an appendix that lists the font IDs.
Press Enter for more parameters and then page down to see the panel below:
Chapter 5. Host Applications Printing to IBM Network Station Local Printer 109

Figure 111. Host Print Transform Parameter
The meaning of the parameters on the panel is following:
Activation timer Specifies the amount of time to wait for the IBM NetworkStation to respond to an activation request. If there is noresponse, the AS/400 issues a message CPA337B asking ifthe request should be retried or canceled. Choose any valuethat is suitable for your environment. In this example, wehave left it at the default, 17ð.
Inactivity timer This is used by the AS/400 to decide when to release theconnection. In this example, we use \ATTACH which meansthat the AS/400 uses the default value for a LAN attachment,which is 15 seconds. Different values may be suitable indifferent environments.
Host Print TransformSpecify \YES, so that AS/400 data streams such as SCS andAFPDS can be converted to ASCII data streams such asPCL or PPDS.
Press Enter to continue.
110 IBM Network Station Printing Guide

Figure 112. Manufacturer Type and Model Parameter
Manufacturer type and modelThis allows us to specify which conversion to use to transform theAS/400 EBCDIC-based spool file to an ASCII printer-specific datastream. In this example, we use an IBM 4029 printer, so we specify\IBM4ð29. This parameter can be prompted using F4 to see all of theavailable conversions.
We also need to specify the paper that will be loaded into the printer. In thisexample, we specify that the paper trays contain letter-sized paper andmonarch-sized envelopes.
Leave the other parameters and page down.
Chapter 5. Host Applications Printing to IBM Network Station Local Printer 111

Figure 113. Remote Location Parameter
Remote location (Name or address)In this example, we specify the IP address of the IBM Network Station,but we can also use a host name, such as windy.raleigh.ibm.com.
System driver programWe use \NETSTNDRV. This means that when the AS/400 sends the spoolfile, it knows that it is communicating with an IBM Network Station.
Text 'description'We give the device description a meaningful text description, and pressEnter.
A message at the bottom of the screen informs us that the device description iscreated:
Figure 114. Device Description Created Message
5.4.2.2 Controlling a Printer Writer for the Device DescriptionControlling printing on a IBM Network Station-attached printer when a devicedescription is used is identical to controlling a printer which is physically attached tothe AS/400 using Twinax.
To start the printer, it is necessary to vary it on first, using the VRYCFG orWRKCFGSTS commands.
112 IBM Network Station Printing Guide
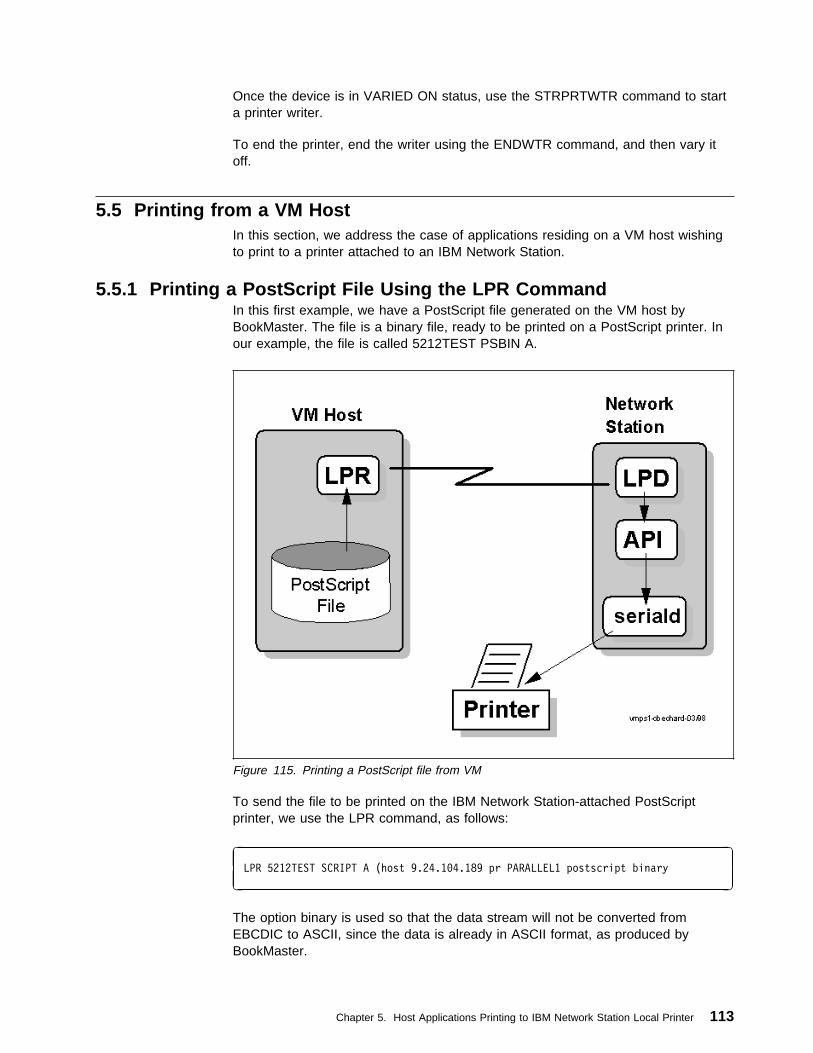
Once the device is in VARIED ON status, use the STRPRTWTR command to starta printer writer.
To end the printer, end the writer using the ENDWTR command, and then vary itoff.
5.5 Printing from a VM HostIn this section, we address the case of applications residing on a VM host wishingto print to a printer attached to an IBM Network Station.
5.5.1 Printing a PostScript File Using the LPR CommandIn this first example, we have a PostScript file generated on the VM host byBookMaster. The file is a binary file, ready to be printed on a PostScript printer. Inour example, the file is called 5212TEST PSBIN A.
Figure 115. Printing a PostScript file from VM
To send the file to be printed on the IBM Network Station-attached PostScriptprinter, we use the LPR command, as follows:
à ðLPR 5212TEST SCRIPT A (host 9.24.1ð4.189 pr PARALLEL1 postscript binary
á ñ
The option binary is used so that the data stream will not be converted fromEBCDIC to ASCII, since the data is already in ASCII format, as produced byBookMaster.
Chapter 5. Host Applications Printing to IBM Network Station Local Printer 113

The option postscript indicates that this is PostScript data.
If we add the TYPE option after the binary option, the following messages aredisplayed in the VM session, indicating the progress of the command.
à ðlpr 5212TEST script a (host 9.24.1ð4.189 pr PARALLEL1 postscript binary type
LPR version V2R4, Internal version id 2.3 PN76ð63
lpr to printer "PARALLEL1" at host "9.24.1ð4.189"
Connected to 9.24.1ð4.189
Data file sent.
Control file sent.
Connection closed.
Ready; T=ð.ð1/ð.ð2 12:44:47
á ñ
Figure 116. Messages on VM Following an LPR Command
Simultaneously, the message log on the network station displays the followingmessages:
à ðNSC62ð1: lpd: Starting.
NSC62ð6: lpd: Print job memory cache size set to 275674ð bytes
(1ð% of free memory).
NSC6218: lpd: Host 192.168.4ð.12ð requests local host to receive a
printer job for queue PARALLEL1.
NSK8ðð1: accepting PARALLELD connection from localhost.itso.ral.ibm.com
NSK65ð1: parallel 1: opened session from 127.ð.ð.1
NSC621ð: lpd: Print job 5212TEST.PSBIN received from host 192.168.4ð.12ð.
NSC6213: lpd: Print job 5212TEST.PSBIN from host 192.168.4ð.12ð printed.
NSC62ð2: lpd: Ending.
á ñ
Figure 117. IBM Network Station Message Log for Print Job from VM
The steps illustrated in the figure above are:
� On receipt of the connection request from the LPR daemon on the VM host,the network station LPD daemon is started.
� The LPD service then issues a message indicating that it will use only 10% ofthe available free memory on the IBM Network Station for the purpose ofstoring the incoming print job. The figure of 10% is the default and can bechanged using the IBM Network Station Manager.
� We then see the address of the requesting host, in this case 192.168.40.120which is our VM host, and the name of the print queue requested.
� The next line (message NSK8001) indicates that the IBM Network Station isaccepting a connection from itself. (localhost is hostname of the local loopbackinterface.) This is an indication that the LPD daemon is making a connectionrequest to the SERIALD daemon, and since both reside in the IBM NetworkStation, the request is made on the loopback interface.
� The next line (message NSK6501) indicates that the parallel1 port of theSERIALD daemon has accepted the connection (from the LPD daemon).
� Finally, the next two lines indicate that the job has been received from the VMhost, and then printed on the local printer.
114 IBM Network Station Printing Guide

5.5.2 Printing a Text File Using the LPR CommandIn this case, we use a simple text file on a VM host, which we created with Xedit,and we want to print it to our local printer attached to the IBM Network Station.
We can also use here the LPR command from the VM command line. However,we must be aware that using the LPR command, each line is terminated with a linefeed (LF) but no carriage return (CR).
Therefore, if we use the LPR command as is, and send the output directly to theIBM Network Station, the output will print as shown in the diagram below, with eachline indented to where the previous line ended. This is because this text file is notprocessed by any program, and it is sent directly to the printer by the receiving anLPD. (Remember that there are no printer drivers on the IBM Network Station andthat the received data must already be in the format expected by the printer.)
Figure 118. Printing a Text File from VM
One way to get around this is to use a program on the host which processes thetext data in the proper format before invoking the LPR program to send it (as wedid in the preceding PostScript example).
Another possible solution is to set the printer Auto CR after LF mode, assumingthat the printer has this capability.
Chapter 5. Host Applications Printing to IBM Network Station Local Printer 115

Another way is to use an intermediate spool system that has been configured witha printer driver corresponding to the printer attached on the IBM Network Station.This is illustrated in the figure below:
Figure 119. Printing a Text File from VM with Intermediate Spool
In the case above, the text data send by the LPR program on the VM host isreceived by the intermediate spooling system, and since it is directed at the queuecorresponding to the printer which is attached to the IBM Network Station, any datain that queue is forwarded to the destination printer on the IBM Network Station, butbefore it is sent, it is processed using the printer driver, thereby adding the requiredcarriage return (CR) at the end of each line.
The text data should then print normally, as expected, because of the extraprocessing by the printer driver.
5.5.3 Printing by Spooling to RSCSInstead of using the LPR command directly from a VM session, it is also possible tospool data to RSCS and let RSCS subsystem then issue the LPR request to aremote LPD server.
This requires an LPR link definition in RSCS, such as the examples below:
116 IBM Network Station Printing Guide

à ðLINKDEFINE NS4ð29 TYPE LPR QUEUE FIFO FO \
PARM NS4ð29 EXIT=LPRXPSE HOST=9.24.1ð4.24ð PORT=515 PR=NS4ð29
LINKDEFINE NSTATION TYPE LPR QUEUE FIFO FO \
PARM NSTATION EXIT=LPRXPSE HOST=9.24.1ð5.189 PORT=515 PR=PARALLEL1
LINKDEFINE IBM4ð29 TYPE LPR QUEUE FIFO FO \
PARM IBM4ð29 EXIT=LPRXONE HOST=9.24.1ð4.24ð PORT=515 PR=IBM4ð29
á ñ
The first link definition is for a PostScript type printer. The EXIT=LPRXPSE is usedindicating that the data is binary. For a TEXT type of link, use EXIT=LPRXONE asin the third definition.
Notice the NSTATION link definition which points to the PARALLEL1 port of anetwork station at 9.24.105.189.
Once these link definitions are in place and activated, the VM user can use thefollowing commands to direct print output to the NSTATION spool queue.
à ðSPOOL PRT TO RSCS
CP SPOOL TAG DEV PRT NSTATION
á ñ
Instead of using the LPR command, the print command then sends the output toRSCS which takes care of issuing the LPR request to the remote print server.
5.6 Printing from an OS/390 HostIn this section, we briefly discuss the case of applications residing on an OS/390host wishing to print to a printer attached to an IBM Network Station.
With the availability of an LPD daemon on the IBM Network Station as of Release 3of the IBM Network Station Manager code, it is now easier for applications residingon an S/390 host to print to an IBM Network Station-attached printer.
Any application or subsytem that supports the LPR/LPD function is able to sendprinted output to a printer attached to an IBM Network Station.
At the moment, there are three main ways to print from VTAM, CICS, IMS and fromthe JES spooling system:
� Using the Network Print Facility (NPF).
� Using NetSpool and IP Printway (recommended).
� Printing to an intermediate spool host, such as AIX, AS/400 or Windows NT toredirect the output to the LPD port on the IBM Network Station.
Chapter 5. Host Applications Printing to IBM Network Station Local Printer 117

5.6.1 Using Network Print FacilityThe Network Print Facility (NPF) is a free feature of TCP/IP V 3.2 that providesbasic LPR support. It can therefore be used to send print data to the LPD daemonon the IBM Network Station.
Note that NPF does not have LPR streaming mode send support, whereas IPPrintway does.
Figure 120. Network Print Facility
5.6.2 Using Netspool and IP PrintwayNetspool and IP Printway are separately orderable products, which are also pricedseparately.
These products have more functionality than NPF and should be considered as therecommended method to print from OS/390.
One of the features of IP Printway, which is not included in NPF, is LPR streamingsupport. With the latest PTF UW46928, IP Printway now supports LPR streamingas defined in the RFC extension of the 1992 proposal. With this newenhancement, IP Printway can use streaming mode to send print data to thenetwork station LPD. This IP Printway enhancement will work on all versions of theOS/390 operating system and is available now.
Note as well that OS/390 V2R5 available March 1998 has an LPD that alsosupports streaming. This function facilitates IBM Network Station LPR clients tosend print data to OS/390 LPD for printing on the host.
118 IBM Network Station Printing Guide

IP Printway also allows you to print directly to the port 6464 of SERIALD daemon ofthe IBM Network Station. However, there should now be little use for that particularfunction since LPD support is now available on the IBM Network Station.
Figure 121. NetSpool and IP PrintWay
For additional details on how to use the LPR/LPD facility in an MVS environment,please see IBM TCP/IP V3 Release 2 for MVS Implementation Guide,SG24-3687-03, Chapter 13 entitled Printing in a TCP/IP Network, from which theabove figures on NOF and IP PrintWay have been taken.
5.7 Printing from an OS/2 HostWith the availability of an LPD daemon on the IBM Network Station as of Release 3of the IBM Network Station Manager code, applications on OS/2 hosts can alsoprint to an IBM Network Station-attached printer using the TCP/IP LPR facility.
Any application or subsytem that supports the LPR/LPD function is able to sendprinted output to a printer attached to a IBM Network Station.
The LPR/LPD support available on OS/2 is somewhat similar to the one availableon Windows NT, in the sense that there are two ways to send jobs to a remoteLPD server:
� Use the command line version of the LPR requester
� Define a printer queue as an LPR port, and spool the data to the local queue,which then uses the LPR to establish a connection to the remote LPD server
Chapter 5. Host Applications Printing to IBM Network Station Local Printer 119

The LPD server on OS/2 can be started either from the command line, at whichtime you can specify a few startup options, or it can be started using INETD whichdoes not allow startup options to be specified. There are a few options available.
For additional details on how to use the LPR/LPD facility in an OS/2 environment,please refer to TCP/IP Implementation in an OS/2 Warp Environment, SG24-4730,Chapter 10 entitled Remote Printing.
120 IBM Network Station Printing Guide

Chapter 6. IBM Network Station Applications PrintingExamples
In this section, we discuss local applications on the IBM Network Station, that wantto print to either a local printer or to remote print servers.
The applications concerned are:
� 3270/5250 emulator
� NC Navigator browser
� Java applications
� VTxxx emulator
Figure 122. IBM Network Station Applications
In summary, the capabilities are as follows, and are illustrated in the diagramabove:
� All applications, except the VTxxx emulator, can select either a local or remoteprinter.
� Java applications and browsers generate only PostScript output. The printerselected by these applications must therefore support PostScript, unless youuse the transform capabilities of another host. See 8.2, “Using the TransformCapabilities of Other Hosts” on page 163 for more details and an example.
� The 3270 and 5250 emulators have the capability to generate either PostScript,PCL or ASCII output.
Copyright IBM Corp. 1998 121

When selecting a printer, the emulator looks at the data type indicated for theselected printer and generates the output according to the data type of theselected printer.
Note that the 3270 emulator only supports Print Screen at this time.
Note equally that these emulators can produce ASCII output and takeadvantage of DBCS conversion capabilities. See Chapter 11, “DBCSConsiderations” on page 225 for more details.
� The VTxxx emulator does not use the print APIs but sends its output directly tothe SERIALD daemon. There is a way to send output to a printer on a remoteIBM Network Station; see Appendix B, “Printing from the VTxxx Emulator to aRemote IBM Network Station” on page 233 for details.
6.1 Printing from the 3270/5250 EmulatorIt is possible to make screen prints (printing of the presentation space of anemulator session) in two ways:
� Using the print screen function on the host to which the user session isconnected.
This means sending a request to the host, using a Print Screen request, so thatthe host is the one that prints the content of the presentation space.
When remapping the emulator keyboard, this function is called, PrintSystem().
Note that the printer queue selected on the host to receive the output of thePrint Screen operation can be defined to route the output to any remote printer,including the one attached to the IBM Network Station from which thecommand is issued.
� Printing the screen through the local IBM Network Station print process.
This means asking the local processor to print the content of the presentationspace.
When mapping the emulator keyboard, this function is called PrintScreen().
In this case, as illustrated in the diagram below, the output can also be routedto a local printer, or it can be sent to a remote printer through the LPRDfunction.
122 IBM Network Station Printing Guide

Figure 123. Print Screen Function
When printing on the host, it is necessary to ensure that the host is correctlyconfigured. For example, on the AS/400, the Print Key Output will use theQSYSPRT printer file to decide which output queue the screen print will be spooledon.
When printing screens locally on the IBM Network Station, the user is prompted tochoose printer settings, such as Orientation and/or Form Feed, as shown in thefigure below:
Chapter 6. IBM Network Station Applications Printing Examples 123

Figure 124. 3270/5250 Emulator Print Dialog
The user may also select a different printer, by clicking the Select a Printer button.
The emulator produces either a PostScript, PCL or ASCII data stream, dependingon the value set in the printer table, either ps, pcl or asc. This value isautomatically picked up when a user selects a printer in the Printer Selector and isconfigured by the administrator using the IBM Network Station Manager. SeeChapter 4, “Configuration Using the IBM Network Station Manager” on page 47 fordetails on how to configure printers.
If the selected printer is ASCII and DBCS conversion is required, see Chapter 11,“DBCS Considerations” on page 225 for additional details on DBCS.
Select a PrinterThis shows the printer that is currently selected. If the button isselected, the Printer Selector is displayed, and a different printer may bechosen. The Printer Selector is discussed in more detail below.
OrientationThis specifies the page orientation to use, either landscape or portrait.
Form FeedThe Form Feed option is only used for printers defined as PCL or ASCII.(To see how to define a printer as an ASCII or PCL printer, please see4.2, “Adding Printers to the Printer List” on page 53.) If the Form Feedparameter is set to Yes, then a Form Feed is issued at the end of theprintout.
Form Feed is a command that can be sent to the printer. On a laserprinter, the Form Feed command tells the printer that all the data for thepage has been received, and that the page can be printed.
If a laser printer does not receive a Form Feed command, it may displaya status of Waiting, and a button on the printer needs to be pressed inorder to print the page.
124 IBM Network Station Printing Guide

For example, on the IBM 4029, the printer displays ð2 Waiting PCL5
and it is necessary to press the Print Buffer button on the printer to getthe printer to continue.
On a line printer, the Form Feed command tells the printer to advancethe continuous paper to the start of the next page.
PrintThis accepts the print settings, and causes the emulator to print to theselected printer.
CancelIgnore the changes that were made, and return to the emulator withoutprinting.
Figure 125. Printer Selector
6.1.1 3270 Emulator Printing FunctionsThe 3270 emulator available with the Release 3 level of the IBM Network Stationsupport enables Print Screen Support only (as illustrated in Figure 123 onpage 123).
TN3270E support for LU1/LU3 printing is currently planned for a follow-on release.
In the meantime, until the TN3270E functions become available, one possibletemporary solution might be to use the NetSpool and IP PrintWay products tointercept the VTAM LU1/LU3 traffic, convert it to ASCII and send it to an IBMNetwork Station via the LPR client.
Chapter 6. IBM Network Station Applications Printing Examples 125
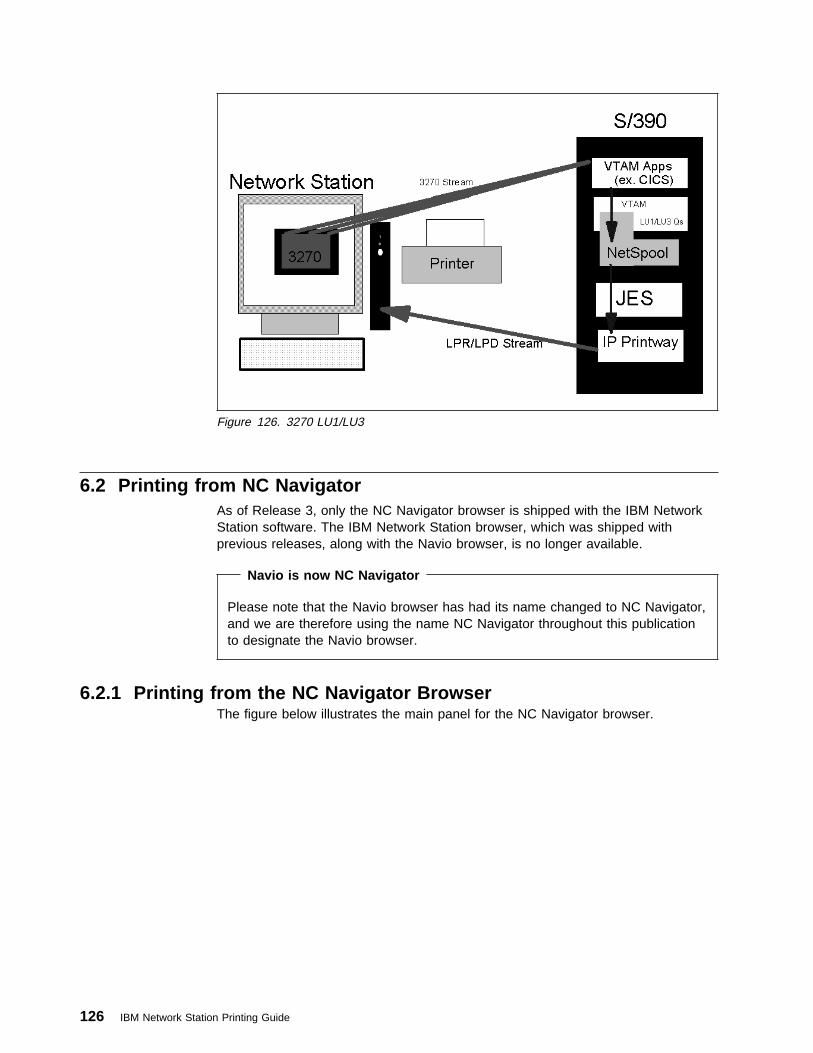
Figure 126. 3270 LU1/LU3
6.2 Printing from NC NavigatorAs of Release 3, only the NC Navigator browser is shipped with the IBM NetworkStation software. The IBM Network Station browser, which was shipped withprevious releases, along with the Navio browser, is no longer available.
Navio is now NC Navigator
Please note that the Navio browser has had its name changed to NC Navigator,and we are therefore using the name NC Navigator throughout this publicationto designate the Navio browser.
6.2.1 Printing from the NC Navigator BrowserThe figure below illustrates the main panel for the NC Navigator browser.
126 IBM Network Station Printing Guide

Figure 127. The NC Navigator Browser
Note that the NC Navigator browser is only capable of printing using the PostScriptdata stream.
When you use the File pull-down and select Print , the NC Navigator Browser'sPrint dialog is displayed, as shown in the figure below:
Chapter 6. IBM Network Station Applications Printing Examples 127

Figure 128. The NC Navigator Browser Print Dialog
Here are a few details on the parameters:
Print To:This gives us the choice between printing to a printer, or printing to afile. If File is specified, the name of the file to be created must beentered.
Printer NameThis shows which printer will be used, shown in the formprinter_queue_name@print_server. It is possible to click on the SelectPrinter... button to choose a different printer using the standard IBMNetwork Station Printer Selector.
File NameThis is used when Print To: File is selected. It specifies where the fileshould be created. This field is greyed out until the Print To: option isset to File. It is possible to use the associated Browse button to bringup a dialog box which allows the user to point and click to choose wherethe file will be created.
Print First/Last Page FirstThis specifies which page of output should come out of the printer first.This is useful for printers that stack pages face up. Depending on theprinter used, this can be set to ensure that the printed pages are in thecorrect order, when the printing is completed.
OrientationThis specifies whether portrait or landscape paper orientation is to beused.
Print Greyscale or ColorThis specifies whether the PostScript data stream generated will beprepared for a color printer. If there is only a monochrome printeravailable, then Grayscale is a more efficient choice because thegenerated output is smaller.
Paper SizeThis specifies the paper size that the PostScript data stream will begenerated for.
128 IBM Network Station Printing Guide

NC Navigator remembers the paper preference for a user in the NCNavigator file for that user, so that when the user next uses the printfunction, the print preference can be recalled. These settings areremembered, even if the IBM Network Station is rebooted and the userlogs back in, because they are stored in a file on the boot server.
The Print button is used to print the data. Cancel is used to cancel the printoperation.
6.2.1.1 Printing from Navio (Prior to Release 3)Prior to Release 3, the NC Navigator browser print dialog was fairly similar exceptthat it did not have the ability to select a printer. The printer choice was hardcoded as local printer, as shown below:
Figure 129. The NC Navigator Browser Print Dialog in Release 2
6.2.2 Printing from the IBM Network Station BrowserThe IBM Network Station Browser was an additional browser that could be usedinstead of the NC Navigator browser in releases prior to Release 3. This browsersupported PostScript printing on the local parallel port.
Note - IBM Network Station browser is not shipped in R3
Please note that the IBM Network Station browser is no longer shipped as ofRelease 3. However, we mention it here for the sake of completeness and forthose users that might still operate at a release prior to Release 3.
The IBM Network Station browser had a print dialog which was substantiallydifferent from the NC Navigator browser. Below is the representation of the IBMNetwork Station print dialog in Release 2:
Chapter 6. IBM Network Station Applications Printing Examples 129

Figure 130. The Network Station Browser Print Dialog
There is a button labeled Printers under the caption Current Printer: Local parallelattached printer. Clicking on that button brings up an additional panel entitledPrinter List on which there is only one choice, which is Local parallel attachedprinter as shown below.
Figure 131. The Network Station Browser - Printer List
6.3 Printing from Java ApplicationsThis chapter briefly outlines the way in which Java applications print on the IBMNetwork Station.
This chapter is not intended to be a guide to writing Java applications that print.For detailed information regarding printing in Java, the reader should refer to Javareference information, such as The Java AWT Reference from O'Reilly, by John
130 IBM Network Station Printing Guide

Zukowski and the Sun Java Web sitehttp://java.sun.com/products/jdk/1.1/docs/guide/awt/designspec/printing.html.
Printing in Java was introduced in Java 1.1.
The Java implementation on the IBM Network Station uses the same method asother Java implementations. The IBM Network Station-specific print APIs areautomatically be used without any IBM Network Station-specific code beingrequired in the Java application.
By using the APIs, the standard Java Print Dialog and the IBM Network StationPrint Selector are used. Using the Print Dialog and Printer Selector means that theprinting interface is consistent across Java applications, and therefore makes theuser interface for the applications more intuitive.
Below is a representation of the Print Dialog which gets presented to the user whenprinting from a Java application:
Figure 132. Print Dialog on IBM Network Station
CopiesThis specifies the number of copies to be printed.
Print toThe user can choose between:
� Printing to a Printer.
Chapter 6. IBM Network Station Applications Printing Examples 131

The default printer that will be used is shown. If we wish to selectanother printer, we can click on Browse to start the Printer Selector.The Printer Selector is discussed in 3.4.2, “The Printer Selector” onpage 34 below.
� Printing to a File.
If Print to File is used, then we must specify the path and name forthe file to be created, and we must ensure that the File Serviceshave been correctly configured on the IBM Network Station to allowaccess to a remote file server.
If Print to File is selected, the Copies, Printer and Banner Page Titleoptions are grayed out to indicate that these are ignored.
Banner Page TitleWe can use this to specify the title used for printing banner pages.
Print Command OptionsThis is currently grayed out.
It is only included to retain a consistent look and feel with the UNIX JavaDevelopers Kit Print Dialog. The IBM Network Station does not use thePrint Command Options field.
Paper SizeThis is used to decide what paper size will be used. It is currentlypossible to specify Letter, Legal, Executive and A4.
OrientationWe can use this to determine which page orientation to use.
There are two buttons at the bottom of the Print Dialog, Print and Cancel.
� Print produces the requested print, and then returns the user to the application.
� Cancel cancels the print operation, and then returns the user to the application.
Figure 133. Printer Selector on IBM Network Station
In addition, using the Printer Selector means that users have the ability to print toany of the printers that have been made available to them by the administrator.They can print to local or remote printers.
132 IBM Network Station Printing Guide

All printing using Java generates a PostScript data stream on the IBM NetworkStation.
Page layout is the responsibility of the application, not the IBM Network Station.This is the same in all implementations of Java.
Note that Java applications do not have any restrictions, security-wise, when itcomes to printing. However, printing from applets instead of applications does comewith some restrictions.
This is because applets are usually loaded over the network and are thereforeconsidered to be untrusted. For this reason, Web browsers and applet viewersrestrict what an applet is allowed to do. For example, one of the restrictions is thatthey are prevented from creating print jobs, as they would have the ability to printanything to the printer. This is a restriction imposed by the Java APIs, not by theIBM Network Station implementation.
In Java 1.1 however, you can get around these restrictions by using a digitalsignature on the JAR file, which is an archive file that contains the applet orapplets. When a JAR file is signed by a trusted entity (the user specifies what is areliable source), the applet may then be allowed to perform operations, such asprinting, that are not available to unsigned applets.
A Java application can be written to keep the printer settings used, by storing thereturned data from the print function. This enables an application to rememberwhich printer and paper size and orientation it last used, and to store thisinformation. Next time the user signs on to the application, he or she can retrievethese settings, and set them as the defaults for the next print request. This can beextremely useful in countries that use A4 paper; the user only has to change theLetter paper size to A4 once, and the application stores this setting as the default.
6.3.1 An Example of a Java Program That PrintsThe following example illustrates how the IBM Network Station print APIs are calledautomatically by the Java implementation. It is not intended to explain how toimplement printing in a user-written Java application.
This small Java program (for which we supply the source code below) displays awindow with a Print button, as shown here:
Figure 134. SimplePrint - Sample Java Application Window
When users click on the Print button, they see the Print Dialog, and from here areable to browse the printers and select the desired printer.
Chapter 6. IBM Network Station Applications Printing Examples 133

The output for the printer is produced in PostScript. Here is what the output lookslike when printed on an IBM 4029 printer:
Figure 135. SimplePrint Sample Output - IBM 4029 Printer
When the output is printed, it is possible that some of the output may be missingnear the edge of the page, as it appears in the figure above. This is due tounprintable borders that are a limitation of the printer used, and the size of theunprintable borders vary between different models of printer. Unprintable bordersare an effect of the hardware design of the printer.
Note that it is the responsibility of the Java application developer to take intoaccount the unprintable area. Advanced Java applications, such as eSuite forexample, take the unprintable area into account and produce high quality printoutput from Java.
In fact, if the same output was sent to a file instead of directly to the printer, andthen the output is examined with a program like GSView32 for example, the outputlooks like it should normally, as illustrated below. This is also how it prints whenprinted on an IBM3130 printer for example.
Figure 136. SimplePrint Sample Output - Print to File
Here is the source code for the very simple Java program called SimplePrint whichwe used to test printing from Java on the IBM Network Station, as we justillustrated above:
134 IBM Network Station Printing Guide

import java.awt.\;
import java.awt.event.\;
public class SimplePrint extends Frame {
Button printButton, closeButton;
public SimplePrint() {
add(new Label("A Simple Java Printing Application"), "North");
add(printButton = new Button ("Print"), "West");
printButton.addActionListener( new PrintCommand() );
add(closeButton = new Button ("Close"), "East");
closeButton.addActionListener( new CloseCommand() );
pack();
}
public static void main (String args[]) {
SimplePrint sP = new SimplePrint();
sP.show();
}
class CloseCommand implements ActionListener {
public void actionPerformed (ActionEvent e) {
System.exit (ð);
}
}
class PrintCommand implements ActionListener {
public void actionPerformed (ActionEvent e) {
PrintJob pjob = getToolkit().getPrintJob(SimplePrint.this, "Simple Print", null);
if (pjob != null) {
Graphics pg = pjob.getGraphics();
if (pg != null) {
printAll(pg);
pg.dispose();
}
pjob.end();
}
}
}
}
Figure 137. A Sample Java Print Program
6.4 VTxxx EmulatorThe VTxxx emulator that you can use to telnet to another host for example allowsthe user to print a copy of the presentation space or a selected portion of thepresentation space to the local serial or parrallel printer.
These choices are available on the File pull-down on the emulator menu bar, andthe output is ASCII only.
However there is a way to configure an entry on the pull-down menu of the VTxxxemulator in order to send output to a printer attached to a remote IBM NetworkStation. See Appendix B, “Printing from the VTxxx Emulator to a Remote IBMNetwork Station” on page 233 for an explanation and example of this function.
Chapter 6. IBM Network Station Applications Printing Examples 135

6.5 Printing from Lotus eSuiteThe Lotus eSuite application is a Java application and therefore uses the standardJava classes for printing. Therefore, all considerations applicable to Javaapplications also apply to eSuite.
136 IBM Network Station Printing Guide

Chapter 7. Printing from an IBM Network Station to RemotePrint Servers
This chapter explains the preparations required on remote hosts in order to receiveprint requests generated by applications on an IBM Network Station.
Print requests received from an IBM Network Station can be printed to printerslocally attached to the remote print servers, as illustrated in the figure below:
Figure 138. Printing to Remote Print Servers
However, note that all these systems also have the ability to have printers queuesdefined that represent printers located on other remote print servers. Therefore, aprint job can be spooled locally on a remote print server, and then re-routed to afurther remote print server. An example of this situation is provided in Chapter 8,“Practical Examples” on page 161.
Generally, to print from the IBM Network Station to a remote system, it is necessaryto:
1. Ensure that an LPD daemon is started on the remote system.
Since the IBM Network Station uses LPR requests to send print jobs to remotehosts, any host that runs an LPD daemon is able to receive print requests fromthe IBM Network Station.
2. Ensure that the remote system is configured to accept print requests (accesscontrol) from the sending IBM Network Station.
On some host systems, it is possible to control access to the LPD daemonbased on an IP host name for example. However, if such an access in not a
Copyright IBM Corp. 1998 137

configurable item, then basically any remote host is allowed to send printrequests.
3. Know the queue name on the remote system of the printer to be used as atarget printer.
Most systems define in their print subsystems, multiple logical printers orqueues. These queue or printer names must be specified in the print jobrequests in order for the target system to route output to the appropriate printer.
4. Know the IP address or Host Name of the remote print server.
5. Configure remote printers using the IBM Network Station Manager so that theyappear in the Printer Selector panel on the IBM Network Station where the userchooses a target remote printer.
7.1 Printing to a Windows NT ServerSince the IBM Network Station is using LPR requests to send print requests toremote hosts, a Windows NT server destined to function as a print server musthave the TCP/IP Printing Services installed in order to accommodate LPR requests.
In addition, the LPD Service must be started and active in order to listen forincoming LPR requests.
7.1.1 Is the LPD Installed and Running?You can verify that the LPD daemon is installed and running on the Windows NTsystem by verifying its status in the active services. To display the Services panel,select Start →Settings →Control Panel →Services .
Figure 139. The Windows NT Services Window - TCP/IP Print Server
If TCP/IP printing is installed, a TCP/IP Print Server entry appears in the Serviceslist, as illustrated in the figure above.
However, it may be that the TCP/IP print services are installed but that the LPDdaemon (print server) has not been configured to start automatically, or has beenshut down.
138 IBM Network Station Printing Guide

If the status is not indicated as Started, then select the TCP/IP Print Server entryand click on Start . It is also possible to ensure that the TCP/IP print server startsautomatically at Windows NT boot time by selecting the Startup... button, andselecting a Startup Type of Automatic in the Service dialog box.
If the Services panel does not have a TCP/IP Print Server entry, then you need toinstall the TCP/IP Print Services. The procedure for installing this component isdescribed in 5.2.1, “Installing TCP/IP Printing Services” on page 72.
7.1.2 Verifying Access Authority to PrintersBy default, in Windows NT, printer access permissions are set so that everyonehas access. Permission is granted on a per user (NT user) basis or per group (NTgroup) basis.
It is possible to set the Everyone permission to No Access, in which case all LPRrequests, no matter where they originate from, will be accepted. However, it is notpossible to restrict access to a particular print queue on a hostname basis.
7.1.3 Choosing the Windows NT Printer Queue to Receive PrintTo see which printers are available to use on the NT server, selectStart →Settings →Printers to display the window containing all the printers definedon the system.
The names appearing under the icons represent both the printer name and thequeue name since in Windows NT a printer is a queue.
In this window, we can see all of the available printer queues. We need to make anote of the printer/queue name to which we want to send print to; note that thespaces in the printer/queue name are to be specified as is when using that queuename in the definitions on the IBM Network Station. When selecting a queue,remember that the IBM Network Station applications usually generate PostScriptdata and that a PostScript-capable printer must therefore be selected.
7.1.4 Adding a New Printer to a Windows NT ServerIf there is a need to add a new printer/queue to a Windows NT system, click onStart →Settings →Printers and click on the Add Printers icon, which starts theAdd Printer Wizard. On the first panel, a selection is made as to whether this is alocal printer or a network printer.
Chapter 7. Printing from an IBM Network Station to Remote Print Servers 139

Figure 140. Add Printer Wizard
Select My Computer , which is the default, and you are presented with a list ofports to select.
Figure 141. Select a Printer Port
In this case, this is a local printer attached to the parallel port so we select LPT1and click on Next , which displays the panel to select a specific printer type.
140 IBM Network Station Printing Guide

Figure 142. Select a Printer Type
In this case, we select an IBM 4029LaserPrinter. Since this is a printer type forwhich we already had a driver installed, we get a question as to whether we wantto keep the same driver, to which we reply Yes.
The next panel asks us to name the printer. This is the name that is specified byremote LPR requesters as the target queue name when they want to send printeroutput to this printer.
Chapter 7. Printing from an IBM Network Station to Remote Print Servers 141

Figure 143. Name the Printer/Queue
You can also specify here whether that printer is now the default printer on thismachine. We selected No.
The next panel is to specify whether we want to make this printer available on thenetwork as a shared printer. We reply No because we intend to make this printeravailable through the TCP/IP LPD service as opposed to using the NetBEUI facility.
Figure 144. Shared Printer
142 IBM Network Station Printing Guide

This task of defining a new printer is basically completed. You get asked if youwant to print a test page. We select No, and the printer gets added to our Printersfolder.
That procedure was for a local parallel port attached printer. If you want to define anetwork printer instead, select Network Printer Server on the first Add PrinterWizard panel (Figure 140 on page 140), which then presents you with the followingpanel:
Figure 145. Adding a Network Printer
Here, you have a choice of directly entering the name of the network printer, if it isknown, in the Printer field. This has the format \\servername\printername. In thisexample, we chose the IBM4029 printer defined on the NSTATIONSERVERmachine.
The other alternative is wait for Windows NT to expand the list (assuming theExpand by Default check box is selected) and to display a list of shared printers onthe network.
Notice that our IBM4029 appears in the list. It has a share name of IBM4029CBand is located on the NSTATIONSERVER machine in the NSTATIONDOMAINdomain. Selecting it automatically fills the Printer field with the correct networkname.
Notice that this share name is what you were being asked about when we defineda local printer in the previous example. If we had indicated that we wanted thisprinter shared, and specified a share name of IBM4029XX, then this printer would
Chapter 7. Printing from an IBM Network Station to Remote Print Servers 143

appear in this list under the name \\servername\IBM4029XX when other machineson the network search for shared printer resources.
This printer is then added to the Printers folder with the name IBM4029 onNSTATIONSERVER.
7.2 Printing to an OS/400 HostIf the target printer chosen on the IBM Network Station by the user resides on anOS/400 system, you can verify that the AS/400 system is ready to receive theserequests with some of the following tasks.
7.2.1 Is LPD Active on the AS/400?To check whether the OS/400 system is ready to accept LPR requests from remotesystems, we need to verify that an LPD daemon is active. This is accomplished byverifying that an LPD job is running.
The LPD jobs are named QTLPDxxxxx, where xxxxx is a unique number. Thesejobs run in the QSYSWRK subsystem. To see if there are any of these jobsrunning, enter the command WRKACTJOB SBS(QSYSWRK).
This brings up the Work with Active Jobs screen, and shows all of the jobs runningin the QSYSWRK subsystem. We can then page down through the list of jobs andcheck that there is a QTLPDxxxxx job running. In the figure below, we can seefour LPD jobs waiting, which are the last four jobs in the list:
There are multiple jobs running here because there are multiple LPD servers.Additional servers can be started specifically or they can be automatically startedby the OS/400 as required.
Figure 146. Work with Active Jobs, Showing QTLPDxxxxx Jobs Running
144 IBM Network Station Printing Guide

7.2.2 Starting the LPD on the AS/400There are two ways of starting the LPD on the AS/400:
� Using Start TCP/IP Server (STRTCPSVR), to start the LPD only.
� Using Start TCP/IP (STRTCP), to start TCP/IP services, including the LPD.
7.2.2.1 Starting TCP/IP Server (STRTCPSVR)The LPD server can be started from the command line, using the STRTCPSVR*LPD command.
7.2.2.2 Starting TCP/IP (STRTCP)We can configure the LPD to start automatically whenever the STRTCP commandis used. The advantage of doing this is that STRTCP is normally incorporated intothe startup program on the AS/400, so that it starts automatically at Initial ProgramLoad (IPL).
On the command line, type CFGTCP and press Enter to reach the Configure TCP/IPscreen. From this screen, select option 20, Configure TCP/IP applications whichbrings up the Configure TCP/IP Applications screen. Then choose option 13 toChange LPD Attributes , which displays the following panel:
Figure 147. Changing LPD Attributes
We see two attributes, Autostart servers and Number of initial servers. We can setAutostart servers to \YES in order to specify that LPD jobs should start automaticallywhen STRTCP is run. The Number of initial servers is used to specify the numberof LPD servers to start when the STRTCP command is executed. This can be setat a low value since OS/400 automatically starts extra LPD jobs if it determines thatthey are needed. In this example, we have set Number of initial servers to 2.
Once this has been configured, the STRTCP command starts LPD with the numberof jobs we specified.
Chapter 7. Printing from an IBM Network Station to Remote Print Servers 145

7.2.3 Verifying Access AuthorityThere isn't a way, in OS/400, to control access to the LPD daemon based on ahost's IP hostname (at least not as far as we could determine).
7.2.4 Choosing the AS/400 Output Queue to Receive Print RequestsWhen the IBM Network Station sends output to the AS/400 using the LPR, it mustspecify the AS/400 output queue in which the output should be placed.
To see a list of all of the available output queues on the AS/400, type WRKOUTQ \ALL
and press Enter, which displays a panel similar to the one shown below:
Figure 148. Work with All Output Queues
Simply make note of the appropriate queue that you want to use and specify thatname in the remote printer entries that you configure in IBM Network StationManager.
7.2.5 Adding a New Printer to the AS/400If the OS/400 does not have the type of printer queue that you need, you can addsuch a queue to the system if required.
The AS/400 supports many different printers, with many different connections and itwould be impractical to include instructions for adding all the different possibletypes of printers here. However, we include a simple example here as a generalguide.
The following example shows how to add a device description for an IBM NetworkPrinter 17 attached to a token-ring network. This example is specific to an IBMNetwork Printer, and will not work for other models of printer, but it gives an idea ofthe steps involved to add a printer.
146 IBM Network Station Printing Guide

More information on this topic can be found in AS/400 Printer Device Programming,SC41-5713 and in AS/400 Printing V, SG24-2160.
The IBM Network Printer used in the example has a host name ofastnp17.havant.ibm.com and is loaded with A4 paper.
Type CRTDEVPRT and press F4 to bring up the Create Device Desc (Printer) screen.Enter the values below for the fields shown. Leave all of the other parameters asthe defaults.
Device descriptionThis is the name which will be given to the printer. In this example, wehave used HAVANTNP17.
Device classThis is the type of connection used for the printer. For a printerattached to the token-ring we use \LAN.
Device typeWe use 3812. For an explanation of why we use this value, please see5.4.1.2, “Creating a Dummy Device Description” on page 104.
Device modelWe use 1.
LAN attachmentWe are using TCP/IP, so we use \IP for this value.
Port numberThis is the IP port number for the Printer Job Language (PJL) interface.In the case of the IBM Network Printer, this is port 25ð1.
Font Identifier and Point SizeWe use 11. For an explanation of why we use this value, please see5.4.1.2, “Creating a Dummy Device Description” on page 104.
Form feedThe IBM Network Printer uses trays of cut sheet paper, so we use\AUTOCUT.
Chapter 7. Printing from an IBM Network Station to Remote Print Servers 147

Figure 149. Create Device Desc (Printer) - 1 of 3
Activation timerThe amount of time in seconds to wait for the device to respond. If itdoes not respond in this time, an error will be generated. We use thedefault value of 17ð.
Inactivity timerThe amount of time the AS/400 will keep a connection to the printerwhen it has finished printing all the jobs on the printer queue. We usethe value of \SEC15 for 15 seconds.
Host Print TransformThis value determines whether EBCDIC spool files (such as, SCS andAFPDS) should be converted into ASCII by the AS/400. In thisexample, we use \YES.
Manufacturer type and modelWe use the value for the IBM Network Printer 17, which is \IBM4317.
Paper source 1 and 2The printer is loaded with A4 paper, so we specify \A4.
Image configurationThis specifies the type of data stream which this queue should produce.
In this example, we are using an IBM Network Printer 17 which supportsPCL at 600 DPI, so we use \IMGAð2. For a more detailed explanation ofthe Image configuration parameter, please see 7.2.6, “Data StreamConversion on the AS/400” on page 150. By specifying this value, weenable a feature of the AS/400 which converts printer data streams. IfPostScript data is sent to this queue, it can be converted to PCLautomatically by the AS/400.
148 IBM Network Station Printing Guide

Figure 150. Create Device Desc (Printer) - 2 of 3
Remote locationThis is the IP address or the host name of the printer. In this example,it is astnp17.havant.ibm.com.
System driver programTo control an IBM Network Printer, we use \IBMPJLDRV.
Text 'description'This is a meaningful description of the printer. In this example, we useIBM Network Printer 17 in Havant.
Figure 151. Create Device Desc (Printer) - 3 of 3
Chapter 7. Printing from an IBM Network Station to Remote Print Servers 149

Once the device description is created, it is necessary to vary it on, using eitherVRYCFG or WRKCFGSTS. For example:
VRYCFG HAVANTNP17 \DEV \ON
Once it is varied on, the print writer must be started using STRPRTWTR. Forexample:
STRPRTWTR HAVANTNP17
If it is necessary to turn the printer off, we end the writer, using ENDWTRHAVANTNP17, and then vary the printer off, using VRYCFG HAVANTNP17 *DEV*OFF.
7.2.6 Data Stream Conversion on the AS/400At the OS/400 R420 and later, the system can perform some conversions on thedata stream. For example, the AS/400 can convert PostScript Level 1 to the IPDSor PCL data streams.
This is particularly useful when using the IBM Network Station, as most IBMNetwork Station applications can only generate PostScript output. Using the imageprint transform functions, it is possible to use existing AS/400 printers, instead ofupgrading to PostScript-capable printers. It is also possible to use the AS/400 toconvert spool files, to be sent on to other systems.
It is possible to convert spool files created on the AS/400 or which have beencreated on another system and then sent to the AS/400. Once the conversion hasbeen performed, it is possible to print to an AS/400 printer, or to send theconverted spool file to another system to be printed.
In brief, the transform can be specified by setting the parameters in the devicedescription or remote output queue on the AS/400. For example, to change adevice description to convert PostScript to PCL5, we change the followingparameters on the device description:
Host Print TransformThis must be set to *YES to enable the transformation of spool files onthis queue.
Image configurationThis value is used to determine what the data will be transformed to.There are many possible values for this parameter, and for eachdifferent model of printer, we need to select the correct value. Ingeneral:
� *IMGA01 - *IMGA09 are for PCL printers.
� *IMGB01 - *IMGB15 are for PostScript printers.
� *IMGC01 - *IMGC11 are for IPDS/AFP printers.
� *IMGD01 - *IMGD11 are for printers which support PCL andPostScript.
For a complete list of all of the Image configuration objects, please seeAppendix A, “Special Values of Image Configurations (AS/400)” onpage 229, AS/400 Printer Device Programming, SC41-5713, andAS/400 System API Reference, SC41-5801.
150 IBM Network Station Printing Guide

As an example, *IMGA02 would be used for 600-DPI PCL printers, suchas:
� HP LaserJet 4, 5 and 6
� IBM Network Printer 12, 17 and 24
� Lexmark Optra S
� Xerox 4230 DocuPrinter
In the following screen we are changing an existing output queue to an IBMNetwork Printer 17. We are specifying Host Print Transform as \YES and Imageconfiguration as \IMGAð2:
Figure 152. Changing Remote Output Queue to Allow Conversion from PostScript to PCL
For more information on Image Print transform, please refer to IBM AS/400 PrintingV, SG24-2160.
7.3 Printing to an AIX HostIf the target host for an LPR request from the IBM Network Station is an AIX host,the following tasks can be accomplished on the AIX system to verify that therequired facilities are available.
7.3.1 Is the LPD Active on AIX?To verify that an LPD server is running on AIX, start System Management andchoose Print Spooling .
The System Management program is started by typing smit or smitty at thecommand line, and pressing Enter. From the Print Spooling screen, chooseManage Print Server and then Show Status of the Print Server Subsystem .This brings up a screen, such as the one displayed in the next figure, where wecan check that the status of the LPD:
Chapter 7. Printing from an IBM Network Station to Remote Print Servers 151

Figure 153. Show Status of the Print Server Subsystem
7.3.2 Starting LPD on AIXIf the LPD job is not active, it can be started from the Manage Print Server panelusing the Start the Print Server Subsystem (lpd daemon) option.
7.3.3 Verifying Access to AIX PrintersTo ensure that the IBM Network Station is granted access to the AIX system inorder to send print requests, type smit and select Print Spooling in the SystemManagement program which displays the choices shown below:
Figure 154. Print Spooling Menu
152 IBM Network Station Printing Guide

Select Manage Print Server , which displays the following menu:
Figure 155. Manage Print Server Menu
Select List all Remote Clients with Print Access to bring up a panel where wecan verify that the IBM Network Station is listed as a client that has print access toAIX. In the example below, there is only one entry (itsonct1.itso.ral.ibm.com).
Figure 156. List of Remote Clients
Chapter 7. Printing from an IBM Network Station to Remote Print Servers 153

7.3.4 Enabling Print Access on AIXIf the IBM Network Station is not listed in the list of clients that have been grantedprint access, you can add an entry by selecting the Add Print Access for aRemote Client option on the Manage Print Server menu.
Figure 157. Add Print Access for a Remote Client
Simply enter the host name of the client being granted access.
7.3.5 Choosing the AIX Printer Queue to Receive Print RequestsTo find out which printer queues exist on AIX, start smit, and choose PrintSpooling , and from the Print Spooling panel select List All Print Queues . Thisbrings up a screen with a list of all the print queues, as illustrated below:
154 IBM Network Station Printing Guide

Figure 158. List All Print Queues
From this list, choose a PRINT QUEUE name and use that name in IBM NetworkStation Manager as the queue name of a remote printer definition.
7.3.6 Adding a New Printer to the RS/6000If the print queue you wish to use is not in the list of available queues, you can adda printer queue to the AIX system with the following procedure.
Go back to the Print Spooling menu and select Add a Print Queue . You get apanel on which you need to select the attachment type.
Figure 159. Local Attachment Type
Chapter 7. Printing from an IBM Network Station to Remote Print Servers 155

Say we want to define an IBM 4039 Laser Printer attached to the parallel port.Select the attachment type as Local , and you get a list of printer types, as shownbelow:
Figure 160. Printer Types
In this case, select IBM and you get a list of different printers to choose from.
Figure 161. Printer Selection
Select the IBM 4039. At this point, if the proper software to support this printer isnot installed, you are asked if you want to proceed with the installation of therequired software. You must have access to the source files for these printerdrivers and you can follow the instructions for the installation.
If the proper drivers are already installed, you are asked for the interface to whichthe printer is attached.
156 IBM Network Station Printing Guide

Figure 162. Interface Selection
In our example, we choose Parallel , which brings up the next panel asking for theparent adapter.
Figure 163. Parent Adapter
There is only one choice so we press Enter to get the next panel.
Chapter 7. Printing from an IBM Network Station to Remote Print Servers 157

Figure 164. Entering a Print Queue Name
Since this printer supports both PostScript and PCL, we have entered a queuename for each of these options. We used the names IBM4039PS for the PostScriptqueue and IBM4029PCL for the PCL queue.
Pressing Enter displays a panel that shows the command to create the queue isrunning. When it completes, the printer we just added shows as Added printer lp0along with the two queue names we created for this local printer.
Figure 165. Printer Queue Added
The queue names of IBM4039PS and IBM4029PCL can now be used as targetqueues when defining remote printers in the IBM Network Station Manager.
158 IBM Network Station Printing Guide

7.4 Printing to an OS/2 Host
7.4.1 Is the LPD Active on OS/2?You can verify if the LPD is running on OS/2 by either looking at the tasks list tosee if there is an LPD.EXE started, or you can issue the netstat - s command andlook to see if the LPD service is listening on port 515.
7.4.2 Verifying Access Authority to the LPDThe OS/2 system does not have a facility to restrict access to the LPD serverbased on the host name requesting the print job.
7.4.3 Starting the LPD on OS/2The LPD service on OS/2 can be started from the command line using an LPDcommand. Issue lpd -? for the available options.
The LPD service can also be started using INETD, in which case startup optionsare not available.
7.4.4 Choosing the OS/2 Print Queue to Receive PrintThe printers available to the LPD daemon are all the printers defined in OS/2. Tosee which printers have been defined, open the Connections folder and the Printersfolder. The name that should be used on the requesting LPR is the physical nameof the printer. This is the name that appears in the Physical Name field when youopen up Properties of the printer.
7.5 Printing to an S/390 HostFor details on how to use the LPR/LPD facility in an MVS environment, please seeIBM TCP/IP V3 Release 2 for MVS Implementation Guide, SG24-3687-03, Chapter13 entitled Printing in a TCP/IP Network.
Chapter 7. Printing from an IBM Network Station to Remote Print Servers 159

160 IBM Network Station Printing Guide

Chapter 8. Practical Examples
This section deals with some examples where we address considerationsassociated with the fact that the IBM Network Station does not have any spoolingcapabilities or in fact any local disk storage capabilities.
In some cases, implementation can be made in such a way as to take advantage ofthe capabilities of other hosts to enhance the printing capabilities of the IBMNetwork Station user.
We describe here some of these considerations, and in particular, build a scenarioof a fictional company where we implement some of the facilities that have beendescribed in earlier chapters.
8.1 Using the Spooling Capabilities of Other HostsBecause the IBM Network Station itself does not have the capability to store printedoutput on a local disk, it does not have the capability to spool print jobs.
One of the drawbacks to this is that a user who has already sent a print job to thelocal printer is not able to send another one until the first job has finishedprocessing.
If the printer usage is a casual one, with small and infrequent print jobs, there mightnot be a problem, but if a user has many print jobs to submit, or large print jobs,then the wait time between each attempt to send a print job can be eliminated bytaking advantage of the spooling capabilities of other hosts.
In this way, the user can queue any number of print jobs to the spooling system ofthe other host, which takes care of scheduling the jobs to be sent back to the localprinter.
Another advantage of this method is that it provides the capability to use a largevariety of printers on the IBM Network Station. Indeed, if for example, the remotehost used as an intermediate spooling system is a Windows NT system, then anyprinters supported by Windows NT can be attached to the IBM Network Station.The IBM Network Station itself does not have the printer drivers for the printer usedbut the Windows NT system does, and it is the Windows NT printing subsystemthat controls the printer.
Let us first illustrate the example of a user who does have a printer attached to hisor her IBM Network Station and who has a very frequent need for printing. We givethis user the capability to spool by using a remote print server, yet directing theoutput back to his or her printer. In this specific case, we use a Windows NT printserver, but other hosts with better spooling capabilities can be used as well.
The following figure illustrates this scenario:
Copyright IBM Corp. 1998 161

Figure 166. Local Printing via Remote Spooler Host
In the figure above, a local application on the IBM Network Station wishes to printto the local printer. If the user selects, in the Printer Selection window, the localPARALLEL1 printer, the printed output is sent to the API for local printing, asindicated by the circle labeled 1 in the diagram.
Instead, we have prepared a printer definition on a Windows NT server to representthe printer on the IBM Network Station. We have done this by defining an LPRport, giving it the name NS4029, associating an IBM 4029 printer driver to it, andindicating that the destination of this LPR port is the LPD residing on the networkstation host and queue PARALLEL1.
See 5.2, “Printing from a Windows NT Host” on page 72 for an example of how todefine an LPR port on a Windows NT server to represent a printer attached to aIBM Network Station.
See also 7.1, “Printing to a Windows NT Server” on page 138 and 7.1.1, “Is theLPD Installed and Running?” on page 138 for instructions on how to prepare aWindows NT system to receive print jobs through LPD.
This printer definition (NS4029 on the Windows NT Server host) has been addedby the administrator as a selectable printer destination on the IBM Network Station.
Therefore, when the user wishes to print, he or she selects the NS4029 printerdefinition, which causes the IBM Network Station to send the output to the LPRdaemon, which transmits it to the LPD daemon on the Windows NT server. At thatpoint, the print job is queued for the NS4029 destination. When the printer becomesavailable, the job is spooled to the LPR port thereby making its way back to the
162 IBM Network Station Printing Guide

IBM Network Station via the LPR on the Windows NT system and the receivingLPD on the IBM Network Station, and printed on the IBM Network Station printer.
The result is that the user has been able to send multiple print jobs, in succession,without waiting each time for the previous print job to terminate. Therefore he orshe is using the Windows NT server as a buffer, accumulating print jobs, large orsmall, and delivering them automatically as the printer becomes available.
A variation of the previous example might be an office with many IBM NetworkStations but with only one of the network stations having a printer attached.
In this situation, all IBM Network Station users direct their printed output to aspecific queue on the remote print server/spooler, which manages all jobs going tothe shared office printer, as opposed to each individual IBM Network Station usersending his or her print output directly to the IBM Network Station to which theoffice printer is attached.
This is illustrated in the diagram below:
Figure 167. Printing via Remote Spooler Host to a Centralized Printer
8.2 Using the Transform Capabilities of Other HostsThe AS/400 system, for example, has the capability to transform one data streaminto another.
If IBM Network Station applications generate PostScript data, but you only have aPCL type printer attached to the IBM Network Station, the print request can be sentto the AS/400, transformed from PostScript to PCL, and routed back to the IBMNetwork Station PCL printer.
Chapter 8. Practical Examples 163

An example of this situation is described in the Blundies scenario which follows.
8.3 A Sample Fictional Scenario - The Blundies CompanyThis scenario of a fictional company called Blundies is used to further illustratesome of the various situations discussed previously in this document. It attempts todefine what could be a typical and practical office environment, and how some ofthe printing capabilities could be designed to provide users with the functions theyneed.
8.3.1 Introducing BlundiesBlundies is a small company that uses AS/400s and has just acquired some IBMNetwork Stations for the users in the Payroll department.
The Payroll department at Blundies uses an AS/400 application to print pay slipsand checks at the end of each month.
There are four people in the Payroll department: Marvin, the manager, and histhree employees, Ravi, Michael and Linna.
They are all migrating to using IBM Network Stations. They already have severalprinters, and they do not want to acquire more printers at the moment.
The IBM Network Stations are used for:
� 5250 emulation sessions to the AS/400
� Using the Intranet, and accessing the Internet with a browser
� Lotus eSuite for e-mail and word processing
They have an IBM 6400 printer, attached directly to the AS/400 using Twinax,which is only used for printing checks and pay slips.
They have an IBM Network Printer 17 attached directly to the LAN and used as ashared printer. It has the PostScript feature installed so that it can handle bothPCL and PostScript data streams.
There is also an IBM 4029 PCL printer that Marvin would like to use as hispersonal printer.
The office network environment is illustrated in the figure below:
164 IBM Network Station Printing Guide

Figure 168. Network Diagram for Blundies
8.3.2 Nomenclature UsedBlundies already has a TCP/IP network setup, and they use the domain name ofblundies.com.
The AS/400 is called PAYROLL, and its host name is payroll.blundies.com.
The IBM Network Stations are given the names PAYNS01, PAYNS02, PAYNS03and PAYNS04, so that the host names would be, for example,payns03.blundies.com.
The IBM 6400 printer is attached to the AS/400, with a device name of PAY6400.
The IBM Network Printer 17 is defined with a host name of paynp17.blundies.com,and is defined to the AS/400 as PAYNP17. An example of adding an IBM NetworkPrinter 17 to an AS/400 was included in 7.2.5, “Adding a New Printer to theAS/400” on page 146.
The IBM 4029 printer has a parallel printer port. It is connected directly to Marvin'sIBM Network Station, PAYNS01.
Lets look now as some of the configuration tasks required to make this environmentwork.
Chapter 8. Practical Examples 165
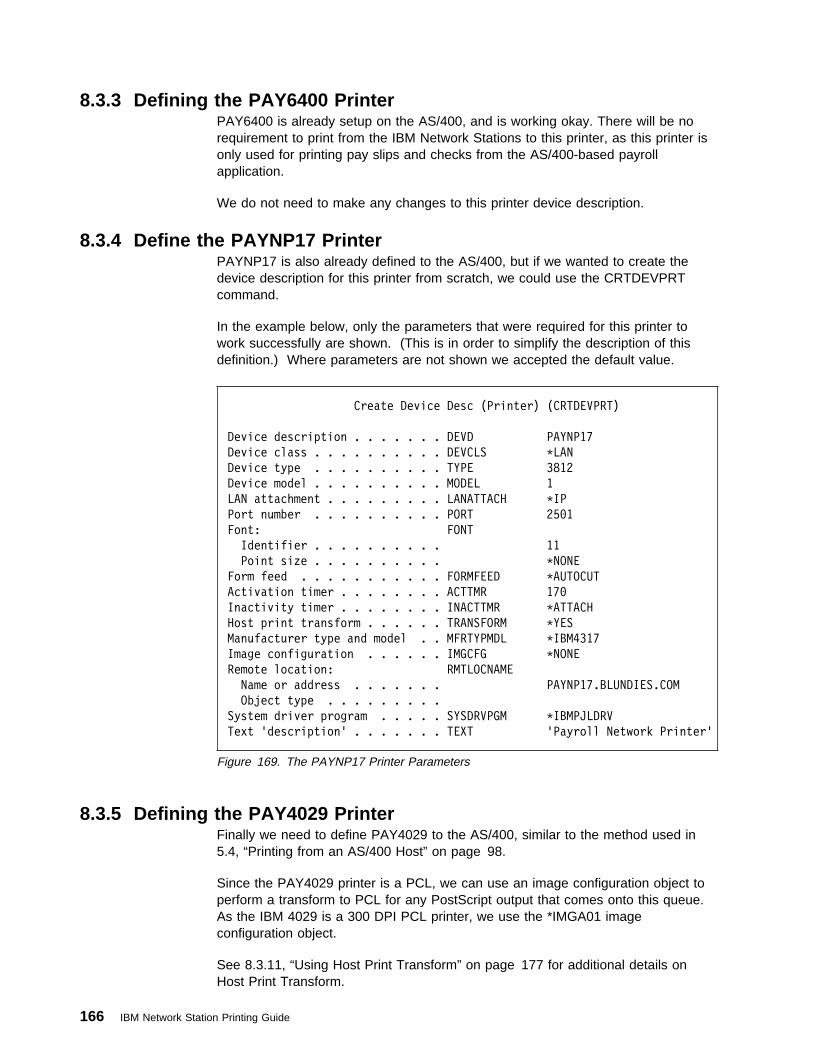
8.3.3 Defining the PAY6400 PrinterPAY6400 is already setup on the AS/400, and is working okay. There will be norequirement to print from the IBM Network Stations to this printer, as this printer isonly used for printing pay slips and checks from the AS/400-based payrollapplication.
We do not need to make any changes to this printer device description.
8.3.4 Define the PAYNP17 PrinterPAYNP17 is also already defined to the AS/400, but if we wanted to create thedevice description for this printer from scratch, we could use the CRTDEVPRTcommand.
In the example below, only the parameters that were required for this printer towork successfully are shown. (This is in order to simplify the description of thisdefinition.) Where parameters are not shown we accepted the default value.
Create Device Desc (Printer) (CRTDEVPRT)
Device description . . . . . . . DEVD PAYNP17
Device class . . . . . . . . . . DEVCLS \LAN
Device type . . . . . . . . . . TYPE 3812
Device model . . . . . . . . . . MODEL 1
LAN attachment . . . . . . . . . LANATTACH \IP
Port number . . . . . . . . . . PORT 25ð1
Font: FONT
Identifier . . . . . . . . . . 11
Point size . . . . . . . . . . \NONE
Form feed . . . . . . . . . . . FORMFEED \AUTOCUT
Activation timer . . . . . . . . ACTTMR 17ð
Inactivity timer . . . . . . . . INACTTMR \ATTACH
Host print transform . . . . . . TRANSFORM \YES
Manufacturer type and model . . MFRTYPMDL \IBM4317
Image configuration . . . . . . IMGCFG \NONE
Remote location: RMTLOCNAME
Name or address . . . . . . . PAYNP17.BLUNDIES.COM
Object type . . . . . . . . .
System driver program . . . . . SYSDRVPGM \IBMPJLDRV
Text 'description' . . . . . . . TEXT 'Payroll Network Printer'
Figure 169. The PAYNP17 Printer Parameters
8.3.5 Defining the PAY4029 PrinterFinally we need to define PAY4029 to the AS/400, similar to the method used in5.4, “Printing from an AS/400 Host” on page 98.
Since the PAY4029 printer is a PCL, we can use an image configuration object toperform a transform to PCL for any PostScript output that comes onto this queue.As the IBM 4029 is a 300 DPI PCL printer, we use the *IMGA01 imageconfiguration object.
See 8.3.11, “Using Host Print Transform” on page 177 for additional details onHost Print Transform.
166 IBM Network Station Printing Guide

The printer is connected to the parallel port of PAYNC01, so we need to use aremote printer queue value of PARALLEL1.
The commands to CRTOUTQ and CRTDEVPRT are used to create the outputqueue and a dummy device description. In the examples below, only theparameters that were required for this printer to work successfully are shown.Where parameters are not shown, we accepted the default value.
Notice that we have set, in this case, the Destination type parameter to *OS400.Even though the real destination is an IBM Network Station, setting this parameterto *OS400 enables the use of streaming, which is supported by the IBM NetworkStation.
Create Output Queue (CRTOUTQ)
Output queue . . . . . . . . . . OUTQ PAY4ð29
Library . . . . . . . . . . . QUSRSYS
Remote system . . . . . . . . . RMTSYS PAYNSð1.BLUNDIES.COM
Remote printer queue . . . . . . RMTPRTQ PARALLEL1
Connection type . . . . . . . . CNNTYPE \IP
Destination type . . . . . . . . DESTTYPE \OS4ðð
Host print transform . . . . . . TRANSFORM \YES
Manufacturer type and model . . MFRTYPMDL \IBM4ð29HP
Image configuration . . . . . . IMGCFG \IMGAð1
Text 'description' . . . . . . . TEXT 'Marvins IBM 4ð29'
Create Device Desc (Printer) (CRTDEVPRT)
Device description . . . . . . . DEVD PAY4ð29
Device class . . . . . . . . . . DEVCLS \VRT
Device type . . . . . . . . . . TYPE 3812
Device model . . . . . . . . . . MODEL 1
Online at IPL . . . . . . . . . ONLINE \YES
Font: FONT
Identifier . . . . . . . . . . 11
Point size . . . . . . . . . . \NONE
Figure 170. The PAY4029 Printer Parameters
The AS/400 can now send spool files to all three printers when the followingqueues are used:
� PAY6400 to use the IBM 6400 printer
� PAYNP17 to use the IBM Network Printer 17
� PAY4029 to use the IBM 4029 printer
8.3.6 Creating a Payroll Group User ProfileWe need to make a group user profile on the AS/400 and make MARVIN, RAVI,LINNA and MICHAEL members of the group. The group user profile is calledPAYGRP.
Chapter 8. Practical Examples 167

We may need to make changes to the user profiles to allow them to use the IBMNetwork Stations, but we can also create a group profile called PAYGRP, andmake the users members of this group. We can use this to make changes to theGroup defaults, instead of changing each individuals user defaults.
We then use IBM Network Station Manager to add the Marvin, Ravi, Linna andMichael users to the group PAYGRP.
8.3.7 Creating a Group Profile on the AS/400Use the Create User Profile (CRTUSRPRF) command to create a group profile onthe AS/400.
8.3.8 Adding Users to the GroupWe need to add the users into the group on the AS/400, by using theCHGUSRPRF command. We use this command to tell the user profiles that theyare in the group called PAYGRP:
CHGUSRPRF username GRPPRF(PAYGRP)
Once we have done this, we can check that the users have been added to thegroup correctly by using NSM, and from the list of Setup Tasks, selecting SelectUser's Group .
Figure 171. Select User's Group Panel
The Select User's Group panel appears, and we are prompted to choose the userto add to the group. We can either enter the name directly, or click on Browse...and select a name from the list. Once we have chosen the user, we need to clickon the Next button. In the example we are selecting Ravi's user profile.
We then see the Select Group for RAVI screen, where we can select PAYGRP, sothat the user profile RAVI now picks up the group defaults for PAYGRP:
168 IBM Network Station Printing Guide

Figure 172. Select Group for RAVI
Once we select PAYGRP, we click on the Finish button, and we are returned tothe Select User's Group screen where we can repeat the process for the other userprofiles, LINNA, MICHAEL and MARVIN.
8.3.9 Changing the Group DefaultsWe now add the IBM Network Printer, PAYNP17 to the Group defaults printer listfor PAYGRP.
Instead of setting the IBM Network Stations to print directly to the IBM NetworkPrinter 17, we send the spool files to the PAYNP17 queue on the AS/400.
By using the AS/400 to spool the print, we gain the following advantages:
� The AS/400 probably receives the data faster than the printer. This means thatthe print process completes faster on the IBM Network Station, and thatmemory is released faster.
� The AS/400 queues the print request.
Imagine a situation where PAYNS01 and PAYNS02 both attempt to printdirectly to PAYNP17 within a few seconds of each other. This is illustrated inFigure 173 on page 170.
Chapter 8. Practical Examples 169

Figure 173. Printing from IBM Network Stations Directly to PAYNP17
PAYNS01 starts printing first. When PAYNS02 starts to print, the printercannot accept another connection, so the PAYNS02 returns an error to theuser that the printer is not available.
Note: This might not be true of all network printers as it is dependent on theamount of buffer space and disk space that the network printer has in order toaccept print requests.
Now imagine that PAYNS01 and PAYNS02 both print to a queue on theAS/400, PAYROLL. The queue that they send print to is set up to print to theIBM Network Printer, PAYNP17. This is illustrated in Figure 174 on page 171.
170 IBM Network Station Printing Guide

Figure 174. Using the AS/400, PAYROLL, to Queue Print for PAYNP17
PAYNS01 starts printing first, and then PAYNS02 starts printing. The AS/400has multiple LPD jobs running, so it is can handle both of the requests at thesame time. Both IBM Network Stations print jobs complete successfully, andthey then disconnect. The print is queued on the AS/400 which then sends theprint jobs to IBM Network Printer in turn. By doing this, the user on PAYNS02does not get error messages, and does not have to wait for the printer tobecome available before sending the print again; the AS/400 queue does thison behalf of the user.
From the IBM Network Station Manager select Hardware → Printers . On thePrinter Defaults screen, select the Group defaults for PAYGRP.
Chapter 8. Practical Examples 171

Figure 175. Selecting PAYGRP for Group Defaults
We click on Next to see the Printer Settings for PAYGRP screen where we add anew printer definition to be used in the printer list. In this case we add the IBMNetwork Printer. We use a remote location of payroll.blundies.com, which is theAS/400, and a printer queue of PAYNP17 on the AS/400.
Figure 176. Adding PAYNP17 to the PAYGRP for Group Defaults
Once all the details are entered, we click on Finish .
The next time one of the group members signs on onto the IBM Network Station,he or she sees this printer queue in the Printer Selector:
172 IBM Network Station Printing Guide

Figure 177. Marvin's Printer Selector
8.3.10 Changing the User DefaultsWe now need to make the PAY4029 printer available to user MARVIN.
By default, he sees a queue of PARALLEL1@localhost, which sends data directlyto the local printer. But, since most IBM Network Station applications generate aPostScript data stream, and Marvin's printer is a PCL printer, we have acompatibility problem to solve. If the PostScript data stream was sent to thisdefault PARALLEL1 printer, we would see incorrect output, as the printer does notunderstand the PostScript commands in the data stream.
So that Marvin can continue to use his PCL printer, we need to transform thePostScript data stream into a PCL data stream. At R420 and later at OS/400, thereis a feature of the operating system that can perform such a transform.
We need to change Marvin's User defaults so that he has a printer queue thatsends the print request to the AS/400, PAYROLL, where it can be transformed fromPostScript to PCL, and then sent back to the IBM Network Station, PAYNS01,where it can be passed to the printer, PAY4029. This process is illustrated in thefigure below:
Chapter 8. Practical Examples 173

Figure 178. Using the AS/400, PAYROLL, to Transform PostScript to PCL
We have already configured the AS/400 queue to perform this transform for us(8.3.5, “Defining the PAY4029 Printer” on page 166), so we now need to add thisprinter queue to Marvin's User defaults so that it appears in his printer selector list.
From the IBM Network Station Manager we select Hardware → Printers . On thePrinter Defaults screen, we select the User Defaults for MARVIN:
174 IBM Network Station Printing Guide

Figure 179. The Printer Defaults Screen, Selecting Marvin's User Defaults
We click on Next . We are now presented with the Printer Settings for MARVINscreen. Here we must add the details of the printer.
Remote printer serverThis is the host name of the LPD server, in this case, the AS/400. Weuse payroll.blundies.com.
Queue nameThe printer queue on the LPD server that output should be placed on.In this case, it is PAY4029, the queue which was defined in 8.3.5,“Defining the PAY4029 Printer” on page 166.
Stream typeThis will only be used by the 5250 and 3270 emulators (see 6.1,“Printing from the 3270/5250 Emulator” on page 122). The queue on theAS/400 will convert output from PostScript to PCL, so we can leave thisas the default of PostScript.
DescriptionThe Description field is optional, but we have specified it as Marvin's4029.
Chapter 8. Practical Examples 175

Figure 180. Printer Settings for MARVIN
We click on Finish .
Next time Marvin signs on, in addition to the System default printers and the groupprinter, PAYNP17, he will also see his personal printer, PAY4029:
Figure 181. Marvin's Printer Selector
It is important to notice that the list contains the Group and User defaults. The listis created by adding the System, Workstation, Group and User defaults, but sincethere were no Workstation defaults defined, we only get the User, Group andSystem defaults.
� PARALLEL1 is shown because it is in the System defaults.
� SERIAL1 is shown because it is in the System defaults.
� PAYNP17 is shown because it is in the Group defaults for PAYGRP, andMarvin is a member of this group.
� PAY4029 is shown because it is in the User defaults for Marvin.
176 IBM Network Station Printing Guide

8.3.11 Using Host Print TransformNow we describe a few additional details on the transform function we used in theexample above.
There are four types of datastream which the AS/400 can handle:
� *SCS � *IPDS � *AFPDS � *USERASCII
One can see which type a spool file is by looking at the spool file attributes. Usethe command WRKSPLF, then opt8, and press Page Down once.
When *USERASCII is used, in general the AS/400 does not understand the datastream (with the exception of Image Print Transform) and it is just passed through.It cannot be displayed on the screen in the same way as the other data streamscan. Even the number of pages shown in WRKSPLF is an approximation only,calculated by the AS/400 based on the size of the spool file.
There are two types of transforms that can take place:
1. Host Print Transform
Host Print Transform is used to convert AS/400 data streams into ASCII datastreams.
It takes SCS, IPDS and AFPDS data streams and transforms them into ASCIIdata streams such as PCL (HP), PPDS (IBM) and ESC/2 (Epson), but notPostScript. This only works for EBCDIC to ASCII, and cannot be used inreverse.
The AS/400 looks at the Host Print Transform parameter in the printer queuedefinition to see if it should transform the data. If the Host Print Transformparameter is set to *YES, then it examines the Manufacturer Type and Modelfield to see the transform that should be used, for example *HP5, *IBM4019,*EPFXnnnn, etc.
2. Image Print Transform
Image Print Transform, which is new with R420 of OS/400, allows convertingdata from GIF, TIFF, BMP and PostScript only. These data streams can beconverted into PostScript, PCL or AFPDS only.
In summary then,
Host Print Transform:
SCS
IPDS ----> HPT ----> ASCII escape-code-based datastreams
AFPDS such as PCL, PPDS and ESC/2
Image Print Transform:
PS PCL
TIFF ----> IPT ----> PS
GIF AFPDS
BMP
Chapter 8. Practical Examples 177

Please reference AS/400 Printing V, SG24-2160 for additional details on the hostprint transform and image print transform capabilities of the AS/400.
178 IBM Network Station Printing Guide

Chapter 9. Problem Determination Tools, Tips andTechniques
The objective of this section is to highlight some of the tools and techniques thatmight be useful in doing problem determination. This is by no means anexhaustive list, but we tried to document here some of the situations we ran intoand some of the ways that we used to get the information required to identify aproblem and solve it.
Another source that can be used is the Problem Determination chapter in theredbook entitled IBM Network Station Guide for Windows NT, SG24-2127-01, whichis more complete in terms of problem determination as it relates to the IBMNetwork Station in general, as opposed to just the printing issues.
9.1 Mini ConsoleIn Release 3, a mini console facility has been added with the objective of providingthe user a more visual feedback when an error occurs.
When the error occurs, the error messages are logged normally to the regularconsole, but a mini console is also displayed drawing the attention of the user tothe abnormal condition.
Below is an example of a mini console showing up on the user display in the casewhere an unknown host name has been specified as the print destination.
Figure 182. Sample Mini Console
9.2 Printer Hex ModeSome printers have a Hex Mode that can be enabled. If the printer has a HexMode and it is enabled, the printer does not print normally.
Any data sent to the printer is printed as hexadecimal numbers. This is sometimesuseful when comparing prints from various systems to identify the difference. It is
Copyright IBM Corp. 1998 179

also useful when we suspect that the data received by the printer is not the datathat was originally sent.
9.3 PINGPING is a command that sends a request to an IP address, asking for a response ifthe command is received. This is a useful tool to verify that two devices are able tocommunicate with each other on the network.
For example, to check that the device at IP address 9.24.104.189 can receive froma PC, we could type the following command at the command prompt:
PING 9.24.1ð4.189
The IBM Network Station responds to PINGs as soon as its network interface is upand running. To ping from the IBM Network Station, click Test Network... from theUtilities menu on the console.
9.4 Problems When Sending from an IBM Network Station to anAS/400
If problems occur when sending spool files from the IBM Network Station to theAS/400, it is useful to check for:
� Messages on the IBM Network Station (see 9.7.1, “Accessing the IBM NetworkStation Message Log Remotely” on page 181 and 9.7, “Message Log on theIBM Network Station” on page 181).
� Messages in the AS/400 Operator message queue, QSYSOPR.
To see the contents of the QSYSOPR message queue, we can type DSPMSG
QSYSOPR. Further help for any message can be obtained by putting the cursorover the message and pressing F1.
� A job log for the LPD job.
To see the job log for the LPD job, we can use the DSPJOBLOG commandand specify the details for the LPD job for example, DSPJOBLOGJOB(xxxxxx/QTCP/QTLPxxxxx).
If the job has ended, we may find a job log in the QEZJOBLOG output queue.This can be displayed using the command WRKOUTQ QEZJOBLOG. The mostrecently written logs will be at the bottom of the list, which can be reached bypressing F18 (or SHIFT and F6)
9.5 Problems When Sending from an AS/400 to an IBM NetworkStation
If problems occur when sending files from the AS/400 to the IBM Network Station, itis useful to check for:
� Messages on the IBM Network Station (see 9.7.1, “Accessing the IBM NetworkStation Message Log Remotely” on page 181 and 9.7, “Message Log on theIBM Network Station” on page 181).
� Messages in the AS/400 Operator message queue, QSYSOPR.
180 IBM Network Station Printing Guide

To see the contents of the QSYSOPR message queue, we can type DSPMSG
QSYSOPR. Further help for any message can be obtained by putting the cursorover the message and pressing F1.
� A job log for the Printer Writer.
To see the job log for the writer, we can use the DSPJOBLOG command andspecify the details for the writer job, for example, DSPJOBLOGJOB(xxxxxx/QSPLJOB/PRTxx).
If the job has ended, we may find a job log in the QEZJOBLOG output queue.This can be displayed using the command WRKOUTQ QEZJOBLOG. Themost recently written logs will be at the bottom of the list, which can be reachedby pressing F18 (or SHIFT and F6).
9.6 Using Windows NT Event ViewerWhen the destination host of an LPR request is a Windows NT system, any errormessages issued by the LPD server is logged to the System Event viewer.
If there are too many messages, you can use the View pull-down to specify displayfilters. Under the Source drop-down list, you find the LPDSVC category and thePrint category, which pertain to messages issued by the LPD service or the Printsubsystem.
9.7 Message Log on the IBM Network StationThe message log on the IBM Network Station is accessed through the console. Todisplay the console, press the left Shift key, the left Alt key and the Home keytogether.
Note that this key combination to display the console is configurable and maytherefore have been changed on your system. Another popular key sequence forthe console is the Pause key.
Once the console is displayed, the messages can be viewed by a clicking on theMessages box which appears just below the Console pull-down.
Alternatively, if the Terminals pull-down menu is available on the console, selectingNew Terminal and then the Diag service brings up a window which lists all theconsole messages.
9.7.1 Accessing the IBM Network Station Message Log RemotelyIt is possible to access the messages on the network station remotely, using aTELNET session to port 5998 on the IBM Network Station from a remote system.For example, in Windows NT at the command prompt, you can type:
TELNET 9.24.1ð4.189 5998
In OS/400 at the command line, we can type:
TELNET RMTSYS(\INTNETADR) INTNETADR('9.24.1ð4.189') PORT(5998)
Chapter 9. Problem Determination Tools, Tips and Techniques 181

9.8 Checking the Version of an IBM Network StationIt is possible to find the version of the IBM Network Station from the console, usingStatistics →Show Version... . This brings up the Show Version screen, whichdisplays the model type, the software (the version of code which was downloadedfrom the server) and the boot monitor (the version of firmware). Other usefulinformation such as the MAC address, the IP address, the IP hostname are alsodisplayed:
Figure 183. Show Version
9.9 Verifying the Currently Loaded IBM Network Station ConfigurationIt is strongly recommended that all configuration changes be made using the IBMNetwork Station Manager. However, there are cases where you might need toverify if a particular parameter has indeed been set correctly, or you might need totemporarily change the value of a parameter in order to test a particular situation ordo general problem determination.
You can have access to all the IBM Network Station configuration parameters usingthe commands available on the Setup menu on the IBM Network Station console,provided that you have been given the proper level of authority to do so.
To bring up the console on your IBM Network Station, the default key sequence isAlt+Shift+Home. However, this is a configurable parameter and it might have beenchanged to the Pause key for example, which is also popular, or some other keysequence. The figure below illustrates the console and the pull-down menu forSetup.
Figure 184. The Setup Menu on the Console
182 IBM Network Station Printing Guide

There are three menu entries that give access to the configuration parameters. Theones we deal most often with are under the Change Setup Parameters option. Wehave listed in the figure below all the sections that we have access to from thismenu.
Figure 185. The Sections Available through Setup
There are four of these sections that contain parameters directly related to printing.They are:
This contains the parameters related to the LPD and LPRD daemon, such asthe print buffers size specifications, the printer selection table and the accesscontrol list for the LPD daemon.
� Access Control
The Access Control parameters for the SERIALD daemon are located here. � Parallel
This is for the configuration parameters related specifically to the parallel port. � Serial
This is for the configuration parameters related specifically to the serial port.
9.9.1 The Print Section ConfigurationThis section of the Setup Parameters concerns the configuration parameters for theLPD and LPRD daemons. The Print section is displayed in the figure below:
Chapter 9. Problem Determination Tools, Tips and Techniques 183

Figure 186. The Print Configuration Section
At the top of the panel, notice the Lpd Cache Size and Lprd Cache Size which arecurrently set to the default of 10%. These are the parameters that determine theamount of free RAM dedicated to the print buffers for LPRD and LPD. Theminimum that can be specified is 0% (5 KB) and the maximum is 95%. If the userenters a value outside of that range, it is automatically adjusted to be within theallowable range.
The next entry is the Lpd Stream Large Jobs parameter, which is also referred toas the Bypass Print Buffer parameter. When this is set to Yes, print jobs thatexceed the capacity of the print buffer automatically cause the LPD to beginstreaming out the data to the printer. If this parameter is set to NO and the printbuffer is exceeded while the LPD reads data in, the print job fails.
Next is the Enable Access Control and Print Access Control List configurationparameters. These determine whether remote hosts that issue LPR requests to theLPD daemon on the IBM Network Station are allowed to use the LPD service ornot. In the example here, the Enable Access Control is not set so that any host isallowed to use the LPD daemon. If set to Yes, then the table should containentries listing the authorized hosts.
The figure below illustrates the configuration parameters as they appear in aconfiguration file, for the items discussed above.
184 IBM Network Station Printing Guide

set print-lprd-cache-size = 1ð
set print-lpd-cache-size = 1ð
set print-lpd-stream-large-jobs = true or false
set print-access-control-enabled = true or false
set print-access-control-list = {
{ hostname1 }
{ hostname2 }
}
Figure 187. The LPRD/LPD Buffer Size Parameters
The next and perhaps most important and visible parameter is the Lpr Serverstable, or the printer table as it is sometimes referred to. (The actual parametername is print-lpr-servers.) This is the table containing the list of printers, local andremote, to which local applications have access to. When an application requeststo print and the user clicks on Browse in the Print Dialog to see which printers areavailable, the printers that get listed in the Printer Selector panel are supplied fromthis table.
In the figure above (Figure 186 on page 184), we can only see the first twoentries, which are labeled localhost PARALLEL1 ps Local Parallel Printer
and localhost SERIAL1 ps Local Serial Printer, but the figure belowillustrates what the complete table looks like in the actual configuration parameterthat builds the printer table.
print-lpr-servers = {
{ "localhost" "PARALLEL1" "ps" "Local Parallel Printer" nil nil nil nil false true }
{ "localhost" "SERIAL1" "ps" "Local Serial Printer" nil nil nil nil false false }
{ "burkhart.austin.ibm.com" "locps" "ps" "ITSO Queue" nil nil nil nil true false }
{ "linna.austin.ibm.com" "javaps" "ps" "Remote AIX4.2.1 server" nil nil nil nil true false }
{ "9.53.113.131" "javaps" "ps" "Remote AIX4.2.1" nil nil nil nil true false }
}
Figure 188. The Printer Table Configuration Parameters
The printer table contains a list of printers available, along with the characteristicsof each of these printers.
This table is configured by the administrator using the IBM Network StationManager, and he or she has the option of configuring printers that are available toall users, or some that are available only to certain groups of users, or only tospecific users.
After the administrator configures the different printers using the IBM NetworkStation Manager, this creates the actual print-lpr-servers table which is added toone or more of the configuration files that get read by the IBM Network Station atboot time.
The printer table contains the following information about the printers:
Location of the printer.This can be a host name or IP address. If the printer is local to the IBMNetwork Station, this will be localhost.
Chapter 9. Problem Determination Tools, Tips and Techniques 185

Printer queue to use on the remote system.If this is a local printer it will be either PARALLEL1 or SERIAL1.
The data stream that the printer handles.This can be:
� ps for PostScript� pcl for PCL� asc for ASCII
A description of the printer.For example, IBM 4ð29 printer on 5th Floor near Pillar Q.
DBCS parametersFour parameters to allow Double Byte Character Sets to be printed onASCII printers. (These parameters are explained in more detail inChapter 11, “DBCS Considerations” on page 225.)
� Transformation Module � DBCS Type � Printer Resolution� DBCS Font Encoding Method
Banner PageWhether a banner page is required when printing to this printer. Thiscan be true or false and can be specified only for remote printers.Banners are not supported for local printers.
Default printerWhether the printer is the default printer. This can be true or false.
Below is a sample panel from the IBM Network Station Manager where theadministrator can configure remote printers.
Figure 189. The Printer Configuration Panel in IBM Network Station Manager
More details on using the IBM Network Station Manager for configuring this tableare given in Chapter 4, “Configuration Using the IBM Network Station Manager” onpage 47.
186 IBM Network Station Printing Guide

9.9.1.1 Removing Local Printers from the Selector ListIf most of the IBM Network Stations do not have printer attached, the administratormay elect to avoid displaying the PARALLEL1 and SERIAL1 entries in the list ofselectable printers for all stations. However, care must be exercised in the waythat this is done if some of the IBM Network Stations do have a printer attached.
To illustrate this, we use our Blundies scenario of the previous chapter where onlythe user called Marvin has a printer attached to his IBM Network Station. Sincenone of the other users has a printer, you might decide to configure the systemdefaults in such a way as to eliminate the PARALLEL1 and SERIAL1 queues fromthe printer selector list, but you then must make sure to add them back for the userMarvin's workstation.
Indeed, even though user Marvin does not use the PARALLEL1 selection directlywhen he chooses a printer (he uses the PAY4029 entry in order to send the outputto the AS/400 to be transformed into PCL data), the printer queue definition on theAS/400 points back to the PARALLEL1 queue on Marvin's IBM Network Station.When the LPD daemon receives the print request, it uses uses the print APIs (andtherefore the printer selector table) to confirm that the queue stated in the receivedprint job request exists. An entry for PARALLEL1 must therefore exists in order forthe job to be processed by the LPD daemon.
If you need to remove the local printers entries from the the user's Printer Selectorby making a change to the System defaults, here is the way to proceed.
From the IBM Network Station Manager Setup Tasks, select Hardware → Printers .From the Printer Defaults screen, select System defaults , and select Next .
On the Printer Settings - System Defaults screen, scroll down to the Printer List.
In the Printer List, change the Local parallel printer and Local serial printer fields toNone attached .
Figure 190. Changing the Local serial printer
Then click on Finish . The next time that any user looks at the Printer Selector,they no longer see the SERIAL1 or PARALLEL1 queues.
Chapter 9. Problem Determination Tools, Tips and Techniques 187

Figure 191. Printer Selector with PARALLEL1 and SERIAL1 Removed
9.9.2 The Access Control Section ConfigurationAccess control is the mechanism by which we control which remote hosts have theauthority to send print requests to the IBM Network Station.
Printer access control in Release 3 consists of two mechanisms:
� One for controlling access to SERIALD from remote hosts (direct access toserial and parallel ports via SERIALD)
� One for controlling access to LPD from remote hosts
In this section, we show the details of the different access control lists that exist inthe configuration parameters of the IBM Network Station. However, remember thatwhen you use the IBM Network Station Manager to configure access control, thereis only one access control list defined which is automatically applied in theconfiguration files to both the SERIALD access control list and the LPD accesscontrol list.
Please refer to Chapter 4, “Configuration Using the IBM Network Station Manager”on page 47 for details on how to use the IBM Network Station Manager toconfigure printer access control.
9.9.2.1 The SERIALD Access ControlTo access the SERIALD access control list configuration on the IBM NetworkStation, use the Setup Parameters command on the Setup pull-down menu on theconsole and select the Access Control section.
Under that section, there are multiple access control lists; scroll down to the oneentitled Serial and Parallel Daemon, as illustrated in the figure below:
188 IBM Network Station Printing Guide

Figure 192. Access Control List for Serial and Parallel Ports
Note
This specific access control list controls the access to the SERIALD daemon, asopposed to the access control list described above (Figure 186 on page 184) inthe Print section, which controls access to the LPD daemon.
Notice that in the example above, the Enable Serial and Parallel Access Controlbutton is not set, and therefore any host has access to the SERIALD daemon. Ifthis button was set to Enable, entries would appear or could be made in the AccessControl list.
The configuration parameters that control this are as follows, where hostnamerepresents the name or IP address of the host which is granted authority to access.The parameter tcpip remains as tcpip and identifies the connection type over whichthe host accesses the IBM Network Station.
set serial-access-control-enabled = true or false
set serial-access-control-list = {
{ localhost tcpip }
}
Figure 193. The Serial Daemon Access Control Configuration Parameters
Chapter 9. Problem Determination Tools, Tips and Techniques 189

9.9.2.2 Controlling Access to the LPD from Remote HostsThe previous access control list for SERIALD concerned direct access to theSERIALD daemon. Access to the LPD daemon is controlled by another accesscontrol list.
This particular access control list configuration panel in the IBM Network Station isnot located in the Access Control section like all the other access control lists butrather in the Print section, along with the other LPD-related configurationparameters, as illustrated below:
Figure 194. Access Control List for the LPD Daemon
There are also two configuration parameters for this access control list:
print-access-control-enabled = true or false
print-access-control-list = {
{ localhost }
{ hostname1 }
{ hostname2 }
}
Figure 195. LPD Access Control List Parameters
localhost, hostname1, hostname2 are the IP addresses or IP host names of thehosts authorized to access the LPD daemon.
190 IBM Network Station Printing Guide

When print-access-control-enabled = true, LPD validates the remote host duringconnection establishment to see if the remote host is listed in theprint-access-control-list table. If the print-access-control-enabled is set to false,then the next parameter is not required as this gives access to any host.
See Chapter 4, “Configuration Using the IBM Network Station Manager” onpage 47 for information on how to configure access control using the IBM NetworkStation Manager.
9.9.3 Parallel and Serial Port Configuration ParametersThe parallel and serial ports also have specific configuration parameters that canbe set, dependent on how these ports are used.
For example, as discussed in 5.3.1.5, “IBM Network Station Configuration” onpage 91, when printing from a WinCenter server, the settings of the parallel and/orserial ports on the IBM Network Station must be set to reflect what the WinCenterserver expects.
9.9.3.1 Parallel Daemon ConfigurationUnder the Parallel section, look for the Parallel Daemon table, illustrated in thefigure below:
Figure 196. Parallel Port
In the figure above, the Use Parallel Protocol value can be toggled from false totrue. When printing from WinCenter, the value under the heading Use ParallelProtocol should read False. This puts the SERIALD daemon in passthru mode, sothat any data received on this port is simply passed through the daemon, withoutany modification, and handed over to the parallel port. Since the printer driver usedon the WinCenter server is the one for the physical printer attached to this port, thereceived print data stream is ready to be handed over directly to the print device.
If you leave the value of Use Parallel Protocol as true, this puts the daemon incommand mode, which triggers SERIALD to examine the incoming data looking forcommands such as a query of the port status, or setting port characteristics suchas baud rate, or parity, etc. This mode is used when the application needs to havea finer control over the port as well as have the ability to monitor the status of thedata transmission.
These commands are imbedded in the data stream by the application and consistof a 0xF0 character followed by some data.
Chapter 9. Problem Determination Tools, Tips and Techniques 191

If the sockets 6461 (serial) and 6464 (parallel) are used to connect to SERIALD,command mode is always used. If sockets 87 (serial) and 5964 (parallel) are used,SERIALD uses the command mode only if the Use Parallel Protocol option is set totrue, otherwise it uses passthrough mode.
If command mode is used but there are no commands in the data stream, then thisis the equivalent of passthrough mode since the SERIALD module will simply passthe data through when there are no commands to act upon.
The port number under the heading of TCP Port should also be set to 5964, sincethis is the port number that WinCenter will attempt to connect to in order to sendthe print data stream.
These values are set by configuration statements in the configuration files on theserver from which the IBM Network Station reads its configuration data, and theparameters for the parallel port are as follows:
set parallel-daemons-table = {
{ 1 false 5964 }
}
Figure 197. Parallel Port Configuration Parameters
9.9.3.2 Serial Port ConfigurationIf the serial port is used instead of the parallel port, then select the section calledSerial in the Change Setup parameters menu, which brings up the panel shownbelow.
Figure 198. Serial Port
If you are using WinCenter, verify the entries in the Serial Daemons table to ensurethat Use Serial Protocol shows as false (it is set to true in the example above) andthat the TCP port is 87.
In the Serial Interfaces Table, the Port Use at Boot and the Current Port Useoptions should both be set to printer. As well, settings for Baud rate, Data Bits,
192 IBM Network Station Printing Guide

Stop Bits, Parity and Handshake should match the settings recommended for theattached printer.
The configuration statements used in a configuration file to set the above valuesare as follows:
set serial-daemons-table = {
{ 1 false 87 }
}
set serial-interfaces-table = {
{ 1 printer printer 96ðð 8 1 none dtr/dsr none }
}
Figure 199. Serial Port Configuration Parameters
Once you have verified that the parallel or serial port configuration is correct, thereare a few statistics that can be monitored to see if certain functions have beenactivated.
One place to look is under the Statistics pull-down on the IBM Network Stationconsole, where choosing the Parallel Daemons entry brings up the panel belowwhere one can see the number of connections that have been accepted by theparallel daemon. Each time a connection is made from WinCenter to the paralleldaemon to send printer output, this counter is incremented by one.
Figure 200. Parallel Daemon
Another useful tool is the Connection Table, also located under User Preferences,where one can see the local IP address and local port, remote IP address and portas well as status for each TCP connection.
In the example below, notice the first line which shows an established connectionbetween 9.24.104.178 (this is the WinCenter Server) port 1859 and 9.24.104.189(this is the IBM Network Station) port 5964.
Chapter 9. Problem Determination Tools, Tips and Techniques 193

Figure 201. Connection Table
9.10 LPR/LPD Control Commands and Data TypesWhen an LPR requester sends a print request to an LPD server, it sends a controlfile along with the data file. This control file contains various options that tells theLPD how to process the print job.
For example, one of these options tells the LPD what type of data is present in thedata file. This allows the receiving LPD to determine whether it should examine thedata and do some processing on it or whether it should just pass the data as is tothe printer.
Other options are, for example, the name of the job, the class of the job, name ofthe user sending the job, etc.
9.10.1 Control File NamesThere is a naming convention for control files and data files exchanged between anLPR and an LPD. The names have the following format:
Control files cfANNNhost
Data files dfCNNNhost
cfA Prefix for all control files.
df Prefix used for data files.
C A letter uniquely identifying the data file within the print job. The firstdata file uses the letter A, the second the letter B, and so on.
NNN A print job number unique within the queue on the originating host.
host The originating host name. For the IBM Network Station, if theoriginating host does not have a host name, the LPRD generates aname in the form IPnnn.nnn.nnn.nnn where nnn.nnn.nnn.nnn is the IPaddress of the IBM Network Station sending the data.
9.10.2 Control File Options Used by the IBM Network StationHere is a description of some of the control file options and how they are used bythe LPRD or LPD daemons on the IBM Network Station.
9.10.2.1 Control File Options Used by the LPRD DaemonThe folowing are the control options used by the LPRD daemon:
C Class for banner page.
Built using the class sent by the printOpen API, if specified. Otherwise,built using the IBM Network Station host name or IP address.
194 IBM Network Station Printing Guide

H Host name of the origin host.
This is the IBM Network Station host name or IP address if no hostname is available.
I Indent printing.
Used with the l and f print request options. Not used by the IBMNetwork Station.
J Job name for the banner page.
This is the job description sent by the printOpen API, if specified.Otherwise, it is not used by the IBM Network Station.
L Print banner page.
Built by the print banner option sent by the printOpen API, if specified.Otherwise, built based on the configuration parameter option to printbanner pages.
M Mail when printed.
Send mail to the user who submitted the print job when it completes.Not used by the IBM Network Station.
N Name of the source file.
Built using a blank name since there is no source file in the case of theIBM Network Station.
P User identification.
Name of the user requesting the print job. Used for authentication whenusing the remove job function and when reporting queue status via theSend Queue State command. Built using the name of the user currentlysigned on to the IBM Network Station.
S Symbolic link data.
Indicates that the data file is a symbolic link to the source file (instead ofcopying the source file to the spool queue directory). Used to conservespace in the spool queue directory. Not used by the IBM NetworkStation.
T Title for pr.
Used by the pr filter to put a title line in the output. Not used by the IBMNetwork Station.
U Unlink data file.
Specifies that the specified data file is no longer needed and should bedeleted. Built for each data file that is sent.
W Width of output.
Specifies the width (in columns) for the f, l, p and r print requests/filters.Not used by the IBM Network Station.
1, 2, 3, 4 Troff R, I, B, and S fonts.
Specifies the fonts to be used for the t, n and d print requests/filters.Not used by the IBM Network Station.
Chapter 9. Problem Determination Tools, Tips and Techniques 195

X Extended print option.
Specifies a platform-dependent option that extends the LPD protocol.Not used by the IBM Network Station.
f Formatted print request.
Tells the LPD to print the data file with the name specified on thisoption. The data file name must match the name specified on aReceive Data File or Receive Data File with Unspecified Lengthcommand.
Not used by the IBM Network Station.
l Literal print request.
Tells the LPD to print the data file with the name specified on thisoption. The data file name must match the name specified on aReceive Data File or Receive Data File with Unspecified Lengthcommand.
This is the default used by the IBM Network Station. One print request isbuilt for every copy of the file that was requested.
c, d, g, k, n, p, r, t, v and x Other print request commands.
Tells the LPD to print the data file with the name specified on this optionusing a filter program that corresponds to the print request type.
Not used by the IBM Network Station.
9.10.2.2 Control File Options Used by the LPD DaemonThe following control file options are used by the LPD daemon:
C Class for banner page.
Not used; banner pages are not implemented in Release 3 of the IBMNetwork Station.
H Host name of the origin host.
This is ignored since no authority checking is done by the LPD on theIBM Network Station.
I Indent printing.
Ignored since filters are not supported by the IBM Network Station.
J Job name for the banner page.
Not used; banner pages are not implemented in Release 3 of the IBMNetwork Station.
L Print banner page.
Not used; banner pages are not implemented in Release 3 of the IBMNetwork Station.
M Mail when printed.
Ignored since mail requires a filter which is not supported.
N Name of the source file.
Ignored.
196 IBM Network Station Printing Guide

P User identification.
Ignored.
S Symbolic link data.
Ignored.
T Title for pr.
Ignored.
U Unlink data file.
Deallocates storage that was associated with the specified file.
W Width of output.
Ignored.
1, 2, 3, 4 Troff R, I, B, and S fonts.
Ignored.
X Extended print option.
Ignored.
f Formatted print request.
The specified data file is printed (no filtering).
l Literal print request.
The specified data file is printed (no filtering).
c, d, g, k, n, p, r, t, v and x Other print request commands.
Tells the LPD to print the data file with the name specified on this optionusing a filter program that corresponds to the print request type.
The specified data file is printed as if the f print request had beenspecified (no filtering). A message is issued to the IBM Network Stationconsole stating that the print job data format may be incorrect.
9.10.3 A Sample Control FileHere is an example of what a control file looks like. We use an example of onesent by a Windows NT system to another Windows NT system.
This very simple example sends the autoexec.bat file using the LPR command. Weuse the command:
LPR -S 9.24.1ð4.24ð -P IBM4ð29 -C CLASS1 - J JOBTEST c:\autoexec.bat
There is no mechanism by which we can actually take a look at this control file onWindows NT, so we used the Network Monitor Tool to capture the frames sent fromthe LPR to LPD.
Below is an example of what the control information that was sent as a result of theabove command.
Chapter 9. Problem Determination Tools, Tips and Techniques 197

à ððð4ð 48 42 45 43 48 41 52 44 ðA 5ð HBECHARD.P
ðð5ð 41 64 6D 69 6E 69 73 74 72 61 74 6F 72 ðA 43 43 Administrator.CC
ðð6ð 4C 41 53 53 31 ðA 4A 4A 4F 42 54 45 53 54 ðA 4C LASS1.JJOBTEST.L
ðð7ð 41 64 6D 69 6E 69 73 74 72 61 74 6F 72 ðA 66 64 Administrator.fd
ðð8ð 66 41 31 36 34 42 45 43 48 41 52 44 ðA 55 64 66 fA164BECHARD.Udf
ðð9ð 41 31 36 34 42 45 43 48 41 52 44 ðA 4E 63 3A 5C A164BECHARD.Nc:\
ððAð 61 75 74 6F 65 78 65 63 2E 62 61 74 ðA ðð autoexec.bat..
á ñ
Figure 202. Sample Control File - Text File
If we lay out the information appearing in this frame, we get the following:
H - BECHARD Target Host Name (Host at 9.24.1ð4.24ð)
P - Administrator Source User Name
C - CLASS1 Job Class
J - JOBTEST Job Name
L - Administrator Print Banner Page
f - dfA164BECHARD Process as TEXT - Data File Name = dfA164
U - dfA164BECHARD Unlink the data file named dfa164
N - c:\autoexec.bat Name of Source File
If the file to send is a binary file, such as a PostScript file, the command to useshould include the option -o l to indicate that this is not a TEXT file. For example:
LPR -S 9.24.1ð4.24ð -P IBM4ð29 -o l -C CLASSX - J MINE c:\test.psbin
A sample of the resulting control file sent would be:
à ððð4ð 48 42 45 43 48 41 52 44 ðA 5ð HBECHARD.P
ðð5ð 41 64 6D 69 6E 69 73 74 72 61 74 6F 72 ðA 43 43 Administrator.CC
ðð6ð 4C 41 53 53 58 ðA 4A 4D 49 4E 45 ðA 4C 41 64 6D LASSX.JMINE.LAdm
ðð7ð 69 6E 69 73 74 72 61 74 6F 72 ðA 6C 64 66 41 38 inistrator.ldfA8
ðð8ð 3ð 39 42 45 43 48 41 52 44 ðA 55 64 66 41 38 3ð ð9BECHARD.UdfA8ð
ðð9ð 39 42 45 43 48 41 52 44 ðA 4E 63 3A 5C 74 65 73 9BECHARD.Nc:\tes
ððAð 74 2E 7ð 73 62 69 6E ðA ðð t.psbin..
á ñ
Figure 203. Sample Control File - Binary File
Notice that the f option has been changed to l (position 7B in the above record)indicating this file should be passthrough without any modifications.
9.10.4 Using the LPQ CommandOn some platforms, the LPQ command can be used to find out the status of LPDjobs in the queue.
Here is an example of the output of the LPQ command when executed from aWindows NT command line to a target AIX system.
198 IBM Network Station Printing Guide

à ðD:\sg245212\artwork\work>lpq -S venus -P ral313ða -l
Queue Dev Status Job Name From To
Submitted Rnk Pri Blks Cp PP %
------- ----- ------- --------- --- --- ----- --- --- -
ral313ð @ral3 DOWN
QUEUED 121 c:\autoexec.ba Administrator@ Administrator@
ð4/16/98 12:44:32 1 15 1 1
/var/spool/lpd/dfA891BECHARD
QUEUED 122 c:\autoexec.ba Administrator@ Administrator@
ð4/16/98 12:47:23 2 15 1 1
/var/spool/lpd/dfA288BECHARD
ral313ð afccu READY
afccu2 pcl1 READY
á ñ
Figure 204. LPQ Command Output - AIX LPD Server
It shows two jobs (the same print job) waiting in the queue.
If we execute the same command but this time to a target Windows NT server, theoutput is as follows:
à ðC:\>lpq -S 9.24.1ð4.24ð -P IBM4ð29
Windows NT LPD Server
Printer IBM4ð29 (Paused)
Owner Status Jobname Job-Id Size Pages Priority
-------------------------------------------------------------------------
Administrat Waiting c:\autoexec.bat 41 5ð ð 1
Administrat Waiting c:\autoexec.bat 42 5ð ð 1
á ñ
Figure 205. LPQ Command Output - Windows NT LPD Server
If we take a look at the actual printer queue called IBM4029 on the Windows NTserver where the target LPD resides, these entries appear as shown in the panelbelow:
Figure 206. The IBM 4029 Printer Queue - Two LPR Jobs Paused
The same two files were sent to the remote printer where they are currently heldbecause the printer queue has been paused.
Notice, in the display output of the LPQ command, the Job-Id indicated here asbeing 41 and 42. These numbers are the same that Windows NT used to store thejobs in the spooler queue.
Chapter 9. Problem Determination Tools, Tips and Techniques 199

You can see these files, using your Windows NT Explorer, by looking at thedirectory \WINNT\System32\Spool\Printers. This directory is displayed in the panelbelow.
Figure 207. Two Print Jobs in the Windows NT Spooler Queue
Notice that for each of the print jobs in the queue, there are two files. The00041.shd is a header file which identifies the characteristics of this job. The00041.spl is the actual data to be printed. If one uses an hex editor to look at thecontents of an shd file, the following figure would appear.
Figure 208. A Sample SHD File
Notice the following data is present in this header file:
BECHARD is the host name of the LPD server.ADMINISTRATOR is the user name on the LPD server.ADMINISTRATOR is the name of the owner of the print job.9.24.1ð4.175 is the IP address of the source host.c:\autoexec.bat is the name of the source file.IBM4ð29 is the name of the destination printer queue to which this file belongs.IBM4ð29 Laser Printer is the name of the device driver for that queue.WINPRINTis the name of the Print Processor to be used.TEXT is the data type of the print job.
200 IBM Network Station Printing Guide

9.10.5 Viewing the Control FileIn Windows NT, the control file is not available to the user. For the examplesabove, we captured the incoming frames to the LPD server using Windows NT'sNetwork Monitor.
In OS/2, the control file is easily accessible by putting the printer queue in HOLDmode. The control file appears as a separate entry in the queue and can simply beexamined with any editor.
In AIX, the control and data file are stored in the directory /var/spool/lpd, and theybear names starting with cfA or dfA. However, the control file is discardedimmediately after it is processed, so that it is not really available for viewing by theuser.
9.10.6 Control Commands As Used in Windows NTIn Windows NT, there are two ways that an LPR request can be sent to a remoteLPD server:
� Using the LPR command from a command line
� Defining an LPR port associated to a remote printer and sending print output tothat port
9.10.6.1 Using the LPR Command LineThe LPR command in Windows NT has the following format:
à ðC:\>lpr /?
Sends a print job to a network printer
Usage:
lpr -S server -P printer [-C class] [-J job] [-o option] [-x] [-d] filename
Options:
-S server Name or ipaddress of the host providing lpd service
-P printer Name of the print queue
-C class Job classification for use on the burst page
-J job Job name to print on the burst page
-o option Indicates type of the file (by default assumes a text file)
Use "-o l" for binary (e.g. postscript) files
-x Compatibility with SunOS 4.1.x and prior
-d Send data file first
á ñ
By default, the command line version of the LPR sends f as the default controlcommand indicating that the data type of the file is TEXT.
However, the user can override this default, on a per job basis, by using the -ooption on the command line. For example, to send a PostScript file calledmyfile.psbin to a remote printer called myqueue on a remote host called myprinter,the user would use the command below causing the default f control flag to bechanged to the l control flag, indicating that the file is a binary file to be passedthrough to the printer.
à ðLPR -S myprinter -P myqueue -o l myfile.psbin
á ñ
Chapter 9. Problem Determination Tools, Tips and Techniques 201

9.10.6.2 Using an LPR PortIf data is sent instead using an LPR port (See 5.2.2, “Creating a Definition for theIBM Network Station Printer” on page 74 for an example of how to define such aport), all jobs going through that port use a control command flag of l by default,which is an indication to the receiving LPD to make no alterations to the data beingreceived.
9.10.6.3 Changing the Default LPR Control Command FlagIf for any reason the default flag of l used by the LPR port needs to be changed to ffor example, this can only be done by altering the Registry entry for this port. Itcannot be done on a job basis, which we can do when using the command lineversion of LPR.
To change this default, use the regedt32 registry editor and locate the followingkey:
à ðHKEY_LOCAL_MACHINE\
SYSTEM\
CurrentControlSet\
Control\
Print\
Monitors\
LPRPorts\
Ports\
portname\
ipaddress:portname
á ñ
Insert a value named PrintSwitch, of type REG_SZ and enter the default controlcommand that you want this LPR port to use.
9.10.6.4 Receiving LPR Requests (by LPD)On the receiving side of a Windows NT system, the LPD daemon assigns a datatype of TEXT whenever it receives a control flag of f, o or p.
For a control flag of l, it assigns a data type of RAW so that the print processordoes not alter the data in any way.
Note that the LPD assigns this data type specifically, based on the received controlflag, which means that the default data type specified in the print pre-processor hasno effect.
If you want to always force passthrough on a Windows NT printer/queue, see theinstructions in the section below (9.10.6.5, “Forcing LPD Passthrough on WindowsNT”).
9.10.6.5 Forcing LPD Passthrough on Windows NTWhen Windows NT receives a spool file from an LPR requester, the LPD daemonmay process the data differently dependent on the flags specified by the LPRrequester.
If Windows NT assumes that the spool file is Text which needs to be passedthrough a Windows NT printer driver, but the file is already processed (such as aPostScript file), the effect is undesirable.
202 IBM Network Station Printing Guide

Print jobs received from the IBM Network Station should be processed correctly byWindows NT because the IBM Network Station sets the proper flag in the controlfile (the l flag).
However, should it become necessary to force the use of passthrough whenqueuing LPR print jobs for a certain printer, this can be accomplished by makingchanges to the Windows NT Registry to alter the way it behaves when receivingspool files.
Using the Registry Editor
Using the Registry Editor incorrectly can cause serious system-wide problemsthat may require you to reinstall Windows NT to correct them. Microsoft doesnot guarantee that any problems resulting from the use of the Registry Editorcan be solved. Use this tool at your own risk.
In Windows NT 3.5, 3.51 and 4.0, the change affects all output that is received bythe LPD server. In Windows NT 4.0 Service Pack 2, it becomes possible toconfigure LPD passthrough on a per-printer basis.
The following sections detail how to make the change in Windows NT versions3.51, 4.0 and 4.0 with Service Pack 2 loaded. If after using these instructions,Windows NT still prints incorrectly, please refer to 9.10.6.5, “Forcing LPDPassthrough on Windows NT” on page 202.
9.10.6.6 Configuring Windows NT 3.5 and 3.51 for LPDPassthroughIn Windows NT 3.5 and 3.51, it is necessary to make a change that will affect alloutput received from LPR clients.
Start the Registry Editor. This can be done by selecting ProgramManager →File→Run... . In the Run dialog box, type REGEDT32 into the CommandLine box, and then click on OK. The Registry Editor will then start.
Find the window titled HKEY_LOCAL_MACHINE on Local Machine. Select theSYSTEM\CurrentControlSet\Services\LPDSVC\Parameters folder. We now seethe following screen:
Chapter 9. Problem Determination Tools, Tips and Techniques 203

Figure 209. The Windows NT 3.51 Registry Editor
From the Edit menu, we select Add Value... to get the Add Value dialog. In thiswindow we enter:
Value NameSimulatePassThrough
Data TypeREG_DWORD
Once we have we entered this information, we click OK. The DWORD Editorwindow will appear, and we can enter the Data as 1. A value of 0 for this willmean that the LPD will assign data types according to the control commands. Avalue of 1 will mean that the LPD will just pass the received data through, withoutaltering it.
We can now click OK, so that the Registry Editor now looks like this:
Figure 210. The Windows NT 3.51 Registry Editor with SimulatePassThrough Added
204 IBM Network Station Printing Guide

Windows NT 3.51 looks for this new registry entry in the LPD key, instead of theLPDSVC key. We therefore need to create a new key called LPD, and copy thecontents of the LPDSVC key into it.
Still in the Registry Editor, find the window titled HKEY_LOCAL_MACHINE on LocalMachine. Select SYSTEM\CurrentControlSet\Services . Go to the Edit menu, andselect Add Key... The Add Key dialog appears. In this window, enter:
Key NameLPD
ClassLeave this blank.
Once we have entered this data, we click on OK. Scroll down to see that there is anew key called LPD which has just been created:
Figure 211. The Windows NT 3.51 Registry Editor with new LPD key created
Now we select the LPDSVC key, and then, from the Registry menu, choose SaveKey... , and save the key as LPDSVC.KEY. We have now saved a copy of theLPDSVC key to disk.
Next select the LPD key, and then, from the Registry menu, choose Restore... , andrestore the LPDSVC.KEY key that was just saved. A warning message appears:
Figure 212. The Windows NT 3.51 Warning Message
We do wish to restore the LPDSVC values, so we select Yes.
Chapter 9. Problem Determination Tools, Tips and Techniques 205

We now have an LPD key which is an exact copy of the LPDSVC key:
Figure 213. The Windows NT 3.51 Registry Editor with the LPDSVC Key Copied to the LPDKey
In order for our changes to take effect, we need to stop and restart the printingservices. To get the Services tool we choose Program Manager →Main→ControlPanel→Services . The services that we need to stop and then start again are theSpooler and the TCP/IP Print Server.
We have now configured Windows NT so that print files received on the LPR willuse passthrough, and will not be changed by Windows NT.
9.10.6.7 Configuring Windows NT 4.0 for LPD PassthoughIn Windows NT 4.0, it is necessary to make a change that will affect all outputreceived from LPR clients.
Start the Registry Editor. This can be started by clicking Start →Run... , and typingREGEDT32 as the name of the program that we want to start. Click OK, and theRegistry Editor will start.
Find the window titled HKEY_LOCAL_MACHINE on Local Machine. Select theSYSTEM→CurrentControlSet →Services →LPDSVC →Parameters folder. Wesee the following screen:
206 IBM Network Station Printing Guide

Figure 214. The Windows NT 4.0 Registry Editor
From the Edit menu, select Add Value... , to get the Add Value window. In thiswindow, enter:
Value NameSimulatePassThrough
Data TypeREG_DWORD
Once this information is entered, click OK. The DWORD Editor window appears,and we can enter the Data as 1. A value of 0 for this means that the LPD assignsdata types according to the control commands. A value of 1 means that the LPDjust passes the received data through, without altering it.
Now click on OK, so that the Registry Editor now looks like this:
Chapter 9. Problem Determination Tools, Tips and Techniques 207

Figure 215. The Windows NT 4.0 Registry Editor with SimulatePassThrough Added
Close the Registry Editor. For the change to take effect, we stop and start theaffected spooling services. To get the list of Services, useStart →Settings →Control Panel →Services . The services that we need to stopand then start are the Spooler and the TCP/IP Print Server.
We have now configured Windows NT so that print files received on LPR will usepassthrough, and will not be changed by Windows NT.
9.10.6.8 Configuring Windows NT Service Pack 2 for LPDpassthroughWhen using Windows NT with Service Pack 2 and later, it is possible to configureLPD passthrough on a per-printer basis.
Start the Registry editor using Start →Run... , and typing REGEDT32 as the name ofthe program. Click OK.
Find the window titled HKEY_LOCAL_MACHINE on Local Machine. Select theSYSTEM→CurrentControlSet →Control →Print →Printers →printer →PrinterDriverData , where printer is the printer that we wish tochange.
208 IBM Network Station Printing Guide

Figure 216. The Windows NT 4.0 Registry Editor
From the Edit menu, select Add Value to get the Add Value window. In thiswindow, enter:
Value NameSimulatePassThrough
Data TypeREG_DWORD
Once this information is entered, click on OK. The DWORD Editor windowappears, and we can enter the value as 1. A value of 0 for this means that the LPDwill queue the print with a Data Type of TEXT, which means that it will change thespool file. A value of 1 for this means that the LPD will just pass the received datathrough without altering it.
Click on OK so that the Registry Editor now looks like this:
Chapter 9. Problem Determination Tools, Tips and Techniques 209

Figure 217. The Windows NT 4.0 Registry Editor with SimulatePassThrough Added
Close the Registry Editor. For the change to take effect, we need to stop and startthe affected spooling services. To get the Services list, clickStart →Settings →Control Panel →Services. The services to stop and then startare the Spooler and the TCP/IP Print Server.
We have now configured Windows NT, so that print files received on LPR to thisprinter will not be changed by Windows NT.
9.10.6.9 Verifying If Passthrough Is Actually UsedIf after using the instructions above spool files still print incorrectly, check thefollowing:
� In Windows NT 3.51, start the Print Manager, by clicking on ProgramManager →Main→Print Manager and select Printer →Pause to pause thequeue. Send print to the queue again, and when it appears, selectDocument →Details... to display the details of the document:
210 IBM Network Station Printing Guide

Figure 218. Document Details
� In Windows NT 4.0, open the Printers folder, by clicking onStart →Settings →Printers , and double-click on the printer icon. A windowappears with the the name of the printer queue as the title. ChoosePrinter →Pause Printing to pause the queue, and send a document to theprinter again. When the file appears, select it and click Document →Propertiesto look at the properties of the document.
Chapter 9. Problem Determination Tools, Tips and Techniques 211

Figure 219. Document Properties
If the data type is RAW, then the changes to the Registry have taken effect.
If the data type is TEXT then the changes to the Registry have not taken effect,and we need to:
– Check in the Registry Editor to ensure that the SimulatePassThrough valuehas been added correctly. It should read as:
SimulatePassThrough : REG_DWORD : ðx1
– Ensure that the print services were stopped and restarted.
9.10.7 Control Commands Used by OS/2The LPD server in OS/2 assumes that the received file is binary if there is noindication of the file type in the control file. If the sender identifies the data type asbinary, the data is put in the queue as is. If the type is indicated as TEXT, then theLPD on OS/2 converts LFs into CRLFs.
The LPD default can be changed to TEXT if the LPD server is started from thecommand line with the -f option.
212 IBM Network Station Printing Guide

For the lpr parameters available in OS/2, use the lpr -? command.
9.10.8 Control Commands Used by AIXOn an AIX system, the LPD daemon uses the control commands to determinewhich flags to generate to the AIX spooler backend.
The spooler backend then, based on the control flags, may choose to parse theprint data to determine its datastream type, and use appropriate filtering to convertthe data suitable to the target printer.
On the sending side, the LPR requester in UNIX almost always sends a control flagof f.
9.11 Working with Windows NT Printers/QueuesHere are a few pointers and tips when working with printers/queues in WindowsNT.
This is not meant as a complete explanation of all one needs to know aboutprinting on Windows NT, but only as a few pieces of information that might beuseful if the user is not familiar with working with these printer definitions.
9.11.1 Assigning Printers to PortsWhen a printer/queue is defined, it represents a logical entity or container intowhich print jobs are stored until such time that they actually get sent to a printer.
Figure 220. Windows NT - Printers and Ports
At the time that you define a printer, you identify the printer driver to be used forthat logical printer, and you also identify the port to which this printer is connected.
For example, the IBM4029 printer illustrated in the figure below has been definedas connected to port LPT1. This display is obtained by selecting the printer icon,clicking the right mouse button and selecting Properties .
Chapter 9. Problem Determination Tools, Tips and Techniques 213

Figure 221. Windows NT - Printer Properties - Port Assignment
If we also had a printer attached to the LPT2 port, we could use the printer poolingfacility and assign this IBM4029 printer to both the LPT1 and LPT2 ports, whichcauses jobs in this printer queue to be serviced by two printers.
This is done by selecting the Enable printer pooling button at the bottom of thepanel, which then allows you to click on LPT2. You have to click on OK beforethese changes take place. If you then re-open Properties for that printer, youshould see the following display:
214 IBM Network Station Printing Guide

Figure 222. Windows NT - Printer Properties - Printer Pooling
If on the other hand, what you need to do is assign a second printer queue to thesame LPT1 port, then open the other printer icon's Properties (in our example, wealso have a printer called NS4029), select the Ports tab, click on LPT1, and clickon OK.
When you re-open the properties for this printer or for any other printer, you willsee two printer names appear besides the LPT1 port, as illustrated in the figurebelow:
Chapter 9. Problem Determination Tools, Tips and Techniques 215

Figure 223. Windows NT - Printer Properties - Multiple Printers per Port
If you noticed, we took the NS4029 printer, which was previously assigned to theLPR port called 9.24.105.189:PARALLEL1 and we re-assigned it to LPT1, the sameport as the IBM4029 printer.
We had originally intended the NS4029 printer queue to send print jobs to our IBMNetwork Station printer. Print jobs could have accumulated in the queue becausethe remote printer at the IBM Network Station was down for example. In this case,re-assigning the NS4029 printer queue to the LPT1 port allows us to reroute thejobs in the NS4029 printer queue to the local LPT1 port and print them there(assuming that the printer on LPT1 has the same capabilities as the one that isattached to the IBM Network Station).
9.11.2 Local Spooling for a LAN PrinterAnother facility that might be useful when working with Windows NT printer queuesis the ability to define a local printer to represent a LAN printer.
Normally, when defining a network printer (see Figure 145 on page 143), you onlyneed to select a printer in the shared printer list. In the example shown in thereferenced figure, we selected the IBM4029 printer on the NSTATIONSERVERserver. Notice that the Share name of that printer is IBM4029CB, which we use ina moment to make another printer definition.
When a printer is defined that way, as a LAN printer, data sent to this printer is notspooled locally but it is sent directly to the printer, and the network connection mustbe available at the time that the print job is sent to that printer.
However, in Windows NT you can define a local printer port which represents thatLAN printer, in order to benefit from local spooling capabilities. In that case, datasent to that printer is spooled locally, and then sent to the remote LAN printer. Jobs
216 IBM Network Station Printing Guide

can be held in the local spool queue, if required (for example if our LAN connectionis not available at that moment), and later de-spooled to the LAN printer.
You can define such a local printer in a fashion similar to what we did earlier todefine an LPR port. If you look at Figure 60 on page 75, instead of selecting LPRPort, select Local Port .
You are then presented with the following panel, on which we enter\\servername\sharename. In this example, we used \\nstationserver\IBM4029CB,and then gave that printer the name IBM 4029 Laser Printer in the next panels.
Figure 224. Windows NT - Add Printer - Local Port
The result, after the printer is created, is as follows. If you select that printer, openits Properties and select the Ports tab, you get a display similar to the one below:
Figure 225. Windows NT - A Local Port for a LAN Printer
Chapter 9. Problem Determination Tools, Tips and Techniques 217

Notice that the port to which this printer is attached shows as\\nstationserver\IBM4029CB. When this printer called IBM4029 Laser Printer isselected by the application, the print data is spooled here first before being sent tothe shared LAN printer called IBM4039CB.
If you also define the same LAN printer as a network printer in the normal fashion,it appears in your Printers folder under the same name that it has on the server,with the additional text on servername. When you open this printer icon, and selectProperties, you are in fact looking at the actual printer properties on the serveritself, and the ports listed under the Properties tab are the ports defined on theserver and not on your local system.
9.11.3 Printing to FileIf for some reason you need to send printed output to a file rather than a realprinter, you should have noticed in all the above examples that there is a portcalled File.
Select the printer icon that you want to use, open its Properties , select the Portstab, click on the File port, and click OK to finish.
When you send output to that printer, you are prompted to supply a filename wherethe output is to be stored.
9.12 Typical and Common SituationsIn this section, we list a few of the common situations or error conditions that youmay encounter, the symptoms and the potential causes.
9.12.1 No Printers ConfiguredWhen you use the Print pull-down of an application, such as the 3270 emulator forexample, you might get a message such as There are no printers configured. SeeSystem Administrator.
This is an indication that the printer table has not been defined and configured withentries for local and remote print destinations.
See 9.9.1, “The Print Section Configuration” on page 183 for instructions on how toverify the contents of the printer table.
9.12.2 Load Letter Message on the PrinterSometimes, the printer stops between pages and displays a message saying LOADLETTER or something similar on the front panel. There are two probable maincauses:
� The printer has run out of paper.
� The wrong type of forms are loaded.
Some printers are able to detect what paper size has been loaded, and comparethis with the paper that is requested by the print job. If these do not match, theprinter requests that the proper form type be loaded.
218 IBM Network Station Printing Guide

It is possible to tell the printer to continue printing on the incorrect paper sizeanyway, by using a button on the printer such as Continue.
The usual reason for this to occur is that many applications default to using U.S.paper sizes, such as Letter, whereas many countries use different paper sizes,such as A4. Some applications seem to always default to Letter status, while somedo "remember" the last setting that was used by the user.
9.12.3 Waiting Message on the PrinterIf the file to be printed is a PostScript file that contains imbedded fonts, these fontsmust be loaded by the printer, as part of the print job, before the data can beprinted.
This can take a long time. If you get the message WAITING on the printer, and itshould alternate between BUSY and WAITING for a while, then one needs to bepatient and wait until the fonts have been downloaded.
For example, using an IBM4029 PostScript printer attached to an IBM NetworkStation Series 1000 model, and a PostScript file of 279 KB in length that includesimbedded fonts, the processing time before the printer starts printing wasapproximately 4 minutes and 45 seconds, and an additional 30 seconds to print thethree pages of the actual print data.
If the same file is processed without the imbedded fonts, the file size drops to 16KB, instead of 279 KB, and the total print time is then approximately 50 seconds.
Chapter 9. Problem Determination Tools, Tips and Techniques 219

220 IBM Network Station Printing Guide

Chapter 10. Application Programming Interfaces (APIs)
Because the print APIs available with the IBM Network Station are not reallyaccessible directly by the user, but only by developers, we only provide here asummary of the functions provided by this API as a matter of reference andinformation.
We do not provide examples of using these APIs or any in-depth information ontheir features and functions.
10.1 Release 1 APIsRelease 1 was the initial release of the IBM Network Station and it provided onlyrudimentary print support. A set of print APIs were provided to allow local clientapplications to print directly to the parallel port on the IBM Network Station. TheAPIs did not allow printing to the serial port or over the network to remote printservers.
The set of print APIs available in Release 1 were as follows:
getPrintAPIs This routine returns an array of function pointers to theindividual print API routines.
getPrinterList This routine returns information from the printer list createdby the system administrator. For Release 1, the API is hardcoded with the only entry being the parallel port.
setDefaultPrinter This routine designates which printer in the printer list is thedefault printer for all local applications. For Release 1, theAPI only accepts the first printer in the list since the list ishard coded with only one entry.
printOpen This routine opens a socket connection to the printerselected by the application.
printWrite This routine writes print data to the printer.
printClose This routine closes the socket connection to the printer.
10.2 Release 2 APIsOne new API, the printOpenSerial was added in Release 2 to allow applications toprint to the serial port, but this API is removed in Release 3 since it is no longerrequired.
10.3 Release 3 APIsThe print APIs have been modified for Release 3 to support printing to the serialport and to remote printers. Several of the APIs have been modified, and one APIthat was available in prior releases has been deleted. Here is a list of the APIs thatwere modified along with a brief description of what changed in each one:
getPrintAPIs This routine returns an array of function pointers to theindividual print API routines.
Copyright IBM Corp. 1998 221

getPrinterList This routine returns information from the list of printersmaintained by the system administrator in the configurationfiles. This list may contain the local serial printer, the localparallel printer, and any number of remote printers. Certaininformation about each printer is maintained in the list andcan be retrieved with the getPrinterList API. The informationin the list includes printer queue name, system hostname forremote printers, type of data stream supported by the printer,description of the printer, whether or not the printer is thedefault for the network station, whether or not banner pagesshould be sent to remote printers, and some DBCSconversion information.
setDefaultPrinter This routine allows the user to indicate which printer from theprinter list should be the default printer for all localapplications.
getDefaultPrinter This routine is used to retrieve the index of the defaultprinter. The routine returns the index into the printer list tablethat was last set using the routine setDefaultPrinter in thecurrent boot cycle of the network station. However, if nosystem-wide default has been set yet, this routine determinesthe default printer by browsing the printer table in the order ofper-user, per-terminal and per-system entries from last to firstin each group, checking to see if the configuration parameteruse-as-default is set to true. It returns the index of the firstentry that is found matching this criteria. If no entry is foundwith the value for the configuration parameter use-as-defaultas true, the API returns the index of the first printer entry inthe printer list.
printOpen This routine was modified to allow sending print job options,such as number of copies and whether or not to print abanner page. Additionally, if the printer being opened is aDBCS printer, the DBCS converter module may provide aninitialization routine to set the printer to the correct modebefore sending any application data via the printWrite API.
printOpenSerial This routine has been deleted in Release 3 because it is nolonger needed. Printing to the local serial port is supportedby the printOpen API with the index value for the serialprinter.
printWrite This routine has been enhanced to call a separate convertermodule if so indicated in the printer list. For Release 3, theonly supported converter module is the DBCS converter. TheprintWrite API accepts write requests from a local applicationand then calls the DBCS converter to transform the data in aform the printer understands. The DBCS converter alsoperforms the actual writing of data to the printer.
printClose This routine has been enhanced for the situation where aDBCS printer is being used. Before closing the connection tothe printer, a reset routine may be called in the DBCSconverter to return the printer to some known state beforeterminating the connection.
222 IBM Network Station Printing Guide

printAbort This routine aborts the connection to the printer in the middleof printing. It should be invoked by the applications in theevent of a printer error (such as printer being offline, out ofpaper, etc.) when the user elects to cancel the print job.Upon invocation, this routine causes the SERIALD daemonto flush the rest of the pending data and to close theconnection to the port (parallel or serial). If this routine isinvoked for a socket connection to the LPRD daemon (forremote printer queues), the routine simply closes theconnection to the socket without waiting for the data to drain.Note that once a connection is aborted using the routineprintAbort, there is no need to invoke the routine printCloseas the socket connection would have already been closed bythe routine printAbort.
getPrintXAPIs This routine returns an array of function pointers to the printGUI API routines.
printerSelectorGUI This routine displays a list of printers (local and remote) toallow the user to select a printer, and optionally to set one ofthe printers as the system default applicable to all clientapplications.
Local client applications are being encouraged to use thisnew API, but they are not required to do so. Theseapplications can still call the getPrinterList API to get a list ofavailable printers and display them using a different userinterface. However, for a consistent look and feel, futureclients should use the printerSelectorAPI.
The routine can be used in three different ways:
1. The API can be directed to create its own applicationcontext and a panel containing the printer selection. TheAPI retains control of X event processing for the panel.
2. The API can be directed to use the application contextcreated by the client application, and to create a panel inthis context. The API retains control of X eventprocessing for the panel.
3. The API can be directed to use the application contextand top widget created by the application, thus letting theAPI only create the printer list inside the panel alreadycreated by the client application. The client applicationretains control of X event processing for the panel it hascreated.
Chapter 10. Application Programming Interfaces (APIs) 223

224 IBM Network Station Printing Guide

Chapter 11. DBCS Considerations
In a Single Byte Character Set (SBCS) environment, a single byte is used torepresent characters. This gives us the ability to represent 256 characters, which issufficient for the numbers, letters and special symbols used in western stylelanguages.
However, this is not sufficient for some languages such as Chinese, Japanese orKorean which require a lot more than 256 characters, thereby the need to use twobytes to represent characters, which provides the ability to code 65,536 characters.
In an SBCS environment, when an application sends data to a printer, eachcharacter is represented by a single byte. (For example, the capital letter A isrepresented by Ox41 when using code page 850.)
The printer receiving these characters knows how to interpret an 0x41 and how toconvert it into the printable A character.
Similarly, when using DBCS and printers that are DBCS-enabled, the applicationcan send 2 bytes for each character that it wants to print, and the printer cantranslate these two bytes into the proper character to print.
However, what about situations where we have printers that are not DBCS-enabledbut that we want to use anyway to print some DBCS characters? That can beaccomplish by transforming DBCS characters into bitmaps images before sendingthe data to the printer, and sending bitmaps rather than normal characters.
This is illustrated in the figure below:
Copyright IBM Corp. 1998 225

Figure 226. DBCS Conversion Processing
This facility, which is transforming DBCS print data from code points to characterbitmaps, has been added in Release 3. This is accomplished by a conversionprogram that gets loaded and executed by the print APIs.
An application is now able to generate ASCII text with DBCS code points, send theresulting output to a conversion program, which then sends the output to a printerthat does not have DBCS code pages loaded. The conversion program needscertain information about the target printer to facilitate the transformation; thisinformation is stored in the printer list when configuring printers in IBM NetworkStation Manager:
� Transformation Module - This is the loadable module the print APIs will invoke.For now only the DBCS conversion module is a choice but in the future,additional conversion modules may be available.
� DBCS Type - This is the type of DBCS output being generated by theconversion program. The choices are ESC/P, IBM PS/55, IBM PAGES,Cannon LIPS, NEC, KS, KSSM, and PCL.
� Printer Resolution - This is the resolution, in dots per inch, of the target printer.Resolution is needed to properly generate the bitmap image of the characters
226 IBM Network Station Printing Guide

being converted. Possible resolutions include 180, 300, 360, 600, 720, and1200.
� DBCS Font Encoding Method - This it the method used for encoding fontinformation in the output data stream. For Release 3, this field is not be usedby the DBCS converter. It is being reserved for future use. Possible fontencoding methods include BIG-5, 5550, shift-JIS, JIS, GB, GBK, KSSM, KS,and TG.
For Release 3, the only applications generating ASCII text that can take advantageof the DBCS conversion are the 5250 and 3270 emulators. The NC Navigatorbrowser generates PostScript data, so DBCS conversion is not possible.
These additional parameters from DBCS conversion processing are configured inthe IBM Network Station Manager when defining printers in the printer list. Pleaserefer to Chapter 4, “Configuration Using the IBM Network Station Manager” onpage 47 for general instructions on how to access the IBM Network StationManager and how to configure printers.
The figure below displays the panel on which the user defines printers. Notice thebutton labeled ASCII Options... to the right of each entry in the panel.
Figure 227. Printer List Parameters - System Defaults
When using DBCS conversion processing, this button allows the specification of theparameters we discussed above, which are specific to DBCS processing. The nextfigure is included for illustration purposes of the configuration of a DBCS printer; itrepresents the panel displayed when a user clicks on the ASCII Options... button.
Chapter 11. DBCS Considerations 227

Figure 228. ASCII Options Configuration Panel
228 IBM Network Station Printing Guide

Appendix A. Special Values of Image Configurations (AS/400)
The following values are allowed for the image configuration (IMGCFG) field of theCRTDEVPRT, CHGDEVPRT, CRTOUTQ and CHGOUTQ commands. You canalso use these values when using the convert image API. For more information onhow to use these values, see AS/400 System API Reference, SC41-5801. Eachvalue is described in terms of the data streams that are supported, the maximumresolution in dots per inch (dpi), and whether the printer has color or supportscompression.
Table 8. Printers Supporting PCL Data Streams
Name Printer
*IMGA01 PCL 300-dpi printer
*IMGA02 PCL 600-dpi printer
*IMGA03 PCL 1200-dpi printer
*IMGA04 PCL 300-dpi color printer
*IMGA05 PCL 600-dpi color printer
*IMGA06 PCL 1200-dpi color printer
*IMGA07 PCL 75-dpi printer (No compression)
*IMGA08 PCL 600-dpi color printer with larger no-print border
*IMGA09 PCL 300-dpi printer (No compression)
Table 9. Printers Supporting PostScript Data Streams
Name Printer
*IMGB01 PostScript 300-dpi printer
*IMGB02 PostScript 600-dpi printer
*IMGB03 PostScript 1200-dpi printer
*IMGB04 PostScript 300-dpi color printer
*IMGB05 PostScript 600-dpi color printer
*IMGB06 PostScript 1200-dpi color printer
*IMGB07 PostScript 600x300-dpi color printer
*IMGB08 PostScript 1200x300-dpi color printer
*IMGB09 PostScript 360-dpi color printer
*IMGB10 PostScript 720-dpi color printer
*IMGB11 PostScript 1440x720-dpi color printer
*IMGB12 PostScript 400-dpi printer
*IMGB13 PostScript 800-dpi color printer
*IMGB14 PostScript 600-dpi color printer with larger no-print border
*IMGB15 PostScript 300-dpi color printer with larger no-print border
Copyright IBM Corp. 1998 229

Table 10. Printers Supporting IPDS Data Streams
Name Printer
*IMGC01 IPDS 240-dpi printer
*IMGC02 IPDS 300-dpi printer
*IMGC03 IPDS 600-dpi printer
*IMGC04 IPDS 1200-dpi printer
*IMGC05 IPDS 240-dpi printer with no-print border
*IMGC06 IPDS 300-dpi printer with no-print border
*IMGC07 IPDS 600-dpi printer with no-print border
*IMGC08 IPDS 1200-dpi printer with no-print border
*IMGC09 IPDS 240-dpi printer (IM/1 image)
*IMGC10 IPDS 240-dpi printer (IM/1 image) with no-print border
*IMGC11 IPDS 240-dpi printer (CCITT G4)
Table 11. Printers Supporting PCL and PostScript Data Streams
Name Printer
*IMGD01 PCL/PostScript 300-dpi printer
*IMGD02 PCL/PostScript 600-dpi printer
*IMGD03 PCL/PostScript 1200-dpi printer
*IMGD04 PCL/PostScript 300-dpi color printer
*IMGD05 PCL/PostScript 600-dpi color printer
*IMGD06 PCL/PostScript 1200-dpi color printer
*IMGD07 PCL 300-dpi/PostScript 600-dpi printer
*IMGD08 PCL 300-dpi/PostScript 1200-dpi printer
*IMGD09 PCL 600-dpi/PostScript 300-dpi printer
*IMGD10 PCL 600-dpi/PostScript 1200-dpi printer
*IMGD11 PCL/PostScript 600-dpi color printer with larger no-print border
Table 12 (Page 1 of 3). Recommended Image Configuration Objects for Some Common Printers
Name Printer
*IMGD01 Compaq Pagemarc 20
*IMGA01 Epson EPCL-4 Printer
*IMGA02 Epson EPCL-5 Printer
*IMGB10 Epson Stylus Photo with PostScript
*IMGB11 Epson Stylus Color 600, 800 with PostScript
*IMGA04 HP Color Laserjet 5
*IMGD04 HP Color Laserjet 5M
*IMGA04 HP Deskjet 560C, 820C, 1200C
*IMGA01 HP Deskjet 500, 600, 1200
230 IBM Network Station Printing Guide

Table 12 (Page 2 of 3). Recommended Image Configuration Objects for Some Common Printers
Name Printer
*IMGA04 HP Deskjet 1600C, 1600CN
*IMGD04 HP Deskjet 1600CM
*IMGA09 HP Laserjet II, IID, IIP
*IMGB01 HP Laserjet II, IID, IIP with PostScript
*IMGA01 HP Laserjet III, IIID, IIISi, 4L
*IMGD01 HP Laserjet III, IIID, IIISi, 4L with PostScript
*IMGA02 HP Laserjet 4, 4P, 4V, 4Si, 4 Plus
*IMGD02 HP Laserjet 4M, 4MP, 4MV, 4Si MX, 4M Plus
*IMGA02 HP Laserjet 5, 5P, 5Si
*IMGD02 HP Laserjet 5M, 5MP, 5Si MX
*IMGA02 HP Laserjet 6, 6P, 6L
*IMGD02 HP Laserjet 6M, 6MP
*IMGD02 IBM 3112, 3116 Page Printer with IPDS feature
*IMGA02 IBM 3112, 3116 Page Printer (ASCII/LAN)
*IMGD02 IBM 3112, 3116 Page Printer with PostScript
*IMGC01 IBM 3130, 3160-1 AF Printer (240-pel mode)
*IMGC02 IBM 3130 AF Printer (300-pel mode)
*IMGC09 IBM 3825, 3827, 3828 AF Printer
*IMGC01 IBM 3825, 3827, 3828 AF Printer (with AFIG)
*IMGC01 IBM 3829 AF Printer
*IMGC10 IBM 3835-001 AF Printer
*IMGC05 IBM 3835-001 AF Printer (with AFIG)
*IMGC05 IBM 3835-002, 3900 AF Printer
*IMGA01 IBM 3912, 3916 Page Printer (ASCII/LAN)
*IMGC06 IBM 3912, 3916 Page Printer with IPDS feature (twinax)
*IMGA01 IBM 3930-03 Page Printer
*IMGD01 IBM 3930-03 Page Printer with PostScript
*IMGC02 IBM 3935 AF Printer
*IMGA09 IBM 4019 LaserPrinters (HP mode)
*IMGB01 IBM 4019 LaserPrinters with PostScript
*IMGC06 IBM 4028 LaserPrinters
*IMGA01 IBM 4029 LaserPrinters
*IMGB02 IBM 4029 LaserPrinters with PostScript
*IMGA01 IBM 4039 LaserPrinters
*IMGD07 IBM 4039 LaserPrinters with PostScript
*IMGA02 IBM 4049 LaserPrinters
*IMGD02 IBM 4049 LaserPrinters with PostScript
*IMGB09 IBM 4079 Color Jetprinter PS
Appendix A. Special Values of Image Configurations (AS/400) 231

Table 12 (Page 3 of 3). Recommended Image Configuration Objects for Some Common Printers
Name Printer
*IMGB05 IBM 4303 Network Color Printer
*IMGC06 IBM 4312, 4317, 4324 NP with IPDS feature (twinax)
*IMGC06 IBM 4312, 4317, 4324 NP with IPDS feature (LAN)
*IMGA02 IBM 4312, 4317, 4324 NP (ASCII/LAN)
*IMGD02 IBM 4312, 4317, 4324 NP with PostScript (ASCII/LAN)
*IMGC03 IBM InfoPrint 60
*IMGC05 IBM InfoPrint 62 Model 2
*IMGC06 IBM InfoPrint 62 Model 3
*IMGB05 IBM InfoColor 70
*IMGC05 IBM InfoPrint 4000
*IMGC06 IBM InfoPrint 4000 High Resolution
*IMGB02 Lexmark 4039Plus
*IMGD11 Lexmark Optra C Color Printer
*IMGA02 Lexmark Optra E, E+
*IMGD02 Lexmark Optra N
*IMGD02 Lexmark Optra R+, Rx+, Lx+, Lxn+
*IMGD02 Lexmark Optra S Printers
*IMGD05 Lexmark Optra SC Color Printer
*IMGA01 Okidata OL400 LED Page Printer
*IMGA02 Okidata OL800, OL810 LED Page Printers
*IMGB12 QMS 2025, 3225
*IMGD04 QMS Magicolor CX
*IMGB09 Tektronix Phaser 140
*IMGB04 Tektronix Phaser 300
*IMGB05 Tektronix Phaser 400
*IMGB05 Tektronix Phaser 540, 550
*IMGB06 Tektronix Phaser 560
*IMGA01 Xerox 4219/MRP
*IMGA02 Xerox 4220/MRP
*IMGA02 Xerox 4230 DocuPrinter
*IMGA02 Xerox 4512, 4517 Network Printer
*IMGB13 Xerox 4520mp Printer
*IMGD04 Xerox 4700 II Color Document Printer
*IMGB08 Xerox 4915 Color Laser Printer
*IMGB05 Xerox 4920, 4925 Color Laser Printer
232 IBM Network Station Printing Guide

Appendix B. Printing from the VTxxx Emulator to a RemoteIBM Network Station
The VTxxx emulator of the IBM Network Station, which is accessible through theTerminal Console menu, allows a user to establish a telnet session to remotehosts.
Data appearing in the terminal emulation window can be printed to a printerattached to the parallel or serial port. However, in cases where there is no localprinter, there is a facility allowing the terminal emulator to print to the serial orparallel port of a remote IBM Network Station.
This sort of a special situation, undocumented for the most part, might be useful incertain situations, which is why we mention it here.
Figure 229. From IBM Network Stationto IBM Network Station
The VTxxx emulator on the IBM Network Station already has the ability to print tothe local serial or parallel port on the IBM Network Station where it executes. Thisfacility is used to normaly either print the content of the display (Print Screen), printselected areas of the the display, such as a few lines of text in the message log forexample, or to print the content of the log buffer.
One can set some of the xserver-initial-x-resources parameter in such a way as toconfigure a remote host on which to print the output of the VTxxx emulator.
As illustrated in the figure below, the required statement is:
set xserver-initial-x-resources =
"NCDterm\printerHost: itsonct1:5964
NCDterm\defaultPrintMode: Remote"
Copyright IBM Corp. 1998 233

Figure 230. From VTxxx Emulator to Remote IBM Network Station
As a result, when the user starts the VTxxx emulator and uses the file pull-down,the default entry Print to Remote is replaced by the entry Print on host:port asshown in the figure below.
234 IBM Network Station Printing Guide

Figure 231. VTxxx Emulator File Pull-Down
When this entry is selected by the user, instead of the normal Print on Parallel 1,the output of the print command is sent to the remote host specified.
Appendix B. Printing from the VTxxx Emulator to a Remote IBM Network Station 235

236 IBM Network Station Printing Guide

Appendix C. Printing Related Configuration Parameters
We summarize here, for your convenience, an example of all the configurationparameters that are directly related to printing, which have been discussed in thepreceding chapters.
set print-lprd-cache-size = 1ð
set print-lpd-cache-size = 1ð
set print-lpd-stream-large-jobs = true
set print-access-control-enabled = true
set print-access-control-list = {
{ hostname }
}
set print-lpr-servers = {
{ "localhost" "PARALLEL1" "ps" "Local Parallel Printer" nil nil nil nil false true }
{ "localhost" "SERIAL1" "ps" "Local Serial Printer" nil nil nil nil false false }
{ "burkhart.austin.ibm.com" "locps" "ps" "ITSO Queue" nil nil nil nil true false }
{ "linna.austin.ibm.com" "javaps" "ps" "AIX4.2.1 server" nil nil nil nil true false }
{ "9.53.113.131" "javaps" "ps" "Remote AIX4.2.1" nil nil nil nil true false }
}
set serial-access-control-enabled = true
set serial-access-control-list = {
{ hostname tcpip }
}
print-access-control-enabled = true
print-access-control-list = {
{ hostname tcpip }
}
set parallel-daemons-table = {
{ 1 false 5964 }
}
set serial-daemons-table = {
{ 1 false 87 }
}
set serial-interfaces-table = {
{ 1 printer printer 96ðð 8 1 none dtr/dsr none }
}
We also include here sections of the configd.doc file, which describes in detail eachof these parameters. We only included the PRINT, PARALLEL and SERIALgroups, where most of the parameters directly related to printing are located.
Please refer to the copy of the configd.doc (or configd2.doc on Windows NT) file onyour installed boot server for a description of all the parameters.
If you are not already familiar with the information contained in the configd.doc file,please refer to IBM Network Station Guide for Windows NT, SG24-2127-01,Appendix D, for a short description of how to interpret this file.
Copyright IBM Corp. 1998 237

GROUP print
NAME print-access-control-enabled
HIDEBOX Console=>Setup=>Change Setup Parameters=>
Print=>Enable Access Control
SNMP NAME ncdPrintAccessControlEnabled
SNMP PATH ncdPrint 4
TYPE BOOL
DEFAULT false
PERMISSION READ-WRITE
EFFECT IMMEDIATE
NVRAM NO
DESCRIPTION
Indicates whether to check the access control list.
NAME print-access-control-list
HIDEBOX Console=>Setup=>Change Setup Parameters=>
Print=>Print Access Control List
SNMP NAME ncdPrintAccessControlTable
SNMP PATH ncdPrint 5
TYPE TABLE
PERMISSION READ-WRITE
EFFECT IMMEDIATE
NVRAM NO
DESCRIPTION
Specifies the list of IP hosts that are allowed
access to the print daemon
BEGIN TABLE ROW ENTRIES
NAME index
SNMP NAME ncdPrintAccessControlTableIndex
SNMP PATH ncdPrintAccessControlTable 1
TYPE INTEGER
VIEW SNMP ONLY
MIN ð
MAX 4294967295
PERMISSION READ-ONLY
NVRAM NO
DESCRIPTION
Index into the Print Access Control table
NAME host
SNMP NAME ncdPrintAccessControlTableHost
SNMP PATH ncdPrintAccessControlTable 2
TYPE STRING
DEFAULT nil
PERMISSION READ-WRITE
EFFECT IMMEDIATE
NVRAM NO
DESCRIPTION
Specifies the network name/address
of a node granted permission to
access the print daemon.
238 IBM Network Station Printing Guide

END TABLE ROW ENTRIES
NAME print-lpd-cache-size
HIDEBOX Console=>Setup=>Change Setup Parameters=>
Print=>Lpd Cache Size
SNMP NAME ncdPrintLpdCacheSize
SNMP PATH ncdPrint 1
TYPE INTEGER
MIN ð
DEFAULT 1ð
MAX 95
PERMISSION READ-WRITE
EFFECT IMMEDIATE
NVRAM NO
DESCRIPTION
Maximum percentage of available memory LPD will allocate for
print job
NAME print-lpd-stream-large-jobs
HIDEBOX Console=>Setup=>Change Setup Parameters=>
Print=>Lpd Stream Large Jobs
SNMP NAME ncdPrintLpdStreamLargeJobs
SNMP PATH ncdPrint 3
TYPE BOOL
DEFAULT true
PERMISSION READ-WRITE
EFFECT IMMEDIATE
NVRAM NO
DESCRIPTION
Indicates whether incoming jobs that overflow
the cache are switched to streaming mode
NAME print-lpr-servers
HIDEBOX Console=>Setup=>Change Setup Parameters=>
Print=>Lpr Servers
SNMP NAME ncdPrintLprServersTable
SNMP PATH ncdPrint 6
TYPE TABLE
PERMISSION READ-WRITE
EFFECT IMMEDIATE
NVRAM NO
DESCRIPTION
Print server information
BEGIN TABLE ROW ENTRIES
NAME index
SNMP NAME ncdPrintLprServersTableIndex
SNMP PATH ncdPrintLprServersTable 1
TYPE INTEGER
VIEW SNMP ONLY
MIN ð
MAX 4294967295
PERMISSION READ-ONLY
Appendix C. Printing Related Configuration Parameters 239

NVRAM NO
DESCRIPTION
Index into the Print Lpr Servers table
NAME server
SNMP NAME ncdPrintLprServersTableServer
SNMP PATH ncdPrintLprServersTable 2
TYPE STRING
DEFAULT nil
PERMISSION READ-WRITE
EFFECT IMMEDIATE
NVRAM NO
DESCRIPTION
server name
NAME queue-name
SNMP NAME ncdPrintLprServersTableQueueName
SNMP PATH ncdPrintLprServersTable 3
TYPE STRING
DEFAULT nil
PERMISSION READ-WRITE
EFFECT IMMEDIATE
NVRAM NO
DESCRIPTION
queue name
NAME datastream-type
SNMP NAME ncdPrintLprServersTableDatastreamType
SNMP PATH ncdPrintLprServersTable 4
TYPE STRING
DEFAULT nil
PERMISSION READ-WRITE
EFFECT IMMEDIATE
NVRAM NO
DESCRIPTION
datastream type
NAME description
SNMP NAME ncdPrintLprServersTableDescription
SNMP PATH ncdPrintLprServersTable 5
TYPE STRING
DEFAULT nil
PERMISSION READ-WRITE
EFFECT IMMEDIATE
NVRAM NO
DESCRIPTION
description
NAME transform-file
SNMP NAME ncdPrintLprServersTableTransformFile
SNMP PATH ncdPrintLprServersTable 6
TYPE STRING
DEFAULT nil
240 IBM Network Station Printing Guide

PERMISSION READ-WRITE
EFFECT IMMEDIATE
NVRAM NO
DESCRIPTION
full path to transform file
NAME dbcs-type
SNMP NAME ncdPrintLprServersTableDbcsType
SNMP PATH ncdPrintLprServersTable 7
TYPE STRING
DEFAULT nil
PERMISSION READ-WRITE
EFFECT IMMEDIATE
NVRAM NO
DESCRIPTION
DCBS type
NAME print-resolution
SNMP NAME ncdPrintLprServersTablePrintResolution
SNMP PATH ncdPrintLprServersTable 8
TYPE STRING
DEFAULT nil
PERMISSION READ-WRITE
EFFECT IMMEDIATE
NVRAM NO
DESCRIPTION
print resolution
NAME dbcs-font-encoding
SNMP NAME ncdPrintLprServersTableDbcsFontEncoding
SNMP PATH ncdPrintLprServersTable 9
TYPE STRING
DEFAULT nil
PERMISSION READ-WRITE
EFFECT IMMEDIATE
NVRAM NO
DESCRIPTION
DBCS font encoding
NAME request-banner-page
SNMP NAME ncdPrintLprServersTableRequestBannerPage
SNMP PATH ncdPrintLprServersTable 1ð
TYPE BOOL
DEFAULT false
PERMISSION READ-WRITE
EFFECT IMMEDIATE
NVRAM NO
DESCRIPTION
request banner page
NAME use-as-default
SNMP NAME ncdPrintLprServersTableUseAsDefault
SNMP PATH ncdPrintLprServersTable 11
Appendix C. Printing Related Configuration Parameters 241

TYPE BOOL
DEFAULT false
PERMISSION READ-WRITE
EFFECT IMMEDIATE
NVRAM NO
DESCRIPTION
indicates whether this entry should be the default
END TABLE ROW ENTRIES
NAME print-lprd-cache-size
HIDEBOX Console=>Setup=>Change Setup Parameters=>
Print=>Lprd Cache Size
SNMP NAME ncdPrintLprdCacheSize
SNMP PATH ncdPrint 2
TYPE INTEGER
MIN ð
DEFAULT 1ð
MAX 95
PERMISSION READ-WRITE
EFFECT IMMEDIATE
NVRAM NO
DESCRIPTION
Maximum percentage of available memory LPRD will allocate for
print job
GROUP parallel
NAME parallel-daemons-lat-service-passwords
HIDEBOX Console=>Setup=>Change Setup Parameters=>
Access Control=>Parallel Daemon LAT Service Passwords
SNMP NAME ncdAccessParalleldLatPasswdTable
SNMP PATH ncdAccess 36
TYPE TABLE
PERMISSION READ-WRITE
EFFECT IMMEDIATE
NVRAM NO
DESCRIPTION
Specifies the LAT service passwords required to
gain access to the parallel port daemon using LAT.
BEGIN TABLE ROW ENTRIES
NAME index
SNMP NAME ncdAccessParalleldLPTIndex
SNMP PATH ncdAccessParalleldLatPasswdTable 1
TYPE INTEGER
VIEW SNMP ONLY
MIN ð
MAX 4294967295
PERMISSION READ-ONLY
NVRAM NO
DESCRIPTION
Index into the Parallel Daemons LAT Passwds Table
242 IBM Network Station Printing Guide

NAME port-number
SNMP NAME ncdAccessParalleldLPTPortNumber
SNMP PATH ncdAccessParalleldLatPasswdTable 2
TYPE INTEGER
MIN 1
MAX 2
PERMISSION READ-ONLY
NVRAM NO
DESCRIPTION
The name of the parallel port.
NAME password
SNMP NAME ncdAccessParalleldLPTPassword
SNMP PATH ncdAccessParalleldLatPasswdTable 3
TYPE STRING
DEFAULT nil
PERMISSION WRITE-ONLY
EFFECT AT_BOOT
NVRAM NO
DESCRIPTION
Specifies the LAT service password.
END TABLE ROW ENTRIES
NAME parallel-daemons-statistics-table
HIDEBOX Console=>Statistics=>Show Statistics=>
Parallel Daemons=>Parallel Daemon Statistics Table
SNMP NAME ncdParallelDStatsTbl
SNMP PATH ncdParallel 2
TYPE TABLE
PERMISSION READ-ONLY
NVRAM NO
DESCRIPTION
Specifies the table of parallel daemon statistics.
BEGIN TABLE ROW ENTRIES
NAME port-number
SNMP NAME ncdParallelDStatsTblPortNumber
SNMP PATH ncdParallelDStatsTbl 1
TYPE INTEGER
MIN 1
MAX 2
PERMISSION READ-ONLY
NVRAM NO
DESCRIPTION
The name of the parallel port.
NAME connections-accepted
SNMP NAME ncdParallelDStatsTblConnAccepts
SNMP PATH ncdParallelDStatsTbl 2
TYPE INTEGER
MIN ð
Appendix C. Printing Related Configuration Parameters 243

MAX 4294967295
PERMISSION READ-ONLY
NVRAM NO
DESCRIPTION
The number of connections made to the parallel daemon.
NAME connections-with-access-control-errors
SNMP NAME ncdParallelDStatsTblConnBadAccesses
SNMP PATH ncdParallelDStatsTbl 3
TYPE INTEGER
MIN ð
MAX 4294967295
PERMISSION READ-ONLY
NVRAM NO
DESCRIPTION
The number of connections that were closed by the
parallel daemon due to the remote address not being
present in the parallel daemon's access control list.
NAME connections-with-io-errors
SNMP NAME ncdParallelDStatsTblConnIOErrors
SNMP PATH ncdParallelDStatsTbl 4
TYPE INTEGER
MIN ð
MAX 4294967295
PERMISSION READ-ONLY
NVRAM NO
DESCRIPTION
The number of connections that were closed by the
parallel daemon due to the a local I/O error. This
includes the user aborting the connection via local
mechanisms.
NAME connections-with-normal-completion
SNMP NAME ncdParallelDStatsTblConnEofCloses
SNMP PATH ncdParallelDStatsTbl 5
TYPE INTEGER
MIN ð
MAX 4294967295
PERMISSION READ-ONLY
NVRAM NO
DESCRIPTION
The number of connections that were closed by the
remote host. This is the normal mode of ending a
connection to the parallel daemon.
END TABLE ROW ENTRIES
NAME parallel-daemons-table
HIDEBOX Console=>Setup=>Change Setup Parameters=>
Parallel=>Parallel Daemons Table
SNMP NAME ncdParallelDTable
SNMP PATH ncdParallel 1
TYPE TABLE
244 IBM Network Station Printing Guide

PERMISSION READ-WRITE
EFFECT IMMEDIATE
NVRAM NO
DESCRIPTION
Specifies the table of parallel daemon parameters.
BEGIN TABLE ROW ENTRIES
NAME parallel-daemon-table-index
SNMP NAME ncdParallelDTableIndex
SNMP PATH ncdParallelDTable 1
TYPE INTEGER
VIEW SNMP ONLY
MIN ð
MAX 4294967295
PERMISSION READ-ONLY
NVRAM NO
DESCRIPTION
The index into the parallel daemons table
NAME port-number
SNMP NAME ncdParallelDTablePortNumber
SNMP PATH ncdParallelDTable 2
TYPE INTEGER
MIN 1
MAX 2
PERMISSION READ-ONLY
NVRAM NO
DESCRIPTION
The name of the parallel port.
NAME use-parallel-protocol
SNMP NAME ncdParallelDTableUseParaProt
SNMP PATH ncdParallelDTable 3
TYPE BOOL
DEFAULT false
PERMISSION READ-WRITE
EFFECT IMMEDIATE
NVRAM NO
DESCRIPTION
Specifies that the parallel daemon control protocol
should be used. Note that this could cause some data
loss if enabled with old host software.
NAME tcp-port
SNMP NAME ncdParallelDTableTCPPort
SNMP PATH ncdParallelDTable 4
TYPE INTEGER
MIN 1
DEFAULT 5964
MAX 65535
PERMISSION READ-WRITE
EFFECT AT_BOOT
Appendix C. Printing Related Configuration Parameters 245

NVRAM NO
DESCRIPTION
Specifies the TCP port on which the terminal
listens for raw TCP connections to the parallel
daemon.
NAME ncdnet-object-name
SNMP NAME ncdParallelDTableNCDnetObjName
SNMP PATH ncdParallelDTable 5
TYPE STRING
DEFAULT PARALLELD
PERMISSION READ-WRITE
EFFECT AT_BOOT
NVRAM NO
DESCRIPTION
Specifies the NCDnet object on which the terminal
listens for NCDnet connections to the parallel
daemon.
NAME enable-lat-service
SNMP NAME ncdParallelDTableEnableLAT
SNMP PATH ncdParallelDTable 6
TYPE BOOL
DEFAULT false
PERMISSION READ-WRITE
EFFECT AT_BOOT
NVRAM NO
DESCRIPTION
Specifies that the unit is to accept incoming
LAT solicit messages for a service which
allows access to the parallel daemon. This is used
to support VMS print services to the unit.
NAME lat-service-name
SNMP NAME ncdParallelDTableLATServName
SNMP PATH ncdParallelDTable 7
TYPE STRING
DEFAULT nil
PERMISSION READ-WRITE
EFFECT AT_BOOT
NVRAM NO
DESCRIPTION
Specifies the name of the parallel daemon LAT service.
NAME lat-service-rating
SNMP NAME ncdParallelDTableLATServRating
SNMP PATH ncdParallelDTable 8
TYPE INTEGER
MIN ð
DEFAULT 5ð
MAX 255
PERMISSION READ-WRITE
EFFECT AT_BOOT
246 IBM Network Station Printing Guide

NVRAM NO
DESCRIPTION
Specifies the rating of the parallel daemon LAT service.
END TABLE ROW ENTRIES
GROUP serial
NAME serial-access-control-enabled
HIDEBOX Console=>Setup=>Change Setup Parameters=>
Access Control=>Enable Serial and Parallel Access Control
SNMP NAME ncdAccessSerialdAccessControlEnabled
SNMP PATH ncdAccess 31
TYPE BOOL
DEFAULT false
PERMISSION READ-WRITE
EFFECT IMMEDIATE
NVRAM NO
DESCRIPTION
Specifies whether xhost-style access control
is on or off for requests to connect to the
serial or parallel port daemon.
NAME serial-access-control-list
HIDEBOX Console=>Setup=>Change Setup Parameters=>
Access Control=>Serial and Parallel Access Control List
SNMP NAME ncdAccessSerialdAccessControlTable
SNMP PATH ncdAccess 32
TYPE TABLE
PERMISSION READ-WRITE
EFFECT IMMEDIATE
NVRAM NO
DESCRIPTION
Specifies the host access control list for the serial
or parallel port daemon.
BEGIN TABLE ROW ENTRIES
NAME index
SNMP NAME ncdAccessSerialdACTIndex
SNMP PATH ncdAccessSerialdAccessControlTable 1
TYPE INTEGER
VIEW SNMP ONLY
MIN ð
MAX 4294967295
PERMISSION READ-ONLY
NVRAM NO
DESCRIPTION
Index into the Serial Access Control List
NAME host
SNMP NAME ncdAccessSerialdACTAddress
SNMP PATH ncdAccessSerialdAccessControlTable 2
Appendix C. Printing Related Configuration Parameters 247

TYPE STRING
DEFAULT nil
PERMISSION READ-WRITE
EFFECT IMMEDIATE
NVRAM NO
DESCRIPTION
Specifies the network name/address
of a node granted permission to
remotely access the serial or parallel
port daemon.
NAME family
SNMP NAME ncdAccessSerialdACTFamily
SNMP PATH ncdAccessSerialdAccessControlTable 3
TYPE CHOICE
CHOICES { tcpip ncdnet lat }
DEFAULT tcpip
PERMISSION READ-WRITE
EFFECT IMMEDIATE
NVRAM NO
DESCRIPTION
Specifies the type of network connection for
which this entry applies.
END TABLE ROW ENTRIES
NAME serial-daemons-lat-service-passwords
HIDEBOX Console=>Setup=>Change Setup Parameters=>
Access Control=>Serial Daemon LAT Service Passwords
SNMP NAME ncdAccessSerialdLatPasswdTable
SNMP PATH ncdAccess 3ð
TYPE TABLE
PERMISSION READ-WRITE
EFFECT IMMEDIATE
NVRAM NO
DESCRIPTION
Specifies the LAT service passwords required to
gain access to the serial port daemons using LAT.
BEGIN TABLE ROW ENTRIES
NAME index
SNMP NAME ncdAccessSerialdLPTIndex
SNMP PATH ncdAccessSerialdLatPasswdTable 1
TYPE INTEGER
VIEW SNMP ONLY
MIN ð
MAX 4294967295
PERMISSION READ-ONLY
NVRAM NO
DESCRIPTION
Index into the Serial Daemons LAT Passwds Table
248 IBM Network Station Printing Guide

NAME port-number
SNMP NAME ncdAccessSerialdLPTPortNumber
SNMP PATH ncdAccessSerialdLatPasswdTable 2
TYPE INTEGER
MIN 1
MAX 3
PERMISSION READ-ONLY
NVRAM NO
DESCRIPTION
The name of the serial port.
NAME password
SNMP NAME ncdAccessSerialdLPTPassword
SNMP PATH ncdAccessSerialdLatPasswdTable 3
TYPE STRING
DEFAULT nil
PERMISSION WRITE-ONLY
EFFECT AT_BOOT
NVRAM NO
DESCRIPTION
Specifies the LAT service password.
END TABLE ROW ENTRIES
NAME serial-daemons-statistics-table
HIDEBOX Console=>Statistics=>Show Statistics=>
Serial Daemons=>Serial Daemon Statistics Table
SNMP NAME ncdSerialDaemonStatsTable
SNMP PATH ncdSerialDaemon 1
TYPE TABLE
PERMISSION READ-ONLY
NVRAM NO
DESCRIPTION
Specifies the table of serial daemon statistics.
BEGIN TABLE ROW ENTRIES
NAME port-number
SNMP NAME ncdSerialDaemonPortNumber
SNMP PATH ncdSerialDaemonStatsTable 1
TYPE INTEGER
MIN 1
MAX 3
PERMISSION READ-ONLY
NVRAM NO
DESCRIPTION
The name of the serial port.
NAME connections-accepted
SNMP NAME ncdSerialDaemonConnAccepts
SNMP PATH ncdSerialDaemonStatsTable 2
TYPE INTEGER
MIN ð
MAX 4294967295
Appendix C. Printing Related Configuration Parameters 249

PERMISSION READ-ONLY
NVRAM NO
DESCRIPTION
The number of connections made to the serial daemon.
NAME connections-with-access-control-errors
SNMP NAME ncdSerialDaemonConnBadAccesses
SNMP PATH ncdSerialDaemonStatsTable 3
TYPE INTEGER
MIN ð
MAX 4294967295
PERMISSION READ-ONLY
NVRAM NO
DESCRIPTION
The number of connections that were closed by the
serial daemon due to the remote address not being
present in the serial daemon's access control list.
NAME connections-with-io-errors
SNMP NAME ncdSerialDaemonConnIOErrors
SNMP PATH ncdSerialDaemonStatsTable 4
TYPE INTEGER
MIN ð
MAX 4294967295
PERMISSION READ-ONLY
NVRAM NO
DESCRIPTION
The number of connections that were closed by the
serial daemon due to the a local I/O error. This
includes the user aborting the connection via local
mechanisms.
NAME connections-with-normal-completion
SNMP NAME ncdSerialDaemonConnEofCloses
SNMP PATH ncdSerialDaemonStatsTable 5
TYPE INTEGER
MIN ð
MAX 4294967295
PERMISSION READ-ONLY
NVRAM NO
DESCRIPTION
The number of connections that were closed by the
remote host. This is the normal mode of ending a
connection to the serial daemon.
END TABLE ROW ENTRIES
NAME serial-daemons-table
HIDEBOX Console=>Setup=>Change Setup Parameters=>
Serial=>Serial Daemons Table
SNMP NAME ncdSerialSDTable
SNMP PATH ncdSerial 3
TYPE TABLE
PERMISSION READ-WRITE
250 IBM Network Station Printing Guide

EFFECT IMMEDIATE
NVRAM NO
DESCRIPTION
Specifies the table of serial daemon parameters.
BEGIN TABLE ROW ENTRIES
NAME serial-daemon-table-index
SNMP NAME ncdSerialSDTableIndex
SNMP PATH ncdSerialSDTable 1
TYPE INTEGER
VIEW SNMP ONLY
MIN ð
MAX 4294967295
PERMISSION READ-ONLY
NVRAM NO
DESCRIPTION
The index into the serial daemons interface table
NAME port-number
SNMP NAME ncdSerialSDTablePortNumber
SNMP PATH ncdSerialSDTable 2
TYPE INTEGER
MIN 1
MAX 3
PERMISSION READ-ONLY
NVRAM NO
DESCRIPTION
The name of the serial port.
NAME use-serial-protocol
SNMP NAME ncdSerialSDTableUseSerialProt
SNMP PATH ncdSerialSDTable 3
TYPE BOOL
DEFAULT false
PERMISSION READ-WRITE
EFFECT IMMEDIATE
NVRAM NO
DESCRIPTION
Specifies that the new serial daemon control protocol
should be used. Note that this could cause some data
loss if enabled with old host software.
NAME tcp-port
SNMP NAME ncdSerialSDTableTCPPort
SNMP PATH ncdSerialSDTable 4
TYPE INTEGER
MIN 1
DEFAULT 87
MAX 65535
PERMISSION READ-WRITE
EFFECT AT_BOOT
NVRAM NO
DESCRIPTION
Appendix C. Printing Related Configuration Parameters 251

Specifies the TCP port on which the terminal
listens for raw TCP connections to the serial
daemon.
NAME ncdnet-object-name
SNMP NAME ncdSerialSDTableUseNCDnetObjName
SNMP PATH ncdSerialSDTable 5
TYPE STRING
DEFAULT SERIALD
PERMISSION READ-WRITE
EFFECT AT_BOOT
NVRAM NO
DESCRIPTION
Specifies the NCDnet object on which the terminal
listens for NCDnet connections to the serial
daemon.
NAME enable-lat-service
SNMP NAME ncdSerialSDTableEnableLAT
SNMP PATH ncdSerialSDTable 6
TYPE BOOL
DEFAULT false
PERMISSION READ-WRITE
EFFECT AT_BOOT
NVRAM NO
DESCRIPTION
Specifies that the unit is to accept incoming
LAT solicit messages for a service which
allows access to the serial daemon. This is used
to support VMS print services to the unit.
NAME lat-service-name
SNMP NAME ncdSerialSDTableLATServName
SNMP PATH ncdSerialSDTable 7
TYPE STRING
DEFAULT nil
PERMISSION READ-WRITE
EFFECT AT_BOOT
NVRAM NO
DESCRIPTION
Specifies the name of the serial daemon LAT service.
NAME lat-service-rating
SNMP NAME ncdSerialSDTableLATServRating
SNMP PATH ncdSerialSDTable 8
TYPE INTEGER
MIN ð
DEFAULT 5ð
MAX 255
PERMISSION READ-WRITE
EFFECT AT_BOOT
NVRAM NO
DESCRIPTION
Specifies the rating of the serial daemon LAT service.
252 IBM Network Station Printing Guide

END TABLE ROW ENTRIES
NAME serial-interface-statistics-table
HIDEBOX Console=>Statistics=>Show Statistics=>
Serial=>Interface Statistics Table
SNMP NAME ncdSerialTable
SNMP PATH ncdSerial 1
TYPE TABLE
PERMISSION READ-ONLY
NVRAM NO
DESCRIPTION
The table of serial interfaces.
BEGIN TABLE ROW ENTRIES
NAME port-number
SNMP NAME ncdSerialInPortNumber
SNMP PATH ncdSerialTable 5
TYPE INTEGER
MIN 1
MAX 3
PERMISSION READ-ONLY
NVRAM NO
DESCRIPTION
The name of the serial port.
NAME reception-overruns
SNMP NAME ncdSerialInOverruns
SNMP PATH ncdSerialTable 1
TYPE INTEGER
MIN ð
MAX 4294967295
PERMISSION READ-ONLY
NVRAM NO
DESCRIPTION
The number of times an incoming octet overwrote a
previously received octet in the UART's buffer.
NAME reception-frame-errors
SNMP NAME ncdSerialInFrameErrors
SNMP PATH ncdSerialTable 2
TYPE INTEGER
MIN ð
MAX 4294967295
PERMISSION READ-ONLY
NVRAM NO
DESCRIPTION
The number of times an incoming octet had bad bit
alignment.
NAME reception-parity-errors
SNMP NAME ncdSerialInParityErrors
Appendix C. Printing Related Configuration Parameters 253

SNMP PATH ncdSerialTable 3
TYPE INTEGER
MIN ð
MAX 4294967295
PERMISSION READ-ONLY
NVRAM NO
DESCRIPTION
The number of times the parity bit of an incoming
octet was incorrect.
NAME reception-break-errors
SNMP NAME ncdSerialInBreakErrors
SNMP PATH ncdSerialTable 4
TYPE INTEGER
MIN ð
MAX 4294967295
PERMISSION READ-ONLY
NVRAM NO
DESCRIPTION
The number of times a stop bit was not received
at the expected time after a start bit, and the
intervening bits were all zero.
NAME total-characters-transmitted
SNMP NAME ncdSerialInTotCharXmit
SNMP PATH ncdSerialTable 6
TYPE INTEGER
MIN ð
MAX 4294967295
PERMISSION READ-ONLY
NVRAM NO
DESCRIPTION
Total characters transmitted
NAME total-transmit-interrupts
SNMP NAME ncdSerialInTotXmitInt
SNMP PATH ncdSerialTable 7
TYPE INTEGER
MIN ð
MAX 4294967295
PERMISSION READ-ONLY
NVRAM NO
DESCRIPTION
Total transmission interrupts
NAME total-characters-received
SNMP NAME ncdSerialInTotCharRcv
SNMP PATH ncdSerialTable 8
TYPE INTEGER
MIN ð
MAX 4294967295
PERMISSION READ-ONLY
NVRAM NO
DESCRIPTION
254 IBM Network Station Printing Guide

Total of characters received
NAME total-receive-interrupts
SNMP NAME ncdSerialInTotRcvInt
SNMP PATH ncdSerialTable 9
TYPE INTEGER
MIN ð
MAX 4294967295
PERMISSION READ-ONLY
NVRAM NO
DESCRIPTION
Total of reception interrupts
NAME total-receive-errors
SNMP NAME ncdSerialInTotRcvErr
SNMP PATH ncdSerialTable 1ð
TYPE INTEGER
MIN ð
MAX 4294967295
PERMISSION READ-ONLY
NVRAM NO
DESCRIPTION
Total of reception errors
END TABLE ROW ENTRIES
NAME serial-interfaces-table
HIDEBOX Console=>Setup=>Change Setup Parameters=>
Serial=>Serial Interfaces Table
SNMP NAME ncdSerialIfTable
SNMP PATH ncdSerial 2
TYPE TABLE
PERMISSION READ-WRITE
EFFECT IMMEDIATE
NVRAM YES
DESCRIPTION
Specifies the table of serial port parameters.
BEGIN TABLE ROW ENTRIES
NAME serial-interface-table-index
SNMP NAME ncdSerialIfTableIndex
SNMP PATH ncdSerialIfTable 1
TYPE INTEGER
VIEW SNMP ONLY
MIN ð
MAX 4294967295
PERMISSION READ-ONLY
NVRAM NO
DESCRIPTION
The index into the serial interface table
Appendix C. Printing Related Configuration Parameters 255

NAME port-number
SNMP NAME ncdSerialIfTablePortNumber
SNMP PATH ncdSerialIfTable 2
TYPE INTEGER
MIN 1
MAX 3
PERMISSION READ-ONLY
NVRAM NO
DESCRIPTION
The name of the serial port.
NAME mode
SNMP NAME ncdSerialIfTableMode
SNMP PATH ncdSerialIfTable 3
TYPE CHOICE
CHOICES { terminal printer serial-daemon slip console input-device xremote ppp }
DEFAULT terminal
PERMISSION READ-WRITE
EFFECT AT_BOOT
NVRAM YES
DESCRIPTION
Specifies what the serial port should be used for, but takes
effect the next time the unit
is booted. The choices
'Printer' and 'Serial Daemon' are equivalent.
NAME current-mode
SNMP NAME ncdSerialIfTableCurMode
SNMP PATH ncdSerialIfTable 9
TYPE CHOICE
CHOICES { terminal printer serial-daemon slip console input-device xremote ppp }
DEFAULT terminal
PERMISSION READ-WRITE
EFFECT IMMEDIATE
NVRAM NO
DESCRIPTION
Specifies what the serial port should be used for. Any
change takes effect immediately, but the value of this
parameter is ignored at boot time in favor of the 'mode'
value.
NAME baud-rate
SNMP NAME ncdSerialIfTableBaudRate
SNMP PATH ncdSerialIfTable 4
TYPE CHOICE
CHOICES { 5ð 75 11ð 134.5 15ð 2ðð 3ðð 6ðð 1ð5ð 12ðð 18ðð 2ððð
24ðð 48ðð 72ðð 96ðð 144ðð 192ðð 384ðð 576ðð 768ðð
1152ðð }
DEFAULT 96ðð
PERMISSION READ-WRITE
EFFECT IMMEDIATE
NVRAM YES
DESCRIPTION
Specifies the baud rate of the serial port.
256 IBM Network Station Printing Guide
NAME data-bits
SNMP NAME ncdSerialIfTableDataBits
SNMP PATH ncdSerialIfTable 5
TYPE CHOICE
CHOICES { 8 7 }
DEFAULT 8
PERMISSION READ-WRITE
EFFECT IMMEDIATE
NVRAM YES
DESCRIPTION
Specifies the number of data bits per
character of the serial port.
NAME stop-bits
SNMP NAME ncdSerialIfTableStopBits
SNMP PATH ncdSerialIfTable 6
TYPE CHOICE
CHOICES { 1 2 }
DEFAULT 1
PERMISSION READ-WRITE
EFFECT IMMEDIATE
NVRAM YES
DESCRIPTION
Specifies the number of stop bits per
character of the serial port.
NAME parity
SNMP NAME ncdSerialIfTableParity
SNMP PATH ncdSerialIfTable 7
TYPE CHOICE
CHOICES { none odd even space mark }
DEFAULT none
PERMISSION READ-WRITE
EFFECT IMMEDIATE
NVRAM YES
DESCRIPTION
Specifies the form of parity generated by
and expected by the serial port.
NAME handshake
SNMP NAME ncdSerialIfTableHandshake
SNMP PATH ncdSerialIfTable 8
TYPE CHOICE
CHOICES { none xon/xoff dtr/dsr rts/cts }
DEFAULT none
PERMISSION READ-WRITE
EFFECT IMMEDIATE
NVRAM YES
DESCRIPTION
Specifies the type of flow control
of the serial port.
Appendix C. Printing Related Configuration Parameters 257

NAME hangup
SNMP NAME ncdSerialIfTableActionOnDiscon
SNMP PATH ncdSerialIfTable 1ð
TYPE CHOICE
CHOICES { none drop-dtr send-break }
DEFAULT none
PERMISSION READ-WRITE
EFFECT IMMEDIATE
NVRAM NO
DESCRIPTION
Specifies what a local NCDterm client will do
when closing the serial port. Also specifies
what the serial daemon will do to
signal the end of a network connection.
END TABLE ROW ENTRIES
258 IBM Network Station Printing Guide

Appendix D. Special Notices
This publication is intended to help any user who needs to understand how to usethe printing capabilities of the IBM Network Station. The information in thispublication is not intended as the specification of any programming interfaces thatare provided by the IBM Network Station Manager. See the PUBLICATIONSsection of the IBM Programming Announcement for the IBM Network StationManager for more information about what publications are considered to be productdocumentation.
References in this publication to IBM products, programs or services do not implythat IBM intends to make these available in all countries in which IBM operates.Any reference to an IBM product, program, or service is not intended to state orimply that only IBM's product, program, or service may be used. Any functionallyequivalent program that does not infringe any of IBM's intellectual property rightsmay be used instead of the IBM product, program or service.
Information in this book was developed in conjunction with use of the equipmentspecified, and is limited in application to those specific hardware and softwareproducts and levels.
IBM may have patents or pending patent applications covering subject matter inthis document. The furnishing of this document does not give you any license tothese patents. You can send license inquiries, in writing, to the IBM Director ofLicensing, IBM Corporation, 500 Columbus Avenue, Thornwood, NY 10594 USA.
Licensees of this program who wish to have information about it for the purpose ofenabling: (i) the exchange of information between independently created programsand other programs (including this one) and (ii) the mutual use of the informationwhich has been exchanged, should contact IBM Corporation, Dept. 600A, Mail Drop1329, Somers, NY 10589 USA.
Such information may be available, subject to appropriate terms and conditions,including in some cases, payment of a fee.
The information contained in this document has not been submitted to any formalIBM test and is distributed AS IS. The use of this information or the implementationof any of these techniques is a customer responsibility and depends on thecustomer's ability to evaluate and integrate them into the customer's operationalenvironment. While each item may have been reviewed by IBM for accuracy in aspecific situation, there is no guarantee that the same or similar results will beobtained elsewhere. Customers attempting to adapt these techniques to their ownenvironments do so at their own risk.
Any pointers in this publication to external Web sites are provided for convenienceonly and do not in any manner serve as an endorsement of these Web sites.
The following document contains examples of data and reports used in dailybusiness operations. To illustrate them as completely as possible, the examplescontain the names of individuals, companies, brands, and products. All of thesenames are fictitious and any similarity to the names and addresses used by anactual business enterprise is entirely coincidental.
Copyright IBM Corp. 1998 259

The following terms are trademarks of the International Business MachinesCorporation in the United States and/or other countries:
The following terms are trademarks of other companies:
C-bus is a trademark of Corollary, Inc.
Java and HotJava are trademarks of Sun Microsystems, Incorporated.
Microsoft, Windows, Windows NT, and the Windows 95 logo are trademarksor registered trademarks of Microsoft Corporation.
PC Direct is a trademark of Ziff Communications Company and is usedby IBM Corporation under license.
Pentium, MMX, ProShare, LANDesk, and ActionMedia are trademarks orregistered trademarks of Intel Corporation in the U.S. and othercountries.
UNIX is a registered trademark in the United States and othercountries licensed exclusively through X/Open Company Limited.
Other company, product, and service names may be trademarks orservice marks of others.
Advanced Function Presentation AFPAIX AS/400AT BookMasterCICS eNetworkIBM IMSInfoColor InfoPrintIntelligent Printer Data Stream IP PrintWayIPDS MVSNetSpool OfficeVision/400OS/2 OS/390OS/400 RS/6000S/390 VM/ESAVTAM 400
260 IBM Network Station Printing Guide

Appendix E. Related Publications
The publications listed in this section are considered particularly suitable for a moredetailed discussion of the topics covered in this redbook.
E.1 International Technical Support Organization PublicationsFor information on ordering these ITSO publications see “How to Get ITSORedbooks” on page 263.
� IBM Network Station Guide for Windows NT, SG24-2127-01
� S/390 - IBM Network Station - Getting Started, SG24-4954-01
� AS/400 - IBM Network Station - Getting Started, SG24-2153
� RS/6000 - IBM Network Station - A Companion Guide, SG24-2016
� AS/400 Printing V, SG24-2160
� IBM TCP/IP V3 Release 2 for MVS Implementation Guide, SG24-3687-03
� TCP/IP Implementation in an OS/2 Warp Environment, SG24-4730
� The IBM eNetwork Communications Suite, SG24-2111
E.2 Redbooks on CD-ROMsRedbooks are also available on CD-ROMs. Order a subscription and receiveupdates 2-4 times a year at significant savings.
CD-ROM Title SubscriptionNumber
Collection KitNumber
System/390 Redbooks Collection SBOF-7201 SK2T-2177Networking and Systems Management Redbooks Collection SBOF-7370 SK2T-6022Transaction Processing and Data Management Redbook SBOF-7240 SK2T-8038Lotus Redbooks Collection SBOF-6899 SK2T-8039Tivoli Redbooks Collection SBOF-6898 SK2T-8044AS/400 Redbooks Collection SBOF-7270 SK2T-2849RS/6000 Redbooks Collection (HTML, BkMgr) SBOF-7230 SK2T-8040RS/6000 Redbooks Collection (PostScript) SBOF-7205 SK2T-8041RS/6000 Redbooks Collection (PDF Format) SBOF-8700 SK2T-8043Application Development Redbooks Collection SBOF-7290 SK2T-8037
E.3 Other PublicationsThese publications are also relevant as further information sources:
� AS/400 Printer Device Programming, SC41-5713
� AS/400 System API Reference, SC41-5801
Copyright IBM Corp. 1998 261

262 IBM Network Station Printing Guide

How to Get ITSO Redbooks
This section explains how both customers and IBM employees can find out about ITSO redbooks, CD-ROMs,workshops, and residencies. A form for ordering books and CD-ROMs is also provided.
This information was current at the time of publication, but is continually subject to change. The latest informationmay be found at http://www.redbooks.ibm.com/.
How IBM Employees Can Get ITSO Redbooks
Employees may request ITSO deliverables (redbooks, BookManager BOOKs, and CD-ROMs) and information aboutredbooks, workshops, and residencies in the following ways:
� PUBORDER — to order hardcopies in United States
� GOPHER link to the Internet - type GOPHER.WTSCPOK.ITSO.IBM.COM
� Tools disks
To get LIST3820s of redbooks, type one of the following commands:
TOOLS SENDTO EHONE4 TOOLS2 REDPRINT GET SG24xxxx PACKAGE
TOOLS SENDTO CANVM2 TOOLS REDPRINT GET SG24xxxx PACKAGE (Canadian users only)
To get BookManager BOOKs of redbooks, type the following command:
TOOLCAT REDBOOKS
To get lists of redbooks, type the following command:
TOOLS SENDTO USDIST MKTTOOLS MKTTOOLS GET ITSOCAT TXT
To register for information on workshops, residencies, and redbooks, type the following command:
TOOLS SENDTO WTSCPOK TOOLS ZDISK GET ITSOREGI 1998
For a list of product area specialists in the ITSO: type the following command:
TOOLS SENDTO WTSCPOK TOOLS ZDISK GET ORGCARD PACKAGE
� Redbooks Web Site on the World Wide Web
http://w3.itso.ibm.com/redbooks/
� IBM Direct Publications Catalog on the World Wide Web
http://www.elink.ibmlink.ibm.com/pbl/pbl
IBM employees may obtain LIST3820s of redbooks from this page.
� REDBOOKS category on INEWS
� Online — send orders to: USIB6FPL at IBMMAIL or DKIBMBSH at IBMMAIL
� Internet Listserver
With an Internet e-mail address, anyone can subscribe to an IBM Announcement Listserver. To initiate theservice, send an e-mail note to [email protected] with the keyword subscribe in the body of thenote (leave the subject line blank). A category form and detailed instructions will be sent to you.
Redpieces
For information so current it is still in the process of being written, look at "Redpieces" on the Redbooks Web Site(http://www.redbooks.ibm.com/redpieces.html). Redpieces are redbooks in progress; not all redbooks becomeredpieces, and sometimes just a few chapters will be published this way. The intent is to get the information outmuch quicker than the formal publishing process allows.
Copyright IBM Corp. 1998 263

How Customers Can Get ITSO Redbooks
Customers may request ITSO deliverables (redbooks, BookManager BOOKs, and CD-ROMs) and information aboutredbooks, workshops, and residencies in the following ways:
� Online Orders — send orders to:
� Telephone orders
� Mail Orders — send orders to:
� Fax — send orders to:
� 1-800-IBM-4FAX (United States) or (+1)001-408-256-5422 (Outside USA) — ask for:
Index # 4421 Abstracts of new redbooksIndex # 4422 IBM redbooksIndex # 4420 Redbooks for last six months
� Direct Services - send note to [email protected]
� On the World Wide Web
Redbooks Web Site http://www.redbooks.ibm.com/IBM Direct Publications Catalog http://www.elink.ibmlink.ibm.com/pbl/pbl
� Internet Listserver
With an Internet e-mail address, anyone can subscribe to an IBM Announcement Listserver. To initiate theservice, send an e-mail note to [email protected] with the keyword subscribe in the body of thenote (leave the subject line blank).
Redpieces
For information so current it is still in the process of being written, look at "Redpieces" on the Redbooks Web Site(http://www.redbooks.ibm.com/redpieces.html). Redpieces are redbooks in progress; not all redbooks becomeredpieces, and sometimes just a few chapters will be published this way. The intent is to get the information outmuch quicker than the formal publishing process allows.
IBMMAIL InternetIn United States: usib6fpl at ibmmail [email protected] Canada: caibmbkz at ibmmail [email protected] North America: dkibmbsh at ibmmail [email protected]
United States (toll free) 1-800-879-2755Canada (toll free) 1-800-IBM-4YOU Outside North America (long distance charges apply)(+45) 4810-1320 - Danish(+45) 4810-1420 - Dutch(+45) 4810-1540 - English(+45) 4810-1670 - Finnish(+45) 4810-1220 - French
(+45) 4810-1020 - German(+45) 4810-1620 - Italian(+45) 4810-1270 - Norwegian(+45) 4810-1120 - Spanish(+45) 4810-1170 - Swedish
IBM PublicationsPublications Customer SupportP.O. Box 29570Raleigh, NC 27626-0570USA
IBM Publications144-4th Avenue, S.W.Calgary, Alberta T2P 3N5Canada
IBM Direct ServicesSortemosevej 21DK-3450 AllerødDenmark
United States (toll free) 1-800-445-9269Canada 1-403-267-4455Outside North America (+45) 48 14 2207 (long distance charge)
264 IBM Network Station Printing Guide

IBM Redbook Order Form
Please send me the following:
Title Order Number Quantity
First name Last name
Company
Address
City Postal code Country
Telephone number Telefax number VAT number
Ø Invoice to customer number
Ø Credit card number
Credit card expiration date Card issued to Signature
We accept American Express, Diners, Eurocard, Master Card, and Visa. Payment by credit card notavailable in all countries. Signature mandatory for credit card payment.
How to Get ITSO Redbooks 265

266 IBM Network Station Printing Guide

Index
Numerics3270 emulator 283270 emulator - LU1/LU3 293270 emulator - print screen 293270 emulator - printing from 1225250 emulator 285250 emulator - printing from 122
Aaccess control 36, 52, 188access control - LPD daemon 190access control - SERIALD 188Add Printer Wizard 72adding a printer 53
AIX 155NT 139OS/400 146
Advanced Function Presentation Data Stream 14AFP 14AFPDS 14AIX - printing from 59AIX - printing to 151Alt+Shift+Home - console key sequence 182APIs 221application default printer 35AS/400 - printing from 98AS/400 message log 180ASCII 13ASCII Options 227assign printer to port - NT 213Auto CR after LF 115
Bbanner page 195baud rate - serial port 193bibliography 261boot monitor 182Browser 126buffer size - LPD and LPRD 184bypass print buffer 42, 184
Ccacher size - LPD and LPRD 184carriage return, line feed 115CFGTCP 145class 194client devices 87, 89client/COM1 90
client/LPT1 90command mode - parallel daemon 191components - network station printing 82configd.doc file 237configuration parameters 182, 237configuration requirements - printing 83configuring
LPD 51LPD passthrough - NT 202LPR 50network station 91parallel port 191printing 47serial port 56, 192the printer List 53user 87WinStation 84
connection table 193console 182console - Network Station 181control commands
AIX 213OS/2 212Windows NT 201
control file 17name 194options 194sample 197
converting data stream 150Create Output Queue 99creating - printer 89CRLF 115CRTDEVPRT 104CRTOUTQ 99
Ddata bits - serial port 193data stream 12, 29data stream conversion 150data type - RAW, TEXT 202DBCS 225
conversion 226converter 29font encoding 227type 226
default control command flag 202deleting printers 56Device Description (AS/400) 98Document Properties - NT 212drivers 14
Copyright IBM Corp. 1998 267

dummy device description 104Dummy Device Description (AS/400) 98
EEBCDIC 14emulator - printing from 122emulator print dialog 33enable access control parameter 184eSuite 136Event Viewer - Windows NT 181
Ffile - printing to 218Form Feed 124formatted print request 196
Ggreyscale 128
Hhandshake - serial port 193hex mode - printer 179hexadecimal output 179Host Print Transform 101, 177
IIBM Network Station Browser 129image configuration 150image conversion 150image print transform 177inherit user configuration 87Intelligent Printer Data Stream 14IP address of Network Station 182IPDS 14
JJava application - Print dialog 33Java applications 130JetDirect 65job name 195joblog - AS/400 180
LLine Printer Daemon 16Line Printer Requester 16literal print request 196LOAD FORMS 218LOAD LETTER 218local application - printing from 121
local IP address 193local port 193local spooling - LAN printer 216localhost 38logging messages - Network Station 181LPD 16, 28, 36
cache size 184daemon configuration parameters 183key 205on OS/2 159on OS/400 144passthrough - forcing - NT 202passthrough configuration - NT 202queue names 41server on AIX 151stream large jobs parameter 184
LPD access controlAIX 152NT 139OS/2 159OS/400 146
LPDSVC key 205LPQ command 198LPR 16, 36LPR command - VM 113LPR command - Windows NT 201Lpr servers table 185LPR/LPD control commands 194LPR/LPD control file 194LPR/LPD support 38LPRD cache size 184LPRD daemon 28LPRD daemon configuration parameters 183LPT1, LPT2 213
MMAC address of Network Station 182Manage Print Server - AIX 151Manufacturer Type and Model 102maximum LPD buffer size 51maximum LPR buffer size 50message log
AS/400 180Network Station 181Windows NT 181
messages - accessing remotely 181
NNC Navigator 28, 126NC Navigator - print dialog 33Network Station Browser 129Network Station Manager 47network station print components 82
268 IBM Network Station Printing Guide

NSK6501 message 114NSK8001 message 114NSM 47
OOS/2 - printing to 159OS/400 - printing to 144Output Queue (AS/400) 98
Ppaper sizes 218paralled 43parallel daemons table 91, 191parallel port configuration 191parallel protocol 92, 191parallel-daemons-table 192PARALLEL1 41PARALLELD 43passthrough 202passthru mode - parallel port 191Pause - console key sequence 182PCL 13Personal Printer Data Stream 13ping utility 180port
2501 147515 165964 44, 82, 191, 1925998 1816461 44, 1926464 44, 19287 44, 1929100 66serial - configuration 192
PostScript 14PPDS 13print access control list 184Print Client (LPR) 50print configuration section 183print dialog 28, 32print dialog - emulator 33print dialog - NC Navigator 33Print Manager 91print screen 122Print Server Status - AIX 151Print Spooling - AIX 151print-access-control-enabled 190print-access-control-list 190print-lpr-servers parameter 185printer
access control 36, 188default 35definition 89drivers 14
printer (continued)list 35pooling example - NT 214queues - NT 213selection 32table 35, 185
Printer Control Language 13Printer Selector 28, 34Printer Selector GUI 32printing from
3270 1225250 122AIX 59AS/400 98browser 126emulator 122eSuite 136host 57IBM Network Station 137Java applications 130local application 121NC Navigator 126Network Station Browser 129OS/2 119OS/390 117RS/6000 59VM 113VTxxx 233WinCenter 80Windows NT 72
printing toAIX 151file 218IBM Network Station 57OS/2 159OS/400 144S/390 159Windows NT 138
Qqueue names 41queues 9
RRAW data type 202Registry Editor - Windows NT 203release 182Release 1 23Release 2 25Release 3 28remote IP address 193Remote Output Queue (AS/400) 98remote port 193
Index 269

Remote Print Queue 59remote printer queue 41removing local printers 187removing printers 56RFC 1179 16RS/6000 - printing from 59RSCS EXIT 117RSCS link definition 117RSCS spooling 116
SS/390 - printing to 159sample control file 197sample SHD spooler file - Windows NT 200screen print 122SCS 14security 36security - AIX 152security - NT 139serial daemons table 92, 192serial interfaces table 92, 192serial port - configuration 192serial protocol 92, 192serial-access-control-enabled 189serial-access-control-list 189serial-daemons-table 193serial-interfaces-table 193SERIAL1 41SERIALD 43, 107SERIALD daemon 28Services window - NT 138setup menu - console 182SimulatePassThrough 204smit 151smitty 151SNA Character Stream 14software level 182spool 9start TCP/IP - OS/400 145start TCP/IP server - OS/400 145statistics - number of connections 193stop bits - serial port 193streaming 18, 36streaming on AS/400 LPR 100STRTCP 145STRTCPSVR 145system default printer 35
TTCP/IP Print Server - NT 138TELNET 181test page 78TEXT data type 202
transformation module - DBCS 226
Uuse parallel protocol 92, 191use serial protocol 92, 192user configuration 87user identification 195user properties 88
Vversion 182VM - printing from 113VTxxx 233VTxxx emulator 29
Wwaiting message 219waiting message - printer 124Web Browser 47WinCenter - printing from 80Windows NT
printing from 72printing to 138test page 78
WinStation configuration 84WinStation printer 84
270 IBM Network Station Printing Guide

ITSO Redbook Evaluation
IBM Network Station Printing GuideSG24-5212-00
Your feedback is very important to help us maintain the quality of ITSO redbooks. Please complete thisquestionnaire and return it using one of the following methods:
� Use the online evaluation form found at http://www.redbooks.ibm.com� Fax this form to: USA International Access Code + 1 914 432 8264� Send your comments in an Internet note to [email protected]
Which of the following best describes you?ØCustomer ØBusiness Partner ØIndependent Software Vendor ØIBM employeeØNone of the above
Please rate your overall satisfaction with this book using the scale:(1 = very good, 2 = good, 3 = average, 4 = poor, 5 = very poor)
Overall Satisfaction ____________
Please answer the following questions:
Was this redbook published in time for your needs? Yes____ No____
If no, please explain:_____________________________________________________________________________________________________
_____________________________________________________________________________________________________
_____________________________________________________________________________________________________
_____________________________________________________________________________________________________
What other redbooks would you like to see published?_____________________________________________________________________________________________________
_____________________________________________________________________________________________________
_____________________________________________________________________________________________________
Comments/Suggestions: ( THANK YOU FOR YOUR FEEDBACK! )_____________________________________________________________________________________________________
_____________________________________________________________________________________________________
_____________________________________________________________________________________________________
_____________________________________________________________________________________________________
_____________________________________________________________________________________________________
Copyright IBM Corp. 1998 271

SG
24-5
212-
00P
rinte
d in
the
U.S
.A.
IBM Network Station Printing Guide SG24-5212-00
ÉÂÔ