sfx quick reference guide to mahara
TRANSCRIPT
8/7/2019 SFX Quick Reference Guide to Mahara
http://slidepdf.com/reader/full/sfx-quick-reference-guide-to-mahara 1/9
Quick Reference Guide to Mahara – St.Francis Xavier 6th
Form College
Updated version 19/04/11 (JBa) Page 1
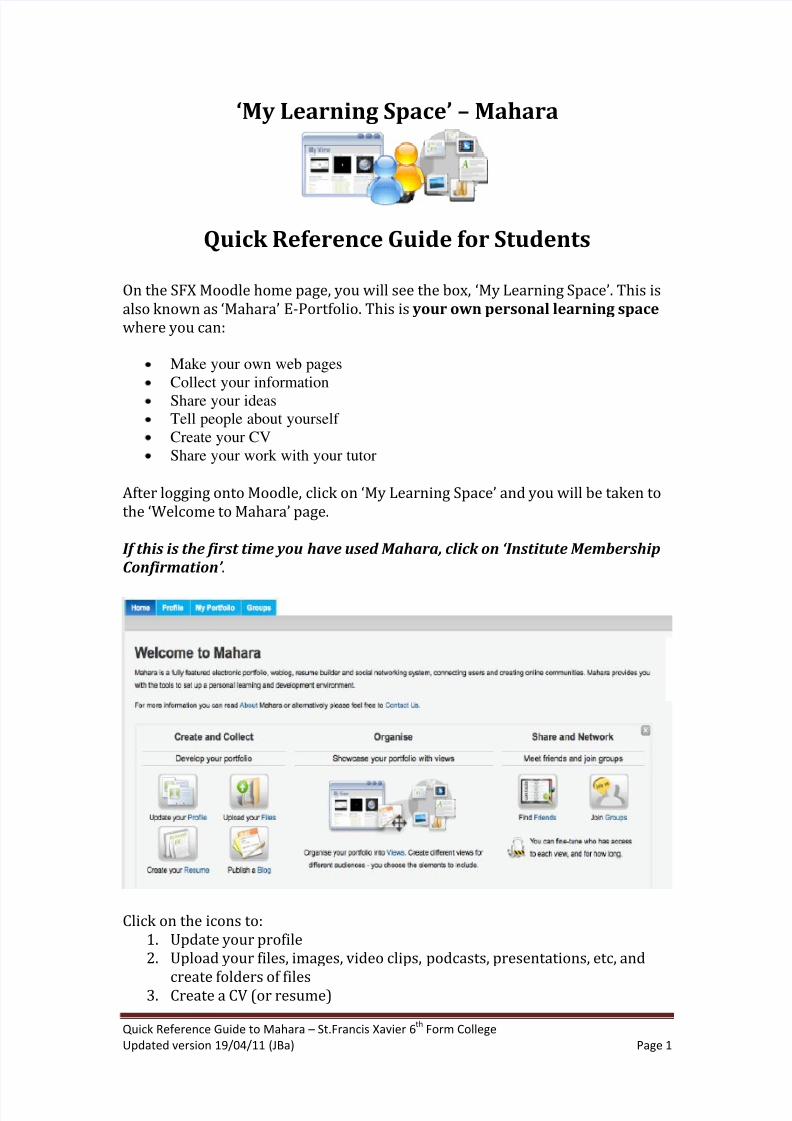
‘My Learning Space’ – Mahara
Quick Reference Guide for Students
On the SFX Moodle home page, you will see the box, ‘My Learning Space’. This is
also known as ‘Mahara’ E-Portfolio. This is your own personal learning space
where you can:
Make your own web pages
Collect your information
Share your ideas
Tell people about yourself
Create your CV
Share your work with your tutor
After logging onto Moodle, click on ‘My Learning Space’ and you will be taken to
the ‘Welcome to Mahara’ page.
If this is the first time you have used Mahara, click on ‘Institute MembershipConfirmation’ .
Click on the icons to:
1. Update your profile
2. Upload your files, images, video clips, podcasts, presentations, etc, and
create folders of files3. Create a CV (or resume)

8/7/2019 SFX Quick Reference Guide to Mahara
http://slidepdf.com/reader/full/sfx-quick-reference-guide-to-mahara 2/9
Quick Reference Guide to Mahara – St.Francis Xavier 6th
Form College
Updated version 19/04/11 (JBa) Page 2
4. Keep a blog to reflect on your learning and experiences, which you can
share with your tutor or other students
Organise a Portfolio
You can also organise your own e- portfolio by bringing together your work (orartefacts) as a web page, simply by dragging and dropping your files, images,
web links, blogs, video clips, CV, achievements and goals, etc, into the page.
When you are ready, you can then create a view to share your portfolio with
your tutor, other students or even with potential universities or employers (see
below, ‘How to create a view’).
Share and Network
Mahara also provides a safe, education-focused social networking environment,where you can find friends and tutors at college and keep in touch through
messaging.
You can also create and join Groups based on shared interests or topics and join
discussion forums. Your tutor may create a Group that you will be a member of,
so that you can share and comment on the work of other students.
Creating a View in Mahara
What is a View?
A View is a page where you can add files, images, video clips, blog posts, CV and
many other things and then share the page with others. It is a way of presenting
your work to your tutor, other students or to potential universities or employers.
What can students use a View for?
You can create as many Views as you want and have different Views for different
‘audiences’. For example:
to display work from an assignment and share it with your tutor or with aGroup of students
to present your portfolio (could include plans, reflection on your work
using a blog, documents, images, video clips, PowerPoint, CV and record
of work experience)
to send a CV to an employer
to send examples of your coursework to a university
8/7/2019 SFX Quick Reference Guide to Mahara
http://slidepdf.com/reader/full/sfx-quick-reference-guide-to-mahara 3/9
Quick Reference Guide to Mahara – St.Francis Xavier 6th
Form College
Updated version 19/04/11 (JBa) Page 3
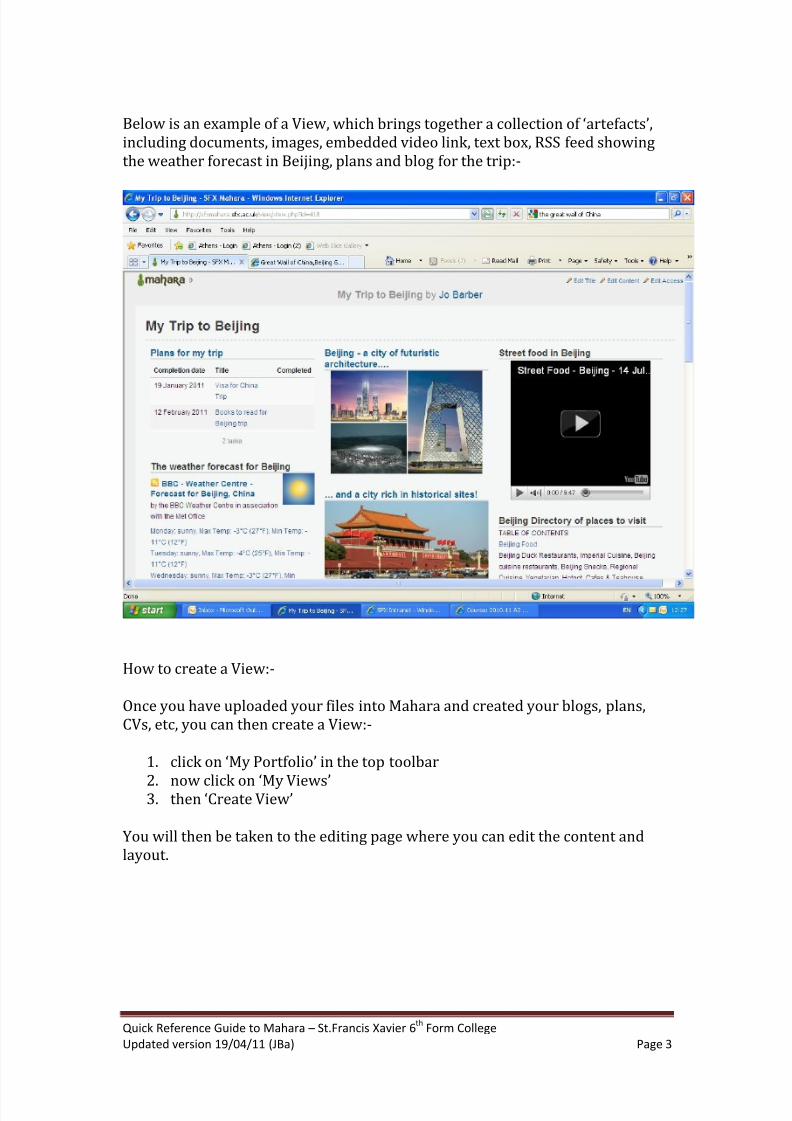
Below is an example of a View, which brings together a collection of ‘artefacts’,including documents, images, embedded video link, text box, RSS feed showing
the weather forecast in Beijing, plans and blog for the trip:-
How to create a View:-
Once you have uploaded your files into Mahara and created your blogs, plans,
CVs, etc, you can then create a View:-
1. click on ‘My Portfolio’ in the top toolbar
2.
now click on ‘My Views’ 3. then ‘Create View’
You will then be taken to the editing page where you can edit the content and
layout.
8/7/2019 SFX Quick Reference Guide to Mahara
http://slidepdf.com/reader/full/sfx-quick-reference-guide-to-mahara 4/9
Quick Reference Guide to Mahara – St.Francis Xavier 6th
Form College
Updated version 19/04/11 (JBa) Page 4
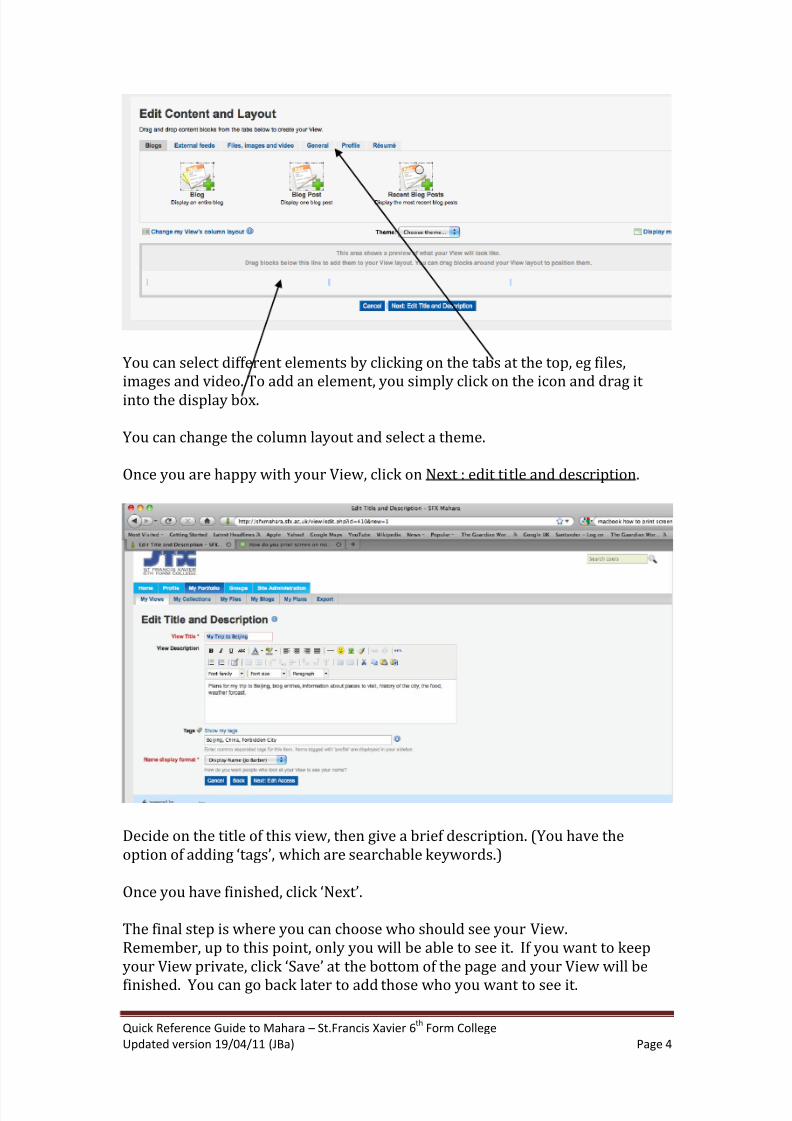
You can select different elements by clicking on the tabs at the top, eg files,
images and video. To add an element, you simply click on the icon and drag it
into the display box.
You can change the column layout and select a theme.
Once you are happy with your View, click on Next : edit title and description.
Decide on the title of this view, then give a brief description. (You have the
option of adding ‘tags’, which are searchable keywords.)
Once you have finished, click ‘Next’.
The final step is where you can choose who should see your View.
Remember, up to this point, only you will be able to see it. If you want to keep
your View private, click ‘Save’ at the bottom of the page and your View will be
finished. You can go back later to add those who you want to see it.
8/7/2019 SFX Quick Reference Guide to Mahara
http://slidepdf.com/reader/full/sfx-quick-reference-guide-to-mahara 5/9
Quick Reference Guide to Mahara – St.Francis Xavier 6th
Form College
Updated version 19/04/11 (JBa) Page 5
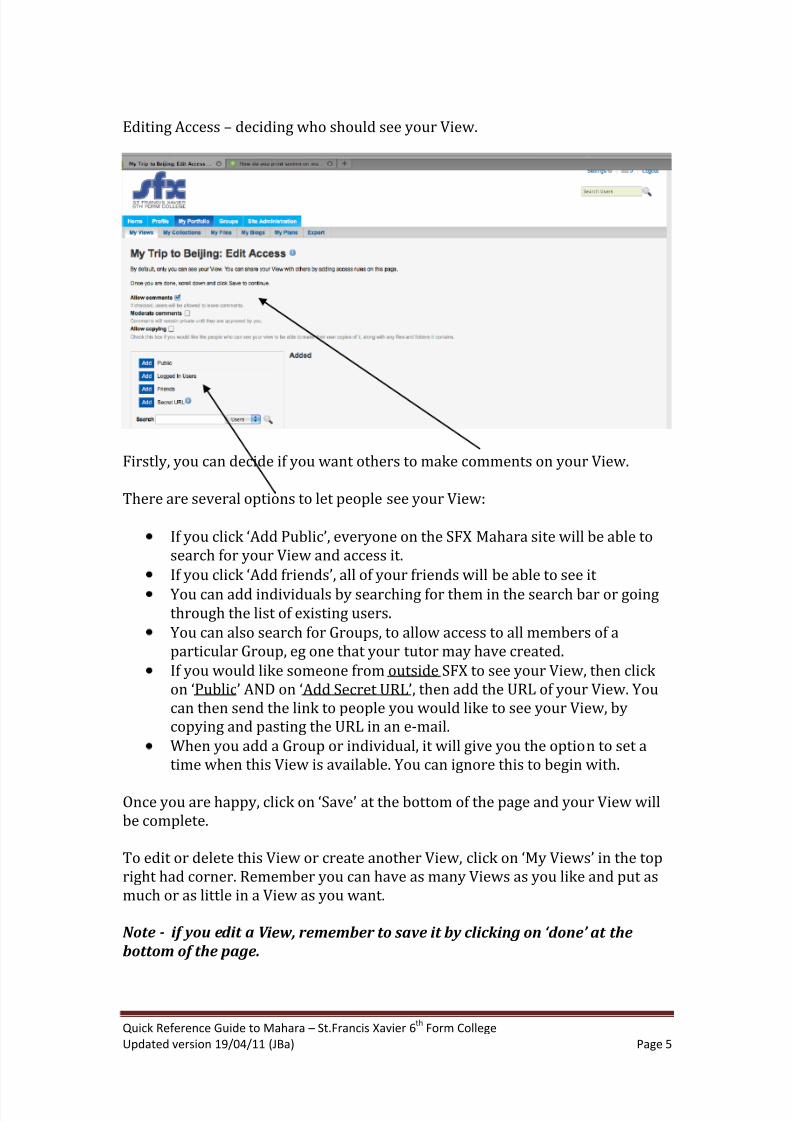
Editing Access – deciding who should see your View.
Firstly, you can decide if you want others to make comments on your View.
There are several options to let people see your View:
If you click ‘Add Public’, everyone on the SFX Mahara site will be able to
search for your View and access it.
If you click ‘Add friends’, all of your friends will be able to see it
You can add individuals by searching for them in the search bar or goingthrough the list of existing users.
You can also search for Groups, to allow access to all members of a
particular Group, eg one that your tutor may have created.
If you would like someone from outside SFX to see your View, then click
on ‘Public’ AND on ‘Add Secret URL’, then add the URL of your View. You
can then send the link to people you would like to see your View, by
copying and pasting the URL in an e-mail.
When you add a Group or individual, it will give you the option to set a
time when this View is available. You can ignore this to begin with.
Once you are happy, click on ‘Save’ at the bottom of the page and your View will
be complete.
To edit or delete this View or create another View, click on ‘My Views’ in the top
right had corner. Remember you can have as many Views as you like and put as
much or as little in a View as you want.
Note - if you edit a V iew, remember to save it by clicking on ‘done’ at the
bottom of the page.
8/7/2019 SFX Quick Reference Guide to Mahara
http://slidepdf.com/reader/full/sfx-quick-reference-guide-to-mahara 6/9
Quick Reference Guide to Mahara – St.Francis Xavier 6th
Form College
Updated version 19/04/11 (JBa) Page 6
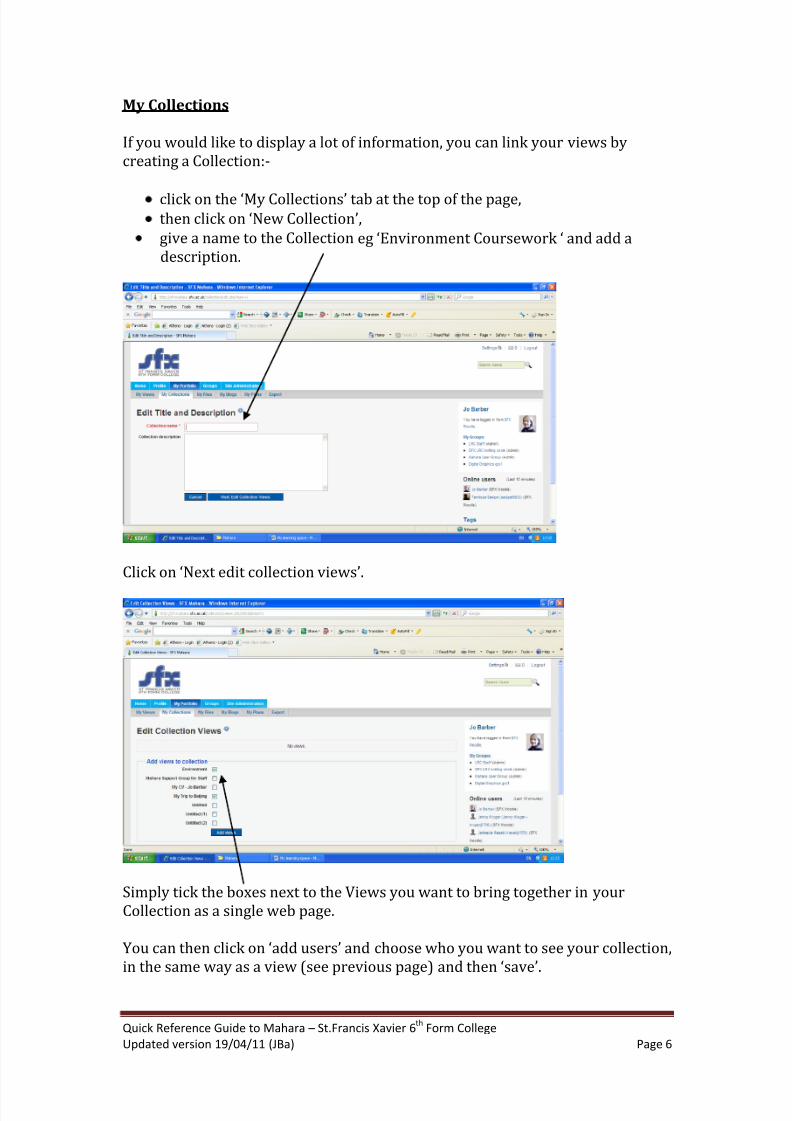
My Collections
If you would like to display a lot of information, you can link your views by
creating a Collection:-
click on the ‘My Collections’ tab at t he top of the page,then click on ‘New Collection’,
give a name to the Collection eg ‘Environment Coursework ‘ and add adescription.
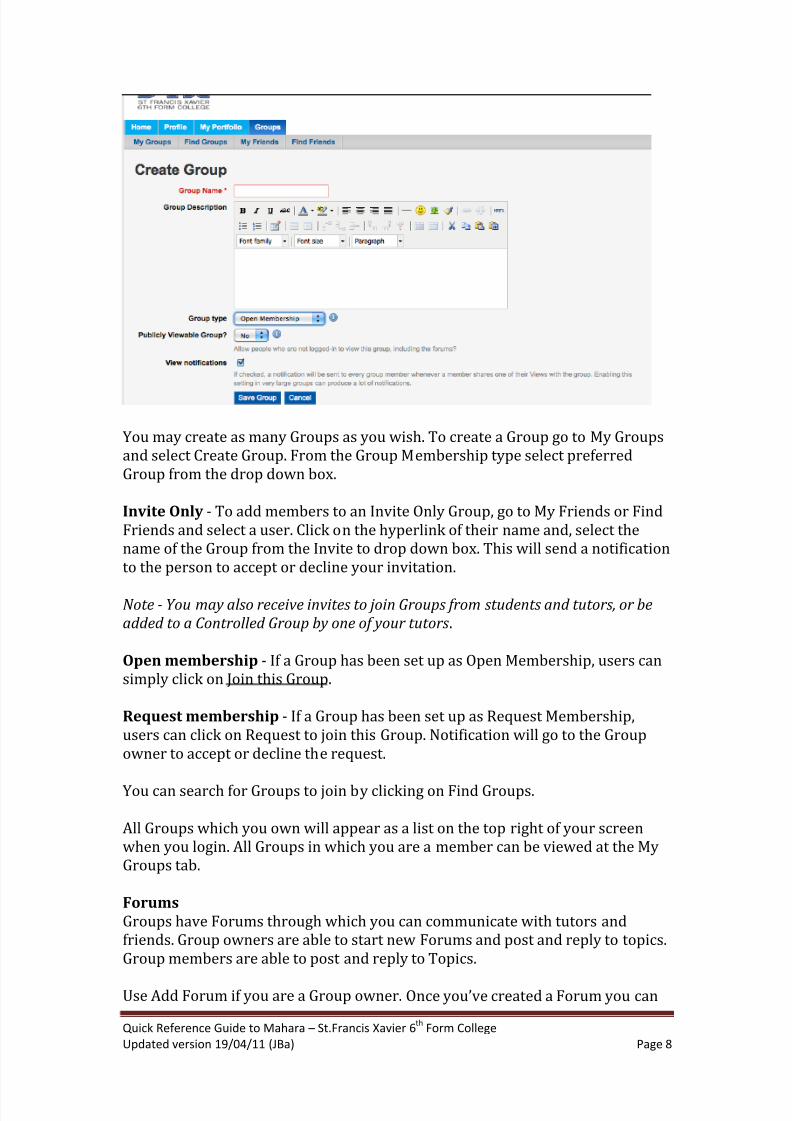
Click on ‘Next edit collection views’.
Simply tick the boxes next to the Views you want to bring together in your
Collection as a single web page.
You can then click on ‘add users’ and choose who you want to see your collection,
in the same way as a view (see previous page) and then ‘save’.

8/7/2019 SFX Quick Reference Guide to Mahara
http://slidepdf.com/reader/full/sfx-quick-reference-guide-to-mahara 7/9
Quick Reference Guide to Mahara – St.Francis Xavier 6th
Form College
Updated version 19/04/11 (JBa) Page 7
Your Collection will look like a single web page, but with different tabs for each
of the Views you selected.
Groups
The Groups tab is the area in which you can begin to make contact with other
Mahara users and search for friends and Groups of interest to you.
A Group is an online community comprising selected or invited Mahara users.
Groups can be used to develop and support learning and social activity in a social
networking environment.
Group membership types include:
Invite OnlyRequest Membership
Open Membership
Controlled Group (only tutors can create these)
8/7/2019 SFX Quick Reference Guide to Mahara
http://slidepdf.com/reader/full/sfx-quick-reference-guide-to-mahara 8/9
Quick Reference Guide to Mahara – St.Francis Xavier 6th
Form College
Updated version 19/04/11 (JBa) Page 8
You may create as many Groups as you wish. To create a Group go to My Groups
and select Create Group. From the Group Membership type select preferred
Group from the drop down box.
Invite Only - To add members to an Invite Only Group, go to My Friends or Find
Friends and select a user. Click on the hyperlink of their name and, select the
name of the Group from the Invite to drop down box. This will send a notification
to the person to accept or decline your invitation.
Note - You may also receive invites to join Groups from students and tutors, or be
added to a Controlled Group by one of your tutors.
Open membership - If a Group has been set up as Open Membership, users can
simply click on Join this Group.
Request membership - If a Group has been set up as Request Membership,
users can click on Request to join this Group. Notification will go to the Group
owner to accept or decline the request.
You can search for Groups to join by clicking on Find Groups.
All Groups which you own will appear as a list on the top right of your screen
when you login. All Groups in which you are a member can be viewed at the My
Groups tab.
Forums
Groups have Forums through which you can communicate with tutors and
friends. Group owners are able to start new Forums and post and reply to topics.
Group members are able to post and reply to Topics.
Use Add Forum if you are a Group owner. Once you’ve created a Forum you can
8/7/2019 SFX Quick Reference Guide to Mahara
http://slidepdf.com/reader/full/sfx-quick-reference-guide-to-mahara 9/9
Quick Reference Guide to Mahara – St.Francis Xavier 6th
Form College
Updated version 19/04/11 (JBa) Page 9
add Topics for discussion. To keep track of discussions in which you are
interested select Subscribe to Forum or Subscribe to Topic for individual
discussions.
Friends
Still in the Groups menu tab you can search for Friends to add to your list. Click on Find Friends.
You can search by first name, last name or preferred name if the user has
assigned one. Click Send Friend Request!, or Add to Friends if the user has
allowed that in the Friends control option.
For further guidance, please ask Jo or Danielle in the LRC .