setup instructions for lesionquant™ online via manual upload
TRANSCRIPT

©2016 CorTechs Labs, Inc. All rights reserved. Manual Upload Quick Start Guide - LesionQuant
Setup Instructions for
LesionQuant™ Online via Manual Upload
REQUIRED DOWNLOADS
1. Scanner parameters for GE, Philips, and Siemens for 1.5T or 3.0T 3D T1 and 2D or 3D FLAIR
http://www.cortechslabs.com/resources/scanner_setup/
YOU PROVIDE
1. Username & password – Included in setup email from CorTechs Labs
2. 3D T1, non-contrast, sagittal MRI scan
3. 2D or 3D FLAIR scan
4. DICOM workstation or capability of accessing and reading DICOM files
USEFUL LINKS
If you do not have a DICOM workstation, you can download a DICOM viewer here:
1. Mac (Horos): http://www.horosproject.org/download/
2. Mac (OSIRIX): http://www.osirix-viewer.com/ContributionOsiriX.html
3. PC (Onis 2.5 Free Edition): http://www.onis-viewer.com/ProductInfo.aspx?id=19
4. PC (K-PACS): http://www.image-systems.biz/forum.php?filename=ucp&mode=register
©2016 CorTechs Labs, Inc. All rights reserved.
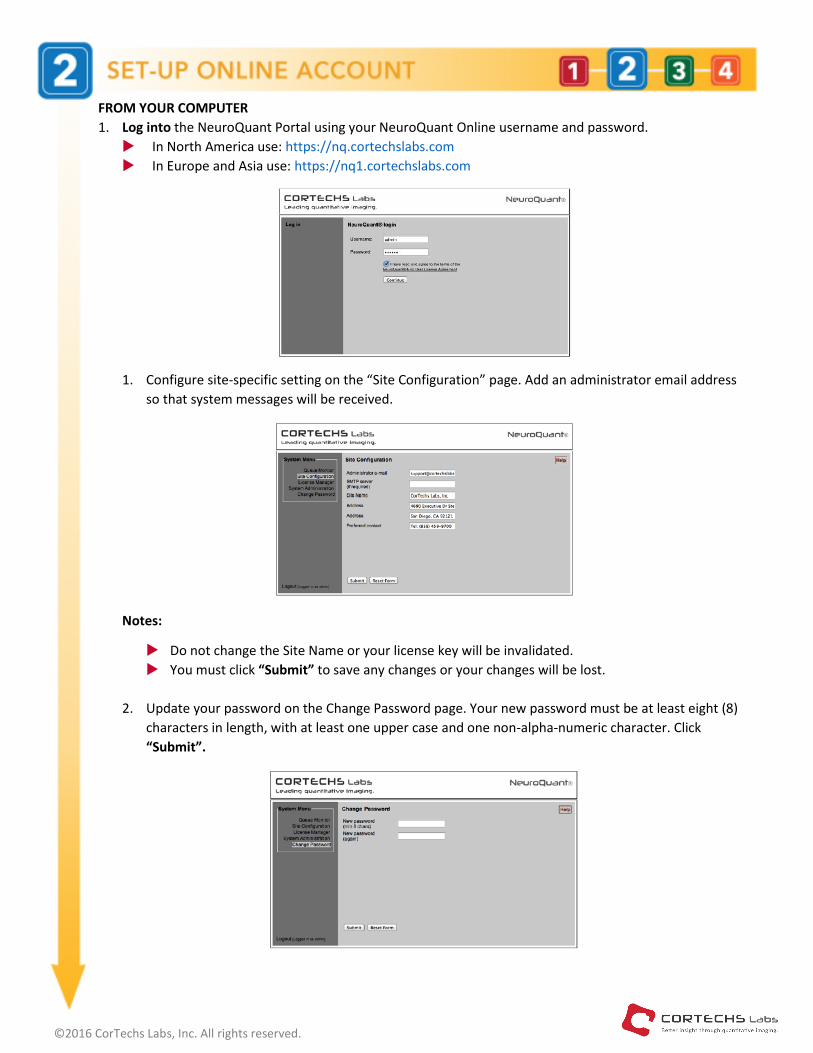
FROM YOUR COMPUTER
1. Log into the NeuroQuant Portal using your NeuroQuant Online username and password.
In North America use: https://nq.cortechslabs.com
In Europe and Asia use: https://nq1.cortechslabs.com
1. Configure site-specific setting on the “Site Configuration” page. Add an administrator email address
so that system messages will be received.
Notes:
Do not change the Site Name or your license key will be invalidated.
You must click “Submit” to save any changes or your changes will be lost.
2. Update your password on the Change Password page. Your new password must be at least eight (8)
characters in length, with at least one upper case and one non-alpha-numeric character. Click
“Submit”.

©2016 CorTechs Labs, Inc. All rights reserved.
FROM YOUR DICOM WORKSTATION
1. Export the uncompressed DICOM images for a single NeuroQuant compatible T1-weighted, sagittal, non-
contrast 3D MR series to your local drive/storage and prepare a zip archive from these files.
2. Export the uncompressed DICOM images from the matching 2D or 3D FLAIR for the same patient to your
local drive/storage and prepare a zip archive from these files.
3. Repeat process for second time point, if applicable.
Notes:
Check recommended scanner protocols for 2D or 3D FLAIR and 3D T1 MRI
http://cortechslabs.com/resources/scanner_setup/
All images must be in the same folder. Include only 3D T1 and 2D or 3D FLAIR compatible series and not
any non-image files or directories.
The image names within the archive and the archive name itself must not contain spaces, punctuation
or other special characters.
The file can be created via the following Operating System specific steps:
Windows: Right click on the folder containing your MR series and choose “Send To” “Compress
(zipped) folder”.
Mac: Right click on the folder containing your MR series and choose “Compress ‘folder’ name”.
FROM YOUR COMPUTER FROM YOUR COMPUTER
1. Log into the NeuroQuant Portal using your NeuroQuant Online
username and password.
In North America use: https://nq.cortechslabs.com
In Europe and Asia use: https://nq1.cortechslabs.com
2. Navigate to the Queue Monitor page and click Choose file at
the bottom of the page, select the archive file created in Step 1
above.
3. Click Report Type and select the desired LesionQuant report.
LesionQuant FLAIR Lesion Report
LesionQuant FLAIR Lesion Report PLUS
4. Click Upload.
PROCESS 3D T1 MRI and FLAIR SCANS

©2016 CorTechs Labs, Inc. All rights reserved.
Notes:
The PatientID must match in the 3D T1 / FLAIR pair uploaded in order for LesionQuant processing to
proceed.
Both the 3D T1 and FLAIR scan should be sent to the same report type to match the report desired.
If the FLAIR is uploaded before the 3D T1, FLAIR processing will be delayed until the matching 3D T1
series is uploaded and processed.
It may take several minutes for your series to be transferred; once the upload dialog closes, your series
will automatically be queued for processing
5. Once processing begins, the LesionQuant output to be ready for download in less than 30 minutes. The
status will be updated throughout the processing steps on the Queue Monitor page.
FINAL REPORT
The selected report can be viewed by clicking the appropriate PDF icon.
LesionQuant FLAIR Lesion Report or LesionQuant FLAIR Lesion Report PLUS
Lesion segmentation
Lesion change segmentation (if two time points are submitted)
The full processed DICOM output can be downloaded by clicking the archive icon.
Contact [email protected] or +1 (858) 459-9700 for any questions or support.
HELPFUL LINKS
LesionQuant: http://www.cortechslabs.com/lesionquant
Online System information: http://www.cortechslabs.com/resources/manual-upload/
PROCESS 3D T1 MRI and FLAIR SCANS
LesionQuant COMPLETE