setting up writer - apache openoffice
TRANSCRIPT

Setting up Writer:Choosing options to suit the way you work
Title: Setting up Writer: Choosing options to suit the way you workVersion: 1.0First edition: December 2004First Englishedition: December 2004

Contents
Overview..........................................................................................................................................ii
Copyright and trademark information.........................................................................................ii
Feedback..................................................................................................................................... ii
Acknowledgments.......................................................................................................................ii
Modifications and updates.......................................................................................................... ii
Choosing options that affect all of OOo.......................................................................................... 1
User data......................................................................................................................................1
General options........................................................................................................................... 2
View options............................................................................................................................... 3
Appearance options..................................................................................................................... 4
Choosing options for text documents.............................................................................................. 6
General options for text documents............................................................................................ 6
View options for text documents................................................................................................ 8
Formatting aids options for text documents................................................................................9
Grid options for text documents................................................................................................10
Default fonts for text documents...............................................................................................11
Print options for text documents............................................................................................... 12
Default table options for text documents.................................................................................. 13
Change tracking options for text documents.............................................................................14
Choosing language settings............................................................................................................15
Install the required dictionaries................................................................................................. 15
Choose the dictionaries and spelling options............................................................................ 15
Change the default language for documents............................................................................. 17
Controlling Writer’s AutoCorrect functions..................................................................................18
Setting up Writer i

Overview
Overview
The Options dialog controls many settings in OpenOffice.org Writer. This chapter coverssome of the setup options, particularly those that are a bit obscure or hard to find when youfirst start using the program. It does not cover all the options in detail. See the online help forfull details.
Copyright and trademark informationThe contents of this Documentation are subject to the Public Documentation License,Version 1.0 (the "License"); you may only use this Documentation if you comply with theterms of this License. A copy of the License is available at:http://www.openoffice.org/licenses/PDL.rtf.
The Original Documentation is “Setting up Writer: Choosing options to suit the way youwork“. The Initial Writer of the Original Documentation is Jean Hollis Weber © 2004. AllRights Reserved. (Initial Writer contacts: [email protected]. Use the Initial Writercontacts to report errors in the documentation. For questions regarding how to use thesoftware, subscribe to the Users Mail List and post your question there:http://support.openoffice.org/index.html.)
All trademarks within this guide belong to legitimate owners.
FeedbackPlease direct any comments or suggestions about this document to:[email protected].
AcknowledgmentsMuch of this material was first published in Taming OpenOffice.org Writer 1.1, by JeanHollis Weber, © 2003.
Modifications and updates
Version Date Description of Change
1.0 29 Dec 2004 First published edition.
Setting up Writer ii
Choosing options that affect all of OOo
Choosing options that affect all of OOo
This section covers some of the settings that apply to all the components of OOo and areparticularly important when using Writer. Other general options are discussed in the chaptertitled “Setting Up OpenOffice.org” in the Common Features Guide.
1) Click Tools > Options.
2) Click the + sign to the left of OpenOffice.org in the left-hand section. A list ofsubsections drops down.
User dataBecause Writer’s revision features mark your changes and comments with the name orinitials stored in User Data, you’ll want to ensure that your name and initials appear there. Todo this:
1) In the Options dialog, click OpenOffice.org > User Data.
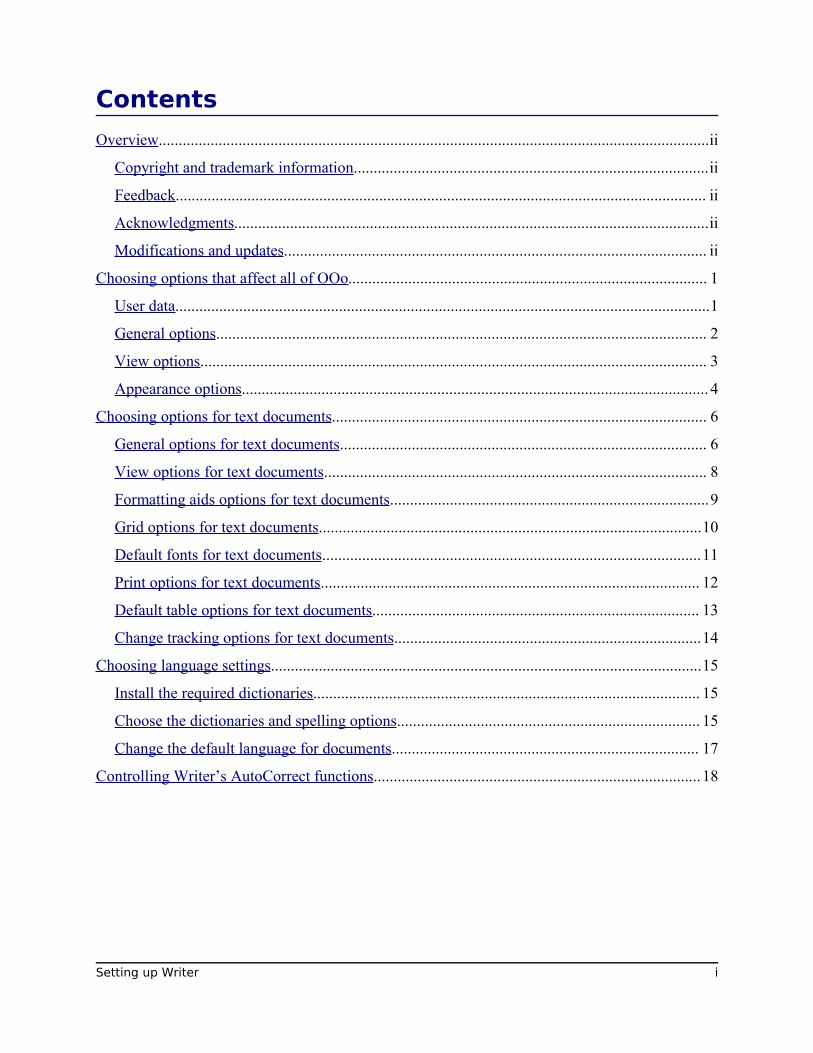
2) If anything on the User Data page (Figure 1) is incorrect, delete it and type the correctinformation.
Figure 1. Filling in user data
Note: The Back button resets options to the values that were in place when you openedOpenOffice.org. This button has the same behavior on all the options dialogs.
Setting up Writer 1
Choosing options that affect all of OOo
General options1) In the Options dialog, click OpenOffice.org > General.
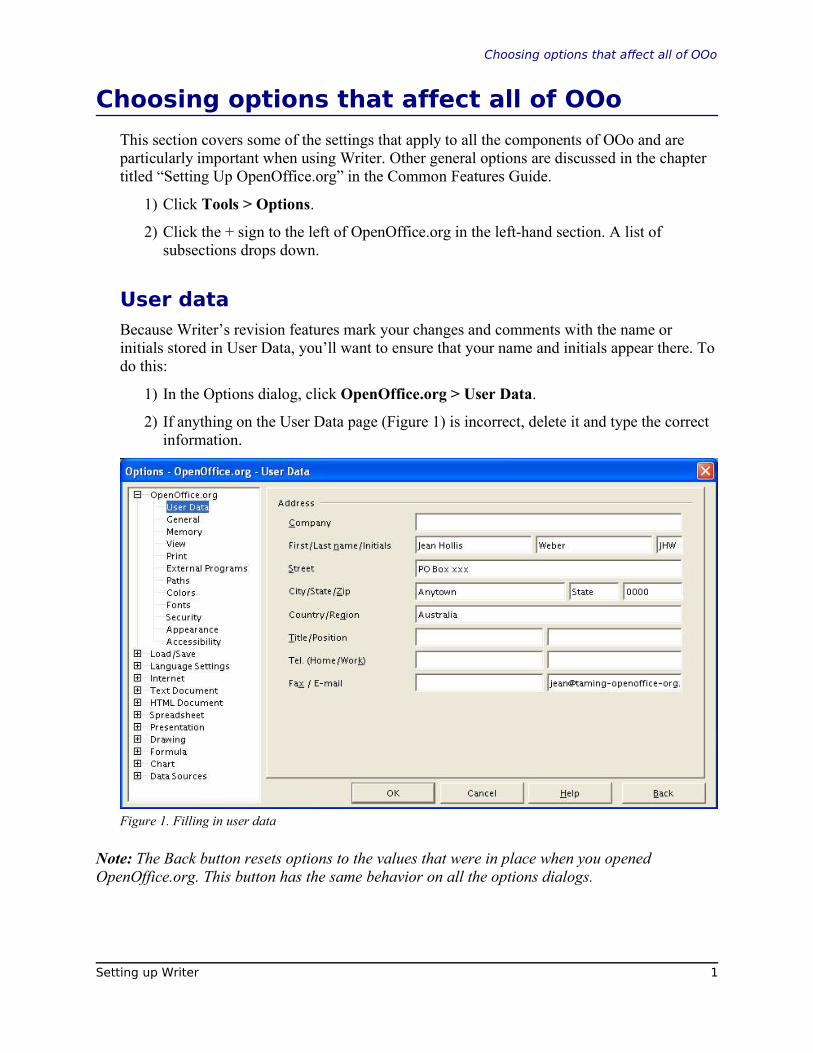
2) On the Options – OpenOffice.org – General dialog (Figure 2), the options are asdescribed below.
Figure 2. Setting general options for OpenOffice.org
Year (two digits)
Specifies how two-digit years are interpreted. For example, if the two-digit year is set to1930, and you enter a date of 1/1/30 or later into your document, the date is interpreted as1/1/1930 or later. An “earlier” date is interpreted as being in the following century; that is,1/1/20 is interpreted as 1/1/2020.
Help Agent
To turn off the Help Agent (OpenOffice.org’s equivalent to Microsoft’s Office Assistant),deselect Activate. If the Help Agent is active, you can specify how long it remains openbefore it is automatically closed. To restore the default Help Agent behavior, click Reset.
Open/Save dialogs
To use the standard Open and Save dialogs for your operating system, deselect the UseOpenOffice.org dialogs checkbox. When this checkbox is selected, the Open and Savedialogs supplied with OpenOffice.org will be used. (See the “File Management” chapter inthe Common Features Guide for more about the OOo Open and Save dialogs.)
Setting up Writer 2

Choosing options that affect all of OOo
Document status
Choose whether printing a document counts as changing the document. If this option isselected, then the next time you close the document after printing, the print date is recordedin the document properties as a change and you’ll be prompted to save the document again,even if you didn’t make any other changes.
View optionsThe choices of View options affect the way the document window looks and behaves.
1) In the Options dialog, click OpenOffice.org > View.
2) On the Options – OpenOffice.org – View dialog (Figure 3), set the options to suit yourpersonal preferences. Some options are described below.
Figure 3. Choosing View options for the OpenOffice.org applications
Preview in fonts lists
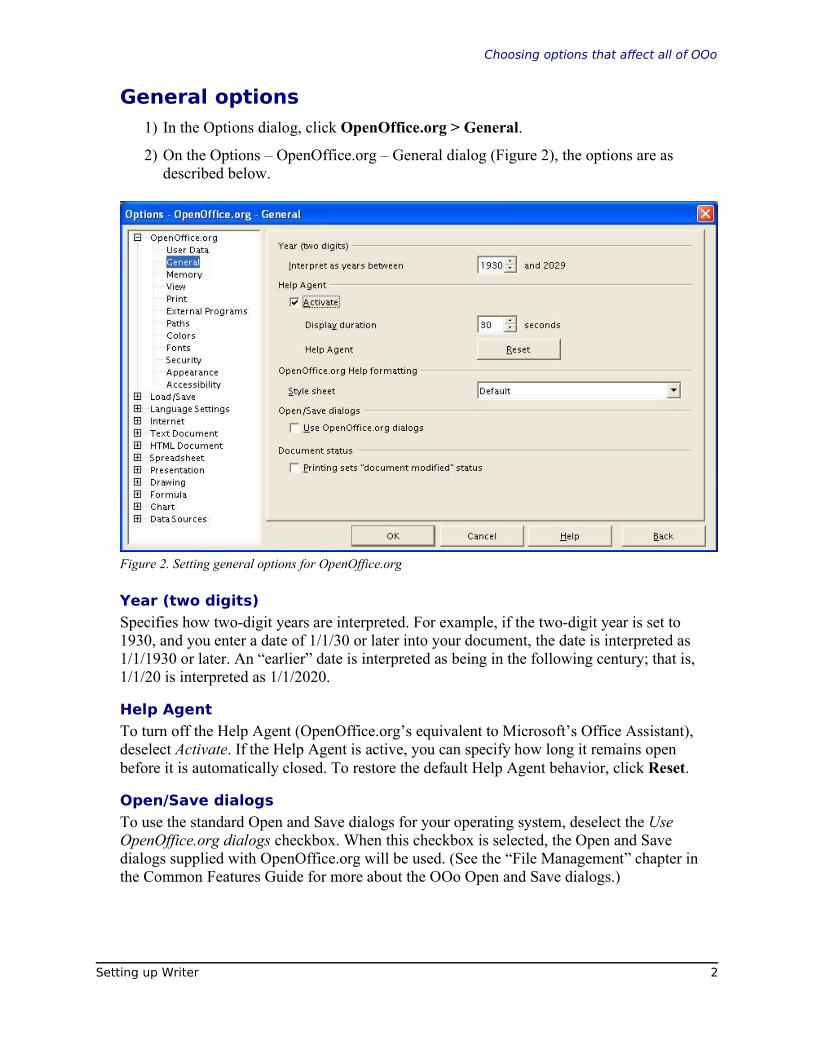
When you select this option, the font list looks like Figure 4, left, with the font names shownas an example of the font; with the checkbox deselected, the font list shows only the fontnames, not their formatting (Figure 4, right). The fonts you will see listed are those that areinstalled on your system.
Inactive menu items
Select this option if you want inactive menu items to be visible but grayed out. Deselect it toprevent inactive menu items from appearing on the menus.
Setting up Writer 3
Choosing options that affect all of OOo
Figure 4. (Left) Font list showing preview; (Right) Font list without preview
Font history
When you select this option, the last five fonts you have assigned to the current document aredisplayed at the top of the font list.
Restore – Editing view
Select this option if you want to open documents at the place the cursor was located whenyou previously closed the document. Deselect this option to always open documents at thefirst page.
Appearance optionsWriting, editing, and page layout are often easier to do when you can see as much as possibleof what’s going on in your document. For example, you need to know if any tables orgraphics are too wide and intrude into the margins of the page.
On the Options – OpenOffice.org – Appearance dialog (Figure 5), you can specify whichitems are visible and the colors used to display various items.
1) In the Options dialog, click OpenOffice.org > Appearance.
2) To show or hide items such as text boundaries, select or deselect the checkboxes nextto the names of the items.
To change the default colors for items, click the down-arrow in the Color Settingcolumn by the name of the item and select a color from the pop-up box.
3) To save your color changes as a color scheme, type a name in the Scheme box andclick Save.
Setting up Writer 4

Choosing options that affect all of OOo
Figure 5. Showing or hiding text, object, and table boundaries
Setting up Writer 5

Choosing options for text documents
Choosing options for text documents
Settings chosen on the dialogs in the Text Document section of the Options dialog determinehow your text documents look and behave while you are working on them.
1) If the Options dialog is not already open, click Tools > Options.
2) Click the + sign to the left of Text Document in the left-hand section. A list ofsubsections drops down.
General options for text documentsThe choices on the Options – Text Document – General dialog affect the updating of linksand fields, the units used for rulers and other measurements, whether captions areautomatically added to selected objects such as tables or figures, paragraph spacing, and tabstop behavior.
1) Choose Text Document > General on the Options dialog (Figure 6).
2) Keep in mind the following considerations when selecting options on this dialog.
Update links when loading
Depending on your work patterns, you may not want links to be updated when you load adocument. For example, if your file links to other files on a network, you won’t want thoselinks to update when you are not connected to the network.
Figure 6. Choosing general options for text documents
Setting up Writer 6

Choosing options for text documents
Update fields and charts automatically
You may not want fields or charts to update automatically when you are working because thatslows down performance.
Compatibility
Do you want your Writer documents to be compatible with Microsoft Word? If so, you maywant to select some or all of these settings.
Note: Unlike some other options, the compatibility settings are valid only for the currentdocument and thus must be defined separately for each document.
Settings – Tab stops
The Tab stop setting is also used for the indent distance applied by the Increase Indent andDecrease Indent icons on the Object Bar.
Captions
Do you want OOo to automatically insert captions for tables, graphics, frames, and OLEobjects that have been inserted in a text document? You may not always want captions forevery table, for example, if you use tables for layout as well as for tables of data. You canalways add captions to individual tables, graphics, or other objects.
If you do want automatic captions on one or more object types:
a) Select Caption – Automatic, then click the Object Selection button.
b) On the Caption dialog (Figure 7), choose which objects will be automatically captioned,and specify the characteristics of the captions. If the term you want for the caption labelis not in the drop-down Category list, type the required term in the box; you are notlimited to the supplied categories. In the example shown, I have added the category“Figure” to the list.
c) Click OK to return to the Options dialog.
Figure 7. Choosing settings for automatic captions on graphics
Setting up Writer 7

Choosing options for text documents
View options for text documentsTwo dialogs of options set the defaults for viewing text documents: View and FormattingAids (described on page 9).
1) Choose Text Document > View on the Options dialog (Figure 8).
2) If the items on this dialog are not self-explanatory, you can easily test their effect in ablank document.
This is a good dialog to check if, for example, you can’t see graphics on the screen, or yousee field codes instead of the text or numbers you are expecting.
Figure 8, Choosing view options for text documents
Setting up Writer 8

Choosing options for text documents
Formatting aids options for text documentsThe display of symbols such as paragraph ends and tabs help you when writing, editing, anddoing page layout. For example, you might want to know if any blank paragraphs or tabs areincluded, or if any tables or graphics are too wide and intrude into the margins of the page.
On the Options – Text Document – Formatting Aids dialog (Figure 9), select the requiredcheckboxes.
Figure 9. Choosing formatting aid options for text documents
Tip: Direct cursor enables you to enter text at any position within the type area in your textdocument. This feature is incompatible with rigorous use of styles and can lead to manyformatting oddities, so it should be avoided by professional writers.
Setting up Writer 9

Choosing options for text documents
Grid options for text documentsSpecifying “snap to grid” can be very helpful when you are trying to align several objectssuch as graphics or tables. If the grid intervals (subdivisions) are too large, you may find thatyou don’t have enough control in placing the objects.
On the Options – Text Document – Grid dialog (Figure 10), you can choose whether toenable this feature, and what grid intervals to use.
Figure 10. Choosing grid options for text documents
Setting up Writer 10

Choosing options for text documents
Default fonts for text documentsThe default fonts specified on the Basic Fonts dialog apply to both text documents andHTML (Web) documents.
1) If you want to change the defaults, do so on the Options – Text Document – BasicFonts dialog (Figure 11). You can, of course, choose other fonts for use in specificdocuments, either by applying direct formatting or by defining and applying styles inthose documents.
2) When choosing fonts in this dialog, you are not limited to single fonts or to the onesshown in the drop-down list. You can specify a “font family”—a set of fonts thatincludes those suitable for Windows, Macintosh, Linux, and other operating systerms.These choices are particularly important in HTML documents.
If the document is viewed on a system that does not have the first font specified, it willuse one of the other fonts if that one is available. Otherwise, it will substitute a fontthat is available on the system.
3) Type the list of fonts, separated by commas, in the boxes. If you want these defaults toapply to the current document only, select that checkbox. The Default button at thebottom of the dialog (not shown) resets the values on this dialog to the defaultsinstalled with OpenOffice.org.
Figure 11. Choosing default fonts for text documents
Setting up Writer 11

Choosing options for text documents
Print options for text documentsOn the Options – Text Document – Print dialog (Figure 12), you can choose which items areprinted with the document by default.
Some considerations:
• When you are working on drafts, and you want to save printer ink or toner, you mightwant to deselect some of the items in the Contents section.
• The Print black selection causes color text (but not graphics) to print as black on acolor printer; on a black-and-white printer, this option causes color text to print assolid black instead of shades of gray (dithered).
Contrast with Convert colors to grayscale on the Options – OpenOffice.org – Printdialog, which prints all graphics as grayscale on color printers. (On black-and-whiteprinters, color in graphics normally prints as grayscale.)
• If you’re printing double-sided on a non-duplexing printer, you might choose to printonly left or right pages, then turn the stack over and print the other pages.
• Depending on how your printer ejects pages (face up or face down), you might need toprint the pages in reverse order so they stack in the correct order as they are printed.
Tip: You can override any of these defaults when printing a document. Click File > Print, thenclick the Options button on the Print dialog to display the dialog in Figure 1-19.
Figure 12. Choosing print options for text documents
Setting up Writer 12

Choosing options for text documents
Default table options for text documentsOn the Options – Text Document – Table dialog (Figure 13), you can specify the defaulttable behavior.
Some considerations:
• If most of your tables will require borders or headings, select those checkboxes; mostof my tables are used for page layout, so I don’t use either borders or headings.
• Number recognition can be very useful if most of your tables contain numerical data;Writer will recognize dates or currency, for example, and format the numbersappropriately. However, in many cases you want the numbers to remain as ordinarytext, so this feature can be quite irritating. I generally deselect it.
• The Keyboard handling section specifies the distances cells will move when you usekeyboard shortcuts to move them, and the size of rows and columns inserted usingkeyboard shortcuts.
• The choices in the Behavior of rows/columns section determine the effects thatchanges to rows or columns have on adjacent rows or columns and the entire table.You may need to test these selections to fully understand the effects.
Figure 13. Choosing default table options for text documents
Setting up Writer 13

Choosing options for text documents
Change tracking options for text documentsIf you plan to use the change-tracking feature of Writer, use the Options – Text Document –Changes dialog (Figure 14) to choose the way inserted and deleted material is marked,whether and how attribute changes are marked, and whether and how change bars are markedin the margins.
Figure 14. Choosing options for tracking changes in text documents
Setting up Writer 14
Choosing language settings
Choosing language settings
You may need to do several things to set the language settings to what you want:
• Install the required dictionaries
• Choose the dictionaries and spelling options
• Change the default language for documents
• Set the version of English to be checked
Install the required dictionariesOpenOffice.org 1.1.x automatically installs several dictionaries with the program. To addother dictionaries, you can use the AutoPilot (not available in versions of OOo before 1.1.1)or install them manually.
Using the AutoPilot
1) Click File > AutoPilot > Install new dictionaries. OOo opens a file (DicOOo.sxw)containing instructions in several languages and macro buttons to start the downloadand installation process. (The available dictionaries are for many more languages thanthose used in the instructions.)
2) Click the macro button and follow the instructions in the wizard to download a list ofavailable dictionaries, select the ones you want, and download and install them. Thisprocess proceeds automatically.
Installing a dictionary manually
See http://lingucomponent.openoffice.org/ for instructions and dictionaries.
Choose the dictionaries and spelling optionsAfter installing the dictionaries (either automatically or manually), you need to register themwith OOo:
1) Start OOo (if it’s not already running) and click Tools > Options.
2) Expand Language Settings and choose Writing Aids (Figure 15).
3) Make sure OpenOffice MySpell SpellChecker under Available language modules isselected, then click the Edit button at the top right of the dialog.
Setting up Writer 15

Choosing language settings
Figure 15. Choosing languages, dictionaries, and options for checking spelling
4) In the Edit Modules dialog (Figure 16), select the language from the list at the top,then select OpenOffice MySpell SpellChecker under Spelling. Click Close.
Figure 16. Registering a new dictionary
5) Back on the Writing Aids dialog (Figure 15), choose the settings that are useful foryou. Some considerations:
• If you don’t want spelling checked while you type, select Do not mark errors anddeselect AutoCheck. (To find these items, scroll down in the Options list.)
• If you use a custom dictionary that includes words in all uppercase and words withnumbers (for example, AS/400), select Check uppercase words and Check wordswith numbers.
Setting up Writer 16

Choosing language settings
• Check special regions includes headers, footers, frames, and tables when checkingspelling. If this checkbox is not selected, text in those parts of the document arenot checked for spelling.
• On this dialog you can also select which user-defined (custom) dictionaries areactive by default, and add or remove dictionaries, by clicking the New or Deletebuttons.
Change the default language for documents1) Choose Languages under Language Settings on the left-hand side of the Options
dialog.
2) On the right-hand side (as shown in Figure 17), change the Locale setting, Defaultcurrency, and Default languages for documents. In the example, English (Australia)has been chosen as the locale, and the Australian dollar (AUD) for the currency.Although an English (Australia) dictionary exists, the English (UK) dictionary hasbeen selected as the default language.
3) If you want the language (dictionary) setting to apply to the current document only,instead of being the default for all new documents, select the checkbox labelled Forthe current document only.
4) If necessary, select the checkboxes to enable support for Asian languages (Chinese,Japanese, Korean) and support for CTL (complex text layout) languages such as Hindi,Thai, Hebrew, and Arabic. If you choose either of these checkboxes, the next time youopen this dialog, you will see some extra dialogs under Language Settings.
Figure 17. Choosing language options
Setting up Writer 17
Controlling Writer’s AutoCorrect functions
Controlling Writer’s AutoCorrect functions
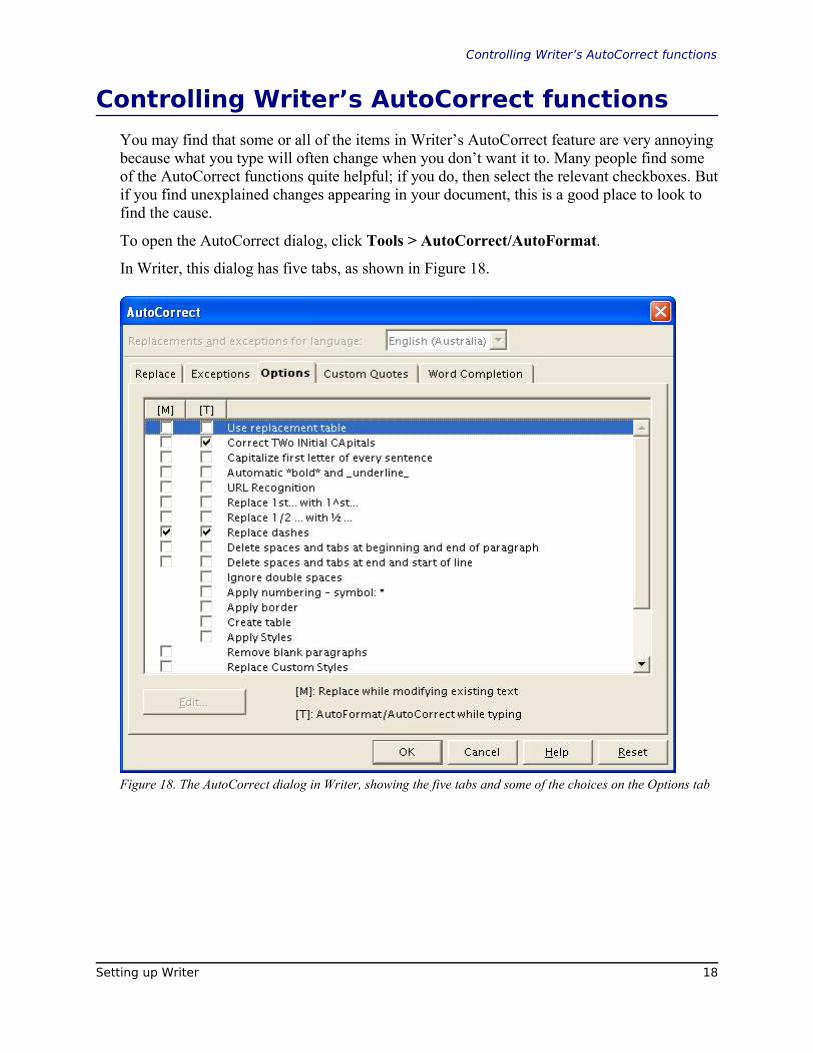
You may find that some or all of the items in Writer’s AutoCorrect feature are very annoyingbecause what you type will often change when you don’t want it to. Many people find someof the AutoCorrect functions quite helpful; if you do, then select the relevant checkboxes. Butif you find unexplained changes appearing in your document, this is a good place to look tofind the cause.
To open the AutoCorrect dialog, click Tools > AutoCorrect/AutoFormat.
In Writer, this dialog has five tabs, as shown in Figure 18.
Figure 18. The AutoCorrect dialog in Writer, showing the five tabs and some of the choices on the Options tab
Setting up Writer 18