setting up the netcomm nb5580wmedia.netcomm.com.au/public/assets/pdf_file/0011/14501/...4 6. on the...
TRANSCRIPT
1
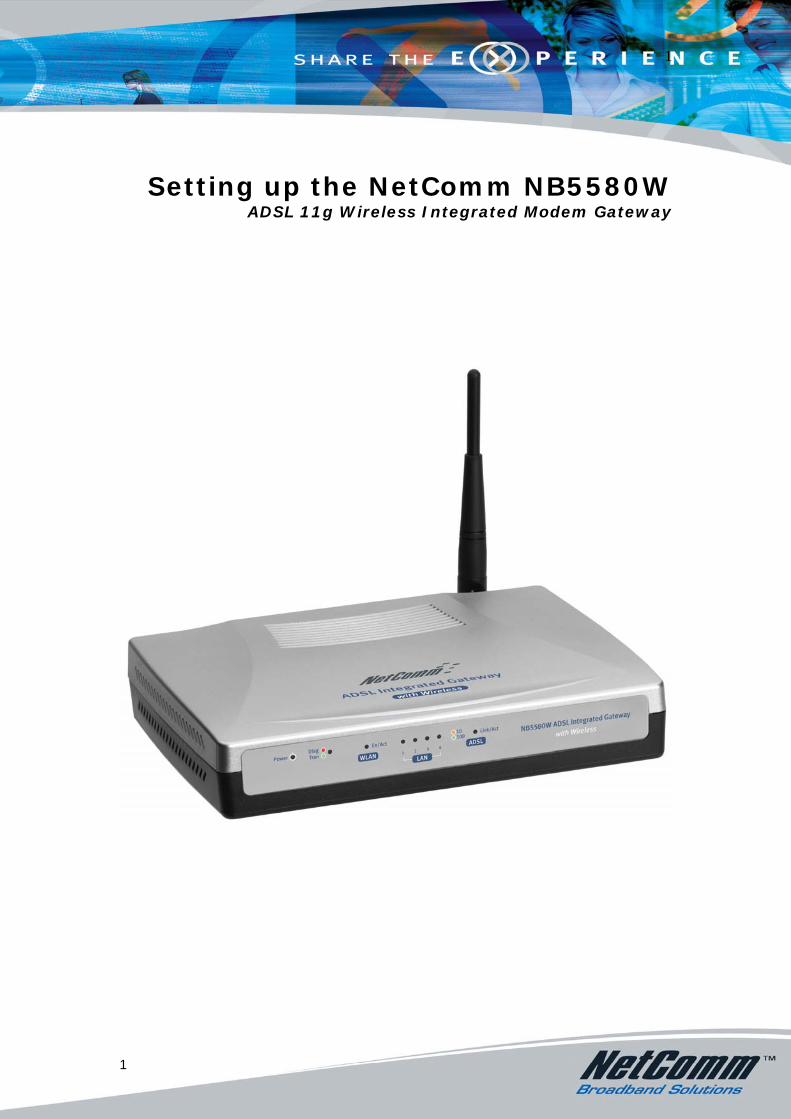
Setting up the NetComm NB5580W ADSL 11g Wireless Integrated Modem Gateway
1
2
Table of Contents:
Introduction 3
Pre-setup 3
Configuring the NB5580w 3
NB5580w Security 5 Setting the administrator password 5 Setting up Wireless Security on the NB5580w 6 Connecting to the NB5580w Wirelessly 12
2
3
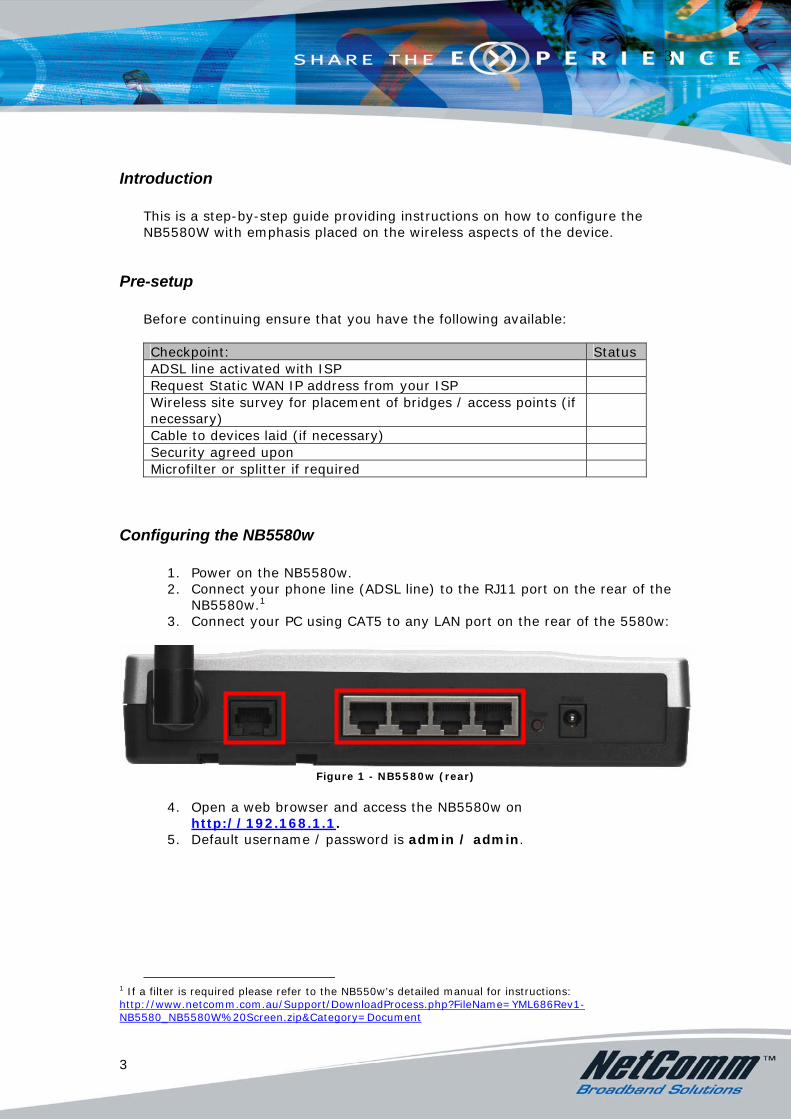
Introduction
This is a step-by-step guide providing instructions on how to configure the NB5580W with emphasis placed on the wireless aspects of the device.
Pre-setup Before continuing ensure that you have the following available: Checkpoint: Status ADSL line activated with ISP Request Static WAN IP address from your ISP Wireless site survey for placement of bridges / access points (if necessary)
Cable to devices laid (if necessary) Security agreed upon Microfilter or splitter if required
Configuring the NB5580w
1. Power on the NB5580w. 2. Connect your phone line (ADSL line) to the RJ11 port on the rear of the
NB5580w.1 3. Connect your PC using CAT5 to any LAN port on the rear of the 5580w:
Figure 1 - NB5580w (rear)
4. Open a web browser and access the NB5580w on
http://192.168.1.1. 5. Default username / password is admin / admin.
1 If a filter is required please refer to the NB550w’s detailed manual for instructions: http://www.netcomm.com.au/Support/DownloadProcess.php?FileName=YML686Rev1-NB5580_NB5580W%20Screen.zip&Category=Document
3
4
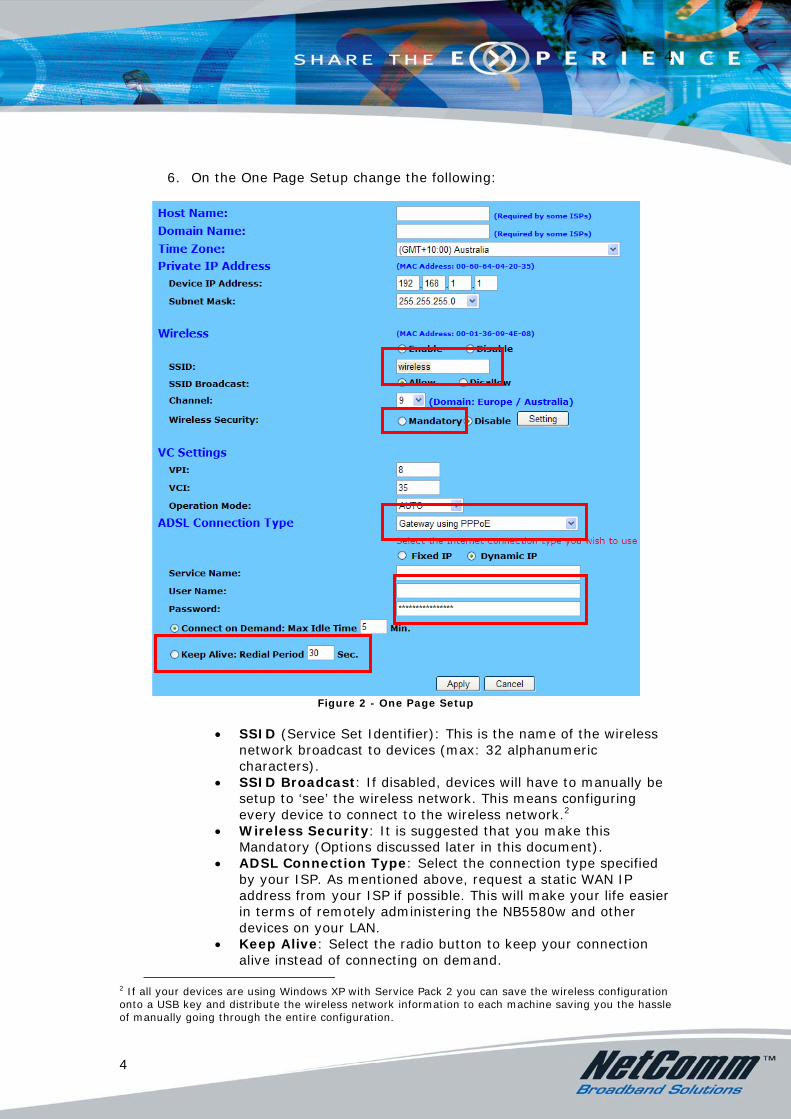
6. On the One Page Setup change the following:
Figure 2 - One Page Setup
• SSID (Service Set Identifier): This is the name of the wireless
network broadcast to devices (max: 32 alphanumeric characters).
• SSID Broadcast: If disabled, devices will have to manually be setup to ‘see’ the wireless network. This means configuring every device to connect to the wireless network.2
• Wireless Security: It is suggested that you make this Mandatory (Options discussed later in this document).
• ADSL Connection Type: Select the connection type specified by your ISP. As mentioned above, request a static WAN IP address from your ISP if possible. This will make your life easier in terms of remotely administering the NB5580w and other devices on your LAN.
• Keep Alive: Select the radio button to keep your connection alive instead of connecting on demand.
2 If all your devices are using Windows XP with Service Pack 2 you can save the wireless configuration onto a USB key and distribute the wireless network information to each machine saving you the hassle of manually going through the entire configuration.
4
5
7. Click Apply. NB5580w will reboot with your new settings loaded. 8. Ensure that you have synch with on your ADSL line (green light for
ADSL link on front of NB5580w). 9. Check you have a connection to the Internet. If not, contact your ISP
or NetComm to resolve this.
NB5580w Security
Setting the administrator password It is a very good idea (in other words – crucial) to change the administrator password on the NB5580w as follows:
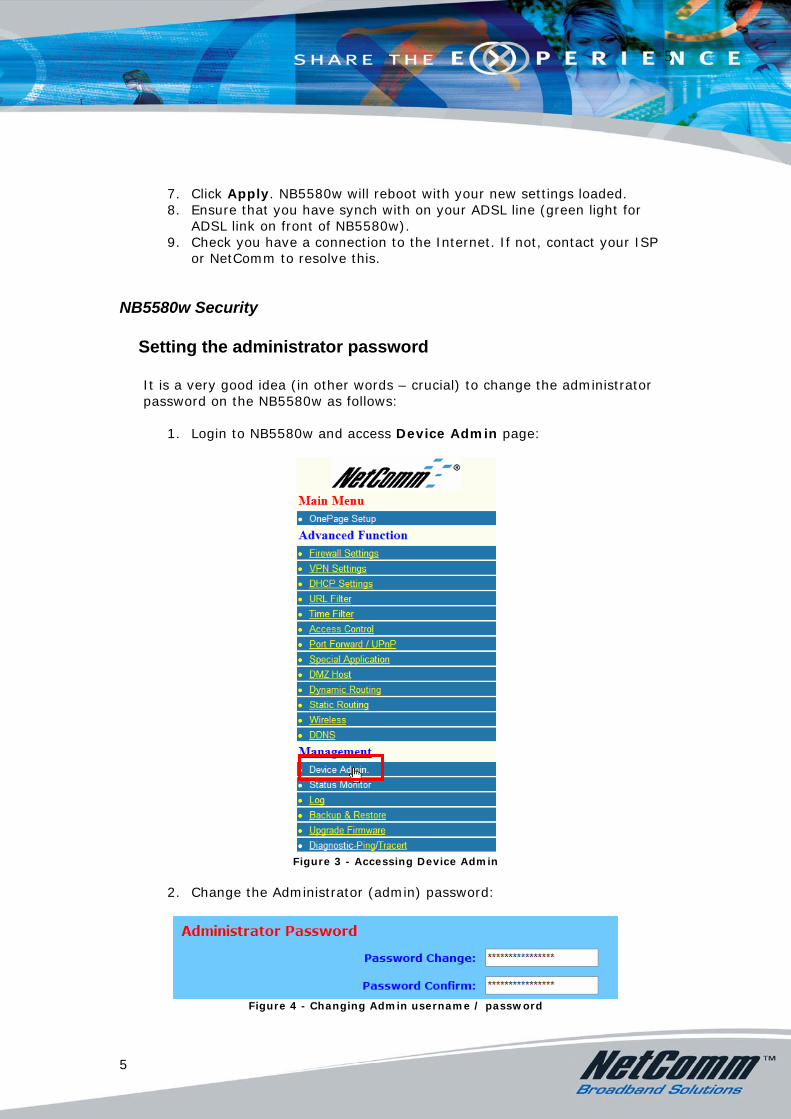
1. Login to NB5580w and access Device Admin page:
Figure 3 - Accessing Device Admin
2. Change the Administrator (admin) password:
Figure 4 - Changing Admin username / password
5
6
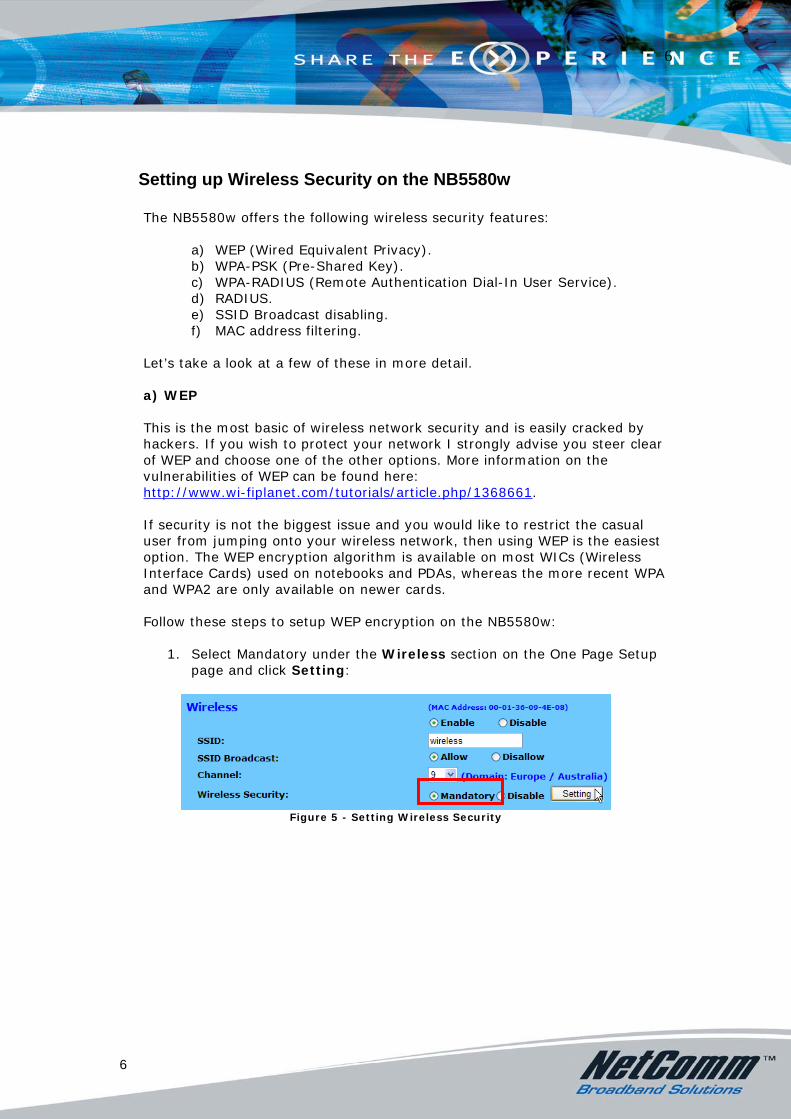
Setting up Wireless Security on the NB5580w The NB5580w offers the following wireless security features:
a) WEP (Wired Equivalent Privacy). b) WPA-PSK (Pre-Shared Key). c) WPA-RADIUS (Remote Authentication Dial-In User Service). d) RADIUS. e) SSID Broadcast disabling. f) MAC address filtering.
Let’s take a look at a few of these in more detail. a) WEP This is the most basic of wireless network security and is easily cracked by hackers. If you wish to protect your network I strongly advise you steer clear of WEP and choose one of the other options. More information on the vulnerabilities of WEP can be found here: http://www.wi-fiplanet.com/tutorials/article.php/1368661. If security is not the biggest issue and you would like to restrict the casual user from jumping onto your wireless network, then using WEP is the easiest option. The WEP encryption algorithm is available on most WICs (Wireless Interface Cards) used on notebooks and PDAs, whereas the more recent WPA and WPA2 are only available on newer cards. Follow these steps to setup WEP encryption on the NB5580w:
1. Select Mandatory under the Wireless section on the One Page Setup
page and click Setting:
Figure 5 - Setting Wireless Security
6
7
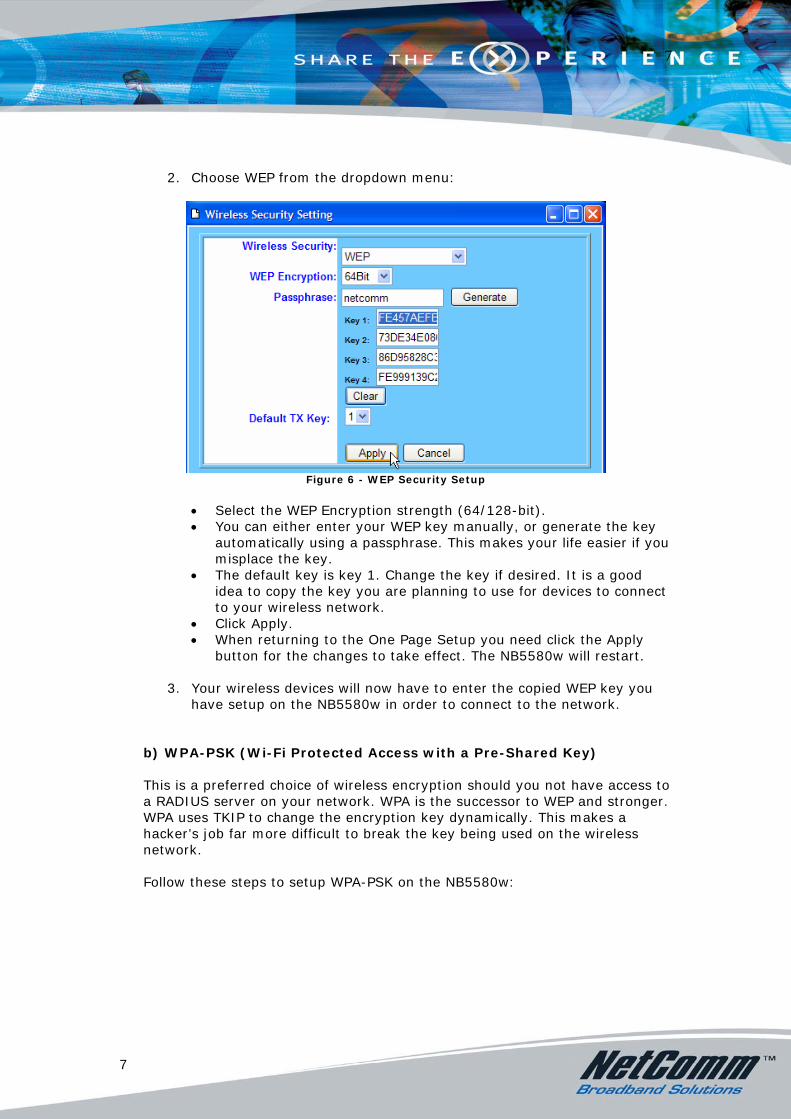
2. Choose WEP from the dropdown menu:
Figure 6 - WEP Security Setup
• Select the WEP Encryption strength (64/128-bit). • You can either enter your WEP key manually, or generate the key
automatically using a passphrase. This makes your life easier if you misplace the key.
• The default key is key 1. Change the key if desired. It is a good idea to copy the key you are planning to use for devices to connect to your wireless network.
• Click Apply. • When returning to the One Page Setup you need click the Apply
button for the changes to take effect. The NB5580w will restart. 3. Your wireless devices will now have to enter the copied WEP key you
have setup on the NB5580w in order to connect to the network.
b) WPA-PSK (Wi-Fi Protected Access with a Pre-Shared Key) This is a preferred choice of wireless encryption should you not have access to a RADIUS server on your network. WPA is the successor to WEP and stronger. WPA uses TKIP to change the encryption key dynamically. This makes a hacker’s job far more difficult to break the key being used on the wireless network. Follow these steps to setup WPA-PSK on the NB5580w:
7
8
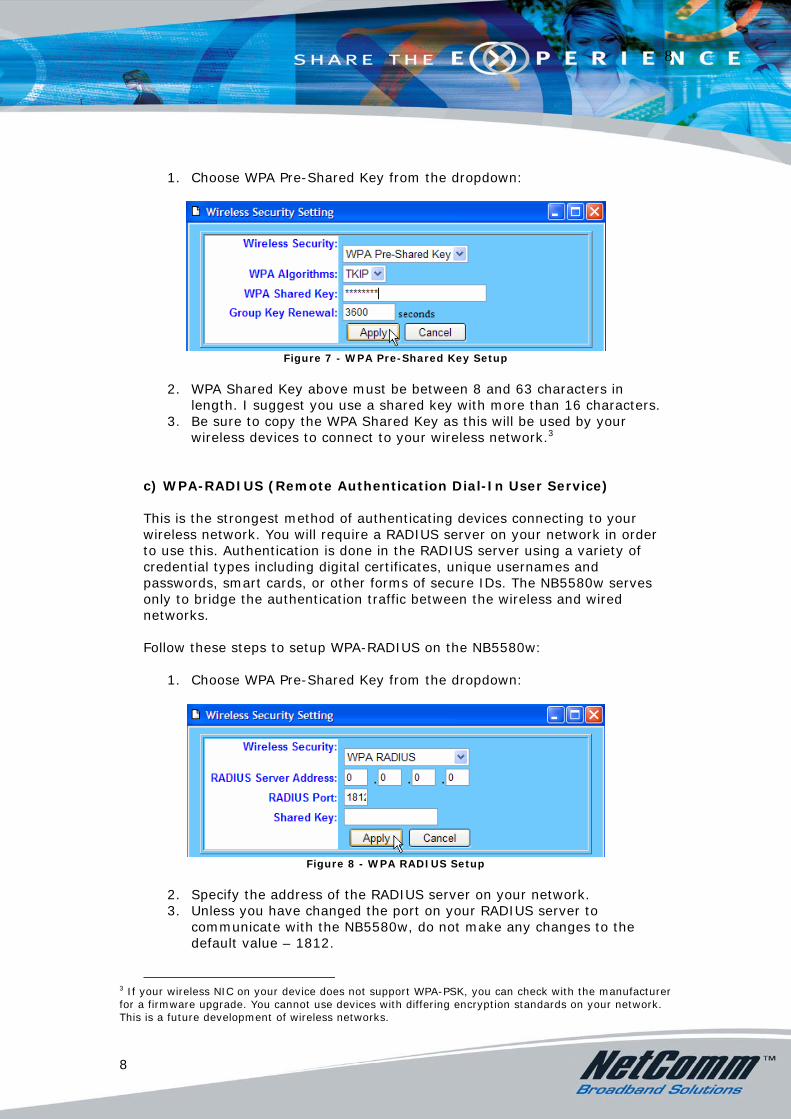
1. Choose WPA Pre-Shared Key from the dropdown:
Figure 7 - WPA Pre-Shared Key Setup
2. WPA Shared Key above must be between 8 and 63 characters in
length. I suggest you use a shared key with more than 16 characters. 3. Be sure to copy the WPA Shared Key as this will be used by your
wireless devices to connect to your wireless network.3
c) WPA-RADIUS (Remote Authentication Dial-In User Service) This is the strongest method of authenticating devices connecting to your wireless network. You will require a RADIUS server on your network in order to use this. Authentication is done in the RADIUS server using a variety of credential types including digital certificates, unique usernames and passwords, smart cards, or other forms of secure IDs. The NB5580w serves only to bridge the authentication traffic between the wireless and wired networks. Follow these steps to setup WPA-RADIUS on the NB5580w:
1. Choose WPA Pre-Shared Key from the dropdown:
Figure 8 - WPA RADIUS Setup
2. Specify the address of the RADIUS server on your network. 3. Unless you have changed the port on your RADIUS server to
communicate with the NB5580w, do not make any changes to the default value – 1812.
3 If your wireless NIC on your device does not support WPA-PSK, you can check with the manufacturer for a firmware upgrade. You cannot use devices with differing encryption standards on your network. This is a future development of wireless networks.
8
9
4. Set the Shared Key recognized by the NB5580w and the RADIUS server.
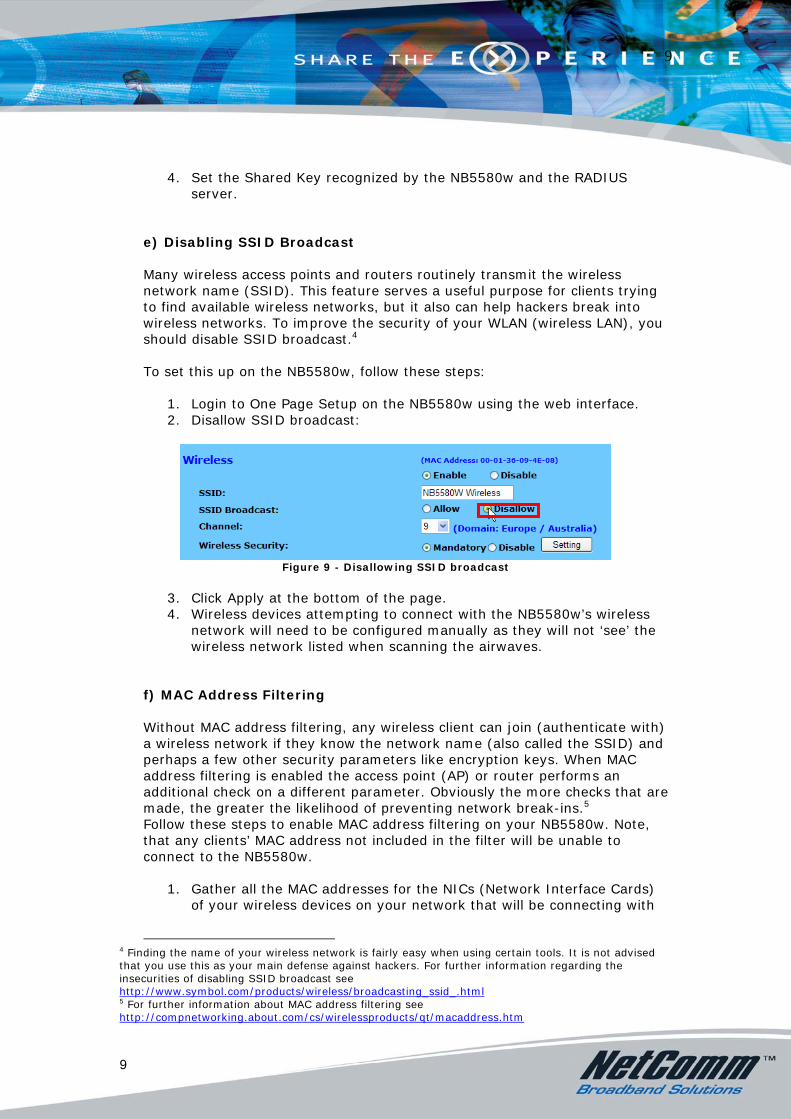
e) Disabling SSID Broadcast Many wireless access points and routers routinely transmit the wireless network name (SSID). This feature serves a useful purpose for clients trying to find available wireless networks, but it also can help hackers break into wireless networks. To improve the security of your WLAN (wireless LAN), you should disable SSID broadcast.4
To set this up on the NB5580w, follow these steps:
1. Login to One Page Setup on the NB5580w using the web interface. 2. Disallow SSID broadcast:
Figure 9 - Disallowing SSID broadcast
3. Click Apply at the bottom of the page. 4. Wireless devices attempting to connect with the NB5580w’s wireless
network will need to be configured manually as they will not ‘see’ the wireless network listed when scanning the airwaves.
f) MAC Address Filtering Without MAC address filtering, any wireless client can join (authenticate with) a wireless network if they know the network name (also called the SSID) and perhaps a few other security parameters like encryption keys. When MAC address filtering is enabled the access point (AP) or router performs an additional check on a different parameter. Obviously the more checks that are made, the greater the likelihood of preventing network break-ins.5
Follow these steps to enable MAC address filtering on your NB5580w. Note, that any clients’ MAC address not included in the filter will be unable to connect to the NB5580w.
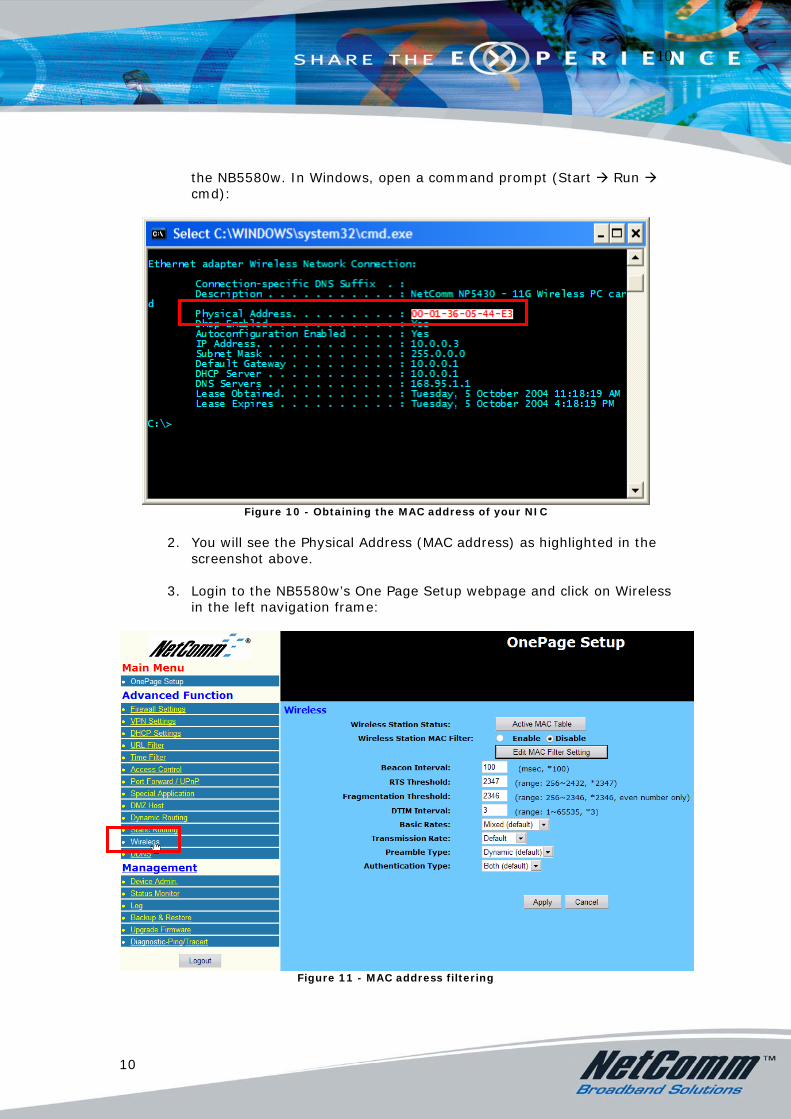
1. Gather all the MAC addresses for the NICs (Network Interface Cards) of your wireless devices on your network that will be connecting with
4 Finding the name of your wireless network is fairly easy when using certain tools. It is not advised that you use this as your main defense against hackers. For further information regarding the insecurities of disabling SSID broadcast see http://www.symbol.com/products/wireless/broadcasting_ssid_.html 5 For further information about MAC address filtering see http://compnetworking.about.com/cs/wirelessproducts/qt/macaddress.htm
9
10
the NB5580w. In Windows, open a command prompt (Start Run cmd):
Figure 10 - Obtaining the MAC address of your NIC
2. You will see the Physical Address (MAC address) as highlighted in the
screenshot above. 3. Login to the NB5580w’s One Page Setup webpage and click on Wireless
in the left navigation frame:
Figure 11 - MAC address filtering
10
11
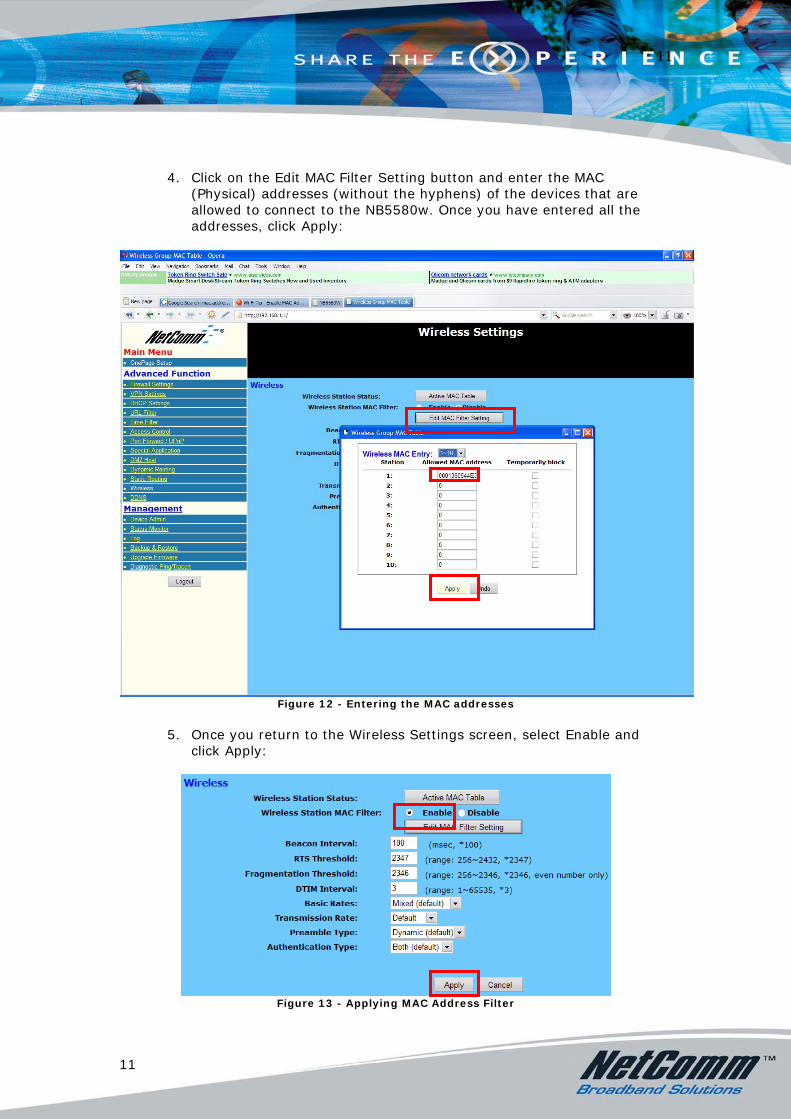
4. Click on the Edit MAC Filter Setting button and enter the MAC (Physical) addresses (without the hyphens) of the devices that are allowed to connect to the NB5580w. Once you have entered all the addresses, click Apply:
Figure 12 - Entering the MAC addresses
5. Once you return to the Wireless Settings screen, select Enable and
click Apply:
Figure 13 - Applying MAC Address Filter
11
12
6. NB5580w will reboot with effective settings.
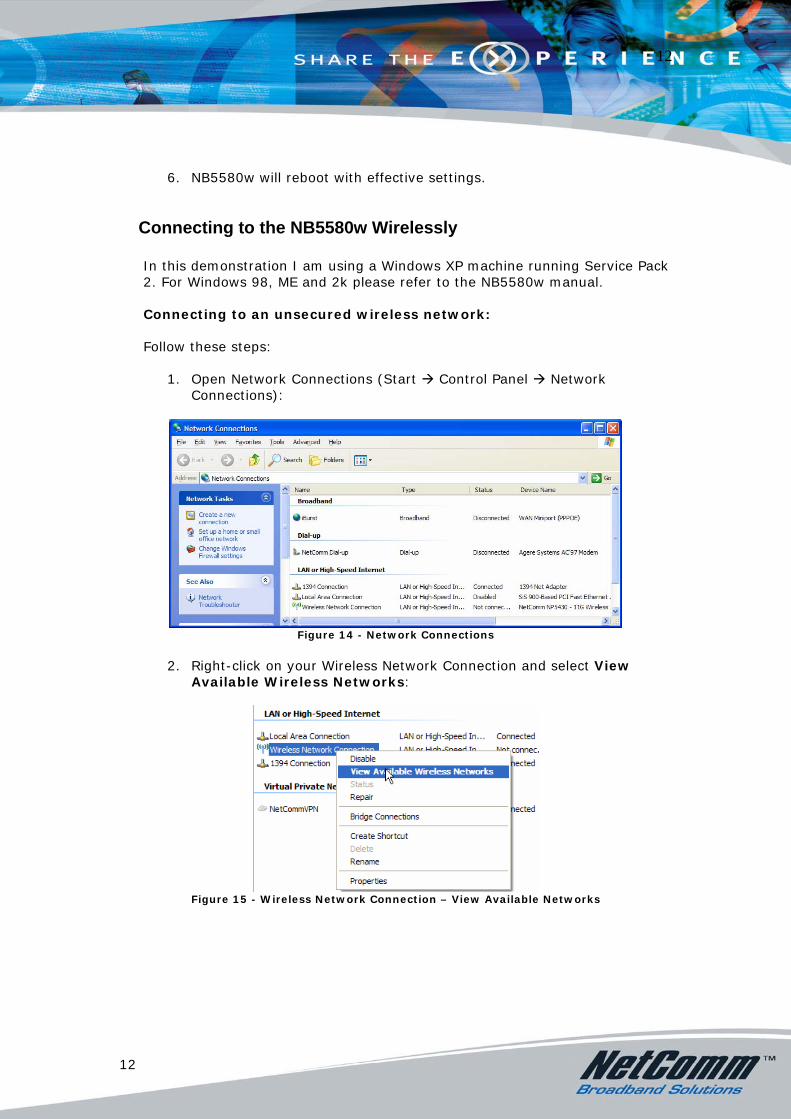
Connecting to the NB5580w Wirelessly In this demonstration I am using a Windows XP machine running Service Pack 2. For Windows 98, ME and 2k please refer to the NB5580w manual. Connecting to an unsecured wireless network: Follow these steps:
1. Open Network Connections (Start Control Panel Network Connections):
Figure 14 - Network Connections
2. Right-click on your Wireless Network Connection and select View
Available Wireless Networks:
Figure 15 - Wireless Network Connection – View Available Networks
12
13
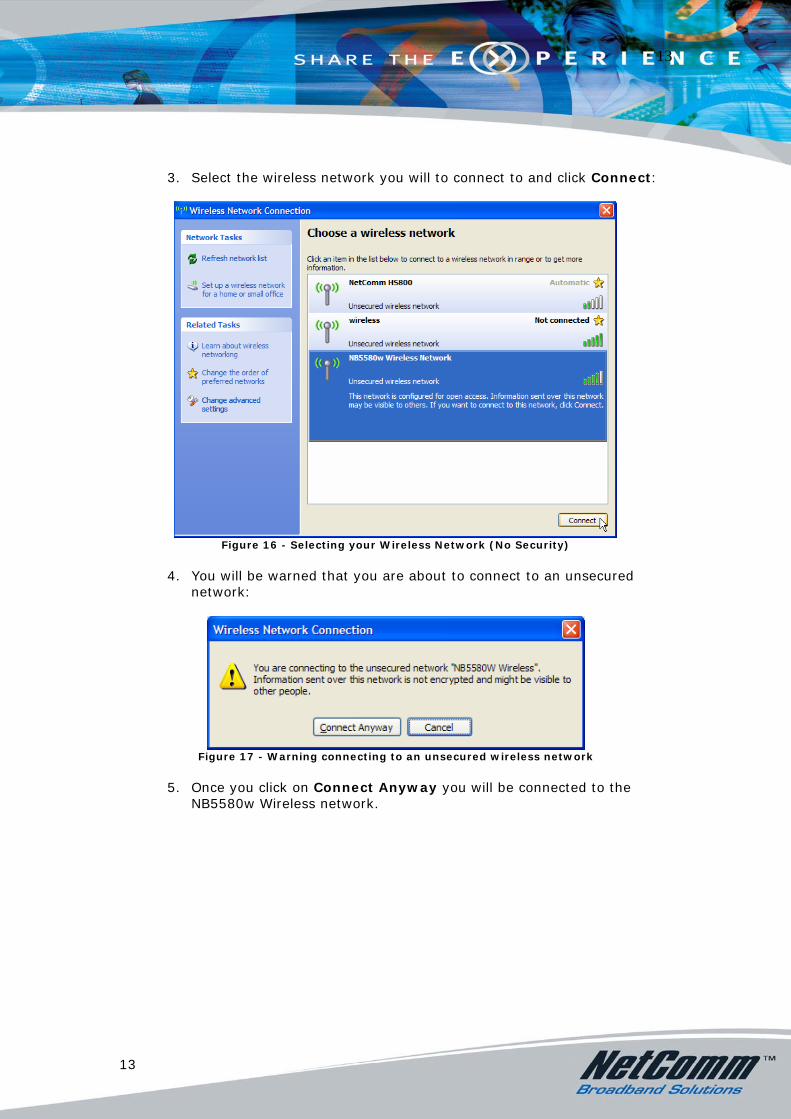
3. Select the wireless network you will to connect to and click Connect:
Figure 16 - Selecting your Wireless Network (No Security)
4. You will be warned that you are about to connect to an unsecured
network:
Figure 17 - Warning connecting to an unsecured wireless network
5. Once you click on Connect Anyway you will be connected to the
NB5580w Wireless network.
13

14
Connecting to a WEP secured wireless network:
1. Follow steps 1 and 2 in the previous section. 2. Select the WEP-secured wireless network from and click Connect:
Figure 18 - Connecting to a secured wireless network
3. Enter the WEP key and click Connect:
Figure 19 - Entering WEP key
4. Your wireless device will attempt to connect to the wireless network:
Figure 20 - Attempt to connect to wireless network
14
15
5. Once connected you are free to start using the wireless network.
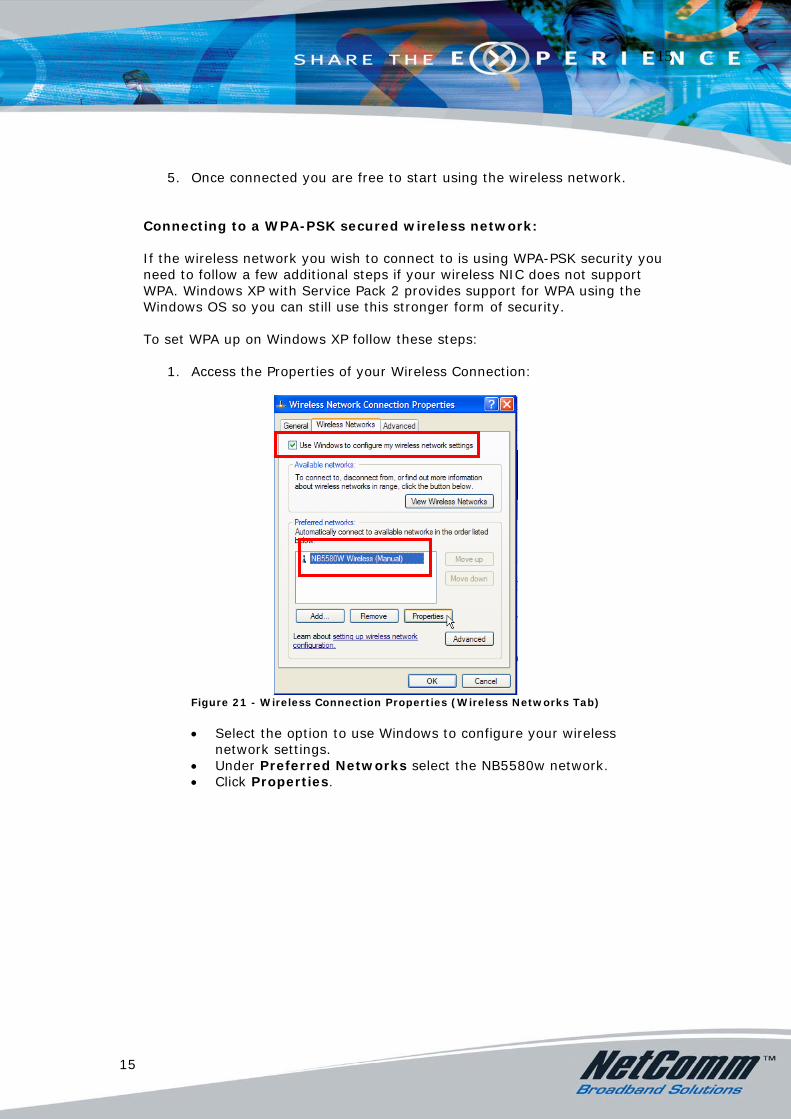
Connecting to a WPA-PSK secured wireless network: If the wireless network you wish to connect to is using WPA-PSK security you need to follow a few additional steps if your wireless NIC does not support WPA. Windows XP with Service Pack 2 provides support for WPA using the Windows OS so you can still use this stronger form of security. To set WPA up on Windows XP follow these steps:
1. Access the Properties of your Wireless Connection:
Figure 21 - Wireless Connection Properties (Wireless Networks Tab)
• Select the option to use Windows to configure your wireless
network settings. • Under Preferred Networks select the NB5580w network. • Click Properties.
15
16
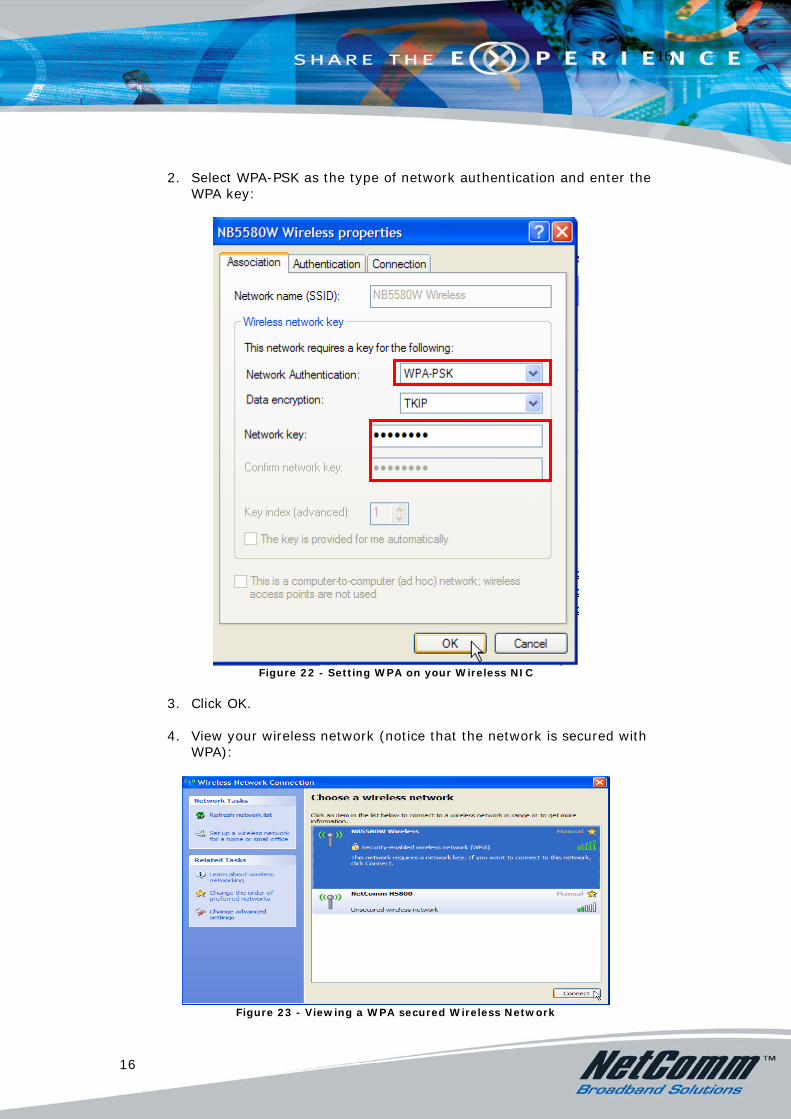
2. Select WPA-PSK as the type of network authentication and enter the WPA key:
Figure 22 - Setting WPA on your Wireless NIC
3. Click OK. 4. View your wireless network (notice that the network is secured with
WPA):
Figure 23 - Viewing a WPA secured Wireless Network
16
17
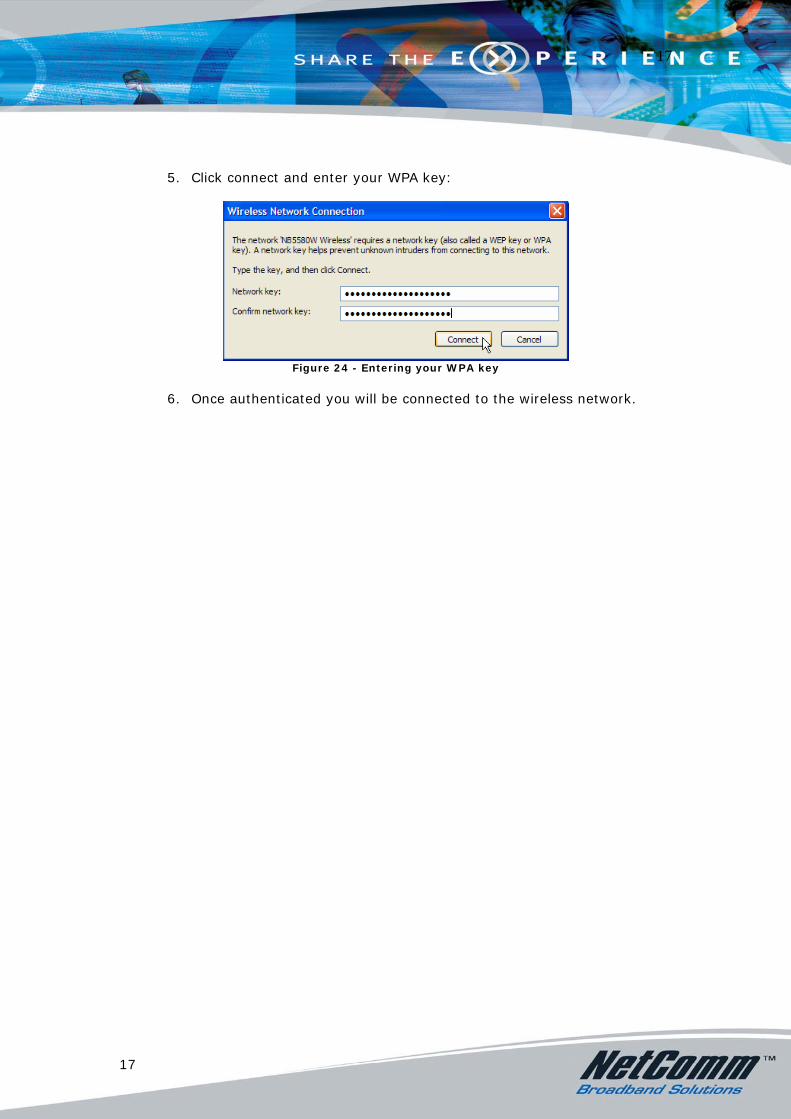
5. Click connect and enter your WPA key:
Figure 24 - Entering your WPA key
6. Once authenticated you will be connected to the wireless network.
17