setting up external ids for appointment resources as voice
TRANSCRIPT
Setting Up External IDs for Appointment Resources as Voice Message Selectors
Set up external system ID: NextGen EPM requires an External System ID to identify each external system it interfaces with, such as NextGen EDI. In futures versions of EPM we will have an external ID pre-defined for NextGen EDI, until then a manual process is required to create it via Query Analyzer, a tool in the Microsoft SQL Server client. Once you have started Query Analyzer and connected to the EPM databased, execute the following SQL statement.
insert into external_system (external_system_id, external_system_name,
external_type, created_by, modified_by) values(5000, 'nextgenedi', 'edi',0,0)
Set up external IDs: You may use some or all of these categories of resources to identity the voice message to be used for each appointment: Provider, Location, Event, and Language. To do so you must define “external IDs” for these resources. Once defined, the proper external IDs will be sent to the call center for each appointment, identifying its provider, location, event type, and patient language, and the pre-defined voice message matching these criteria will be automatically selected to go out for that appointment. Follow the below steps to set up external IDs for each of these category. Please keep a complete list of all external IDs that you have created and the entities they represent. Furnish a copy of the list to Nextgen EDI with your instructions for voice message mapping.
Set up external IDs for providers:
1. Start NextGen Application Launcher, and click on File Maintenance. (Figure 1) 2. In File Maintenance, click on EPM. (Figure 2) 3. In the EPM Master Files – System list, click on Providers. The “Providers List” dialog box
opens. (Figure 3) 4. For each provider that you want to associate voice messages with:
a. Double click to open the provider to open the “Modify Provider Information” dialog box, and click the “External” tab in the dialog; (Figure 4)
b. Click on the menu icon, and choose “New …”; c. In the “Add External Interface” dialog (Figure 5), choose “nextgenedi” for External
System, and enter the ID that you want sent to the call center for “External ID”. Note: The external ID is a 1 to 4-character code that uniquely identifies the provider within your practice – for example, you may use a sequential number starting with 0001 for each provider, alternatively you may use the initials of each provider. You must ensure each provider’s external ID is unique within your practice.
d. Close the “Add External Interface” and “Modify Provider Information” dialog boxes by clicking on “OK”.
e. Repeat step 4 for all providers that you want to associate voice message with.
5. Close the “Providers List” dialog box by clicking on “Close”.
Set up external IDs for locations: 1. Start NextGen Application Launcher, and click on File Maintenance. (Figure 1) 2. In File Maintenance, click on EPM. (Figure 2) 3. In the EPM Master Files – System list, click on Locations. The “Locations List” dialog box
opens. (Figure 6) 4. For each location that you want to associate voice messages with:
a. Double click to open the “Location Information” dialog box, and click the “External” tab in the dialog; (Figure 7)
b. Click on the menu icon, and choose “New …”; c. In the “Add External Interface” dialog (Figure 8), choose “nextgenedi” for External
System, and enter the ID that you want sent to the call center for “External ID”. Note: The external ID is a 1 to 4-character code that uniquely identifies the location within your practice – for example, you may use a sequential number starting with 0001 for each location, alternatively you may use a code name. You must ensure each location’s external ID is unique within your practice.
d. Close the “Add External Interface” and “Location Information” dialog boxes by clicking on “OK”.
e. Repeat step 4 for all locations that you want to associate voice message with. 5. Close the “Locations List” dialog box by clicking on “Close”.
Set up external IDs for languages:
1. Start NextGen Application Launcher, and click on File Maintenance. (Figure 1) 2. In File Maintenance, click on “Master List”. The “Master Lists List” dialog box appears.
(Figure 9) 3. In the “Master List” drop-down box, select “Language”. 4. Double click the language that you wish to define an external ID for, e.g. “Spanish”. The
“Modify Language Information” dialog box appears. (Figure 10) 5. Choose the “External” tab in the dialog. 6. Click the menu icon, and choose “New …”, the “Add External Interface” dialog box
appears. (Figure 11) 7. Choose “nextgenedi” for External System, and enter a 2-character unique ID for that
language in External ID. We recommend using the 2-letter language code as defined in ISO 639-1, e.g “en” for English, “es” for Spanish, etc. Refer to the Library of Congress website http://www.loc.gov/standards/iso639-2/php/code_list.php for a complete list of ISO 639-1 language codes (use codes under the “ISO 639-1” column).
Set up external IDs for event types:
1. Start Application Launcher, and start NextGen EPM. (Figure 1) 2. On the menu bar, choose Admin | Scheduling Admin …(Figure 12), the Scheduling
Administration window appears. (Figure 13) 3. For each event type that you wish to associate voice messages with:
a. Double click on the event type. The “Edit Event” dialog box appears. (Figure 14) b. Click on the “External” tab (along the middle of the dialog).
c. Click the menu icon, and choose “New …”, the “Add External Interface” dialog box appears. (Figure 15)

d. Choose “nextgenedi” for External System, and enter a 1 to 4-character code name for the event type. We recommend using the short name of that event. You must ensure each event external ID is unique within your practice.

Figure 1 NextGen Application Launcher

Figure 2 EPM Master Files - System

Figure 3 Providers List Dialog Box

Figure 4 Modify Provider Information Dialog Box
Figure 5 Add External Interface Dialog Box (Provider)
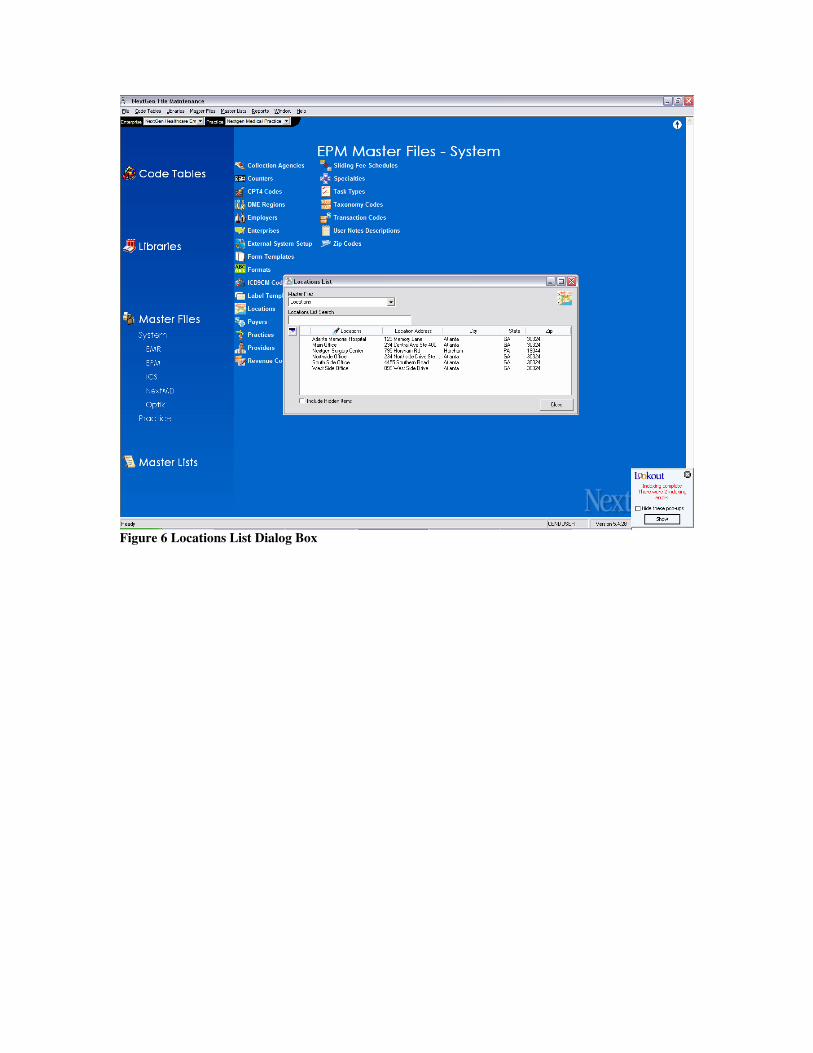
Figure 6 Locations List Dialog Box

Figure 7 Location Information Dialog Box
Figure 8 Add External Interface Dialog Box (Location)

Figure 9 Master Lists List Dialog Box
Figure 10 Modify Language Information Dialog Box

Figure 11 Add External Interface Dialog Box (Language)
Figure 12 Admin | Scheduling Admin ... Menu

Figure 13 Scheduling Administration Window

Figure 14 Edit Event Dialog Box
Figure 15 Add External Dialog Box (Event)