setting up email alerts and dashboard links
DESCRIPTION
Setting Up Email Alerts and Dashboard Links. Setting Up Active Orders Notifications. When you first start using the Active Orders system, you will need to establish the settings for two types of system notifications: Email notifications Message Center workflow links - PowerPoint PPT PresentationTRANSCRIPT
Setting Up Email Alerts and Dashboard Links
When you first start using the Active Orders system, you will need to establish the settings for two types of system notifications:
• Email notifications
• Message Center workflow links
We will describe these activities in three stages:
1) Add contacts to your Active Orders Company settings (Master Data tab). These are your email or distribution list recipients for Active Orders email notifications.
2) Complete the Email Settings in the Active Orders system (Admin tab). These settings determine the email sender and email recipients, as well as email frequency.
3) Complete settings for Message Filter Groups. These settings determine what documents or conditions activate workflow links and email notifications.
Setting Up Active Orders Notifications
About the Active Orders Email Contact List
The Active Orders system can send email notifications when new documents arrive in the system. It can also provide email reminders about documents that you need to prepare and send. The recipient list is built from the contact list you establish in your Active Orders Company settings.
Before your establish your E-Mail Settings, check your Active Order Company settings and make sure that any individuals or email distribution lists that should receive Active Orders email notifications are entered in the Point of Contact Details list. If not, you will need to add them.
Adding Active Orders Contacts
Adding Contacts to Your Company Information in Master Data Manager
To add contacts (who will be email recipients) to your Active Orders company information:
1. Select the Master Data tab.
2. Choose the Company option in the Master Data Manager portlet.
3. Click on the Edit symbol.
4. Scroll down to the Point of Contact Details section.
5. If you need to add a contact, click the plus (+) sign next to Add Row(s).
a) Complete the contact information.
b) Select the Is Default type. (Determines which contact list on the E-Mail Settings tab the contact appears in.)
• Yes – Contact will be added to the Default mail list.
• No – Contact will be added to the Other Contact(s) list.
6. If you made any additions or deletions, choose Save.
Adding Active Orders Contacts (continued)
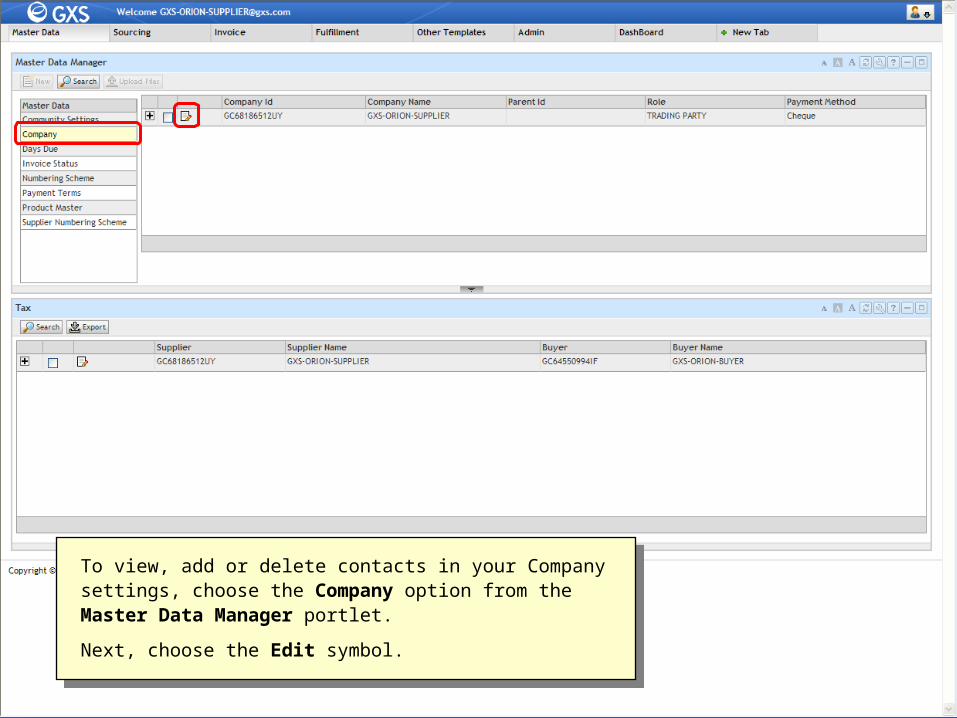
To view, add or delete contacts in your Company settings, choose the Company option from the Master Data Manager portlet.
Next, choose the Edit symbol.
To view, add or delete contacts in your Company settings, choose the Company option from the Master Data Manager portlet.
Next, choose the Edit symbol.
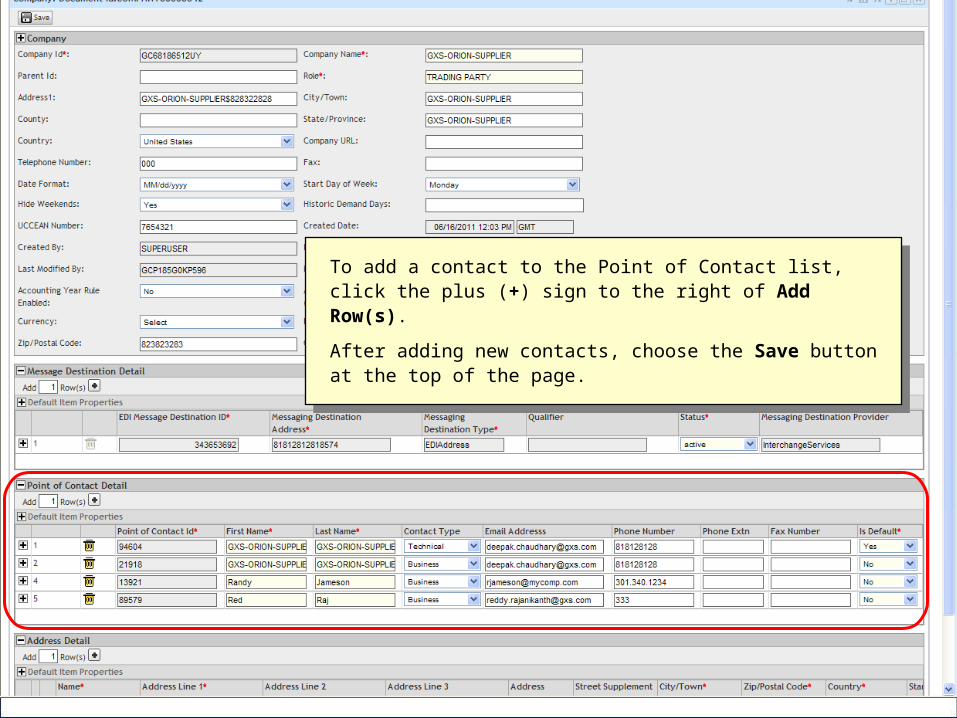
To add a contact to the Point of Contact list, click the plus (+) sign to the right of Add Row(s).
After adding new contacts, choose the Save button at the top of the page.
To add a contact to the Point of Contact list, click the plus (+) sign to the right of Add Row(s).
After adding new contacts, choose the Save button at the top of the page.

About Active Orders Email Settings
The Active Orders Email Settings determine four important options:
• What language is used in the email notification content.
• Whether the system sends email notifications immediately, or batches them into groups.
• What email address the system uses as the email sender.
• Which contacts from the Point of Contact Detail list will receive the email notifications.
Establishing Email Settings in the Message Center Filters Portlet
To establish Active Orders email settings:
1. Choose the Dashboard tab.
2. Locate the Message Center Filters portlet.
3. Choose the Email Settings tab.
4. Use the Parties list to select your Supplier company.
5. After completing the email settings (described on the next slides), choose Save.
Completing Email Settings

The tools to set up the email alerts and the Dashboard links are found on the Admin tab, Message Center Filters portlet..
The tools to set up the email alerts and the Dashboard links are found on the Admin tab, Message Center Filters portlet..
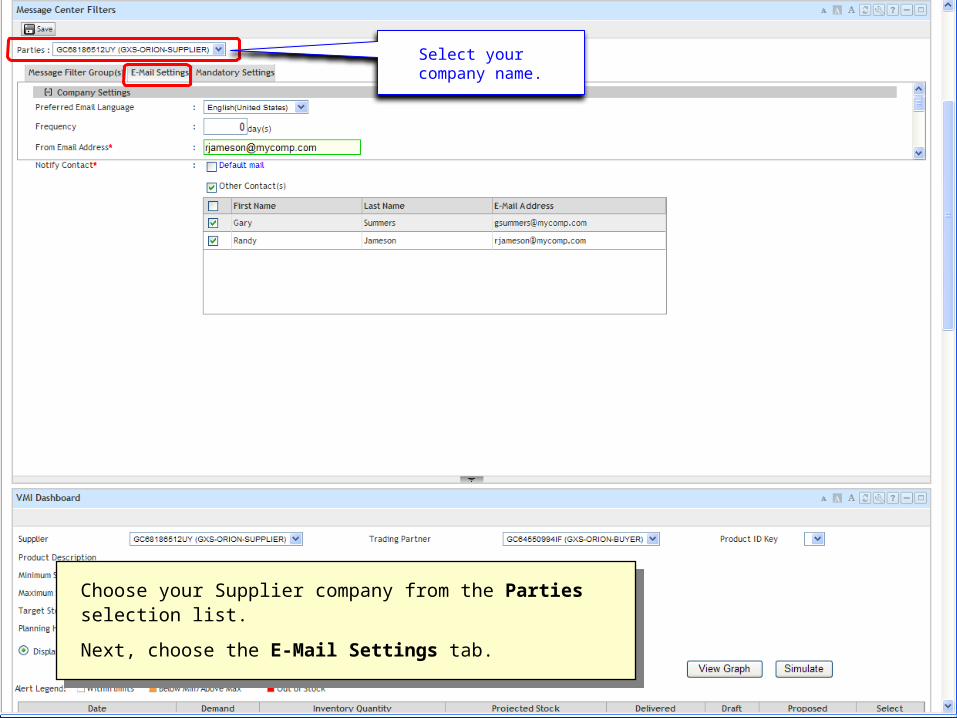
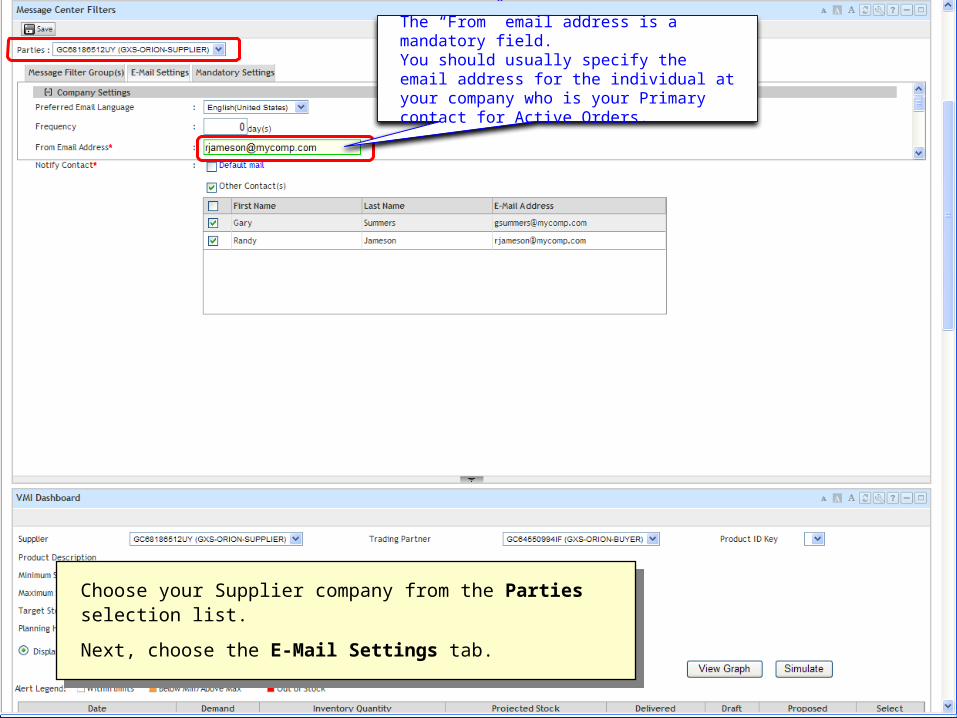
Choose your Supplier company from the Parties selection list.
Next, choose the E-Mail Settings tab.
Choose your Supplier company from the Parties selection list.
Next, choose the E-Mail Settings tab.
Select your company name.
Choose your Supplier company from the Parties selection list.
Next, choose the E-Mail Settings tab.
Choose your Supplier company from the Parties selection list.
Next, choose the E-Mail Settings tab.
The “From” email address is a mandatory field.You should usually specify the email address for the individual at your company who is your Primary contact for Active Orders.
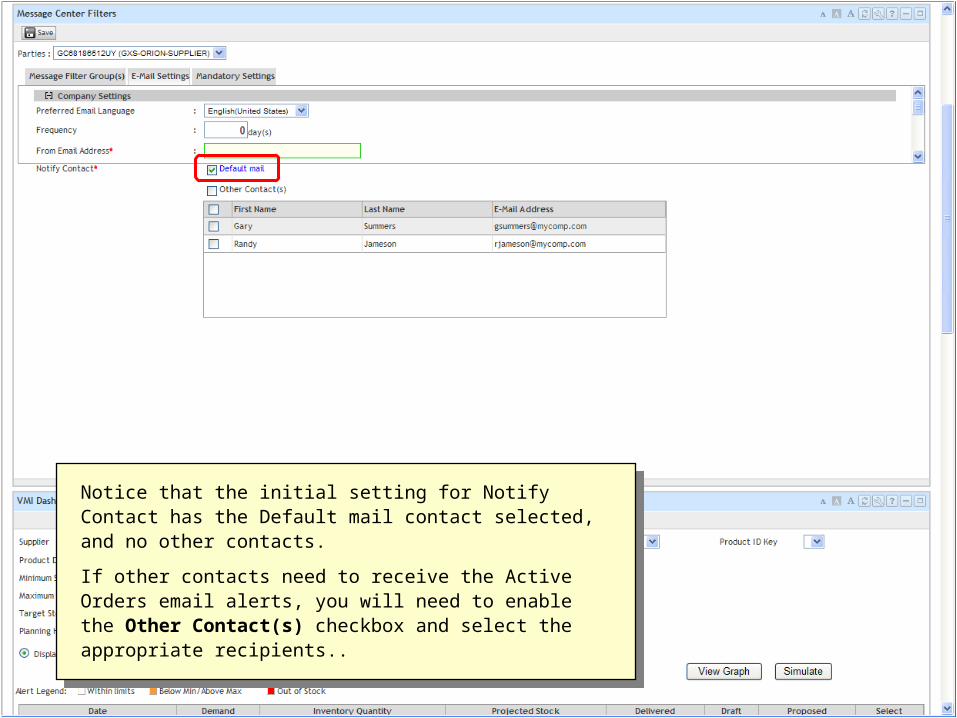
Notice that the initial setting for Notify Contact has the Default mail contact selected, and no other contacts.
If other contacts need to receive the Active Orders email alerts, you will need to enable the Other Contact(s) checkbox and select the appropriate recipients..
Notice that the initial setting for Notify Contact has the Default mail contact selected, and no other contacts.
If other contacts need to receive the Active Orders email alerts, you will need to enable the Other Contact(s) checkbox and select the appropriate recipients..
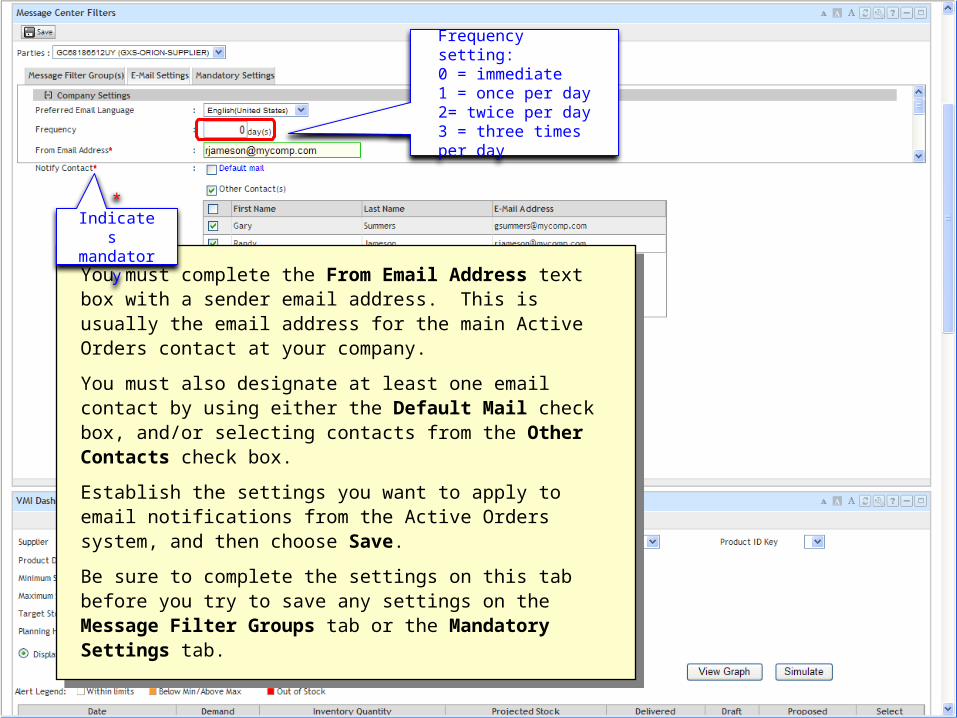
Frequency setting:0 = immediate1 = once per day2= twice per day3 = three times per day
You must complete the From Email Address text box with a sender email address. This is usually the email address for the main Active Orders contact at your company.
You must also designate at least one email contact by using either the Default Mail check box, and/or selecting contacts from the Other Contacts check box.
Establish the settings you want to apply to email notifications from the Active Orders system, and then choose Save.
Be sure to complete the settings on this tab before you try to save any settings on the Message Filter Groups tab or the Mandatory Settings tab.
* Indicates mandatory
About Message Filter Groups
Each Message Filter Group establishes workflow links and/or email settings for a particular document or condition (such as a New document). Since each Buyer community chooses which document types and activities will be used, not all Message Filter Groups will be relevant to you.
A Message Filter Group determines:
• Whether notification occurs by activating a workflow link and/or sending an email.
• Whether certain events trigger proactive or reactive notifications.
• What time period should precede or follow the event before triggering notification.
If you work with multiple Buying companies in Active Orders, you can set up unique Message Filter Group settings for each Buyer.
Establishing Workflow Links and Email Notifications
Setting Up Your Message Filter Groups
To complete this activity, you must have the Account Manager service privilege.
1. Choose the Dashboard tab, and locate the Message Center Filters portlet.
2. Choose the Message Filter Group(s) tab.
3. If none is selected, use the Parties list to select your Supplier company.
4. Select an event or document type on the left. Establish your settings on the right.
5. After establishing your settings for message filter groups, open the Actions list and choose Save.
See related screen examples on the following slides.
Establishing Workflow Links and Email Notifications (continued)
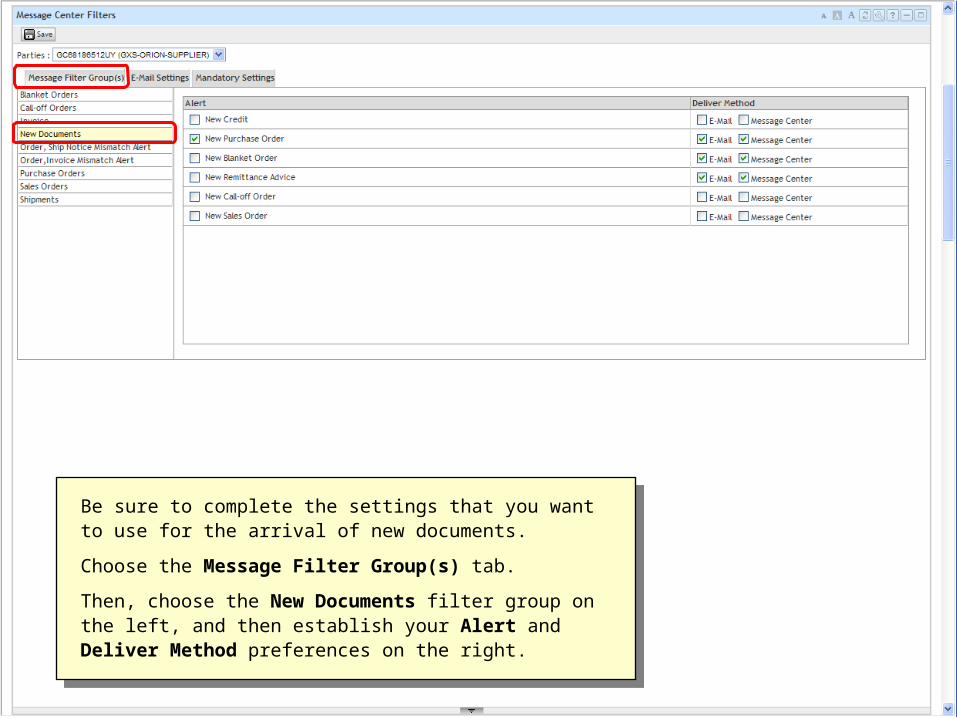
Be sure to complete the settings that you want to use for the arrival of new documents.
Choose the Message Filter Group(s) tab.
Then, choose the New Documents filter group on the left, and then establish your Alert and Deliver Method preferences on the right.
Be sure to complete the settings that you want to use for the arrival of new documents.
Choose the Message Filter Group(s) tab.
Then, choose the New Documents filter group on the left, and then establish your Alert and Deliver Method preferences on the right.
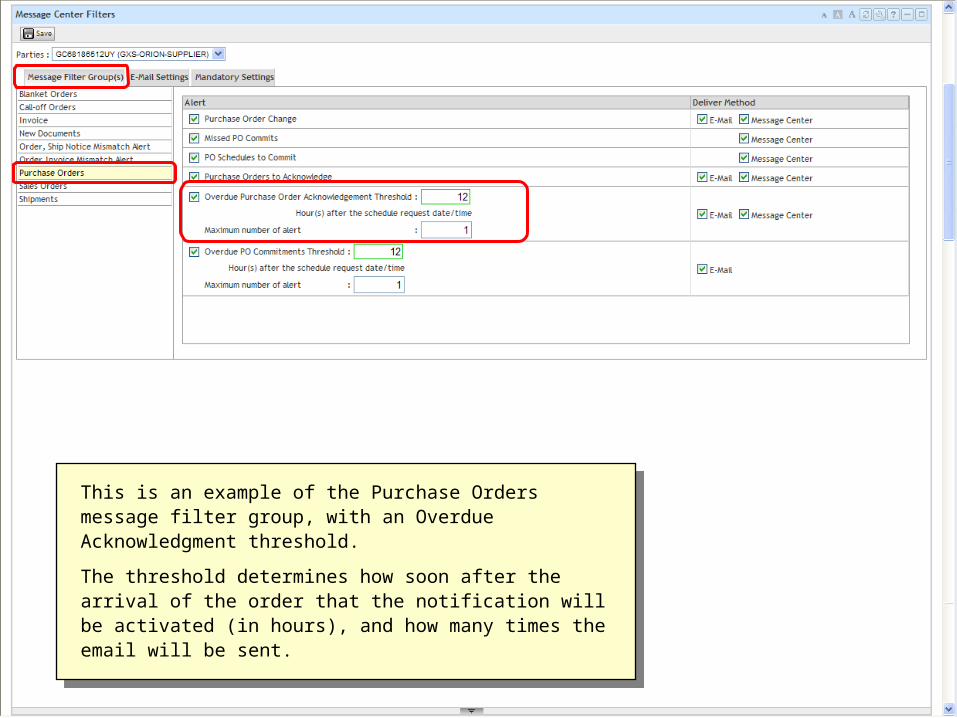
This is an example of the Purchase Orders message filter group, with an Overdue Acknowledgment threshold.
The threshold determines how soon after the arrival of the order that the notification will be activated (in hours), and how many times the email will be sent.
This is an example of the Purchase Orders message filter group, with an Overdue Acknowledgment threshold.
The threshold determines how soon after the arrival of the order that the notification will be activated (in hours), and how many times the email will be sent.
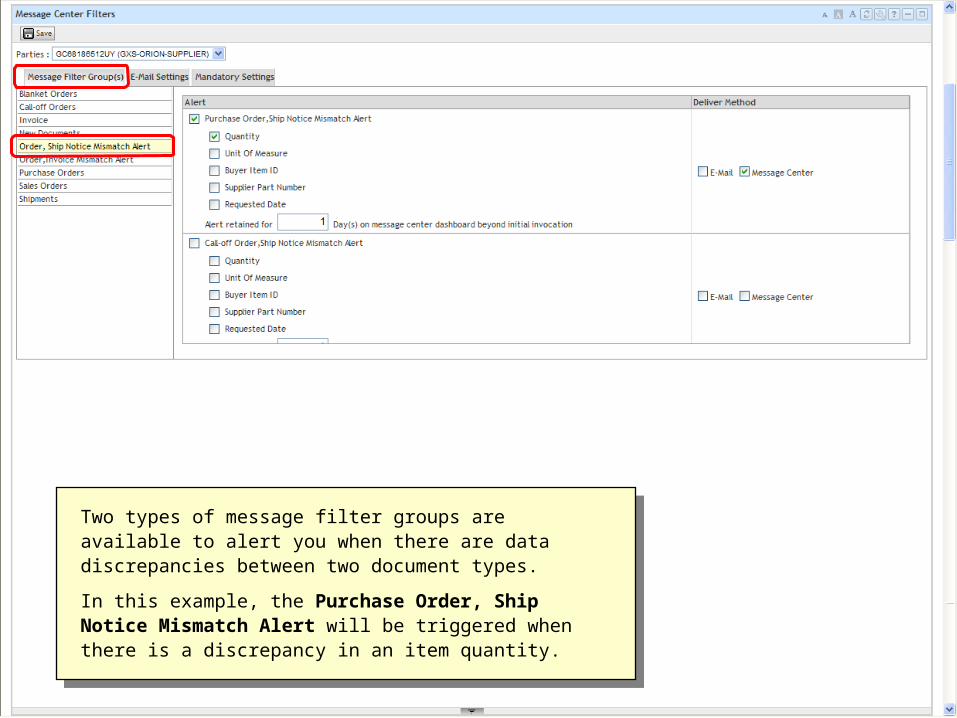
Two types of message filter groups are available to alert you when there are data discrepancies between two document types.
In this example, the Purchase Order, Ship Notice Mismatch Alert will be triggered when there is a discrepancy in an item quantity.
Two types of message filter groups are available to alert you when there are data discrepancies between two document types.
In this example, the Purchase Order, Ship Notice Mismatch Alert will be triggered when there is a discrepancy in an item quantity.
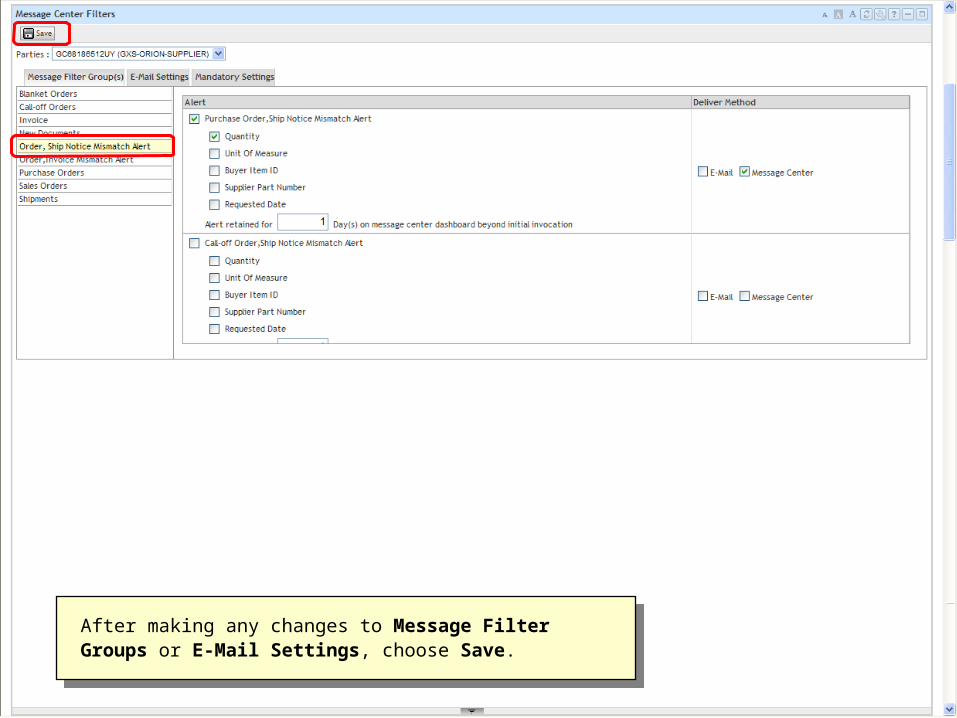
After making any changes to Message Filter Groups or E-Mail Settings, choose Save.
After making any changes to Message Filter Groups or E-Mail Settings, choose Save.
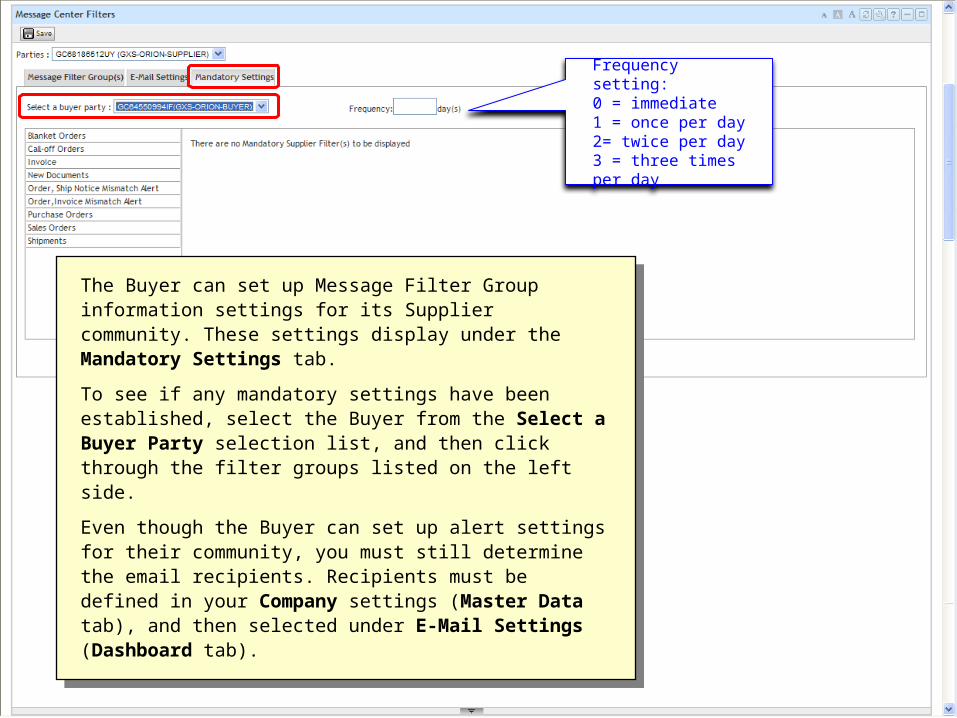
The Buyer can set up Message Filter Group information settings for its Supplier community. These settings display under the Mandatory Settings tab.
To see if any mandatory settings have been established, select the Buyer from the Select a Buyer Party selection list, and then click through the filter groups listed on the left side.
Even though the Buyer can set up alert settings for their community, you must still determine the email recipients. Recipients must be defined in your Company settings (Master Data tab), and then selected under E-Mail Settings (Dashboard tab).
Frequency setting:0 = immediate1 = once per day2= twice per day3 = three times per day