setting the stage for the 7th-10th may 2012 bialystok · 7th-10th may 2012, bialystok! ... this...
TRANSCRIPT

Gabriel Wurzer, Wolfgang LorenzVienna University of Technology
Setting the Stage for the
7th-10th May 2012, Bialystok

!
Cover Image: Giovanni Paolo Pannini “Musical Fête”, 1747
This copy belongs to:
Lorenz: dedicated to Wurzer,
Wurzer: dedicated to Lorenz.
Obviously, dedications suck.
Copyright Notice: This lecture note was produced by Wurzer and Lorenz for the sake of supporting the workshop “Build the Code – Programming for Architects” from 7th to 10th May 2012 in Bialystok. No usage of this material apart from the mentioned workshop may be conducted without the previous consent of the authors.
All Images apart from: “Bug by Grace Hopper” (© Wikipedia) and cover (© Mr. Panini, but obviously his copyrights have long ceased) are courtesy of the authors. AutoDesk is an official company name, as is Microsoft Corporation. AutoCAD is a registered trademark of AutoDesk. Microsoft Office, Word, Excel are registered trademarks of Microsoft Corporation.

Preface: Programming is a drama.
ROMEO AND JULIETTE by William Shakespeare
Juliette…. the Daughter of the Montagues Romeo: …. the Son of the Capuletti Clan
In a drama, it is normal to begin by introducing the audience to the cast of characters. Because programming is primarily a writing activity, the very same concept is used to give a sense of setting to a program:
ADDNUMBERS by John Doe
a….the first Number b…the second Number result … the result of adding a and b
As in a play, the name of the program already hints at its content (or: purpose). Likewise, the names used in a program (here: a, b and result) should point at their role in the now beginning chain of events.
Introducing proper names may be difficult at start. It requires a clear concept of what a program should do and in which steps it is going arrive at its solution. Architects often find it difficult to concentrate on the problem their program should solve, when all they want is really “a fancy solution”1. But understanding the problem, breaking it up into sub-problems which are easily solvable and finally arriving at the solution is what lies at the heart of programming. To teach both knowledge about programming as well as a basic understanding on how to model and structure problems is what we want to do with in the workshop “Build The Code – Programming for Architects” from 6th to 10th November in Istanbul. In this respect, we will often deviate from this pure “programmer’s handbook” and relate to how algorithms we present work, and how they can be understood.
Gabriel P.X. Wurzer and Wolfgang E. Lorenz Vienna University of Technology
1 Lawson: How Designers Think

How to use VBA for AutoCAD
AutoCAD provides several opportunities for extending the application, one of which is Visual Basic for Applications. Being a scripting language, VBA executes the code directly in the AutoCAD application. The benefit of this approach lies in the fact that no software except AutoCAD needs to be installed in order to be able to code. On the downside, however, one cannot write completely new programs that are distributed without AutoCAD in this manner.
Since the 1990ies, VBA is available as integral part of Microsoft Office. Since then, numerous companies have adopted the scripting language. In 2007, however, Microsoft urged all vendors that include VBA in their application to switch to the .NET platform – i.e. VisualBasic.NET, C# etc. This move is no surprise, since the technology has been around for nearly 20 years and the company did not want to invest any more resources into a scripting platform that it sees not in its main strategy line. Despite these troubles, AutoDesk is continuing to use VBA in AutoCAD, giving support to the community and ensuring that previously produced code is usable. It also provides support for .NET-based languages, although (as they say) the learning curve is steeper for beginners2.
We have decided to stubbornly stick to VBA, despite ongoing movements in the direction of .NET. On the one hand, one can expect VBA support to be still available in the years to come, on the other hand, programming is not about language but about the mental ability to formulate a program – therefore, switching to whatever language might come will not make a difference once the basic constructs of what you can expect from a programming language are understood. Furthermore, VBA offers an excellent integration into Microsoft Office (just what is needed when in a project situation!) - and Microsoft will still not cease using VBA in these products for a long time.
Calling (and using) the Visual Basic Editor In order to write code in Visual Basic, one needs to enter the Visual Basic Editor by typing into the AutoCAD command line. This brings up the editing environment (see Figure 1), which is split into several areas:
• The Project Area on the left displays all parts of a VBA project. As per default, you can see the current drawing “ThisDrawing” being present in the project tree.
• Upon double-clicking ThisDrawing, the Editor Area in the middle appears and shows us the code that is attached to this AutoCAD file. It is in this area that nearly all of our subsequent coding activities will take place.
Let us now enter some basic code in ThisDrawing, without actually knowing what it does:
0 Sub test() 1 MsgBox(“Test”) 2 End Sub
In order to execute the code, choose the play button that is available in the top tool bar. You will see a dialog appearing, which you can quit by hitting ok. 2 http://usa.autodesk.com/adsk/servlet/index?siteID=123112&id=770215, „Recommendation for new Programmers”, Retrieved 2010/25/10
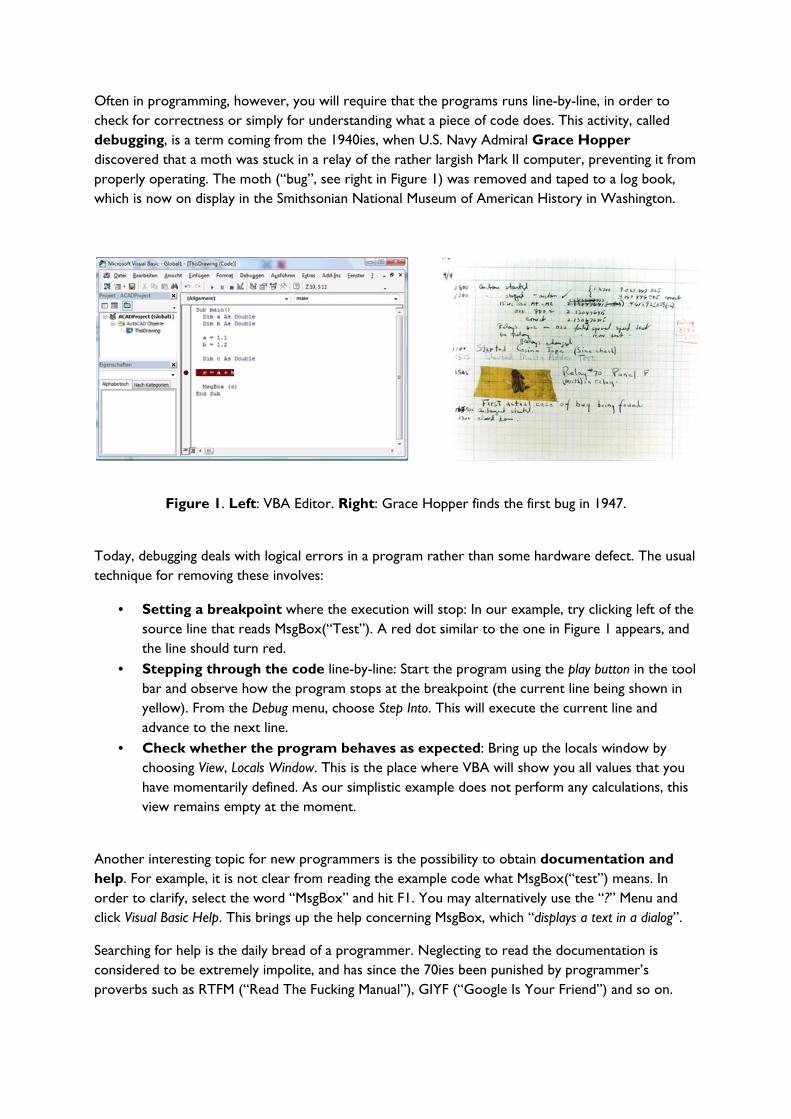
Often in programming, however, you will require that the programs runs line-by-line, in order to check for correctness or simply for understanding what a piece of code does. This activity, called debugging, is a term coming from the 1940ies, when U.S. Navy Admiral Grace Hopper discovered that a moth was stuck in a relay of the rather largish Mark II computer, preventing it from properly operating. The moth (“bug”, see right in Figure 1) was removed and taped to a log book, which is now on display in the Smithsonian National Museum of American History in Washington.
Figure 1. Left: VBA Editor. Right: Grace Hopper finds the first bug in 1947.
Today, debugging deals with logical errors in a program rather than some hardware defect. The usual technique for removing these involves:
• Setting a breakpoint where the execution will stop: In our example, try clicking left of the source line that reads MsgBox(“Test”). A red dot similar to the one in Figure 1 appears, and the line should turn red.
• Stepping through the code line-by-line: Start the program using the play button in the tool bar and observe how the program stops at the breakpoint (the current line being shown in yellow). From the Debug menu, choose Step Into. This will execute the current line and advance to the next line.
• Check whether the program behaves as expected: Bring up the locals window by choosing View, Locals Window. This is the place where VBA will show you all values that you have momentarily defined. As our simplistic example does not perform any calculations, this view remains empty at the moment.
Another interesting topic for new programmers is the possibility to obtain documentation and help. For example, it is not clear from reading the example code what MsgBox(“test”) means. In order to clarify, select the word “MsgBox” and hit F1. You may alternatively use the “?” Menu and click Visual Basic Help. This brings up the help concerning MsgBox, which “displays a text in a dialog”.
Searching for help is the daily bread of a programmer. Neglecting to read the documentation is considered to be extremely impolite, and has since the 70ies been punished by programmer’s proverbs such as RTFM (“Read The Fucking Manual”), GIYF (“Google Is Your Friend”) and so on.

Getting ready to code
ADDNUMBERS begins. After the curtain lifts, there are three actors on the stage: a, b and result. Taking a closer look at them, we realize that they are all holding a number in their hand (although we do not know exactly, which number this is). a and b walk over to result and show them the numbers they are holding in their hands. result sums these up in his mind and changes the number he holds in his hand to this outcome. The curtain closes. The program ends.
This was a dramatized version of the program mentioned at the beginning. There are two things which must be distinguished in this context:
• The actors a, b and result are called variables. Their primary role is to hold values, i.e. numbers, sequences of characters and so on.
• The script that acts on the variables is called the program flow. In our case, there was only one instruction present, which required result to sum up a and b.
Declaring and initializing variables We already learned that variables hold values. But how do they enter the stage ? And how does one specify that a variable may only hold a value of a certain type (e.g. a number)? Both is done in a process named declaration, where a new variable is created under the specified name and with a specified type restriction: Description Codedeclare variable with the name “a” which holds a floating point number
Dim a As Double
initialize the variable a to 1.5 a = 1.5
Table 1: example for declaring and initializing After declaration, we might initialize a variable to hold a specific value. If the initialization is omitted, the programming language will assign a default value to the variable, depending on its type (see next section for an in-depth description of this). Working with numbers If the protagonists of your program are numbers, you have two choices: Integers store whole numbers while Doubles store floating point numbers. Table 2 lists the typical declaration of these two types: Characteristics Declaration Initialization Default Integer an whole number between
-32768 and +32767 Dim i As Integer i = 0 0
Double a floating point number roughly between -10308 and +10308
Dim d As Double d = 0.0 0.0
Table 2: a few simple data types
Note that the values you can assign to integers and doubles have a different form – floating point numbers are written using a decimal point “.”, integers without. If you assign an integer to a floating

point variable, the value will be implicitly converted (the value 0 becomes 0.0). Vice versa, floating point values that are assigned to an integer variable will be rounded up to the nearest integer (0.6 becomes 1), which is a common source of frustration for many beginning programmers. Working with numbers is straightforward – you can use the standard operators +, -, / and * for performing simple calculations. Program 1 demonstrates the concepts and the pitfalls we have mentioned so far, plus some new ones, which will be elaborated after the code listing.
0 Sub Calculate() ‘by John Doe begin of the program called “Calculate” (by John Doe) 1 Dim i As Integer create a new variable “i”, which represents an integer number 2 i = 1 assign 1 to variable i3 i = 1 + 4 * (2 / 10) assign 1 + 4 * (2 / 10) to the variable i. the result is being rounded.4 Dim d As Double create a new variable “d”, a floating point number 5 d = 1.0 assign 1.0 to d6 d = 1 assign 1 to d. will implicitly convert to 1.07 End Sub end of the program
Program 1: Simple calculations using doubles and integers
Lines 0 and 7 declare the start and end of a program. In VBA, the general form of such a program is:
Sub name ( input ) block of code where the processing takes place End Sub
Note that there are three parts which are generally of interest to the programmer: The input part, which introduces the variables the program should act on, the processing part, where the computation takes place based on the input values, and the output part, where the result of the computation is returned. Subs are special in the sense that they do not produce output but just perform computation. On the contrary, programs that produce output are called Functions, but we will come to these later. If we return to the description of the code, we note that after Sub comes the name of the program. This should be informative, as in our case: “Calculate”. Then follows a list of inputs between round brackets. At the moment, we do not wish to specify any inputs, so these brackets stay empty - “( )”. A description of inputs (and how to use them) will also be presented when introducing Functions. If you look closer at line 0, you will also notice the part ’by John Doe. This is a comment, used to give additional information to the code. Everything written after an apostrophe ‘ is not interpreted by VBA, giving you the chance to write whatever narrative seems appropriate. It is generally good practice to write a program first using comments, and then translate these to actual code (“Code follows Comments”). In our example, this could have been:
0 Sub Calculate() 1 ‘do some calculation with integers2 ‘do some calculation with doubles3 End Sub

After Sub comes the program body, meaning one or more lines of code that (in our case) declare two variables and perform calculations on them. Notice also these lines are indented for easier readability. This indentation should be made whenever a block of code starts, which is after the keywords Sub, Function, If, Else, While, For and Do (described later). More to do with numbers (using Functions) As mentioned, there are programs with outputs and those without. The former are called Functions, the latter were the already introduced Subs. The good news is that you have already
encountered functions, albeit in another context: Consider , , , √ and other functions which you have learned in math class(Figure 1, left). These take one or more values as input and produce an output. When seen as programs, this can be expressed as in the right part of Figure 1 – in the classical way of input, processing and output. The way in which these programs work internally is not of interest (black-box thinking). All that is required is that they produce, for each sets of input, the correct output. sin 0 0 cos 0 1 √4 2 cos 0 1 max 1, 2 2
Figure 1. Left: Mathematical calculations. Right: Seen as flowchart. Notice also that a function produces only one output, not many. The same is not true for the input, of which there can be many. Furthermore, it is possible and common to use the output of one function as input to another (nesting). The following program is a translation of the mathematical formulation into VBA:
0 Sub Calculate2() ‘by John Doe 1 Dim a As Double 2 a = sin(3.1415927) call function sin, passing 0 as input, receive output in variable a 3 Dim b As Double 4 b = cos(3.1415927) call function cos, passing 0 as input, receive output in variable b5 Dim c As Double 6 c = sqr(4) call function sqr, passing 4 as input, receive output in variable c 7 Dim d As Double 8 d = sqr(cos(0)) call function sqr, pass the result of function cos(0) as input, output in d9 Dim e As Double 10 e = max(1, 2) call function max with two parameters, 1 and 2 11 End Sub
Program 2: Calling functions
As in mathematics, VBA uses square brackets to signify the list of parameters given to a function. To specify multiple parameters, enter them separated by comma, as seen in the last line of Program 2. Also note that the last function max is not yet written, we will come back to this in the course of describing Booleans.

Defining Functions The general form of a function is:
Function name ( input ) As type of output block of code where the processing takes place set output End Function
A function can do everything a Sub does, plus it produces an output. Therefore, there are two differences in the declaration of the function: First, the programmer must give back the type of the output (we know of Double or Integer at the moment). Second, the output has to be set to the result of the computation. Program 3 shows a simple function RollTheDice that produces a number between 1 and 6, using functions Randomize, Rnd and Int to do its computations.
0 Function RollTheDice() As Integer RollTheDice will take no input and produce an Integer as output1 Randomize Init random number generator (without giving an input) 2 Dim a As Integer 3 a = Int((6 – 1 + 1) * Rnd + 1) calls function Rnd without input, receive result in a 4 RollTheDice = a set the result of function RollTheDice to a 5 End Function
Program 3: Writing functions
The first thing to notice is the declaration of the output “As Integer” on line 0. This is written immediately after the specification of the input. Randomize (see line 1) reinitiates the random number generator, so that two runs of the program always end up producing different numbers. Rnd on line 3 then has the duty of returning a floating point number between 0 (inclusive) and 1 (exclusive). Note that there are no inputs given to the function Rnd, therefore, the brackets must be omitted. What Rnd returns does not fit our purpose; we want to eventually arrive at an Integer number between 1 and 6, not a floating point from 0 to 1. The following formula is therefore used to compute numbers out of 1..6: 1 The therein used Int function produces an integer out of a floating point number by cutting off everything after the comma. The contrary of the Int function would be Round, which would round to the nearest integer. As last step (line 4), the function is set to the result of the computation. When the Program crosses End Function, it returns whatever value was produced to the caller, e.g.
0 Sub CallToNewFunction() 1 Dim i As Integer 2 i = RollTheDice 3 End Sub

Defining Inputs Inputs are used for handing a value over to a sub or function. Declaring inputs is similar to defining variables, the only difference being that the Dim statement is omitted and the list of parameters is written in one long sequence, separated by commas:
0 Function Sum(a As Double, b As Double) As Double Input two Doubles, outputs one Double1 Sum = a + b Set output directly to a + b 2 End Function
Program 4: Defining inputs
Accessing inputs is similar to accessing variables – their name is simply used in a computation (see line 1 of program 4). Summing up this chapter In this part, we have had a look at variables of type Double and Integer. Starting with the definition using Dim, we then went on to simple calculations in a Sub. We have also looked into Functions, which, in contrast to Subs, produce an output. As last step, we were occupied with defining inputs for both Subs and Functions. In the course of the chapter, various side-topics were introduced:
• The use of Rnd for producing a random integer number between an upper and a lower bound.
• The use of Flowcharts for depicting program flow. • Some notes on good coding style using indentation and comments.
Questions
Draw the flowchart for the previously mentioned formula 1 . Give an explanation of how it works, remembering that Rnd normally produces numbers between 0 (inclusive) and 1 (exclusive). How do you declare a variable? What is the difference in declaring variables and specifying an input parameter for a sub or function? How does the output of the function relate to variables? What is the default value for an integer? What happens if you assign a double to an integer? How can you cut off everything behind the comma instead?

Issuing drawing commands to AutoCAD
When using drawing functions, AutoCAD’s expects the user to supply three-dimensional coordinates. So far, we have had Integers and Doubles each having one value, so how can one specify a variable that has three entries – e.g. (1.6, 2.5, 3.8)?
So enters the Array. An Array is an ordered list of values of the same type, e.g. three Doubles, four Integers and so on. Program 5 gives a listing on how to define an array of three Doubles and initialize each entry to a value:
0 Sub DefiningACoordinate() 1 Dim pos(0 To 2) As Double Define an Array out of three Doubles, 0, 1, 22 pos(0) = 1.6 Initialize the first element of the array with 1.6,3 pos(1) = 2.5 the second with 2.5, 4 pos(2) = 3.8 the third with 3.85 End Sub
Program 5: Defining Coordinates as Arrays
Just as with regular variables, arrays are declared using the Dim statement. The size declaration (0 To 2) after the variable’s name implicitly gives the number of entries (in our case three: 0, 1 and 2). After declaring the array, we initialize each of its elements using pos(index) = value. When you specify an index that is not in the defined range, VBA will raise an error.
If you have troubles in comprehending the concept of Arrays, the following analogy will help: As soon as a play has ended, the curtain drops. When the applause has reached an adequate volume, the curtain lifts again and you see all actors assembled in a line. “Look”, you might say, “the third one from the left, I found that she played really well”. Picking out the third actor from the left was what we would do programmatically by using actors(2) – remember that Arrays usually start at 0.
But how about picking the third actor from the right? This can be done using the UBound function, which gives you the last index in the array. Vice versa, LBound gives the first index:
0 Sub ArrayBounds() 1 Dim actors(... To ...) As Double2 Dim firstIndex As Integer2 Dim lastIndex As Integer 3 firstIndex = LBound(actors)4 lastIndex = UBound(actors)5 End Sub
AutoCAD’s drawing API An Application Programmer’s Interface (API) is a set of Functions or Subs are exposed by an application so that you can issue the same commands that normally come from interacting with its user interface. In AutoCAD’s case, the API is exposed by the way of the ThisDrawing object you see in the project structure.

So what is an object? An object is a collection of variables, Subs and Functions into a common package (“the Object”). By using the object’s name (“ThisDrawing”) and appending a point, you get access to all contained entities (refer to left part of Figure 2). The small window you see is also called IntelliSense, it can be very helpful in suggesting possible variables, Functions, Subs and their parameters without the programmer having to look at documentation.
Figure 2. Left: The ThisDrawing Object. Right: Object Catalogue with AutoCAD API.
Objects may contain other objects, too. Throughout this course, we are going to use Functions of ThisDrawing.ModelSpace (ModelSpace being an object inside the ThisDrawing object), the first example of which is given in Program 6:
0 Sub DrawInAutoCAD() 1 Dim pos(0 To 2) As Double 2 pos(0) = 1.6 3 pos(1) = 2.5 4 pos(2) = 3.8 5 ThisDrawing.ModelSpace.addCircle pos, 10 adds a circle located at pos, with radius of 106 End Sub
Program 6: Defining inputs
The addCircle Function which is located in ThisDrawing.ModelSpace takes two input parameters, an Array of Doubles giving the middle of the circle and a Double giving its radius. Apart from the IntelliSense that is brought up when you type ThisDrawing.ModelSpace.addCircle(, the parameters of such a drawing function can be also seen in the so-call Object Catalogue, which you can bring up using the key F2 (also see Figure 2, Right). It is an index over all objects that are known to VBA. Furthermore, there is still the F1 help which you might use in combination with selecting the word “addCircle” – this brings up the help file on addCircle and a more elaborate description with examples. As a shortcut, we have also compiled a list of popular drawing commands as appendix (see page 25).
Questions Please give the command for creating an array of 1000 integers and state what the initial value of each array element is.

Whether you like it or not: Having the Option
Zeitgeist has produced theatre plays in which the audience, rather than a director, controls the ongoing of events. At a certain point in the play, you might be asked: What should the actor do next, kiss the girl or tell her that he wants a divorce? “Divorce, Divorce”, I hear you scream, but wait: The important thing was that you had the option, right?
Options in computer terms always evaluate to True or False – this is what is called Boolean. In Program 7, we show how to define new variable of type Boolean, initialize it with True3 and then perform some basic evaluations using >, <, the logical And, logical Or and the negation Not:
0 Sub BooleanEvaluations() 1 Dim b As Boolean 2 b = True 3 b = 10 < 20 True4 b = 10 > 20 False5 b = 10 < 20 And 10 > 20 False6 b = 10 < 20 Or 10 > 20 True7 b = Not 10 < 20 Or 10 > 20 False8 End Sub
Program 7: Working with Booleans
The operations for Booleans are “greater-than” >, “less-than” <, “equality” =, “inequality” <> as well as the logical And, Or and Not, which require some more thought. And is True when both sides of the equations evaluate to True. Or is True when one of both sides is True. The negation Not negates whatever comes after it, i.e. the expression Not True would evaluate to False.
Conditions give options Booleans are used for having conditions in the code, i.e. if some condition is true, perform a set of operations, else, perform another set. The general form for a condition is:
If condition Then block of code to execute if condition is True Else block of code to execute if condition is False End If
The Else part of the conditions can be left out if nothing is to be done else, giving you the stripped-down version of If ... Then ... End If. Program 8 shows a program that is using the previously written RollTheDice and DrawInAutoCAD programs together with a condition to draw a circle when the rolled value is greater than 3. Also notice that everything in an If requires indentation, so as to be clearly legible (especially usefull when you have If and Else blocks).
3 The default value for Booleans is False.

0 Sub TestCondition()1 If RollTheDice > 3 Then uses the previously written RollTheDice Function 2 DrawInAutoCAD uses the previously written DrawInAutoCAD Sub 3 End If 4 End Sub
Program 8: Using conditions
Summing up the previous two chapters We have seen that there are variables that can take sequences of values (mathematically, this would be called “tuple”, in computer science we call this Array). Each cell can be accessed and changed individually. Arrays are needed to store e.g. co-ordinates, a circumstance we often encounter when working with AutoCAD’s drawing functions. In this context, we also had a look at the Objects of AutoCad, most prominently the ThisDrawing.ModelSpace object. An Object is an encapsulation of variables, Functions, Subs and other Objects. In order to access enclosed entities, one has to append a dot “.” to the object’s name, which we have done for the case of the circle drawing function (ThisDrawing.ModelSpace.addCircle). Furthermore, we have introduced a new variable type called Boolean that is predominantly used in conjunction with If. The If statement checks if a supplied condition evaluates to True, then executes an enclosed block of code. There is a second block of code (“Else”), that can optionally defined and is executed when the condition is False. Questions Compare a program with indentation to one without. Assume that there are three nested If statements (i.e. an If in an If in an If) present, now speculate what would happen if you tried to delete the middle If. Write a Function that returns True if RollTheDice is 1, 2 or 6. Bring up the Object catalogue and navigate through ThisDrawing.PaperSpace (as opposed to ModelSpace). What does PaperSpace stand for?

Repetitive Work – The Case of the Stairs
As first full-grown program, we want to develop a stair algorithm that produces a staircase in 2D, given the following parameters:
• StartingPoint – should be located at (0,0) • StepHeight – should be 18cm • StepDepth – should be 32cm • NumberOfSteps – should be 2 for now.
Now comes the analysis phase. A step starts at a certain position in 2D space, initially this would be StartingPoint. From this position, we draw a line of length StepHeight vertically upwards. Then we draw a horizontal line of length StepDepth to complete the first step. The whole process is repeated from the current position to get the second step.
From an implementation viewpoint, we are going to use the AddLightWeightPolyline function to draw a 2D polyline. AddLightWeightPolyline takes an array of doubles representing 2D points as input. Note that there must be at least two points in the array, i.e. the array must have at least size 4.
0 Sub StepByStep() 1 Dim points(0 To 9) As Double holds all generated points sequentially 2 Dim x As Integer 3 Dim y As Integer 4 ‘set start position and write to points5 x = 0 6 y = 0 7 points(0) = x initial pos8 points(1) = y 9 ‘step 1 10 y = y + 18 11 points(2) = x stair1 vertical point 12 points(3) = y 13 x = x + 32 14 points(4) = x stair 1 horizontal point 15 points(5) = y 16 ‘step 2 17 y = y + 18 18 points(6) = x stair 2 vertical point 19 points(7) = y 20 x = x + 32 21 points(8) = x stair 2 horizontal point 22 points(9) = y 23 ‘and finally draw 24 ThisDrawing.ModelSpace.AddLightWeightPolyline(points) array is passed to AddLightWeightPolyline25 End Sub
Program 9: First version of the step program

Figure 3: Output of Program 9
Referring to the finished program (Program 9, also see Figure 3), there are several oddities which require attention:
• The algorithm seems to know that there are only two steps. Else, the sizing of the array “points” could not have happened in advance. Because the number of steps is fixed to 2, NumberOfSteps was never defined as variable.
• The algorithm uses integers. While this might be OK for now, we have to think about changing this is subsequent versions of the program, to also allow for stair depths and widths of non-integer type.
• The starting position is fixed to (0,0). The StepHeight and StepDepth are also fixed. Clearly, one should be able to pass these values into the Sub rather than defining it in the code.
• We notice that the code for step 1 is the same as for step 2, only the indices for the array seem to change.
You might have guessed it – these points smell like a proper cause to introduce something new that will fix all these problems.
Dynamic Arrays and Loops Programmers hate code duplication, therefore coining the DRY Principle (“Don’t Repeat Yourself”). Code repetition is error-prone and tedious to work through when changing software, the key to proper coding lies in trying to avoid it at all costs. Two mechanisms for coping with repetitions were already given, namely the use of Function and Sub. If we could write a Sub the draws a single stair by, we could eliminate a lot of code and end up with two calls to e.g. drawStair(x, y, StairWidth, StairDepth) in our case. But how about 1000 stairs, I ask? This would again produce repetition in the form of all these calls to drawStair. No, there has to be some other construct that can really solve this problem (which we will see later). Another point that really troubles the programmer’s mind is the Line 1 of Program 9, in which the size of the array is pre-calculated. Of course, this can be done in advance and is no error per se. However, from a programmer’s standpoint, it might be more convenient to extend the points array whenever new coordinates are to be stored.

Extension at run-time can be done using dynamic arrays, i.e. arrays that can change size:
• A dynamic array is declared without size, i.e. Dim points() As Double • Before storing a new point into the array, the points array is resized to “one value more”.
Resizing an array happens with the ReDim Preserve statement, i.e.:
... Dim points() As Double ReDim Preserve points(0 To 9) As Double...
We see that instead of writing Dim points(0 To 9) As Double we use ReDim Preserve points(0 To 9) As Double, thereby extending the previously empty array to 10 cells. Preserve means that VBA will preserve the contents of the Array when resizing, which of course only applies if we are extending an array that was previously non-empty.
There is an important point in extending an array by one cell. Remembering the previously presented UBound function, you could set the new size to UBound(points) + 1, i.e.:
... Dim points() As Double ReDim Preserve points(0 To UBound(points) + 1) As Double...
However, UBound does not like arrays that are empty at all – it simply crashes when trying to execute that code. It has no problems with filled arrays. Of course this smells like an If:
... Dim points() As Double If you find out that points is empty Then
ReDim Preserve points(0 To 0) As Double ‘make it one cell big Else
ReDim Preserve points(0 To UBound(points) + 1) As DoubleEnd If ...
We have come far, but we have to go even further. Why does this extension of the array and subsequent putting a value into it take place just inside my code? There should be a Sub for doing exactly this, since this could be used over and over for many different programs.
Program 10 is the program that we would have in mind. From the outside, you pass over an array of doubles (i.e. a() As Double) and a value to store. The Sub appends the value to the array, and that’s it. If you have no clue concerning line 1 “If (Not a) = -1 Then” – don’t worry, as we don’t understand that specific snipped of code, too. This is a workaround taken from the internet which

tests whether an array is empty. In the words of the Author of the hack: “[the code is] a slightly obscure but quite neat hack to check if a dynamic array has been initialized”.
Apart from the check for the empty array, however, everything should be clear. The array is extended with ReDim Preserve, then we set the last cell of the array to the passed-in value. Changes that are made to the array stay even after the Sub has finished. This is true per default for every parameter you pass into a Sub – if you change it, the changes are kept.
0 Sub appendTo(a() As Double, value As Double)1 If IsArrayEmpty(a) Then extend the array by one2 ReDim Preserve a(0 To 0) As Double 3 Else 4 ReDim Preserve a(0 To UBound(a) + 1) As Double5 End If 6 a(UBound(a)) = value set last cell to passed-in value7 End Sub
Program 10: appendTo a Double Array
0 Function isArrayEmpty(a() As Double) As Boolean1 On Error Resume Next ‘If an error occurs, continue”2 Dim arraylength As Integer 3 arraylength = Ubound(a) try executing UBound 4 If Err.Number = 0 Then If no error happened then5 isArrayEmpty = False array is not empty 6 Else Else7 isArrayEmpty = True the array is empty 8 End If 9 End Function
Program 10a: appendTo a Double Array
When trying the new appendTo Sub, we notice some peculiarities in how VBA handles Sub and Functions with more than one parameter. We here give rules on “when to use brackets when calling Subs and Functions”, plus some examples:
RULES FOR BRACKETS IN VBA (keep under your pillow) • Rule 1: Calling a Function without using its result consider as Sub. • Rule 2: Calling a Sub or Function with one parameter use brackets. • Rule 3: Calling a Sub with multiple parameters do not use brackets. • Rule 4: Calling a Function with multiple parameters use brackets.
... Dim result As Double OneParameterSub (a)

TwoParameterSub a, b result = OneParameterFunction(a) OneParameterFunction (a) result = TwoParameterFunction(a, b) TwoParameterFunction a, b ‘and in the case of our new Sub: Dim points() As Double appendTo points 10.2 ...
Coming back to the criticism over the repeated stair code, we need something new that can repeat code (i.e. the same lines are executed multiple times). This construct is called a Loop. Although there are three kinds of loops available, we choose to present only one of them - the While loop4:
While condition block of code to execute if condition is True Wend
This looks quite similar to an If, you might say. This is completely right - a While is like an If, only that the If executes the enclosed block of code one time if the condition is true. On the contrary, While executes the block over and over, as long as the condition is true. How about a typical usage of a While loop? Usually, before the While, an integer variable (the “counter”) is defined and initialized to 0. Then, the While checks whether counter is smaller than a maximum value, e.g. counter < 10. If so, the following block is executed. The last statement in the block then increments the counter, i.e. counter = counter + 1:
0 Sub IntroducingWhile() 1 Dim counter As Integer 2 While counter < 10 2 ‘do something 3 counter = counter + 1 4 Wend 5 End Sub
With this knowledge in mind, the reimplementation can be conducted (see Program 11). The new version is cleaner, shorter and easier to read, plus: introduces parameters.
4 Interested readers are encouraged to look into the documentation and learn more about the other loops once having completed the introductory course.

Summing up this chapter The urge to produce a full-blown has led us to the production of the code for GenNStairs. In the course of programming, we have seen that it is possible to pre-allocate data such as an array beforehands, and fill it programmatically in the course of the program. However, defining static arrays might not always be easy – therefore, we have introduced dynamic arrays, which can store an amount of values that is not known in advance. We have implemented a utility program that cann append a value to an array, and have thereby seen that it is possible to change values passed as parameters. The final version of the program uses the While loop, repeating the stair drawing process for as many times the user wishes. Loops, Functions and Subs can help in keeping code free of repetitive parts (this was referred to as the DRY principle).
0 Sub GenNSteps(NumberOfSteps As Integer, StepHeight As Double, _ “parametric”1 StepDepth As Double, startx As Double, starty As Double) 2 Dim points() As Double 3 Dim x As Double 4 Dim y As Double 5 x = startx 6 y = starty 7 appendTo points, x store co-ordinate8 appendTo points, y store co-ordinate9 Dim counter As Integer 10 counter = 0 11 While counter < NumberOfSteps 12 y = y + StepHeight 13 appendTo points, x 14 appendTo points, y 15 x = x + StepDepth 16 appendTo points, x 17 appendTo points, y 18 counter = counter + 1 don’t forget this19 Wend 20 ThisDrawing.ModelSpace.AddLightWeightPolyline(points) 21 End Sub
Program 11: Second version of the step program
Questions The following code has several errors and minor flaws. Can you spot all of them?
… Dim mid(0 To 2) As Double Dim counter As Double While counter < 10
ThisDrawing.ModelSpace.AddCircle(mid,3)End …

Write a Sub appendCoordinateTo that is in the same fashion as appendTo, with which you can append two values to an array. Make use of appendTo inside of appendCoordinateTo.

Supplying parameters using the User Interface
Instead of writing a main sub that supplies values to a program, we want to present a user interface where parameters can be entered. Creating a user interface involves creating a new Form, using VBA’s Form editor. In the project Structure, click on Insert, UserForm.
Figure 4. Form, Toolbox and Properties.
What you see should be similar to the parts depicted in Figure 4 – a Form in the middle of the screen, a Toolbox nearby and a Property editor on the lower-left part of the screen. We will now build up a form using three components, Labels, Textboxes and Buttons. Hover over the toolbox the A symbol. Then click in the form to insert. Do the same with the ab| symbol as well as the button.
Your Form should contain three parts, a Label, a Textbox and a Button. Click on the Form (anywhere in the gray area will do) and look at the property editor. You can change the name of the form by typing a new name und (Name). As example, you can use StepUserInterface. You can also change the title of the form window by changing Caption (e.g. “Enter Parameters”). Once finished, go click on the label and set its Caption to “Number of Steps” (again in the property editor). Click on the Textbox. Set its (Name) to “Steps”. Click on The Button. Set its Caption to “OK”.
Then double-click the Button, this should bring up an Editor with a CommandButton1_Click() Sub. Note that you can return anytime to the form by double-clicking the form symbol in the project outline.
CommandButton1_Click() is an event handler. It is being called whenever the user clicks on the OK Button. Inside CommandButton1_Click come all commands you want to have executed. For example, we might write:
0 Private Sub CommandButton1_Click()1 Hide 2 End Sub
Now, execute the form editor by selecting it in the project view, then pressing the play button. Once you press OK, the form window will hide itself, and execution will finish.

Forms are Objects. They have different variables, Functions and Subs for working with the window you see. Try typing “StepUserInterface.” inside the handler. This should bring up the list of things available for calling. If you are in a handler, you are “inside” the object. Therefore, you can either use StepUserInterface.Hide or just Hide. Furthermore, each control you add (in our example: the Label, the Textbox and the Button) is available as Object inside the Form, accessible for example via StepUserInterface.Steps.
As the Textbox control is (as the name suggests) a control for Text, we need to look at a new variable type String. String values are given in between double quotes, i.e. “this is a String value”. The following program illustrates how to declar and initialize a String, then presents some String functions that come handy. Furthermore, we present the MsgBox function, which is responsible for opening an info dialog and displaying a string:
0 Sub FunWithStrings () 1 Dim s As String2 s = “Abracadabra”3 MsgBox(s) a simple text box 4 MsgBox(“Length of the String: “ & Len(s)) join a string with a second using &5 MsgBox(Mid(s,1,1)) Strings begin at 1 6 Dim pos As Integer 7 pos = InStr(s,”cad”) get the position of “cad” in s 8 MsgBox(Mid(s, pos, Len(“cad”))) extract the word “cad” from Abracadabra9 s = “123,3” 10 ‘String Conversions check if String contains only numbers11 If IsNumeric(s) Then 12 If InStr(s,”,”) <> 0 Or InStr(s,”.”) Then if you find the comma in the string13 Dim d as Double then it is a Double 14 d = CDbl(s) therefore: convert to Double 15 Else in all other cases 16 Dim i as Integer it is an Integer 17 i = CInt(s) therefore: convert to Integer 18 End If 19 End If 20 If StrComp(LCase(s), “true”) = 0 Or _21 StrComp(LCase(s), “false”) = 0 Then22 Dim b As Boolean 23 b = CBool(s)24 End If 24 End Sub
Program 12: Strings
Now let us consider the new functions in Program 12 in detail:
• The concatenation “&” in Line 4 joins a String with another value together. This can happen multiple times, i.e. “you ” & “could ” & “do ” & “this “ & “more “ & “than “ & “once.”
• String conversions occur whenever a function expects a string, but gets something different. In line 4, the concatenation encounters a Len, which is a functions that returns the length of

a String as integer. This value is converted to string, since the concatenation “&” expects two strings.
• Mid extracts a part of a String. The first argument is the string, the second is the starting position in the string, the third is the number of characters to extract. Note that the first character in a String has the index 1, not 0 as with arrays.
• InStr(s, searchword) determines if it can find searchword in the String s. If not, it will return 0, in all other cases the index where the searchword begins in the String.
• Multiple functions may be nested, in our example MsgBox(Mid(s, pos, Len(“cad”))). Nothing new though.
• The function IsNumeric on line 11 returns true if the passed string contains only numeric characters. We will use it together with If to convert a string to another data type.
• After knowing that the string represents a number, we check for the existence of a decimal point. This lets us know whether it is a floating point number or an integer. As different countries write the decimal point in different ways (“.” for the U.S., “,” in Austria), we have to check both cases using the logical Or.
• The conversion from string to a different type must be triggered manually by using CInt (“convert to Integer”) or CDbl (“convert to Double”). Additionally, there is the function CBool (which is used in due course) that converts from a string to Boolean.
• If the string is not numeric, it can still be Boolean, in all other cases it is simply a String. What we would like to do to find out if it is a Boolean is to compare the string with “true” and “false”, since these are the only values that it could have then. However, the string might also read “fALSe” – therefore, we have to bring transform it to lower case using the function LCase. The opposite function for converting to upper case would be UCase, but this is not shown in this example.
• Once the String is in lower case, we would like to compare it agains “false” or “true”. Strings are not compared using the equality “=”, but rather using the string compare function StrComp(s1, s2) that returns 0 when the two strings are equal, -1 in all other cases. If the string is “false” or “true”, we move on to convert it to Boolean using the CBool function.
If you have not remembered every string function that was presented herein, do not despair. A cheat sheet is given in the Appendix, showing what you can do with every type (see page 25). The important point why we do this is to now get from the previously defined form the number of steps (a string). This must be checked e.g. if it is empty, if it is a number, then converted to integer. And then, we may finally call the stair algorithm in order to do useful work.
We therefore take up the handler for the ok button again, and fill it similarly to the string program (see Program13):
• In order to obtain the value of the Textbox, we can use either Steps.Value or StepUserInterface.Steps.Value.
• If the user has not typed anything into the Textbox, we ask him to enter something and then end this Sub right away using the Exit Sub statement. Note that there is a similar functionality for functions called Exit Function.
• If we find (after many checks) that the value is an integer, we call the steps program, passing the converted integer value as number of steps.

0 Private Sub CommandButton1_Click1 Dim s As String2 s = Steps.Value 3 If Len(s) = 0 Then 4 MsgBox(“Enter a value for steps, please”)5 Exit Sub Exit the Sub now (no further processing)6 End If 7 If IsNumeric(s) Then 8 If InStr(s,”,”) <> 0 Or InStr(s,”.”) Then9 MsgBox(“Please enter an Integer number.”)10 Else 11 Dim i As Integer 12 i = CInt(s)13 ThisDrawing.GenNSteps i, 18, 32, 0, 014 Hide 15 End If 16 Else 17 MsgBox(“Please enter a number.”)18 End If 19 End Sub
Program 13: Handler that calls the steps program
Summing up this chapter Filling a program with parameters in a graphical way has lead us to dive into user interfaces, or (as called in VBA) Forms. A form is an object onto which you can draw controls (e.g. Textboxes, Labels, Buttons). These controls are available by prepending the form’s name (a Textbox “Steps” of a Form “StepUserInterface would be accessible via StepUserInterface.Steps). We have also seen handlers in the form of a click handler for the “OK” Button. A handler is a code inside the form that usually does some error-checking on the form’s controls and then goes on to call some program. There are many handlers available (but beyond scope of this workshop), for example for handling keypresses, selection of a list etc. We encourage the reader to look inside these when the basic knowledge has settled. In the course of reading parameters from the user interface, we have encountered the String type. There is a variety of functions to be performed with strings, some of which are given in the appendix. An important point to remember is that Strings start at index 1, quite contrary to Arrays (which start at 0 in the case of AutoCAD). Questions Extend the form to also let the user enter the rest of the parameters for the GenNStairs program.

Now comes the Real Work
You have so far learned everything that is needed in order to write great code that produces form. We have seen four basic variable types, Integer, Double, Boolean and String, and everything else is an Object5. Also, you may create sequences using Arrays (being either static or dynamic).
You have learned Subs, Functions and how to specify parameters – keeping in mind the awkward Rules for multi-parameter Subs. Furthermore, you should know what If and While does – and if not, there is a summary (“cheat sheet”) of almost everything we learned in the Appendix.
“So”, you might say, “what remains to be learned”? The Objects that AutoCAD has in store are definitely the next step for further study, what you can do with them is given in Program 14:
• All drawing functions will hand you back the objects they have created. Take a look at the documentation for the specific drawing function in order to know what it will return.
• If you want to store the object coming from a drawing function, you have to define a variable of the type that comes back, e.g. Dim sphere As Acad3DSolid on line 1. Important: This variable cannot be set with the normal assignment. All variables that hold objects must be set using the Set keyword (see line 3).
• Once you have the object in your variable, you can access its Functions, Subs and variables by appending a dot “.” to the variable’s name. See line 4 for an example of this.
0 Sub GettingHoldOfObjects() 1 Dim sphere As Acad3DSolid 2 Dim center(0 To 2) As Double no initialization, (0,0,0) is fine.3 Set sphere = ThisDrawing.ModelSpace.AddSphere(center, 10)4 MsgBox(sphere.ObjectName) 19 End Sub
Program 14: Storing objects in variables
From this moment onward, real programming begins.
Wurzer and Lorenz
5 To be totally honest with you, there are some more basic types such as Variant (which you can assign any type), however, these are not of importance to us in the context of this course.

Cheat Sheet: All Programming Constructs at a Glance
Subs and Functions
Sub name ( input ) block of code End Sub Function name ( input ) As type of output block of code where set output End Function
Conditions
If condition Then block of code to execute if condition is True Else block of code to execute if condition is False End If
Loops
While condition block of code to execute if condition is True Wend
Call Rules for Brackets Rule 1. Calling a Function without using its result consider as Sub.
Rule 2. Calling a Sub or Function with one parameter use brackets.
Rule 3. Calling a Sub with multiple parameters do not use brackets.
Rule 4. Calling a Function with multiple parameters use brackets.

Cheat Sheet: What to do with every type
Sub, Function or Operator Description
Integer x + y, x – y, x / y, x * y sin(x), cos(x) sqr(x) Round(x) Int(x)
For calculations Trigonometric functions Sqare Root Round a Double to Integer Cut off a Double (no decimals)
Doublesame as Integer, additionally:Rnd6
get a number between [0..1[
Boolean x > y, x < y, x = y, x <> y Not x, x And y, x Or y
Comparison operators Logical operators
String & Len(s) Mid(s, pos, numcharacters) InStr(s, searchword) IsNumeric(s) CDbl(s), CInt(s), CBool(s) LCase(s), UCase(s) StrComp(s1, s2)
Concatenation operator Length of a String Extracts numcharaters beginning at pos in the string Returns position of searchword in s, or -1 if not found Returns true for strings containing only numbers Converts a String Returns lower and upper case Returns 0 if s1 equals s2, -1 else
Array LBound(a), UBound(a) appendTo(a, value)7
Obtain the bounds of an array the useful Sub we have written
Variant can hold all other types (seldomly used)
Object remember to use Set when assigning
6 do not forget to Randomize. Furthermore, the formula for obtaining an Integer between a lower bound L and an upper bound U is: Int((O – L + 1) * Rnd + L)
7 Remeber, you need a dynamic array for using this function, e.g. Dim a() As Double

Cheat Sheet: ThisDrawing.ModelSpace’s Drawing Functions Description Parameter(s) Note
addPoint add a point Double(0 To 2) Point
addCircle add a circle Double(0 To 2) Middle
Double Radius
addLine add a line Double(0 To 2) Start
Double(0 To 2) End
addPolyline add 3D line Double(0 To N) Points N is at least 5
addLightWeightPolyline add 2D line Double(0 To N) Points N is odd, at least 3
addSolid adds a polygon Double(0 To 2) A
Double(0 To 2) B Double(0 To 2) C Double(0 To 2) D
Edges are: AB, AC, CD and DB. For Triangles: C=D.
addBox adds 3D Box Double(0 To 2) Center
Double Depth Double Width Double Height
addSphere adds 3D Sphere Double(0 To 2) Center
Double Radius
addCone adds 3D Cone Double(0 To 2) Center
Double Radius Double Height
addCylinder adds 3D Cylinder Double(0 To 2) Center
Double Radius Double Height
addText adds a label String Text
Double(0 To 2) Point Double Height
addMText adds multiline label
Double(0 To 2) Point Double Width String Text