servicenow: user guide5 | servicenow: user guide 3. the refresh icon in the upper-right corner of...
TRANSCRIPT

For additional training resources, visit www.calstatela.edu/training.
ServiceNow: User Guide Spring 2018, Version 2
Table of Contents Introduction ...................................................................................................................................... 2 Logging In .......................................................................................................................................... 2 Overview of the User Interface ........................................................................................................... 2
Banner Frame ......................................................................................................................................... 3 Navigation Bar ........................................................................................................................................ 3 Content Frame ........................................................................................................................................ 4
Reporting Issues ................................................................................................................................ 5 Requesting Services ........................................................................................................................... 7 Checking the Status of Tickets ............................................................................................................ 9 Approving or Rejecting Requests ...................................................................................................... 10 Delegating Approvals to Another User .............................................................................................. 11 Searching the Knowledge Base ......................................................................................................... 12 Getting Help .................................................................................................................................... 13 Logging Out ..................................................................................................................................... 13

2 | ServiceNow: User Guide
Introduction ServiceNow is an online ticketing system that allows Cal State LA users to report IT issues and request IT services. The system keeps a log of all activities and automatically emails status updates, allowing users to track the status of an incident ticket or a service request that has been submitted. This handout provides an overview of the ServiceNow user interface and covers how to report an issue, request a service, check the status of a ticket, approve or reject a request, delegate approvals, search the knowledge base, and get help.
Logging In You can log in to ServiceNow from any device with an internet connection using your MyCalStateLA ID account.
To log in to ServiceNow: 1. Open a web browser and go to http://calstatela.service-now.com. 2. On the ServiceNow login page, enter your MyCalStateLA ID username and password in the
corresponding fields, and then click the Login button (see Figure 1).
Figure 1 – ServiceNow Login Page
Overview of the User Interface The ServiceNow user interface is composed of three main sections (see Figure 2).
1. The Banner frame is located at the top of the user interface and provides access to account settings, system settings, and help.
2. The Navigation bar is located on the left side of the user interface and provides access to all available applications and modules, your favorites, and recently viewed items.
3. The Content frame is located on the right side of the user interface and displays homepages, lists, or forms.

3 | ServiceNow: User Guide
Figure 2 – ServiceNow User Interface
Banner Frame The Banner frame runs across the top of every page and provides access to account settings, system settings, and help (see Figure 3).
1. Clicking the Cal State LA logo displays the Self Service homepage in the Content frame. 2. The User menu displays the name of the logged in user. Clicking the menu provides access to
the following options: • Profile displays your user profile page in the Content frame. • Logout logs you out of the system and returns to the login page.
3. Clicking the Help icon opens the Help sidebar on the right side of the user interface which includes a link to the official ServiceNow product documentation.
4. Clicking the Settings icon opens the System Settings pop-up window which allows you to customize the user interface and set your preferences.
Figure 3 – Banner Frame
Navigation Bar The Navigation bar (also called the Application Navigator) provides access to all available applications and modules, your favorites, and recently viewed items (see Figure 4, Figure 5, and Figure 6). You can use the Filter navigator box at the top of the Navigation bar to quickly find an application or a module. As you enter text, the bar shows only matching applications and modules. You can collapse or expand
the Navigation bar by clicking the Minimize/Maximize Navigator icon at the bottom of the bar. In the collapsed view, only favorites are displayed and they appear as icons.

4 | ServiceNow: User Guide
The Navigation bar consists of three tabs.
1. The Applications tab, represented by a Storage Box icon , displays all available applications and modules (see Figure 4). Each application appears as a section on the tab. All modules that an application contains are listed below the application label. You can collapse or expand an application by clicking its label. Clicking a module opens it in the Content frame.
2. The Favorites tab, represented by a Star icon , displays items you have added as favorites (see Figure 5). Any application, module, list, or record can be marked as a favorite. By default, the Favorites tab includes a link to the homepage. • To add a favorite for an application or a module, click the Applications tab, point to the
application or module, and then click the Star icon that appears on the right.
• To reorder favorites in the list, click the Favorites tab, click the Edit Favorites icon at the bottom of the Navigation bar, drag a favorite to a new location in the list, and then click the Edit Favorites icon to exit edit mode.
• To delete a favorite, click the Favorites tab, point to the favorite, and then click the Remove
Favorite icon that appears on the right.
3. The History tab, represented by a Clock icon , displays items you have recently accessed (see Figure 6). Items appear in chronological order from most to least recently accessed.
Figure 4 – Applications Tab
of the Navigation Bar
Figure 5 – Favorites Tab of
the Navigation Bar
Figure 6 – History Tab of the
Navigation Bar
Content Frame The Content frame displays homepages, lists, or forms. When you log in to ServiceNow, the Self Service homepage appears in the Content frame (see Figure 7). It gives an overview of the information you access often and provides quick access to commonly used features.
1. The title of the homepage appears at the top of the Content frame. 2. Any widget that has been added to the homepage appears below the title. Widgets are sections
of content that provide information and links.

5 | ServiceNow: User Guide
3. The Refresh icon in the upper-right corner of the homepage is used to refresh the page. You can specify a refresh interval of 5 minutes, 15 minutes, 30 minutes, or 1 hour by clicking the
Settings icon next to the Refresh icon and selecting the desired option. The default is Off (no refresh).
Figure 7 – Self Service Homepage in the Content Frame
Reporting Issues ServiceNow provides a convenient method for reporting IT issues. You can access the system 24/7 to create an incident ticket and track it until the issue has been resolved.
To report an issue: 1. If necessary, click the Cal State LA logo in the Banner frame to display the Self Service
homepage. 2. On the Self Service homepage, click Can We Help You (see Figure 8).
Figure 8 – Can We Help You Section of the Self Service Homepage
3. On the Can We Help You page, click Report an Incident (see Figure 9). The Report an Incident form opens in the Content frame (see Figure 10).
NOTE: Fields marked with a red asterisk are required. Read-only fields are gray.

6 | ServiceNow: User Guide
Figure 9 – Can We Help You Page
Figure 10 – Report an Incident Form
4. In the Who is this for field, enter the name of the user who is affected by the incident.
NOTE: The Who is this for field is automatically filled with your name. If you are reporting an incident on behalf of someone else, enter their name so they can be contacted directly. You can start typing the user’s name, username, or CIN to display a list of matching users, and then select the appropriate user from the list. Once you select a user, one or more fields of the form will autofill with the user’s information.

7 | ServiceNow: User Guide
5. In the Phone Number field, enter your preferred contact number. 6. From the Impact drop-down list, select the level of impact (1 - High, 2 - Medium, or 3 - Low)
based on the number of users that are affected. The more users affected, the higher the impact. 7. In the Subject field, enter a brief description of the incident. 8. In the Description field, enter a detailed description of the incident. You should include
information such as what device or system you are using, when and where the issue occurred, and if anything has been done to resolve the issue.
9. To add an attachment (such as a screenshot of the error), click the Attachment icon on the form’s title bar to open the Attachments pop-up window, select the file that you want to attach, and then click the Close button . The attachment appears at the top of the form.
10. When finished, click the Submit button. A confirmation message displays in the Content frame and an email notification is sent to you to confirm that the ticket has been submitted.
Requesting Services ServiceNow includes a service catalog that enables you to request IT services and products. Catalog items are grouped into categories and subcategories to help you quickly find the items you need.
To request a service: 1. On the Applications tab of the Navigation bar, under Self-Service, click Service Catalog (see
Figure 11).
Figure 11 – Applications Tab of the Navigation Bar

8 | ServiceNow: User Guide
2. The Service Catalog homepage opens in the Content frame (see Figure 12). Click the desired category (e.g., Multimedia Services), and then click the item that you want to request (e.g., Media Production Request Form).
Figure 12 – Service Catalog Homepage
3. The Service Catalog request form for the selected item opens in the Content frame (see Figure 13). Fill in all relevant fields.
NOTE: Fields marked with a red asterisk are required. Read-only fields are gray.
4. To add an attachment, click the Attachment icon on the form’s title bar to open the Attachments pop-up window, select the file that you want to attach, and then click the Close button . The attachment appears at the top of the form.
5. When finished, click the Submit Request button. A confirmation message displays in the Content frame and an email notification is sent to you to confirm that the request has been submitted.
Figure 13 – Service Catalog Request Form

9 | ServiceNow: User Guide
Checking the Status of Tickets ServiceNow automatically emails status updates so you can easily track the status of your incident tickets and service requests. You can also check to status of your tickets using the ServiceNow system.
To check the status of an incident ticket: 1. If necessary, click the Cal State LA logo in the Banner frame to display the Self Service
homepage. The My Open Incidents section displays a list of your incident tickets (see Figure 14). 2. To open a ticket and view its details, click the link in the Category column and review the
Activity log for information and work completed on the ticket.
Figure 14 – My Open Incidents Section of the Self Service Homepage
NOTE: You can display a list of all your incident tickets by clicking Incidents on the Applications tab of the Navigation bar (see Figure 11).
To check the status of a request: 1. If necessary, click the Cal State LA logo in the Banner frame to display the Self Service
homepage. The My Requested Items section displays a list of your requested items (see Figure 15).
2. To see the status of a specific request, click the arrow in the Stage column to expand it. 3. To open a request and view its details, click the request number in the Number column.
Figure 15 – My Requested Items Section of the Self Service Homepage
NOTE: You can display a list of all your requested items by clicking Requested Items on the Applications tab of the Navigation bar (see Figure 11).

10 | ServiceNow: User Guide
Approving or Rejecting Requests If a Service Catalog item requires your approval before it can be fulfilled, you will be notified via email that you have an item to approve. You can approve or reject a requested item via email or the ServiceNow system.
To approve or reject a requested item via email: 1. In Outlook, open the email notification for the item that requires your approval. 2. In the Comments section, click the Approve or Reject link.
To approve or reject a requested item via ServiceNow: 1. On the Applications tab of the Navigation bar, under Self-Service, click My Approvals (see
Figure 11). 2. The Approvals list opens in the Content frame. Locate the item that you want to approve, and
then click the Requested link in the State column (see Figure 16).
Figure 16 – Approvals List
3. The Approval form opens in the Content frame. Review the request, and then click the Approve or Reject button on the form’s title bar or at the bottom of the form (see Figure 17).
Figure 17 – Approval Form
11 | ServiceNow: User Guide
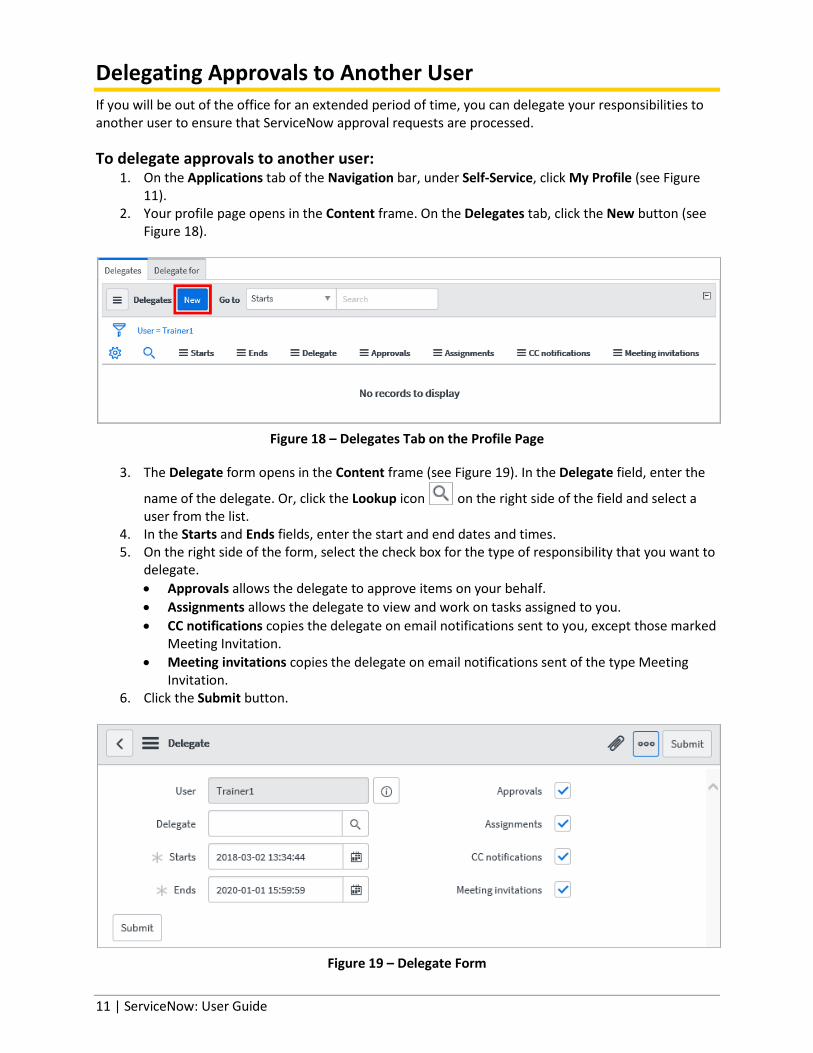
Delegating Approvals to Another User If you will be out of the office for an extended period of time, you can delegate your responsibilities to another user to ensure that ServiceNow approval requests are processed.
To delegate approvals to another user: 1. On the Applications tab of the Navigation bar, under Self-Service, click My Profile (see Figure
11). 2. Your profile page opens in the Content frame. On the Delegates tab, click the New button (see
Figure 18).
Figure 18 – Delegates Tab on the Profile Page
3. The Delegate form opens in the Content frame (see Figure 19). In the Delegate field, enter the
name of the delegate. Or, click the Lookup icon on the right side of the field and select a user from the list.
4. In the Starts and Ends fields, enter the start and end dates and times. 5. On the right side of the form, select the check box for the type of responsibility that you want to
delegate. • Approvals allows the delegate to approve items on your behalf. • Assignments allows the delegate to view and work on tasks assigned to you. • CC notifications copies the delegate on email notifications sent to you, except those marked
Meeting Invitation. • Meeting invitations copies the delegate on email notifications sent of the type Meeting
Invitation. 6. Click the Submit button.
Figure 19 – Delegate Form

12 | ServiceNow: User Guide
Searching the Knowledge Base ServiceNow includes a knowledge base that can be used to find information or solutions to problems. The Knowledge homepage displays knowledge articles organized by category. You can search for a specific article by using the Search box in the upper-left corner of the homepage.
To search the knowledge base: 1. On the Applications tab of the Navigation bar, under Self-Service, click Knowledge (see Figure
11). 2. The Knowledge homepage opens in the Content frame (see Figure 20). Enter one or more
keywords in the Search box, and then press the Enter key. 3. The search results display in the Content frame. Click an article to open it.
Figure 20 – Knowledge Homepage
NOTE: You can also use the Knowledge Search section of the Self Service homepage to search the knowledge base (see Figure 21).
Figure 21 – Knowledge Search Section of the Self Service Homepage

13 | ServiceNow: User Guide
Getting Help ServiceNow includes a contextual help feature that can be used to get assistance on any topic or task.
To get help: 1. In the Banner frame, click the Help icon . The Help sidebar opens on the right side of the
user interface (see Figure 22). 2. Click the Search Documentation link. The official ServiceNow Product Documentation website
opens in a new tab. 3. Click any link to display the corresponding information or use the Search box in the upper-right
corner of the page to search for a specific topic.
Figure 22 – Help Sidebar
Logging Out Logging out prevents others from accessing your account. When you have finished using ServiceNow, you should log out of the system and close the web browser window.
NOTE: For security reasons, your session will time out after four hours of inactivity.
To log out of ServiceNow: 1. In the Banner frame, click the User menu, and then click Logout (see Figure 23). 2. Close the web browser window.
Figure 23 – User Menu