service / training manual - cornelius xtreme 24.06.08.pdfservice / training manual revision date:...
TRANSCRIPT
Service / Training Manual
Revision Date: October 17, 2005Release Date: November 26, 2001Publication Number: TP00952Revision: Fwww.cornelius.com


i
TABLE OF CONTENTS
Product Preview 1. . . . . . . . . . . . . . . . . . . . . . . . . . . . . . . . . . . . . . . . . . Preview Questions 1. . . . . . . . . . . . . . . . . . . . . . . . . . . . . . . . . . . . . . . . . . . . . . . . . Key Things to Know / Do 1. . . . . . . . . . . . . . . . . . . . . . . . . . . . . . . . . . . . . . . . . . . .
Model and Serial Location 2. . . . . . . . . . . . . . . . . . . . . . . . . . . . . . . . . Xtreme Ice Machine 2. . . . . . . . . . . . . . . . . . . . . . . . . . . . . . . . . . . . . . . . . . . . . . . . Serial Number Explanation 2. . . . . . . . . . . . . . . . . . . . . . . . . . . . . . . . . . . . . . . . . . Specifications 2. . . . . . . . . . . . . . . . . . . . . . . . . . . . . . . . . . . . . . . . . . . . . . . . . . . . . .
General 5. . . . . . . . . . . . . . . . . . . . . . . . . . . . . . . . . . . . . . . . . . . . . . . . . . . Freight Damage Claims Procedure 5. . . . . . . . . . . . . . . . . . . . . . . . . . . . . . . . . . . Technical Specifications 5. . . . . . . . . . . . . . . . . . . . . . . . . . . . . . . . . . . . . . . . . . . . . Cube Size: 5/8”W X 7/8”H X 7/8”D 5. . . . . . . . . . . . . . . . . . . . . . . . . . . . . . . . . . . . Ambient Temperature: 50_F/10_C – 100_F/38_C 5. . . . . . . . . . . . . . . . . . . . . . . Water Temperature: 50_F/10_C – 90_F/32_C 5. . . . . . . . . . . . . . . . . . . . . . . . . . Water Pressure: 20–80 psi 5. . . . . . . . . . . . . . . . . . . . . . . . . . . . . . . . . . . . . . . . . . . Maximum Fuse Size: See Nameplate 5. . . . . . . . . . . . . . . . . . . . . . . . . . . . . . . . . Circuit Amp.: See Nameplate 5. . . . . . . . . . . . . . . . . . . . . . . . . . . . . . . . . . . . . . . . Refrigerant Type: R–404a 5. . . . . . . . . . . . . . . . . . . . . . . . . . . . . . . . . . . . . . . . . . . Refrigerant Charge: See Nameplate 5. . . . . . . . . . . . . . . . . . . . . . . . . . . . . . . . . .
Installation Instructions 6. . . . . . . . . . . . . . . . . . . . . . . . . . . . . . . . . . . Location of Equipment 6. . . . . . . . . . . . . . . . . . . . . . . . . . . . . . . . . . . . . . . . . . . . . . Equipment Set-Up 6. . . . . . . . . . . . . . . . . . . . . . . . . . . . . . . . . . . . . . . . . . . . . . . . . . Dispenser Installation 7. . . . . . . . . . . . . . . . . . . . . . . . . . . . . . . . . . . . . . . . . . . . . . . Plumbing Connections 8. . . . . . . . . . . . . . . . . . . . . . . . . . . . . . . . . . . . . . . . . . . . . . Electrical 8. . . . . . . . . . . . . . . . . . . . . . . . . . . . . . . . . . . . . . . . . . . . . . . . . . . . . . . . . . Installation Check Points 8. . . . . . . . . . . . . . . . . . . . . . . . . . . . . . . . . . . . . . . . . . . . Start Up and Check Out 8. . . . . . . . . . . . . . . . . . . . . . . . . . . . . . . . . . . . . . . . . . . . . Start Up Sequence 8. . . . . . . . . . . . . . . . . . . . . . . . . . . . . . . . . . . . . . . . . . . . . . . . . Preventative Maintenance Sequence 9. . . . . . . . . . . . . . . . . . . . . . . . . . . . . . . . . .
Cleaning Procedures 10. . . . . . . . . . . . . . . . . . . . . . . . . . . . . . . . . . . . . Cleaning Procedure if there is ice on the evaporator plate. 10. . . . . . . . . . . . . . . Prep – Cleaning Procedure 11. . . . . . . . . . . . . . . . . . . . . . . . . . . . . . . . . . . . . . . . . . Cleaning the Water System and Evaporator 11. . . . . . . . . . . . . . . . . . . . . . . . . . . . Sanitizing The Water System and The Evaporator 12. . . . . . . . . . . . . . . . . . . . . .
Operations 13. . . . . . . . . . . . . . . . . . . . . . . . . . . . . . . . . . . . . . . . . . . . . . . Unit Selection 13. . . . . . . . . . . . . . . . . . . . . . . . . . . . . . . . . . . . . . . . . . . . . . . . . . . . . . Normal Operations 13. . . . . . . . . . . . . . . . . . . . . . . . . . . . . . . . . . . . . . . . . . . . . . . . . Start Up Sequence (Primary) 14. . . . . . . . . . . . . . . . . . . . . . . . . . . . . . . . . . . . . . . . Secondary Start Up 14. . . . . . . . . . . . . . . . . . . . . . . . . . . . . . . . . . . . . . . . . . . . . . . . . Dump Cycle 14. . . . . . . . . . . . . . . . . . . . . . . . . . . . . . . . . . . . . . . . . . . . . . . . . . . . . . . Water Fill Cycle 14. . . . . . . . . . . . . . . . . . . . . . . . . . . . . . . . . . . . . . . . . . . . . . . . . . . . PreChill Cycle (300’s, 500’s, 600’s, 800’s, 1000’s, and 1200’s) 14. . . . . . . . . . . . PreChill Cycle (1400’s and 1800’s) 15. . . . . . . . . . . . . . . . . . . . . . . . . . . . . . . . . . . . Freeze Cycle 15. . . . . . . . . . . . . . . . . . . . . . . . . . . . . . . . . . . . . . . . . . . . . . . . . . . . . .

ii
Harvest Cycle 15. . . . . . . . . . . . . . . . . . . . . . . . . . . . . . . . . . . . . . . . . . . . . . . . . . . . . . Fan control 15. . . . . . . . . . . . . . . . . . . . . . . . . . . . . . . . . . . . . . . . . . . . . . . . . . . . . . . . Adjusting Bridge Thickness 16. . . . . . . . . . . . . . . . . . . . . . . . . . . . . . . . . . . . . . . . . . Total Ice Capacity 16. . . . . . . . . . . . . . . . . . . . . . . . . . . . . . . . . . . . . . . . . . . . . . . . . . Ice Production Check 16. . . . . . . . . . . . . . . . . . . . . . . . . . . . . . . . . . . . . . . . . . . . . . . LED Indicators 18. . . . . . . . . . . . . . . . . . . . . . . . . . . . . . . . . . . . . . . . . . . . . . . . . . . . . Harvest Button 20. . . . . . . . . . . . . . . . . . . . . . . . . . . . . . . . . . . . . . . . . . . . . . . . . . . . . Manual Harvest 20. . . . . . . . . . . . . . . . . . . . . . . . . . . . . . . . . . . . . . . . . . . . . . . . . . . . Unit Check 20. . . . . . . . . . . . . . . . . . . . . . . . . . . . . . . . . . . . . . . . . . . . . . . . . . . . . . . . Clean Cycle 20. . . . . . . . . . . . . . . . . . . . . . . . . . . . . . . . . . . . . . . . . . . . . . . . . . . . . . .
Safety (Old Software) 21. . . . . . . . . . . . . . . . . . . . . . . . . . . . . . . . . . . . . . Safety Features 21. . . . . . . . . . . . . . . . . . . . . . . . . . . . . . . . . . . . . . . . . . . . . . . . . . . . Flashing code for self Diagnostics
(300’s, 500’s, 600’s, 800’s, 1000’s, and 1200’s) 21. . . . . . . . . . . . . . . . . . . . . Flashing code for self Diagnostics (1400’s and 1800’s) 21. . . . . . . . . . . . . . . . . . Water Fill Time Out 22. . . . . . . . . . . . . . . . . . . . . . . . . . . . . . . . . . . . . . . . . . . . . . . . . Possible Causes 22. . . . . . . . . . . . . . . . . . . . . . . . . . . . . . . . . . . . . . . . . . . . . . . . . . . Maximum Freeze Time Out 22. . . . . . . . . . . . . . . . . . . . . . . . . . . . . . . . . . . . . . . . . . Possible Causes 22. . . . . . . . . . . . . . . . . . . . . . . . . . . . . . . . . . . . . . . . . . . . . . . . . . . Harvest Time Out 23. . . . . . . . . . . . . . . . . . . . . . . . . . . . . . . . . . . . . . . . . . . . . . . . . . Possible Causes 23. . . . . . . . . . . . . . . . . . . . . . . . . . . . . . . . . . . . . . . . . . . . . . . . . . . Bin Full Delay 23. . . . . . . . . . . . . . . . . . . . . . . . . . . . . . . . . . . . . . . . . . . . . . . . . . . . . . Low Condenser Temperature Delay 23. . . . . . . . . . . . . . . . . . . . . . . . . . . . . . . . . . . Possible Causes 23. . . . . . . . . . . . . . . . . . . . . . . . . . . . . . . . . . . . . . . . . . . . . . . . . . . High Condenser Temperature 23. . . . . . . . . . . . . . . . . . . . . . . . . . . . . . . . . . . . . . . . Possible Causes 24. . . . . . . . . . . . . . . . . . . . . . . . . . . . . . . . . . . . . . . . . . . . . . . . . . . Open Condenser Thermistor 24. . . . . . . . . . . . . . . . . . . . . . . . . . . . . . . . . . . . . . . . . Possible Causes 24. . . . . . . . . . . . . . . . . . . . . . . . . . . . . . . . . . . . . . . . . . . . . . . . . . . Failed Water Temperature 24. . . . . . . . . . . . . . . . . . . . . . . . . . . . . . . . . . . . . . . . . . . Possible Causes 24. . . . . . . . . . . . . . . . . . . . . . . . . . . . . . . . . . . . . . . . . . . . . . . . . . . Open Water Thermistor 24. . . . . . . . . . . . . . . . . . . . . . . . . . . . . . . . . . . . . . . . . . . . . Possible Causes 24. . . . . . . . . . . . . . . . . . . . . . . . . . . . . . . . . . . . . . . . . . . . . . . . . . .
Safety (New Software) 25. . . . . . . . . . . . . . . . . . . . . . . . . . . . . . . . . . . . . Safety Features 25. . . . . . . . . . . . . . . . . . . . . . . . . . . . . . . . . . . . . . . . . . . . . . . . . . . . Flashing code for self Diagnostics
(300’s, 500’s, 600’s, 800’s, 1000’s, and 1200’s) 25. . . . . . . . . . . . . . . . . . . . . Flashing code for self Diagnostics (1400’s and 1800’s) 25. . . . . . . . . . . . . . . . . . Failed Freeze Time Out Shutdown 26. . . . . . . . . . . . . . . . . . . . . . . . . . . . . . . . . . . . Possible Causes 26. . . . . . . . . . . . . . . . . . . . . . . . . . . . . . . . . . . . . . . . . . . . . . . . . . . Failed Harvest Shutdown 26. . . . . . . . . . . . . . . . . . . . . . . . . . . . . . . . . . . . . . . . . . . . Possible Causes 26. . . . . . . . . . . . . . . . . . . . . . . . . . . . . . . . . . . . . . . . . . . . . . . . . . . Bin Full Delay 26. . . . . . . . . . . . . . . . . . . . . . . . . . . . . . . . . . . . . . . . . . . . . . . . . . . . . . Low Condenser Temperature Warning 26. . . . . . . . . . . . . . . . . . . . . . . . . . . . . . . . . Possible Causes 26. . . . . . . . . . . . . . . . . . . . . . . . . . . . . . . . . . . . . . . . . . . . . . . . . . . High Condenser Temperature Warning and Shutdown 27. . . . . . . . . . . . . . . . . . . Possible Causes 27. . . . . . . . . . . . . . . . . . . . . . . . . . . . . . . . . . . . . . . . . . . . . . . . . . . Open Condenser Thermistor Shutdown 27. . . . . . . . . . . . . . . . . . . . . . . . . . . . . . . Possible Causes 27. . . . . . . . . . . . . . . . . . . . . . . . . . . . . . . . . . . . . . . . . . . . . . . . . . . Water Inlet Warning 27. . . . . . . . . . . . . . . . . . . . . . . . . . . . . . . . . . . . . . . . . . . . . . . . .

iii
Possible Causes 27. . . . . . . . . . . . . . . . . . . . . . . . . . . . . . . . . . . . . . . . . . . . . . . . . . . Failed Water System Shutdown 27. . . . . . . . . . . . . . . . . . . . . . . . . . . . . . . . . . . . . . Possible Causes 27. . . . . . . . . . . . . . . . . . . . . . . . . . . . . . . . . . . . . . . . . . . . . . . . . . . Failed Water Temperature Shutdown 28. . . . . . . . . . . . . . . . . . . . . . . . . . . . . . . . . . Possible Causes 28. . . . . . . . . . . . . . . . . . . . . . . . . . . . . . . . . . . . . . . . . . . . . . . . . . . Open Water Temperature Thermistor 28. . . . . . . . . . . . . . . . . . . . . . . . . . . . . . . . . . Possible Causes 28. . . . . . . . . . . . . . . . . . . . . . . . . . . . . . . . . . . . . . . . . . . . . . . . . . .
Component Function (Circuit Board, Etc.) 29. . . . . . . . . . . . . . . . . . Sensors 29. . . . . . . . . . . . . . . . . . . . . . . . . . . . . . . . . . . . . . . . . . . . . . . . . . . . . . . . . . . Reset Operation 29. . . . . . . . . . . . . . . . . . . . . . . . . . . . . . . . . . . . . . . . . . . . . . . . . . . . Evaporator Switches 29. . . . . . . . . . . . . . . . . . . . . . . . . . . . . . . . . . . . . . . . . . . . . . . . Voltage Checks 29. . . . . . . . . . . . . . . . . . . . . . . . . . . . . . . . . . . . . . . . . . . . . . . . . . . . Evaporator Proximity Switch Pins and Condenser Thermistor Pins 29. . . . . . . . Stacking Cable 29. . . . . . . . . . . . . . . . . . . . . . . . . . . . . . . . . . . . . . . . . . . . . . . . . . . . . Sensor [Thermistor] Diagnosis 29. . . . . . . . . . . . . . . . . . . . . . . . . . . . . . . . . . . . . . . Condenser Fan Cycling Control 30. . . . . . . . . . . . . . . . . . . . . . . . . . . . . . . . . . . . . . Thermostatic Expansion Valves 30. . . . . . . . . . . . . . . . . . . . . . . . . . . . . . . . . . . . . . Starving TXV - Product Symptoms 30. . . . . . . . . . . . . . . . . . . . . . . . . . . . . . . . . . . . Flooding TXV - Product Symptoms 30. . . . . . . . . . . . . . . . . . . . . . . . . . . . . . . . . . . Water Regulating Valve 31. . . . . . . . . . . . . . . . . . . . . . . . . . . . . . . . . . . . . . . . . . . . . Service Stem Valves 31. . . . . . . . . . . . . . . . . . . . . . . . . . . . . . . . . . . . . . . . . . . . . . . . Moisture Contamination 32. . . . . . . . . . . . . . . . . . . . . . . . . . . . . . . . . . . . . . . . . . . . . Compressor Contactor 32. . . . . . . . . . . . . . . . . . . . . . . . . . . . . . . . . . . . . . . . . . . . . . Compressor & Starting Component Check-Out Procedure 33. . . . . . . . . . . . . . . Relay 33. . . . . . . . . . . . . . . . . . . . . . . . . . . . . . . . . . . . . . . . . . . . . . . . . . . . . . . . . . . . . Potential – 33. . . . . . . . . . . . . . . . . . . . . . . . . . . . . . . . . . . . . . . . . . . . . . . . . . . . . . . . . Current – 33. . . . . . . . . . . . . . . . . . . . . . . . . . . . . . . . . . . . . . . . . . . . . . . . . . . . . . . . . . Capacitors 33. . . . . . . . . . . . . . . . . . . . . . . . . . . . . . . . . . . . . . . . . . . . . . . . . . . . . . . . . Compressor 34. . . . . . . . . . . . . . . . . . . . . . . . . . . . . . . . . . . . . . . . . . . . . . . . . . . . . . . Leak Detection 34. . . . . . . . . . . . . . . . . . . . . . . . . . . . . . . . . . . . . . . . . . . . . . . . . . . . . System Evacuation & Recharging 35. . . . . . . . . . . . . . . . . . . . . . . . . . . . . . . . . . . . Self-Contained Products 35. . . . . . . . . . . . . . . . . . . . . . . . . . . . . . . . . . . . . . . . . . . . REFRIGERANT DEFINITIONS (ASHRAE 3-1990) 36. . . . . . . . . . . . . . . . . . . . . . High Pressure Safety Switch 36. . . . . . . . . . . . . . . . . . . . . . . . . . . . . . . . . . . . . . . . . Compressor Run-On 36. . . . . . . . . . . . . . . . . . . . . . . . . . . . . . . . . . . . . . . . . . . . . . . .
Troubleshooting 37. . . . . . . . . . . . . . . . . . . . . . . . . . . . . . . . . . . . . . . . . .
Xtreme Ice – Kits 43. . . . . . . . . . . . . . . . . . . . . . . . . . . . . . . . . . . . . . . . . . Bin Stat Kit, P/N 630000408 43. . . . . . . . . . . . . . . . . . . . . . . . . . . . . . . . . . . . . . . . . Installation Instructions 43. . . . . . . . . . . . . . . . . . . . . . . . . . . . . . . . . . . . . . . . . . . . . . Remote Condensers 47. . . . . . . . . . . . . . . . . . . . . . . . . . . . . . . . . . . . . . . . . . . . . . . . Installation Instructions 47. . . . . . . . . . . . . . . . . . . . . . . . . . . . . . . . . . . . . . . . . . . . . . Remote Condenser Location 49. . . . . . . . . . . . . . . . . . . . . . . . . . . . . . . . . . . . . . . . . Head Pressure Control [Headmaster] 51. . . . . . . . . . . . . . . . . . . . . . . . . . . . . . . . . Remote System Evacuation/Re-charge 52. . . . . . . . . . . . . . . . . . . . . . . . . . . . . . . .

Xtreme Ice Training Manual
TP00952October 17, 2005 1
PRODUCT PREVIEW
PREVIEW QUESTIONSCheck your current knowledge by taking a few minutes to answer the following questions:
1. Does the ice machine need to be level? _____ Yes _____ No?
2. What is the recommended clearance for a air cooled machine?____________________________________________________________________________________________________________
3. What kind of cleaner should be used when cleaning this ice machine?_______________________________________________________________________________________________________
4. Water filters are required in most installations? _____ Yes _____ No?
5. Water regulators are required in most installations? _____ Yes _____ No?
6. What initiates the harvest cycle? _____________________________________________________________________________________________________________________________________
KEY THINGS TO KNOW / DO� This is a batch harvest system.� The sealant should be added before the unit is placed on the dispenser or bin. Always seal the ice
maker to the bin (with a gasket or food grade sealant). Sealing prevents melted ice from running outof the joint between the ice machines!
� Choose the proper condenser for the application:Air – with sufficient clean air circulation.Water – high ambient temperature or dusty environment, restricted air flow, or where extra BTUs areun–wanted.
Remote – when heat or noise are a problem!
� Always refer to serial plate for electrical power requirements and refrigeration charge and type ofrefrigerant!
NOTE: Note serial plate locations. Lower left–hand corner of cabinet, inside the unit on the bulk-head between the evaporator and the compressor.
� Always use proper size and type of water conditioning equipment (filter, chlorine, etc.)!� Do NOT use softened or reverse osmosis water!
� There is a manual reset high pressure cut out on the 500 series units.� Installation of a bin thermostat control is required in some installations, such as ice drink dispensers
or ice drink unit!� Bin stat is available to lower ice level! Part No. 630000408.
NOTE: If there is a very large slab of ice on the evaporator you will need to push the manual har-vest button to remove it.

Xtreme Ice Training Manual
TP00952 October 17, 20052
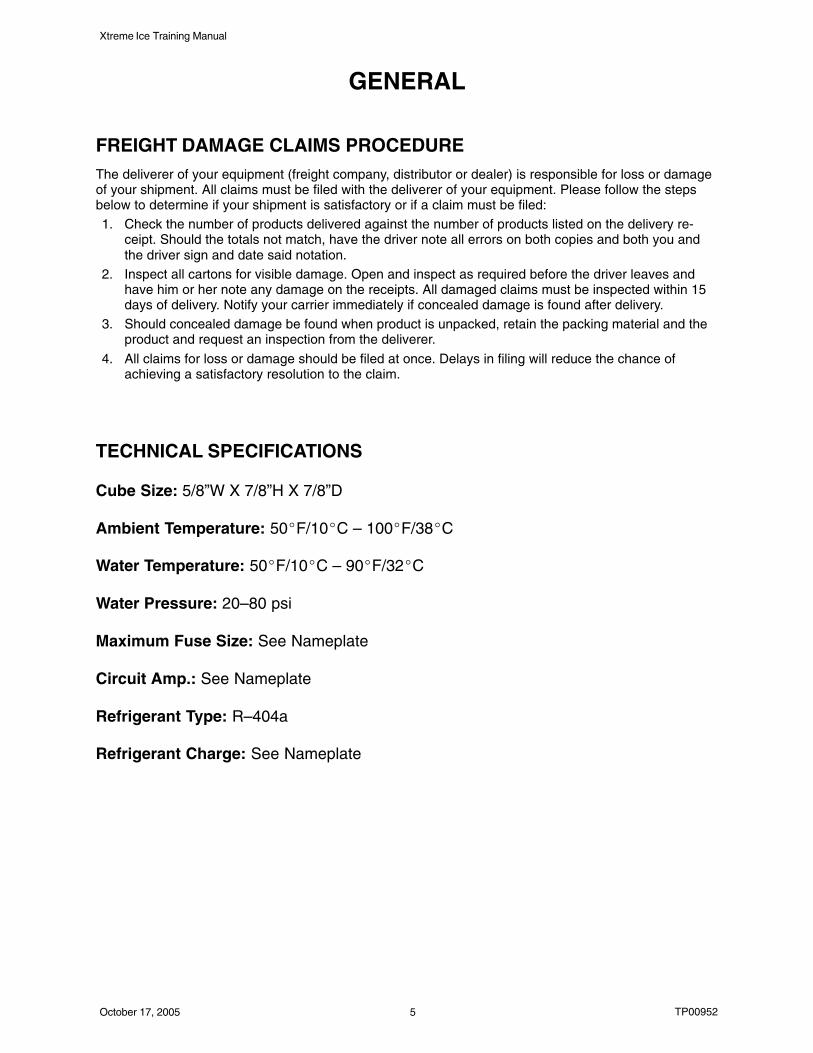
MODEL AND SERIAL LOCATION
XTREME ICE MACHINE
Condenser Discharge AirDeflector (as required)*
Bin Adapter (as required)*
Model/SerialNumber Location
FIGURE 1
*Bin adapters and condenser discharge air deflector may be equipped depending on your location or thesize of the storage bin.Record the model number and the serial number of your ice equipment. These numbers are requiredwhen requesting information from your local dealer/distributor/service company.
Model Number – Date Installed –
Serial Number – Purchased From -
SERIAL NUMBER EXPLANATION
63 A 01 01 BC 101
Sequential Number
Product Code (PC) – Ice Maker
Week of Manufacture – First week of the year
Year of Manufacture – 2001
Control Code (Revision Level)
Manufacturing Location – Mason City
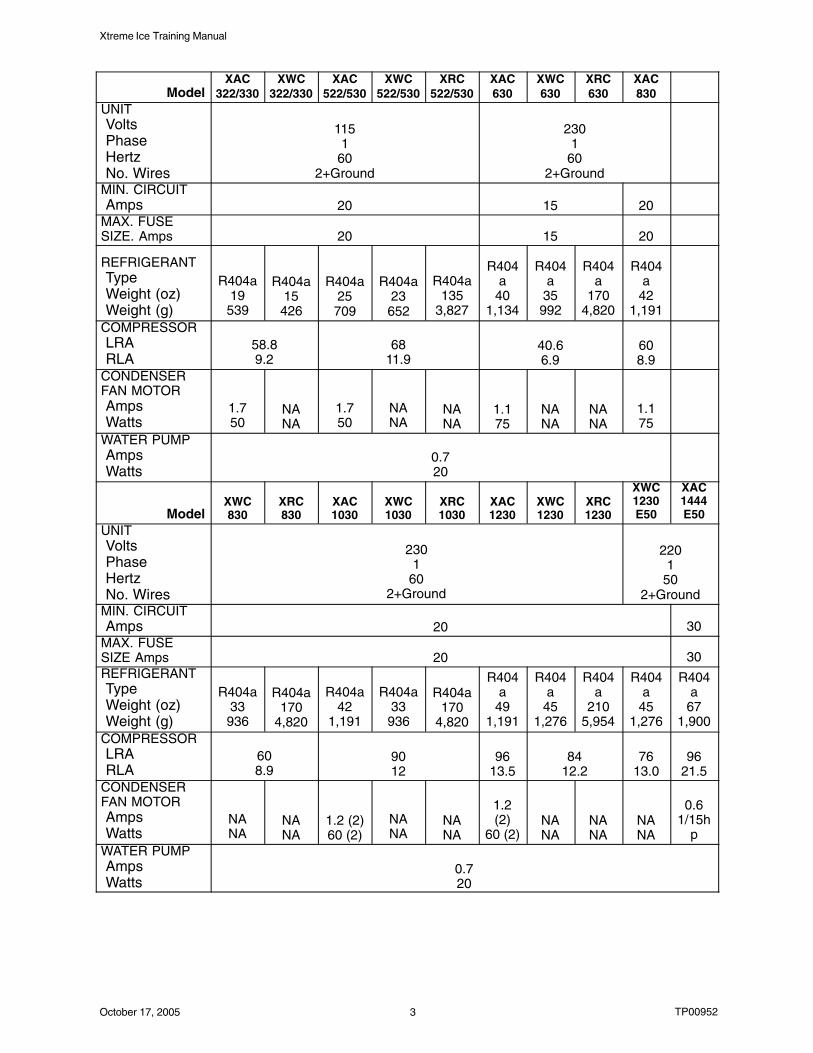
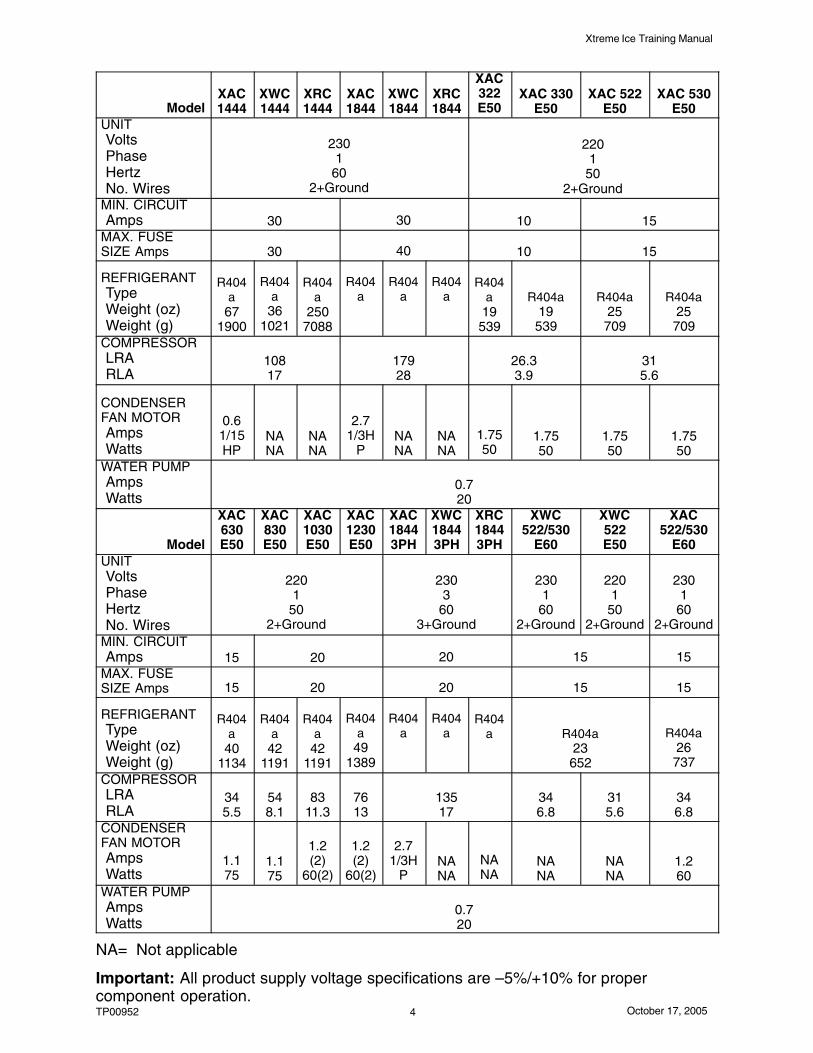
SPECIFICATIONSThe following table contains equipment specification information for the Ice Machines.
Xtreme Ice Training Manual
TP00952October 17, 2005 3
ModelXAC
322/330XWC
322/330XAC
522/530XWC
522/530XRC
522/530XAC630
XWC630
XRC630
XAC830
UNITVoltsPhaseHertzNo. Wires
1151
602+Ground
2301
602+Ground
MIN. CIRCUITAmps 20 15 20
MAX. FUSESIZE. Amps 20 15 20
REFRIGERANTTypeWeight (oz)Weight (g)
R404a19539
R404a15426
R404a25709
R404a23652
R404a135
3,827
R404a
401,134
R404a
35992
R404a
1704,820
R404a
421,191
COMPRESSORLRARLA
58.89.2
6811.9
40.66.9
608.9
CONDENSERFAN MOTORAmpsWatts
1.750
NANA
1.750
NANA
NANA
1.175
NANA
NANA
1.175
WATER PUMPAmpsWatts
0.720
ModelXWC830
XRC830
XAC1030
XWC1030
XRC1030
XAC1230
XWC1230
XRC1230
XWC1230E50
XAC1444E50
UNITVoltsPhaseHertzNo. Wires
2301
602+Ground
2201
502+Ground
MIN. CIRCUITAmps 20 30
MAX. FUSESIZE Amps 20 30REFRIGERANTTypeWeight (oz)Weight (g)
R404a33936
R404a170
4,820
R404a42
1,191
R404a33936
R404a170
4,820
R404a
491,191
R404a
451,276
R404a
2105,954
R404a
451,276
R404a
671,900
COMPRESSORLRARLA
608.9
9012
9613.5
8412.2
7613.0
9621.5
CONDENSERFAN MOTORAmpsWatts
NANA
NANA
1.2 (2)60 (2)
NANA
NANA
1.2(2)
60 (2)NANA
NANA
NANA
0.61/15h
pWATER PUMPAmpsWatts
0.720
Xtreme Ice Training Manual
TP00952 October 17, 20054
ModelXAC1444
XWC1444
XRC1444
XAC1844
XWC1844
XRC1844
XAC322E50
XAC 330E50
XAC 522E50
XAC 530E50
UNITVoltsPhaseHertzNo. Wires
2301
602+Ground
2201
502+Ground
MIN. CIRCUITAmps 30 30 10 15
MAX. FUSESIZE Amps 30 40 10 15
REFRIGERANTTypeWeight (oz)Weight (g)
R404a
671900
R404a
361021
R404a
2507088
R404a
R404a
R404a
R404a
19539
R404a19539
R404a25709
R404a25709
COMPRESSORLRARLA
10817
17928
26.33.9
315.6
CONDENSERFAN MOTORAmpsWatts
0.61/15HP
NANA
NANA
2.71/3H
PNANA
NANA
1.7550
1.7550
1.7550
1.7550
WATER PUMPAmpsWatts
0.720
Model
XAC630E50
XAC830E50
XAC1030E50
XAC1230E50
XAC18443PH
XWC18443PH
XRC18443PH
XWC522/530
E60
XWC522E50
XAC522/530
E60UNITVoltsPhaseHertzNo. Wires
2201
502+Ground
2303
603+Ground
2301
602+Ground
2201
502+Ground
2301
602+Ground
MIN. CIRCUITAmps 15 20 20 15 15
MAX. FUSESIZE Amps 15 20 20 15 15
REFRIGERANTTypeWeight (oz)Weight (g)
R404a
401134
R404a
421191
R404a
421191
R404a
491389
R404a
R404a
R404a R404a
23652
R404a26737
COMPRESSORLRARLA
345.5
548.1
8311.3
7613
13517
346.8
315.6
346.8
CONDENSERFAN MOTORAmpsWatts
1.175
1.175
1.2(2)
60(2)
1.2(2)
60(2)
2.71/3H
PNANA
NANA
NANA
NANA
1.260
WATER PUMPAmpsWatts
0.720
NA= Not applicable
Important: All product supply voltage specifications are –5%/+10% for propercomponent operation.
Xtreme Ice Training Manual
TP00952October 17, 2005 5
GENERAL
FREIGHT DAMAGE CLAIMS PROCEDUREThe deliverer of your equipment (freight company, distributor or dealer) is responsible for loss or damageof your shipment. All claims must be filed with the deliverer of your equipment. Please follow the stepsbelow to determine if your shipment is satisfactory or if a claim must be filed:1. Check the number of products delivered against the number of products listed on the delivery re-
ceipt. Should the totals not match, have the driver note all errors on both copies and both you andthe driver sign and date said notation.
2. Inspect all cartons for visible damage. Open and inspect as required before the driver leaves andhave him or her note any damage on the receipts. All damaged claims must be inspected within 15days of delivery. Notify your carrier immediately if concealed damage is found after delivery.
3. Should concealed damage be found when product is unpacked, retain the packing material and theproduct and request an inspection from the deliverer.
4. All claims for loss or damage should be filed at once. Delays in filing will reduce the chance ofachieving a satisfactory resolution to the claim.
TECHNICAL SPECIFICATIONS
Cube Size: 5/8”W X 7/8”H X 7/8”D
Ambient Temperature: 50�F/10�C – 100�F/38�C
Water Temperature: 50�F/10�C – 90�F/32�C
Water Pressure: 20–80 psi
Maximum Fuse Size: See Nameplate
Circuit Amp.: See Nameplate
Refrigerant Type: R–404a
Refrigerant Charge: See Nameplate
Xtreme Ice Training Manual
TP00952 October 17, 20056
INSTALLATION INSTRUCTIONS
Installation and start up of the equipment should be performed by the distributor or the dealer’s profes-sional staff.
LOCATION OF EQUIPMENT
For maximum performance the location should be away from heat sources such as ovens, direct sunlight,hot air discharge, etc.
To reduce cost of maintenance and loss of efficiency, avoid placing air-cooled equipment in areas wheregrease, flour and other airborne contaminants are present. Allow a minimum of 6� (15.24 cm.) clearanceat the rear and right side for proper air circulation. Restricted air circulation will affect the efficiency andrequired maintenance of the product.
IMPORTANT: Never operate your equipment in room temperature below 50�F (10�) or above100�F (38�C). Should the location of your product ever be exposed to freezing temperatures, itmust be shut down and winterized.
EQUIPMENT SET-UP
The following steps refer to the set-up of the ice bin and the cuber:
1. Remove the bin from its carton, place it on its back and install the legs and drain flange (if applica-ble) into the bottom of the bin. Bins must be installed on legs or sealed to the floor with RTV-732sealant.
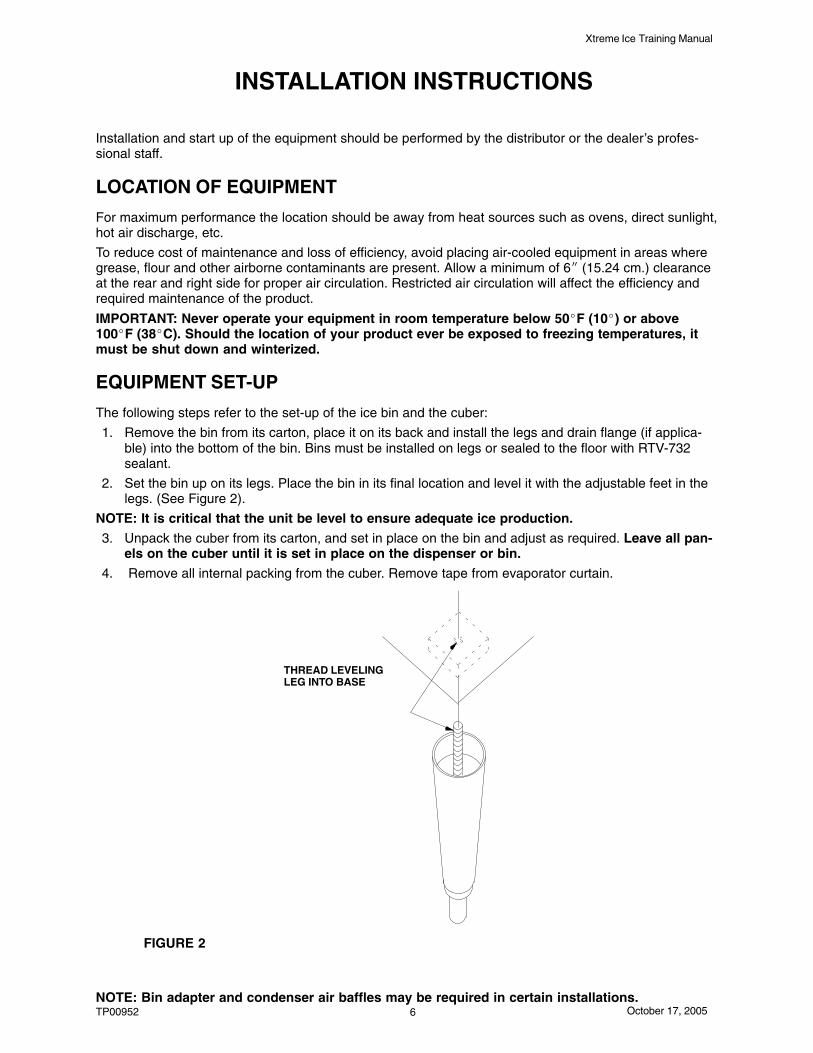
2. Set the bin up on its legs. Place the bin in its final location and level it with the adjustable feet in thelegs. (See Figure 2).
NOTE: It is critical that the unit be level to ensure adequate ice production.
3. Unpack the cuber from its carton, and set in place on the bin and adjust as required. Leave all pan-els on the cuber until it is set in place on the dispenser or bin.
4. Remove all internal packing from the cuber. Remove tape from evaporator curtain.
THREAD LEVELING LEG INTO BASE
FIGURE 2
NOTE: Bin adapter and condenser air baffles may be required in certain installations.
Xtreme Ice Training Manual
TP00952October 17, 2005 7
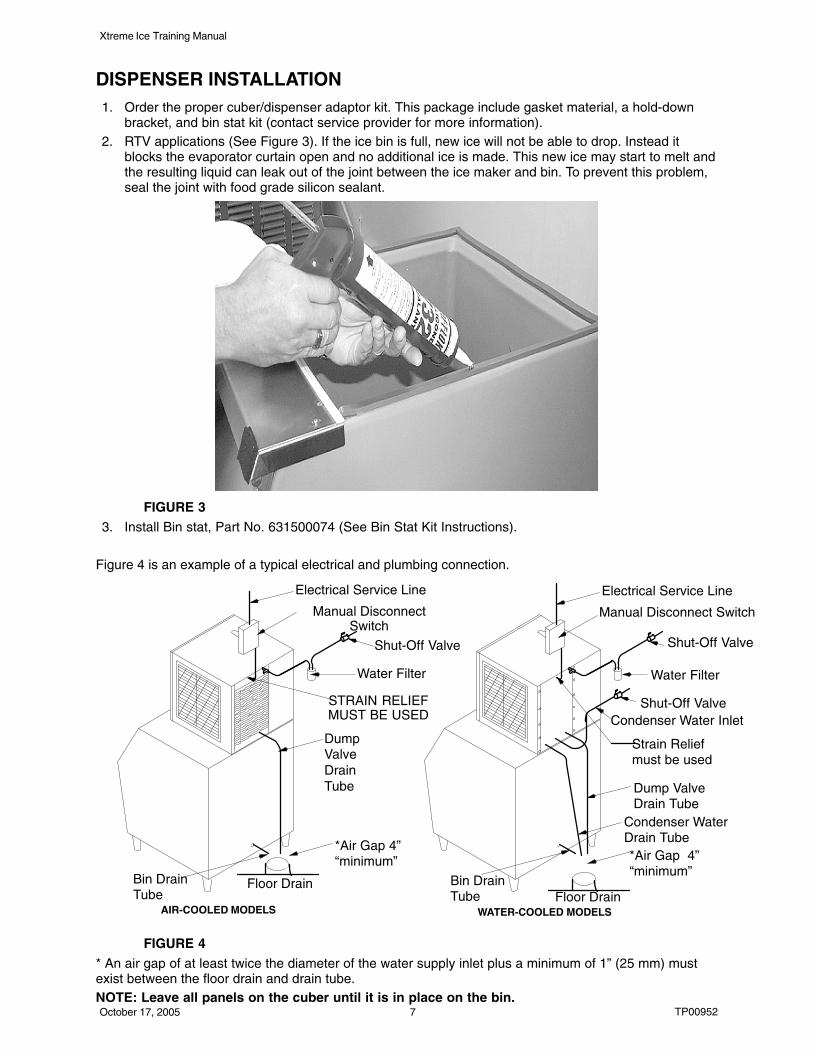
DISPENSER INSTALLATION1. Order the proper cuber/dispenser adaptor kit. This package include gasket material, a hold-down
bracket, and bin stat kit (contact service provider for more information).2. RTV applications (See Figure 3). If the ice bin is full, new ice will not be able to drop. Instead it
blocks the evaporator curtain open and no additional ice is made. This new ice may start to melt andthe resulting liquid can leak out of the joint between the ice maker and bin. To prevent this problem,seal the joint with food grade silicon sealant.
FIGURE 3
3. Install Bin stat, Part No. 631500074 (See Bin Stat Kit Instructions).
Figure 4 is an example of a typical electrical and plumbing connection.
AIR-COOLED MODELS WATER-COOLED MODELS
Electrical Service Line
Manual DisconnectSwitch
STRAIN RELIEFMUST BE USED
Water Filter
Shut-Off Valve
DumpValve DrainTube
Bin DrainTube
*Air Gap 4”“minimum”
Electrical Service Line
Manual Disconnect Switch
Shut-Off Valve
Water Filter
Shut-Off ValveCondenser Water Inlet
Dump Valve Drain Tube
*Air Gap 4”“minimum”
Bin DrainTube
Condenser Water Drain Tube
Strain Reliefmust be used
Floor DrainFloor Drain
FIGURE 4
* An air gap of at least twice the diameter of the water supply inlet plus a minimum of 1” (25 mm) mustexist between the floor drain and drain tube.NOTE: Leave all panels on the cuber until it is in place on the bin.
Xtreme Ice Training Manual
TP00952 October 17, 20058
PLUMBING CONNECTIONS1. All plumbing lines and connections must conform to local and national plumbing codes.2. Line shut-off valves must be located in supply water lines for cuber and condenser if product is wa-
ter-cooled. Water supply to water-cooled condenser must include a stand-pipe to prevent “water hammer”.
3. Should your local water supply quality require the installation of a water filter system, consult yourlocal distributor or dealer for proper size required.
4. Water supply pressure must not be lower than 20 PSI (1.37 BAR), nor should it exceed 80 PSI (5.52BAR).
NOTE: Water filters larger than 5 microns do not give proper protection.NOTE: Bin and cuber drain lines must never be connected together and must be vented.NOTE: Always flush inlet water lines 1–2 minutes before connecting to Ice Maker.
ELECTRICAL1. All wiring and connections must conform to national and local electrical codes.2. Wire size and circuit protection must conform to specifications and cuber must be on a separate
electrical circuit.3. Strain relief connectors must be used at the junction box of the control box and the cuber.4. Cuber must be grounded by the control box ground screw or other method for intentional safety
grounding that meets code requirements.5. A manual disconnect in a convenient location to the cuber must be installed.
NOTE: See Remote Condensers, Install Instructions.NOTE: All HP-62 (R404A) ice machines have a voltage range of –5%, +10% from the serial platerating.
INSTALLATION CHECK POINTS
1. Has bin and cuber been leveled and sanitized?
2. Does electrical and plumbing meet code requirements?
3. If water-cooled, are inlet and drain connections to condenser correct?
4. Are drain lines separate and vented?
5. Is there a 6� clearance on the right and back side for proper air circulation?
6. Does the water curtain move freely? Does the inlet solenoid valve shut off incoming water to the water pan?
7. Has the unit been properly sealed to the bin or dispenser?NOTE: A 6” top clearance will improve service accessibility.
START UP AND CHECK OUT
Start Up Sequence1. Check all connections.
2. Turn on the main power switch. The red LED will flash 6 times then remain on for 4 seconds.
3. The unit will go through a 45 second hot gas defrost to remove any ice that might be on the evaporator.
4. There will be approximately a (45) second evaporator pre–chill, then the water pump will start, and the freeze cycle begins.

Xtreme Ice Training Manual
TP00952October 17, 2005 9
Preventative Maintenance Sequence
The installation is not complete until you are sure the owner-operator understands the cuber operationand his or her responsibility of preventative maintenance.
Does the owner-operator know:
1. Location of electrical disconnect switch and water shut-off valves?
2. How to start and/or shut down the product, clean and sanitize it?
3. Bin full operation and reset operation of high pressure cutout (water-cooled and remoteproducts and 500 series (Air Cooled)?
4. How to clean the condenser and fan blade?
5. Whom to call for product information and/or service?NOTE: CONDENSER SENSOR USED ONLY ON A/C UNITS. 1.8K ohm RESISTER USED ONLY ONW/C & R/C UNITS.

Xtreme Ice Training Manual
TP00952 October 17, 200510
CLEANING PROCEDURES
Approved ice machine cleaners by brand names:
� Calgon Nickel Safe (green color only)
NOTE: Failure to use approved products will void the warranty.
CAUTION: Ice machine cleaners are acidic-based chemicals. Before beginning anycleaning of the cuber, the ice in the storage bin or dispenser must be removed.
WARNING: When using any chemical, rubber gloves and eye protection should be worn.
Cleaning Procedure if there is ice on the evaporator plate.1. Turn the power switch on.
2. Press and hold the Harvest button to start a 4 minute defrost cycle. (Button is located on the controlboard see Figure 5).
FILL VALVE
WATER PRESSURE LINE
POWERNEUTRALHOT GASWATER PUMPCOMPRESSORFAN MOTOR (AIR COOLED)DUPM VALVE
RH EVAPSWITCH
LH EVAPSWITCH
STOCKINGCABLE PLUG
NOTE: CONDENSER SENSOR USED ONLY ON A/C UNITS.1.8K ohm RESISTER USED ONLY ON W/C AND R/C UNITS.
(WHITE LEAD)CONDENSER SENSOR SEE NOTE
(BLACK LEAD)WATER TEMP SENSOR
ERROR DELAYCLEAN
HARVEST
UNITSELECTION
SWITCH
S3–1
BINSWITCHES
TRANSFORMER
#1
#3
#2
#4
#5
#6
#7
BRIDGETHICKNESSPOT
S3–2
OFF3 2 1
OFF
ON
ON
MICRO PROCESSOR
(MANUFACTURING DATE) 3643001
FIGURE 5
NOTE: Condenser sensor used only on A/C units. 1.8k resistor used only in W/C and R/C units.Single evaporator units must have the proximity connected in the top connection.
Xtreme Ice Training Manual
TP00952October 17, 2005 11
PREP – CLEANING PROCEDURE
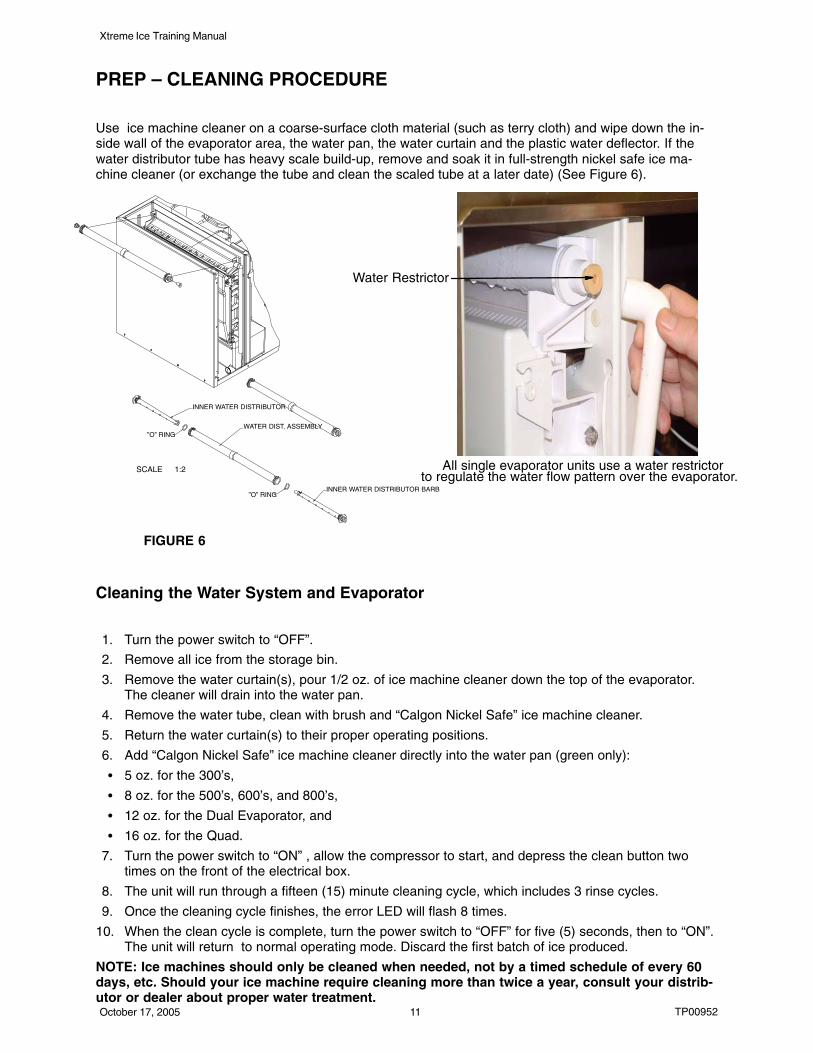
Use ice machine cleaner on a coarse-surface cloth material (such as terry cloth) and wipe down the in-side wall of the evaporator area, the water pan, the water curtain and the plastic water deflector. If thewater distributor tube has heavy scale build-up, remove and soak it in full-strength nickel safe ice ma-chine cleaner (or exchange the tube and clean the scaled tube at a later date) (See Figure 6).
SCALE 1:2
INNER WATER DISTRIBUTOR
INNER WATER DISTRIBUTOR BARB
”O” RING
”O” RING
WATER DIST. ASSEMBLY
All single evaporator units use a water restrictor
Water Restrictor
to regulate the water flow pattern over the evaporator.
FIGURE 6
Cleaning the Water System and Evaporator
1. Turn the power switch to “OFF”.
2. Remove all ice from the storage bin.
3. Remove the water curtain(s), pour 1/2 oz. of ice machine cleaner down the top of the evaporator.The cleaner will drain into the water pan.
4. Remove the water tube, clean with brush and “Calgon Nickel Safe” ice machine cleaner.
5. Return the water curtain(s) to their proper operating positions.
6. Add “Calgon Nickel Safe” ice machine cleaner directly into the water pan (green only):
� 5 oz. for the 300’s,
� 8 oz. for the 500’s, 600’s, and 800’s,
� 12 oz. for the Dual Evaporator, and
� 16 oz. for the Quad.
7. Turn the power switch to “ON” , allow the compressor to start, and depress the clean button twotimes on the front of the electrical box.
8. The unit will run through a fifteen (15) minute cleaning cycle, which includes 3 rinse cycles.
9. Once the cleaning cycle finishes, the error LED will flash 8 times.
10. When the clean cycle is complete, turn the power switch to “OFF” for five (5) seconds, then to “ON”.The unit will return to normal operating mode. Discard the first batch of ice produced.
NOTE: Ice machines should only be cleaned when needed, not by a timed schedule of every 60days, etc. Should your ice machine require cleaning more than twice a year, consult your distrib-utor or dealer about proper water treatment.
Xtreme Ice Training Manual
TP00952 October 17, 200512
SANITIZING THE WATER SYSTEM AND THE EVAPORATOR
NOTE: To be performed only after cleaning the ice machine:1. Turn the power switch to “OFF”.
2. Add 1/4 ounce (7.08 g) sodium hypochlorite solution (common liquid laundry bleach) to the waterpan. You may also use a commercial sanitizer such as Calgon Ice Machine Sanitizer following thedirections on the product label.
3. Turn the Cuber power switch “ON” allowing the compressor to start. Depress the clean button twotimes on the control board. The unit will run through a 15 minute sanitizing cycle.
4. Once the sanitizing cycle is complete, the error LED will flash 8 times. Turn the power switch to“OFF” for 5 seconds and then turn to “ON”. Discard the first batch of ice produced.
5. To sanitize the bin and other surface areas, use 1 ounce of liquid bleach per gallon of water and wipeall areas with the solution. Or use a commercial sanitizer.
6. Cleaning and sanitizing are now complete. Cuber may be returned to normal service.
Xtreme Ice Training Manual
TP00952October 17, 2005 13
OPERATIONSCAUTION: WHEN REPLACING THIS BOARD, BE SURE THE DIP SWITCH SETTINGS ARE IN THEPROPER POSITION FOR YOUR UNIT.
UNIT SELECTION
1. The unit selection dip switches tell the microprocessor the correct water level difference for harvestand the number of proximity switch circuits to monitor.
2. The unit selection dip switches are a series of 3 switches that can be placed in either the ON or OFFposition.
3. The following list shows the dip switch settings for each model:
NOTE: The unit selection switches are preset at the factory to the correct model. Use the chartbelow if the control is replaced.
Model Switch 1 Switch 2 Switch 3 Proximity Switch Circuits
300 OFF OFF OFF 1
500 ON OFF OFF 1
600/800/1000 OFF ON OFF 1
1200 ON ON OFF 2
1400/1800 OFF OFF ON 2
NORMAL OPERATIONS1. Start up sequence.2. Secondary start up.3. Dump cycle.
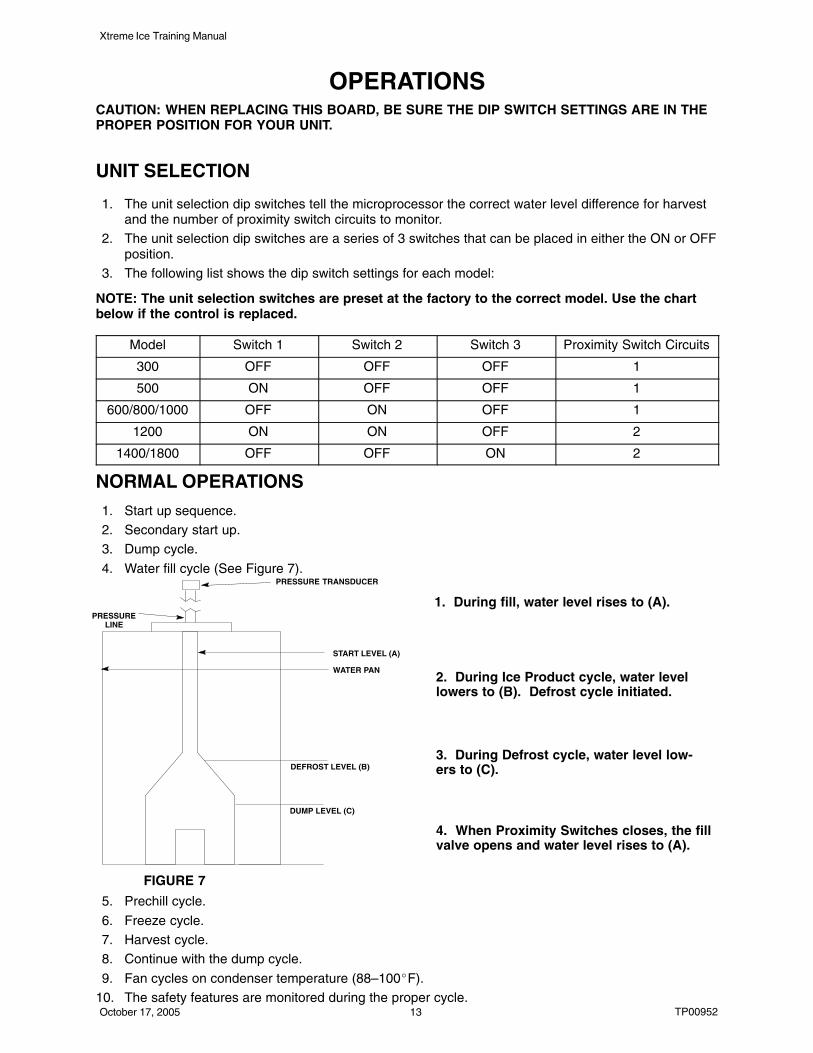
4. Water fill cycle (See Figure 7).
DEFROST LEVEL (B)
DUMP LEVEL (C)
PRESSURELINE
PRESSURE TRANSDUCER
1. During fill, water level rises to (A).
2. During Ice Product cycle, water levellowers to (B). Defrost cycle initiated.
3. During Defrost cycle, water level low-ers to (C).
4. When Proximity Switches closes, the fillvalve opens and water level rises to (A).
START LEVEL (A)
WATER PAN
FIGURE 7
5. Prechill cycle.
6. Freeze cycle.7. Harvest cycle.8. Continue with the dump cycle.
9. Fan cycles on condenser temperature (88–100�F).10. The safety features are monitored during the proper cycle.

Xtreme Ice Training Manual
TP00952 October 17, 200514
START UP SEQUENCE (PRIMARY)1. Check all connections.2. Water pan must be empty at the start of the initial fill cycle.3. Turn on the main power switch, the red LED will flash 6 times then remains on for 4 seconds.
NOTE: If there is a very large slab of ice on the evaporator you will need to push the manual har-vest button to remove it.
SECONDARY START UP1. Compressor starts after ERROR LED extinguishes, and the green COMP LED turns on.2. Compressor runs continuously after secondary start up sequence.
3. Hot gas valve opens for a 45 second period.4. Green GAS LED is on when the hot gas valve opens.5. After 45 seconds, the hot gas valve de–energizes.
NOTE: If there is a very large slab of ice on the evaporator you will need to push the manual har-vest button to remove it.6. Compressor starts then the unit will go through a 45 second hot gas defrost to remove any ice
that might be on the evaporator.7. The water inlet solenoid makes its initial fill.8. There will be approximately a (45) second evaporator pre chill, then the water pump will start,
and the freeze cycle begins.
DUMP CYCLE1. The dump cycle can be changed by moving the setting on the dump cycle dip switches.2. If both switches are off, the machine dumps water after each cycle. This is the factory set point.3. If switch 1 is on and switch 2 is off, the machine dumps after every third harvest.4. If switch 1 is off and switch 2 is on, the machine dumps after every seventh harvest.
WATER FILL CYCLE1. The fill valve opens.2. The green FILL LED is on when the fill valve energizes.3. Once the water level reaches the maximum level the fill valve de–energizes.
NOTE: During the initial filling of the water pan, air is captured inside the pressure sensor pickup. When the pressure inside the pressure sensor pick up rises to a predetermined value, thepressure transducer shuts off the water fill valve and starts the prechill cycle then the freezecycle.
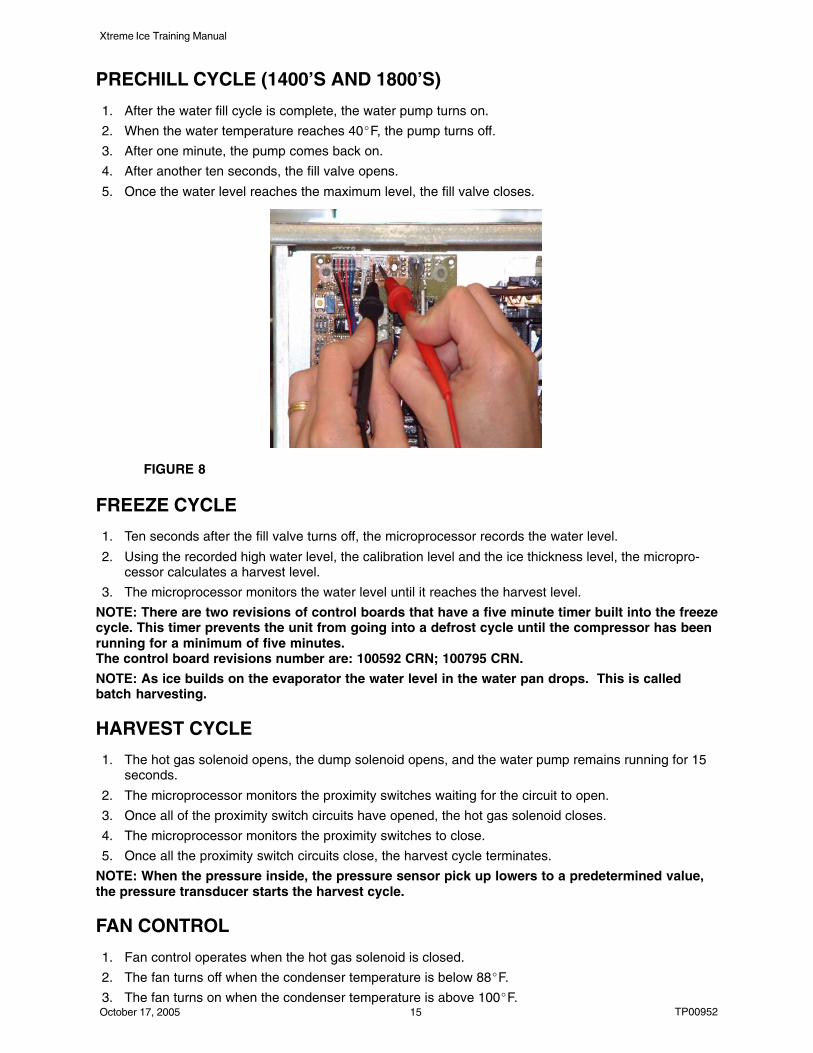
PRECHILL CYCLE (300’S, 500’S, 600’S, 800’S, 1000’S, AND 1200’S)1. The water pump turns on 45 seconds into the cycle.
2. After another 45 seconds, the fill valve turns on and tops off the water level.3. Once the water level reaches the maximum level the fill valve de–energizes.4. During normal operation, as the water pan fills the D.C. voltage will range from .25 to 3.5 VDC at
center and left pins, on the J9 connector (See Figure 8).
Xtreme Ice Training Manual
TP00952October 17, 2005 15
PRECHILL CYCLE (1400’S AND 1800’S)
1. After the water fill cycle is complete, the water pump turns on.
2. When the water temperature reaches 40�F, the pump turns off.
3. After one minute, the pump comes back on.
4. After another ten seconds, the fill valve opens.
5. Once the water level reaches the maximum level, the fill valve closes.
FIGURE 8
FREEZE CYCLE
1. Ten seconds after the fill valve turns off, the microprocessor records the water level.
2. Using the recorded high water level, the calibration level and the ice thickness level, the micropro-cessor calculates a harvest level.
3. The microprocessor monitors the water level until it reaches the harvest level.
NOTE: There are two revisions of control boards that have a five minute timer built into the freezecycle. This timer prevents the unit from going into a defrost cycle until the compressor has beenrunning for a minimum of five minutes. The control board revisions number are: 100592 CRN; 100795 CRN.
NOTE: As ice builds on the evaporator the water level in the water pan drops. This is calledbatch harvesting.
HARVEST CYCLE
1. The hot gas solenoid opens, the dump solenoid opens, and the water pump remains running for 15seconds.
2. The microprocessor monitors the proximity switches waiting for the circuit to open.
3. Once all of the proximity switch circuits have opened, the hot gas solenoid closes.
4. The microprocessor monitors the proximity switches to close.
5. Once all the proximity switch circuits close, the harvest cycle terminates.
NOTE: When the pressure inside, the pressure sensor pick up lowers to a predetermined value,the pressure transducer starts the harvest cycle.
FAN CONTROL
1. Fan control operates when the hot gas solenoid is closed.
2. The fan turns off when the condenser temperature is below 88�F.
3. The fan turns on when the condenser temperature is above 100�F.
Xtreme Ice Training Manual
TP00952 October 17, 200516
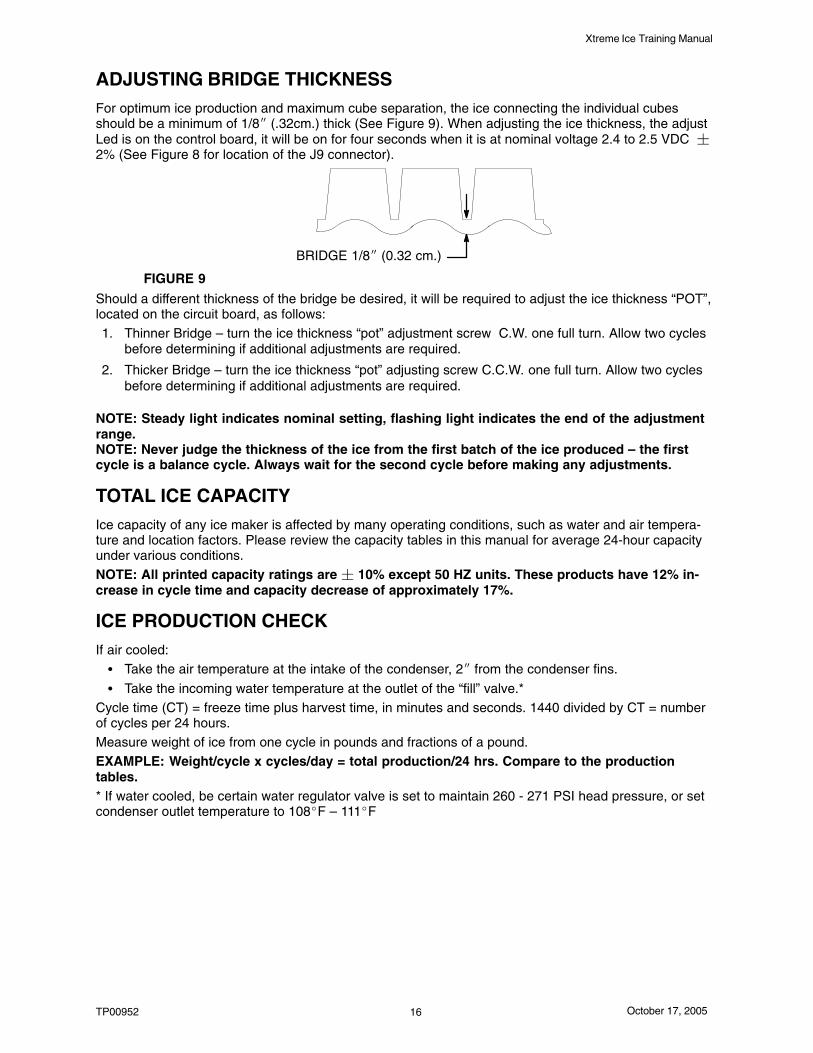
ADJUSTING BRIDGE THICKNESSFor optimum ice production and maximum cube separation, the ice connecting the individual cubesshould be a minimum of 1/8� (.32cm.) thick (See Figure 9). When adjusting the ice thickness, the adjustLed is on the control board, it will be on for four seconds when it is at nominal voltage 2.4 to 2.5 VDC �2% (See Figure 8 for location of the J9 connector).
BRIDGE 1/8� (0.32 cm.)
FIGURE 9
Should a different thickness of the bridge be desired, it will be required to adjust the ice thickness “POT”,located on the circuit board, as follows:1. Thinner Bridge – turn the ice thickness “pot” adjustment screw C.W. one full turn. Allow two cycles
before determining if additional adjustments are required.
2. Thicker Bridge – turn the ice thickness “pot” adjusting screw C.C.W. one full turn. Allow two cyclesbefore determining if additional adjustments are required.
NOTE: Steady light indicates nominal setting, flashing light indicates the end of the adjustmentrange.NOTE: Never judge the thickness of the ice from the first batch of the ice produced – the firstcycle is a balance cycle. Always wait for the second cycle before making any adjustments.
TOTAL ICE CAPACITYIce capacity of any ice maker is affected by many operating conditions, such as water and air tempera-ture and location factors. Please review the capacity tables in this manual for average 24-hour capacityunder various conditions.NOTE: All printed capacity ratings are � 10% except 50 HZ units. These products have 12% in-crease in cycle time and capacity decrease of approximately 17%.
ICE PRODUCTION CHECKIf air cooled:� Take the air temperature at the intake of the condenser, 2� from the condenser fins.
� Take the incoming water temperature at the outlet of the “fill” valve.*Cycle time (CT) = freeze time plus harvest time, in minutes and seconds. 1440 divided by CT = numberof cycles per 24 hours.Measure weight of ice from one cycle in pounds and fractions of a pound.EXAMPLE: Weight/cycle x cycles/day = total production/24 hrs. Compare to the productiontables.* If water cooled, be certain water regulator valve is set to maintain 260 - 271 PSI head pressure, or setcondenser outlet temperature to 108�F – 111�F

Xtreme Ice Training Manual
TP00952October 17, 2005 17
C
R
S
WATER DUMP
CONTACTOR
WATERM
CONTROL(W/C ONLY) HIGH PRESSURE
M
FAN MOTOR
VALVE
CORD
COMPRESSOR CAPACITOR
START
COMPRESSOR
START RELAY
POTENTIAL
25
1
CONDENSER
HOT GAS
SOLENOID
RD
YL
OR
(A/C ONLY)
OF
FO
N
PUMP
BL
BL
BK BR
WHWH
BR
WH
BK
WH
YL
BK
WH
WH
COMPRESSOR
OVERLOAD
WH
WH
WH
WH
BR
BK
BR
SWITCH
UNIT
GR
1
3
EXTERNAL
MANUAL RESET
250V 60 HZ
CO450 PSIG
72–88 mfd
25 mfd370V 60 HZ
RD
COMPRESSOR
RUN
CAPACITOR
YL
WATER FILL
BKWH
PUMP
See note
CLEAN
36430001
Processor(Manufacturing Date)
Triac
N
Bin SN
S
YL
PlugCableStacking
StackOutCom
1
In
2
LH Evap.
Switch
RH Evap.
Switch
5
YL
YL
3
4
YL
Unit 3 12 Thickness
Off
OnSwitchSelection
S3–2
pot.
S3–1On
Micro
Off
Harvest
Bridge
ERROR DELAY
#5
#1
#2
#3
#4
#6
#7
Transformer
Pump
Gas
GR
GR
Comp
GR
GR
GRFan
DumpGR
Valve
RD
Condenser Sensor(White Lead)
RD
WH
BR
BK
WH
BL
YL
BK
Water Temp Sensor(Black Lead)
Water Pressure Line
FIGURE 10
NOTE: CONDENSER SENSOR USED ONLY ON A/C UNITS. 1.8 ohm RESISTOR USED ONLY ONW/C AND R/C UNITS. EVAPORATOR SWITCHES MUST USE THE TOP CONNECTOR DOWN.

Xtreme Ice Training Manual
TP00952 October 17, 200518
LED INDICATORSThe LEDs are board circuit indicators. If the LED in the functional board circuit is complete, check component.Example: Contactor does not energize and LED is “ON”, board circuit is OK. Check contactor, coil, leads,& connections.
Yellow:� Evaporator switch(s) (proximity)� Delay (located on the electrical box front).
Green:� Water dump valve� Compressor contactor
� Water Pump� Hot Gas Valve� Condenser Fan (cycles on & off with fan)� Fill Valve
Red:
� Error (located on the electrical box front).� Ice thickness Adjustment.
Refer to flash codes for control and system diagnostics. Add the flash codes before status indicators (See Figure11).
Error LED Delay LEDRed Yellow
FIGURE 11
STATUS INDICATORGreen LED Condenser FanYellow LED Left Water CurtainGreen LED Hot Gas ValveGreen LED Water PumpYellow LED Right Water CurtainGreen LED Compressor ContactorRed LED ErrorGreen LED Dump ValveGreen LED Fill ValveYellow LED DelayRed LED Ice Thickness Adjustment

Xtreme Ice Training Manual
TP00952October 17, 2005 19
Curtain Open�������� ��� � �������������������� �������
�������� ��� ��������������������� �������
Prechill Mode������������� ������� ����������� ��������������� ���������������������� ��������������������!���������
��!������� ������� ���� ��!��������������������� ��"��!������������ ���
� ��������� � �������� ���� � �������������������� ���������
���������� � �������� ���� ��������������������� ������������� � ���� �����������������������
� ���#���� ������� ���� � ��������������
�!��#���� ������� ���� �!�������������
Ice-Making Mode������� ����������� ��������������� ���������������������� ��������������������!���������
������� ���� $�������!����� ���
������� ���� ��!��������������������� ���%���!������������ ���
�������� ���� � �������������������� ���������
�������� ���� ��������������������� ������������� � ���� �����������������������
Harvest Mode&������ ������� ���� &������������������
��!������� ������� ���� ��!��������������������� ��"��!������������ ���
�������� ���� � �������������������� �����������$�������� ���������������������� �������'������� ������������
�������� ���� (�!������)���� �������� �����������������������������
Xtreme Ice Training Manual
TP00952 October 17, 200520
HARVEST BUTTONThe Harvest Button is located on the control board (See Figure 5 in the Cleaning Procedures chapter.
Manual Harvest
1. At any time after secondary start up, the machine can be put into the harvest cycle by depressingthe harvest button.
2. Pressing the harvest button will tell the microprocessor to skip directly to the harvest cycle.
3. Once the harvest cycle completes, the machine continues with normal operations.
Unit Check
1. Like manual harvest, any time after secondary start up the microprocessor monitors the harvest but-ton.
2. If the harvest button is depressed and held for 5 seconds, the unit goes into a diagnostics mode.3. All outputs are initially turned off.4. Then the microprocessor powers each output individually for one second.5. This continues from 10 minutes or until the power is cycled.
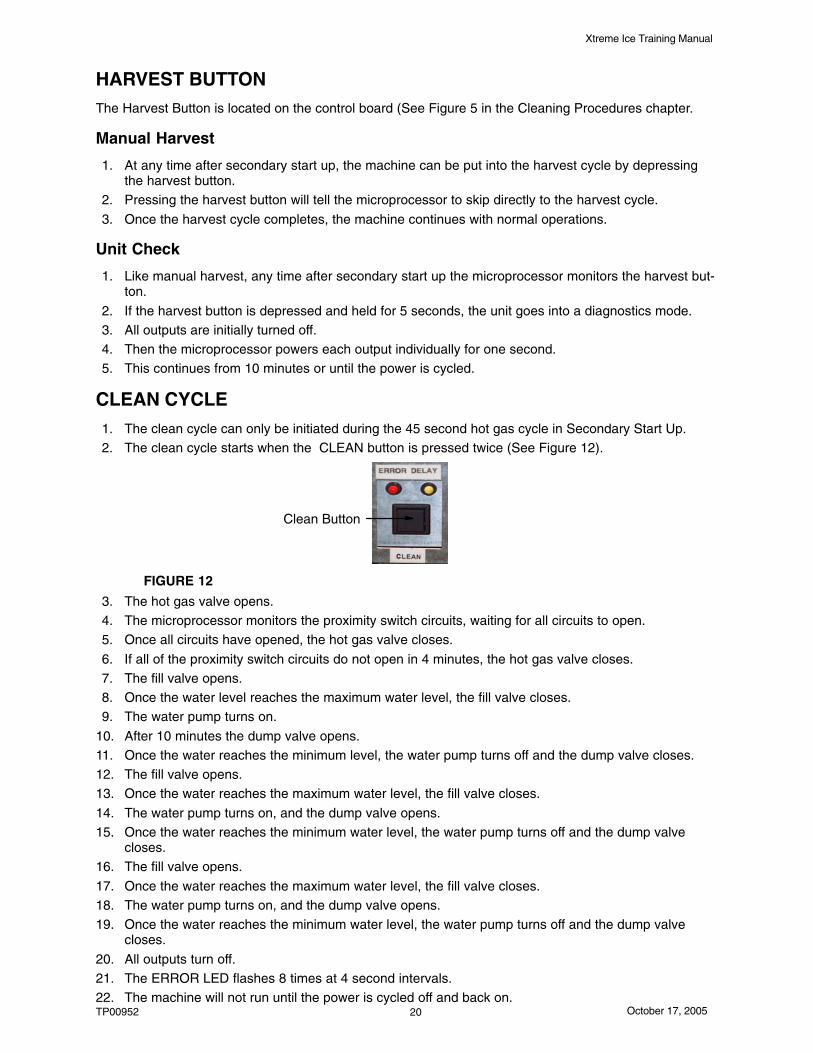
CLEAN CYCLE1. The clean cycle can only be initiated during the 45 second hot gas cycle in Secondary Start Up.2. The clean cycle starts when the CLEAN button is pressed twice (See Figure 12).
Clean Button
FIGURE 12
3. The hot gas valve opens.4. The microprocessor monitors the proximity switch circuits, waiting for all circuits to open.5. Once all circuits have opened, the hot gas valve closes.
6. If all of the proximity switch circuits do not open in 4 minutes, the hot gas valve closes.7. The fill valve opens.8. Once the water level reaches the maximum water level, the fill valve closes.9. The water pump turns on.
10. After 10 minutes the dump valve opens.11. Once the water reaches the minimum level, the water pump turns off and the dump valve closes.12. The fill valve opens.13. Once the water reaches the maximum water level, the fill valve closes.
14. The water pump turns on, and the dump valve opens.15. Once the water reaches the minimum water level, the water pump turns off and the dump valve
closes.16. The fill valve opens.
17. Once the water reaches the maximum water level, the fill valve closes.18. The water pump turns on, and the dump valve opens.19. Once the water reaches the minimum water level, the water pump turns off and the dump valve
closes.
20. All outputs turn off.21. The ERROR LED flashes 8 times at 4 second intervals.22. The machine will not run until the power is cycled off and back on.
Xtreme Ice Training Manual
TP00952October 17, 2005 21
SAFETY (OLD SOFTWARE)NOTE: Prior to S/N 63K0344BC050 for self–contained units and S/N 63M0351BC056 for remoteunits.
SAFETY FEATURES
1. Water Fill Time Out
2. Maximum Freeze Time Out
3. Harvest Time Out
4. Bin Full Delay
5. Low Condenser Temperature Delay
6. High Condenser Temperature
7. Open Condenser Thermistor
8. Failed Water Temperature
9. Open Water Thermistor
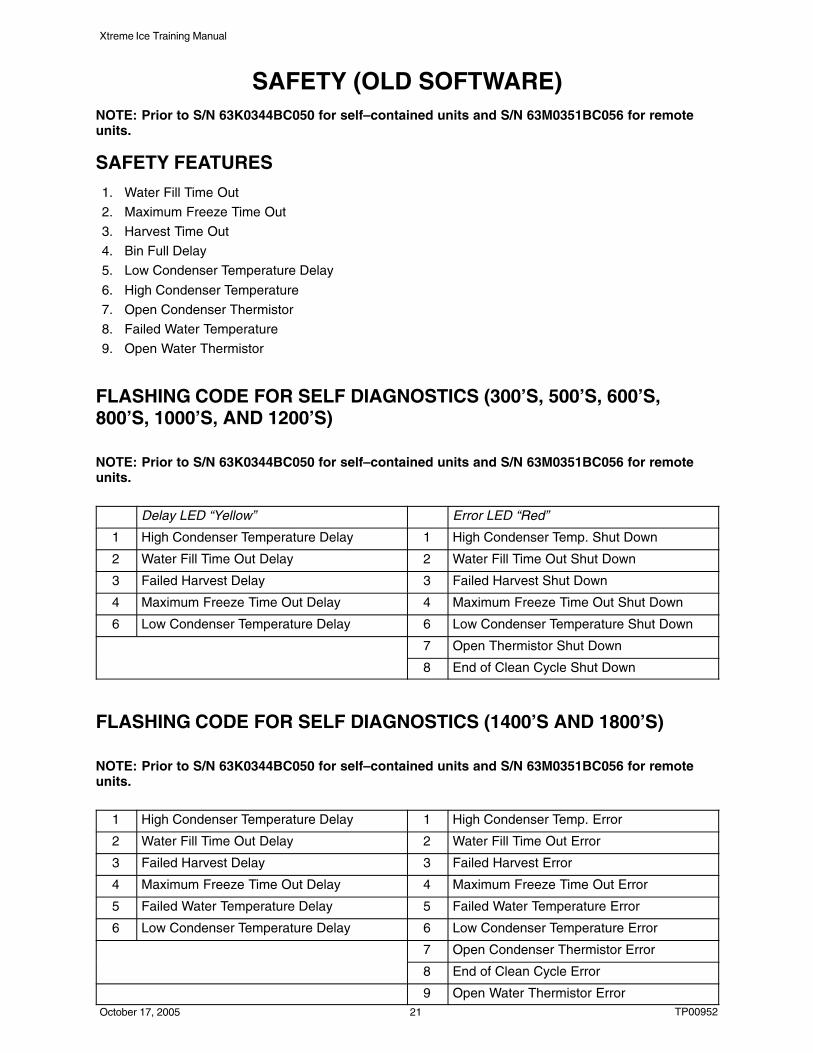
FLASHING CODE FOR SELF DIAGNOSTICS (300’S, 500’S, 600’S,800’S, 1000’S, AND 1200’S)
NOTE: Prior to S/N 63K0344BC050 for self–contained units and S/N 63M0351BC056 for remoteunits.
Delay LED “Yellow” Error LED “Red”
1 High Condenser Temperature Delay 1 High Condenser Temp. Shut Down
2 Water Fill Time Out Delay 2 Water Fill Time Out Shut Down
3 Failed Harvest Delay 3 Failed Harvest Shut Down
4 Maximum Freeze Time Out Delay 4 Maximum Freeze Time Out Shut Down
6 Low Condenser Temperature Delay 6 Low Condenser Temperature Shut Down
7 Open Thermistor Shut Down
8 End of Clean Cycle Shut Down
FLASHING CODE FOR SELF DIAGNOSTICS (1400’S AND 1800’S)
NOTE: Prior to S/N 63K0344BC050 for self–contained units and S/N 63M0351BC056 for remoteunits.
1 High Condenser Temperature Delay 1 High Condenser Temp. Error
2 Water Fill Time Out Delay 2 Water Fill Time Out Error
3 Failed Harvest Delay 3 Failed Harvest Error
4 Maximum Freeze Time Out Delay 4 Maximum Freeze Time Out Error
5 Failed Water Temperature Delay 5 Failed Water Temperature Error
6 Low Condenser Temperature Delay 6 Low Condenser Temperature Error
7 Open Condenser Thermistor Error
8 End of Clean Cycle Error
9 Open Water Thermistor Error

Xtreme Ice Training Manual
TP00952 October 17, 200522
WATER FILL TIME OUT
1. During the fill cycle if the water level does not reach the maximum level in 4 minutes the machinegoes into a delay sequence.
2. After each delay, the machine restarts at the secondary start up.3. The sequence continues as follows:
� Fill try, 30 min delay, fill try, 30 min delay, fill try, 2 hr delay.� Fill try, 30 min delay, fill try, 30 min delay, fill try, 2 hr delay.� Fill try, 30 min delay, fill try, 30 min delay, fill try, 2 hr delay.� Fill try, 30 min delay, fill try, 30 min delay, fill try, 2 hr delay.� Fill try, 30 min delay, fill try, 30 min delay, fill try, shut down.
4. During the delay times, the DELAY LED flashes 2 times at 4 second intervals.5. Once the machine reaches shut down position, all outputs turn off.
6. At the shut down time, the ERROR LED flashes 2 times at 4 second intervals.7. The machine will not run until the power is cycled.8. The delay sequence resets after each successful harvest.
Possible Causes
1. Low inlet water pressure2. Fill valve failure3. Plugged fill valve screen4. Pressure tube disconnected or cut5. Pressure sensor failure6. Leak in water pan7. Water pan cap removed
MAXIMUM FREEZE TIME OUT1. At the beginning of the prechill cycle, the microprocessor starts a timer.2. If the timer reaches 50 minutes before a harvest cycle can be initiated, the machine enters a delay
sequence.3. After each delay, the machine restarts at the secondary start up.4. The delay sequence continues as follows:
� Freeze try, 30 min delay, freeze try, 30 min delay, freeze try, 2 hr delay,
� Freeze try, 30 min delay, freeze try, 30 min delay, freeze try, 2 hr delay,� Freeze try, 30 min delay, freeze try, 30 min delay, freeze try, 2 hr delay,� Freeze try, 30 min delay, freeze try, 30 min delay, freeze try, 2 hr delay,� Freeze try, 30 min delay, freeze try, 30 min delay, freeze try, shut down.
5. During the delay times, the DELAY LED flashes 4 times at 4 second intervals.6. Once the Machine reaches shut down position all out puts turn off.7. At the shut down time, the ERROR LED flashes 4 times at 4 second intervals.
8. The machine will not run until the power is cycled.9. The delay sequence resets after each successful harvest.
Possible Causes1. Water pump failure
2. Low refrigerant charge3. Leak in refrigerant lines4. Compressor failure5. Hot gas valve leaking6. Dirty evaporator

Xtreme Ice Training Manual
TP00952October 17, 2005 23
HARVEST TIME OUT
1. If the microprocessor does not recognize all proximity switch circuits opening 4 minutes after the hotgas valve opens during the harvest cycle, the machine enters a delay sequence.
2. After each delay, the machine restarts at the secondary start up.3. The delay sequence continues as follows:
� Harvest try, 30 min delay, harvest try, 30 min delay, harvest try, 2 hr delay.� Harvest try, 30 min delay, harvest try, 30 min delay, harvest try, 2 hr delay.� Harvest try, 30 min delay, harvest try, 30 min delay, harvest try, 2 hr delay.� Harvest try, 30 min delay, harvest try, 30 min delay, harvest try, 2 hr delay.� Harvest try, 30 min delay, harvest try, 30 min delay, harvest try, shut down.
4. During the delay times, the DELAY LED flashes 3 times at 4 second intervals.5. Once the machine reaches shut down position all out puts turn off.6. At the shut down time, the ERROR LED flashes 3 times at 4 second intervals.7. The machine will not run until the power is cycled.8. The delay sequence resets after each successful harvest.
Possible Causes1. Hot gas valve failure2. Low refrigerant charge3. Prox. Switch4. Compressor failure
BIN FULL DELAY
1. During the harvest cycle if the microprocessor does not recognize all proximity switch circuits close 5second after the last one opens, the machine enters a delay sequence.
2. The machine turns off all outputs except the bin full output.3. The microprocessor monitors the proximity switch circuits waiting for all circuits to close.4. After all circuits close, the machine continues with the dump cycle.
LOW CONDENSER TEMPERATURE DELAY
1. After initial start up, the microprocessor continuously monitors the condenser temperature.2. If the condenser temperature falls to 36�F, all outputs turn off.3. The machine stays in a delay mode as the microprocessor continues to monitor the condenser tem-
perature.4. During the delay time, the DELAY LED flashes 6 times at 4 second intervals.5. If the condenser temperature rises to 42�F while in this delay mode, the machine will restart at sec-
ondary start.
Possible Causes1. Cold ambient temperature 50�F or below.
HIGH CONDENSER TEMPERATURE
1. While monitoring the condenser temperature, the microprocessor monitors high temperatures.2. If the condenser temperature rises to 150�F, all outputs turn off.3. The machine delays for 30 minutes, and a restart ensues at secondary start up.4. If the condenser temperature rises to 150�F again, all outputs turn off.5. The machine delays for 30 minutes, and a restart ensues at secondary start up.6. If the condenser temperature rises to 150�F a third time, the unit shuts down.
Xtreme Ice Training Manual
TP00952 October 17, 200524
7. During delay period, the DELAY LED flashes 1 times at 4 second intervals.8. Once the machine reaches shut down, all outputs turn off.9. At the shut down time, the ERROR LED flashes 1 times at 4 second intervals.
10. The machine will not run until the power is cycled.11. The delay sequence resets after each successful harvest.
Possible Causes1. Above 100�F ambient temperature2. Fan motor failure
3. Clogged condenser4. No water flow (water coiled condenser)
OPEN CONDENSER THERMISTOR
1. While monitoring the condenser temperature, the microprocessor also monitors for an open signal.2. If the signal from the thermistor reads open for a continuous 19 seconds, all outputs turn off.
3. The ERROR LED flashes 7 times at 4 second intervals.4. The machine will not run until the power is cycled, Off and On to reset the control board.
Possible Causes1. Thermistor wire removed2. Thermistor failure
FAILED WATER TEMPERATURE1. After initial start–up, the microprocessor continuously monitors the water temperature.
2. If the water temperature does not reach 40�F within 5.5 minutes, all outputs turn off and the ma-chine shuts down.
3. At. the shut down time, the ERROR LED flashes 5 times at 4–second intervals.
Possible Causes
1. Water pump failure2. Low refrigerant charge3. Leak in refrigerant lines4. Compressor failure5. Hot gas valve leaking
OPEN WATER THERMISTOR1. While monitoring the water temperature, the microprocessor also monitors for an open signal.2. If the signal from the thermistor reads open for 19 seconds, all output turn off.3. The ERROR LED flashes 9 times at 4–second intervals.
4. The machine will not run until the power is cycled, Off and On to reset the control board.
Possible Causes
1. Thermistor wire removed2. Thermistor failure

Xtreme Ice Training Manual
TP00952October 17, 2005 25
SAFETY (NEW SOFTWARE)NOTE: After S/N 63K0344BC050 for self–contained units and S/N 63M0351BC056 for remote units.
SAFETY FEATURES
1. Failed Freeze Shutdown
2. Failed Harvest Shutdown
3. Bin Full Delay
4. Low Condenser Temperature Warning
5. High Condenser Temperature Warning and Shutdown
6. Open Condenser Thermistor Shutdown
7. Inlet Warning
8. Failed Water System Shutdown
9. Failed Water Temperature Shutdown
10. Open Water Thermistor Shutdown
FLASHING CODE FOR SELF DIAGNOSTICS (300’S, 500’S, 600’S,800’S, 1000’S, AND 1200’S)
NOTE: After S/N 63K0344BC050 for self–contained units and S/N 63M0351BC056 for remote units.
Warning LED Error LED
1 High Condenser Temperature Warning 1 High Condenser Temp. Shutdown
2 Failed Freeze Time Out Shutdown
3 Failed Harvest Shutdown
4 Low Condenser Temperature Warning
5 Water Inlet Warning 5 Failed Water System Shutdown
6 End of Clean Cycle Shutdown
8 Open Condenser Thermistor Shutdown
FLASHING CODE FOR SELF DIAGNOSTICS (1400’S AND 1800’S)
NOTE: After S/N 63K0344BC050 for self–contained units and S/N 63M0351BC056 for remote units.
Warning LED Error LED
1 High Condenser Temperature Warning 1 High Condenser Temp. Shutdown
2 Failed Freeze Time Out Shutdown
3 Failed Harvest Shutdown
4 Low Condenser Temperature Warning 4 Failed Water Temperature Shutdown
5 Water Inlet Warning 5 Failed Water System Shutdown
6 End of Clean Cycle Shutdown
7 Open Water Thermistor Shutdown
8 Open Condenser Thermistor Shutdown

Xtreme Ice Training Manual
TP00952 October 17, 200526
FAILED FREEZE TIME OUT SHUTDOWN1. If the freeze time reaches 50 minutes before a harvest cycle is initiated, the machine goes into the
harvest cycle.2. After a successful harvest cycle, the machine goes into another water fill and freeze cycle.
3. If the freeze time reaches 50 minutes again, the machine again goes into the harvest cycle.
4. After a successful harvest cycle, the machine goes into another water fill and freeze cycle.
5. If the freeze time reaches 50 minutes again, the machine shuts down.
6. While shut down, the ERROR LED flashes 2 times at 4–second intervals.7. The machine will not run until the power is cycled OFF and then ON.
Possible Causes
1. Water pump failure.
2. Low refrigerant charge.
3. Leak in refrigerant lines.
4. Compressor failure.5. Hot gas valve leaking.
6. Dirty evaporator.
FAILED HARVEST SHUTDOWN1. During the harvest cycle, if the proximity switches remain closed for 4 minutes after the hot gas valve
opens, the machine goes into another water fill and freeze cycle.
2. If the harvest time again exceeds 4 minutes, the machine goes into another water fill and freezecycle.
3. If the harvest time again exceeds 4 minutes, the machine shuts down.
4. While shut down, the ERROR LED flashes 3 times at 4–second intervals.
5. The machine will not run until the power is cycled OFF and then ON.
Possible Causes
1. Hot gas valve failure.
2. Low refrigerant charge.3. Proximity switch failure.
4. Compressor failure.
BIN FULL DELAY1. During the harvest cycle, if the proximity switches remain open for more than 5 seconds after the last
switch opens, the machines enters a delay sequence.
2. The machine remains in a delay until all proximity switches close. Once all switches are closed, themachine goes into a water fill and freeze cycle.
LOW CONDENSER TEMPERATURE WARNING
1. If the condenser temperature falls below 36�F, the machine shuts down.
2. While shut down, the WARNING LED flashes 4 times at 4–second intervals.
3. If the condenser temperature rises above 42�F, the machine goes into a secondary startup cycle.
Possible Causes
1. Ambient temperature below 50�F.
Xtreme Ice Training Manual
TP00952October 17, 2005 27
HIGH CONDENSER TEMPERATURE WARNING AND SHUTDOWN
1. If the condenser temperature rises above 160�F, the machine shuts down.
2. While shut down, the WARNING LED flashes 1 time at 4–second intervals.
3. If the condenser temperature falls below 110�F, the machine goes into a secondary startup cycle.
4. If the condenser temperature rises above 160�F again, the machine shuts down again.
5. While shut down, the WARNING LED flashes 1 time at 4–second intervals.
6. If the condenser temperature falls below 110�F again, the machine goes into another secondarystartup cycle.
7. If the condenser temperature rises above 160�F again, the machine shuts down.
8. While shut down, the ERROR LED flashes 1 time at 4–second intervals.
9. The machine will not run until the power is cycled OFF and then ON.
Possible Causes
1. Ambient temperatures above 100�F.
2. Fan motor failure.
3. Plugged condenser.
4. No water flow (water–cooled units only).
OPEN CONDENSER THERMISTOR SHUTDOWN
1. If the condenser temperature thermistor is open, the machine shuts down.
2. While shut down, the ERROR LED flashes 8 times at 4–second intervals.
3. The machine will not run until the power is cycled OFF and then ON.
Possible Causes
1. Thermistor wire removed.
2. Thermistor failure.
WATER INLET WARNING
1. If the water pan does not fill at a given rate during the water fill cycle, the machine shuts down.
2. While shut down, the WARNING LED flashes 5 times at 4–second intervals.
3. If the water level eventually reaches a given level, the machine goes into a freeze cycle.
Possible Causes
1. Low inlet water pressure.
2. Water fill valve failure.
3. Plugged water fill valve screen.
FAILED WATER SYSTEM SHUTDOWN
1. If the water pan does not fill to a given level, the machine shuts down.
2. While shut down, the ERROR LED flashes 5 times at 4–second intervals.
3. The machine will not run until the power is cycled OFF and then ON.
Possible Causes
1. Pressure tube disconnected or cut.
2. Leak in water pan.
3. Water pan cap removed.
Xtreme Ice Training Manual
TP00952 October 17, 200528
FAILED WATER TEMPERATURE SHUTDOWN
1. If the water temperature does not reach 40�F within 5.5 minutes, the machine shuts down.
2. While shut down, the ERROR LED flashes 4 times at 4 second intervals.3. The machine will not run until the power is cycled OFF and then ON.
Possible Causes1. Water pump failure.
2. Low refrigerant charge.
3. Leak in refrigerant lines.4. Compressor failure.
5. Hot gas valve leaking.
OPEN WATER TEMPERATURE THERMISTOR1. If the water temperature thermistor is open, the machine shuts down.
2. While shut down, the ERROR LED flashes 7 times at 4–second intervals.3. The machine will not run until the power is cycled OFF and then ON.
Possible Causes1. Thermistor wire removed.
2. Thermistor failure.

Xtreme Ice Training Manual
TP00952October 17, 2005 29
COMPONENT FUNCTION (CIRCUIT BOARD, ETC.)
SENSORSCondenser sensor (WHITE) is a thermistor rated at 2618 ohms to 3032 ohms at 32�F (0�C).Condenser sensor signals the circuit board for fan cycling and also serves as the high temperature safetyshut down. The red “DELAY LED” will flash on and off every second, during high temperature safetydelay. The yellow “ERROR LED” will flash on and off every second, during high temperature safety error.Product is functionally shut down. Reset procedure must be performed to restart product operation.
RESET OPERATIONWhen Cuber is functionally shut down and red “Error LED” is operational, the Cuber power switch mustbe turned off for 5 seconds and returned to the ON position to reset the circuit board and allow the Cuberto restart operation.
Evaporator Switches
Proximity Switches are mounted to the evaporator, and the magnet is mounted to the side rail.Switch Notes:1. Manually holding the curtain open during freeze mode will shut the Cuber down in 5 seconds.2. During harvest cycle, if curtain is open for 5 seconds, the water pump and the compressor will stop.
When the water curtain is closed, the Cuber will begin the normal start up process.3. In single evaporator machines, the proximity switch connection must be on the top (RH) connection
on the circuit board.4. In dual evaporator machines, both RH and LH switches must open and reset to start the next freeze
mode.
VOLTAGE CHECKS
Evaporator Proximity Switch Pins and Condenser Thermistor Pins
Turn Cuber power switch OFF. Disconnect proximity switch plug(s) and condenser sensor plug from thecircuit board. Use a digital multimeter set for D.C. Voltage; turn power switch ON, connect leads of meteracross the top two terminal pins on the board, (for the switch being tested), meter should read 5VDC ±0.2 output voltage. If not, replace the circuit board.
STACKING CABLEWhen stacking the Xtreme Ice Machine the connecting cable (connecting the two (2) circuit boards) willallow: the bottom Unit to shut off on the full bin signal (or any error code), the top Unit will then finish thecycle it is in and shut down. The Xtreme Ice Machine should never be stacked more than two high.
SENSOR [THERMISTOR] DIAGNOSISCondenser sensor – Turn Cuber power switch OFF. Disconnect sensor plug from board. Install testlead part no. 164984009 and use digital multimeter set for D.C. Voltage. Turn power switch ON. Con-nect the leads of the meter across the two leads of the test lead being checked. The meter should read 5VDC ± 0.25 output voltage from the board. If voltage is not correct, replace the circuit board.Should the cuber operation indicate there may be a fault in the sensor [thermistor] or the control boardcircuit proceed as follows:1. Condenser Sensor (white leads) - self-contained air-cooled only - water cooled and remote systems
use a resistor plug on the control board.2. Shorted sensor – a steady low millivolt reading will be recorded. The reading will not change.3. Open sensor – the multimeter will record control board output voltage of 5.0 VDC.4. Should sensor (thermistor) pass the voltage test proceed to the control board diagnosis for LED se-
quence.

Xtreme Ice Training Manual
TP00952 October 17, 200530
NOTE: The sensor controls the condenser fan cycling from 88/100 degree Fahrenheit. Thus anydefects in the condenser circuit will effect the fan cycling rate.
CONDENSER FAN CYCLING CONTROLThe condenser fan on air-cooled cubers is cycled by the circuit board. The condenser sensor signals thecircuit board when the condenser temperature reaches 100°F (38°C) the fan starts and continues to rununtil the temperature is reduced to 88°F (31°C).NOTE: There is no pressure control used to cycle the fan motor on integral condenser unit.
THERMOSTATIC EXPANSION VALVESThe following suggestions for diagnosis of automatic Thermostatic Expansion Valve (TXV) are given withthe understanding that the following have been checked and are correct and/or have been corrected priorto proceeding.1. The condenser and fan blade are clean and have proper operating conditions.2. Water supply to the product is correct and flow over the evaporator is correct.3. Cuber refrigerant charge is correct.
4. TXV sensing bulb is properly located and secured to the suction line and correctly insulated.5. Hot gas valve(s) are not leaking and/or seeping through.
Starving TXV - Product Symptoms
1. Suction pressure lower than normal for the operating conditions.2. Ice production lower than normal and/or none.3. Ice pattern on evaporator (if any) thin at top and thick at bottom.
Flooding TXV - Product Symptoms
1. Suction pressure stabilizes at higher than normal pressure for operating conditions. Suction pressuredoes not modulate and may start to slowly rise.
2. Ice pattern will be very heavy at the bottom and thin at the top of the evaporator. Product may notenter harvest cycle because of higher than normal suction line temperature.
IMPORTANT: Frost on the suction line may be normal on medium temperature refrigerationequipment. Frost should be considered a red flag, long run times will normally produce sometype of frost pattern. Before checking the sealed refrigeration system, the external conditionsthat could lead to frost follow:1. Dirty condenser2. Dirty condenser fan blade
3. Improper air clearance around Cuber4. Loose TXV bulb mount5. Poor water flow over evaporator6. Ventilation problems
The expansion valves used on Cornelius “X” series ice equipment have special super heat settings andbulb charge designed for the product load and HP 62 refrigerant. Should the need arise to replace this orany refrigerant components, be certain to use only components recommended by Cornelius for the modelof the Cuber being serviced. Use of non–approved components will compound system difficulties andmay void product warranty.

Xtreme Ice Training Manual
TP00952October 17, 2005 31
WATER REGULATING VALVEThe water regulating valve is used on water-cooled cubers only. The valve is installed in the condenseroutlet water line. It’s function is to control the proper operating head pressure by regulating the amount ofwater flowing through the condenser. The valve is adjustable and factory set to maintain condenser dis-charge water temperature @ 108/112�F (42-44�C). Setting the water regulating valve to maintain dis-charge water temperature eliminates the need to enter the sealed refrigeration system. When checkingthe valve, the water temperature should be taken as close to the condenser discharged as possible. Thewater temperature will equate to operating head pressure of approximately 260 – 271 PSI (21.1 BAR).Should adjustment be required, the valve has an adjustment stem on the top of the valve. After allowingthe cuber to operate for 10 minutes in the icemaking mode to balance the system, turning the adjustingstem CW will increase the discharge water temperature, and CCW will decrease the discharge wa-ter temperature.
The water regulating valve must close off condenser water flow completely during the “hot gas” harvestcycle. There should be no discharge water flowing out of the condenser during the harvest cycle. Shouldthe valve fail to close during the harvest mode, the condenser will continue to condense the compressordischarge vapor needed for the harvest cycle and this will result in long harvest times. Also discharge water temperature below 108�F /112�F will result in long harvest times.Leaking (bypassing) water regulating valves are normally the result of scale build-up on the valve dia-phragm and the valve should be flushed, not replaced. To flush the valve, open the adjusting stem wideopen CCW (or force the valve spring up with a screwdriver), open and close the water supply to the con-denser resulting in the flushing action. Should this not correct the problem, replace the valve diaphragm.This can be done without entering the sealed refrigeration system.Damage to the water regulating valve may also be caused by water hammer. Water hammer will resultfrom the condenser inlet and outlet water lines being reversed or defective valve stops in the water supplyline. Proper installation of water cooled equipment should always include an anti-water hammer standpipein the supply inlet line as close to the cuber as possible.
FIGURE 13
SERVICE STEM VALVESWhen closing the service stem valves to remove your gauge and manifold set always close the high sidestem valve first. Following this procedure will allow the system to “PULL” the refrigerant vapor from yourmanifold set reducing refrigerant loss. When the pressure has been reduced, close the low side stemvalve.
Xtreme Ice Training Manual
TP00952 October 17, 200532
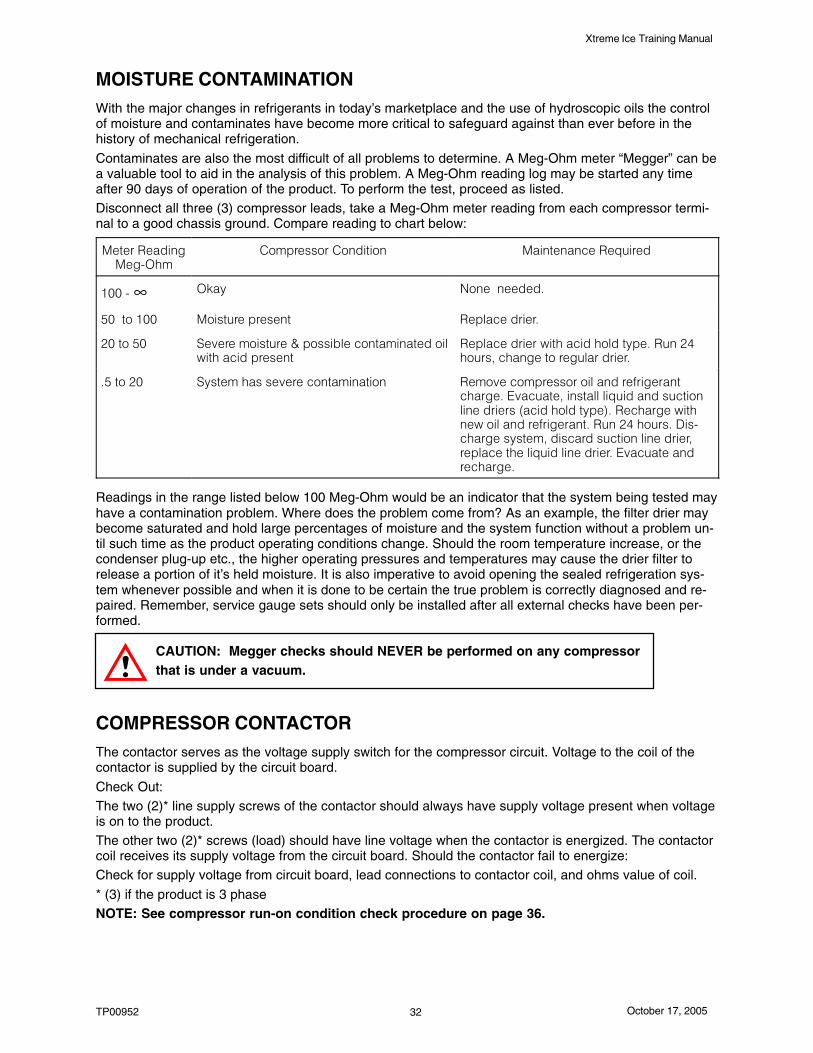
MOISTURE CONTAMINATIONWith the major changes in refrigerants in today’s marketplace and the use of hydroscopic oils the controlof moisture and contaminates have become more critical to safeguard against than ever before in thehistory of mechanical refrigeration.
Contaminates are also the most difficult of all problems to determine. A Meg-Ohm meter “Megger” can bea valuable tool to aid in the analysis of this problem. A Meg-Ohm reading log may be started any timeafter 90 days of operation of the product. To perform the test, proceed as listed.Disconnect all three (3) compressor leads, take a Meg-Ohm meter reading from each compressor termi-nal to a good chassis ground. Compare reading to chart below:
*��������� ��*��"+�!
��!������������ � �� *� �����������,� ���
-..�"�∞ +/� 0������������
1.�����-.. *� ������������� ���������� ���
2.����1. (������!� ������3����� )��������! ������� �� ����� ���������
���������� ���� ����� �������� ��������24�����'��������������������� ���
�1����2. ( ���!�����������������! ��� �� ��!������!��������� ���������� ���������������������'� �������� ,� ���������� ��� ����� ������� �������� ��������������� ������� ���������� ������������24�������� �"�������� ���!'�� ���������� ���� ����� ��'������������� ,� ��� ����� ������������������������
Readings in the range listed below 100 Meg-Ohm would be an indicator that the system being tested mayhave a contamination problem. Where does the problem come from? As an example, the filter drier maybecome saturated and hold large percentages of moisture and the system function without a problem un-til such time as the product operating conditions change. Should the room temperature increase, or thecondenser plug-up etc., the higher operating pressures and temperatures may cause the drier filter torelease a portion of it’s held moisture. It is also imperative to avoid opening the sealed refrigeration sys-tem whenever possible and when it is done to be certain the true problem is correctly diagnosed and re-paired. Remember, service gauge sets should only be installed after all external checks have been per-formed.
CAUTION: Megger checks should NEVER be performed on any compressorthat is under a vacuum.
COMPRESSOR CONTACTORThe contactor serves as the voltage supply switch for the compressor circuit. Voltage to the coil of thecontactor is supplied by the circuit board.
Check Out:The two (2)* line supply screws of the contactor should always have supply voltage present when voltageis on to the product.The other two (2)* screws (load) should have line voltage when the contactor is energized. The contactorcoil receives its supply voltage from the circuit board. Should the contactor fail to energize:Check for supply voltage from circuit board, lead connections to contactor coil, and ohms value of coil.
* (3) if the product is 3 phaseNOTE: See compressor run-on condition check procedure on page 36.

Xtreme Ice Training Manual
TP00952October 17, 2005 33
COMPRESSOR & STARTING COMPONENT CHECK-OUT PROCEDURE
When a compressor fails to start or run properly, it is normally the external electrical supply or the com-pressor start components that are defective – the overload protector, start and/or run capacitor, relay,circuit board, safety controls, etc.
1. Check voltage at compressor terminals. NO voltage will require checking the electrical circuit work-ing back from the compressor to determine where the voltage supply is interrupted and correct asrequired. The load voltage, while compressor is trying to start, should not be less than 90% of ratedrequired voltage.
Line voltage and wire size effect the life expectancy of the electrical components, compressor, motorwinding, solenoid coils, etc.
Poor line quality voltage will cause many erratic electrical problems. Remember every electrical product,ice machine, dispenser, walk-in, reach-in, air conditioner, etc. required proper power supply to operate.Be certain when voltage checks are performed that you are measuring load voltage, not line voltage.
2. A defective capacitor or start relay may prevent the compressor from starting. Should the compres-sor attempt to start, but is unable to do so, or if the compressor hums or trips off on the over protec-tor, check the following:
NOTE: For 50 HZ application on dual rated 50/60 HZ models, load voltage while compressor isstarting must not be less than 90% of 50 HZ rating.
Relay
Potential –
For the potential type, contacts are normally closed. The start contacts open by C.E.M.F. generated bythe compressor at approximately 80% of the normal operating speed. The run winding and the run capac-itor remain in the circuit. This relay may or may not be directional in mounting.
Current –
For the current type, contacts are normally open. The start contacts close by the high current draw fromthe locked rotor condition with only the run winding in the circuit. As the contacts close, the start capacitorand the start winding is energized and the compressor starts. At approximately 80% of its operatingspeed the current draw drops off, the relay contacts open removing the start winding and start capacitorfrom the circuit. (Remember, current relays are directional in their mounting to allow contacts tolift and close).
Capacitors
A quick check is to replace suspected defective capacitors with known good capacitors being careful tostay within the range for substitute values. Should those values be unknown, a basic rule for capacity is:for start capacitors �10% and run capacitors �5% of the rating on the defective original capacitor beingreplaced. Voltage should always try and be matched; if it cannot be, it is acceptable to increase up to10% higher than the voltage listed on the capacitor being replaced. NEVER put a capacitor on a productwith a voltage rating lower than the original being replaced. If a capacitor analyzer is not available, anohm meter may be used to check a capacitor for short or open circuits. Set the ohm meter to its highestscale and connect its leads to the capacitor terminals.
1. With a capacitor, without plate defect, the indicator should first move to zero (0) and then graduallyincrease to infinity.
2. If there is no movement of the ohm meter indicator, an open circuit is indicated.
3. If the ohm meter indicator moves to zero (0) and remains there, or on a low resistance reading, ashort circuit is indicated.
4. Please note this check does not determine if the capacitor will deliver the proper rated MFD/UFDrequired, it only shows if the capacitor has shorted or open circuits.
5. Capacitors that show any signs of leakage of electrolyte, or damage of the can, should be replaced.DO NOT TEST!
Xtreme Ice Training Manual
TP00952 October 17, 200534
Compressor
1. Using an ohm meter, check for continuity from compressor terminal C to R and C to S. If the com-pressor is hot, wait one (1) hour for compressor to cool and recheck. An open internal overload pro-tector can cause a lack of continuity. If continuity cannot be measured through all windings, the com-pressor must be replaced.
2. To check the compressor motor for accidental ground, perform a continuity check between terminalsC, R and S to the compressor shell or a copper line of the refrigeration system (do not use a paintedsurface). Continuity present, the compressor windings are grounded and the compressor must bereplaced.
If the compressor starts, but trips repeatedly on the overload protector, remember that the overload isboth temperature and current activated. Be sure to check:� Low voltage� Undersized supply lines� High head pressure� High suction pressure� Defective capacitors� Compressor mechanical problems� Low refrigerant charge
LEAK DETECTIONThe new non-chlorine based refrigerants such as [HP - 62/R 404A] require special leak detection devicesother than what has been standard for the CFC’s.While the instruments for leak detection are different, the processes have not changed.Basics to remember:1. Look for signs of oil when you visually start your leak check process. Oil is carried with the refriger-
ant. If the oil has leaked out so will the refrigerant.2. Refrigerant vapor is heavier than air. When leak checking suspect areas, probe below the joints or
connections.A. Always check the high-side of the system with the compressor operational.B. Check the low-side of the system, with the system idle.C. Following a & b will normally allow the highest pressure on each portion of the system for the
best detection.3. Systems short of refrigerant will show improper operational results in both the freeze and harvest
cycles. Many systems will appear normal in higher operating temperatures and change drastically incooler condenser temperatures.
4. Many new and reworked leak detection instruments have the ability to detect CFC’s, HCFC’s andthe new HFC’s by making a simple switch selection. This type of detector will be more sensitive onone setting than the other. This results in finding some leaks that are so small it may take years be-fore the actual leak rate would create adverse operating conditions in the product.
A bubble test and/or additives with UV lamp may be the best team for the most positive leak testingresults.
5. Never pressurize a system with oxygen or a mixture of refrigerant and air.
WARNING: Either of these methods may cause a system explosion to occur.
6. Pressurizing systems to leak test should only be done with dry nitrogen. Be sure the regulator set-ting does not exceed the recommended system pressure.
CAUTION: A full cylinder of nitrogen will have pressure of approximately 2700 PSI.
7. Failure to correct leaks will also cause shorter compressor life as a result of the higher operatingtemperatures. Always check the total system for leak, there may be more than one leak.

Xtreme Ice Training Manual
TP00952October 17, 2005 35
SYSTEM EVACUATION & RECHARGINGShould service work ever be required on a product where the sealed refrigeration is opened for any rea-son, the refrigerant must be recovered, drier/filter replaced, evacuated and recharged. The old method of“purging” is NOT ACCEPTABLE. Always evacuate the system through both the high and low side servicevalves. Be certain both valves are completely open when evacuating and the drier/filter has been re-placed.
SELF-CONTAINED PRODUCTSWith the new POE [Polyol Ester] oils, the refrigeration system is more prone to moisture problems thanthe CFC systems. Every effort should be made to never have the system open to the atmosphere forlonger than 15 minutes, and the replacement of the drier/filter is no longer an option, [IT IS MANDATO-RY].A good vacuum is not always easy to measure, however the goal is to have less then 1% non-condens-ible vapors in the system at the completion of the evacuation. Basic guidelines with a good pump wouldbe to evacuate a self–contained product 30 to 45 minutes and a remote product no less than 60 minutes.The system should be evacuated to approximately 200/250 microns. Then perform a 5 minute holdingtest. You may expect a low grade loss of the vacuum as normal. However, a rapid rise to normal atmo-spheric pressure would signal a system leak is present and must be located and repaired before recharg-ing the product. A slower pressure rise to approximately 1500 microns would signal moisture still presentin the refrigeration system.On a “WET” system, it would be beneficial to use heat lamps to raise the temperature of the compressordome and evaporator surface area during the evacuation.To assure a properly recharged product, the refrigerant charge must be weighed into the product using anelectronic charging scale or dial-a-charge. On air- and water-cooled products the charge should beintroduced into the high side service valve. On remote systems, the charge should be introduced into theproduct receiver.
MANIFOLD SET
OPEN
OPEN
VACUUMPUMP
ELECTRONICSCALE
CHARGING CYLINDER
CLOSED
CLOSED
LOW SIDESERVICE
VALVE
HIGH SIDESERVICE
VALVE
OPEN
OPEN
MANIFOLD SET
OPEN
VACUUMPUMP
ELECTRONICSCALE
CHARGING CYLINDER
CLOSED
CLOSED
LOW SIDESERVICE
VALVE
HIGH SIDESERVICE
VALVE
OPEN
OPEN
CLOSED
FIGURE 14

Xtreme Ice Training Manual
TP00952 October 17, 200536
IMPORTANT: Service personnel are held responsible for all aspects of the clean air act of July,1992.
REFRIGERANT DEFINITIONS (ASHRAE 3-1990)
RECOVERYTo remove refrigerant in any condition from a system and store it in an external container without neces-sarily testing or processing it in any way.RECYCLINGTo clean refrigerant for reuse by oil separation and single or multiple passes through devices, such asreplaceable core filter-driers, which reduce moisture, acidity, and particulate matter. This term usually ap-plies to procedures implemented at the field job site or at a local service shop.RECLAIMTo reprocess refrigerant to new product specifications by means which may include distillation. Will re-quire chemical analysis of the refrigerant to determine that appropriate product specifications are met.This term usually implies the use of processes or procedures available only at a reprocessing ormanufacturing facility.NOTES REGARDING RECLAIM:“New product specifications” currently means ARI standard 700-88. Note that chemical analysis is re-quired to assure that this standard is met.Chemical analysis is the key requirement to the definition of “Reclaim”. Regardless of the purity levelsreached by a re-processing method, the refrigerant is not “reclaimed” unless it has been chemically ana-lyzed and meets ARI Standard.
HIGH PRESSURE SAFETY SWITCHAll water-cooled, remote products and air cooled 500’s contain a high pressure safety cut-out switch. Thefunction of this switch is to shut down the cuber should excessive pressure develop in the high side of therefrigeration system. This switch will open the power supply at 450 PSI (30.61 BAR) high side pressure.Should this control open, it must be reset manually and the cause for the increase in pressure deter-mined.
COMPRESSOR RUN-ONContactor remains energized when curtains are in a full bin condition – compressor runs but water pumpand condenser fan (AC) are off.1. Check VAC at contactor coil with an analog voltmeter (dial type, not digital).
A. Voltage at the contactor coil 12 VAC or higher may hold the coil energized. Turn the powerswitch OFF, if contactor de-energizes, replace the circuit board, the snubber circuit is leaking.
B. Should you find 1/2 normal line voltage, replace the circuit board, the triac is shorted.C. If no voltage or very low voltage (6 VAC or less) is present and plunger is still closed, replace
the contactor.

Xtreme Ice Training Manual
TP00952October 17, 2005 37
TROUBLESHOOTING
IMPORTANT: Only qualified personnel should service internal components or electrical wiring.
Trouble Probable Cause Remedy
CUBER NOT OPERATING A. Power switch in “OFF”position.
A. Place switch in “ON” position.
CUBER NOT OPERATING,INDICATOR LIGHTS “OFF”,NO POWER TO CIRCUITBOARD
A. Test power switch and leads. A. If defective, replace.
CUBER NOT OPERATING,INDICATOR LIGHTS “OFF”,POWER TO THE CIRCUITBOARD
A. Magnet not in proximity switchfield.
A. Water curtain drifting out of switchrange. Reduce clearance betweencurtain and proximity switch.
B. No curtain movement. B. Adjust proximity switch.
C. Faulty proximity switch. C. Replace proximity switch.
D. Unit “OFF” due to bin full. D. Remove ice from curtain.Eliminate curtain restriction.
PROXIMITY SWITCH LIGHT“OUT”
A. Loose wire connection atcircuit board.
A. Tighten, reattach wire.
B. Proximity switch defective, seecheck-out procedure.
B. Replace as needed.
C. Water curtain stuck, curtainfrozen to ice on evaporator.Curtain hung on water pan,proximity switch out of range.
C. Check and adjust as needed.
COMPRESSOR DOES NOTRUN, CIRCUIT BOARDINDICATOR LIGHTS “ON”
A. Check contactor and leads. A. Replace if defective.
B. Compressor overload “open”. B. Permit overload to cool and resetor replace.
C. High pressure cut-out open.(water cooled or remotesystems)
C. Press manual reset. Determine cause:Water supply shut off; waterpressure too low; water valvedefective or out of adjustment;water condenser dirty orcorroded; unit overcharged; waterinlet pressure too high. Replacedefective component as needed.
D. Check compressor and startcomponents.
D. Replace as needed.

Xtreme Ice Training Manual
TP00952 October 17, 200538
Trouble Probable Cause Remedy
COMPRESSOR RUNS BUTDOES NOT COOL, CIRCUITBOARD INDICATOR LIGHTS“ON”
A. Low charge. A. Leak check – Recharge.
B. Hot gas solenoid leaking. B. Replace.
C. Defective expansion valve. C. Replace.
D. Inefficient compressor. D. Replace.
E. Internal by-pass open,compressor noisy.
E. Permit pressures to equalize.
CUBER DOESN’T GO INTOFREEZE CYCLE
A. Ice bridge setting too low. A. Adjust per bridge adjustmentinstructions.
B. Expansion valve failure (willnot pull down).
B. Tighten bulb, replace as needed.See check-out procedure.
CUBER REMAINS IN THEFREEZE CYCLE
A. Low inlet water pressure A. Check for restriction in the watersupply line or filter.
B. Fill valve failure
C. Pressure tube failure.
D. Pressure sensor failure.
E. Water leak.
F. High or low ambienttemperature.
B. Replace as needed.
C. Ensure that pressure tube isconnected and free of cuts orkinks.
D. Replace control board as needed.
E. Check for leaks in the waterdistribution system and repair asneeded.
F. Ensure air ambient temperature isfrom 50 to 100 degrees.
LONG FREEZE CYCLEGENERAL
A. Water inlet valve leaking. A. Repair or replace.
B. Dirty condenser or fan blade. B. Clean as required.
C. Louvers at condenserobstructed.
C. Remove obstruction.
D. Ambient air temperature toohigh.
D. Advise customer.
E. Condenser discharge airre-circulating.
E. Install condenser baffle.
F. Low charge. F. Check for leak, correct, evacuateand recharge.
G. Hot gas solenoid valve leaking(not seating).
G. Replace.
H. Water regulator valve set toohigh or stuck (water cooledunits only).
H. Adjust, clean or replace (setting tobe 260 to 271 PSI).
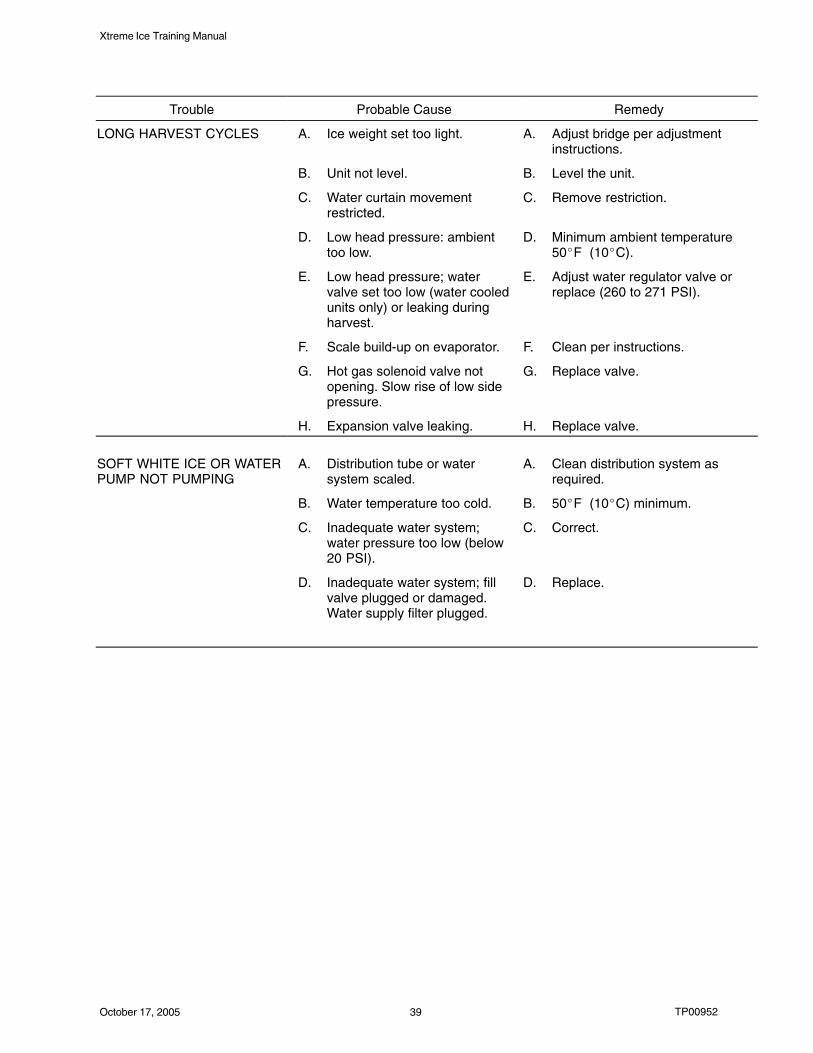
Xtreme Ice Training Manual
TP00952October 17, 2005 39
Trouble Probable Cause Remedy
LONG HARVEST CYCLES A. Ice weight set too light. A. Adjust bridge per adjustmentinstructions.
B. Unit not level. B. Level the unit.
C. Water curtain movementrestricted.
C. Remove restriction.
D. Low head pressure: ambienttoo low.
D. Minimum ambient temperature50�F (10�C).
E. Low head pressure; watervalve set too low (water cooledunits only) or leaking duringharvest.
E. Adjust water regulator valve orreplace (260 to 271 PSI).
F. Scale build-up on evaporator. F. Clean per instructions.
G. Hot gas solenoid valve notopening. Slow rise of low sidepressure.
G. Replace valve.
H. Expansion valve leaking. H. Replace valve.
SOFT WHITE ICE OR WATERPUMP NOT PUMPING
A. Distribution tube or watersystem scaled.
A. Clean distribution system asrequired.
B. Water temperature too cold. B. 50�F (10�C) minimum.
C. Inadequate water system;water pressure too low (below20 PSI).
C. Correct.
D. Inadequate water system; fillvalve plugged or damaged.Water supply filter plugged.
D. Replace.

Xtreme Ice Training Manual
TP00952 October 17, 200540
Trouble Probable Cause Remedy
LEAKING WATER PAN A. Damaged water pan. A. Replace water pan (see KitInstructions, number below, forWater Pan Replacement).
Model # Kit #300 631500152500/600/800/1000 6315001531200 631500154
Pull tab toward you. Turn pump clockwise and lift.
FIGURE 15
NOTE: Remove pump tubing from the dump solenoid, after the pump has been lifted out of the res-ervoir, disconnect the distributor tubing at the tee fitting and lift pump out.
ICE WILL NOT HARVEST A. Grid separation.
B. Defective plating.
A. Replace evaporator (see KitInstructions, number below, forEvaporator Replacement).
B. Replace evaporator (see KitInstructions, number below, forEvaporator Replacement).
Model # Kit #300 631500121500 631500119600/800/1000 6315001351200 Right 6315001191200 Left 631500141

Xtreme Ice Training Manual
TP00952October 17, 2005 41
ÄÄÄÄÄÄ
AIR
CO
OL
ED
CO
ND
EN
SE
R
FAN
BL
AD
ES
FAN
MO
TOR
HE
AT
EX
CH
AN
GE
R
FIL
TE
R/D
RIE
R
CO
MP
RE
SS
OR
LO
W S
IDE
SE
RV
ICE
VA
LVE
RE
FR
IGE
RA
TIO
N A
ND
WA
TE
R S
YS
TE
MS
MO
DE
LS
XA
C32
2, X
AC
330,
XA
C52
2, X
AC
530,
XA
C63
0, X
AC
830
HIG
H S
IDE
SE
RV
ICE
VA
LVE
TH
ER
MO
STA
TIC
E
XPA
NS
ION
VA
LVE
HO
T G
AS
SO
LE
NO
IDV
ALV
E
S
EVA
PO
RA
TOR
WA
TE
RD
UM
P V
ALV
EW
AT
ER
PU
MP
FIGURE 16

Xtreme Ice Training Manual
TP00952 October 17, 200542
ÄÄÄÄ
WA
TE
R R
EG
UL
AT
ING
VA
LVE
WA
TE
R-C
OO
LE
D C
ON
DE
NS
ER
FIL
TE
R/D
RIE
R
WA
TE
R IN
LE
T
HE
AT
EX
CH
AN
GE
R
PR
ES
SU
RE
SW
ITC
H
LO
W S
IDE
SE
RV
ICE
VA
LVE
HIG
H S
IDE
SE
RV
ICE
VA
LVE
CO
MP
RE
SS
OR
Ref
rig
erat
ion
an
d W
ater
Sys
tem
s
Mo
del
s X
WC
322,
XW
C33
0, X
WC
522,
XW
C53
0 , X
WC
630,
XW
C83
0
TH
ER
MO
STA
TIC
EX
PAN
SIO
N V
ALV
E
S
HO
T G
AS
SO
LE
NO
IDV
ALV
E
EVA
PO
RA
TOR
WA
TE
RD
UM
P V
ALV
EW
AT
ER
PU
MP
FIGURE 17

Xtreme Ice Training Manual
TP00952October 17, 2005 43
XTREME ICE – KITS
BIN STAT KIT, P/N 630000408
Installation Instructions
These Bin Stat kits apply to all “X” Series Ice makers.
Loose–Shipped PartsItem No. Part No. Name Qty.1 630000837 Thermostat Asy 12 07578 Screw TC 08–32 23 630460162 Installation Instruction, Thermostat 14 630900895 Hex Nut 8–32 SS Keps 25 620045454 or
620045455 or620045456 or620045457
Bin Stat Support 1
1. Disconnect power.2. Remove front cover of the unit and the electrical box cover plate. For 22” wide units you will need to
remove the Grill from the right side of the unit.
3. To mount bin thermostat in electrical box:A. Route wires and connector through grommet in electrical box (see Figure 18).B. Attach bin thermostat to electrical box with two 08–32 TC screws provided (see Figure 18).
4. Connect the bin thermostat lead to the circuit board (see Figure 19).5. Straighten approximately 12” of capillary tube to go through hole in chassis base. Re–coil the re-
mainder. Do not disturb the tightly coiled end.6. Insert the “1/4” diameter wire Bin Stat support into the coiled end of capillary tube. Carefully wrap 5
turns of free capillary tube tightly around the Bin Stat support. Insert the assembly through the holein the chassis base. Route capillary tube to follow the Bin Stat support as closely as possible (seeFigure 20).
7. Slip eye of Bin Stat support over the 8–32 weld stud in the chassis base. If a nut exists on this weldstud remove before assembling the Bin Stat support. Secure the Bin Stat support with the 8–32Keps nut provided in the kit (see Figure 20).
8. Any excess capillary tubing must be carefully pulled back into the compressor compartment to pre-vent ice from damaging it during dispenser operation.
9. Seal �” diameter hole with sealant (RTV).10. Turn bin stat adjustment screw clockwise until it stops. Then turn it counterclockwise 1/8 of a turn.11. Reinstall the front cover of the electrical box and the ice machine and reconnect the power. Verify
that the Bin Stat is working by holding ice on the coiled bare capillary tube. The bin stat will allow theice machine cycle to complete and harvest ice. Then the ice machine will shut down. Remove the icefrom the capillary tube and warm the tube with hand heat. The ice machine should start in approxi-mately 60 seconds. Reinstall front cover and grill (22” units only).
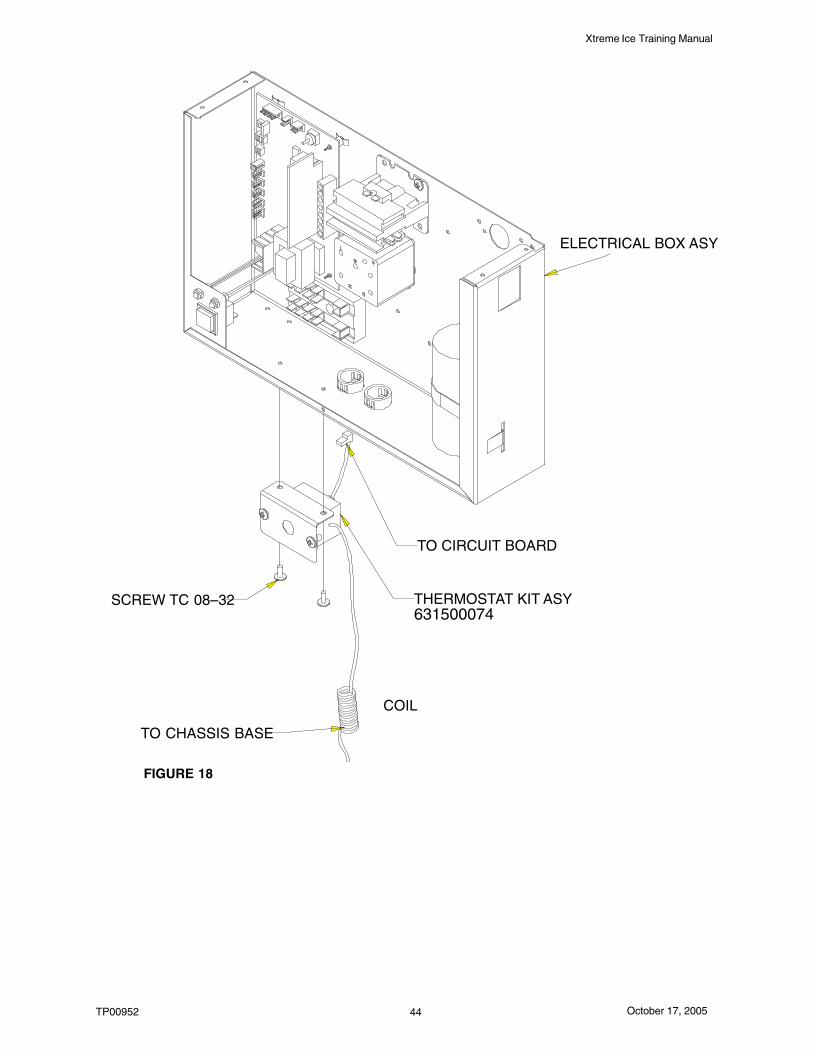
Xtreme Ice Training Manual
TP00952 October 17, 200544
COIL
THERMOSTAT KIT ASY631500074
ELECTRICAL BOX ASY
TO CHASSIS BASE
SCREW TC 08–32
TO CIRCUIT BOARD
FIGURE 18

Xtreme Ice Training Manual
TP00952October 17, 2005 45
Unit
Stack
SwitchesBin
1
In
ComOut
2
Switch
LH Evap.
SelectionSwitch
Switch
RH Evap.
NS
SN
4
3
5
On
S3–2 S3–1Off
On
Transformer
YL
Triac
YL
YL
YL
(Manufacturing Date)Processor
36430001
Micro
pot.
#5
#1
#2
#3
#4
#6
#7
(White Lead)
Condenser Sensor
See note 1
Harvest
Off3 12
Adj
ust
ThicknessBridge
RD
FILL VALVE
DUMP VALVE
FAN MOTOR (AIR COOLED)
COMPRESSOR
WATER PUMP
HOT GAS
NEUTRAL
POWER
PRESSURE Transducer
GR
GR
Valve
Dump
GR
Fan
GR
Comp
GR
Pump
GR
Gas
CLEANDELAYERROR
#8
J9
Plug Bin Thermostat on Top Two Pins of Stacking Cable Plug
FIGURE 19

Xtreme Ice Training Manual
TP00952 October 17, 200546
CAPILLARY TUBE
BIN STAT SUPPORT
SEE DETAILA
DETAILASCALE 1:2
INSERT COIL AROUNDBIN STAT SUPPORT
8–32 HEX
BIN STATSUPPORT
NUT
FIGURE 20
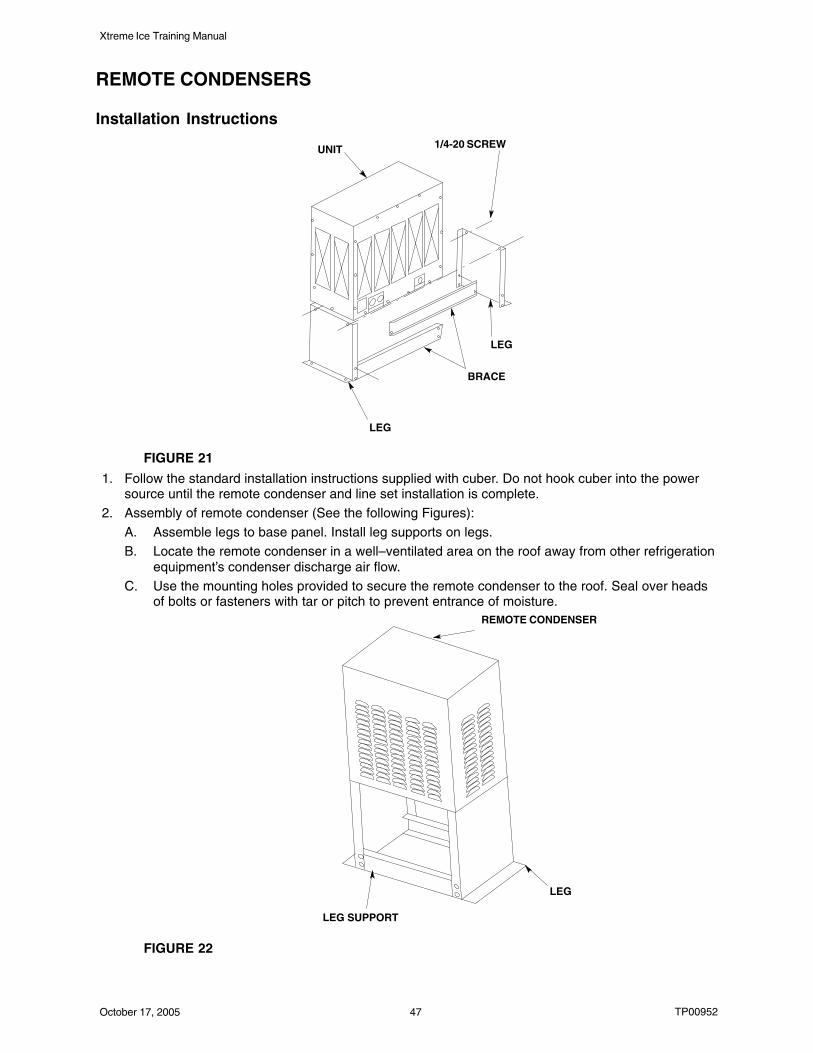
Xtreme Ice Training Manual
TP00952October 17, 2005 47
REMOTE CONDENSERS
Installation Instructions
UNIT 1/4-20 SCREW
LEG
BRACE
LEG
FIGURE 21
1. Follow the standard installation instructions supplied with cuber. Do not hook cuber into the powersource until the remote condenser and line set installation is complete.
2. Assembly of remote condenser (See the following Figures):A. Assemble legs to base panel. Install leg supports on legs.B. Locate the remote condenser in a well–ventilated area on the roof away from other refrigeration
equipment’s condenser discharge air flow.C. Use the mounting holes provided to secure the remote condenser to the roof. Seal over heads
of bolts or fasteners with tar or pitch to prevent entrance of moisture.REMOTE CONDENSER
LEG
LEG SUPPORT
FIGURE 22

Xtreme Ice Training Manual
TP00952 October 17, 200548
3. Remote condenser electrical hook-up:A. Connect remote condenser to a power source (208/230VAC, 60 HZ) separate from the cuber.
An external disconnect switch must be used.B. Make sure the electrical connections follow all local and
national codes.C. DO NOT turn condenser on until cuber install and refrigerant line connections are com-
plete!D. Never wire condenser into cuber section. The condenser is an independent electrical connec-
tion.E. Fan motor will not start until pressure rises to 205 PSIG [14.07 Bars] closing fan cycling switch.F. The condenser fan may cycle off during the harvest cycle – this would be normal.
NOTE: Installing an IMI Cornelius remote cuber with other than an IMI Cornelius remote condens-er and line set may be reason to void the cuber warranty.
LIQUIDREFRIGERANTLINE
DISCHARGELINE
CORRECT
FIGURE 23
4. Each condenser and cuber is connected with two (2) *pre-charged lines (See Figure 23).A. The pre-charged lines are ordered separately from the condenser to suit each individual ap-
plication (contact your service provider for more information).B. The pre-charged line lengths are 20 feet [6.096 meters], 35 feet [10.66 meters] and 55 feet
[16.76 meters] (contact your service provider for more information).NOTE: Pre-charged is defined as a vapor holding charge – not a portion of the system charge.5. Installation of line kits (see drawing). Remove the tubing from the carton. Carefully uncoil the lines so
the tubing doesn’t become kinked, and route lines to cuber and condenser.6. Keep line-set as short as possible. Place a 3-foot service loop behind cuber to allow for rear service
should it ever be required.

Xtreme Ice Training Manual
TP00952October 17, 2005 49
REMOTE CONDENSER LOCATION
1. Physical Line-Set Length: 55 Ft. Maximum [16.764 meters]
The ice machine compressor must have the proper oil return. Line-set rises, drop, or horizontal runsgreater than the maximum distance allowed will exceed the compressor start up and pumping designlimits, and will result in poor oil return to the compressor.
Line-Set Rise: 35 Ft. Maximum [10.66 meters]Line-Set Drop: 15 Ft. Maximum [4.57 meters]
2. Calculated Line-Set Distance: 100 Ft. [30.48 meters] (See Figure 24)
To prevent the combination of rises, drops and horizontal runs exceeding the compressor start-upand pumping design limit, the following calculations should be made:
NOTE: Max. line–set for IMI Cornelius cubers is 55 ft. Do not confuse line length with calculatedline distance
A - (RISE) CONDENSER HIGHER THAN EVAP. MAX. 35 FT.
B - LINE LENGTH 15 FT.: EXAMPLE
B - LINE LENGTH 35 FT.: EXAMPLEC - (DROP) CONDENSER LOWER THAN EVAP. 15 FT.: MAX.
A
B
B
C
FIGURE 24
Maximum Line-Set Distance Formula
A. Measured rise x 1.7= Calculated Rise 35 ft. Max) [10.66 meters]
B. Measured drop x 6.6= Calculated Drop 15 ft. Max) [4.57 meters]
C. Measured Horizontal Distance = actual measurement.
D. Total Calculated Distance (A+B+C)=Total Calculated Distance (100 ft. Max.) [30.48 meters]
Examples:
a. Insert measured rise (R) into the formula and multiply it by 1.7 to get a calculated rise (SeeFigure 25).
example: A condenser located 15 ft. [4.572 meters] above the ice machine has a 25.5 ft.[8.874 meters] calculated total (15 ft. x 1.7 = 25.5).
H
R
AIRFLOW
FIGURE 25

Xtreme Ice Training Manual
TP00952 October 17, 200550
b. Insert measured drop (D) into formula and multiply by 6.6 to get a calculated drop (SeeFigure 26).example: A condenser located 8 ft. [2.438 meters] below the ice machine has a 52.8 ft.[16.093 meters] calculated total (8 ft. x 6.6 = 52.8 ft.).
D
H
AIRFLOW
COMBINATION OFDROP(S)WITH HORIZONTAL
FIGURE 26
c. Insert measured horizontal distance into formula. No calculation is necessary. (6 ft.) [1.828meters].
d. Add the calculated rise, calculated drop, and horizontal distance together to get the totalcalculated distance (25.5 + 52.8 + 6) equals 84.3 ft. [25.694 meters]. If 100 ft. [30.48 me-ters] total calculated distance is exceeded, the condenser must be moved to a new loca-tion which permits proper equipment operation (See Figure 27).
R
H
D
AIRFLOW
COMBINATION OF RISE ANDDROP(S)WITH HORIZONTAL
FIGURE 27
CAUTION: If a line-set rise is followed by a line-set drop, a second line-set rise cannotbe made. Or If a line-set drop is followed by a line-set rise, a second line-set dropcannot be made.
3. Lengthening or Reducing the Line-Set LengthsIn most cases, by routing the line-set properly, shortening will not be necessary (refer to illustration).However, when shortening or lengthening is required, do so before connecting the line-set to the icemachine or the remote condenser. This prevents the loss of refrigerant from the ice machine or thecondenser.
The quick connect fittings on the line-sets are equipped with Schrader Valves. Use these valves torecover any vapor charge from the line-set. When lengthening or shortening lines, apply good refrig-eration practices and insulate new tubing. Do not change the tube sizes. Evacuate the lines andplace approximately 5 oz. of vapor refrigerant charge in each line (See Figure 28).
Intermediate Seal
Parent Metal SealSchrader Valve
FIGURE 28
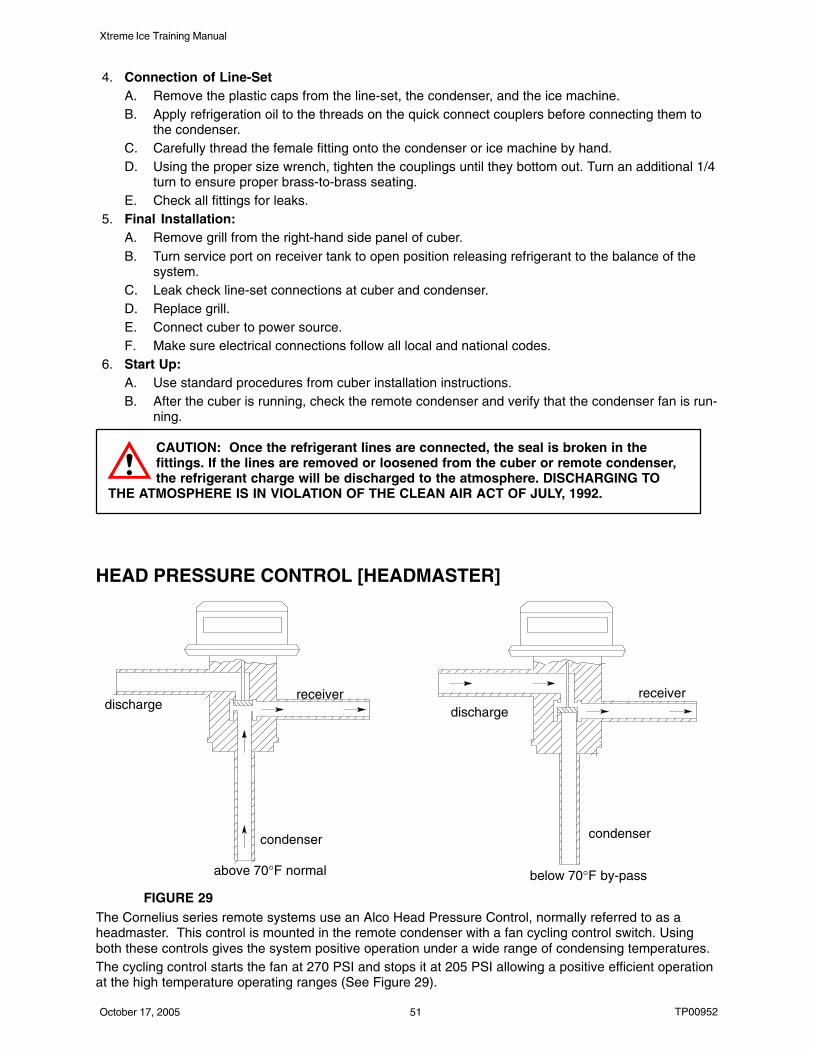
Xtreme Ice Training Manual
TP00952October 17, 2005 51
4. Connection of Line-SetA. Remove the plastic caps from the line-set, the condenser, and the ice machine.B. Apply refrigeration oil to the threads on the quick connect couplers before connecting them to
the condenser.C. Carefully thread the female fitting onto the condenser or ice machine by hand.D. Using the proper size wrench, tighten the couplings until they bottom out. Turn an additional 1/4
turn to ensure proper brass-to-brass seating.E. Check all fittings for leaks.
5. Final Installation:A. Remove grill from the right-hand side panel of cuber.B. Turn service port on receiver tank to open position releasing refrigerant to the balance of the
system.C. Leak check line-set connections at cuber and condenser.D. Replace grill.E. Connect cuber to power source.F. Make sure electrical connections follow all local and national codes.
6. Start Up:A. Use standard procedures from cuber installation instructions.B. After the cuber is running, check the remote condenser and verify that the condenser fan is run-
ning.
CAUTION: Once the refrigerant lines are connected, the seal is broken in thefittings. If the lines are removed or loosened from the cuber or remote condenser,the refrigerant charge will be discharged to the atmosphere. DISCHARGING TO
THE ATMOSPHERE IS IN VIOLATION OF THE CLEAN AIR ACT OF JULY, 1992.
HEAD PRESSURE CONTROL [HEADMASTER]
dischargereceiver
condenser
above 70°F normal
dischargereceiver
condenser
below 70°F by-pass
FIGURE 29The Cornelius series remote systems use an Alco Head Pressure Control, normally referred to as aheadmaster. This control is mounted in the remote condenser with a fan cycling control switch. Usingboth these controls gives the system positive operation under a wide range of condensing temperatures.The cycling control starts the fan at 270 PSI and stops it at 205 PSI allowing a positive efficient operationat the high temperature operating ranges (See Figure 29).

Xtreme Ice Training Manual
TP00952 October 17, 200552
The headmaster controls the operation when the condensing temperature drops below 70°F. The refriger-ant charge is HP - 62 [R - 404A] and the headmaster dome charge setting is 200 PSI of nitrogen pres-sure making it stable under the low temperature operating range down to - 20°F.
The normal flow pattern through the headmaster is from the condenser port to the receiver port. Whenthis flow pattern is unable to maintain a receiver outlet pressure equal to or above the dome pressure set-ting of the valve, the dome pressure will force the valve portage to change closing the condenser port andopening the bypass port from the compressor discharge line. This allows the high pressure vapor fromthe discharge port to “buck” the receiver pressure back up. With the condenser port closed, the refriger-ant is backed up in the condenser, basically reducing the condenser size, assisting in maintaining the dis-charge portage flow and increasing the head pressure.
Remember, sense of touch to the lines of the headmaster will determine the flow path the headmaster isin, condenser to receive, or bypass to receiver.
High side gauge installed at the receiver outlet valve will determine if the headmaster is functioning tomaintain the proper operating pressure.
In the event the control appears to be “stuck in bypass”, the pressure drop across the headmaster mustbe measured. With a gauge installed at the receiver outlet valve and the high side service valve, the pres-sure difference at these two points must be less than the 15 PSI. The three most common causes of anexcessive pressure drop are shortage of refrigerant, kinked remote lines, and excessive line length.
Eliminate refrigerant shortage first. Add refrigerant in two-pound increments (not to exceed six pounds)to determine if it corrects the pressure drop. If pressure drop is not corrected, inspect line set for sharpbends or kinks and correct as required. If adding refrigerant does not correct continued (bypass) conditionand line set is not damaged, replace headmaster.
REMOTE SYSTEM EVACUATION/RE-CHARGEAll field repairs to the sealed system must start with a total discharge of the system following the require-ments of the Clean Air Act of July, 1992.Proper evacuation of the total remote system will require a three (3) point hook-up of your manifold andhose set, (See Figure 30):Point #1 - Cuber receiver outlet valvePoint #2 - Cuber high side service valvePoint #3 - Cuber low side service valveEvacuation:1. With cuber power supply turned “OFF” disconnect and insulate all 3 compressor leads at the com-
pressor. Turn power supply on, place power switch in the “on” position. This will energize (open) theLiquid Line solenoid allowing evacuation of the Liquid Line between the solenoid and the expansionvalve(s).
2. Evacuate system to 200/250 microns or less. At this point, there should be a holding test of five(5)minutes. You may expect a slight loss of vacuum as normal. A rapid rise to normal atmosphericpressure indicates moisture still present in the system. On a “wet” system, it will prove beneficial touse heat lamps to warm the compressor dome and evaporator surface during evacuation.
3. Turn cuber power switch OFF. Reconnect compressor leads.4. *After proper evacuation hold test has been performed, the refrigerant charge should be “dumped”
into the receiver until the pressure equalizes, stopping the flow. Do not try to throttle the refrigerantflow. Doing so will allow system pressure to balance too soon. The high-side service valve should beclosed and the balance of the charge fed slowly through the suction side service valve with the com-pressor operational. Control the feed rate at no faster than four (4) ounces [113.g] per minute to en-sure the compressor oil does not become too saturated with refrigerant resulting in a loss of com-pressor lubrication.
5. All refrigerant re-charging must be weighed into the system, utilizing an electronic charging scale.DO NOT attempt to recharge the system by sight glass, system pressure, amperage, frost line orsweat patterns.
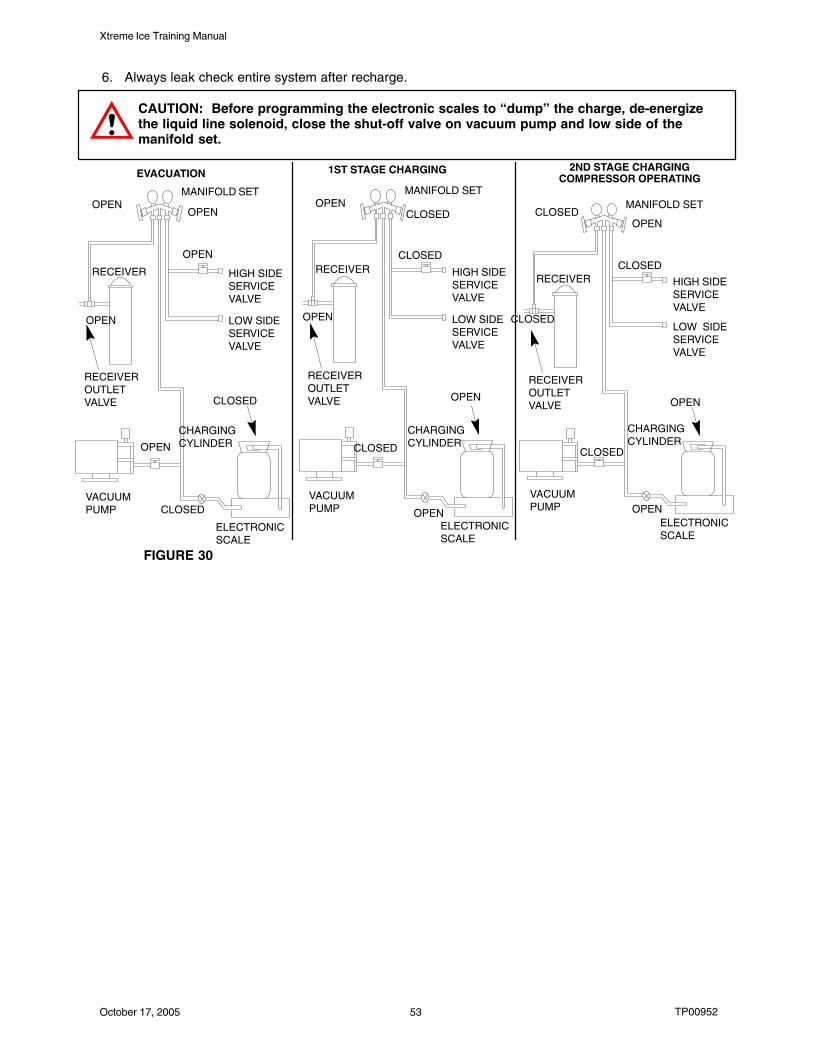
Xtreme Ice Training Manual
TP00952October 17, 2005 53
6. Always leak check entire system after recharge.
CAUTION: Before programming the electronic scales to “dump” the charge, de-energizethe liquid line solenoid, close the shut-off valve on vacuum pump and low side of themanifold set.
EVACUATION
MANIFOLD SETOPEN
RECEIVER
OPEN
RECEIVEROUTLET VALVE
OPEN
VACUUMPUMP
ELECTRONICSCALE
CHARGING CYLINDER
CLOSED
CLOSED
LOW SIDESERVICEVALVE
HIGH SIDESERVICEVALVE
OPEN
OPEN
1ST STAGE CHARGING
MANIFOLD SETOPEN
RECEIVER
OPEN
RECEIVEROUTLET VALVE
OPEN
VACUUMPUMP
ELECTRONICSCALE
CHARGING CYLINDERCLOSED
LOW SIDESERVICEVALVE
HIGH SIDESERVICEVALVE
2ND STAGE CHARGINGCOMPRESSOR OPERATING
MANIFOLD SET
RECEIVER
RECEIVEROUTLET VALVE
OPENVACUUMPUMP
ELECTRONICSCALE
CHARGING CYLINDER
CLOSED
CLOSED
LOW SIDESERVICEVALVE
HIGH SIDESERVICEVALVE
OPEN
OPEN
CLOSED
CLOSED
OPEN
CLOSED
CLOSED
FIGURE 30

Xtreme Ice Training Manual
TP00952 October 17, 200554
THIS PAGE LEFT BLANK INTENTIONALLY
Xtreme Ice Training Manual
TP00952October 17, 2005 55
IMI CORNELIUS INC.
CORPORATE HEADQUARTERS:
One Cornelius PlaceAnoka, Minnesota 55303-6234(763) 421-6120(800) 238-3600