modcan series manual.pdf · modcan synthesizer do’s and don’ts thank you for purchasing modcan...
TRANSCRIPT

B Series User Manual
modcanmodcan

Modcan Synthesizer DO’s and DON’TS
Thank you for purchasing Modcan products. Your Synthesizer was built by hand to exacting standards. To get the best long term performance from your system we suggest reading and following the guidelines listed below. Technical support questions can be submitted to [email protected] or call Modcan at 416-919 5346
Safety Issues:
1/ DON’T move the Power Supply module from its' case location. The position of the PSU module is set by the internal wiring bus.The power supply uses dangerous 110/230V. Shock could occur if improperly handled. Contact Modcan for any issues regarding the PSU.
2/ DO return the synthesizer to Modcan for service in the event that it stops functioning .Individual modules can be returned if the problem is localized to one or two modules.
3/ DON’T have the power switched on when rearranging or exchanging modules and preferably don’t operate the synth with any module spaces left open. See page below for important info on module power connector orientation.
4/ Grounding Issues: DO NOT remove the ground pin from the power cord. This is an UNSAFE connection for electronic equipment . If ground loops are a problem, first try cutting the ground wire connection on one end (not both) of the 1⁄4” phone cable that con-nects the output of the synth to your mixer or amplifier. Also try making sure that both the synth and your mixer/amp or other equipmentare plugged into the same wall socket, power bar or are at least on the same house circuit. If all else fails contact Modcan for other sugges-tions.
5/ Obviously, DON’T use the synth while in the bath or swimming. Other methods can be used to achieve bubbly sounds during these activi-ties.
Operation Issues:1/ Power up the synthesizer: switch on synth power first then power up mixer/amplifier. To power down: switch off mixer/amp first (or mute the appropriate channel) and then switch off the synth.
2/ When swapping modules DON’T adjust the trim pots on the module circuit boards as these have been set at the factory using precision test equipment for optimized performance.
2/ Use a mixer module if you wish to combine 2 or more outputs patched to one input. No damage will result in the short term but prolonged use of parallel output connections could exceed the recommended current specifications of the output opamps. Depending on the types of modules combined, unpredictable or degraded signal performance could result. Connecting several outputs into one input is not considered good patching practice. Connecting one output to many inputs is fine.
4/ The scaling calibration of the Oscillator will need adjustment over the course of time. This is especially true if the ambient temperature of the synths' environment changes radically from season to season. This is a fact of life and no different than a piano or guitar. The procedure for calibration is outlined on the page following the Oscillator operation page.

Dual Rack Rail AssemblyStep 1/ Screw rails together withsupplied #8 screws, washers and nuts x 2 (Ignore for single rack)
Step 2/ Screw power distribution bracketto the rails with supplied #8 screws, washer and nuts x 3
Power distributionscrew terminals
Step 3/
Step 4/
Step 5/
Step 6/
Step 7/
SEE NEXT PAGE FOR DETAILED PHOTO OF TERMINAL LOCATIONS
Step 8/
Step 9/
Step 10/ ONE
SEE PDF MANUAL FOR PHOTO OF INSTALLED END CAPS
Screw joined rails with attached bracket to 19" rack.
Screw other top and bottom rails 5U above and below to accommodate module height.
Attach modules at each end of the rails and adjust rail position till modules aresquare to rails and parallel to rack support columns.
Install Power Supply 50B module. Position on the right most location on the rack railsnext to the rack vertical support for maximum rigidity.
Connect wires from the PSU to the screw terminals on the power distribution boardon the bracket. The wire with the RED sleeve goes to the terminal marked with a +.The wire with the YELLOW sleeve attaches to the terminal marked with a - sign.The Green goes to the center terminal with the GROUND symbol.
Connect AC Power cord to PSU module and switch supply on. Check RED LEDstatus light is lit. Switch off immediately if not lit. If everything looks right switch off supplyand install a module power cable onto one of the white headers on the power distributionboard. Switch power on again and then if possible check to see that the RED wire is +15V,WHITE wire is -15V. Place black (common) volt meter probe on the GREEN wire while doing thechecks. The 3 Pin connectors have small contacts visible which can be touched withthe volt meter probe for checking voltage. Switch off power before installing remaining modules.
Install the remaining modules and connect power cables from modules to distributionboard headers (check for correct orientation of connectors). Adjust the rails again if the modules arenot aligning correctly and then tighten rail screws securely.
Carefully remove screws from end of one pair of rack rails and support if necessary.Place painted end cap with bend side matching module bend over the protruding rail ends.Insert screw through slot opening and into rail mounting hole and screw firmly into 19" rack.End caps are cosmetic to hide protruding rack rail ends. Follow the same steps for theother end caps. Only do one at a time so modules are supported at one end at all times.
SEE NEXT PAGE FOR DETAILED PHOTO OF TEST POINTS

+15V (Red)
Test points (left to right)Pin 1 GNDPin 2 -15VPin 3 +15V
Ground (Green)
-15V (Yellow)
POWER DISTRIBUTION HOOKUP
Connect wires from the PSU to the screw terminals on the power distribution boardrack bracket.
Tighten connecting terminal screws firmly and arrange wires so adjacentconnectors not in contact with each other.
Wires should be attached to lower distro board when a doublerack is involved. Position Power Supply 50B module on lowest rack on right sideLeave Distro board interconnecting jumper wires installed andattach PSU terminal connectors over top of jumper connectors.
The wire with the RED sleeve goes to the terminal marked with a +.The wire with the YELLOW sleeve attaches to the terminal marked with a - sign.The Green goes to the center terminal with the GROUND symbol.

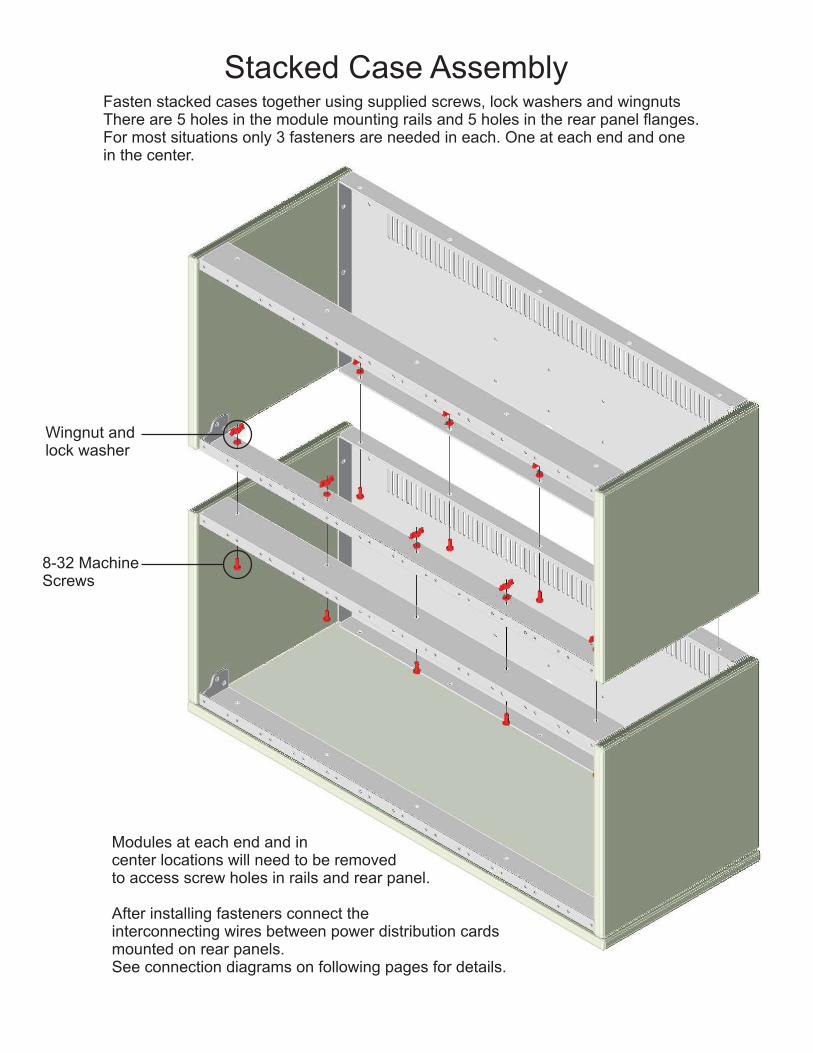
Stacked Case Assembly
Wingnut andlock washer
8-32 MachineScrews
Fasten stacked cases together using supplied screws, lock washers and wingnutsThere are 5 holes in the module mounting rails and 5 holes in the rear panel flanges.For most situations only 3 fasteners are needed in each. One at each end and onein the center.
Modules at each end and incenter locations will need to be removedto access screw holes in rails and rear panel.
After installing fasteners connect theinterconnecting wires between power distribution cardsmounted on rear panels.See connection diagrams on following pages for details.

FromPSU
+15V (Red)Ground (Green)
-15V (White)
Power distribution card connection for multi-case systems
Connection for Case with PSU on side of cabinetsRIGHT
This diagram shows jumper connection for power distribution cards in a multi-case systemwith Power Supply 50B mounted on hand side of case. See drawing on pagefor side connection.Use lock washers between ring connector and screw terminal
RIGHTLEFT
next

FromPSU
+15V (Red)
Ground (Green)-15V (White)
This diagram shows jumper connection for power distribution cards in a multi-case systemwith Power Supply 50B mounted on hand side of case. See drawing on previous pagefor side connection.Use lock washers between ring connector and screw terminal
LEFTRIGHT
Power distribution card connection for multi-case systems
Connection for Case with PSU on side of cabinetsLEFT

End Cap
Assembled Rack Rails


Mix Out : Mix out of all four LFOs.
Inserting plugs into the individual LFO outputs removesthem from the mix output.
The LFOs 1-4 are normalled to the mix output
QUAD LFO 03B
Status LEDs: Displays the LFO status. When lit the LFO isat its' positive potential.
Tri/Pulse Selectors: The LFO waveform is selected by theswitch to the right of the CV input jacks. The choices areTriangle (+/-2.5V) and Pulse or Square (0-5V)
CV Input: Control voltage input for modulation of the LFOfrequency. The response of this input is 1 Volt per Octave.Tracking the LFO with a keyboard scaled voltage will result instandard semitone intervals.The CV inputs are normalled* together. A voltage at the LFO 4CV input will modulate all four LFO frequencies. To break theconnection insert a plug into the other CV inputs to disconnecteach one for separate modulation control.This is useful when using the four LFOs as audio rangeoscillators. * normalled definition: when jacks are internallyconnected behind the panel. Saves using external patchcables. It is often that some jacks are connected by patchconvention. Normalling is done on some modules as a shortcut to reduce patch cable clutter.
LFO Rate Control: Sets the frequency of the LFO section inconjunction with the CV inputs.
The Quad LFO is 4 simple wide range voltage controlled LFOs on one panel. Each of the four sectionsworks independently of each other and the functions are the same for all four.This module is ideal for general purpose LFO modulation, sweeping filters, amplitude modulation, etc.The mix output sums all four LFOs together for complex modulation and audio range output.

VC DADSR 04B
Attack Control Knob: CV input subtracts from the knobposition.
Decay : CV input adds to the decay durationControl Knob
Sustain : CV input adds to the sustain level.Control Knob
Release : CV input adds to the release duration.Control Knob
1V/Oct Input: Changes the time constant of all stagessimultaneously. Primarily used for keyboard tracking ofenvelope. Positive input voltages shorten the envelope stagedurations. Negative voltages increase the stage durations
Trigger Input: Can be used for re triggering the envelopewhile a gate signal is present ( An example would be to restartthe envelope with an LFO pulse output while feeding a gatesignal to the gate input above it )
DELAY/HOLD Control:DELAY/HOLD
DELAY
HOLD
DELAYCV
HOLDPUNCH SUSTAIN
ATTACK DECAYRELEASE
Double function control works togetherwith toggle switch.With switch set to : Sets the Delay stage duration fromthe time the gate signal goes high till the onset of the envelopeattack stage begins. (Fig.1)
Sets the duration of the built in timerthat over-rides the incoming gate signal duration. Short gatescan be made long and long gates short. (Fig. 2) This can beuseful when triggering from a software sequencer and gateduration needs to be altered to suit the envelope. The
input function changes in accordance with the position of thetoggle switch as well. The can also be used to add
to percussive sounds. Set to short Hold time,control to full CW position, and to full CCW.Use to control decay time. Use Lin switch position forfast response.
With switch set to :
The Envelope Generator is a unique five stage, voltage controlled contour generator.A gate processing HOLD control is switch selectable from the front panel.
Indicator LED: shows status of envelope output
0V
0V
0V
0V
+5V
+5V
+5V
+5V
+5V
+5V0V
0V
AT
TA
CK
DE
CA
Y
RE
LE
AS
E
GA
TE
SUSTAIN
DELAY
Input 40ms. Gate
Lengthened to 200ms.
Shortened to 20ms.
Fig.1 Fig.2
LIN
LOG
REL

DUAL LFO 05B
Mode 3: Lag Processor or Slew Limiter.Patch a stepping voltage or pitch control voltage from a Midi>CVconverter to the SIG input. The RISE and FALL knobs control the glidetime or slew rate between steps. This feature can be used to provideportomento between pitches of an oscillator as an example. Use theTRI/SAW output patched to the 1V/OCT input of the oscillator in theabove example.
Mode 2: Envelope or Contour Generator.Configuration 1: Patch a GATE or pulse to the RESET input. The RISEcontrol sets the Attack portion of the envelope, the FALL sets the Re-lease time. In this configuration the envelope will not re-trigger until ithas completed the release duration. New triggers will be ignored. Usethe TRI/SAW output for the envelope out. The CV inputs can be usedto alter the Attack and Release times for non-linear slopes.Configuration 2: Patch a GATE or pulse to the SIG input. The RISEcontrol sets the Attack portion of the envelope, the FALL sets theDecay time. In this configuration the envelope will re-trigger with thearrival of each new gate regardless of the envelope state.
Mode 4: Divide by N.
Example:
With a Gate or Clock from another LFO or Gate source patched to theRESET input the RISE and FALL controls are used to set the divisionof the output PULSE at the PULSE OUT Jack. By setting the controlsto the correct position, divisions of 2,3,4,5,6 etc. are possible. This isan excellent method of syncing events to a sequencer to fall on thedivision of a beat. every 3rd beat a pulse from the 05Btriggers an envelope generator that opens a VCA that is modulating theoscillator. This works like the Config. 1 Envelope by ignoring each newgate or clock until the release portion of the cycle has completed.
Mode 5: 6dB Low-Pass Filter.Audio signals patched to the SIG input can be filtered by the Dual LFO.Adjusting the RISE and FALL controls set the cutoff frequency. Use theTRI/SAW output to hear the results.
The Dual LFO Module has many modes of operation:1/ Low Frequency Oscillator. Outputs are 0-5V2/ Envelope generator3/ VC Lag processor with separate rise and fall CV control4/ Divide by ‘N’ Pulse or clock divider5/ A 6db audio low pass filter.
Mode 1: LFO mode. For LFO to Cycle remove patch cables from theRESET and SIG inputs.The RISE and FALL controls set the frequency of the LFO. When usingthe Tri/Saw output the RISE knob controls the rise time of thewaveform. The FALL knob controls the fall time.With long rise and fall times the LFO frequency will be slow. Fastertimes will increase the rate. With both controls set to the same valuethe output will be a symmetrical TRANGLE wave.It is possible to set the knobs so that the waveform is asymmetrical inthe case of fast rise and slow fall or the inverse. Rising or falling SAWtooth waves are acheived this way.The CV inputs can also be used to control the rates as well. The CVDestination toggle switches allow the selection of CV control for theRISE and FALL times separately or both together. The disadvantagesof needing 2 controls for rate is far outweighed by the flexibility thisfeature offers as will be shown by the other modes. The PULSE outputis a square or pulse wave. The width and frequency of the pulse is alsoset by the RISE and FALL knobs.
The functions for each of the two LFOsections is identical

3X1 MIXER 09B
Clipping Indicator LED: The LED will light when thecombined signals exceed +/-10V. Clipping the mixer will notdamage the module but will cause distortion to occur.Reducing the input levels with the panel controls will eliminatethe distortion.
N-Inverting Output:
Inverting Output:
The mixed signal appears at this outputwithout inversion.
The mixed signal appears at this outputinverted relative to the input.Both outputs are available at the same time.An Example use for both outputs would be a Triangle LFOpatched to one of the mixer inputs. The non-inverting output isused to open a VCA. The inverting output is used to close asecond VCA. This creates a simple cross-fade or panner using2 VCAs processing the same signal.
Input Level Controls:MODE Uni-
Polar
Bi-Polar
Rotating the knobs to the right of center controls the levelof the channel input signal without inverting it.Rotating the knob left of center controls the level of thechannel input and inverts the signal.
The three input level controls function intwo different modes. With the selector switch in the
position the knobs are simple attenuators.Fully CCW is minimum or off. CW is maximum amplitude.With switch in position the 0 position is off.The following applies to the N-INVERTING (no inversion)output.
The opposite condition applies when using the INVERTINGoutput. This allows the mixing of up to 3 signals while alsocontrolling the positive or negative amplitude of the signal.
The 3x1 Mixer 09B is a simple 3 input mixer suitable for both audio and CV signal mixing.Unique features include a selector switch for Uni-polar or Bi-polar pot function,inverting and non-inverting outputs and a clipping LED to indicate input level status.

Gain Panel Controls:.
Sets the initial level of theVCA in conjunction with the CV input The term'gain' is a misnomer as the VCA provides noamplification or gain. At full level the output is atunity with the input.VCA in this application should be an abbrev-iation for voltage controlled amplitude.
Gain CV Amt: Attenuates the incoming CVinput.
Pan Controls: Manual control of the channelpan position. Center knob when using triangle orsine wave (+/-2.5V) as CV for panning. If usingthe Dual LFO 05B or other positive going CVturn fully CCW as signal is 0 to +5V.
Pan CV inputs: Control voltage inputs for panposition. There is no attenuator for the pan CV.This can be done with the attenuator module
Gain CV inputs: Input range 0-5V. Inputs forvoltage control of the VCA output signal ampli-tude. At 5V the output is at unity. 0V is off.
Left Right Channel outputs: These outputs canbe used instead of the mix outs when twoseparate VCAs are required. Outputs areun-balanced standard Tip-Sleeve.
Balanced Mix outs: The mix outputs combinethe signal from VCAs 1 and 2. The typical outputlevel is +4dBu. Use TRS (Tip-Ring-Sleeve) cablesto take advantage of the noise reductionof a balanced signal. Unbalanced cables can beused but are not recommended.Primary use is for final output to mixing desk orcontrol console. Connect to balanced line levelinputs of mixing desks and avoid connectionwith microphone preamp inputs.
Audio Inputs: Input range 0-10Vpk-pk
VCA Panner 21B
Description: The VCA Panner 21B is a two channel mixer employing low noise,Class ‘A’ VCAs for voltage controlled amplitude and panning. The VCA sectionscan be used as 2 distinct channels with individual LEFT and RIGHT outsor output as a mix using the MIX OUT balanced TRS 1/4” jacks for connectionto mixing desks etc.

MiniWave 22B
Bank Indicator LEDs:
WAVE
The LEDs indicate the status of the bankselection. A Binary numbering system is used. When LED 1 is on,bank one is selected. With LED 1,2, and 4 lit Bank 7 is selected etc.Simply add the numbers next to the lit LEDs together to get the value.Bank 15 are all LEDs on. Bank 0 are all LEDs off. The sameinformation also applies to the LEDs. There are 16 waves in
The MiniWave 22B
EXT
is a Modcan adaptation of the Wiard/Blacet design.The 22B’s onboard ramp oscillator output is converted to binary logicusing an 8bit A to D converter. Conversion logic selects the memoryaddresses of a preprogramed waveform data storage ROM. The ROMdata is then converted to an analogue output by means of a D to Aconverter. The resulting combination is a complex
Digital oscillator with the desirable imperfections ofan analogue oscillator. Using the ernal input turns the Miniwaveinto a precision voltage quantizer or signal distortion effects unit.
256 wave form(expandable to 512)
Bank Select: Panel slider control for selecting one of 16 banks. Eachbank contains 16 waveforms for a total of 256 waves.
Wave Select: Panel slider control for selecting one of 16 waves.
Bank CV AMT: BANK CV INPUTPanel attenuator connected to thescales control voltage used to select the banks.
Wave CV AMT: WAVE CV INPUTPanel attenuator connected to thescales control voltage used to select the waves.
Mod Amount: Panel attenuator scales the internal oscillatorexponential frequency modulation input (MOD CV IN)
PROM Select switch: Panel switch for selection between the twoavailable ROM slots (Prom slot A is the factory ROM withslot B left empty for third party ROMs available form Modcan)
INPUT Select Switch:
EXT INPUT
.
Panel switch for selection between +/-2.5Vinput or 0-5V signal. For normal operation using the internal oscillatorswitch should be in the +/-2.5V position. If using the Miniwave as aquantizer (Bank 15) set to +5V for external connection to sequencersor positive voltage outputs only. The overrides theinternal oscillator. When using the Miniwave as a distortion effect setswitch to +/-2.5V
OUTPUT Select switch: Panel switch for selection between Audio orquantize output function. For normal operation using the internaloscillator leave this switch in NORMAL position.If using the Miniwave as a quantizer (Bank 15) set to QUANTIZE.
See info below regarding setupfor typical operation


4VCA 31B
CV INPUTS: Inputs for controlling the VCA gain. Input level is0-5V. Envelope Generators or LFOs are the most commonsignals for these inputs. Audio rate signals can be used forAmplitude Modulation (AM) effects.
VCA OUTPUTS: VCAs 1-3 have individual outs.The MIX output in VCA 4 is the sum of all four VCA outputs.Connecting a patch cable to the outputs of VCAs 1-3 removesthe signal from the mix. This is accomplished using switchingjacks.
VCA INPUTS :
Example:
Input for audio signals or control voltages.Maximum recommended input signal level is 10V pk-pk. TheAC/DC mode switch selects the input type. AC is for audiosignals and is capacitively coupled to the VCA circuit. Theinternal capacitor filters out low frequency signals below 10Hz.This mode eliminates offsets in the VCA which can causethumping. In DC mode the capacitor is removed from the input,permitting very low frequencies to pass to the VCA. This modeallows control voltages to be processed by the VCA.The result is that control signals can be used to modulate thedepth of other control signals. Use one LFO tocontrol the depth of a second LFO as it sweeps a filter cutoff.
The 4VCA 31A is 4 identical VCAs in a single module.The controls and input/output functions are the same forall four sections.

DUAL MULTIMODE 40B
Level Sliders: Attenuates the input signal level to the filtersections. Reducing the level can alter the effects of resonanceon the sound. Lower level settings should be used if distortionoccurs.
Resonance Sliders: Sets the peak amplitudes at the filtercutoff or center frequency.
Response selector switches:Low-pass, High-pass, Band-pass Notch
Selects between available filtertypes, and . Themajority of function descriptions for the top filter section alsoapply to the bottom section.
INPUT/OUTPUT STRUCTURE:INPUT
MIX
INPUT
MIX
OUTPUTMIX
* Normal: INTERNALLY
Patching an audio signal tothe lower filter section passes the signal to both filtersections in parallel. The parallel mixed output appears at the
output of the lower section. This helps minimize cablelingwhen patching one signal to both filters.If another signal is patched to the top section the inputnormal* is disconnected from the lower filter and the topsection processes the signal separately from the bottom. The
output becomes a straight mix of the two filters. The topsection output normal* can be disconnected by patching acable to the of the top section. This removes the topfilter section from the and permits isolated use of the twofilter sections.
is when a switching jack is used toconnect between two points in a circuit. The internalconnection can be "switched-off" by connecting a patch cableto the normalled jack.
Frequency Controls:
CV INPUT
sets the cutoff frequency of the filtersections in Low or Highpass modes and the center frequencyfor Band and Notch response in tandem with patched ControlVoltage at the .
CV Amounts: T CV AMT
CV INPUTS.
he sliders are attenuators with bdepth of Voltage
Control at the
othinverting and non-inverting positions for(-) (+)
The Dual Multimode Filter module is comprised of two Multimode 10B filters. Some of the featuresavailable on the 10B have been omitted due to panel space but the filter quality has been retainedThe two filters are normalled in parallel but can used individually and connected in series.

1V Octave Inputs: 1V/OCT
1V/OCT B
The A and B inputs are coupledtogether. Inputting a voltage from midi>CV converter or voltagekeyboard to the A input will control the pitch both oscillators .Inputting a voltage to the input overrides the A inputand permits the user to control the pitch of the B oscillatorindependently from the A osc. Also, simply inserting anunconnected patch cable into the
of
input will allow theB oscillator pitch to remain static while changing the A osc.pitch.
1V/OCT B
DUAL VCO 46B
Detune: Detunes the B oscillator relative to the A osc.Range is +/- 1 Octave approx.
Octave Range Switch: Switch sets the initial octave range ofthe oscillator. Range is 6 octaves. With no CV input and FINETUNE control centered the oscillators are calibrated for C130.7Hz in center 0 position.
Fine Tune: The fine tune control knob has a range of +/- 1octave with finer rotation resolution near the zero mark formore accurate tuning
B Octave Switch: Offsets the B oscillator by 1 or 2 octavesabove the initial frequency set by the Octave Range switch.
Waveform Selector Switchs: Select between Sawtooth andPulse waves for each oscillator.
Initial Pulse Width:
Wave selector switches
Sets the initial pulse width between 50%and 90% for both the A and B oscillators. Set to 0 for standardsquare wave sound. need to be set toSQUARE.
AB Mix:Mix output OSC B
The MIX slider controls the level of the two oscillatorsat the . When using the output, positioningthe slider in the A location removes the B osc. from the MIXout. This allows the two osc. to be processed separately.
Pulse Width Modulation (PWM) Amt:PWM input
The A and B PWMAMT sliders are attenuators for the . The PWMinput is global to both oscillators but having separate slidersallows the depth to be set independently.
CV Amount: The A and B CV AMT sliders attenuate the depthof CV inputs. 0 is off and 10 max.
The Dual VCO 46B combines two oscillators in one module with global control over pitch andtuning. Thus providing a convenient, space saving method of generating the 'thickened' soundproduced by detuned oscillators.

GATE BUS WIDTH
�
�
�
�
�
�
�
�
�
�
�
�
�
�
�
�
�
�
��
��
��
��
��
��
��
��
��
1 2 3
�
�
�
�
��
�
�
���
�
�
�
��
�
�
��
CV OFFSETCV OFFSETCV AMOUNTCV AMOUNT
ROW 1 OUTROW 1 OUT
HOLD INHOLD INCV INPUTCV INPUT
CLOCK OUTCLOCK OUT
CLOCK CONTROLCLOCK CONTROL
CONTROL VOLTAGECONTROL VOLTAGE
GATE WIDTH CVGATE WIDTH CV
RUN/STOP
MANUAL RESETMANUAL RESET
ROW 2 OUTROW 2 OUT
BUS DISABLEBUS DISABLE
UP/DOWN
GATES
MODE
CV SELECTCV SELECT
DISABLE
ASYNC
BUS 2BUS 2 BUS 2BUS 2 BUS 2BUS 2
OFF OFF OFF
ENABLE
SYNC
BUS 1BUS 1 BUS 1BUS 1 BUS 1BUS 1
STOP RUN
ROW 3 OUTROW 3 OUT
GATE BUS 1GATE BUS 1
ROW CLOCKROW CLOCK
TRIG 1TRIG 1
ROW 1-3 OUTROW 1-3 OUT
GATE BUS 2GATE BUS 2
GATE 1GATE 1 GATE 2GATE 2 GATE 3GATE 3
CLOCK INCLOCK INRESET
TRIG 2TRIG 2
ROW 1ROW 1
ROW 2ROW 2
ROW 3ROW 3
VC SEQUENCER 54B
�
� ��
VC Sequencer 54B
Description: The VC Sequencer is a 16x3 horizontal and verticle step sequencerwith unique Analogue to Digital voltage controlled step selection feature.See following pages for details of I/O and control functions.
22
21
17
20
16
19
15
18
14
13
12
11
10
9 8 7 6 5 4 3 2 1
25 27 28 29 30 31262423

GATE BUS WIDTH
�
�
�
�
�
�
�
�
�
�
�
�
�
�
�
�
�
�
��
��
��
��
��
��
��
��
��
1 2 3
�
�
�
�
��
�
�
���
�
�
�
��
�
�
��
CV OFFSETCV AMOUNT
ROW 1 OUT
HOLD INCV INPUT
CLOCK OUT
CLOCK CONTROL
CONTROL VOLTAGE
GATE WIDTH CV
RUN/STOP
MANUAL RESET
ROW 2 OUT
BUS DISABLE
UP/DOWN
GATES
MODE
CV SELECT
DISABLE
ASYNC
BUS 2 BUS 2 BUS 2
OFF OFF OFF
ENABLE
SYNC
BUS 1 BUS 1 BUS 1
STOP RUN
ROW 3 OUT
GATE BUS 1
ROW CLOCK
TRIG 1
ROW 1-3 OUT
GATE BUS 2
GATE 1 GATE 2 GATE 3
CLOCK INRESET
TRIG 2
ROW 1
ROW 2
ROW 3
VC SEQUENCER 54B
�
� ��
1/ Gate Jacks 1-16:A 5 volt pulse is output from the Gate jacks coincident with the sequence step. Each output is high for the fullduration of the sequence step. Gates can be patched to the RESET input to return the sequence to step onewhen reaching the desired step. Can also be used to trigger envelopes or reset LFOs etc.Combining or mixing gates is best done through a mixer module. Patching multiple gates to one input will notprovide good results. See Gate Bus info below for a better method of achieving multiple gates to one input.
2 Bus Switches/ Gate 1-16:Switches have three positions. With switch in UP position a 5 Volt pulse is output from the Gate Bus 1 Jack forthat step. If switch is in the DOWN position a similar pulse is output from Gate Bus 2 Jack.With the switch in the center position no gate is present on either bus. The width or duration of the pulseon the bus is set by the Gate Bus Width control knob and CV input jack.Try using a row output to control the gate width for different length pulse for each step.
3/ :UP/Down Input JackWith lowlogic (0 Volts) input at the UP/Down jack. A high logic (+5 Volt) input will cause the sequencer to countbackwards from right to left.
CV selection switch (14) in the Clock/CV position the sequencer will step normally from left to right with a
Has no effect in CV mode.
13 Hold Input Jack/ :Withwhen a high logic (+5 Volt) input is present at the hold jack. Has no effect in CV mode.
CV selection switch (14) in the Clock/CV position the sequence will pause or hold
14 Sequencer CV mode selection switchMode 1-
/ :
Mode 2
With
is in ASYNC position the clock will have no effect on step selection and the control voltage(CV) input will be the only means of advancing the sequence and selecting the step.Input a low frequency triangle wave with CV offset control (16) set to 5 and set CV amount Control (17) fully CW.The sequencer will now step up from 1-16 and then backwards from 16-1. Adjust offset and amount controls tillthe stepping is symmetrical.With each step advance a pulse will be output from the gate bus to allow synchronization to envelope generators etc.This is a free mode with no clock control.
CV selection switch in the Clock/CV position the sequence will advance or step when a clock orpulse (square wave) is present at the Clock Input (26). If a voltage that exceeds .2V is input to the CV input (15)the sequence steps will jump to the position determined by the voltage level. This will override the clockstep position. Example: clock the sequencer normally and then use a voltage output from the X/Y Controller 32Bmodule to override the step position momentarily to add dynamic performance variation.
- With CV switch in the down position the CV input only, controls the step position.The clock input now controls only the time duration of each step. It works like a sample and hold wherethe CV input is the sample and the clock holds the sample or in this case the step till the next clock pulse.The MODE switch (27) must be in SYNC position for this to work.Input a white noise signal to the CV input and clock the sequence at a moderate rate. The sequence step orderwill now be random but still in time with the clock. Adjust the CV amount and Offset control knobs to set the desiredrange for the CV input.If the MODE switch (27)
4 Gate Bus 2 Output/ :Gate bus output controlled by gate bus switches in the down position. Connect to Envelope Generatorsor any logic input.
7/ :Gate Bus 1 OutputGate bus output controlled by gate bus switches in the up position. Connect to Envelope Generatorsor any logic inputs etc.
5/ :Row 1-3 OutputThis is the voltage output for all three rows. Use this output for longer sequences in conjunction with the ROWClock Input. Pulsing the Row Clock will cycle the rows vertically to the output allowing for up to 48 step sequence.
6 Row Output 3/ :This is the voltage output for Row 3 of the sequencer. Use output to control clock duration as an example.
8/ :Row Output 2This is the voltage output for Row 2 of the sequencer. Patch to filter CV input or any CV input.
10 Row Output 1/ :This is the voltage output for Row 1 of the sequencer. Patch to Oscillator 1V/Oct input or use MiniWave toscale quantize.
9 Bus Disable/ :High logic input to this jack disables the bus outputs.
11/ :Bus Disable status indicatorWhen lit the bus is disabled.
1 / :2 Bus Disable switchUp position enables the gate bus. Down position disables it.
Sequencer page 2

GATE BUS WIDTH
�
�
�
�
�
�
�
�
�
�
�
�
�
�
�
�
�
�
��
��
��
��
��
��
��
��
��
1 2 3
�
�
�
�
��
�
�
���
�
�
�
��
�
�
��
CV OFFSETCV AMOUNT
ROW 1 OUT
HOLD INCV INPUT
CLOCK OUT
CLOCK CONTROL
CONTROL VOLTAGE
GATE WIDTH CV
RUN/STOP
MANUAL RESET
ROW 2 OUT
BUS DISABLE
UP/DOWN
GATES
MODE
CV SELECT
DISABLE
ASYNC
BUS 2 BUS 2 BUS 2
OFF OFF OFF
ENABLE
SYNC
BUS 1 BUS 1 BUS 1
STOP RUN
ROW 3 OUT
GATE BUS 1
ROW CLOCK
TRIG 1
ROW 1-3 OUT
GATE BUS 2
GATE 1 GATE 2 GATE 3
CLOCK INRESET
TRIG 2
ROW 1
ROW 2
ROW 3
VC SEQUENCER 54B
�
� ��
1 /5 CV Input:Input for control voltage step selection. Offset and CV amount control knobs attenuate and offset the inputvoltage to adjust the voltage range. The sequencer will not respond to negative voltages below 0. The sequencewill remain at step 1 till the voltage goes positive. Adjusting the offset can put the voltage into positive rangewhich solved the problem. A triangle wave, for instance swings +/-2.5V. During the triangles negative phase thesequencer will be stuck at step one. Offsetting the triangle by 2.5V+ places the wave in the desired range of0-5V+.
16 CV Offset Contol:/See above. Range of offset is 0-5V. Another useful function of the Offset control is if the sequencer is put intoASYNC mode and the CV input is disconnected. The offset knob can be used to increment and decrementthe sequence steps. This is useful when setting up or tuning the sliders for melody creation.
17 CV Amount Control/ :Simple attenuator that controls the depth of modulation from the CV Input. See 15 above for more details.
18 Gate Bus Width Control/ :Sets the width or duration of gate bus pulse in conjuction with the Gate width CV input (20). Variable between20-1000msec. Approximately.
25/ Trig Input 2:Same as above (24).
26 Clock Input/ :Input for clocking the sequencer in Clock/CV mode. The Clock module 53B is the ideal source for clockingthe sequencer but any +5V pulse signal with fast rise time will do. The square wave output fromthe VCO 01B or Quad or Dual LFO 05B will also work well. Another good source is a midi to CV convertergate output. This allows the sequencer to be synchronized via midi to computer other software sequencers.
27/ Sync/Async mode switch:In the up position the sequencer is in Sync mode. This means that the clock input will determine the stepduration. With switch in Async position the sequencer will ignore the clock and the control voltage inputwill set the pace of the sequence based on the frequency of the input signal.
28/ Row clock input:Pulsing the Row clock input will step the sequencer vertically through the rows. The Row LEDindicators display the row status. The Row 1-3 output jack (5) is the patch point for the resulting output voltage.Patch step one gate output to this jack and the sequencer will advance through the rows each time the sequencecycles to the beginning.
19 Clock Out:/Clock output separate from the Gate Bus with pulse duration. Clock out can be used to clock other modulesbypassing the Gate Bus switches.
22 Run Stop/ Pushbutton Switch:The name says it all. When pushed the sequencer will start. Press again and the sequencer will stop.Using a clocked Flip Flop circuit the sequence will not stop until the clock cycle has finished and will not starttill the clock cycle is complete. This makes it possible to start and stop the sequence while maintainingtiming synchronization. The Run Stop switch has no effect in ASYNC mode.
20 Gate width CV Input/ :Voltage control input for Clock/Gate width CV. Responds to CV range 0-5V+.
21 Manual Reset Pushbutton Switch:/When pressed the sequence will return to step one when in Clock/CV mode.Reset jack input (23) does the same with a high logic pulse patched.
24 Trig Input 1/ :Trig 1 and 2 are pulse inputs for starting and stopping the sequencer. A logic high pulse will alternativelystart or stop the sequencer depending on the running state. A useful function for these jacks is to patchone of the 1-16 gate outputs to the Trig 1 or 2 jacks. Now start the sequence and it will automaticallystop when it gets to the gate output stage. This makes a one shot sequence that can be fire from akeyboard or LFO etc.
23 Reset Input/ :See 21 above.
Sequencer page 3

29 Row status LEDs:When lit row voltage output is present at Row 1-3 Output jack.
/
30 Step Column indicator LED:When lit step column is active.
/
1/ Start by patching a pulse signal from a VCO square wave output or clock out from the Clock 53B to the clock input (26) on the sequencer.2/ Put the CV Select switch in the clock position (up) and the Mode switch in the Sync position (up).3/ Patch Row 1 Out to the 1V/Oct input on a VCO.4/ Patch Gate Bus 1 output to gate in on an envelope generator and connect EG to a VCA.5/ Patch VCO output to VCA6/ Push Run/Stop button on sequencer to begin stepping.7/ Adjust row 1 sliders fro desired effect.8/ Adjust Gate Bus width control knob to set pulse output duration between 5ms-5 sec.
Things to try
1/ Patch a low frequency pulse signal from LFO etc to the clock output jack. Each pulse will cause the sequence to skip a step
2/ Patch a very low frequency pulse signal from LFO etc to the UP/DWN jack. With pulse high the sequence will reverse direction.
3/ Move the gate bus switches to the center or bottom position to create rests in the sequence.
4/ Patch the output from an X/Y Controller module to the CV input jack and use the output voltage to interrupt the sequence and change the step pattern manually. Return the Joystick to zero and the sequence continue stepping normally. Set CV AMT to max and Offset to 0.
5/ Patch one of the GATE outputs 1-16 to the RESET input and the sequence will reset when it reaches the step.
6/ Patch GATE 1 output jack to the ROW CLOCK input. Patch ROW 1-3 output to 1V/Oct input on a VCO. Now each time the sequence cycles the ROW will change and become active at the ROW 1-3 output. Using this method allows you to have a sequence of up to 48 steps long.
7/ Use Gate Bus 2 output to control external modules such as Envelope generators or pulse Dual LFO etc. Place gate bus switches in bottom position to send pulses to GATE 2 Bus.
31 Slider Potentiometer:Slider sets the step voltage that appears at the Row outputs.Range is 0-5V+. 0-10V+ is available upon request.
Quick Start Guide
/
Sequencer page 4
Basic clocked sequencer patch

1/ Start by patching a pulse signal from a VCO square wave output or clock out from the Clock 53B to the clock input (26) on the sequencer.2/ Put the CV Select switch in the CV position (down) and the Mode switch in the Sync position (up).3/ Patch Row 1 Out to the 1V/Oct input on a VCO.4/ Patch Gate Bus 1 output to gate in on an envelope generator and connect EG to a VCA.5/ Patch VCO output to VCA6/ Connect a signal such as a sawtooth output from a VCO to the CV input on the sequencer7/ Set CV AMT to about 5 and Offset to 0 if using a Modcan VCO8/ Push Run/Stop button on sequencer to begin stepping.9/ Adjust row 1 sliders fro desired effect.10/ Adjust Gate Bus width control knob to set pulse output duration between 5ms-5 sec.
You will observe that the step is hopping around in a seemingly random fashion. What is happeningis that the clock driving the sequencer and the input control voltage are at different frequencies.This causes the sequencer to work like a sample and hold where the clock samples the input CVand selects a corresponding step. Changing the frequency of the clock or input signal will alter thepattern. This provides a method of producing continuously evolving pattern variations while not beingcompletely random. Of course patching a noise source or random voltage to the CV input will produce arandom pattern if desired.
Things to try in CV mode
1/ Patch a low frequency triangle wave to the CV input. Set Offset control to around 5 position And CV AMT to about 5. The sequence will now count up and then down.
2/ Slow the frequency of the triangle wave way down. Set the Mode switch to ASYNC position Now the sequence will follow the CV input and will ignore the clock. This is the ASYNC mode where the input signal controls the sequence pattern. Adjust the CV amount control to set the span of the input signal and use the offset control to change the range. RESET and SKIP function have no effect in this mode.
3/ Move the gate bus switches to the center or bottom position to create rests in the sequence.
4/ Patch the output from an X/Y Controller module to the CV input jack and use the output voltage to select steps manually.
Sequencer page 5
Basic voltage control sequencer patch

Clock 53B
Description: The Clock 53B was designed as a companion to the VC Sequencer 54B.The 53B can also be used a system clock for triggering logic and LFO modules.The unique function of this module is the ability to divide clock pulses using divisiontables stored in memory. The key function of the Clock module is the ability to divideclock pulses into musically useful divisions of 1/16th, 1/8, 1/4 notes etc. using voltage control.
1/ : manual control knob for rate or tempo ofthe internal clock VCO.Clock Tempo
2/ : indicates the status of the divided clock output.Division LED
3/ : indicates the status of the internal clock.Clock LED
4/ : Uses a binary counting system to indicatetable selection. None is 0, 1 and 2 is equal to 3, all lit equals7. There are 8 tables from 0-7 available. The tables divisiondenominators are listed below.
Table indicator LEDs
5/ : Control knob for manual selection ofDivision table 0-7Division Table Selector
7/ : The Sync switch allows the selection of16 or 32 clock division bar sync. The CLOCK OUT jack becomesan output for pulses that occur every 16 or 32 clock stepsto be used to reset a sequencer. This allows the sequencer toreset to a 4/4 bar length regardless of the clock divisionlengths. In the center position the clock out is not divided.The clock output is the internal clock pulse in this switch position.
SYNC Selector
8/ : Control voltage input for internal clock rate.Rate CV Input
9/ : Patch the pulse output from a VCO orLFO etc. to this input. This is a switching jack that disconnectsthe internal clock when patched.
External Clock Input
10/ : Input to select the division usinga control voltage. See next page diagram for ideas on use.Divide by N CV Input
11/ : Input to select the division table using a CV.Table CV Input
12/ : Output of the divided clockDivided Clock Output
13/ : Output of the internal clock VCO or bar sync pulses.Clock Output
6/ : Control knob for manual selection of div-ision denominator. An example using table 0: Knob in 1 positionwill give a division of 1. Clock Out and Div Clk out will be thesame. With knob in center position Div Clk out will be half thenumber of pulses as Clock out for a division of 2. Fully CWwill provide a division of 4 or 4 clock pulses equals 1 pulsefrom the Div Clk out. Using this in a sequence of 1/16/th notesthe divide by 2 will be 1/8th note and the divide by 4 will be1/4 note duration.
Divide by N Selector
0/ 1,2,41/ 1,2,3,42/ 1,2,4,8,16,32,64,1283/ 1,34/ 1,3,6,95/ 1,3,6,9,12,16,24,326/ 1,2,3,4,6,8,9,12,16,24,32,48,64,96,1287/ 1,2,3,4,5,6,7,8,9,10,11,12,13,14,15,16
DIVIDE BY N� �
CLK DIV
DIVISION TABLE
CLOCK TEMPO
�
�
�
� �
�
CLOCK 53BCLOCK 53B
�
�
�
�
��
�
�
��
SYNC32
0
16
DIV CLK OUTDIV CLK OUT CLOCK OUTCLOCK OUT
EXT CLK INEXT CLK IN
DIV N CVDIV N CV TABLE CVTABLE CV
TEMPO CVTEMPO CV
1 2 4
13
12
11
10
9
8
7
6
5
4
3
2
1


Dual Quantizer 55BThe Dual Quantizer 55B translates signal voltage from continuous controllers and analoguesequencers into quantized steps conforming to standard musical scales. The upper and lowersections function independently of each other and are identical circuits.
Transpose Control
Scale Bank Selector
Voltage Input
Quantized Output
Clock InputTranspose CV In
Scale CV In
Scale LED Indicators
Invert Input
Pulse Output
Scale Selector

Quantizer 55B panel functions and operation
Scale Selector: The scale selector is divided into a16 increments. Each increment selectsone of the available scales. The active scale number is indicated in binary format by the panel LEDs.All LEDs off is 0, all LEDs lit is 15. Simply add the numbers next to the LEDs that are lit to get thescale number (See scale list fig.1.). There are 3 banks of scales A,B,C each containing 16 scales for a total of 48. Banks are accessed using the Scale Bank selector switch.The scale selector level is added to the Scale CV input.
Transpose Control: The Transpose control knob is divided into 12 semitones. Transposing will retain the scale intervals while shifting the key up or down in semitones. The transpose control level is added to the transpose CV input. In order to transpose or shift the scale without changing the key center, mix an offset voltage with the input signal to be quantized instead.
Bank Select Switch: Selects between the 3 banks of scales. See scale list fig.1.
Invert: Patching a logic high (+5V) to this input inverts the quantized output. Low voltage in becomes high voltage out and vice versa.
Pulse Output: When the input voltage crosses a quantize step boundry a 5 ms pulse is outputfrom this jack. The pulse can be patched to fire envelope generators or any other gate input.This feature is very useful when quantizing continuous voltage controllers like the X/Y Controlleror a ribbon controller etc. Try patching a joystick module to the volatge input and patching the quantized output to a VCO 1V/Oct input. Then use the pulse out to fire an envelope controllinga VCA that shapes the VCO output signal. You can generate sequence type patterns this way.
Clock Input: The clock input changes the quantizers to function like a sample and hold.Patching a clock or pulse signal from an LFO or VCO etc sets up the quantizer forclocking mode. Regardless of the signal at the voltage input the output will remain staticuntil a clock high pulse is present. When the clock goes high the quantizer will sample the input and then output a quantized voltage. It will then wait for another clock pulse before repeating the sequence of sampling and quantizing. This is a useful feature when you want to use a clock to set a tempofor a sequence of quantized voltages. Try the patch outlined in the pulse out sectionabove with the addition of a clock input to create a sequence of quantized voltagessampled from the joystick but set to a tempo by the clock. Random noise can also bequantized in this way to create random harmonic sequences. Set the Clock in/out switch toin when using the clock input.
Bank A Bank C Bank B -Triads
0- 1/4 tone 0- Algerian 0- Major1- Semitone 1- Altered 1- Major6 2- Major 2- Aux Diminished 2- Major73- Minor 3- Balinese 3- Maj7b5 4- Dorian 4- Byzantine 4- Minor5- Phrygian 5- Diatonic 5- Minor66- Lydian 6- Spanish 6- Minor77- Aeolian 7- Double Harmonic 7- Sus48- Mixolydian 8- Hindu 8- Sus29- Wholetone 9- Sixtone Symmetric 9- Sus4 Sus2
10- Blues 10- Nine Tone 10- Augmented11- Diminished 11- Overtone_Dominant 11- Diminished12- Augmented 12- Pelog 12- Diminished 7th13- Pentatonic neutral 13- Prometheus 13- Sus7 Sus414- Fourths 14- Enigmatic 14- Major 7 b515- Octaves 15- Octatonic 15- Major 7 #5

CV Recorder 57BThe CV Recorder 57A module provides a radical new approach to generating modulation andvoltage control signals. The implications for this module are extensive when placed in a modularsynthesizer context.Concept: Combine the ability to record and playback control voltage signal events from standardmodules with the tools to shape, mix, loop and time scale these performances in a simple andrepeatable manner. See the following pages for more info on panel functions and operation.
Record/Trigger Button
Loop End Knob
Loop Start Knob
Record/Playback rate control
Channel Record Switches 1-4
Record Status LEDs 1-4
Channel Inputs 1-4
Channel Outputs 1-4
Loop End CV input
Loop Start CV input
Gate Output
Record/Playback Rate CV
Reset Input
Trigger Input
Loop Mode
Status Tri-LED
Play Mode selection switch

CV Recorder Guide Page 2
Record/Trigger Button: Momentary switch with multiple functions dependingon the status of the Play Mode selection switch next to it.See Chart below for Button functions relative to Play and Loop Mode Switches
Pressing once plays Pressing once plays Pressing once playssample forward from sample forward from Loop sample in reverse from One ShotLoop start to loop end start to loop end. Pressing Loop end to loop startas set by panel knobs twice plays in reverse as set by panel knobs
Pressing and holding plays Pressing and holding plays Pressing and holding playsthe sample forward from the sample forward from the sample in reverse from Hold PlayLoop start to loop end Loop start to loop end Loop end to loop start until button is released and then in reverse until button is released
until button is released
In Loop mode the Rec/Trig Button becomes the record button Press once to activate the rehearse mode (see below for explanation) Loop Press a second time to activate record. Recording is achieved by selecting the input channel Record activation buttons. When the LEDs are lit the channel is selected. The LEDs will extinguish when recording is complete.
Play Mode: By default the unit powers up in Play mode. After recording is finished the CV Recorder returns to play mode automatically. There is no switch to select play mode. Placing the PLAY MODE switch in loop mode (middle position) will loop the recording between start and end loop points as set by the corresponding loop knobs.With Play mode switch in the ONE SHOT position, playback will be started when the REC/TRIG button is depressed and released. Pulsing the TRIGGER input jack will do the same. With the switch in lower HOLD PLAY mode holding the REC/TRIG button down will playback the sample for the duration that the button is depressed. The sample will playback according to the LOOP MODE switch settings.Rehearse Mode: While in loop mode depressing the Record Button once places the recorder into rehearse mode. The status LED changes from blinking yellow to green with the loop point indicated by a red blinkRehearse Mode passes the signal at the channel inputs to the channel outputs without recording it.This makes it possible to rehearse the control voltage event without committing it to memory.Once the performance is ready to record simply press the REC button again and start recording.The Status LED will change from green to red during recording and then back to yellow when complete.Be sure to arm the channel first by depressing one or all of the Channel Selector Switches.At the end of recording the channel LEDs will extinguish to prevent accidentally recording over the track.Recording: As mentioned above, select the channels to record before proceeding with the recording. Set the LOOP START and LOOP END knobs to determine where in the track to place the recordingSetting the LOOP START fully CCW and LOOP END fully CW provides the longest recording.Shorter recordings are made by placing the loop points closer together. This is also the method forchaining multiple recordings together. Simply record a short segment with loop pointsset near zero and then move loop points to the end of the first recording and record again.Now place loop start to the beginning and you will hear both recordings one after the other.Duration Control: The Duration control knob and rate CV jack control the sample rate of recording and playback.For most situations, higher sample rates (shorter durations) are best as they provide more samples per secondproviding a more accurate recording of fast transients and better resolution of slower moving signals.Some experimentation may be required to find the best sample rate/duration for the signal to be recorded.During playback the Duration control can be used to vary the playback speed of the recording.The CV Rate input is 1V/Octave response.
Forward Bi-Dir Reverse

CV Recorder Guide Page 3Channel Record Switches 1-4: Momentary switches select the channel to be recorded. When lit the channel selected will be active in bothRecord and Rehearse modes. Any combination of switches can be selected. Recording on simultaneous multipleis supported or complex signals can be built up by recording on individual channels one at a time3 etc. Switches can be used to activate PUNCH-IN recording if selected mid-way through a recording. Channel LEDs are turned off when recording is finished to provide both a visual cue and to deactivatethe channel to prevent further recording.
Channel I/0: Channel inputs are capable of handling signals at +/-5V. Levels outside this range will be clippedTo use with 0-10V signals it will be required to offset them prior to recording. The Dual Mixer 27 can be usedto scale and offset. Outputs are also +/-5V.
Gate Output: The GATE output jack provides a short pulse coincident with the start point of the recording loop.The pulse out can be used to synchronize other logic modules or sequencers etc. with the loop point.
Reset Input: Pulsing the reset input with logic high gate will reset the recorded loop to the beginning as set by the LOOP START KnobIf Loop mode is set to Reverse it will be from the LOOP END point.
Trigger Input: The TRIGGER input jack performs the same functions as the REC/TRIG Button.Pulsing this jack will have the same results in the various modes as outlined in the Record/Trigger Button section.
Quick Start Guide:
1/ Patch the output from an X/Y Controller or Sequencer or LFO etc. to Channel One input jack2/ Patch the output of channel one to the 1V/OCT input on a VCO or Filter etc.3/ Switch PLAY Mode switch to LOOP position. 4/ Set DURATION control knob to 4 sec. position and turn LOOP START knob fully CCW and LOOP END fully CW5/ Depress and release Channel One selector switch to ARM channel one as indicated by the CH1 LED6/ Depress and release REC/TRIG button once to enter REHEARSE mode, checking that input signal is passing to the output jack. The status LED will begin blinking green with one red blink to indicate loop start point.7/ Once you are satisfied with the modulation signal you are about to record press the REC/TRIG button a second time. Recording will start immediately and continue till the status LED resumes blinking yellow and the Channel LED extinguishes. The recording will immediately playback at the end of record.8/ Experiment with different loop points and DURATION settings and then try another recording on a different channel. Also try setting new loop points and recording over top of the original recording. Return the Loop knobs to fully left and right to hear all recordings on channel 1 strung together.
Experiments: Try recording a sequence from an analogue sequencer on one channel and recording the master clock at the same time on another channel. Then use the clock recording to clock the sequencer and you will have the pitchrecording which can be synced to the sequencer to use for modulation. This frees up rows on the sequencerdo other things. Also use the clock recording to fire an envelope generator which will now be in sync with thepitch recording.You can also record the output from an envelope generator and a sequencer at the same time. Now you can usethe recorded envelope shape to control a VCA etc. This can be really cool if using the BI-DIR settingon the LOOP mode switch. Notice how the envelope changes duration as the playback rate is changed.Try recording the output from an LFO while changing the LFOs frequency or chaining together multiple recordingsusing different wave outputs from the LFO. This way you can have an LFO that goes from sine to triangle to saw etc.Put a VCA between the LFO and recorder and now record with different levels from the VCA allowing the LFO amplitudeto fade in and out. Some of the most interesting effects happen by altering the loop points in odd waysOne way to use the loop points is to set for a very short loop and then use an LFO or X/Y Controller to sweep theusing the LOOP ST, LOOP END CV input jacks. Patch the same control signal to both jacks and get loop pointsgranular synthesis effects. As you can see there are many possibilities available.

VCDO 58BThe VCDO 58B is a voltage controlled digital wave form oscillator.Two operator FM is implemented here as is Amplitude modulation (AM) and traditionalExponential FM. There are 16 wave forms selectable with the Wave Control and Wave CVinputs. See the following pages for more details on panel controls and functions.
Initial Pulse Width/Amp-litude Control
FM Ratio Control
Fine Tune Control
Range Switch
FM Index CV Input
Quantize ON/OFF switch
Main Audio Output
Sync Input
Exponential FM CV Input1V/Oct Input
Wave select CV input
PWM /AM CV Input
Waveform Indicator LEDs
FM Ratio CV Input
Coarse Tune Control
FM Index Control
Waveform Selector

VCDO Guide
Waveform Selector Control:Control knob used to select from the 16 on-board waveforms (0-15). The LEDs on the panel indicatethe number of wave selected. The LEDs use a binary number system. Simply add the values together to get the sumi.e.. 1&4 LEDs lit is wave 5. No LEDs is 0 and all is 15. All waves are AC +/-2.5V for a 5V peak to peak output.
Waveform list0-Sine1-Triangle2-11-sample based waveforms arranged from simple to complex12-sawtooth13-PWM pulse14-PWM double-pulse15-Noise
Initial Pulse Width/Amplitude Control: The Pulse Width/AM control is dual function depending on which of the 16 waves is selectedWhen the Pulse (13) and Double Pulse (14) waves are selected this control in conjunction with the PWM CV jackcontrols the width of the pulse or square wave shape between 1 and 99% width.When any of the other waves are selected this becomes an amplitude or level control.Setting the knob in the center will produce the lowest level or most attenuation.The AM CV input can be used to control the amplitude like a VCA. The CV input is +/-2.5V so if usingwith an envelope generator the EG signal needs to be scaled by half to give the full range of control.Modulating this input with a sine wave or other AC signal will produce Amplitude Modulation (AM) effects.
FM Index Control:This control in conjunction with the Index CV input, sets the amount or depth of the internal sine wave modulatorseffect on the carrier wave. Sweep the FM index CV input with an envelope for some classic DX7 type sounds
FM Ratio Control:The Ratio Control and ratio CV input tunes the modulator to a rational frequency value relative to the carrier frequency. The modulator and carrier are phase locked which produces beat-free timbres that retain spectral relationships over the entire frequency range.
Range Control:The Range control sets the initial frequency of the VCDO. The 1Volt per Octave input jack is summedwith this control . The range is 10 octaves from 10kHz-10Hz with the range switch in theHIGH position. In the LOW position the range is 0.040Hz-40Hz. If the Quantize switch is on you can hear the semitone steps as the Range knob is swept.
Fine Tune Control:The Fine tune is a fine adjustment for tuning the VCDO. The range available is 1 octave.This control is never quantized regardless of the quantize switch settingsNor is the Expo CV input.
Sync Input Jack:The sync input functions identically to the hard sync on a typical VCO. Driving this input with a square wave from another VCO, produces the characteristic hard sync effect. For best results the input sync frequency should be less than the VCO (or VCDO) it is driving. The input pulse is resetting the VCDO wave start with each logic high pulse.This can be useful when the VCDO is functioning as an LFO as the SYNC in can be used to reset or synchronize the LFO start point to a clock or timed event.
Main Output:The main output uses a Stereo jack. The tip is the main signal out while the ring is a quadrature or 90 degree out ofphase version of the same signal. This feature makes the VCDO into a quadrature oscillator that can be usedto do quad panning or quad mixing using the Vector fade module.The FM section will also effect the quadrature output. As the FM index is increased the outputs will not remain symmetricalThe FM is applied to both waves at the same time and is consequently 90 degrees out of phase as well.The output signal can become relatively harsh sounding with a complex carrier and high FM index.Judicious filtering with one of the wide variety of Modcan Lowpass filters can go a long way to help tame the output.

Digital Delay 59BThe Digital Delay is a stereo out DSP signal processor specializing in time delay effects
Clip and sync indicator
Delay CV Amount Wet / Dry Mix
Regeneration
Audio Input Level
Tap Delay Tempo
Regen CV Input
Delay CV Input
Right Audio Output
Left Audio Output
External Feedback amount
Delay Mode/Range
Delay Time
Filter Selector
Feedback Loop input
Feedback Loop Output
Audio Input
Sync Input

Digital Delay panel functions and operation
Delay Mode Selector: The mode or range selector sets the delay range. It is impossible to cover theentire delay range with only one range so it was broken down into four ranges of Mono and 4 rangesof ping-pong or stereo delay times. The M is for mono and the S is for stereo. Use the Left outputonly for mono and both left and right for stereo. In Mono mode the right output is the delay only signalwith no mix of dry signal. This makes it possible to mix wet and dry "down-line" using a mixer module ifdesired.Once a range has been selected the DELAY time knob adjusts the delay time between the upper andlower values for that range.Delay ranges are: 20uS-50mS, 50mS-600mS, 600mS-2.4Sec., 2.4Sec-5.8Sec.
Wet/Dry Mix:
Clip Indicator:
External Feedback Amount:
Tap Temp:
Filter Selector Switch:
Delay CV Control:
Sets the wet dry mix of the effect. The Regen CV jack can also be used to CV controlthe mix. To do this will require an "insert" cable with stereo connector split to 2 mono cables. The Tip isregen CV and the ring is Mix CV.
Led will lite if the input level is too hot. High Regeneration (feedback) levelswill also cause the internal signal to clip if input is high. It is best to allow some headroom for regenwhen setting initial levels and boost the signal at the amplifier or mixing desk to compensate.LED will also lite in time with a pulse signal at the SYNC input jack. This will show the rateof the sync signal.
To use the external feedback loop. Patch the Feedback loopoutput jack into something like the Frequency Shifter input. Take the FS output and patch backinto the external FBK input. The Feedback amount control sets the level of the feedback loop.External feedback only works in MONO mode. Stereo will self oscillate and squeal.Use the Right Audio out for "normal" results but using the Left/Mono out is also possible.The left output will mix some of the dry signal in with the feedback while the right will not.The Mix control also has an effect on the level of feedback signal going to the externalmodule. The best is to experiment with the combination of outputs till you find a sound you like.
Tapping on this button will adjust the delay time to match the time between buttondepresses. You can use this to tap along with pre recorded music to set a matching Delay time.The Sync input does a similar trick but you can use a clock from a sequencer or LFO to set delay time.
There are two filter modes that can be engaged as part of the delayregeneration loop (not the external FBK) The LP1 is a 2.5kHz Lowpass filter with some resonance.It helps to simulate the slightly dreamy effect one gets with Analogue Delays at higher regen.It does this by progressively filtering the echos as they trail off. Exactly as happens with a BBD.Filter LP2 is a 4kHz LP filter with no resonance used to dull the repeating echos and warm the effect.Center position removes all filtering and returns you to mirror echos with no frequency degradation.
The Delay time is variable with CV control. Having said that you will find that itresponds better to a stepped CV like the output from a sequencer etc. Patching in a low frequencyTriangle wave will change the delay time but it is not as successful as one would hope. The reason forthis is we had to use cross-fading to eliminate nasty glitches when changing delay times. The resultis that slowly transitioning through delay times results in a slight tremolo effect as the signal changesoutput level. Jump transitions don't suffer from this effect.

Quad Envelope 60B
Attack Control
Decay Control
Release Control
CV Amount Control
Status Indicators 1-4
Gate Inputs 1-4
Envelope/LFO Outputs 1-4
Delay Control
Hold Control
Sustain Control
Channel Indicators
Edit Selector
Shape Selector
Mode Selector Button
The Quad Envelope 60B brings together the traditional functions of the modular Envelope generatorwith an extended range of features that a micro controller can offer. A "paging" interfacepermits easy access to four individual contour generators programmed by a common set of panelcontrol knobs and switches. All parameters are stored in non-volatile memory without need for battery backup.See following page for more detailed information.
based design

Quad Envelope 60B panel functions and operation
Edit Selector Button:
Saving parameters:
Mode Selector Button:
Overview:
Panel Control Details
The Quad Envelope 60B, as the name suggests, is four envelopes/LFOs in one
as a precaution in case of power disruption,
The envelope will loop through the Attack, Hold and Decay stagesfor as long as the gate input is held "high" or on. The Release stage kicks in when the Gate input goes "low" or off.Mostly Triangle shapes are available in this mode so for a more complex envelope shape the output can be used to triggera second channel set to function in envelope mode.
LFO mode loops through the Delay, Attack, Hold and Decay stages to form a widevariety of wave shapes. With zero Delay, moderate Attack and Decay and zero Hold, Triangle waves are produced.Varying the Attack and Decay will produce rising or falling sawtooth shapes.With equal amounts of Delay and Hold and zero Attack and Decay square waves are possible. The LFO frequency is thesum of the durations of the individual stages. Shorter stage durations will increase the speed of the LFO etc. No gate isrequired and for this mode and the gate input will be ignored for the channel.
The Shape selector button permits the user to select between 3 different envelope curves.
This button is used to increment through the 4 channels in order that they may be edited by thepanel controls. Simply depress the button repeatedly till the desired channels indicator LED is lit .The lit channel is now"live" and all changes made to the panel control knobs and switches will apply to that channel. it is probably wise to savenew settings to memory before moving on to edit the next channel but is notessential provided that a save is done before finally shutting down the system. Further editing of the channel will overwritethe buffered or stored settings but will not be permanent till stored. A second function of this button, in conjunction with theShape button is to store the edits to memory.
The mode selector button sets the currently selected channel to function in one of threemodes. The LED above the button indicates the mode. Modes settings are saved with the individual channel settings. It ispossible to have one of 3 modes for each of the four channels for a possible 12 combinations.
The Delay through Release controls set the time durations of the envelope asshown in above. +5V Gate inputs fire the envelopes when high.LED OFF: Standard Envelope mode.
fig. 1LED ON:
LED Blinking:
Gated Envelope Loop mode.
LFO mode.
Shape selector button:
module. Each of the four channels is accessed using the Edit Selection button.Envelope Stage Control knobs are used for dialing in the settings or time constantsas with a conventional envelope generator. Once the user is satisfied with theedited settings, holding the Edit Sel button and then momentarily depressing theShape button, stores the settings to memory. The Delay, Attack, Decay, Sustainand Release stages function identically to the Envelope 04B or Dual EG 47B.The new Hold stage adds an extra punch between the attack and decay stages.See for a diagram showing stages.
Depress and hold the Edit Sel button, while momentarily depressing the Shape button. Thechannel indicator LEDs will flash 1-4 to show a save has completed. The save function stores settings for all channelsto non-volatile memory and is retained even after power down.
The LED above the button indicates the Shape and shape chosen is saved with the individual channel settings.See fig.2 above for shape. Standard response for use with linear VCAs
See fig.3. Log can be used to linearize an exponential response VCASee fig.4. Expo can be used to simulate the effect of an audio curve on a linear VCA
The CV amount sets the depth of effect the control voltage patched to the CV input jack will have on theenvelope. The greater the CV voltage the shorter the duration of the envelope stages. In the case of LFOs, larger CVvoltages will increase the frequency of the LFO. This makes it a voltage controlled LFO. CV control has no effect onSustain. The CV Amount value is stored with the channel. This allows the user to set different CV depths for each of the fourenvelopes/LFOs.
Provide visual feedback of envelope status at each of the 4 channel outputs.
patching a gate to input 1 will trigger envelope channels 1-4, Patching to gate input 2 will trigger 2-4Patching to gate input 3 will trigger 3-4, Patching to gate input 4 will trigger 4 only. The Gates are "normaled" togetherand patching to a gate input disconnects (un-normals) it from the gate to the left.
CV Amount:
Status indicator LEDs:
Gate Inputs:
fig.1
LED OFF:LED ON:LED Blinking:
Linear.Log.
Exponential.
fig.1
GATE
DE
LAY
AT
TAC
K
HO
LD
DE
CA
Y
SU
STA
IN
RE
LEA
SE
fig.2
Linear
fig.3
Log
fig.4
Expo

A B
A+B
1
4
5
7 8
10
11
12
13
14
2
15
-5
-12
5+
+12
-4 4+
-3 3+
-2 2+
-1 1+0
0
0
0
180
180
18
18
162
162
36
36
144
144
54
54
126
126
72
72
108
108
90
90
0 10
1 9
2 8
3 7
4 65
A B
A+B
Quad LFO 61B
Panel Control Locations
Wave Transform (morph) Control
CV Depth Control
Amplitude Control
Channel Wave selectorLFO Rate Control
Mode Selector Switch
Store Button
LED indicator symbols
CV Modulation routing
Status Indicators 1-4
Output polarity selection switch
MIX out
Gate mode selector switch
Channel CV Inputs 1-4
Gate Input
LFO Channel Outputs 1-4
Edit LFO Selector

A B
A+B
1
4
5
7 8
10
11
12
13
14
2
15
-5
-12
5+
+12
-4 4+
-3 3+
-2 2+
-1 1+0
0
0
0
180
180
18
18
162
162
36
36
144
144
54
54
126
126
72
72
108
108
90
90
0 10
1 9
2 8
3 7
4 65
A B
A+B
Quad LFO 61B Quickstart Guide
This brief outline will get you up and running right out of the box and provide the instant gratification we all need.
Start by powering up the module with no patch cords connected. You will see the LFO status LEDs do a little dance
indicating that the stored knob and switch settings have been loaded from memory into their respective buffers ready for play.
Step 1:
Step 2:
Step 3:
Step 4:
Step 5:
Step 6:
Step 7:
Step 8:
Step 9:
Patch LFO output 1 to a suitable modulation destination. A good start would be the Expo CV input of a VCO or similar
module. This will make it easy to hear the effects of the modulation.
Set the LFO EDIT knob so that it is aligned with the number one on the dial graphic. This sets LFO 1 as the active LFO
ready for editing.
Set the Wave knob to #4 TRIANGLE, Set Level knob to center position, Transform knob fully CCW, Rate knob can be
set to any desired frequency but start with a moderate rate so you can hear the effects of the other controls as they are
changed. You will notice that tuning the knobs causes the LFO to jump to the current knob setting. This is intentional but can be
modified so that the knob needs to be aligned with the stored settings before the effects of editing will be heard. This is done by
powering off the module and then back on while holding the MODE switch down. returning to “INSTANT EDIT MODE” is done
the same way.
Start by powering up the module with no patch cords connected. You will see the LFO status LEDs do a little dance
indicating that the stored knob and switch settings have been loaded from memory into their respective buffers ready for play.
As you can probably hear you have a Triangle wave modulating the pitch of your VCO about now. sweeping the
Transform knob across its range. You will notice the effect of the LFO gradually changing as it morphs between a Triangle wave
and a Square wave. The in-between wave shapes are a blend of the two waves as they morph. You can adjust the Level knob
to set the desired modulation depth and change the Rate control so try different frequencies. Now try the other waves and the
effect that changing the Tranform control has on each one. The Waveform diagrams on the last page will help you to better
visualize the Transforms effect on each waveform.
Staying on LFO 1 for now to keep it simple, try the different polarity setting by incrementing the Polarity Switch. The
saved value on first power up is 0-5V+ with LED off. The LED ON setting is +/-5V or double the range with positive and negative
swings etc.
Patch a clock or square wave signal from an LFO or second VCO in low range to the GATE IN jack. Increment the
GATE MOD switch till the LED is flashing rapidly. You will notice that the LFO RATE has now changed
to the same rate as the external clock or LFO signal. Changing the clock tempo will speed up or slow down the Quad LFOs
rate. You could try doing this with the clock also stepping a sequencer so that the LFO is in sync with the sequence events.
Step the GATE MOD switch one more increment to shut off the SYNC function and remove the clock signal from the
GATE IN. Patch that same clock or LFO output into CV INPUT 1. Now adjust the CV Amount knob to hear the effect of
modulation on the LFOs RATE. Try a triangle or sine source instead of a clock/square to hear a more gradual transition effect.
Turning the CV Amount left of center subtracts while to the right adds to the RATE of
LFO 1. You can try selecting the other modulation assignments with the CV MOD switch to hear the effect of modulation on
these destinations. To remove the CV effect on each routing set the CV AMOUNT knob to center position to ZERO out the
effect. At any point you can hit the STORE button to save any of your edits to memory.
I wouldn’t do this just yet though as you may want to return to the default settings if you get lost. Powering off and back on will
return to the default settings.
We have now covered the basic operation of all the knob and most of the switch functions.
The next step it to try setting up each of the LFOs as we did in PART I. The key to doing this is remembering to set the LFO
EDIT selection knob to the desired LFO to edit before changing the settings. Otherwise you will find yourself editing the wrong
LFO channel. You can continue to experiment with the other LFO settings and then continue on to read the rest of this manual
for a greater understanding of the other features of the Quad LFO

A B
A+B
1
4
5
7 8
10
11
12
13
14
2
15
-5
-12
5+
+12
-4 4+
-3 3+
-2 2+
-1 1+0
0
0
0
180
180
18
18
162
162
36
36
144
144
54
54
126
126
72
72
108
108
90
90
0 10
1 9
2 8
3 7
4 65
A B
A+B
Quad LFO 61B Section 1
Introduction: 1.1
Basic Concepts 1.2
Knob edit modes: 1.3
knob edit mode.
Instant Edit Mode:
Alignment Edit Mode:
The sequence of events for editing: 1.4
The Quad LFO is the second in a series of modules that represents a new approach in User Interface design for
Modcan modules. The intent is to combine multiple iterations of otherwise single module functions, in this case an
LFO, into a high density module with large feature set that maximizes panel space and control hardware.
As a result many features may not be readily apparent from the front panel alone. The following sections will attempt
to help the user grasp the somewhat complex UI and discover that it is both highly versatile and like any other
musical instrument, becomes easier to navigate with practice. It is possible to use the Quad LFO in its
simplest modes and still get a lot of functionality. T
Each of the 4 LFOs share the same panel control knobs and switches for setting parameters.
Each LFO has its own output jack and CV input. The GATE IN jack and its functions are applied to each LFO
independently but share the same switch and jack.
When first powering up the module the “PATCH” values for knobs and switches are loaded automatically from
internal EEPROM, restoring the unit to a previous state from the last time a STORE was completed.
The main control for editing patch settings is the LFO EDIT knob. Placing this knob in any of the four quadrants
selects the current LFO for edit. Once the LFO to edit has been selected moving the knobs or toggling switches will
override the saved values and become “live” for the selected LFO. Depressing the STORE button will write the new
edit values to memory if desired otherwise can be used as a temporary edit that will not be saved when powered
down. The new edited settings are retained in a temporary buffer allowing the LFO EDIT knob to select another LFO
for edit and allowing you to return to the previous LFO to edit again later.
Parameters do not need to be STORED between edits but may be good practice in the event of a power glitch.
There are two knob edit modes available. They are switched by first powering off the module and then
depressing and holding the MODE switch button will powering the module on. This will toggle between the two
states. Pressing the STORE button will save the chosen state so that it will be the default state next
time the module is powered up. No need to depress the MODE switch after this has been done unless you want to
switch to the other The modes are explained next.
In this mode moving the knobs will cause the knobs value to “Jump” from the saved value to the
new knob position value the instant the knobs are moved. The pros to this are no need to align the knob to the
former value stored in memory before editing can occur. Cons are that you can't make a minor tweak to the value
easily when switching between LFOs to edit and no visual feedback from knob regarding previously stored values.
In this mode the knob is moved till it aligns with the value stored in memory.
Moving the knob will not edit the value till it is in approximately in the same position as the last time it was stored to
memory. This is also true if switching between LFOs. Editing LFO 1 and then moving the LFO2
and then back to 1 the knobs will need to be re-aligned to continue editing. The main benefit to this style of editing is
no sudden jump to a new value, allowing for minor adjustments to stored values. Also it allows the user to seethe
knobs previous position when last saved or edited.
1/Select LFO to edit using LFO EDIT knob.
2/ Change knob settings and switches for selected LFO. Make sure selected LFO is patched to another module so
you can hear the effect of changing parameters.
3/Press STORE button to save edited values or select another LFO for edit and do 1 and 2 above.
here are a LOT of features built into this module, with a few that
may require some reading to implement. Again to use the musical instrument example, a little study will be greatly
rewarded with a deeper knowledge of the powerful and unique features that lurk within.
as it is the one I prefer.This is the default factory MODE

A B
A+B
1
4
5
7 8
10
11
12
13
14
2
15
-5
-12
5+
+12
-4 4+
-3 3+
-2 2+
-1 1+0
0
0
0
180
180
18
18
162
162
36
36
144
144
54
54
126
126
72
72
108
108
90
90
0 10
1 9
2 8
3 7
4 65
A B
A+B
Quad LFO 61B Section 2
Panel KNOB Definitions:
Panel knob settings are assigned to each of the 4 LFOs independently based on EDIT knob position.
AMPLITUDE:
LFO EDIT:
RATE Control:
WAVE Control:
Knob sets the initial level or peak to peak amplitude of the LFO waveform output in conjunction with
the Polarity switch which sets the +/- polarity of the output for each LFO (see below). With Polarity set
to +5V the peak to peak output is 0-5V+, when +/-5V the range is 0V to +/-5V, set to -5V the range is 0 to -5V
See below for more info on the
The LFO Edit knob selects the target LFO for editing. This is a pot not a switch so there are no click
stops to reference. For best results place the knob line indicator pointing directly at the numbers in the dial graphics
or at least within the approximate centers of the quadrants indicated. Setting the knob for LFO1 makes that LFO
“live” for editing using the other panel knobs and switches. Switching to LFO2 stops editing in LFO1 and activates
LFO2 for edit. The settings made in LFO1 are not lost and can be returned to for further editing by moving the EDIT
control back to LFO1 position. Nothing is saved at this point but pressing the STORE button will commit the edits to
EEPROM memory and will be reloaded on next power-up. The EEPROM retention spec. is typically 100 years.
Pretty simple this one. Adjusts the LFO rate or frequency. Exponential curve response with a
19.1 Octave range of .0008 Hz (1 cycle every 20.8 minutes) to 500Hz.
This knob selects the waveform for each LFO. The numbers, starting at 0 on the dial graphic
correspond with the WAVE chart printed on the panel. See page 4 for graphics of waves available.
The CV AMOUNT and CV input can also be used for wave selection using external CVs.
CV AMOUNT:
TRANSFORM:
Knob sets the amount or depth of CV modulation between the source CV Channel input jack and the
modulation destination. Positioning the knob near center results in 0 modulation depth with fully CW rotation adding
positive values and CCW subtracting from values initially set with panel controls. i.e. when modulating amplitude it
subtracts or adds to the initial value set by the amplitude control knob. The destinations for modulation are set with
CV MOD switch and include, WAVE AMPLITUDE, WAVE TRANSFORM, LFO RATE and WAVEFORM SELECTION.
CV MOD switch. Any or all of the above modulation destinations can be assigned
with individual CV AMOUNT settings for each destination. There is only one CV jack per channel so it will
be shared by all destinations. If no CV is required for a particular destination just set to center 0 position for off.
This control has different functions depending on the waveform selected by the WAVE knob.
A graphic representation of the waves with their transformed shapes is on last page of this document.
For most of the waves the TRANSFORM is like a morph or blend function. It allows two waves to be gradually
“transformed” from one to the other shape. For example, with Triangle wave selected the output is a Tri Wave
when Transform control is fully CCW and a square wave when fully CW. The in between settings result in a
blend of the two wave shapes dependant on knob position. There are no less than 4096 different wave shapes
between these two extremes. The transition will sound more gradual than this number implies however as the
increments are small. The WAVES named in the wave list are at the fully CCW position of the TRANSFORM
Control knob. The waves at the other end of the “MORPH” are not named but are depicted in the TRANSFORM
graphics on page 4. The CV AMOUNT and CV input can also be used to transform the waves using external CVs.
The CV AMOUNT and CV input can also be
used to modulate the rate using external CVs.

A B
A+B
1
4
5
7 8
10
11
12
13
14
2
15
-5
-12
5+
+12
-4 4+
-3 3+
-2 2+
-1 1+0
0
0
0
180
180
18
18
162
162
36
36
144
144
54
54
126
126
72
72
108
108
90
90
0 10
1 9
2 8
3 7
4 65
A B
A+B
Quad LFO 61B Section 3
Panel SWITCH Definitions:
Panel switch settings are assigned to each of the 4 LFOs independently based on EDIT knob position.
The MODE switch is a global assignment and applies to all 4 LFOs, not independently.
Depressing the MODE switch while powering on the module is used to set the knob edit mode as discussed
in Section 1.3
MODE Switch:
Mode 1 NORMAL=Mode LED OFF:
Mode 2 QUADRATURE=Mode LED ON:
Mode 3 ROTATE=Mode LED BLINK:
Output 1-4 Status LEDs do not rotate
Polarity Switch:
This switch sets the operation MODE for the module. Each of the three modes applies globally
across all 4 LFOs and can have a dramatic effect on the modules function. Depressing the switch increments
through the three modes with LED indicator lit according to state.
In this mode the module functions a 4 independant LFOs with EDIT KNOB used to select the LFO to edit.
This mode puts the module into a quadrature state with only settings on channel one applying to all 4 LFOs.
Editing the other 3 channels will have no effect. The output waves on channel 1-4 are in quadrature phase with each
other. Ch1 = 0 degrees, Ch2 = 90, Ch3 = 180, Ch4 = 270 degrees. See for illustration of phases on a sine
wave. Quadrature mode is useful when patched with the 4VCA module. Each of the 4 outputs can be patched to the
CV inputs of the 4VCA to be used for Quad panning in a quadraphonic speaker system. Patching the 4VCA mix
out would give you 4way cross-fading. It can also be used to sequence 4 Envelope generators or a variety of other
quad patches.
Output 1>2>3>4>1
This is a unique mode that responds to pulses on the GATE IN jack. The result is that each of the 4 LFOs outputs
rotate one jack to the right with each new pulse in. Despite the fact that this is a global MODE each of the 4 LFOs
can be edited as in NORMAL mode with all switch, Gate, and knob functions applied to each LFO independently.
It is only the ordering of the outputs that are modified in this mode. See The Gate pulse controls the rotate
stepping but can also be used with the GATE MOD functions simultaneously if selected by the GATE MOD switch.
The . This provides some visual feedback if editing the LFOs in this mode.
Rotating the LEDs would make it difficult to see what changes are being made by knob edits etc.
This Switch controls the peak to peak voltage of the outputs for each channel.
+5V=LED OFF: Output is positive only with peak of 0-5V+ on the selected LFO channel.
+/-5V=LED ON: Peak to Peak is +/-5V
-5V=LED BLINK: The output swings only negative between -5V and 0 or ground.
First select the LFO channel with the EDIT knob, then set the chosen polarity for that channel by incrementing the
fig.1
fig.2
Store Button: The Store button is used to save edited parameters to memory for future sessions. All knobs and
switch states are saved for all of the 4 LFOs. No need to save each LFO separately. A short depress is all that is
required. The 4 Output LEDs will sequence 1-4 once to show that a save has been successful.
0d 90d 180d 270d
fig.1
fig.2

A B
A+B
1
4
5
7 8
10
11
12
13
14
2
15
-5
-12
5+
+12
-4 4+
-3 3+
-2 2+
-1 1+0
0
0
0
180
180
18
18
162
162
36
36
144
144
54
54
126
126
72
72
108
108
90
90
0 10
1 9
2 8
3 7
4 65
A B
A+B
Quad LFO 61B Section 4
Panel SWITCH Definitions continued:
CV Modulation Overview.
CV MOD Switch:
Modulation Destinations:
RATE=MOD LED OFF
AMP=MOD LED ON:
Each of the 4 LFOs has its own CV jack for external modulation control. There are 4 modulation control destinations
that can be assigned using the CV MOD switch. Each destination has a separate Depth set by the CV AMOUNT
knob. All of the destinations can be assigned or none. Setting the CV AMOUNT knob to center effectively shuts off
the modulation to the selected routing. One LFO can modulate another and is a great way to create a complex
patch. An LFO can even modulate itself, leading to unpredictable results but it is possible.
Use this switch to internally assign the routing or destination of the LFO channel CV input jack
This switch has 4 states. Each of the destinations shares one CV input jack. Therefore modulating the frequency
and amplitude will be done with the same modulation source. The CV AMOUNT knob sets the level and polarity of
modulation for each destination and can be set to differing amounts for each. Rotating the CV AMT right of center
adds while left of center subtracts. This helps to compensate for the limitations of sharing one jack for all 4 mod
routings. Like all the switches, pressing repeatedly increments the switches state.
: In this state the CV input is routed to the LFO RATE. If LFO is at maximum frequency no
amount of CV will increase the LFO rate. Only subtracting by setting the CV AMT knob left of center will have any
effect.
Routes the CV to the AMP(litude) destination. This allows for CV control of output level for
each of the LFO channels. This is a great function for changing the depth of vibrato etc.
TRANS=MOD LED BLINK:
WAVE=MOD LED Double BLINK:
GATE MOD Selection Switch:
NONE=GATE MOD LED OFF:
RESET= GATE MOD LED ON:
HOLD= GATE MOD LED BLINK:
SYNC= GATE MOD LED Double BLINK:
Sends the CV to the TRANSFORM destination. Shape is the function that allows
changes to the waveform shapes as discussed in Section 2.
Fast LED blinking indicates CV routing to the WAVE destination. This allows CV
control of waveform selection.
There are 4 different modes for GATE INPUT jack routing. Only one mode is available at any one time but any of the
4 modes can be applied to Each of the 4 LFOs independently. Set to off position on selected LFO for no GATE
effect. The LED updates to show GATE MOD selections for each channel as EDIT selector changes channels.
Set to this position if no GATE effect is required
In this mode pulses on the GATE IN jack will reset the LFO channel to wave start
with each new pulse. This is a good mode if you want to use the LFO wave like an envelope shape to control pitch
or filter cutoff etc.
Holding the GATE IN Jack high using a square wave or any +5V source voltage
will cause the LFO to freeze in position. The LFO will resume once the GATE IN goes low (0V). This can be useful
in Quadrature mode as it allows you to freeze panning position or as an effect for modulation.
This is a very unique mode and one you won’t find on any other modular
LFO. It allows the use of a clock or second LFO to set the RATE or frequency of the selected channel.
This can be very useful for synchronizing the LFO rate with a sequence or other timed events. The Staircase waves
are very good in this mode to simulate the effects of an arpeggiator. Try setting all channels to SYNC, then using the
ROTATE function for sequenced LFOs synchronized to a clock. Changing the clock speed will alter the rate and
sequence tempo in step. The range is 600Hz-0.003Hz and is extremely precise (32bit accuracy)

A B
A+B
1
4
5
7 8
10
11
12
13
14
2
15
-5
-12
5+
+12
-4 4+
-3 3+
-2 2+
-1 1+0
0
0
0
180
180
18
18
162
162
36
36
144
144
54
54
126
126
72
72
108
108
90
90
0 10
1 9
2 8
3 7
4 65
A B
A+B
Quad LFO 61B Section 5
I/O Jack definitions:
Gate IN:
CV INPUTS:
LFO Outputs:
There is only one jack for gate input signals. The GATE MOD destination switch assigns this jack to the
various GATE MOD routings that have been previously covered in Section 4. Gate signals are typically 0-5V+
and are usually a square or pulse shape. On this module they can be any shape and between +3V
and +10V when high.
Each LFO has its own CV input jack. These are routed to the various CV modulation destinations by
the CV MOD Switch. The maximum input level that will be accepted at these jacks is +/-5V. Positive (0-5V+)
and negative (0-5V-) can also be used.
These are the main outputs for each of the 4 LFOs, The output amplitude can range between 0V and
+/-5V depending on the AMP settings in each LFO setup. These outs can be patched back into the LFO CV inputs
to enable modulation between LFOs.
MIX Out: This output is available by using a special INSERT cable. Insert cables have a stereo plug that splits the
signal out to two mono cables with tip wired to one, and ring wired to the second cable. Both outputs are available
simultaneously from the one jack.
The MIX is available on the RING connection in this case. LFO Output 4 can still be used as normal on the TIP
connected cable. The MIX is a sum off all 4 LFOs on one output. The signal has been reduced by half otherwise the
output could be as high as +/-15V and clipping would occur. When using this output it is wise to set the individual
LFO Amplitude levels to at least half down to reduce clipping and keep the signal from being too hot.

A B
A+B
1
4
5
7 8
10
11
12
13
14
2
15
-5
-12
5+
+12
-4 4+
-3 3+
-2 2+
-1 1+0
0
0
0
180
180
18
18
162
162
36
36
144
144
54
54
126
126
72
72
108
108
90
90
0 10
1 9
2 8
3 7
4 65
A B
A+B
WAVES
WAVE 0 SINE>DOUBLE SINE WAVE 1 CIRCLE>SINE WAVE 2 CURVE L>CURVE R
WAVE 3 PEAK(EXPO)>LOG WAVE 4 TRIANGLE>SQUARE WAVE 5 SAW>EXPO
WAVE 6 INVSAW>INVEXPO WAVE 7 TRAPAZOID>SLOT WAVE 8 TRI>SLOT
WAVE 9 PULSE with PWM WAVE 10 DOUBLE PULSE with PWM WAVE 11 WOBBLE1>WOBBLE2
WAVE 12 STAIR UP 1-16 steps WAVE 13 STAIR UP/DOWN 1-16 steps. WAVE 14 RANDOM STEP with SLEW
WAVE 15 COSINE RANDOM>smooth and step
=TRANSFORM KNOB CCW
=TRANSFORM KNOB CENTER
=TRANSFORM KNOB CW

Dual VDO 62B
Panel Control Locations
Oscillator B (separate out)
Blend Control (Osc1 & 2 wave mix)
Wave Selector A OscWave Selector B Osc
Detune
Fine TuneMaster Tune
Sync Input
Mix Output
Expo FM CV Input
Blend CV Input
Wave A CV Input
Wave B CV Input
Hi-Res Button
1V/Oct Input
Octave Switch
Quantize ON/OFF

Dual VDO 62B
Introduction:
The Dual VDO is an all digital, dual numerically controlled oscillator (NCO). Similar to the VCDO but without the internal FM
capabilities. The new features that the Dual VDO does offer: Table of 180 single cycle waves that can be loaded into the A and
B oscillators and blended together to form complex wave shapes. The two oscillators can be detuned against each other to
produce gradually evolving sounds that beat against each other or set to intervals, 3rds,5ths etc. for added thickening.
The ability to combine two distinct wave shapes produces a huge variety of tonal possibility that is not available from a standard
single oscillator. The Blend control is not a simple mixer, but is actually a morph function that performs a mathematical linear
interpolation between the two waves to produce a third new wave. Wave sequencing is also possible for each oscillator with
independent CV control.
Output for the blended signal of Oscillators A and B. Output signal is +/-2.5V pk-pk
The blend control sets the mix levels of each oscillator.
Panel Control definitions:
Mix Out:
B Out:
HI-Res Button
Sync Input:
Expo CV input:
Blend Control:
Blend CV Input:
Wave Selector A:
Wave Selector B:
Detune Control
1V/Octave
Fine Tune
Master Tune
Octave Switch
Quantize ON/OFF:
Separate output for the B oscillator allowing mixing to be done externally or for stereo effects.
: Depressing this button increases the resolution of the wave selection knobs from 180 to 16 waves per rotation,
making wave selection more precise. Selecting waves without using this feature is still possible but it is available if required.
Patching a pulse to this input will reset the start point of the wave in the same manner that “Hard Sync” does on a
regular VCO. Ideally the pulse frequency should be less than the Dual VDO to work.
Input for external modulation and vibrato etc. This input accepts +/-2.5V signals. Expo CV Amount must be
handled downline using an attenuator or mixer module.
This knob is used to set the blend (mix) of the two oscillators. As mentioned in the introduction the blend control
is more than a simple mix and allows for new waves to be created by setting the blend amounts of each oscillator wave. With
knob rotated fully CCW oscillator B can be removed from the mix. The opposite case with OSC A is true if rotated fully CW.
CV control of wave blend. Input accepts +/-2.5V signal. Allows wave blend to controlled by external LFO or
other CV source. This can add animation to the sound. Can also be modulated by audio range
signals for AMP modulation effects.
Selection control for OSC A waveform 0-180. Wave CV A input adds or subtracts from this control.
Selection control for OSC B waveform 0-180. Wave CV B input adds or subtracts from this control.
: Detunes Oscillator B in relation to OSC A. Detune range is a few cents to +/-1 Octave.
Detune CV adds to the amount of detuning.
: The Dual VDO tracks this input with a 1V per octave response for standard keyboard or midi2cv control.
The range of input is +10V for a ten octave range.
: Adjusts the overall fine tuning of the module.
: Adjusts the coarse tuning.
: Offsets one OSC from the other by 1 or 2 octaves. Detune can add another octave for a total of 3.
Enables internal semitone quantizer function. When off tuning is un-quantized.