series getting startedstatic.highspeedbackbone.net/pdf/mx350_gs_en-us_v1.pdfmake sure to read this...
TRANSCRIPT

Make sure to read this manual before using the machine. Please keep it in hand for future reference.
Getting StartedRead Me First
Office All-In-One
series

Model Number: K10349 (MX350)
Symbols Used in This Document■
Informational notes.
Instructions including important information.
Operations that take some time to complete.
Indicates operations in Windows.
Indicates operations in Macintosh.
Prohibited actions.
Microsoft is a registered trademark of Microsoft Corporation.Windows is a trademark or registered trademark of Microsoft Corporation in the U.S. and/or other countries.Windows Vista is a trademark or registered trademark of Microsoft Corporation in the U.S. and/or other countries.Internet Explorer is a trademark or registered trademark of Microsoft Corporation in the U.S. and/or other countries.Macintosh, Mac, and AirPort are trademarks of Apple Inc., registered in the U.S. and other countries.Bonjour is a trademark of Apple Inc., registered in the U.S. and other countries.
••••••
In this guide, Windows 7 operating system is referred to as Windows 7 and Windows Vista operating system as Windows Vista.

1
Describes how to set up and use your machine. Introduces the machine and its functions, the included manuals and application software.
Getting Started ( th is manual)
•
Network Setup Troubleshooting
•
Describes basic operations and media, and gives an introduction to other functions available.
Describes various operating procedures to make full use of machine.
Describes troubleshooting tips for problems you may encounter when using the machine.
Basic Guide Advanced Guide Troubleshooting
For details on opening the on-screen manuals, refer to page 55.
On-Screen ManualsPrinted Manuals
This machine contains both printed manuals and on-screen manuals to be viewed on a computer.The on-screen manuals are included on the Setup CD-ROM and are installed during the software installation.

�
Contents■
Wireless Setup Using Easy Setup ................................................... Wireless Setup Using WPS (Wi-Fi Protected Setup) ...................... Wireless Setup Using WCN (Windows Connect Now) ....................
10 Wireless Setup ......................................................................
9 Install the Software (USB Connection) ..................................
8 Select Connection Method ....................................................P.19
1 Check the Included Items ......................................................P.5
P.6
P.20
P.26
P.27P.31P.34
2 Remove the Protective Material ............................................
7 Set Up for Fax Reception ......................................................
6 Load Paper ............................................................................
5 Install the FINE Cartridges ....................................................
4 Turn the Power On ................................................................
3 Connect the Telephone Line ..................................................P.8
P.9
P.11
P.15
P.16
Install the Software .......................................................................... Install the Software (Registration) ................................................... Install the Software (Information) ....................................................
12 Install the Software (Network Connection) ............................
11 Wired Setup ...........................................................................P.39
P.43
P.43P.48P.52
13 Use from Additional Computers .............................................P.54
14 Try Using the Machine...........................................................P.55
Try Copying ..................................................................................... Print Photos from a Computer ......................................................... Send Faxes .....................................................................................
P.56P.58P.59
15 Maintenance ..........................................................................P.61
16 Specifications ........................................................................P.62

�
Network Connection
Wireless ConnectionUSB Connection Using from Additional
Computers
Machine Preparation
Fax Reception Setup
Machine Instal lat ion Flow■
P.4 - 15
P.16 - 18
Software InstallationP.54 P.43 - 53
Software InstallationP.19 - 25
Machine Wireless Setup
P.19, 26 - 38
Software InstallationP.43 - 53
Machine Wired Setup
P.19, 39 - 42
Installation CompleteTry Using the Machine P.55 - 60
Wired Connection
(when the machine is already connected to the network and you want to add computers from which to use the machine)

�
Devices Required for Wireless/Wired Connect ion■
Wireless Connection
When using the machine over a wireless/wired connection, the following devices are required depending on the connection method.
Wired Connection
Router, etc.
A commercial access point or router that supports IEEE802.11b/g is required. A commercial network device (router, etc.) and Ethernet cable are required.
Ethernet cableAccess point or wireless router

1
�
Che
ck th
e In
clud
ed It
ems
Manuals
Other documents
Setup CD-ROM (containing the drivers, applications and on-screen manuals)
Power cord Telephone line cableFINE cartridges
Color Black
Check that all the items shown below are included in the box.
A USB cable is necessary to connect the machine with your computer (USB connection only).•

2
B
D
A
C
321
D
�
Open the Paper Output Tray (A).
Lift the Scanning Unit (Cover) (B) and fix it with the Scanning Unit Support (C).
Remove all the protective materials and orange tape from the outside of the machine.
The tape and protective materials may differ in shape and position from what they actually are.
•
Rem
ove
the
Prot
ectiv
e M
ater
ial
Close the Document Cover (D) and lift it with the Scanning Unit (Cover).

2
1
3
54
E
F
�2 Remove the Protective Material
Remove the orange tape (E) carefully. Lift the Scanning Unit (Cover) slightly (1) and fold the Scanning Unit Support (2), then gently close the Scanning Unit (Cover) (3).The protective material (F) is removed along with the orange tape.

3
2
1
B
A
21
�
Connect the machine with a telephone line using the supplied telephone line cable (A).
Remove the Cap (B) (1), then connect a telephone with the telephone line cable (2).
When using as a fax only:
Go to "4 Turn the Power On" on page 9.
Do not connect the machine and a telephone in parallel to the same telephone line using a distribution adapter. The machine may not operate properly.
•
Only when connecting a telephone:
Con
nect
the
Tele
phon
e Li
ne
If you cannot send faxes after installing the machine, check the telephone line type. For details, refer to "Confirming the Telephone Line Connection" in the on-screen manual: Basic Guide.
•
To use the machine as a fax, a telephone line needs to be connected.This section describes the basic method of telephone line connection.
When using as both a fax and telephone:
When using as a fax only:
When not using as a fax:
Go to "4 Turn the Power On" on page 9.
only
For other connection methods, refer to the on-screen manual: Basic Guide.
Do not turn the power on yet.
4A
1B
2
�
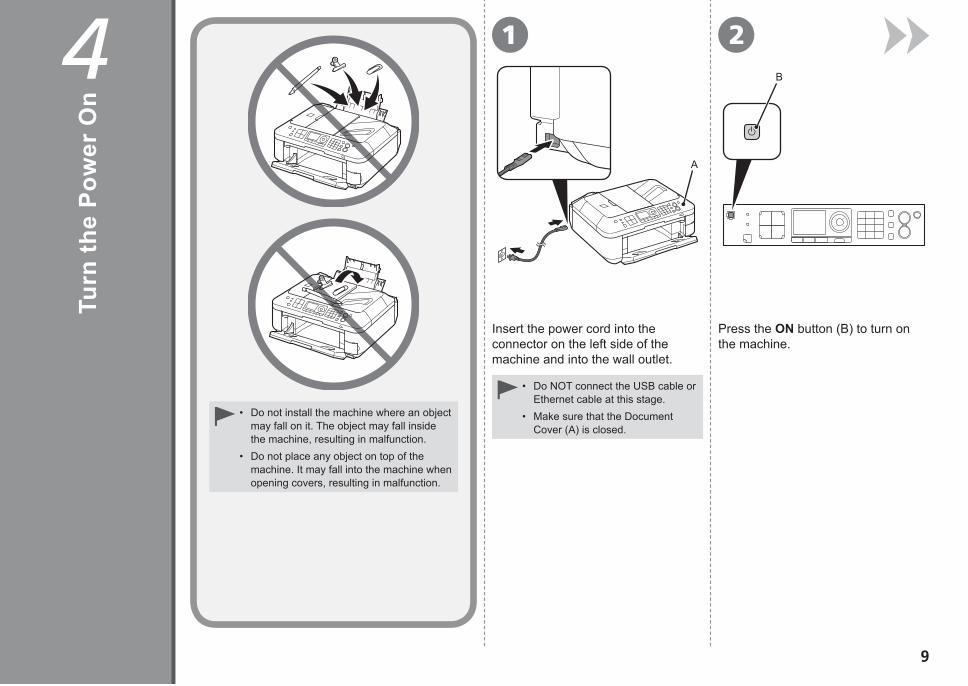
Do NOT connect the USB cable or Ethernet cable at this stage.Make sure that the Document Cover (A) is closed.
•
•
Insert the power cord into the connector on the left side of the machine and into the wall outlet.
Do not install the machine where an object may fall on it. The object may fall inside the machine, resulting in malfunction.Do not place any object on top of the machine. It may fall into the machine when opening covers, resulting in malfunction.
•
•
Turn
the
Pow
er O
n
Press the ON button (B) to turn on the machine.

3E
4
C
D
1 2A
10 4 Turn the Power On
Turning the power off □
When removing the power plug, make sure that all the lamps on the Operation Panel are not lit before removing the plug. Removing the power plug while all the lamps on the Operation Panel light up or flash may cause drying and clogging of the FINE Cartridges, resulting in poor printing.
•
Use the { or } button (C) on the Operation Panel to select the language for the LCD (Liquid Crystal Display) (D), then press the OK button.
If an unintended language is displayed on the LCD, press the Back button (E) to return to the Language selection screen.
•
Make sure that the above screen is displayed and go to the next step.
If your machine is used as fax
Removing the power plug deletes all faxes stored in memory. Send or print faxes as necessary before removing the power plug.
•
Be sure to follow the procedure below.
1. Press the ON button (A) to turn off the machine.2. Make sure that all the lamps on the Operation Panel
are not lit.
Operating noise may continue for up to 30 seconds until the machine turns off.

5
A
E
G
F
H
321
DE
11
Lift the Scanning Unit (Cover) (A) and fix it with the Scanning Unit Support (D).
Make sure that the FINE Cartridge Holder (H) moves to the installation position.
Do not touch the buttons or LCD (F) on the Operation Panel (G). May result in unintended operation.When opening the Scanning Unit (Cover), the FINE Cartridge Holder moves automatically.If the FINE Cartridge Holder does not move, make sure that the machine is turned on.If the Scanning Unit (Cover) is left open for more than 10 minutes, the FINE Cartridge Holder moves to the right. In this case, close and reopen the Scanning Unit (Cover).
••••
Go to the next page.
Follow the next procedure to insert the Black and Color FINE Cartridges into their corresponding slots and .In
stal
l the
FIN
E C
artr
idge
s
Close the Document Cover (E) and lift it with the Scanning Unit (Cover).

I
4 65
KL
J
1� 5 Install the FINE Cartridges
Open the Ink Cartridge Locking Cover on the right side.Pinch (I) firmly and pull up the cover.
Remove the Black FINE Cartridge from its package.
Pull the orange protective tape (J) in the direction of the arrow and remove it carefully.
Handle the FINE Cartridges carefully. Do not drop or apply excessive pressure to them.Be sure to use the supplied FINE Cartridges.Be careful not to stain your hands or surrounding work area with ink on the removed protective tape.Do not touch the Electrical Contacts (K) or Print Head Nozzles (L) on a FINE Cartridge. The machine may not print properly if you touch them.
•••
•

87
1�5 Install the FINE Cartridges
Do not knock the FINE Cartridge against the sides of the holder.Install in a well-lit environment.Install the Black FINE Cartridge into the right slot , and the Color FINE Cartridge into the left slot .
•
••
Place the Black FINE Cartridge into the right slot .
Push down of the Ink Cartridge Locking Cover until you hear a click to close it completely.View the Ink Cartridge Locking Cover straight on and check that it is locked correctly (not at an angle).
9
3
1
2
10 11
1� 5 Install the FINE Cartridges
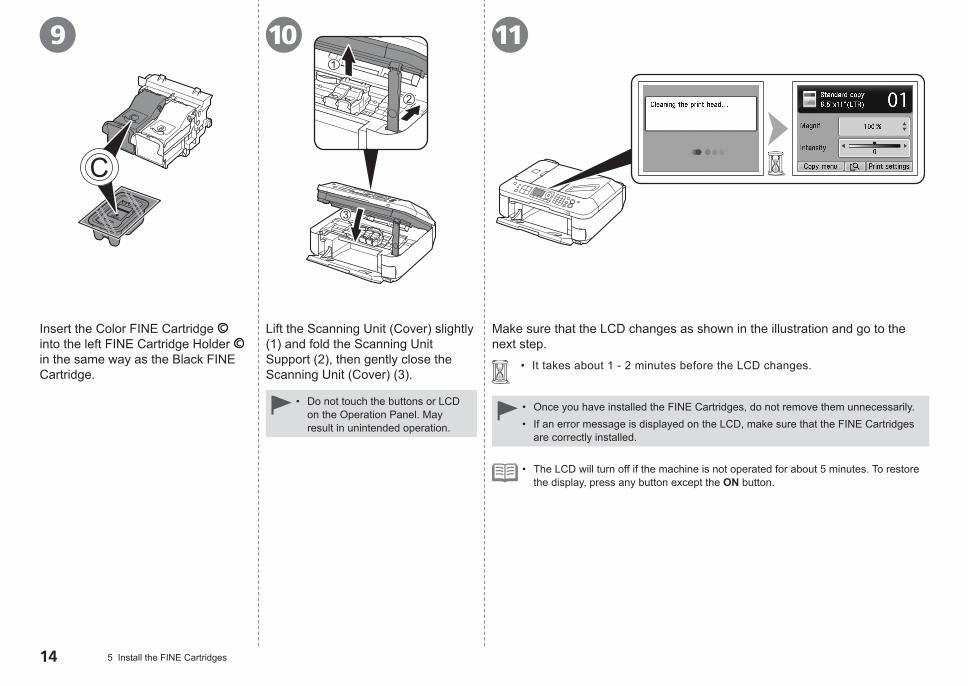
Insert the Color FINE Cartridge into the left FINE Cartridge Holder in the same way as the Black FINE Cartridge.
Once you have installed the FINE Cartridges, do not remove them unnecessarily.If an error message is displayed on the LCD, make sure that the FINE Cartridges are correctly installed.
••
It takes about 1 - 2 minutes before the LCD changes.•
Lift the Scanning Unit (Cover) slightly (1) and fold the Scanning Unit Support (2), then gently close the Scanning Unit (Cover) (3).
Make sure that the LCD changes as shown in the illustration and go to the next step.
The LCD will turn off if the machine is not operated for about 5 minutes. To restore the display, press any button except the ON button.
•
Do not touch the buttons or LCD on the Operation Panel. May result in unintended operation.
•
6D
C
12
A
B
4321
1�
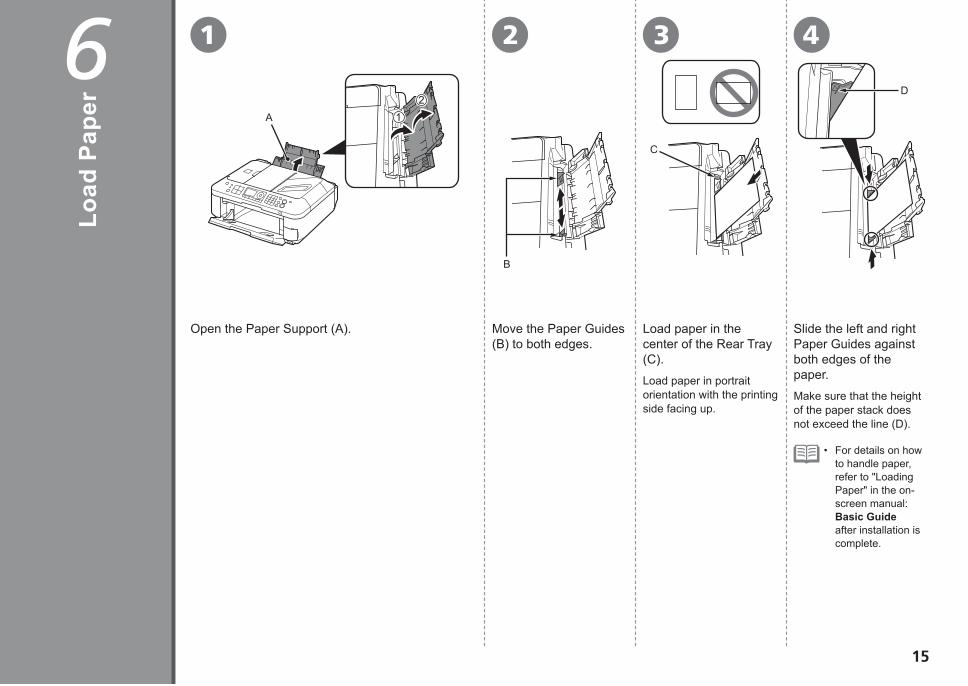
Open the Paper Support (A). Move the Paper Guides (B) to both edges.
Load paper in portrait orientation with the printing side facing up.
Load paper in the center of the Rear Tray (C).
Slide the left and right Paper Guides against both edges of the paper.Make sure that the height of the paper stack does not exceed the line (D).
For details on how to handle paper, refer to "Loading Paper" in the on-screen manual: Basic Guide after installation is complete.
•
Load
Pap
er
7
1�
Set U
p fo
r Fa
x R
ecep
tion
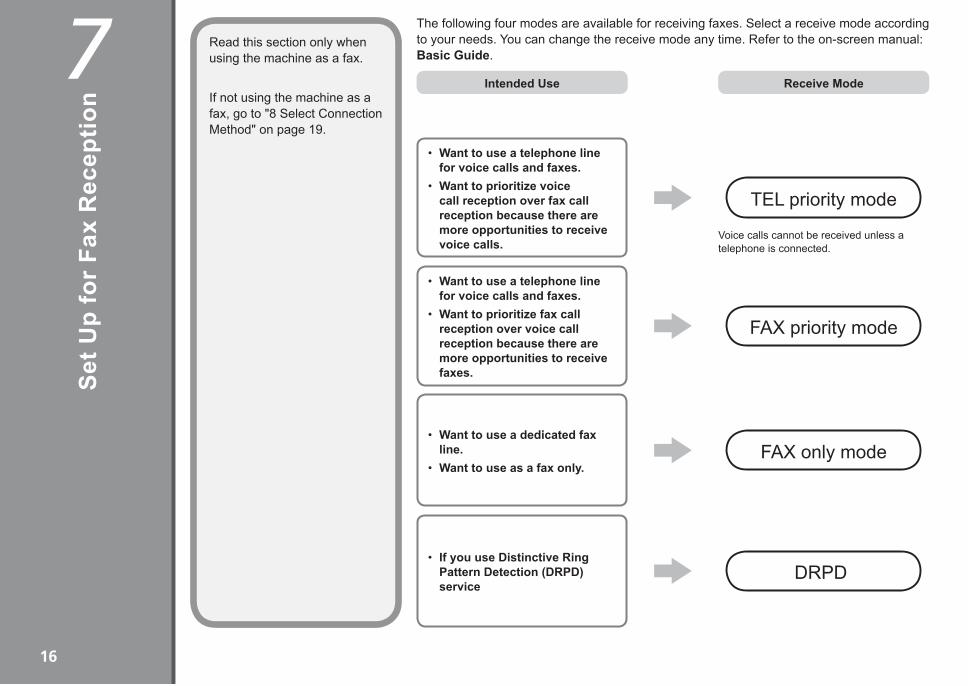
Read this section only when using the machine as a fax.
If not using the machine as a fax, go to "8 Select Connection Method" on page 19.
Intended Use
The following four modes are available for receiving faxes. Select a receive mode according to your needs. You can change the receive mode any time. Refer to the on-screen manual: Basic Guide.
Receive Mode
Want to use a dedicated fax line.Want to use as a fax only.
•
•
Want to use a telephone line for voice calls and faxes.Want to prioritize fax call reception over voice call reception because there are more opportunities to receive faxes.
•
•
Want to use a telephone line for voice calls and faxes.Want to prioritize voice call reception over fax call reception because there are more opportunities to receive voice calls.
•
•
FAX only mode
TEL priority mode
Voice calls cannot be received unless a telephone is connected.
FAX priority mode
If you use Distinctive Ring Pattern Detection (DRPD) service
•DRPD

1�7 Set Up for Fax Reception
Even when a telephone is connected to the machine, the telephone's ringtone may not sound for an incoming call depending on the type or settings of the telephone.
•
When a voice call arrives:When a fax call arrives:
The fax is received automatically. The call cannot be answered.
While the telephone's ringtone sounds, pick up the handset to answer the call.When it switches to the machine's ringtone, pick up the handset and press the Stop button to answer the call.
The telephone's ringtone sounds. The fax is received automatically.
While the telephone's ringtone sounds, pick up the handset to answer the call.
While the telephone's ringtone sounds, pick up the handset. When the fax reception starts, replace the handset.If an answering machine is connected, the fax is received automatically.
Responses to Calls in Each ModeFA
X o
nly
mod
eFA
X p
riorit
y m
ode
TEL
prio
rity
mod
e
The telephone's ringtone sounds. The fax is received automatically when the machine detects the fax ring pattern.
DR
PD
The telephone continues to ring. Pick up the handset to answer the call.

321A B
C
1� 7 Set Up for Fax Reception
Press the FAX button (A).The fax standby screen is displayed.
Press the FUNCTION button (B), then select a receive mode using the { or } button (C).
Press the OK button.The fax standby screen returns.

8
1�
Want to connect to a computer with a USB cable.
•
Want to connect to computers without using cables.Want to use from multiple computers.
•
•Wireless Connection
USB Connection
What is LAN (Local Area Network)?
What is Network?A system to exchange information between computers by connecting them to each other with cables or via wireless communication. The Internet and LAN are types of networks.
A type of network that connects computers to each other within a limited area (room, building, etc.).
Access point or wireless router
USB cable
Intended Use Connection Method Device Required
Go to "9 Install the Software (USB Connection)" on page 20.
Go to "10 Wireless Setup" on page 26.
If it is uncertain whether your device (access point, router, etc.) supports wireless connection or wired connection, refer to the manual supplied with the device, or contact its manufacturer.
If Your Device Supports Wireless Connection
If Your Device Supports Wired Connection
Want to use from multiple computers.Want to connect to a computer with an Ethernet cable.
••
Wired Connection
Ethernet cable, router, etc.
Go to "11 Wired Setup" on page 39.
Check if it supports simultaneous connection of multiple computers and network devices.
Check if it supports IEEE802.11b/g.
Sele
ct C
onne
ctio
n M
etho
d
9
�0
Quit all running applications before installation.Log on as the administrator (or a member of the Administrators group).Do not switch users during the installation process.Internet connection may be required during the installation. Connection fees may apply. Consult the internet service provider.It may be necessary to restart your computer during the installation process. Follow the on-screen instructions and do not remove the Setup CD-ROM during restarting. The installation resumes once your computer has restarted.Mac OS 9, Mac OS X Classic environments, or Mac OS X v.10.4.10 or earlier are not supported.
••
••
•
•
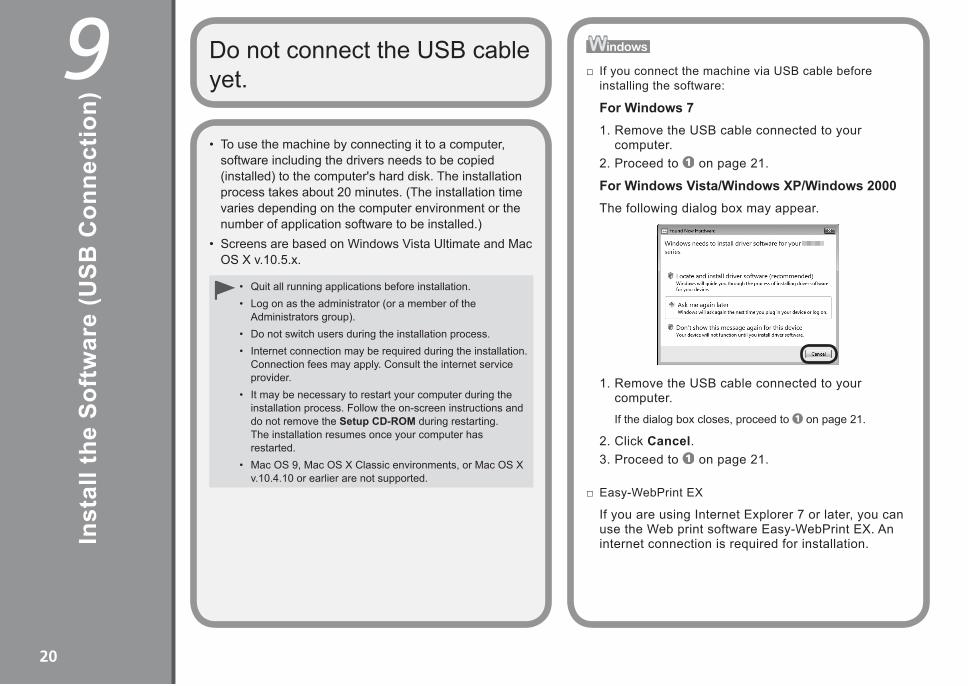
To use the machine by connecting it to a computer, software including the drivers needs to be copied (installed) to the computer's hard disk. The installation process takes about 20 minutes. (The installation time varies depending on the computer environment or the number of application software to be installed.)Screens are based on Windows Vista Ultimate and Mac OS X v.10.5.x.
•
•
Do not connect the USB cable yet.
Inst
all t
he S
oftw
are
(USB
Con
nect
ion)
If you connect the machine via USB cable before installing the software:
□
If the dialog box closes, proceed to on page 21.
1. Remove the USB cable connected to your computer.
1. Remove the USB cable connected to your computer.
2. Proceed to on page 21.
2. Click Cancel.3. Proceed to on page 21.
Easy-WebPrint EX□
If you are using Internet Explorer 7 or later, you can use the Web print software Easy-WebPrint EX. An internet connection is required for installation.
For Windows 7
The following dialog box may appear.
For Windows Vista/Windows XP/Windows 2000

A
21
�19 Install the Software (USB Connection)
Turn on the computer, then insert the Setup CD-ROM into the CD-ROM drive.If you are using Windows, the setup program starts automatically.
Press the ON button (A) to TURN OFF THE MACHINE.Operating noise may continue for up to 30 seconds until the machine turns off.
For WindowsDo NOT connect the USB cable to the computer and the machine yet. If you have already connected the cable, disconnect it now.
• If the program does not start automatically, double-click the CD-ROM icon in Computer or My Computer. When the CD-ROM contents appear, double-click MSETUP4.EXE.
•
3
3
�� 9 Install the Software (USB Connection)
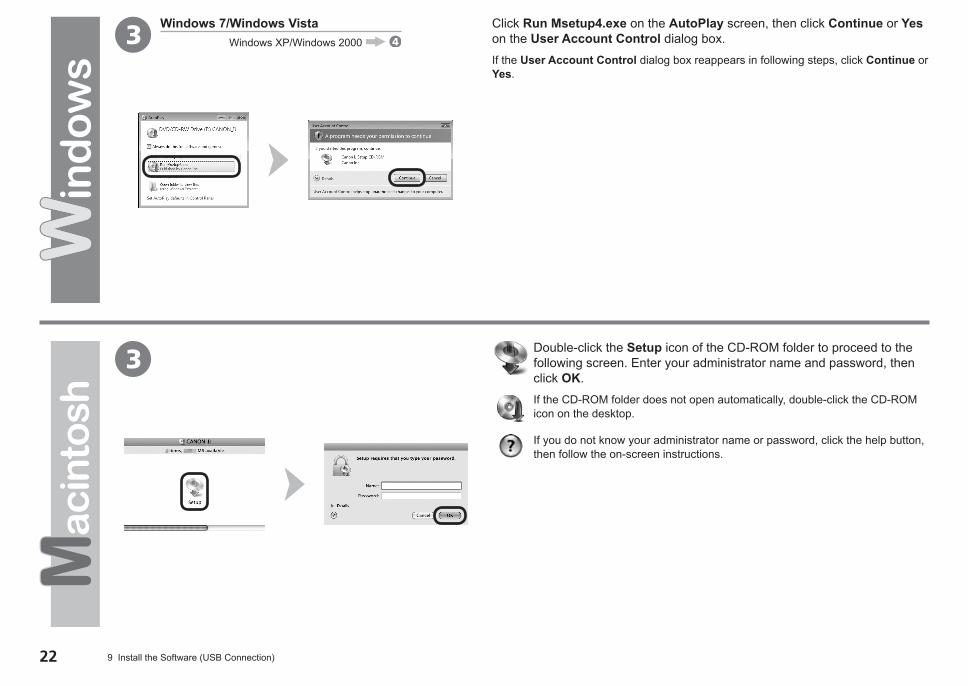
Click Run Msetup4.exe on the AutoPlay screen, then click Continue or Yes on the User Account Control dialog box.If the User Account Control dialog box reappears in following steps, click Continue or Yes.
Double-click the Setup icon of the CD-ROM folder to proceed to the following screen. Enter your administrator name and password, then click OK.If the CD-ROM folder does not open automatically, double-click the CD-ROM icon on the desktop.
If you do not know your administrator name or password, click the help button, then follow the on-screen instructions.
Windows 7/Windows VistaWindows XP/Windows 2000

654
��9 Install the Software (USB Connection)
Click Install.Click Easy Install.The drivers, application software, and on-screen manuals are installed all together.
For Windows
If you want to select particular items to install, click Custom Install.
•
Follow any on-screen instructions to proceed with the software installation.
Select Use the printer via USB, then click Next.
For Windows 7/Windows Vista SP1 or later
You can install the XPS Printer Driver from Custom Install. When installing the XPS Printer Driver, select the MP Drivers at the same time.For details on useful functions of the XPS Printer Driver, refer to the on-screen manual: Advanced Guide after installation is complete.
•
•
To install Easy-WebPrint EX, you need to connect your computer to the internet at this stage. (Internet Explorer 7 or later is required.) If an internet connection is not available, it is also possible to install this software later. For details, refer to "Useful Software Applications" in the on-screen manual: Basic Guide after installation is complete.
•

Serial No. * * * * * * * * *
B
�� 9 Install the Software (USB Connection)
Necessary Information for the User Registration
□ If the Extended Survey Program screen appears
□
If you can agree to Extended Survey Program, click Agree. If you click Do not agree, the Extended Survey Program will not be installed. (This has no effect on the machine's functionality.)
Important Information for the Installation
If the power is on, the FINE Cartridge Holder will move when the Scanning Unit (Cover) (B) is opened.
•
The product serial number is required when registering the product. The serial number is located inside the machine (as shown in the illustration).
USB Port□
When the Printer Connection screen appears, connect the machine to the computer with the USB cable. The USB Port is located on the back center of the machine. The upper port is for USB.

87
��9 Install the Software (USB Connection)
If Restart is displayed, follow the instruction to restart the computer.
Click Exit to complete the installation. For Windows:
Congratulations! Setup is complete. Proceed to page 55 for information regarding the Solution Menu and the on-screen manual or page 56 to start using the machine.
For Macintosh:It is necessary to restart the computer before scanning using the Operation Panel on the machine for the first time.
Remove the Setup CD-ROM and keep it in a safe place.The buttons displayed on Solution Menu may vary depending on the country or region of purchase.
••
Solution Menu starts automatically.
For Macintosh:Click the icon on the Dock to start Solution Menu.

10
��
An "Ad-hoc connection," which establishes a direct connection to the computer over a wireless connection without using an access point, is not supported. Be sure to prepare an access point.
Notes on Wireless Connect ion■The configuration, router functions, setup procedures and security settings of the network device vary depending on your system environment. For details, refer to your device's instruction manual or contact its manufacturer.In an office setup, consult your network administrator.If you connect to a network that is not protected with security measures, there is a risk of disclosing data such as your personal information to a third party.The machine cannot be used over a wireless and wired connection at the same time.If an error message appears or if you have trouble with the network connection, refer to the printed manual: Network Setup Troubleshooting.
•
••
•
•
Before connecting the machine to the network, the computer needs to be connected to the network. Make sure that configuration of the computer and access point or router is complete.
Add (connect) the machine to the network.
Internet Access point or wireless router, etc.W
irel
ess
Setu
p

10 Wireless Setup ��
Wir
eles
s S
etup
Usi
ng E
asy
Set
up
For details on how to check the following information, refer to the manual of your access point or router, or contact its manufacturer.
Check the Informat ion for Wireless Connect ion■
The following information is required to connect to your access point or router. Check your access point or router for the following information, then write it down.
Access Point Name/Network Name:
Network Key:
* Also referred to as SSID. An identifier to identify the specific access point.
* Also referred to as encryption key, WEP key or WPA/WPA2 passphrase, Pre-Shared key. A password required to set to prevent unauthorized access to communication.
If your access point or router supports WPS (Wi-Fi Protected Setup):
□
A wireless connection can be set up easily without checking the information to the left. Go to "Wireless Setup Using WPS (Wi-Fi Protected Setup)" on page 31.
You can retrieve your network key by using the Canon PIXMA Wireless Setup Assistant or the instructions which can be downloaded from the Canon support webpage (www.usa.canon.com/downloadlibrary). If you are unable to retrieve the network key or other settings, refer to the manual of your access point or router, or contact its manufacturer.
For details on WPS, refer to the manual of your access point.If you are using Windows 7/Windows Vista and have a USB flash drive, you can configure wireless connection settings by using the WCN (Windows Connect Now) function as well. For details, refer to "Wireless Setup Using WCN (Windows Connect Now)" on page 34.
•
•

321A DB
C
�� 10 Wireless Setup
Press the Setup button (A). Use the [ or ] button (B) to select Wireless LAN setup, then press the OK button.
Use the { or } button (C) to select Yes, then press the OK button.When wireless connection is enabled, the Wi-Fi lamp (D) lights blue.
The Setup menu screen is displayed.

4 5 6E
��10 Wireless Setup
Select Easy setup, then press the OK button.
When one of the above screens is displayed, enter the network key you wrote down on page 27 using the Numeric buttons (E), then press the OK button.If the above screen is not displayed, go to .
Press the button to switch character entry modes.If you are living in an apartment, nearby access points in use may be detected.
•
Select the access point name you wrote down on page 27, then press the OK button.
Enter upper and lower case letters of the alphabet correctly.•
For details on character entry, refer to the printed manual: Network Setup Troubleshooting.
•

7 8 9F
�0 10 Wireless Setup
Make sure that the network key is correct, then press the OK button.
Next, read "12 Install the Software (Network Connection)" on page 43!
If Failed to connect to the access point. appears, press the OK button, make sure that the network key is correct, then enter it again. If a connection still cannot be established, refer to the printed manual: Network Setup Troubleshooting.
•
Press the COPY button (F).The copy standby screen is displayed.
When the above screen appears, press the OK button.The Setup menu screen returns.

21A B
C
10 Wireless Setup �1
Wir
eles
s S
etup
Usi
ng W
PS
(W
i-F
i P
rote
cted
Set
up)
Press the Setup button (A). Use the [ or ] button (B) to select Wireless LAN setup, then press the OK button.
Read this section only when setting up a wireless connection by using the WPS (Wi-Fi Protected Setup).
If not using WPS, the following procedure is not necessary.
The Setup menu screen is displayed.

4 5 63D
7
�� 10 Wireless Setup
Select Push button method, then press the OK button.
Select WPS, then press the OK button.
To use the PIN code method for setup, select PIN code method in , then press the OK button. Follow the on-screen instructions to operate the machine and access point. When the screen in appears, press the OK button. When the screen in
returns, press the COPY button to return to the copy standby screen. A timeout error occurs if setup is not completed within 10 minutes. If the timeout error screen appears, press the OK button, then perform the setup again and set the new PIN code displayed on the screen to the access point. If another error appears, refer to the printed manual: Network Setup Troubleshooting.
•
Press the OK button.Use the { or } button (C) to select Yes, then press the OK button.When wireless connection is enabled, the Wi-Fi lamp (D) lights blue.
Select Other setup, then press the OK button.
8 9E
10
��10 Wireless Setup
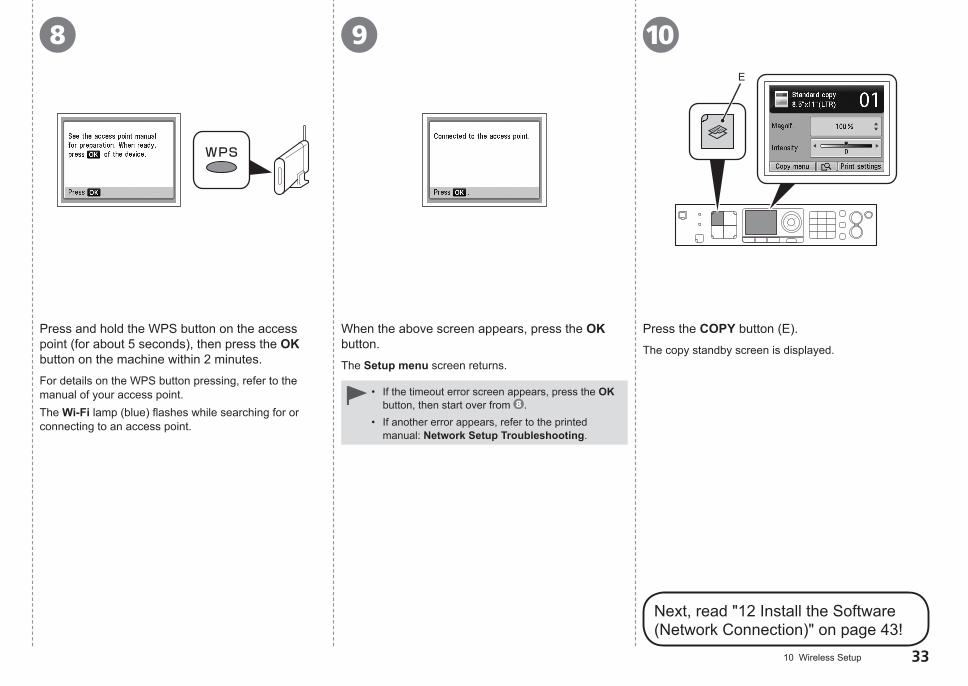
Press and hold the WPS button on the access point (for about 5 seconds), then press the OK button on the machine within 2 minutes.For details on the WPS button pressing, refer to the manual of your access point.The Wi-Fi lamp (blue) flashes while searching for or connecting to an access point.
If the timeout error screen appears, press the OK button, then start over from .If another error appears, refer to the printed manual: Network Setup Troubleshooting.
•
•
Press the COPY button (E).The copy standby screen is displayed.
When the above screen appears, press the OK button.
Next, read "12 Install the Software (Network Connection)" on page 43!
The Setup menu screen returns.

1 A-1
�� 10 Wireless Setup
Wir
eles
s S
etup
Usi
ng W
CN
(W
indo
ws
Con
nect
Now
)
From the Start menu of the Windows side, click Network.The Network folder opens.
Click Add a wireless device on the menu.The Add a wireless device to the network screen will be displayed.
Click I want to add a wireless device or computer that is not on the list, using a USB flash drive.
1
Windows VistaWindows 7 - (P.36)
2 3
Read this section only when setting up a wireless connection by using the WCN (Windows Connect Now) function of Windows 7/Windows Vista. If not using WCN, the following procedure is not necessary.Proceed with the setup according to your operating system.
The machine supports "WCN-UFD".•
Before setting up by using the WCN, establish wireless communication between the computer and the access point.Canon assumes no responsibility for any damage or loss of data stored on your USB flash drive regardless of the cause even within the warranty period.If your USB flash drive cannot be attached to the Direct Print Port of the machine, a commercial extension cord (for USB flash drives) may be required.Operation may not be guaranteed depending on your USB flash drive.USB flash drives with security enabled may not be used.
•
•
•
•
•
Windows 7
Windows Vista
Go to - on page 36.
Go to - .

��10 Wireless Setup
When the above screen appears, remove the USB flash drive from the computer, then click Close.
Click Add the device or computer using a USB flash drive.
From the list, select the network name (SSID), then click Next.
Connect the USB flash drive to the computer, make sure that the drive name is displayed, then click Next.
If the User Account Control dialog box appears, click Continue. If the same dialog box reappears in subsequent steps, click Continue.
•
4 5 6 7
Go to on page 37.
1 -1 B
�� 10 Wireless Setup
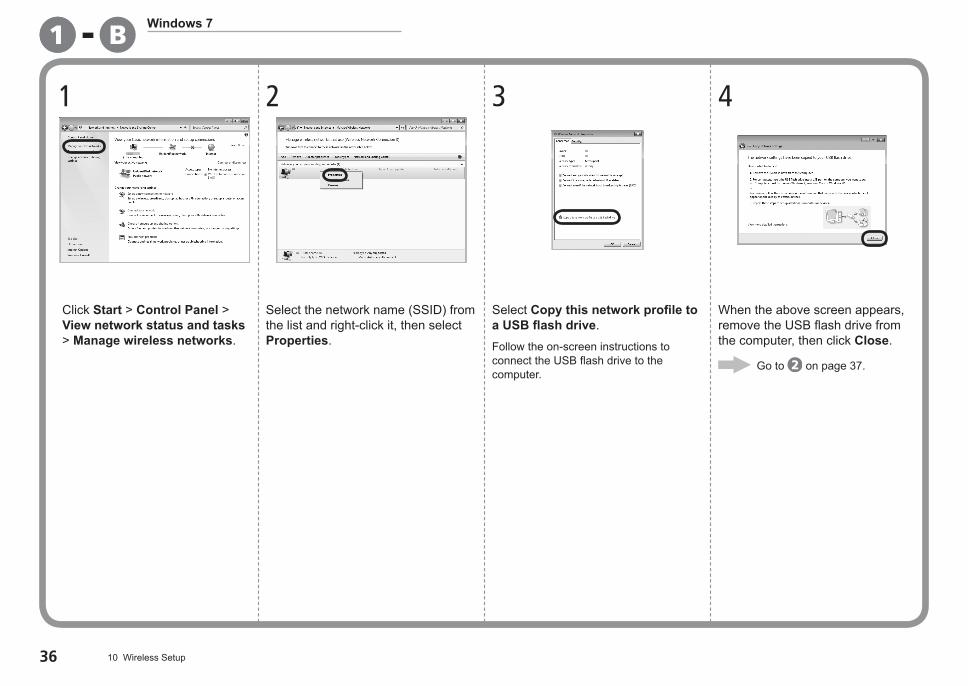
Click Start > Control Panel > View network status and tasks > Manage wireless networks.
Select the network name (SSID) from the list and right-click it, then select Properties. Follow the on-screen instructions to
connect the USB flash drive to the computer.
Select Copy this network profile to a USB flash drive.
1
Windows 7
2 3
When the above screen appears, remove the USB flash drive from the computer, then click Close.
4
Go to on page 37.

A D
4 532B
C
��10 Wireless Setup
Press the Setup button (A). Use the [ or ] button (B) to select Wireless LAN setup, then press the OK button.
Use the { or } button (C) to select Yes, then press the OK button.When wireless connection is enabled, the Wi-Fi lamp (D) lights blue.
Select Other setup, then press the OK button.
The Setup menu screen is displayed.

F
E
8 96 7
�� 10 Wireless Setup
Select WCN, then press the OK button.
When the above screen appears, press the OK button, then remove the USB flash drive from the machine.
Connect the USB flash drive to the Direct Print Port (USB connector) (E) on the front of the machine, then press the OK button.
Next, read "12 Install the Software (Network Connection)" on page 43!
Press the COPY button (F).The copy standby screen is displayed.
The Setup menu screen returns.
11
��
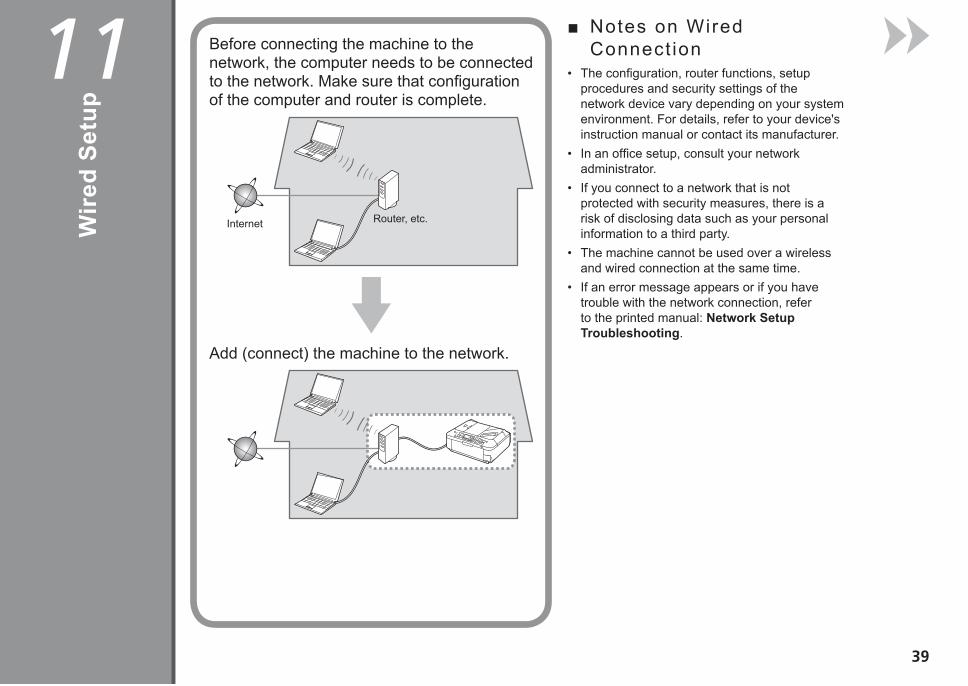
Notes on Wired Connect ion
■
The configuration, router functions, setup procedures and security settings of the network device vary depending on your system environment. For details, refer to your device's instruction manual or contact its manufacturer.In an office setup, consult your network administrator.If you connect to a network that is not protected with security measures, there is a risk of disclosing data such as your personal information to a third party.The machine cannot be used over a wireless and wired connection at the same time.If an error message appears or if you have trouble with the network connection, refer to the printed manual: Network Setup Troubleshooting.
•
•
•
•
•
Before connecting the machine to the network, the computer needs to be connected to the network. Make sure that configuration of the computer and router is complete.
Add (connect) the machine to the network.
Internet Router, etc.Wir
ed S
etup
A B
1 2C
�0 11 Wired Setup
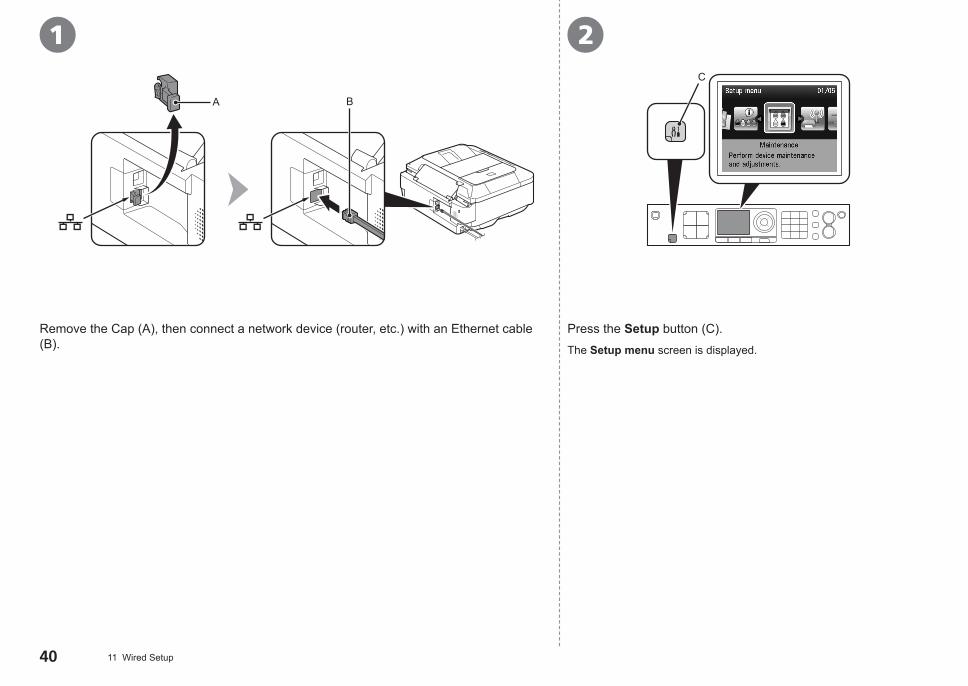
Remove the Cap (A), then connect a network device (router, etc.) with an Ethernet cable (B).
Press the Setup button (C).The Setup menu screen is displayed.

543DD
E
�111 Wired Setup
Use the [ or ] button (D) to select Device settings, then press the OK button.
Use the { or } button (E) to select LAN settings, then press the OK button.
Select Change wireless/wired, then press the OK button.

6 7F
�� 11 Wired Setup
Next, read "12 Install the Software (Network Connection)" on page 43!Select Wired LAN active, press the OK button. Press the COPY button (F).
The copy standby screen is displayed.The LAN settings screen returns.

12
��
Quit all running applications before installation.Log on as the administrator (or a member of the Administrators group).Do not switch users during the installation process.Internet connection may be required during the installation. Connection fees may apply. Consult the internet service provider.It may be necessary to restart your computer during the installation process. Follow the on-screen instructions and do not remove the Setup CD-ROM during restarting. The installation resumes once your computer has restarted.If the firewall function of your security software is turned on, a warning message may appear that Canon software is attempting to access the network. If such a warning message appears, set the security software to always allow access.Mac OS 9, Mac OS X Classic environments, or Mac OS X v.10.4.10 or earlier are not supported.
••
••
•
•
•
To use the machine by connecting it to a computer, software including the drivers needs to be copied (installed) to the computer's hard disk. The installation process takes about 20 minutes. (The installation time varies depending on the computer environment or the number of application software to be installed.)Screens are based on Windows Vista Ultimate and Mac OS X v.10.5.x.
•
•
Easy-WebPrint EX□
If you are using Internet Explorer 7 or later, you can use the Web print software Easy-WebPrint EX. An internet connection is required for installation.
Inst
all
the
Sof
twar
e
Inst
all t
he S
oftw
are
(Net
wor
k C
onne
ctio
n)
2
2
1
�� 12 Install the Software (Network Connection)
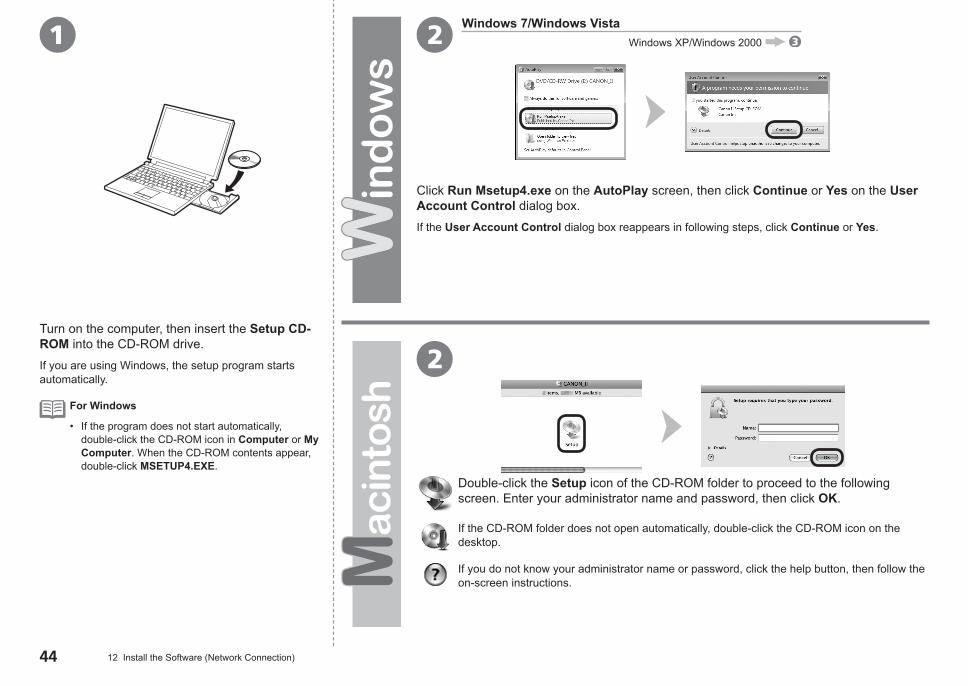
Click Run Msetup4.exe on the AutoPlay screen, then click Continue or Yes on the User Account Control dialog box.If the User Account Control dialog box reappears in following steps, click Continue or Yes.
Turn on the computer, then insert the Setup CD-ROM into the CD-ROM drive.If you are using Windows, the setup program starts automatically.
For Windows
If the program does not start automatically, double-click the CD-ROM icon in Computer or My Computer. When the CD-ROM contents appear, double-click MSETUP4.EXE.
•
Windows 7/Windows VistaWindows XP/Windows 2000
Double-click the Setup icon of the CD-ROM folder to proceed to the following screen. Enter your administrator name and password, then click OK.
If the CD-ROM folder does not open automatically, double-click the CD-ROM icon on the desktop.
If you do not know your administrator name or password, click the help button, then follow the on-screen instructions.

3 4
��12 Install the Software (Network Connection)
Click Install.Click Easy Install.The drivers, application software, and on-screen manuals are installed all together.
For Windows
If you want to select particular items to install, click Custom Install.
•
For Windows 7/Windows Vista SP1 or later
You can install the XPS Printer Driver from Custom Install. When installing the XPS Printer Driver, select the MP Drivers at the same time.For details on useful functions of the XPS Printer Driver, refer to the on-screen manual: Advanced Guide after installation is complete.
•
•
To install Easy-WebPrint EX, you need to connect your computer to the internet at this stage. (Internet Explorer 7 or later is required.) If an internet connection is not available, it is also possible to install this software later. For details, refer to "Useful Software Applications" in the on-screen manual: Basic Guide after installation is complete.
•
5 6
�� 12 Install the Software (Network Connection)
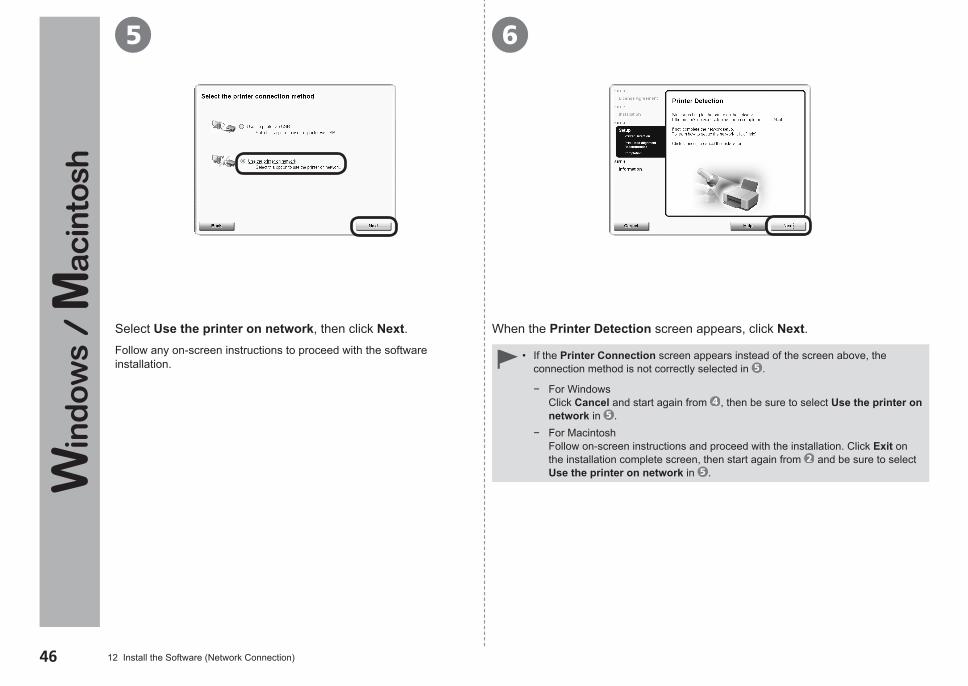
Select Use the printer on network, then click Next.Follow any on-screen instructions to proceed with the software installation.
When the Printer Detection screen appears, click Next.
If the Printer Connection screen appears instead of the screen above, the connection method is not correctly selected in .
•
For Windows Click Cancel and start again from , then be sure to select Use the printer on network in .For Macintosh Follow on-screen instructions and proceed with the installation. Click Exit on the installation complete screen, then start again from and be sure to select Use the printer on network in .
−
−
7
7
��12 Install the Software (Network Connection)
Next, read "Install the Software (Information)" on page 52!
Next, read "Install the Software (Registration)" on page 48!
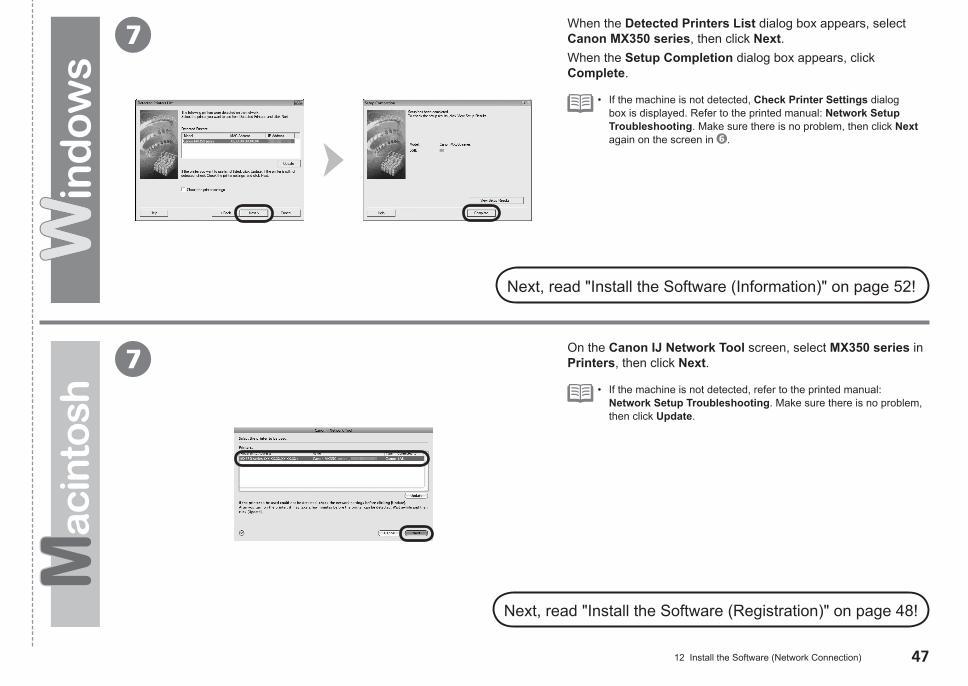
If the machine is not detected, Check Printer Settings dialog box is displayed. Refer to the printed manual: Network Setup Troubleshooting. Make sure there is no problem, then click Next again on the screen in .
•
When the Detected Printers List dialog box appears, select Canon MX350 series, then click Next.When the Setup Completion dialog box appears, click Complete.
On the Canon IJ Network Tool screen, select MX350 series in Printers, then click Next.
If the machine is not detected, refer to the printed manual: Network Setup Troubleshooting. Make sure there is no problem, then click Update.
•

1
�� 12 Install the Software (Network Connection)
This section describes how to register the machine on a Macintosh computer.Windows users: read "Install the Software (Information)" on page 52.
When the Register Printer and Scanner screen appears, click Register Printer.
v.10.6.x v.10.5.x
v.10.4.11
Mac OS X
Go to - on page 49.
Go to - on page 49.
Proceed to the section that relates to your operating system for further installation instructions.
□
The alphanumeric characters after Canon MX350 series is the machine's Bonjour service name or MAC address.If the machine has not been detected, make sure of the following.
•
•
Inst
all
the
Sof
twar
e (R
egis
trat
ion)
The machine is turned on.The firewall function of any security software is turned off.Wireless Connection: The computer is connected to the access point.Wired Connection: The machine is connected to the network device with the Ethernet cable.
−−
−
−
A-2 B-2
��12 Install the Software (Network Connection)
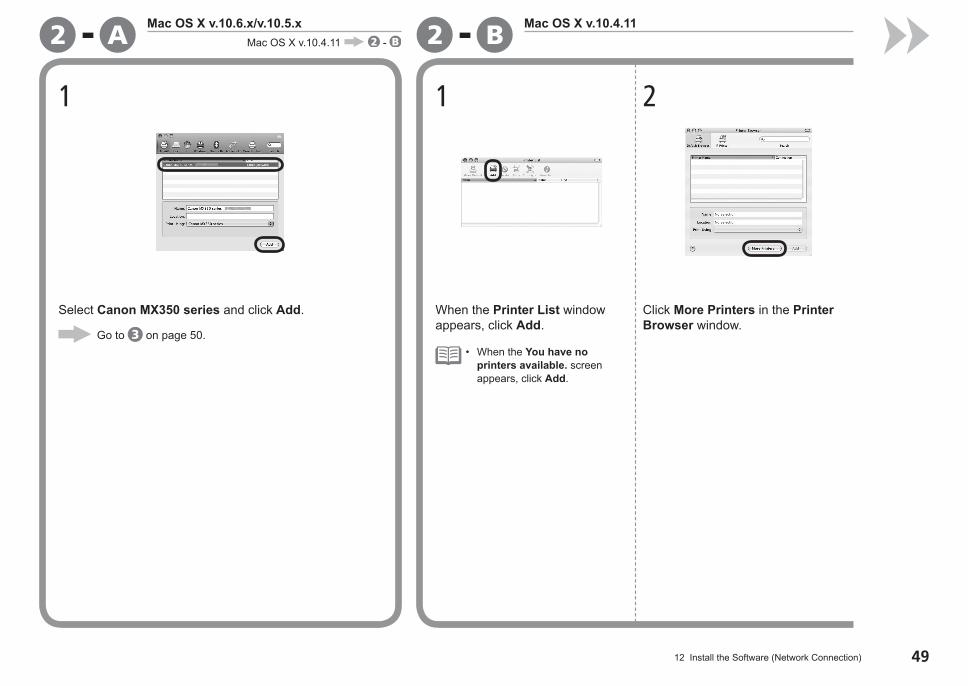
Select Canon MX350 series and click Add.
1
Go to on page 50.
Click More Printers in the Printer Browser window.
2
When the Printer List window appears, click Add.
1
When the You have no printers available. screen appears, click Add.
•
Mac OS X v.10.4.11Mac OS X v.10.6.x/v.10.5.xMac OS X v.10.4.11 -

3
�0 12 Install the Software (Network Connection)
When the Register Printer and Scanner screen appears, click Register Scanner.
Make sure that Canon MX350 series is added to the list of printers.
4
Go to .
Select Canon IJ Network in the pop-up menu, select Canon MX350 series in the list of printers, then click Add.
3

4 5
�112 Install the Software (Network Connection)
Select Canon MX350 series on the Scan-from-PC Settings screen, then click OK.
Click Next on the Register Printer and Scanner screen.
Next, read "Install the Software (Information)" on page 52!

1
Serial No. * * * * * * * * *
A
�� 12 Install the Software (Network Connection)
Click Next.
Necessary Information for the User Registration
□
If you can agree to Extended Survey Program, click Agree. If you click Do not agree, the Extended Survey Program will not be installed. (This has no effect on the machine's functionality.)
Important Information for the Installation
Inst
all
the
Sof
twar
e (I
nfor
mat
ion)
If the Extended Survey Program screen appears
□
If the power is on, the FINE Cartridge Holder will move when the Scanning Unit (Cover) (A) is opened.
•
The product serial number is required when registering the product. The serial number is located inside the machine (as shown in the illustration).
Follow any on-screen instructions to proceed with the software installation.

2 3
��12 Install the Software (Network Connection)
Click Exit to complete the installation.If Restart is displayed, follow the instruction to restart the computer.
Congratulations! Setup is complete. Proceed to page 55 for information regarding the Solution Menu and the on-screen manual or page 56 to start using the machine.
For Macintosh:
Using the Machine from Additional Computers
Now that the wireless/wired connection of the machine is complete, it can be used from additional computers on the same network.Install software including the drivers on the computer from which you want to use the machine. Other settings are not required.
For the software installation procedure, refer to "12 Install the Software (Network Connection)" on page 43.
Computer from which the machine can be used currently
Additional computers on the same networkIt is necessary to restart the computer
before scanning using the Operation Panel on the machine for the first time.
Remove the Setup CD-ROM and keep it in a safe place.The buttons displayed on Solution Menu may vary depending on the country or region of purchase.
••
For Windows:Solution Menu starts automatically.
For Macintosh:Click the icon on the Dock to start Solution Menu.
13
��
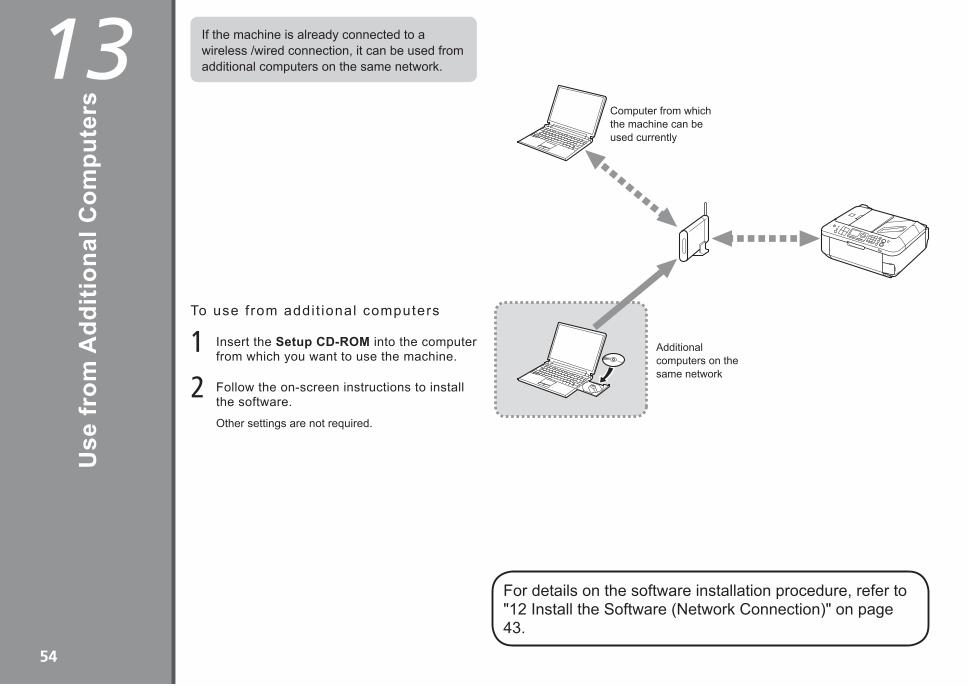
If the machine is already connected to a wireless /wired connection, it can be used from additional computers on the same network.
For details on the software installation procedure, refer to "12 Install the Software (Network Connection)" on page 43.
Use
from
Add
ition
al C
ompu
ters Computer from which
the machine can be used currently
Additional computers on the same network
Other settings are not required.
Insert the Setup CD-ROM into the computer from which you want to use the machine.
1Follow the on-screen instructions to install the software.
2
To use from addi t ional computers

14
��
Solut ion Menu is a gateway to funct ions and informat ion that al low you to make ful l use of the machine! For example,
Solut ion Menu
Use the Operat ion Panel on the machine to pr int your own i tems easi ly.
Var ious appl icat ion sof tware are instal led on the computer along with the dr ivers. You can pr int creat ive i tems by correct ing/enhancing photos using the appl icat ion sof tware.
For detai ls on how to use the appl icat ion sof tware and the machine, refer to the on-screen manual.
Open the on-screen manual with a single click.Open various applications with a single click.
••
How to start Solution Menu
Click this icon on the desktop (Windows) or on the Dock (Macintosh) to start Solution Menu.
If you have a problem with machine settings, click this button.
Click this button to open the on-screen manual.
How to open the on-screen manual
Try
Usi
ng th
e M
achi
ne
1 2 3
B
C
DA
�� 14 Try Using the Machine
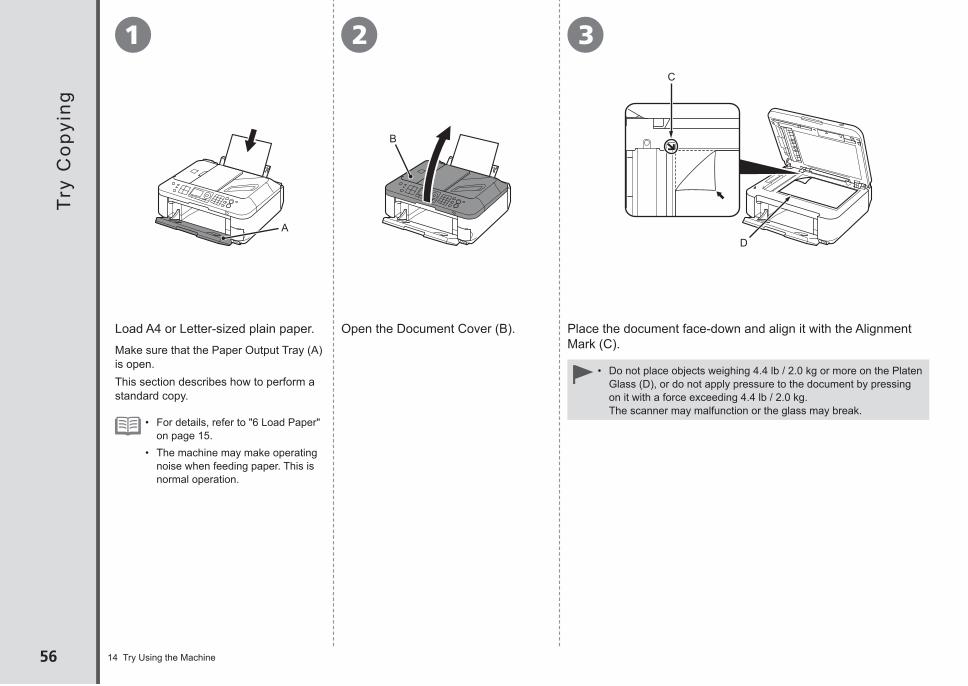
Open the Document Cover (B). Place the document face-down and align it with the Alignment Mark (C).
Do not place objects weighing 4.4 lb / 2.0 kg or more on the Platen Glass (D), or do not apply pressure to the document by pressing on it with a force exceeding 4.4 lb / 2.0 kg. The scanner may malfunction or the glass may break.
•
Try
Cop
ying
Load A4 or Letter-sized plain paper.
For details, refer to "6 Load Paper" on page 15.The machine may make operating noise when feeding paper. This is normal operation.
•
•
Make sure that the Paper Output Tray (A) is open.This section describes how to perform a standard copy.
4
EF
G
��14 Try Using the Machine
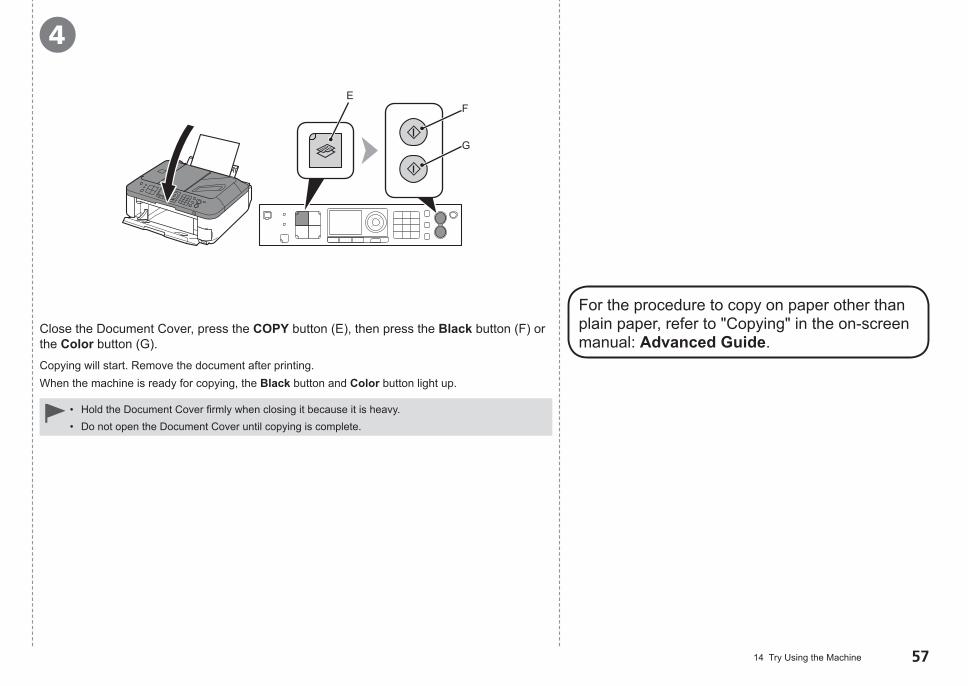
Close the Document Cover, press the COPY button (E), then press the Black button (F) or the Color button (G).Copying will start. Remove the document after printing.When the machine is ready for copying, the Black button and Color button light up.
Hold the Document Cover firmly when closing it because it is heavy.Do not open the Document Cover until copying is complete.
••
For the procedure to copy on paper other than plain paper, refer to "Copying" in the on-screen manual: Advanced Guide.

1 2 3 4
A
�� 14 Try Using the Machine
Start Solution Menu from the Canon Solution Menu icon on the desktop (Windows) or on the Dock (Macintosh), then click One-Click to Photo Print.
Select the image you want to print, then click Layout/Print.
Easy-PhotoPrint EX starts.
When a photo is selected, the number of copies is set to "1".
Load 4" x 6" size photo paper in portrait orientation with the printing side facing up.Make sure that the Paper Output Tray (A) is open.This section explains how to print borderless photos using 4" x 6" size Photo Paper Plus Glossy II.
Click Print.
For details, refer to "6 Load Paper" on page 15.
•The screens are based on Windows Vista.For details on starting Solution Menu, refer to page 55.
••
Pri
nt P
hoto
s fr
om a
Com
pute
r
For more information, refer to the on-screen manual: Advanced Guide.
If you are using Windows, printing will start.If you are using Macintosh, click Print on the Print dialog box to start printing.

21
C D
A
B
14 Try Using the Machine ��
Press the FAX button (A).The fax standby screen is displayed.This section explains how to send a fax in black and white from the ADF (Auto Document Feeder) (B).
Open the Document Tray (C), then move the Document Guides (D) to both edges.
For details on supported documents and settings for image quality, density (brightness), etc., refer to the on-screen manual: Basic Guide.
•
Sen
d F
axes
Make sure that the telephone line type is set correctly. For the setting procedure, refer to "Preparing for Faxing" in the on-screen manual: Basic Guide.The setting may not be available depending on the country or region of your residence.
•
•
53 4E
F
�0 14 Try Using the Machine
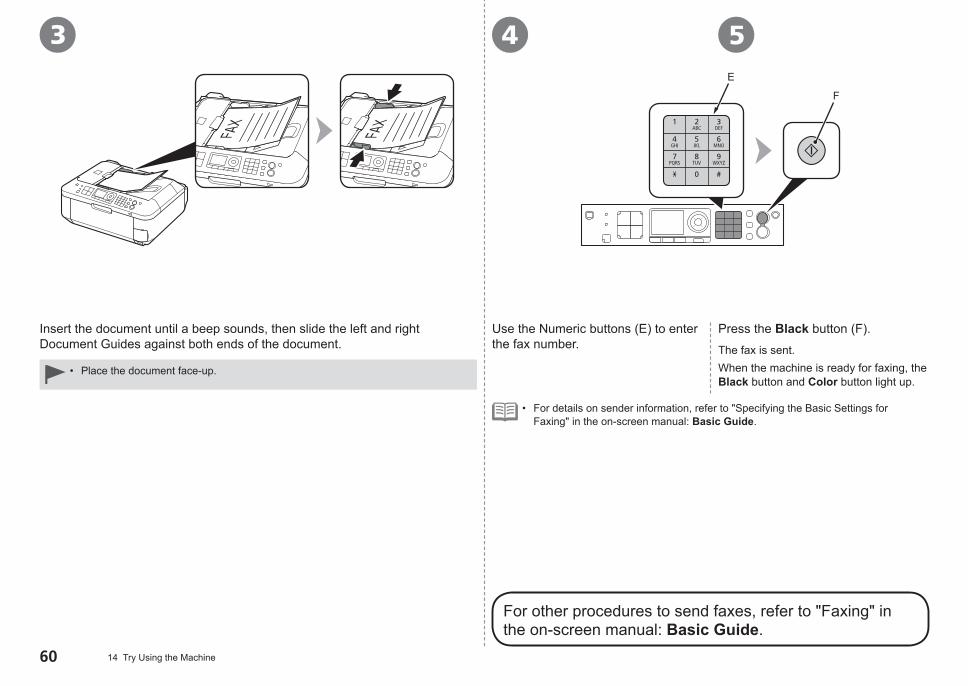
Insert the document until a beep sounds, then slide the left and right Document Guides against both ends of the document.
Use the Numeric buttons (E) to enter the fax number.
Press the Black button (F).The fax is sent.When the machine is ready for faxing, the Black button and Color button light up.
For details on sender information, refer to "Specifying the Basic Settings for Faxing" in the on-screen manual: Basic Guide.
•
Place the document face-up.•
For other procedures to send faxes, refer to "Faxing" in the on-screen manual: Basic Guide.
15
B
A
�1
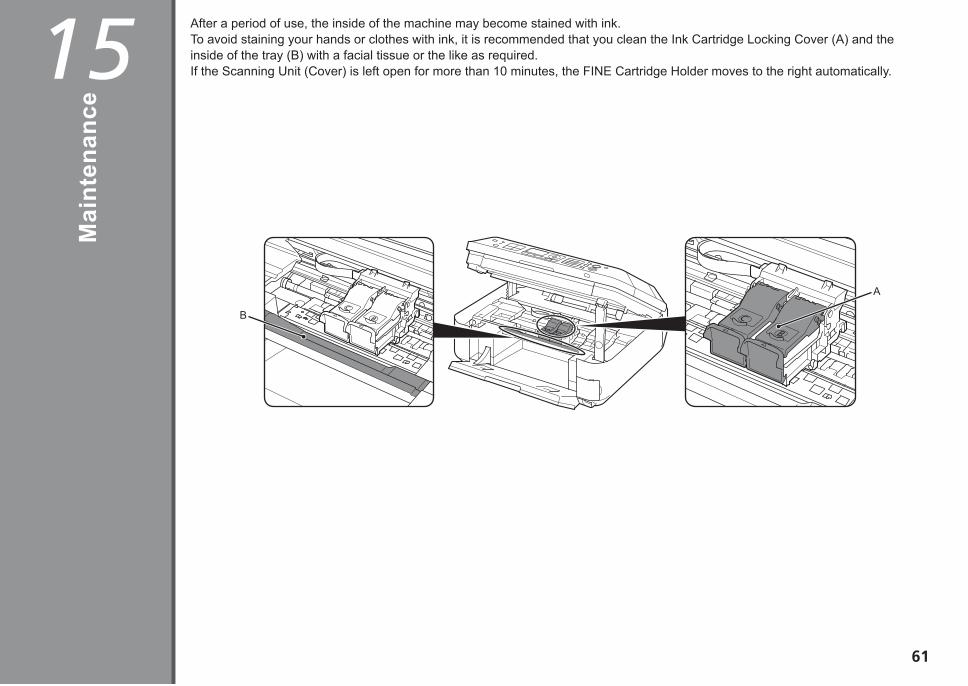
After a period of use, the inside of the machine may become stained with ink. To avoid staining your hands or clothes with ink, it is recommended that you clean the Ink Cartridge Locking Cover (A) and the inside of the tray (B) with a facial tissue or the like as required. If the Scanning Unit (Cover) is left open for more than 10 minutes, the FINE Cartridge Holder moves to the right automatically.
Mai
nten
ance

16
��
Spec
ifica
tions
General SpecificationsPrinting resolution (dpi)
4800* (horizontal) x 1200 (vertical)* Ink droplets can be placed with a pitch of 1/4800 inch at minimum.
Interface USB Port: Hi-Speed USB *1
Direct Print Port: PictBridge Bluetooth v2.0 (Option) *2 *3 *4 USB flash drive
LAN Port: Wired LAN: 100BASE-TX/10BASE-T Wireless LAN: IEEE802.11b/IEEE802.11g *5
*1 A computer that complies with Hi-Speed USB standard is required. Since the Hi-Speed USB interface is fully upwardly compatible with USB 1.1, it can be used at USB 1.1.
*2 Maximum speed: 1.44 Mbps*3 JPEG/PNG only*4 Bluetooth connection is for printing only.*5 Setup possible through Easy setup, WPS (Wi-Fi Protected Setup) or WCN
(Windows Connect Now).Print width 8 inches /203.2 mm
(for Borderless Printing: 8.5 inches/216 mm)Operating environment
Temperature: 5 to 35°C (41 to 95°F) Humidity: 10 to 90% RH (no condensation)
Storage environment Temperature: 0 to 40°C (32 to 104°F) Humidity: 5 to 95% RH (no condensation)
Power supply AC 100-240 V, 50/60 HzPower consumption Printing (Copy): Approx. 12W
Standby (minimum): Approx. 2.7W* OFF: Approx. 0.8W** USB connection to PC
External dimensions Approx. 18.1 (W) x 16.4 (D) x 7.8 (H) inches Approx. 458 (W) x 415 (D) x 198 (H) mm* With the Paper Support and Paper Output Tray retracted.
Weight Approx. 8.8 kg (Approx. 19.4 lb)* With the FINE Cartridges installed.
Canon FINE Cartridge
Black: 320 nozzelsColor: 384 x 3 nozzels
ADF capacity A4 or Letter size: Max. 30 sheets (20 lb/75 gsm paper), up to 0.16 inches/4 mm in heightLegal size: Max. 5 sheets (20 lb/75 gsm paper), up to 0.04 inches/1 mm in heightOther sizes: 1 sheet
Copy SpecificationsMultiple copy Max 99 pagesIntensity adjustment 9 positions, Auto intensity (AE copy)Reduction/Enlargement
25% - 400% (1% unit)
Scan SpecificationsScanner driver TWAIN/WIA (for Windows 7/Windows Vista/Windows XP)Maximum scanning size
A4/Letter, 8.5 x 11.7 inches/216 x 297 mm (Platen Glass)/8.5 x 14.0 inches/ 216 x 356 mm (ADF)
Scanning resolution Optical resolution (horizontal x vertical) max: 1200 dpi x 2400 dpi Interpolated resolution max: 19200 dpi x 19200 dpi
Gradation (Input/Output)
Gray: 16 bit/8 bit Color: 48 bit/24 bit (RGB each 16 bit/8 bit)
Fax SpecificationsApplicable line Public Switched Telephone Network (PSTN)Communication mode
Super G3, G3
Data compressing system
Black: MH, MR, MMRColor: JPEG
Modem speed Max. 33.6 kbps(Automatic fallback)
Transmission speed Black: Approx. 3 seconds/page at 33.6 kbps(Based on ITU-T No.1 chart for US specifications and Canon FAX Standard chart No.1 for others, both in standard mode or Canon FAX Standard chart No.1, standard mode.)Color: Approx. 1 minute/page at 33.6 kbps(Based on Canon COLOR FAX TEST SHEET.)
Gradation Black: 256 levelsColor: 24 bit Full Color (RGB each 8 bit)
Density adjustment 3 levelsMemory Transmission/reception: approx. 50 pages
(Based on ITU-T No.1 chart for US specifications and Canon FAX Standard chart No.1 for others, both in standard mode.)
Fax resolution Black Standard: 8 pels/mm x 3.85 lines/mm (203 pels/inch x 98 lines/inch)Black Fine, Photo: 8 pels/mm x 7.70 lines/mm (203 pels/inch x 196 lines/inch)Black Extra fine: 300 x 300 dpiColor: 200 x 200 dpi
Dialing Automatic dialing Coded speed dial (max. 20 destinations) Group dial (max. 19 destinations)Regular dialing (with Numeric buttons)Automatic redialingManual redialing (with the Redial/Pause button/max. 10 destinations)
Others Activity report (after every 20 transactions)Sequential broadcasting (max. 21 destinations)Rejected numbers (Max 10 destinations)

��16 Specifications
Minimum System Requirements Conform to the operating system’s requirements when higher than those given here.
Operating SystemProcessorRAM
Windows 71 GHz or faster 32-bit (x86) or 64-bit (x64) processor 1 GB (32-bit)/2 GB (64-bit)
Windows Vista, Vista SP1, Vista SP21 GHz processor512 MB
Windows XP SP2, SP3300 MHz processor128 MB
Windows 2000 Professional SP4300 MHz processor128 MB
Mac OS X v.10.6Intel processor1GB
Mac OS X v.10.5Intel processor, PowerPC G5, PowerPC G4(867 MHz or faster)512 MB
Mac OS X v.10.4.11Intel processor, PowerPC G5, PowerPC G4, PowerPC G3256 MB
Browser Internet Explorer 6 or later SafariHard Disk Space 650 MB
Note: For bundled software installation.850 MBNote: For bundled software installation.
CD-ROM Drive RequiredDisplay SVGA 800 x 600 XGA 1024 x 768
Windows: Operation can only be guaranteed on a PC with Windows 7, Windows Vista, Windows XP or Windows 2000 pre-installed. Windows: Uninstall software bundled with the Canon inkjet printer before upgrading from Windows Vista to Windows 7, then, install the bundled software again.Some functions may not be available with Windows Media Center.Macintosh: Hard Disk must be formatted as Mac OS Extended (Journaled) or Mac OS Extended.Macintosh: After upgrading from Mac OS X v.10.5 or lower to Mac OS X v.10.6, install software bundled with the Canon inkjet printer.Internet Explorer 7 or later is required to install Easy-WebPrint EX.
•
•
•••
•
Specifications are subject to change without notice.About ConsumablesConsumables (ink tanks / FINE Cartridges) are available for 5 years after production has stopped.
Additional System Requirements for the On-Screen Manuals
Browser: Easy Guide ViewerNote: Internet Explorer 6 or later must be installed. The on-screen manual may not be displayed properly depending on your operating system or Internet Explorer version. We recommend that you keep your system up to date with Windows Update.
Browser: Easy Guide ViewerNote: The on-screen manual may not be displayed properly depending on your operating system or Safari version. We recommend that you keep your system up to date.
Network SpecificationsCommunication protocol
TCP/IP
Wireless LAN Supported Standards: IEEE802.11g/IEEE802.11bTransfer speed: IEEE802.11g: 6/9/12/18/24/36/48/54 Mbps IEEE802.11b: 1/2/5.5/11 MbpsFrequency bandwidth *1: 2.412-2.462 GHz or 2.412 GHz-2.472 GHzChannel *1: 1-11 or 1-13Communication distance: Indoors 50 m *2Security: Encryption by WPA-PSK, WPA2-PSK, or WEP (64/128 bits), and access control by
passwords
*1 Frequency bandwidth and available channels differ depending on country or region.*2 Effective range varies depending on the installation environment and location.
Wired LAN Supported Standards: IEEE802.3u (100BASE-TX)/IEEE802.3 (10BASE-T)Transfer speed: 10M/100Mbps (auto switching)

QT5-2840-V01 XXXXXXXX ©CANON INC.2010 PRINTED IN VIETNAM
Email Tech Support — www.usa.canon.com/support
The following ink cartridges are compatible with this machine.
Getting Help from Canon
This option provides live telephone technical support, free of service charges, Monday-Friday (excluding holidays), during the warranty period. Telephone Device for the Deaf (TDD) support is available at 1-866-251-3752.
Toll-Free Tech Support— 1-800-OK-CANON
Ordering Information
Call 1-800-OK-CANON to locate a dealer near you, or visit the Canon online store at www.shop.usa.canon.com
PG-210XLCL-211XLPG-210CL-211
2973B0012975B0012974B0012976B001
Order #
CANON U.S.A. INC.One Canon Plaza, Lake Success, NY 11042 U.S.A.www.usa.canon.com