sella by - fibre mood · 2018-08-21 · fusible interlining applied to the wrong side. 0 0 0....
TRANSCRIPT

#Sella 1/9
Sella by

#Sella 2/9
Short, sassy A-line button-through skirt in rust-brown, with a row of buttons along the front side. The waistline can be easily adjusted
thanks to the buttonhole elastic in the waistband. The sweet pockets on the back make this skirt pretty as a picture.
Sella by
2 - 14 years
2

#Sella 3/9
• Thread
• Buttonhole elastic: see table
• Iron-on fusible interlining: 45 cm
• Snaps (ø 1 cm): 4 (for sizes 2-6)
5 (for sizes 8-10) - 6 (for sizes 12-14)
• Buttons (ø 1 cm): 2
• Fabric: see table
Compare the stated length for the skirt to the measured or desired lengths. Lengthen or shorten the pattern by cutting the pattern pieces at the indicated double lines and then spreading the pattern pieces out X cm from each other or overlapping them. Make sure that the CF and CB lines and the side seams all run straight through.
measurements
2
* 140 cm wide
size (year)
fabric* (cm)
2
35
3-5
40
6-8
45
10-12
55
14
60
notions
BL: body length Waistline measurement (WM): Measure horizontally at the waistline. Hip measurement (HM): Measure horizontally at the widest point of the lower body.
sizing chart
size (year)
BL (cm)
WM (cm)
HM (cm)
2
92
50
56
3
98
52
58
4
104
53
60
5
110
54
62
6
116
55
64
8
128
57
68
10
140
60
72
12
152
63
76
14
164
66
80
size (year)
length (cm)
1/2 WM (cm)
1/2 HM (cm)
2
21
25.75
28
3
23
26.75
28.75
4
25
27.25
29.75
5
27
27.75
30.75
6
29
28.25
31.5
8
32.5
29.25
33.5
10
36
30.75
35.5
12
39.5
32.25
37.5
14
43
33.75
39.5
* 2 cm wide
size (year)
elastic* (cm)
2
31.5
4
33
5
33.5
6
34
8
35
3
32.5
10
36.5
12
38
14
39.5
It’s best to make the Sella Skirt in a medium weight fabric, like denim or suede, which has a slightly stiffer drape and therefore suits an A-line.
fabric advice
IMP
O
RTANT
Adapt the amount of fabric used to the alterations that you are making to the pattern!
HM
WM
#Sella 4/9
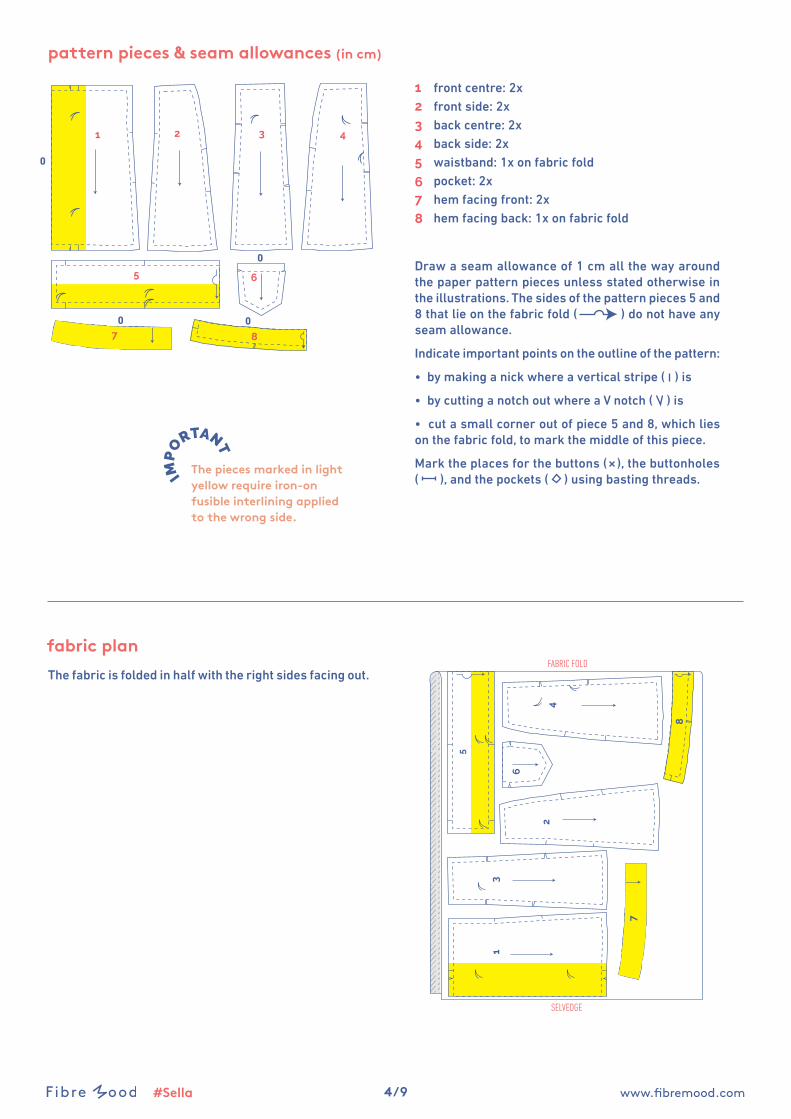
pattern pieces & seam allowances (in cm)
front centre: 2xfront side: 2xback centre: 2x back side: 2xwaistband: 1x on fabric foldpocket: 2xhem facing front: 2xhem facing back: 1x on fabric fold
12345
67
8
Draw a seam allowance of 1 cm all the way around the paper pattern pieces unless stated otherwise in the illustrations. The sides of the pattern pieces 5 and 8 that lie on the fabric fold ( ) do not have any seam allowance.
Indicate important points on the outline of the pattern:
• by making a nick where a vertical stripe ( ) is
• by cutting a notch out where a V notch ( ) is
• cut a small corner out of piece 5 and 8, which lies on the fabric fold, to mark the middle of this piece.
Mark the places for the buttons ( ), the buttonholes ( ), and the pockets ( ) using basting threads.
1 32 4
5
7 8
6
fabric plan
13
24
5
7
8
6
FABRIC FOLD
SELVEDGE
The fabric is folded in half with the right sides facing out.
IMP
O
RTANT
The pieces marked in light yellow require iron-on fusible interlining applied to the wrong side.
0
0 0
0

#Sella 5/9
Pin and sew the front centre (1) and the front side (2) with the markings matching exactly. Finish the raw edges together using an overlock stitch.
Press the seam allowances to the front centre.
Secure with one row of topstitching right next to the seam and another row at presser foot width.
sewing instructions
1
Key with symbolsand abbreviations used
21
1 2 1 2
2 1
21
21
1 2 1 2
2 1
21
21
1 2 1 2
2 1
21
21
1 2 1 2
2 1
21
The method used to finish sewing the garment depends on the fabric used. The various pieces are sewn together each time with the right sides of the fabric matching exactly, unless stated otherwise.
1 (cijfers) = DIN NEXT LT PRO / 16 pt
SELLA ROK
elastiek
Legende Filippa
goede kant
averechtse kant
strijkbare tussenvoering
middenvoor
rechtervoorpand
linkervoorpand
middenrug
voorpand
rugpand
right side
reverse side
interlining
elastic
centre front
centre back
left front panel
front panel
back panel
CF
CB
LFP
FP
BP
#Sella 6/9
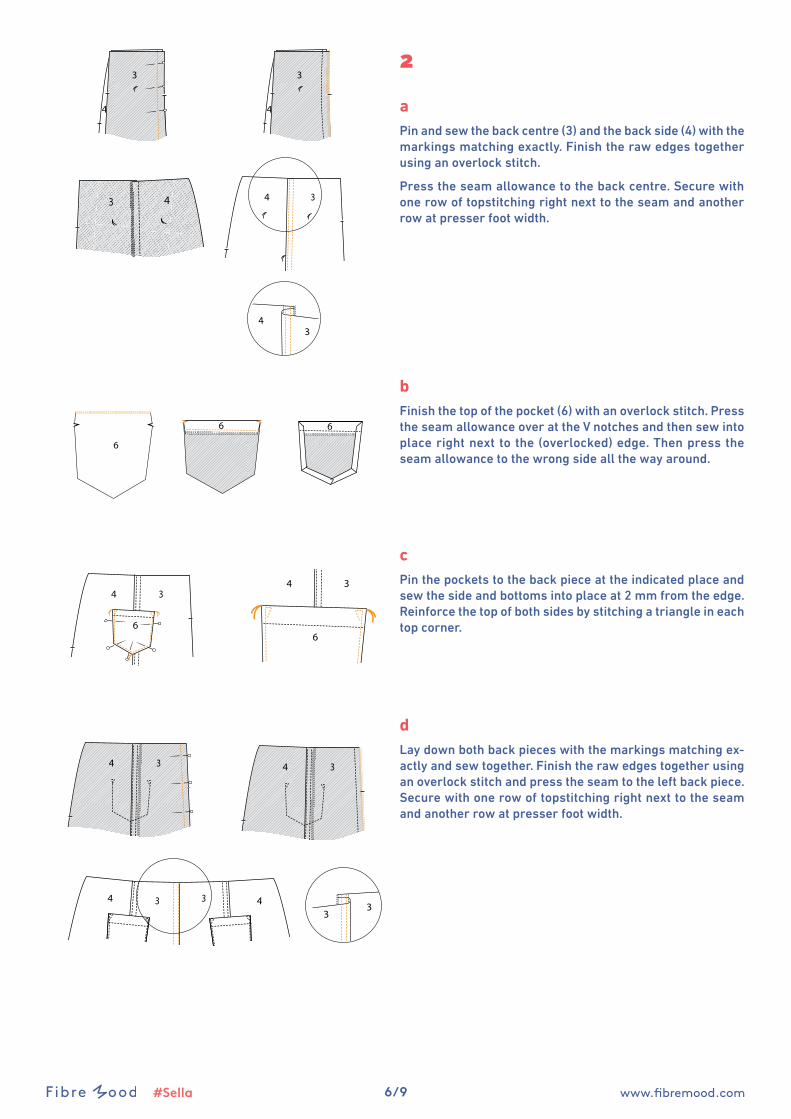
2
aPin and sew the back centre (3) and the back side (4) with the markings matching exactly. Finish the raw edges together using an overlock stitch.
Press the seam allowance to the back centre. Secure with one row of topstitching right next to the seam and another row at presser foot width.
bFinish the top of the pocket (6) with an overlock stitch. Press the seam allowance over at the V notches and then sew into place right next to the (overlocked) edge. Then press the seam allowance to the wrong side all the way around.
cPin the pockets to the back piece at the indicated place and sew the side and bottoms into place at 2 mm from the edge. Reinforce the top of both sides by stitching a triangle in each top corner.
dLay down both back pieces with the markings matching ex-actly and sew together. Finish the raw edges together using an overlock stitch and press the seam to the left back piece. Secure with one row of topstitching right next to the seam and another row at presser foot width.
6
6
6
34
6
4 3
6
4
4
34
4
3
3 4
343
4
4
4
34
4
3
3 4
343
4
4
4
34
4
3
3 4
343
4
4
4
34
4
3
3 4
343
4
34 34
3 34 43
3
34 34
3 34 43
3

#Sella 7/9
4
aMake two vertical buttonholes in the waistband at the basting threads.
bFold the waistband in half lengthwise, with the right side of the fabric facing in and sew the short sides at each end. Then turn waistband inside out.
cOverlock the right side to CF. Pin the raw edges of the waistband to the top of the skirt. The finished short side is even with the V notch. Fold the shaped facing over the waistband at the V notch and sew together.
Finish the raw edges using an overlock stitch. Fold the facing back over to the wrong side of the skirt.
3 34 4
3 34 421
12
5
555
21
5
5
11
5
21
5
5
2
1 5
5
12
3
Now finish the side seams of both front pieces and of the back using an overlock stitch. Pin and sew these into place. Press the seam allowances open each time.
21
5
5
11
5
21
5
5
2
1 5
5
12
21
5
5
11
5
21
5
5
2
1 5
5
12

8/9#Sella
7 8
78
787
8
75
aOverlock the short sides for the hem facing front (7) and hem facing back (8). Pin and sew the side seams (the sides with the markings).
Press the seam allowance open. Overlock the top of the facing.
bPin and sew the short sides at the bottom of the side of the shaped facing for the front. Press the seam open..
cNow press the shaped facing of the CF to the right side of the skirt at the V notches. Pin the unfinished side of the hem facing to the hem of the skirt (with the markings on the seam each time). Sew together.
dFold the hem facing and the seam allowance to the side. Sew the hem facing into place at 2 mm from the seam through all the layers of fabric.
Reverse the shaped facing on the CF + the hem facing to the wrong side.
21
7
21
78
1
7
21
78
1
7
21
78

9/9#Sella
21
1
2
6
Fold the ends of the elastic over and sew into place.
Sew the 2 buttons to the inside of the waistband, right next to the buttonholes. Thread the buttonhole elastic through the buttonholes and attach it to the buttons on each side.
Attach the snaps at the indicated places.
Sew the hem facing into place.