selectvoice admin portal
TRANSCRIPT

1
SelectVoice Admin Portal
User Guide V2.09 090318-1

2
Index Index ................................................................................................................................... 2
Introduction ....................................................................................................................... 3
Home Page ........................................................................................................................ 4
Users ................................................................................................................................... 5
Departments .................................................................................................................... 13
Phones ............................................................................................................................. 22
Provisioning Tab ............................................................................................................ 26
Import Phone................................................................................................................... 32
Unassigned phones ....................................................................................................... 33
Routing ............................................................................................................................. 37
Auto Attendant................................................................................................................ 37
DDI Routing ..................................................................................................................... 39
Meet Me Conferences .................................................................................................... 42
Plans ................................................................................................................................. 48
Utilities ............................................................................................................................. 51
Backup ............................................................................................................................. 51
Manage Contacts ........................................................................................................... 52
Manage Contacts (Export) ............................................................................................ 52
Manage Contacts (Import) ............................................................................................ 53
System .............................................................................................................................. 54
Call Status ....................................................................................................................... 57
Licence Status ................................................................................................................ 58
SIP Status ........................................................................................................................ 60
Help ................................................................................................................................... 61

3
Introduction Admin Portal is a web based interface that allows you to quickly and easily modify the most common aspects of your Soft PBX, without having to use the standard configuration tool (Manager). Managers There are two types of Managers on the Soft PBX: System Manager This Manager has access to all areas of the Soft PBX and has access to the main Manager pages for more complex configuration. End User Manager The End User Manager still has the ability to make basic changes to the Soft PBX Configuration, however if you are in a multi tenanted environment, you will be restricted to seeing only the configuration for your organisation.
System Manager
End User Manager
End User Manager (Company)
Users (Manage Users) l l l Department (Groups) l l l Department (Manage Departments) l l l Phones (Manage Phones) l l Phones (Import Phones) l l l Phones (Unassigned) l l l Routing (AutoAttendant) l l l Routing (DDI Routing) l l l Routing (MeetMe Conference) l l l Plans (TimePlans) l l l Utilities (Backups) l l Utilities (Import Contacts) l l l System (Call Status) l l System (Licence Status) l l System (SIP Status) l l

4
Home Page
The Admin Portal Home Page gives quick access to the most common areas of the Soft PBX where changes are more likely to be made. The Home page consists of 9 menu items allowing you to make changes for Users, Departments, Phones, Routing, and Time Plans There are a further two menus items that providing you have had the correct privileges assigned to you will allow you to create a Backup, Import Contacts and view the Call, Licence and current SIP status of the Soft PBX.
Manage Users: provides a simple way to add, edit and delete users on the system. The user form also allows you to search, order or select users.
Groups: provides a simple way to add, edit, view or delete distribution groups. Manage Departments: provides a simple way to add, edit and delete departments on the system. The department form also allows you to search, order or select departments.
Manage Phones: provides a simple way to add, edit and delete Phones on the system. The Phones form allows you to search, order or select Phones. Import Phones: allows you to load a CSV file for the bulk creation of Phones and/or Users. Unassigned Phones: will list all unassigned Splicecom PCS IP and Generic SIP Phones.
Auto Attendant: provides a simple way to configure the single layer Auto Attendant facility so that callers can select the User or Department to which they wish to be transferred. DDI Routing: provides a simple way to add, edit and delete DDI entries on the system. The DDI form allows you to select the required DDI Plan and then search for the DDI entry. DDI Alternate Routing: This page provides a simple way to add additional numbers to a DDI Plan entry. The saved numbers can then be enabled to change the DDI routing to the new alternate number. MeetMe Conference: provides a simple way to add, edit and delete Meet Me Conferences on the system. The Meet Me Conference form allows you to search, order or select conferences.
Time Plans: provides a simple way to add, edit and delete TimePlans on the system. The TimePlan form allows you to search, order or select TimePlans.
Backup: provides a simple way to backup the system configuration. Import Contacts: provides a simple way to import or export contacts to/from the system database. Manage Contacts:allows you to add, edit and delete contacts
Call Status: shows the current status of calls on the specific system you are connected to. Licence Status: page shows an overview of all licences installed on the system. SIP status: page shows an overview of all SIP Trunks configured on the system.
Admin Portal Home Page

5
Users Manage users provides a quick way to add, edit and delete users on the Soft PBX. If you are a Manager of a company then you will only see the users in your organisation. To find an existing user on the system you can either use the search facility or use the Navigation controls to move through the pages. You can expand the number of entries shown by selecting from the Show entries drop down. The Manager Users page shows The users name, Extension number, Phone model (If applicable), Description and User status (Shows if a user is enabled or not)
Select a user by highlighting that user and then choosing one of the editing buttons. Editing Buttons
To add a new user, click on the Add user button this will open the user form.
To edit an existing user, click on the required user or use the search facility and then click on the Edit user button.
To delete a user, click on the required user and then on the Delete user button.
Page Navigation controls
Search will look at Name, Ext and Description
List of users for your Organisation
Select the number of users to show 15,25,50,100,250 or 500
Click to reverse the display order
Phone Model, If you hover over the Model it will display
a Picture of the phone

6
New User The New User form is used to add a new user. It has five tabs, User, Details, Forwarding, Licences & SpeedDials. The user tab allows you to set user specific details and has eight sections to it.
Username Used for the name to be associated to an extension, User names should be Alpha Numeric only and not include any punctuation characters.
Telephone Number The extension number to be associated to this user. NOTE: This will be automatically generated and is based on the last extension number used.
Description A description to be associated to this user. DialPlan A Dial plan is a table of actions that can be associated to a user or users, it allows or
restricts the numbers that can be dialled. EG the DialPlan could be used to stop International calls or restrict access to Voicemail. Your maintainer might have created several dial plans to use, please be sure to select DialPlan for this user.
Ex Directory The Ex Directory option, if ticked, will ensure that this User does not appear in the User Directory of another user. This is also enabled if a users license is invalid.
First & Last Name Users name separated into first / last name (these fields will automatically be populated)
Initial Phone This is the Physical device that the user will be using and is identified by its MAC Address (This can typically be found on the bottom of the Device)
Restrict Groups Users can be restricted from logging themselves in and out of a Group on their handsets, This Feature will only work with Splicecom’s PCS range of handsets.
Company Select the company this user belongs to. If this field is left empty, the user will not be added to a company and will be a global user. NOTE:This entry is only shown to Administrators not assigned to a company. If the Administrator is assigned to a company, the company field is not displayed and the user is added to the company the administrator is in.

7
The details tab allows you to set a user’s common features. The Home and Mobile numbers will be matched against an incoming calls number and if matched will display the users name in the Caller Display field of the phone.
Voicemail Home The Current Home field determines which Soft PBX is providing the User with the
voicemail service. This is relevant when a system consists of multiple Call Servers and it is necessary to know which Call Server is storing the User’s messages and to ensure the correct Call Server is being used.
Voicemail Access Code The access code required to be entered to login to voicemail No Answer Time The No Answer Time is the amount of time the User will be given to answer their
extension before the call is routed to voicemail or to their Forward on No Answer number .
Login Access Code The access code required to be entered to login as this User Home Phone Number Users home phone number. This field should not contain an internal system
number Mobile Phone Number Users mobile phone number. This field should not contain an internal system
number. Email Address Users email address. Logo URL URL to image to be displayed on compatible Splicecom IP Phone.

8
The forwarding tab allows you to set call forwarding and call waiting for a user. Forwarding can be set in 3 main ways, allowing users calls always to be answered.
Forward Forwards calls based on the selected forward type. Forward On Busy If you receive a call whilst being on a call and you do not have Voicemail enabled
then the call will be forwarded to the selected forward type, If voicemail is enabled then the call will ring on the forwarded number until the no answer time is reached, the call will then go to voicemail
Forward On No Answer If you do not answer a call and you do not have Voicemail enabled then the call will be forwarded to the selected forward type, If voicemail is enabled then the call will ring on the forwarded number until the no answer time is reached, the call will then go to voicemail
Call Waiting Call waiting will give a beep in the handset or headset if you are on a call telling you that you have another call, you will also get a notification on the phone of a new call waiting.
Forward calls. The forward calls drop down list gives you several ways to forward calls:
Off Default operation all calls are sent to your phone. My Extension / DDI Calls Forward internal and DDI calls, but allow Department calls. My Extension / DDI Calls and Ring my Extension
As above and ring the phone as well.
All Calls Forward ALL Calls, Internal, DDI and Department. All Calls and Ring my Extension As Above but ring the extension as well. All External Calls Forward all DDI calls only. All External Calls and ring my Extension As Above and ring the phone as well. All External / Department Calls Forward All DDI and Department calls but allow calls to the
Extension. All External / Department Calls & Ring my Extension
As Above and ring the phone as well.
All Internal Calls Forward all Internal calls, but allow DDI and Department calls. All Internal Calls & Ring my Extension As above and ring the phone as well. All Internal / Department Calls Forward all Internal / Department calls and allow DDI calls to
ring the Extension All Internal / Department Calls & Ring my Extension
As above and ring the phone as well.
Once you have selected the forward type you then have several options as to which number to send the call to:
Home Telephone Number The number set against the Users Home Telephone number in the Details tab. Mobile Telephone Number The number set against the Users Mobile Telephone number in the Details
tab. Users This will show a list of users to forward the call to, if you are a member of a
company then you will only see Users in your company. Departments This will show a list of Departments to forward the call to, if you are a member
of a company then you will only see Departments in your company. Other Free form entry to enter any other number to forward the call to.

9
Forward on Busy and No Answer. If you are on a call or do not answer call, then you have several options to forward your calls based on the call type.
None Default operation, calls will not be forwarded Internal and External Forward Internal and External calls. Internal Forward Internal calls only. External Forward External calls only.
Once you have selected the forward type you have the same options as Forward to send the calls to.
Home Telephone Number The number set against the Users Home Telephone number in the Details tab. Mobile Telephone Number The number set against the Users Mobile Telephone number in the Details
tab. Users This will show a list of users to forward the call to, if you are a member of a
company then you will only see Users in your company. Departments This will show a list of Departments to forward the call to, if you are a member
of a company then you will only see Departments in your company. Other Free form entry to enter any other number to forward the call to.
Call Waiting Call Waiting will allow the User to receive a second call and to toggle between the two calls. When this feature is enabled the user will hear an intermittent beep in the headset or handset and be alerted on the phone when a second call is received. There are several options that can be used for call waiting.
Disable If disabled calls will go to Voicemail or if enabled will follow any forwarding if set. Enable The user will hear a beep in his or her handset or headset. Phone Tools For use with partner software. Enables Call Waiting but the intermittent beep in the
headset is disabled. The beep is provided by the partner device, if the partner is not running then you will receive a beep as normal.
No Beep Enables Call Waiting but the intermittent beep is disabled. The User will be informed of a call waiting on the screen of their PCS device.
Options will remain disabled until a valid forward is selected

10
The licence tab allows you to enable or disable various licences for a user: NOTE: Disabling a licence might cause operational issues e.g. if an Operator licence was removed from a receptionist then they would no longer have the ability for forward or set DND for other users.
There are several licences that can set against a user, it is advisable that you check with your Maintainer first before changing any licence settings because of the effect it might have on the working of the Soft PBX.
User Licence Type Each user must have the correct Licence type assigned them, the choices are IP, Analogue and Virtual.
Voicemail Box Licence This enables the voicemail facility for a user. SIP Phone Licence This is required if the user is using a SIP Phone. iPCS Licence Enables a user to use the iPCS smart phone application on their Android or
IOS device. Web Portal Licence Enable if the user is has a Vision Mobility Licence and will use the Web Portal. Navigate Softphone Licence Enables Navigate to be used as a Softphone Navigate Outlook Licence This enables Navigate to integrate with Outlook Contacts and Calendar
functions. Operator Console Licence The will enable Operator features for a user, please see the Operator Console
documentation for a list of features. Disabled (lack of licence) If you have insufficient licences for a user then the system will automatically
disable the user, use this to enable a user again once the licence has been applied.
Use to select the user type associated with this user. IP Used for PCS and SIP Phones. Analogue Used for Analogue (POT) Users Virtual Used for users without a Physical device but does allow PBX functionality.
Use to select the Correct type of Outlook working for this user None Outlook is disabled Yes Allows Outlook integration within Navigate Calendar Disabled Allows Outlook integration within Navigate, However Calendar integration is disabled.
Use to select how the operator console licence should operate. None Operator Console disabled Yes Allows Operator console mode on both Phone and PCS 60 PCS Partner Only Allows Operator console mode on PCS Partner only.

11
The Favourites tab allows you to add, remove and edit favourites for a user, each user can have a number of Favourites assigned, if the user has a large number of Favourites these can be Grouped together to make them more manageable. NOTE: The groups feature is only available on Splicecom PCS Devices.
Add Group Clicking on 'Add Group' adds a new group header. You can edit the group header name by typing in the header field.
Add Favourite Clicking on 'Add Favourites' allows you to add a new blank Favourites entry. In the first field enter the telephone number and in the second field the description.
Ordering Groups You can change the groups order using the up and down arrows on each row. The groups value will be updated. Associated Favourites will move the group as it's order is changed. Changing the order value changes the order the Favourite groups are shown. eg: 1 is first, 2 is second etc. Ordering Favourites Hovering over a favourite entry will change the mouse to a move cursor. You can then click on the Favourites entry, hold and drag the entry to the required position. You can move a Favourites into a group by dragging into the required group section. Changing the order of the Favourites, changes the order they are shown. Deleting a Favourite Clicking on Trash Can against a Favourite or a Group will delete that entry from the users Favourites list. If you delete a group then any Favourites in that group will not be deleted but moved to the NOT GROUPED Favourites list. Saving the changes To save your new user or any changes made to an existing user click on the Save button a popup will appear asking if you want to save the changes, click OK to save the new user or any changes made or Cancel to go back and make further changes. If you click on close then a popup will appear, if changes have been made you can click OK to discard them or cancel to go back and make further changes.
To move a Group highlight it by hovering over the Group until it is
highlighted in blue and then click on the double chevron to change its
order.
To move a Favorite highlight it by hovering over the favorite until it is highlighted in blue and then drag it to
either add it to a group or change its order. If there are many users click on the chevron to display a list of groups you can move the user
to.

12
Deleting a user To delete a user, highlight the user you wish to delete and click the Delete button, you will see a pop-up window confirming the deletion. Press OK to remove the selected user or Cancel to stop the deletion. NOTE: Deleting a user might have an adverse effect on the operation of the SoftPBX, it is advisable to check with your Maintainer if that user is not being used for any forwarding of calls.
Highlighted user to delete

13
Departments The Departments tab gives you two options Groups and Departments, Groups allows you to create new distribution groups or amend the users in an existing Group. The Departments option allows you to create a new department or make changes to an existing one.
Groups A Group can be used to arrange together a particular selection of Users i.e Users that are in the Sales Team or users in the Account team, Groups can also be used for routing of calls to different users depending on the Department alternate routing. NOTE: When you make changes to Groups these are actioned immediately, removing a group could have severe consequences on the routing operation of the Soft PBX. The Groups page has two panes, the left side of the page shows the Available Group Members. These tiles change colour to show who is an active member of the currently selected group. The tiles can also be used to add or remove members from groups. The right hand side of the page allows you to select the required group or create a new group. Information relating to the selected group or action will be shown in the blue information pane below the Select Group list. Note: If a group is configured using capabilities, you will be able to view the group but not edit or delete it, please contact your Maintainer if you want any Capabilities changed. Create New Group To create a new group, click on the Select group drop down and select ‘Create New Group’ enter the New group name, the new group will be created when you add the first member from the available group members. To add new members to this group, click on the relevant users tile in the Available Group Members pane. The selected tile will be changed blue to show they are now a member of this group. The group will be created when the first member is added. NOTE: If you are a member of a Company then you will only see Users within your company. The Company drop down is only shown to Administrators not assigned to a company.
List of available users
List of available users
If you select a group then the users in that group get
highlighted
Allows you to search for specific users or groups of users

14
Rename Group Edit Group Delete Group To Delete a group, Select the required group from the Select Group List, Click on the Delete Group icon. A confirmation message is shown asking you to confirm the deletion of this group. Click OK to delete the group or Cancel to leave the group as it is.
To Edit a group, Select the required group from the Select Group List, the available group members tiles will update blue to show who is an active member of this group and the information pane will update to show a list of all group members. If you are using rotary distribution for a department then the order of the members entered will be used to distribute the calls. To add a new member to this group click on their tile. A confirmation message will be shown, their tile will turn blue and the members list updated. To remove a member from this group click on their tile. A confirmation message will be shown, their tile will reset and the members list updated. NOTE: If you remove all members from a group you will asked if you want to remove the empty group, click Yes to remove the group or No to keep the empty group.
To Rename a group, Select the required group from the Select Group drop down. In the information pane click on the Rename Group slider, A new field will be shown asking for the groups new name. Enter the new name and click Rename. A confirmation message is shown asking you to confirm the renaming of the group. The group will be renamed and the Select Group list updated to show the name change.

15
Departments Departments provides a quick way to add, edit and delete departments on the Soft PBX. If you are a Manager of a company then you will only see the departments in your organisation. To find an existing department on the system you can either use the search facility or use the Navigation controls to move through the pages. You can expand the number of entries shown by selecting from the Show entries drop down. Select a Department by highlighting the entry you wish to edit and then click one of the editing buttons. Editing Buttons
To add a new department, click on the Add department button this will open the Department form.
To edit an existing department, click on the required department or use the search facility and then click on the Edit department button.
To delete a department, click on the required department and then on the Delete department button.
Select the number of departments to show
15,25,50,100,250 or 500
Click to reverse the display order
Search will look at Name, Ext and Description
Page Navigation controls
List of Departments for your Organisation

16
New Department The New Department form is used to add or edit a Department. It has four tabs, Department, Distribution, Timing and Voicemail. The department tab allows you to set department specific details and has seven sections to it.
Department Name Used for the name to be associated to a department, Department names should be Alpha Numeric only and not include any punctuation characters.
Telephone Number The extension number to be associated to this department. NOTE: This will be automatically generated and is based on the last extension number used.
Description A description to be associated to this department. Out of Hours Mode The Out of Hours Mode field determines the operational state of a Department. By
default this is set to Not Used, which means the Out of Hours facilities are not used and calls are always presented to the Distributions Groups.
In Hours Time Plan The In Hours Time plan is used to specify the timeplan used for the working day. Voicemail Home This is the place where the departments Voicemail will be stored. Company Select the company this department belongs to. If this field is left empty, the
department will not be added to a company and will be a global department. (this entry is only shown to Administrators not assigned to a company)
If you enter a duplicate Department name the department name field will get a red border and you will see an error message at the bottom of the window.
Extension Number is automatically generated

17
The Distribution tab allows you to set the way calls are presented to a department it works in conjunction with the Timing tab and allows you to make routing decisions based on user availability and time.
When DDI routing has been applied to a department calls are sent to groups of users in a specific ringing pattern of if all the users in a group are already on calls, you can send calls to alternate groups based on availability or ringing time. The call flow to a department can be visualised as follows:- Distribution types
All All members of the Group are presented with a call simultaneously. This mode will allow you to reject a call (using a PCS) without it coming back a few seconds later.
Rotary A call will be presented to the member of the Group with the highest Order number. If that member is unavailable it will be presented to the User with the next highest number and so on. The system will always attempt to present a new call to the member with the highest Order number.
Sequential same as Rotary however subsequent calls will be presented to the next User in the Group after the User who was last presented with a call.
Vision or Manual This option will allow Vision call centre to control when calls will be presented to an agent.
Call to Department DDI
TimePlan
Distribution Group
Distribution Type
No free agents or Max ring time reached to move on To the alternate distribution group
Distribution Group
Distribution Type
No free agents or Max ring time reached to move on to the second alternate distribution group
Distribution Group
Distribution Type
Distribution Type
Distribution Group
Voicemail if set

18
From the Send Inbound Calls To drop down list select the first distribution group to send the calls to followed by the Ringing type, if you want calls to be routed immediately to the next Distribution group when all users in the first group are busy select Skip if Agents Busy otherwise enter a time in seconds to wait before moving to the next distribution. Keep going until you have completed your routing tree. If your department has voicemail enabled then as a last resort you can send your calls to voicemail so that no call is lost. If you have Vision call-centre then the Distribution type must be set to Vision, this allows Vision to take over call control and distribute (Please see the Vision documentation for further details)
The timing form allows you to enable comfort messaging and various timings that affect the call flow and how the call ends. Your Maintainer would have set these up for existing Departments and changing them will affect call distribution.
Max ring time before announcement The Max Ring Time before Announcement Time option will
specify how long the call will ring before the caller is played the first announcement.
Repeat announcement time The Repeat Announcement Time specifies the amount of time before the second announcement is played and how often this is then played.
Max number of active calls before busy The Max Number of Active Calls before Busy feature will determine the total number of calls to be controlled by the Department at any one time. Once this number has been exceeded any subsequent caller will be given busy.
Wrap up time The Wrap Up Time feature specifies the amount of time given to each member of the Distribution Groups at the end of each call. By default, this is set to 6 second and if configured must be set to 1 or greater. They will not be available to receive the next call until this time has elapsed. This will allow time for any administrative tasks eg completing contact reports, updating databases etc.
No answer time If Rotary or Sequential Mode is selected the No Answer Time will determine how long the call will ring on each extension before moving to the next extension.
Max no answer time before voicemail If calls to a Department are to be routed to voicemail, to allow callers to leave a message, the Max No Answer Time Before Voicemail option must be set
OOH Max no answer time before voicemail When the Department The Out of Hours Max No Answer Time before Voicemail is set a call will ring in the out of hours group for the time set before being passed to voicemail.
Distribution Options

19
Default Values. Please note, the SoftPBX has several fields where a value of zero does not mean zero: Repeat announcement time set to zero = 10 Seconds Wrapup time set to zero = 6 seconds No answer time set to zero = 15 seconds. If Max Ring Time Before Announcement is set to zero then both the repeat announcement time will be disabled, however if the Max Ring Time Before Announcement has been set the repeat announcement will be played after 15 seconds even if it is set to zero.
Max Ring Time Before Announcement
The Max Ring Time before Announcement Time option will specify how long the call will ring before the caller is played the first announcement.
Repeat Announcement Time The Repeat Announcement Time specifies the amount of time before the second announcement is played and how often this is then played.
Max Number Of Active Calls Before Busy
Max Number of Active Calls before Busy entry has been exceeded the caller will be given busy or presented to voicemail.
Wrap Up Time The Wrap Up Time feature specifies the amount of time given to each member of the Distribution Groups at the end of each call. By default, this is set to 1 second and if configured must be set to 1 or greater. They will not be available to receive the next call until this time has elapsed.
No Answer Time The No Answer Time will determine how long the call will ring on each extension before moving to the next extension.
Max No Answer Time Before Voicemail
Calls will pass to voicemail after the time entered in the Max No Answer Time before Voicemail field.
OOH Max No Answer Time Before Voicemail
the number of seconds that a call will ring for the Department before being passed to voicemail.

20
The voicemail tab allows you to add a licence to a department (see Licence status to see how many MessageBox licences are available to use), enable voicemail and set a Voicemail access code.
Voicemail Box Licence Each User and Department on the system can be configured to use the voicemail functionality. To activate this use a MessageBox licence must be purchased and assigned to the User or Department.
Enable Voicemail Toggle to activate or de-activate Voicemail for a Department Voicemail Access Code In order to listen to voicemail, an access code must be entered, NOTE, this should
not be obvious so as to protect from toll fraud. Add Voicemail Monitor Use to add a user so that they have access to the department voicemail. Voicemail Monitors List of users that can access and see BLF for this department.
Saving Changes At any point you can Save or Discard the changes made by clicking on the Close or Save buttons, if you have entered details and click on close you will get a pop up conformation window. If you click Save then you will see a pop up window asking if you wish to save the current department, click OK to save the department or Cancel to go back and make further changes.

21
Edit an Existing Department To make changes to an existing department highlight the department by hovering the mouse over the department list and clicking on the department you wish to edit, You can also use the search facility to find the department you wish to edit. Once selected click on the Department edit button. The Forms shown are exactly the same as used by the add department button.
Deleting an Existing Department To delete a department use the same methods as described above to find the department you wish to remove. Then click on the department Delete button, you will be presented with a popup window asking if you wish to deleted the selected department, click OK to delete the department or Cancel to return back to the Department form. NOTE: Deleting a department WILL cause call routing to be effected within the Soft PBX, please make sure any DDI entries, Auto-Attendants or Other departments that might use the delete department for Voicemail are amended accordingly.
Highlight or use the search facility to edit a department
Highlight or use the search facility to edit a department

22
Phones The Phones tab allows you to manipulate the physical phones on your Soft PBX, you can easily add Splicecom phones or SIP Devices. With SIP devices you can add a generic SIP phone which will have a limited set of functions or alternately you can add Yealink phones which have a more tightly integrated feature set. Editing Buttons
To add a new phone, click on the Add phone button this will open the Add Endpoint form.
To edit an existing phone, click on the required phone or use the search facility and then click on the Edit phone button.
To delete a phone, click on the required phone and then on the Delete phone button.
List of available phones in your organisation
Highlight or use the search facility to edit a department
List of available phones in your organisation

23
Adding a Splicecom phone to the SoftPBX To add a Splicecom phone to your Soft PBX select ‘Splicecom PCS IP Phone’ from the drop down list, you will be presented with the Add Phone form.
You will need the last 6 digits of the phones MAC Address to complete the process, this can be found on the side of the PCS packaging or the bottom of the phone itself. Set the Splicecom PCS Phone Name, typically ‘PCS and MAC address’ then give the phone a Partner Login code followed by a Meaningful Description, Select the Soft PBX you wish the phone to register from the Registration System list. NOTE: See Table for descriptions of fields.
Splicecom PCS MAC Address The MAC Address of the Splicecom PCS IP Phone. Only the last 6 characters are needed. As you enter the numbers the field will automatically format itself.
Splicecom PCS Phone Name
Name to be associated to this phone. This defaults to 'PCS' followed by the MAC Address
Description A description to be associated to this Phone PCS IPPhone Partner Login Code
1-8 digit code. Used to secure ability to run Navigate as a partner on this phone.
Registration System System this phone is to be registered to. Assign Phone To User
If this option is selected a list of users with will be shown. Selecting a user from this list will assign this phone to them. Only users who are not Vision agents will be available. (See note at the end of this section for more information)

24
Adding a Generic SIP phone to the Soft PBX To add a Generic SIP device to the Soft PBX select SIP phone from the ‘Select Phone Type’ list, you will be presented with a similar screen to adding a Splicecom phone. Select Generic SIP Device from the ‘SIP Device Model list’ Set the Device name, typically the extension number and then enter the IP address of the phone, give the phone a Meaningful Description and then select the Soft PBX you wish the phone to register from the Registration System list. NOTE: See Table for descriptions of fields.
Generic Device IP Address IP Address associated to this SIP Phone (Please see your system Admin for the IP address of the phone) NOTE:IPV4 is only supported.
Device Name Name to be associated to this phone. Description A description to be associated to this Phone Registration System System this phone is to be registered to. Assign Phone To User If this option is selected a list of users with will be shown. Selecting a
user from this list will assign this phone to them. Only users who are not Vision agents will be available. (See note at the end of this section for more information)

25
Adding a Yealink SIP phone to the Soft PBX To add a Yealink SIP device to the Soft PBX select SIP phone from the ‘Select Phone Type’ list you will be presented with a similar screen to adding a Splicecom phone. Select Yealink SIP Device from the ‘SIP Device Model list’ Enter the MAC address of the Yealink phone the Device name will automatically be generated, Select the Soft PBX you wish to add the phone to from the Registration System list.
Select the user you require and then click on save to assign the new phone to the user. If you now go to users and select that user you will see the new phone assigned to the user under initial phone. Alternatively, you can select the use the Users tab and assign the phone from there.
Yealink Device MAC Address
Enter the MAC address of the Yealink phone this must be in the form of lower case characters with no spaces, colons or dashes.
Device name This field is auto generated when you enter the phones MAC Address Description A description to be associated to this Phone Registration System System this phone is to be registered to. Assign Phone To User If this option is selected a list of users with will be shown. Selecting a user from
this list will assign this phone to them. Only users who are not Vision agents will be available.
NOTE: If you choose to assign a phone to a user you will see a warning window, alerting you to the fact that if you assign the new phone to a user that has a phone assigned to them already, they will be logged out and any partner software they may be using might stop working.
The assign a phone to a user field will change and now include a drop-down list of users that you may assign to the new phone. NOTE: If you are a member of a company then you will only see users in your company listed.

26
Provisioning Tab Yealink phones have the ability to be Provisioned in two ways:-
Local The Yealink is being connected to an on premise PBX STUN with TLS The Yealink is being connected to a cloud based Soft PBX with Secure calling
If you are connecting to a Local ‘On Premise Soft PBX’ then all you have to do is assign a user to the phone and save the phone details. If you are connecting a phone to a cloud based Soft PBX without a VPN then Select Enable STUN from the Use STUN drop down, unless your company has its own STUN configuration it is recommended that you use the default settings for the STUN server and Ports.
For Auto provisioning to work correctly you will have to set the PnP model Description to the correct type, if this is not set correctly then the phone may not work as you expect PNP Model Names
T-Series T48S/P,T46P,T29P,T27P,T42P,T41P,T40P,T23P,T21P,T19P,T52S,T54S,T56A Video Phones SIP VP-T49G, T58V Dect Phones W52P,W56P,W60P
Saving the changes To save your new phone or any changes made to an existing phone click on the Save button a popup will appear asking if you want to save the changes, click OK to save the new user or any changes made or Cancel to go back and make further changes. If you click on close then a popup will appear, if changes have been made you can click OK to discard them or cancel to go back and make further changes.
The PnP Version will be set automatically when the phone is
provisioned

27
If you have selected ‘Enable STUN’ and your system has not been previously configured for this, then you will see a banner warning you that your Soft PBX will require a restart.
Click to close this dialog box, you will see an additional button appear under the phones list, when you are ready to re-start the Soft PBX then click the Restart AdminModule Button.
You will see a warning Dialog asking if you are sure to restart, click ok to continue or cancel to reboot another time.
NOTE: If you choose to assign a phone to a user you will see a warning window, alerting you to the fact that if you assign the new phone to a user that has a phone assigned to them already, they will be logged out and any partner software they may be using might stop working.
The assign a phone to a user field will change and now include a drop-down list of users that you may assign to the new phone. NOTE: If you are a member of a company then you will only see users in your company listed. Select the user you require and then click on save to assign the new phone to the user. If you now go to users and select that user you will see the new phone assigned to the user under initial phone. Alternatively, you can select the use the Users tab and assign the phone from there.

28
Editing a phone entry To edit a phone select the phone you wish to make changes to from the phone list and then click the Edit button. The editing forms will only show the items that can be edited depending on the phone selected, if there is an issue with a phone we would recommend involving your maintainer as making changes might affect the call routing. Editing a PCS Phone Selecting a Splicecom PCS phone will allow you to change the Phone name, Description, Serial Number (Also known as the MAC address), Partner login code*, Upgrade time and set a phone number for Extension Anywhere*.
You will only see the Upgrade time field if you maintainer has configured the upgrade server.

29
Partner login code* If you are using partner software with your phone (eg Navigate) then this code will have been pre-set by your maintainer. If this is changed then your partner software might stop working.
Extension Anywhere* Extension Anywhere is used for diverting calls to an external number, but allowing the called device to act like an extension. Entering a number in this field (Even a partial number) will stop calls from being delivered to the extension this has been set on.
Editing A SIP Phone Selecting a (Non Yealink) phone from the list will allow you to change the SIP Device name, Description and IP address. NOTE: Changing the IP address of a SIP device might stop calls being presented to a user, this should only be changed if the actual IP address of the phone has changed.

30
Editing a Yealink Phone Selecting a Yealink phone from the list gives you a form with two tabs “Edit Phone” and “Provisioning” the Edit Phone page allows you to change the SIP Device name, Description, Mac Address and IP address. The Yealink will only have an IP address assigned if it is a local phone (ie not a STUN device), and changing this will should only be done with advisement from your maintainer. The Provisioning Tab allows you to change the Model details and STUN Setting for the Yealink phone (Please see adding a phone for an explanation of these settings)

31
Deleting a Phone To remove a phone from the Soft PBX select the phone you wish to delete from the phone list and then click the Delete button. NOTE: This takes immediate effect, if you have deleted the wrong phone then follow the instructions for adding a new phone onto the Soft PBX. After clicking the Delete button you will get a pop-up confirmation banner, click OK to remove the phone from the system or Cancel to go back and select another phone to remove.
Highlight the phone to be deleted and then click the Delete button

32
Import Phone In order to make the provisioning of multiple phones easier the Soft PBX has the ability to import phones from a plain text file. An example of this would be If you have had a number of phones delivered to your premises this would then allow you to load the new phones onto your system and assign them to users. Please refer to your reseller for the import list which will have been given them by Splicecom.
Click Choose file and then use the file picker to locate the file you wish you load up, after selecting the file click the upload button to import the phones into your system.
You will see a list of phones that are ready to import, click the Import Phones button to continue the phone import. Each phone that has been successfully imported will have a tick by it, if any duplicates have been detected then you will see an error. Failed import due to duplicate phones. Successful import of phones. Once the phones have been imported, use the unassigned phones form to continue adding the phones, or you click on the unassigned Phone page link.
33
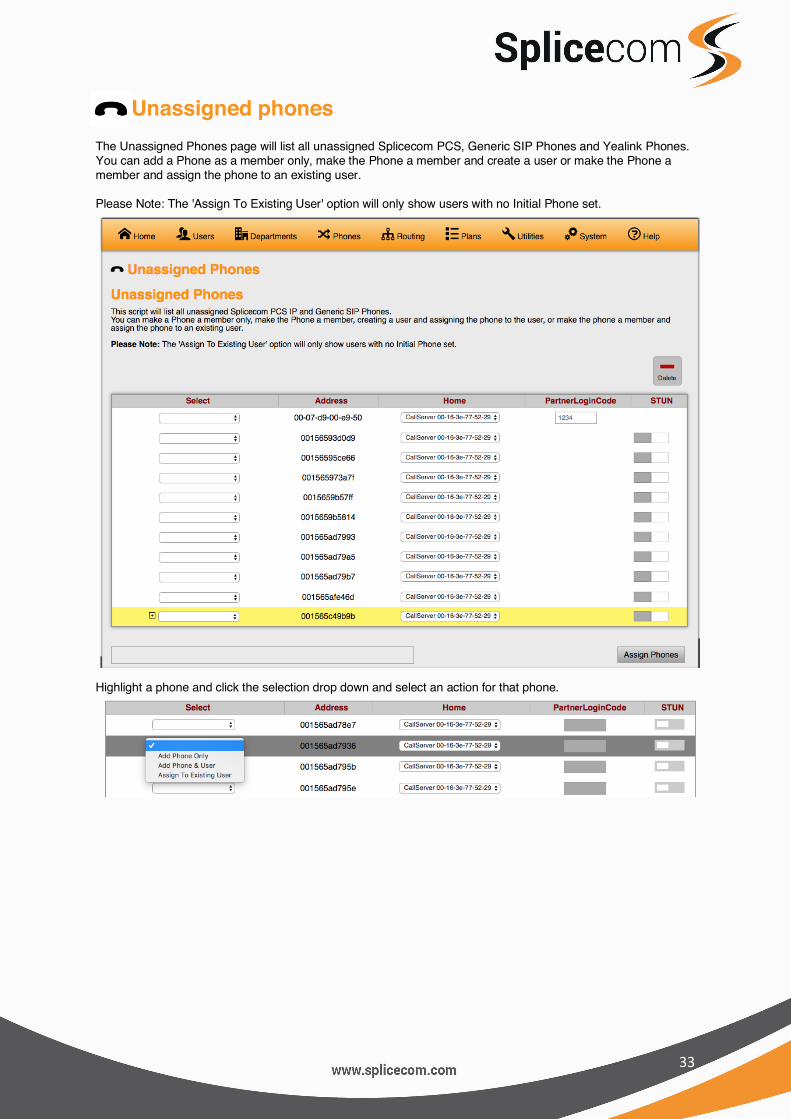
Unassigned phones The Unassigned Phones page will list all unassigned Splicecom PCS, Generic SIP Phones and Yealink Phones. You can add a Phone as a member only, make the Phone a member and create a user or make the Phone a member and assign the phone to an existing user. Please Note: The 'Assign To Existing User' option will only show users with no Initial Phone set.
Highlight a phone and click the selection drop down and select an action for that phone.

34
Add phone only If you select ‘Add phone only’ the selected phone will be added to the Soft PBX but will not be assigned a user, you can do this later by using the Manage Phones. If you have selected STUN against a phone and STUN has not been previously enabled on the system you will warned that the Soft PBX will have to be restarted to enable this fully. Add Phone & User Selecting Add phone & User allows you manually to enter a user name and Extension number to the unassigned phone.
Assign to an existing user Adding an unassigned phone to an existing user will give you a drop down list of existing users within your company. NOTE: The users listed will be users that do not have a phone currently assigned to them.
Assigning users to a Dect base station If you have a Yealink W52 or W56P base station then you can assign up-to 5 users, If you have a W60B then you can assign up to 8 users. The admin portal recognises which type of base station you are adding and high-lights the unit as well as auto configuring for either 5 or 8 users.
Click the Plus sign to expand the selection window.
Click the drop down menu to select the user to assign to one of the 5 devices available on the base station, if this is a remote unit click the STUN slider.

35
When you have finished assigning your phones click the Assign phones button to assign the selected phones, as mentioned above if STUN has been selected then you will a warning dialog: Select OK to continue or Cancel to go back to amend your phones. If you have selected OK you will be returned back to the main form where you will see a list of the Phones added and a Button for Restarting the Soft PBX. Clicking the Restart AdminModule will give you a further dialog window asking if you want to restart the Soft PBX, Click yes to restart or Cancel to restart at a later date.

36
Delete an unassigned phone To remove an unassigned phone select the phone from the phone list and click on the delete button. you will see a dialog window asking if you wish to delete the unassigned phone. Select OK to delete the phone or cancel to go back and select another phone.

37
Routing The routing menu allows you to create and amend some of the basic call routing on the SoftPBX, there are 3 sections Auto Attendant, DDI Routing and Meet Me Conferencing.
Auto Attendant The Embedded voicemail within the SoftPBX provides the ability to configure a single layer Auto Attendant facility so that an external call can select the User or Department to which they wish to be transferred by pressing 0 - 9, * and # on their phones keypad. The Auto Attendant Form provides a simple way to configure the Auto Attendant facility by allowing you to set each option by selecting either a user, department. You can also use the ? option to set where the call should go to if the caller does not press a key. Select a company to view it's AutoAttendant. The AutoAttendant options and available wav files will update to show the correct details for the selected entry. If this field is left empty, the default AutoAttendant will be shown. (this entry is only shown to Administrators not assigned to a company) Once you have made your changes click 'Save AutoAttendant' to update the configuration, you will see a popup asking if you want to save the AutoAttendant, click OK to save the AutoAttendant or Cancel to go back and make further changes.
Select the type of routing required
If you select users then a list of users on the system will be shown depending on the company selected.
If you select Departments then a list of Depaertments on the system will be shown depending on the company selected.
If you select others then you have the option to enter a free form entry eg !Play:Message.wav

38
Auto Attendant Greeting From the configuration form, you can upload new wav files which are then available to be used by the Auto Attendant. These files can be recorded on a PC and must be formatted as CCITT A-Law 8.000kHz 8bit mono. Upload WAV File To upload a new file wav file, either click on the 'Choose File' button and select the required wav file or drag the required wav file to the choose file field. Click Upload and the file will be uploaded to the system and added to the available file list. If a file with the same name exists the new file will be renamed to include the current date stamp. eg: Uploading AAGreeting.wav will result in AAGreeting_19122016114214.wav Managing WAV Files The available wav file list allows you to Apply, Download or Delete files.
Download WAV File Clicking on the Download icon for a specific wav file will download that file.
Delete WAV File Clicking on the Delete icon for a specific wav file will delete that file. A confirmation message is shown before the file is deleted.
Apply WAV File Clicking on the Apply icon for a specific wav file will set that file as the current Auto Attendant Greeting. The existing AAGreeting.wav file will be backed up with a default backup name being suggested. A new backup name can be entered. A confirmation message will be shown advising the name of the backup file and which new file is being applied. Once complete the backup file will appear in the file list and the applied file will be the active Auto Attendant greeting.
2
1
1
2

39
DDI Routing This page provides a simple way to add, edit and delete DDI entries on the system. The DDI form allows you to select the required DDI Plan via a drop-down list if the DDI Plan belongs to a company then select the company via the company drop down list otherwise leave this blank and then search for the DDI entry.
Add a New DDI Entry To add a new DDI entry, click on the Add button, this will open the DDI entry form. This is the same form as used to edit an existing DDI entry. Enter the DDI number to use in the number match field and then give that DDI a meaningful description, from the Translate To drop down list select how you want to route the call (AutoAttendant, Conference, Users, Departments or Other) for descriptions of these options see the Edit an Existing DDI section. Select the time plan you wish to use for this DDI and then select the relevent DDI options to use. Please note if you do not see the Company drop down list and wish to use this feature then please see contact your Maintainer for further details. DDIPlan Entry form This form allows you to change/add specific details for a selected DDI entry.
Select the Company from the drop down list
Select the DDI Plan from the drop down list

40
Number Match The incoming DDI number to be matched. This must be an exact match as the incoming routing will not work. Telecoms providers will send differing lengths and formats of numbers to the SoftPBX, please check with your Maintainer as to the correct format required. NOTE: This number will also be the outgoing CLI for the extension number entered in the Translate To field unless your Maintainer has programmed the system to send another number. Description Enter a description to be associated to this DDI entry, note your Maintainer might have set your system up the display this Description on your phones and within Vision reports. Translate To To route the incoming call to the correct place use the Translate To dropdown list to select either Auto-Attendant, Conference, Users, Departments or Other.
Auto-Attendant Selecting this option will route the incoming call to the default Auto-Attendant (See Auto-Attendant Under Routing)
Conference Selecting this option will allow you to select the conference the incoming call will be routed to. Selecting Join will allow the caller to enter the conference number when they connect.
Users Selecting this option will allow you to select the user the incoming call will be routed to
Departments Selecting this option will allow you to select the Department the incoming call will be route to.
Other Selecting this option will allow you to manually enter routing information. Time Plan Select the name of the Time Plan to determine when this entry is active. Note: Your provider may have setup multiple TimePlans for the same DDI Entry so that call routing is done over differing times ie Day, Night and Weekend. DDI Options These are selections that enable special configuration options to be applied to a DDI entry. For further information on these options contact your Maintainer.
Inbound Recordings Enabling this option will record all calls received on this number. Please note, your maintainer must have previously setup call recording for this to work.
Contact Lookup Enabling this option will allow the system to lookup the incoming call within the contacts database. You can set this to lookup with in a specific company.
Pass DDI to CLI Text Field Can be used to display the text within Description field or the dialled number in the caller’s name field. This means that when a call is received the incoming CLI will be ignored and Caller Display/Call Status will display the Description, if entered, or the DDI number the call was received on.

41
Editing an existing DDI Entry In the 'Search DDI’s' field enter the DDI information to search on. You can search on the Number Match (Incoming DDI Number), Translate To (Department, user or Auto attendant entry) or the DDI Description. As you type entry matches are shown in the results table. A maximum of 30 results are returned. From the list of matching results, select the line you wish to either Edit or Delete. To edit an existing DDI entry click on the required DDI Entry and then on the Edit button, this will open the DDI entry form (The same form is also used for Adding a new DDI) the DDIPlan form will populate the existing fields with the data from the selected DDI. Deleting a DDI Entry If you chose to delete an entry then you will see a pop up window asking you to verify the Delete action. Click OK to Delete the selected entry, or Cancel to go back to the selection picker. NOTE: Deleting a DDI Entry will have an impact on call routing, please be sure that the DDI number you wish to remove is the correct one. Saving Changes At any point, you can Save or Discard the changes made by clicking on the Close or Save buttons, if you have entered details and click on close you will get a pop up conformation window. If you click Save then you will see a pop up window asking if you wish to save the current department, click OK to save the department or Cancel to go back and make further changes.
DDI Entries will be listed as you enter your search details

42
DDI Alternate Routing This page provides a simple way to add additional numbers to a DDI Plan entry. The saved numbers can then be enabled to change the DDI routing to the new alternate number. The form displays the TimePlan, Number Match, Translate To, Alternate Number and Alternate Mode values of the DDI entries. From the 'Select DDI Plan' dropdown list, select the required DDIPlan and Company.
If there are over 25 entries in the DDIPlan, the results will be shown in pages of 50 entries and navigation icons are shown above the search field and below the results table.
Show the first 50 entries. Show the previous 50 entries. Show the next 50 entries. Show the last 50 entries.
Number Match fields highlighted with a yellow background indicate entries where duplicate number match values have been found.
Rows highlighted with a red background indicate an entry that has been updated using the normal Web manager.

43
Search In the 'DDI Search' field enter the number to search for, then click the Search button. The page will update to show the first match for this number. Add Alternate Number. Alternate numbers can be Users, Departments, System entries VXML Scripts or !AA entries and Telephone numbers. When you click out of the field you will be alerted that changes need to be saved via a pop up window. Click the Save Entries button to save the current settings for that page. Apply Alternate Number To enable the alternate routing click the corresponding Alternate Route mode slider. The Translate To and Alternate Number values will be swapped.
Please Note: You can only enable the alternate mode on entries where the Translate To and Alternate Number values are set. Disable Alternate Number To disable the alternate routing click the corresponding Alternate Route mode slider. The Translate To and Alternate Number values will be swapped.
To add a new alternate number to a DDI entry,
enter the required number or number in the corresponding alternate
number field
As you type the page will search users and departments for
corresponding matches and will show upto 10 of
each entry. If the required entry is shown
click to select it.
You will be alerted that changes need to be saved to enable the alternate routing. Click the Save Entries button to save the current settings.
You will be alerted that changes need to be saved to enable the alternate routing. Click the Save Entries button to save the current settings.

44
Bulk Updates As well as changing a single entry you can apply bulk update visible entries, updates are added a page at a time, if you try and move to the next page without saving the changes you will receive a warning.
By clicking copy the alternate number value from the first DDI entry will be copied to all visible entries. Click Save Entries before moving on to the next page.
Clear the alternate number value and disable the alternate mode for all visible entries.
Toggle on or off the alternate mode of all visible DDI's.

45
Meet Me Conferences This page provides a simple way to add, edit and delete Meet Me Conferences on the system. The Meet Me Conference form allows you to search, order or select conferences.
Add a Conference To add a new Meet Me Conference, click on the Add button, this will open the Meet Me Conference form, enter the following fields to create your conference, once created your conference can be accessed via setting up a DDI Plan entry or call the conference internally by ringing *45 followed by the conference number. Users can join the conference up until the end time whilst the conference is in progress.
Page Navigation Buttons
You can use this drop down list to display more entries

46
Conference Number Enter a number to be associated to this Meet Me Conference Organiser Enter the name of the Organiser for this Conference. Date Enter the date that the conference should be active. Click in this field and select the required date from the date picker. Default value is todays date. Start Time Enter the time that the conference should be active for participants to join. Click in this field and select the required time using the time picker. Default value is time now. End Time Enter the time that the conference should cease to accept new participants. Click in this field and select the required time using the time picker. Default value is time now+1 hour. Access Pin Enter a Personal Identification Number to be entered by all participants before they can join the conference. Max Members Specifies the maximum number of participants in this conference. Each participant occupies a voicemail connection, please refer to your Maintainer to find out the Maximum number of participants you can have in a conference. Company Select the company this Conference belongs to. If this field is left empty, the Conference will not be added to a company. NOTE: This entry is only shown to Administrators not assigned to a company.
Save the Conference To save your conference click on Save, you will see a pop up where you can click OK to save the conference or click cancel to go back to the Meet Me Conference form to make any necessary amendments. If you decide to abandon the conference you have created, then click close on the Meet Me Conference form, you will see a pop up where you can click OK to go back to the main Meet Me Conference form or Cancel to go back to the Meet Me Conference form.

47
Edit To edit an existing Meet Me Conference, click on the required Meet Me Conference and then on the Edit button, this will open the Meet Me Conference form. This is the same form as the conference add form, please refer to the conference add field descriptions for a further explanation. Save Changes To save your conference click on Save, you will see a pop up where you can click OK to save the conference of click cancel to go back to the Meet Me Conference form to make any necessary amendments. If you decide to abandon the conference you have created, then click close on the Meet Me Conference form you will see a pop up where you can click OK to go back to the main Meet Me Conference form or Cancel to go back to the Meet Me Conference form. Delete To delete a Meet Me Conference, click on the required Meet Me Conference and then on the Delete button. A notification will be shown asking you to confirm the deletion of the Meet Me Conference. Click OK to confirm deleting the Conference or Cancel to go back to the Meet Me Conference Form.

48
Plans This page provides a simple way to add, edit and delete Time Plans on the system. The Time Plan form allows you to search, order or select Time Plans.
Used to add a new Time Plan, this will open the Time Plan form. To edit an existing Time Plan, click on the required Time Plan and then on the Edit button, this will open
the Time Plan form. To delete a Time Plan, click on the required Time Plan and then on the Delete button. A notification will be shown asking you to confirm the deletion of the Time Plan.
The Time Plan form is used to add or edit a Time Plan. It has two tabs, Time Plan and Add Entries. If you are editing an existing TimePlan some of the fields will be pre-populated. Time Plan Tab The TimePlan tab allows you to configure TimePlan settings.
Use the drop down to expand the number of
entries shown Page navigation buttons

49
Name Enter the name to be associated to this Time Plan, ie Weekend or Bank Holiday. Description Enter a description to be associated to this Time Plan, ie Used for Saturday opening. Mode Select the mode of use for the Time Plan.
Timed The entry will follow the configured time bands. Out of Hours The Time Plan considers itself to be outside of the hours specified by the Time Band(s)
regardless of the day or time. In Hours The Time Plan is operational, in other words it considers itself to be inside the hours
specified by the Time Band(s) regardless of the day or time Company Select the company this Time Plan belongs to. If this field is left empty, the TimePlan will not be added to a company. NOTE: This entry is only shown to Administrators not assigned to a company. To save the Time Band without adding any entries or Date Exceptions click the save button to close and save the current Time Band, you will be see a popup confirming if you want to save or continue editing your Time Plan. If you Click close you will see a popup warning you that changes have not been saved, click OK to continue and not save any changes or Cancel to go back to your TimePlan. To view then current active entries on a per day basis for a time band click on the Question mark a popup window will show displaying the time band information.

50
Add Entries Tab The Add Entries tab allows you to edit or configure Time Band and Date Exception entries. Add Time Band To add a new Time Band complete the time band fields entering a start day and time and the end day and time by using the drop-down list and the time picker. Click 'Save Time Band' to update the Time Plan Entry, the new Time Band will be added to the Time Plan. Edit Time Band From the Time Band overview on the Time Plan tab click on the required time band. The time band will be displayed on the Add Entries tab. The Time Bands Start Day of Week and Time and End Day of Week and Time will be shown Edit Date Exception From the Date Exceptions overview on the TimePlan tab click on the required date exception. The date exception will be displayed on the Add Entries tab. The date exceptions date will be shown in the date exception field Add Date Exception To add a new Date Exception click on the data exception field and select the required date Click 'Save Date Exception' to update the TimePlan Entry

51
Utilities The Utilities page is only available to System and End User Managers, if you do not see this option then please refer to your Maintainer for further details. As standard backups of the Soft PBX are automatically performed on the 1st day of the month.
Backup This page provides a simple way to make a backup of the running configuration of the Soft PBX, backups are stored on the Soft PBX in the /Splicecom/ftp directory but you are also given the option to download the backup to your local computer. Accessing the page automatically starts a backup of the system, when complete you will see the download icon.
The file name is based on the first 10 characters of the System name followed by a date and timestamp. eg: File Name is: Splicecom-Backup-20.10.16-142521.txt The backup file can be used by your maintainer to restore the system configuration to the state it was when the backup was taken.

52
Manage Contacts The Contacts database can be used to store information on external associates, for example, customers and suppliers. The database can be used as an address book, a telephone directory for speed dialling and for matching incoming CLI. The Contacts database can store up to 10,000 entries, if more than 10,000 contacts are required please refer to your maintainer for options on how to do this.
Manage Contacts (Export) The Import Contacts page also allows you to export contacts to a file so that they can be edited and imported back into your Soft PBX. Select the company you wish to export the contacts from the company drop down list if left blank then the global contacts list will be exported Export To export contacts from the system database click the Export button to start the export process. Once this has completed, you can download the contacts file using the download link. The contacts are not removed from the system database. Export & Delete To export and delete contacts from the system database click the Export & Delete button to start the export process. Once this has completed, you can download the contacts file using the download link. The contacts will have been removed from the system database.
Click the Download icon to download the contacts to your PC. NOTE: The system checks see if there is a download file and will display the download link if it finds one.
4
If no Company is selected then contacts will be exported from the
Global contacts, otherwise Contacts will be exported from the Company
selected.

53
Manage Contacts (Import) This page provides a simple way to import or export contacts to/from the Soft PBX database. NOTE: The Import Contacts function is only available as an option to System and End User Manager’s, if you do not see the Utilities menu on the Home page then please contact your reseller for any changes to Contacts. In order to use the Import Contacts facility, you will need to create a comma separated file with the following headers.
The following shows a single example contact entry: name,company,phone,fax,mobile,home,spare1,spare2,ambiguous,mail,firstname,lastname,description,department,job,street,city,county,postcode,country,ouraccount,theiraccount,url,autourl,directrouteto,priorityboost,exdirectory "Martin Jones","Watrose","01923287???","","","","","","","[email protected]","Martin","Jones","Manager Richmond Branch","All","Manager","Street","Town","County","Post Code","Country","","","","0","","0","0" Save the file as a txt file and use the Upload New Contacts picker to locate and upload the file to your Soft PBX. Once uoloaded select the Company that the Contacts should appear against (Leave blank if you want to add the contacts globally) and then select Import
Heading Description name Name of the Contact. This name will be displayed in Caller Display when the incoming CLI is matched against
this contact. (64 Characters. No spaces or punctuation should be used) company Text to identify the Contact’s company/business. (128 Characters. No spaces or punctuation should be used) phone The Landline number to use for this contact. (No spaces or punctuation should be used) fax The Fax number if applicable. (No spaces or punctuation should be used) mobile The Mobile number for this contact. (No spaces or punctuation should be used) home The Contacts home number. (No spaces or punctuation should be used) spare1 Additional spare number. (No spaces or punctuation should be used) spare2 Additional spare number. (No spaces or punctuation should be used) ambiguous The Ambiguous Number field can be used to match a range of numbers, particularly useful if a company has
a large DDI number range. The ? is used to specify any number, therefore an entry of, eg 01923 2877??, will match all calls within the range of 01923 287700 to 287799. Contacts with a complete match will have priority over an ambiguous number.
mail The Contacts email address. (Limited to 64 characters) firstname The Contacts first name. (Limited to 64 characters) lastname The Contacts last name. (Limited to 64 characters) description A free form description for the Contact. (Limited to 128 characters) department Text to identify the Contact’s department within that company. (Limited to 128 characters) job The Job description for the Contact. (Limited to 64 characters) street Contacts Street. (Limited to 64 characters) city Contacts City. (Limited to 64 characters) county Contacts County. (Limited to 64 characters) postcode Contacts Postcode. (Limited to 64 characters) country Contacts Country (Limited to 30 characters) ouraccount The code to be registered with this Contact when making a call with an Account Code. This code then appears
in the Call Logging output against telephone calls made using this Account Code. Please refer to your reseller to use this feature.
theiraccount Allows an Account Code to be entered for this Contact. This code then appears in the Call Logging output against telephone calls made to or from this Contact. Please refer to your reseller to use this feature.
url N/A autourl N/A directrouteto The extension number, User or Department Name to which a call from the Contact is to be routed. Alternative
you can play a wav file, please contact your reseller to programme this feature. priorityboost The priority calls from this Contact will have over other incoming external calls. The higher the number entered
the higher the priority. exdirectory 0/1 When enabled this Contact will not be displayed in the Contacts directory on any of Splicecom’s Unified
Comms devices.

54
Manage Contacts Manage contact allows you to add, edit and delete contacts, if you are a System manager you can select a company’s contacts to edit, If you are an End User Manager then you can only edit your companies contacts.
Adding A Contact
Clicking on the add button allows you to add a new contact to your system, if you have selected a company then you can add a contact to that company. Contacts added within companies cannot be seen by other companies. You have two tabs Contact and Contact Details, The Contact tab allows you to enter basic details, the Contact Details tab allows special you assign special actions.
Search for a contact by entering the first characters of name, those items matching the search will be displayed

55
Manage Contacts When adding a contact you have the following fields available to use within the contacts tab.
Contact Name Name of the Contact. This name will be displayed in Caller Display when the incoming CLI is matched against this contact. (64 Characters. No spaces or punctuation should be used) Company Name Text to identify the Contact’s company/business. (128 Characters. No spaces or punctuation should be used) Description A free form description for the Contact. (Limited to 128 characters) Telephone Number The Landline number to use for this contact. (No spaces or punctuation should be used) Mobile Telephone Number The Mobile number for this contact. (No spaces or punctuation should be used) Home Telephone Number The Contacts home number. (No spaces or punctuation should be used) Spare 1 Telephone Number Additional spare number. (No spaces or punctuation should be used) Spare 2 Telephone Number Additional spare number. (No spaces or punctuation should be used)
The Contact Details page allows other contact information to be added as well as special actions. Direct Route To The extension number, User or Department Name to which a call from the Contact is to be routed. Alternative you can play a wav file, please contact your reseller to programme this feature. Email Address The Contacts email address. (Limited to 64 characters) Priority Boost The priority calls from this Contact will have over other incoming external calls. The higher the number entered the higher the priority. Account (Our ref) The code to be registered with this Contact when making a call with an Account Code. This code then appears in the Call Logging output against telephone calls made using this Account Code. Please refer to your reseller to use this feature. Account (Their Ref) Allows an Account Code to be entered for this Contact. This code then appears in the Call Logging output against telephone calls made to or from this Contact. Please refer to your reseller to use this feature. Ambiguous Telephone Number The Ambiguous Number field can be used to match a range of numbers, particularly useful if a company has a large DDI number range. The ? is used to specify any number, therefore an entry of, eg 01923 2877??, will match all calls within the range of 01923 287700 to 287799. Contacts with a complete match will have priority over an ambiguous number.

56
Manage Contacts To save a contact press the save button, you will see a pop up confirmation window. Press OK to save the contact or Cancel to return back and edit the entered details, If you want to discard your changes press the Close button. Press OK to discard your changes or Cancel to return to editing the current contact. Edit a contact To edit a contact first search for the contact using the Search Contacts facility and then highlight the contact you wish to edit. You will be presented with contacts details to edit. Delete a contact To delete a contact first search for the contact you wish to remove by using the search facility, highlight the contact you wish to delete, and then press the Delete button. You will see a popup window, press OK to delete the contact or cancel to return search window.

57
System The System menu is only available to System and End User Managers, if you do not see this option then please refer to your Maintainer for further details.
Call Status This page shows the current status of calls on the specific Soft PBX you are connected to. The callstatus table shows the Source Name and Number, Target Name and Number, Connected to Name and Number, Total Call Time, Now Call Time and Number of Calls. Only calls routing via this system will be shown. Each call record shows which trunk the call is routing via.
Source Outgoing external or internal call - name and extension number of the User making the call. Incoming call – name (if the incoming CLI is matched in the Contacts database) and number of the caller (if CLI is presented with the call)
Target Outgoing external call – name (if the number dialled is matched in the Contacts database) and the number dialled.Incoming external or internal call – the name and extension number of the User or Department receiving the call.
Connected to Outgoing call - the number the User was actually connected to. Incoming external and internal call - the name and extension number of the User who answered the call.
Total Total shows the total call duration (Including Ringing time) Now Now shows the time from an event happening with the call, i.e. hold, transfer etc.

58
Licence Status The licence status page shows an overview of all licences installed on the system. In a multi-site environment, this includes all licences across the sites that are linked as one. The licence count table shows an overview of all licences, their type, amount available and amount used. The modules table shows which modules are being used for the licence count. Certain licences, which are entered into the system configuration and therefore displayed in the table, are allocated in other applications, EG Vision, therefore these licences will show as 0 used in the status table, the licences that display this way are:- VisionLive, VisionRecording, VisionReport, VisionSupervisor
Click to expand the Licence description

59
Licence Status IPUser licences This is a cumulative count of all IP User licences and POTS ports available and used. Clicking on this row will show a breakdown of how the available count has been calculated. Voicemail Port licences This is a cumulative count of all Voicemail Port licences available and used. Clicking on this row will show a breakdown of how the available count has been calculated.

60
SIP Status The SIP status page shows an overview of all SIP Trunks configured on the system. In a multi-site environment, this includes all SIP trunks across the sites that are linked as one. SIP Status The table at the top of the page provide a clear overview of all SIP Trunks, including the Soft PBX they are located on, basic configuration details and In Service Status. Any Trunk that is highlighted Green is currently In Service. If the trunk is highlighted in Red then it is Out of Service. Trunk Status The Trunk Status entries show the current state of all trunks visible to this page. If multiple modules are available each modules trunks will be shown in their own section. Any Trunk that is highlighted Green is currently In Service. If the trunk is highlighted in Red then it is Out of Service. The type of trunk is shown along with the number of currently assigned channels.

61
Help The Admin portal has a comprehensive help section which covers all the sections in this manual. Click on the main headings to show the relevant help sections.

The Hall Business Centre, Berry Lane, Chorleywood, Hertfordshire, WD3 5EX t | 01923 287700 e | [email protected] w | splicecom.com