selecting the panel size - simplyglassblocks.co.uk part2.pdf · repeat step 4 until you have...
TRANSCRIPT

OR
DE
RIN
G M
AD
E E
ASIE
R - PA
NE
L KITS &
INSTA
QU
OTE
9
Extensive research into glass block sales have been analysed & the findings show that about 80 – 85% of glass block projects undertaken will be using 190 x 190 x 80 within straight glass block walls not exceeding 12 blocks wide x 12 blocks high.
Ordering glass blocks & installation accessories need not be complicated, Panel Kits offers a fast solution.When requesting a quote or ordering, three vital items of information are required: Block Type, Panel Size and Installation System.
Panel Kits has been developed to speed up the process of requesting a quotation. A unique simple way has beendesigned for ordering accessories for any straight panel from a single block to a wall 12 blocks wide x 12 high, for both loose build fitting systems, Rods & Mortar and Easifix.
Panels are identified by unique reference codes. Panel kits are available for either Rods & Mortar or Easifix,recognisable by a specific prefix.
Diagrams are arranged to represent the panels, the prefix denotes the fitting system for example RM for Rods &Mortar and EF for Easifix. The first numerical figure denotes the width, the second figure the height and thedimensions below state the required opening size in mm’s.
The first numberdenotes the numberof blocks wide
The second numberdenotes the numberof blocks high
Details required openingsize to construct glass
block panel in mm.
An RM prefix denotesRods & Mortar
installation accessories.(EF denotes Easifix)
RM6/6(1210x1210)
If a multiple number of panels are required, detail the quantity of blocks, style, colour etc & add the number ofaccessory kits with relevant reference code.
Safewall end & corner posts need to be ordered as separate items similarly to the blocks.
Along with detailing any Panel Kits reference code (ie RM66), the block type required should be included(ie 6x6 = 36 Clear Flemish).
Should your company stock glass blocks & accessories, to identify the quantity of accessories included withinthe kits, refer to the relevant Instaquote matrix. These instant calculators list all components specific toconstructing with either Rods & Mortar or Easifix, from one single block to a panel 12 blocks wide multiplied by12 blocks high.
STEP 1Choose the number of
blocks wide.
STEP 2Choose the number ofblocks high.
ACCESSORYCODES
ACCESSORYQUANTITIES
MERCHANT/RETAILERA full list of accessories for each Panel Kit reference is detailed in Instaquote matrix’s. For more information visit www.glassblocks.co.uk/instaquote or contact your distributor.Instaquote should be calculated in association with cost price per item pricelists.
SALES ASSISTANCE FOR MERCHANTS & RETAILERS
SELECTING THE PANEL SIZE
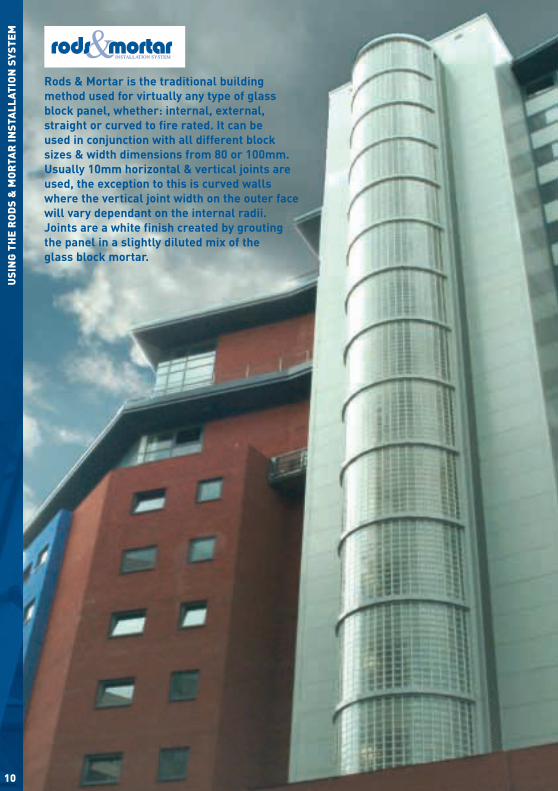
Rods & Mortar is the traditional buildingmethod used for virtually any type of glassblock panel, whether: internal, external,straight or curved to fire rated. It can be used in conjunction with all different blocksizes & width dimensions from 80 or 100mm.Usually 10mm horizontal & vertical joints areused, the exception to this is curved wallswhere the vertical joint width on the outer facewill vary dependant on the internal radii.Joints are a white finish created by groutingthe panel in a slightly diluted mix of the glass block mortar.
USI
NG
TH
E R
OD
S &
MO
RTA
R IN
STA
LLAT
ION
SY
STE
M
10

80mm
10mm
10m
m
USIN
G TH
E R
OD
S & M
OR
TAR
INSTA
LLATION
SYSTE
M
11
GOLDEN RULES FOR RODS & MORTAR INSTALLATION
RODS & MORTAR ACCESSORIES
✓
✓
✓
✓
✓
PERIMETER EXPANSIONJOINTSExpansion and contractionis one of the most criticalaspects of any glass blockconstruction. Expansionjoints must be incorporatedto the perimeter of all glassblock panels.
Bitumen strip
Expansion foam
REINFORCEMENTStainless steel ribbed reinforcement rods are used to anchor glass block panels in place and increase integral strength. Reinforcement rods should be anchored into all substratas to a minimum depth of 25mm.
Selfadhesiveisolationpad ø7mmhole
Stainless steelpanel anchor
40mm
length 125mm or 250mm
PANEL ANCHORSAs an alternative to drillingoversized holes, panel anchorscan be used.
SPACER PEGS10mm spacer pegs areavailable to assist withaccuracy of construction andprevent mortar squeeze.When the spacer peg is fitted and the wall is finished,the tabs at the end twist offand this is then grouted over.
GLASS BLOCK MORTARColmef Vetromix glass block mortar when constructing brick by brick. Colmef Vetromix is used asa bedding mortar and then by slightly diluting the mix it can be used as a grout for finishing.
Golden Rules - essential guidelines that need to be considered prior to preparation of the openingand before beginning installation of glass blocks.
✓ Glass block walls are self supporting, but not load bearing. Therefore similar to doors & windows, supportabove should be provided in the form of a lintel.
For best integral strength, glass blocks should ideally be installed into a four sided pre-prepared opening.This opening can be timber, brick, steel, concrete or block work.
Glass blocks expand and contract with temperature change.
Glass blocks should not be installed when the surrounding temperature is 5OC and falling or 30OC and rising.
Expansion material must be incorporated to the perimeter opening & intermittently between vertical orhorizontal joints if a panel exceeds 6m in any direction. Perimeter expansion should be weatherproofed bycaulking with silicon and not grouted over with mortar. If grouted the joint is bridged, restricting expansion &contraction & may cause blocks to crack.
Openings must be square and perpendicular and made to suit glass block modules. Glass blocks should not becut like masonry bricks or tiles.
Maximum panel size without intermediate support or slip joints is 25m2 with no single dimension exceeding 6min any direction.
✓

Repeat Step 4 until you have completed the first row.Insert spacer pegs in between blocks, this prevents steelrods from touching glass, assists with accuracy of vertical& horizontal joints whilst preventing mortar squeeze,enabling more courses to be constructed. (fig.5).
After the first course is complete, if left & allowed to set itwill make building subsequent rows easier due to buildingoff a firm bed. Lay half the quantity of mortar and fix thehorizontal rod in position, not forgetting to put silicon inthe holes, and then cover over the rod with remainder ofmortar (fig.6). Rods have to be positioned every rowvertically and horizontally.
If using a ‘U’ channel, two stainless steel reinforcementrods are required around the perimeter.
Fit next row,checkingvertical andhorizontalalignment.
Expansionfoam
(fig.1)
Bitumenexpansionfoam
Timber frame represents opening within
stud wall partition or brick wall etc..
STEP
1
STEP
2
PREPARATION OF OPENING
Calculate the correct opening size. Make sure the openingis square and perpendicular. Lay bitumen expansionmaterial along base of opening. Secure expansion foam tojambs and head. All four sides of the opening should nowbe covered in expansion material Bitumen is necessary onthe base to take the weight of the glass block wall.
Timber frame on images represents a perimeter opening;this can be constructed alternatively out of masonry, brick,stud wall, steelwork.
USI
NG
TH
E R
OD
S &
MO
RTA
R IN
STA
LLAT
ION
SY
STE
M
12
INITIAL CLEAN AND AFTER CARE MAINTENANCEDo not clean with any acidic products, the best product for cleaning is water. Polish each block with a soft cloth using good old elbow unblemished condition. Requiring only periodical cleaning to maintain an excellent appearance. However, there may be a residue of cproprietary cement stain remover. (BAL HD Tar Cleaner)
BUILDING THE PANEL
Set out dry your first row of glassblocks to ensure opening size is correct.Mark accurately and drill oversized holesin between the blocks, vertically and horizontally whererods will be positioned. The holes need to be a depth ofbetween 25 – 35mm. Fill holes with silicon and fit verticalbars in place (fig.2). When a horizontal or vertical jointdimension exceeds the length of a stainless steel re bar,overlap two by 150mm & tie loosely using stainless tie wire.
Panel anchors can be used as an alternative to drillingoversized holes and are an ideal alternative to drilling holesif the opening is a metal box section or steel I & H beam etc.
(fig.2)
(fig.5)
(fig.6)
STEP
5
STEP
6

Mix Colmef Vetromix glass block mortar followinginstructions on reverse of bag (fig.3). The mix should bea semi dry consistency (Slump 1 or less). Lay down a bedof mortar.
STEP
7
Fit first block and tamp down gently, fit second blockand repeat. Ensure there is enough mortar between theblocks and the base to create sufficient adhesion,compact the vertical mortar joint using a woodeninstrument. (fig.4) Note: Spacer pegs are not necessarilyrequired between base and first row of blocks. Whenusing spacers at the base or up the side jambs cut thelegs of the cross spacer pegs to form at shape.
(fig.4)
When the wall has set, snap off spacer tabs and groutall joints with diluted Colmef mortar.
STEP
8
Rake back and mastic aroundperimeter of expansion foamto create weatherproof sealand prevent bridging whichcan restrict expansion andcontraction of overall panel.
USIN
G TH
E R
OD
S & M
OR
TAR
INSTA
LLATION
SYSTE
M
13
w grease .Note : Clean face of block as work proceeds.The glass block installer should have left the glass block wall in a clean,f cement on the glass surface left from mortar/tiling grout identified by whiteish bloom when dry. This may be removed by use of
Restriction can result in block cracking.!
It is advised to construct the first course and allow this to initially cure so that on returning to build consecutivecourses it becomes easier building a firm bed. In ideal circumstances around 6-8 courses before the panel willwobble to much, dependent on the panel width. Spacer pegs assist with stability, but back shuttering could beconsidered for additional support. At this point it is advised to stop building and allow the panel to set prior tocompleting construction.
For loose build of glass blocks ensure enough time is set aside to fully build.
✓
✓
LAYING FIRST COURSE
FINISHING THE GLASS BLOCKPANEL
SEALING ANDWEATHERPROOFING THE PANEL
(fig.3)
STEP
4
STEP
3

RO
DS
& M
OR
TAR
PA
NE
L K
ITS
14
TERMS
All kits and opening sizes are calculated using 10mmjoints. For alternative spacer peg sizes contact localglass block outlet or visit www.glassblocks.co.uk
If you require Rods & Mortar for fire rating, pleaseconsult fire rated section (pages 28 & 29), prior toordering.
All kits are based only on 190x190x80 blocks.
All kits are based on straight panels. Do not use forcurved applications.
All kits do not include panel anchors, if requiredcontact local glass block outlet.
Accessory fact sheets referring to fitting instructionsare available in this A5 ‘Complete guide to glassblocks’ or can be downloaded fromwww.glassblocks.co.uk/rods&mortar
●!
●!
●!
●!
●!
●!
CALCULATING OPENING SIZES
Calculating the opening size accurately is essential becauseglass blocks should not be cut like masonry bricks or tiles.The diagram demonstrates the principle of how to calculate anopening size based on using 190x190x80mm glass blocks and10mm joints. Calculating opening sizes• Take the width of the block (eg. 190mm) • Add the width of the vertical/horizontal joint (10mm) • Multiply by the number of blocks in the horizontal/vertical
course (eg 5 No.) 5 x 200 = 1000mm• Add one more joint width (10mm) as for 5 blocks you will
have 6 joints resulting in 1010mm.
CURVED WALLS
190mm 10mm10mm
200mm
610m
m
1010mm
EXAMPLE :Using 10mm joints
*The expansion material is incorporated into thismeasurement.
Denotes expansion material
Curved wallsCurved glass block walls canonly be constructed usingRods & Mortar installationsystem. The principle of acurved panel follows the sameguidelines as straight glassblock walls, except the frontvertical joint is opened to forma curve.
Expansion jointsPerimeter expansion shouldbe allowed for around allfour sides of the panel,ensure caulking with siliconweatherproofs this joint andnot grouted over with mortar.Where a curve changesplane, a vertical slip jointmust be inserted.
Joint sizes andminimum radiiWhen constructingcurved glass blockpanels, Glass BlockTechnologyrecommend the useof a 10mm internalvertical joint. Using190x190x80mm glassblocks, the minimuminternal radius of1650mm will result inthe external verticaljoint being 18-19mm.Note importance ofminimum radius andexpansion joints.
190mm glass block : 19010mm joint : + 10
200Number of blocks : x 5
1000Add sixth joint of 10mm: 10
Minimum opening size : 1010mm
Denotes position ofvertical slip joint.
10mm internal joint
10mm internal joint
19mm external joint
19mm externaljoint
min. 900mm
min. 165
0mm
190x190x80BLOCKS
190x90x80BLOCKS

RO
DS &
MO
RTA
R PA
NE
L KITS
15
RM12/12(2410x2410)
RM11/12(2210x2410)
RM10/12(2010x2410)
RM9/12(1810x2410)
RM8/12(1610x2410)
RM7/12(1410x2410)
RM6/12(1210x2410)
RM5/12(1010x2410)
RM4/12(810x2410)
RM3/12(610x2410)
RM2/12(410x2410)
RM1/12(210x2410)
RM12/11(2410x2210)
RM11/11(2210x2210)
RM10/11(2010x2210)
RM9/11(1810x2210)
RM8/11(1610x2210)
RM7/11(1410x2210)
RM6/11(1210x2210)
RM5/11(1010x2210)
RM4/11(810x2210)
RM3/11(610x2210)
RM2/11(410x2210)
RM1/11(210x2210)
RM12/10(2410x2010)
RM11/10(2210x2010)
RM10/10(2010x2010)
RM9/10(1810x2010)
RM8/10(1610x2010)
RM7/10(1410x2010)
RM6/10(1210x2010)
RM5/10(1010x2010)
RM4/10(810x2010)
RM3/10(610x2010)
RM2/10(410x2010)
RM1/10(210x2010)
RM1/1(210x210)
RM1/2(210x410)
RM1/3(210x610)
RM1/4(210x810)
RM1/5(210x1010)
RM1/6(210x1210)
RM1/7(210x1410)
RM1/8(210x1610)
RM1/9(210x1810)
RM2/1(410x210)
RM2/2(410x410)
RM2/3(410x610)
RM2/4(410x810)
RM2/5(410x1010)
RM2/6(410x1210)
RM2/7(410x1410)
RM2/8(410x1610)
RM2/9(410x1810)
RM3/1(610x210)
RM3/2(610x410)
RM3/3(610x610)
RM3/4(610x810)
RM3/5(610x1010)
RM3/6(610x1210)
RM3/7(610x1410)
RM3/8(610x1610)
RM3/9(610x1810)
RM4/1(810x210)
RM4/2(810x410)
RM4/3(810x610)
RM4/4(810x810)
RM4/5(810x1010)
RM4/6(810x1210)
RM4/7(810x1410)
RM4/8(810x1610)
RM4/9(810x1810)
RM5/1(1010x210)
RM5/2(1010x410)
RM5/3(1010x610)
RM5/4(1010x810)
RM5/5(1010x1010)
RM5/6(1010x1210)
RM5/7(1010x1410)
RM5/8(1010x1610)
RM5/9(1010x1810)
RM6/1(1210x210)
RM6/2(1210x410)
RM6/3(1210x610)
RM6/4(1210x810)
RM6/5(1210x1010)
RM6/6(1210x1210)
RM6/7(1210x1410)
RM6/8(1210x1610)
RM6/9(1210x1810)
RM7/1(1410x210)
RM7/2(1410x410)
RM7/3(1410x610)
RM7/4(1410x810)
RM7/5(1410x1010)
RM7/6(1410x1210)
RM7/7(1410x1410)
RM7/8(1410x1610)
RM7/9(1410x1810)
RM8/1(1610x210)
RM8/2(1610x410)
RM8/3(1610x610)
RM8/4(1610x810)
RM8/5(1610x1010)
RM8/6(1610x1210)
RM8/7(1610x1410)
RM8/8(1610x1610)
RM8/9(1610x1810)
RM9/1(1810x210)
RM9/2(1810x410)
RM9/3(1810x610)
RM9/4(1810x810)
RM9/5(1810x1010)
RM9/6(1810x1210)
RM9/7(1810x1410)
RM9/8(1810x1610)
RM9/9(1810x1810)
RM10/1(2010x210)
RM10/2(2010x410)
RM10/3(2010x610)
RM10/4(2010x810)
RM10/5(2010x1010)
RM10/6(2010x1210)
RM10/7(2010x1410)
RM10/8(2010x1610)
RM10/9(2010x1810)
RM11/1(2210x210)
RM11/2(2210x410)
RM11/3(2210x610)
RM11/4(2210x810)
RM11/5(2210x1010)
RM11/6(2210x1210)
RM11/7(2210x1410)
RM11/8(2210x1610)
RM11/9(2210x1810)
RM12/1(2410x210)
RM12/2(2410x410)
RM12/3(2410x610)
RM12/4(2410x810)
RM12/5(2410x1010)
RM12/6(2410x1210)
RM12/7(2410x1410)
RM12/8(2410x1610)
RM12/9(2410x1810)
KITS INCLUDE:GBT CODE DESCRIPTIONBGBM 10kg Glass Block MortarMSSR0.6 0.6m stainless steel reinforcement barMSSR1.2 1.2m stainless steel reinforcement barESP80 10mm spacer peg
GBT CODE DESCRIPTIONEXP1 Expansion foam - 2mEXP2 Bitumen expansion material - 2mDC794(W) Dow Corning silicone (white)*
MATRIX
*If your glass block outlet does not stock Dow Corning, a high quality, low odoursilicon should be used. (Glass Block Technology only endorses Dow Corning.)

USI
NG
TH
E E
ASI
FIX
INST
ALL
ATIO
N S
YST
EM
16
Easifix is an installation methodrecommended for internal use only. It isideal for shower screens, panels withinpartition walls and many interiorfeatures within the home. It can only beused for straight walls. Interiordesigners, property developers andshop fitters are all realising the benefitsof the simplicity of construction usingthe Easifix system.